
Some people would feel frustrating about that after installing Windows server 2016 successfully, the user interface has changed. There is no a graphic user interface, so all the operation would be executed by typing some professional commands. That is not easy for some users who are not familiar with Windows server, especially for the people who is the freshman for Windows server. Then people may ask whether there is a way to enable the GUI in Windows server 2016. Here I would show you how to enable the GUI in Windows server 2016.
Here I would show the detailed steps from scratch.
When we begin installing the new Windows server 2016, there are many options for us.

You can see many option are list on the above picture. The options without Desktop Experience are the core editions. They would not offer GUI after installation. And the ones with Desktop Experience would offer full GUI features. If you clear about which is your favor, you would find the problem and has no need to read the under passage. But if you just wrong installed the core edition of Windows server 2016 and you regretted it when finding that all the operations have to be implemented by typing commands. Then you should follow the under steps.
Step 1: Open PowerShell console and type Get-WindowsFeature -Name *GUI* into it.

You would find that all the install state of the GUI features listed are shown as removed. And now you should try to install the removed GUI features. Before that, you should make sure that your server has access to internet.
Step 2: Just type Install-WindowsFeature -Name Server-Gui-Shell, Server-Gui-Mgmt-Infra into PowerShell console and press Enter to execute it.

Typically, when the above operation is completed and you should just type Restart-Computer into the PowerShell console to restart your server. Then you would see windows server 2016 with the full graphic user interface(GUI).
Note: If your server has no access to the internet, you would probably see a large number of error message with red color. Then you have to use your installation media to successfully install server GUI features. Before you can do that, you need to identify appropriate index of Windows server 2016 edition from which you want to install features. The GUI features are only default built in the editions labelled with desktop experience, so you should skip indexes for core editions in the list.

So here i would show you installing the GUI features from a installation media.
Here we go.
Step 1: If you have store the windows server installation media in this system before, just navigate to the path of it. Type the command Get-WindowsImage -ImagePath XXX\XX\X into the console.
Attention : The GUI features information are stored in install.win file located on D:\sources in my system drive, so you should just adapt it to your condition.
Here the GUI features related file’s path is D:\sources\install.wim. Then i just type Get-WindowsImage -ImagePath D:\sources\install.wim into the console to find the system imageindex.

From the first picture in this passage, we know that the imageindex of core edition without GUI is 1 and 3. Then you should just choose the right imageindex between 2 and 4. Here i would choose the imageindex as 2.
Step 2: Type Install-WindowsFeature -Name Server-Gui-Shell, Server-Gui-Mgmt-Infra -Source wim:D:\sources\install.wim:2 into PowerShell console. And press Enter to execute it.

Note: To install feature from non-default location, you should follow the appropriate syntax like below.
InstallationProvider:WIMFileLocation:ImageIndex
So if you want to install the GUI features from a installation media, you should follow the syntax.
Step 3: After the above operation is finished, you should be prompted with the information that you must restart this server to finish the installation process. Just type Restart-Computer into the PowerShell console and execute it.

Then you would find that the full GUI features has been enabled in your Windows server 2016.

In this post, we’gonna explain if it’s possible to Switch from Windows Server 2016 Core to GUI (Desktop Experience).

You may be also interested to check Windows Server 2016: Expand Virtual Machine Hard Disk & Extend the Operating System Drive.
Switch from Windows Server 2016 Core to Desktop Experience
-
1
Switch from Windows Server 2016 Core to Desktop Experience-
1.1
How to Convert from Windows Server 2016 Core to GUI? -
1.2
Is there any workaround to Switch from Windows Server 2016 Core to GUI Without Performing a Fresh Installation?
-
1.1
-
2
Install Windows Server 2016 Step by Step-
2.1
Windows Server 2016 Hardware Requirements -
2.2
Download Windows Server 2016 -
2.3
Windows Server 2016 Installation Steps
-
2.1
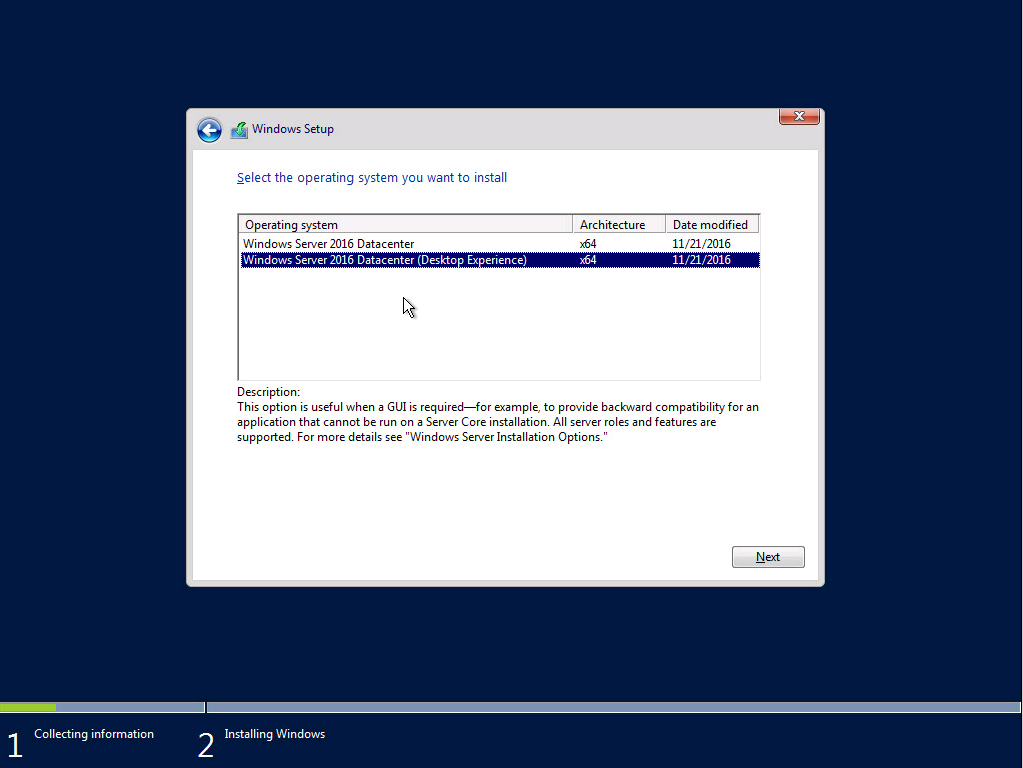
When I tried to install Windows Server 2016, I got the below dialog that ask me to select the operating system that I would like to install as shown below:
Actually, I have confused which option should I use
- Windows Server 2016 Standard or,
- Windows Server 2016 Standard (Desktop Experience).
Unfortunately, I selected the first option “Windows Server 2016 Standard“, after taking a long time to install the windows server 2016, it was the shock, I got the Windows Server 2016 console interface, not the normal Windows Server 2016 GUI Desktop Experience interface as shown below:

You might also like to read Convert from Windows Server 2019 Core to GUI
How to Convert from Windows Server 2016 Core to GUI?
Actually, In previous Windows Server releases like Windows Server 2012, 2008, we were able to add the Windows Server GUI functionality to the Windows Server core without performing a fresh installation.
But, In Windows Server 2016 and later, it’s no longer doable to convert from Windows Server 2016 core to Windows Server 2016 with Desktop experience and vice versa!
Is there any workaround to Switch from Windows Server 2016 Core to GUI Without Performing a Fresh Installation?
Unfortunately, there is no workaround to convert from Windows Server 2016 Core to GUI, the only available solution is performing a fresh installation from scratch again!
Install Windows Server 2016 Step by Step
In this section, we’ll explain how to install Windows Server 2016 Standard with GUI by doing the following:
- Exploring Windows Server 2016 Hardware Requirements.
- Download Windows Server 2016.
- Install Windows Server 2016.
Windows Server 2016 Hardware Requirements
The hardware requirements for Windows Server 2016 with desktop experience is differ from Windows Server 2016 Core.
Below is the minimum hardware requirements for Windows Server 2016 with desktop experience:
- CPU: 1.4 GHz 64-bit processor.
- RAM: 2 GB, (512 for core)
- Disk: 32 GB as absolute minimum value, (4 GB for core).
Download Windows Server 2016
Below are the official links to download Windows Server 2016 as well as Windows Server 2019.
- Download Windows Server 2016 Evaluation ISO.
- Download Windows Server 2019 Evaluation ISO.
The Windows Server 2016 Evaluation Period is 180 days that can be extended 6 times for additional 180 days.
To extend Windows Server 2016 Evaluation Period, please check Evaluation Period expired for Windows Server 2016, How to extend it?
Windows Server 2016 Installation Steps
- Mount your Windows Server 2016 ISO image.
- Run the Setup file.
- Select your language, time, currency format, and input method.

- Click on “Install now” button to start Windows Server 2016 installation.
- Select, “Windows Server 2016 Standard (Desktop Experience)“, then click “Next”.

Note: Windows Server 2016 Standard option refers to the core!
- Accept the license terms and click “Next”.

- Select “Install Windows Only“.

It’s strongly recommended to perform a clean installation for Windows Server 2016.
- The Windows Server 2016 installation will start!

- Finally, the Windows Server 2016 GUI has been installed with desktop experience as shown below!

Conclusion
Unlike previous Windows Server releases, you can’t convert from Windows Server 2016 core to GUI and vice versa, the only solution is performing a fresh installation!
So in this post, we have learned how to download and install Windows Server 2016 and Which option should we select during Windows Server installation to install Windows Server 2016 with Desktop Experience instead of Windows Server 2016 Core.
Applies To
- Windows Server 2019.
- Windows Server 2016.
You might also like to read
- Extend Volume option is disabled within Disk Management in Windows Server 2012.
- Error extending volume: Size Not Supported, During extending Operating System partition In Windows Server 2012.
- Windows failed to start: The Boot Configuration Data for your PC is missing or contains errors.
- Extend SQL Server Evaluation Period.
Have a Question?
If you have any related questions, please don’t hesitate to ask it at deBUG.to Community.
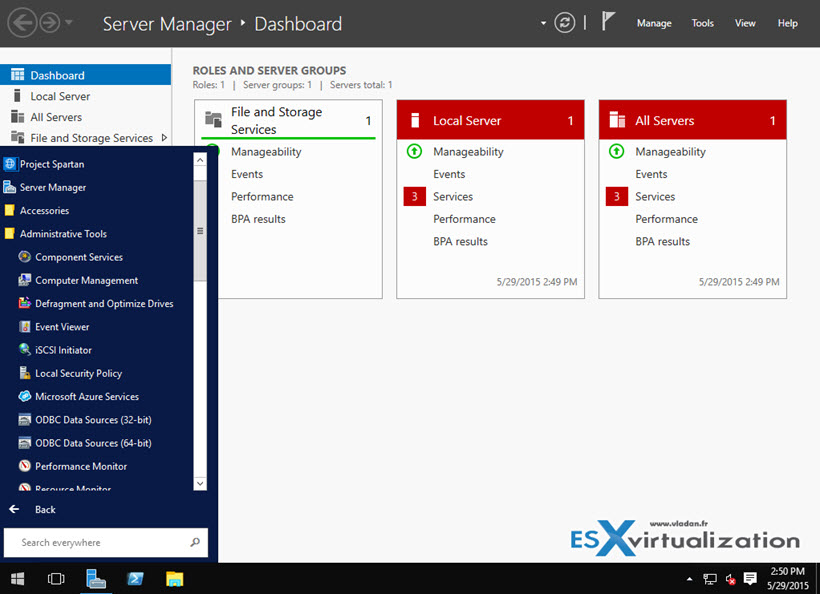
The default install of the Windows Server 2016 (Tech preview 2) do not provide Graphical User Interface (GUI) and even the second option only installs the local administrative tools (Server Manager). Not the traditional desktop that we’re used to having in 2012 R2 or 2008 R2 server systems. So if you take the second option (with local admin tools) you basically end up with a server without a desktop and start menu.
I know that this is rather good as the server system gets very slim footprint, reducing the surface, but If you want to install a third party application(s) that needs the GUI and the usual desktop environment ,then you must add something – a full desktop GUI. Windows server 2016 GUI install can be done through PowerShell, and you only need a single line of code. You can also add the GUI by selecting a Feature through adding a new role and feature wizard. (as you do that in Windows Server 2012 R2…)
Note that I’m testing it with a built through VMware Workstation 11. I picked up the default config (Workstation 11 compatible VMs) and the ISO has been detected as Windows 10.
Windows Server 2016 Gui Install – How to:
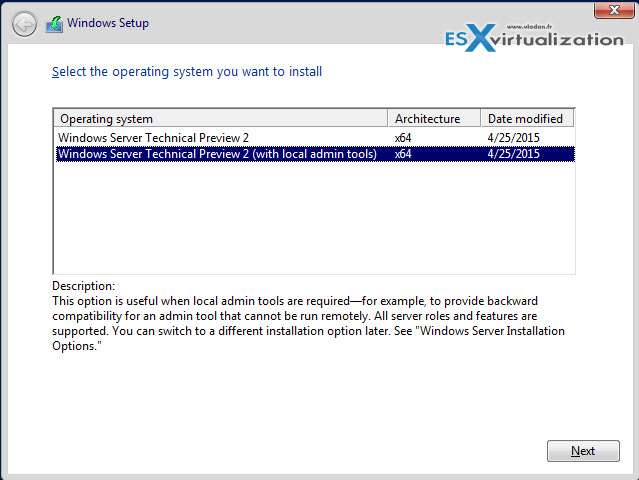
Step 1: During the setup process I choose the second option – Windows Server Technical preview 2 (with local admin tools), but you could only install the core (tested that as well).
Step 2: After reboot, you’re asked to assign a new password to the user’s account. After that, you’ll end up with a console where the server manager launches automatically. Well, in my case I was using easy install with VMware workstation, so I had an automatical installation of VMware tools followed by another reboot…
But if I would have assigned that password in VMware workstation during the assistant walking me through the creation of the VM, then the double reboot would have happened without my interaction.
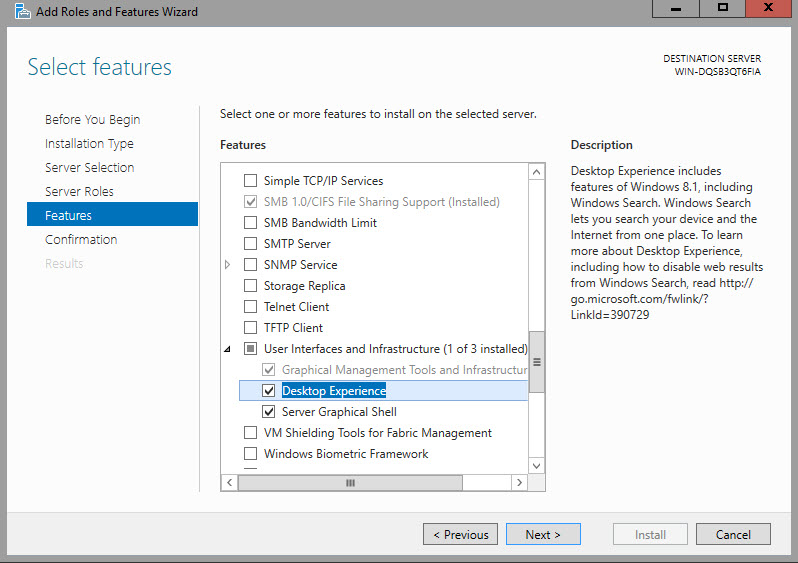
Anyway, through Server manager click Add roles and features > skip the first and second page and go directly to “features” where you choose the Server Graphical Shell. I picked the desktop experience in this example but that is not necessary. The desktop experience adds the usual package used for desktop environments:
- Windows Search
- Desktop wallpapers
- Etc…
At the same time, you can tick the checkbox so the server can reboot automatically at the end of the installation process.
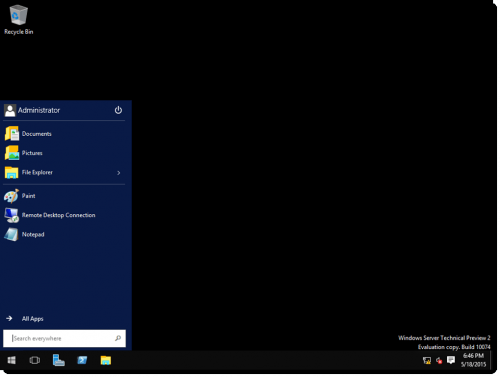
Validate the choice > Next > Install. And after a reboot the server shows well the Full desktop with Start menu and Server Manager.
Option 2: Install the GUI via PowerShell
In case you choose to install just the core (nano) and you don’t have server manager installed, you can use PowerShell. To install the GUI via PowerShell you can enter this single line of code in your PowerShell Window:
Install–WindowsFeature Server–Gui–Shell –Restart –Source wim:D:sourcesinstall.wim:4
Shoot from the lab:

The server reboots automatically at the end (without a prompt). And after the reboot where you’ll see this usual screen…
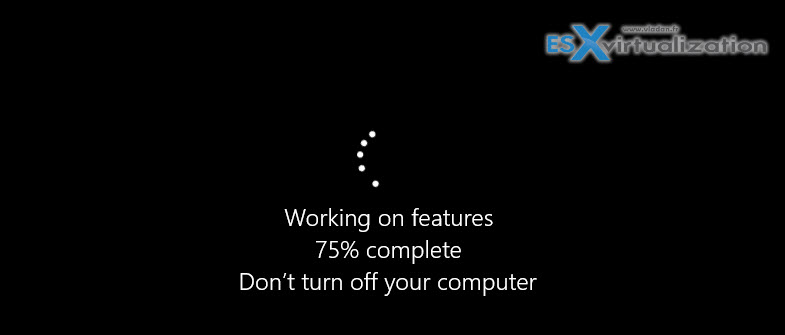
The server reboots and shows GUI, Start Menu AND the Server manager.
As you can see, the process is quite similar to what’s available in Windows Server 2012 R2, and it’s quite simple.
I don’t think that the GUI will completely disappear. There will still be applications that won’t work in environments without a GUI. Look at the SMBs which usually have 1 or 2 Windows servers (physical, yeah) and which do need to provide not only file level service with domain authentication, but many more custom based enterprise applications, printing, and networks core services etc. So the Windows based servers (with GUI windows on it) will, IMHO, never die…
At the same time, it’s good that we have the option to deploy stripped down version of Windows server (who knows how the final version will look like) without any services. And add more services/roles later via Powershell or from remote workstation via administrative tools.
Microsoft released Windows Server 2016 Technical Preview 2 and lots of people found a little surprise: no graphic interface!
During the installation though, this wasn’t mentioned, you would only see two options:
- Windows Server Technical Preview 2
- Windows Server Technical Preview 2 (with local admin tools)
Nothing about the installation being server core. Whether you choose the first or the second option you’re still going to end up with no GUI. Note that Server Manager will still open up.
In order to enable the GUI on Windows Server 2016 follow the steps below.
- Open Server Manager (if not already opened).
- Click Add Roles and Features Wizard.
- Click on Features from the left pane.
- Expand User interfaces and infrastructure and then select Server Graphical Shell

- Continue with the installation and once completed you’re good to go!

If you have installed Microsoft Windows Server 2016 and are wondering where the GUI now called Desktop Experience is, then unfortunatly the only way to have the Desktop is to re-install the OS.
I have just installed Windows Server 2016 today for the first time, and as its just for testing purposes, never really paid much attention to the installation procedure. I’ve installed Windows countless times, so just always click next, next select disk finish. Unfortunatly this time, Windows Server Core (thats what it was called in the old days) appeared. No big deal, lets have a quick google and install it.
The first article you come to is from petri.com (everyones favourite source of Windows fixes) and it gives you some tips on how to install the GUI using PowerShell. Perfect! Unfortunatly no! It doesnt work. This article was written when W2k16 was in Tech Preview. The install feature isnt supported in the GA version.

After somemore googling time, I found the official Microsoft article “Install Server with Desktop Experience”
Make sure you read the important NOTE
Note
Unlike some previous releases of Windows Server, you cannot convert between Server Core and Server with Desktop Experience after installation. If you install Server with Desktop Experience and later decide to use Server Core, you should do a fresh installation.
So, the only option was to re-install and select the right option:
Windows Server 2016 Datacenter (Desktop Experience)
Its a bit annoying. Surely Microsoft must realise people may want to change server roles without re-installing Windows everytime. Anyway, hopefully this will help others and save countless google searches.