
Все способы:
- Способ 1: Удаление программ
- Способ 2: Отключение залипания клавиш
- Способ 3: Удаление одного из языков
- Способ 4: Обновление драйверов для тачпада (только ноутбуки)
- Способ 5: Устранение аппаратных неполадок
- Вопросы и ответы: 6
Операционной системой можно пользоваться даже без мышки, посредством горячих клавиш. Иногда, впрочем, эта функция перестаёт работать, и сегодня мы расскажем, почему это происходит и как с этим бороться.
Способ 1: Удаление программ
Наиболее часто описываемый сбой возникает из-за специфического софта, такого как средства для автоматической смены раскладки или менеджеров буфера обмена. Решением проблемы будет его деинсталляция.
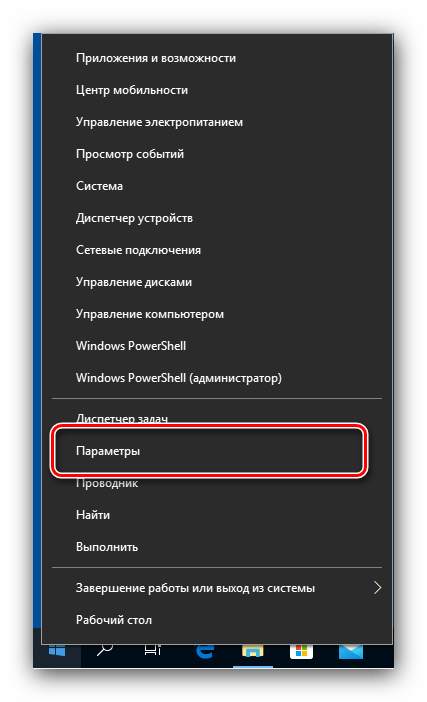
- Откройте «Параметры» любым удобным способом – например, кликните правой кнопкой мыши по кнопке «Пуск» и выберите соответствующий пункт в меню.
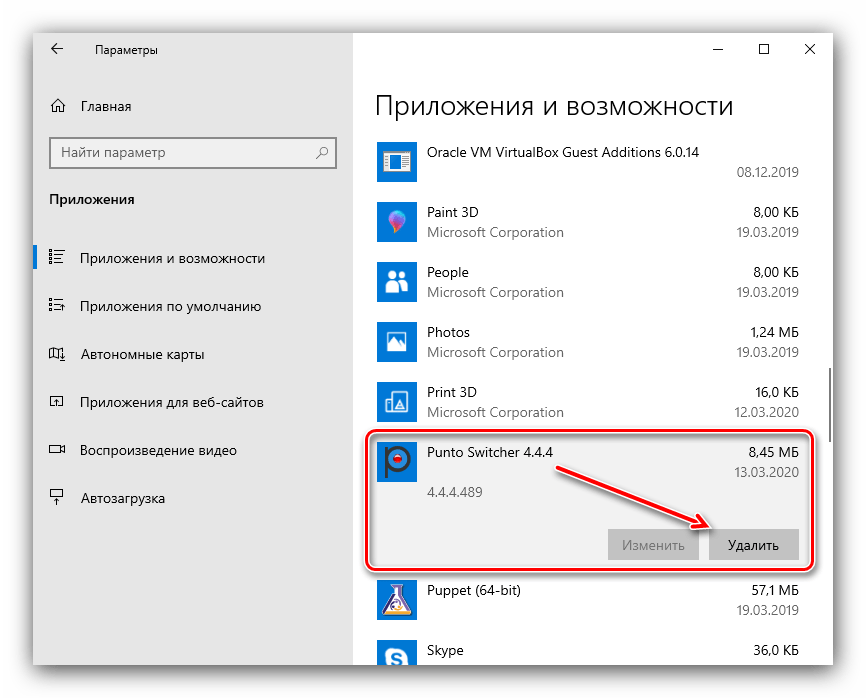
- В окне «Параметров» откройте пункт «Приложения».
- Прокрутите страницу вниз для доступа к списку инсталлированных программ. Найдите там нужное ПО и кликните по нему левой кнопкой мыши, затем воспользуйтесь кнопкой «Удалить».
- Используйте инструмент удаления программы, после чего перезапустите ПК. Проверьте работоспособность горячих клавиш Виндовс – наверняка проблема будет решена.

Способ 2: Отключение залипания клавиш
Иногда хоткеи неработоспособны из-за активной опции залипания. Отключить её можно следующим образом:
- Снова воспользуйтесь «Параметрами», но на этот раз выберите пункт «Специальные возможности».
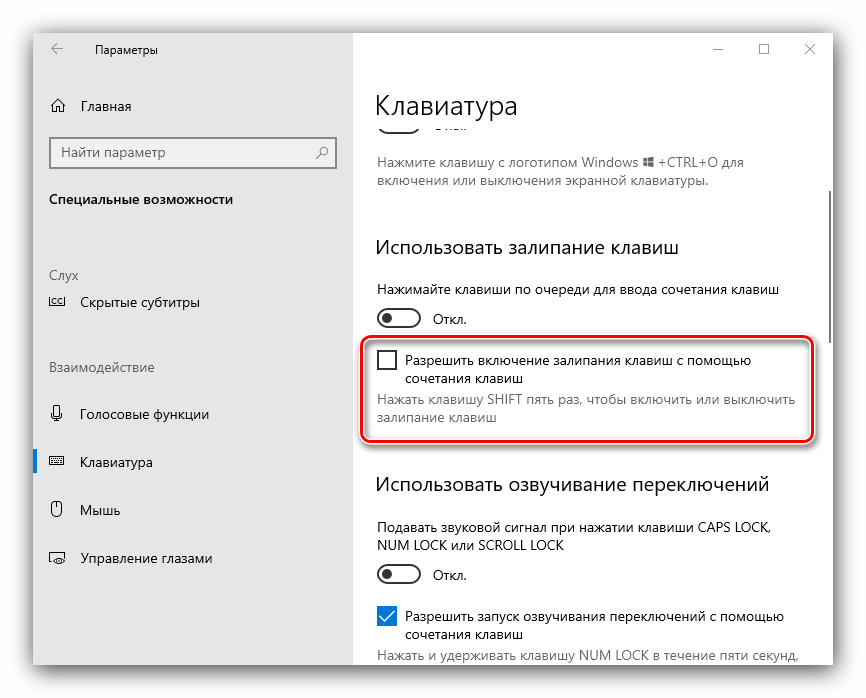
- Прокрутите боковое меню до раздела «Клавиатура» и перейдите к нему.
- Найдите блок «Использовать залипание клавиш». Если переключатель «Нажимайте клавиши по очереди…» включён, переведите его в положение «Откл».
- Также отключите пункт «Разрешить включение залипания клавиш с помощью сочетания клавиш».


Проверьте работоспособность функции хоткеев – она должна работать без проблем.
Способ 3: Удаление одного из языков
Также горячие клавиши могут не работать на некоторых из языковых пакетов. Решение проблемы заключается в определении сбойного компонента и его удалении.
- Для начала стоит выяснить, с каким языком не работает рассматриваемая возможность. Проверить это достаточно просто – по очереди переключайте раскладки и прожимайте комбинации.
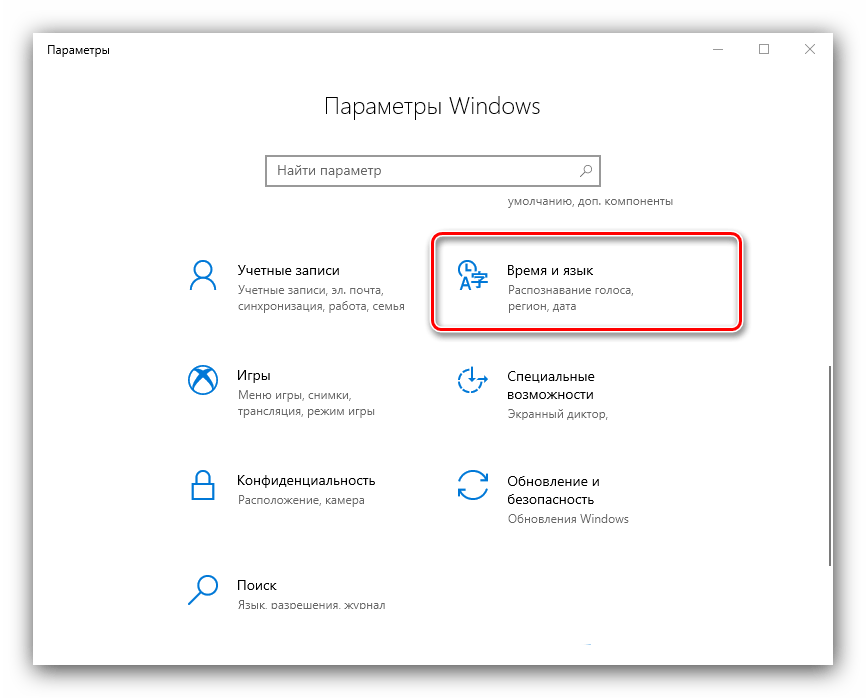
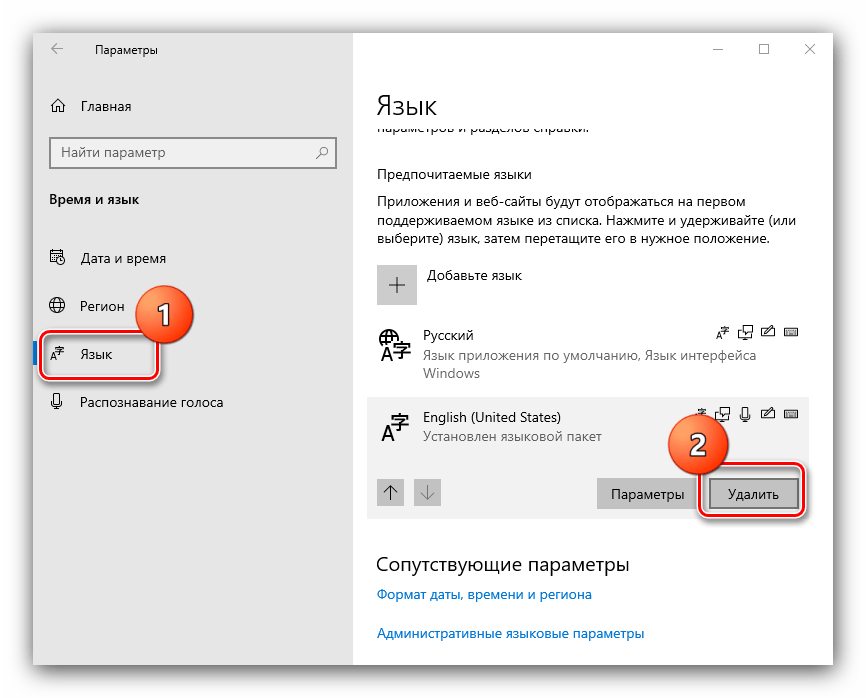
- Для удаления проблемного пакета нужно воспользоваться «Параметрами»: вызовите оснастку и перейдите к разделу «Время и язык».
- Откройте пункт «Язык», затем в правой части окна найдите список языков. Выделите его и нажмите на кнопку «Удалить».
- Подождите, пока пакет будет удалён, после чего перезагрузите машину.
- После запуска ОС проверьте, работают ли сочетания клавиш. Если да, попробуйте снова добавить удалённый языковой пакет, если он вам требуется.
Подробнее: Добавление языковых пакетов в Windows 10
Способ 4: Обновление драйверов для тачпада (только ноутбуки)
Пользователи ноутбуков могут столкнуться с рассматриваемым сбоем после обновления служебного софта для тачпада. Проделайте следующёе:
- Удалите текущую версию драйверов по инструкции далее.
Подробнее: Удаление драйверов в Windows 10
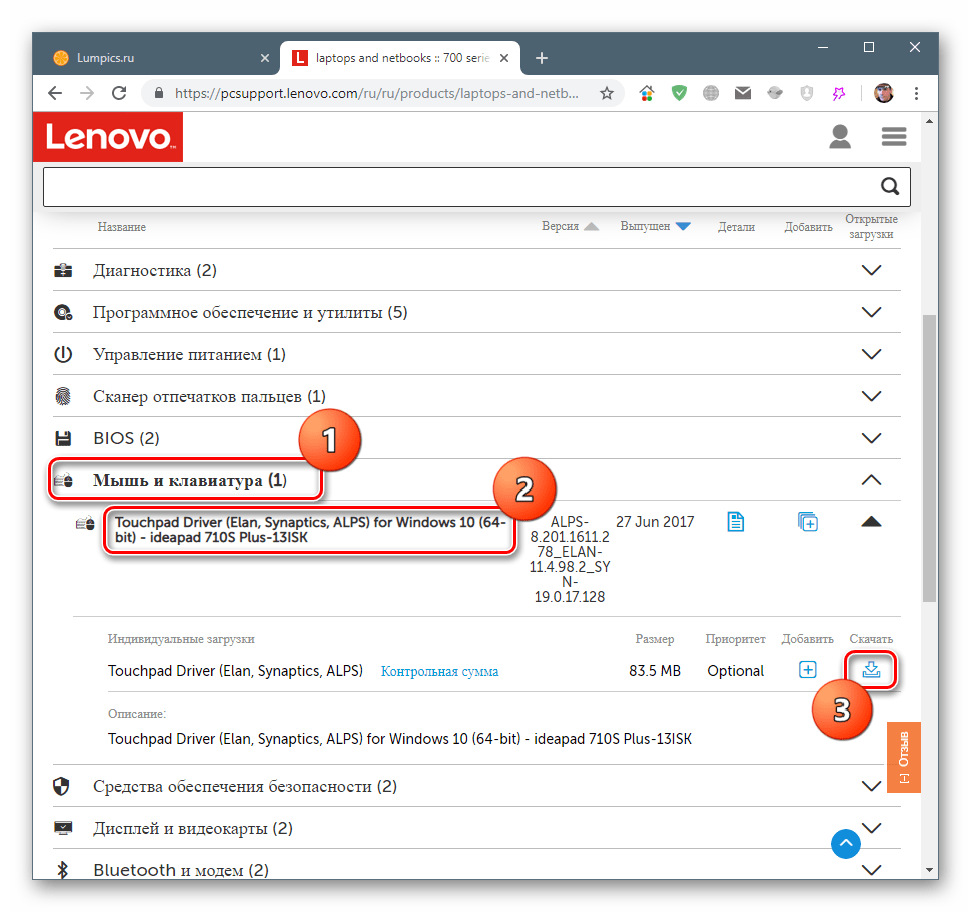
- Загрузите с сайта производителя вашего лэптопа предыдущий вариант служебного ПО для сенсорной панели и инсталлируйте его.

Подробнее: Установка драйверов для тачпада
- Проверьте, пропала ли проблема – если её причиной был конфликтующий софт, она должна быть устранена.
Способ 5: Устранение аппаратных неполадок
Если программные методы решения рассматриваемой проблемы не помогают, логично предположить, что сбой имеет аппаратную природу, на стороне клавиатуры либо самого компьютера. Для определения причины выполните следующее:
- На настольном компьютере подключите его клавиатуру к другой машине, заведомо работоспособной. Для ноутбуков же, напротив, подсоедините к нему внешнее решение. Если проблема всё так же наблюдается, её источником является клавиатура. Методом устранения в такой ситуации будет замена устройства.
- Если же на другом настольном ПК либо с другой клавиатурой на ноутбуке сбой всё ещё присутствует, его причина на стороне компьютера. В нём выйти из строя может как разъём подключения (для проводных комплектующих), так и беспроводной модуль (для Bluetooth-средств). Здесь можно порекомендовать только обращение в сервисный центр.
Таким образом, мы выяснили, почему в Windows 10 перестают работать горячие клавиши, и предложили вам несколько вариантов решения этой проблемы.
Наша группа в TelegramПолезные советы и помощь
Unable to use keyboard shortcuts on your Windows PC? There may be problems with your keyboard hardware, drivers, shortcut change, or some Windows setting. Whatever the reason that is causing the keyboard shortcuts issue on your Windows PC, we will show every possible way to fix keyboard shortcuts not working on your Windows PC.
1. Check if Keyboard Hardware is Working
Let’s begin with minor and common issues. The first thing you should do is a hardware check. Try to plug the keyboard into another USB port if any of the keys are not working.
If you are facing an issue with only some specific keys, try using another keyboard with your PC to verify. If other keyboards are working properly, then the issue is with your keyboard itself. Similarly, you can also try using your keyboard with other PCs. If shortcuts are working fine on the other PC, then the issue may be with your PC’s software. This will help you understand if the problem is with your keyboard or with the software.
If the issue is with the hardware, make sure to clean the keyboard. There can be specks of dirt or debris accumulated under the keyboard keys. If cleaning isn’t helping you, then you have to replace the keyboard. You can also check out these tips to use your PC with a broken keyboard.
2. Restart the PC
If the issue is with the software, before tweaking the Windows settings, try restarting your PC first. Often, a simple restart can iron out many issues like keyboard shortcuts not working on Windows PC by clearing the bugs present in the memory on your computer. To restart, click on the Windows icon in the bottom bar > Power icon and then select the Restart option.

3. Troubleshoot the Keyboard
Windows comes preinstalled with troubleshooting tools that can find and fix common errors. Running the keyboard troubleshooter may fix keyboard shortcuts not working on Windows.
1. On Windows 11, Open the Settings app > System > Troubleshoot > Other troubleshooters. Whereas on Windows 10, open the Settings app > Update and security > Additional troubleshooters.

2. Here, click on the Run button beside the Keyboard option to run the Keyboard Troubleshooter.

3. This process can run up to 5 minutes.
4. Update/Reinstall Keyboard Drivers
For the most part, troubleshooting the keyboard should fix the problems. But if it does not, try updating the keyboard drivers. Drivers are a piece of software that connects hardware to the OS. Updating keyboard drivers to the latest version will ensure there are no bugs in the connection.
1. Right-click on the Windows icon and then select the Device Manager option.

2. In the Device Manager window, select the Keyboards option to open the drop-down.

3. Here you should find all the attached keyboards. Right-click on the keyboard where shortcuts are not working and then select the Update driver option.

4. In the pop-up window, select Search automatically for drivers.

5. If there is an available driver update, your PC will automatically install it.

If updating the driver isn’t solving the issue, you can try reinstalling the driver.
1. To do that, just right-click on the keyboard and then select Uninstall driver option.

2. In the pop-up, click on Uninstall button to confirm.

3. Finally, restart your PC for Windows to install the available driver again.
5. Update to the Latest Windows Version
Windows updates also include driver updates. So updating Windows to the latest version will also update the keyboard drivers and can also fix many other bugs.
1. To update to the latest version of Windows 11, open the Settings app > Windows update. On Windows 10, open the Settings app > Updates and security > Windows updates.
2. Then click on Check for updates. If there are any updates available, click on Download & install all option.

Are keyboard shortcuts now working on your Windows 10/11 computer? If not, maybe you have a keyboard with a gaming mode?
6. Disable Special Keyboard Modes
Some keyboards come with special modes such as gaming. These modes disable some keyboard shortcuts to prevent you from pressing the wrong buttons accidentally while gaming. If you own a gaming keyboard, for instance, try disabling them in order to use your Keyboard shortcuts properly.
7. Turn Off Sticky Keys
Sticky keys are a Windows feature that changes the behavior of Windows shortcuts. For example, instead of pressing Windows Key + I to open Settings, you need to press the Windows key and then press the I key (one at a time instead of together) to open Settings. This can be helpful for people who have issues using keyboard shortcuts on Windows. Anyhow, if this setting is turned on, it will disable the default Windows shortcuts behavior.
1. To disable it on Windows 11, open the Settings app > Accessibility > Keyboard. On Windows 10, open the Settings app > Ease of Access and then select Keyboard.
2. In the Keyboard settings, make sure the toggle beside the Sticky Keys is turned off.

8. Reset Keyboard Settings
If none of the above options worked, try resetting the Keyboard Settings. On Windows, there is no special option that can reset the keyboard settings. But if you change the language and then change it back to your preferred language, it will reset all keyboard settings including your layout, themes, text correction, autosuggestion, etc.
1. Open the Settings app > Time and language > Language and region. Under the Preferred Languages section, you will see a list of installed language packs.

2. Click on the meatballs menu beside the language name and then select the Remove option.

3. You cannot remove the primary language directly. To remove it, click on Add a language button and add any language.

4. Now drag that added language to the top making it a primary language.
5. Now click on the meatballs menu beside your preferred language and then select Remove to remove it. This will remove all the keyboard settings.

6. Once done, click on Add a language button and add your preferred languages back.
7. Drag your preferred language to the top making it primary again. Now you can remove the added language by clicking on the Meatballs icon beside it and then selecting the Remove option.
9. Disable NoWinKeys from Registry Editor
Registry Editor is a graphical tool that helps users to configure system files and settings. On Registry Editor, there is an option to toggle off Windows keyboard shortcuts. If other shortcuts are working fine, but you have an issue with only shortcuts that include the Windows key, then Registry Editor might be the culprit. Making any changes in the registry editor can damage your device beyond repair. So make sure to take a backup before making any changes.
1. Click on the Windows icon and search for the Registry Editor app and open it. In the pop-up, click on Yes to make changes in the Registry Editor.
2. Now paste this path into the address bar above.
HKEY_CURRENT_USER\Software\Microsoft \Windows\CurrentVersion\Policies\ExplorerNote: If you are not able to find the Explorer option, then you can consider NoWinKeys is set to default. This means that the shortcuts issue is not with the Registry Editor.

3. Now in the right pane, right-click on the NoWinKeys option and select Modify.

4. Make sure the value is set to 0 and click on OK.

10. Turn on Shortcuts from Group Policy Editor
Group policy is a graphical tool similar to the Registry editor. Unlike on the Registry editor where you can disable the Windows key shortcuts, with Group Policy, you can disable all shortcuts. However,
1. Open Command Prompt and enter gpedit.msc and press Enter.
Note: Group Policy Editor is not available on the Windows Home edition. If you do not have Group Policy Editor, you can skip this step considering all the settings in Group Policy are set to default.
2. Now on the Group Policy Editor, navigate to User Configuration > Administrative Templates > Windows Components > File Explorer.
3. Now in the right pane, double-click on Turn off Windows keys hotkeys.
4. In the pop-up window, select the Disabled option and then click on OK and then Apply.
11. Run DISM
Deployment Image Servicing and Management (DISM) tool fixes any defects in the Windows image. Running it on your PC can change a few settings like Registry Editor settings to their default settings.
1. Open the Command Prompt in administrator mode.

2. Then in the Command Prompt, enter the following command and press Enter.
Dism /Online /Cleanup-Image /ScanHealth 
3. The process may take 2 – 5 minutes. Once the above command scans the Windows image health, enter the following command and then press Enter.
Dism /Online /Cleanup-Image /RestoreHealth

4. Within a few minutes, the tool will fix any defects in the Windows image.
12. Run System File Checker
Similar to DISM, System File Check (SFC) tool can scan for any corrupted system files and replace them with their original state.
1. Open the Command Prompt as an administrator.
2. Then type the following command and press Enter.
sfc /scannow
3. Once the tool does its work, check if the problem is solved.

13. Restart Human Interface Device Service
Human Interface Device (HID) Services are just services that control human interface devices such as keyboards, mice, game controllers, etc.
1. Click on the Windows icon, search for the Services app, and open it.
2. In the Services app, scroll down and right-click on the Human Interface Device Services option.

3. In the pop-up menu, click on the Start option. If the service is already in the start, click on Restart.

4. Now double-click on the Human Interface Device Services option. In the pop-up window, click on the drop-down beside the Startup type and change it from Manual to Automatic, To save, click on OK and then Apply.

14. Check Third-Party Apps
On Windows, third-party apps can change system features such as keyboard shortcuts. You might have installed an app that disabled or remapped the Windows keyboard shortcuts. There are also apps like Power Toys, that can even remap keyboard keys on your Windows PC.
Check for apps that you might have installed on your PC. You can disable any setting in those apps that are causing the issue or you can clean and uninstall those apps.
Fix Keyboard Shortcuts on Windows
We have covered troubleshooting the keyboard to enabling shortcuts from Group Policy Editor. If any of the above-mentioned ways failed to fix keyboard shortcuts not working on Windows error, try resetting the device in order to get back to the default state. If you have any backup of your Windows PC when it is working fine, then you can also system restore to that working version.
Ravi Teja KNTS
Tech writer with over 4 years of experience at TechWiser, where he has authored more than 700 articles on AI, Google apps, Chrome OS, Discord, and Android. His journey started with a passion for discussing technology and helping others in online forums, which naturally grew into a career in tech journalism. Ravi’s writing focuses on simplifying technology, making it accessible and jargon-free for readers. When he’s not breaking down the latest tech, he’s often immersed in a classic film – a true cinephile at heart.
Всем привет! Что же делать, если не работают горячие клавиши в Windows 10 или 11? В статье ниже мы постараемся с этим разобраться. В частности мы поговорим про неработающую клавишу «Win», которая находится в нижней части клавы. Но советы помогут и для других сочетаний быстрых кнопок.
Содержание
- Причина 1: Игровые клавиатуры и доп ПО
- Переустановка драйвера
- Средства устранения неполадок
- Фильтрация ввода
- Реестр
- Дополнительные советы
- Видео
- Задать вопрос автору статьи
Причина 1: Игровые клавиатуры и доп ПО

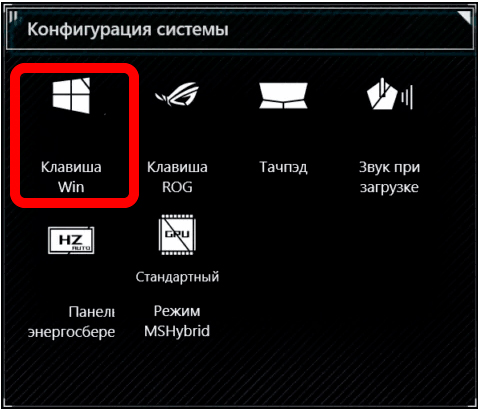
В некоторых игровых клавиатурах есть специальная клавиша или функция дополнительного программного обеспечения, отключающая кнопку «Win» или другие вспомогательные клавиши. Это нужно, чтобы она не мешала во время игры. Например, у ASUS есть отдельная программа Armoury Crate или iCUE. Поэтому если у вас в Виндовс стоит что-то подобное, проверьте, чтобы там была отключена функция деактивации кнопки Win.
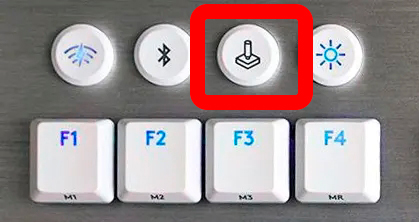
Помимо этого, кнопка может отключаться с помощью специального сочетания кнопок у отдельных моделей:
- Red Square: Fn + или Fn + + L
- XPG: Fn + F1
- Logitech: Fn + F8
- Другие модели: Fn + F6
Внимательно ознакомьтесь со всеми возможными комбинациями для вашей клавиатуры на официальном сайте производителя. Также эта информация может быть написана в руководстве пользователя, которую обычно кладут в коробку. Некоторые модели имеют отдельную кнопку, которая переключает устройство в «Игрой режим» (Game Mode).
Игровой режим также есть и в Виндовс, его можно попробовать тоже отключить. Более подробно про то, как это сделать – читаем в этой статье.
Переустановка драйвера
Первое что мы можем сделать – это переустановить драйвера для клавиатуры. Это может помочь, если у вас обычная клавиатура и перестала работать какая-то из функциональных кнопок, в том числе и клавиша «Win».
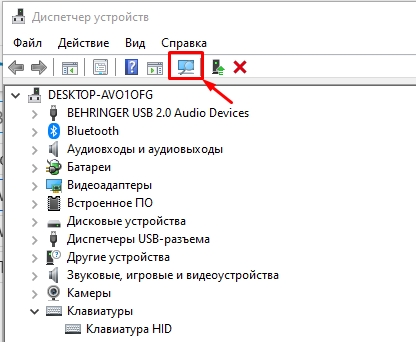
- Заходим в «Диспетчер устройств».
- Откройте «Клавиатуры» и удалите все устройства через правую кнопку мыши.

- Перезагрузите компьютер.
- Проверьте, чтобы драйвера установились повторно. Если этого не произошло, кликните по кнопке обновления конфигурации ПК.
Если и это не помогло, попробуйте обновить все драйвера, скачав их с официального сайта. В особенности сделайте упор на дрова для материнской платы. Дополнительно можно попробовать переподключить клавиатуру в другой USB порт. Если у вас стационарный компьютер, используйте задние подключения, напрямую к материнской плате. В переднюю панель лучше не подключать, так как там не всегда есть достаточно питания.
Средства устранения неполадок
Можно позволить системе самой решить проблему с помощью встроенного функционала. Для этого воспользуемся «Средством устранения неполадок».
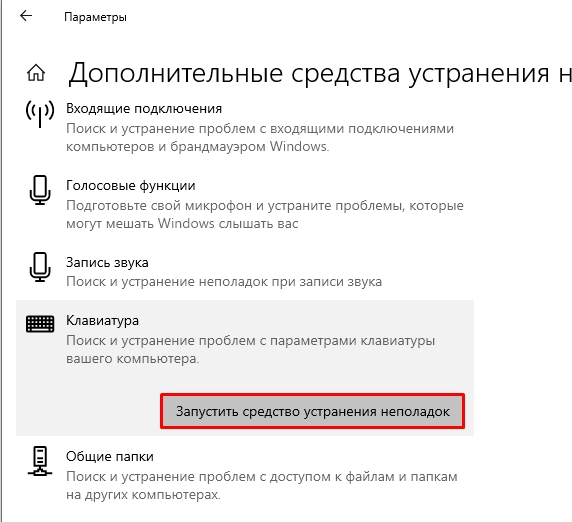
- «Пуск» – «Параметры».
- Откройте раздел «Обновление безопасность».
- «Устранение неполадок» – «Дополнительные средства устранения неполадок».
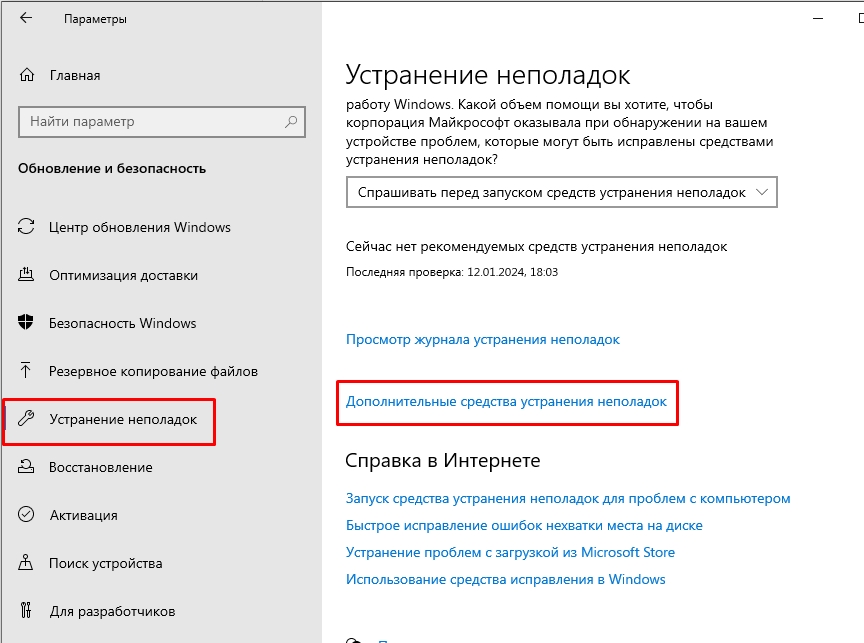
- Выберите клавиатуру и запустите средство. Далее действуем согласно инструкциям на экране.
Фильтрация ввода
Данная функция позволяет выключить реагирование системы на краткое или повторное нажатие на определенные кнопки. Лучше её выключить
- В «Параметрах» системы в меню «Пуск» найдите пункт «Специальные возможности».
- Перейдите на вкладку «Клавиатура».
- Найдите саму функцию справа и отключите.
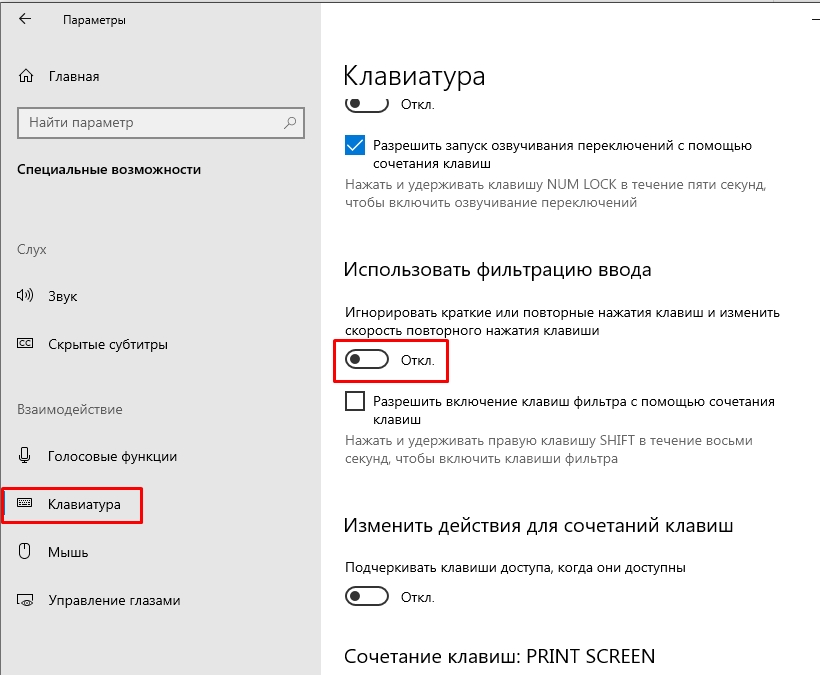
- Можете дополнительно перезагрузить ПК.
Реестр
- Через поиск найдите «Редактор реестра» и откройте его.
- Перейдите по пути:
HKEY_CURRENT_USER\Software\Microsoft\Windows\CurrentVersion\Policies\Explorer
- Посмотрите, нет ли параметра «NoWinKeys», если он есть – удалите!
- И аналогично проверьте путь:
HKEY_LOCAL_MACHINE\Software\Microsoft\Windows\CurrentVersion\Policies\Explorer
- Перезагрузите комп.
Дополнительные советы
- Если вы до этого устанавливали какие-то программы, работающие с клавиатурой, типа Punto Switcher – удалите их с ПК.
- Проверьте систему на наличие вирусов.
- Откатите систему до самой ранней точки восстановления.
- Не забываем, что проблема может быть аппаратная – то есть кнопка просто сломалась.
- С помощью программы AutoHotkey, можно переназначить клавишу на другую.
Остались какие-то вопросы, может появилась ошибка? – Пишите в комментариях, чтобы команда портала WiFiGiD.RU вам помогла.
Видео
Приветствую всех, кто зашел на мою страницу! Сегодня я хочу поделиться с вами своей историей о том, как я столкнулся и решил проблему с неработающими горячими клавишами в Windows 10. Это было непростое испытание, но благодаря нему я узнал много нового и теперь готов поделиться этими знаниями с вами.
Первые Признаки: Горячие Клавиши Отказываются Работать
Все началось довольно неожиданно. Однажды я попытался использовать привычные комбинации клавиш, такие как Ctrl+C для копирования текста, и ничего не произошло. Сначала я подумал, что это просто маленький сбой, но со временем понял, что проблема куда серьезнее.
Проверка Индивидуальных Клавиш
Первым делом я убедился, что проблема не в самих клавишах:
1. Проверил работу Ctrl, Alt и Shift в других сочетаниях и приложениях.
2. Убедился, что проблема касается всех горячих клавиш в целом.
Поиск и Устранение Неполадок: Мои Шаги
Поняв, что дело не в отдельных клавишах, я начал поиск способов решения проблемы.
Перезагрузка Системы
Как часто бывает, первый и самый простой шаг – это перезагрузка компьютера. Иногда это помогает решить множество небольших проблем.
Проверка Языковых Настроек
1. Я проверил, не были ли изменены языковые настройки клавиатуры, так как это могло повлиять на работу горячих клавиш.
Обновление Драйверов Клавиатуры
1. Через «Диспетчер устройств» я обновил драйверы клавиатуры, чтобы исключить возможные проблемы с ними.
Более Глубокие Решения: Технические Действия
Когда базовые методы не помогли, я перешел к более серьезным шагам.
Использование Встроенной Функции Устранения Неполадок Windows
1. Я запустил встроенный инструмент устранения неполадок Windows для клавиатуры через «Панель управления«.
Сброс Настроек Системы
1. Я пробовал восстановить систему до последней рабочей точки восстановления, чтобы отменить возможные изменения, повлиявшие на работу горячих клавиш.
Финальные Шаги: Решение Найдено
В итоге, проблема оказалась в конфликте между недавно установленным программным обеспечением и системными настройками горячих клавиш. После удаления этой программы и повторной настройки горячих клавиш все вернулось в норму.
Это был настоящий вызов, но я рад, что смог найти и устранить причину проблемы. Надеюсь, что мой опыт окажется полезным для всех, кто сталкивается с подобными трудностями. Помните, что для каждой проблемы найдется решение, главное – не сдаваться и методично искать источник неполадки. Удачи вам, и до новых встреч в моем блоге!
This post will guide you on what to do if your keyboard shortcuts or hotkeys are not working on your Windows 10 computer. A lot of users use hotkeys as they make things easier for them as they use their computer. However, there are instances when these hotkeys suddenly stop working. It’s actually one of the most common problems with keyboards. And so to resolve this problem, you can try out some suggestions prepared on this post.
Option 1 – Clean the keyboard keys physically
Your keyboard might not be working properly due to some dirt or other corrosion. First, you need to shut down your computer and then unplug the keyboard if you are using a desktop computer and then prepare it for cleaning. After that, use a small cotton ear cleaning tool to get between the creases and clean them. You can dip it slightly in alcohol to make it more efficient in cleaning dust and dirt. And if you can, you have the option to pull apart the keyboard completely and then wipe away all the corrosion from the inside. Once you’re done, put the keyboard back together and then plug it back into your PC. Now turn your PC on and check if the hotkeys are now working.
Option 2 – Try running the Hardware and Devices Troubleshooter
The first thing you can do to fix the problem is by running the Hardware Troubleshooter. Although it won’t make much of a difference, there’s still a possibility that it could automatically fix the problem with these function keys. To use it, refer to these steps:
- The first thing you need to do is click on Start and then on the gear-like icon to pull up the window for Settings.
- After opening Settings, look for the Update and Security option and select it.
- From there, go to the Troubleshoot option located on the left-hand side of the list.
- Next, select Hardware and Devices from the list and open the Troubleshooter and run it. Once it is doing its job, wait for it to complete the process and then restart the system.
- After the system restarts, check if the problem’s now fixed. If not, refer to the next option given below.
Option 3 – Try connecting the keyboard to a different USB port
The problem might have something to do with the USB port that’s currently in use by your keyboard. It could be that it’s not working so it makes sense to unplug it and attach it to another USB port. You can also clean the USB port on both ends to ensure that they are not affected by corrosion.
Option 4 – Uninstall previously installed keyboard software
If you have been previously using another keyboard, it might be better if you make sure that the software for the old device has been removed since there are instances when multiple software can cause problems due to similarities in actions.
Option 5 – Update the keyboard driver
You can also update the keyboard driver to fix the problem. There are cases when an outdated or corrupted driver can fix the problem. To do so, follow the steps below.
- Tap the Win + R keys to open the Run dialog box.
- Then type “devmgmt.msc” in the field and hit Enter to open the Device Manager.
- From there, look for the keyboard driver and click on it.
- Next, right-click on the keyboard driver and select the Update driver option.
- After that, click the “Search automatically for updated driver software” option to proceed.
Option 6 – Reinstall the keyboard driver
If updating the keyboard driver didn’t help, then you might want to reinstall it. How? Follow the steps below.
- Tap the Win + R keys to launch Run.
- Type in MSC into the box and tap Enter or click OK to open the Device Manager.
- After that, a list of device drivers will be displayed. Look for keyboard driver, right-click on it and then select “Uninstall device”.
- After that, unplug the device and restart your PC.
- Then plug your device back in. Assuming your device is connected to your PC, open the Device Manager again.
- Next, click on the Action button and click the Scan for hardware changes button. That should fix the problem.
Note: You could also completely uninstall the driver and go directly to the manufacturer’s website and download the latest driver for your hardware and then install it.
Option 7 – Enable Human Interface Device (HID) Service
Another thing to consider is the Human Interface Device Service. If this service is disabled, then no wonder why your hotkeys are not working. Thus, you need to enable this service. Refer to the following steps to do that:
- Tap the Win + R key to launch the Run dialog box.
- Then type “services.msc” in the field and hit Enter to open Services.
- After opening Services, scroll down until you see the Human Interface Device service.
- Double click on HID and make sure that its Startup Type is set to “Automatic” and then click OK.
- Restart your PC and check if the hotkeys are now working or not.
Option 8 – Try resetting the keyboard
You might also want to try resetting the keyboard as it can also help in fixing the problem. Setting it back to its default state will surely help.
Do You Need Help with Your Device?
Our Team of Experts May Help
Troubleshoot.Tech Experts are There for You!
GET HELP
Troubleshoot.Tech experts work with all versions of Microsoft Windows including Windows 11, with Android, Mac, and more.
Share this article:
You might also like
If by any chance you are working on a touchscreen PC, tablet, or any similar device and have no access to a hardware keyboard there is a way to place Touch Keyboard on your screen for easy typing, and you can enable icon on the taskbar for easy access.
Enabling the Touch Keyboard
- Right-click on the Taskbar
- Select Taskbar Settings
- Go to Personalization > Taskbar
- Click on Taskbar Corner Icons to expand it
- Click on the switch next to Touch Keyboard to turn it ON
- Close settings
The icon will immediately appear on the Taskbar in the lower right corner. Clicking the icon virtual keyboard will appear on the lower part of the screen.
You can use this keyboard to type in applications the same as you were typing on hardware one.
By taping on X in the upper right corner, you will hide the keyboard. Tap on the icon in Taskbar to bring it up again.
Hide the Taskbar icon
If you do not want to use Touch Keyboard anymore you can easily hide the icon:
- Right-click on the Taskbar
- Select Taskbar Settings
- Go to Personalization > Taskbar
- Click on Taskbar Corner Icons to expand it
- Click on the switch next to Touch Keyboard to turn it OFF
- Close settings
Read More
As you know, Windows has a built-in Automatic Maintenance feature that takes care of important tasks such as security scanning and updating, Windows software updates, Disk Defragmentation, System Diagnostics, Disk Volume Errors, and many more. So if you receive an error message saying, “Windows is unable to run automatic maintenance, The maintenance schedule is unavailable”, then this post will guide you in what you can do to resolve this issue.
Here are some suggestions you can try if the Automatic Maintenance in your Windows 10 PC is not able to run.
Option 1 – Enable Automatic Maintenance
It is possible that Automatic Maintenance has been disabled so you can try enabling Automatic Maintenance on your Windows 10 PC. To do so, follow these steps:
- Go to Control Panel.
- From there, select System and Security > Security and Maintenance > Automatic Maintenance.
- After that, set the time you want to run the Automatic Maintenance and then check the checkbox saying, “Allow scheduled maintenance to wake up my computer at the scheduled time”.
- Click OK to save the changes.
On the other hand, you can also enable Automatic Maintenance via the Registry Editor. But before you proceed, you need to create a System Restore Point first.
- Tap the Win + R keys to open the Run dialog box.
- After that, type “Regedit” in the field and hit Enter to open the Registry Editor.
- Navigate to the following path:
HKEY_LOCAL_MACHINESOFTWAREMicrosoftWindows NTCurrentVersionScheduleMaintenance
- Next, look for the “MaintenanceDisabled” key and then double click on it to open it and then set its value to “0”.
- Click OK and exit the Registry Editor.
- Restart your computer.
Option 2 – Check the Task Scheduler Services status
Majority of the tasks in Windows 10 run via services. So it is most likely that either the Service has been stopped or is set to the manual which is why Windows is unable to run Automatic Maintenance. Thus, you need to change it to automatic mode.
- Tap the Win + R keys to open Run.
- Type “services.msc” in the field and hit Enter to open Services.
- Next, look for the Task Scheduler service and tap the T key on your keyboard which should take you to the services that start with T.
- Double click on the Task Scheduler service and select the Automatic option under the Startup Type.
- If it is not started yet, click on the Start button.
- Then click Apply and OK to save the changes.
Option 3 – Check the Status in Task Scheduler
You can also try checking the status in the Task Scheduler. Just open the Task Scheduler > Task Scheduler Library > Microsoft > Windows > TaskScheduler. From there, make sure that Idle Maintenance, Maintenance Configurator, and Regular Maintenance are enabled.
Option 4 – Run the System File Checker
The SFC or System File Checker scan could detect and automatically repair damaged system files that could be causing the Automatic Maintenance issue. SFC is a built-in command utility that helps in restoring corrupted files as well as missing files. It replaces bad and corrupted system files with good system files. To run the SFC command, follow the steps given below.
- Tap Win + R to launch Run.
- Type in cmd in the field and tap Enter.
- After opening Command Prompt, type in sfc /scannow and hit Enter.
The command will start a system scan which will take a few whiles before it finishes. Once it’s done, you could get the following results:
- Windows Resource Protection did not find any integrity violations.
- Windows Resource Protection found corrupt files and successfully repaired them.
- Windows Resource Protection found corrupt files but was unable to fix some of them.
Option 5 – Run the DISM tool
The DISM tool is another command-line tool in the Windows operating system that could help users fix various corrupted system files. To use it, follow these steps:
- Open the Command Prompt as admin.
- Then type in this command: DISM /Online /Cleanup-Image /RestoreHealth
- The DISM command you entered will repair the corrupted system image. Do not close the window if the process takes a while as it will probably take a few minutes to finish.
- Restart your PC.
Read More
What Is 0x80040600 Error?
The 0x80040600 error is a common error that becomes particularly distressing for Outlook users.
This error prevents users from sending or receiving emails through Microsoft Outlook. Users may also encounter this problem while altering an entry on the calendar or adding a new contact. There is no obvious message that is displayed to the user when this error occurs.
However, Outlook displays a vague message that includes the code 0x80040600.
Solution
Download available to recover all lost Outlook data
Error Causes
The primary cause of this error is a problem with the PST file. When the PST file is corrupt, missing, or damaged, this error occurs at once. The PST file is essentially an important file that stores crucial and personal information of an individual’s accounts.
Sometimes this error is because the file is corrupt while at other times, the reason that it occurs is that the file is too full to accommodate any further information.
Irrespective of the causes of this problem, it is important that this error is promptly fixed to ensure the proper and uninterrupted functioning of Outlook in the future.
Further Information and Manual Repair
The error occurs because the Outlook application encounters problems while attempting to receive, send or read emails. Some solutions that can work wonders and help you get rid of the problem are outlined below.
- As soon as the error appears, the first solution is to restart the system. This is the first thing that must be done because a lot of times, these errors can be removed by simply restarting the system. This will, hence, save the user the inconvenience of manually fixing this problem.
If restarting the system doesn’t resolve the problem and the error message displays again, it is advised the user makes use of the ‘Inbox Repair Tool’.
This is the most commonly used and effective approach to fixing a corrupt PST file. The procedure to remedy this Personal Storage Table file or PST file is listed below.
- Go to the start menu. Type Run and launch the Inbox Repair Tool by typing the following path: drive name: Program FilesCommon FilesSystemMapiLocale IDscanpst.exe. Now click Ok. A pop-up message will appear. Enter the file name and path of the damaged PST file. Now click on the Start button. Here it is important to mention that the inbox repair tool may take a long time depending upon the file size and the amount of data that has to be recovered. However, it is the most effective way of fixing this problem.
Read More
Recently, some users reported not being able to boot up their Windows 10 computers. And during the startup phase, at some time, the bootup sequence is halted with a Recovery error along with an error message saying, “Your PC/Device needs to be repaired” with an error code of 0x0000605.
This kind of error message indicates that Windows was not able to verify the digital signature for the file as the signing certificate or it could be that it has expired. To resolve this error, you can follow the potential fixes given below and see if you stumble upon a fix that might work out for you.
Option 1 – Change the Date & Time settings in the BIOS
Some users reported that they were able to fix the error by changing the Date & Time settings in the BIOS. Upon checking, they saw that in their BIOS settings, the date was off several years. As a result, the incorrect date and time settings end up ticking the system into believing that the Windows build has expired long before the actual expiration date.
You can check if the error pops up due to the same reasons by accessing the BIOS settings. To do so, you have to tap the Boot key that’s associated with your motherboard manufacturer during the initial startup phase. After that, you can search for a particular boot key online or you can also tap keys like F2, F4, F8, F10, F12, and the Delete key.
Once you’re able to access the BIOS settings, locate the Date & time or anything similar, and then check if the date is correct or not. If not, you need to change the date to the actual date and then save the changes made and restart your computer and then check if the issue is now fixed or not.
Just remember that if the actual date is past the expiration date of the build you have, you need to change it to an older date. If your Windows 10 PC is able to boot back up, you have to update it to a stable Windows build and then go back to the BIOS settings and change the date to the current one else you will definitely encounter Windows update errors in the future as well as security alerts.
Option 2 – Perform a clean install of a stable Windows 10 build
If every system boot fails accompanied by a BSOD error with error code 0x0000605 “A component of the operating system has expired” and you’ve already followed every instruction on option 1, then it’s most likely that your current Windows build has already expired. Remember that almost all the Windows 10 Insider Preview builds (98xx) are created along with an expiration date and when your computer reaches the expiration date, you won’t be able to boot your computer up.
Note that the exact expiration date varies based on the build number. And prior to the expiration date, the operating system will start to display some error warnings telling you that the build will expire and urge you to update the most recent build available. And so once the computer reaches its expiration date, it will begin to reboot every three hours until it no longer boots up which is about 2 weeks approximately after the license has expired.
Once the expiration date is up and your computer no longer boots up, you need to perform a clean install and then install the latest Windows 10 build to resolve the issue once and for all.
Read More
Stop Running This Script Error — What is it?
«Stop Running This Script» Error is a Windows Internet Explorer error message that is displayed in the following format with a yes and a no button:
Stop running this script?
A Script on this page is causing your web browser to run slowly. If it continues to run, your computer might become unresponsive.
This occurs when some scripts take an excessive amount of time to run. To be precise, there are some websites that use JavaScript, JQuery, and Active X scripts to run.
These scripts are notorious for taking too much time to run. So, if you use the Internet Explorer as your web browser, then by default if the website takes a long time to load, the ‘Stop running this script error will be triggered.
Other than this, if you are scripting an Active X control on the web page to transfer a very heavy file or run a huge database query, this may cause delays and lead to the error display.
However, if you use Firefox, then the ‘Stop running this script error code will be promoted as ‘Unresponsive Script’ error.
Solution
Error Causes
The ‘Stop running this script error code’ is triggered due to multiple reasons. These include:
- Webpage programming errors
- Running a pop-up killer
- Spyware and viral infection
- Active X control errors
Further Information and Manual Repair
Here are some of the best methods that you can try to resolve Internet Explorer’s ‘stop running this script error’ on your PC:
1. Change the Internet Explorer Settings
This can be done by opening Internet Explorer and in the top menu, click on Tools, and then go to Internet Options. Now click on the Advanced Tab option. Locate where it says ‘Disable Script Debugging’.
Once you find it uncheck the box beside it. Now close the browser and restart your PC. Access the same website on your IE web browser and see if the website opens. If it does, then the error is resolved.
However, if it doesn’t, then you the underlying causes for the stop running this script error message could either be spyware or ActiveX control error.
2. Download Restoro
Whether the error occurs due to spyware invasion of Active X control error, it is advisable to download Restoro on your PC.
This is a next-generation, innovative, and multi-functional PC repair tool that has several powerful utilities deployed together in one program.
Plus you don’t have to get into the technicalities of resolving Active X control issues.
Restoro is safe, bug-free, and efficient. It has a user-friendly interface and simple navigation which makes it quite easy for all levels of users to operate. It is compatible with all Windows versions including Windows 7, 8, XP, Vista, 8.1, and 10.
This PC repair tool is a one-stop solution for all your script error repair needs. It includes the following utilities: a registry cleaner, a system stability detector, and an ActiveX control error scanner.
It simultaneously scans for ActiveX control errors too. So, if the IE script error is triggered by ActiveX control issues, it resolves them too.
To fix the ‘stop running this script’ error code on your PC, click here to download Restoro
Read More
You will notice the blurred background on the login screen right away when you start your Windows 10 computer that’s running the v1903 and up. This kind of blurred background is known as “Acrylic Blur Effect on Sign-in Screen”. This new feature delivers a beautiful experience to users by adding more focus to the login screen. However, no matter how nice this feature is and even if it only stays for less than a minute, not all users like it and if you’re one of these users, read on as this post will guide you in disabling the blurred background login screen in your Windows 10 computer.
Disabling the blurred background in the login screen can be done in two methods. The first one is via the Registry Editor and the second one is via the Group Policy Editor. Before you proceed, make sure that you are using an admin account and you must create a System Restore point first. Once you have that covered, follow the options provided below.
Option 1 – Disable the Blurred background in the login screen via Registry Editor
- First, tap the Win + R keys to open the Run dialog box and type “Regedit” in the field, and hit Enter to open the Registry Editor.
- After that, navigate to this registry path: KEY_LOCAL_MACHINESOFTWAREPoliciesMicrosoftWindowsSystem
- Next, right-click on any empty space in the right pane and create a new DWORD (32 bit) and name it as “DisableAcrylicBackgroundOnLogon”.
- Once you’ve created the DWORD, double click on it and set its value to 1 to disable it and 0 to enable it.
- After you make the necessary changes, restart your computer. You won’t now see the blurred background on the login screen.
Note: No matter what option you select to change the background, it will stay blurred when you click on the login button. At the time of writing, there is no way to disable this feature in the Personalization section so the Registry Editor will have to suffice for now.
Option 2 – Disable the Blurred background in the login screen via Group Policy Editor
- Tap the Win + R keys to open the Run utility and type “gpedit.msc” in the field and tap Enter to open the Group Policy Editor.
- After that, navigate to this policy setting: Computer ConfigurationAdministrative TemplatesSystemLogon
- From there, double click on the “Show clear logon background settings” and since its default value is “Not configured”, set it to “Disabled”. You will see the following description under this setting:
- “This policy setting disables the acrylic blur effect on the logon background image.”
- “If you enable this policy, the logon background image shows without blur.”
- Now click on OK and then check the login screen.
Note: If you don’t configure or if you disable this policy, the logon background image adopts the acrylic blur effect. However, if it didn’t work, you have to restart your computer and then check.
Read More
In case you don’t know, Windows 10 supports installation and use of a number of removable devices which includes plug and plays mouse, keyboard, and other USB-based devices. But this could actually pose a threat to the integrity of a computer system and thus, some organizations pose a restriction in using these kinds of devices.
the restriction on these devices is also useful especially if you keep on leaving your computer idle and someone tries to mess it up by plugging in a removable device. In such situations, the restriction will defend the user against data theft. Thus, in this post, you will be guided on how you can prevent the installation of removable devices on your Windows 10 computer.
There are two options that can help you in preventing the installation of any removable devices on your computer – you can either try to use the Registry Editor or use the Group Policy Editor instead. Follow whichever option you want to use the instructions given below but before you start, don’t forget to create a System Restore Point first.
Option 1 – Prevent installation of Removable Devices via Registry Editor
- Tap the Win + R keys to open the Run dialog box and type “Regedit” in the field and hit Enter to open the Registry Editor.
- Next, navigate to this registry path: HKEY_LOCAL_MACHINESOFTWAREPoliciesMicrosoftWindowsDeviceInstallRestrictions
- From there, look for a DWORD named “DenyRemovableDevices” and set its value to “0”. On the other hand, if you can’t find this DWORD, just simply create it and set its value to 0.
- Once done, exit the Registry Editor and reboot your PC to apply the changes made.
Option 2 – Prevent installation of Removable Devices via Group Policy Editor
Keep in mind that the Group Policy Editor is not available in the Home Edition of the Windows operating systems. Thus, if you are using one, just stick to the first option, otherwise, proceed to the following steps.
- Tap the Win + R keys to open the Run utility and type “gpedit.msc” and click OK or tap Enter to open the Group Policy Editor.
- After that, go to this policy setting: Computer ConfigurationAdministrative TemplatesSystemDevice InstallationDevice Installation Restrictions
- Next, look for the “Prevent installation of removable devices” entry and once you find it, set it as “Enabled”. From this window, you should see the following description of this policy setting:
“This policy setting allows you to prevent Windows from installing removable devices. A device is considered removable when the driver for the device to which it is connected indicates that the device is removable. For example, a Universal Serial Bus (USB) device is reported to be removable by the drivers for the USB hub to which the device is connected. This policy setting takes precedence over any other policy setting that allows Windows to install a device. If you enable this policy setting, Windows is prevented from installing removable devices and existing removable devices cannot have their drivers updated. If you enable this policy setting on a remote desktop server, the policy setting affects redirection of removable devices from a remote desktop client to the remote desktop server. If you disable or do not configure this policy setting, Windows can install and update device drivers for removable devices as allowed or prevented by other policy settings.”
- Then click the Apply and OK buttons to save the changes made.
- Now restart your computer to save the changes made. This should prevent the installation of any removable devices in your Windows 10 computer.
Read More

Interesting information has come out from Microsoft, Windows 11 dark theme will include a different sound theme from its standard light one.
When in dark mode on Windows 11, the system sounds generally become softer, and they echo a bit, creating a more soothing experience that matches the overall look and feel of the dark mode. Flipping back to light mode brings the system sounds back to their normal level.
However, even though the light model has slightly louder sounds than the dark mode, Microsoft has taken great care to make sure the audio is more soothing, according to a report from CNBC.
The designers of Windows 11 took inspiration from an approach called calm technology. Microsoft’s Christian Koehn and Diego Baca wrote about calm technology in a post on Medium. In it, they said, “Windows 11 facilitates this through foundational experiences that feel familiar, soften formerly intimidating UI, and increase emotional connection.”
According to a Microsoft spokesperson in a statement to CNBC, “The new sounds have a much rounder wavelength, making them softer so that they can still alert/notify you, but without being overwhelming.”
Read More
There are instances when you open a picture or an image in the Windows Photo Viewer and instead of displaying the image, it displays nothing and you’ll see an error message instead that says, “Windows Photo Viewer can’t display this picture because there might not be enough memory available on your computer”.
Although this may look like a clear-cut issue of less storage space or low RAM in your computer, that’s not always the case. Security experts noticed that even when your computer has enough resources and disk space, this kind of problem could still occur. So if you experience the same thing, you need to check the Color Profile of your screen. For more information, refer to the detailed instructions provided below but before you proceed, make sure that you close some processes in the Task Manager or restart your computer and see if it helps in fixing the problem. You can also try using the Disk Cleanup tool. To use it, refer to these steps:
- Tap the Win + R keys to open the Run dialog box and then type “cleanmgr” in the field and hit Enter to open the Disk Cleanup window.
- After that, select the drive you want to clean.
- Now click OK to clean the disk and restart your computer.
If the Disk Cleanup tool didn’t help in resolving the issue, refer to the instructions below.
Step 1: In the search box, type “color management” and then select the “Change advanced color management settings for display” option from the search results. Or you could simply go to Settings > System > Display, Advanced display settings, and from there, select display and click on the Display adapter properties of Display.
Step 2: Next, switch to the Color Management tab and click on the Color Management button.
Step 3: Select the monitor where you’re getting the “Windows Photo Viewer can’t display this picture because there might not be enough memory available on your computer” error in the next window. And if you have two displays, make sure that you select the primary display. You also have an option to identify the monitor.
Step 4: Once confirmed, select the “Use my settings for this device” checkbox.
Step 5: After that, select the Profile listed under the “Profiles associated with this device” option and then click on Remove.
Step 6: Next, go to the Advanced tab and make sure that all settings are set to System default which includes a device profile, perceptual images, rendering intent, Relative Colorimetric, and many more.
Step 7: Once you’re done, you have to restart your computer and then try to open the same image you were trying to open earlier and then check if you can now open it instead of seeing the error.
Read More
Code 43 — What is it?
Code 43, Device Manager Error, is reported when Windows doesn’t recognize a hardware device such as the video card, USB, printer, or any other piece of external hardware attached to your PC.
The Device Manager stops the hardware if it reports some kind of unspecified problem. It is mostly displayed in the following format:
“Windows has stopped this device because it has reported problems. Code 43”
Solution
Error Causes
Code 43 can be triggered due to several reasons. However, 95% of the times it is related to the device driver problems such as:
- Missing Drivers
- Corrupted Drivers
- Outdated Drivers
Driver problems pop up when either new driver versions are available or drivers become damaged due to some underlying reasons like viral infections.
Other than driver problems, code 43 can also pop up when you install and remove the software. This can cause hardware conflict in the registry, altering driver communication.
Code 43 can hamper your ability to use your desired device smoothly. Although Code 43 is not a fatal error code like Runtime and BSoD errors, it is still advisable to resolve it immediately to avoid inconvenience.
You can sometimes bypass error code 43 temporarily by a simple PC reboot but this will not fix the problem permanently. For a permanent fix, try the methods given below.
Further Information and Manual Repair
To help you repair code 43 permanently from your PC, below are some of the best, easy perform, and effective solutions. Simply follow the steps to get rid of code 43 from your PC.
Method 1 — Launch and Run the Troubleshoot Wizard
This is one way to find the exact nature of the problem that spurred error code 43 to pop up. To launch and run the Troubleshoot Wizard, here’s what you need to do:
- Go to the start menu
- Type Device Manager in the search bar and then press enter
- Click on Device Manager to run it on your system
- Now click on the ‘General Tab’
- After that press Trouble Shoot to launch the Troubleshooting Wizard
The Wizard will diagnose the problem and provide you a solution to resolve it, all you have to do from there is to follow the Wizard’s instructions
Method 2 — Check the Hardware Documentation
If for some reason Method 1 doesn’t work, another solution would be to check the hardware documentation for more information about diagnosing the problem.
Method 3 — Uninstall Faulty Drivers
If the underlying reason for code 43 is related to driver problems, then the best way to resolve it is to uninstall faulty drivers and then reinstall new drivers. One of the many ways to uninstall drivers is:
- Click on the start button
- Type ‘sysdm.cpl’ in the search box and then press enter to continue
- In the System Properties dialog box open the Hardware tab
- Click Device Manager and then double click Device Type
- Now click on the problematic hardware device reporting code 43
- After that go to the Driver tab and click Uninstall to uninstall that driver completely
- Visit the manufacturer’s website and download the new driver version
- Install it on your system by extracting the .ZIP file
Method 4 — Update Drivers Automatically
Identifying and updating new driver versions manually can be both frustrating and time-consuming especially if you are in a rush and no computer whiz.
Also, after you update the drivers, you need to keep checking them time and again to ensure they don’t become outdated. You need to update them every time new versions are available which can be stressful.
To avoid this hassle by repairing code 43 permanently, download DriverFIX. This is an innovative and user-friendly device driver software program exclusively designed to resolve all kinds of driver problems.
Whether code 43 occurs on your PC due to missing or outdated drivers, DriverFIX can resolve the problem easily.
The intelligent programming system embedded in this software enables it to detect problematic and outdated drivers in seconds.
It matches new and compatible versions and updates the drivers immediately, automatically, and on a regular basis in just a few clicks. This resolves code 43 and also ensures that all your drivers remain up to date.
DriverFIX is compatible with all Windows versions.
Click here to download DriverFIX to repair and resolve code 43 right away.
Read More
Copyright © 2023, ErrorTools. All Rights Reserved
Trademark: Microsoft Windows logos are registered trademarks of Microsoft. Disclaimer: ErrorTools.com is not affiliated with Microsoft, nor claims direct affiliation.
The information on this page is provided for information purposes only.