
Nvidia G-Sync modifies the refresh rate of your monitor to provide a smooth, seamless gameplay experience. If you have one of the best monitors, it probably has G-Sync so you’ll need to know how to enable G-Sync on a PC. And in this guide, we’re going to show you how.
Got an AMD graphics card or a Freesync monitor instead? Here’s how to enable Freesync.
How to enable Nvidia G-Sync on PC
Before getting to how to enable G-Sync, you need to make sure you have a G-Sync monitor. Nvidia has a few different G-Sync categories. G-Sync and G-Sync Ultimate monitors come with dedicated hardware inside that handles the variable refresh rate, and they’re typically more expensive than other monitors. There are also G-Sync Compatible monitors, which don’t have dedicated hardware but still support Nvidia’s adaptive refresh feature.
You also need an Nvidia graphics card. As long as you have everything you need, hook up your monitor, update your graphics card drivers, and install the latest version of Nvidia Control Panel. From there, enabling G-Sync is simple:
Step 1: Open the Nvidia Control Panel.
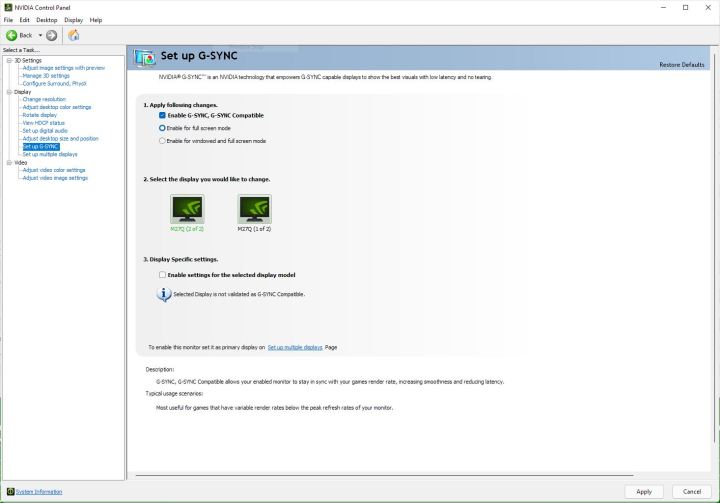
Step 2: Expand the Display tab and select Set Up G-Sync.
Step 3: Check Enable G-Sync, G-Sync Compatible.
Step 4: Select either Enable For Full Screen Mode or Enable for Windowed and Full Screen Mode depending on what you want.
Step 5: Click Apply.
Using multiple monitors with G-Sync
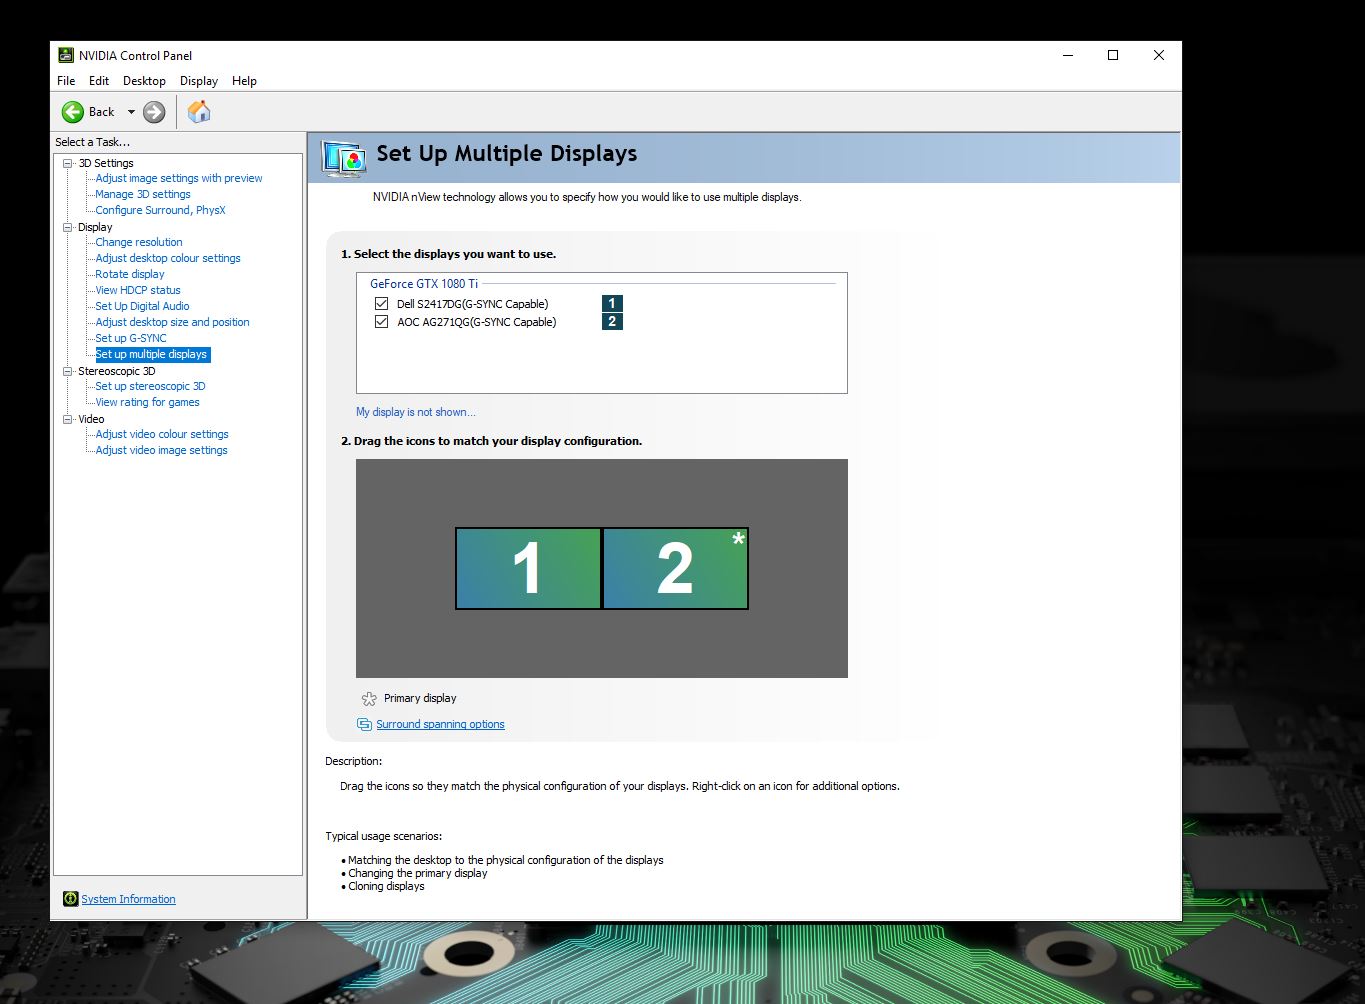
If you have multiple monitors, you’ll see a few more settings on the page. You can apply G-Sync settings to a specific display if you choose, which can be useful in a few different situations. If your primary display supports G-Sync, for example, but your secondary display doesn’t, you can apply the setting only to a single display.
If that’s what you want to do, follow these additional steps:
Step 1: Select the display you want to update.
Step 2: Check Enable Settings for the Selected Display Model.
Step 3: Click Apply.
You also need to make sure the display you’re applying the settings to is your primary display. To do that, head to System > Display in Windows, select your primary display, and then check Make This My Main Display.
Enable G-Sync for your monitor
After you’ve done that, you’ll want to double-check that your monitor is set to use G-Sync instead of a fixed refresh rate. In the Nvidia Control Panel, take these steps:
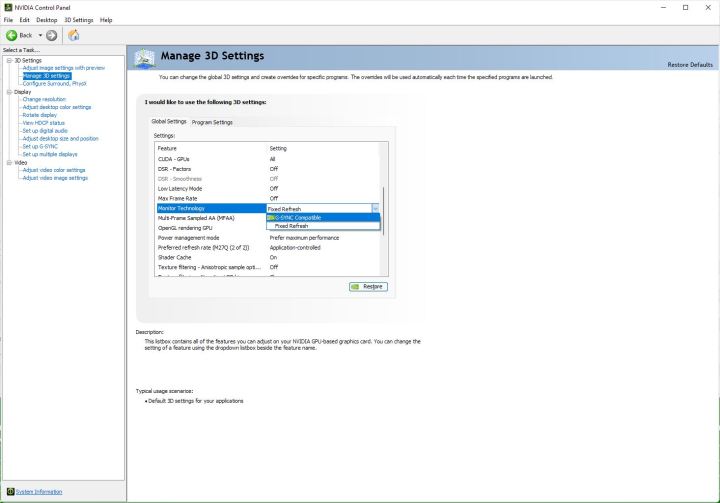
Step 1: Expand the 3D Settings tab and select Manage 3D Settings.
Step 2: Under the Global Settings tab, find the Monitor Technology setting.
Step 3: Change the setting from Fixed Refresh Rate to G-Sync.
Step 4: Click Apply.
That’s it. Whenever you load up a game, you’ll be able to use variable refresh rate as long as you have a compatible display. In most cases, you don’t need to do anything on your monitor. However, some displays come with a toggle in the settings for G-Sync, so make sure to turn that on, as well.
Still weighing up the best option for your graphics and display solution? Check our comparison of G-Sync and FreeSync.
NVIDIA G-Sync is a technology licensed out by the GPU maker to companies making displays the best computer monitors and laptop displays. In a nutshell, it provides silky smooth, tear-free gaming by allowing the monitor and GPU to talk to each other.
The display draws every frame outputted by the GPU, and this variable refresh rate ensures no tears during gameplay. It is, however, not enabled by magic as soon as you hook up a G-Sync display. There’s some mild setup involved, but the good news is that as long as you’ve at least installed drivers once for your NVIDIA GPU, you won’t have any additional software to install.
How to enable G-Sync on your PC
The first thing to do is to make sure you actually turn on the G-Sync setting on your PC.
- Right-click on your desktop.
- Select NVIDIA Control Panel.
- Expand the display item in the sidebar.
- Click on Set up G-Sync.
- Check the box next to Enable G-Sync.
- Below this choose whether you want G-Sync enabled for only full screen or full screen and windowed modes.
How to use G-Sync in your PC games
To use G-Sync in your games, you’ll also need to set your monitor as your primary display in this same control panel if you’re using multiple monitors.
- In the same window as above click on Set up multiple displays.
- Ensure that the G-Sync monitor is in the correct location and highlighted as primary.
If you need to make it your primary display then follow these steps.
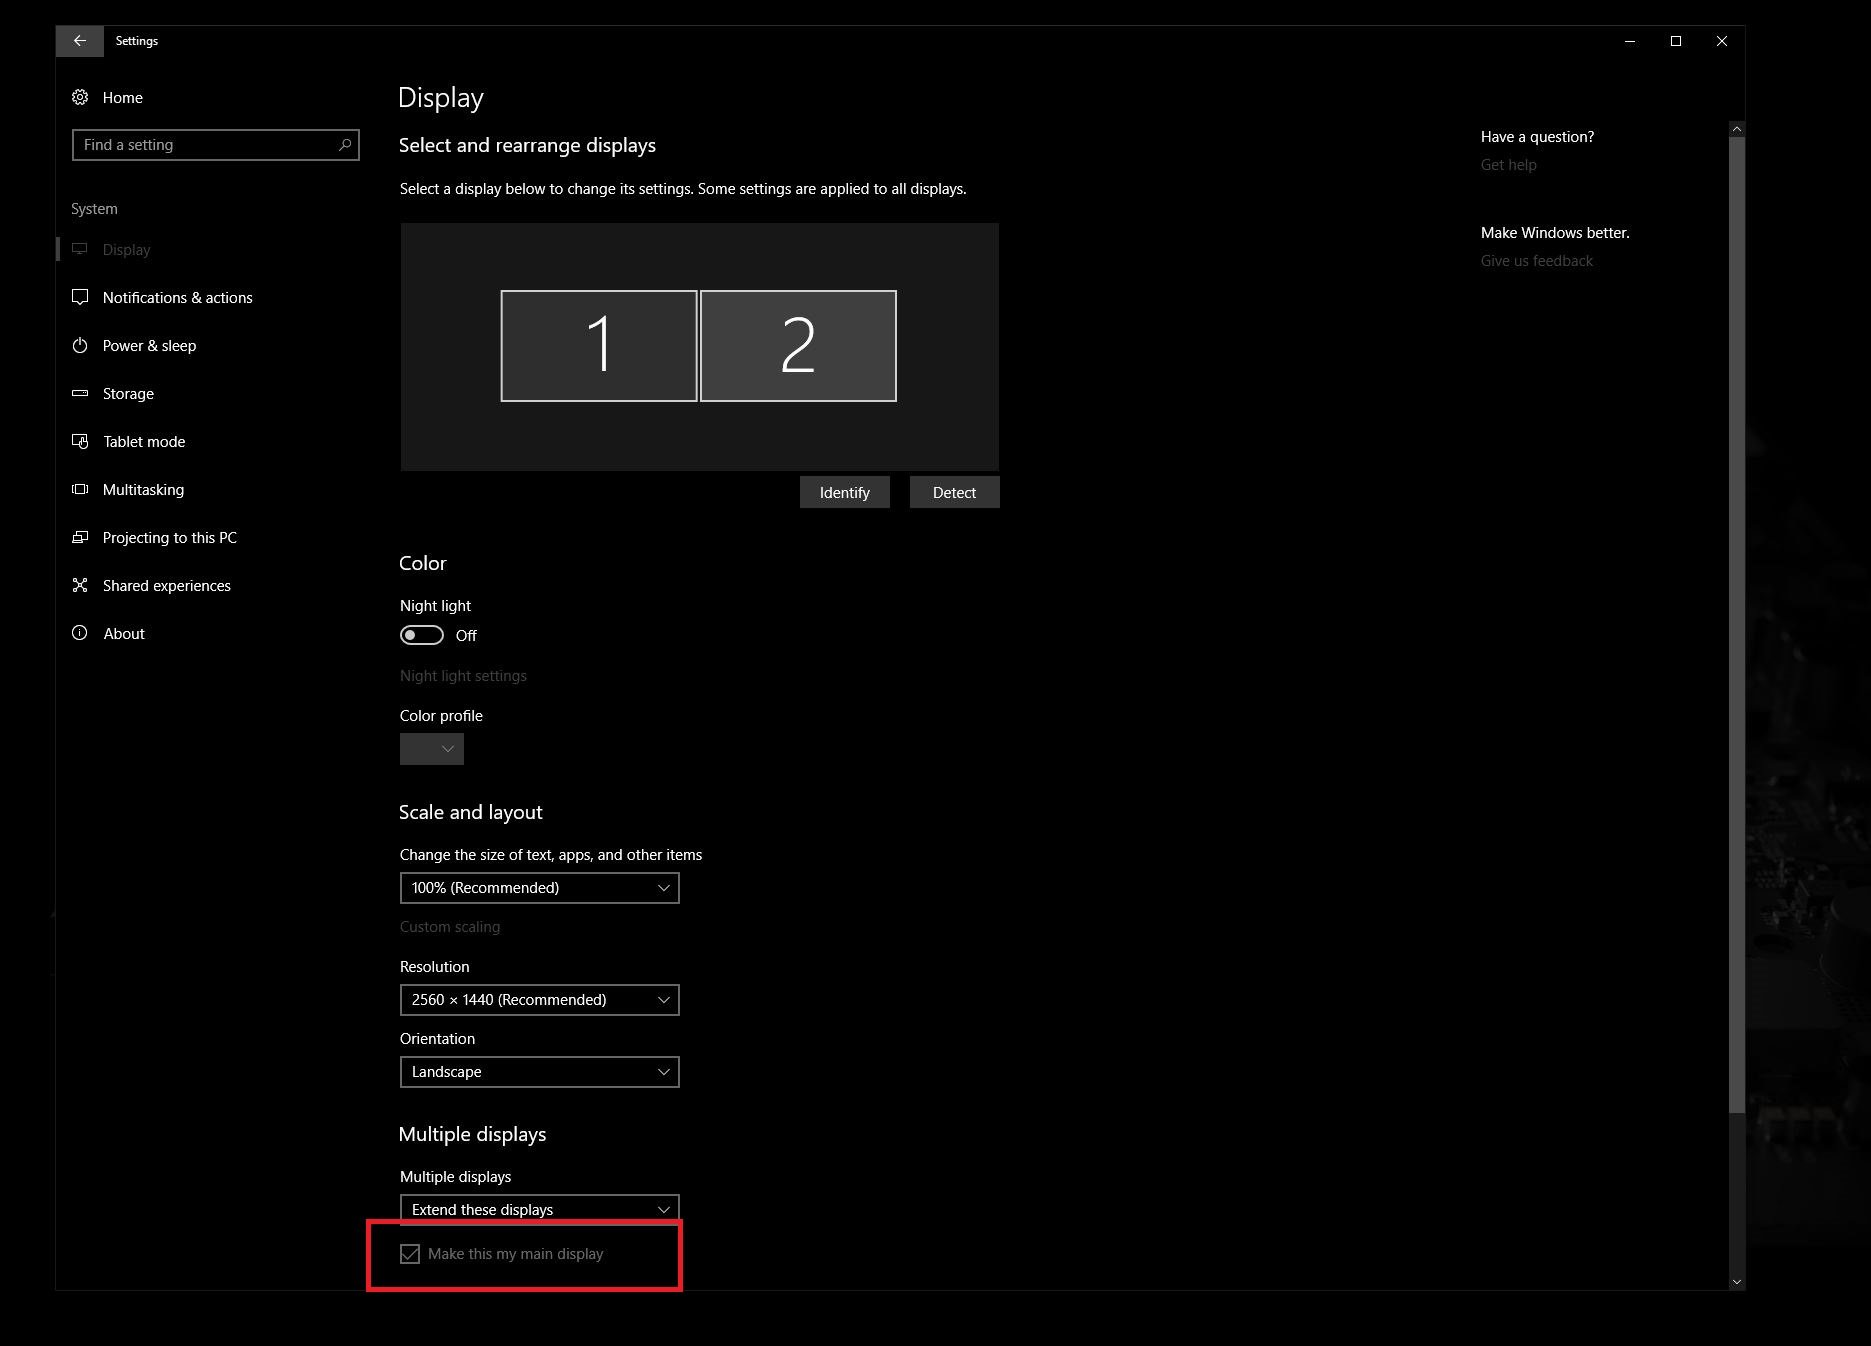
- Open the Windows 10 Settings app.
- Click System.
- Now click on Display.
- Highlight the box corresponding to the display in question.
- Scroll down and check the box next to Make this my primary display.
Now when you game you’ll have crisp, tear-free on-screen action. Simple!
All the latest news, reviews, and guides for Windows and Xbox diehards.
Richard Devine is a Managing Editor at Windows Central with over a decade of experience. A former Project Manager and long-term tech addict, he joined Mobile Nations in 2011 and has been found on Android Central and iMore as well as Windows Central. Currently, you’ll find him steering the site’s coverage of all manner of PC hardware and reviews. Find him on Mastodon at mstdn.social/@richdevine

Sometimes despite having high frames or a high refresh rate monitor, games can still look choppy and an easy way to resolve this issue is by enabling G-Sync. For those who are unsure of how to enable G-Sync, we’ll be covering everything from what you need to step-by-step instructions.
G-Sync is a technology that matches your frame rate in game with the refresh rate of your monitor. There are many benefits to enabling G-Sync, including no screen tearing, reduction in stuttering and less input lag. For those wondering how to enable G-Sync, it’s worth noting that you need an Nvidia GPU in order to do so.
When considering how to enable G-Sync, the process is very simple and once you’ve enabled it once, you won’t need to constantly keep switching it on.
The technology can make for a much more pleasant gaming experience and with less input lag, it can even make you better at games.
Tools and requirements
- PC or laptop with Nvidia graphics card
- Nvidia Control Panel software
- Up-to-date graphics card drivers
- G-Sync capable monitor
Steps for how to enable Nvidia G-Sync
- Open up your Nvidia Control panel
- Under Display hit the Set up G-Sync option
- Tick the enable G-Sync box and select whether you want it to enable for full screen mode or both windowed and full screen mode and which display you want to change
Step by step guide on how to enable Nvidia G-Sync
1. Open Nvidia Control Panel
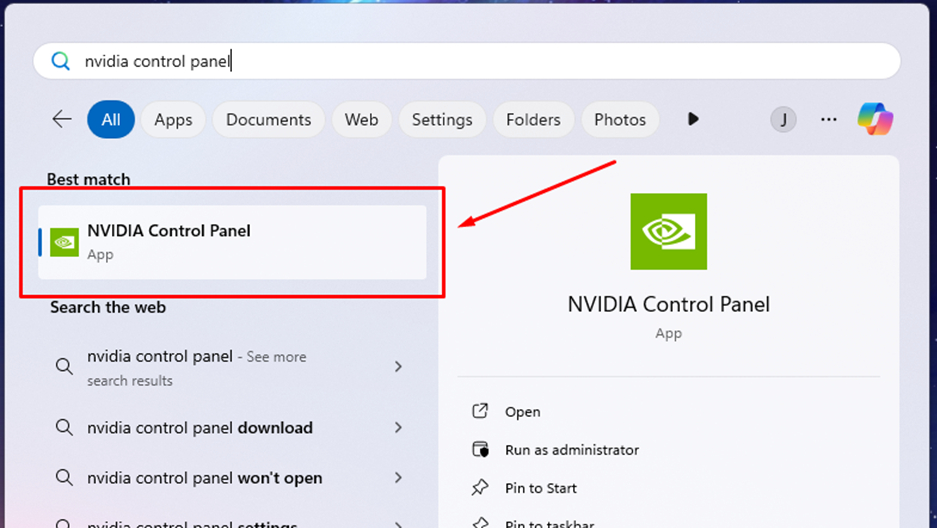
(Image: © Future / Microsoft)
Open up your Nvidia control panel, you can search for this in your taskbar or Start menu.
You can also open it by right-clicking on your desktop, select Show more options and select NVIDIA Control Panel.
2. Change G-Sync settings
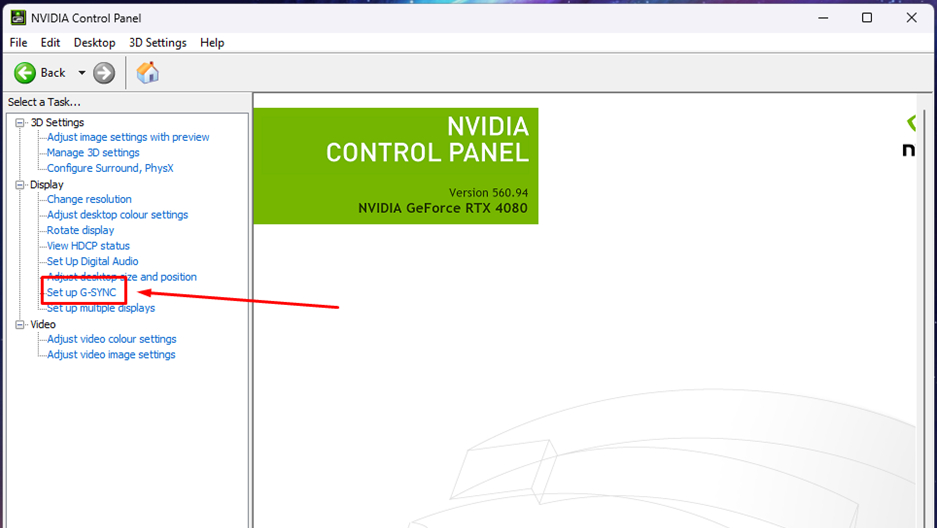
(Image: © Future / Microsoft)
Once the control panel window opens, under the Display category, hit the Set up G-SYNC option.
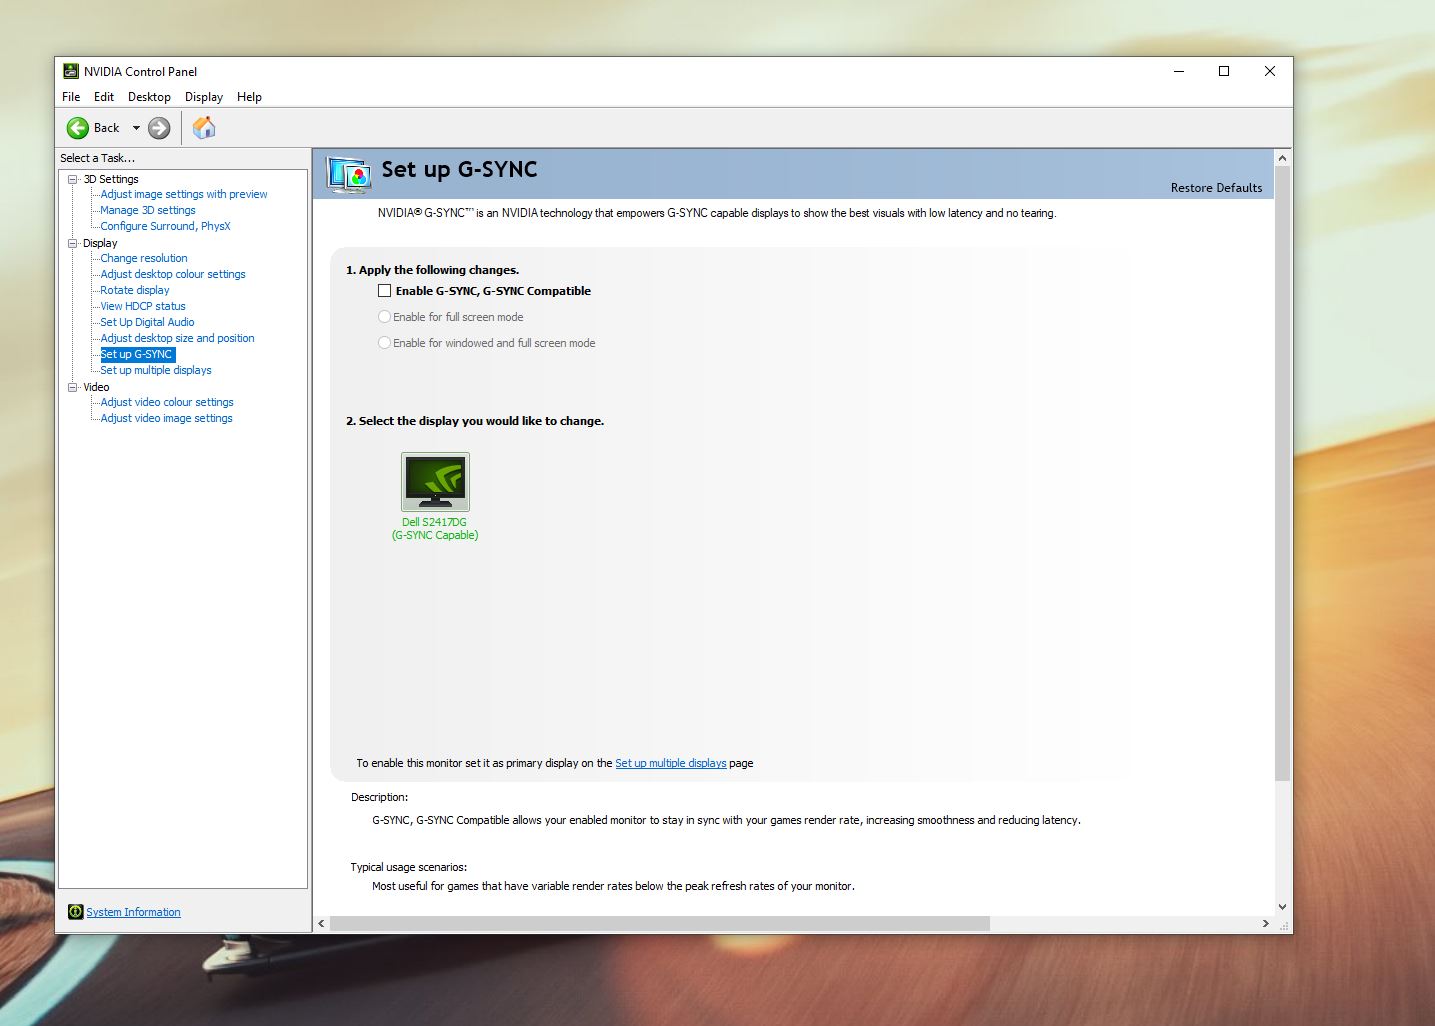
3. Enable G-Sync
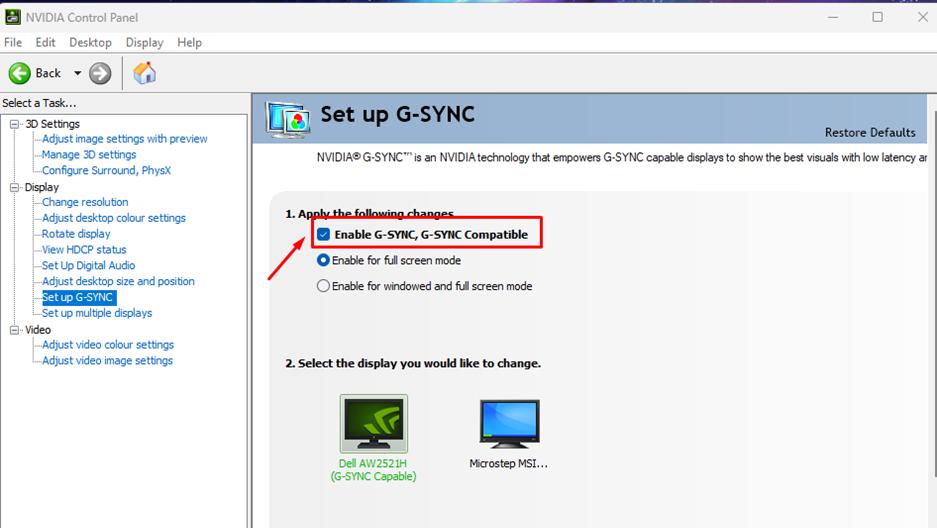
(Image: © Future / Microsoft)
Check the Enable G-SYNC box. If it’s greyed out then you may not have a G-Sync-compatible display or GPU.
4. Choose when G-Sync is used
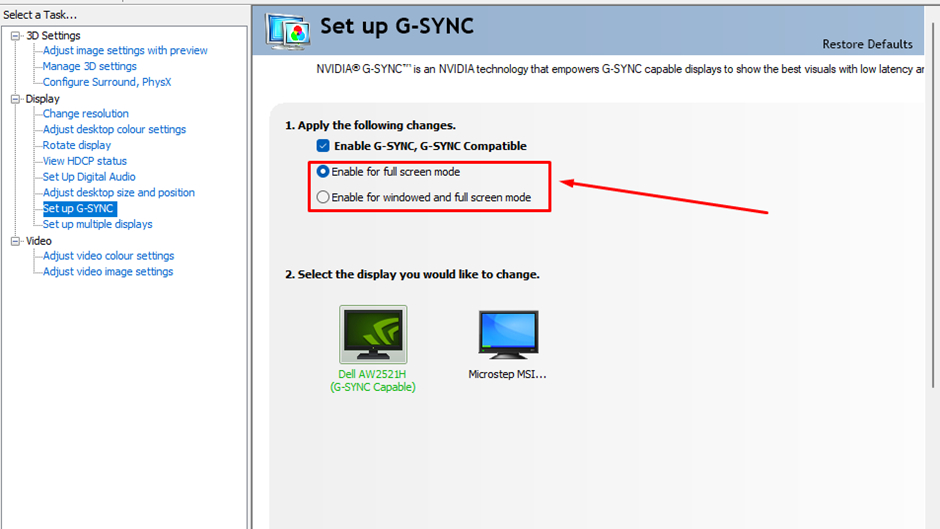
(Image: © Future / Microsoft)
Select whether you want to enable G-Sync for when apps are in fullscreen mode or both windowed and full-screen modes. This will be based on whether or not you play games in windowed mode.
5. Choose the monitor to use
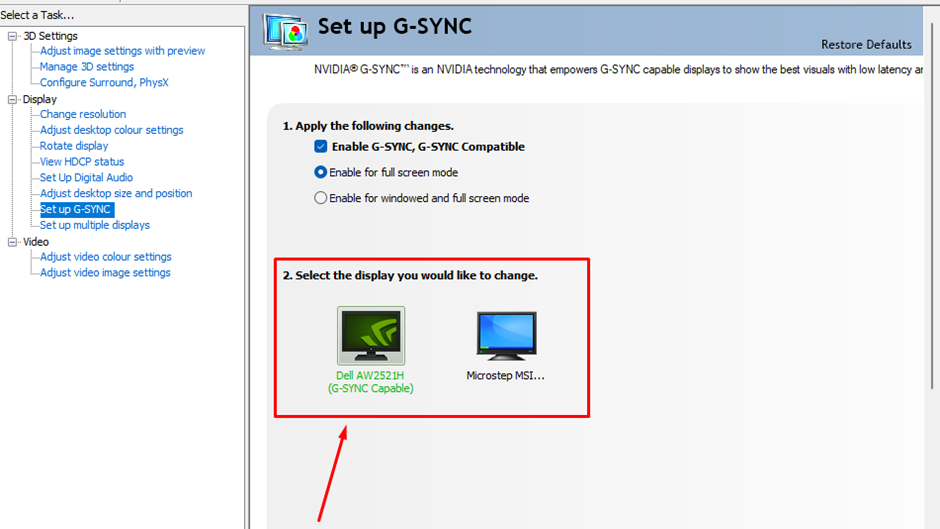
(Image: © Future / Microsoft)
If you have multiple monitors, then choose which display you want these settings to apply to. This will be the display that you play games on or your primary monitor.
Final thoughts on enabling Nvidia G-Sync
Overall, using Nvidia’s G-Sync technology is a great way to make for the smoothest and most pleasant gaming experience.
By syncing up your frame rate and refresh rate, you don’t have to worry about screen tearing or stuttering.
Another great benefit of enabling G-Sync technology is that it can lead to less input lag, making for quicker reactions that can mean the difference between life and death in competitive games.
Sign up for breaking news, reviews, opinion, top tech deals, and more.
You might also like
- How to enable G-Sync on a FreeSync monitor
- Nvidia G-Sync vs AMD FreeSync
- We pick the best gaming monitors
Jasmine is a gaming hardware and tech journalist with an appreciation for all things others dare to call boring or complicated.
Previously of GamesRadar and The Mirror, Jasmine has reviewed and covered hundreds of devices from laptops to sound bars, monitors to cameras and almost everything in-between.
In her spare time, Jasmine enjoys playing games that make her rage and building PCs, which also makes her rage – as well as spending time with her three cats. Crazy cat lady in the making!
Is your G-Sync monitor tearing on Windows 10? Is there no G-Sync option on Control Panel? Does it stop working suddenly in full-screen mode on NVIDIA graphics card?
As a computer game lover, it is a common phenomenon that though your NVIDIA graphics card and monitor both support the G-Sync, it cannot work on Windows 10.
As it is well known that G-Sync can not only solve the screen tearing or stuttering error caused by V-Sync, but it can be rather helpful on NVIDIA monitor with a higher refresh rate in that it is able to help the NVIDIA monitor display better on Windows 10.
Therefore, you must be exceptionally upset if you cannot get high performance and high-quality image from G-Sync when you are playing games.
G-Sync not working on Windows 10, either not showing up or out of work, can result from many factors, among them, the faulty settings and the outdated or missing or corrupted graphics card drivers are the most common but also the most critical ones.
Solutions:
On the basis of this fact, this post will guide you to fix the G-Sync out of work error from the following solutions.
- 1: Turn on V-Sync
- 2: Check Related Settings for G-Sync
- 3: Update NVIDIA Driver
- 4: Roll Back NVIDIA Driver
- 5: Reset Windows 10
Solution 1: Turn on V-Sync
As discussed before, G-Sync is associated with V-Sync, for it is designed to fix the stuttering and tearing screen problems brought by V-Sync, so if your G-Sync cannot work properly on Windows 10, you are in the first place advised to change the V-Sync settings.
1. Open NVIDIA Control Panel. You can right-click the desktop and choose NVIDIA Control Panel from the list. In this case, if you found your NVIDIA Control Panel is missing, you need to fix this issue immediately.
2. In the left NVIDIA Control Panel window, click Manage 3D settings.
3. Select Global setting in Manage 3D settings window and then find out Vertical sync.
4. Scroll down Vertical sync drop-down box and choose On.
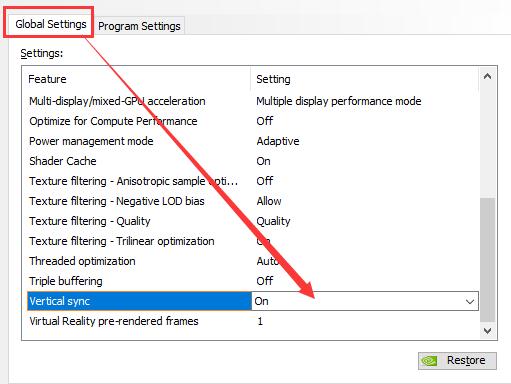
5. Click Apply to save your settings.
6. Reboot your computer to let it take effect.
At this point, you will have successfully enabled V-Sync for Windows 10 in NVIDIA control panel. If you are lucky, you can find that your G-Sync monitor tearing and not working error disappeared. Of course, if not, you can keep going on.
Solution 2: Check G-Sync Settings
The problematic G-Sync settings can also lead to the not working or tearing G-Sync, so it is proposed for you to check if all the settings are in normal.
1. Check if your G-Sync monitor is good. In this step, you should reboot your PC and when you sign in again, turn off all the other monitor except the G-Sync monitor.
2. In the NVIDIA Control Panel, under Manage 3D settings, make sure you have turned on the G-Sync option. You can also try to turn on and off the G-Sync option for many times to see if it can work.
3. Make sure there are not fixed options about your G-Sync, such as refresh, frame rate limit, V-Sync, and all the other related settings.
Having checked all the G-Sync configurations, you may probably have resolved the G-Sync not working and keeps tearing or stuttering on Windows 10.
If you noticed NVIDIA G-Sync is still out of work, maybe you need to fix NVIDIA driver issue. Your NVIDIA G-Sync disappears when the NVIDIA driver failed to make the NVIDIA card work on Windows 10.
Solution 3: Update NVIDIA Driver
For most gamers, they are used to using NVIDIA graphics card to support the G-Sync, under this circumstance, if your NVIDIA driver is missing or outdated or corrupted on Windows 10, your G-Sync may also fail to work and start tearing. So it is extremely necessary for you to update NVIDIA graphics driver to fix the G-Sync not working on Windows 10.
In most cases, it can be troublesome to find the suitable graphics driver on your own, so here it is wise and time-saving to make the most use of Driver Booster, which is a professional and completely safe driver updating tool for Windows 10.
It boasts of millions of drivers and is able to download and install drivers automatically. More significantly, Driver Booster will back up your drivers in case you need it in the future.
1. Download, install and run Driver Booster on Windows 10.
2. Then click Scan to search for outdated, missing, and faulty drivers on your PC.

3. Locate Display adapters and then hit Update to let Driver Booster download the latest NVIDIA graphics driver.
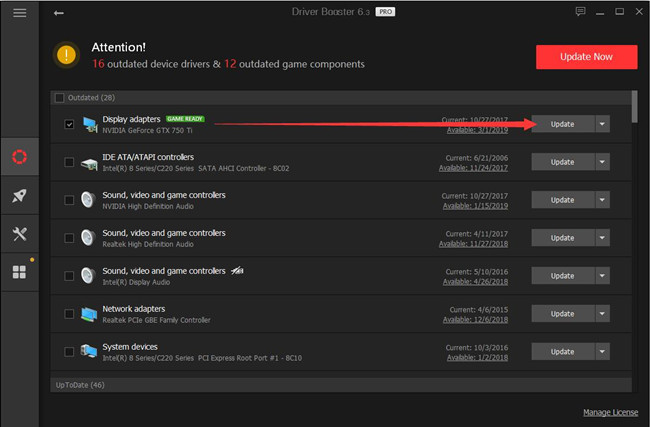
After you updated the NVIDIA drivers to the latest version, G-Sync not working in Windows 10 can be solved.
Solution 4: Roll Back NVIDIA Driver
It is often said that the latest NVIDIA driver may cause the G-Sync to fail to work or tear. NVIDIA graphics is the supporter of your G-Sync, so if your graphics card is NVIDIA, you can try to roll back it to the former version in device manager to see if it can turn the G-Sync to normal.
To roll back the NVIDIA driver in device manager, you can follow the path:
Device Manager > Display adapters > NVIDIA graphics driver > Properties > Drivers> Roll back driver> OK.
Sometimes, the older version of NVIDIA driver may make the G-Sync perform in better condition. After you changed the NVIDIA driver to the older version, you can check whether the G-Sync monitor display clear image or not.
If not, maybe you can try to uninstall the NVIDIA graphics driver. After that, you can install an older version NVIDIA driver again.
But the problem is users often failed to roll back drivers in Device Manager unless the NVIDIA G-Sync out of work occurs right after Windows 10 update or driver update. In this situation, it is necessary to resort to Driver Booster again to allow it to restore the NVIDIA driver on Windows 10.
After Driver Booster’s scanning, on the left side, hit Devices and then on the right side, click Driver Backup.
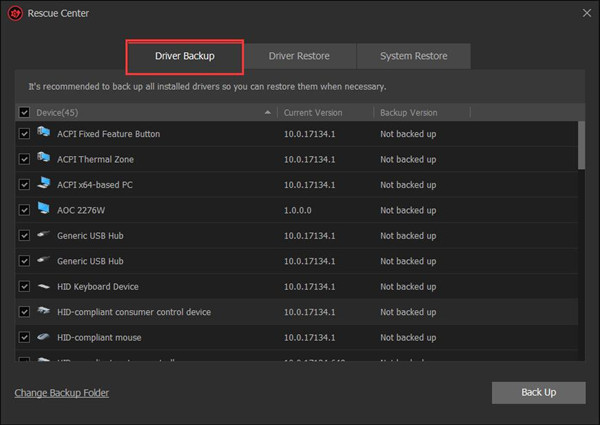
If needed, Driver Booster will automatically roll back NVIDIA driver so as to resolve NVIDIA G-Sync not showing up on Windows 10.
Solution 5: Reset Windows 10
In the last place, there is a high probability that the NVIDIA control panel comes across corruptions and that makes G-Sync not showing up the NVIDIA Control Panel app or not working on Windows 10.
If the ways above are of no use to fix your G-Sync option not in NVIDIA Control Panel, it is worth a shot to reset Windows 10 to delete all the software settings and files.
In short, this post is designed to help you fix the error that G-Sync is not working on Windows 10. It mainly includes updating graphics driver and changing G-Sync settings. You can enjoy its effectiveness if you have tried them.
Related Articles:
How to Download Control Panel on Windows 10
How to Fix Unable to Connect to NVIDIA Issue
NVIDIA Driver Crashes on Windows 10