
You have the ability to launch explorer.exe from multiple locations in Windows 10. The organizer is one of the most used tools of Windows 10 that allows you to manage and view your files. Additionally, File Explorer can be used to transfer files with your associated homegroup too. So, the topic very necessary to know how to access File Explorer in Windows 10 in separate ways.
The methods involve everything from keyboard shortcuts to the Windows search bar to using Task Manager and so on. So let’s get started to the procedures.
Open File Explorer
Here are 12 Ways to Open File Explorer in Windows 10 –
1] Access File Explorer with just one click
- Taskbar of Windows 10, most often pin the Explorer. So to get access to the app, you just need to click on the same. As simple as that.
2] Use the keyboard shortcut Win+E
- Another quickest way to access File Explorer is to use the keyboard shortcut generated by Microsoft itself. All you need to do is pressing Win+E at one go.
3] Open File Explorer in Windows 10 through Quick access menu
In Power user menu, Microsoft places a File Explorer link so that users can quickly launch it whenever needed. For that –
- Press Win+X at once to invoke the Power user menu.
- Once it appears, click File Explorer to open it.
4] Try out the Start menu
- Do a click on the Start icon located at the bottom left corner of your desktop screen.
- Type explorer and you see the best match in the search result hit the Enter key.
5] Exploit dialog command to access File Explorer
- Open Run Dialog box using Win+R hotkeys.
- Upon appearing, write down explorer.exe in the void text bar and click the OK button.
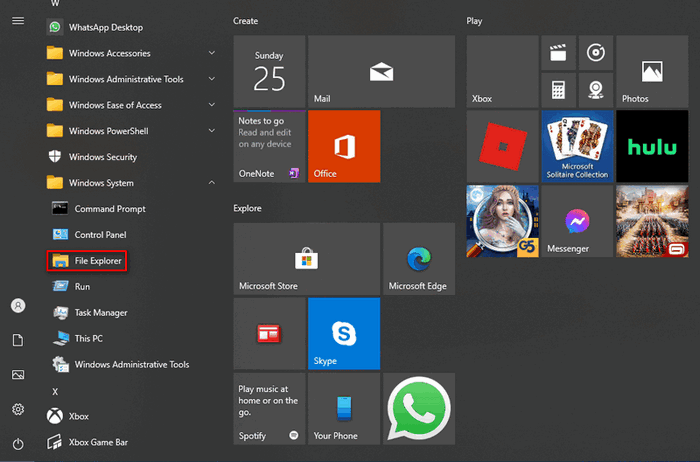
6] Open File Explorer in Windows 10 by means of Start menu
- To bring up the Start menu in the display, press the Windows key.
- Now, you need to navigate W alphabet. For that purpose.
- Click # option located top of the interface and then select W from there.
- Locate Windows System from the visible options and when found make a click on the arrow icon located beside it.
- From the expanded list, select File Explorer to open it.
7] Bring Windows Search into the play
- Make a combined press of Win+S to view search in text mode.
- When it comes into the sight, type explorer.exe and hit the Enter key once the result shows up.
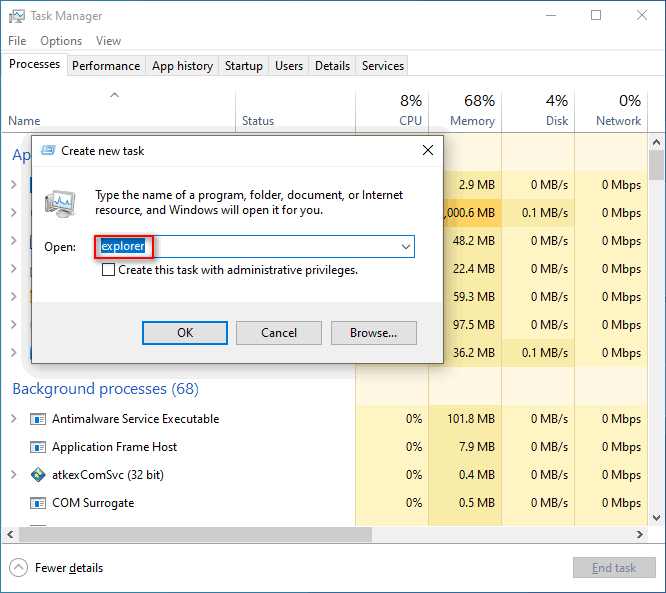
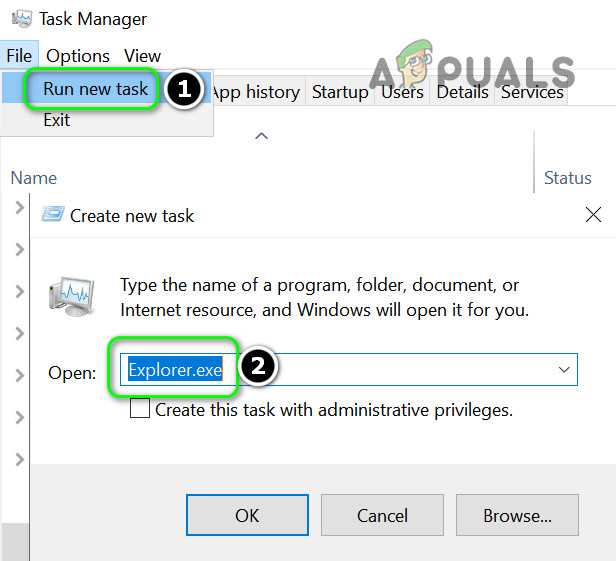
8] Open File Explorer in Windows 10 using Task Manager
- Hover the cursor to any void space of Taskbar eventually make a right-click on it.
- Select Task Manager and then click on More details if the interface is not expanded already.
- Click the File option located in the Menu bar and select Run new task.
- A pop-up will come up, put explorer.exe in the provided field located next to Open and hit the OK button.
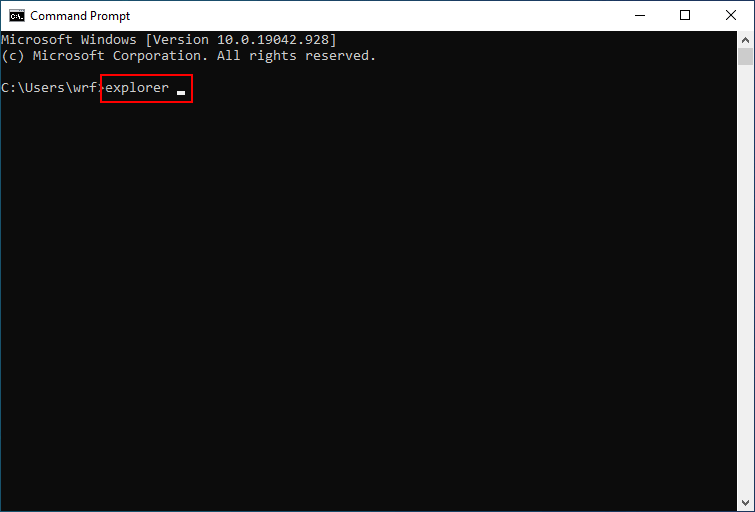
9] Via CMD.exe
- First of all, right-click on Start icon and select Run from the appearing items.
- Type cmd.exe and thereafter press Ctrl+Shift+Enter in one go.
- A UAC will come up for asking permission to run command prompt as admin, click the Yes button to grant it.
- Once the black window makes the appearance, type explorer.exe after the blinking cursor and hit Enter on your keyboard.
10] Open File Explorer in Windows 10 From Windows PowerShell
- Right click on Start and then select Windows PowerShell (Admin).
- If a UAC shows up, click Yes to continue.
- Next, you need to wait a few seconds so that the system can prepare PowerShell to use.
- Later on, type explorer.exe after the flicking PS C:\WINDOWS\system32> and hit Enter to access File Explorer.
11] Prepare a desktop shortcut
To make a desktop shortcut of File Explorer, you need to launch Task Manager first. For this purpose, go to the Desktop screen and press Ctrl + Shift + Esc simultaneously.
- Once it turns up, move to its Details tab.
- Under the Name column, you will get all the services available in your system. Find out explore.exe from there.
- When you get it, right-click on the same and select Open file location.
- A window will come into the view highlighting the explorer.exe option. Again right-click on it and select Send to >> Desktop (create shortcut).
12] Make a hotkey to Open File Explorer in Windows 10
To generate a manual shortcut key for File Explorer, you just need to create a desktop shortcut first. Thereafter follow the below steps –
- Press Win+D to access Desktop screen.
- Right-click on the shortcut you created for File Explorer and select Properties.
- When the Properties wizard shows up, you will be on the Shortcut tab by default. Take your mouse cursor to the Shortcut key section and click on the text bar situated beside it.
- The system has already set Ctrl+Alt as the prefix of the hotkeys. You just need to type any other letter to complete the keyboard shortcut.
- In the end, click the Apply button followed by pressing OK to save the changes.
Methods:
1] Access File Explorer with just one click
2] Use the keyboard shortcut
3] Through Quick access menu
4] Try out the Start menu
5] Exploit dialog command
6] By means of Start menu
7] Bring Windows Search into the play
8] Using Task Manager
9] Via CMD.exe
10] From Windows PowerShell
11] Prepare a desktop shortcut
12] Make a hotkey
That’s all!!
-
Home
-
News
- 11 Ways To Open Windows Explorer On Windows 10
By Sarah |
Last Updated
Windows Explorer is a file manager application built in Windows operating systems since Windows 95 to replace the previously File Manager. Users can access files and folders easily via Windows Explorer since it provides a graphical user interface for accessing your file systems. What are the feasible ways to open Windows Explorer on computer?
Windows Explorer was introduced with Windows 95 as a replacement for File Manager. Microsoft gives it a new name in Windows 8 and Windows 10: File Explorer. Windows Explorer provides you with an easy way to access files and folders; that’s an important reason why Windows Explorer (File Explorer) becomes one of the most used apps on Windows.
Tip: It’s easy to make mistakes when you manage files and folders on computer through Windows Explorer. But the good news is that even if the files get lost due to misoperation, they can be recovered easily by using MiniTool software. You should click on the download button below to get it and then start installing it on your PC at once.
MiniTool Power Data Recovery TrialClick to Download100%Clean & Safe
Whenever you’d like to copy or move files on Windows 10, the first thing to do should be opening File Explorer. Where is File Explorer? Please don’t worry if you can answer this. In the following content, I’ll show you how to open Windows Explorer on Windows 10 in 11 ways.
- Troubleshoot Windows Explorer not responding/has stopped working!!!
- How to enable tabs in File Explorer on Windows 11?
- How to download the Files app on Windows 10/11?
#1. Open Windows Explorer from Taskbar
By default, there’s a File Explorer icon (which looks like a folder) on the left end of taskbar in Windows 10. You should click on this icon to start Windows Explorer in Windows 10.
#2. Open File Explorer Windows 10 via Windows Search
If you have no idea of where is File Explorer in Windows 10, the best way to find it is using Windows search.
Please follow these steps to open Windows 10 File Explorer:
- Click on the search icon or search box located on the left side of your taskbar.
- Type explorer into the textbox.
- Select File Explorer from the search result.
Please read this page to know more about how to search in Windows 10:
#3. Ask Cortana to Open File Explorer
You can also use Cortana – Microsoft’s personal productivity assistant – to open Windows Explorer.
- Click on the Cortana icon on taskbar; it’s located on the right side of the search icon/box.
- Click on the microphone icon and say “Open File Explorer”.
- Cortana will then respond to this.
You can also type File Explorer into the Cortana search box if you don’t have a microphone.
Start Menu is frequently used on all Windows versions to help people access certain files, apps, and settings quickly. How to open File Explorer?
Step 1: How to Open Start Menu
And there are 2 common ways to open the Start menu on Windows 10.
- Click on the Start button in the lower left corner of Windows 10 PC screen.
- Press the Start (Windows logo) key on the keyboard.
Step 2: How to Start Windows Explorer
Then, you can open Windows 10 File Explorer from Start menu in 3 different ways.
- Scroll down the list of apps -> find Windows System and expand it -> click File Explorer under it.
- Navigate to the left sidebar -> click on the File Explorer icon.
- Navigate to the right tile section -> select File Explorer.
Q1: What if File Explorer doesn’t appear in the left sidebar?
You may also click on the Documents or Pictures icon to open file manager Windows 10. Besides, you can pin File Explorer to the sidebar by: click on the Settings icon -> click Personalization -> choose Start -> click on the Choose which folders appear on Start link -> turn On File Explorer.
Q2: How to pin File Explorer to the tile section?
Press Windows + S -> type File Explorer -> right click on it and choose Pin to Start.
#5. Use Keyboard Shortcut to Open File Explorer
Your keyboard offers fast shortcuts for launching lots of things, including File Explorer. How to start Windows Explorer easily? Just press Windows + E on the keyboard.
WinX menu, also known as the Power User Menu, refers to the menu you see after pressing Windows + X. You can also right click on the Start button to show this menu. Then, you should select File Explorer.
[Fixed] WinX Menu Not Working In Windows 10.
#7. Open Windows Explorer via Run
How to open File Explorer in Windows 10 by using the Run application?
- Press Windows + R to open Run.
- Type explorer into the text box.
- Click OK or press Enter.
#8. Use Task Manager to Start Windows Explorer
- Press Ctrl + Shift + Esc to open Task Manager.
- Switch to More details. (Optional)
- Select File from the menu bar and choose Run new task.
- Type explorer and press Enter.
#9. Start Windows 10 File Explorer from Command Prompt or Powershell
- Open Command Prompt or Windows Powershell as you usually do.
- Type explorer and press Enter.
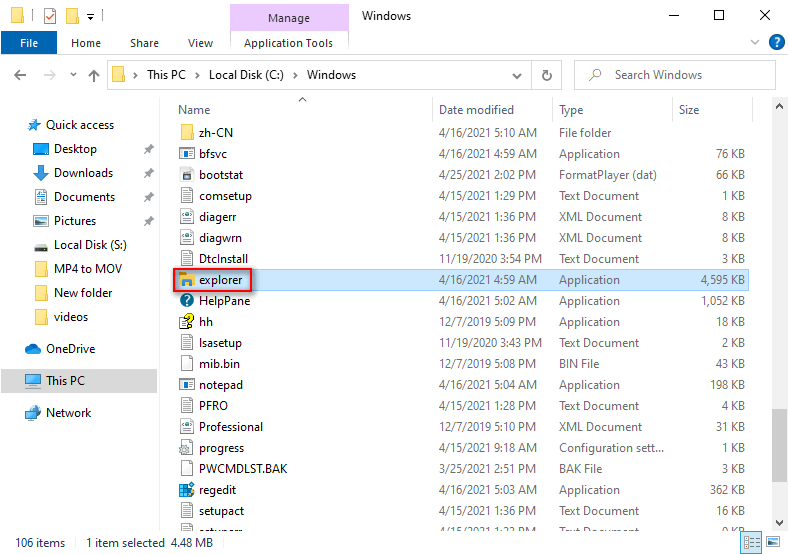
#10. Run Explorer.exe
- Double click on This PC.
- Go to C:\Windows.
- Find the explorer application file.
- Double click on it.
#11. Make a Shortcut Manually
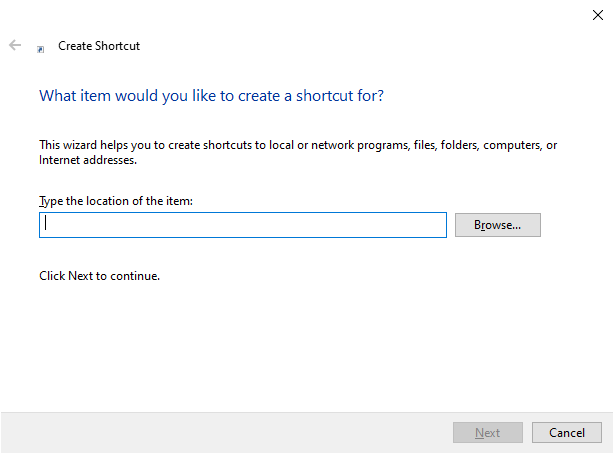
You can open File Explorer from anywhere you want by creating a shortcut manually.
- Navigate to the place you want to open Windows Explorer from.
- Right click on the blank space.
- Select New -> Shortcut.
- Type the correct location or click Browse.
- Click Next.
- Give it a name.
- Click Finish.
Another way to creat a File Explorer shortcut quickly is: dragging and dropping the File Explorer shortcut from the Start Menu to anywhere else you want.
Can you fix File Explorer if it won’t open or start?
About The Author
Position: Columnist
Sarah has been working as an editor at MiniTool since she graduated from university. Sarah aims at helping users with their computer problems such as disk errors and data loss. She feels a sense of accomplishment to see that users get their issues fixed relying on her articles. Besides, she likes to make friends and listen to music after work.
Некоторые пользователи Windows 11/10 и других версий ОС могут столкнуться с ситуацией, когда Проводник не открывается при попытке открыть его с ярлыка, исполняемого файла, открытии папок и в других ситуациях.
В этой инструкции подробно о возможных причинах такого поведения и способах исправить ситуацию.
Простые способы решения проблемы
Прежде чем приступить, одно примечание: предложенные методы относятся к ситуации, когда сама Windows работает и рабочий стол загружается, а отдельные окна Проводника не открываются.
Если речь идёт о системном процессе (который участвует в работе интерфейса Windows) на сайте присутствует отдельная инструкция: Бесконечно перезапускается explorer.exe и мигает рабочий стол в Windows — что делать?
Начнём с простых методов решения проблемы, если Проводник не запускается:
- Попробуйте выполнить простую перезагрузку компьютера, при этом используйте именно пункт «Перезагрузка», а не «Завершение работы» в меню, это может быть важным фактором.
- Если проблема возникла недавно, попробуйте использовать точки восстановления системы: нажмите клавиши Win+R на клавиатуре, введите rstrui и нажмите Enter, выберите точку восстановления системы на дату до появления проблемы, используйте её. Если клавиши Win+R не работают, вы можете открыть диспетчер задач через меню Ctrl+Alt+Delete и использовать опцию запуска новой задачи для выполнения rstrui.

- В случае, если папки стали открываться не в «Проводнике», а в каком-то другом файловом менеджере, внимательно изучите его настройки, с большой вероятностью, соответствующие опции там найдутся. Второй вариант: если вы не пользуетесь альтернативным файловым менеджером, но папки открываются в нём, просто удалите его в «Параметры» — «Приложения» или «Панель управления» — «Программы и компоненты». И ещё одна возможность: проверьте контекстное меню папок, есть ли там дополнительные пункты «Открыть» кроме используемого по умолчанию (верхнего) и как будет открываться папка при их использовании.
- При наличии каких-либо программ для изменения оформления системы и Проводника, в частности — ExplorerPatcher, проверьте, решит ли проблему их удаление.
- Если Проводник перестал запускаться после установки обновлений Windows, попробуйте удалить их.
- Попробуйте выполнить проверку и восстановление системных файлов Windows: запустите командную строку от имени администратора, по порядку используйте команды
dism /online /cleanup-image /restorehealth
sfc /scannow
после чего перезагрузите компьютер. Восстановление системных файлов можно выполнить и с флешки WinPE.
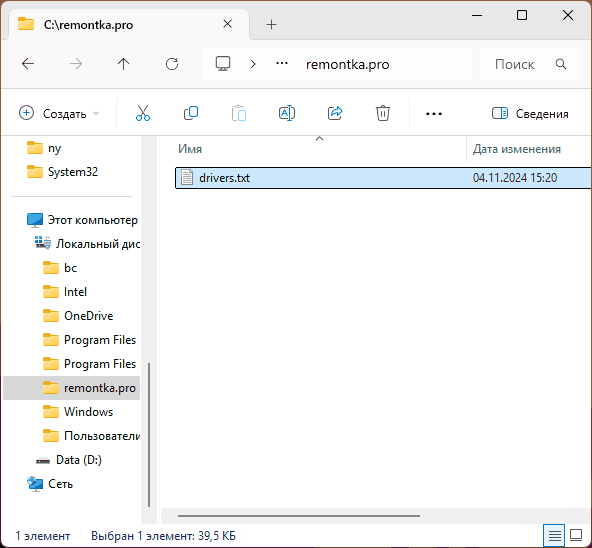
- Если Проводник не открывается с какого-то конкретного ярлыка или панели задач, при этом работает при открытии папок или путём запуска файла explorer.exe из папки C:\Windows, попробуйте создать ярлык заново или закрепить Проводник из указанного файла на панели задач заново.
- В случае, если не открываются только папки библиотек, такие как Документы, Изображения, Музыка, Видео, Загрузки, вы можете открыть их напрямую из их фактического расположения в
C:\Пользователи\Имя_пользователя
также может помочь восстановление параметров по умолчанию для библиотек, подробнее — в этой инструкции.

В некоторых случаях описанных выше способов оказывается достаточно для решения проблемы, но не всегда. В этом случае можно прибегнуть к описанным далее вариантам.
Расширения Проводника
Многие программы, устанавливаемые на компьютере, также устанавливают дополнительные модули или «Расширения» Проводника Windows, которые не всегда работают исправно. Чтобы проверить, не в них ли дело:
- Загрузите утилиту ShellExView с официального сайта и запустите её от имени администратора.
- Обратите внимание на все расширения, выделенные розовым цветом (можно также отсортировать список по столбцу «Product Name») — это расширения, установленные сторонними программами. Попробуйте отключить их все используя кнопку отключения в меню инструментов, клавишу F7 или контекстное меню соответствующих пунктов.

- Перезагрузите компьютер (либо перезапустите Проводник) и проверьте, запускается ли Проводник теперь.
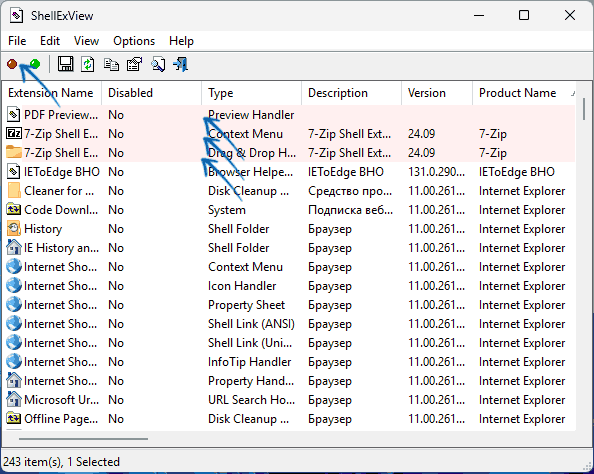
Если всё работает исправно, при этом некоторые из отключенных расширений вам нужны, можно попробовать включать их по одному, пока не найдётся то, которое приводит к поломке «Проводника».
Создание нового пользователя
В некоторых случаях проблемы с запуском «Проводника» связаны с какими-то повреждениями или особенностями учётной записи пользователя Windows.
Например, некоторые из тех, кто использует системную учётную запись «Администратор» иногда сталкиваются с рассматриваемой проблемой, но даже если это не так в вашем случае, рекомендую проверить работу «Проводника» в новой учётной записи. Возможный вариант действий:
- Запустите командную строку от имени администратора и введите команду
net user имя_пользователя /add
Имя пользователя замените на любое удобное. Есть и другие способы создать нового пользователя Windows
- Зайдите под вновь созданной учётной записью и проверьте, запускается ли проводник теперь.
Если всё работает исправно, вы можете перенести файлы и данные из учётной записи другого пользователя, сделать текущего пользователя администратором и работать под ним.
Некоторые дополнительные нюансы и способы, которые могут помочь разобраться с проблемами запуска Проводника и исправить ситуацию:
- Проверьте, запускается ли Проводник в безопасном режиме (способы зайти в безопасный режим) и/или при чистой загрузке Windows. Если в этом случае всё работает исправно, возможно, причина в программах в автозагрузке или сторонних службах.
- Может иметь смысл проверить компьютер на наличие вирусов и вредоносного ПО, используя KVRT, MinerSearch, средств удаления вредоносных программ.
- В случае, если ничего не помогает, можно выполнить сброс системы, например — этим способом для Windows 11 или же путём «Обновления на месте».
В случае, если ваша ситуация с «Проводником» Windows отличается, и проблема сохраняется, опишите в комментариях — что именно и при каких условиях происходит, какие действия уже предпринимались и к чему они привели. Возможно, решение удастся найти.
Explorer.exe might not work at the Windows startup if the essential system files are corrupt. Moreover, outdated system drivers may also result in the error under discussion.
The issue arises (usually, after a Windows update) when the user boots his system but the File Explorer of the system fails to launch with Windows & the user encounters a black screen (or a Command Prompt on the screen) but can start Explorer manually.
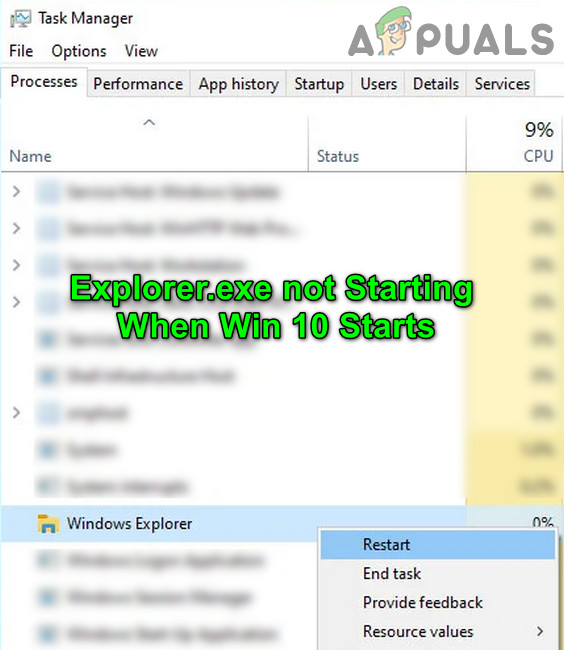
Before moving on with the solutions to enable Explorer.exe on startup, you may have to launch a New Task of Explorer.exe from the File Menu of the Task Manager (so that you can try the solutions easily).
If you are part of a corporate/domain network, then check if any of the group policy or startup scripts of your organization is causing the issue. Moreover, check if booting the system with the bare minimal peripherals & without any mapped drivers resolves the issue (make sure to disconnect the network & speakers). If so, then adding the peripherals one by one till you find the problematic one. Last but not least, perform a malware scan to rule out any of the malware causing the issue.
Solution 1: Use the SFC and DISM Commands
You may encounter the error at hand if the files essential for the operation of the OS are corrupt. In this context, performing SFC or DISM scans may solve the problem.
- Perform an SFC scan in an elevated Command Prompt & check if the Explorer issue is resolved.
- If not, then check if executing the DISM commands resolves the Explorer issue.
Solution 2: Disable Fast Startup and Rename the Computer
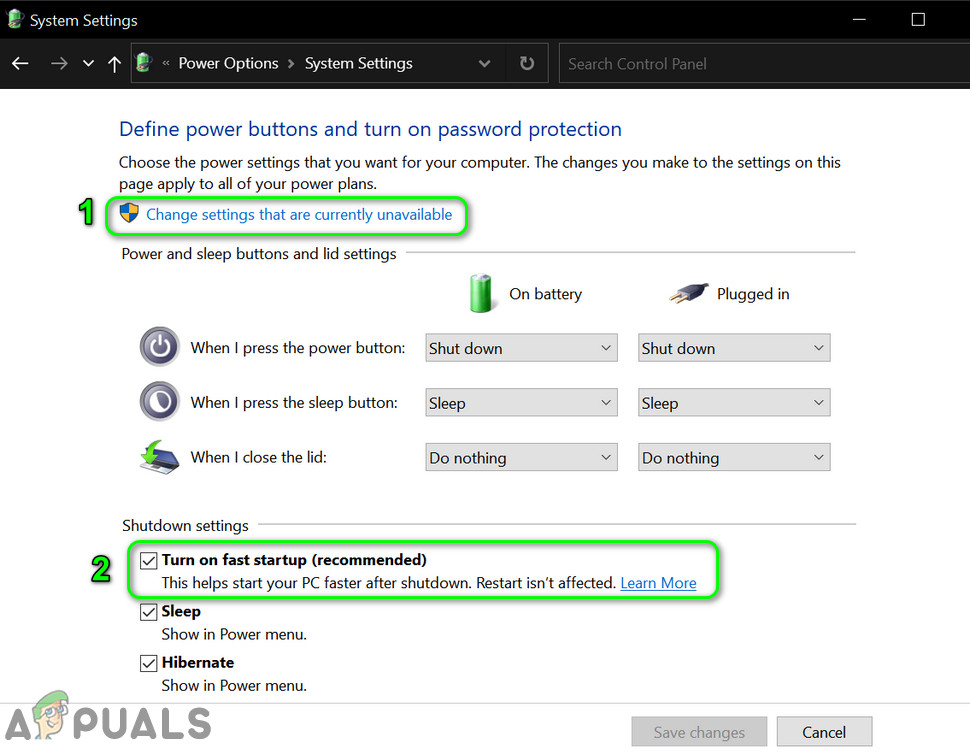
Fast Startup helps to boot your system quite fast but your system is not completely shut down but it is put in a mixed state of hibernation & power off. Despite its usefulness, it can break the operation of certain OS modules (especially, the startup items) & thus cause the Explorer issue. In this scenario, disabling the Fast Startup may solve the problem.
- Hit the Windows key & type Power & Sleep Settings. Then select Power & Sleep Settings.
Open Power & Sleep Settings - Then select Additional Power Settings (in the right pane of the window) & click on the option of Choose What the Power Buttons Do.

Open Additional Power Settings - Now click on Change Settings That Are Currently Unavailable & then uncheck the option of Turn on Fast Startup.

Disable Fast Startup - Then save your changes and reboot your PC.
- Upon reboot, check if the Explorer issue is resolved.
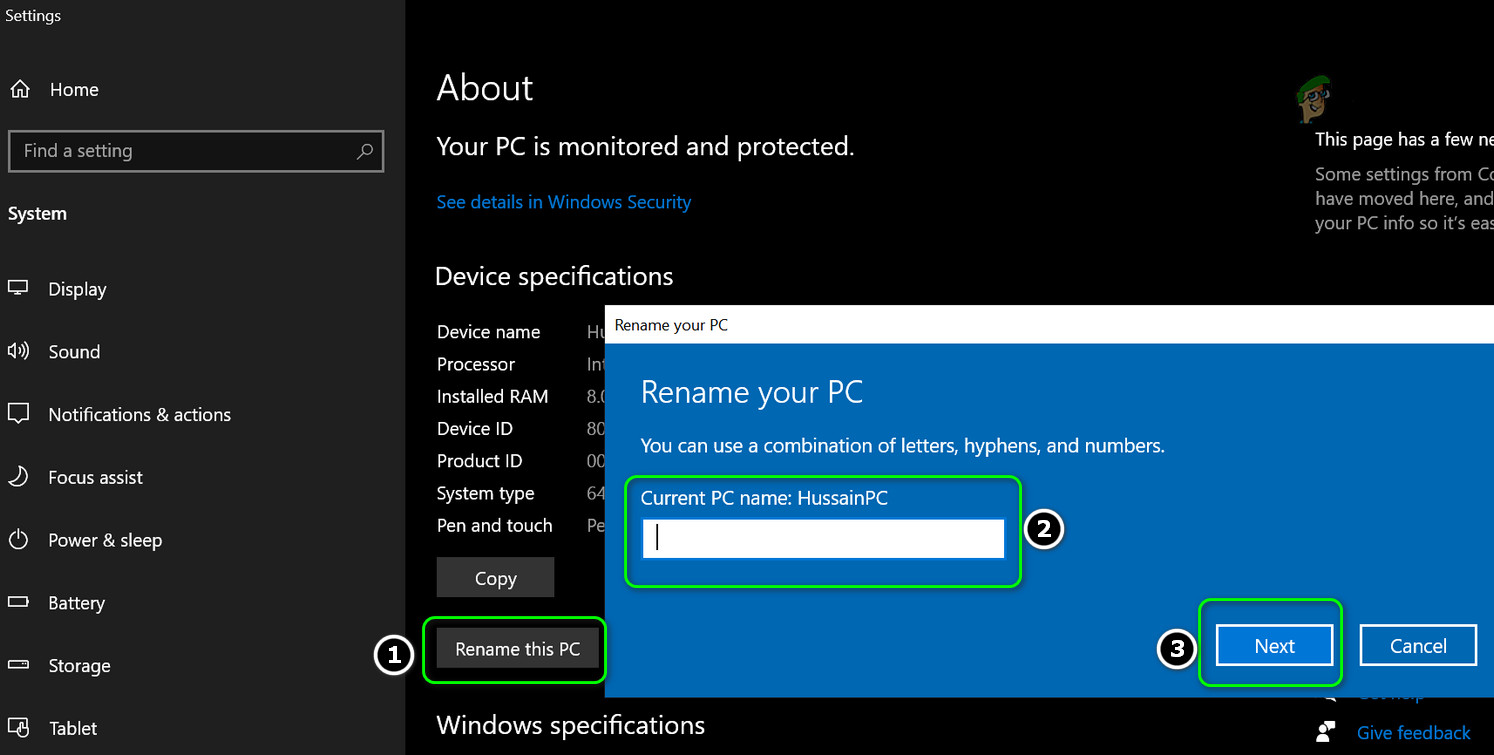
- If not, hit the Windows key and type PC Name. Then select View PC Name.
Open View Your PC Name - Then click on Rename this PC and enter the new name for your PC.

Rename This PC - Now click on Next (you may have to enter your credentials) and then reboot your PC.
- Upon reboot, check if the Explorer issue is resolved.

Solution 3: Edit Display Settings and Update/Reinstall Drivers
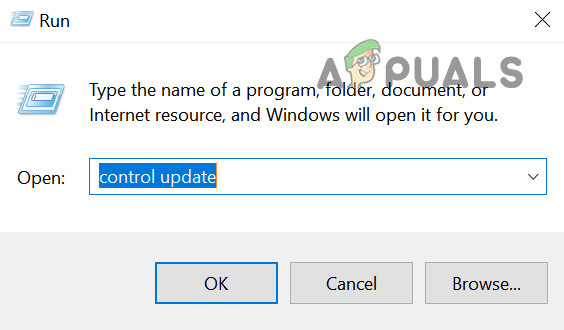
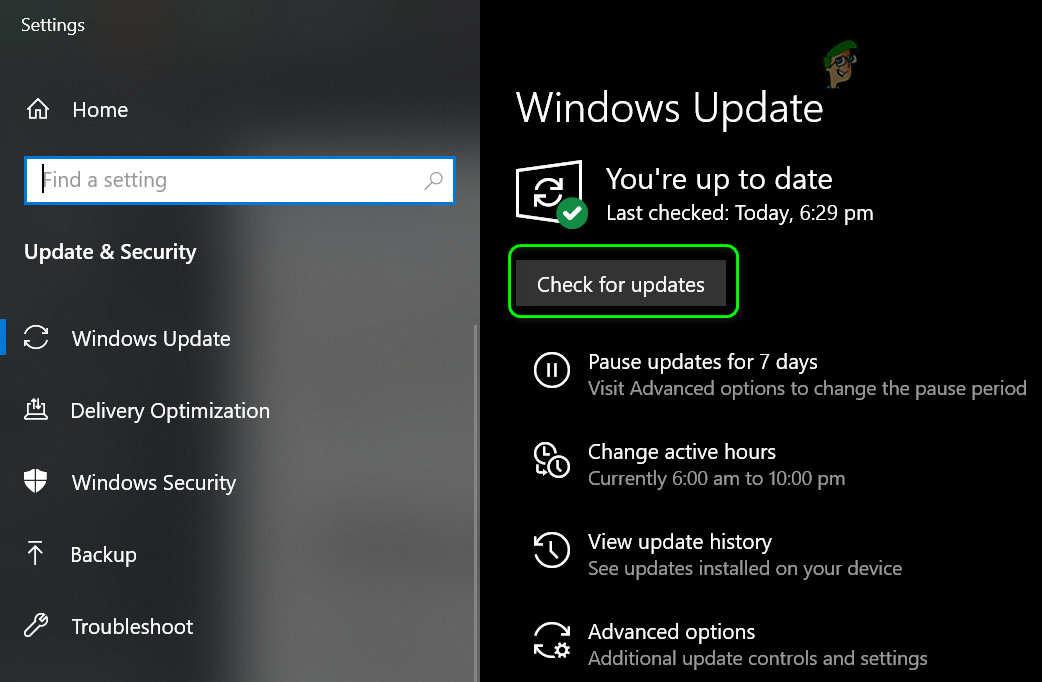
You may encounter the error at hand if the drivers (especially the display/video drivers) are corrupt. In this context, editing the display settings or updating/reinstalling drivers may solve the problem. Before proceeding, check if removing the desktop background image resolves the issue.
- Launch the Run command box (by pressing Windows + R keys) and execute the following:
control update

Run the Control Update Command - Now click on the Check for Updates button and if updates are available, then apply these updates.

Check for Windows Updates - Now reboot your PC and launch the Run command box (step 1) to execute the following
devmgmt.msc
Run the devmgmt.msc Command - Now update your device drivers and check if the Explorer issue is resolved.
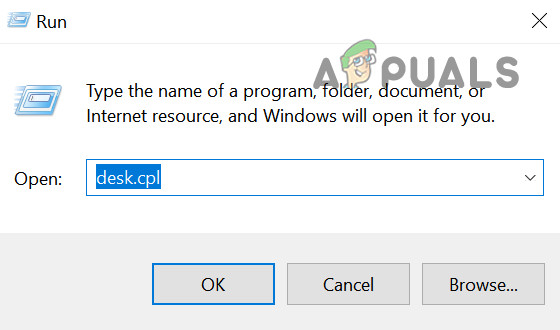
- If not, launch the Run command box (step 1) and execute the following to open the Display Settings:
desk.cpl

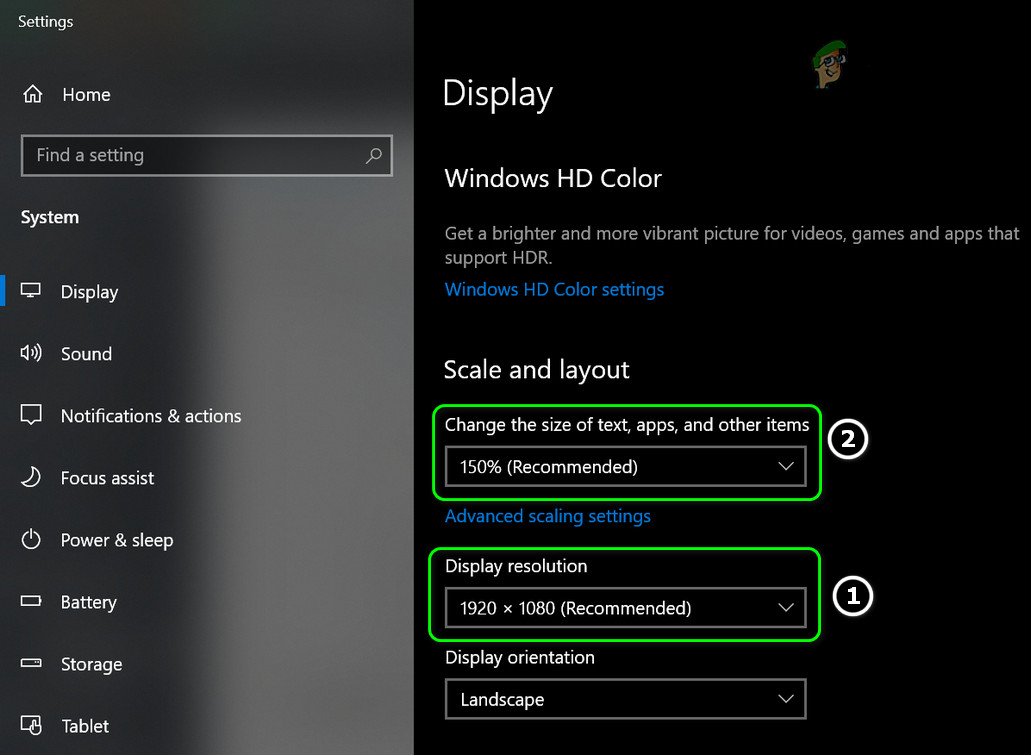
Run the desk.cpl Command to Open the Display Settings of Your System - Now change the Display Resolution and check if the issue is resolved.
- If not, then check if setting the Scale and Layout to 100% resolves the issue.

Change the Display Resolution and Scale & Layout
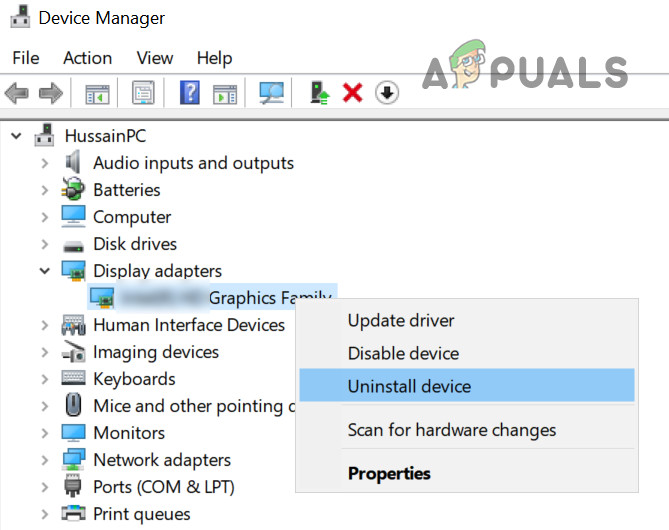
If the issue is resolved, then most probably the issue is caused by a corrupt display/video driver. In this context, reinstalling the display/video driver may solve the problem. Before moving on, make sure you have downloaded the latest display/video driver from the OEM website.
- Launch the Device Manager (step 3) and expand the Display Adapters.
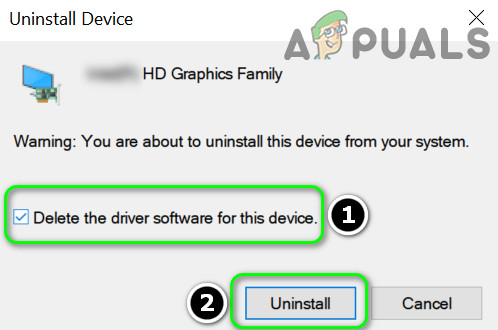
- Now, right-click on your display adapter and choose Uninstall Device.

Uninstall the Graphics Adapter - Then, check-mark the option of Delete the Driver Software for This Device and click Uninstall.

Delete the Driver Software for This Device for the Graphics Driver - Now, repeat the same to uninstall the video driver (under Sound, Video, and Game Controllers).
- After uninstalling the driver, reboot your PC and check if the Explorer issue is resolved (Windows will apply its default drivers).
- If not, then check if installing the latest display/video driver resolves the Explorer issue.
Solution 4: Disable App Readiness Service and Start Shell Infrastructure Host Process
Explorer might not work if any of the system services (App Readiness service is reported to cause the issue) is hindering the operation of GUI modules of the system. In this context, disabling the service may solve the problem. You can check the Event Viewer of your system to find out the problematic service.
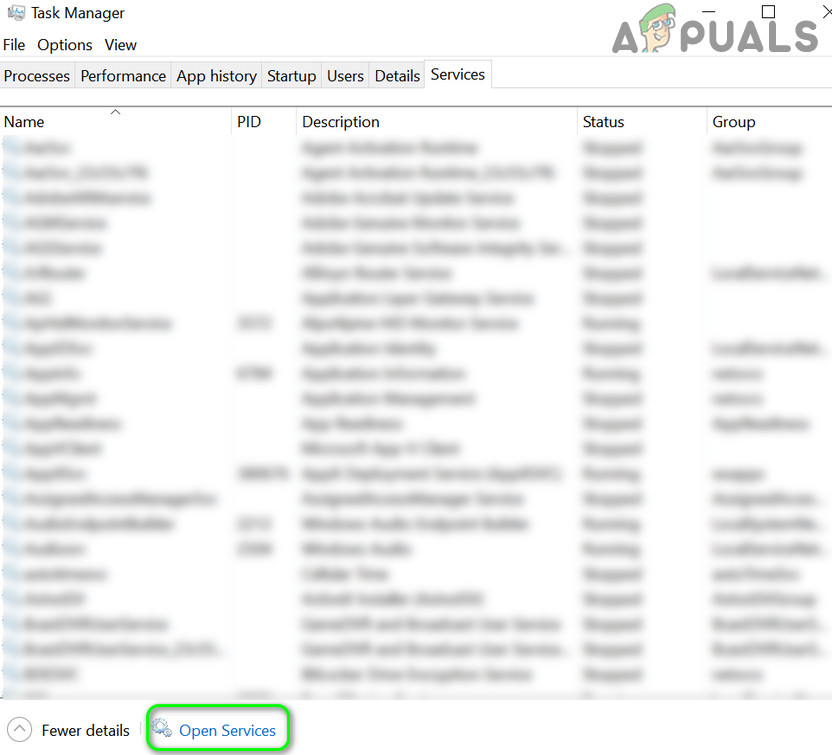
- Hit the Ctrl + Alt + Delete (or Ctrl + Shift + Esc) to bring out the Task Manager of your system.
- Now navigate to the Services tab and click on Open Services (near the bottom of the window).

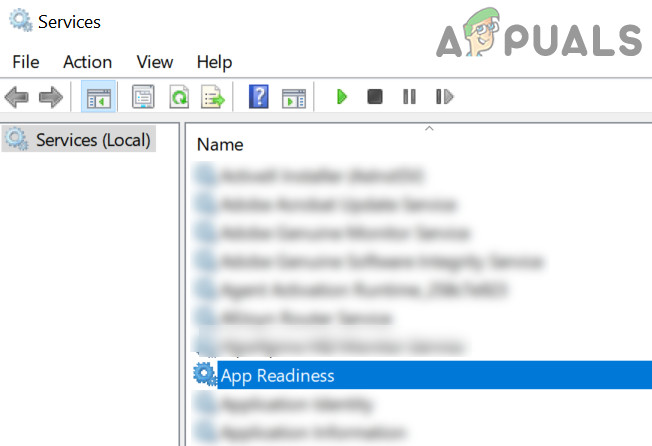
Open Services Through the System’s Task Manager - Then right-click on the App Readiness service and choose Properties.

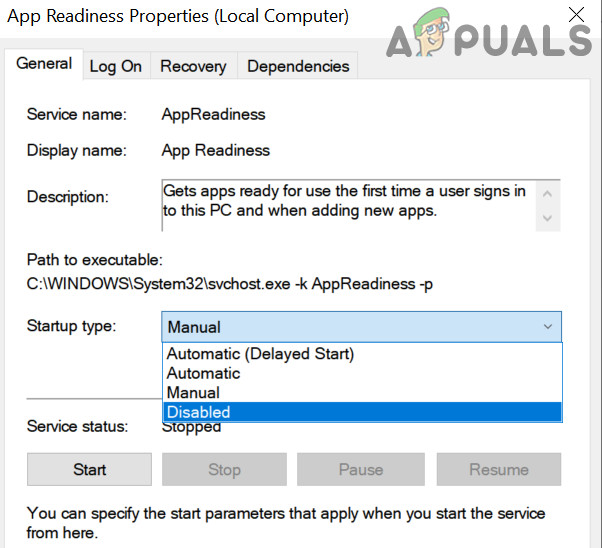
Open App Readiness Service - Now change the Startup type to Disabled and click on Apply/OK (keep in mind that disabling the App Readiness service may badly impact Microsoft Store and its apps along with future Windows updates).

Disable App Readiness Service - Then reboot your PC and check if the Explorer is working fine.
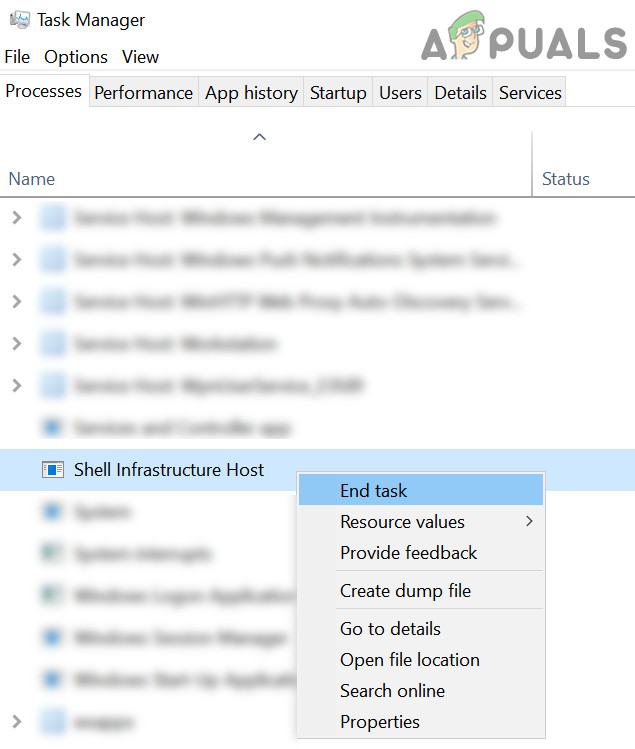
- If not, then open the Task Manager of your system (step 1) and in the processes tab, End Task of the Shell Infrastructure Host (it will automatically restart).

End Task of the Shell Infrastructure Host - If there is no Shell Infrastructure Host, then open the File menu of the Task Manager and select the Run New Task.
- Then type sihost.exe and click on the OK button.

Run New Task of sihost.exe - Now reboot your PC and check if the Explorer is working fine.

Solution 5: Create Another User Account
The File Explorer may not work if the user account is corrupt. In this scenario, creating another user account and using that account may solve the problem.
- Create a new user account (make sure to be an administrator account) and log out of the current user.
- Now login with the newly created user account and check if the Explorer issue is resolved.
If so, and you want to use the old user account, then check the permissions/ groups (in the Local Users and Groups tab in the Computer Management) of both the accounts and copy the permissions/groups from the working user account to the problematic account to check if that resolves the issue.
Solution 6: Clean Boot and Uninstall Conflicting Applications
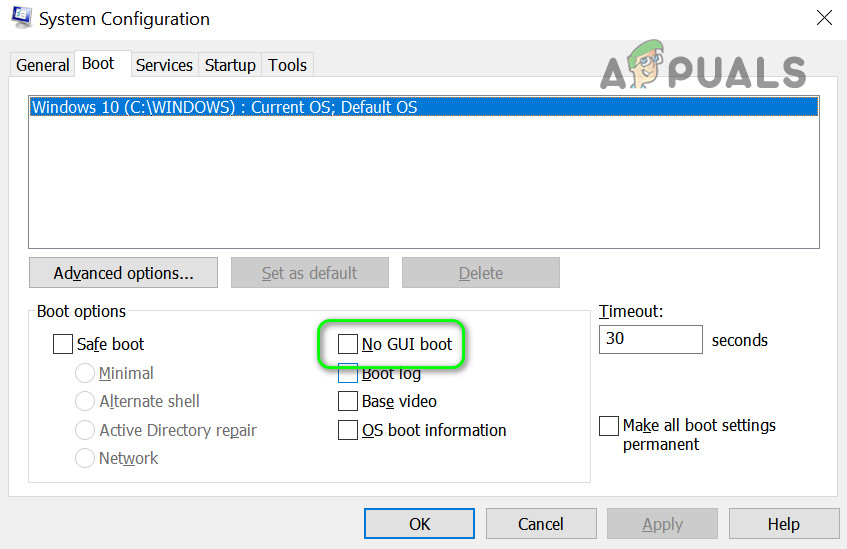
You may encounter the error at hand if any of the installed applications are interfering with the startup processes or Explorer.exe. In this context, clean booting your system and then disabling/uninstalling the conflicting applications may solve the problem. Before proceeding, make sure that No GUI is unchecked in the Boot tab of the System Configuration.
- Clean boot your system and then check if the Explorer issue is resolved. If not, then check if booting the system in the safe mode resolves the issue.
- If so, then enable the startup items one by one till you find the problematic one (you can check the Event Viewer of your system to find out the problematic application). Once found, either disable or reinstall the problematic application (you may have to use the Safe Mode). Users have reported that the following applications have caused the issue for them:
- OneDrive
- UXStyle
- 360 Extreme Browser
- Trend Micro Antivirus
- Open Office Quickstarter
- Dell SupportAssist
- Symantec SEP
- Classic Shell
- AVG Antivirus
You can also check which applications/processes are performing the maximum disk read/writes operation in the Task Manager and check if disabling/uninstalling that application solves the problem. If the issue is still there, then you can check if changing UEFI to legacy BIOS (or vice versa resolves) the issue.
Solution 7: Use the Registry Editor
If none of the solutions has worked for you, then some registry edits may let an affected user overcome the Explorer issue.
Warning: Proceed at your own risk as editing the system’s registry requires a certain level of expertise and if not done properly, you may cause non-recoverable damage to your system/data.
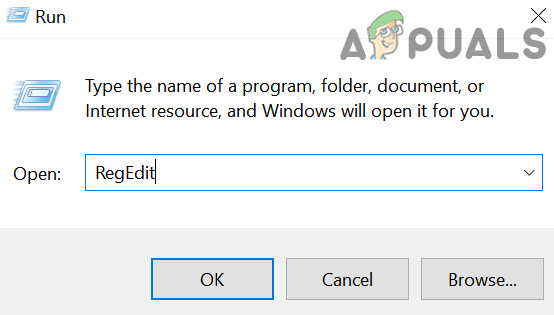
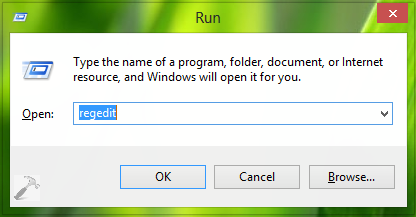
Firstly, you should create a backup of your system’s registry. Then launch the Run command box (by pressing the Windows + R keys) and enter “RegEdit”. Then press Ctrl + Shift + Enter keys to launch the Registry Editor as administrator and check if any of the following registry edits resolve your problem.
Set the Shell Key to Explorer.exe
- Navigate to the following:
Computer\HKEY_CURRENT_USER\SOFTWARE\Microsoft\Windows NT\CurrentVersion\Winlogon
- Then, in the right pane, double-click on the Shell key and set its value to the path of Explorer.exe. Usually, the path mentioned below (if the key is not there, then create a New > DWORD (32-bit) Value and set its name to Shell and set its value to the undermentioned path):
C:\Windows\explorer.exe

Set the Shell to the Explorer Path in HKCU - Now reboot your system and check if the Explorer issue is resolved.
- If not, then launch the Registry Editor and navigate to the following path:
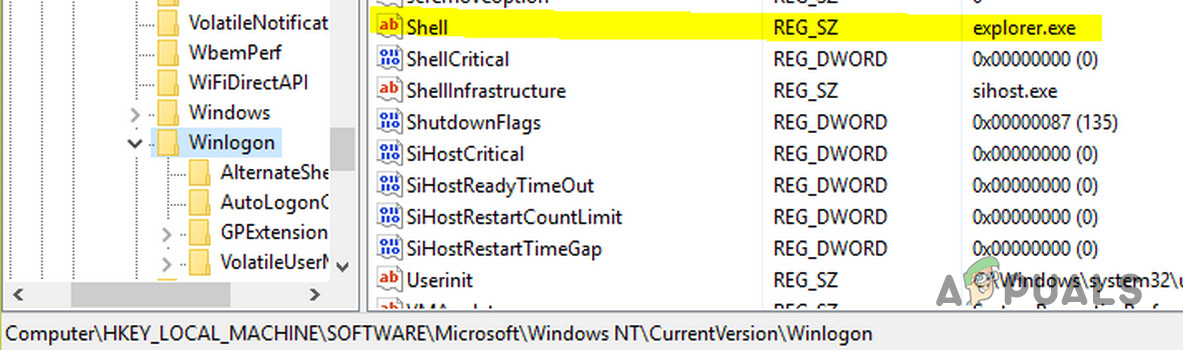
Computer\HKEY_LOCAL_MACHINE\SOFTWARE\Microsoft\Windows NT\CurrentVersion\Winlogon
- Now, in the right pane, make sure that the value of the Shell key is set to explorer.exe, and then reboot your PC to check if the Explorer issue is resolved.

Set the Shell Value to Explorer.exe in HKLM - If not, then launch the Registry Editor and navigate to the following:
Computer\HKEY_CURRENT_USER\SOFTWARE\Microsoft\Windows NT\CurrentVersion\Winlogon
- Now, in the right pane, delete the Shell key and reboot your system to check if the issue is resolved.
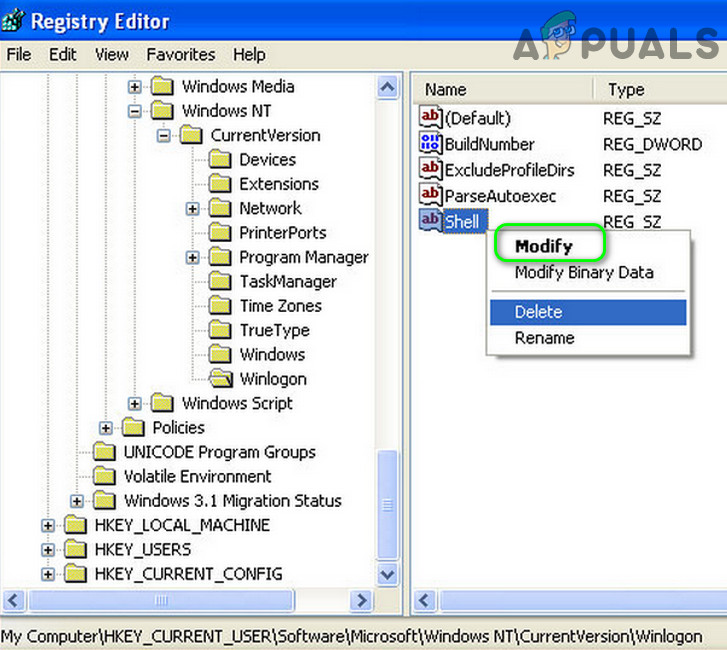
Delete the Explorer.exe Key
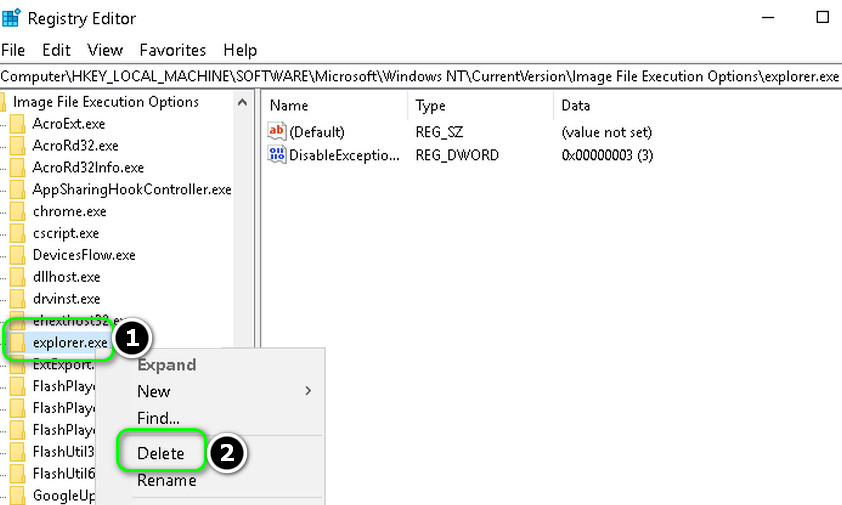
- Navigate to the following:
Computer\HKEY_LOCAL_MACHINE\SOFTWARE\Microsoft\Windows NT\CurrentVersion\Image File Execution Options
- Then, in the left pane, right-click on the Explorer.exe folder and select Delete.

Delete the Explorer.exe in the Image File Execution Options - Now confirm to delete the key and reboot your PC to check if the Explorer issue is resolved.
Delete the Load Key
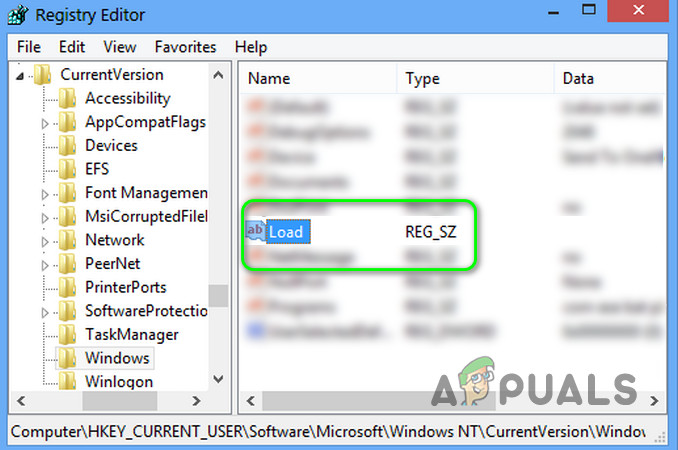
- Navigate to the following:
Computer\HKEY_CURRENT_USER\SOFTWARE\Microsoft\Windows NT\CurrentVersion\Windows
- Now, in the right pane, right-click on the Load key and select Delete.

Delete the Load Key in HKCU - Then confirm to delete the key and reboot your PC to check if the Explorer is working fine.
Use an Elevated Command Prompt to Add the Registry Keys
- If none of the registry edits resolved the issue, then execute the following one by one in an elevated Command Prompt:
reg add "HKLM\Software\Microsoft\Windows NT\CurrentVersion\Winlogon" /v "Shell" /t REG_SZ /d "explorer.exe" /f

reg add "HKLM\Software\Microsoft\Windows NT\CurrentVersion\Winlogon" /v "Userinit" /t REG_SZ /d "C:\Windows\System32\userinit.exe," /f

reg add "HKLM\Software\Wow6432Node\Microsoft\Windows NT\CurrentVersion\Winlogon" /v "Shell" /t REG_SZ /d "explorer.exe" /f

reg add "HKLM\System\CurrentControlSet\Control\Session Manager" /v "BootExecute" /t REG_MULTI_SZ /d "autocheck autochk *" /f

reg add "HKLM\System\CurrentControlSet\Control\Session Manager" /v "SETUPEXECUTE" /t REG_MULTI_SZ /d "" /f
- Then reboot your and check if the Explorer is working fine.
If the issue is still there, then check if adding the Explorer.exe (from the location of C:\Windows) to the Startup folder (%appdata%\Microsoft\Windows\Start Menu\Programs\Startup) resolves the issue. If not, then check if performing the repair install (or repair upgrade) of your system resolves the issue. If not, then you may have to Reset your PC or perform a clean installation of Windows.
Kevin Arrows
Kevin Arrows is a highly experienced and knowledgeable technology specialist with over a decade of industry experience. He holds a Microsoft Certified Technology Specialist (MCTS) certification and has a deep passion for staying up-to-date on the latest tech developments. Kevin has written extensively on a wide range of tech-related topics, showcasing his expertise and knowledge in areas such as software development, cybersecurity, and cloud computing. His contributions to the tech field have been widely recognized and respected by his peers, and he is highly regarded for his ability to explain complex technical concepts in a clear and concise manner.
Whenever we sign-in to Windows, usually the File Explorer starts itself automatically. In case we need to restart Explorer, we can do it with the help of Task Manager. The automatic start up of Explorer helps you to browse files and folders quickly. Now imagine if the system won’t find Explorer starting automatically, what will happen? This could be the issue with your system, where you find only the black screen after logon, having only the pointer in it. Recently, I came around this issue as experienced with Windows 8.1.
This trouble happens basically with the mess up of registries on the system. Initially, you can try the System File Checker (running SFC /SCANNOW command in the administrative Command Prompt) utility to fix it. Even if that helps, you can try the DISM commands mentioned here. If still that doesn’t works, this registry fix might help you:
FIX : Explorer.exe Not Running On Startup In Windows 10/8/7
Registry Disclaimer: The further steps will involve registry manipulation. Making mistakes while manipulating registry could affect your system adversely. So be careful while editing registry entries and create a System Restore point first.
1. Press + R and put regedit in Run dialog box to open Registry Editor (if you’re not familiar with Registry Editor, then click here). Click OK.
2. Navigate here:
HKEY_LOCAL_MACHINE\SOFTWARE\Microsoft\Windows NT\CurrentVersion\Winlogon
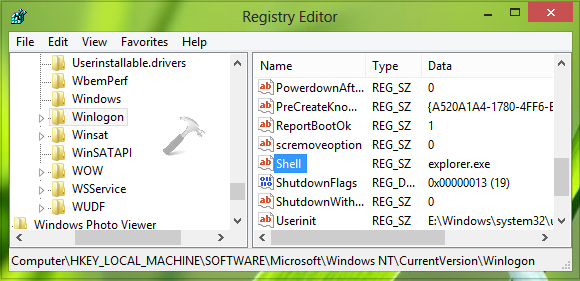
3. In the right pane of this location, look for the Shell named registry string (REG_SZ). All you need to make sure is that this string must have the Value data equals to explorer.exe. If you’re facing the issue, you might find different Value data, so restore it explorer.exe, which is the default value. It will significantly fix the issue. You may close the Registry Editor and reboot to verify.
Hope you find the fix useful!
UPDATE (16 DEC 2020): You can illustrate above fix with this video:
Related: File Explorer Not Working In Windows.