
Readers help support Windows Report. We may get a commission if you buy through our links.
Read our disclosure page to find out how can you help Windows Report sustain the editorial team. Read more
Moving files or folders, or even paragraphs and sentences around while working on your computer, is impossible when you can’t drag and drop in Windows 10.
If you’re experiencing issues and the drag and drop not working on Windows 10 issue happens on your computer, here are 12 quick fixes you can use to resolve it.
Why is drag and drop not working on Windows 10?
There are several potential reasons why drag and drop may need to be fixed on Windows 10. Some common causes include:
- Touchpad or mouse driver issues – If the touchpad or mouse driver is outdated or incompatible with Windows 10, drag and drop may not function properly. Updating or reinstalling the driver may resolve the issue.
- Corrupted system files – Drag and drop may not work if certain system files are missing or corrupted. Running the System File Checker (SFC) tool can help detect and fix any corrupted system files.
- Third-party software conflicts – Some third-party programs, such as antivirus or security software, can interfere with drag and drop. Temporarily disabling or uninstalling these programs may resolve the issue.
- Touchscreen issues – If you use a touchscreen device, drag and drop may only work properly if the touch screen is calibrated or the touch screen driver is updated.
- Incorrect settings – Drag and drop may be disabled or not configured correctly in the settings. Check the settings of the specific program or the operating system settings to ensure that drag and drop is enabled.
- Hardware problems – Hardware problems such as a malfunctioning touchpad or mouse can also cause drag and drop not to work. Replacing hardware such as a touchpad or mouse is the solution.
Now, let us examine some reliable solutions.
How can I fix drag and drop not working?
1. Run the DISM tool
- Click Start and type command, right-click the Command Prompt, and select Run as administrator.
- Type the script below and hit Enter.
Dism /Online /Cleanup-Image /ScanHealth - Lastly, type the repair script and hit Enter.
Dism /Online /Cleanup-Image /RestoreHealth
Once the repair is complete, reboot your computer and check if the problem persists, after which you can run an SFC scan as described in the next solution.
2. Run a System File Checker scan
- Click Start and type command, right-click the Command Prompt, and select Run as administrator.
- Type the script below and hit Enter.
sfc/scannow

- Restart your computer

3. Perform a Clean Boot
- Go to the search box, type msconfig, then select the System Configuration app.
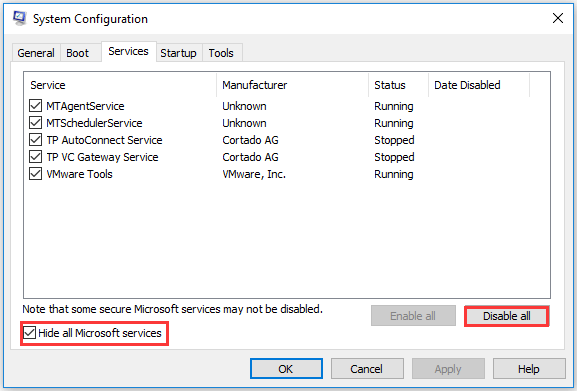
- Click the Services tab, tick Hide all Microsoft services, and click the Disable all button.

- Go to the Startup tab and click the Open Task Manager option.

- Close Task Manager, then click Ok
- Reboot your computer.


4. Install Windows Updates
- Click Start.
- Go to the search field box and type Updates.
- Lastly, click Check for Updates, and install all updates listed.
Windows will immediately detect your system’s configuration and download appropriate ones.
- Microsoft wants Windows 10 users to upgrade to Windows 11 or Copilot + PCs
- Deleting ‘inetpub’ folder lets hackers permanently stop Windows updates, Microsoft warns
5. Reset your PC
- Press Windows + I to open the Settings app.
- Click Update & Security.

- Click Recovery on the left pane, and under Reset this PC, click Get started.

- In the Choose an option screen, select the Keep my files option.

- Follow the Wizard to complete the reset.


6. Edit the registry
- Right-click Start and select Run.
- Type regedit, then hit Enter.
- Go to the path below:
Computer\HKEY_LOCAL_MACHINE\SOFTWARE\Microsoft\Windows\CurrentVersion\Policies\System - Right-click EnableLUA and select Modify.

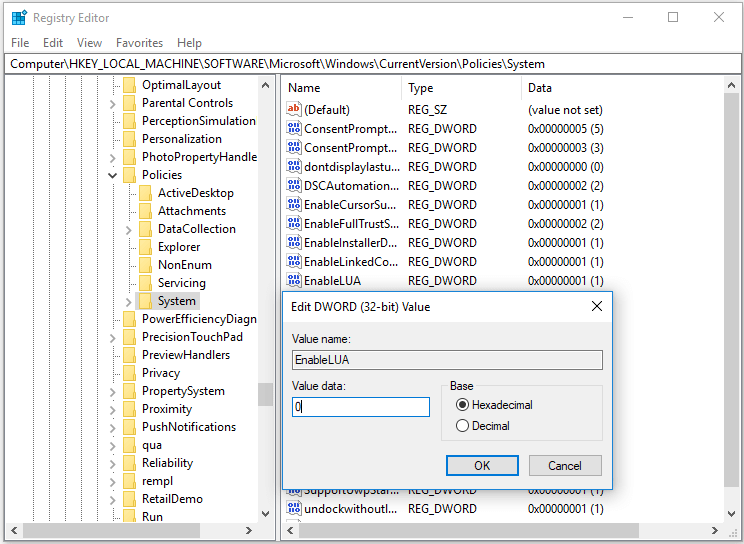
- Change the value from 1 to 0.
- Press OK. then restart your computer.


Check if, after the restart, the drag and drop not working on Windows 10 problem is gone. Try the next solution if you still can’t drag and drop in Windows 10.
7. Run Hardware and Devices troubleshooter
- Right-click Start and select Control Panel.
- Go to the View by option on the top right corner, click the drop-down arrow, and select Large icons.

- Click Troubleshooting.
- Select Hardware and Sound.
- Select Configure a Device.

- Click Next to run the troubleshooter


8. Uninstall and reinstall mouse drivers
- Right-click Start and select Device Manager.
- Expand Mice and other pointing devices to open the list, right-click the mouse device you want to remove, and click Uninstall driver.

- Click Yes when you get a confirmation message, then restart your computer.

9. Enable drag and drop using ESC key
- Open File Explorer or Windows Explorer by pressing Windows + E.
- Click any file, and long-press the left-click mouse button.
- Press the Esc key.
10. Restart Windows Explorer
- Press Crtl + Shift + Esc to open the Task Manager.
- Search for Windows Explorer from the list of processes.
- Right-click on it and select Restart.


The explorer will be restarted, and in about 2 seconds, your problem should be fixed.
These simple tweaks have managed to fix the drag-and-drop feature for some of your readers, so you should try it also.
Other users reported that the program freezing caused this issue, and when they closed it, things went back to normal, so make sure you don’t have any stuck software.
If the Windows 11 drag and drop not working issue arises too, we have yet another guide to help you out.
Did any of these tips help you fix the drag and drop not working on Windows 10 problem? Let us know in the comments section below.
Milan Stanojevic
Windows Toubleshooting Expert
Milan has been enthusiastic about technology ever since his childhood days, and this led him to take interest in all PC-related technologies. He’s a PC enthusiast and he spends most of his time learning about computers and technology.
Before joining WindowsReport, he worked as a front-end web developer. Now, he’s one of the Troubleshooting experts in our worldwide team, specializing in Windows errors & software issues.
Drag and Drop feature brings great convenience. But if the drag and drop are not working, what can you do? Do you know how to fix this problem? This post shows how to fix the drag and drop not working Windows 10 issue. In addition, after solving this problem, you can use MiniTool software to back up the computer so as to avoid encounter more server problems.
4 Solutions to Drag and Drop Not Working Windows 10
The drag and drop feature of Windows 10 is used to move or copy files and folders and it brings great convenience for users. However, some users complain that sometimes the drag and drop features fail to work and they can’t drag and drop files or folder directly.
Thus, they asked how to solve the drag and drop not working Windows 10 issue. Here, if you have the same trouble, you come to the right place. This post will show you the solutions to this problem.
Solution 1. Run the Esc Key
To begin with, we will show you the first solution to the Windows 10 drag and drop not working. In most situations, the issue drag and drop not working Windows 10 may be caused by the previous drag and drop operation getting stuck in the windows memory due to interface from another program or service.
So, in order to fix the Windows 10 drag and drop not working issue, you can try canceling the interface. Thus, just left-click the file or folder you want to drag and press the Esc key on your keyboard.
After that, you can check whether the issue drag and drop not working Windows 7/8/10 is solved.
Solution 2. Perform a Clean Boot
Here, we will show you the second solution to the issue cannot drag and drop Windows 10, you can try to perform a clean boot to fix this problem.
Now, we will show you how to perform a clean boot to solve this problem.
Step 1: Press Windows key and R key together to open Run dialog.
Step 2: In the popup window, type the msconfig in the box and click OK to continue.
Step 3: In the System Configuration window, please go to the Service tab.
Step 4: Then check the option Hide all Microsoft service and click Disable all.
Step 5: Then go to Startup tab and click Open Task Manager to continue.
Step 6: On the Startup tab in Task Manager window, select the item and click Disable.
Step 7: Then close the Task Manager window.
Step 8: Returning the System Configuration window, click Apply and OK to continue.
Then reboot your computer and check whether the issue drag and drop not working Windows 10 is solved.
Solution 3. Disable UAC
Now, we will demonstrate the third method to the issue Windows 10 drag and drop not working. In this way, you can try disabling UAC.
Step 1: Press Windows key and R key together to open Run dialog.
Step 2: Type the regedit in the box and click OK to continue.
Step 3: In the Registry Editor window, navigate to the following folder.
HKEY_LOCAL_MACHINE\SOFTWARE\Microsoft\Windows\CurrentVersion\Policies\System
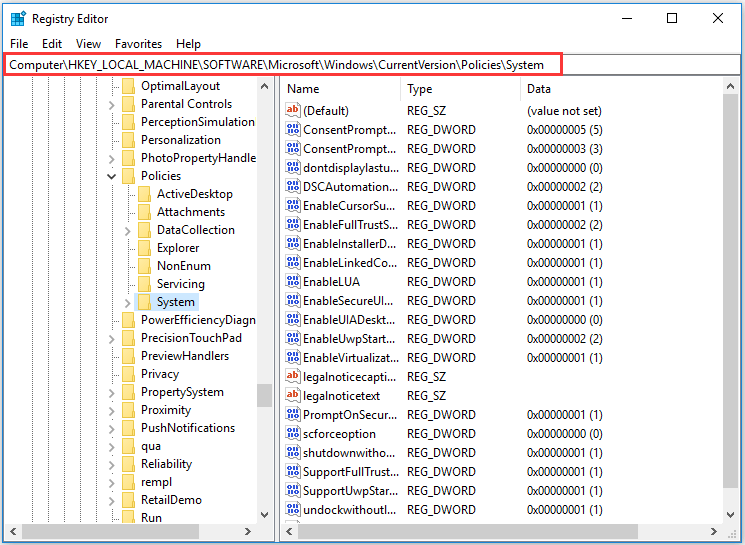
Step 4: Then select the EnableLUA and double-click it. Then change its value data to 0.
When you have finished all steps, close the Registry Editor window and reboot your computer to take effect. Then check whether the issue drag and drop not working Windows 10 is solved.
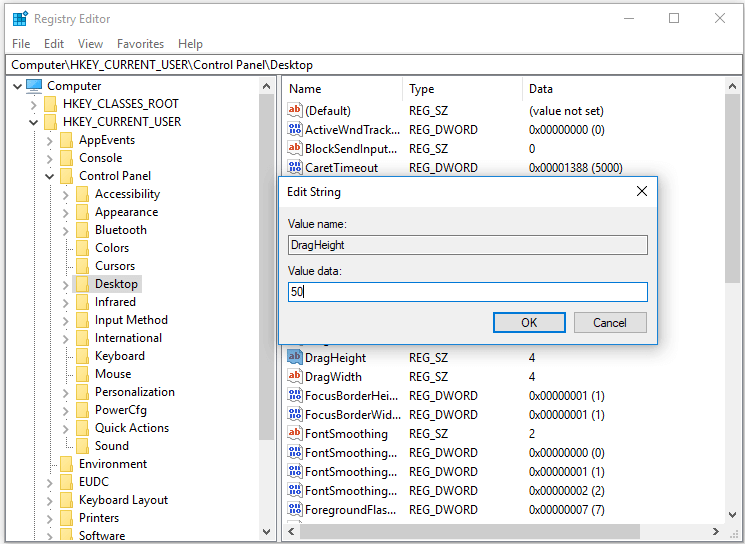
Solution 4. Change Drag Height and Width
At last, we will show you the last solution to drag and drop not working Windows 7. In this way, you can try changing drag height and width. Now, follow the instruction to continue.
Step 1: In this way, you also need to open the Registry Editor window again. So, for the detailed instruction, please refer to the steps listed above.
Step 2: Then in the registry window, please navigate to the following folder.
HKEY_CURRENT_USER\Control Panel\Desktop
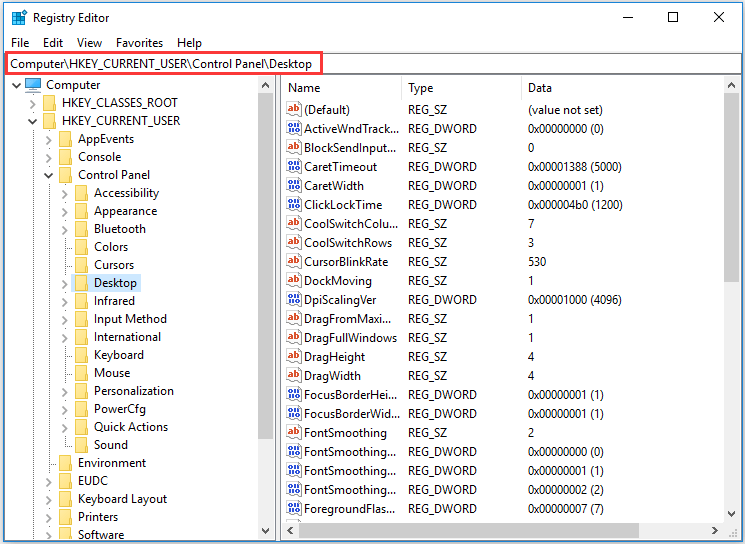
Step 3: On the right pane, select the DragHeight and DragWidth, then double-click them to change their value data to a very high number. Then click OK to continue.
When all steps are finished, you can reboot your computer to check whether the drag and drop not working Windows 10 issue is solved.
All in all, this post introduced 4 methods to drag and drop not working Windows 7. If you encounter the same issue, try these ways. Of course, you can also try running System File Checker or DISM tool to fix this issue.
Quickly Fix – SFC Scannow Not Working (Focus on 2 Cases)
If you are a lot of files or files to copy or move, there is an easier way for you. You can choose to clone the whole hard drive or partition. In addition, you can also clone the OS to another hard drive.
Final Words
To sum up, this post has shown how to fix drag and drop problems Windows 7/8/10 with 4 different solutions. If you encounter the same issue, try these ways.
There could be a few reasons why you can’t drag and drop windows in Windows 10. One reason could be that your computer’s security settings are preventing you from doing so. Another reason could be that you don’t have the appropriate permissions to drag and drop windows. If you’re having trouble drag and dropping windows, here are a few things you can try:
1. Check your computer’s security settings.
2. Make sure you have the appropriate permissions.
3. Try restarting your computer.
4. Update your drivers.
Why is my drag and drop not working?
Can’t move files drag and drop?
There are a few potential reasons why you might not be able to move files via drag and drop. First, make sure that you’re logged in with an account that has the appropriate permissions to modify files in the target location. If you’re still having trouble, try restarting your computer. If that doesn’t work, there may be something wrong with the file permissions on the target location. You can check this by opening the target location in File Explorer and selecting «Properties» from the context menu. Then, go to the «Security» tab and check the permissions that are set for your account.
How do I enable drag in Windows 10?
There are a few different ways to enable drag in Windows 10. One way is to go to the Start menu and search for «drag.» This will bring up a list of options, one of which will be «Enable drag.» Another way is to go to the Control Panel and search for «drag.» This will also bring up a list of options, one of which will be «Enable drag.«
How do I enable drag and drop in Windows?
To enable drag and drop in Windows, first make sure that the option is enabled in your settings. To do this, go to Start > Settings > System > Drag and Drop. Then, enable the option and try dragging and dropping files again. If you still can’t drag and drop, try restarting your computer.
How do I change drag and drop settings?
There is no one-size-fits-all answer to this question, as the drag and drop settings will vary depending on the specific software or operating system you are using. However, in general, you can usually change drag and drop settings by accessing the ‘Preferences’ or ‘Settings’ menu of the relevant program. From here, you should be able to find the options for configuring drag and drop behavior.
How do I change the default drag and drop action in Windows 10?
To change the default drag and drop action in Windows 10, you will need to change the default file manager. This can be done by opening the File Explorer, clicking on the View tab, and then selecting the Options button. From here, you will need to click on the Change folder and search options link. Once the Folder Options window opens, you will need to select the General tab and then change the default file manager under the Advanced settings section.
How do I enable drag and drop in windows?
There are a few different ways to enable drag and drop in windows. One way is to open the control panel and go to the «mouse» settings. From there, you can enable drag and drop by checking the box next to «enable drag and drop.» Another way to enable drag and drop is to hold down the left mouse button and then press the «e» key. This will enable drag and drop for the current window.
Why can’t I drag icons on my desktop?
There could be a few reasons why you are unable to drag icons on your desktop. One reason could be that your desktop is set to «auto-arrange«. To check if this is the case, right-click on your desktop and select «view«. If «auto-arrange» is checked, uncheck it and try dragging your icons again.
Another reason could be that you do not have administrator privileges. In order to be able to drag icons on your desktop, you will need to be an administrator on your computer. If you are not an administrator, you can contact your IT department to have them give you the appropriate permissions.
If you are still unable to drag icons on your desktop, there could be an issue with your operating system. You can try restarting your computer to see if that resolves the issue. If you are still having problems, you can contact your computer’s manufacturer for further troubleshooting assistance.
How do I enable drag and drop to the taskbar in Windows 11?
There is no drag and drop to the taskbar in Windows 11.
How do I drag and drop on a laptop Windows 10 without a mouse?
There are a few different ways that you can drag and drop on a laptop without a mouse. One way is to use the trackpad. To do this, simply place your finger on the item you want to move and then drag it to the desired location. Another way is to use the keyboard. To do this, press and hold the Alt key, then use the arrow keys to move the item to the desired location.
How do I drag and drop files?
There are a few different ways to drag and drop files, depending on what you’re trying to do.
To move a file from one location to another on your computer, simply click and hold on the file, then drag it to the desired location. You can also select multiple files by holding down the Shift or Command key while clicking on the files you want to select, then drag and drop them all at once.
To copy a file, click and hold on the file while pressing the Option key, then drag and drop the file to the desired location.
To create a shortcut to a file, click and hold on the file while pressing the Command key, then drag and drop the file to the desired location.
How do you drag and drop?
There are a few different ways to drag and drop, depending on what you’re trying to do.
To move an object:
1. Click and hold on the object you want to move.
2. Drag the object to the desired location.
3. Release the mouse button to drop the object.
To copy an object:
1. Click and hold on the object you want to copy.
2. While holding down the mouse button, press and hold down the Ctrl key (Windows) or the Option key (Mac).
3. Drag the object to the desired location.
4. Release the mouse button and the Ctrl/Option key to drop the object.
To create a shortcut:
1. Click and hold on the object you want to create a shortcut to.
2. Drag the object to the desired location.
3. While still holding down the mouse button, press and hold down the Shift key.
4. Release the mouse button and the Shift key to drop the object and create the shortcut.
Все способы:
- Способ 1: Перезапуск «Проводника»
- Способ 2: Исправление неполадок с ПО мыши
- Способ 3: Отключение UAC
- Способ 4: Проверка на вирусы
- Способ 5: Выполнение чистой загрузки
- Способ 6: Сброс вида папок
- Способ 7: Редактирование реестра
- Способ 8: Удаление программ для персонализации
- Способ 9: Решение аппаратных неисправностей
- Способ 10: Включение залипания мыши
- Вопросы и ответы: 0
Способ 1: Перезапуск «Проводника»
Чаще всего проблема с перетаскиванием связана со сбоем в работе встроенного «Проводника». Устранить неполадку можно перезапуском встроенного файлового менеджера:
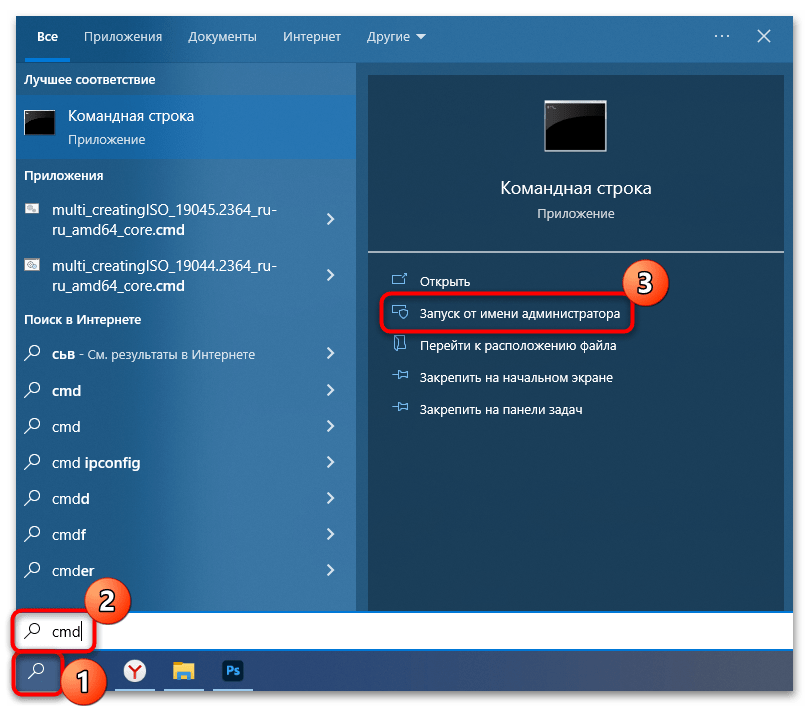
- Запустите «Командную строку» с расширенными правами. Нажмите на иконку поиска на нижней панели или используйте клавиши «Win + S», затем введите
cmdи выберите в окне правее пункт «Запуск от имени администратора». - В консоли введите
taskkill /F /IM explorer.exe & start explorer, затем нажмите на «Enter».
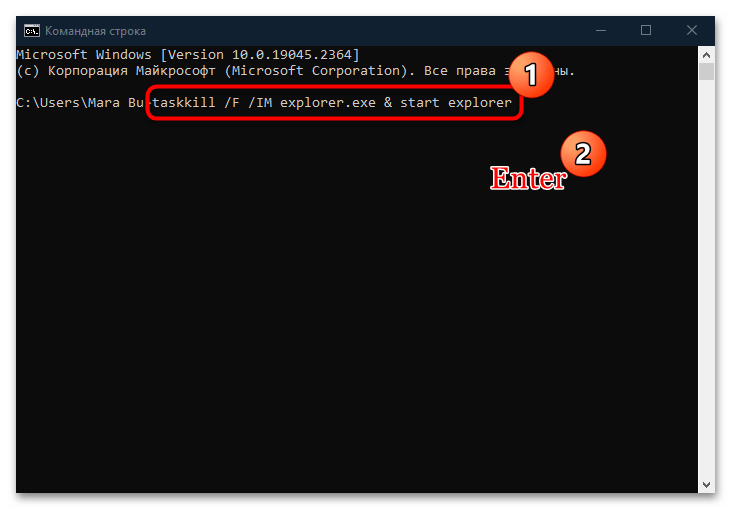
После этого «Проводник» перезапустится, и ошибка может решиться. Попробуйте перетащить файл мышкой, чтобы проверить, исправлена ли неполадка.
Способ 2: Исправление неполадок с ПО мыши
Сбои в работе указывающего устройства нередко вызваны поврежденным программным обеспечением, поэтому в этих случаях может помочь исправление проблем именно с софтом. Стоит отметить, что обладателям игровых девайсов вряд ли понадобится переустанавливать фирменное приложение для тонкой настройки, поскольку оно почти никогда не оказывается виноватым. Как правило, виновата оказывается базовая версия драйвера, которая устанавливается самой Microsoft или при первом подключении мыши. Ее-то и нужно обновить/переустановить. Рассмотрим все по порядку.
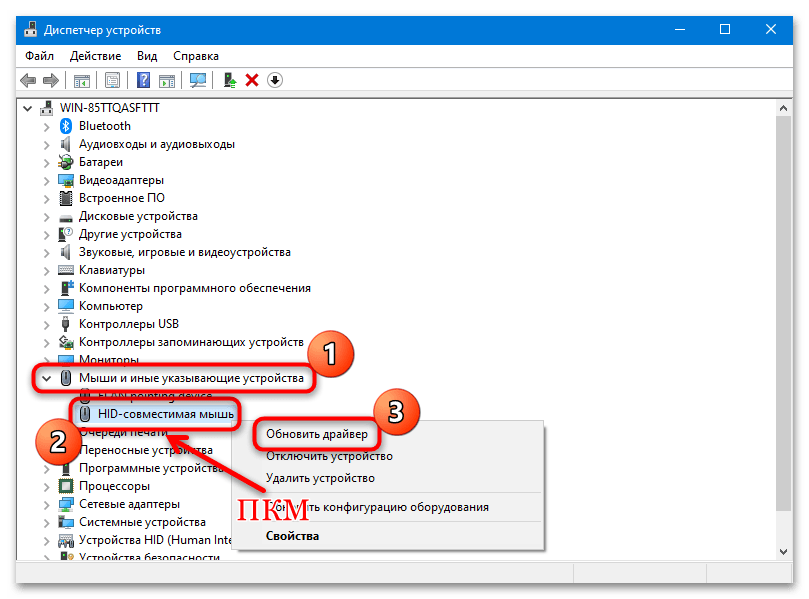
- Кликните правой кнопкой мыши по значку «Пуск» и выберите из отобразившегося меню пункт «Диспетчер устройств».
- Разверните меню «Мыши и иные указывающие устройства». Если рядом с названием оборудования есть значок в виде восклицательного знака, значит, его драйвер нуждается в обновлении. Кликните по устройству правой кнопкой мыши и выберите соответствующий пункт.
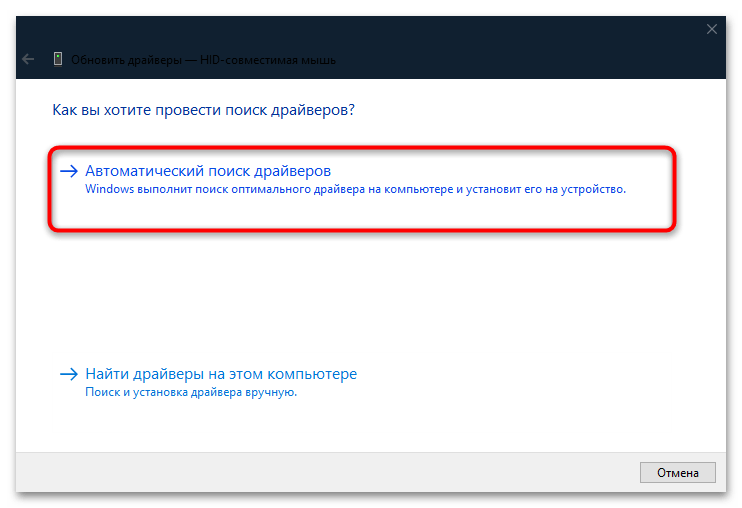
- В новом окне укажите один из вариантов поиска актуального ПО. Можно использовать автоматический, при котором необходимый софт система будет искать на официальных серверах Microsoft или фирмы-изготовителя.
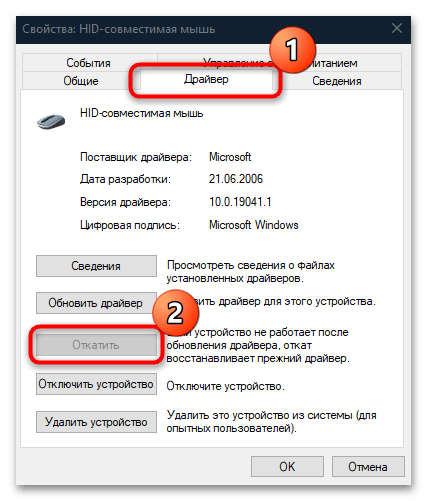
В некоторых случаях оказывается действеннным откат состояния версии программного обеспечения до предыдущего, особенно если при обновлении возникла ошибка. Кликните два раза ЛКМ по названию, чтобы перейти в окно со свойствами. Нажмите на вкладку «Драйвер», затем на кнопку «Откатить». Но вариант не всегда работает, поскольку возможность отката доступна не всегда.
Чаще всего потребуется полностью удалить драйвер мыши, затем заново его установить. Это автоматическая процедура, однако требующая при этом перезагрузки компьютера. Суть заключается в том, что через «Диспетчер задач» и контекстное меню мыши вы выбираете пункт «Удалить устройство», перезагружаете ПК, и во время создания нового сеанса Windows автоматически устанавливает драйвер. Дополнительно можно отсоединить мышь и подсоединить ее при включении компьютера.
Если у вас больше нет никаких указывающих устройств (тачпада или второй мышки), можете ознакомиться с тем, как управлять компьютером с помощью клавиатуры, чтобы перезагрузить его, перейдя по ссылке ниже.
Подробнее: Работаем на компьютере без мыши
Способ 3: Отключение UAC
Иногда функция контроля учетных записей, или UAC, вызывает проблему с перетаскиванием файлов, потому что может посчитать такое действие подозрительным. Чтобы проверить, в этом ли проблема, попробуйте отключить функцию. В Windows 10 делается это через классическую «Панель управления» и посредством редактирования системного реестра. Об этом более детально мы писали в нашей отдельной инструкции.
Подробнее: Отключение UAC в Windows 10

Способ 4: Проверка на вирусы
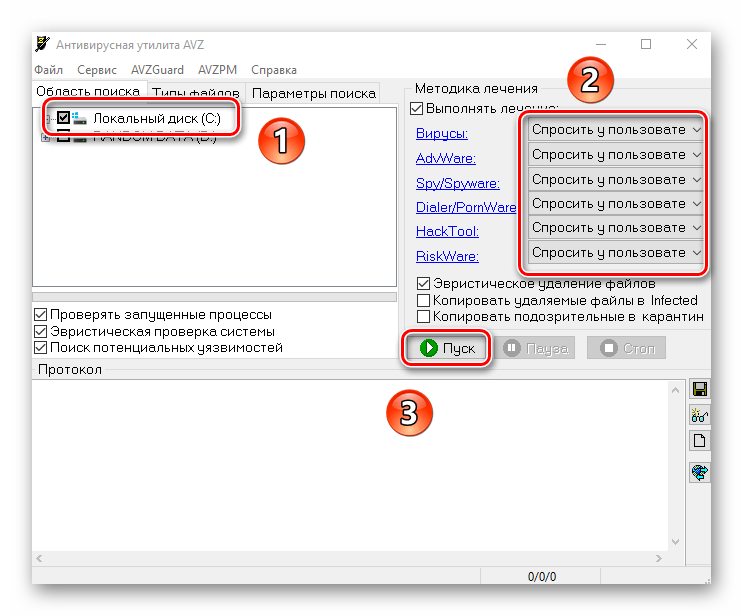
Некоторые сбои и неправильное функционирование оборудования нередко связаны с деятельностью вирусного ПО, которое попало на компьютер и получило доступ к пользовательским и системным файлам. Проверьте Windows 10 на наличие вредоносных утилит, используя встроенные возможности системы или специализированный софт. Читайте о способах сканирования у нас на сайте.
Подробнее: Методы удаления вируса с компьютера под управлением Windows 10
Способ 5: Выполнение чистой загрузки
Бывает так, что сторонние службы или установленные программы могут вмешиваться в работу подключенного оборудования, в том числе периферии. Сбойный софт вы можете в любой момент удалить, если догадываетесь, из-за чего могла произойти неполадка. Проверить и узнать наверняка, есть ли программный конфликт, можно, выполнив чистую загрузку Windows 10:
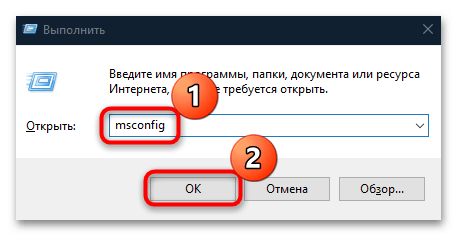
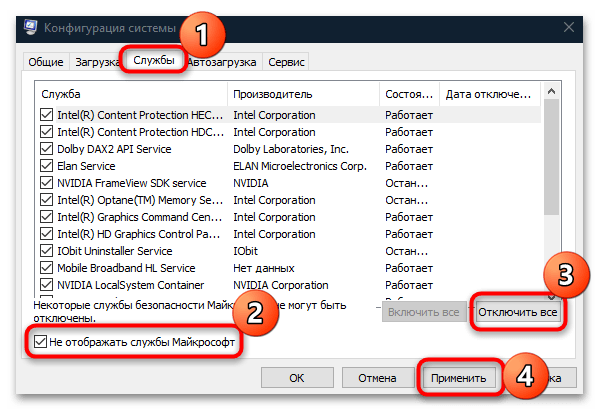
- Откройте утилиту «Конфигурация системы», нажав на клавиши «Win + R» и выполнив команду
msconfigв окне «Выполнить». - Перейдите на вкладку «Службы». Здесь отобразится список всех активных служб, как встроенных, так и сторонних, которые связаны с установленными программами, но при этом работают в фоновом режиме. Чтобы не навредить системе, лучше не трогать службы Майкрософт – чтобы исключить их из списка, отметьте галочкой соответствующий пункт внизу. Остальные можно убрать, нажав на кнопку «Отключить все». Примените настройки.
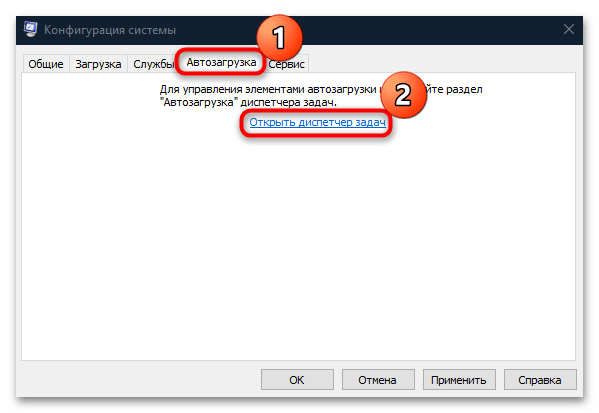
- Далее нажмите на вкладку с автозагрузкой и оттуда осуществите переход в интерфейс встроенного «Диспетчера задач».
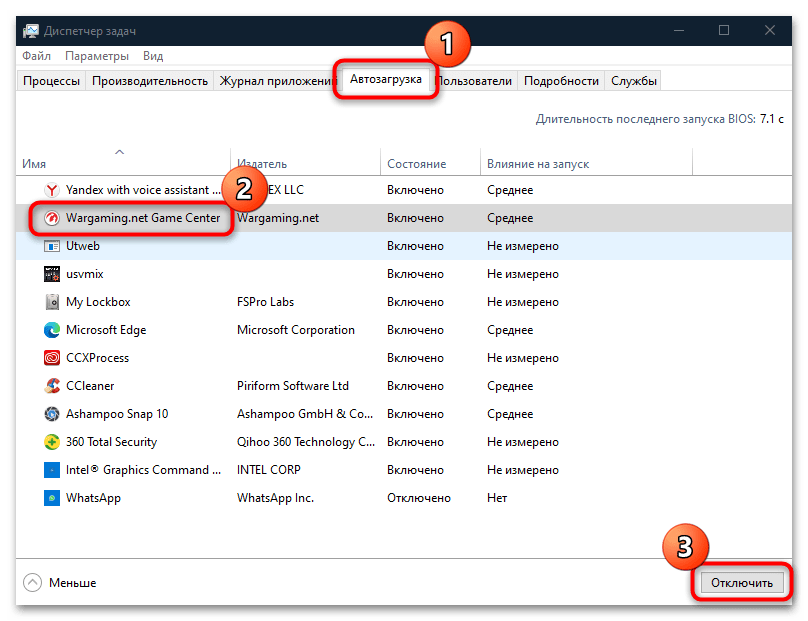
- Отключите элементы автозагрузки – софта, который автоматически запускается, когда вы включаете компьютер.
После проделанных манипуляций нужно перезагрузить систему, а затем проверить, пропала ли проблема. Если да, то придется искать сбойный софт и деинсталлировать его.
Читайте также: Удаление программ в Windows 10
Иногда может помочь откат состояния системы до предыдущего, то есть до того момента, когда были установлены различные программы, которые могут конфликтовать с периферией. В этом случае они полностью будут деинсталлированы вместе с остаточными файлами. Это актуально, если проблема с перетаскиванием появилась недавно.
Читайте также: Откат к точке восстановления в Windows 10
Способ 6: Сброс вида папок
Попробуйте сбросить вид папок в «Проводнике» к заводским, поскольку изредка именно это способствует устранению неполадки. Эта проблема связана со Способом 1 и актуальна, когда простой перезапуск системного файлового менеджера не приносит результата:
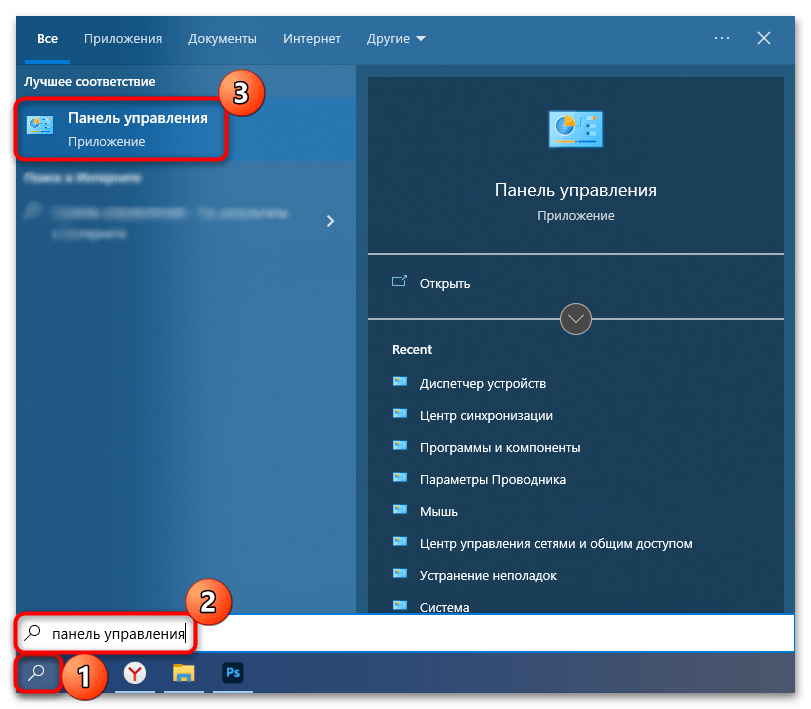
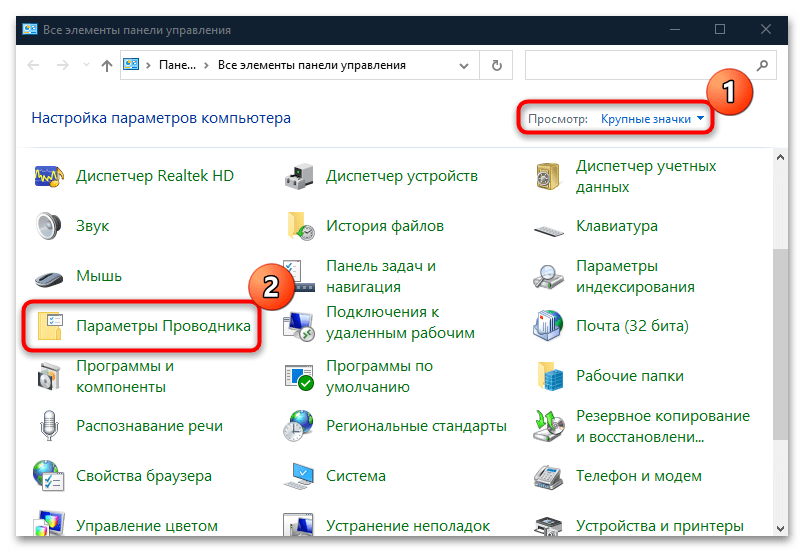
- Запустите «Панель управления», отыскав средство через системный поиск.
- Нажмите на выпадающий список у пункта «Просмотр» и выберите отображение разделов как крупные значки. Откройте «Параметры Проводника».
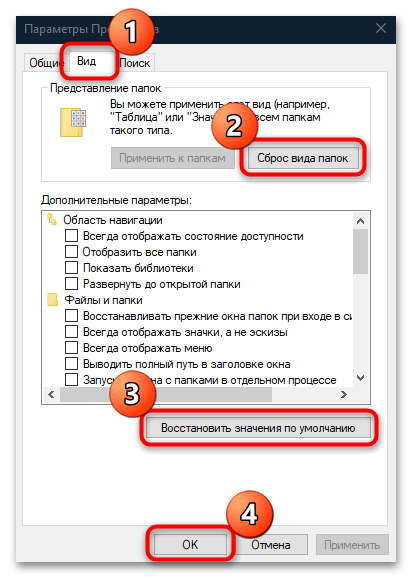
- В новом окне перейдите на вкладку «Вид», кликните по кнопке «Сброс вида папок», затем по «Восстановить значения по умолчанию». Нажмите на «ОК», чтобы подтвердить настройку.
Способ 7: Редактирование реестра
В системе реализованы настройки перетаскивания, которые могут сбоить — к примеру, это касается параметров масштаба захвата. Дело в том, что Windows может посчитать, что захвачена слишком маленькая область экрана, отчего перетаскивание не срабатывает. Проверить и вернуть при необходимости настройки масштаба можно только через «Редактор реестра».
Прежде чем вносить настройки в системном реестре, создайте точку восстановления, чтобы была возможность вернуть состояние «десятки» к прежнему в случае непредвиденных обстоятельств после редактирования.
Читайте также: Инструкция по созданию точки восстановления Windows 10
- Одновременно зажмите клавиши «Win + R» и впишите команду
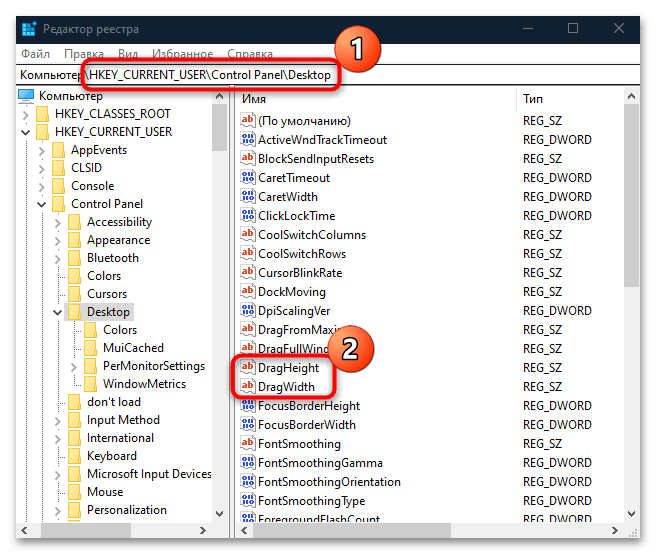
regedit, затем нажмите на «ОК» для перехода в «Редактор реестра». - Перейдите по пути
HKEY_CURRENT_USER\Control Panel\Desktop, вставив адрес в адресную строку или развернув соответствующие ветки на панели слева. В центральной части окна найдите параметры «DragHeight» и «DragWidth», отвечающие за высоту и ширину масштаба соответственно. Поочередно измените у них значения, дважды кликнув по названию. - В новом окне задайте новые параметры, допустим сначала «15». Причем в каждом из них.


После редактирования реестра перезагрузите компьютер и проверьте, работает ли перетаскивание. Если нет, вернитесь к тем же окнам и попробуйте увеличить значение параметров, например до 20, и так далее, пока функция не начнет корректно функционировать.
Способ 8: Удаление программ для персонализации
Определенные программы, позволяющие изменять внешний вид интерфейса операционки, могут повлиять на работу некоторых устройств. Например, из-за стороннего вмешательства в персонализацию перестанет корректно работать мышка. Отключите работу такого софта, а если это невозможно, то удалите его. Вероятно, после этого перетаскивание курсором вновь заработает.
Способ 9: Решение аппаратных неисправностей
Если ни один способ не сработал, все дело может быть в аппаратной неисправности самого устройства или USB-порта, через который оно подключается. Попробуйте вставить оборудование в другой разъем и проверить его работоспособность.
Вероятно, причина неработающего порта носит программный характер, поэтому некоторые из проблем можно решить самостоятельно.
Читайте также:
Включаем USB-порты в BIOS
Скачиваем драйверы для USB-портов
Также все дело может быть в мыши. Если есть возможность, в целях проверки используйте другое указывающее устройство.
Способ 10: Включение залипания мыши
Следующий способ не универсален и пригодится, если нужно именно сейчас перетащить файл с помощью мыши. Сама по себе рекомендация не является решением проблемы, а лишь предполагает альтернативный временный вариант. Вам нужно включить функцию залипания мыши на время, благодаря чему перетаскивание будет происходить не удержанием левой кнопки мыши, а только кликом:
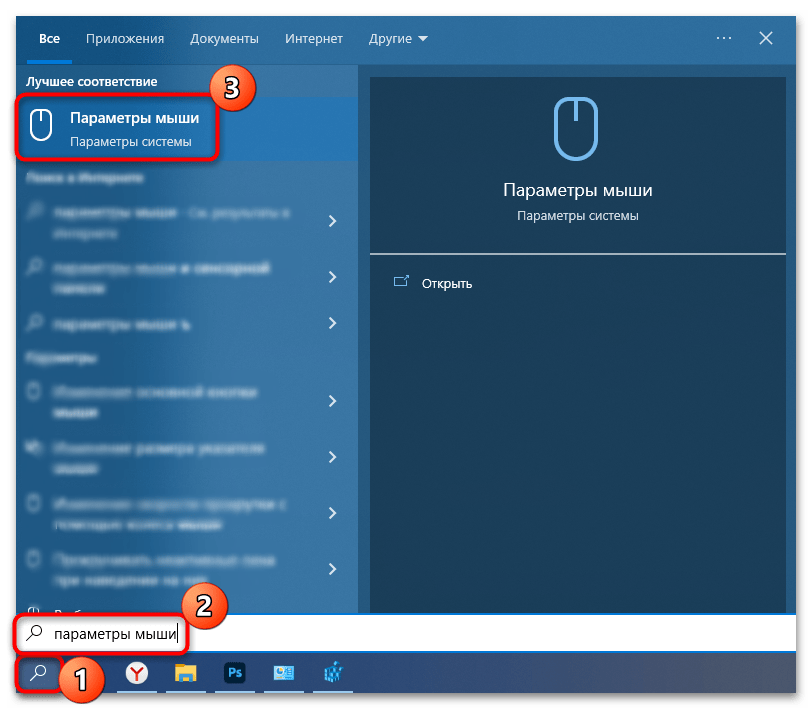
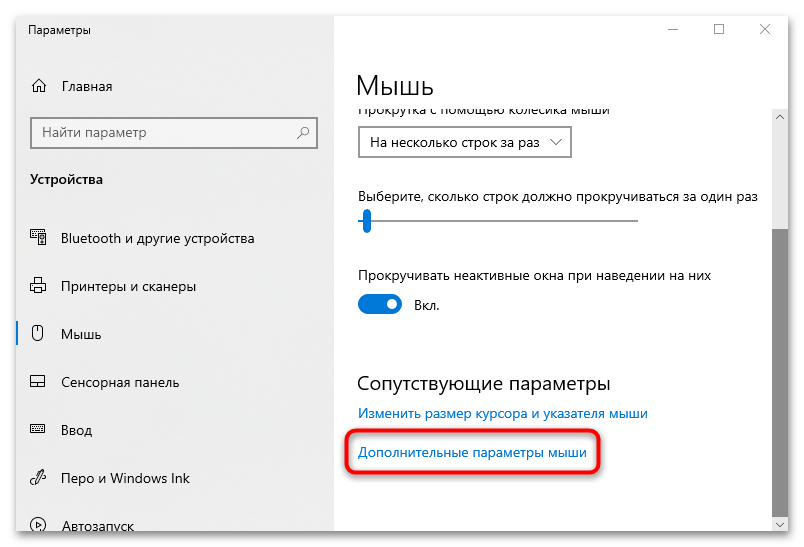
- Через поисковую строку найдите раздел «Параметров» — «Параметры мыши».
- В новом окне кликните по строке «Дополнительные параметры мыши».
- На вкладке «Кнопки мыши» отметьте пункт «Включить залипание» внизу. Примените настройки.
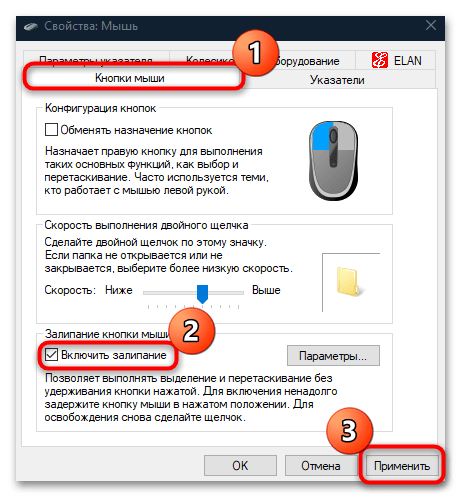
На то время, пока функция активна, будет работать перетаскивание одним нажатием. В любой момент можно вернуть прежние настройки, убрав галочку у соответствующего пункта и нажав на кнопку «Применить».
Наша группа в TelegramПолезные советы и помощь
Let’s agree with the fact that drag and drop feature is very useful as it offers great convenience while we are working on our PC. This amazing feature helps in moving or copying various folders and files, hence offering easy productivity.

However it has been seen if you are using outdated Windows, the feature of drag and drop may not work. But we have some amazing ways by which you can solve this stubborn situation of Windows drag and drop is not working.
Solve this Windows drag and drop is not working
Method 1- Check Windows Updates
Starting with the basic solution is always best because they save your time and resolutions are quicker. Hence in this method, we will check for Windows updated through the below steps.
- Press Win key I to launch Windows Settings.
- Here tap on Update & Security

- As you can see in the above there is an option that says to check updates, tap on it to proceed further.
- Windows will automatically search the updates and start downloading the newer Windows 10 update.
- Once this method is completed, restart your system and check the issue of “drag and drop is not working” is solved or not.
I hope this easiest method could solve this problem, if not jump to the next fix.
Method 2- Run DISM Tool
Deployment Image Servicing and Management is a command line that is used to fix Windows error or other damaged system files. In this method, we will execute the DISM command line in the command box.
- Search CMD in the Cortana search and run it as administrator.
- Enter “Dism /Online /Cleanup-Image /ScanHealth” and then “Dism /Online /Cleanup-Image /RestoreHealth” in the command prompt.

- Let the procedure complete and wait for few seconds till you restart your system.
Reboot your system and check drag and drop is not working or now this feature starts working correctly. If this method doesn’t help much, follow the next step.
Method 3- Disable UAC
This method is to be performed in the registry editor and to launch this feature follow the below steps:
- Launch the run box by pressing the win key and R together.
- Enter Regedit as shown in the below image.
- Follow the below-mentioned path
“HKEY_LOCAL_MACHINE\SOFTWARE\Microsoft\Windows\CurrentVersion\Policies\System”

As you can see on the right-side pane there is an option of EnableLUA, double click on it and set the value data by 0
Press Ok and now you can exist. Reboot your system and check the windows drag and is not working?
Method 4- Change Drag Height and Width
This method 4 will also be done in the registry editor. Launch this feature through the run box in a similar method you did in method 3.
Once Registry Editor is launched, follow the below path “HKEY_CURRENT_USER\Default\Control Panel\Desktop”

- On the right side pane, tap on drag height and set its value data to 50. You can set the same value data of dag width too.
Exit from the Registry Editor and restart your system and check whether the drag and drop are not working or now it is resolved.
Method 5- Perform A Clean Boot
You can also try this clean boot to solve this issue, to start with this method follow the below-mentioned steps
- Launch the Windows run box and enter Msconfig.
- Here go to the service tab and checkmark the feature that says “Hide All Microsoft services”

- Tap on Disable all followed by Ok,
- Now go to the startup tab and tap on Open Task Manager
- Here you can choose the program to disable them.

- Close the Task Manager window and again reopen the system configuration window, choose Ok followed by Apply.
Restart your system and check whether this issue has solved the problem of drag and drop not working on Windows 10.
Final Words
That’s all folks! This is how you can get rid of drag and drop is not working on Windows 10 issue If you have any other method to solve this problem, let me know in the comments. I hope you like this article and also shared it with your friends.
Don’t forget to subscribe to our newsletter for amazing tips and tricks.
Next Read:
How to Fix Windows Key Not Working in Windows 10
How to Fix Backspace not Working in Windows 10