
| Пресс-центр
Знаете ли вы, что в Windows 10 можно легко и быстро включить пространственный звук, чтобы наслаждаться эффектным иммерсивным звучанием?
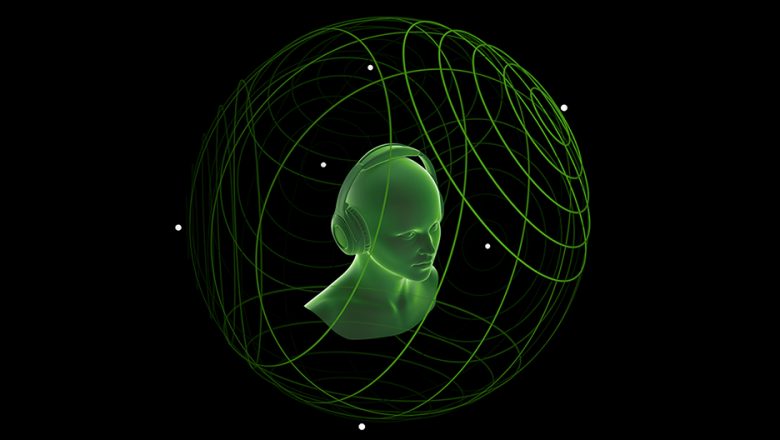
Что такое пространственный звук (Spatial Sound)?
Представьте, что вы смотрите фильм или играете в компьютерную игру и слышите звук пролетающего вертолета не только вокруг, но и прямо над головой. Система пространственного звука дает такую возможность! Это современная иммерсивная технология, создающая эффект объемного звучания в виртуальном трехмерном пространстве, вокруг вас и над вами. Пространственный звук создает более реалистичную атмосферу, превосходя старые форматы объемного звучания типа «звук вокруг».

С пространственным звуком все фильмы и игры звучат круче. Самый высокий уровень погружения и точности дают игры, фильмы и телешоу со встроенной поддержкой этой новой технологии. Но даже если такой поддержки нет, все равно любой контент, подходящий для традиционных систем объемного звучания, автоматически звучит гораздо эффектнее.
Какие форматы пространственного звука поддерживает Windows?
В Windows 10 доступны три варианта пространственного звука: Windows Sonic для наушников (Windows Sonic for Headphones), Dolby Atmos для наушников (Dolby Atmos for Headphones) и Dolby Atmos для домашних кинотеатров (Dolby Atmos for home theater)*.
Windows Sonic для наушников можно использовать с любыми наушниками, микронаушниками и гарнитурами. Этот вариант делает звук во всех фильмах и играх более иммерсивным и обеспечивает очень высокую точность звукового окружения в играх.
С Dolby Atmos домашние и портативные устройства обретают звук Dolby премиум-качества, как в кинотеатрах. Этот вариант можно использовать с наушниками или с домашними кинотеатрами, телевизорами и акустическими системами, поддерживающими Dolby Atmos. Формат Dolby Atmos позволяет получить иммерсивный, крайне эмоциональный звук при просмотре большинства современных кассовых фильмов. Игры, поддерживающие Dolby Atmos, позволяют игрокам испытать совершенно новый уровень потрясающей детализации, точности и реалистичности пространственной звуковой картины.
Как включить Windows Sonic для наушников или Dolby Atmos?
Windows Sonic для наушников поддерживается в Windows 10 по умолчанию. Чтобы включить этот вариант, следуйте приведенной ниже инструкции.
Чтобы включить поддержку Dolby Atmos, загрузите бесплатное приложение Dolby Access из Магазина Microsoft. После этого вы сможете наслаждаться улучшенным звуком домашних кинотеатров, телевизоров и акустических систем с поддержкой Dolby Atmos без какой-либо платы. А чтобы включить поддержку Dolby Atmos еще и для наушников, вы можете приобрести через приложение Dolby Access подписку, распространяющуюся на 10 устройств (включая Xbox One).
Как включить на моем компьютере Windows Sonic для наушников или Dolby Atmos?
Чтобы включить пространственный звук на ПК под управлением Windows 10:
- Подключите наушники или AV-ресивер с поддержкой Dolby Atmos к ПК через порт HDMI.

- Кликните правой кнопкой мыши значок звука в области уведомлений на панели задач и выберите вариант пространственного звука, который хотите использовать. (Примечание: при выборе Dolby Atmos для наушников или Dolby Atmos для домашних кинотеатров будет выполнен переход в магазин для загрузки бесплатного приложения Dolby Access. Там будут предоставлены инструкции, следуя которым, вы сможете приобрести или включить в пробном режиме Dolby Atmos для наушников или включить Dolby Atmos для домашних кинотеатров.)
- Запустите свою любимую игру или фильм. Наслаждайтесь!
* Доступно на ПК под управлением Windows 10 Creators Update и более поздних версий.
Tags: Dolby, Dolby Atmos, Windows 10, Windows Sonic, звук
Download Windows Speedup Tool to fix errors and make PC run faster
Dolby Atmos is an interesting piece of sound technology designed for some speaker systems, and Microsoft hasn’t shied away from supporting it. Interested parties can now take advantage of Dolby Atmos as it is offered in Windows 11/10 – and from there, they’ll need a supported headphone.
When it comes down to headphones, so far, the official Xbox headphone from Microsoft is one of the few headphones to support the feature. If you do not have one of these headphones, Microsoft has an alternative, but we’ll talk more of that later in the article, where we will show you how to enable, set up & use spatial sound with Dolby Atmos on Windows 11/10.
What is Dolby Atmos
The platform is an improved surround sound version that isn’t mixed into several different channels. Apparently, sounds are mapped in a 3D space to virtual locations, and from there the data is sent over to your speakers. Now, a Dolby Atmos receiver then positions the sound to the right speakers.
Devices supporting this new platform include headphones and speakers designed for the ceiling and floor. Speakers on the roof would bounce sound from the floor, while the ones on the ground bounce sound from the ceiling.
As stated above, users will need a Dolby Atmos receiver because Microsoft can only provide the software If you’re using a Surface product, the Dolby Receiver won’t be present, but there’s always the chance for third-party partners to release computers with the receiver.
Note, the software giant added supported for the new sound platform on the Xbox One family of video game consoles. We expect the Xbox One X to support this as well when the console launches in November of this year.
Read: How to install Dolby Audio on Windows PC.
Headphone users rejoice
Microsoft added support for “Dolby Atmos for headphones” in the Windows 10 Creators Update. This means that even if you do not have an Atmos receiver but own headphones, you can enjoy improved positional audio. However, users won’t get the same experience as using a receiver, as “Dolby Atmos for headphones” is more software than hardware.

To do this, first, download the Dolby Access app from the Windows Store. The app will guide users through the setup process, which is quite easy. If you have a receiver and a home theater system, select “With my home theater.” However, if you’re the owner of a headphone, then choose “With my headphones” instead.
Keep in mind, the Dolby Access app is not free, but Microsoft wants the user to take advantage of a trial period before having to pay fully for the experience.

Once the trial has been activated, the app will ask to enable Dolby Atmos for headphones. To do this, click “Configure PC settings” then select the option, “Dolby Atmos for headphones” and that’s it.
TIP: See this post if Dolby Atmos is not working on Windows 11/10.
Microsoft’s alternative to Dolby Atmos for headphones
In Windows 10 and Windows 11, there’s a free feature known as “Windows Sonic for Headphones.” It’s possible to enable this rather than Dolby Atmos for headphones, but at the moment, no one is capable of telling if there’s any huge difference between the two services. It makes sense since they are software-based.
See this post if you receive a message Something went wrong while trying to turn on Spatial Sound.
Vamien has studied Computer Information Services and Web Design. He has over 10 years of experience in building desktop computers, fixing problems relating to Windows, and Python coding.
Reader Interactions
In recent years, audio technology has evolved tremendously, enhancing our experience in movies, music, and gaming. One of the most significant advancements in sound technology is Dolby Atmos. This immersive audio technology provides a three-dimensional sound experience that envelops the listener, making music, films, and games more engaging. If you’re looking to enhance your audio experience on Windows 10 or 11, this guide will walk you through the steps to install and configure Dolby Atmos on your system.
Understanding Dolby Atmos
Before diving into installation, it’s essential to understand what Dolby Atmos is. Unlike traditional surround sound systems that rely solely on channels (e.g., 5.1 or 7.1), Dolby Atmos adds height to the sound. This means sound can come from above or around you, providing a more immersive experience. This technology allows audio to be placed and moved in three-dimensional space.
Dolby Atmos is supported by various devices, including soundbars, home theater systems, headphones, and built-in computer speakers. When you install Dolby Atmos on Windows, you can enjoy this advanced audio technology through supported devices, effectively transforming your computer into a powerful multimedia hub.
System Requirements
Before proceeding with the installation, ensure that your system meets the following requirements:
- Operating System: Windows 10 (version 1803 or later) or Windows 11.
- Compatible Audio Hardware: A device that supports Dolby Atmos, such as:
- A Dolby Atmos-capable soundbar or home theater system.
- High-quality headphones that support Dolby Atmos.
- Built-in speakers in some laptops and desktops.
- Dolby Access App: To configure your audio settings and enable Dolby Atmos, you will need the Dolby Access app, which can be downloaded from the Microsoft Store.
Step-by-Step Installation Guide
1. Check Your Audio Hardware
Before you begin the installation of Dolby Atmos, make sure your audio hardware is compatible. You can do this by checking the specifications of your sound system (whether it’s a soundbar, headphones, or speakers). Most modern audio devices will highlight their compatibility with Dolby Atmos.
2. Update Windows
Ensure that your Windows 10 or 11 installation is up to date. This can prevent potential issues during installation. To check for updates, follow these steps:
- Click on the Start button and select Settings (the gear icon).
- Navigate to Update & Security and click on Check for updates.
- Install any available updates, then restart your computer.
3. Download and Install Dolby Access
The next step is to download the Dolby Access app. Here’s how to do it:
- Open the Microsoft Store on your computer.
- In the search bar, type Dolby Access and press Enter.
- Click on the app in the search results, and then click the Get or Install button to download and install the app.
4. Launch Dolby Access
Once installed, you’ll need to launch the Dolby Access app. You can do this by:
- Finding the app in the Start menu or searching for it using the search bar.
- Click on the app to open it.
5. Set Up Dolby Atmos
When you first launch Dolby Access, you’ll be greeted with an overview of what Dolby Atmos can do. Follow these steps to get started:
-
Choose Your Audio System: Dolby Access will present you with options to select your audio system. You can choose between:
- Dolby Atmos for Home Theater (for soundbars and surround sound systems)
- Dolby Atmos for Headphones (for headphone users).
Select the option that best matches your setup.
-
Follow the On-Screen Instructions: Based on your selection, Dolby Access will provide instructions tailored for your chosen setup. For example, if you chose home theater, you may need to connect your sound system via HDMI, while if you selected headphones, you might have to ensure they are plugged in correctly.
-
Calibration: Once you’ve made your selection, Dolby Access may prompt you to calibrate your sound settings. Follow the steps to ensure optimal audio performance. This may involve playing test sounds to adjust various aspects of your audio.
6. Activating Dolby Atmos
Once setup is complete, you may need to activate Dolby Atmos within your audio settings to use it efficiently.
- Right-click on the sound icon in the system tray located at the bottom right of your screen.
- Select Spatial sound (Off) and then choose Dolby Atmos for Headphones or Dolby Atmos for Home Theater, depending on your hardware setup.
- Click Apply once you have made your selection.
This step is crucial as it ensures your Windows system is using Dolby Atmos as the spatial sound format.
Configuring Audio Settings in Windows
After setting up Dolby Atmos, it’s important to configure your audio settings within Windows for optimal sound quality. Here’s how to do that:
-
Open Sound Settings: Right-click the sound icon in the system tray and select Sounds.
-
Playback Tab: In the Sounds window, navigate to the Playback tab.
-
Select Your Device: Choose the audio device you wish to configure (e.g., your speakers or headphones) and click on Properties.
-
Enhancements Tab: In the Properties window, navigate to the Enhancements tab. Here, you can enable or disable enhancements depending on your preference.
-
Advanced Tab: Next, go to the Advanced tab. Here, you can select the default format (sample rate and bit depth) for your audio device. Choose a higher quality format if your hardware supports it, such as 24-bit, 192 kHz.
-
Apply Changes: Click OK to apply any changes you made.
Testing Dolby Atmos
Once setup and configuration are complete, it’s time to test your Dolby Atmos setup to ensure everything is working as intended.
1. Use Dolby Access to Test Audio
- Within Dolby Access, navigate to the Home screen where you can find some audio tests specifically designed for Dolby Atmos.
- Play the test audio clips to experience the spatial sound effect. If your setup is correct, you should notice sounds coming from various directions, including overhead.
2. Streaming Services and Games
To truly experience Dolby Atmos, try accessing content from supported platforms. Here are a few recommendations:
- Movies: Platforms like Netflix, Disney+, and Apple TV+ offer movies with Dolby Atmos sound. Ensure you have a compatible subscription to access this content.
- Games: Noteworthy games like “Call of Duty,” “Battlefield,” and “Gears of War” support Dolby Atmos. Make sure to enable Dolby Atmos within the game settings to experience the immersive sound fully.
- Music: Tidal and Amazon Music HD also offer music tracks with Dolby Atmos for eligible subscribers.
Troubleshooting Common Issues
While installing and setting up Dolby Atmos, you might encounter some issues. Here are common problems and their solutions:
1. No Sound After Setup
If you experience no sound after setting up, check the following:
- Ensure your audio device is connected properly.
- Right-click the sound icon in the system tray and check the playback device settings to ensure the correct device is set as default.
- Reboot your computer and relaunch Dolby Access.
2. Audio Lag or Dropouts
Audio lag or dropouts can stem from various sources:
- Ensure that no other applications are using the audio device excessively.
- Update your audio drivers through the Device Manager.
- Try switching ports if you are using an external sound card or USB device.
3. Inconsistent Sound Quality
If sound quality is inconsistent, consider:
- Adjusting the playback format in the audio device settings under the Advanced tab.
- Re-calibrating your audio settings within the Dolby Access application.
Conclusion
Installing and configuring Dolby Atmos on Windows 10 and 11 can dramatically improve your audio experience, making entertainment more immersive and engaging. By following the detailed steps outlined above, you can ensure that your audio devices are set up correctly to harness the full potential of Dolby Atmos technology. Whether you’re watching movies, gaming, or listening to music, with Dolby Atmos, you will enjoy sound like never before.
Take your time to explore various audio settings and configurations to find what works best for you. Delving into the world of Dolby Atmos opens up new dimensions of sound that can transform the way you experience entertainment on your computer. Enjoy your journey into high-fidelity audio!
Quick Links
-
How to Enable Dolby Atmos on Windows 10
-
How to Try Microsoft’s Free Alternative, Windows Sonic for Headphones
Windows 10’s Creators Update added support for Dolby Atmos positional sound. This includes two things: Support for Dolby Atmos hardware and virtual Dolby Atmos sound that works in any pair of headphones.
The Dolby Atmos for headphones feature is a bit weird. It appears in the standard Windows control panel as an option, but it requires a free trial or $14.99 purchase via the Windows Store before you can actually use it.
What Is Dolby Atmos?
Traditional 5.1 or 7.1 surround sound uses 5 or 7 speaker channels, plus a subwoofer. When you watch a movie or play a game with surround sound, that movie or game is actually sending 6 or 8 separate channels of sound to your speakers.
Dolby Atmos is an improved type of surround sound. It isn’t mixed into several separate channels; instead, sounds are mapped to virtual locations in 3D space, and that spatial data is sent to your speaker system. A Dolby Atmos-enabled receiver then uses specially calibrated speakers to position these sounds. Dolby Atmos systems may include ceiling-mounted speakers above you or speakers on the floor that bounce their sound off the ceiling, for example.
This feature requires Dolby Atmos-enabled hardware, notably a Dolby Atmos-enabled receiver. Microsoft also just added Dolby Atmos support to the Xbox One, and many Blu-ray discs include Dolby Atmos audio.
Windows 10’s Creators Update also added a separate feature named «Dolby Atmos for headphones». This feature promises improved positional audio in any pair of headphones or earbuds. You don’t need special Dolby Atmos headphones. It’s a type of virtual surround sound built into Windows.
Really, this is a completely different feature that’s only linked by Dolby’s branding. True Dolby Atmos requires a hardware receiver and special speaker setup, while Dolby Atmos for headphones is a digital signal processor (DSP) that takes surround sound from your PC and mixes it to offer an improved positional sound experience in headphones.
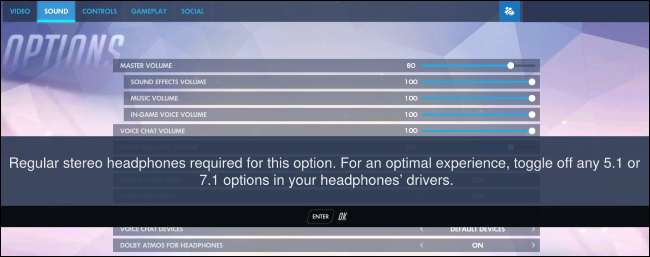
Some games have already added support for Dolby Atmos for headphones. For example, Blizzard’s Overwatch includes built-in Dolby Atmos support, and it works even if you’re not running Windows 10’s Creators Update. You can enable this feature from Options > Sound > Dolby Atmos for Headphones in Overwatch. Blizzard argues that Atmos offers an improved experience that allows you to more easily pinpoint where sounds are coming from in the game.
How to Enable Dolby Atmos on Windows 10
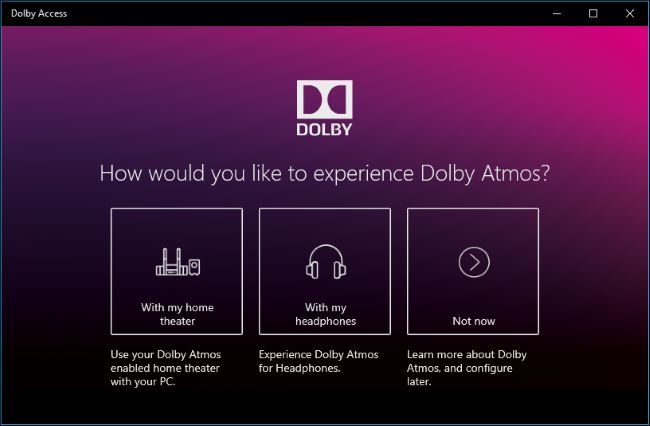
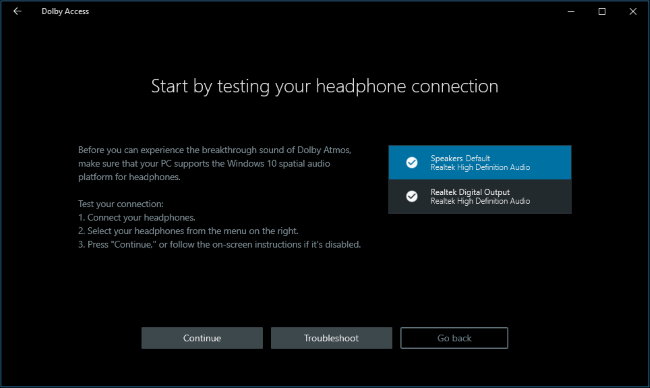
To start using this feature, download the Dolby Access app from the Windows Store and launch it.
The app will guide you through setting this up. If you have Dolby Atmos receiver you want to use with your PC, select «With my home theater». If you want to use any pair of headphones, select «With my headphones».
If you select a home theater PC, you’ll be given a link to enable the «Dolby Atmos for home theater» option in the Windows Sound settings control panel. After you do, the app will prompt you to calibrate your system. There’s no additional purchase necessary for the home theater option—you just need the hardware.
If you select headphones, you’ll be prompted to confirm your PC’s sound hardware supports the Windows 10 spatial audio platform for headphones. Modern PCs should have sound drivers that support this feature, but you may be out of luck if you have a much older PC you’ve upgraded to Windows 10.
The Dolby Atmos for headphones feature isn’t free. While Microsoft integrated it into Windows, Microsoft clearly didn’t pay the licensing fees to allow any Windows user to use it.
You can still try Dolby Atmos for headphones for free, however. Click the «30-day trial» button to enable it.

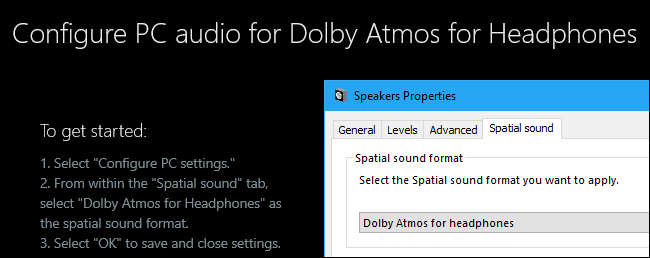
Once you’ve enabled the free trial, you’ll be prompted to enable Dolby Atmos for headphones. Click the «Configure PC settings» button and then select «Dolby Atmos for headphones» in the Spatial sound format box.
This option actually appears in the properties window for your audio device even if you don’t have the Dolby app installed. However, if you try to enable this feature without installing the app first, Windows will prompt you to install the Dolby Access app from the Windows Store first.
How to Test Dolby Atmos
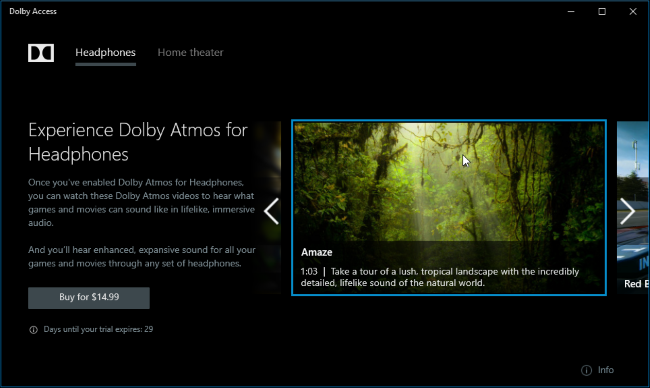
The Dolby Access app will allow you to test Dolby Atmos by playing a variety of videos that support Dolby Atmos audio.
While the videos are impressive enough, you’ll want to actually test Dolby Atmos by playing some PC games or watching some surround sound-enabled videos before paying for it and see if you can notice an appreciable difference. Some people say they notice an improvement, while others don’t notice much of a difference. It likely depends on the games you’re playing videos you’re watching, too.
When testing Dolby Atmos, be sure to enable 5.1 or 7.1 surround sound in whatever game or application you use. The application will then produce surround sound, and Dolby Atmos will mix it to stereo sound for your headset.
You’re free to test Dolby Atmos for 30 days, after which it will cost $14.99 to buy Dolby Atmos for headphones support from the Windows Store.
How to Try Microsoft’s Free Alternative, Windows Sonic for Headphones
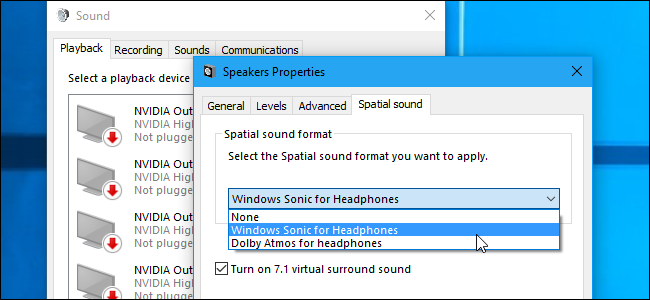
Windows 10’s Creators Update also offers a free «Windows Sonic for Headphones» option you can enable instead of Dolby Atmos. Just right-click the speaker icon in your system tray, select «Playback Devices», click your playback device, and click «Properties». On the Spatial sound tab, select «Windows Sonic for Headphones».
You may want to test this feature to see how it compares to Dolby Atmos for Headphones in your games and videos. We’ve seen some people say it doesn’t work quite as well as the Dolby Atmos option in their experience, but we’ve also seen some people say they don’t notice much of a difference.
When it comes to sound, everyone often has their own opinion. Audio quality can be very subjective.

Spatial sound is a new format included on Windows 10, and it enables a more immersive audio experience. When you enable spatial sound using “Windows Sonic” or “Dolby Atmos,” the audio will feel that is playing around you, instead of through speakers (or cheap headphones).
In other words, spatial sound is what Microsoft refers to 3D sound, and Windows 10 leverages this new format by using a combination of optimized audio to deliver this listening experience, apps that support the feature, and headphones configured for spatial sound.
In this guide, you’ll learn the steps to configure spatial sound on Windows 10 for headphones and home theaters.
- How to enable spatial sound for headphones
- How to enable spatial sound for home theater
How to enable spatial sound for headphones
To configure spatial sound for your headphones on Windows 10, use these steps:
-
Open Settings.
-
Click on System.
-
Click on Sound.
-
Under the “Related settings” section, click the Sound Control Panel option.
-
Select the playback device (for example, headphones or speakers).
-
Click the Properties button.

Sound settings -
Click the Spatial sound tab.
-
Under the “Spatial sound format” section, select the Windows Sonic for Headphones option.
Spatial sound settings -
Click the Apply button.
-
Click the OK button.


While you can use the spatial sound format on any headphone, it should be noted that it will work best with headphones designed to take advantage of this feature.
How to enable spatial sound for home theater
If you want to use Dolby Atmos with your home theater, you’ll need to purchase the Dolby Access app from the Microsoft Store.
To configure spatial sound for your home theater using Dolby Atmos, use these steps:
-
Open Microsoft Store.
-
Click the Install/Open button.
-
Click the Open Microsoft Store button.
-
Click the Install button to install the Dolby Access app on Windows 10.

Dolby Access app download -
Click the Launch button.
-
Skip the setup suggestions.
-
Click the Products tab.
-
Select the Dolby Atmos for home theater option.
-
Click the Setup button.

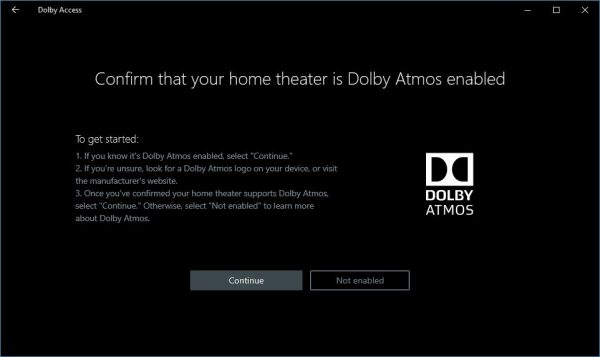
Dolby Atmos for home theater -
Click the Continue button.
-
Turn on your home theater.
-
Continue with the on-screen directions.


After you complete the steps, your home theater should be working with the new sound format. Alongside the ability to configure your home theater, remember that you can also use Dolby Atmos with supported headphones.
Update June 18, 2020: Originally published in April 2017, and it’s been revised to reflect new changes.
Mauro Huculak is a
Windows How-To Expert and founder of
Pureinfotech
(est. 2010). With over 21 years as a technology writer and IT Specialist,
Mauro specializes in Windows, software, and cross-platform systems such as Linux, Android, and macOS.
Certifications:
Microsoft Certified Solutions Associate (MCSA),
Cisco Certified Network Professional (CCNP),
VMware Certified Professional (VCP),
and
CompTIA A+ and Network+.
Mauro is a recognized Microsoft MVP and has also been a long-time contributor to Windows Central.
You can follow him on
YouTube,
Threads,
BlueSky,
X (Twitter),
LinkedIn and
About.me.
Email him at [email protected].