
Have you ever wondered how to enable DHCP on Windows 10? DHCP (Dynamic Host Configuration Protocol) is a crucial feature that allows devices on a network to automatically obtain IP addresses and other network configurations. Without DHCP, you would need to manually set up these settings for each device, which can be time-consuming and prone to errors. Luckily, Windows 10 provides a simple way to enable DHCP and ensure seamless connectivity for your devices.
Enabling DHCP on Windows 10 is a straightforward process that can be done in a few simple steps. By enabling DHCP, you allow your computer to request and obtain an IP address automatically, eliminating the need for manual configuration. This not only saves time but also ensures that your device connects to the network seamlessly. DHCP has become the standard protocol for IP address assignment, offering a reliable and efficient solution for network administrators and home users alike. With DHCP enabled, your Windows 10 device can join networks effortlessly and receive the necessary network configurations.
If you want to enable DHCP on Windows 10, follow these steps:
- Press the «Windows» key and type «Control Panel» to open it.
- In the Control Panel, click on «Network and Internet» and then «Network and Sharing Center».
- In the left pane, click on «Change adapter settings».
- Right-click on your network connection and select «Properties».
- In the Properties window, scroll down and double-click on «Internet Protocol Version 4 (TCP/IPv4)».
- In the TCP/IPv4 properties, select the «Obtain an IP address automatically» and «Obtain DNS server address automatically» options.
- Click «OK» to save the changes.
These steps will enable DHCP on your Windows 10 computer, allowing it to automatically
Understanding DHCP in Windows 10
In a network environment, DHCP (Dynamic Host Configuration Protocol) plays a crucial role in automatically assigning IP addresses to devices. Windows 10, being the latest version of the Windows operating system, provides built-in support for DHCP configuration. Enabling DHCP in Windows 10 ensures that devices can connect to the network and obtain the necessary network settings without manual configuration.
This article will guide you through the process of enabling DHCP in Windows 10, allowing your devices to communicate and access network resources seamlessly. Whether you are setting up a new network or troubleshooting networking issues, understanding how to enable DHCP in Windows 10 is essential.
Step 1: Accessing Network Connections
The first step to enable DHCP in Windows 10 is to access the network connections settings. To do this, follow these steps:
- Click on the Start menu and go to «Settings.»
- In the Settings window, select the «Network & Internet» option.
- In the Network & Internet settings, click on the «Ethernet» or «Wi-Fi» tab based on your network connection.
- Under the selected network connection, click on the «Change adapter options» link.
By following these steps, you will have access to the network connections settings, which is necessary for enabling DHCP in Windows 10.
Step 2: Enabling DHCP for Ethernet or Wi-Fi Connection
Once you have accessed the network connections settings, follow these steps to enable DHCP for your Ethernet or Wi-Fi connection:
- Right-click on the desired network connection (Ethernet or Wi-Fi) and select «Properties.»
- In the Properties window, locate and select the «Internet Protocol Version 4 (TCP/IPv4)» option.
- Click on the «Properties» button.
- In the TCP/IPv4 properties, make sure the «Obtain an IP address automatically» and «Obtain DNS server address automatically» options are selected.
Enabling DHCP for your Ethernet or Wi-Fi connection ensures that the IP address and DNS server address will be obtained automatically, simplifying the network setup process.
Step 3: Verifying DHCP Configuration
After enabling DHCP in Windows 10, it is essential to verify the DHCP configuration to ensure it is working correctly. Follow these steps to verify your DHCP configuration:
- Open the Command Prompt by typing «cmd» in the search bar and selecting «Command Prompt» from the search results.
- In the Command Prompt window, type «ipconfig /all» and press Enter.
- Look for the network adapter that corresponds to your Ethernet or Wi-Fi connection.
- Check if the DHCP Enabled field is set to «Yes» and that the IP address, subnet mask, and default gateway are assigned by DHCP.
By verifying the DHCP configuration, you can ensure that your Windows 10 device is correctly obtaining the necessary network settings.
Understanding the Importance of DHCP in Windows 10
DHCP is essential in Windows 10 as it simplifies and automates the process of assigning IP addresses and other network settings to devices. Here are a few key reasons why DHCP is important:
- Simplicity: DHCP eliminates the need for manual IP address configuration, making it easier and more efficient to connect devices to the network.
- Centralized Management: DHCP allows for centralized management of IP address assignments, making it easier to maintain and troubleshoot network configuration.
- Dynamic Address Allocation: DHCP dynamically assigns IP addresses to devices, ensuring efficient use of available address space.
By enabling DHCP in Windows 10, you can reap these benefits and ensure a smooth and hassle-free networking experience.
Troubleshooting DHCP Issues in Windows 10
Despite the advantages of DHCP, issues may arise that can disrupt network connectivity. Here are some common DHCP issues in Windows 10 and their troubleshooting steps:
- IP Address Conflicts: If multiple devices on the network have the same IP address, conflicts can occur. To resolve this, ensure that DHCP is properly enabled and configure the DHCP server to assign unique IP addresses.
- DHCP Server Unavailable: If the DHCP server is down or unreachable, devices may fail to obtain IP addresses. Ensure that the DHCP server is functional and accessible.
- Incorrect DHCP Configuration: Mistakes in the DHCP server configuration can cause issues. Double-check the DHCP server settings and ensure they align with the desired network configuration.
By troubleshooting these common DHCP issues, you can quickly resolve connectivity problems and restore normal network operations.
Exploring Advanced DHCP Configuration in Windows 10
While the previous section covered the basics of enabling DHCP in Windows 10, there are advanced configurations that can be explored. These configurations provide additional control and customization options for your network environment.
Reserved IP Addresses
Reserved IP addresses allow specific devices to consistently receive the same IP address from the DHCP server. To configure reserved IP addresses in Windows 10, follow these steps:
- Access the DHCP server settings.
- Locate the DHCP reservation settings.
- Enter the MAC address of the device and assign the desired IP address.
Reserved IP addresses are helpful in scenarios where specific devices, such as servers or printers, require consistent network configurations for easier access and management.
DHCP Options
DHCP options provide additional control and configuration for network devices. Options like DNS servers, NTP servers, or domain names can be specified through DHCP options. To configure DHCP options in Windows 10, use these steps:
- Access the DHCP server settings.
- Locate the DHCP options configuration.
- Select the desired DHCP option and configure the appropriate values.
By utilizing DHCP options, you can provide additional configuration details to network devices, enhancing their functionality and integration within the network environment.
DHCP Relay Agent
The DHCP relay agent allows DHCP messages to be forwarded between DHCP clients and servers that reside on different IP subnets. This ensures DHCP functionality even in complex network setups. To configure the DHCP relay agent in Windows 10, follow these steps:
- Access the network device acting as the DHCP relay agent.
- Configure the DHCP relay agent settings, providing the IP address of the DHCP server.
- Enable the DHCP relay agent.
The DHCP relay agent is particularly useful in scenarios where the DHCP server and clients are located on different network segments.
Enabling DHCP in Windows 10 is crucial for seamless and automated network configuration. By following the steps outlined in this article, you can enable DHCP and ensure that your devices can efficiently communicate and access network resources. Additionally, advanced configurations like reserved IP addresses, DHCP options, and DHCP relay agents can be explored to further enhance and fine-tune your network environment.

Enabling DHCP in Windows 10
To enable DHCP in Windows 10, follow these steps:
- Press the Windows key + R to open the Run dialog box.
- Type «ncpa.cpl» in the Run dialog box and press Enter. This will open the Network Connections window.
- Locate the network connection you want to enable DHCP for (e.g., Ethernet or Wi-Fi).
- Right-click on the network connection and select «Properties» from the context menu.
- In the Properties window, scroll down to find «Internet Protocol Version 4 (TCP/IPv4)» and double-click on it.
- In the TCP/IPv4 Properties window, select the «Obtain an IP address automatically» option and the «Obtain DNS server address automatically» option.
- Click «OK» to save the changes.
- Restart your computer to apply the changes.
Once you have successfully enabled DHCP, your Windows 10 computer will obtain an IP address and DNS server automatically from the DHCP server on your network.
### Key Takeaways: How to Enable DHCP Windows 10
- DHCP stands for Dynamic Host Configuration Protocol and allows for automatic IP address configuration.
- To enable DHCP on Windows 10, open the Control Panel and go to Network and Sharing Center.
- Click on «Change adapter settings» on the left-hand side of the window.
- Right-click on your network adapter and select «Properties.»
- In the Properties window, scroll down to find «Internet Protocol Version 4 (TCP/IPv4)» and double-click on it.
Frequently Asked Questions
Here are some common questions about enabling DHCP on Windows 10:
1. What is DHCP and why is it important?
DHCP stands for Dynamic Host Configuration Protocol. It is a network protocol that allows devices to automatically obtain an IP address and network configuration when connecting to a network. DHCP is important because it simplifies the process of network configuration and allows for efficient management of IP addresses.
By enabling DHCP on Windows 10, your device will automatically obtain an IP address from the network, eliminating the need for manual configuration. This makes it easier to connect to different networks, especially when moving between locations.
2. How can I enable DHCP on Windows 10?
To enable DHCP on Windows 10, follow these steps:
1. Open the Start menu and click on the «Settings» icon.
2. In the Settings window, click on «Network & Internet».
3. On the left side of the Network & Internet window, click on «Ethernet» or «Wi-Fi», depending on your connection type.
4. Click on the network connection you want to configure.
5. Scroll down and click on «Properties» under the IP settings section.
6. In the Properties window, select «Obtain an IP address automatically» and «Obtain DNS server address automatically».
7. Click on «OK» to save the changes and enable DHCP on Windows 10.
3. What do I do if DHCP is not working on Windows 10?
If DHCP is not working on Windows 10, there are a few troubleshooting steps you can try:
1. Restart your computer and router to refresh the network connections.
2. Check your network cables or Wi-Fi connection to ensure they are properly connected.
3. Update your network drivers by going to the manufacturer’s website or using a driver update tool.
4. Disable any firewalls or security software temporarily to see if they are causing the issue.
5. If the issue persists, contact your network administrator or Internet Service Provider for further assistance.
4. Can I assign a static IP address if DHCP is enabled on Windows 10?
Yes, you can assign a static IP address even if DHCP is enabled on Windows 10. Assigning a static IP address can be useful for devices that require a consistent IP address for specific purposes, such as network printing or remote access.
To assign a static IP address on Windows 10:
1. Follow steps 1-4 from the previous question to open the network properties.
2. In the Properties window, select «Use the following IP address» and enter the desired IP address, subnet mask, default gateway, and DNS server addresses.
3. Click on «OK» to save the changes and assign a static IP address on Windows 10.
5. Is it safe to enable DHCP on Windows 10?
Enabling DHCP on Windows 10 is generally safe and recommended for most users. DHCP allows for easy network configuration and simplifies the process of connecting to different networks.
However, it’s important to ensure that you are connecting to a trusted network and that the DHCP server is properly configured. Using DHCP on public or unsecured networks may pose security risks, as it can open the door for unauthorized access to your device.
Always exercise caution and use trusted networks when enabling DHCP on Windows 10.
Enabling DHCP in Windows 10 is a straightforward process that allows your computer to automatically obtain an IP address from a DHCP server. By following a few simple steps, you can ensure that your network connection is seamless and hassle-free. First, open the Control Panel and navigate to the Network and Internet section. From there, click on Network and Sharing Center and select Change adapter settings. Once you’ve done that, right-click on your network connection and choose Properties. In the Properties window, scroll down and select Internet Protocol Version 4 (TCP/IPv4). From here, click on the Properties button and select Obtain an IP address automatically and Obtain DNS server address automatically. Finally, click OK to save the changes. With DHCP enabled, your Windows 10 computer will now automatically obtain the necessary network configuration whenever it connects to a new network.
Enabling DHCP in Windows 10 is a crucial step in ensuring a seamless and hassle-free network connection. With the DHCP protocol enabled, your computer can automatically obtain an IP address from a DHCP server, eliminating the need for manual configuration. This not only simplifies the network setup process but also allows for easy scaling of your network. By following the steps outlined above, you can easily enable DHCP in Windows 10 and enjoy the benefits of a dynamic network connection. So go ahead and make the necessary changes in your network settings, and enjoy the convenience and efficiency that DHCP brings to your Windows 10 experience.
Enabling DHCP (Dynamic Host Configuration Protocol) in Windows 10 is a straightforward process that helps your computer automatically obtain an IP address from a network server. This ensures seamless internet connectivity without manual IP configuration. Follow these steps to quickly enable DHCP on your Windows 10 machine.
This section will guide you through the steps to enable DHCP on your Windows 10 computer, ensuring it automatically gets an IP address. Let’s dive in!
Step 1: Open Network Settings
First, click on the Start menu and open Settings.
Navigate to the Start menu (the Windows icon on the bottom left), and then click on the gear icon to open the Settings app.
Step 2: Go to Network & Internet
Next, click on Network & Internet in the Settings app.
Once in the Settings app, you’ll find the Network & Internet option. Click on it to access network settings.
Step 3: Access Ethernet or Wi-Fi
Select either Ethernet or Wi-Fi depending on your current connection.
If you’re connected via Ethernet, click on Ethernet. If you’re using Wi-Fi, click on Wi-Fi. This helps in managing the specific network interface you’re currently using.
Step 4: Change Adapter Options
Click on Change Adapter Options.
This action takes you to the Network Connections window, where you can see all network interfaces on your computer.
Step 5: Open Properties
Right-click on your current connection and select Properties.
Find the active network connection, right-click on it, and choose Properties. A new window will pop up.
Step 6: Select IPv4 and Configure
Double-click on Internet Protocol Version 4 (TCP/IPv4).
Scroll down in the Properties window, find Internet Protocol Version 4 (TCP/IPv4), and double-click it to open its properties.
Step 7: Enable DHCP
Select Obtain an IP address automatically and Obtain DNS server address automatically. Click OK to save changes.
Choose these options to enable DHCP, allowing your computer to automatically receive an IP address and DNS settings. Click OK to apply and close the window.
After completing these steps, your Windows 10 computer will be configured to use DHCP, ensuring it automatically obtains the necessary network settings for internet connectivity.
Here are some additional tips to help you when enabling DHCP in Windows 10:
- Always check if your router is set to provide DHCP services before configuring your PC.
- Restart your computer after making these changes to ensure they take effect properly.
- If you experience connectivity issues, try disabling and then re-enabling the network adapter.
- Make sure your network drivers are up to date to avoid any compatibility issues.
- If you frequently switch between different networks, enabling DHCP can save you time and hassle.
Why should I enable DHCP on my Windows 10 computer?
Enabling DHCP allows your computer to automatically obtain IP settings, making network management simpler and reducing the risk of configuration errors.
How can I tell if DHCP is already enabled?
You can check the current network connection properties under the IPv4 settings. If Obtain an IP address automatically is selected, DHCP is enabled.
What should I do if DHCP is not working?
Ensure your router’s DHCP server is active. You can also try renewing the IP address by opening Command Prompt and typing ipconfig /renew.
Will enabling DHCP affect my internet speed?
No, enabling DHCP only automates IP address assignment and doesn’t impact your internet speed.
Can I enable DHCP for both Ethernet and Wi-Fi connections?
Yes, you can enable DHCP for both types of connections. Just follow the same steps for each network adapter.
- Open Network Settings.
- Go to Network & Internet.
- Access Ethernet or Wi-Fi.
- Change Adapter Options.
- Open Properties.
- Select IPv4 and Configure.
- Enable DHCP.
Enabling DHCP in Windows 10 is a simple yet powerful way to streamline your network management. By following these steps, you ensure that your computer can automatically obtain the necessary IP settings, making connectivity issues a thing of the past. This is particularly useful in dynamic environments where you might switch between different networks frequently.
If you found this guide helpful, consider exploring more Windows 10 network configuration tips and tricks. And remember, keeping your network settings optimized not only ensures a smooth internet experience but also minimizes potential connectivity problems. For anyone dealing with network configurations often, mastering these steps can save a significant amount of time and effort.
So, what are you waiting for? Go ahead and enable DHCP on your Windows 10 machine today!
Kermit Matthews is a freelance writer based in Philadelphia, Pennsylvania with more than a decade of experience writing technology guides. He has a Bachelor’s and Master’s degree in Computer Science and has spent much of his professional career in IT management.
He specializes in writing content about iPhones, Android devices, Microsoft Office, and many other popular applications and devices.
Read his full bio here.
При проблемах с доступом в Интернет в Windows 10 и попытке устранения неполадок в «Диагностике сетей Windows» вы можете получить сообщение «DHCP не включен на сетевом адаптере Беспроводная сеть» или «сетевом адаптере Ethernet», при этом в параметрах сети и Интернет вы можете видеть сообщение: «Без доступа к Интернету. Устройство подключено, но доступ к данным сети может быть ограничен», либо «Нет подключения. Вы не подключены ни к одной сети».
В этой инструкции подробно о том, как исправить ошибку «DHCP не включен на сетевом адаптере» в Windows 10 и восстановить доступ к Интернету. Также может быть полезной отдельная инструкция: Не работает Интернет в Windows 10.
- Причина проблемы и методы исправления
- Видео инструкция
Основная причина проблемы и способы её исправить

Самая частая причина ошибки «DHCP не включен на сетевом адаптере» — изменение параметров сетевого подключения (самостоятельное или какой-либо программой), отключающее DHCP, как об этом и сообщает утилита устранения неполадок. Под DHCP здесь понимается опция автоматического получения IP-адреса вашим сетевым адаптером. Второй по распространенности вариант — указание неверного для вашей сети статического IP-адреса (иногда он может стать неверным после того, как вы изменили параметры LAN на роутере). Чтобы включить DHCP снова, или поменять параметры IP-адреса вы можете:
- В диагностике неполадок нажать «Попробуйте выполнить восстановление от имени администратора». А в следующем окне с заголовком «Автоматически обновлять параметры сети» — нажать «Внести это исправление».
- Если всё прошло успешно, в результате вы должны получить сообщение о том, что проблема «DHCP не включен на сетевом адаптере» для адаптера Ethernet или Беспроводная сеть была исправлена.

- Если предыдущее не помогло, нажмите клавиши Win+R (Win — клавиша с эмблемой Windows) на клавиатуре, введите ncpa.cpl и нажмите Enter.
- В открывшемся списке сетей нажмите правой кнопкой мыши по той сети, которая сообщает о проблеме и выберите пункт меню «Свойства».
- В списке компонентов подключения выберите IP версии 4 и нажмите «Свойства».
- Убедитесь, что в общих свойствах установлено «Получить IP-адрес автоматически и «Получить адрес DNS-сервера автоматически». Если это не так, установите соответствующие параметры и примените настройки.

- Если параметры уже заданы на автоматическое получение параметров, попробуйте, наоборот, вручную ввести IP-адрес: в качестве адреса используйте адрес вашего роутера с отличающимся последним числом (адрес роутера обычно указан на нем самом на наклейке сзади/внизу). Например, адрес роутера — 192.168.1.1, в качестве IP указываем что-то наподобие 192.168.1.33 (не следует указывать 2-ку и т.п., они могут быть заняты), маска подсети будет подставлена автоматически, в «Основной шлюз» указываем просто адрес роутера. Для DNS можно указать 8.8.8.8 и 8.8.4.4 соответственно. Примените настройки. Если вы не знаете адрес роутера, то почти всегда это 192.168.1.1 или 192.168.0.1, можно просто поочередно попробовать оба варианта.


Обычно, что-то из указанного позволяет решить проблему, но не всегда. Если в вашем случае работоспособность сети так и не была восстановлена, попробуйте следующие варианты:
- Если у вас прямое кабельное подключение от провайдера и роутер не используется, и вы проверили, что кабель подключен надежно, проблема может быть со стороны самого Интернет-провайдера (в этом случае она обычно исправляется в короткие сроки с его стороны).
- Перезагрузите роутер, если он используется для подключения (выключите его из розетки, подождите несколько секунд, снова включите и подождите, когда загрузится).
- Выполните сброс сетевых настроек Windows 10.
- Попробуйте отключить протокол IP версии 6 в компонентах подключения — снять галочку в окне, которое вы видели на шаге 5 и применить настройки.
- Если вы перед появлением проблемы меняли настройки роутера, возможно, стоит сбросить их и выполнить настройку заново.
- Если у вас установлен сторонний антивирус, попробуйте отключить функции сетевой защиты в нем или полностью отключить антивирус.
- Загляните в диспетчер устройств (правый клик по кнопке пуск — диспетчер устройств) и откройте раздел «Сетевые адаптеры». Откройте свойства Wi-Fi адаптера (если ошибка возникает на сетевом адаптере «Беспроводная сеть») или Ethernet-адаптера. Проверьте, активна ли кнопка «Откатить» на вкладке «Драйвер». Если да — используйте её.
- Проверьте, есть ли точки восстановления на дату, предшествовавшую появлению проблемы. Если да, используйте их. См. Точки восстановления Windows 10.
Видео инструкция
В случае, если описанные методы не решили проблему, опишите в комментариях, после чего (каких действий или событий), предположительно, она появилась и сообщите о других подробностях, возможно, мне удастся помочь.
Dynamic Host Configuration Protocol (DHCP) is a service that assigns an IP address, DNS address, gateway IP address, and subnet mask to all computers on a network.
What Does DHCP (Dynamic Host Configuration Protocol) Do?
DHCP is a network tool that makes it easy for devices in a network to get set up.
Here’s how it works: there’s a central computer or a router that hands out IP addresses. These addresses are like labels for each device, telling them where they are in the network.
With DHCP, when a new device joins the network, it gets all the necessary info, like its IP address, automatically.
Using DHCP saves you a bunch of time because you don’t have to set up each device manually.
Once you’ve set up a DHCP server in your network, all the computers can get their settings automatically. And if there are devices with WiFi hardware, they can get their info from your machine, too.
But if a computer already has its settings manually configured, DHCP won’t give it a new address.
For all the devices to join in, you need to make sure DHCP is turned on and ready to assign addresses. In this article, we’ll show you how to set up DHCP to get an automatic IP address on a laptop or desktop from your ADSL router.
Features Of the DHCP Protocol
It gives setup details to computers on the network through the TCP/IP protocol. Plus, it has a way to hand out addresses.
This protocol came out in October 1993 and was published in a document called RFC 2131. Also, the latest version is in RFC 3415.
Host Address Assignment
If you don’t have DHCP, you have to set up each computer’s settings by hand. And if you move a computer to a new spot on the network, you have to give it a new IP address.
However, with DHCP, the admins can handle everything from one place. They can give out IP numbers automatically and even switch them up if a computer moves to a new spot on the network.
This protocol has three ways to give out these numbers:
- Manual or Static Assignment: We give a specific computer its IP address. This helps us control which client gets which address and stops unknown devices from connecting.
- Automatic Assignment: When a PC asks our DHCP machine for an address for the first time, it gives it a permanent one. We usually use this when the number of PCs stays about the same.
- Dynamic Allocation: This is the only way we change network numbers as needed. The network boss sets up a range of numbers, and any device we connect to the LAN gets one automatically. When a device joins the network, it asks the machine for an Internet connection ID.
Some apps can update the DNS for servers using a protocol called DNS update (RFC 2136) when there are new IP addresses.
It’s another way to manage network codes besides BOOTP (Bootstrap Protocol). Both are often used.
If a server can’t give out an address in Windows 98 or later, it uses something called “Automatic Private Internet Protocol Addressing.”
DHCP Parameters
A DHCP machine can provide an optional configuration for the client’s PC. These options are defined in RFC 2132.
A list of configurable options:
- DNS Server Address
- DNS Name
- IP Address Gateway
- Broadcasting Address
- Subnet Mask
- Maximum ARP (Address Resolution Protocol)
- MTU (Maximum Transfer Unit)
- NIS Servers (Network Information Service)
- NIS Domains
- NTP Servers (Network Time Protocol)
- SMTP Server
- TFTP Server
- WINS Server Name
DHCP Applications
Microsoft introduced DHCP to NT Servers in late 1994 with Windows NT version 3.5. Despite calling it a new function, they didn’t invent it.
ISC introduced DHCP deployments for Unix in 1997 with version 1.0.0 of ISC-DHCP-SERVER. Later, a more RFC-compliant version (2.0) was released in 1999.
- Cisco: A server enabled in Cisco IOS 12.0 as of February 1999.
- Sun: On July 8, 2001, its support was added to the Solaris operating system.
Additionally, some routers support dynamic IP assignment for LANs of up to 255 computers.
How DHCP Works?
1) Discover
Clients send a request to the DHCP machine to obtain their IP addresses. The router can be configured to route packets to a server on a different subnet. The client application creates a UDP (User Datagram Protocol) package with a target of 255.255.255.255. It requires the last known ones, although it is not needed and can be ignored by the server.
2) Offer
It specifies the server configuration based on the media code of the specified client computer. The machine determines the number in the registry, which is given in other parameters.
3) Request
The client selects the configuration of the packets received from the Offer. The client once again requests a specific address specified by the server.
4) Acknowledge
It sends confirmation and closing messages showing the last parameters from the server to the client.
5) Pack
The server responds to DHCPREQUEST with a DHCPACK to complete the startup cycle. The source address is the server machine, and the destination one is still 255.255.255.255. But the Source Address is the code of the machine, and the destination one is still 255.255.255.255.
6) Inform
When a client PC needs to obtain an IP address, it sends a request to the DHCP server. The server then requests more information than what was sent with the original DHCPACK. Or it wants to repeat data for a specific use.
Let me give an example: browsers use this information to obtain the proxy configuration via WPAD. Such requests do not cause the server to refresh the expiration time in the database.
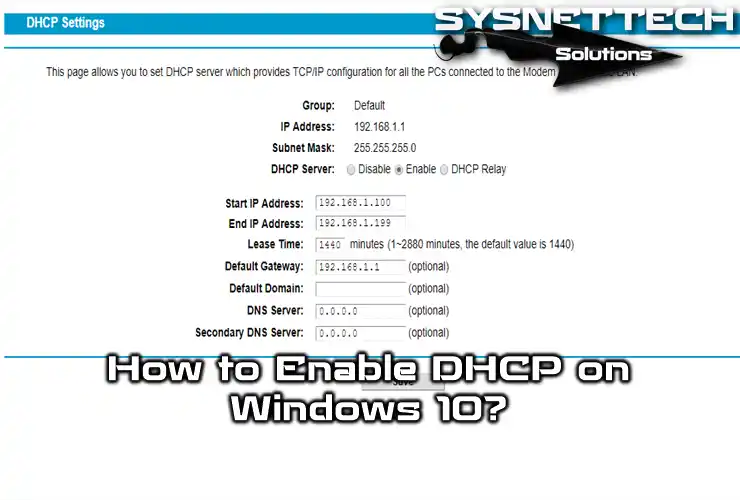
How to Enable DHCP on the ADSL Modem/Router using Windows 10
Suppose you are a home user using an ADSL modem. In that case, you must enable the DHCP server on your device to assign an automatic IP address to clients on your LAN.
Steps:
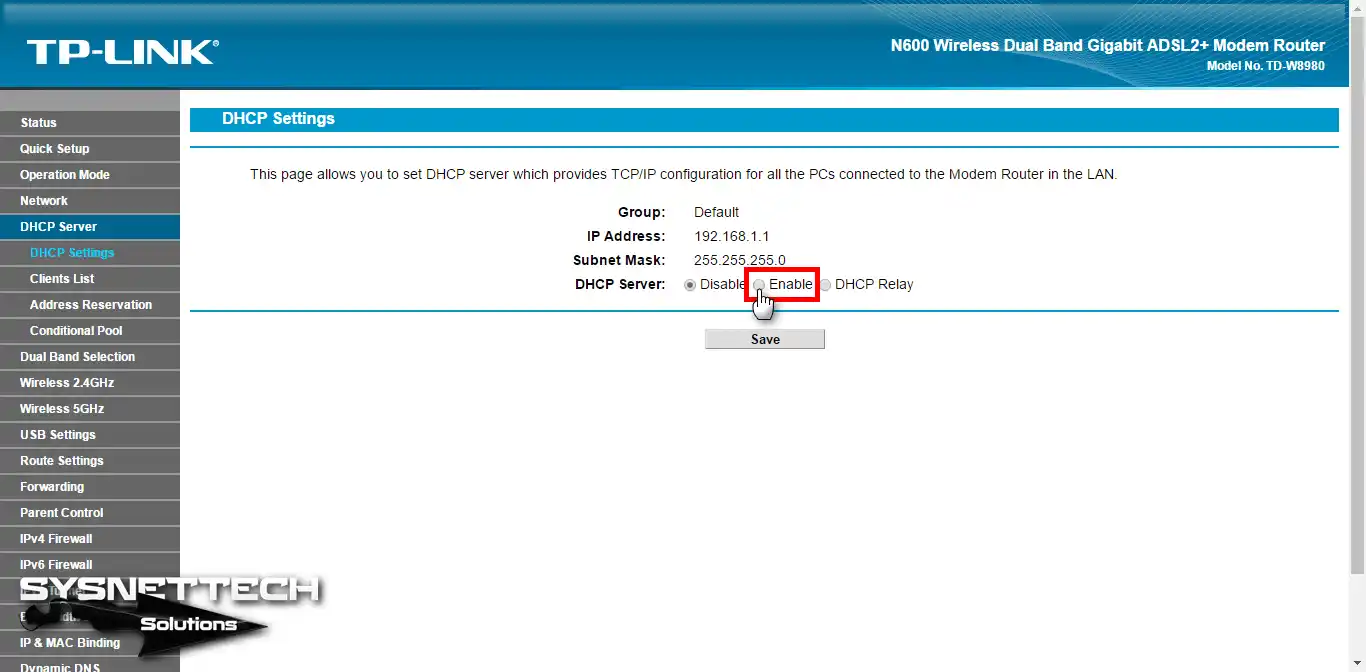
Step 1
To enable the DHCP PC on the TP-Link W8980 ADSL Router, first enter the default gateway number in your web browser, press Enter, and then click the DHCP machine.

Step 2
If this option is disabled, click Enable to reactivate it.
Step 3
After enabling the server, you can specify which numbers to use on the 192.168.1.0 network.
The following screenshot is set to assign values between 192.168.1.100 and 192.168.1.199. After entering the DNS addresses, save the settings.

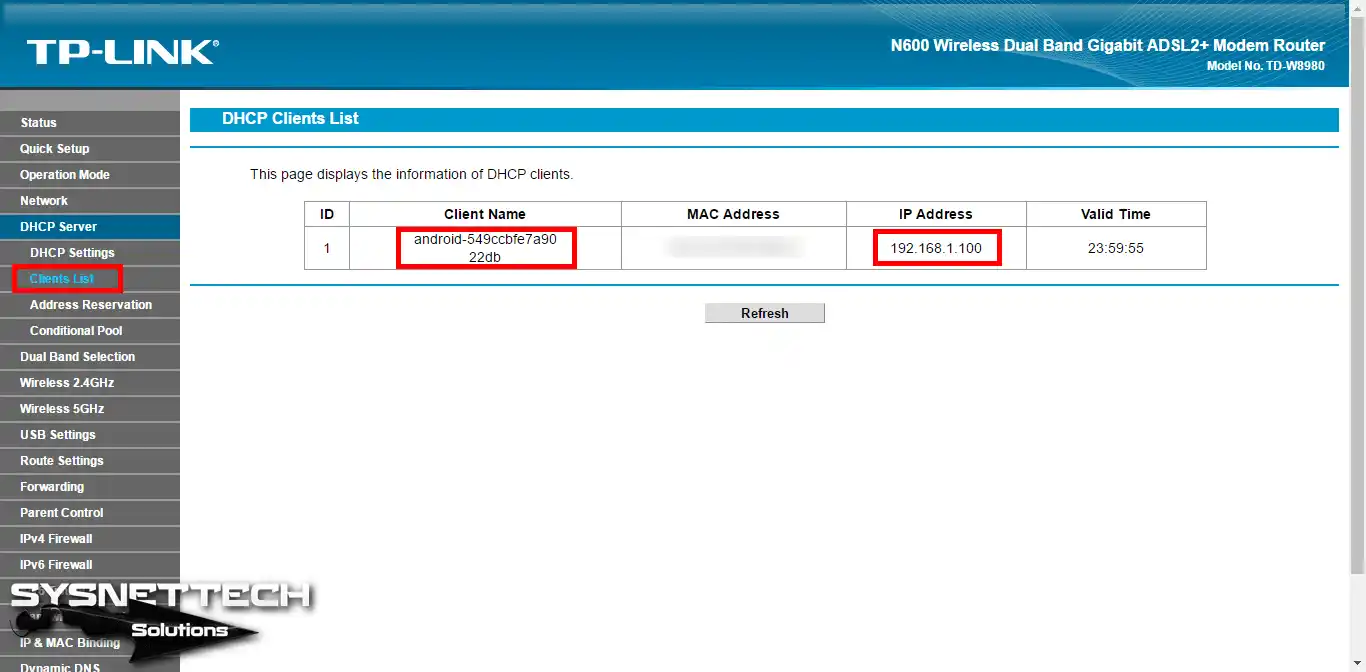
Step 4
If you look at the IP addresses assigned by the dynamic assignment server, you can see that the Android phone receives 192.168.1.100.
Automatic IP Settings and Configuration on Windows 10
For DHCP settings, you must configure your LAN adapter from the Network and Sharing Center.
Follow these steps to help a computer obtain an automatic address from the server.
Steps:
Step 1
The first step in enabling dynamic IP assignment is to open the Network and Sharing Center. As shown in the picture below, you can immediately access the LAN and the sharing center after clicking the Wireless icon.

Step 2
Click the WiFi card or Ethernet card you connected. Then, the WiFi status window will open.

Step 3
After the WiFi Status opens, click the Properties button. The WiFi properties window will open.

Adım 4
To set up your WiFi, go to the WiFi Properties window. Then, choose the IPv4 option and click on Properties. From there, you can adjust your WiFi settings however you like.

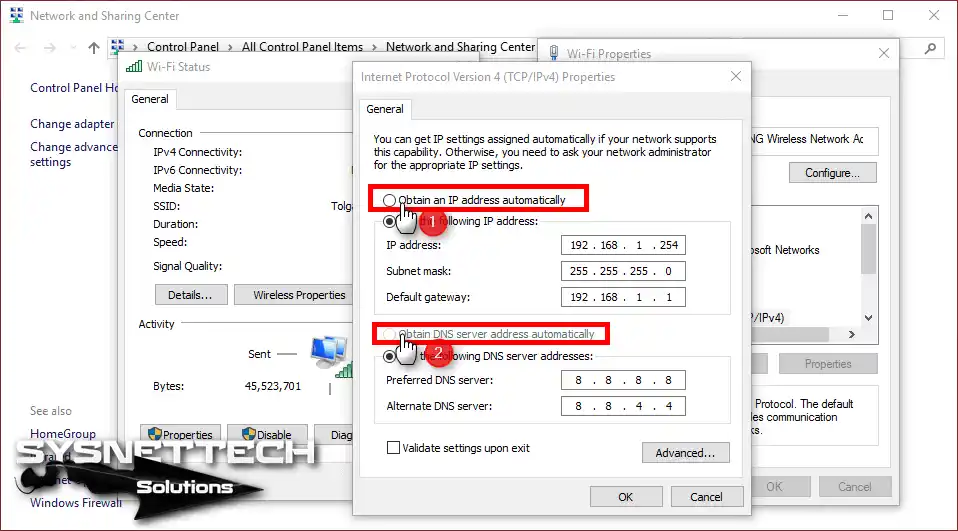
Step 5
The settings in the following image are statically set. You can enter the desired address manually. In this screen, we can enable the DHCP service to get an address from the modem.
For TCP settings on the Windows 10 platform, select the option in the following image. After choosing the automatic assignment, the Obtain an IP address automatically option will be enabled.
Step 6
After setting the IP settings to be automatically retrieved from the server, click OK to save the settings.

Step 7
After enabling client service, click on your WiFi card and automatically check the TCP information you receive.

What Happens If DHCP Is Turned Off?
As you can see, the system settings for automatically getting the Internet Protocol address are elementary. However, TCP/IP settings must be configured correctly. If this protocol is disabled, computers on the network cannot automatically obtain an IP address.
If you have 150-200 computers in a network environment, you must configure the server. Otherwise, you must manually configure this information and others.
If this protocol is turned off, you must manually configure it. In the above steps, you can examine the IP, Subnet Mask, Gateway, and DNS addresses assigned to a computer.
Suppose this protocol is turned off in a network environment with 200 computers. In that case, the computers cannot receive and communicate information from the Internet Protocol.
Video
To enable this server on the ADSL Router and configure automatic Internet Protocol addresses, you can watch the video below and subscribe to our YouTube channel to support us!
Conclusion
To summarize, I have examined the process of setting up a DHCP server, with a focus on ADSL modems and wireless routers. Finally, I have given you an IP address and essential network information. Thanks for following us!