
BitLocker — встроенная функция шифрования дисков в Windows 7, 8 и Windows 10, начиная с Профессиональных версий, позволяющая надежно зашифровать данные как на HDD и SSD — системных и нет, так и на съемных накопителях.
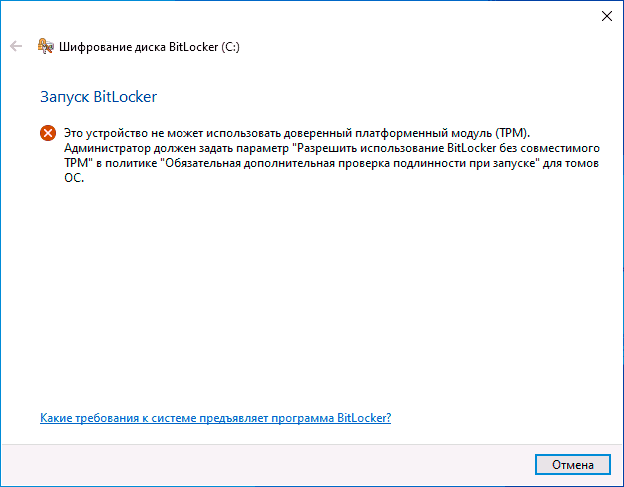
Однако, при включении шифрования BitLocker для системного раздела жесткого диска, большинство пользователей сталкиваются с сообщением о том, что «Это устройство не может использовать доверенный платформенный модуль (TPM). Администратор должен задать параметр Разрешить использование BitLocker без совместимого TPM». О том, как это сделать и зашифровать системный диск с помощью BitLocker без TPM и пойдет речь в этой короткой инструкции. См. также: Как поставить пароль на флешку с помощью BitLocker.
Краткая справка: TPM — специальный криптографический аппаратный модуль, использующийся для задач шифрования, может быть интегрирован в материнскую плату или подключаться к ней. Примечание: если ваш компьютер или ноутбук оснащен модулем TPM, а вы видите указанное сообщение, это может означать, что по какой-то причине TPM отключен в БИОС или не инициализирован в Windows (нажмите клавиши Win+R и введите tpm.msc для управления модулем).
Разрешить BitLocker без совместимого TPM в Windows 10 последней версии
В последней версии Windows 10 (1903 May 2019 Update) расположение политики, отвечающей за разрешение использования BitLocker для шифрования системного раздела диска без модуля TPM несколько изменилось (для предыдущих версий расположение описывается в следующем разделе).
Для включения шифрования BitlLocker без TPM в новой версии ОС проделайте следующие шаги:
- Нажмите клавиши Win+R на клавиатуре, введите gpedit.msc и нажмите Enter.
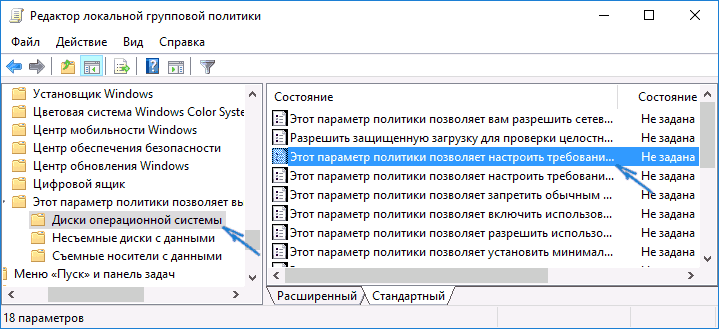
- Откроется редактор локальной групповой политики. Перейдите к разделу: Конфигурация компьютера — Административные шаблоны — Компоненты Windows — Шифрование диска BitLocker — Диски операционной системы.
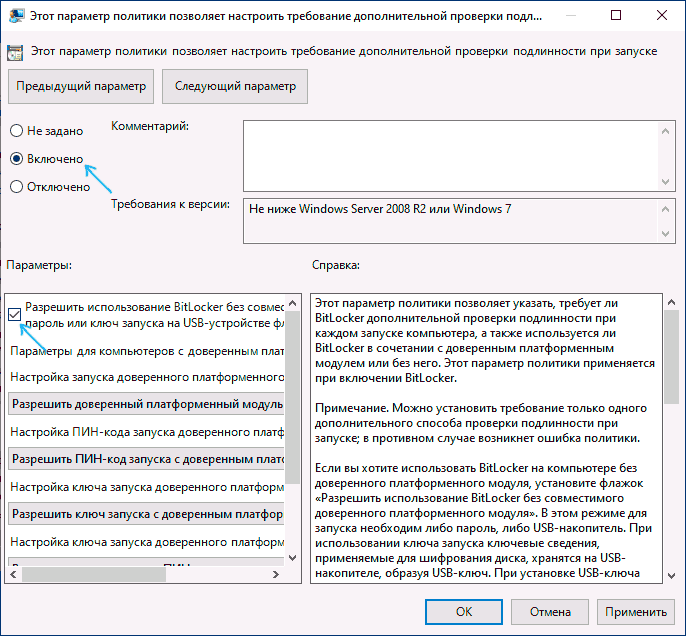
- В правой панели редактора локальной групповой политики найдите параметр «Этот параметр политики позволяет настроить требование дополнительной проверки подлинности при запуске» и дважды кликните по нему мышью. Обратите внимание, что в списке есть два параметра с таким именем, нам требуется тот, который без указания Windows Server.

- В открывшемся окне выберите пункт «Включено» и убедитесь, что пункт «Разрешить использование BitLocker без совместимого TPM включен». Примените сделанные настройки.


На этом процесс завершен и теперь вы можете включить шифрование BitLocker для системного раздела диска Windows 10.
Это же разрешение вы можете включить и с помощью редактора реестра: для этого в разделе HKEY_LOCAL_MACHINE\SOFTWARE\Policies\Microsoft\FVE создайте параметр DWORD с именем EnableBDEWithNoTPM и установите для него значение 1.
Разрешение использования BitLocker без совместимого TPM в Windows 10, 8 и Windows 7
Для того, чтобы возможно было зашифровать системный диск с помощью BitLocker без TPM, достаточно изменить один единственный параметр в редакторе локальной групповой политики Windows.
- Нажмите клавиши Win+R и введите gpedit.msc для запуска редактора локальной групповой политики.

- Откройте раздел (папки слева): Конфигурация компьютера — Административные шаблоны — Компоненты Windows — Этот параметр политики позволяет выбрать шифрование диска BitLocker — Диски операционной системы.

- В правой части дважды кликните по параметру «Этот параметр политики позволяет настроить требование дополнительной проверки подлинности при запуске.
- В открывшемся окне, установите «Включено», а также убедитесь, что стоит отметка «Разрешить BitLocker без совместимого доверенного платформенного модуля» (см. скриншот).
- Примените сделанные изменения.


После этого вы можете использовать шифрование дисков без сообщений об ошибках: просто выберите системный диск в проводнике, кликните по нему правой кнопкой мыши и выберите пункт контекстного меню «Включить BitLocker», после чего следуйте указаниям мастера шифрования. Также этом можно сделать в «Панель управления» — «Шифрование диска BitLocker».
Вы сможете либо задать пароль для получения доступа к зашифрованному диску, либо создать USB-устройство (флешку), которая будет использоваться в качестве ключа.

Примечание: в ходе шифрования диска в Windows 10 и 8 вам будет предложено сохранить данные для расшифровки в том числе в вашей учетной записи Майкрософт. Если она у вас должным образом настроена, рекомендую это сделать — по собственному опыту использования BitLocker, код восстановления доступа к диску из учетной записи в случае возникновения проблем может оказаться единственным способом не потерять свои данные.
BitLocker commonly needs a security chip called Trusted Platform Module, popularly known as TPM on your PC’s motherboard. This chip generates and stores the encryption key that you use for decrypting the file. But if you proceed to encrypt the drive without TPM, the OS directs you to set a system policy. Fortunately, for the systems that don’t support the installation of this chip, Windows provides you an option to Allow BitLocker Without a Compatible TPM.
The problem is that some older hard disks don’t possess TPM chip and even some new ones also. This happens when the manufacturer prefers to keep the costs low. However, you can easily bypass this restriction of the chip and continue with the encryption process through Group Policy Editor. But before you head towards the steps ensure that your PC is not joined to a domain. This process works perfectly when you do it for your own computer. Note – BitLocker feature is available only on computers loaded with either Windows 10 Enterprise and Windows 10 Professional.
How to Allow BitLocker Without a Compatible TPM in Windows 10
Step 1 – Open “Group Policy Editor” to Allow BitLocker Without a Compatible TPM in Windows 10. To launch it, first, type in gpedit.msc on Cortana text box. Press Enter when the same command shows up as the result.
Step 2 – Navigate to the given path in the left sidebar of the window that opens up.
Local Computer Policy => Computer Configuration => Administrative Templates => Windows Components => BitLocker Drive Encryption => Operating System Drives
Step 3 – Now, shift to the corresponding right pane of Operating System Drives. Here, search for the setting namely Require additional authentication at startup and double-click it.
Step 4 – Moving ahead, click Enabled button. Also, ensure that the option “Allow BitLocker without a compatible TPM (requires a password or a startup key on a USB flash drive)” is selected (see screenshot). Lastly, click OK to implement the TPM modification.
For reference, you may like to follow our guide on How to Change BitLocker Password in Windows 10.
Setup BitLocker Without TPM
Step 1 – Once you make the above changes in the Group Policy, you have to enable BitLocker. To do so, navigate Control Panel => BitLocker Drive Encryption => “Turn on BitLocker” for the drive you want.
Step 2 – As you don’t have the TPM, it provides you two options – a) Insert a USB flash drive and b) Enter a password.
Step 3 – So, choose the option as per preference and continue to Encrypt Drive Partition using BitLocker.
You may find another guide interesting to read – How to Change Default BitLocker Encryption Method and Cipher Strength on Windows 10.
How to Know If Your PC Has a TPM
Step 1 – Type tpm.msc on Cortana and press Enter to launch TPM Management snap-in console. If your PC does not have TPM, then console shows that Compatible cannot be found (see screenshot).
Step 2 – If the device has a TPM, you can see its manufacturer’s name, version, status and so on.
Conclusion
Hopefully, after following the above series of steps you can pretty much easily Allow BitLocker Without a Compatible TPM in Windows 10. However, when the PC boots, if you fail to provide password or USB drive, then BitLocker won’t be able to decrypt the drive. Hence, be careful with the password and enhance the security of your system to another level.
Readers help support Windows Report. We may get a commission if you buy through our links.
Read our disclosure page to find out how can you help Windows Report sustain the editorial team. Read more
Windows Bitlocker is a fantastic tool – allowing you to fully encrypt your data directly on the hard disk level, giving you an extra layer of privacy that you demand.
However, Bitlocker has its limitations – more like security features that prove to be a limitation for some. There is a security chip called Trusted Platform Module – or in short TPM – that is supposed to store the encryption key for your encrypted hard disk.
When you encrypt something, on the basic level, it is comparable to putting something in a locker – so the name BitLocker actually does make sense. Any encrypted data has a key known as its encryption key – whoever has this key is able to decrypt the data.
Now, obviously, this means the key needs to be stored somewhere safe – that is what the TPM chip is for.
Now the problem comes here – some older hard disks or even some newer ones don’t have this TPM chip, either because the hard disks were too old to consider it or the manufacturer was trying to keep the manufacturing costs low and thus skipped on an optional feature.
There is however a way to get around this requirement of a TPM and chip and encrypt your drive anyway.
How do you allow BitLocker without a compatible TPM?
- Open your Start Menu and type gpedit.msc, then click the top result.
- This will open the Group Policy Editor.
- Under Local Computer Policy, follow this path:
- Computer Configuration > Administrative Templates > Windows Components > BitLocker Drive Encryption > Operating System Drives.

- Now locate Require additional authentication at startup and right-click it, then click Edit.
- On this window, click Enabled and under Options check the box that says Allow BitLocker without a compatible TPM.
- Now click OK, and close the Local Policy Editor.
- Now open the BitLocker setup once again on the drive you want to encrypt, it should ask you to go through a restart to prepare the disk.
- Once you have restarted, it will ask you to set up a Startup key for every time you start your PC
- This is the key that was supposed to be saved on the TPM chip but since we have bypassed that, you will need to save this on a USB flash drive.
- That’s your key now.
Now you can encrypt your hard disk even though it doesn’t have a TPM chip – and store the key for encryption in a handy USB flash drive that you can unplug from your PC to deny access to the drive. It exactly works like a physical key at this point.
This is the beauty of Windows – the reason Windows is so complex is because of how many options it features.
It’s easy to make a feature – it’s harder to make a feature that can be tweaked in every way possible.
In case you are stuck on the Preparing BitLocker recovery screen; read this guide to learn about the solutions.
If you’re on Windows 11, don’t miss our guide on how to turn off BitLocker on Windows 11.
By following our suggestions, you can now use your Bitlocker without any further issues. Let us know which solution you used by leaving your feedback in the comments section below.
Madalina Dinita
Networking & Security Specialist
Madalina has been a Windows fan ever since she got her hands on her first Windows XP computer.
She is interested in all things technology, especially emerging technologies — AI and DNA computing in particular.
Prior to joining the WindowsReport team, she worked in the corporate world for a number of years.
Bitlocker is basically a drive encryption tool that allows you to protect your drive against any system or firmware unauthorized access. Normally, you need a computer system with TPM to execute Bitlocker drive encryption. If you try to open it without a TPM, your computer system will tell you that the administrator needs to set a system policy option. In this article, we will discuss how to allow Bitlocker without a compatible TPM in Windows 10.
- Part 1: What is TPM?
- Part 2: How to Enable Bitlocker without TPM
Part 1: What Is TPM (Trusted Platform Module)
Before heading towards the methods, let’s find out what TPM exactly is. TPM, or Trusted Platform Module, is a microchip on your computer’s motherboard that generates and stores the Bitlocker encryption keys. When you log on to your Windows during start-up, it automatically unlocks the encrypted drive. If someone tries to tamper with your PC or remove the drive, it will not decrypt without the TPM key. Likewise, the TPM key will not work if it is moved to another computer as well.
Some computers come with an in-built TPM microchip, while others need it to be added later. However, if your computer does not support one, you will need to enable Bitlocker without a compatible TPM. Although it is less secure, it is still better than nothing.
Part 2: How to Enable Bitlocker Without TPM
Ideally, it is recommended that you should install a TPM chip in your computer system and use Bitlocker. However, if you are unable to do so, don’t worry. There is a way that you can try to enable Bitlocker without a compatible TPM. To do this, you will need to reconfigure the default settings in Bitlocker. In this way, you can store the encryption keys on a separate removable device that needs to be inserted every time you boot your computer. You can do this in three easy steps:
- Step 1: Configure Settings in Group Policy to Enable Bitlocker Without TPM.
- Step 2: Apply the Group Policy Changes to Take Effect.
- Step 3: Set Up Bitlocker on Computer.
Note: Make sure to update your BIOS to the latest version before doing this. Your Bitlocker may take time to complete the encryption process. The time duration will depend on the size of the drive and the amount of data.
Step 1: Configure Settings in Group Policy to Enable Bitlocker Without TPM
In the first step, we will configure the group policy setting to enable Bitlocker without a compatible TPM. To do this, you have to:
1. Click on the Windows icon on the bottom-left corner of your computer screen. This will open the Start menu.
2. In the search bar, type gpedit.msc and press Enter.
3. Select Group Policy Object Editor from the search results to open it.
4. From the left pane, locate Computer Configuration. Under that, double-click on Administrative Templates to expand it. The subfolders under Administrative Templates will appear.
5. Now, double-click on Windows Components.
6. From there, select Bitlocker Drive Encryption.
7. Now, click on Operating System Drives. A list of settings will appear on your right pane.
8. From there, double-click on Require additional authentication at start-up. A window box will appear.
9. Since the default settings of the «Require additional authentication at start-up» are not configured, thus we need to enable them. To do this, simply click on Enable. The rest of the options will be enabled automatically. Now, simply press OK and close the Group Policy Object Editor.
Step 2. Apply the Group Policy Changes to Take Effect
After that, we need to apply the group policy changes through the gpupdate.exe /force command. To do this, you have to:
1. Type CMD in the search box from the Start button, right click on Command Prompt and choose Run as administrator.
2. Type gpupdate.exe /force into the search bar and press Enter. The process might take a few minutes. Once it is complete, the group policy changes will be applied.
Step 3. Set Up Bitlocker on Computer
Lastly, you need to enable the Bitlocker Drive Encryption with a removable storage drive or a USB Flash drive. To do this, you have to:
1. Press the Windows key from your keyboard to open the Start menu. Type Control Panel in the search bar and hit Enter.
2. From here, select System and Security and click on Bitlocker Drive Encryption.
3. To enable Bitlocker for a drive, click Turn on Bitlocker.
4. The start-up preference page for Bitlocker start-up will appear. Follow the on-screen instruction to prepare your drive for Bitlocker.
5. After that, it will ask you how you want to unlock your drive during start-up. You can either choose Enter a Password or Insert a USB Flash Drive. If you choose the former, you will need to enter a password every time you start your computer. However, with the latter, you’ll need to insert the USB drive every time your PC boots in order to access your files.
6. Select Enter a Password And set a start-up password.
7. After that, Bitlocker will ask you to make a recovery key. Select Save to USB Flash Drive.
8. Now, follow the on-screen instructions to enable the Bitlocker Driver Encryption.
Summary
Typically, Bitlocker requires a computer system with a compatible Trusted Platform Module (TPM). However, in some cases, you may need to allow Bitlocker without a compatible TPM. That is why this article provides you with a step-by-step on how to allow/enable Bitlocker without a compatible TPM in your Windows 10. In case you forget your Windows password, you can easily recover your Windows password through PassFab 4WinKey. And with that, I bid you all a Farewell and a Good Luck!
Back to Blog
13Apr2017
BitLocker used to require an Enterprise or Ultimate copy of Windows 7. These days, it is included with Windows 10 Pro, which many people get OEM with their computer. This is great news, because it means that you will be able to fully encrypt your hard drive, making it much safer in the event of loss or theft.
Full disk encryption is becoming more and more necessary with an increasing number of information workers going mobile and choosing devices like ultra-books. Furthermore, there is an increasing need for compliance with standards like HIPAA, FINRA, PCI and more, which all require encryption of sensitive datasets at rest and in transit (BitLocker encrypts “at rest” data).
Even for a typical/standard user with any amount of personal data stored on the device, I strongly recommend enabling this protection (or some other encryption software).
Enabling BitLocker with TPM
Many modern systems come with a Trusted Platform Module (TPM) chip. This is a special piece of hardware on your motherboard that stores cryptographic information, and is unique to your device. So if you have BitLocker enabled and it is able to leverage the TPM chip, that means that removing the hard disk and attempting to read it somewhere else will be fruitless–there is no way to read the data without that chip.
The other major benefit that TPM owners enjoy is that there is no need to input a BitLocker password or USB key upon boot, since the TPM chip contains the “unlock key” already. Users without a TPM chip will be required to provide a password (different than your Windows password), and this means every single time the computer boots or is restarted for any reason, you actually have to login to the machine twice. Windows won’t even begin to load until that first prompt is taken care of. Again, with a TPM in place, you will have no issues. You can reboot, and not need any sort of human interaction to complete the boot sequence.
Turning BitLocker on is pretty straightforward. The key is, your TPM has to be enabled–many devices will have this on by default (like the Surface line of products from Microsoft), but for others you might have to go into BIOS/Setup (oftentimes this means pressing F1, F11, some other “F” key or DEL as your machine first boots–to enter Setup Mode). Once you find and enable the TPM, Save & Exit your system BIOS and boot back to Windows.
Depending on your view settings in Control Panel, find BitLocker as follows:
- Control Panel > System and Security > BitLocker Drive Encryption > Turn on BitLocker OR
- Control Panel > BitLocker Drive Encryption > Turn on BitLocker
Enabling BitLocker without TPM
This process has a few extra steps, but they aren’t difficult to follow. Administrators, you can control this through Group Policy also. Users that have administrative control of their own device would do the following:
- Right-click on the Start Menu, and click Run (or Windows Key + R)
- Type gpedit.msc and press enter
- Navigate to Local Computer Policy > Computer Configuration > Administrative Templates > Windows Components > BitLocker Drive Encryption > Operating System Drives
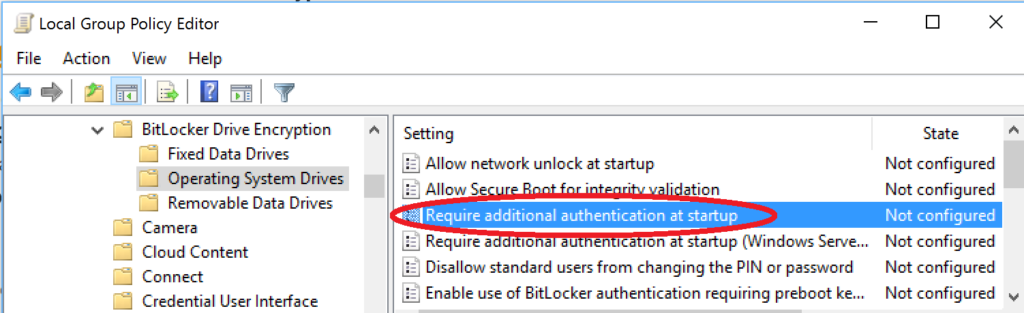
- Double-click the “Require additional authentication at startup” option in the right pane
- Select “Enabled” and be sure to select the check mark box for: Allow BitLocker without a compatible TPM (requires a password or a startup key on a USB flash drive)
- Now you can go to Control Panel > BitLocker Drive Encryption > Turn on BitLocker
- You will be prompted for how you’d like to configure the unlock (via USB key or password)
- Continue through to the end of the Wizard
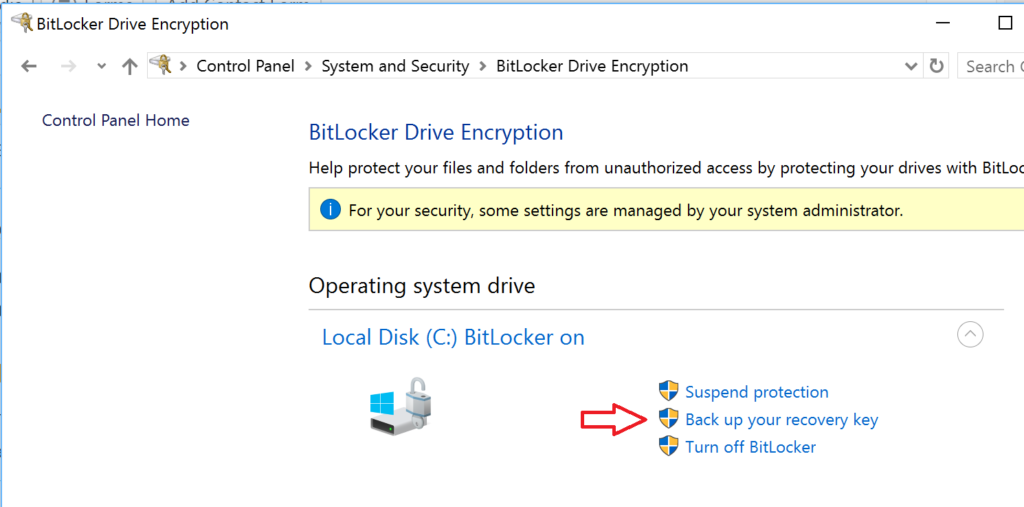
Save your recovery key
At the end of either process, you should have an option to back up the BitLocker recovery key. If you missed this step or didn’t do it, you can always return to this area in the Control Panel and click Back up your recovery key. You can save it to a file, print it, or even back it up to the cloud.
Discover more from ITProMentor
Subscribe to get the latest posts sent to your email.
Back to Blog