
Все современные пользователи ПК серьезно озабочены безопасностью своего устройства. И речь идет не только о защите от вирусов и шпионских программ при работе в Интернете, но и о сохранности данных, размещенных на жестких дисках. Если вы решите купить Windows 7 Professional и установить в качестве основной системы, то можно ли будет как-то обезопасить свои данные? Да – для этого в системе предусмотрено шифрование диска Bitlocker. Благодаря данному модулю никто не сможет получить доступ к файлам, не имея специального ключа. Поэтому даже при загрузке файлов посторонними лицами они ничего не смогут добиться. Функция будет также полезна при использовании внешних жестких дисков, которые подключаются к сторонним ПК. А как включить эту функцию?
_02.jpg)
Порядок включения Bitlocker
Прежде всего, важно отметить несколько нюансов. Модуль шифрования доступен только на системах, начиная от Win 7 (и не для базовых редакций). При этом материнская плата ПК должна иметь модуль TPM, который и необходим для шифрования. Однако последнее требование можно обойти, используя альтернативные подходы. Также учтите, что процесс может потребовать достаточно много времени. Но вернемся к основному функционалу. Итак, как включить Bitlocker Windows 7 Professional:
- запустите диалоговое окно «Выполнить», нажав Win + R или найдя соответствующее меню в «Пуске»;
- введите в пустую строку «gpedit.msc» и нажмите Ок, вы попадете в редактор групповых политик;
- в новом окне в левой части найдите строку «Конфигурация компьютера» и раскройте ее;
- в подменю найдите пункт «Административные шаблоны» и также откройте его;
- в новом меню перейдите к пункту «Компоненты Windows»;
- отыщите папку «Шифрование диска Bitlocker» и раскройте ее;
- в новом подменю выделите «Диски операционных систем» и активируйте.
Вы попадаете в меню, где можно задать параметры запуска и настроить шифрование. Найдите в этом меню пункт «Включить» и поставьте напротив него галочку. Чуть ниже в дополнительном меню с настройками вы можете поставить галочку напротив функции запуска Bitlocker без модуля TPM, о чем упоминалось выше. Сделайте это, если ваша материнская плата не имеет соответствующего модуля.
Закройте данное окно и перейдите в «Панель управления». Теперь в ней появится новый пункт, который и отвечает за включение Bitlocker в Windows 7 Professional. Перейдите в него и выберите жесткий диск, на котором вы хотите активировать шифрование. После этого запустится процесс настройки. Внимательно следите за ним и подтверждайте действия, чтобы обеспечить максимальную точность. После вам будет предоставлен пароль для получения доступа к зашифрованным файлам.
Обязательно проследите, чтобы процесс успешно завершился без сбоев в системе. Иначе велик риск, что вам придется переустанавливать всю ОС, так как у вас попросту не будет доступа к закрытым данным.
BitLocker — встроенная функция шифрования дисков в Windows 7, 8 и Windows 10, начиная с Профессиональных версий, позволяющая надежно зашифровать данные как на HDD и SSD — системных и нет, так и на съемных накопителях.
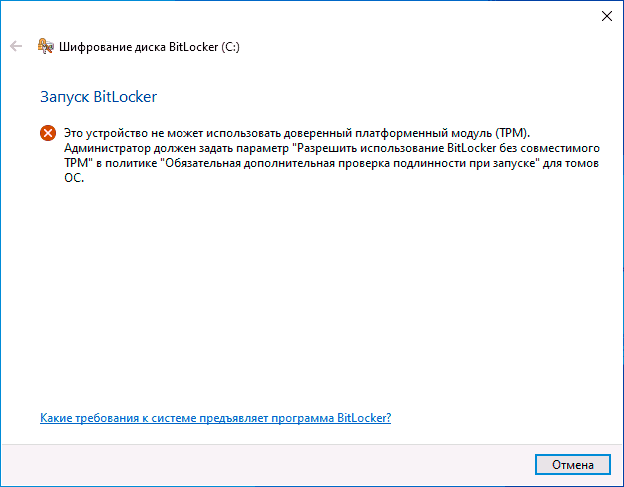
Однако, при включении шифрования BitLocker для системного раздела жесткого диска, большинство пользователей сталкиваются с сообщением о том, что «Это устройство не может использовать доверенный платформенный модуль (TPM). Администратор должен задать параметр Разрешить использование BitLocker без совместимого TPM». О том, как это сделать и зашифровать системный диск с помощью BitLocker без TPM и пойдет речь в этой короткой инструкции. См. также: Как поставить пароль на флешку с помощью BitLocker.
Краткая справка: TPM — специальный криптографический аппаратный модуль, использующийся для задач шифрования, может быть интегрирован в материнскую плату или подключаться к ней. Примечание: если ваш компьютер или ноутбук оснащен модулем TPM, а вы видите указанное сообщение, это может означать, что по какой-то причине TPM отключен в БИОС или не инициализирован в Windows (нажмите клавиши Win+R и введите tpm.msc для управления модулем).
Разрешить BitLocker без совместимого TPM в Windows 10 последней версии
В последней версии Windows 10 (1903 May 2019 Update) расположение политики, отвечающей за разрешение использования BitLocker для шифрования системного раздела диска без модуля TPM несколько изменилось (для предыдущих версий расположение описывается в следующем разделе).
Для включения шифрования BitlLocker без TPM в новой версии ОС проделайте следующие шаги:
- Нажмите клавиши Win+R на клавиатуре, введите gpedit.msc и нажмите Enter.
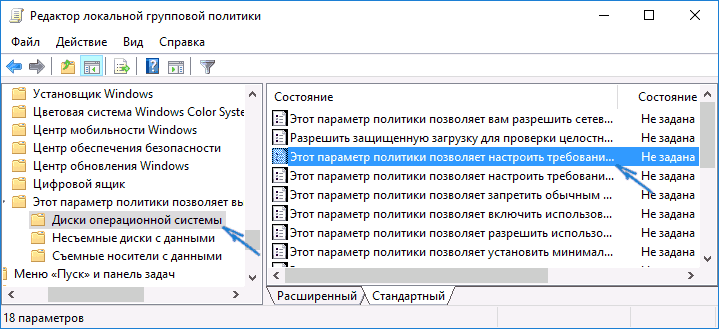
- Откроется редактор локальной групповой политики. Перейдите к разделу: Конфигурация компьютера — Административные шаблоны — Компоненты Windows — Шифрование диска BitLocker — Диски операционной системы.
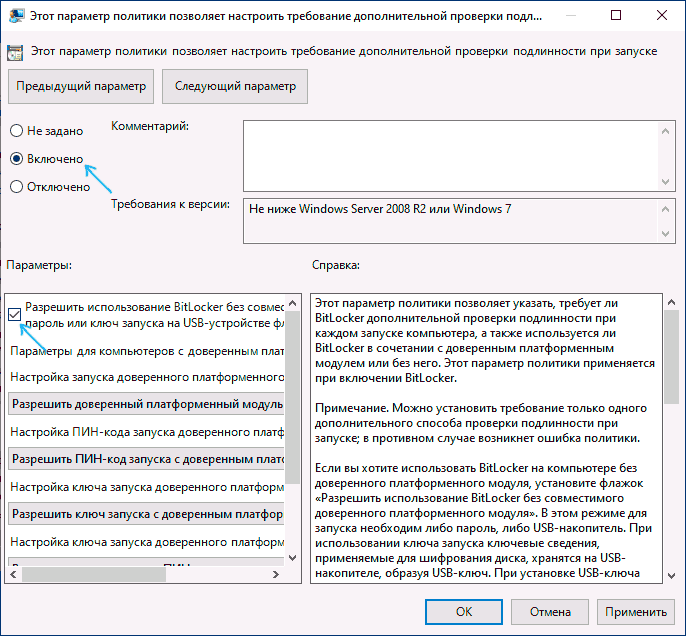
- В правой панели редактора локальной групповой политики найдите параметр «Этот параметр политики позволяет настроить требование дополнительной проверки подлинности при запуске» и дважды кликните по нему мышью. Обратите внимание, что в списке есть два параметра с таким именем, нам требуется тот, который без указания Windows Server.

- В открывшемся окне выберите пункт «Включено» и убедитесь, что пункт «Разрешить использование BitLocker без совместимого TPM включен». Примените сделанные настройки.


На этом процесс завершен и теперь вы можете включить шифрование BitLocker для системного раздела диска Windows 10.
Это же разрешение вы можете включить и с помощью редактора реестра: для этого в разделе HKEY_LOCAL_MACHINE\SOFTWARE\Policies\Microsoft\FVE создайте параметр DWORD с именем EnableBDEWithNoTPM и установите для него значение 1.
Разрешение использования BitLocker без совместимого TPM в Windows 10, 8 и Windows 7
Для того, чтобы возможно было зашифровать системный диск с помощью BitLocker без TPM, достаточно изменить один единственный параметр в редакторе локальной групповой политики Windows.
- Нажмите клавиши Win+R и введите gpedit.msc для запуска редактора локальной групповой политики.

- Откройте раздел (папки слева): Конфигурация компьютера — Административные шаблоны — Компоненты Windows — Этот параметр политики позволяет выбрать шифрование диска BitLocker — Диски операционной системы.

- В правой части дважды кликните по параметру «Этот параметр политики позволяет настроить требование дополнительной проверки подлинности при запуске.
- В открывшемся окне, установите «Включено», а также убедитесь, что стоит отметка «Разрешить BitLocker без совместимого доверенного платформенного модуля» (см. скриншот).
- Примените сделанные изменения.


После этого вы можете использовать шифрование дисков без сообщений об ошибках: просто выберите системный диск в проводнике, кликните по нему правой кнопкой мыши и выберите пункт контекстного меню «Включить BitLocker», после чего следуйте указаниям мастера шифрования. Также этом можно сделать в «Панель управления» — «Шифрование диска BitLocker».
Вы сможете либо задать пароль для получения доступа к зашифрованному диску, либо создать USB-устройство (флешку), которая будет использоваться в качестве ключа.

Примечание: в ходе шифрования диска в Windows 10 и 8 вам будет предложено сохранить данные для расшифровки в том числе в вашей учетной записи Майкрософт. Если она у вас должным образом настроена, рекомендую это сделать — по собственному опыту использования BitLocker, код восстановления доступа к диску из учетной записи в случае возникновения проблем может оказаться единственным способом не потерять свои данные.
How to enable Bitlocker is our next topic for the followers of Get IT Solutions, in today’s article. Also we are going to explain how to use TPM+PIN combination of authentication mechanism and how Bitlocker works.
What is BitLocker and how bitlocker works
BitLocker Drive Encryption works by encrypting contents of your chosen disk and then creating an encryption key. Without this key, access to the encrypted disk cannot be given. This is particularly useful for laptop owners who keep sensitive information on their computer. BitLocker is Microsoft’s easy-to-use, proprietary encryption program for Windows. Encrypting your entire drive can help protect against unauthorized changes to your system such as firmware-level malware. It is designed to protect data by providing encryption for entire volumes. By default, it uses the AES encryption algorithm in cipher block chaining (CBC) or XTS mode with a 128-bit or 256-bit key. CBC is not used over the whole disk; it is applied to each individual sector
BitLocker is used in conjunction with a hardware component called a Trusted Platform Module (TPM). The TPM is a smartcard-like module on the motherboard that is installed in many newer computers by the computer manufacturer. BitLocker stores its recovery key in the TPM (version 1.2 or higher). The following combinations of the above authentication mechanisms are supported, all with an optional escrow recovery key:
- TPM only
- TPM + PIN
- TPM + PIN + USB Key
- TPM + USB Key
- USB Key
- Password only
Requirements
BitLocker could not be enabled for Windows 7 Professional and it cannot be downloaded and installed. You can turn on bitlocker for Windows 7 Ultimate and Windows 7 Enterprise editions. The computers without TPMs also can use BitLocker. Computers without TPMs will not be able to use the system integrity verification that BitLocker can also provide. To use BitLocker, your computer must satisfy certain requirements. Supported operating systems:
-
- Windows 10 – Education, Pro, or Enterprise edition
- Windows 8 — Professional or Enterprise edition
- Windows 7 — Enterprise or Ultimate edition
- For Windows 7, the Trusted Platform Module (TPM) version 1.2 or higher must be installed. It must also be enabled and activated (or turned on).
Additional requirements:
- You must be logged in as an administrator.
- You must have access to a printer to print the recovery key.
TPM module bitlocker
If your computer meets the Windows version and TPM requirements, the process for enabling BitLocker is as follows:
Step1. Click Start, and in search bar start typing BitLocker Drive Encryption
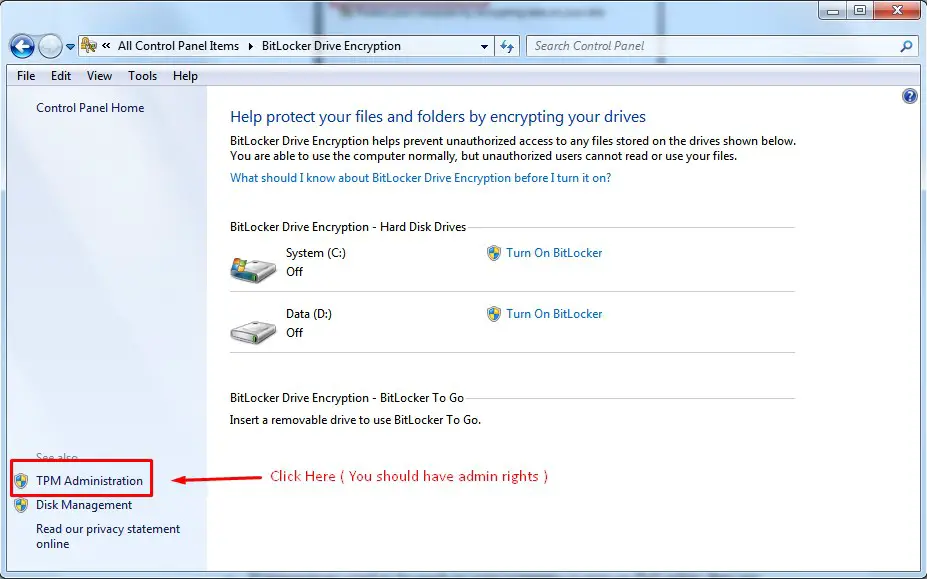
Search for bitlocker on control panel
Step2. Click TPM Administration (You should have admin rights)
TPM module bitlocker
Step3. Start Initializing TPM by clicking Initialize TPM, in the right panel
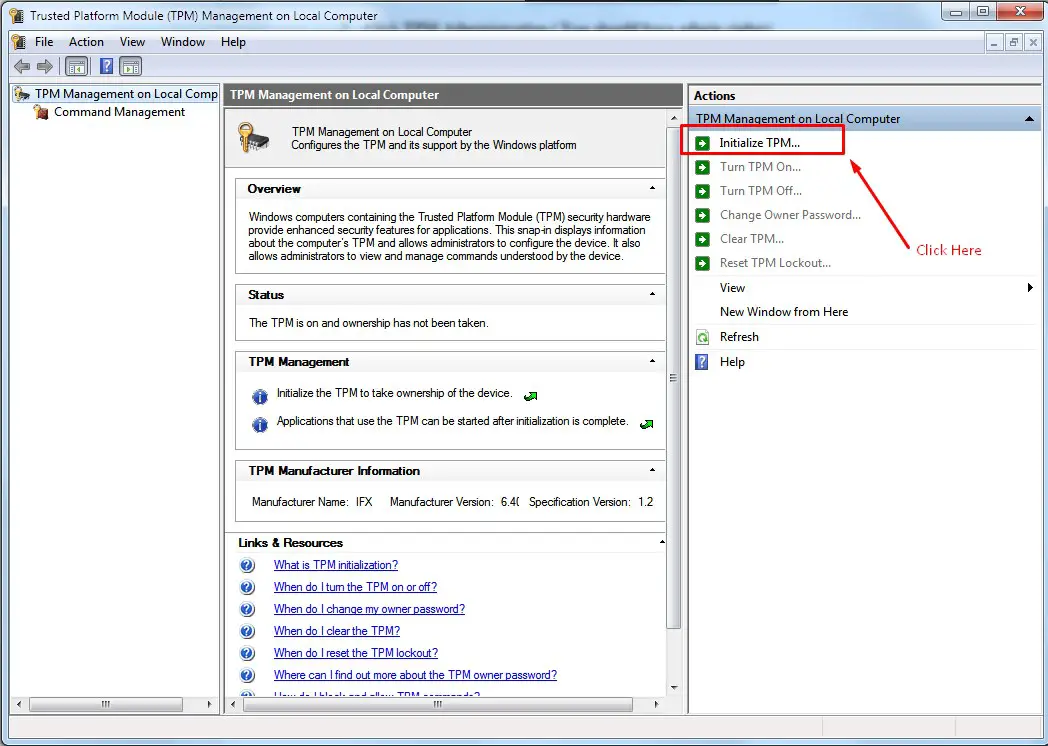
Start TPM module bitlocker
- You need to restart your computer.
- Save the recovery key of TPM in a USB key.
- Restart your computer again
Enable bitlocker Windows 7 & Windows 10
These is the TPM+PIN combination of authentication mechanism
Step1. Open Local Group Policy Editor by typing Run and gpedit.msc
gpedit.msc
Step2. Go to Operating System Drives by following these path:
Computer Configuration > Administrative Templates > Windows Components > Bitlocker drive Encryption > Operating System Drives
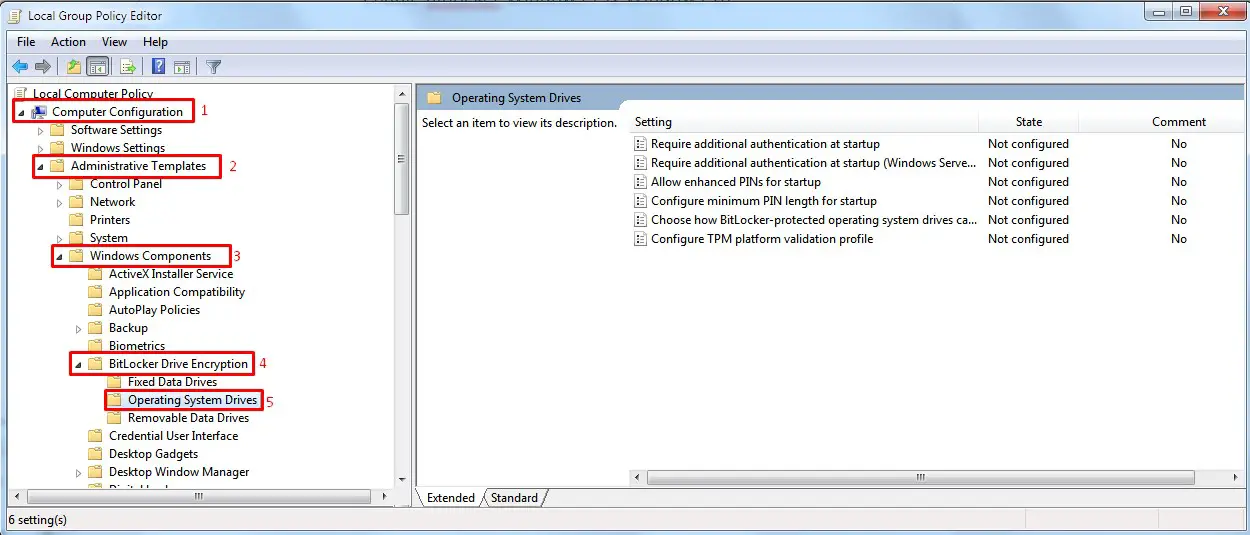
Enable bitlocker gpedit
Step3. Enable Require additional authentication at startup and do the following configurations. After that click OK
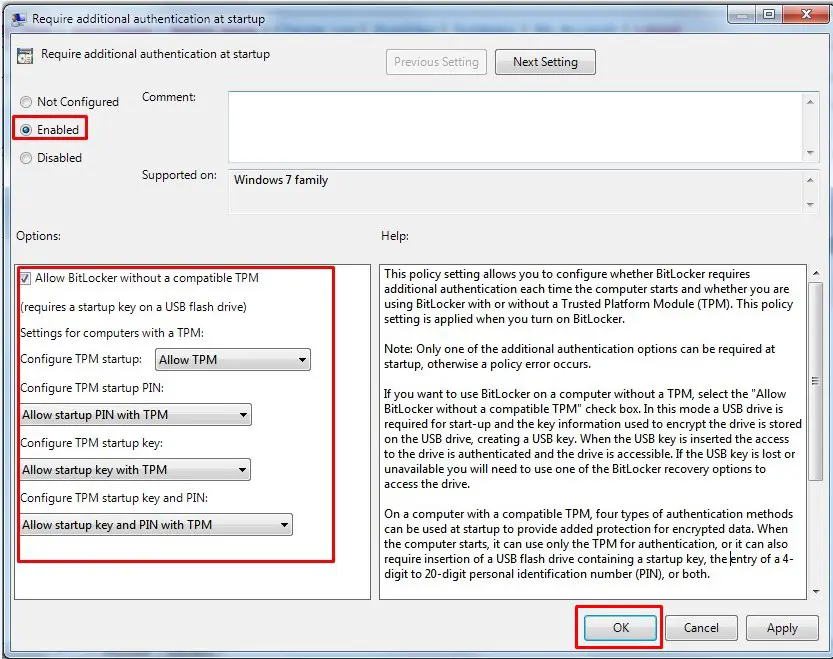
Require additional authenticcation at startup
Step4. Enable Allow enhanced PINs for startup. Click OK.
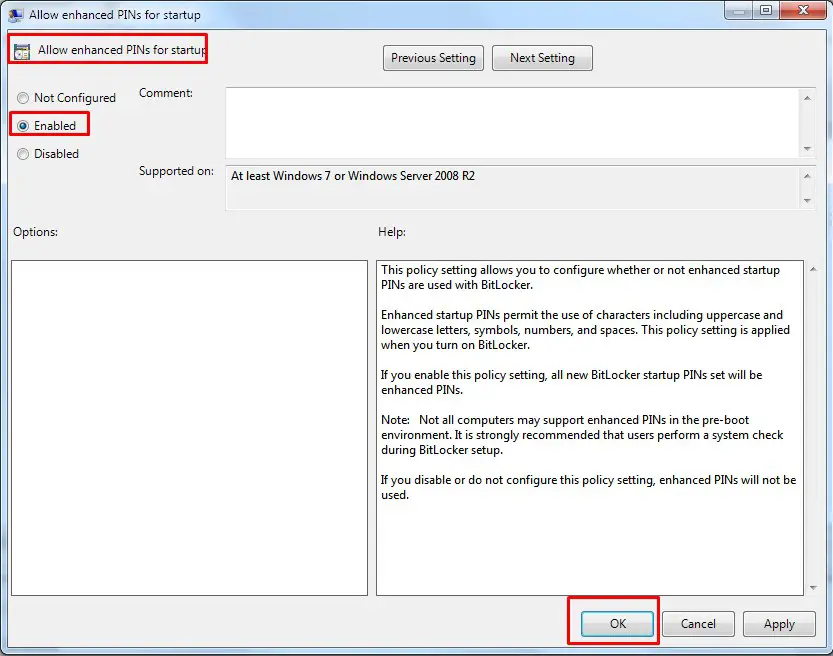
Allow enhanced PINs for startup
Step5. Open command prompt and type: gpupdate /force. After that restart or log off
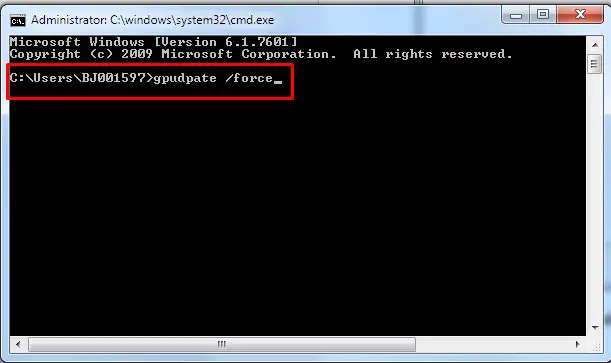
gpupdate
How to encrypt Windows 7 and Windows 10
Step1. Click Start, and in the search bar start typing BitLocker Drive Encryption. Start by encrypting System C or Data D by clicking Turn On Bitlocker
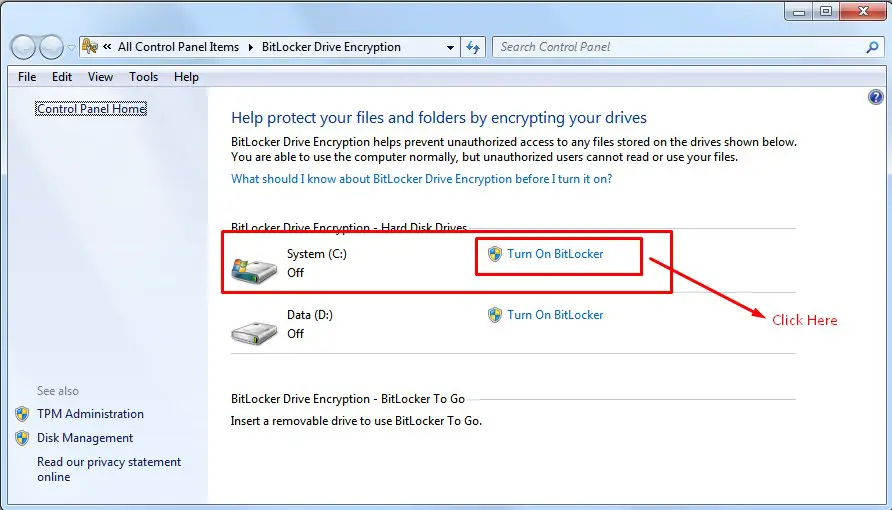
How to encrypt windows 7 and window 10
BitLocker scans your computer to verify that it meets the system requirements. If your computer meets the system requirements, the setup wizard continues. Click Next
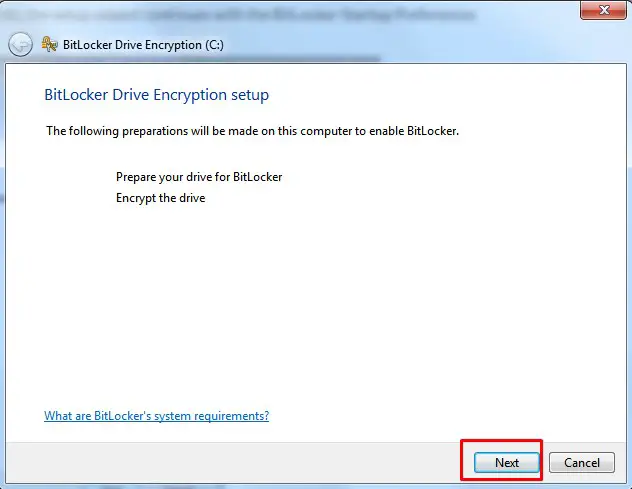
Encrypt the drive
Step 2. When the BitLocker startup preferences page is displayed, click Require a PIN at every startup.
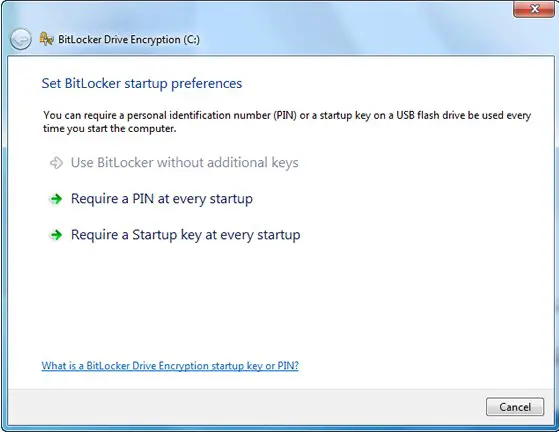
Require a PIN at every startup
Enter a PIN from 8 to 20 characters long and then enter it again in the Confirm PIN field. Click Set PIN. Note: You will need to enter your PIN each time you start your computer.
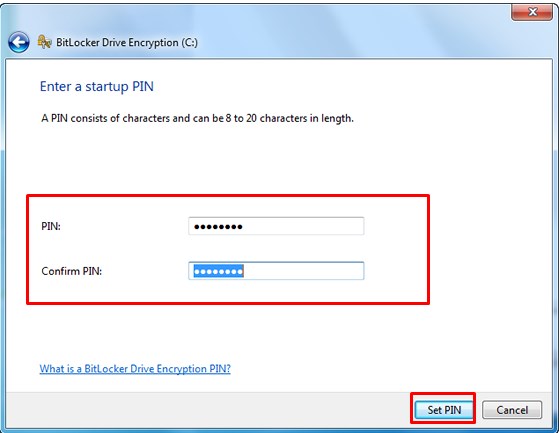
Enter a PIN at every startup
You can store your recovery key in a USB, or select Print the recovery key to print it. And then click Next. Note: Make sure your computer is connected to a printer.
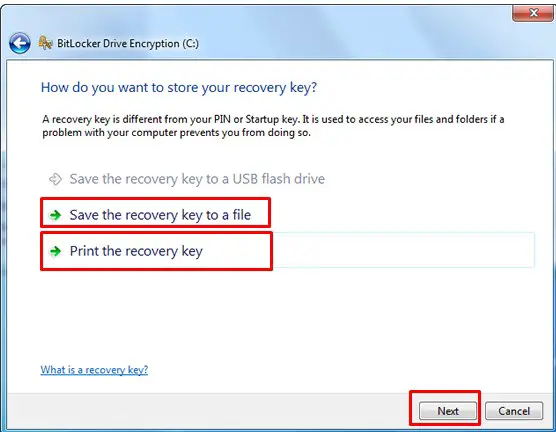
Print the recovery key
You will be prompted to restart your computer to start the encryption process. Your computer can be used while your drive is being encrypted. If you want to enable Bitlocker and encrypt even the Drive D of your PC just follow the same steps (in the section How to encrypt Windows 7 and Windows 10)
Logging in
Enabling BitLocker will change the way you log in to your system. You need to enter your PIN at every startup, prior to entering your password. This is designed to provide an additional layer of security for your data.
Enabling Bitlocker on Microsoft Windows 7 Professional 64 bit
Updated 6/24/18
A while back, I added a new laptop that required Enabling Bitlocker on Microsoft Windows 7 Professional 64 bit. At that time some of my other devices run Windows 7 Ultimate 32 bit with Bitlocker security encryption enabled (since upgraded to various Windows 10 editions). However back then, I ran into a problem getting Bitlocker to work on the 64 bit version of Windows 7 Professional.
Yes I know I should not be using Windows and I also have plenty of iDevices and other Apple products lying around. Likewise to the security pros and security arm-chair quarterbacks I know I should not be using Bitlocker, instead using Truecrypt of which I have done some testing and may migrate too in the future along with self-encrypting device (SED).
However lets stay on track here ;).
Image courtesy of Lenovo.com
The problem that I ran into with my then new Lenovo X1 was that it came with Windows 7 Professional 64 bit, which has a few surprises when trying to turn on Bitlocker drive encryption. Initializing and turning on the Trusted Platform Module (TPM) management was not a problem, however for those needing to figure out how to do that, check out this Microsoft TechNet piece.
The problem was as simple as not having a tab and easy way to enable Bitlocker Drive Encryption with Windows 7 Professional 64 bit. After spending some time searching around various Microsoft and other sites to figure out how to hack, patch, script and do other things that would take time (and time is money), it dawned on me. Could the solution to the problem be as simple as upgrading from the Professional version of Windows 7 bit to Windows 7 Ultimate?
Update: 6/25/18
While this post is about Windows 7, there are some new challenges with Windows 10 bit locker and removable devices including USB. These new issues are tied to Windows 10 running in BIOS instead of UEFI boot mode.
Here are some additional Windows 10 Bitlocker related resources:
Windows 7 image courtesy of Amazon.com
The answer was going to the Microsoft store (or Amazon among other venues) and for $139.21 USD (with tax) purchase the upgrade.
Once the transaction was complete, the update was automatically and within minutes I had Bitlocker activated on the Lenovo X1 (TPM was previously initiated and turned on), a new key was protected and saved elsewhere, and the internal Samsung 830 256GB Solid State Device (SSD) initializing and encrypting. Oh, fwiw, yes the encryption of the 256GB SSD took much less time than on a comparable Hard Disk Drive (HDD) or even an HHDD (Hybrid HDD).
Could I have saved the $139.21 and spent some time on work around? Probably, however as I did not have the time or interest to go that route, however IMHO for my situation it was a bargain.
Sometimes spending a little money particular if you are short on or value, your time can be a bargain as opposed to if you are short on money however long on time.
I found the same to be true when I replaced the internal HDD that came with the Lenovo X1 with a Samsung 256GB SSD in that it improved my productivity for writing and saving data. For example in the first month of use I estimate easily 2 to three minutes of time saved per day waiting on things to be written to HDDs. In other words 2 to three minutes times five days (10 to 15 minutes) times four weeks (40 to 60 minutes) starts to add up (e.g. small amounts or percentages spread over a large interval add up), more on using and justifying SSD in a different post.
Samsung SSD image courtesy of Amazon.com
If your time is not of value or you have a lot of it, then the savings may not be as valuable. On the other hand, if you are short on time or have a value on your time, you can figure out what the benefits are quite quickly (e.g. return on investment or traditional ROI).
Where To Learn More
Learn more about Windows, Bitlocker and related topics
- Part 1 of HDD for content servers series Trends and Content Application Servers
- As the platters spin, HDD’s for cloud, virtual and traditional storage environments
- PCIe Server I/O Fundamentals
- If NVMe is the answer, what are the questions?
- Via Computerweekly – NVMe discussion: PCIe card vs U.2 and M.2
- Announcing Windows Server Summit Virtual Online Event
- Microsoft Windows Summit save the date, Windows Server Summit updates and event here
- Microsoft Windows Server 2019 Insiders Preview
- Fixing the Microsoft Windows 10 1709 post upgrade restart loop
- Introducing Windows Subsystem for Linux WSL Overview #blogtober
- Microsoft Windows Server, Azure, Nano Life cycle Updates
- Azure Stack TP3 Overview Preview Review Part II
- Dell Technology World 2018 Part I, Part II, Part III, Part IV and Part V
- Application Data Value Characteristics Everything Is Not The Same (Part I)
- Data Infrastructure Primer Overview (Its Whats Inside The Data Center)
- Have you heard about the new CLOUD Act data regulation?
Additional learning experiences along with common questions (and answers), as well as tips can be found in Software Defined Data Infrastructure Essentials book.
What This All Means
The reason I bring the topic of time and money into this discussion about Bitlocker is to make a point that there are situations where spending some time has value such as for learning, the experience, fun or simple entertainment aspect, not to mention a shortage of money. On the other hand, sometimes it is actually cheaper to spend some money to get to the solution or result as part of being productive or effective. For example, other than spending some time browsing various sites to figure out that there was an issue with Windows 7 Professional and Bitlocker, time that was educational and interesting, the money spent on the simple upgrade was worth it in my situations. While many if not most of you have since upgraded to Windows 8 or Windows 10, some may still have the need for Enabling Bitlocker on Microsoft Windows 7 Professional 64 bit.
Ok, nuff said, for now.
Gs
Greg Schulz – Microsoft MVP Cloud Data Center Management, VMware vExpert 2010-2018. Author of Software Defined Data Infrastructure Essentials (CRC Press), as well as Cloud and Virtual Data Storage Networking (CRC Press), The Green and Virtual Data Center (CRC Press), Resilient Storage Networks (Elsevier) and twitter @storageio. Courteous comments are welcome for consideration. First published on https://storageioblog.com any reproduction in whole, in part, with changes to content, without source attribution under title or without permission is forbidden.
All Comments, (C) and (TM) belong to their owners/posters, Other content (C) Copyright 2006-2024 Server StorageIO and UnlimitedIO. All Rights Reserved. StorageIO is a registered Trade Mark (TM) of Server StorageIO.
Published: March 30, 2010
Updated: April 21, 2020
Tags:
Windows Configuration/Setup
Windows BitLocker Drive Encryption is a security feature that provides better data protection by encrypting all data stored on the Windows operating system volume. For the sake of this article, a volume consists of one or more partitions on one or more hard disks. BitLocker works with simple volumes, where one volume is one partition. A volume usually has a drive letter assigned, such as C:
A Trusted Platform Module (TPM), as found on a CyberMed NB24k, is a microchip that is built into a computer. It is used to store cryptographic information, such as encryption keys. Information stored on the TPM can be more secure from external software attacks and physical theft. A TPM is a microchip designed to provide basic security-related functions, primarily involving encryption keys. The TPM is usually installed on the motherboard of a desktop or portable computer, and communicates with the rest of the system by using a hardware bus. Computers that incorporate a TPM have the ability to create cryptographic keys and encrypt them so that they can be decrypted only by the TPM. This process, often called «wrapping» or «binding» a key, can help protect the key from disclosure. Each TPM has a master wrapping key, called the Storage Root Key (SRK), which is stored within the TPM itself. The private portion of a key created in a TPM is never exposed to any other component, software, process, or person. Computers that incorporate a TPM can also create a key that has not only been wrapped, but is also tied to specific hardware or software conditions. This is called «sealing» a key. When a sealed key is first created, the TPM records a snapshot of configuration values and file hashes. A sealed key is only «unsealed» or released when those current system values match the ones in the snapshot. BitLocker uses sealed keys to detect attacks against the integrity of the Windows operating system. With a TPM, private portions of key pairs are kept separated from the memory controlled by the operating system. Because the TPM uses its own internal firmware and logic circuits for processing instructions, it does not rely upon the operating system and is not exposed to external software vulnerabilities.
BitLocker uses the TPM to help protect the Windows operating system and user data and helps to ensure that a computer is not tampered with, even if it is left unattended, lost, or stolen. BitLocker can also be used without a TPM. To use BitLocker on a computer without a TPM, change the default behavior of the BitLocker setup wizard by using Group Policy, or configure BitLocker by using a script. When BitLocker is used without a TPM the required encryption keys are stored on a USB flash drive. This flash drive must be presented (plugged in) to unlock the data stored on a volume.
The data is protected by encrypting the entire Windows operating system volume. If the computer is equipped with a compatible TPM, BitLocker uses the TPM to lock the encryption keys that protect the data. As a result, the keys cannot be accessed until the TPM has verified the state of the computer. Encrypting the entire volume protects all of the data, including the operating system itself, the Windows registry, temporary files, and the hibernation file. Because the keys needed to decrypt data remain locked by the TPM, an attacker cannot read the data just by removing the hard disk and installing it in another computer. During the startup process, the TPM releases the key that unlocks the encrypted partition only after comparing a hash of important operating system configuration values with a snapshot taken earlier. This verifies the integrity of the Windows startup process. The key is not released if the TPM detects that the Windows installation has been tampered with. By default, the BitLocker setup wizard is configured to work seamlessly with the TPM. An administrator can use Group Policy or a script to enable additional features and options. For enhanced security, combine the use of a TPM with either a PIN entered by the user or a startup key stored on a USB flash drive. On computers without a compatible TPM, BitLocker can provide encryption, but not the added security of locking keys with the TPM. In this case, the user is required to create a startup key that is stored on a USB flash drive.
The remainder of this article will assist in initializing TPM successfully in Windows 7 environments so that Bitlocker can be turned on. Errors in doing so are most likely due to incorrect permissions for the SELF account in AD for ms-TPMOwnerInformation attribute.
When trying to turn on Bitlocker on a Windows 7 Hard Drive, an Access Denied Error message may be encountered while initializing TPM.

Additionally, when opening the TPM Management Console and attempting to initialize TPM, error message 0x80070005 will appear.
Solution:
Follow the instruction below to set the correct permissions:
1. Open Active Directory Users and Computers.
2. Select the OU for all computers which will have Bitlocker turned ON.
3. Right Click on the OU and click Delegate Control.
4. Click Next, then Add.
5. Type SELF as the Object Name.

6. Select create a custom task to delegate.

7. From the object in the folder, select Computer Objects.

8. Select the 3 checkboxes under show these permissions.

9. Scroll through the permissions and select Write msTPM-OwnerInformation.

10. Click Finish.
After completing these steps, TPM can be successfully initialized.
Additional References
Windows BitLocker™ Drive Encryption Step by Step Guide (https://docs.microsoft.com/en-us/previous-versions/windows/it-pro/windows-vista/cc766295(v=ws.10))
Backing Up BitLocker and TPM Recovery Information to AD DS (https://docs.microsoft.com/en-us/previous-versions/windows/it-pro/windows-7/dd875529(v=ws.10))