Ensuring secure boot on your Windows 11 device is crucial for protecting your system from unauthorized access and malware. But did you know that you can enable secure boot without having to access the BIOS settings? This convenient method provides an alternative solution that is user-friendly and doesn’t require technical expertise.
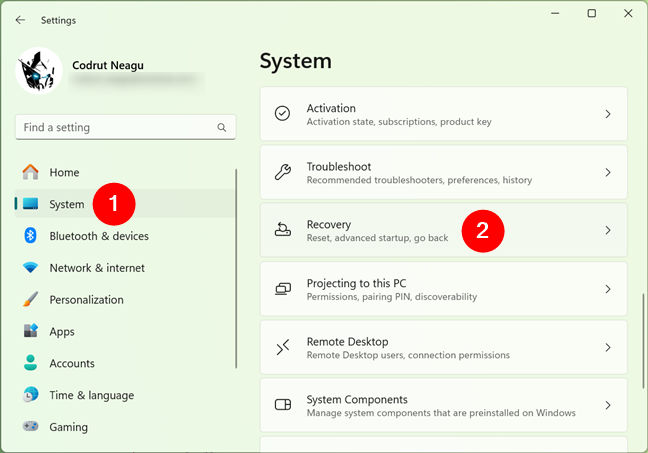
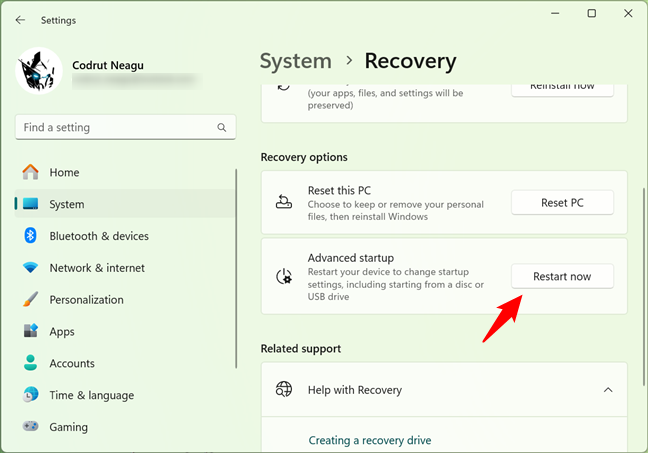
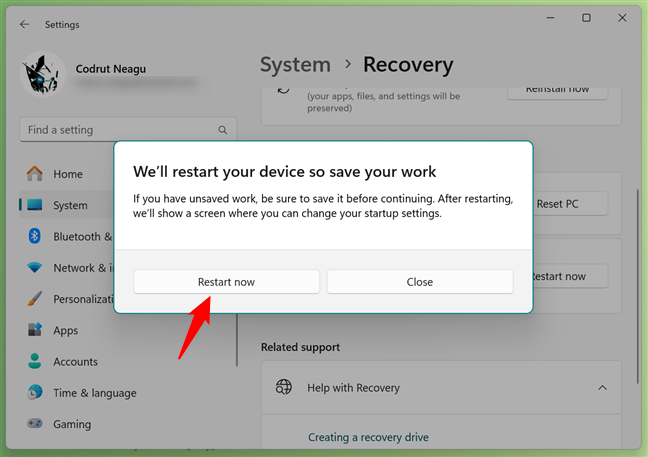
To enable secure boot on Windows 11 without accessing the BIOS, you can simply follow a few easy steps. Begin by opening the Settings app on your computer. Then, navigate to the «Update & Security» section and click on «Advanced startup» under the Recovery tab. From there, choose the «Restart now» option, which will reboot your device into the Advanced Startup settings. Here, select «Troubleshoot,» then «Advanced options,» and finally «UEFI Firmware Settings.» Once you’re in the UEFI settings, locate the «Secure Boot» option and enable it. Save your changes, exit the settings, and your Windows 11 device will now have secure boot enabled, providing enhanced protection for your system.
To enable Secure Boot on Windows 11 without accessing the BIOS, follow these steps:
- Click on the Start button and select «Settings».
- In the Settings menu, click on «Update & Security».
- Choose «Recovery» from the left-hand side menu.
- Under the «Advanced startup» section, click on «Restart now».
- Your computer will restart and boot into the Advanced startup options.
- Select «Troubleshoot», then «Advanced options».
- Click on «Startup Settings» and then «Restart».
- After the restart, you will see a list of options. Press the number corresponding to «Enable Secure Boot» (usually F10 or F12).
- Your computer will now boot with Secure Boot enabled.
Enabling Secure Boot in Windows 11 Without BIOS
Secure Boot is a feature that helps protect the integrity of the operating system during the boot process by ensuring that only trusted software is loaded. In Windows 11, Secure Boot provides an additional layer of security, but enabling it typically requires accessing the BIOS settings. However, there is a method to enable Secure Boot in Windows 11 without accessing the BIOS, which can be helpful if your computer’s BIOS does not support Secure Boot or if you face difficulties accessing it. In this article, we will guide you on how to enable Secure Boot in Windows 11 without BIOS.
Method 1: Using the Command Prompt
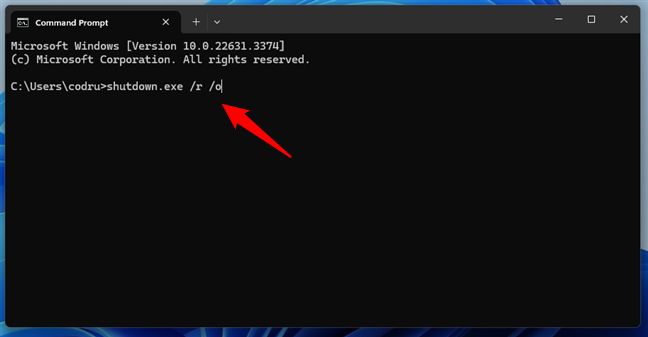
The first method for enabling Secure Boot in Windows 11 without BIOS involves using the Command Prompt utility. Here are the steps:
- Open the Start menu and type «cmd» to search for the Command Prompt.
- Right-click on Command Prompt and select «Run as administrator» to open it with administrative privileges.
- In the Command Prompt window, type the following command and press Enter:
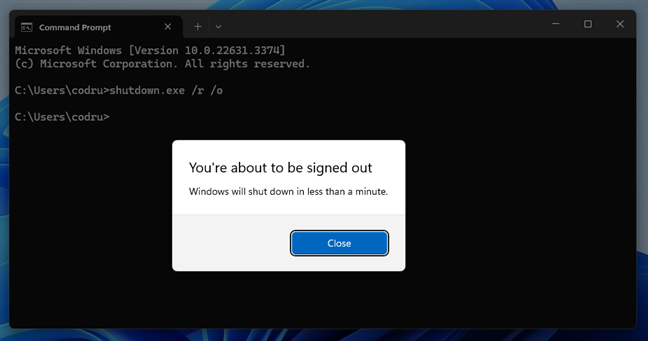
shutdown /r /fw - Your computer will restart and boot into the UEFI firmware settings.
- Navigate to the «Secure Boot» or «Security» section in the UEFI firmware settings.
- Enable Secure Boot by changing the setting from «Disabled» to «Enabled».
- Save the changes and exit the UEFI firmware settings.
- Your computer will restart, and Secure Boot will be enabled in Windows 11 without accessing the BIOS.
Benefits of Method 1
Using the Command Prompt to enable Secure Boot without BIOS has its advantages:
- Bypasses BIOS limitations: If your computer’s BIOS does not have the option to enable Secure Boot, this method provides an alternative solution.
- Simplifies the process: Many users find accessing and navigating the BIOS settings complex or intimidating. Using the Command Prompt streamlines the process.
- Can be performed without restarting: With Method 1, you can enable Secure Boot without the need to manually restart your computer and access the BIOS.
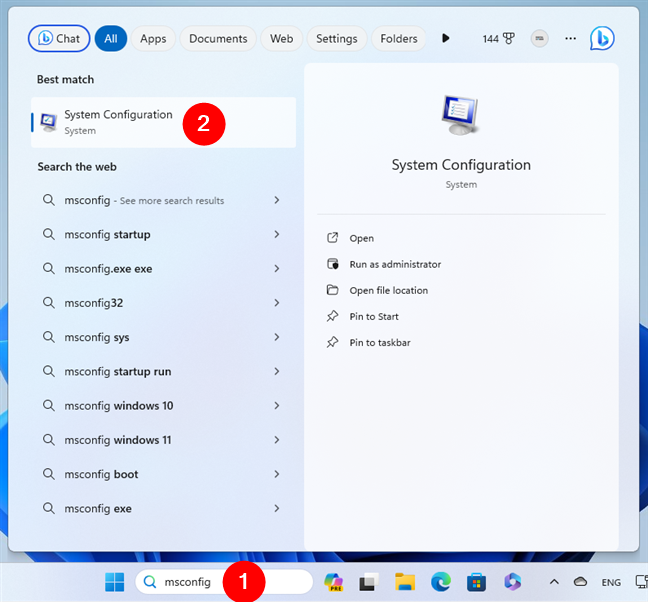
Method 2: Using the System Configuration (msconfig) Tool
The second method for enabling Secure Boot in Windows 11 without BIOS involves using the System Configuration (msconfig) tool. Here are the steps:
- Open the Start menu and type «msconfig» to search for the System Configuration tool.
- Click on «System Configuration» or «msconfig» to open the tool.
- In the System Configuration window, navigate to the «Boot» tab.
- Under the «Boot options» section, check the box next to «Safe boot» and select «Minimal».
- Click on «Apply» and then «OK».
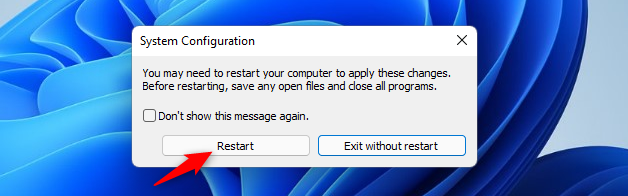
- Restart your computer.
- Your computer will boot into Safe Mode. Open the Start menu, type «msconfig», and open the System Configuration tool again.
- In the System Configuration window, navigate to the «Boot» tab.
- Under the «Boot options» section, uncheck the box next to «Safe boot».
- Click on «Apply» and then «OK».
- Restart your computer again.
- Your computer will boot normally, and Secure Boot will be enabled in Windows 11 without BIOS.
Benefits of Method 2
Using the System Configuration (msconfig) tool to enable Secure Boot without BIOS offers the following benefits:
- Simplifies the process: The System Configuration tool provides a user-friendly interface to enable Secure Boot, making it easier for users.
- Minimal system changes: Method 2 allows you to enable Secure Boot without making extensive changes to your computer’s settings.
- No BIOS access required: By using the System Configuration tool, you can enable Secure Boot without the need to access and navigate the BIOS.
Conclusion
Enabling Secure Boot in Windows 11 without BIOS is possible using either the Command Prompt or the System Configuration (msconfig) tool. These methods provide alternatives for users who face BIOS limitations or difficulties navigating the settings. By following the steps outlined in this article, you can enhance the security of your Windows 11 operating system and ensure that only trusted software is loaded during the boot process.

Enabling Secure Boot Windows 11 Without Bios
Secure Boot is a feature that enhances the security of your operating system by ensuring that only trusted software is loaded during the boot process. In Windows 11, enabling Secure Boot usually requires accessing the BIOS settings. However, there are alternative methods available to enable Secure Boot without accessing the BIOS:
- Use the Windows Security app: Open the Windows Security app and go to «Device security». Under «Core isolation», enable the «Memory integrity» option. This will enable Secure Boot without BIOS access.
- Use Command Prompt: Open Command Prompt as an administrator and enter the following command:
bcdedit /set {current} secureboot on. Restart your computer to enable Secure Boot without BIOS. - Use Group Policy Editor: Press Windows + R, type «gpedit.msc», and hit Enter. Navigate to «Computer Configuration» > «Administrative Templates» > «System» > «Device Guard» > «Turn on Virtualization Based Security». Enable this option to enable Secure Boot without BIOS access.
Key Takeaways
- Secure Boot can be enabled in Windows 11 without accessing the BIOS.
- Ensure your PC meets the necessary requirements for Secure Boot.
- Update your computer’s firmware to the latest version.
- Go to the Windows 11 settings and open the «Recovery» section.
- Click on «Restart now» under the «Advanced startup» section.
Frequently Asked Questions
Here, we have provided answers to some commonly asked questions about enabling Secure Boot in Windows 11 without accessing the BIOS settings.
1. Can I enable Secure Boot on Windows 11 without accessing the BIOS?
Yes, it is possible to enable Secure Boot on Windows 11 without accessing the BIOS settings. Windows 11 provides an alternative method to enable Secure Boot through the Control Panel.
To do this, go to the Control Panel and navigate to the «System and Security» section. Then, click on «BitLocker Drive Encryption» and select «Turn on BitLocker» for the system drive.
2. Will enabling Secure Boot without accessing the BIOS affect my system’s performance?
No, enabling Secure Boot without accessing the BIOS will not have any adverse effects on your system’s performance. Secure Boot is designed to enhance the security of your system by preventing unauthorized code from running during the boot process.
Enabling Secure Boot without BIOS access simply utilizes the built-in Windows 11 security features to enable this protection.
3. Are there any specific requirements for enabling Secure Boot without accessing the BIOS in Windows 11?
Yes, there are a few requirements to enable Secure Boot without accessing the BIOS in Windows 11:
— Your system must have UEFI firmware supporting Secure Boot.
— You should be using a version of Windows 11 that supports Secure Boot.
— The system drive (usually C:\) should be encrypted using BitLocker.
4. How can I check if Secure Boot is enabled on my Windows 11 system?
You can check if Secure Boot is enabled on your Windows 11 system by following these steps:
— Open the «System Information» window by pressing the Windows key + R, then typing «msinfo32» and pressing Enter.
— In the «System Information» window, look for the «Secure Boot State» under the «Security» section. If it says «On», Secure Boot is enabled.
5. Can I disable Secure Boot if I enabled it without accessing the BIOS in Windows 11?
Yes, you can disable Secure Boot even if you enabled it without accessing the BIOS in Windows 11. To disable Secure Boot, follow these steps:
— Go to the Control Panel and navigate to the «System and Security» section.
— Click on «BitLocker Drive Encryption» and then select «Turn off BitLocker» for the system drive.
In conclusion, enabling Secure Boot in Windows 11 without accessing the BIOS is a straightforward process that ensures enhanced security for your system. By following the steps outlined in this guide, you can enable Secure Boot through the Windows system settings.
Remember to check if your device meets the requirements for Secure Boot and update your Windows 11 version if needed. Once enabled, Secure Boot provides protection against unauthorized software and ensures that only trusted software can run during the boot process, safeguarding your system from potential threats.
Ensuring the security of your operating system is crucial in today’s digital landscape. While BIOS has traditionally been the go-to method for enabling Secure Boot on Windows, there is actually a way to achieve it without relying on BIOS. This exciting alternative opens up new possibilities for users who want to enhance the security of their Windows 11 experience.
By leveraging the UEFI firmware, Windows 11 offers a pathway to enable Secure Boot without the need for BIOS. This approach allows users to strengthen the protection of their system against unauthorized firmware and software during the boot process. With this method, users can have peace of mind knowing that their Windows 11 installation is fortified against potential security threats.
To enable Secure Boot in Windows 11 without accessing the BIOS, follow these steps: 1. Press the Windows key + I to open the Settings app. 2. Click on «Update & Security» and then select «Recovery». 3. Click on «Restart now» under the «Advanced Startup» section. 4. Once the computer restarts, select «Troubleshoot» and then «Advanced options». 5. Choose «UEFI Firmware Settings» and click on «Restart». 6. When the computer restarts again, go to the «Security» or «Boot» tab in the BIOS settings. 7. Enable Secure Boot and save the changes. Restart the computer to apply the settings. Enjoy a more secure Windows 11 experience!

Enabling Secure Boot in Windows 11 Without BIOS
Secure Boot is a feature provided by modern computer systems that ensures the integrity and security of the operating system during the boot process. It verifies the digital signature of each component before allowing it to load, protecting against malware and unauthorized modifications. While enabling Secure Boot traditionally requires accessing the BIOS settings, Windows 11 introduces a convenient method to enable Secure Boot without the need for BIOS access. This article will guide you through the process of enabling Secure Boot in Windows 11 without BIOS.
Check Compatibility and Pre-requisites
Before proceeding with the steps to enable Secure Boot in Windows 11 without BIOS access, it is crucial to verify the compatibility and ensure that all pre-requisites are met. Here are a few key points to consider:
- Make sure your computer supports UEFI firmware with Secure Boot capability.
- Ensure that your computer is running Windows 11, as Secure Boot settings may vary across different versions of Windows.
- Disable any third-party antivirus or security software temporarily to prevent conflicts with Secure Boot.
- Ensure you have administrative privileges on your Windows 11 computer.
- Take a backup of all important files and data to avoid any potential data loss during the process.
Step 1: Verify UEFI Firmware and Secure Boot Support
To enable Secure Boot without BIOS access, your computer must support UEFI firmware with Secure Boot capabilities. Here’s how you can check for compatibility:
| 1. | Press Windows key + R to open the Run dialog box. |
| 2. | Type msinfo32 and press Enter to open the System Information window. |
| 3. | In the System Information window, look for the «BIOS Mode» under the «System Summary» section. |
| 4. | If the BIOS Mode is listed as «UEFI», it means your computer is using UEFI firmware. |
Once you have confirmed that your computer is using UEFI firmware, you can proceed to verify if Secure Boot is enabled or disabled:
| 1. | Press Windows key + I to open the Settings app. |
| 2. | Click on System and then select About from the left pane. |
| 3. | Scroll down to the «Secure Boot» section. |
| 4. | If the status is listed as «On», it means Secure Boot is already enabled. |
| 5. | If the status is listed as «Off», proceed to the next step to enable Secure Boot without BIOS access. |
Step 2: Enable Secure Boot without BIOS Access
With Windows 11, Microsoft has introduced a simplified method to enable Secure Boot without accessing the BIOS settings. Follow these steps:
- Open the Settings app by pressing Windows key + I.
- Navigate to System and select Advanced system settings from the left pane.
- In the System Properties window, go to the Hardware tab and click Device Installation Settings.
- In the Device Installation Settings window, select Yes and click Save Changes.
- Restart your computer and enter the UEFI firmware settings (often accessed by pressing a specific key during boot, such as F2 or Del).
- Navigate to the Secure Boot section, and use the provided options to enable Secure Boot.
- Save the changes and exit the UEFI firmware settings.
- Once the computer restarts, Windows 11 will enable Secure Boot without requiring BIOS access.
Benefits of Secure Boot
Secure Boot offers several benefits and plays a crucial role in maintaining the security of your Windows 11 system. Here are some key advantages:
- Protection against boot-level malware: Secure Boot ensures that only digitally signed and trusted components are loaded during the boot process, preventing bootkits and other boot-level malware.
- Data and system integrity: By verifying the integrity of the operating system and its components, Secure Boot protects against unauthorized modifications that can compromise your system’s security and stability.
- Enhanced system trust: Secure Boot enhances the overall trustworthiness of the system by ensuring that every component in the boot chain is verified and secure.
- Prevention of unauthorized operating systems: Secure Boot allows you to only run approved operating systems, reducing the risk of running tampered or malicious versions of the OS.
Conclusion
Enabling Secure Boot in Windows 11 without BIOS access provides a convenient method to enhance the security and integrity of your system. By following the steps outlined in this article, you can easily enable Secure Boot and enjoy the benefits it offers. Remember to regularly update your system and keep your anti-malware software up to date for maximum protection.

Enabling Secure Boot in Windows 11 without BIOS
Secure Boot is an essential security feature that protects your computer from booting unauthorized software or malware during startup. By default, Windows 11 requires Secure Boot to be enabled in the BIOS for system integrity. However, if your device does not support BIOS or does not have Secure Boot settings in the BIOS, there is still a way to enable it.
- First, make sure your device meets the minimum system requirements for Windows 11 and the TPM (Trusted Platform Module) is enabled.
- Open the «Settings» app in Windows 11 and navigate to «System» -> «About».
- Click on «Advanced system settings» and go to the «Startup and Recovery» section.
- Click on the «Settings» button next to «Startup and Recovery».
- In the Startup and Recovery settings, under «Default operating system,» click on the drop-down menu and select «Windows 11».
- Check the «Time to display list of operating systems» box and set the time to 0 seconds.
- Click «OK» to save the changes and exit the Startup and Recovery settings.
- Restart your computer for the changes to take effect.
By following these steps, you can enable Secure Boot on your Windows 11 device without accessing the BIOS. It is important to note that while this method may enable Secure Boot, it may not provide the same level of security as enabling it through the BIOS. If possible, it is recommended to enable Secure Boot through the BIOS settings for optimal security.
Key Takeaways: How to Enable Secure Boot Windows 11 Without Bios
- Secure Boot is an essential security feature that helps protect your computer and data.
- Windows 11 provides a streamlined process to enable Secure Boot without accessing your BIOS settings.
- To enable Secure Boot, you need to have a compatible hardware and UEFI firmware.
- First, ensure that your device meets the minimum requirements for Windows 11.
- Next, check if Secure Boot is supported and enabled in your UEFI firmware settings.
Frequently Asked Questions
In this section, we will answer some common questions about how to enable secure boot on Windows 11 without accessing the BIOS.
1. Can I enable secure boot on Windows 11 without accessing the BIOS?
Yes, you can enable secure boot on Windows 11 without accessing the BIOS. Microsoft has introduced a new method to enable secure boot through the Windows 11 settings.
To enable secure boot without BIOS, follow these steps:
2. How do I enable secure boot on Windows 11 without BIOS?
To enable secure boot on Windows 11 without accessing the BIOS, you can use the following steps:
Step 1: Open the Start Menu and click on the «Settings» icon.
Step 2: In the Settings window, click on «System» and then select «Update & Security».
Step 3: From the left panel, click on «Recovery» and then click on «Restart now» under the Advanced startup section.
Step 4: After your computer restarts, click on «Troubleshoot» and then select «Advanced options».
Step 5: In the Advanced options menu, click on «UEFI Firmware Settings» and then click on «Restart».
Step 6: Your computer will restart again, and this time it will boot into the UEFI firmware settings.
Step 7: In the UEFI firmware settings, navigate to the «Security» or «Boot» menu, depending on your motherboard.
Step 8: Look for an option called «Secure Boot» and enable it.
Step 9: Save the changes and exit the UEFI firmware settings.
Step 10: Your computer will restart, and secure boot will be enabled on Windows 11 without accessing the BIOS.
3. What if I can’t find the «UEFI Firmware Settings» option in the Advanced options menu?
If you can’t find the «UEFI Firmware Settings» option in the Advanced options menu, it’s possible that your computer doesn’t support this feature. Some older models or custom-built PCs may not have the option to access the UEFI firmware settings directly from the Advanced options menu.
In this case, you may need to access the BIOS to enable secure boot on Windows 11. Consult your computer’s manual or manufacturer’s website for specific instructions on how to access the BIOS.
4. Why is secure boot important on Windows 11?
Secure boot is important on Windows 11 as it helps protect your computer from unauthorized software and malware. When secure boot is enabled, only trusted software and operating systems that have been digitally signed by relevant entities can run on your computer. This adds an extra layer of security and ensures that your system is protected from potentially harmful software.
By enabling secure boot, you can prevent the installation of malicious software or unauthorized modifications to your system, thereby enhancing the overall security of your computer.
5. Are there any prerequisites for enabling secure boot on Windows 11 without BIOS?
To enable secure boot on Windows 11 without accessing the BIOS, there are a few prerequisites:
— Your computer should be running Windows 11.
— The UEFI firmware of your computer should support secure boot.
If these prerequisites are met, you can proceed with the steps mentioned earlier to enable secure boot on Windows 11.
To enable Secure Boot on Windows 11 without accessing the BIOS, you can utilize the Device Manager and System Configuration tool. By following these simple steps, you can enhance the security of your system and protect it from unauthorized firmware and malware attacks.
First, open the Start menu and search for «Device Manager.» Locate the «System devices» category and expand it. Right-click on «System Firmware» and select «Properties.» In the Properties window, go to the «Driver» tab and click «Update driver.» Next, select «Browse my computer for drivers» and then «Let me pick from a list of available drivers on my computer.» Finally, choose «Trusted Platform Module 2.0» and click «Next» to complete the driver update process.
Secure Boot is an important security feature designed to prevent malicious software from loading when your PC starts up (boots). Most modern PCs are capable of Secure Boot, but in some instances, there may be settings that cause the PC to appear to not be capable of Secure Boot. These settings can be changed in the PC firmware. Firmware, often called BIOS (Basic Input/Output System), is the software that starts up before Windows when you first turn on your PC.
Note: This article is intended for users who are not able to upgrade to Windows 11 because their PC is not currently Secure Boot capable. If you are unfamiliar with this level of technical detail, we recommend that you consult your PC manufacturer’s support information for more instructions specific to your device.
How to enable Secure Boot on my PC
To access these settings, you can consult your PC manufacturer’s documentation or follow these instructions:
-
Go to Settings > Update & Security > Recovery and select Restart now under Advanced startup.
-
On the next screen, select Troubleshoot > Advanced options > UEFI Firmware Settings > Restart to make changes.
To change these settings, you will need to switch the PC boot mode from one enabled as “Legacy” BIOS (also known as “CSM” Mode) to UEFI/BIOS (Unified Extensible Firmware Interface). In some cases, there are options to enable both UEFI and Legacy/CSM. If so, you will need to choose for UEFI to be the first or only option. If you are unsure how to make any necessary changes to enable the UEFI/BIOS, we recommend that you check your PC manufacturer’s support information on their website. Here are a few links to information from some PC manufacturers to help get you started:
Dell | Lenovo | HP
While the requirement to upgrade a Windows 10 device to Windows 11 is only that the PC be Secure Boot capable by having UEFI/BIOS enabled, you may also consider enabling or turning Secure Boot on for better security.
Related articles
Windows 11 System Requirements
Ways to install Windows 11
Windows help & learning
Need more help?
Want more options?
Explore subscription benefits, browse training courses, learn how to secure your device, and more.
В безопасном режиме (Safe Mode) загружаются только программы, установленные на Виндовс по умолчанию. И то не все, потому что работают только те, которые обеспечивают минимальную работоспособность. Набор приложений без заставки (просто черный экран), все значки крупнее обычного и даже будто в пикселях, устройство может даже медленнее работать. В общем, тут все строго и по делу.
Зачем может пригодиться безопасный режим? Это специальная опция для устранения неполадок и выявления причин поломки (или как минимум для сужения круга причин):
- вы обновили драйвера или установили программу и затем устройство перестало загружаться или начало зависать;
- появляется ошибка с синим экраном смерти;
- ПК постоянно перезагружается;
- нужно проверить ПК на вирусы (или загрузить антивирус)
- большинство вирусов не загружаются в этом варианте работы Виндовс;
- при любых сбоях и неисправностях системы.
Когда все спокойно, компьютер не глючит, не выскакивают ошибки, значит, проблема не в ОС и ее программах. Его еще называют диагностическим режимом.
Как включить безопасную загрузку Windows?
На каждой из версий ОС есть несколько способов и вариантов безопасности.
Windows 10, 11
Начнем с самой популярной сейчас 10-ки. Для 11-той алгоритмы похожи. На них наибольшее количество методов.
Из настроек
Меню Пуск (значок Виндовс в левом нижнем углу) – Параметры – раздел Обновление и безопасность («Система» на 11 версии) – Восстановление – Особые варианты загрузки (Расширенные параметры запуска в 11 ОС) – Перезапустить сейчас.
Выбор действия – Поиск и устранение неисправностей – Диагностика – Дополнительные параметры – Параметры загрузки.
Выпадает целый список, среди них нас интересует:
- безопасный режим F4;
- … с загрузкой сетевых драйверов F5, когда необходим интернет или доступ к другим ПК по локальной сети;
- … с поддержкой командной строки F6. Разработчики Microsoft советует использовать ее только айтишникам. Но ниже мы дадим точные алгоритмы, как использовать строку, чтобы не навредить устройству, а наоборот помочь.
В этом списке выбор осуществляется кнопками F (в некоторых случаях только цифрами 4, 5, 6).
С помощью Shift
Зажмите клавишу и в значке питания выберите Перезагрузка.
После перезапуска Виндовс – Выбор действия – Поиск и устранение неисправностей и те же разделы до пунктов F4, 5, 6 (зависит от вариантов режима).
При нарушении нормального рабочего процесса
Когда предыдущий сеанс был резко завершен, без привычного постепенного завершения, то при новом включении сначала на заставке появится надпись Диагностика компьютера. Чтобы специально запустить этот процесс (хотя это и рискованно), принудительно отключите и включите ПК кнопкой питания. Можно даже резко выдернуть розетку. Обычно достаточно трех попыток.
Появится Автоматическое восстановление – Дополнительные параметры – Поиск и устранение неисправностей… и далее тот же путь до списка загрузок – F4.
Через конфигурации системы
Приложение, используемое для запуска системы и поиска и устранения ошибок и поломок.
Win+R – Выполнить – печатаем msconfig. А можно написать название приложения в поисковике меню Пуск.
Откроется Конфигурация системы – Загрузка – Безопасный режим (ставьте галочку) – Минимальная.
В дальнейшем, когда закончите работу, снова откройте в приложение и уберите метку.
С загрузочной флешки
Перед этим в Биос в разделе Boot поставьте на первое место (1st Device) этот USB, чтобы запуск начался с внешнего носителя.
В окне, где предлагается выбрать язык, нажимаем Далее – Восстановление системы – Поиск и устранение неисправностей – Дополнительные параметры – Командная строка. Или попробуйте вместо этого вызвать ее комбинацией Shift+F10.
В черном окне печатаем bcdedit / set {default} safeboot minimal (вместо последнего слова печатаем network, если нужен интернет). Клавиша Enter. Перезагрузите.
Когда нужно вернуться к обычному режиму винды, то снова подключаем флешку, доходим до командной строки, но пишем другую команду bcdedit / deletevalue {default} safeboot. Клавиша Enter. Перезапуск.
Или через окно Конфигурации.
Windows 8
Для восьмерки актуальны те же способы, что и на 10.
Параметры (шестеренка) – Изменение параметров компьютера – Обновление и восстановление – Восстановление… Идем по знакомому алгоритму и выбираем нужный пункт, нажав F4, 5 или 6.
Windows 7
Для семёрки подходит метод с Конфигурацией: вызовите окно Выполнить, нажав Win+X, но перед вкладкой Загрузки сначала выберите Общие – Диагностический запуск.
Причем бывают случаи, когда в этом диагностическом запуске даже не работают устройства, подключенные по USB (мышки и клавиатуры).
А вообще в этой версии, в отличие от 8, 10 и 11, где ускорен процесс загрузки Windows, работает простой способ – перезапуск и удерживание F8.
Безопасная загрузка на Windows 11
Отдельный вопрос для 11 версии. Безопасная загрузка – это специальный вид загрузки, необходимый для установки новой ОС. Не путать с безопасным режимом.
Как включить безопасную загрузку Виндовс 11?
Проверьте есть ли такая конфигурация на вашем устройстве:
Сведения о системе – пункт Режим BIOS – значение UEFI.
Тут же ищем Состояние безопасной загрузки – Вкл.
Чтобы активировать Secure Boot:
Параметры – Обновление и безопасность – Восстановление – Особые варианты загрузки – Перезагрузить сейчас.
Выбор действия – Поиск и устранение неисправностей – Диагностика – Дополнительные параметры – Параметры встроенного ПО UEFI. Перезагрузить.
В UEFI – Secure Boot Control – Enable.
Мы охватили все способы для всех версий. Больше всего методов применяется на последних версиях ОС 10 и 11. Безопасный режим – крайне полезная опция, она есть на любых устройствах (ПК, лэптопы, планшеты и смартфоны).
В 11 Виндовс особый вид безопасной загрузки Secure Boot стал обязательным условием установки. Функция проверяет загружаемую ОС на наличие цифровой подписи, вирусы и осуществляет контроль загрузок. В случае ошибок сразу блокирует установку.
Когда удается войти в Диагностический режим, значит, для вашего ПК еще не все потеряно. Хуже, если не получается зайти:
- попробуйте «откатить» систему до последней сохраненной точки;
- просканируйте систему и дайте ей исправить неполадки: Win+R – Выполнить – печатаем cmd. В черном окне печатаем sfc / scannow и клавиша Enter;
- сторонние утилиты: Safe Mode Fixer и AVZ.
Когда обычный режим тоже не работает, то остается только переустановка ОС.
So, you have Windows 11 installed on your computer, but apps misbehave, and system features are constantly acting up, causing you headaches? If that’s the case, you’re probably looking for a way to troubleshoot and fix your system. Lucky for you, Windows 11 comes with a neat tool called Safe Mode that can help with the whole troubleshooting process. Now, you might be wondering, “How do I start Windows 11 in Safe Mode?” Well, I’ve got you covered! There are actually eight different ways to do it, and I’ve gathered them all for you in this guide:
NOTE: This tutorial is about booting into Safe Mode in Windows 11. If you got here looking for instructions on how to start Safe Mode on a Windows 10 computer, check this article instead: How to boot Windows 10 in Safe Mode.
What you get when you start Windows 11 in Safe Mode
Is this your first time hearing about Safe Mode in Windows 11? In that case, you must first understand what it is and what it does; I’ve covered this subject in detail here: What is Safe Mode on a Windows computer? The key takeaway is that Safe Mode is like a stripped-down version of the Windows 11 system that only loads the essentials, leaving out all the extra stuff that could be causing trouble. So, if your computer’s acting up, Safe Mode can be a lifesaver for troubleshooting.

Windows 11 Safe Mode
Unfortunately, old tricks for getting into Safe Mode, like pressing F8 or Shift + F8, don’t work anymore because Windows 11 requires UEFI BIOS. It’s also impossible to make Windows 11 enter Safe Mode from BIOS or boot Windows 11 in Safe Mode from a power-off state. Fear not, though! There are still plenty of ways to get there — eight to my count — and I’m about to walk you through all of them.
In the first part of this guide, sections 1 through 4, I’ll show you how to boot into Safe Mode in Windows 11 when you’re locked out of your system. And if you can actually log in, you may prefer the later methods, from 5 to 8. Having said that, let’s get into it!
How to boot into Safe Mode when you can’t sign in to Windows 11
If you want to start your computer into Safe Mode but can’t log in to Windows 11, here are the ways and steps you should take:
1. How to enter Windows 11’s Safe Mode by stopping the PC from booting normally
Windows 11 has a built-in failsafe switch that triggers when it fails to start normally. The fourth time it tries to boot after three failed attempts, Windows 11 automatically loads its Automatic Repair mode. So, all you have to do is interrupt Windows 11’s normal boot process three consecutive times. Press the physical Restart or Power button on your Windows 11 computer or device to stop it during its startup process. Note that if you press the Power button, you must hold it down for about 4 seconds to enforce the power off. If you succeed in doing it, Windows 11 loads its Automatic Repair mode.

How to start Windows 11 in Safe Mode using automatic repair
Wait for a few moments until Windows 11 diagnoses your PC.
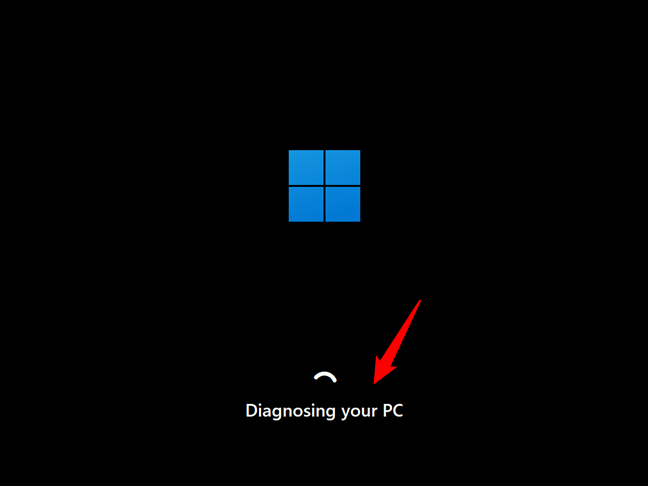
Windows 11 is diagnosing your PC
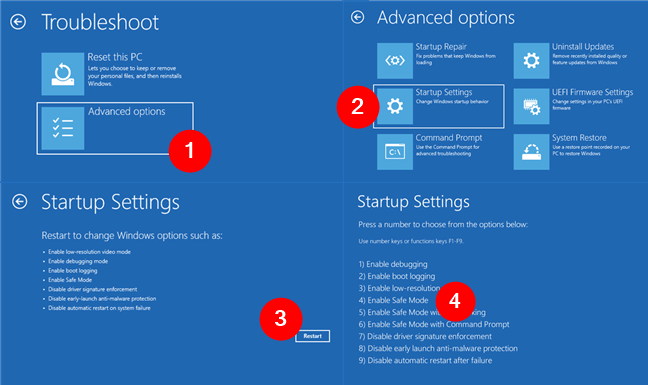
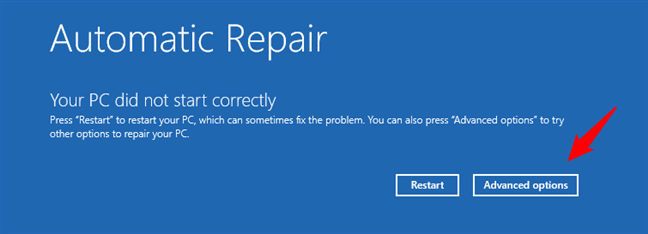
Then, it loads the Automatic Repair screen. On it, press the Advanced options button.
Click or tap Advanced options
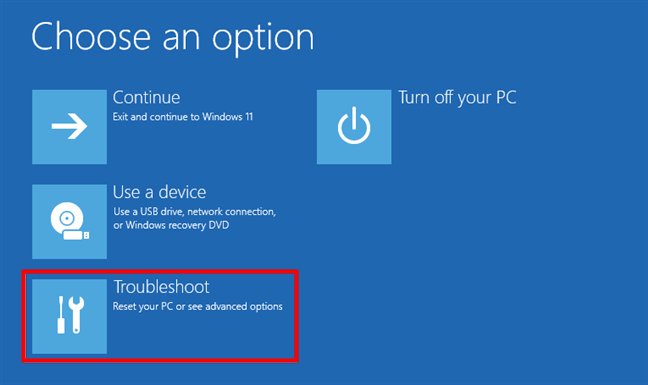
On the “Choose an option” screen, select Troubleshoot.

Troubleshoot Windows 11
On the Troubleshoot screen, click or tap on Advanced options.

Accessing the advanced troubleshooting options
Next, the Advanced options screen loads. On it, select Startup Settings. If you don’t have this option on the screen, use the “See more recovery options” link at the bottom to get to it. Then, click or tap on Startup Settings.
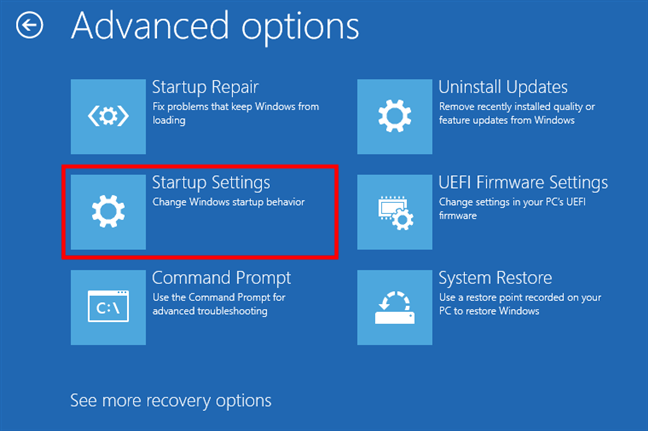
Choose Startup Settings
Windows 11 then loads another screen called Startup Settings. It informs you that after restarting your PC, you can change Windows options. One of them is that you can Enable Safe Mode. Click or tap on the Restart button.
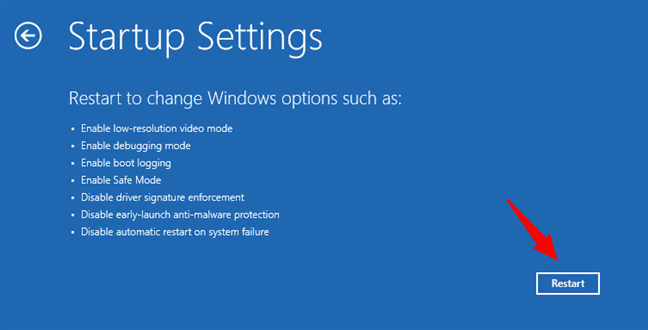
Startup Settings: Choose Restart for Windows 11 Safe Mode options
Once Windows 11 restarts, you can select the Startup Settings you want to enable. To enter Windows 11’s Safe Mode, there are three options you can choose from:
- Safe Mode — press 4 or F4 on your keyboard to start Windows 11 in the standard Safe Mode.
- Safe Mode with Networking — press 5 or F5 to enter Safe Mode and load networking drivers and services.
- Safe Mode with Command Prompt — press 6 or F6 to get into Safe Mode and automatically load Command Prompt.

Choose one of the three Safe Mode options for Windows 11
Then, Windows 11 starts in its Safe Mode, and you can log into it using an admin account and start troubleshooting.
2. How to start Safe Mode in Windows 11 by pressing “Shift + Restart” on the sign-in screen
If you can’t log into Windows 11 but your computer or device can reach the sign-in screen, press and hold Shift on your keyboard. While holding down the Shift key, click or tap on the Power button and select Restart in the menu.

How to start Windows 11 in Safe Mode from the Sign In screen
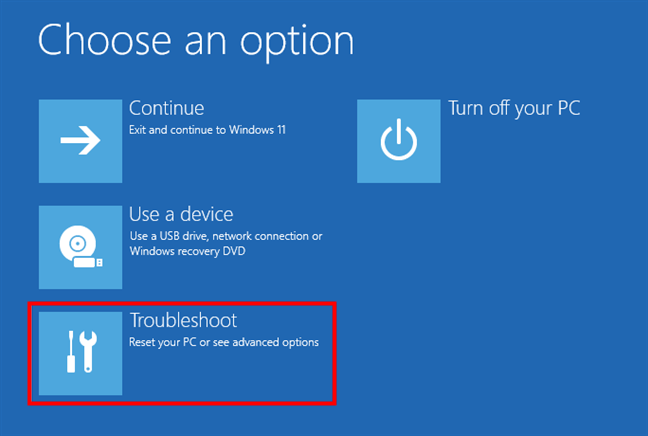
Windows 11 immediately reboots. Then, when it asks you to Choose an option, select Troubleshoot.
Choose Troubleshoot
From here on, follow the same steps as I’ve shown in the first method of this guide. Go to “Advanced options > Startup Settings > Restart” and press 4 or F4 on your keyboard to boot into minimal Safe Mode, 5 or F5 to activate Windows 11’s “Safe Mode with Networking,” and 6 or F6 to enter “Safe Mode with Command Prompt.”

Go to Advanced options > Startup Settings > Restart > Enable Safe Mode
TIP: When you’re done troubleshooting Windows 11, here’s how to exit Safe Mode and boot your PC normally.
3. How to start Windows 11 in Safe Mode using a DVD or USB installation drive and Command Prompt
Another way to enter Safe Mode in Windows 11 is by using a USB stick or DVD with the Windows 11 setup. Use the one you already have, or make one now if you can, on another computer. Then, use it to boot your PC, select the language and keyboard layout you prefer, and click or tap Next.
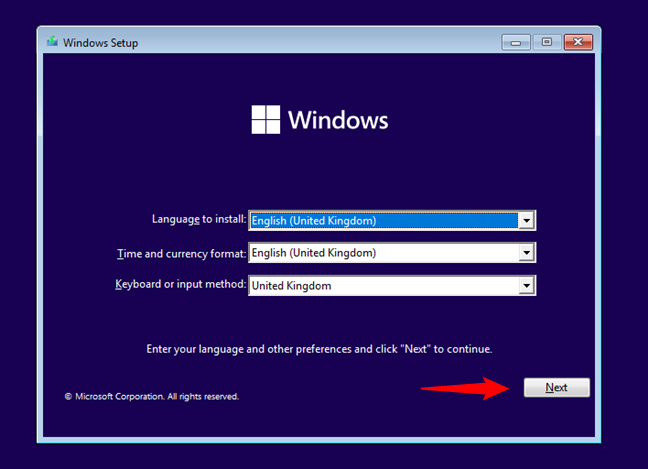
In the Windows 11 Setup, press Next
Next, click or tap the “Repair your computer” link from the bottom-left corner of the Windows Setup window.
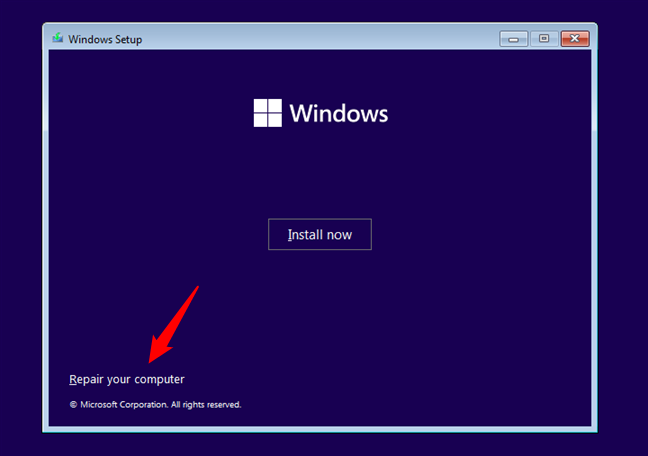
Click or tap Repair your computer
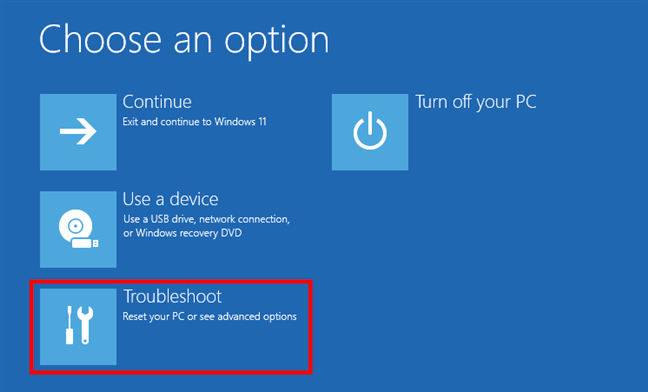
On the “Choose an option” screen, select Troubleshoot.
To get to Windows 11 Safe Mode, select Troubleshoot
On the “Advanced options” screen, choose “Command Prompt (Use the Command Prompt for advanced troubleshooting).”
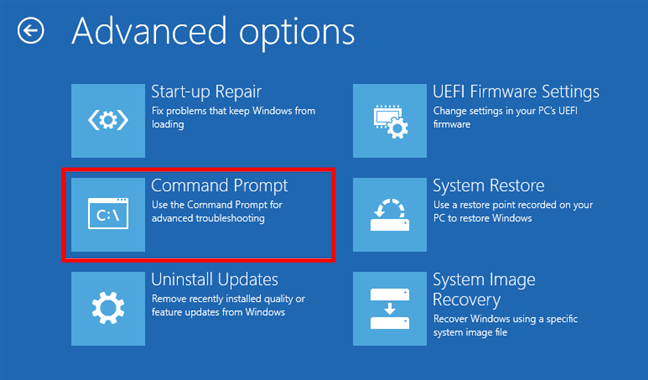
Starting the Command Prompt
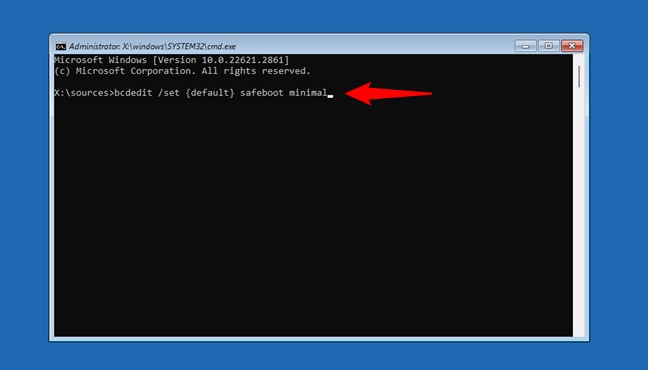
Now comes the most important part: in Command Prompt, run the command:
bcdedit /set {default} safeboot minimal
Press Enter on the keyboard and wait to see the message that “The operation completed successfully.”
How to boot Windows 11 in Safe Mode from the Command Prompt
Close the Command Prompt and click or tap the Continue button on the next screen.
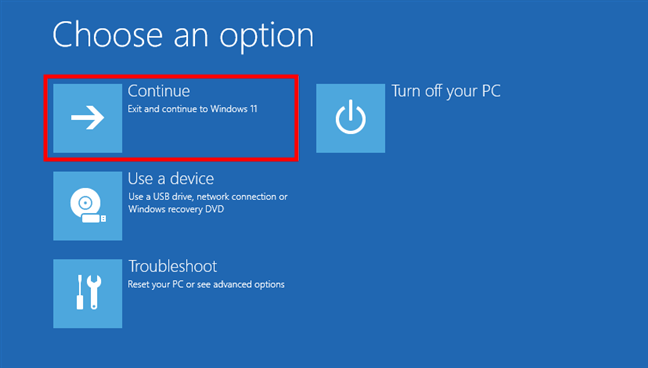
Choose Continue to start Windows 11 in Safe Mode
Wait for your computer or device to restart and watch Windows 11 enter Safe Mode.
IMPORTANT: If you use this method, Windows 11 will go into Safe Mode each and every time it starts. If you want it to start normally again, you must disable this setting by running this command:
bcdedit /deletevalue {default} safeboot
You can execute it from Windows 11’s Safe Mode, or you can run it following the same steps from this chapter.
4. How to start Windows 11 in Safe Mode from a recovery drive
You can also enter Windows 11’s Safe Mode from a system recovery USB drive. Either use one that you already made or create a USB recovery drive on another Windows 11 PC.

Creating a Windows 11 Recovery Drive
Boot your Windows 11 PC from the USB recovery drive and select the layout for your keyboard.

Choosing the keyboard layout for the recovery drive
Then, the already familiar “Choose an option” screen loads. On it, click or tap Troubleshoot.

Choose Troubleshoot to get to the Windows 11 Safe Mode options
The next steps are the same ones I presented in the first method from this guide. In short, you have to go to “Advanced options > Startup Settings > Restart” and then press the 4 (F4) key to boot into minimal Safe Mode, 5 (F5) to access “Safe Mode with Networking,” or 6 (F6) to activate Windows 11’s “Safe Mode with Command Prompt.”

Go to Advanced options > Startup Settings > Restart > Enable Safe Mode
How to boot into Safe Mode when you can log in to Windows 11
Do you want to start your Windows 11 in Safe Mode and you’re already logged in with your user account? Just follow the simple steps in any of the next methods, and you’ll be on your way to troubleshooting your PC in no time:
5. How to start Windows 11 in Safe Mode by pressing “Shift + Restart” on the Start Menu
One other way to enter Safe Mode in Windows 11 is available from the Start Menu. While pressing the Shift key on your keyboard, click the Start button, then Power, and then Restart.
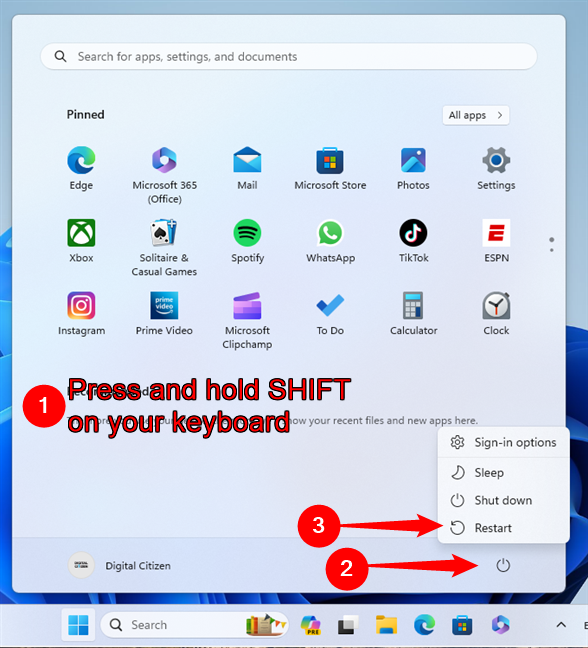
How to start Windows 11 in Safe Mode from the Start Menu
Windows 11 restarts and loads the “Choose an option” screen. Select Troubleshoot.
Click or tap on Troubleshoot to get to the Safe Mode settings
Next, take the same steps shown in this guide’s first method. Go to “Advanced options -> Startup Settings -> Restart,” and press 4/F4 on your keyboard to start in Safe Mode, 5/F5 to boot into “Safe Mode with Networking,” or 6/F6 to go into “Safe Mode with Command Prompt.”