
Все способы:
- Способ 1: Встроенные средства
- Способ 2: Программное обеспечение звуковой карты
- Способ 3: Функции проигрывателя
- Способ 4: ПО наушников
- Способ 5: Сторонний софт
- Вариант 1: Boom 3D
- Вариант 2: FX Sound
- Вариант 3: Bass Treble Booster
- Вариант 4: Dolby Atmos
- Способ 6: Возможности аудиооборудования
- Вопросы и ответы: 0
Способ 1: Встроенные средства
Чаще всего пользователями для изменения звучания низких частот используется встроенный эквалайзер или параметры звуковой карты. Басы на компьютере с Windows 10 настраиваются с помощью встроенных средств, а именно – свойств звукового оборудования.
Сразу следует отметить, что данный способ подойдет не для всех звуковых плат. В некоторых из них встроенный эквалайзер не предусматривается. Для начала проверьте, есть ли у вас соответствующие настройки, и если они отсутствуют, тогда переходите к следующим способам.
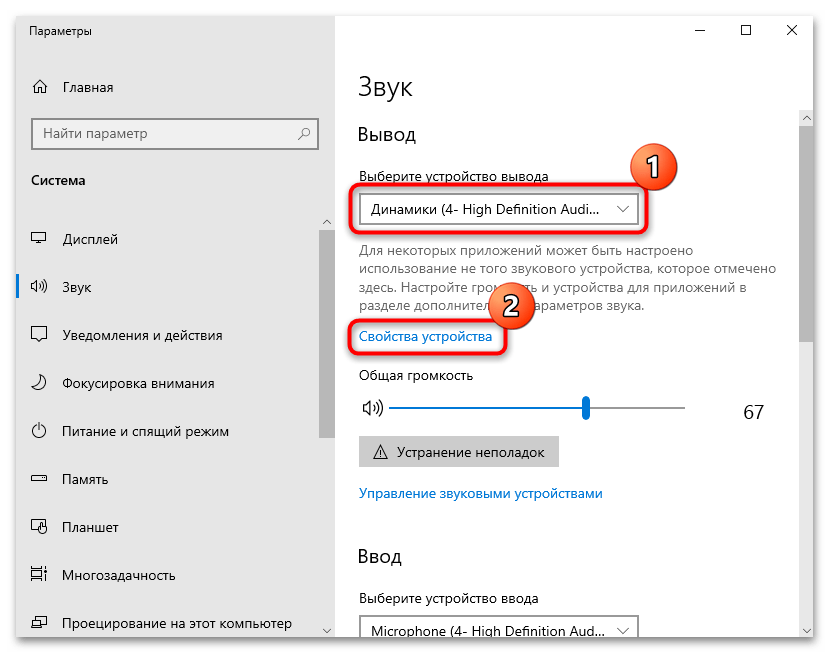
- Кликните правой кнопкой мыши по значку громкости в нижней панели, затем из появившегося меню выберите пункт «Открыть параметры звука».
- Отобразится окно штатных «Параметров» с информацией о подключенных звуковых устройствах. Если потребуется, через выпадающее меню укажите используемое оборудование, затем кликните по строке «Свойства устройства».
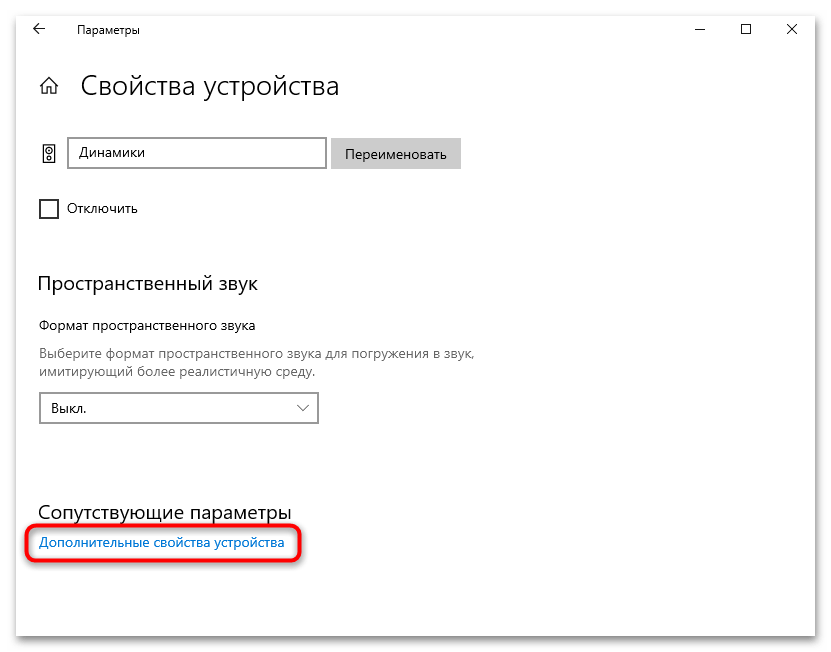
- Далее кликните по строке «Дополнительные свойства устройства».
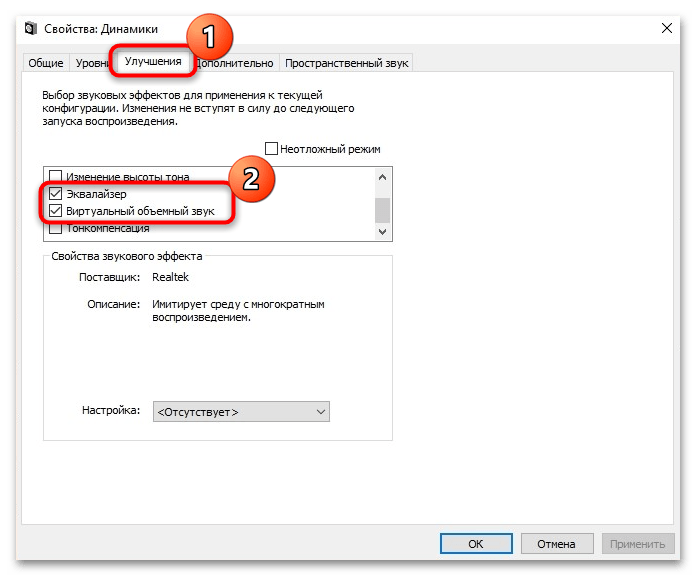
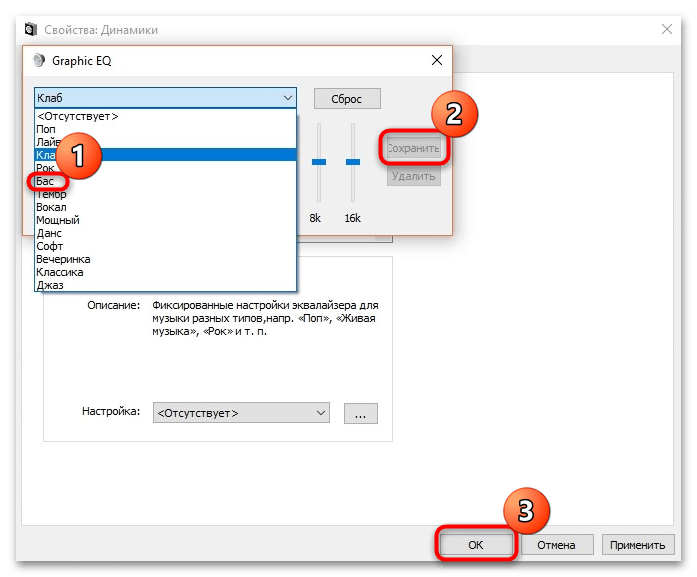
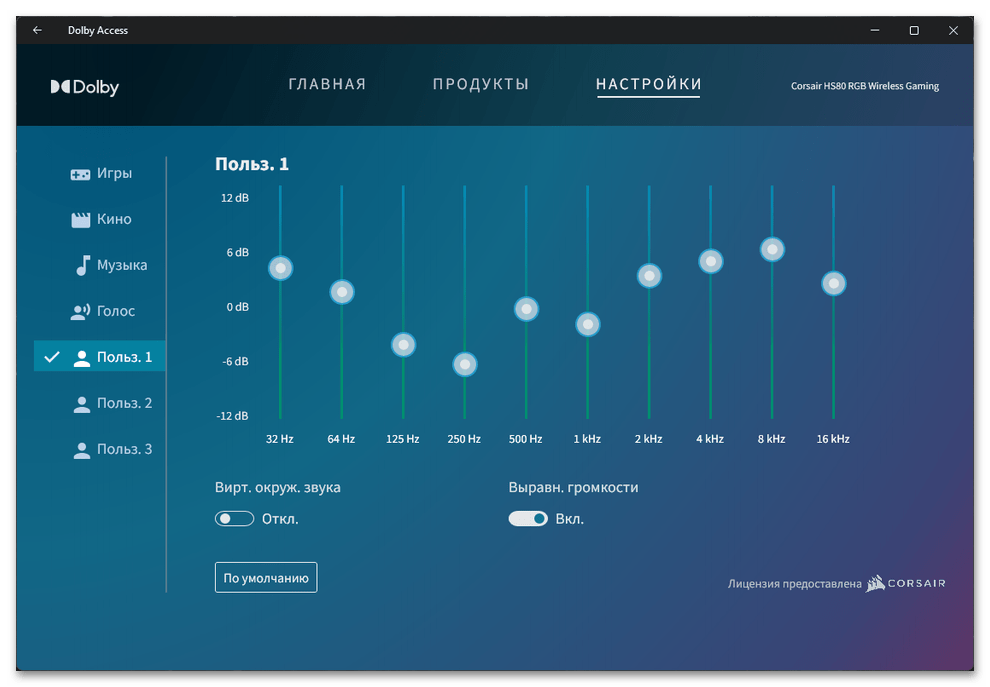
- В появившемся окне перейдите на вкладку «Улучшения» (она может называться «Дополнительные эффекты» или «Enhancements»), затем отметьте опцию «Виртуальный объемный звук» и «Эквалайзер», после чего станут доступны настройки эквалайзера.
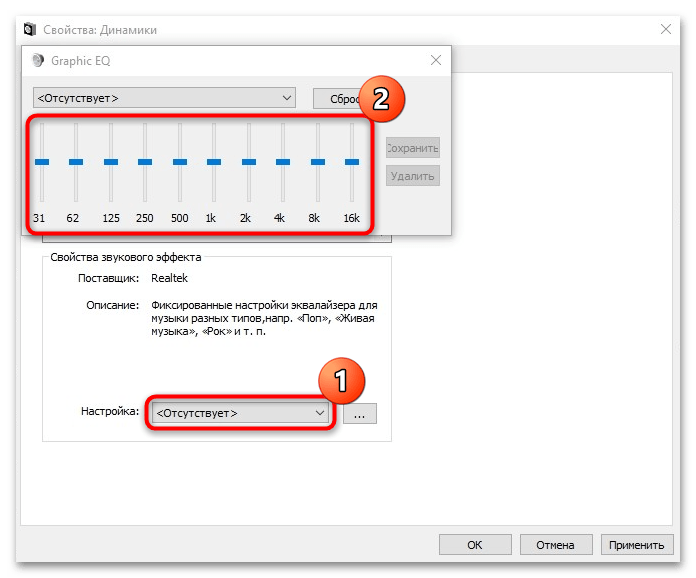
- В дополнительном окне отобразятся ползунки встроенного эквалайзера, где можно вручную выставить уровень в децибелах, на который нужно увеличить/уменьшить басы.
- Также можно выбрать один из предустановленных пресетов, например «Бас», после чего сохраните настройки.
После данной настройки все звуки, которые будут идти через Windows 10 (от системных до игр и просмотра кино), станут воспроизводиться в соответствии с выбранными параметрами.
Способ 2: Программное обеспечение звуковой карты
Также некоторые модели звуковых карт, большинство из которых работают на аудиочипе от Realtek, имеют расширенные настройки в фирменном программном обеспечении.
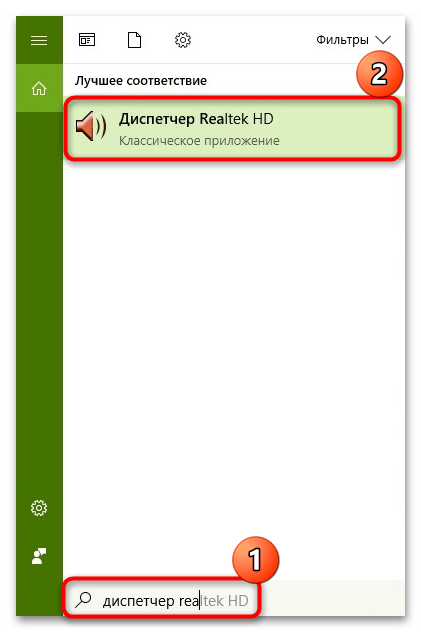
- Откройте программу «Диспетчер Realtek HD», отыскав ее с помощью строки системного поиска.

Читайте также: Методы открытия Диспетчера Realtek HD в Windows 10
- Если на компьютере не предустановлено ПО, которое, по сути, должно инсталлироваться вместе с драйверами звуковой карты, установите его отдельно. О том, как это сделать, читайте в нашем отдельном материале.
Подробнее: Установка Realtek HD на компьютер с Windows 10
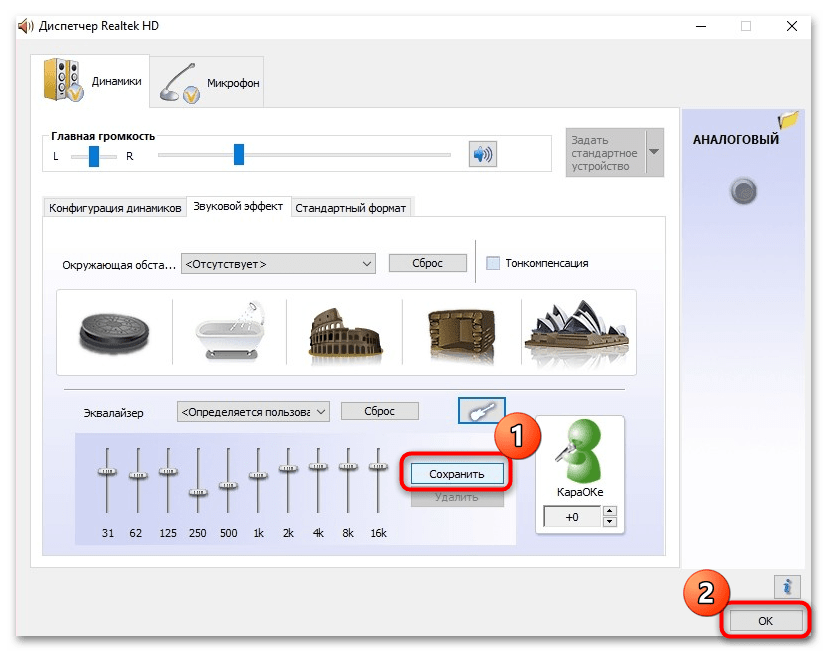
- На вкладке «Динамики» отображаются все доступные настройки звукового оборудования для вывода звука. При наличии на вкладке «Звуковой эффект» строки «Эквалайзер» используйте его параметры для того, чтобы настроить басы в Windows 10. Так же, как и в предыдущем способе, здесь должны быть готовые пресеты и ползунки для ручной настройки низких частот.
- По завершении настройки не забудьте сохранить новые параметры.

Помимо настройки басов и других частот, в «Диспетчере Realtek HD» предусматривается большое количество дополнительных параметров для улучшения звучания через выбранное оборудование. Причем функции зависят от модели звуковой карты – в некоторых случаях эквалайзер можно не найти.
Читайте также: Что делать, если не запускается Realtek HD в Windows 10
Способ 3: Функции проигрывателя
Настроить басы можно и в проигрывателе, через который осуществляется прослушивание музыки или просмотр фильма. Большинство из плееров поддерживает тонкую регулировку звучания на программном уровне, но при этом параметры будут работать только при использовании данного софта.
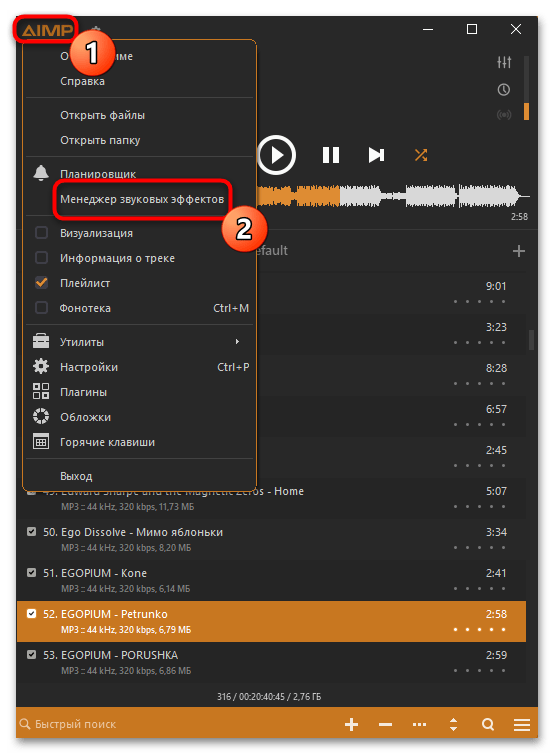
На примере одной из популярных программ для прослушивания музыки AIMP рассмотрим, как отрегулировать уровень низких частот:
- Переход в раздел с настройками звука осуществляется по-разному, в зависимости от скина плеера. Значок эквалайзера может быть вынесен отдельно в главное окно проигрывателя, а универсальный метод заключается в вызове меню путем клика по логотипу софта, где следует выбрать пункт «Менеджер звуковых эффектов».
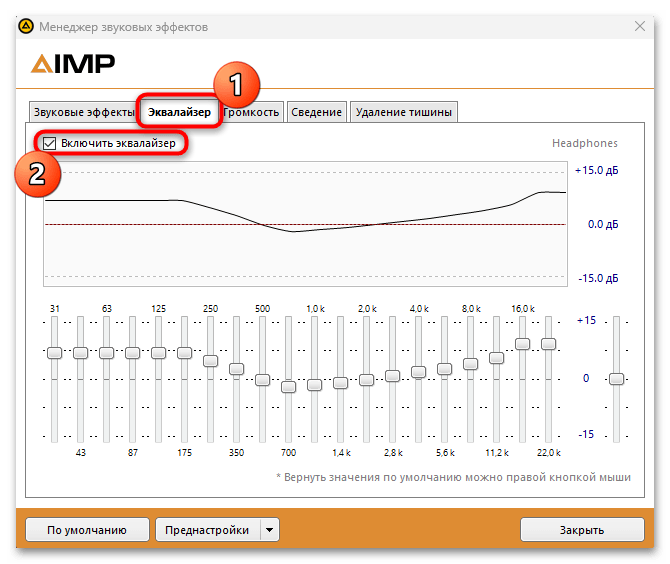
- Находясь на вкладке «Эквалайзер», поставьте галочку у опции «Включить эквалайзер», чтобы изменение частот стало доступно.
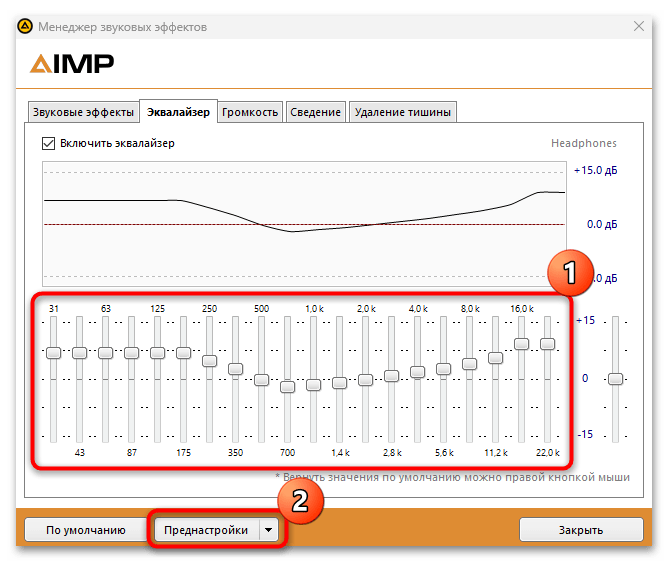
- Ниже можно отрегулировать басы, используя ползунки слева и ближе к центру. Также есть возможность установить преднастройки, нажав на соответствующую кнопку внизу.
- Выберите один из предустановленных вариантов. Например, для увеличения баса используется пресет «Full Bass». Щелкните по кнопке «ОК», чтобы применить настройки.
Перезагрузка компьютера не требуется – параметры вступят в силу мгновенно и произойдет изменение звучания. Большинство проигрывателей для Windows обладают аналогичными возможностями, но в некоторых из них есть больше полос эквалайзера, что позволяет более тонко настроить как низкие, так и средние или высокие частоты.
Читайте также: Программы для прослушивания музыки на компьютер
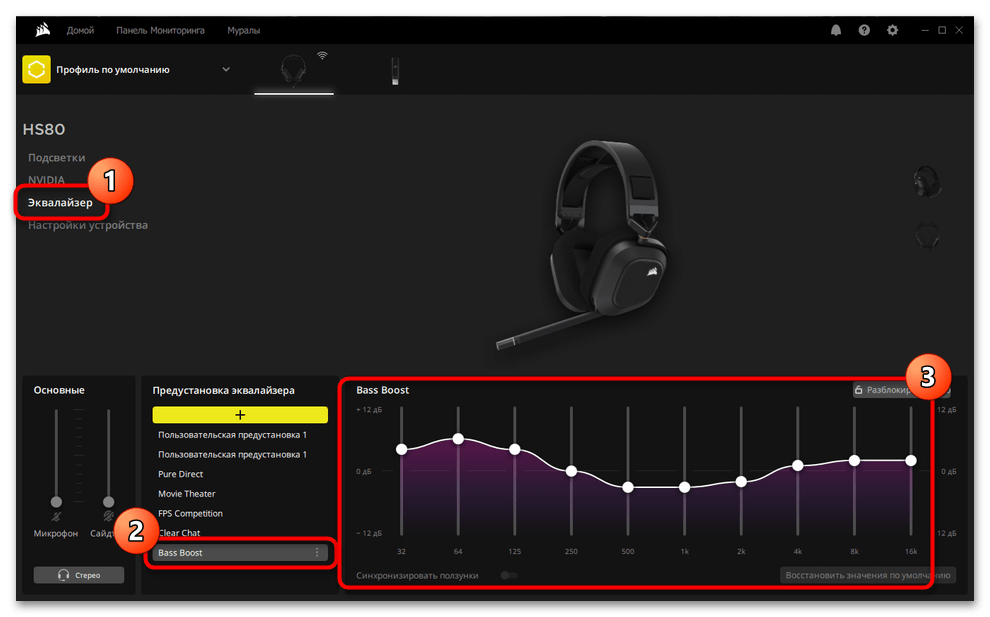
Способ 4: ПО наушников
Обладателям игровых девайсов, как правило, доступно фирменное программное обеспечение от производителя. Если наушники поддерживаются таким приложением, следует поискать настройку эквалайзера там. Поскольку в разных ПО собственный интерфейс, отыскать необходимый параметр вам понадобится самостоятельно. В большинстве случаев там уже есть пресет, связанный с усилением басов, а также возможна ручная регулировка с сохранением измененного профиля под свой вкус.
Способ 5: Сторонний софт
Для Windows разработаны специализированные программы, предназначенные для регулировки и усиления басов на компьютере. Их основные преимущества заключаются в большом количестве различных настроек для улучшения звучания, а также в поддержке настроенного звучания во всей системе, включая плееры и игры.
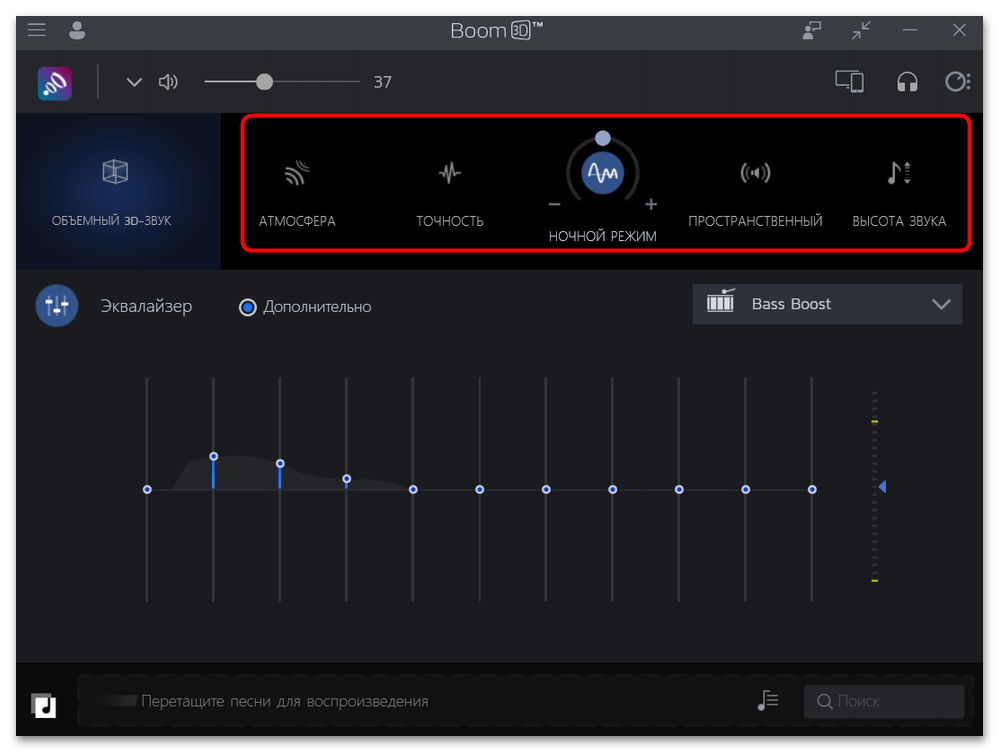
Вариант 1: Boom 3D
Boom 3D – одно из самых популярных приложений для улучшения звука. Здесь предусматривается режим 3D Surround, продвинутый 31-полосный эквалайзер с предустановленными пресетами, менеджер для регулировки громкости в отдельных приложениях, современный аудиопроигрыватель и даже возможность прослушивания интернет-радио. Средство довольно многофункциональное, но распространяется на платной основе, при этом предоставляется пробный период на срок 30 дней для ознакомления со всеми функциями софта без ограничений.
Скачать Boom 3D с официального сайта
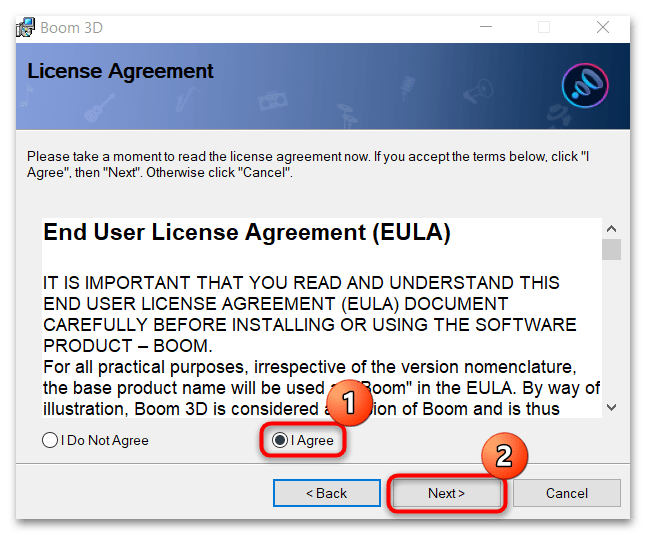
- Перейдите по ссылке выше и скачайте программу, нажав на соответствующую кнопку, после чего потребуется ее инсталлировать в систему, следуя инструкциям мастера пошаговой установки.

Следует отметить, что для корректной работы софта может потребоваться дополнительное программное обеспечение — .NET 5.0 Desktop Runtime. После запуска инсталлятора Boom 3D и при подтверждении действия вы будете перенаправлены на страницу официального сайта софта от Microsoft, а загрузка EXE-файла начнется автоматически. После скачивания останется его запустить и выполнить установку.
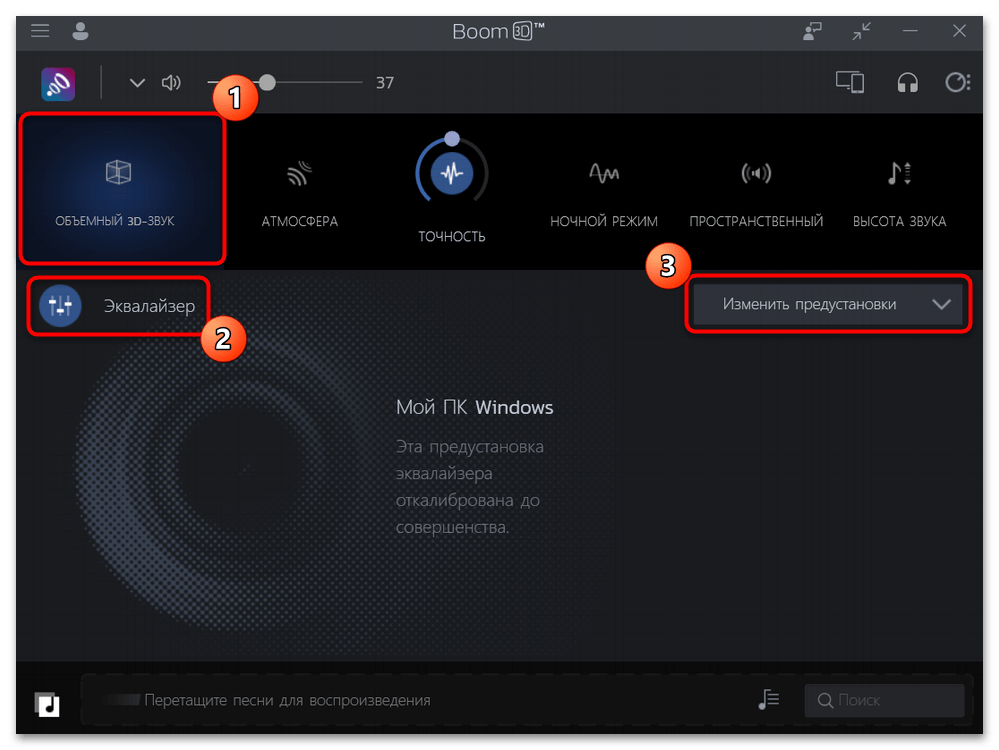
- Отобразится главное окно программы с основными инструментами для настройки звучания и басов. На вкладке «Объемный 3D-звук» активируйте пункт «Эквалайзер», после чего из меню справа можно выбрать одну из предустановок, например «Bass Boost» для более выраженного баса.
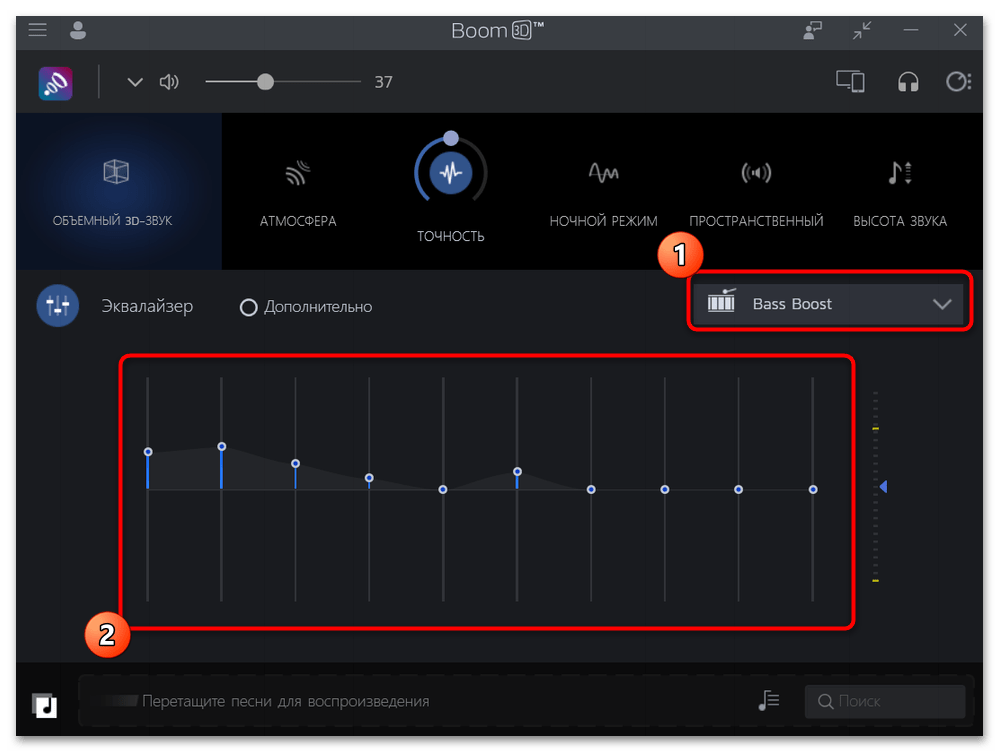
- В центральной части окна станут доступны ползунки для настройки частот.
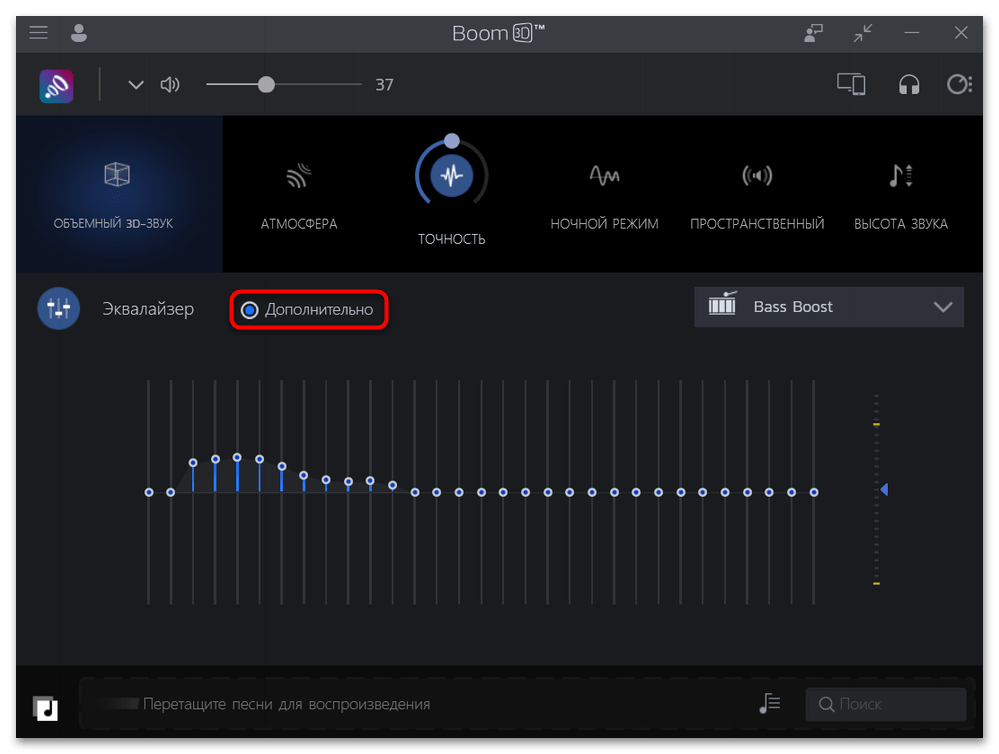
- После активации опции «Дополнительно» отобразится еще больше полос эквалайзера для более тонкой настройки звука.
Что касается других настроек, то они регулируются с помощью ползунков, расположенных на панели инструментов. Достаточно выбрать один из звуковых эффектов, затем его отрегулировать, а все настройки будут применяться в режиме реального времени.
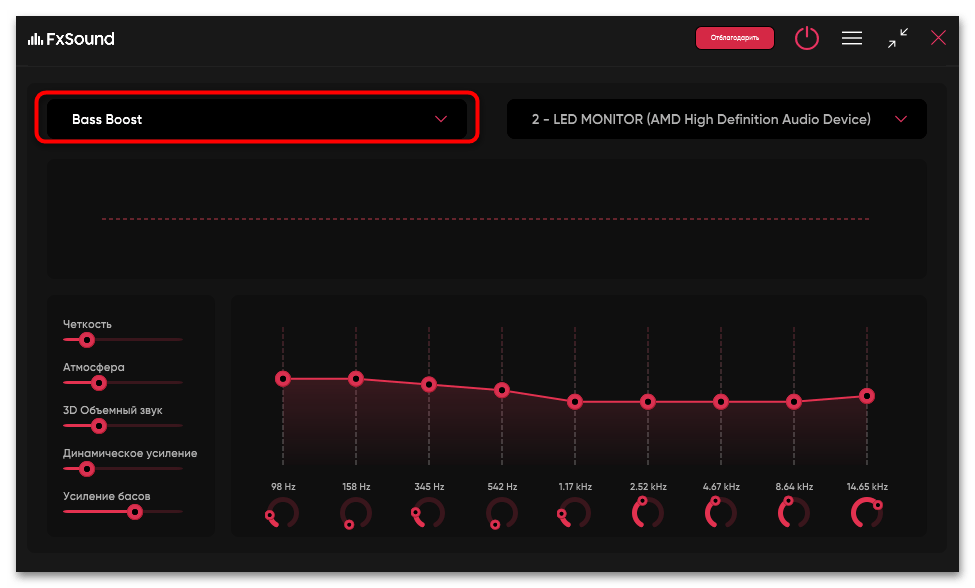
Вариант 2: FX Sound
FX Sound – простое и бесплатное решение для регулировки звучания на программном уровне. С его помощью можно настроить басы и выбрать один из предустановленных режимов.
Скачать FX Sound с официального сайта
Пользоваться программой достаточно просто: установите ее, после чего фирменные драйверы интегрируются в систему. В главном окне отображается 9-полосный эквалайзер, с помощью которого происходит регулировка частот. Также тут доступно усиление басов – используйте соответствующий ползунок для этого.
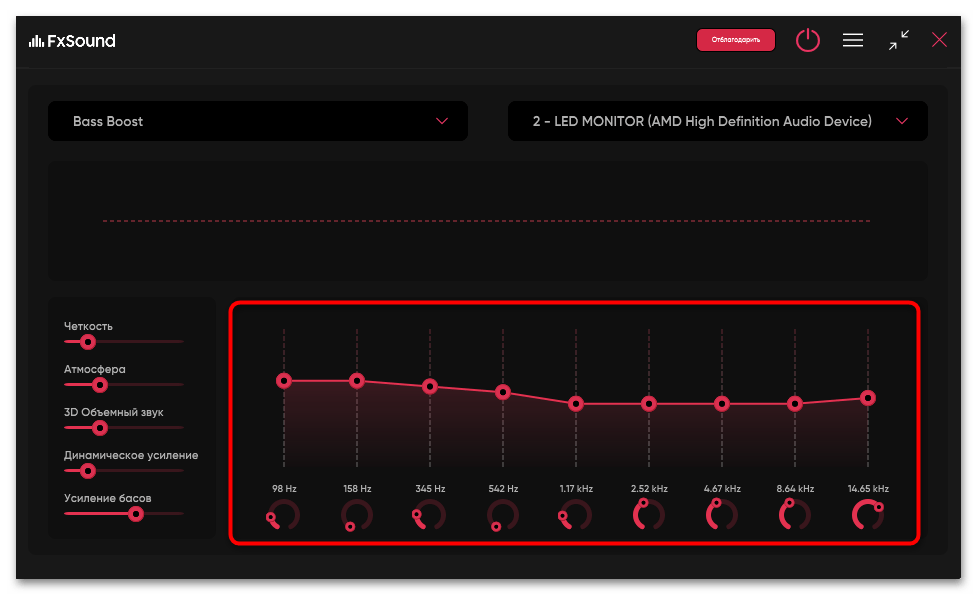
Через меню слева выбирается один из предустановленных режимов. Там же есть режим «Bass Boost» с четко выраженными и усиленными низкими частотами.
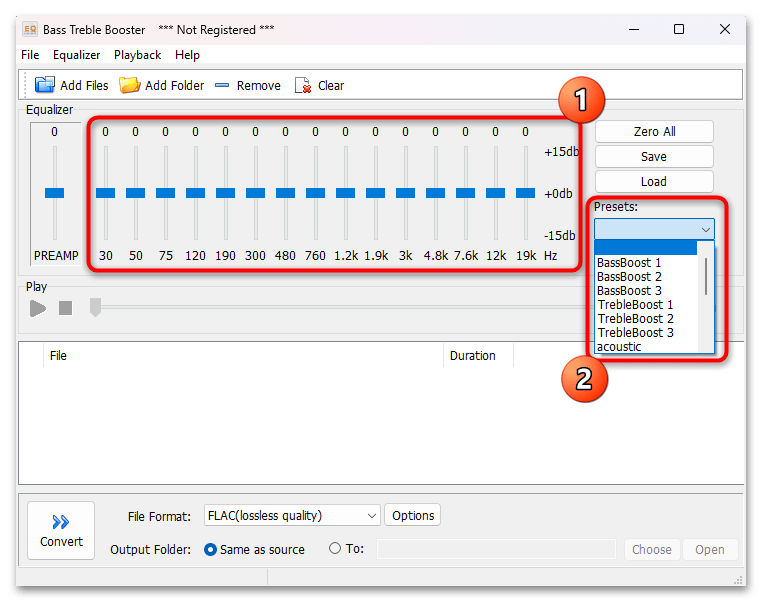
Вариант 3: Bass Treble Booster
Также следует отметить еще одну программу для настройки звучания – Bass Treble Booster, где тоже есть встроенные пресеты и 15-полосный эквалайзер. Она не требовательна к ресурсам системы и не занимает много места. К сожалению, официальный сайт больше недоступен, но Bass Treble Booster можно без труда найти на разных сайтах с каталогом софта.
В главном окне располагается эквалайзер, где регулируются частоты, в том числе низкие. Для выбора встроенного пресета достаточно кликнуть по меню «Presets». В программе предусматриваются целых три режима «Bass Boost» с различными параметрами.
Вариант 4: Dolby Atmos
При наличии в вашей ОС функции Dolby Atmos можете воспользоваться бесплатным фирменным приложением для регулировки звукового профиля.
- Воспользуйтесь ссылкой ниже — в результате следования одной из выбранных инструкций вам надо выставить «Dolby Atmos для наушников» или «Dolby Atmos for Headphones».
Подробнее: Включаем пространственный звук в Windows 10
- Скачайте приложение из магазина Microsoft и запустите его.
Скачать Dolby Atmos из Microsoft Store
- Теперь переключитесь на вкладку «Настройки» и для начала можете попробовать готовые варианты из категории «Музыка». Выбирайте тут «Гармоничный» или «Теплый» тип. Естественно, в этот момент в целях проверки качества звучания лучше включить какую-то музыку.
- Для детальной настройки низких частот переключитесь в «Пользовательский» режим и отредактируйте их по своему усмотрению.

Рекомендуем также прочитать о преимуществах Dolby Atmos в интернете.
Способ 6: Возможности аудиооборудования
Обратите внимание на ваше звуковое оборудование. Некоторые аудиосистемы оснащаются аппаратными регуляторами для некоторых эффектов, в том числе и басов. Как правило, они располагаются на задней части корпуса сабвуфера.
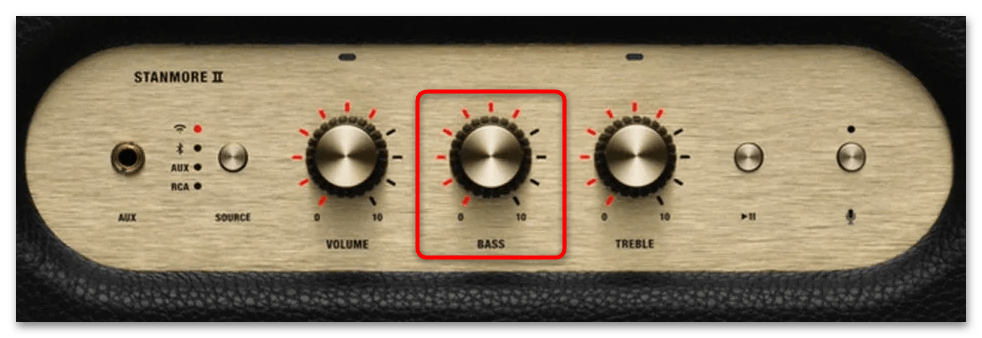
Возможности устройства реализуются в реальном времени, поэтому настроить басы можно с помощью таких регуляторов прямо во время прослушивания музыки, просмотра фильма или даже игры.
Наша группа в TelegramПолезные советы и помощь
Download Article
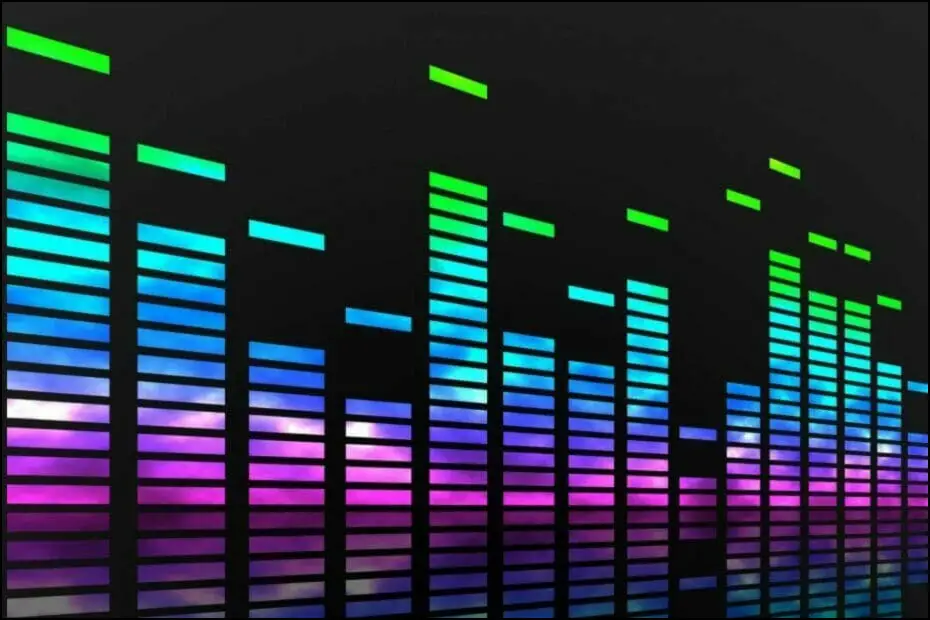
Quick, easy ways to get deeper, louder bass on your PC
Download Article
- Using FxSound
- Using Windows Audio Enhancements
- Using Your PC’s Audio Software
- Video
- Tips
|
|
|
|
Does the music you play on your PC sound high-pitched or tinny? Boosting the bass can help add much-needed depth to your favorite tracks. Or, if there’s a little too much bass boost, you can decrease the bass easily. Read on to learn how to get a bass boost or decrease the bass on your Windows 10 or 11 computer.
Adding Bass to Audio on Windows 10 & 11
The easiest way to adjust the bass is to install free software called FxSound. If you don’t want to install anything, use your PC’s built-in audio software, or open the Sound Control Panel, select your audio device, click Properties, and look for a «Bass Boost» option on the Enhancements tab.
-

Download FxSound from https://www.fxsound.com/download. FxSound is a free, open-source application designed to enhance your PC’s audio. You can use the built-in equalizer to boost the bass, decrease the bass when there’s too much, and even apply audio effects.[1]
- FxSound is just one of many apps that let you adjust the bass on your PC. Most of these apps cost money, but FxSound is free and works great.
- To download the installer, click the Download button, then click Save to save it to your PC.
-

Double-click the installer (fxsound_setup.exe, which is in your default downloads folder) and follow the on-screen instructions to install it.
Advertisement
-
If the app doesn’t open automatically, click FxSound in the Start menu.
- When FxSound is open, your computer’s audio will be routed through it automatically.
-
The menu is at the top-right corner. For example, if you’re listening to music through a Bluetooth speaker, select that speaker from the menu.
-
Drag the slider right to increase the bass, or left to decrease it.
- You can also use the app to adjust the equalizer manually. Also, try the other sliders on the left, such as «Clarity» (to adjust the highs and mids) and «Surround Sound» (to widen the left-right balance for a wider sound).
- Click the power button at the bottom to disable FxSound while you’re listening to hear the difference when the app is activated versus when it isn’t.


Advertisement
-
Depending on your sound card, you may be able to boost the bass in Windows 10 or 11 using the Enhancements area of the Sound control panel. If there’s too much bass, you can disable this option. To open Control Panel, type control panel into the Windows search bar, then click Control Panel.
- This method will not work for all sound cards. If it doesn’t work for you, check your PC for audio software, or use third-party bass boosting software.
- If you haven’t updated your drivers in a while, check for updates in the device manager, and then check the manufacturer’s website for updates.
-
It’s toward the bottom under the «Related Settings» header.
-
If you don’t see this option, skip to the next step.
-
This opens the Sound control panel.
-
For example, if you’re listening out of your computer’s built-in speakers, select Speakers. This opens your properties for that device.
-
If you see this tab at the top of the window, you can use this method to adjust the bass on your PC.
- If you don’t see this option, click the Advanced tab instead.
-
This will add a general bass-boosting effect to your audio.
- If you clicked Advanced, check the box next to «Enable audio enhancements.»
- If your goal is to hear less bass in your Windows audio, remove the checkmark.
-
This saves your new audio settings. Any audio you play on your speakers will have the bass boosted.


Advertisement
-
Many desktops and laptops come with apps that can help you boost the bass in your audio. For example, many HP computers come with Bang & Olufsen audio software called B&O Audio Control, and many Dell computers come with Waves MaxxAudio Pro. Many Acer models come with the HD Audio Manager app, and Asus models often come with one called Asus Realtek HD Audio.
- To look for audio software, click the Start menu (or press the Windows key) and check the list of programs for apps that contain the word «Audio» or «Sound.»
- If you installed your own sound card, go to the manufacturer’s website and download your model’s latest drivers and software.
-
The name of this tab varies by app, but it’ll usually have one of those words in the title.
-
For example, if you want to boost the bass for your built-in speakers, choose that speaker.
-
Not all audio software has this feature, but if yours does, it may be on a separate tab called «Sound effects.» An equalizer looks like many vertical lines with sliders and numbers at the bottom.
- You may not be able to adjust the equalizer for all audio devices. For example. If you selected your headphones in the last step, you may not see an option to adjust the bass or drag the sliders on the equalizer; however, choosing your onboard speaker may produce different results.
- You may not be able to adjust an equalizer, but your app could still have a «Bass Boost» option. Click around to look for any settings involving the word «bass.»
-
You can usually do this in one of three ways:
- If you can select a Bass Boost option, this will usually increase the bass significantly.
- If you have a preset menu, you can sometimes choose a «Bass» preset.
- If you have a graphical equalizer with sliders but don’t see the option to choose «Bass,» you can increase the bass by dragging the sliders on the left upwards, or downwards to decrease it. Bass sounds are generally between 20Hz and 250Hz, so increase the sliders that fall within that range. Do this while listening to music to hear the effects in real-time.


Advertisement
Ask a Question
200 characters left
Include your email address to get a message when this question is answered.
Submit
Advertisement
Video
-
Many apps, including iTunes, have built-in bass boost features and/or equalizers that you can adjust manually. If you’re listening with iTunes, click the View menu and select Show equalizer to display the equalizer, and then choose Bass Booster from the menu.
Thanks for submitting a tip for review!
Advertisement
About This Article
Article SummaryX
1. Install FxSound.
2. Open FxSound and select your speakers.
3. Drag the Bass Boost slider all the way to the right.
Did this summary help you?
Thanks to all authors for creating a page that has been read 141,905 times.
Is this article up to date?
Feeling the sound of your speakers or headphones is rather flat? Don’t worry, you’re not alone. The root cause may not lie in the audio output devices, but in your sound card drivers and Windows settings instead. So now it’s about time you follow this tutorial, make some fine tuning, and wait to enjoy the mind-blowing bass boost effect as you expected.
Step 1: Update your sound card driver
Out-dated or corrupt drivers have limited functions, so they could fail to provide you with the best sound quality or get your audio output devices in tip-top condition. If you want to make the most of your devices (say speakers or headphones), you should keep their drivers up to date.
You have 3 options to update the audio drivers:
Option 1 – Download & install the drivers from manufacturers – You’ll need some computer skills and patience to update your driver this way, because you need to find exactly the right driver online, download it and install it step by step.
Option 2 – Update the driver via Device Manager – This is the most common method to update your driver, but sometimes Windows may fail to provide you with the latest (and even necessary) device drivers.
Option 3 – Update the driver automatically (recommended)– This is the quickest and easiest option. It’s all done with just a couple of mouse clicks – easy even if you’re a computer newbie.
Option 1 – Download & install the drivers from manufacturers
Usually you can get the sound card drivers from your motherboard’s manufacturer (e.g. Dell, Lenovo, HP). To do this, simply visit its official website, find the drivers corresponding with your specific flavor of Windows version (for example, Windows 10, 64 bit) and download the drivers manually. If you’re using the Realtek HD Audio Driver, you can also download the driver from Realtek. (However, if you want to get the latest version of Realtek HD Audio Driver, you should still go to the website of your motherboard’s manufacturer.)
Once you’ve downloaded the correct driver for your system, double-click on the downloaded file and follow the on-screen instructions to install the driver. On completion, restart your PC for the changes to be fully implemented.
Option 2 – Update the driver via Device Manager
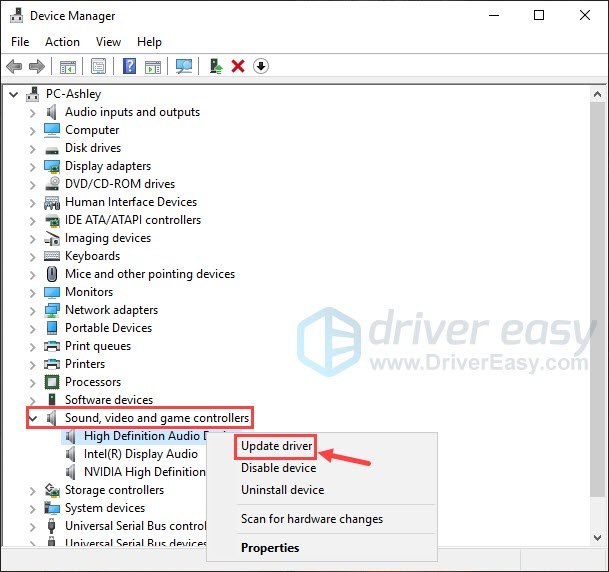
To update your audio driver via Device Manager, here’s the procedure:
- On your keyboard, press the Windows logo key and R at the same time to invoke the Run dialog box. Then, type devmgmt.msc and click OK.
- In the Device Manager window, double-click Sound, video and game controllers to expand its drop-down list. Then right-click on your sound card and select Update driver.

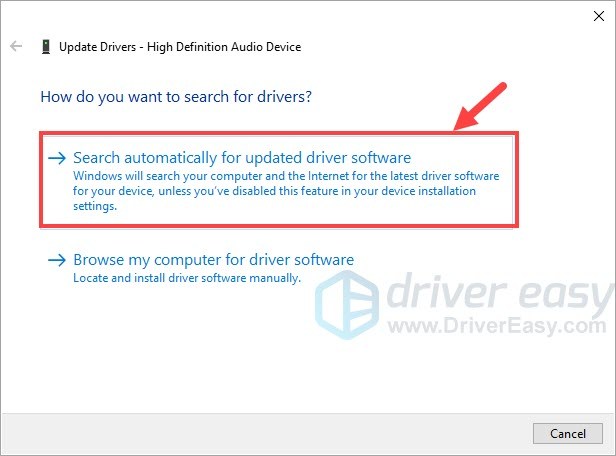
- Click Search automatically for updated driver software. Then follow the onscreen instructions to update your driver.

- If you’re presented with the notification that reads “The best driver software for your device is already installed,” that means your audio driver has probably been up-to-date. But if you’re not sure about that, please turn to option 1 or option 3 to look for the latest version of your audio driver.
- Reboot your PC for the changes to take effect.

Option 3 – Update the driver automatically (recommended)
Some people may find it hard to locate the correct driver online. And even if you successfully find it, it’s still time-consuming and error-prone to install the driver. So if you don’t have the time, patience or computer skills to update your audio drivers manually, you can do it automatically with Driver Easy.
Driver Easy will automatically recognize your system and find the correct drivers for it. You don’t need to know exactly what system your computer is running, you don’t need to risk downloading and installing the wrong driver, and you don’t need to worry about making a mistake when installing. Driver Easy takes care of everything.
You can update your drivers automatically with either the FREE or the Pro version of Driver Easy. But with the Pro version it takes just 2 clicks (and you get full support and a 30-day money back guarantee):
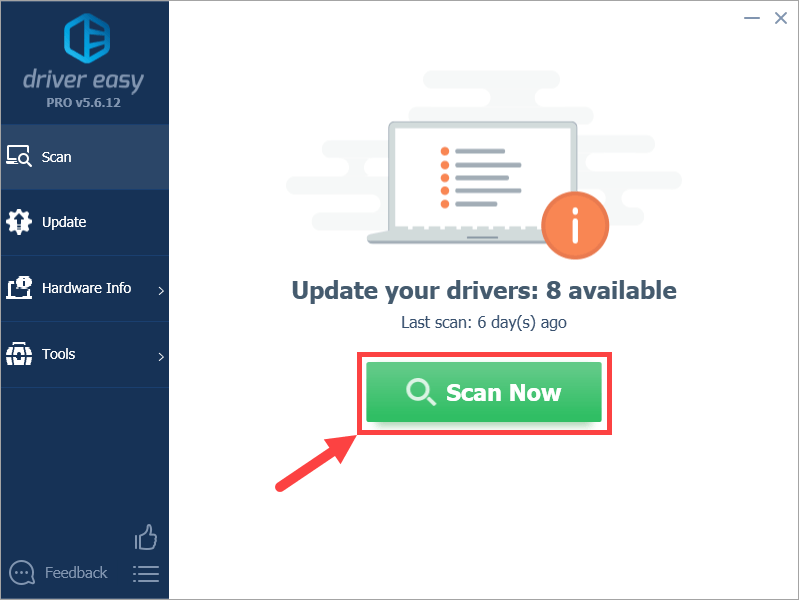
- Download and install Driver Easy.
- Run Driver Easy and click the Scan Now button. Driver Easy will then scan your computer and detect any problem drivers.

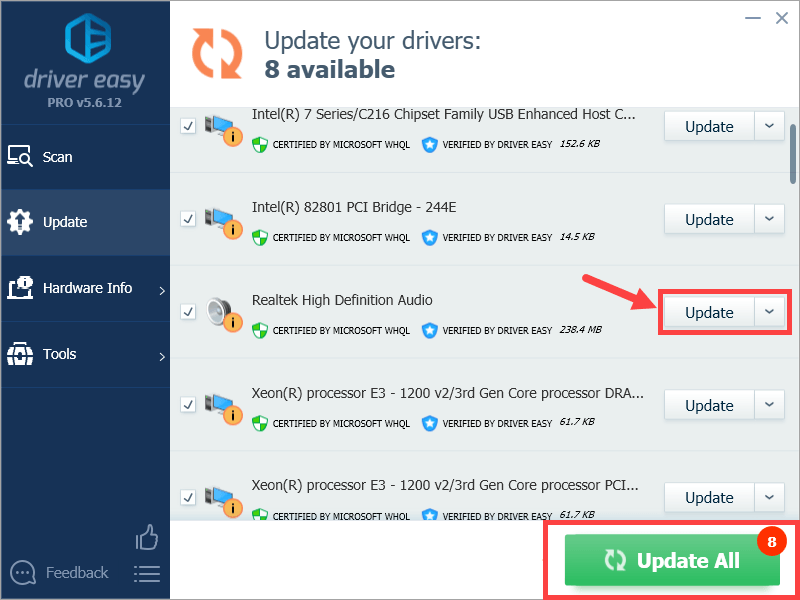
- Click Update All to automatically download and install the correct version of all the drivers that are missing or out of date on your system (this requires the Pro version – you’ll be prompted to upgrade when you click Update All). Or if you just want to update your sound card driver for now, simply click the Update button next to it.

Note: you can do it for free if you like, but it’s partly manual.
Driver Easy uses only genuine drivers, straight from your hardware manufacturer. And they’re all tested and certified – either by Microsoft or by itself. Or both.
If you have any problems when using Driver Easy to update your driver, please feel free to email us at support@drivereasy.com. We’re always here to help.
Step 2: Adjust bass boost settings in Windows 10
Whether you’re using a headset or speakers, you can follow the steps below to adjust your bass boost settings:
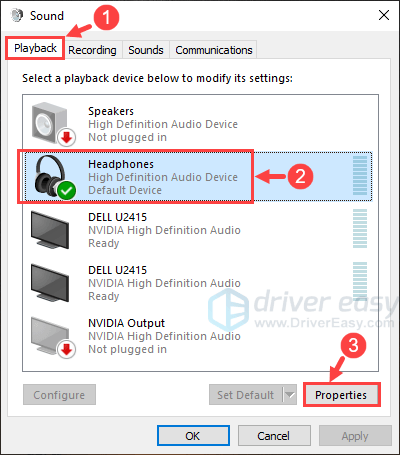
- Right-click the speaker icon at the bottom right corner of your taskbar (namely the system tray), then select Sounds.
- On the Playback tab, click to highlight the playback device you’re using, then click Properties. (If you want to adjust the settings for your speakers, click Speakers instead of Headphones. )

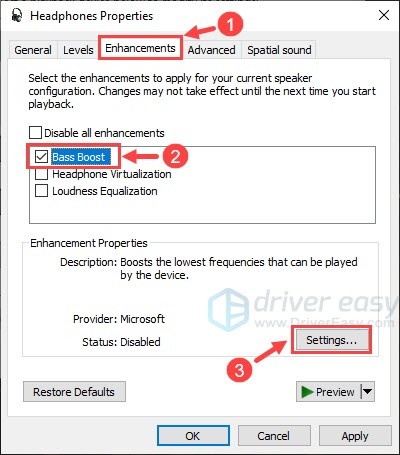
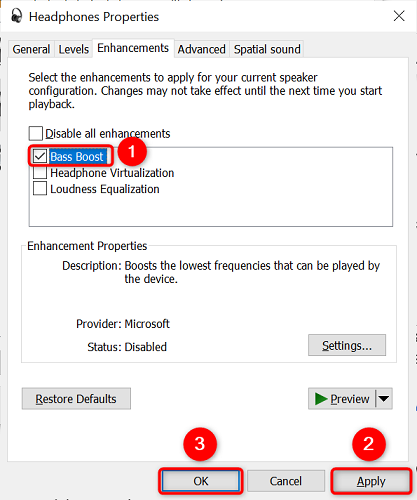
- On the Enhancements tab, locate the Bass Boot checkbox and select it. After that, click Settings.
- In the next window, click the chevron icons of Frequency and Boost Level to tweak the bass boost settings according to your preference. Or you can simply leave them on auto. When finished, click OK.
- There you go – now you should be able to enjoy the marvelous bass boost effect via your playback devices.
Hopefully this post helped you solve the problem! If you have any further questions or ideas, please feel free to leave a comment below. Thanks for reading!
25
25 people found this helpful
Quick Answer
- Windows offers some preset options to change the sound profile so that you can enjoy the same audio in a slightly different way, depending on your taste.
- If you prefer to use a pair of Bluetooth earphones while listening to music on your Windows computer, then there’s a feature you’ll definitely love to use.
- It boosts relatively quieter sounds and underpowers loud sounds to get a consistent sound volume without having to change the volume now and then while watching a movie or show.
Hello Windows users! Do you like to hear music on your computer while working to relax? While some may be satisfied with the default sound quality, there’s always room for improvement, thanks to the built-in sound enhancement options and apps on Windows. In this article, let’s see some handy ways to improve the audio quality and boost the bass on your PC running Windows 10 or 11.
Also, Read | 2 Ways to Increase Video Audio Volume in Google Chrome
Improve Audio Quality & Boost Bass on Windows PC
There are several ways to enhance the sound quality or bass of speakers or connected Bluetooth/ wired earphones on your Windows 11 or 10 computer. You can enable spatial audio, change audio preset, tweak equalization, etc. All methods are detailed below.
1. Enable Spatial Audio Support in Windows
If you prefer to use a pair of Bluetooth earphones while listening to music on your Windows computer, then there’s a feature you’ll definitely love to use. That’s Spatial Audio support built right into windows which helps you enjoy music with Dolby Atmos in 3D (Dolby Atmos supported headphones/earphones recommended for best results).
Here’s how you can enable it:
1. Connect your pair of Headphones / Earphones to your Windows Computer.
2. Right-click on the Speaker icon in the taskbar.
3. Go to Spatial Sound and set it to Windows Sonic For Headphones.
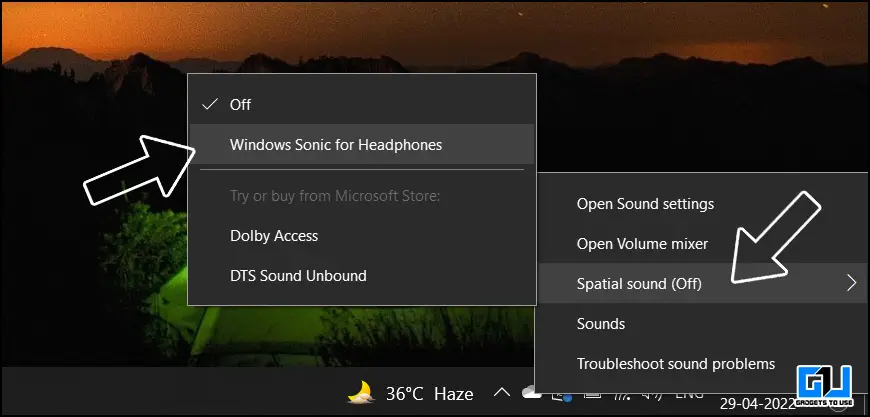
Note: You can also set it to Dolby Access or DTS Sound Unbound, but you need to download them from Microsoft Store.
Also, Read | 5 Ways to Fix Low Volume in Laptop Speakers on Windows 10 and 11
2. Change Audio Profile Preset
Windows offers some preset options to change the sound profile so that you can enjoy the same audio in a slightly different way, depending on your taste. Here’s what you can change and how it works.
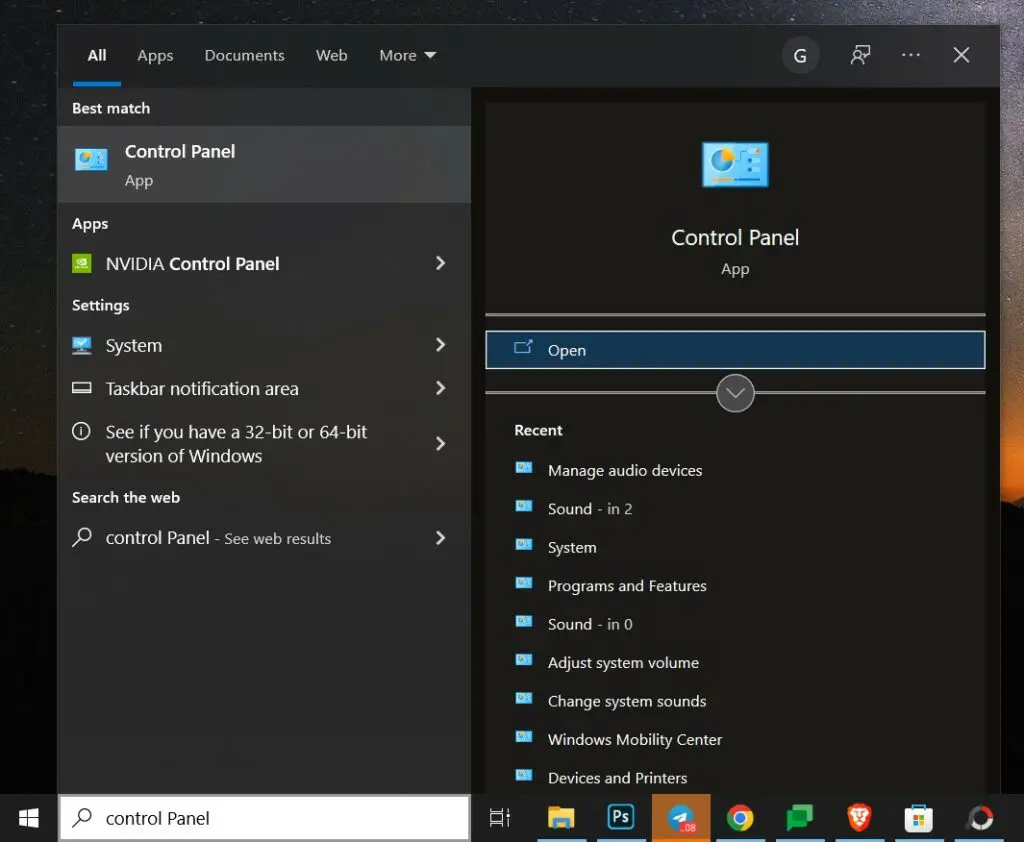
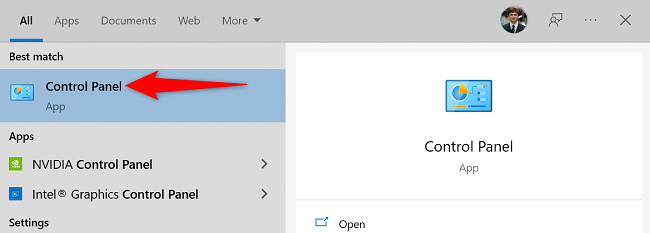
1. Launch Control Panel on your Windows Computer (you can type control panel in the start menu).
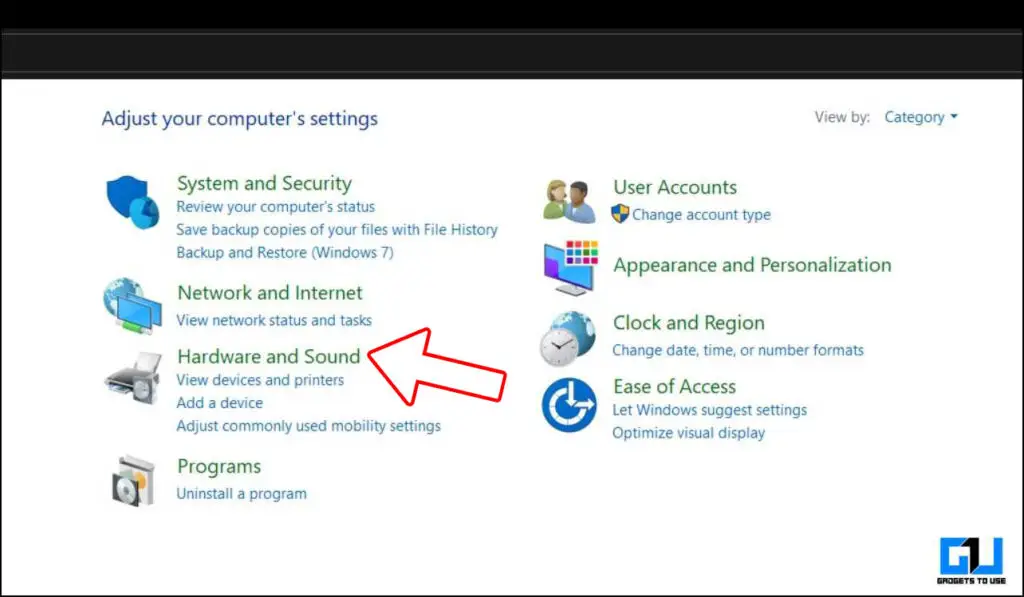
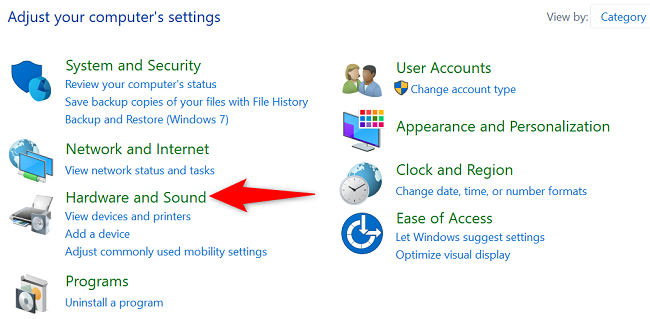
2. Go to Hardware and Sound. Set the View Style to Category from the top right for a quick search.
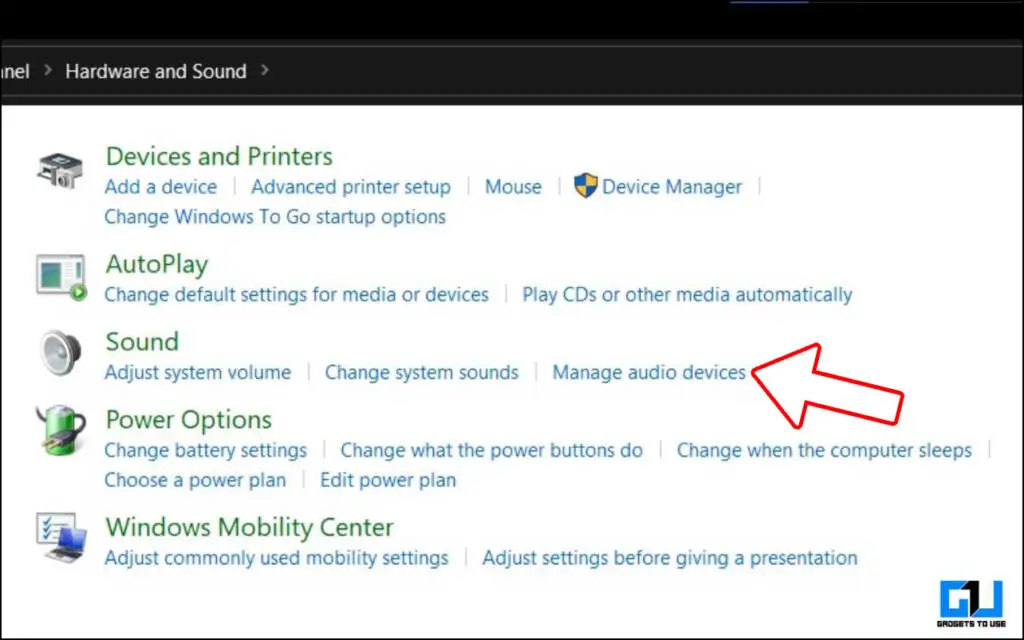
3. On the next page, click on Manage Audio Devices. This will open up a new window.
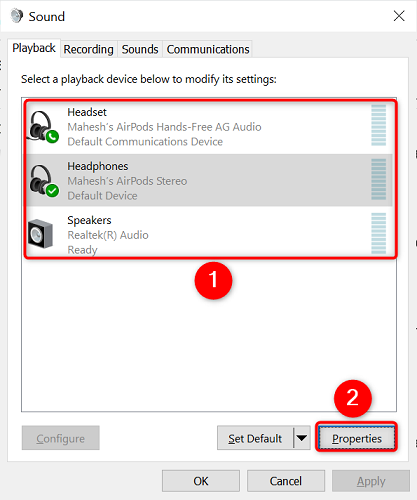
4. Inside this new sound window, select the audio device you are using. It can be the default speakers or even a pair of Bluetooth earphones. After selecting the audio device, click on Properties.
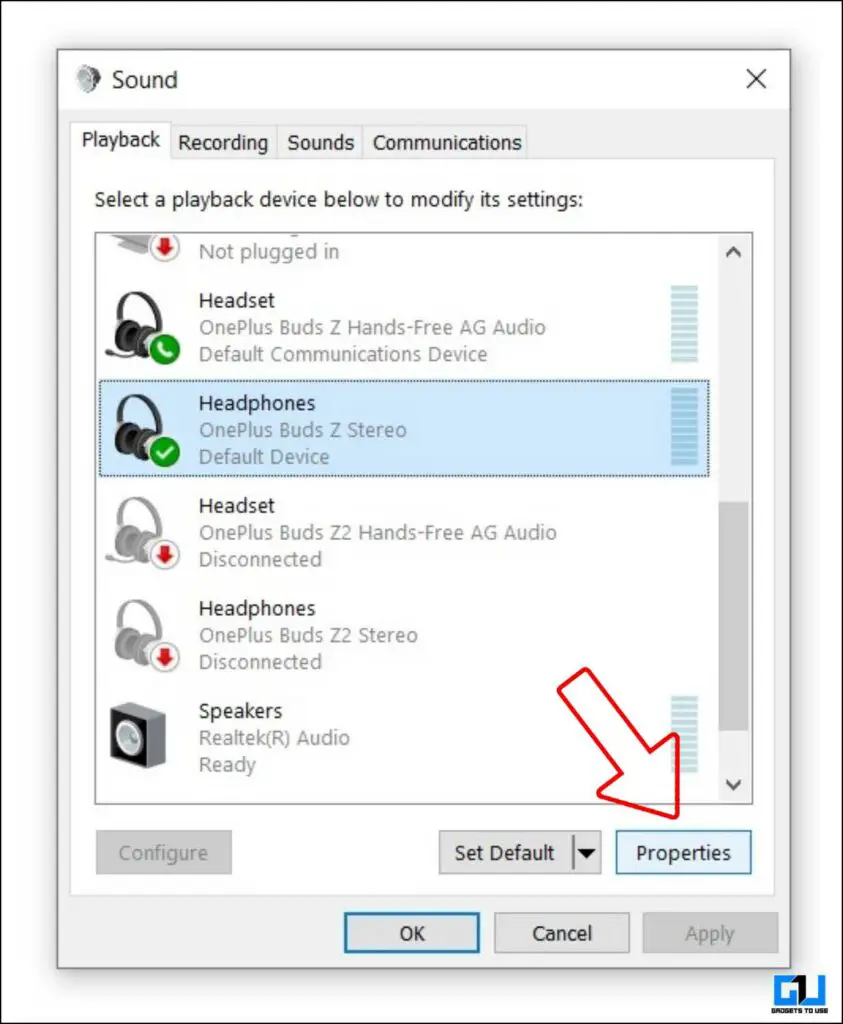
5. On the properties windows, change the tab to Enhancements. Here you will find Headphone Virtualization & Loudness Equalization.
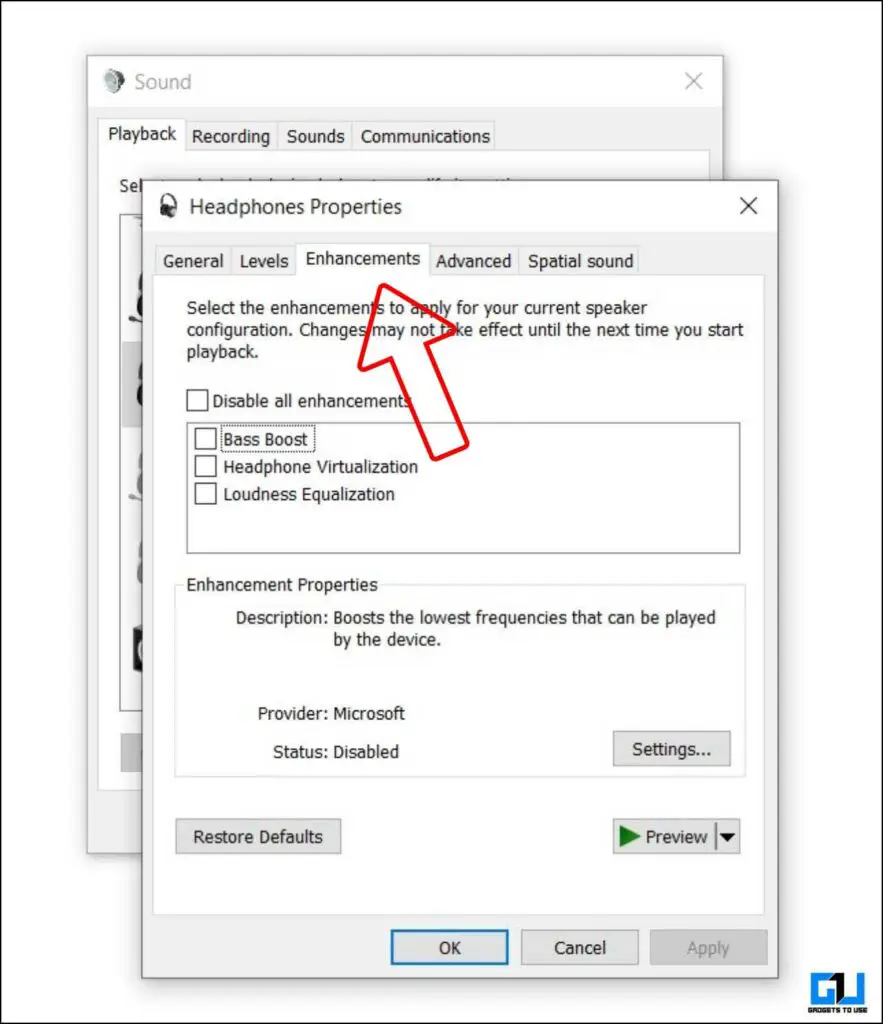
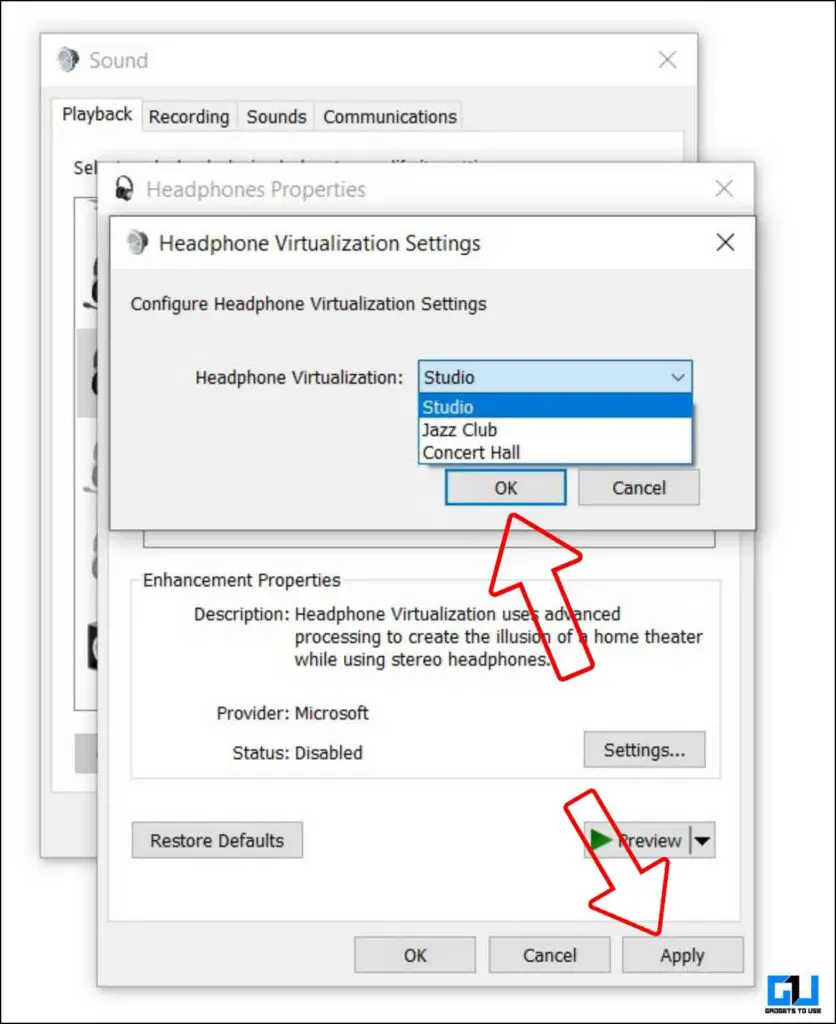
Headphone Virtualization
It uses advanced processing to create an illusion of a home theater experience while you are using a pair of stereo headphones or stereo earphones. You can select it and then go to settings to choose from three presets- Studio, Jazz Club, and Concert Hall.
Loudness Equalization
It uses an advanced understanding of human hearing to adjust and even out the volume differences. It boosts relatively quieter sounds and underpowers loud sounds to get a consistent sound volume without having to change the volume now and then while watching a movie or show. You can even adjust this to your preference by tweaking the release time from settings.
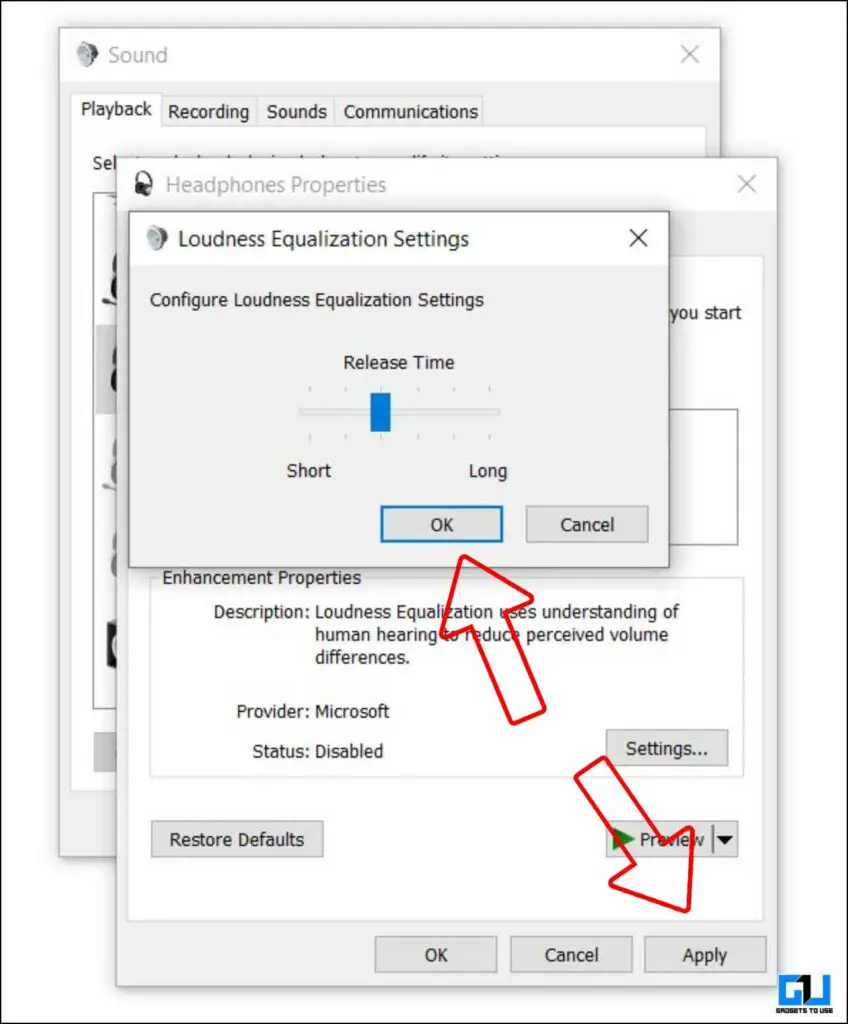
Note: Do not use Loudness Equalization while gaming or mastered audio, as you will miss the extreme lows and highs, resulting in a very unpleasant experience.
Also, Read |Trick To Increase Loudspeaker Volume On Android Phone
3. Enable Bass Boost in from Windows Control Panel
Not having enough bass feels like an empty experience, making the music or audio sound weak. One way to boost the audio bass on your Windows computer is to enable bass boost hidden under control panel settings. It will produce better bass on the audio device you are using. Here’s how you can enable it.
1. Launch Control Panel on your Windows Computer (you can type control panel in the start menu).
2. Go to Hardware and Sound.
3. On the next page, click on Manage Audio Devices. This will open up a new window.
4. Inside this new sound window, select the audio device you are using. It can be the default speakers or even a pair of Bluetooth earphones. Then, click on Properties.
5. On the properties windows, change the tab to Enhancements and select the Bass Boost option.
6. Now, tap on the Settings button under it. In the next window, you can change the frequency. The more the frequency is, the more the bass will be.
7. Click on OK to close the tab and then click Apply.
Also, Read | 6 Ways to Improve Speaker or Earphone Sound Quality On Android
4. Enable Bass Boost from Windows 11 Settings
If you are using Windows 11, you can improve the sound even from Windows Settings on your computer. Here’s how you can do it.
1. Launch Settings on your Windows Computer (you can type settings in the Start menu or from the notifications tray).
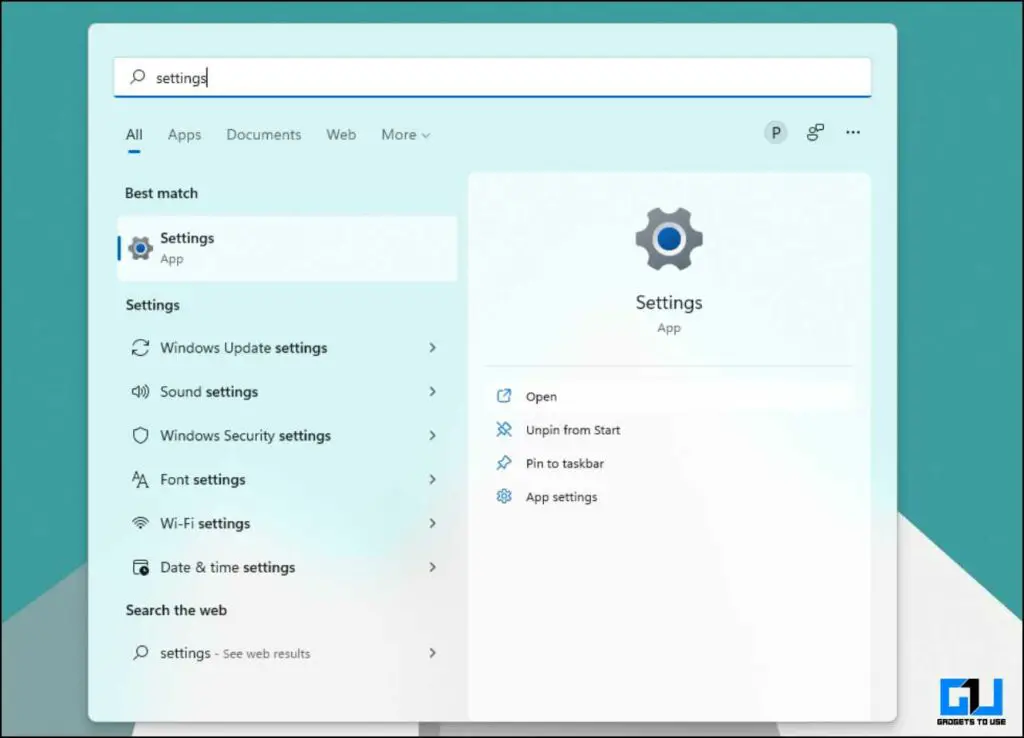
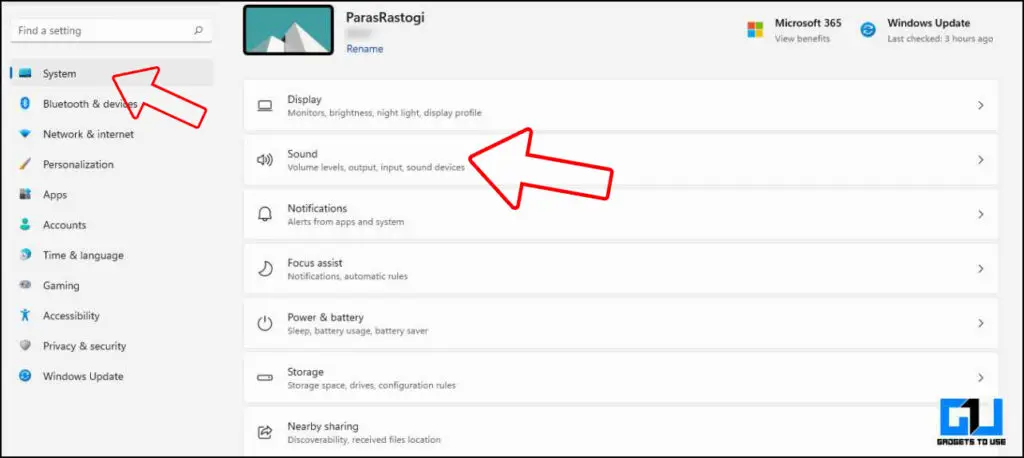
2. Go to System and further click on Sound.
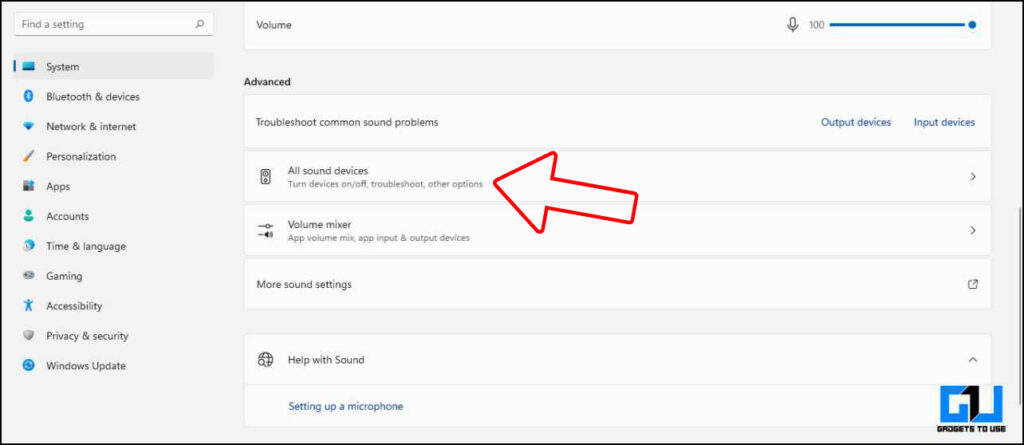
3. Under sound settings, click on All Sound Devices under Advanced Settings.
4. On the All Sound Devices page, click on the audio device you are using under Output Devices.
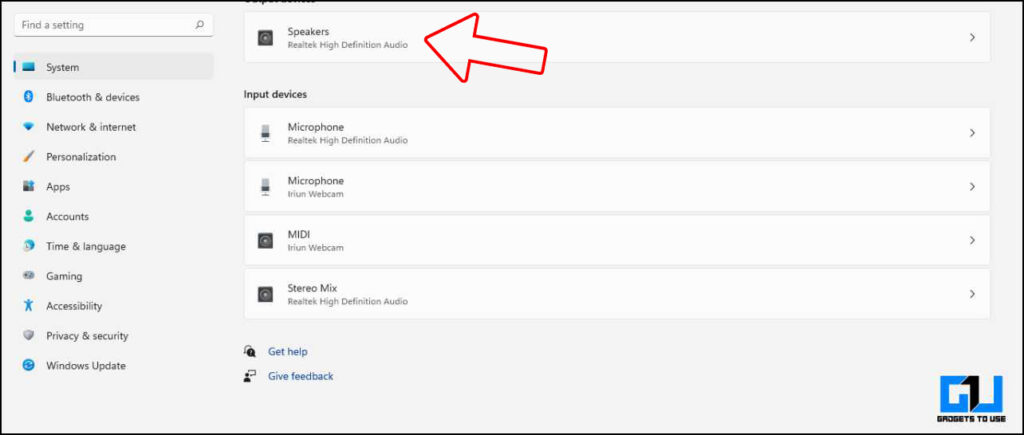
5. Enable the toggle named Enhance Audio.

5. Boost Bass Using Third-Party Software
If you like to fine-tune the bass to your personal preference, you can use third-party software for bass boost, as they offer way more features than native support on Windows, including creating a personal bass effect profile.
Here are some of our recommended Bass Boosters Software you can use:
- FX Sound: 7.1 Surround Sound, Optimization for low-quality sources, Simple & easy UI
- Equalizer APO: Unlimited filters, Highly-customizable bass-boost options, low latency
- Bass Treble Booster: 15 Frequency settings, Drag and drop support, Ability to convert audio files
- Boom 3D [Paid]: Equalizer Presets, Advanced Audio Player, Internet Radio Stations
Also, Read | Boost Volume of Sounds & Conversations Around You on Android
Can Boosting Bass Damage Your Computer/Laptop Speaker?
Well, the answer to this question is both NO and YES. Let me explain how.
Boosting the bass of any speaker does result in increasing the overall volume. Every speaker has an upper limit to produce volume. If you increase bass marginally and only up to the permissible limit of the speaker, then it won’t damage the speaker.
However, if you exceed that limit and push the bass and volume to their limits, the speakers will wear out quickly, making them sound very feeble and without any bass.

Another explanation for this is that when the bass boost is activated, the bass driver in the speaker needs more air to push the audio waveform. The more air the driver pushes out, the more the speaker cone moves. If this puts more pressure on the cone than it can bear, it will break the speaker cone. For this, you need to check the speaker’s sound pressure level (SPL), which is measured by a Decibel Meter.
Also, Read | Low Volume in Chrome? Here’s the Trick To Boost Volume in Chrome Tabs
Wrapping Up

So these are some ways you can enhance the audio quality and bass of your Windows computer running on Windows 10 or Windows 11. Keep in mind that pushing the bass to the speaker’s limit can damage any speaker. So before tweaking the bass and volume, make sure to check the SPL of the speaker. Also, Instead of tweaking the internal speakers of your laptop or notebook, it’s better to get a pair of external speaker and tweak them. Stay tuned for more such tech tips and tricks.
You can also follow us for instant tech news at Google News or for tips and tricks, smartphones & gadgets reviews, join GadgetsToUse Telegram Group or for the latest review videos subscribe GadgetsToUse YouTube Channel.
Was this article helpful?
YesNo
Quick Links
-
Turn Up the Bass on Windows 10 and Windows 11
Disappointed that the rafters aren’t shaking when you play your music? Both Windows 10 and Windows 11 offer an option to enhance your current bass levels. We’ll show you how to enable this option on your PC.
The option to boost bass isn’t available on all PCs. If your machine has supported hardware and drivers, you will see this option as described in the below steps. Also, whether you’re on Windows 10 or Windows 11, you’ll follow the same set of steps.
Turn Up the Bass on Windows 10 and Windows 11
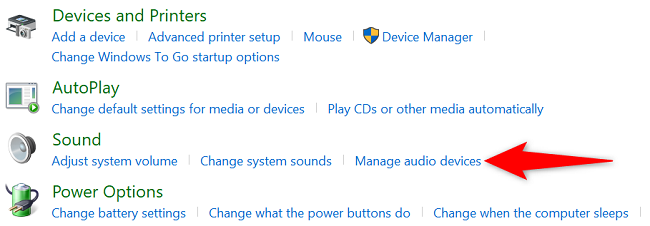
To increase the bass on your Windows PC, first, launch Control Panel. Do this by opening the «Start» menu and searching for and clicking on «Control Panel.»
On the Control Panel window, select «Hardware and Sound.»
On the following page, beneath «Sound,» choose «Manage Audio Devices.»
A «Sound» window will open. Here, select your headphones or speakers, then click «Properties.»
On the «Properties» window, open the «Enhancements» tab. Then activate the option that says «Bass Boost.»
Once you’ve done that, save your settings by clicking «Apply» followed by «OK» at the bottom.
And that’s it. Your connected headphones or speakers will now produce relatively better bass while playing audio. Enjoy your favorite music on your PC!
While you’re at it, you might want to enable Dolby Atmos and also consider using a few tips to improve your Spotify sound.