

Steam – это одна из самых популярных платформ для игр и программного обеспечения. Многие пользователи хотят, чтобы Steam автоматически запускался при включении компьютера. В этой статье мы рассмотрим, как добавить Steam в автозагрузку на Windows и MacOS, а также как удалить его оттуда, если это необходимо.
Зачем добавлять Steam в автозагрузку
Добавление Steam в автозагрузку имеет несколько преимуществ:
Удобство: Steam будет запускаться автоматически при включении компьютера, что позволит вам сразу же начать играть или обновлять игры без необходимости запускать платформу вручную.
Уведомления: Steam будет отображать уведомления о новых обновлениях игр и программ, что поможет вам быть в курсе последних изменений.
Синхронизация: Если вы используете несколько устройств, добавление Steam в автозагрузку обеспечит синхронизацию вашей библиотеки игр и настроек между ними.
Как добавить Steam в автозагрузку на Windows
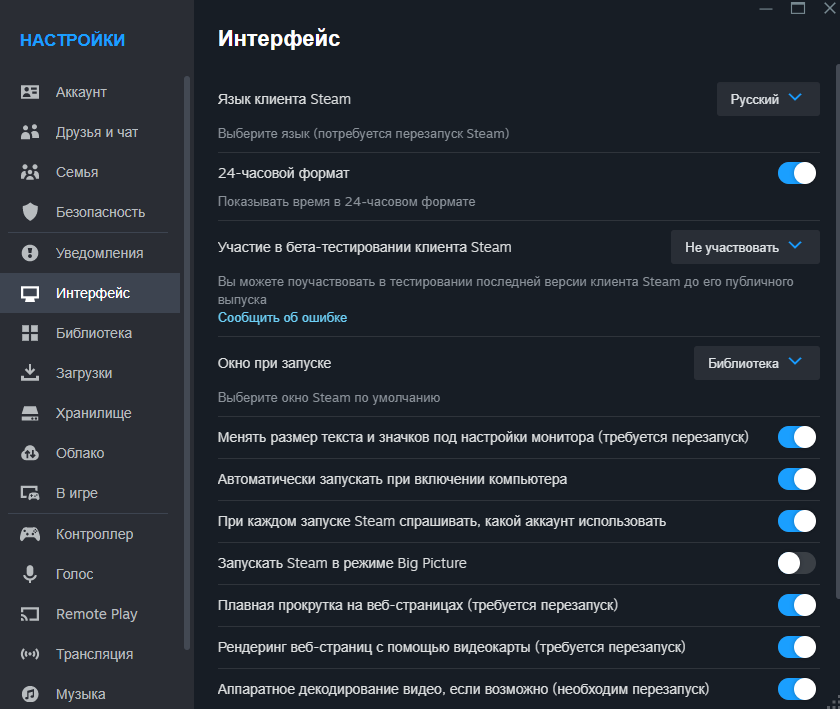
- Откройте настройки Steam
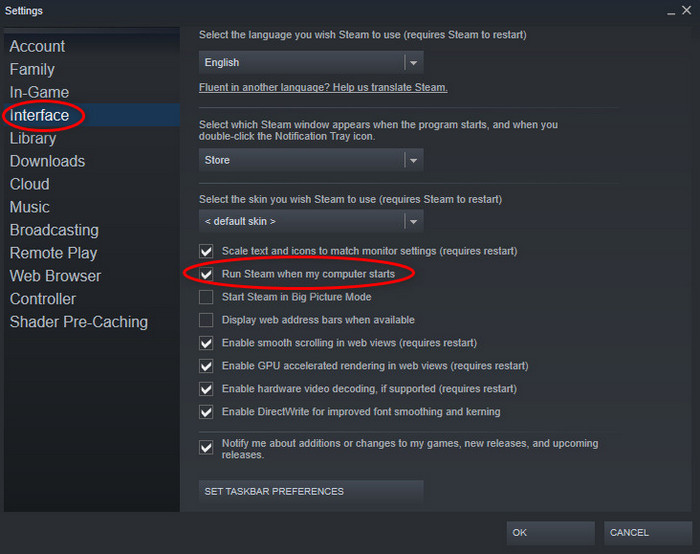
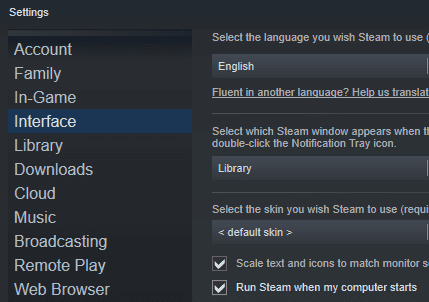
- Выберите вкладку “Интерфейс”
- Включите слайдер “Автоматически запускать при включении компьютера”
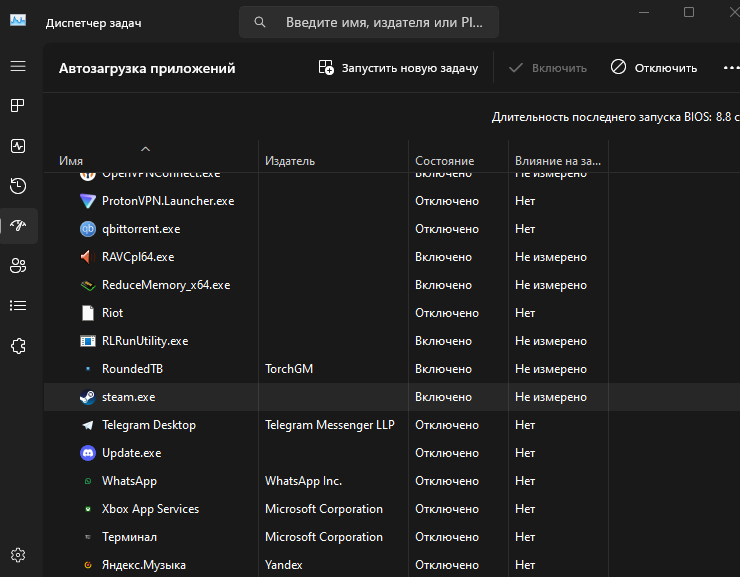
Проверить автозагрузку Steam просто:
- Откройте диспетчер задач
- Выберите вкладку “Автозагрузка приложений”
- Найдите “steam.exe” и проверьте включена ли автозагрузка
Как убрать Steam из автозагрузки
Windows:
- Откройте настройки Steam
- Выберите вкладку “Интерфейс”
- Выключите слайдер “Автоматически запускать при включении компьютера”
MacOS:
- Откройте «Настройки системы» и выберите «Пользователи и группы».
- Выберите свой аккаунт и нажмите на «Входные параметры».
- В разделе «Автозапуск» найдите «Steam» в списке приложений и щелкните на нем правой кнопкой мыши.
- Выберите «Удалить» или «Удалить из списка» для удаления Steam из автозагрузки.
Заключение
Добавление Steam в автозагрузку на Windows и MacOS позволяет упростить процесс запуска платформы и быть в курсе новых обновлений игр и программ. Если вам не нужно, чтобы Steam автоматически запускался при включении компьютера, вы можете легко удалить его из автозагрузки, следуя приведенным выше инструкциям. Помните, что добавление или удаление приложений из автозагрузки может повлиять на производительность вашего компьютера, поэтому рекомендуется быть осторожным при изменении настроек автозагрузки.
The world is very fast compared to how it was a decade ago. In this age of technology, where information is moving at lightning speeds, every second matters.
More and more people are using SSDs rather than HDDs. As SSDs are much faster, it is ok to run multiple apps at startup, meaning these apps will run right after starting up your PC.
As Steam is one of the largest if not the largest online platforms for PC gaming, many users have Steam installed on their systems.
Many Steam users want to know how to set Steam to start automatically with Windows.
Why does Steam not start automatically with Windows?
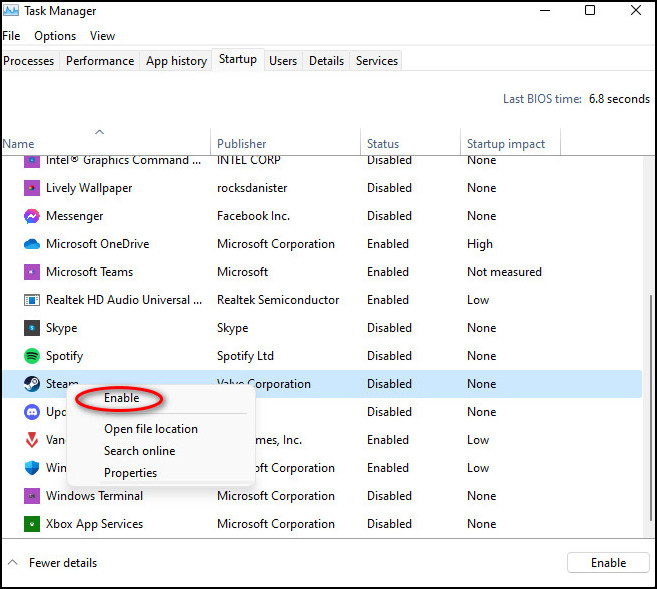
Having Steam disabled in the Startup tab in the Task manager will result in Steam not starting at startup. You need to enable Steam in the Startup option available in the Task Manager. To fix this, go to Task Manager>Startup>right click on Steam>Enable.
It is annoying when you want to see Steam, but it does not pop up at startup. That is why I conducted thorough research and have written the best ways to enable Steam at startup.
Read the full post for more details.
If you want Steam to start right after your system boots into Windows, all you need to do is access the Task Manager and go to the Startup tab to enable Steam.
The processes given below are very simple and the steps given below are straightforward, so there is no reason for you to worry or be nervous. You got this!
Here are the methods to set Steam to start automatically with Windows:
1. Enable Steam in Startup
The Task Manager has a tab where you can select which apps will launch during startup. In this process, you will use a keyboard shortcut(Ctrl+Alt+Delete buttons together) to access the Task Manager.
You will then go to the Startup tab and enable Steam.
If you are confused, do not be as the simple steps to this process are given below, so keep calm and go through them. Trust me, you are just a few clicks away from the solution.
Here are the steps to enable Steam Startup to start Steam automatically with Windows:
- Press the Ctrl+Alt+Delete buttons together on your Keyboard.
- Click on Task Manager.
- Enter the Startup If you do not see it, click on the More details.
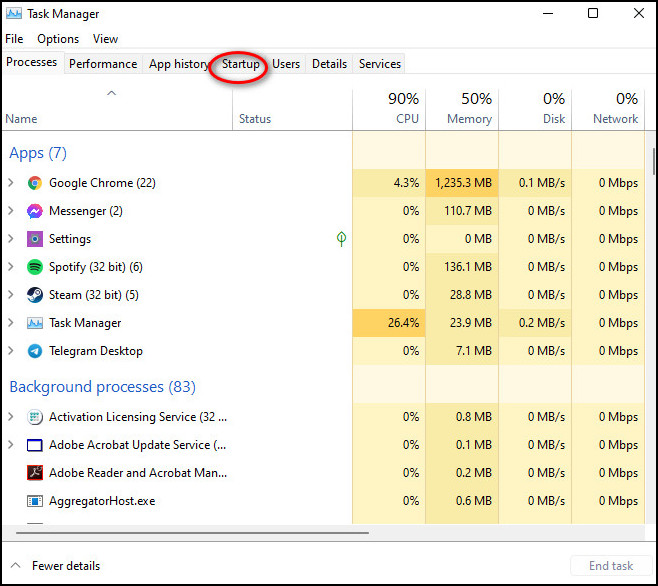
- Scroll through the list and right-click on Steam, then select Enable.
- Restart your PC.
- Check whether Steam is running at startup after your pc boots up.
If this method did not fix the problem, please follow the other methods given in this post.
Check out the easiest way to fix Steam takes forever to open.
2. Use Steam Settings
You can configure Steam to run at Startup from the Settings menu in the Steam app. Steam has a very easy-to-use UI, so you should have no trouble navigating through the app.
If you do not have much experience running Steam on your system, there is n reason to worry as I have given the simple steps to change the Steam settings below.
Keep calm and go through the straightforward steps given below.
Here are the steps to use the Steam settings to set Steam to start automatically:
- Run the Steam
- Click on Steam.

- Navigate to Settings and click on it.

- Go to the Interface
- Turn on the Run Steam when my computer starts.
If this method did not answer your question, please keep reading the post.
Here’s a complete guide on how to fix Steam link setup: no host computers found.
How to Stop Steam from Opening on Startup
Sometimes it may be too much for your pc to launch multiple apps right after starting up. There can be stutters or slow boot times for too much stress on your system.
Having an SSD guarantees fast boot-up times even if you have multiple apps launching at startup. If you are using an HDD, the case is the exact opposite.
If you want to reduce the stress on your pc or storage device and want to stop Steam from opening on startup, please follow the simple steps below.
Here are the steps to stop Steam from opening on startup:
- Press the Ctrl+Alt+Delete buttons together on your Keyboard.
- Select Task Manager.
- Go to the Startup Click on More details if you do not see the Startup tab.
- Right-click on Steam and select Disable.
- Restart your PC.
- Check whether Steam is running at startup after your pc boots up.
Also, check our exclusive tutorial on how to fix Steam pending transaction.
How to Stop Steam from Opening on Startup Windows 10
Although it has been a while that Windows 11 was released, Windows 10 still has a lot of loyal users and I am not surprised. There is no need to fix something that is already working.
So it is no surprise if there are Windows 10 users with the same question, how to stop Steam from opening on Windows 10?
The answer is given below.
Here are the steps to stop Steam from opening on startup Windows 10:
- Press the Ctrl+Shift+Esc buttons together on your Keyboard.
- Click onTask Manager.
- Enter the Startup tab. Click on More details if you do not see the Startup
- Right-click on Steam and select Disable.
- Restart your PC.
- Check whether Steam is running at startup after your pc boots up.
If you followed the steps correctly, you must have fixed the issue. If not, please follow the other procedures given in this post.
Follow our guide to Calibrate Steam VR.
How to Add a Game on Steam
Video games are amazing and I am not embarrassed to say it as an adult in his early 20s. Just like you, I want you to be transported to a world of my choice where I can be a character I like.
As Steam is one of the largest platforms to download and install PC games, it is no surprise if you want to know how to add a game on Steam.
That is why I have written the methods on how you can add a game or multiple games on Steam.
Here are the methods to add a game on Steam:
1. Purchase a Game on Steam
Yes, I know the title to this section sounds very basic and obvious, but this is one of the ways to add a game on Steam.
You need to go to the Steam Store and purchase the desired game that you want to play. If you do not know how to purchase a game on Steam, please follow the simple steps given below.
Here are the steps to purchase a game on Steam:
- Open Steam.
- Click on Store.
- Search for a game in the Search bar.
- Purchase the game.
- Download and install the game.
- Play the game and enjoy!
If this procedure did not work, there are other methods given in this post. Please go through them.
2. Use Steam Gift Card
You can send and receive gifts on Steam. Games can be some of those gifts. You can add games by receiving a gift from a person, and it is very easy to add games from the gifts you receive.
When you receive a gift, you will be shown two options, “Accept Gift” and “Decline Gift.” Selecting the “Accept Gift” option will install the game you received.
Please follow the steps given below.
Here are the steps to add a game on Steam by accepting a gift:
- Click on Accept Gift.
- Select Add to my game library.
- Check whether you can play the game.
If you could not play the game, please follow the other methods given in this post.
3. Use a Code on Steam
You can receive gift codes on Steam. You can use gift codes to purchase games on Steam. If you want to know how to use a code to buy a game on Steam, please follow the straightforward steps given below.
Here are the steps for using a code to add a game on Steam:
- Enter Steam.
- Click on the + icon at the bottom left corner.
- Click on Activate a Product on Steam.
- Confirm the Steam Subscriber Agreement.
- Enter the code.
- Click on Next.
- Wait for the process to finish.
- Install the game.
Hopefully, by now, you were able to add your desired game on Steam.
Conclusion
I have tried my best to provide you with the latest information regarding Steam.
Hopefully, you got what you were searching for in this post. I also love gaming and am excited for the games released in the future. May we all have new graphics cards and beast systems to play the latest games on the maximum settings at high fps!
I wish you luck in whatever you do in the future. Take care and stay safe!
Теперь вам не прийдётся каждый раз кликать по ярлыку на рабочем столе, автозагрузка принудит Steam запускаться в трее сразу после включения вашего компьютера. Для примера мы возьмем Windows 11, как самую популярную версию ОС на данный момент. Для Windows 10 порядок действий приметно такой же.
- Открываем меню Пуск, находим приложение Параметры в закрепленных или через меню поиска;
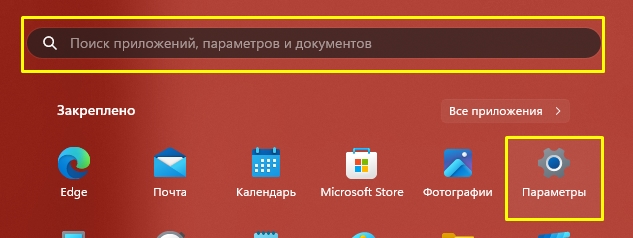
- В новом окне выбираем параметр Приложения в левой части экрана;
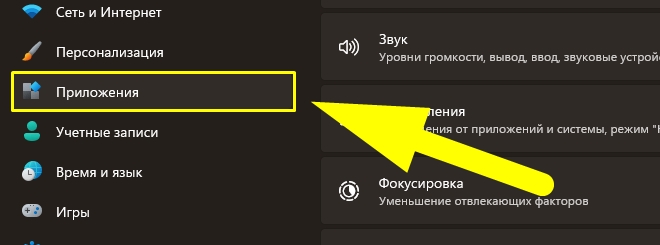
- В самом низу будет пункт Автозагрузка, он нам и нужен для последующих действий;
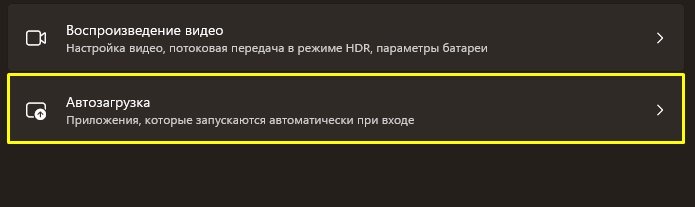
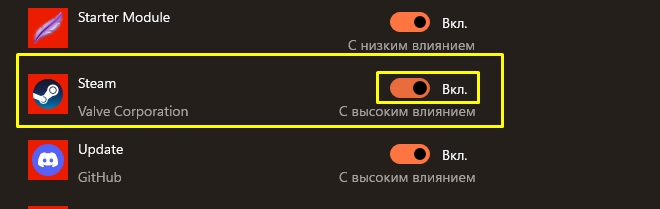
- Находим Steam, после чего переключаем ползунок в положение Вкл.
Помимо стандартного способа, существует довольно удобное и универсальное приложение CCleaner. Достаточно скачать утилиту в любом удобном месте, после чего перейти по пути Инструменты > Запуск.
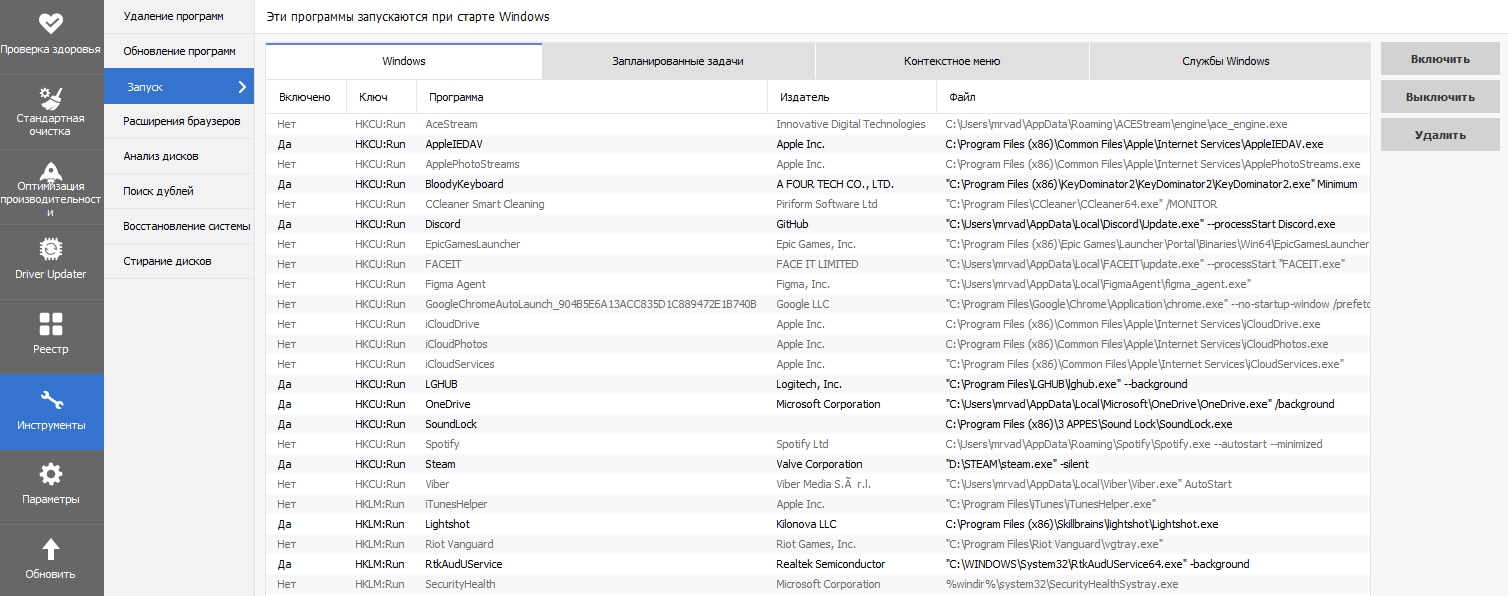
К слову, часто Windows может не видеть приложения которые являются опасными или нежелательными для вашей ОС, в отличие от CCleaner. Даже если вы установили автозапуск Steam предусмотренным системой способом, проверить наличие странных приложений все же стоит. Это могут быть как майнеры, так и просто случайно установленный мусор, который кушает вашу производительность и тормозит запуск компьютера.
If you’re a PC gamer, you probably have Steam installed as it is the most popular store for PC games. If you regularly play games on your computer, you may want to configure Steam to launch automatically when your computer boots up. This option won’t be for everyone, as not everyone will want Steam to open automatically and it does slow down your boot-up times a little.
If you want to configure Steam to launch as Windows boots up, then you can enable this in the Steam settings. To open the settings, click on “Steam” in the top-left corner of the main Steam window, then click “Settings” in the drop-down menu.
Once you’re in the Steam settings window, switch to the “Interface” tab. Here you can set Steam to start automatically with Windows by ticking the “Run Steam when my computer starts” checkbox, found roughly halfway down the page. Click “OK” in the bottom-right of the window to save the change.
Tip: Sometimes when Steam is configured to launch automatically with Windows, it struggles to correctly apply updates to the Steam client. If you see an update window pop up every time Steam launches, then you may be experiencing this issue. If the update fails, no error message is shown so it can be hard to notice this happening. To ensure that Steam updates correctly, close Steam then restart it with administrative rights. To do so, press the Windows key, type “Steam”, then click “Run as administrator”. This will ensure that Steam has the permissions it needs to update correctly.
Если вы видите это сообщение, значит, произошла проблема с загрузкой файлов в стилей (CSS) нашего сайта. Попробуйте сбросить кэш браузера (Ctrl+F5).
Если это не поможет, а вы находитесь в регионе, где возможны ограничения интернет-трафика с российских серверов — воспользуйтесь VPN.
|
Закинь ярлык программы в папку Автозагрузка. Пуск/Все программы/Автозагрузка. Можно просто перетаскивая ярлык со стола. Щелкаешь левой кнопкой на ярлык и держишь. Тянешь на кн. Пуск — открывается меню — все программы — автозагрузка — отпускаешь кнопку. модератор выбрал этот ответ лучшим Может он хочет чтоб в аккаунт сразу заходило ? Если ты про то , что бы сразу в аккаунт заходило , то при вводе логина и пароля нажми «Запомнить пароль» и сделай все также как расписано сверху от Гурустарр . Знаете ответ? |
Смотрите также: Как запустить игру в стиме без входа в аккаунт? Не могу открыть игру, которую купил в стиме, что делать? Сколько времени ждать, если в стиме высвечивается «повторите ошибку после»? Черный экран в стиме винда 11, что делать? Не работает Steam (Стим) Онлайн 31.03.2025, почему, что делать, надолго? Не работает сервис Стим 18.03.25, почему, что делать (см.)? Не работает Steam (Стим) Онлайн 01.03.2025, почему, что делать (см.)? Не работает Steam (Стим) Онлайн 26.02.2025, почему, что делать, надолго? Почему не работает сайт Стим 16.02.25? Что за сбой (см.)? Не работает Steam (Стим) Онлайн 15.02.2025, почему, что делать, надолго? |