
Защитник Windows 10 находится в активном режиме по умолчанию, однако иногда с его функционированием возникают проблемы, в частности появляется уведомление «Параметрами защиты от вирусов и угроз управляет ваша организация».
Далее я продемонстрирую все доступные способы решения этой и других ошибок, мешающих работе встроенной защиты операционной системы.
Способ 1: Ручная проверка параметров
Первое, что нужно сделать, – самостоятельно проверить текущее состояние антивируса, перезапустив перед этим компьютер. Иногда сбои являются кратковременными, они исправляются автоматически и не требуют от пользователя дополнительных действий, чтобы включить защитник Windows. Для проверки работы антивируса выполните следующие шаги:
-
Откройте меню «Пуск» и перейдите в «Параметры».
-
Опуститесь по списку и щелкните по плитке «Обновление и безопасность».
-
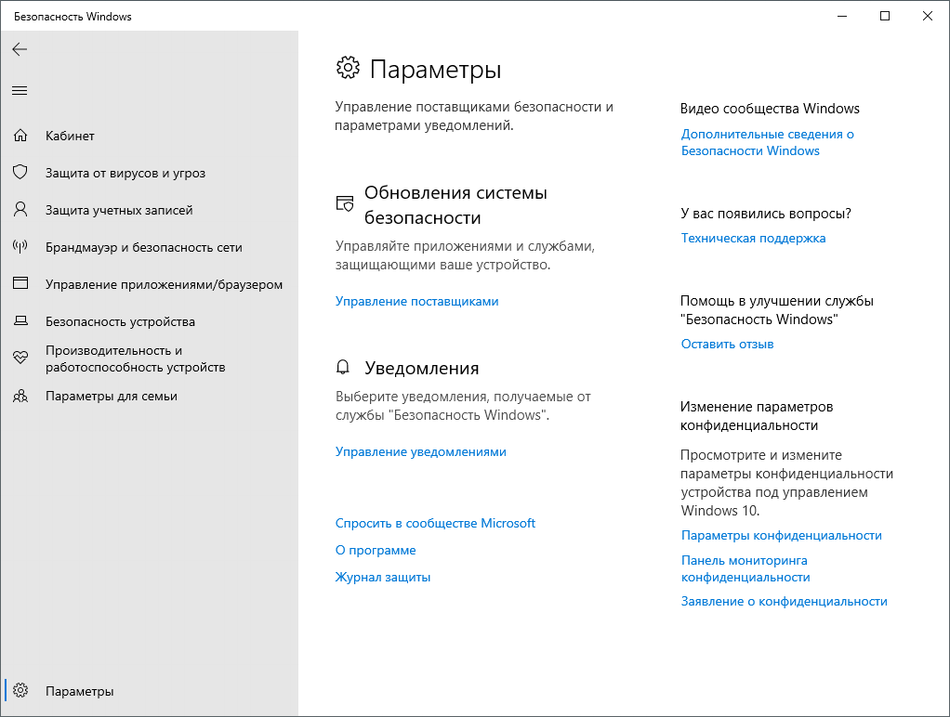
Среди доступных параметров выберите «Безопасность Windows».
-
В новом окне перемещайтесь по вкладкам, прочтите текущую информацию и запустите сканирование для проверки действия защиты.
Если запустить проверку не удалось или на экране появилась информация о том, что антивирус сейчас отключен, а кнопка для активации не действует, приступайте к следующим способам.
Комьюнити теперь в Телеграм
Подпишитесь и будьте в курсе последних IT-новостей
Подписаться
Способ 2: Сканирование ПК на наличие вирусов
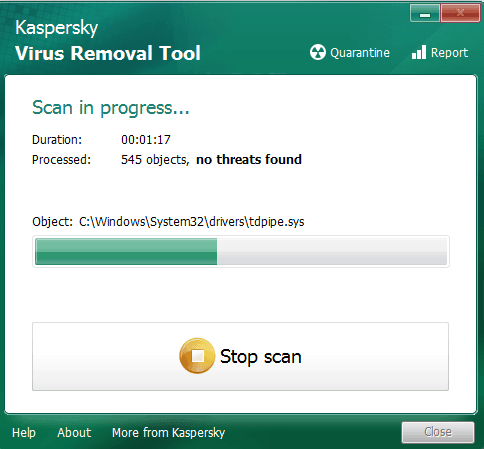
Такой совет может показаться банальным, поскольку его дают практически во всех статьях по исправлению разных проблем в функционировании ОС, однако в этом случае он более чем уместен и имеет логическое основание. Если компьютер заражен вирусом, угроза может внедриться в работу параметров и влиять на активность защиты, самостоятельно отключая ее при помощи манипуляций с параметрами реестра или групповых политик. Обычно вирус прикидывается управляющей организацией, чтобы пользователь самостоятельно не смог изменить настройку. Решается проблема сканированием и очисткой ПК от вирусов. Для этого вы можете выбрать любой удобный для вас антивирус, загрузив его с официального сайта.
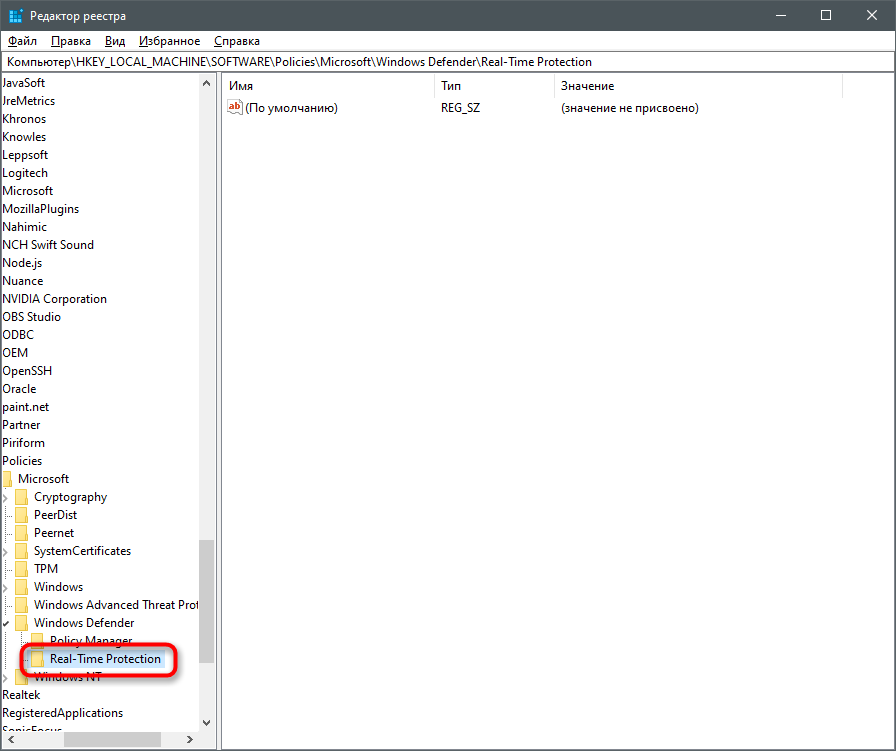
Способ 3: Проверка параметров реестра
Практически у каждой настройки операционной системы есть свой параметр в редакторе реестра. Он позволяет обращаться к другим программам для просмотра состояния, а пользователю – управлять состоянием непосредственно при редактировании ключей. При возникновении проблем с работой защиты рекомендуется проверить параметры реестра и изменить их, если текущее состояние окажется неудовлетворительным.
-
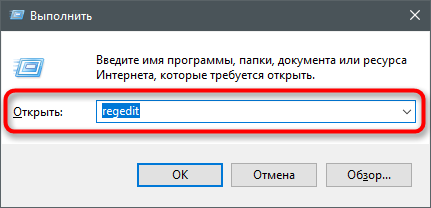
Для этого откройте утилиту «Выполнить», используя стандартное сочетание клавиш Win + R.

-
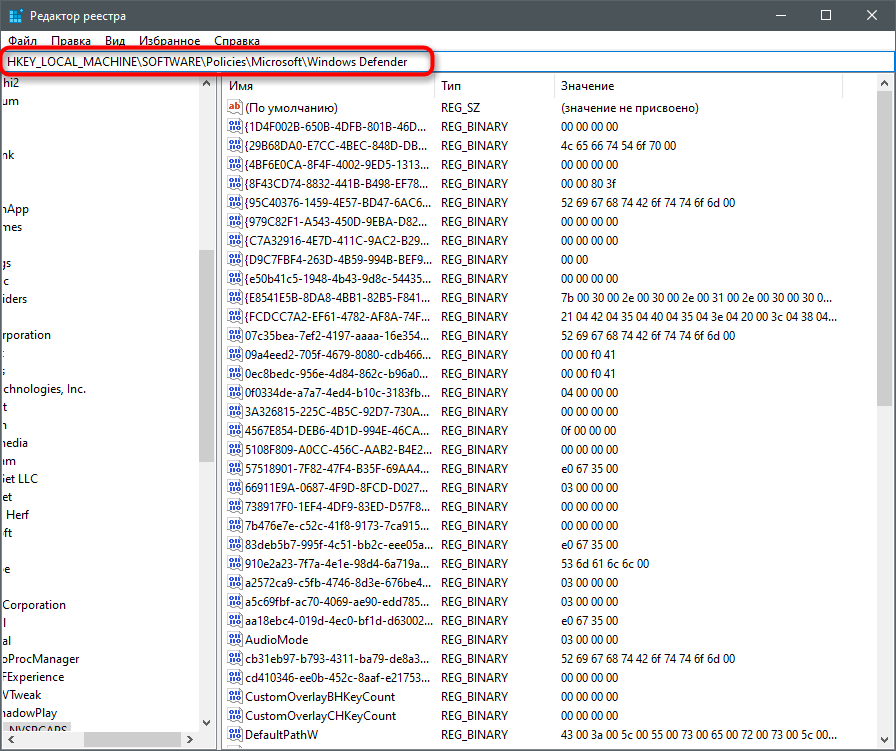
Вставьте в адресную строку путь HKEY_LOCAL_MACHINE\SOFTWARE\Policies\Microsoft\Windows Defender и нажмите Enter для перехода по нему.
-
Если в корне папки находится директория с названием «Real-Time Protection», удалите ее.
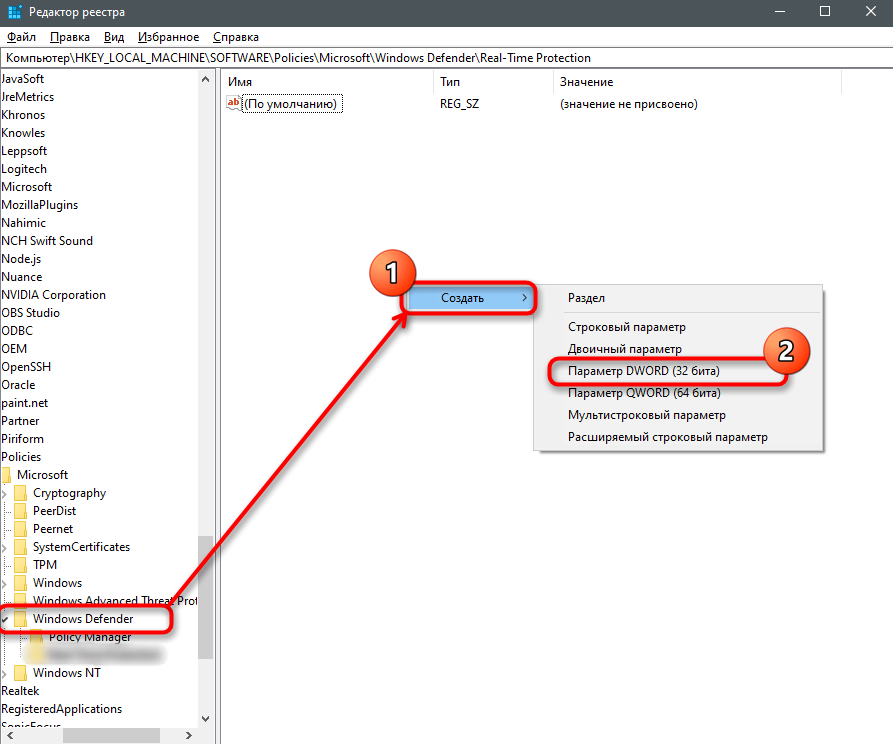
-
Затем вернитесь в выбранную ранее директорию, нажмите по пустому месту в правой части окна правой кнопкой мыши, наведите курсор мыши на «Создать» и выберите пункт «Параметр DWORD (32 бита)».
-
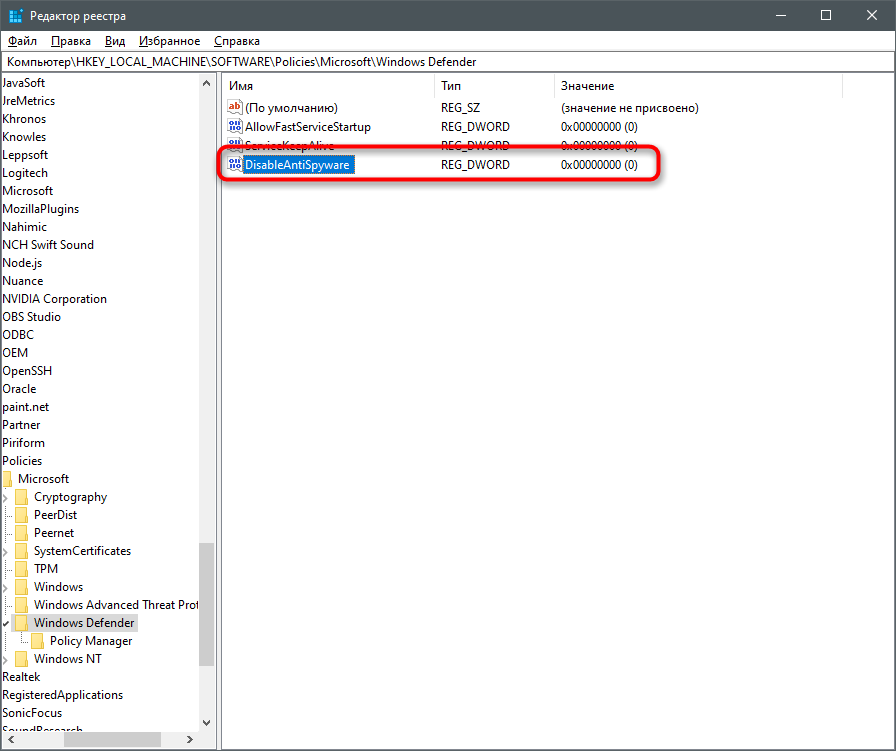
Задайте для параметра название DisableAntiSpyware и закройте окно.
-
Если такой параметр уже существует, и его значение отличается от 0, дважды кликните по нему для редактирования и вручную поменяйте настройку.
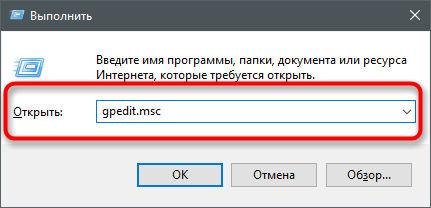
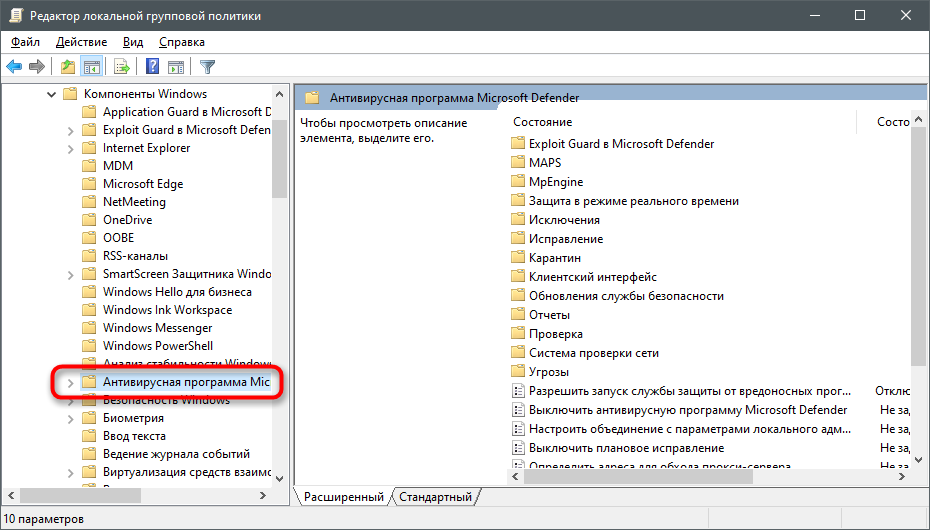
Способ 4: Редактирование параметров локальных групповых политик
При появлении надписи «Параметрами защиты от вирусов и угроз управляет ваша организация» возникает вероятность того, что действие защитника отключено через редактор локальных групповых политик. Такая оснастка доступна только в Windows 10 Pro и Enterprise, а обладателям других версий операционной системы придется использовать предыдущий метод активации.
-
Если редактор есть в вашей версии ОС, откройте утилиту «Выполнить», впишите в поле gpedit.msc и нажмите Enter для активации команды.
-
Перейдите по пути Конфигурация компьютера > Административные шаблоны > Компоненты Windows и выберите папку «Антивирусная программа «Защитник Windows».
-
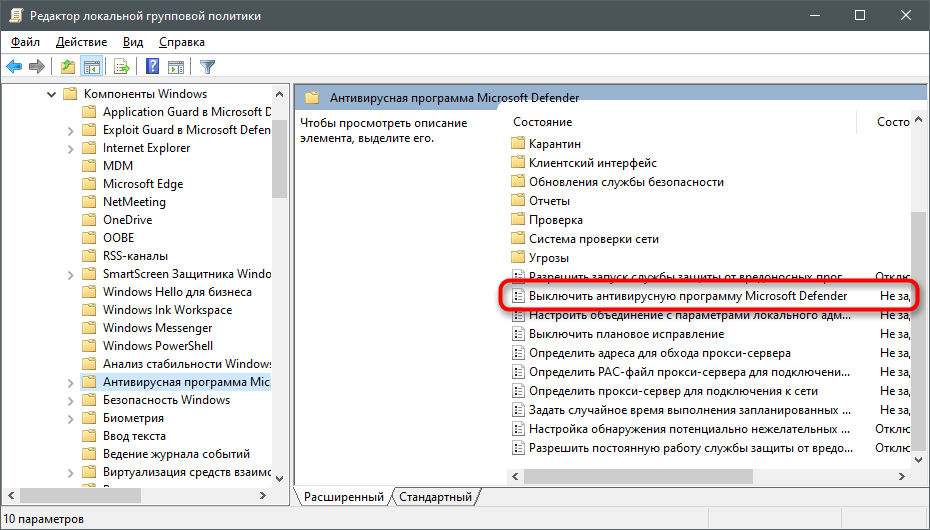
В ней найдите параметр «Выключить антивирусную программу Microsoft Defender» и дважды нажмите по строке для открытия свойств.
-
Убедитесь в том, что значение установлено как «Не задано» или «Отключено», в противном случае самостоятельно измените его.
-
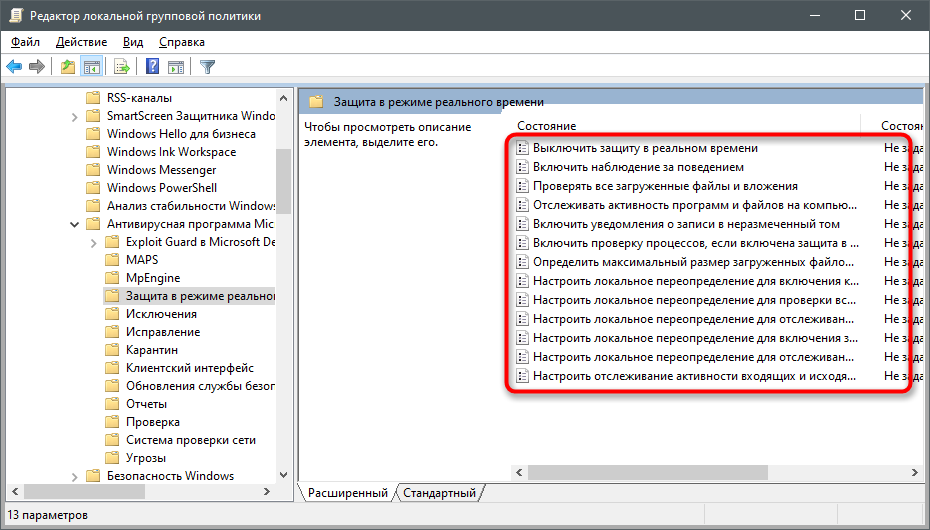
Вернитесь к папке и откройте хранящийся там каталог «Защита в режиме реального времени».
-
Ознакомьтесь с присутствующими там настройками и измените их значения точно так же, как это было показано выше, чтобы включить необходимые вам средства безопасности.


Способ 5: Удаление Tweaker
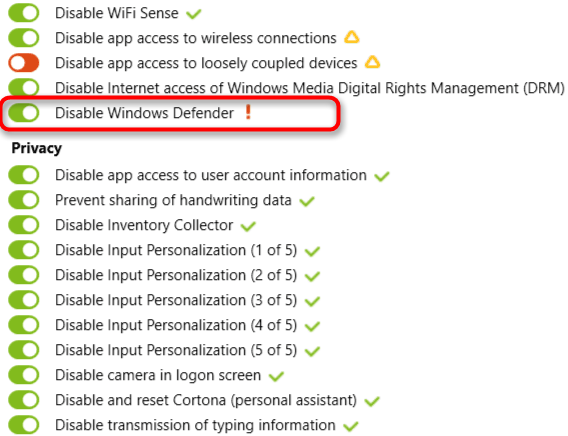
Некоторые пользователи устанавливают на свои компьютеры твикеры, предназначенные для изменения системных настроек. Многие из них поддерживают отключение защитника Windows и иногда устанавливают соответствующий параметр по умолчанию. Если вы используете такую программу, самостоятельно проверьте ее конфигурацию или вовсе удалите, если она больше не нужна и оказывает только негативное влияние на работу ПК.
Способ 6: Проверка целостности системных файлов
Последний метод позволяет восстановить защитник Windows 10, если проблемы с его функционированием связаны с повреждениями системных файлов. Благо в ОС есть две утилиты, предназначенные для проверки их целостности.
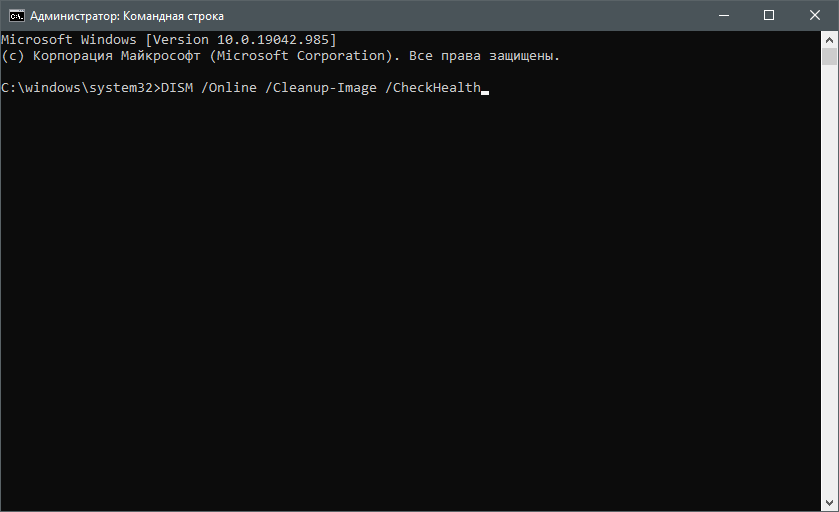
-
Запустите «Командную строку» от имени администратора удобным для вас методом.
-
Введите команду DISM /Online /Cleanup-Image /CheckHealth и нажмите Enter для ее применения.
-
Как только появилась новая строка ввода, напишите DISM /Online /Cleanup-Image /ScanHealth.
-
То же самое сделайте и с DISM /Online /Cleanup-Image /RestoreHealth.
-
Перезапустите компьютер и проверьте, исправлена ли работа антивируса. Если нет, дополнительно проверьте целостность при помощи команды sfc /scannow.
Только что мы разобрались со всеми доступными методами того, как можно включить антивирус, если в его работе возникли ошибки. Выполняйте представленные методы по порядку, чтобы в итоге отыскать тот, который поможет избавиться от проблемы.
(Image credit: Windows Central)
On Windows 10, Microsoft Defender Antivirus provides advanced real-time protection to protect your device and files against viruses, ransomware, spyware, rootkits, and other forms of malware, including hackers.
Although you can easily control the feature using the Windows Security app, you can also handle various aspects of the antivirus (updates, scans, and quarantined items) through Command Prompt. Usually, managing the experience with commands can be useful in many situations. For instance, when you need to use a script to automate some of the anti-malware tasks. You want to set a specific schedule to download updates or perform a quick, full, or custom scan. Or when you need to complete particular tasks on multiple computers.
In this Windows 10 guide, we will walk you through the steps to manage Microsoft Defender Antivirus with Command Prompt.
- How to check for updates on Microsoft Defender
- How to perform quick virus scan with Microsoft Defender
- How to perform full virus scan with Microsoft Defender
- How to perform custom virus scan with Microsoft Defender
- How to perform boot sector malware scan on Microsoft Defender
- How to restore quarantined items on Microsoft Defender
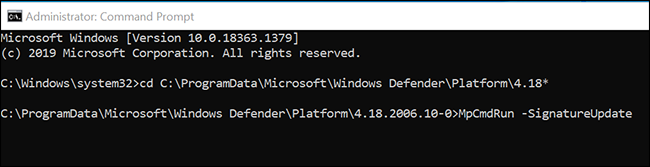
How to check for updates on Microsoft Defender
To check and download updates for Microsoft Defender, use these steps:
- Open Start.
- Search for Command Prompt, right-click the top result, and select the Run as administrator option.
- Type the following command to open the antivirus tool location and press Enter:
cd C:\ProgramData\Microsoft\Windows Defender\Platform\4.18* - Type the following command to check and update Microsoft Defender Antivirus and press Enter:
MpCmdRun -SignatureUpdate
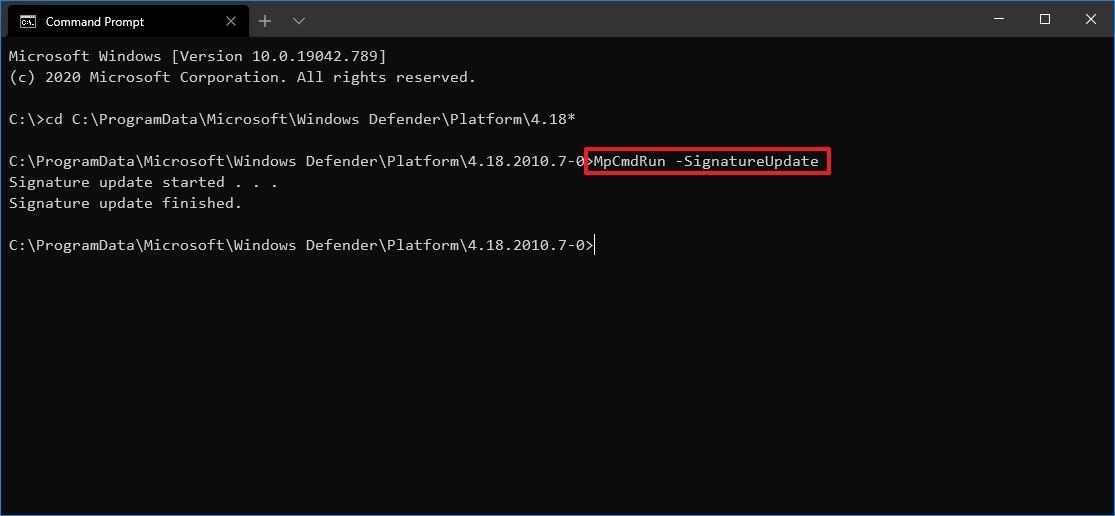
Once you complete the steps, the tool will check and download any update available for the built-in antivirus.
Uninstall definitions updates
You can also remove previously installed updates with these steps:
- Open Start.
- Search for Command Prompt, right-click the top result, and select the Run as administrator option.
- Type the following command to open the antivirus tool location and press Enter:
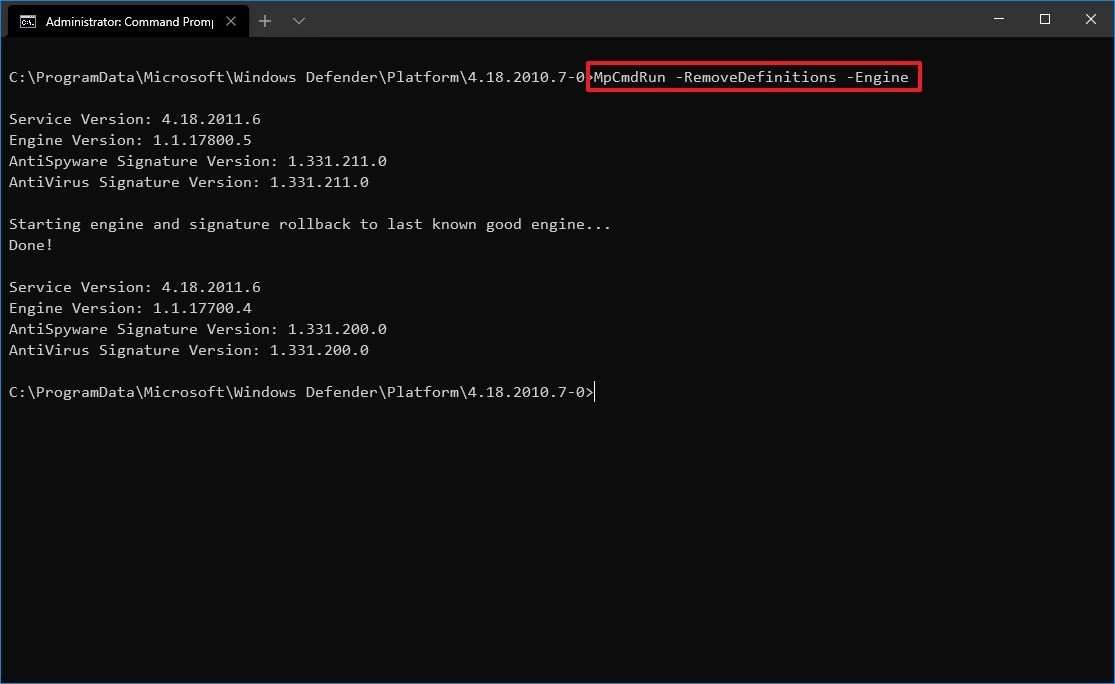
cd C:\ProgramData\Microsoft\Windows Defender\Platform\4.18* - Type the following command to remove the most recent definitions and press Enter:
MpCmdRun -RemoveDefinitions -AllThe -All option restores the previous definitions from the backup or original default set of signatures. - Type the following command to rollback the engine version and press Enter:
MpCmdRun -RemoveDefinitions -EngineThe -Engine option rolls back to the previous version of the antivirus engine.
- Type the following command to remove dynamic signature updates and press Enter:
MpCmdRun -RemoveDefinitions -DynamicSignaturesThe -DynamicSignatures option uninstalls only the dynamic signatures.
After you complete the steps, the definitions will be removed from your computer according to your configuration.
All the latest news, reviews, and guides for Windows and Xbox diehards.
How to perform quick virus scan with Microsoft Defender
To perform a quick Microsoft Defender scan, use these steps:
- Open Start.
- Search for Command Prompt, right-click the top result, and select the Run as administrator option.
- Type the following command to open the antivirus tool location and press Enter:
cd C:\ProgramData\Microsoft\Windows Defender\Platform\4.18* - Type the following command to perform a quick antivirus scan and press Enter:
MpCmdRun -Scan -ScanType 1Quick tip: You can also replace 1 with the 0 option in the command to start a default scan according to your configuration.

Once you complete the steps, the scan will begin, but it takes more than one day, the process will stop automatically.
How to perform full virus scan with Microsoft Defender
To perform a full Microsoft Defender scan with Command Prompt, use these steps:
- Open Start.
- Search for Command Prompt, right-click the top result, and select the Run as administrator option.
- Type the following command to open the antivirus tool location and press Enter:
cd C:\ProgramData\Microsoft\Windows Defender\Platform\4.18* - Type the following command to perform a full antivirus scan and press Enter:
MpCmdRun -Scan -ScanType 2
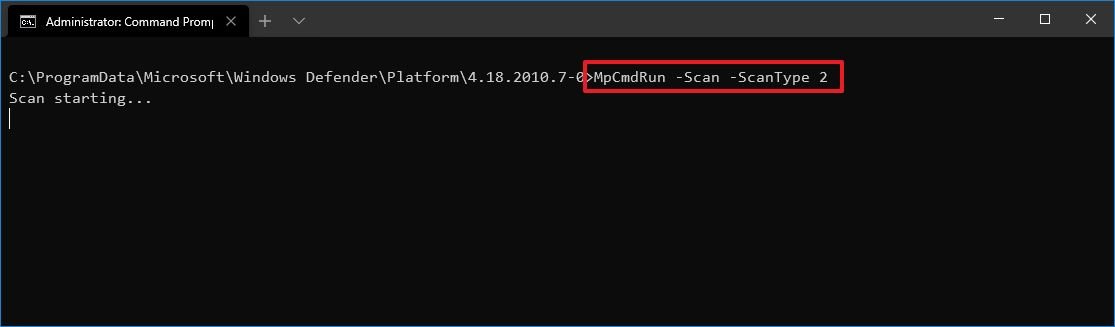
After you complete the steps, the antivirus will perform a full malware scan on your device. Depending on the amount of data, this process can take a very long time.
How to perform custom virus scan with Microsoft Defender
To customize a malware scan using Command Prompt, use these steps:
- Open Start.
- Search for Command Prompt, right-click the top result, and select the Run as administrator option.
- Type the following command to open the antivirus tool location and press Enter:
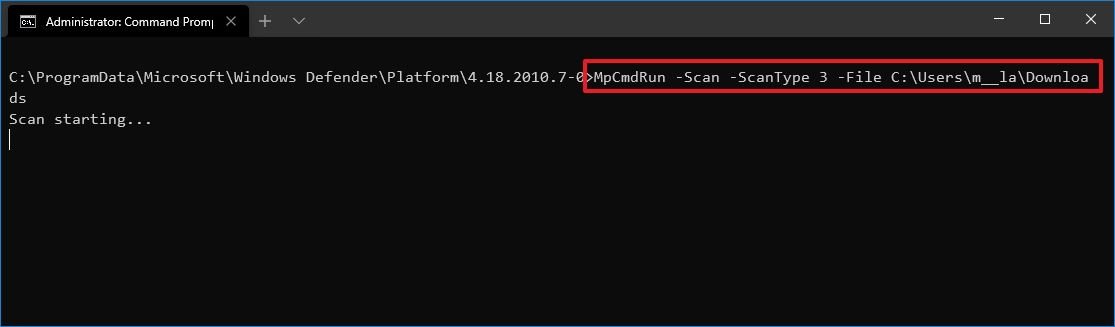
cd C:\ProgramData\Microsoft\Windows Defender\Platform\4.18* - Type the following command to perform a custom antivirus scan and press Enter:
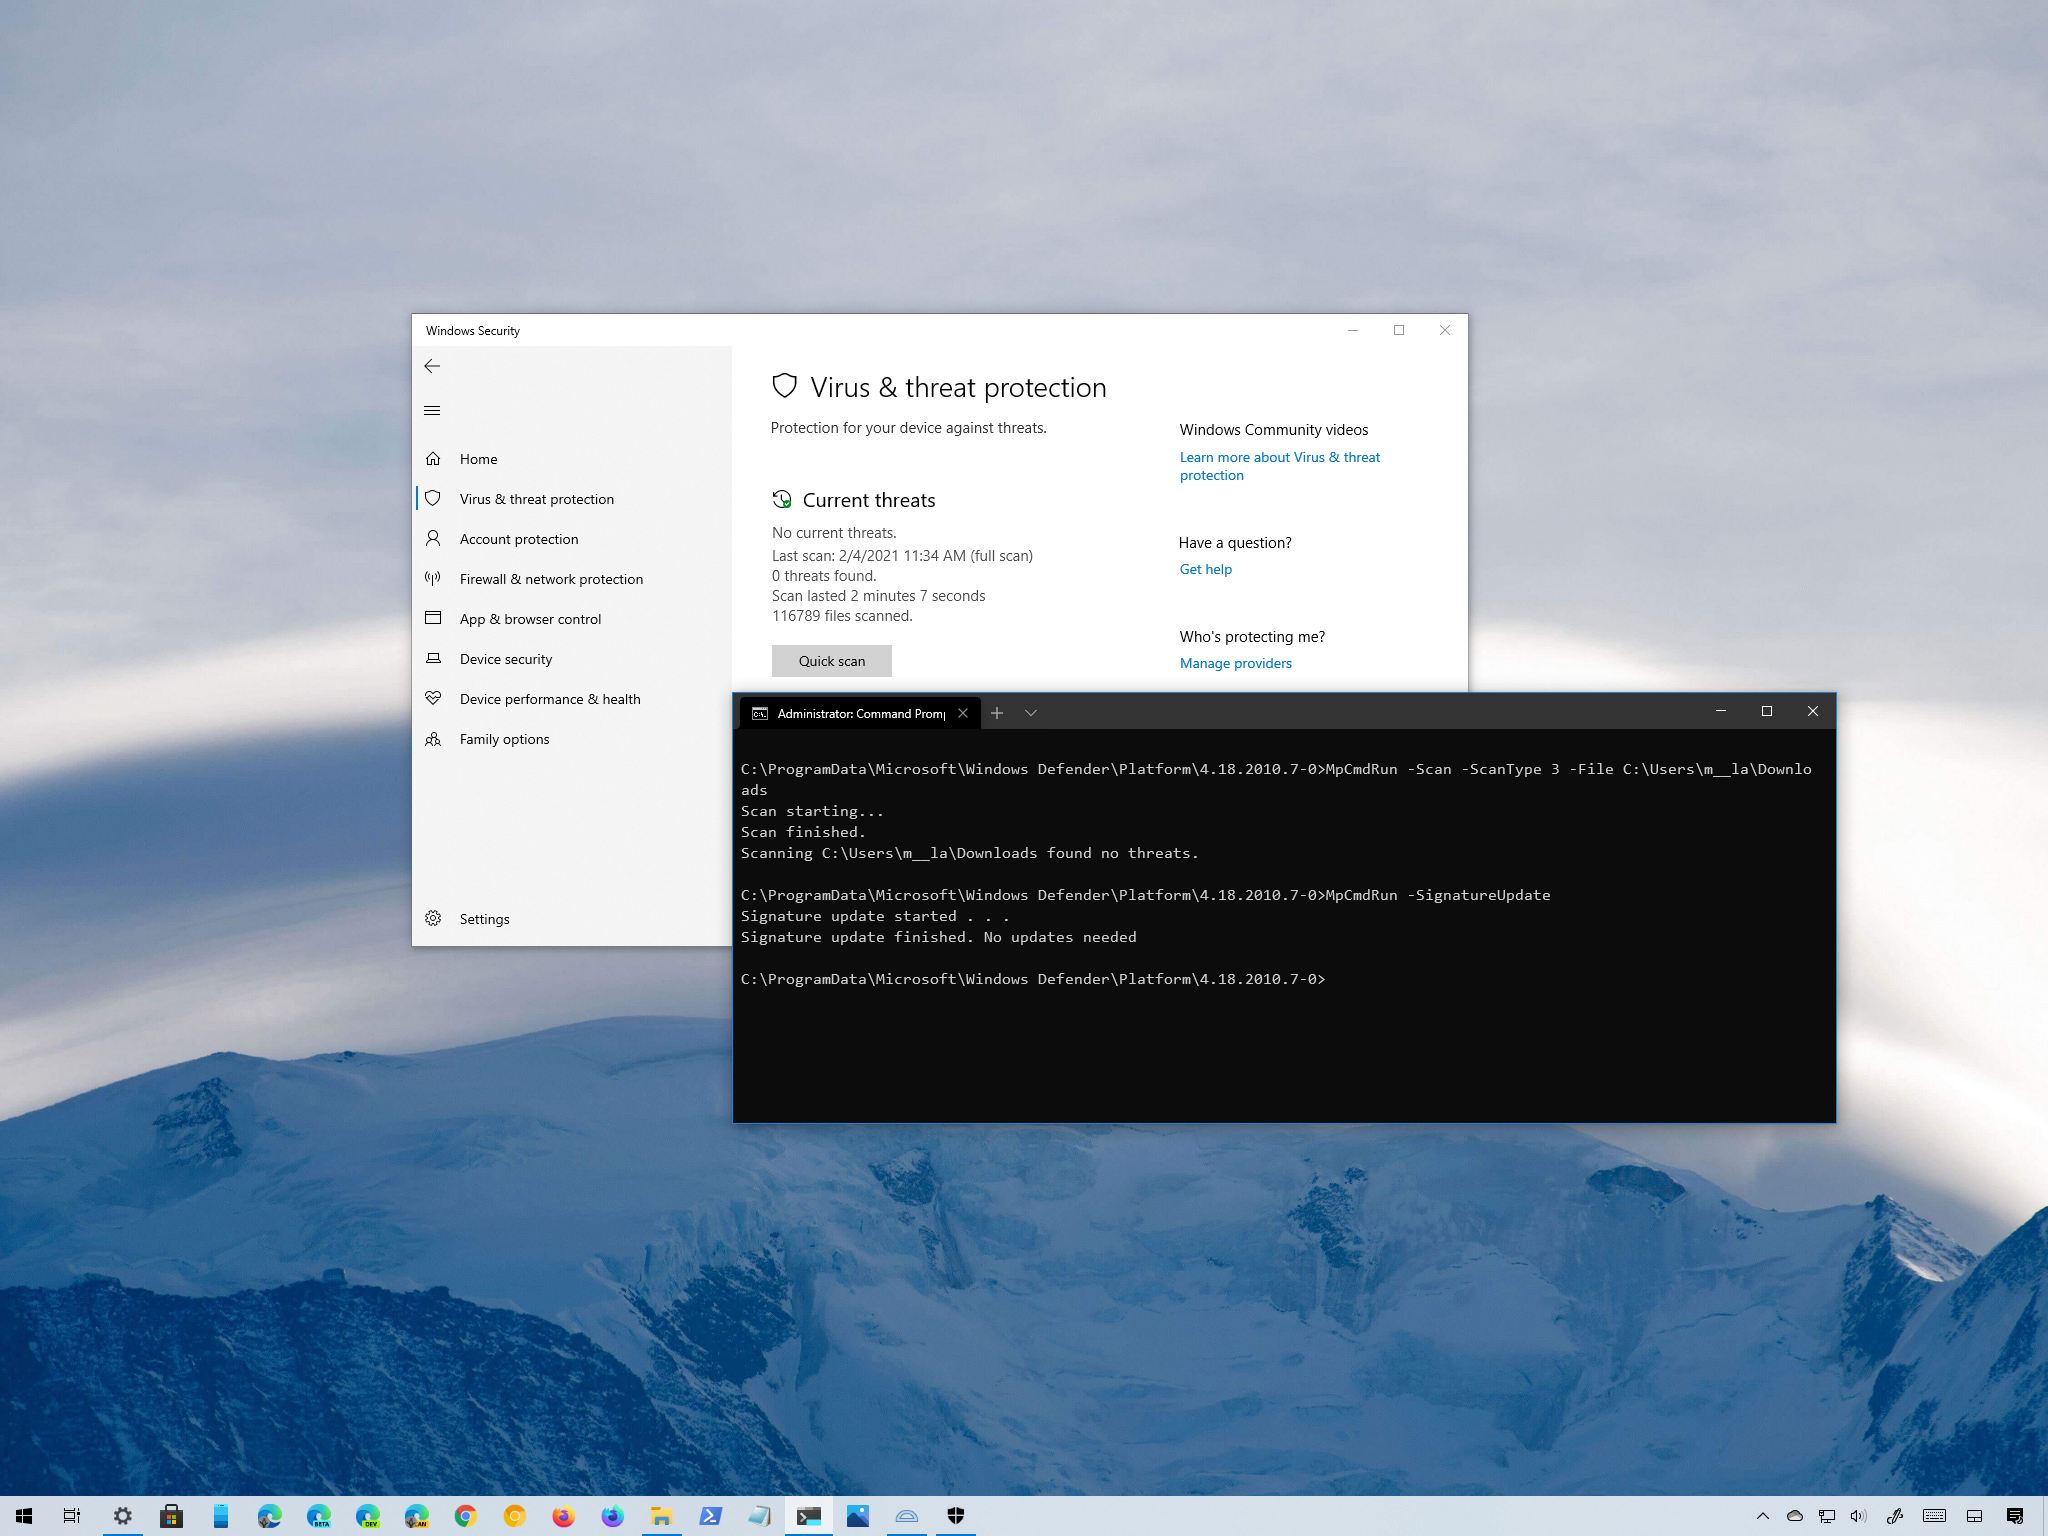
MpCmdRun -Scan -ScanType 3 -File PATH\TO\FOLDER-FILESIn the command, make sure to specify the path to the folder you want to scan.For example, this command scans the «Downloads» folder:MpCmdRun -Scan -ScanType 3 -File C:\Users\username\Downloads
- (Optional) Type the following command to perform a custom scan with timeout time and press Enter:
MpCmdRun -Scan -ScanType 3 -File PATH\TO\FOLDER-FILES -Timeout 1In the command, make sure to specify the path to the folder you want to scan.For example, this command scans the «Downloads» folder and sets the timeout to one day:MpCmdRun -Scan -ScanType 3 -File C:\Users\username\Downloads -Timeout 1Quick note: You can always change the number for the timeout option to specify another number of days. The option is also available for quick and full scan commands.
Once you complete the steps, the anti-malware solution will only scan the location you specified. If you are using the «-Timeout» option, then if the scan is taking a long time, it will timeout once the time you specified has been reached.
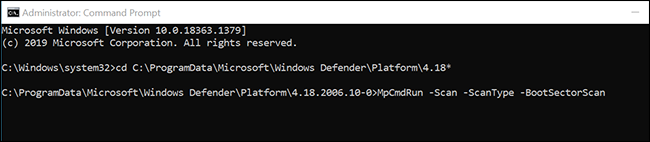
How to perform boot sector malware scan on Microsoft Defender
On Windows 10, the boot sector is an essential section in the installation drive that stores the instructions on how to start the boot process. Sometimes, viruses can also attack the boot sector causing unwanted behaviors, which can be challenging to troubleshoot and fix. However, Microsoft Defender Antivirus includes an option to check and remove malicious code that may be residing in the boot sector.
To scan the boot sector for malware with Microsoft Defender, use these steps:
- Open Start.
- Search for Command Prompt, right-click the top result, and select the Run as administrator option.
- Type the following command to open the antivirus tool location and press Enter:
cd C:\ProgramData\Microsoft\Windows Defender\Platform\4.18* - Type the following command to perform a custom antivirus scan and press Enter:
MpCmdRun -Scan -ScanType -BootSectorScan

After you complete the steps, Microsoft Defender Antivirus will scan the boot sector for any malicious code that may be affecting the device.
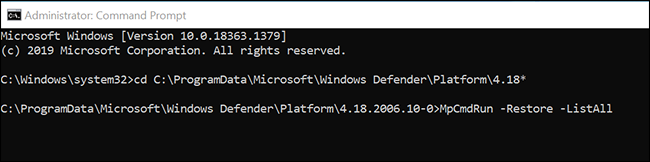
How to restore quarantined items on Microsoft Defender
The Microsoft Defender Antivirus command-line tool also includes an option to view a list of quarantined items and another option to restore items that might have been detected as malicious when they are not harmful.
To view and restore quarantined items with Command Prompt, use these steps:
- Open Start.
- Search for Command Prompt, right-click the top result, and select the Run as administrator option.
- Type the following command to open the antivirus tool location and press Enter:
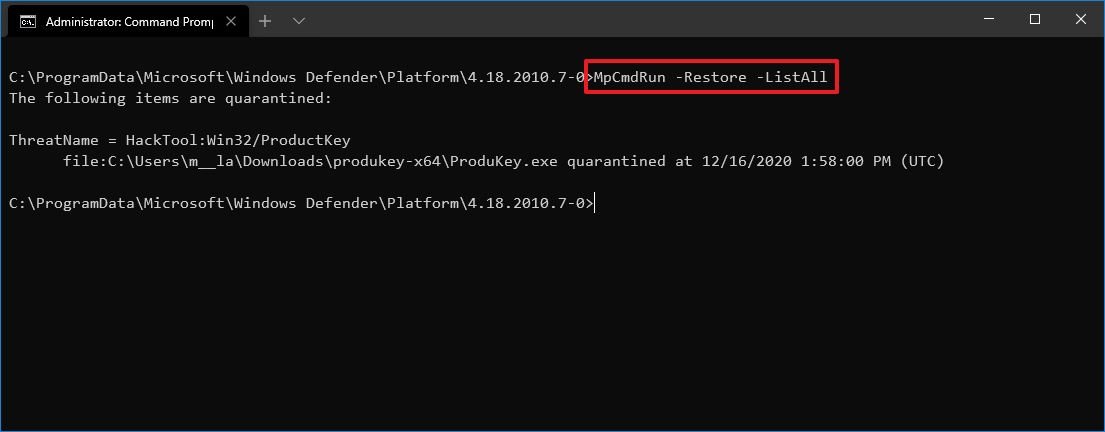
cd C:\ProgramData\Microsoft\Windows Defender\Platform\4.18* - Type the following command to view quarantined items and press Enter:
MpCmdRun -Restore -ListAll
- Type the following command to restore all quarantined item and press Enter:
MpCmdRun -Restore -All - Type the following command to restore a specific quarantined item and press Enter:
MpCmdRun -Restore -Name ITEM-NAMEIn the command, replace the «ITEM-NAME» for the name of the quarantined item you want to restore. - Type the following command to restore a specific quarantined item to a specific path and press Enter:
MpCmdRun -Restore -Name ITEM-NAME -FilePath PATH\TO\RESTOREDIn the command, make sure to specify the path to restore the item.For example, this command restores a specific item to the Documents folder:MpCmdRun -Restore -Name app.exe -FilePath C:\Users\username\Downloads
Once you complete the steps, the items will be restored in the original or alternate location, depending on the command.
This guide focuses on the more important commands you can use with Command Prompt, but the tool includes additional options, which you can view running the
MpCmdRuncommand.
While you can manage a number of functions through Command Prompt, the tool is quite limited. For example, you cannot start an offline scan or change preferences. If you want to manage settings and control virtually every aspect of Microsoft Defender Antivirus with commands, you should be using the PowerShell modules instead.
Mauro Huculak has been a Windows How-To Expert contributor for WindowsCentral.com for nearly a decade and has over 15 years of experience writing comprehensive guides. He also has an IT background and has achieved different professional certifications from Microsoft, Cisco, VMware, and CompTIA. He has been recognized as a Microsoft MVP for many years.
-
Home
-
Partition Manager
- Open/Run/Use Windows Defender from Command Prompt (New Guide)
By Amy | Follow |
Last Updated
How to use Windows Defender from Command Prompt to execute various tasks? Well, this post of MiniTool would tell you how to do that in detail.
What Can Windows Defender Do
Windows Defender is also referred to as Windows Security, which is an embedded utility in Windows systems. It usually runs silently in the background and offers you real-time protection. What does it do? It scans, detects, and removes viruses, spyware, and malware.
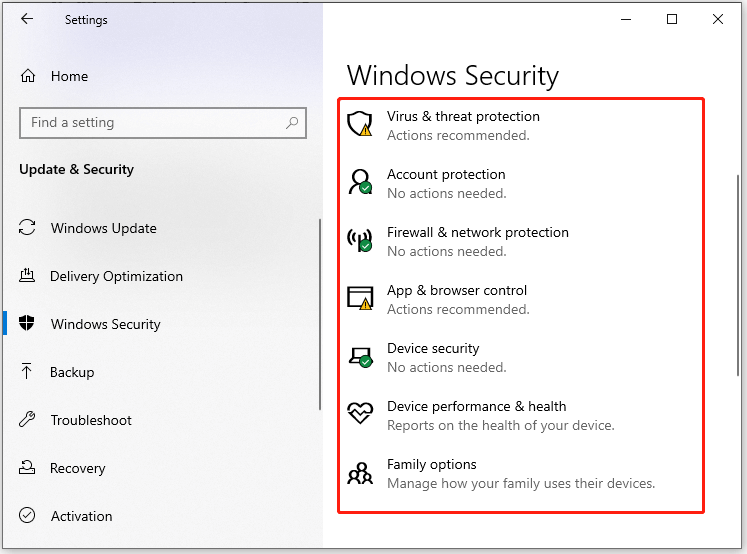
As shown in the picture below, Windows Defender can provide you with virus & threat protection, account protection, Firewall & network protection, app & browser control, and device (performance & health) protection.
If you are locked out of its graphics user interface or don’t want to launch it, you can directly use Windows Defender from Command Prompt. This post shows you how to use Windows Defender from Command Prompt to execute different operations.
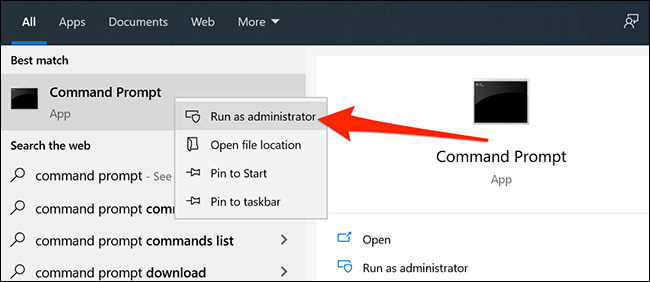
Before starting any operations, run Command Prompt as administrator. Here are the detailed steps for doing that.
Step 1: Type cmd in the search box.
Step 2: Click Run as administrator in the right panel. Alternatively, you can also right-click on Command Prompt and click Run as administrator.

Is Windows Defender Enough? More Solutions to Protect PC
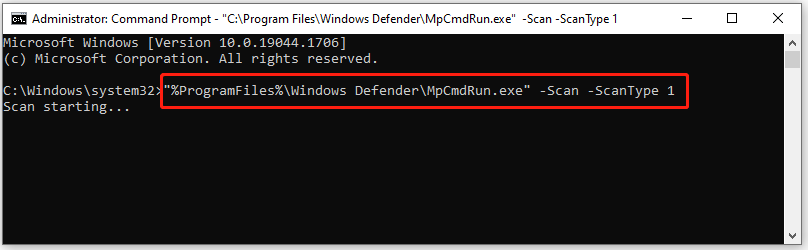
Use Command Lines to Perform a Quick Scan
To find viruses, malware, and other threats in some common places, you can run a quick scan. As its name implies, the quick scan process will complete in a few minutes. If you want to use Windows Defender from Command Prompt to perform a quick scan, type the command below after running Command Prompt as administrator and hit Enter.
Tip: According to your configuration, you can replace 1 with 0 in the command to begin a default scan.
“%ProgramFiles%Windows DefenderMpCmdRun.exe” -Scan -ScanType 1
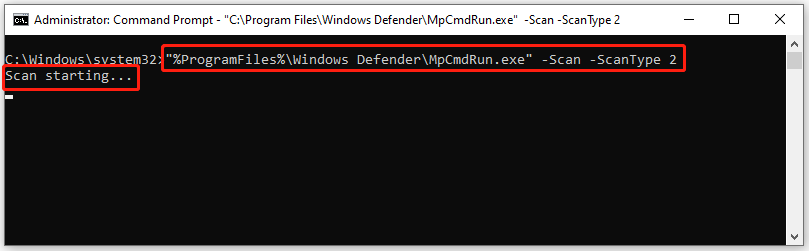
Use Command Lines to Perform a Full Scan
If you would like to conduct an in-depth scan on your PC, you need to perform a full scan. Compared with quick the quick scan, a full scan needs more time. To execute a full scan via command lines, type the following command in the opened prompt window and press Enter.
“%ProgramFiles%Windows DefenderMpCmdRun.exe” -Scan -ScanType 2
How to Remove Mechanical, Membrane, and MacBook Keyboard Keys
Use Command Lines to Perform a Custom Scan
To scan specific files or folders for viruses and other threats, you should perform a custom scan. This sort of scan is also available for external storage devices like USB flash drives and external hard drives. The following command shows you how to use Microsoft Defender Antivirus from Command Prompt to conduct a custom scan.
Tip: You should replace D:FolderPath with the actual folder or file path that you would like to scan.
“%ProgramFiles%Windows DefenderMpCmdRun.exe” -Scan -ScanType 3 -File “D:FolderPath”
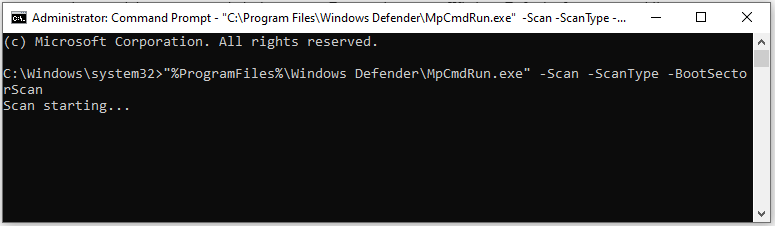
Use Command Lines to Scan for Infected Boot Sectors
Boot sectors in the computer store all the important information related to your PC’s boot-up. However, some viruses and threats may attack the boot sector. Fortunately, you run Windows Defender from command line to scan and remove threats with boot sectors.
“%ProgramFiles%Windows DefenderMpCmdRun.exe” -Scan -ScanType -BootSectorScan
WWE 2K22 Image Upload: Use the Image Uploader or Face Scan
Run Command Lines to Update Windows Defender Antivirus
You can also use Windows Defender from Command Prompt to update Microsoft Defender Antivirus. For that, you simply need to type the command below and press Enter.
“%ProgramFiles%Windows DefenderMpCmdRun.exe” -SignatureUpdate
Run Commands Lines to Restore Quarantined Files
Files would be moved to Quarantine if Microsoft Defender Antivirus thinks it’s suspicious. If you need these files, you can restore them via the command lines of Windows Defender.
“%ProgramFiles%Windows DefenderMpCmdRun.exe” -Restore -ListAll
Find the file that you want to restore from the list, and then type the command below and press Enter. You should replace FileName with the exact file name you want to restore.
“%ProgramFiles%Windows DefenderMpCmdRun.exe” -Restore -Name “FileName”
How to run Windows Defender from command line? How to use Microsoft Defender Antivirus from Command Prompt? This post has shown you the answers. Read it now!
About The Author
Position: Columnist
Having writing articles about computer tech for a long time, I am rather experienced especially on the aspect of computer optimization, PC enhancement, as well as tech terms explanation. The habit of looking through tech forums makes me a great computer issues collector. And then, many articles related to these issues are released, which benefit plenty of users. Professional, effective, and innovative are always the pursuit of an editing worker.
Quick Links
-
Perform a Custom Virus Scan
-
Scan Your PC’s Boot Sector Files
-
Restore Quarantined Files
-
Update Microsoft Defender Antivirus
-
View All Available Microsoft Defender Antivirus Options
Windows 10’s included Microsoft Defender antivirus—also known as Windows Defender—has a command-line interface. Rather than using the graphical Windows Security app, you can run Windows 10’s built-in antivirus from Command Prompt, PowerShell, or Windows Terminal.
Run a Quick Virus Scan
You can run a quick scan to look for viruses, malware, and other threats in some common places, such as the Windows Registry and startup folders. This scan usually only takes a few minutes to finish.
To use this scan, open the «Start» menu, search for «Command Prompt,» right-click the utility, and select «Run as administrator.»
Click «Yes» in the User Account Control prompt.
In the Command Prompt window, type the following to make the Microsoft Defender Antivirus directory your current working directory:
cd C:\ProgramData\Microsoft\Windows Defender\Platform\4.18*
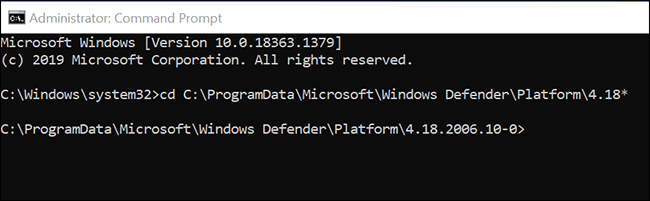
If you make another directory your current working directory or close and reopen the Command Prompt, make sure that you run the above command before using any other Microsoft Defender Antivirus commands.
Then, enter the following command and press «Enter» to start a quick virus scan:
MpCmdRun -Scan -ScanType 1
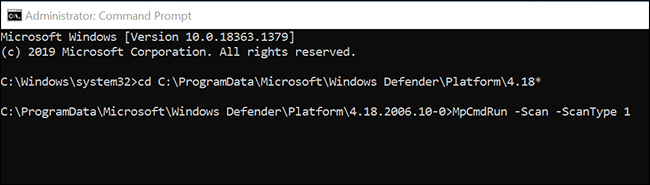
You’ll see the live scan progress on your screen.
Run a Full Virus Scan
A full scan thoroughly checks all your computer files for viruses, malware, and other security threats. Since this is a comprehensive scan, it tends to take longer than the other scans.
You can run a full scan using the following command in the Command Prompt:
MpCmdRun -Scan -ScanType 2
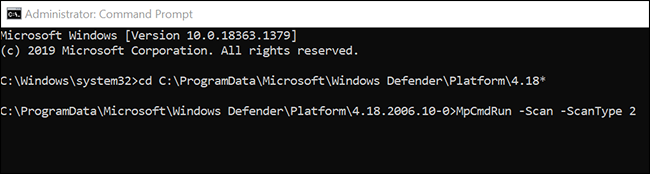
If you need to stop a scan for some reason, press Ctrl+C on your keyboard.
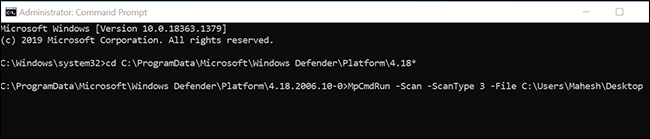
Perform a Custom Virus Scan
You’ll want to use a custom scan when you have particular files or folders that you want to scan for viruses, malware, and other threats. You can use this to scan files on your external storage as well, such as your USB flash drives.
To use this, type the following command into the Command Prompt window and press «Enter.»
Make sure to replace «PATH» with the path to the folder or file that you want to scan. If there are spaces in your path, add double quotes before and after the path, like this: «C:\Users\Mahesh\Desktop\My Files»
MpCmdRun -Scan -ScanType 3 -File PATH
For instance, if you wanted to scan your desktop for any threats, you’d run the following command, replacing «MYNAME» with your username.
MpCmdRun -Scan -ScanType 3 -File C:\Users\MYNAME\Desktop
Scan Your PC’s Boot Sector Files
Your PC’s boot sector is where all the essential information regarding your computer’s boot-up is stored. This sector contains the code that launches your operating system.
Sometimes, certain viruses and other threats attack this boot sector. When this happens, you experience issues booting up your computer. You could face other issues as well.
If you believe your PC is infected with a virus or malware, it’s worth running a boot sector scan to find and remove any suspicious content from this sector.
You can use the following Microsoft Defender Antivirus command to run a boot sector scan:
MpCmdRun -Scan -ScanType -BootSectorScan
Restore Quarantined Files
When Microsoft Defender Antivirus finds a suspicious file, it moves that file to the Quarantine. This is a special location to store suspicious files, and your files can’t launch when they’re here in the Quarantine.
If you believe the antivirus has mistakenly moved a file to the Quarantine, you can use a command to restore that file back to its original location.
To do this, first, run the following command to view a list of all your quarantined files:
MpCmdRun -Restore -ListAll
From the list, note the name of the file that you want to restore. Then type the following command, replace «MyApp.exe» with the name of the file you want to restore, and press «Enter.»
MpCmdRun -Restore -Name MyApp.exe
If you want to restore your file to another folder, use the following command instead. Make sure that you replace «PATH» with the path to your folder before you run the command.
Of course, replace «MyApp.exe» with the name of the file that you want to restore.
MpCmdRun -Restore -Name MyApp.exe -FilePath PATH
Update Microsoft Defender Antivirus
The Microsoft Defender Antivirus updates itself regularly to ensure that it can find newer viruses and threats. However, you can force it to find and download newer updates at any time.
You can do this by running the following command in the Command Prompt window:
MpCmdRun -SignatureUpdate
It’ll update the virus definitions without any prompts.
View All Available Microsoft Defender Antivirus Options
In addition to the above, there are many other command combinations that you can use to make the most of this antivirus on your Windows 10 PC.
To find all available commands and parameters, run this command in the Command Prompt:
MpCmdRun -h

You’re now a pro when it comes to using the Microsoft Defender Antivirus from the Command Prompt.
If you prefer the graphical interface, check out our guide on how to use the Microsoft Defender Antivirus, which explains all the graphical features of this program.
Windows Security, formerly known as Microsoft Defender, is the go-to app for those who want to know more about security in Windows 10 and Windows 11. This app is part of Microsoft’s operating system, and this is where you can find out what your antivirus has been doing, what your firewall has to say, and whether other security features are turned on and working well. However, before you can get any information, you must know how to access Windows Security. That’s why, in this article, I show you several ways to open Windows Security in Windows 10 and Windows 11:
1. Where to find Windows Security in the system tray
By default, Windows Security is started automatically by Windows, and it runs in the background, protecting your computer or device. Few people know that you can find its icon in the system tray (the bottom-right corner of the taskbar) in Windows 11 and Windows 10.
Click or tap the arrow pointing upwards to Show hidden icons, and then, in the list of icons, click or tap the blue shield. If you hover your mouse over it, it says Microsoft Defender. Don’t worry, it’s just another name for Windows Security.
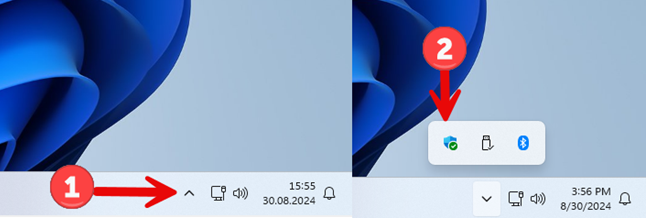
Opening Windows Security from the system tray in Windows 11
In Windows 10, the process is identical, even though things look a little different. The main difference is that the Windows Security icon is a white shield instead of a blue one.
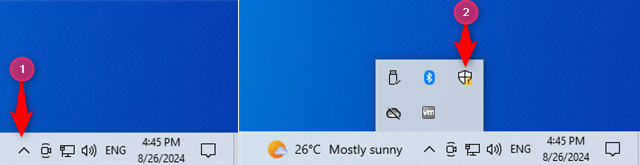
Opening Windows Security from the system tray in Windows 10
Keep in mind that Windows Security displays an exclamation mark alongside its icon when it finds issues that require your attention, similar to the screenshot above.
2. Open Windows Security from the command line (CMD, PowerShell, Terminal)
Some people who work with Windows Security need to find a way to open it from a command-line app like the Command Prompt, PowerShell, or Windows Terminal. Open any of these apps on your Windows computer, type this command, and press Enter:
start windowsdefender:
Here’s me running it in the Windows Terminal from Windows 11:
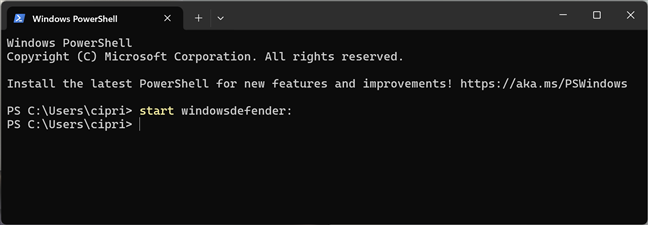
Opening Windows Security from Windows Terminal
In the screenshot below, I’ve started CMD and ran the same command in Windows 10:

Opening Windows Security from CMD
TIP: If your computer is having issues loading Windows, here’s how to open Command Prompt when Windows doesn’t boot.
3. How to access Windows Security from the Start Menu
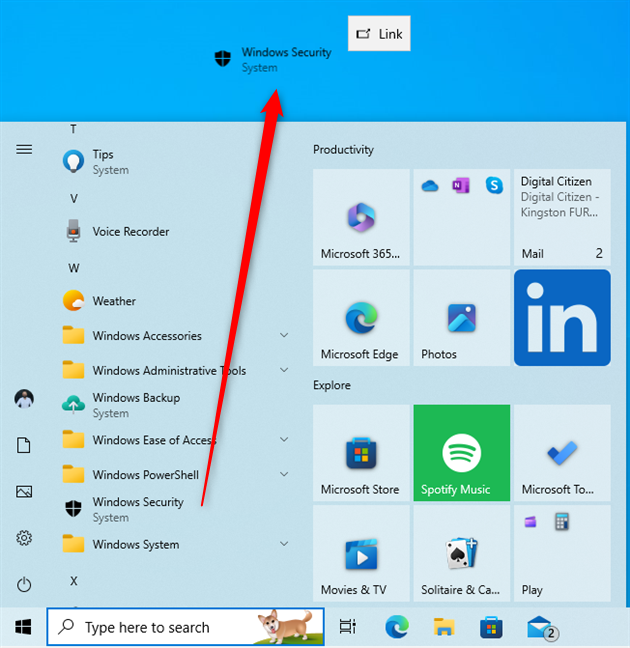
A simple way of accessing Windows Security is from the Start Menu. In Windows 10, click or tap Start, scroll down through the list of apps until you find those that start with the letter W, and then choose the Windows Security shortcut.
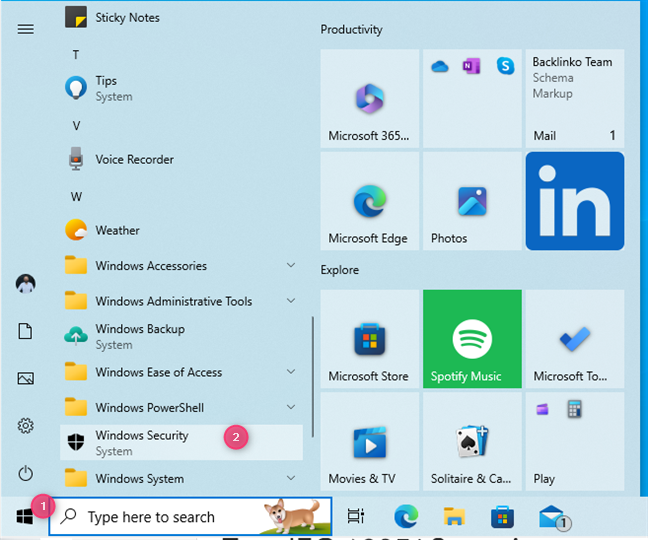
The Windows Security shortcut in the Windows 10 Start Menu
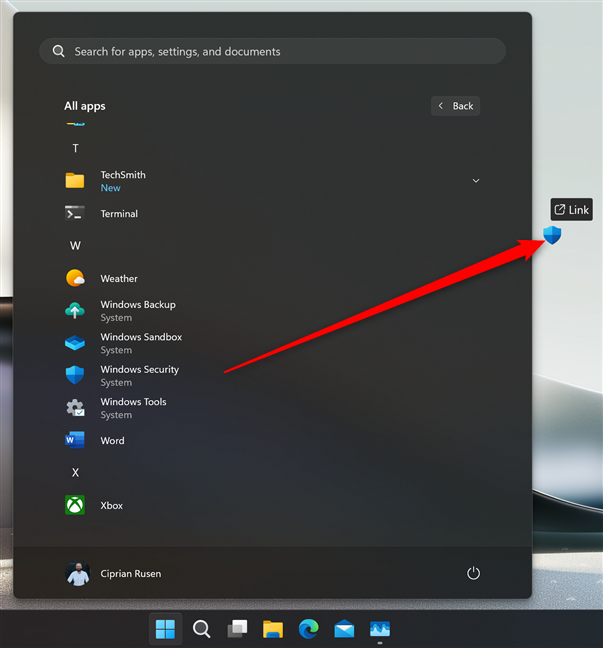
In Windows 11, things are a bit different: click or tap Start followed by All apps. Then, in the list of apps, scroll to the bottom, find the Windows Security shortcut, and tap on it.
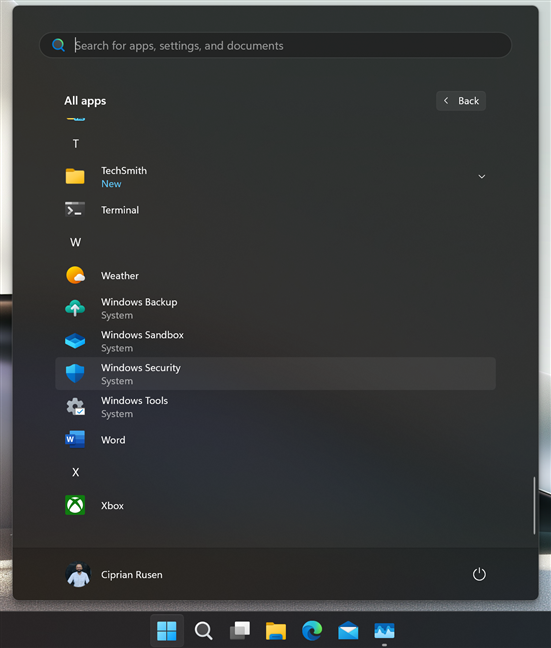
The Windows Security shortcut in the Windows 11 Start Menu
4. How to create a Windows Security shortcut on your desktop
After finding the Windows Security shortcut in the Start Menu (using the instructions from the previous section), you can drag and drop it to the desktop. If you execute the move correctly, a Link text and the Windows Security shortcut accompany your cursor as you move it across the desktop. Release the left mouse button (or lift your finger from the touchscreen) anywhere on the desktop, and Windows 10 creates a new shortcut right there.
Creating a Windows Security shortcut on the Windows 10 desktop
In Windows 11, it’s just as easy to create a Windows Security shortcut on the desktop using the Start Menu. Find the Windows Security shortcut in the All apps list, click or press and hold on it, and then move the mouse (or your finger) outside the Start Menu somewhere on the desktop. When you see the Link text alongside the shortcut, release the mouse or lift your finger, and the shortcut is created.
Creating a Windows Security shortcut on the Windows 11 desktop
You can also create a Windows Security shortcut using the Create Shortcut wizard. Right-click (or press and hold) on the empty space on your desktop and choose New > Shortcut. Then, copy and paste or type the following as your target location:
windowsdefender:
You can also use this target:
%windir%\explorer.exe windowsdefender:
Click or tap Next, name the shortcut Windows Security, and press Finish.
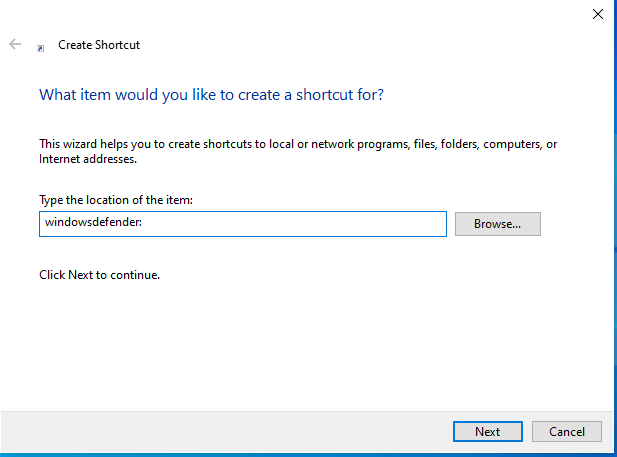
Creating a Windows Security shortcut
Keep in mind that the first target that I provide creates a shortcut using the default Windows Security icon, while the second uses the File Explorer icon.
5. How open Windows Security with a keyboard shortcut
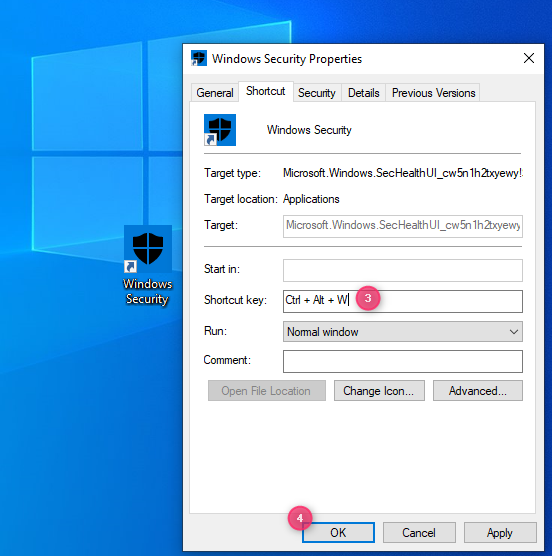
If you’ve created a Windows Security shortcut on the desktop by dragging it from the Start Menu, as shown in this guide’s fourth method, you can then edit the shortcut’s Properties in order to open this app with a keyboard shortcut. After creating the shortcut on the desktop, right-click (or press and hold) on it and choose Properties.
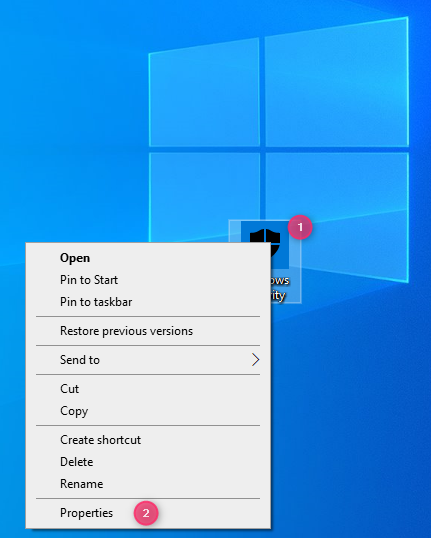
Accessing the Properties of the Windows Security shortcut
Next, click or tap inside the Shortcut key text box and press the shortcut key combination you want to use to open this app. For example, you could press CTRL + ALT + W, like I did in my screenshot. When you’re done setting up the shortcut key, press OK.
Setting the shortcut key for Windows Security
This method works the same in Windows 10 and Windows 11. If you need more information, read this guide: How to open any program (or app) with a keyboard shortcut in Windows.
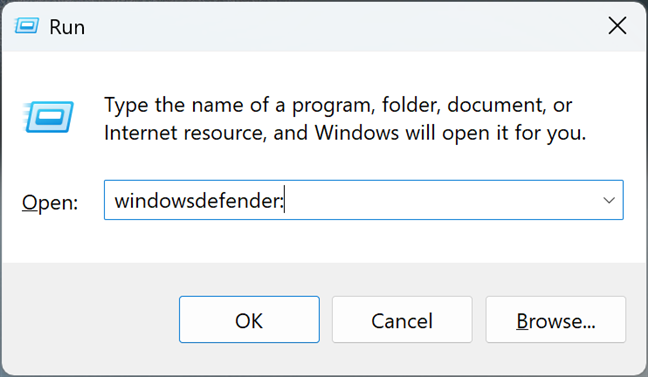
6. How to open Windows Security with Run
An old-school way of opening apps in Windows is through the Run dialog. Press Windows + R on your keyboard, and in the Open field, type:
windowsdefender:
Don’t forget to press Enter on your keyboard or click/tap OK to execute your command and open Windows Security.
Opening Window Security from Run
7. How to find Windows Security using search
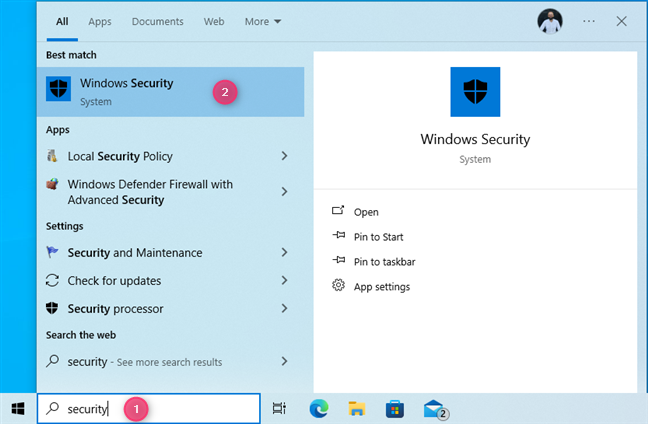
People who are wondering where to find Windows Security on their Windows computer can always use search. It’s a fast and reliable way of opening apps.
If you’re using Windows 10, click or tap inside the Search box on the taskbar, type the word security, and choose the Windows Security search result.
Accessing Windows Security via search in Windows 10
If you’re using Windows 11, finding Windows Security works exactly the same way. However, remember that the search feature may not always display Windows Security as the first search result on the list. It may also display folders with this name or apps like those in the screenshot below.
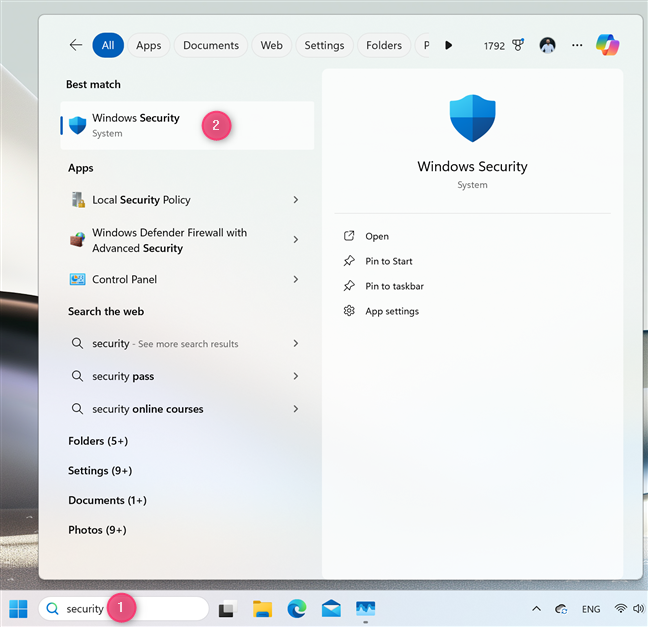
Accessing Windows Security via search in Windows 11
8. How to start Windows Security from File Explorer
Few people know that File Explorer offers another convenient way to start Windows Security. Open File Explorer and type or copy and paste this command in its address bar:
windowsdefender:
Then, press Enter on your keyboard to execute it.🙂
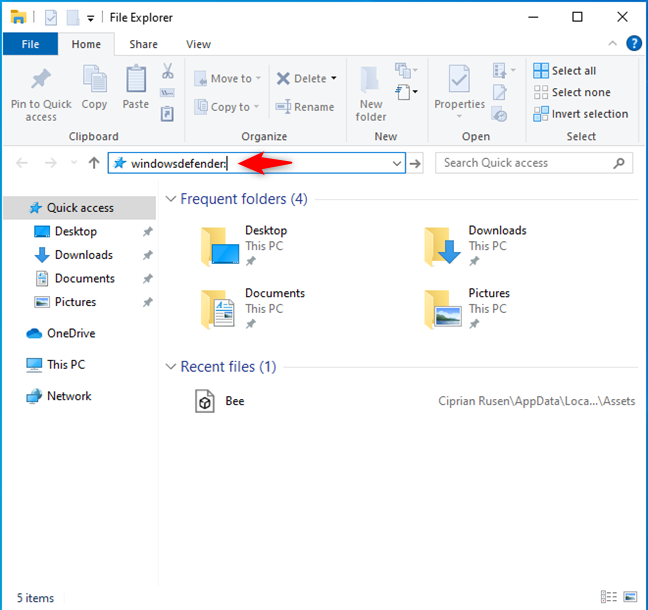
Opening Windows Security from File Explorer in Windows 10
While the screenshot above is from Windows 10, the steps involved work the same in Windows 11, even though File Explorer looks different.
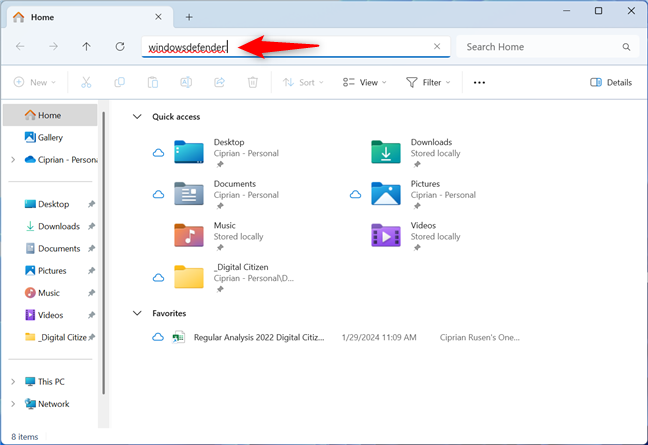
Opening Windows Security from File Explorer in Windows 11
9. Pin Windows Security on your taskbar or Start Menu
Locate the Windows Security shortcut in the Start Menu. As shown in method 3, in Windows 10, you can find this shortcut at the bottom of the apps list. Then, right-click or press and hold Windows Security, and a contextual menu appears. The first option in the menu is Pin to Start, which pins the Windows Security shortcut in the Start Menu. If you choose More, an extension opens, allowing you to Pin to taskbar.
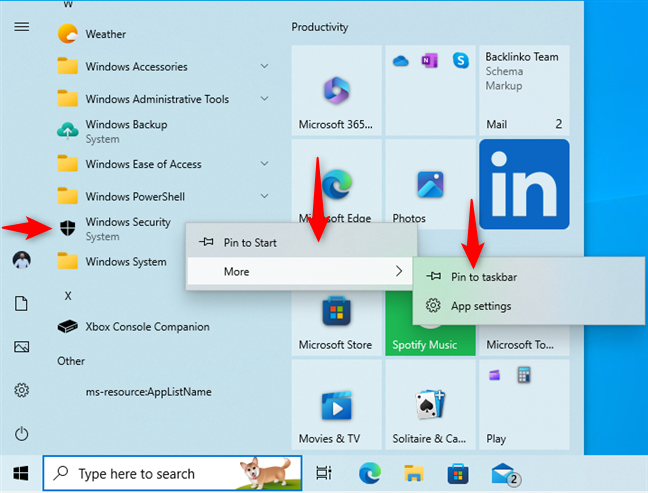
Pinning Windows Security to the Start Menu or the taskbar in Windows 10
The steps are similar in Windows 11. However, you first need to click or tap Start, followed by All apps, to see the list of apps installed on your computer. Then, right-click (or press and hold) the Windows Security shortcut and pin it where you want.
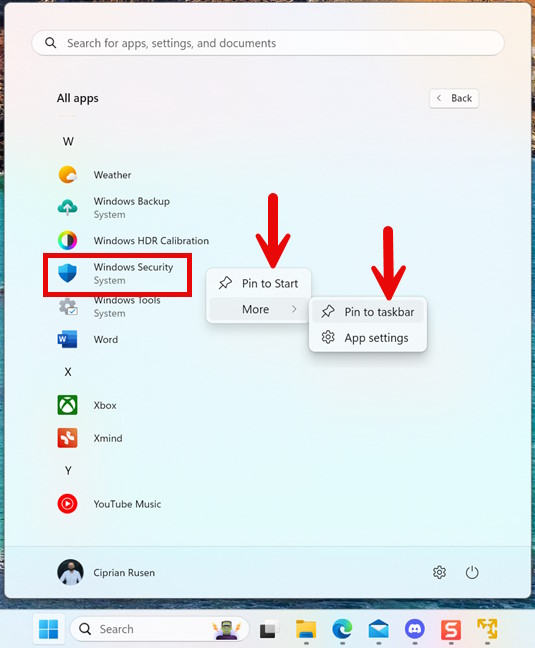
Pinning Windows Security to the Start Menu or the taskbar in Windows 11
10. How to open Windows Security using Settings
If you’re already using the Settings app and need to access Windows Security, you can do that really quickly:
Open Settings and go to the Update & Security category. On the left side of the window, select Windows Security; then, on the right, click or tap Open Windows Security.
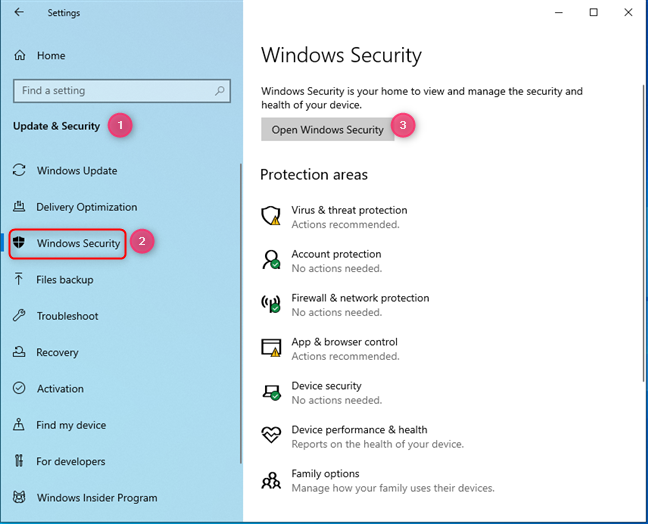
Open Windows Security from the Windows 10 Settings
If you’re using Windows 11, open the Settings app (Windows + I) and choose Privacy & security on the left. On the right side of the window, click or tap Windows Security, followed by Open Windows Security.
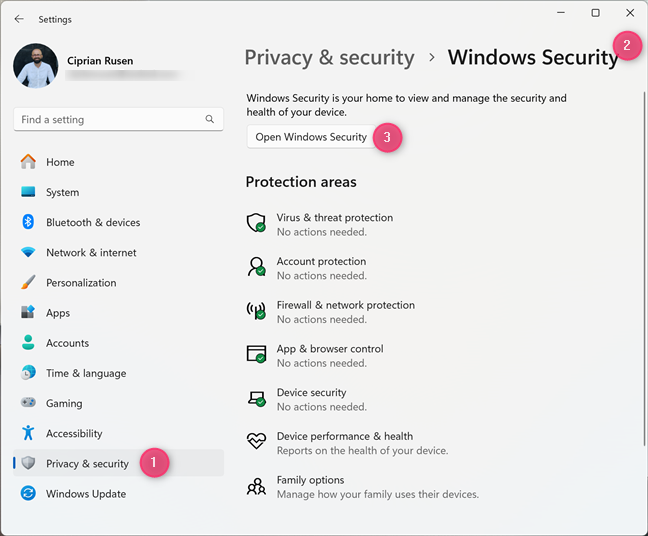
Open Windows Security from the Windows 11 Settings
11. Start Windows Security from Task Manager
If you’re using Task Manager to view running apps and processes, and you need to bring up Windows Security, you can do that straight from this app, like this:
In Windows 10, open Task Manager (a quick way is to press the Control + Shift + Escape keys simultaneously). If you get the compact view of the Task Manager, click or tap on More details. Next, click or tap File > Run new task.
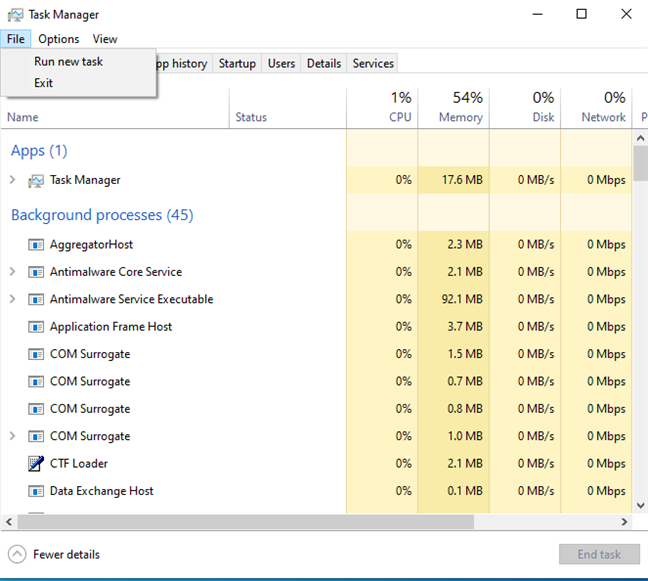
In Task Manager go to File > Run new task
In the Create new task window, type or copy and paste this command in the address bar:
windowsdefender:
Don’t forget to press Enter or click or tap OK.
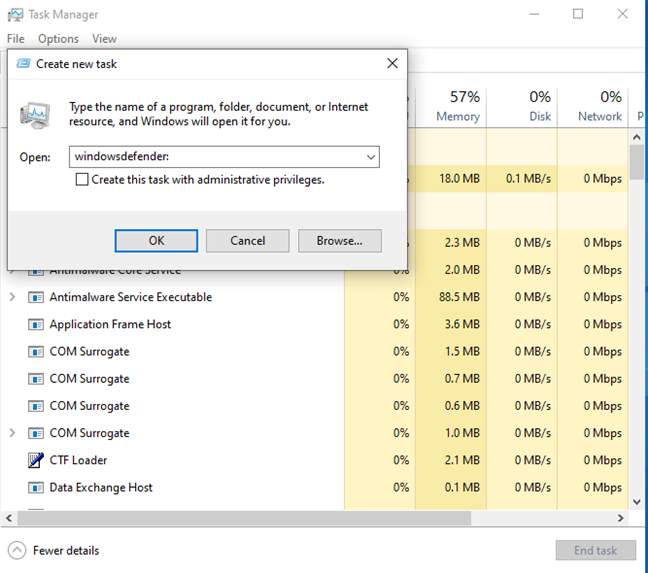
Run Windows Security from Task Manager
This process no longer works in Windows 11 because the Task Manager has been completely revamped, and it no longer gives you access to the Create new task window, like it does in Windows 10.
What is your preferred way of accessing Windows Security?
This is a lengthy tutorial that aims to provide you with as complete information as possible. Most people need to know a method or two for opening Windows Security, while others may have to experiment with most of the methods I detailed and then choose the one that suits their needs. Regardless, let me know which works best for you and why. How do you access Windows Security on your Windows 10 or Windows 11 computer?