
«I want to AirDrop pictures from my iPhone to my Windows 10 desktop. I have Bluetooth turned on, and my iPhone is paired. My desktop does not appear as an eligible receiver on my phone».
— Microsoft Community
As one of the handiest features on your iPhone, AirDrop allows you to easily transfer files between Apple devices. However, if you have a Windows PC and want to AirDrop to a PC, can you get AirDrop on a PC? Don’t worry. This article will walk you through the problem in detail.
Directory
- Part 1. Can You AirDrop to a PC?
- Part 2. How to AirDrop from iPhone to PC?
- 2.1 How to AirDrop to Computer Using iOS Assistant
- 2.2 How to AirDrop to Windows 10/11 Using iTunes
- 2.3 How to AirDrop to Laptop via iCloud
- 2.4 How to AirDrop from iPhone to PC with Snapdrop
Part 1. Can You AirDrop to a PC?
Unfortunately, you cannot AirDrop from iPhone to PC since AirDrop is a proprietary wireless service for iPhone, iPad, iPod touch, and MacBooks running iOS 7 or macOS X 10.7 or later. (How to AirDrop from iPhone to Mac?) By now, AirDrop does not support other operating systems except for iOS. If you wish to AirDrop to Windows 10/11, you can use other alternative methods introduced below.
Part 2. How to AirDrop from iPhone to PC?
Although AirDrop cannot be used directly for file transfers between an iPhone and a PC, the following methods can help you achieve similar results:
2.1 How to AirDrop to Computer Using iOS Assistant
Coolmuster iOS Assistant is the best way to transfer iPhone to a Windows PC. It supports everything on your iPhone, like contacts, photos, bookmarks, calendars, videos, music, apps, iBooks, etc. You can selectively copy desired items to the computer or back up all iPhone content on the PC in one click.
What can you do with iOS Assistant?
- Selectively export contacts, music, photos, messages, bookmarks, iBooks, videos, calendars, etc., from your iPhone to a PC.
- Import contacts, calendars, iBooks, bookmarks, and iTunes backups from the computer to your iPhone.
- Back up everything from your iPhone to the PC in one click.
- Restore backups from the PC to your iPhone in one click.
- Easily manage iTunes backup files and iOS data on your computer.
- Edit, add, or delete data stored on your iOS device directly from your PC/Mac.
- Widely compatible with iPhone 16/15/14/13/11 and earlier models (iOS 5 to iOS 18).
Here is how to transfer files from iPhone to PC using iOS Assistant:
01Download and install iOS Assistant on your PC. Connect your iPhone to the PC using a USB cable and trust the computer on your iPhone. When connected, it will display your iPhone information on the home interface.

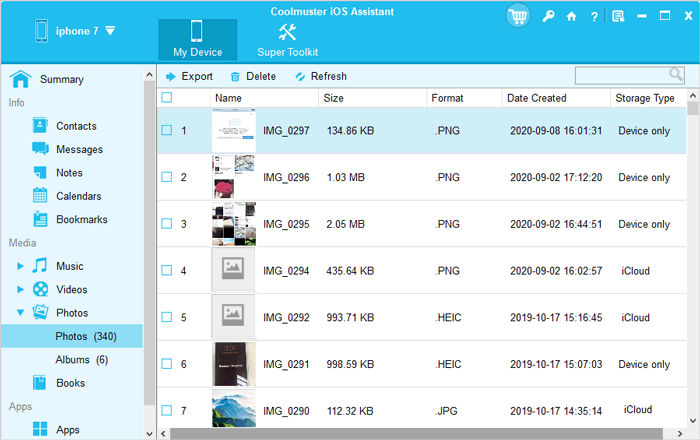
02Choose the data type you want to transfer on the left side, for instance, «Photos». Preview the thumbnails on the right side and tick off the desired images. Next, press the «Export» button on the top to save them to your PC.
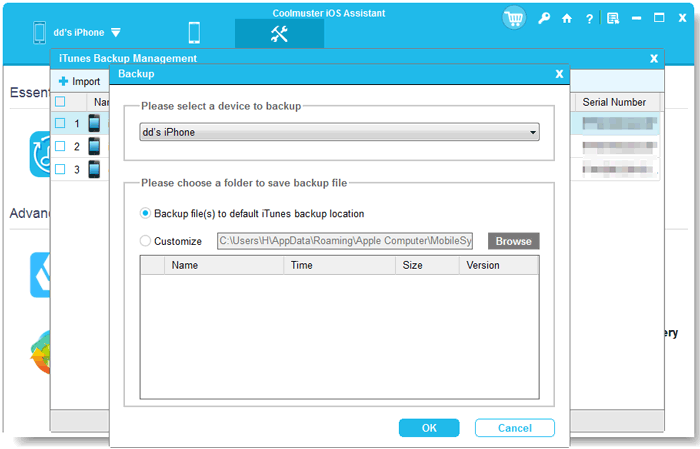
To back up your entire iPhone, go to the «Super Toolkit» section and select «iTunes Backup & Restore». Click «Backup» and choose your iPhone from the drop-down menu. Next, click «Browse» to select a folder on your computer to save the backup. Finally, click «OK» to start the backup process.
2.2 How to AirDrop to Windows 10/11 Using iTunes
Apple provides iTunes File Sharing to help you AirDrop to Windows 11/10. It works seamlessly on your Windows PC and is safe and reliable.
Note: You can use iTunes File Sharing to sync documents created by Numbers, Keynotes, Pages, or other apps that support File Sharing.
How can I transfer files from iPhone to PC using iTunes? Here are the steps:
Step 1. Install and launch the latest version of iTunes on your Windows PC.
Step 2. Plug your iPhone into the computer via a USB cable and tap the iPhone icon when it appears at the top-left of the iTunes window. (iTunes not recognize your iPhone?)
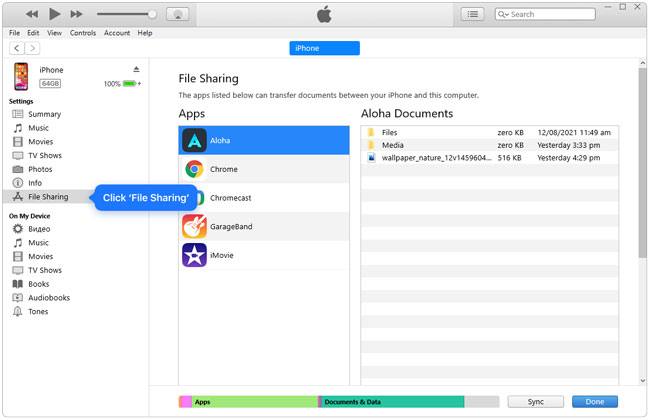
Step 3. Click «File Sharing» on the left panel, choose the file you want to transfer and tap the «Save» button at the lower-right corner.
Step 4. Define a location on your computer to store files and hit «Apply».
2.3 How to AirDrop to Laptop via iCloud
You can also use a cloud storage service to AirDrop from iPhone to PC. iCloud is Apple’s cloud storage service, allowing you to upload files from your iPhone to the cloud and then download them to your PC. Please note that cloud storage services may not support all iPhone data, and the storage space is limited. (iCloud storage full?)
Here is how to AirDrop photos from iPhone to Windows 10/11 using iCloud:
Step 1. Open the «Settings» app on your iPhone > Tap your «Apple ID» at the top, then select «iCloud» > Tap «Photos» and enable «iCloud Photos» to upload your photos to iCloud.
Step 2. Open www.icloud.com in your PC browser and sign in with your Apple ID.
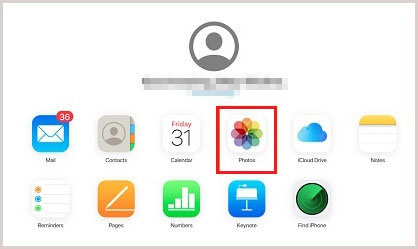
Step 3. Click on the «Photos» icon to access your iCloud Photos.
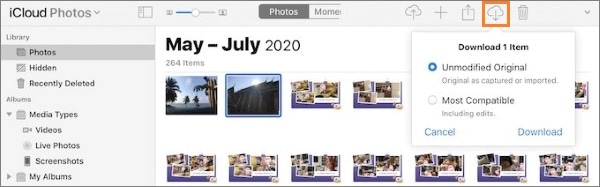
Step 4. Select the photos you want to download, then click the «Download» button (a cloud icon with an arrow) in the top right corner to save the selected photos to your PC.
2.4 How to AirDrop from iPhone to PC with Snapdrop
If you are looking for an AirDrop clone app, look at Snapdrop. This web-based app imitates AirDrop and allows you to sync everything from an iPhone to a PC over the same local network.
Here is how to AirDrop from iPhone to PC via Snapdrop:
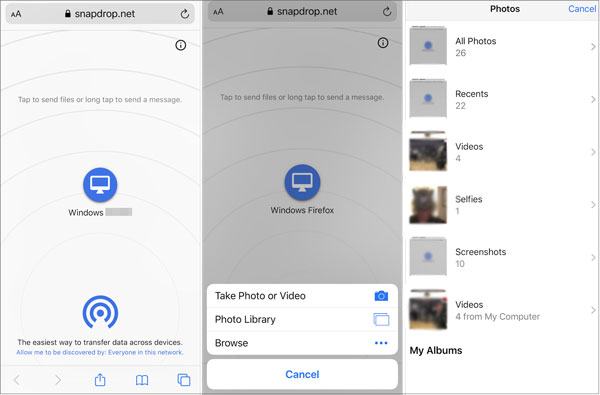
Step 1. Connect your iPhone and the PC to the same Wi-Fi network and pen snapdrop.net on both devices.
Step 2. Tap your computer’s nickname on your iPhone and select the files you want to share.
Step 3. Tap «Save» to accept the files on your computer.
Final Thoughts
That’s how to AirDrop to a PC. You can select the way accordingly. If you are looking for the easiest and quickest method, you can try Coolmuster iOS Assistant. It uses wired transfer and will be much more stable than any other method. Moreover, you can preview the content and choose whichever to copy if you only transfer part of your iPhone data.
Related Articles:
Can You AirDrop from PC to iPhone? How to Transfer Between Them?
[7 Quick Fixes] How to Fix AirDrop Declined on iPhone/iPad?
[Answered] Where Do AirDrop Files/Photos/Videos Go on iPhone/Mac?
[Solved] How to Fix AirDrop No People Found Problem on iPhone/iPad?
iOS Transfer
How to AirDrop from iPhone to PC Windows 11/10/8/7 in 4 Practical Ways?
У меня есть обычный стационарный компьютер с Windows на борту, и я периодически им пользуюсь. Это, скажем, игровая машина, а также просто рудимент прошлого, от которого пока избавляться не хочется.
Иногда я за ним работаю и быстро вспоминаю, как хорошо всё-таки оставаться внутри экосистемы Apple. Взять тот же AirDrop: два тапа – и файлы с iPhone или iPad практически моментально улетают на ноутбук и обратно, без всяких кабелей.
На Windows сделать что-то подобное оказывается КРАЙНЕ проблематично. Протоколы AirDrop закрыты, а пользоваться сторонними программами-передатчиками я не хочу, это небезопасно (особенно для «винды»).
Поэтому при необходимости быстро закинуть на айфон несколько файлов с компьютера на Windows, или сбросить что-нибудь с айпэда на сам компьютер, приходится колхозить что-то ужасное. Вроде перекидывания файлов вначале в Telegram себе в «сохранёнки», а потом скачивания с десктопного клиента.
Но есть решение в десятки, если не сотни раз проще. Его достаточно один раз настроить за пару минут. И после этого у вас будет что-то похожее на AirDrop.
Никакими навыками для этого обладать не стоит. Нам даже Команды не понадобятся.
Что потребуется
▪ компьютер на Windows 10 (подозреваю, что и пара предыдущих версий подойдут)
▪ любое устройство на iOS или iPadOS, желательно с прошивкой от iOS 14 и новее
▪ локальная сеть Wi-Fi (подойдет и проводное подключение до ПК, если в итоге через него этот ПК выходит в одну локальную сеть вместе с iPhone или iPad).
То есть берём айфон в руки, садимся за компьютер с Windows – и поехали.
Как настроить сверхлёгкую передачу файлов с Windows на iPhone и iPad (и обратно)

Папку можете назвать как угодно, но рекомендую использовать латиницу.
1. В компьютере с Windows создаём папку, которая будет служить «свалкой» для файлов, предназначенных для передачи или скачивания с iPhone и iPad.
Свою я назвал iPhoneShare и поместил на Рабочий стол.
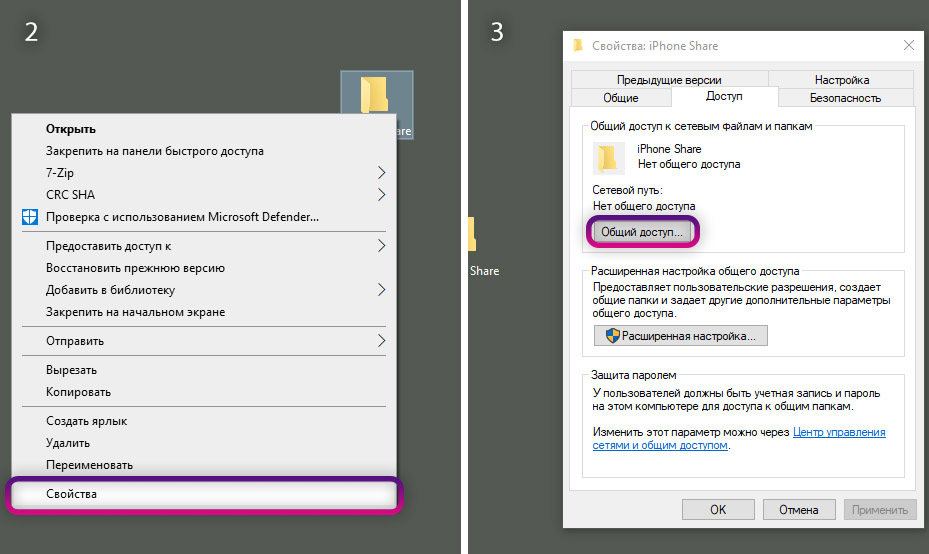
2. Щёлкаем правой кнопкой мыши на папке, в выпадающем меню выбираем Свойства. Во вкладках открывшегося окна нажимаем на Доступ.
3. В блоке Общий доступ к сетевым файлам и папкам кликаем на Общий доступ…
Тут будет ваш логин. Запомните его для пункта 8 инструкции.
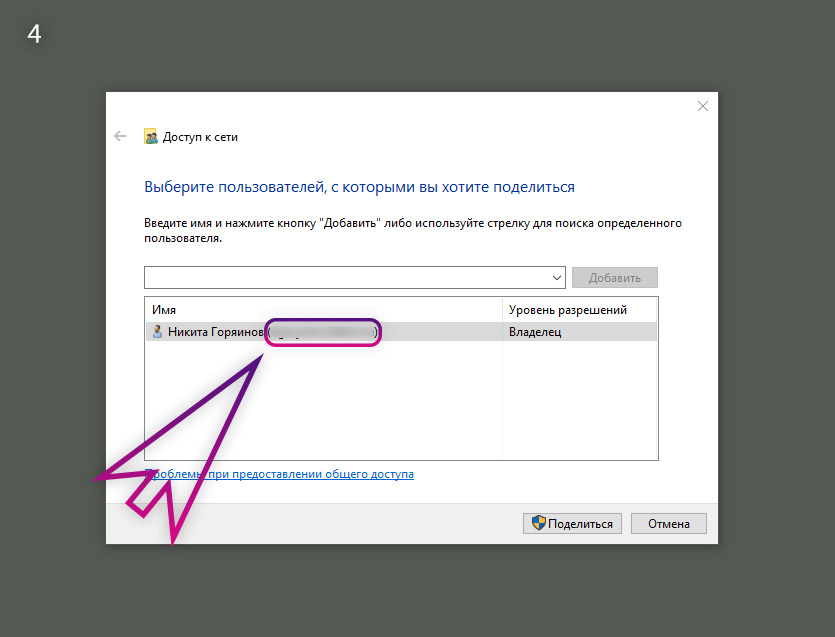
4. В открывшемся окне запоминаем, что написано в скобках в подменю Имя. Это ваш полный логин аккаунта в Windows, и он нам скоро понадобится.
Затем жмём Поделиться.
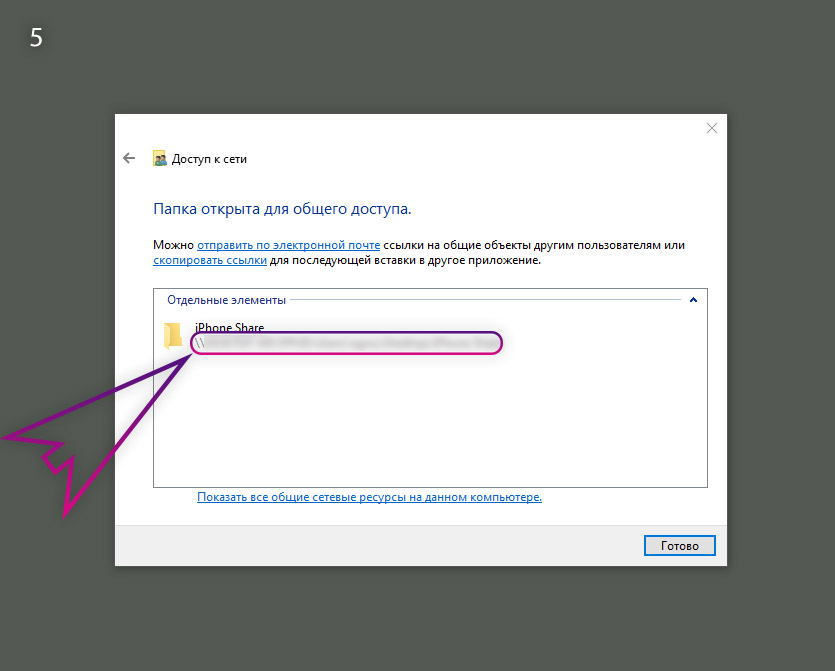
Это сетевой адрес вашей папки, его надо запомнить для пункта 7 инструкции. Лучше сделать скриншот или сфотографировать.
5. В появившемся окне запомните сетевой адрес для доступа к этой папке. Он написан светло-серым шрифтом.
Окно можно закрыть, а можно и временно оставить открытым, чтобы перед глазами было, с чего списывать путь в пункте 7 этой инструкции.
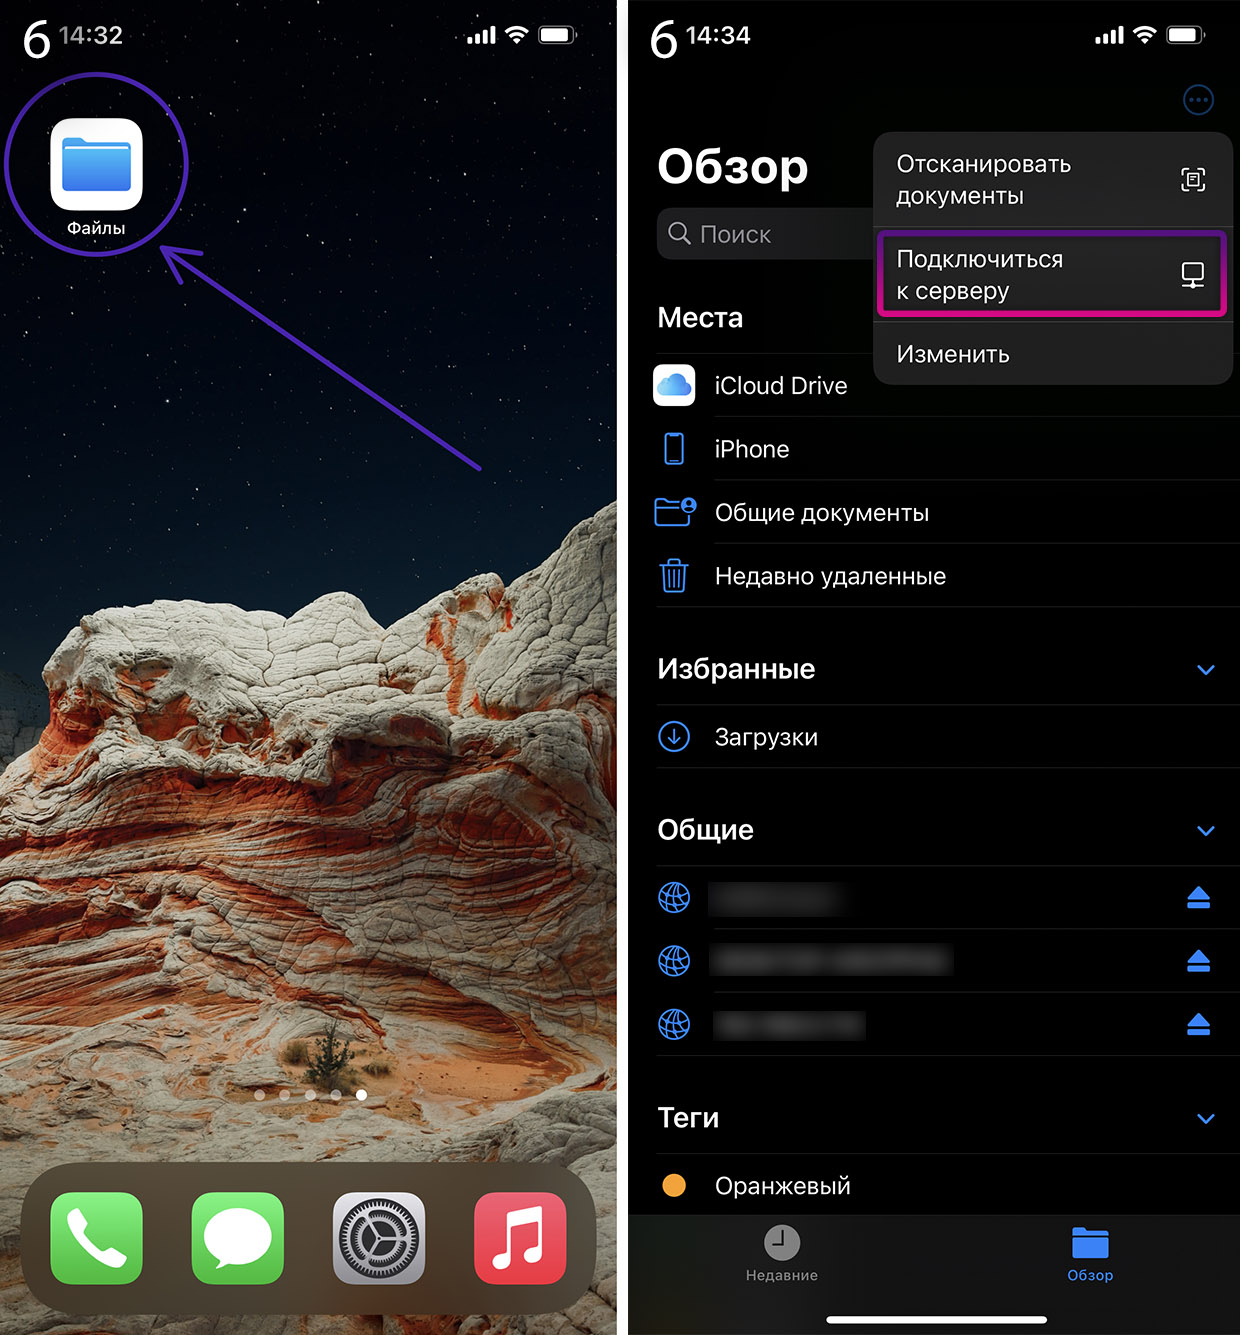
6. Берём iPhone или iPad в руки. Открываем встроенное приложение Файлы. Кто удалил, можете скачать заново из App Store.
В правом верхнем углу нажимаем на иконку с троеточием, в выпадающем меню тапаем на Подключиться к серверу.
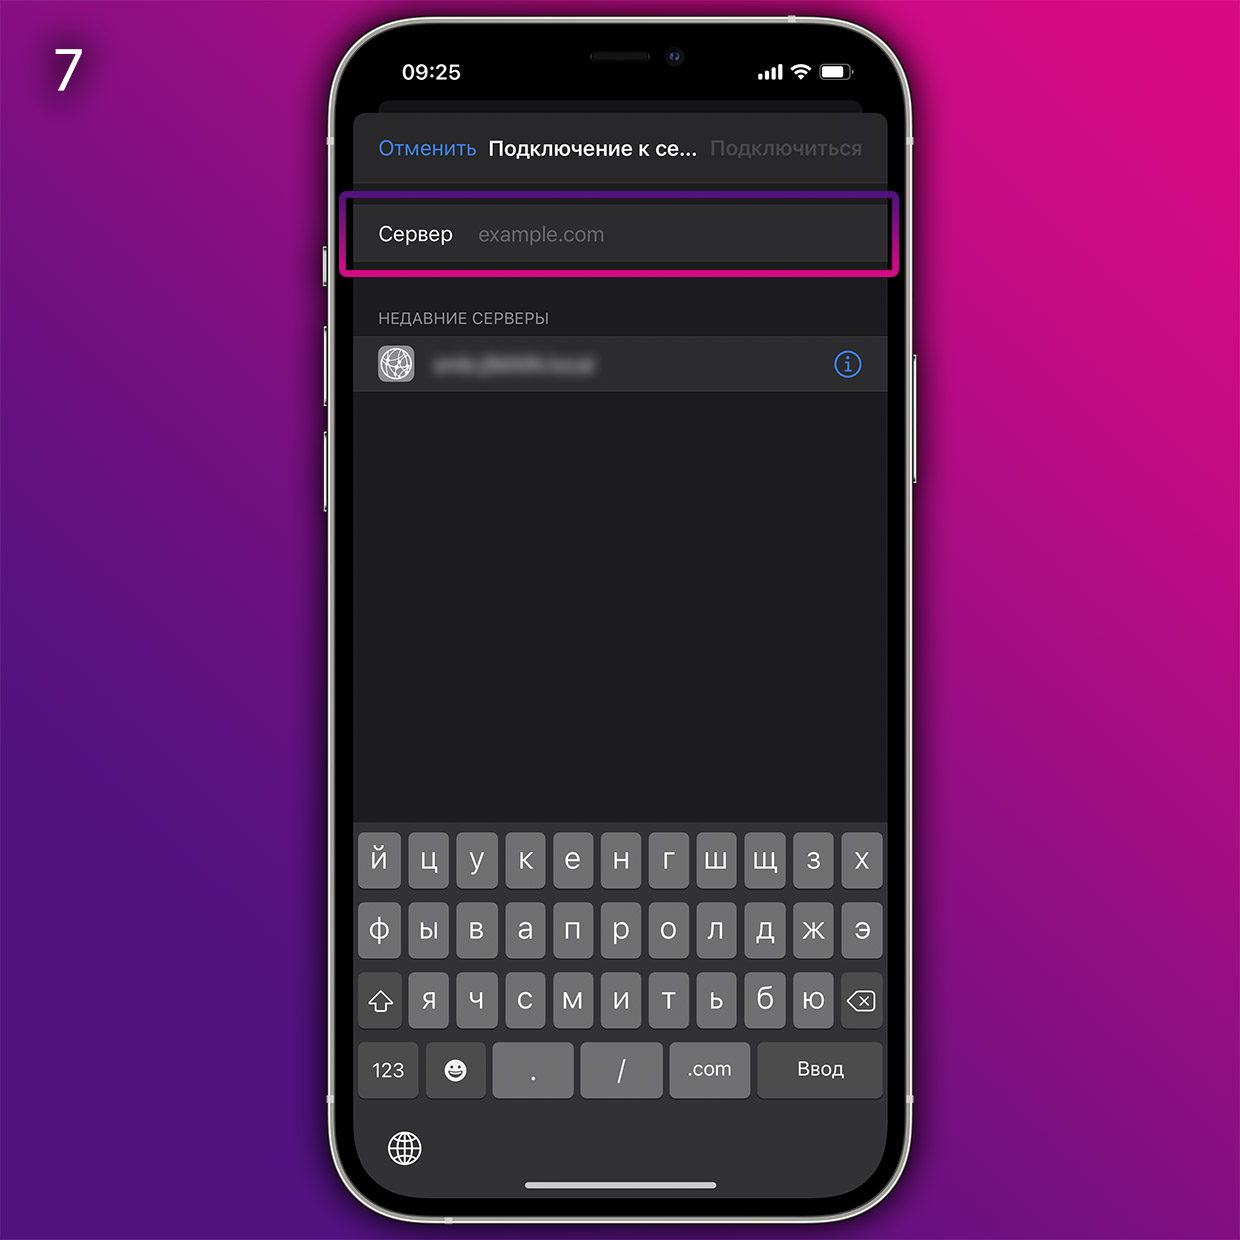
Сюда в приложении Файлы вписывайте то, что вам больше подходит: либо доступ ко всем Общим папкам Windows (если их много), либо только к специально созданной (тогда надо ввести полный путь).
7. Пишем в пункте Сервер что-то из нижеследующего, сверяясь с адресом, который был указан в Windows на пункте 5.
▶ если хочется получить доступ сразу ко всем Общим папкам на Windows, то пишем только часть сетевого пути доступа, дописывая в конце без пробела текст .local:
smb://*путь-до-первого-слэша*.local
например,
smb://DESKTOP-VASYAKRASAVCHIK.local
▶ если хочется получить доступ только к свежесозданной папке, то пишем весь путь доступа и добавляем в конце (снова без пробела) текст .local:
smb://*весь-путь-до-папки-как-вам-написал-windows*.local
например,
smb://DESKTOP-VASYAKRASAVCHIK/Users/Vasya/Desktop/iPhoneShare.local
▶ если хочется получать доступ ко всем папкам именно через IP-адрес вашего Windows-ПК, то заходим на компьютере в Настройки, Сеть, кликаем по активной и запоминаем текущий IP-адрес ПК (строка IPv4 адрес). Вот этот адрес и пишем в строку Сервер на iOS (например, 192.168.0.98).
Но в этом случае помните, что при смене IP-адреса компьютера (такое часто бывает, когда ПК подключен через Wi-Fi) вам придется повторять эту инструкцию заново с шестого пункта по последний.
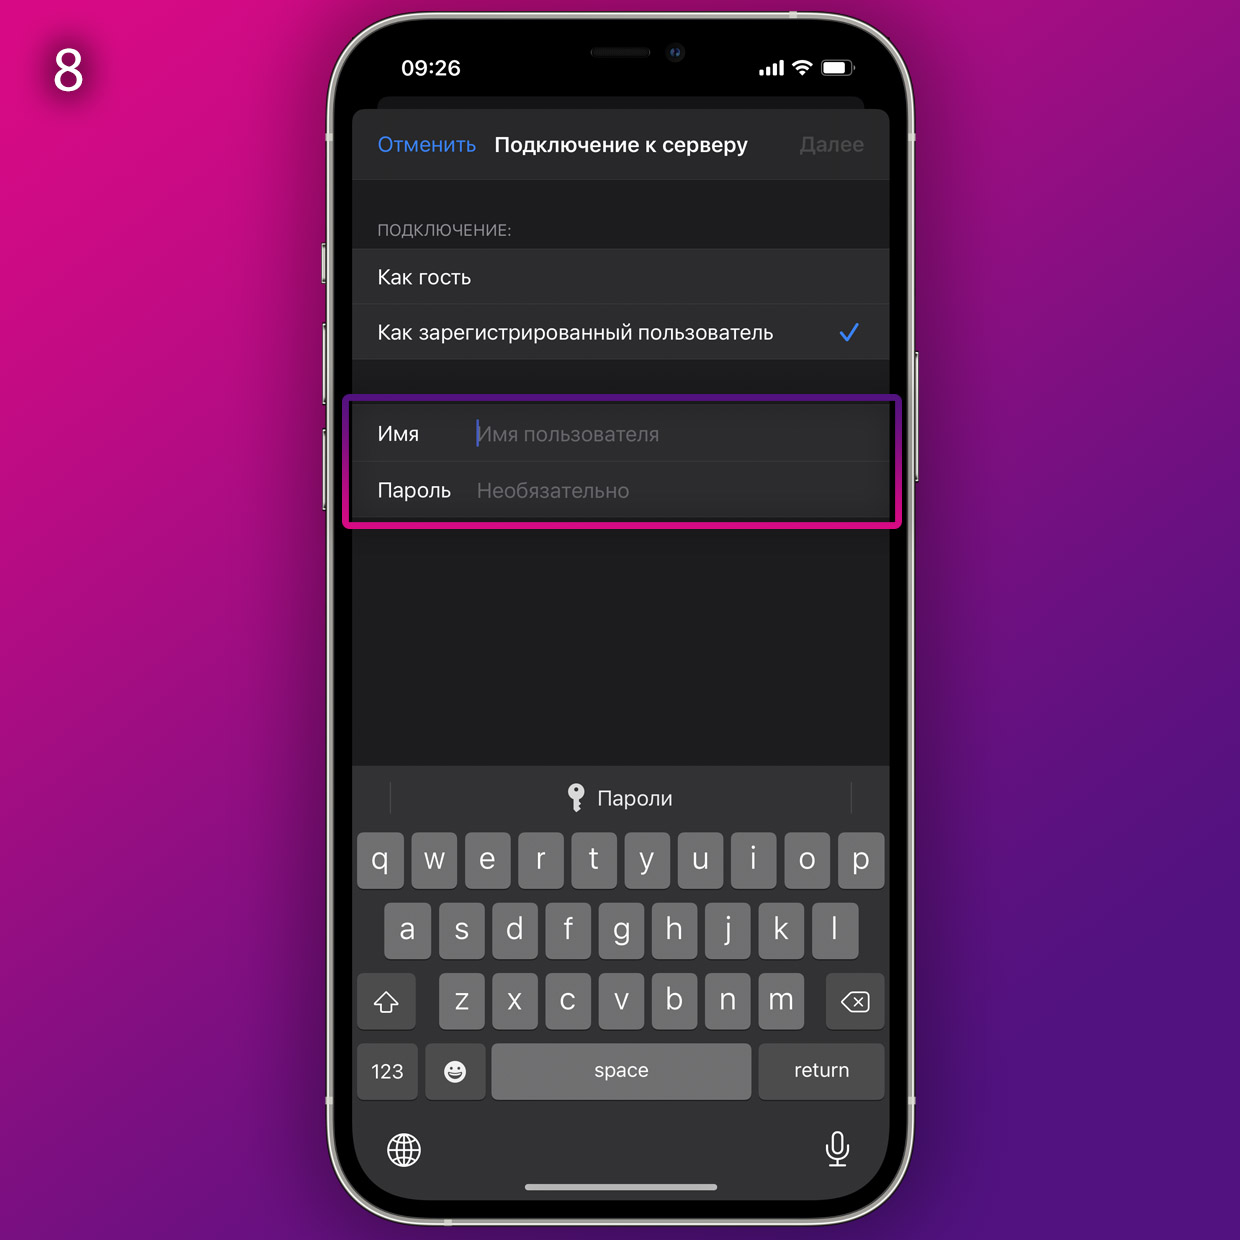
Здесь вписывайте ваш полный логин учётной записи в Windows и его пароль.
8. В следующем окне на iPhone или iPad выбираем пункт Как зарегистрированный пользователь, а в меню ниже указываем то, что запомнили в пункте 4 этой инструкции:
▪ Имя: это ваш логин в Windows
▪ Пароль: это пароль вашего логина в Windows
9. Нажимаем на Далее в правом верхнем углу и ждём подключения.
Если через некоторое время выскакивает ошибка про невозможность найти сервер, то проверьте корректность адреса, указанного вами в пункте 7 инструкции, а также попробуйте убрать .local с его конца. Если же в ошибке сказано про неверный пароль или логин, то вы ошиблись в имени или пароле.
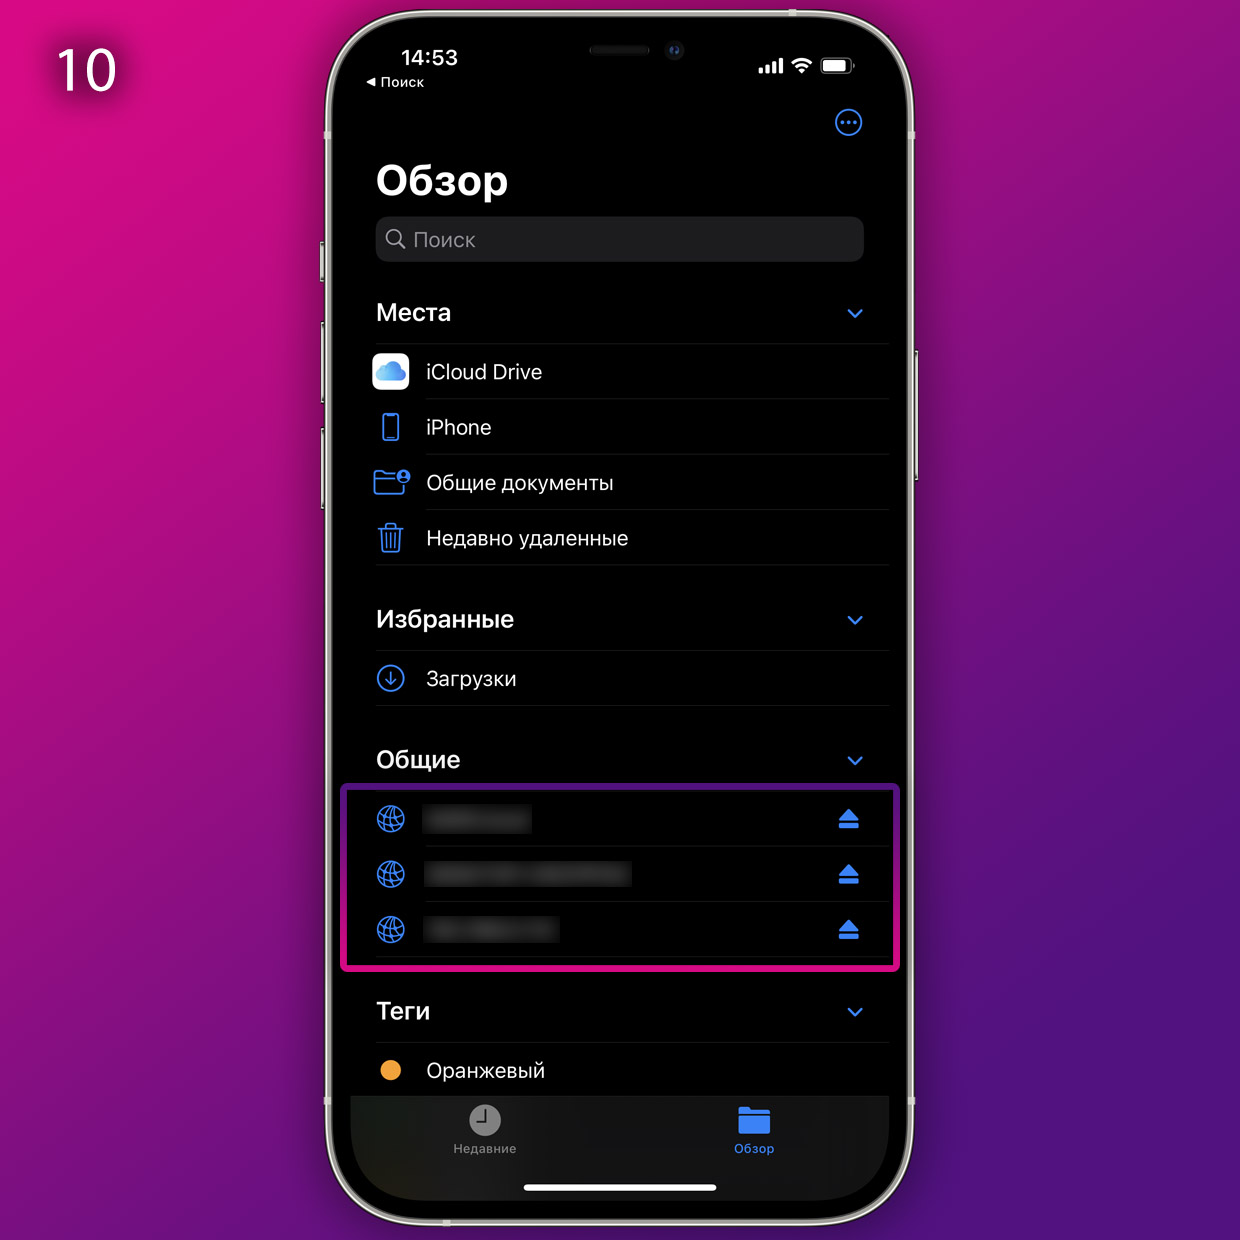
Теперь здесь вы можете открыть облачную папку в Windows.
10. Если всё получилось, то теперь в приложении Файлы у вас появилось подменю Общий доступ.
Это и есть доступ к файлам на Windows, а также любым другим облачным папкам с файлами внутри вашей сети. Открываете его и видите то, что лежит в папке на компьютере с Win. Туда же можно кидать любые файлы.
Как теперь всем этим пользоваться?
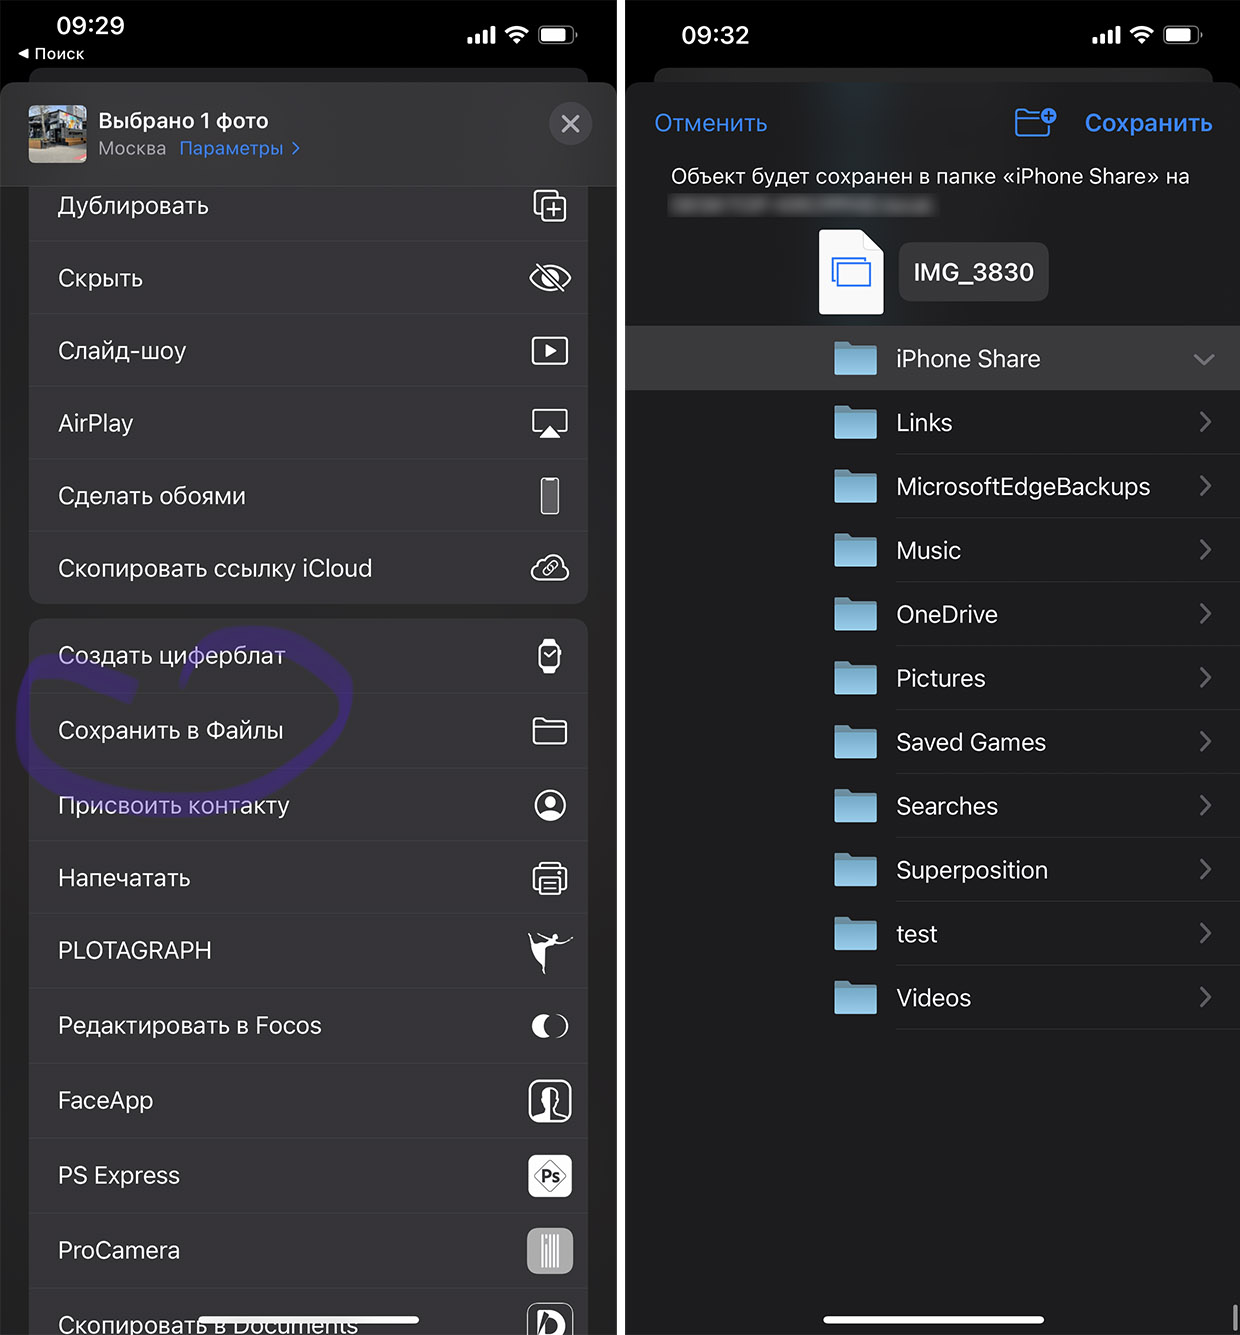
С iPhone можно перекидывать любые файлы в такую папку прямо через стандартный интерфейс Поделиться.
Через встроенное приложение Файлы в iPhone и iPad вы можете копировать, удалять, вставлять и переименовывать любые файлы, которые лежат в вашей новой папке на компьютере с Windows.
Например, если нужно передать на компьютер с Windows фотографию, вы просто копируете её в Фото на iOS, открываете Файлы, затем находите эту папку в общем меню приложения и вставляете в пустое место, прямо как текст (долгий тап пальцем -> Вставить).
То же самое работает в обратную сторону. Если понадобится забрать какие-то файлы с ПК, просто кидаете их в эту папку, а затем в приложении Файлы на iOS забираете всё в локальную память (долгий тап пальцем на файле -> Поделиться или Сохранить).
Всё это будет работать, пока вы находитесь в одной локальной сети с компьютером.
Конечно, способ и рядом не стоит с простотой использования AirDrop. Но в целом – сильно облегчает взаимодействие iPhone, iPad и Windows-компьютеров во всём, что касается передачи и приёма файлов. Пользуйтесь на здоровье.
(160 голосов, общий рейтинг: 4.45 из 5)
iPhones.ru
Вот неплохая альтернатива, раз AirDrop для Windows в обозримом будущем не появится.
Никита Горяинов
@ngoryainov
Главный редактор iPhones.ru. Спасибо, что читаете нас. Есть вопрос, предложение или что-то интересное? Пишите на [email protected].
Airdrop is a popular file-sharing feature that originated on Apple’s devices, allowing users to easily transfer files, photos, and documents between Apple devices using Bluetooth and Wi-Fi technology. While Windows 11 does not have a native Airdrop feature, users can achieve similar functionality through various methods and applications. In this detailed guide, we’ll explore file-sharing options available in Windows 11 that mimic the convenience of Airdrop, as well as how to use them effectively.
Understanding the File Transfer Landscape
Before diving into alternatives to Airdrop on Windows 11, it’s essential to understand the various ways to transfer files. Windows users often rely on email, USB drives, external hard drives, or cloud services like OneDrive, Google Drive, or Dropbox. However, these methods may not always provide the instantaneous convenience that Airdrop offers to Apple users.
With Windows 11’s new features and applications, there are a few tools that can resemble Airdrop’s straightforward file transfer process.
Exploring Nearby Sharing
One of the primary features that can mimic Airdrop-like functionality on Windows 11 is the Nearby Sharing feature. This built-in tool allows you to share content with nearby devices using Bluetooth and Wi-Fi.
Enabling Nearby Sharing
-
Check Bluetooth and Wi-Fi: Ensure that both Bluetooth and Wi-Fi are turned on for the PC you’re using as well as the device you want to share files with.
-
Open Settings:
- Click on the Start menu and select the Settings icon (gear-shaped).
- In the Settings window, select System from the left sidebar.
-
Select Nearby Sharing:
- In the System settings, scroll down and click on Nearby sharing.
- Toggle the Nearby sharing switch to On.
- You will also see a dropdown menu where you can choose whether to share files with Everyone nearby or My devices only.
-
Configure Additional Settings: You can also choose whether to receive files or links from nearby devices, as well as change your device name for easier identification.
Sending Files Using Nearby Sharing
-
Select the File: Navigate to the file you want to send. This could be any file from your file explorer, such as documents, images, or videos.
-
Right-Click and Share: Right-click on the file, and select the Share option from the context menu.
-
Choose the Recipient Device: A panel will appear showing nearby devices that have Nearby Sharing enabled. Select the device you want to send the file to.
-
Accept the Transfer: The recipient device will receive a notification asking if they want to accept the file. Once they accept, the transfer will commence.
-
Accessing the Received File: On the recipient’s device, the file will typically be saved in the Downloads folder.
Using File Sharing Apps
If Nearby Sharing does not meet your needs, several third-party apps can create Airdrop-like functionality on Windows 11.
1. Snapdrop
Snapdrop is a web-based application that provides a simple way to share files across different platforms, including Windows, Mac, Android, and iOS.
How to Use Snapdrop:
- Open a web browser on both the sending and receiving devices and navigate to Snapdrop.net.
- Ensure both devices are connected to the same Wi-Fi network.
- Each device will display a unique identifier or name.
- To send a file, simply click on the device’s name you want to send to and select the files to share.
- The receiving device will get a notification, and once accepted, the file will download automatically.
Advantages of Snapdrop:
- Platform-independent; works on any operating system.
- No app download is necessary, just a web browser.
2. Send Anywhere
Send Anywhere is another excellent option that can mimic the Airdrop experience. It allows users to transfer files effortlessly using a 6-digit code, QR code, or link.
How to Use Send Anywhere:
-
Download the App: Visit the Send Anywhere website or install the app from the Microsoft Store on Windows 11.
-
Select Files: Open the application and select the files you wish to send.
-
Share: Once you select the files, the app will generate a 6-digit code and a QR code.
-
Send to the Recipient: The recipient can either enter the code on their Send Anywhere app or scan the QR code to receive the file.
-
Download the Files: The recipient can download the files directly onto their device.
Advantages of Send Anywhere:
- Supports large file transfers up to 10GB for free.
- Cross-platform compatibility.
3. SHAREit
SHAREit is a powerful sharing application that can send files at incredible speeds. It works across various platforms, including Windows, Android, iOS, and Mac, making it versatile for sharing between different devices.
How to Use SHAREit:
-
Install SHAREit: Download SHAREit from its official website or from the Microsoft Store.
-
Create an Account: You may need to create an account or log in to use the app.
-
Select Files: Choose the files you want to send from your device.
-
Send the File: Tap the Send button. The app will search for nearby devices that have SHAREit installed.
-
Accept on Recipient’s Device: The recipient needs to accept the incoming file transfer through their SHAREit application.
-
Download: Once accepted, the transfer will begin, and the recipient can find the files in the SHAREit folder.
Advantages of SHAREit:
- Fast transfer speeds.
- Supports a variety of file types and formats.
Using Cloud Storage Services
If you prefer a more traditional way to share files that is not limited by proximity, using cloud storage services might be the best option. Cloud services are excellent for sharing larger files or when the devices are not physically close.
1. OneDrive
OneDrive is Microsoft’s integrated cloud storage service in Windows 11, allowing you to store files online and share them easily with others.
How to Use OneDrive for File Sharing:
-
Setup OneDrive: Make sure you have OneDrive set up on your Windows 11 computer. If you don’t, you can create a Microsoft account and install OneDrive.
-
Upload Files: Drag and drop files into your OneDrive folder or use the OneDrive app to upload files.
-
Share Files: Right-click on the file or folder you wish to share, select Share, and choose how to send the share link (via email, direct link, etc.).
-
Set Permissions: Specify whether recipients can edit or view the files by modifying the link settings.
-
Send the Link: Send the generated link to the person you want to share the file with.
Advantages of OneDrive:
- Seamlessly integrated with Windows.
- Excellent for collaboration with Office files.
2. Google Drive
Google Drive is another powerful cloud service where users can store, share, and collaborate on files.
How to Use Google Drive for File Sharing:
-
Create an Account: If you don’t have one, create a Google account to access Google Drive.
-
Upload Files: Go to Google Drive and upload the files you want to share. You can drag files or use the New button to upload.
-
Share Files: Right-click on the uploaded file or folder, then select Share.
-
Set Permissions: Specify whether you want others to be able to view or edit the files.
-
Obtain the Shareable Link: Click on Get link to generate a shareable link and send it to anyone you wish.
Advantages of Google Drive:
- Excellent for collaborative work.
- Allows simultaneous editing of documents.
Challenges and Considerations
While Airdrop features are immensely useful, the methods we discussed in this article come with their own set of challenges. Here are some points to keep in mind when transferring files on Windows 11:
- Proximity: Nearby Sharing is limited to devices that are physically close to each other.
- Network Connection: Most third-party apps rely on stable Wi-Fi connectivity. Ensure that both devices are on the same network.
- Compatibility: Some file-sharing apps may require both devices to have the same application installed or may have different interfaces across platforms.
- File Size Limits: Various services and applications have file size limits that may affect large file transfers. Always check these limitations beforehand.
Conclusion
While Windows 11 does not include a built-in Airdrop feature, users have access to several tools and methods to facilitate file sharing. Whether you choose to use Nearby Sharing for quick transfers between nearby devices, or opt for popular third-party applications like Snapdrop, Send Anywhere, and SHAREit, you can successfully replicate the Airdrop experience on Windows 11.
Additionally, leveraging cloud storage services like OneDrive and Google Drive provides a superb alternative for sharing files over the internet without proximity constraints. Each method comes with its own pros and cons, so consider your specific needs for file size, device compatibility, and speed when selecting the best option for you.
With these tools and techniques, file sharing on Windows 11 can be quick, efficient, and convenient, enabling users to transfer files seamlessly between devices, much like the Airdrop experience Apple users enjoy.
Семь кросс-платформенных решений, которые помогут перебрасывать файлы с девайса на девайс без проводов и лишней возни.
Функция AirDrop на Mac, позволяющая обмениваться файлами со всеми своими устройствами без проводов, появилась ещё в 2011 году — в том, что касается внедрения новых технологий, Apple всегда впереди. Аналогичная функция Near Share от Microsoft появилась лишь недавно, в предыдущем крупном обновлении Redstone 4.
AirDrop безупречен на устройствах от Apple, Near Share удобен на компьютерах и планшетах с Windows 10. Но что, если в вашем зоопарке устройств есть и девайсы с Windows, и с macOS, и с Linux, и с Android, и с iOS? Попробуйте один из этих способов.
1. Локальная сеть

Этот способ очень прост и универсален. Все современные ОС — Windows 10, macOS и Linux — поддерживают создание общих папок. А iOS и Android умеют подключаться к ним в локальной сети с помощью сторонних файловых менеджеров.
Просто расшарьте нужную папку, назначьте ей нужные права на чтение и запись, и можете подключаться к ней с любого устройства в локальной сети.
На десктопах просматривать сетевые папки можно в стандартных файловых менеджерах: «Проводнике» в Windows 10, Finder в macOS, Nautilus и Nemo в Linux. На мобильных устройствах можно воспользоваться сторонники приложениями, например ES File Manager для Android и FileMaster для iOS.
Преимущества: все средства для создания общих папок уже есть в ОС. Скорость обмена файлами зависит только от вашего Wi-Fi.
Недостатки: хотя в сети полно гидов, как настроить общие папки, многие пользователи не могут с этим справиться и предпочитают сторонние решения.
FileMaster-Privacy Protection
Shenzhen Youmi Information Technology Co. LtdЦена: Бесплатно
Загрузить
2. Облачное хранилище

Не хотите возиться с настройкой общих папок? Воспользуйтесь Dropbox, Google Drive или любым другим облачным хранилищем на ваш выбор. Установите соответствующее приложение, забрасывайте нужные файлы в папку облачного хранилища, а затем копируйте их оттуда в любой удобный момент.
Преимущества: копия ваших файлов всегда будет оставаться в облачном хранилище, и вы имеете к ним доступ, даже если компьютер с оригинальными файлами не в сети. И поскольку большинство облачных хранилищ поддерживают восстановление версий файлов, вы заодно будете иметь бэкап.
Недостатки: размер файловых хранилищ в той или иной мере ограничен. За дополнительное место придётся платить. Кроме того, скорость загрузки файлов в облачное хранилище может быть меньше, чем в локальной сети. Хотя тот же Dropbox умеет обмениваться файлами в локалке.
3. Snapdrop

Разработчики Snapdrop вдохновлялись AirDrop. Это очень простое веб-приложение, которое работает прямо в вашем браузере. Не нужно ничего скачивать и устанавливать. Просто откройте Snapdrop на всех устройствах, куда хотите перебрасывать файлы, и всё. Snapdrop позволяет перетаскивать файлы и папки прямо в окно браузера. Работает и на десктопах, и в Android с iOS.
Преимущества: предельная простота, работает без установки.
Недостатки: всё придётся перебрасывать вручную. Автоматическая синхронизация папок, работа без сети и прочие штуковины не предусмотрены.
Snapdrop →
4. AirDroid
AirDroid — кросс-платформенный инструмент, который позволяет обмениваться файлами между устройствами Windows, macOS, iOS и Android. Кроме того, приложение работает и в браузере, но для этого нужно создать учётную запись AirDroid.
Помимо обмена файлами, AirDroid предоставляет ещё несколько интересных возможностей. Например, можно писать сообщения на своём компьютере, чтобы затем пересылать их через телефон. Или просматривать уведомления с телефона в трее компьютера.
Преимущества: простое и популярное решение. Многие пользователи девайсов Android уже знакомы с AirDroid, так почему бы не использовать его?
Недостатки: возможности обмена файлами в бесплатной версии ограничены — вам придётся приобрести платную подписку за 20 долларов в год.
AirDroid →
AirDroid: файлы и управление
SAND STUDIOЦена: Бесплатно
Загрузить
AirDroid: File & Docs Manager
Sand StudioЦена: Бесплатно
Загрузить
5. Resilio

Он же бывший BitTorrent Sync. Resilio синхронизирует файлы по протоколу P2P (проще говоря, с помощью торрента). Никаких облаков, никаких учётных записей. Расшарьте папку в Resilio, а затем отправьте ссылку на другое устройство или просканируйте QR-код.
Resilio предоставляет урезанную бесплатную версию, где ограничено количество папок, которыми можно обмениваться. Платная версия стоит около 60 долларов и поддерживает функцию выборочной синхронизации.
Преимущества: простой и удобный клиент. Скорость синхронизации зависит только от скорости вашей сети.
Недостатки: урезанные возможности в бесплатной версии. До ребрендинга разработчики BitTorrent Sync были менее жадными.
Resilio →
Resilio Sync
Resilio Inc.Цена: Бесплатно
Загрузить
Resilio Sync
Resilio Inc.Цена: Бесплатно
Загрузить
6. Send Anywhere

Простое и при этом функциональное приложение для обмена файлами. Его вполне можно полноценно использовать и в бесплатной версии, поскольку ограничений на объём передаваемых файлов нет. Достаточно выбрать нужные файлы и указать на устройстве, куда вы их отправляете, а также ввести шестизначный код. Либо просто установить клиенты Send Anywhere на всех ваших девайсах и выбирать, куда и что отправить, безо всяких кодов. Send Anywhere поддерживает 256-битное шифрование.
Кроме того, программа умеет отправлять файлы через ссылки и email. Этим и отличается free-версия от pro: бесплатная версия отправляет в почте только 10 ГБ, платная — 50 ГБ. Бесплатно можно временно хранить в облаке 10 ГБ, платно — до 1 ТБ.
Клиенты Send Anywhere доступны на Windows, macOS, Linux, Android и iOS. Кроме того, сервис предоставляет плагины для Chrome и Outlook.
Преимущества: лёгкий, удобный и универсальный сервис. Вам не придётся утруждаться настройкой.
Недостатки: всё-таки возможности клиента представляются несколько ограниченными. Впрочем, для большинства пользователей их будет достаточно.
Send Anywhere →
Send Anywhere (File Transfer)
Rakuten Symphony Korea, Inc.Цена: Бесплатно
Загрузить
Send Anywhere — File Transfer
Rakuten Symphony Korea, Inc.Цена: Бесплатно
Загрузить
7. Приватный торрент
Это великолепный способ, если вам нужно отправить действительно большой объём данных, — скажем, папку с аудиофайлами или фильм.
Вы можете использовать любой торрент-клиент. Просто создайте в нём торрент, укажите нужные данные, подождите, пока они проиндексируются, и отправьте созданный торрент-файл на другое устройство. А затем просто начните загрузку как обычно.
Преимущества: способ позволяет обмениваться неограниченным количеством данных. Вы можете использовать любые торрент-клиенты по вашему усмотрению.
Недостатки: устройство, с которого пересылаются данные, должно быть включено, пока загрузка не завершится. Торрент-файлы придётся создавать вручную.
А какой способ используете вы? Делитесь в комментариях.