
By default, when you install Windows 7 in a VirtualBox virtual machine, Aero will not work. This prevents you from enjoying the transparency of Windows 7 windows.
- Enable Windows 7 Aero (up to VirtualBox 6.0)
- WDDM compatible driver required
- Enable 2D and 3D acceleration
- Enable Aero interface
- Enable Windows 7 Aero (since VirtualBox 6.1)
1.1. WDDM compatible driver required
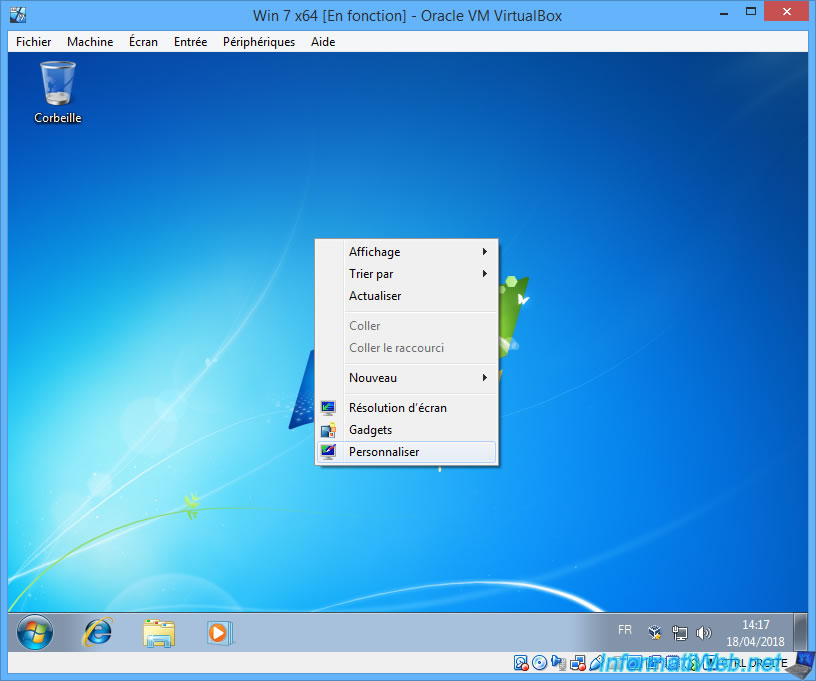
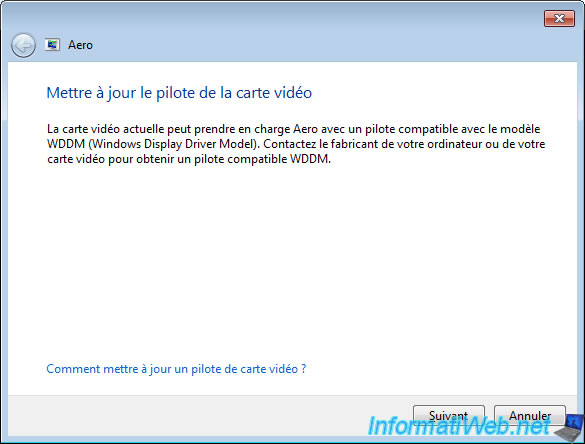
Indeed, if you try to activate the Aero feature by right-clicking «Customize» on the desktop, you will see a warning appear.
Click on the warning : Troubleshoot problems with transparency and other Aero effects.
If the driver is not installed, Windows will tell you about a WDDM compatible driver.
1.2. Enable 2D and 3D acceleration
To overcome this problem, you need to install the VirtualBox’s experimental 3D support.
However, you must first enable the 2D and 3D accelerations in your VM configuration.
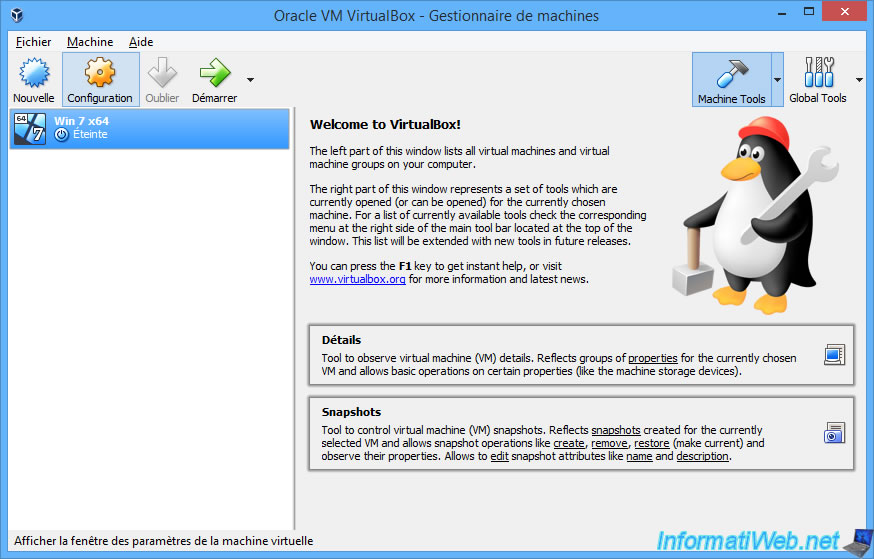
To do this, select your Windows 7 virtual machine and click on Configuration.
Then, in the Display section, check the «Enable 3D Acceleration» and «Enable 2D Video Acceleration».
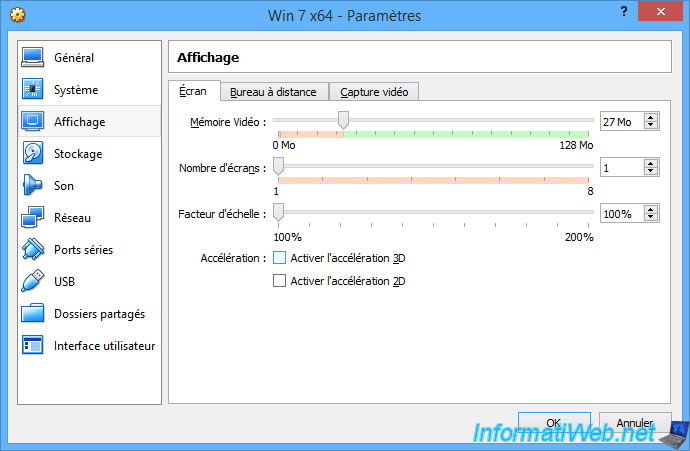
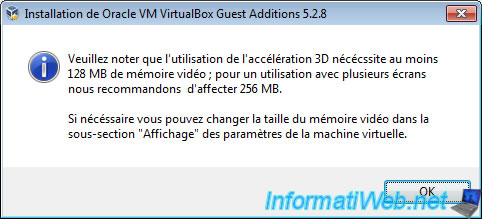
Then, you will see (thanks to the colors) that the video memory will have to be at least 128 MB.
Move the slider to allocate at least 128 MB of video memory to your Windows 7 virtual machine.

Start your virtual machine.
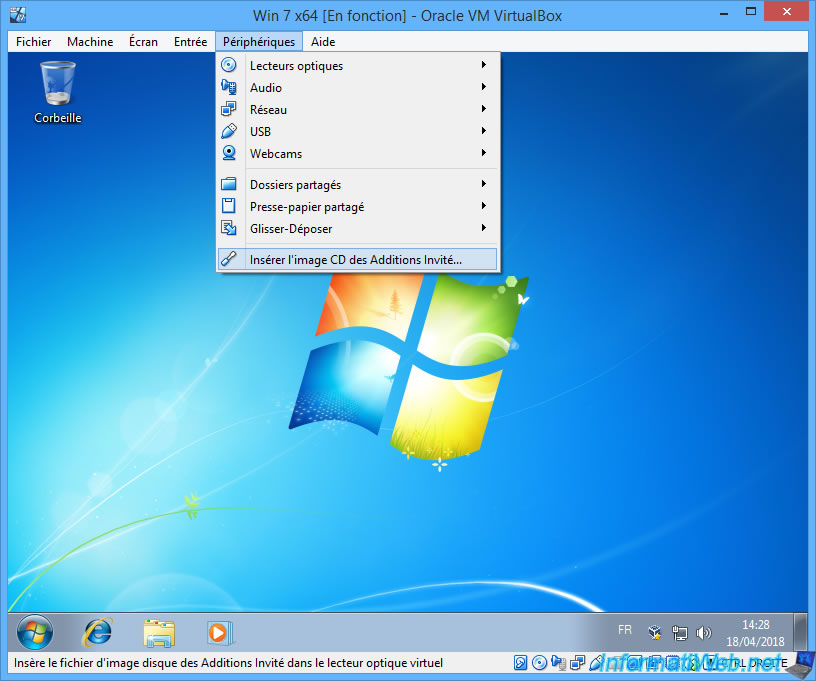
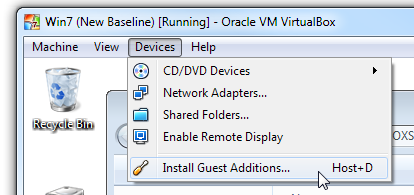
Then, go to the Devices menu and click on : Insert Guest Additions CD image.
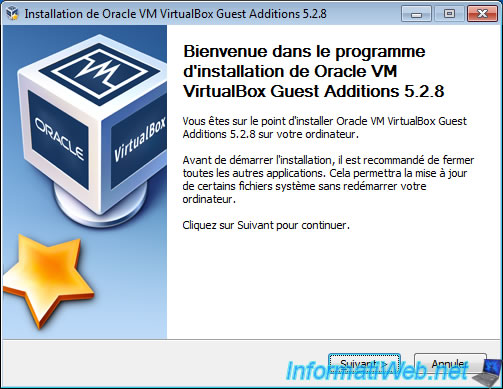
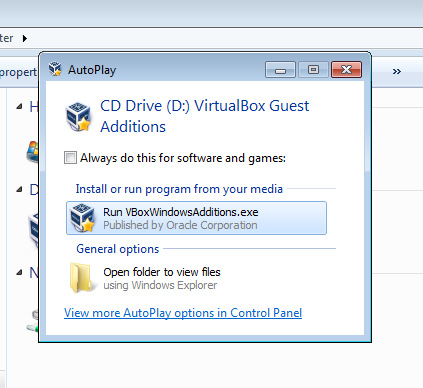
The installation program «VirtualBox Guest Additions» is displayed.
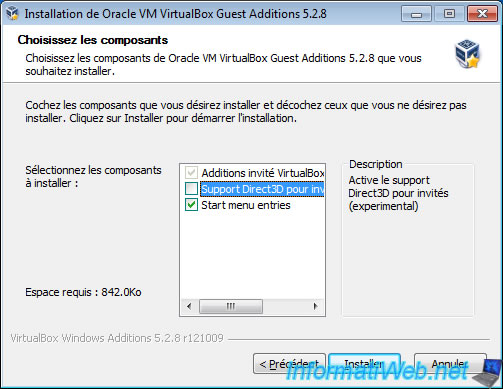
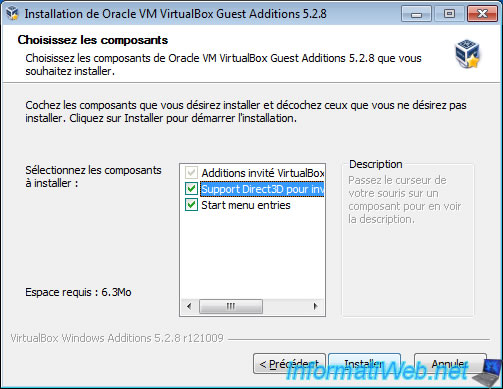
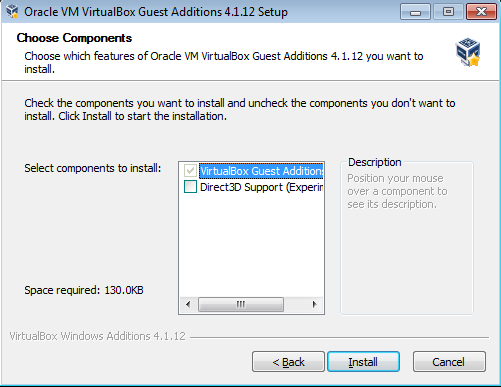
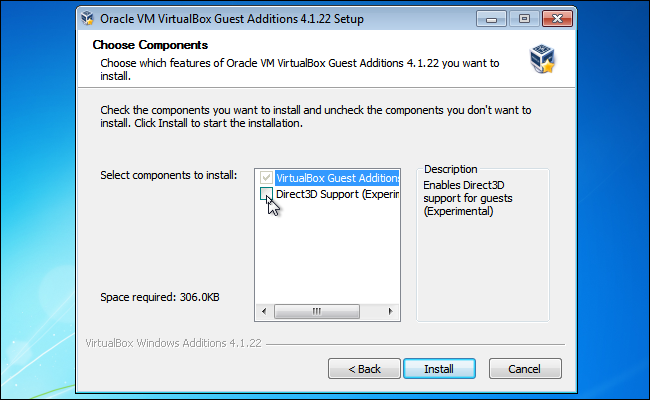
Check the «Direct3D Support (Experimental)» box.
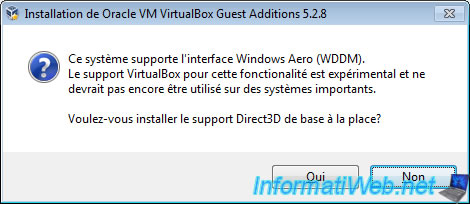
As indicated by the installation wizard, this system supports the Windows Aero interface (WDDM).
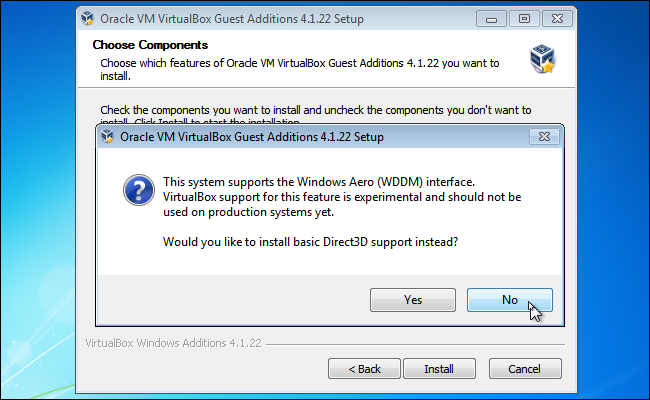
Answer «No» to this question : Would you like to install basic Direct3D support instead?
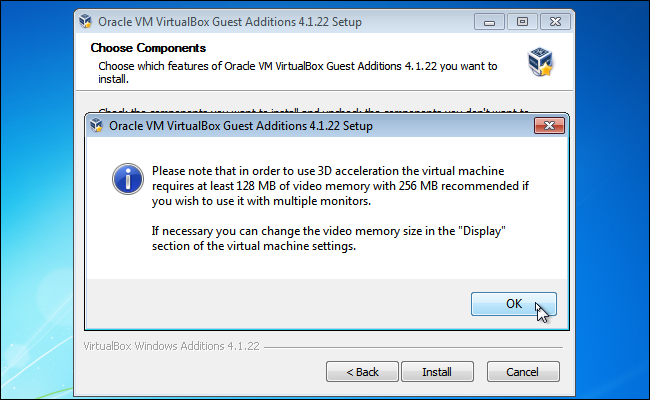
As stated by VirtualBox, the use of the 3D acceleration requires at least 128 MB.
Then, click Install.
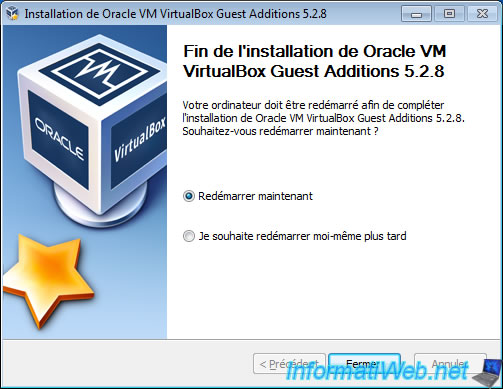
Restart your virtual machine.
1.3. Enable Aero interface
Now that 3D acceleration and the Direct3D driver are enabled, you will be able to activate the Aero interface.
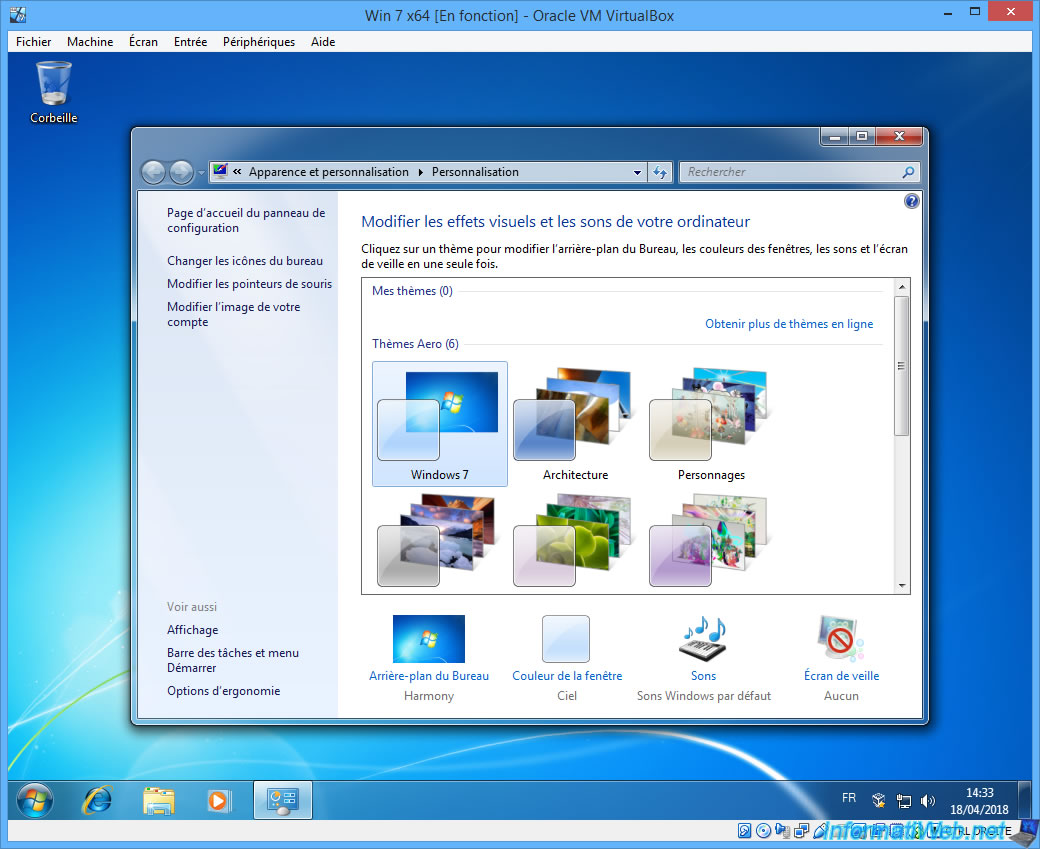
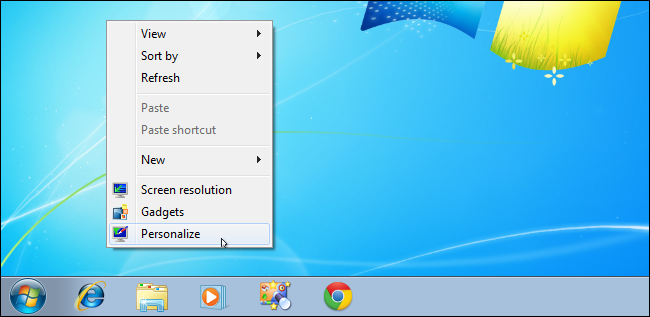
To do this, right-click «Customize» on the desktop.
Select an Aero theme (for example : Windows 7) and the windows will become transparent.
Source : VirtualBox’s forum
VirtualBox is an amazing application. In fact, I would go so far as to say it is one of the most important applications you could install on your computer, if you care about your privacy, security, and the general repair of your system.With VirtualBox, you can browse the Web, test applications, and perform potentially risky operations – all in a completely protected environment, separate from your “real” operation system.
But up until recently, VirtualBox had a pretty major limitation: There was no way to use Windows Aero effects when running Windows Vista or Windows 7 inside VirtualBox. If you are testing software, this makes a big difference: You are not getting the Aero experience most Windows users would get, and your screenshots look wrong. Fortunately, with the advent of VirtualBox 4.1, this can be fixed.
What You Need To Get Started

The first thing you need is VirtualBox 4.1 and up. You can get it here.
Next, you need an instance of Windows 7 running in VirtualBox. Back in 2009, we’ve shown you How To Install Windows 7 on a Virtual Machine with VirtualBox, and the process hasn’t really changed since. Make sure you load that instance of Windows 7 before the next step.
Installing The New Guest Additions
Even with VirtualBox 4.1, you will see something like this when you fire up Explorer:
Meaning, no Aero. That’s because you need to install the latest version of VirtualBox Guest Additions. This is a software package you install within the guest OS (the “virtualized” one), and allow it to integrate better with its host (both guest and host are Windows 7 in my case).
To install the Guest Additions, select Devices > Install Guest Additions:
VirtualBox will then insert a virtual CD into your VM, and run it:
Mind your step now: Aero support is still experimental, and is switched off by default. So we can’t just Next-Next-Next our way through this installer:
Above you see the crucial step. Note that Direct3D Support is switched off by default. You must check this box on for this tutorial to work. As soon as you do, VirtualBox Guest Additions tells you you’re on the right track for Aero:
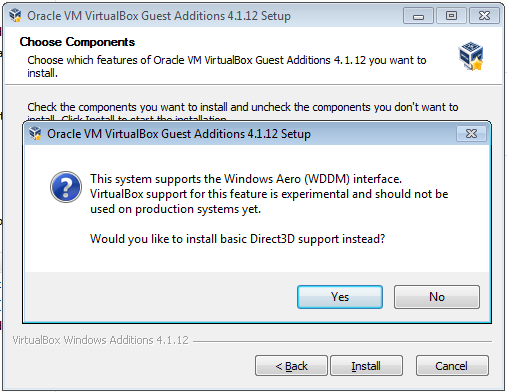
This is a trick question: Click No. You don’t want the basic Direct3D support: You want the new, experimental stuff. Living on the edge! Once you click No, VirtualBox will explain the memory requirements:
![aero[16]](https://static1.makeuseofimages.com/wordpress/wp-content/uploads/2012/04/aero16.png)
No problem; we’ll get to that part in a moment. Now click Install and let the setup utility do its thing. Windows will ask if you want to install a driver; obviously, you do:
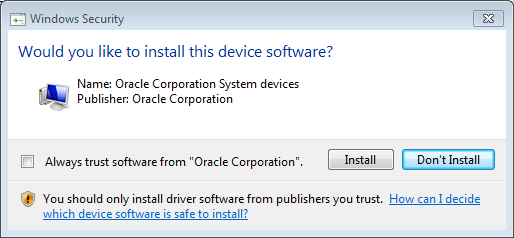
Again, the wrong default is selected for you. Make sure you click Install. This popup will appear more than once, so keep an eye on the VM during this process. Once it’s done, you will be asked to reboot the VM:
![aero[20]](https://static1.makeuseofimages.com/wordpress/wp-content/uploads/2012/04/aero20.png)
Yup: Reboot now.
Confirm Machine Settings
While the VM is rebooting, let’s make sure we have enough display memory for Aero to work. Click Machine > Settings, and then Display:
![aero[22]](https://static1.makeuseofimages.com/wordpress/wp-content/uploads/2012/04/aero22.png)
You can’t change this when the VM is running, so if you see a setting lower than 128MB on the Video Memory slider or “Enable 3D Acceleration” unchecked, shut down the VM and fix that, then load it again.
Enabling Aero
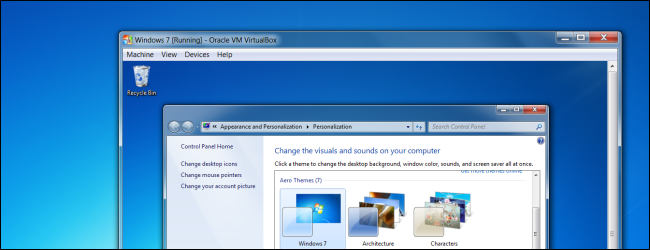
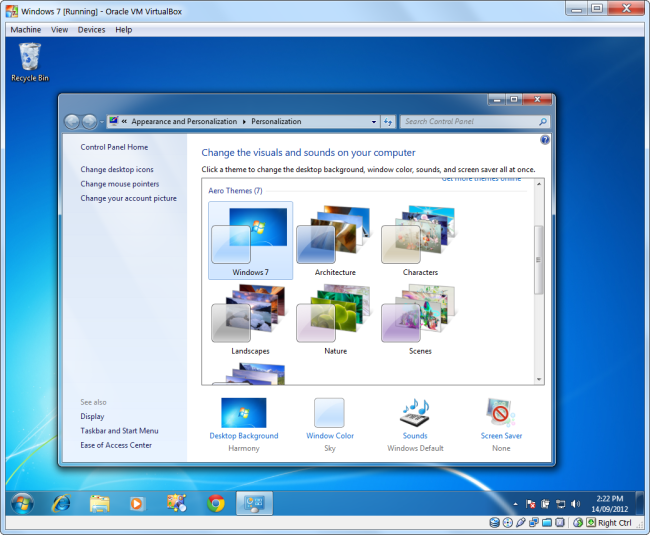
Now that we’re all set, the moment of truth has arrived. Right-click the desktop in the guest system and select Personalize. The Personalization window will open:
![aero[24]](https://static1.makeuseofimages.com/wordpress/wp-content/uploads/2012/04/aero24.png)
Under Aero Themes, just click any theme you like. I went with the default Windows 7 one, and a brief moment later, lo and behold:
Victory! Aero is now switched on within the VM, and any application you install there will work just like it does on a native instance of Windows 7! You can now take screenshots to your heart’s content, and enjoy a better virtualized Windows 7 experience.
Sign in to your How-To Geek account
Quick Links
-
Adjust Virtual Machine Settings
VirtualBox’s experimental 3D acceleration allows you to use Windows 7’s Aero interface in a virtual machine. You can also run older 3D games in a virtual machine – newer ones probably won’t run very well.
If you installed Windows 7 in VirtualBox, you may have been disappointed to see the Windows 7 Basic interface instead of Aero – but you can enable Aero with a few quick tweaks.
Adjust Virtual Machine Settings
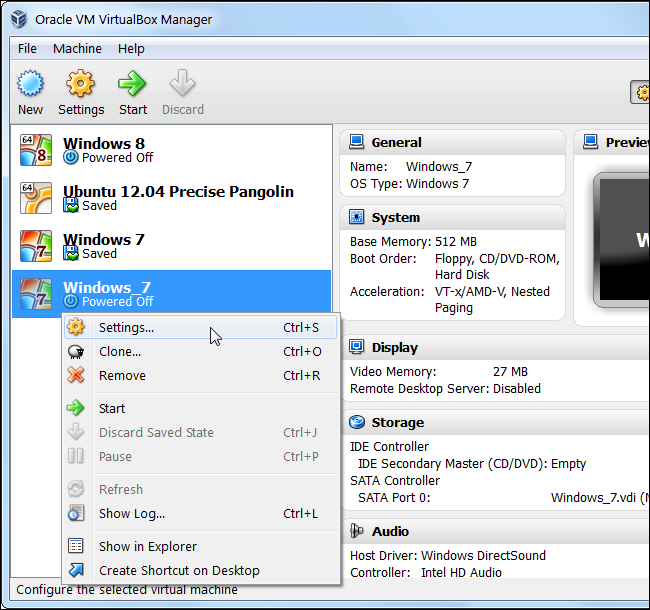
First, power your Windows 7 virtual machine off – you won’t be able to change its settings if the virtual machine is running or if it’s suspended (also known as “saved”).
Right-click the virtual machine and select Settings to access its settings.
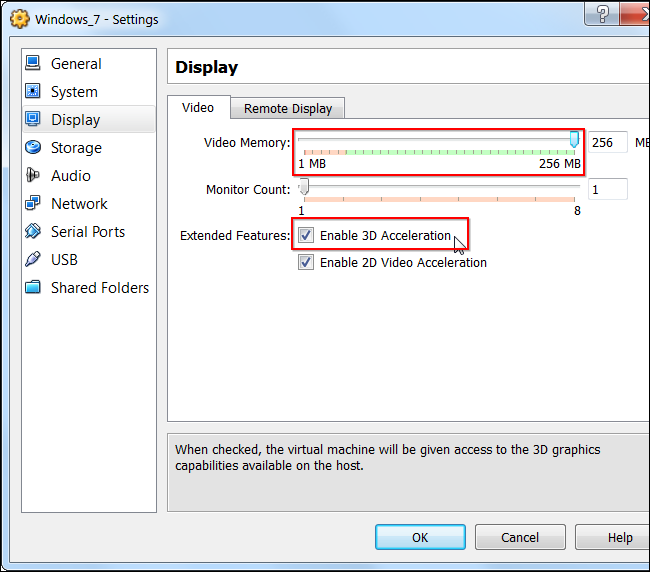
Click over to the Display category and activate the Enable 3D Acceleration checkbox. You must also increase the video memory slider to at least 128 MB. You’ll need the full 256 MB if you’re using multiple monitors with your virtual machine.
The Enable 2D Video Acceleration option here is not required, but it accelerates video-playing applications that use 2D overlays.
Install 3D Drivers
After you’ve changed these settings, click OK and boot the virtual machine by double-clicking it.
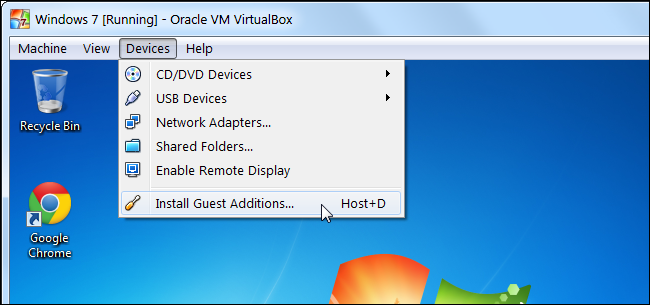
Once the virtual machine is running, click the Devices menu and select Install Guest Additions.
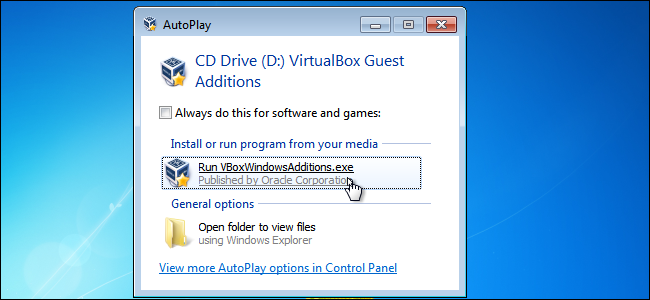
Click the Run option in the AutoPlay window to launch the installer.
Proceed through the installer until you reach the Choose Components window. When you do, click the Direct3D Support (Experimental) check box.
You’ll be asked if you want to install basic Direct3D support instead – click No to install the WDDM driver, which includes support for Windows Aero.
Note that, if you want to install the basic Direct3D driver instead, you’ll need to install it from safe mode – restart your virtual machine, press F8 while it’s booting, select Safe Mode, and install the guest additions from there. The basic Direct3D driver doesn’t support Aero, but it’s theoretically more stable. However, we haven’t had any issues with the more experimental driver.
VirtualBox warns that you should have at least 128 MB of video memory, which you should have configured above. If you haven’t done this yet, you can adjust your virtual machine’s settings after installing the drivers.
Click Install and VirtualBox will install the guest additions and experimental 3D driver in your virtual machine. You’ll be prompted to restart your virtual machine after installing the drivers.
Enable Windows Aero
Your virtual machine now has 3D support, so you can try playing older 3D games and using other applications that require 3D acceleration.
However, Windows Aero is not enabled by default. If you want to enable Windows Aero, right-click your virtual machine’s desktop and select Personalize.
The default theme is Windows 7 Basic, which doesn’t use Aero. Scroll up in the Personalization window and select one of the Aero themes, such as Windows 7. Aero will be enabled.
Note that 3D acceleration and the driver are experimental in VirtualBox – if you encounter any issues, you may want to disable 3D acceleration and uninstall the driver to make your virtual machine more stable.
Windows Aero is a graphical user interface feature introduced in Windows Vista and continued in Windows 7. It includes transparent window frames, window animations, and various visual effects that enhance the overall user experience. However, when running Windows 7 in a virtual machine using VirtualBox, the Aero effects are typically disabled by default due to limited graphics capabilities.
In this article, we will discuss how to enable Windows 7 Aero effects inside VirtualBox. We will walk through the necessary steps to configure VirtualBox settings and install the required drivers to enable Aero in your virtual machine.
Setting up VirtualBox for Windows 7 Aero Effects
Before we can enable Aero effects in Windows 7 virtual machine, we need to make sure that VirtualBox is properly configured to support 3D acceleration. Here are the steps to set up VirtualBox for Aero effects:
-
Start by opening VirtualBox and selecting the Windows 7 virtual machine from the list of installed VMs.
-
Click on the «Settings» button to open the virtual machine settings window.
-
In the settings window, go to the «System» tab and select the «Acceleration» tab.
-
Enable the «Enable 3D Acceleration» option by checking the box next to it.
-
Next, go to the «Display» tab and increase the video memory allocated to the virtual machine. You can do this by moving the slider to the right or entering a higher value in the text box.
-
Finally, click «OK» to save the changes and close the settings window.
Installing Guest Additions in Windows 7 Virtual Machine
To enable Windows 7 Aero effects inside VirtualBox, we need to install the VirtualBox Guest Additions in the virtual machine. Guest Additions are a set of drivers and system utilities that enhance the performance and functionality of the virtual machine. Follow these steps to install Guest Additions in Windows 7:
-
Start the Windows 7 virtual machine in VirtualBox.
-
From the VirtualBox menu, go to «Devices» and select «Insert Guest Additions CD image.» This will mount the Guest Additions ISO file in the virtual machine.
-
Open Windows Explorer in the virtual machine and navigate to the CD drive containing the Guest Additions files.
-
Run the «VBoxWindowsAdditions.exe» file to start the installation process.
-
Follow the on-screen instructions to complete the installation of Guest Additions. You may need to restart the virtual machine after the installation is complete.
Enabling Windows 7 Aero Effects
Once the Guest Additions are installed in the virtual machine, we can proceed to enable Windows 7 Aero effects. Follow these steps to enable Aero in your Windows 7 virtual machine:
-
Right-click on the desktop and select «Personalize» from the context menu.
-
In the Personalization window, select the «Windows 7» theme under the «Aero Themes» section. This will apply the Aero theme to the desktop.
-
Next, right-click on the desktop and select «Screen Resolution.»
-
In the Screen Resolution window, click on «Advanced settings.»
-
Go to the «Troubleshoot» tab and click on «Change settings.»
-
Slide the Hardware Acceleration bar to «Full.»
-
Click «OK» to apply the changes.
-
Restart the virtual machine to make sure the Aero effects are properly enabled.
Testing Windows 7 Aero Effects
To test whether Aero effects are working in your Windows 7 virtual machine, try the following:
-
Open multiple windows and move them around the desktop. You should see transparent window frames and smooth window animations.
-
Hover over the taskbar icons to see Aero Peek in action. Aero Peek allows you to preview open windows by hovering over their icons on the taskbar.
-
Shake a window back and forth quickly to minimize all other windows. This feature is known as Aero Shake.
-
Press the Windows key + Tab to switch between open windows using Aero Flip 3D.
If you can see these Aero effects in your Windows 7 virtual machine, then congratulations – you have successfully enabled Windows 7 Aero effects inside VirtualBox!
Troubleshooting Windows 7 Aero Effects
If you encounter any issues while trying to enable Aero effects in your Windows 7 virtual machine, here are some troubleshooting tips:
-
Make sure that 3D acceleration is enabled in VirtualBox settings and that you have allocated enough video memory to the virtual machine.
-
Check that Guest Additions are installed correctly in the virtual machine. You can reinstall Guest Additions by going to the VirtualBox menu and selecting «Devices» > «Insert Guest Additions CD image.»
-
Restart the virtual machine after making changes to settings or installing Guest Additions to ensure that the changes take effect.
-
If Aero effects are still not working, try updating the graphics drivers in the virtual machine. You can download and install the latest drivers from the manufacturer’s website.
Conclusion
In this article, we have discussed how to enable Windows 7 Aero effects inside VirtualBox. By configuring VirtualBox settings, installing Guest Additions, and enabling Aero features in the virtual machine, you can enhance the visual experience of running Windows 7 in a virtual environment.
With Aero effects enabled, you can enjoy transparent window frames, window animations, and various visual effects that make using Windows 7 more enjoyable and visually appealing. Follow the steps outlined in this article to enable Aero effects in your Windows 7 virtual machine and experience the full capabilities of the Windows Aero interface.
Users who have ever installed Windows 7 Home Premium or higher edition in Oracle VirtualBox probably aware of the fact that Aero feature is disabled by default, even if your PC supports the feature. Clicking on the Aero theme in Personalization panel will just activate the basic theme once again and the Aero troubleshooter will suggest you install video card driver or install WDDM compatible driver.

A couple of years ago, as you probably know, VirtualBox announced support for Aero but the problem is that enabling Aero in VirtualBox isn’t very straight-forward. If you have installed Windows 7 in a VirtualBox virtual machine and would like to enable Aero, you can do so by completing the below mentioned instructions.
NOTE: Your PC must have Aero compatible video card to enable and activate Windows 7 Aero. This guide doesn’t help you activate Aero on non-supported PCs.
Step 1: The first step is to install Guest Additions in VirtualBox. To do that, when Windows 7 is running in VirtualBox, you need to click Devices in the VirtualBox file menu and then click Install Guest Additions.

Step 2: If the setup wizard of Guest Additions doesn’t start, open Computer (My Computer), double-click on CD Drive: VirtualBox Guest Additions to fire up the install wizard. Click Yes for the UAC prompt to continue.

Step 3: Once setup wizard is launched, click Next button, click Next button again in the following screen to continue to the crucial stage of the procedure.

Step 4: Here, you’ll see two options: Virtual Guest Additions and Direct 3D Support (Experimental). The first option (VirtualBox Guest Additions) is selected by default and you need to select the second option titled Direct3D Support (Experimental).

Upon checking the Direct3D Support box(Experimental), you’ll see the following dialog:

Here, click No button. Yes, you need to click No button, as clicking Yes will only install the basic Direct3D support (read the content of the dialog again to understand!).
Clicking No button will show you the following dialog:

Click Ok button.
Step 5: Finally, click Install button to start installing VirtualBox Guest Additions with Direct3D support. Once installed, you’ll need to reboot the virtual machine.


Step 6: After rebooting your Windows 7, right-click on Desktop, click Personalize to open Personalization window, and then click on the Aero theme activate Aero. That’s it!

How to boot from USB in VirtualBox guide might also interest you.