
-
Home
-
News
- How to Set Monitor to 144Hz Windows 10/11 If It Is Not?
By Vera | Follow |
Last Updated
144Hz monitor only showing 60Hz? How to set monitor to 144Hz or how to make sure your monitor is running at 144Hz? After reading this post from MiniTool, you know what you should do in Windows 10/11. Let’s go to look through the following ways.
144Hz Monitor Only Showing 60Hz Windows 10/11
You may buy a 144Hz monitor for high performance in games since it can refresh the monitor 144 times per second to show new images on the high-resolution screen. However, during the use, you find this monitor doesn’t run at 144Hz as advertised. Usually, you may run into this situation – 144Hz monitor only showing 60Hz.
Why my 144Hz monitor is only showing 60Hz? Then you may ask this question. The possible reasons are default monitor settings, an unsuitable HDMI or display port, outdated GPU driver, etc.
Well then, how to change monitor to 144Hz in Windows 10/11? Try some ways below to fix the issue so that your monitor can work at 144Hz.
How to Set Monitor to 144Hz Windows 11/10 via Some Fixes
Set 144Hz in Settings
If your monitor doesn’t run at 144Hz but 60Hz, you should make sure the monitor is configured correctly. Do this task in these steps:
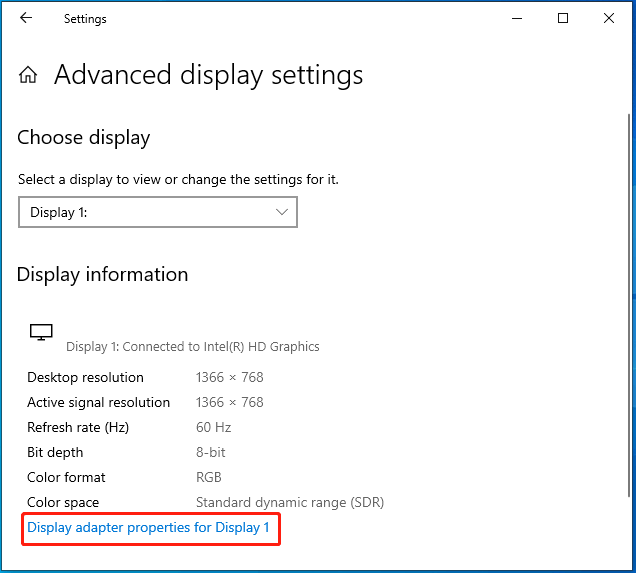
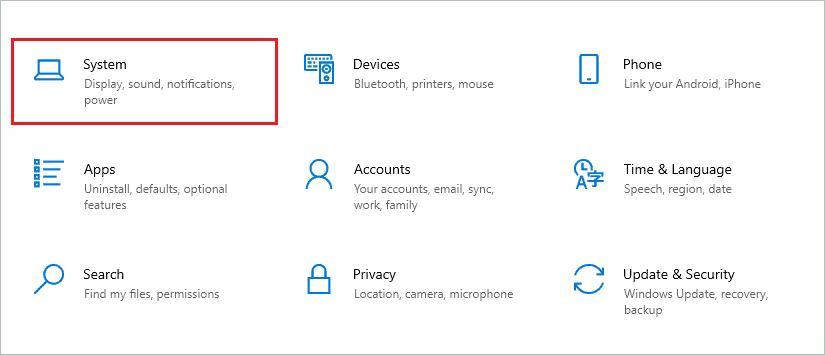
Step 1: In Windows 11/10, go to Settings by pressing Win + I and click System > Display.
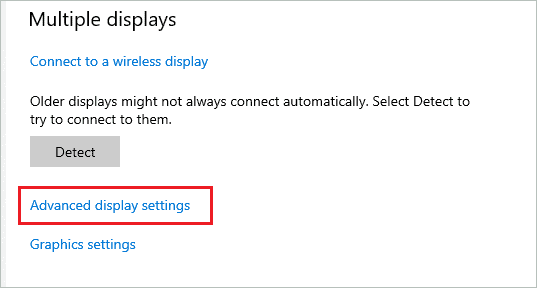
Step 2: Click Advanced display or Advanced display settings, select a display, and tap on Display adapter properties for Display (Number).
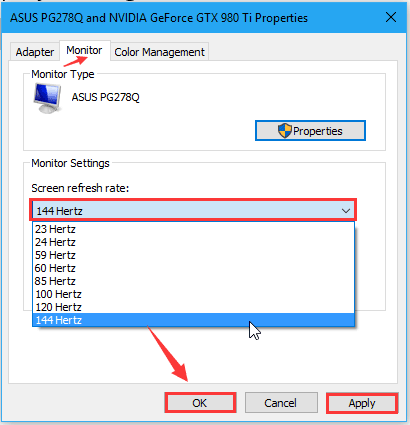
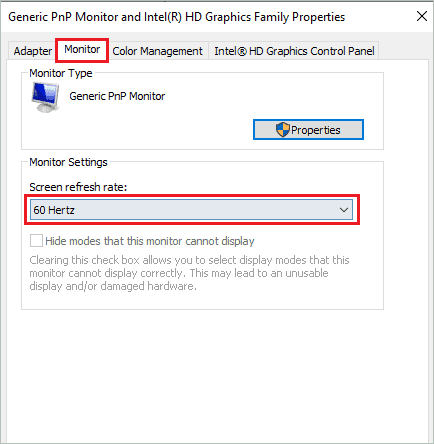
Step 3: In the Monitor tab, set Screen refresh rate to 144Hertz. Click OK to save the change.
Tips:
If there is no 144Hertz option in the list in Windows 11/10, it means your monitor doesn’t support this refresh rate. But if your purchased monitor actually supports 144 Hz, perhaps something blocks you from setting the refresh rate.
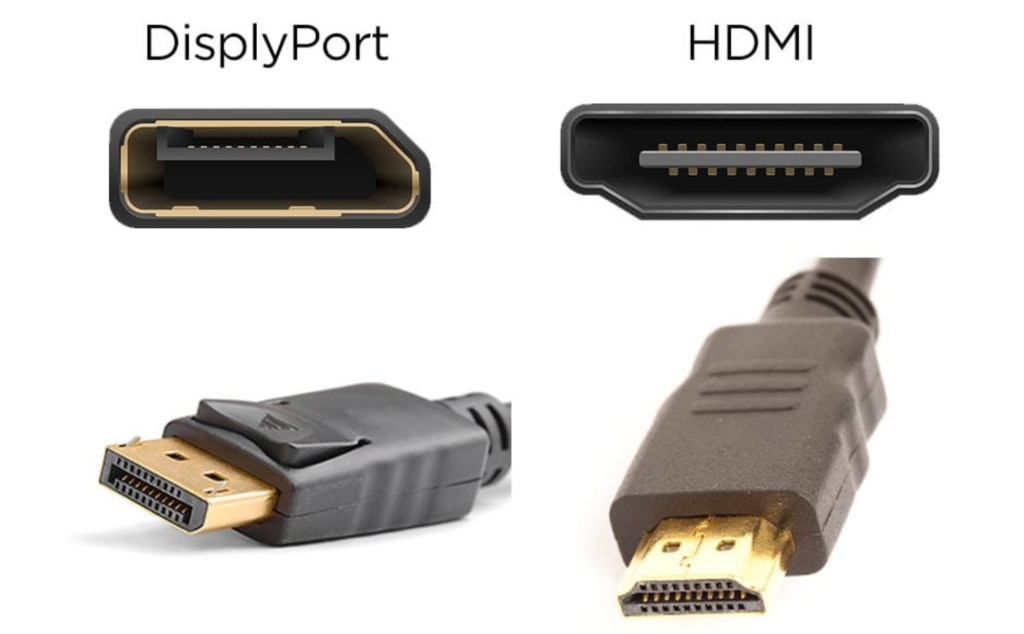
Check Your Cables
Some displays support HDMI and DisplayPort ports at the same time but the refresh rate may be limited to 60Hz when using HDMI. This is why is your 144Hz monitor only showing 60Hz. In this case, use a DisplayPort cable that should be properly certified and built to the DisplayPort specification.
Set Monitor to 144Hz via NVIDIA Control Panel
If you are using an NVIDIA dedicated graphics card, you can open its control panel to change monitor to 144Hz. Or when you meet 144Hz not showing up in display settings, you can also try this if you are an NVIDIA user.
See how to set monitor to 144Hz using NVIDIA Control Panel:
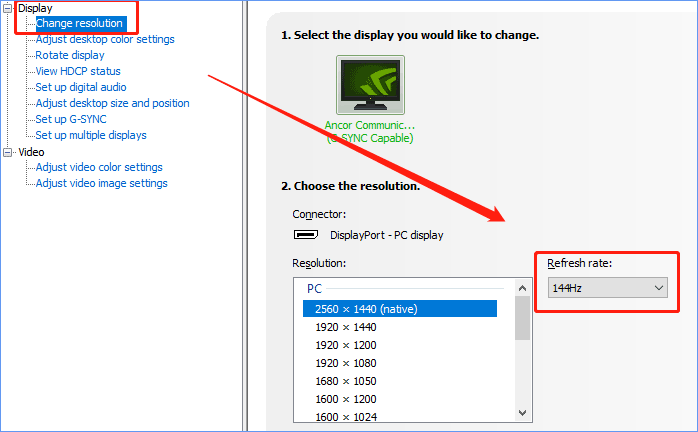
Step 1: Right-click on anywhere on the desktop and choose NVIDIA Control Panel.
Step 2: Click Change resolution from the Display tab, locate the refresh rate and choose 144Hz.
If you cannot see 144Hz but you make sure your monitor supports this refresh rate and uses the correct cable, you can click Customize > Create Custom Resolution and directly input 144 under Refresh Rate (Hz). Next, save the change.
Tips:
Sometimes you cannot see the control panel even if you are an NVIDIA user. Go to find solutions from this post — How to Fix NVIDIA Control Panel Missing on Windows 10.
Check If Your Console Supports 144Hz
If you run into the issue of 144Hz monitor only showing 60Hz, one common issue is that the monitor supports 144Hz but the console doesn’t support it. All the models of PS4 and Xbox One offer a maximum refresh rate of 60Hz. For PS5 and Xbox Series X consoles, the maximum refresh rate is 120 Hz. Thus, play games on a PC to unlock the peak performance.
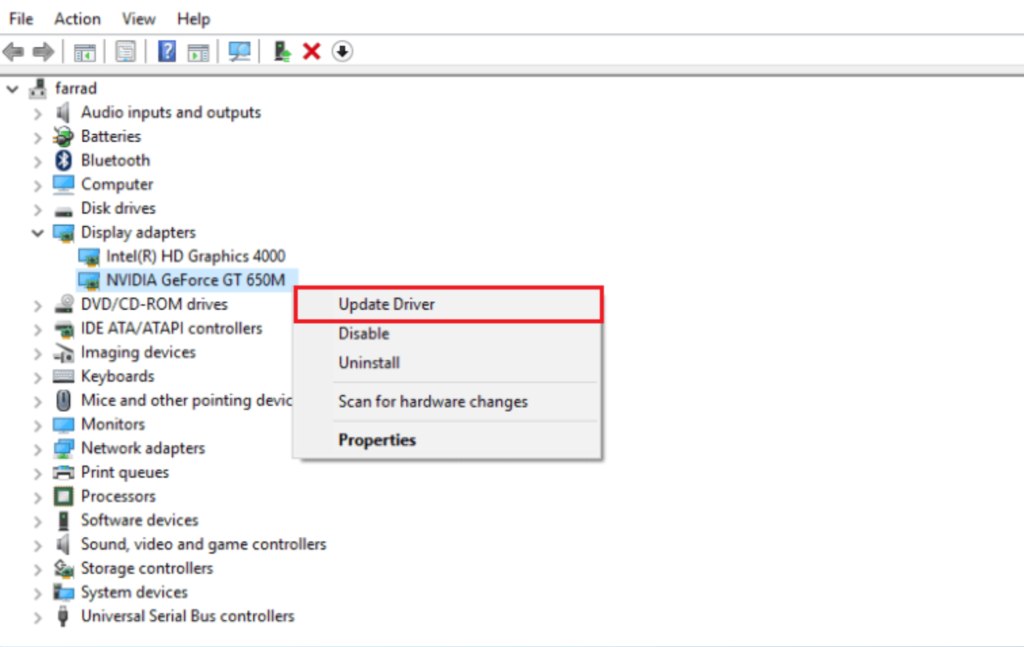
Update Graphics Card Driver
An outdated graphics card driver can impact the refresh rate due to some reason. You should make sure the PC uses an up-to-date GPU driver. So, how to set monitor to 144Hz via driver update in Windows 10/11?
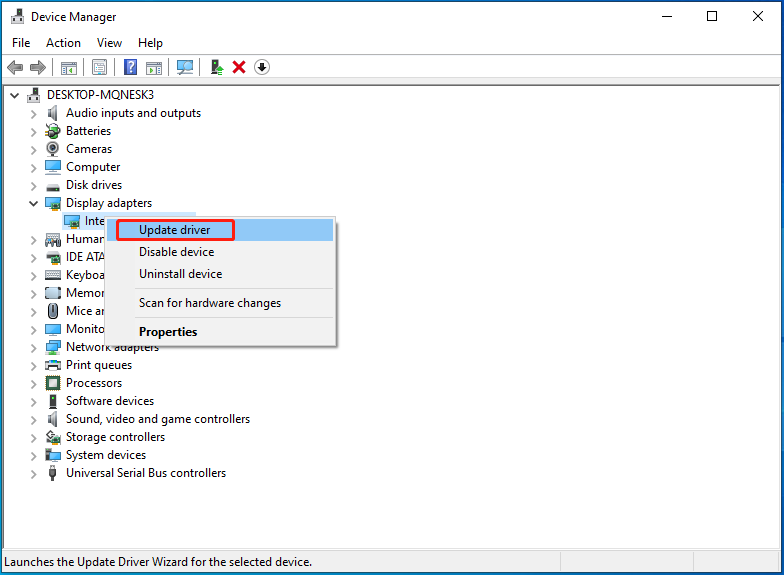
It is easy to update your video card driver. You can go to Device Manager, expand Display adapters, right-click on your GPU and choose Update driver. Then, click the first option to update the driver.
Adjust In-Game Setting
How to set monitor to 144Hz if it shows 60Hz in games? If the running game has its integrated graphics settings, you can go to the graphics options menu of each game to choose the native resolution of your monitor and the refresh rate of 144Hz. Or else, the game can use the lower refresh rate.
Final Words
How to set monitor to 144Hz in Windows 10/11 or how to make sure your monitor is running at 144Hz if it shows 60Hz? After trying the workarounds above, you can easily achieve the aim. If you have some other ideas, let us know in the comment below.
About The Author
Position: Columnist
Vera is an editor of the MiniTool Team since 2016 who has more than 7 years’ writing experiences in the field of technical articles. Her articles mainly focus on disk & partition management, PC data recovery, video conversion, as well as PC backup & restore, helping users to solve some errors and issues when using their computers. In her spare times, she likes shopping, playing games and reading some articles.
Key Takeaways:
- The display quality is better when the refresh rate is high
- The 144Hz refresh rate means the display refreshes 144 times in a second to display an image on the screen
- In some cases, you may not see 144Hz option because your monitor may not support it
- If you don’t see 144Hz option, you can use DisplayPort instead of HDMI
The higher the refresh rate, the better the gaming experience on the monitor. Therefore, the gamers and graphics designers upgrade themselves to a display monitor that supports a higher refresh rate. However, if you have recently upgraded to your display device and the 144Hz option not showing up, you need to perform a few fixes.
The refresh rate means the number of times the monitor refreshes in a second to display a new image. Here, 144Hz means the display refreshes 144 times in a second. Windows allows you to change the refresh rate of your monitor as per your wish. You can change your graphics card and monitor settings in Windows 10 to see the 144Hz option.
5 Solutions To Fix 144Hz Option Not Showing Issue
Here are some fixes and workaround that can help you get back the 144 Hz option for refresh rate in the gaming monitor. You may need to make some changes in the graphics card control panel to have the required refresh rate.
1. Make Changes to Windows 10 Display Settings
It is essential to check if you are looking at the right place to find the desired monitor setting to fix the 144Hz option not showing up. For example, you can change the refresh rate from the Settings app.
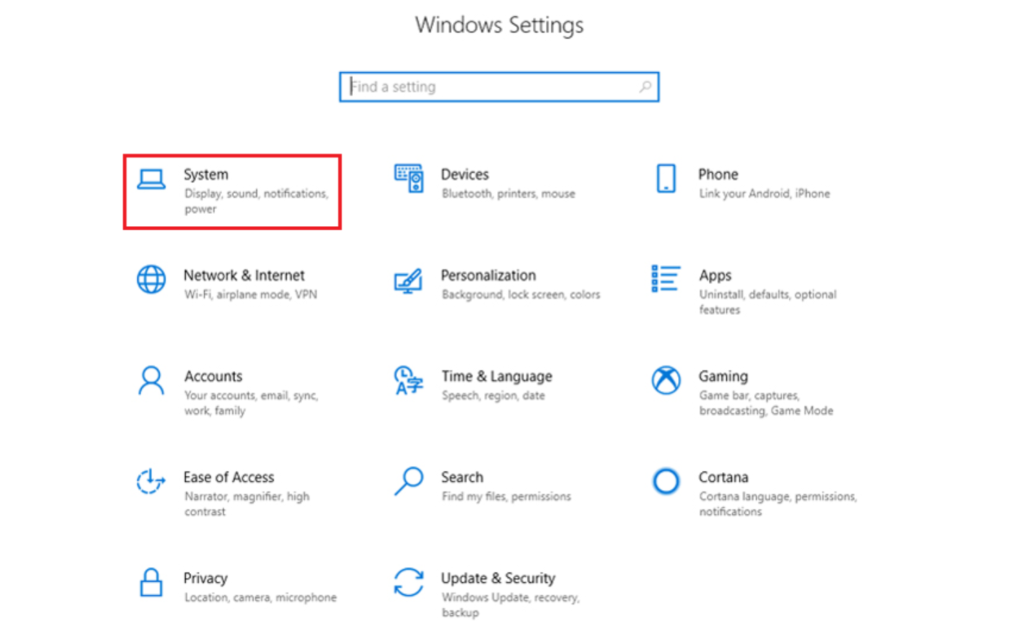
Step 1: Press Windows key + I to open the “Settings” app and go to the “System” section.
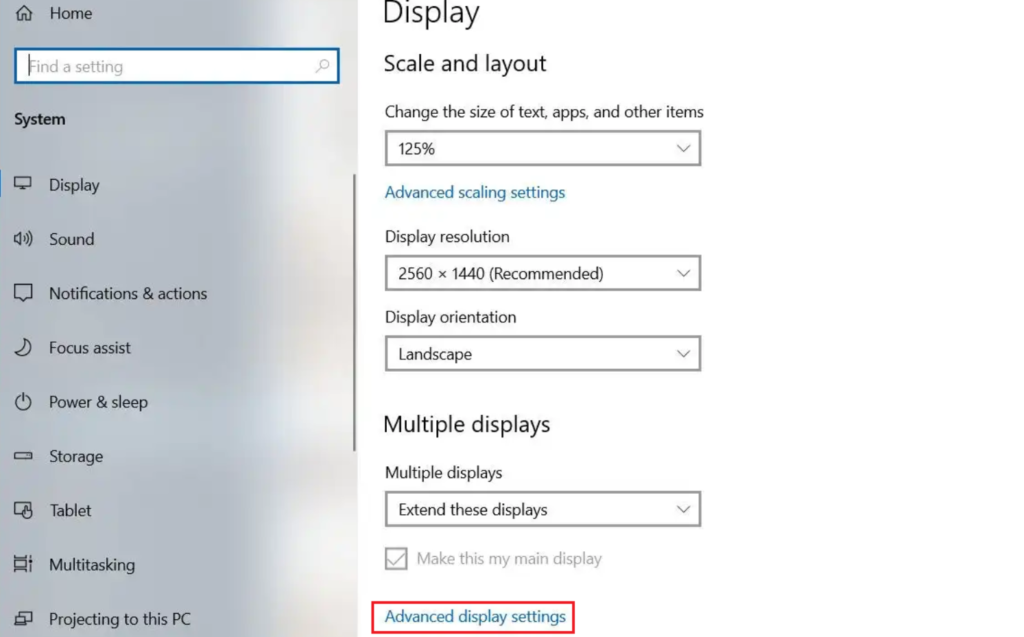
Step 2: Make sure you are in “Display” settings from the left panel of the system settings window. And then click on “Advanced display settings.”
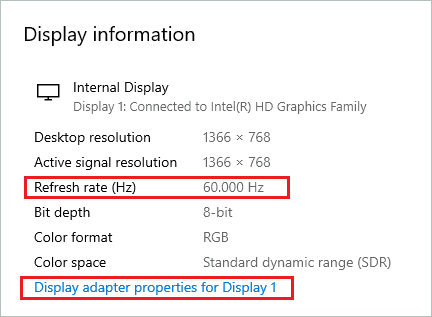
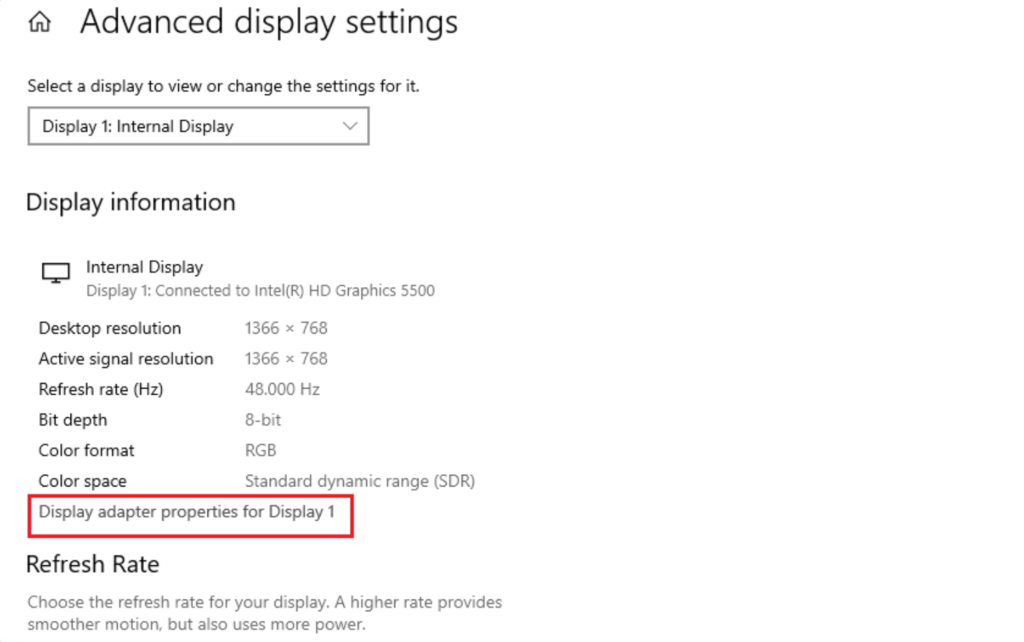
Step 3: Once you click Advanced Settings, on the next screen, under Display information, you will see the refresh rate of your monitor. In old monitors, it will be 60 Hz by default. If it does not show 144, you can click on the “Display adapter properties for Display 1” link.
Step 4: When the display properties window opens, go to the “Monitor” tab and select the required refresh rate from the “Screen refresh rate” drop-down menu.
Step 5: Once the changes are made, click on “Apply” followed by “OK” to save the changes.
If the 144Hz option is not showing even after following the above steps, you need to follow the other solutions mentioned below.
2. Check Your Monitor Configurations
If you face the 144Hz option not showing in the Windows Settings app, your monitor probably does not support it. You can check the manual that came along with your monitor and see if it is a 144Hz monitor or not. This applies only if you have a desktop computer.
If you have a laptop, you can check the model details on the manufacturer’s website. Once it is confirmed that the monitor supports 144Hz, you can check the below solutions to get the option.
3. Use DisplayPort for Monitor Connection
Many monitors come with HDMI and DisplayPort connections. If your monitor is connected via the HDMI port, the refresh rate will be limited to 60Hz in some cases. However, you can try connecting the cable to DisplayPort to fix the 144Hz option not showing up and get the 144Hz in the refresh rate box.
Also, make sure you use the display cable with DisplayPort specifications, as some poor cables can cause refresh rate issues. You can purchase the cable from the authenticated source. After connecting the monitor through certified cable and DisplayPort, you can check the refresh rate in the Settings app again.
4. Update Graphics Driver
The outdated display drivers can also lead to the 144Hz option not showing problem. You can manually update the graphics driver via Device Manager. However, make sure you download driver software from the trusted source and also use the stable version for the update.
You can find the driver software in Device Manager under Display adapters. If you don’t wish to perform the update manually, you can use Driver Booster to do it for you. Once the update is performed, you can change the refresh rate to 144Hz.
5. Use NVIDIA Control Panel
If the 144Hz option is not showing, you can use the respected graphics driver control panel to change the refresh rate. Well, this is applicable only if you have an NVIDIA graphics driver. Follow the steps below to make the right changes to the NVIDIA Control Panel.
Step 1: Launch the NVIDIA Control Panel on your computer and go to the “Display” option from the left panel.
Step 2: Click on “Change resolution” under Display.
Step 3: Below the “Refresh rate” option, select 144Hz from the drop-down menu.
If you have an AMD graphics driver, you can use the Settings app as shown above in the first solution.
Conclusion
Changing the refresh rate is an easy thing to do on Windows computers. However, if the desired option is not available, it can ruin the overall graphics experience. The DisplayPort, cable, and monitor configurations are important aspects in getting the refresh rate.
If you face the 144Hz option not showing up issue, you may need to tweak some settings, check hardware configurations, and update drivers on your Windows 10 computer. The above article will help you with detailed steps and instructions to perform fixes and get back the 144Hz refresh rate option.
FAQs
Can HDMI run a 144Hz refresh rate?
Yes, HDMI does run a 144Hz refresh rate. However, it depends on the HDMI version, bandwidth, resolution, and many other factors. Therefore, it is better to use DisplayPort instead of HDMI for 144Hz.
Why is my monitor not displaying 144Hz?
If the monitor is not configured to support 144Hz, you will not see a 144Hz refresh rate. However, incorrect settings, outdated display drivers, and hardware issues can also lead to the monitor not displaying a 144Hz refresh rate.
How do I enable 144Hz on my screen?
To enable 144Hz on your screen, go to Settings ➜ System ➜ Display and click on “Advanced display settings.” You can then go to “Display adapter properties for Display 1” and click on the Monitor tab. Lastly, select the Screen refresh rate from the drop-down menu.
Trying to fix 144Hz not showing up on Windows 10?
The refresh rate of your system determines how many times per second its display can draw an image and is usually expressed in Hz. This determines the resolution, meaning the refresh rate and the display quality are proportional to one another. Many users opt for the higher value of refresh rate for an optimal experience.
In contrast, a lower refresh rate results in issues like screen tearing or flickering. Fortunately, you can change this value in your Windows system whenever you wish. The minimum required value for gamers or designers is 120Hz. But for an even better experience, you should opt for 144Hz.
Unfortunately, there are times when users may have trouble with 144Hz not showing up on Windows 10. Some common reasons for this issue include outdated display drivers, incompatibility of the monitor, hardware issues, etc. To resolve this error, follow this detailed guide and try each fix yourself.
Let’s get started right away!
1. Fix Hardware Issues.
The 144Hz not showing up on Windows is sometimes a hardware issue. To ensure whether that’s the case with you, perform some basic checks, as explained below.
- Connect the monitor using DisplayPort and not the HDMI port.
- Ensure that the cables are properly inserted into their appropriate ports, for example, an HDMI cable in an HDMI port.
- For better visuals, we recommend HDMI 2.0, DisplayPort 1.2, or dual-link DVI cable.
- Check if the connection port is damaged. If so, use another port to connect the cable.
- Check if the connecting cable is damaged. If so, replace it with a new one.
2. Check Device Configuration.
There can also be instances where users experience 144Hz not showing up on Windows 10 because their device doesn’t support the specified refresh rate. You can check your system configuration by going to the official manufacturer’s website or referring to the user manual that initially came with your device.
3. Update Windows OS.
Another way to resolve any bugs that might be preventing 144Hz from showing up is to update the Windows OS. As we all know, outdated softwares carries all types of bugs within, so it’s recommended never to leave an update on hold to avoid such issues in the future.
Here’s how you check for an update on a Windows 10 computer:
- Launch Settings by pressing Win + i keys.
- After that, select Update & Security.
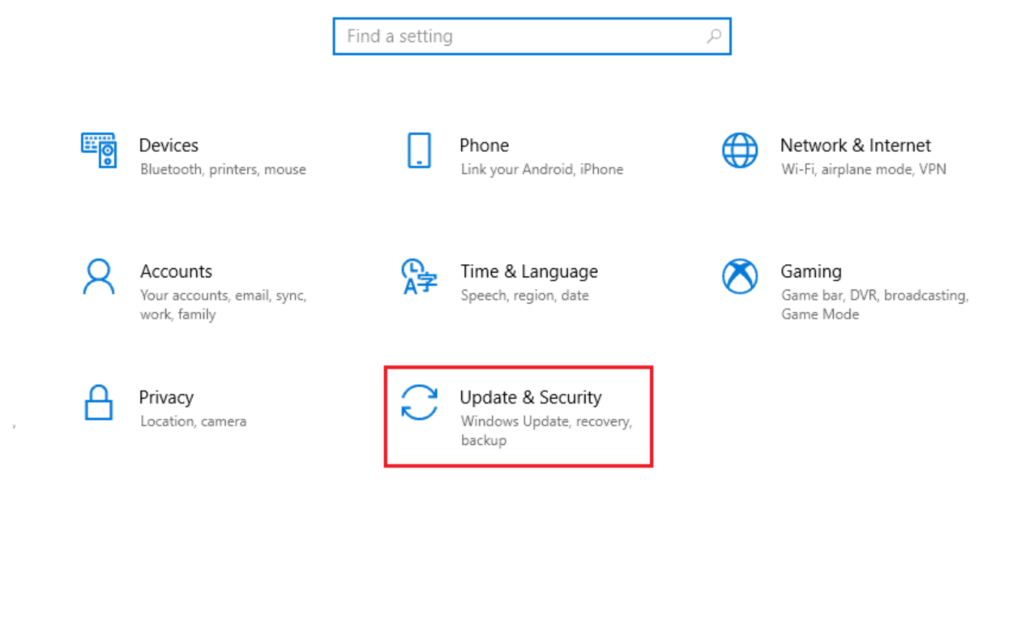
- From the Windows Update tab, click on the Check for updates button.
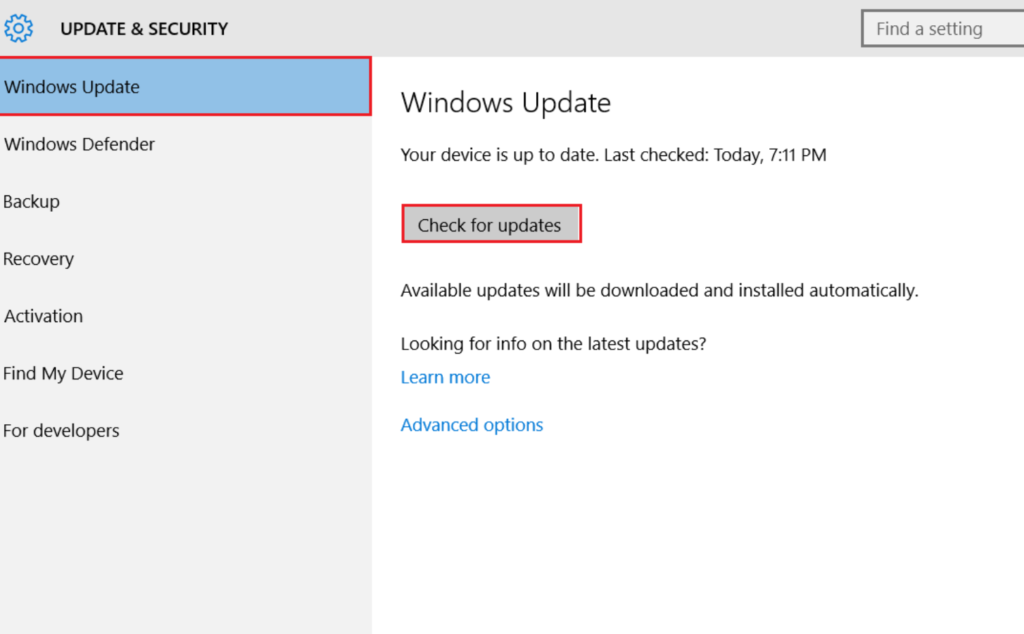
- If there’s a pending update, select Install now to download and install the latest Windows update.
4. Update Display Drivers.
The refresh rate of your display is directly related to the visuals, which in turn are related to the display drivers. For this reason, you are to ensure that the display drivers are not outdated as well.
If they need an update, you can either allow your system to automatically search and install their newer version or manually install the latest drivers yourself. Here’s how:
- Open the Run dialog box by pressing Win + R keys from your keyboard.
- Next, type in ‘devmgmt.msc’ in the text field and click on OK.
- This will open the Device Manager window. From there, double-click on the Display adapters option to expand it.
- Now, right-click on the adapter you want to update and click Update Driver.
- From the next window that appears, click on Search automatically for updated driver software.
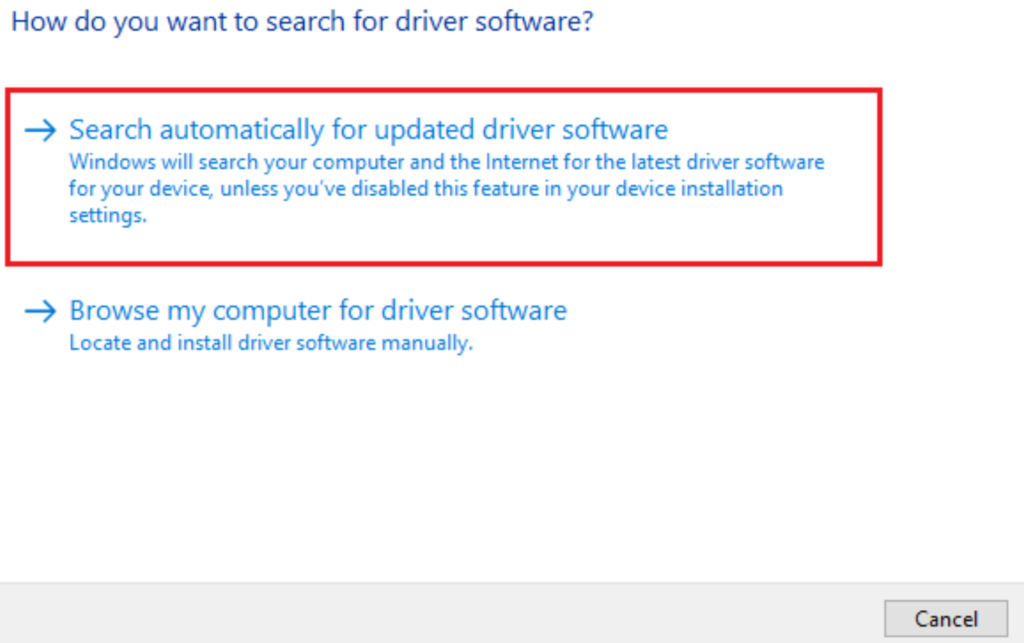
- Windows will find the driver software and update it automatically. However, if it fails to do so, continue with these steps.
- Right-click on the driver again and choose Update Driver.
- Next, click on Browse my computer for driver software.
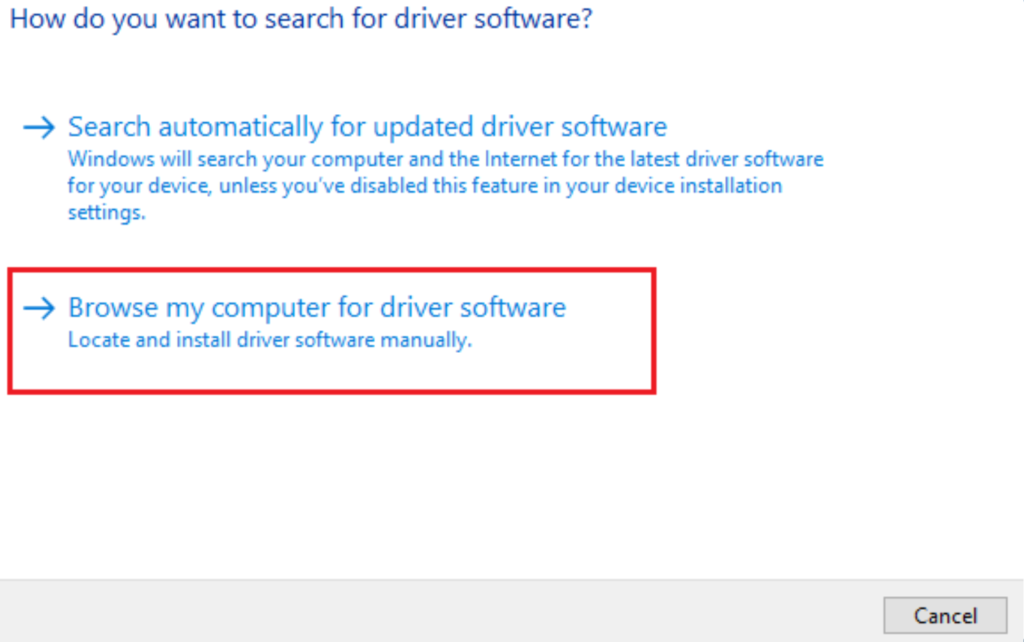
- Then, select Let me pick from a list of available drivers on my computer.
- Choose the recently available driver and click on Next.
- Lastly, follow the on-screen instructions to update the driver.
5. Rollback Driver Updates.
In case you started experiencing 144Hz not showing up on Windows 10 after updating the display drivers, you need to roll back the update to fix the problem. By doing so, the driver will delete the current version and return to its previous version.
Follow the steps below to do so:
- From Device Manager, click on Display adapters to expand it.
- Next, right-click on the driver you want to downgrade and choose Properties.
- Head over to the Driver tab from the top and select Roll Back Driver.
- Finally, reboot your PC to check if this resolves the 144Hz not showing up on Windows 10 issue.
6. Reinstall Display Drivers.
If updating or rolling back drivers was of no help in resolving the stated issue, the drivers could be potentially damaged or corrupted. One way to go about this situation is to delete and reinstall the problematic driver.
Here’s how to do it:
- Once in the Device Manager, expand the Display adapters by clicking on the downward arrow next to it.
- Now, right-click on the driver and choose Uninstall.
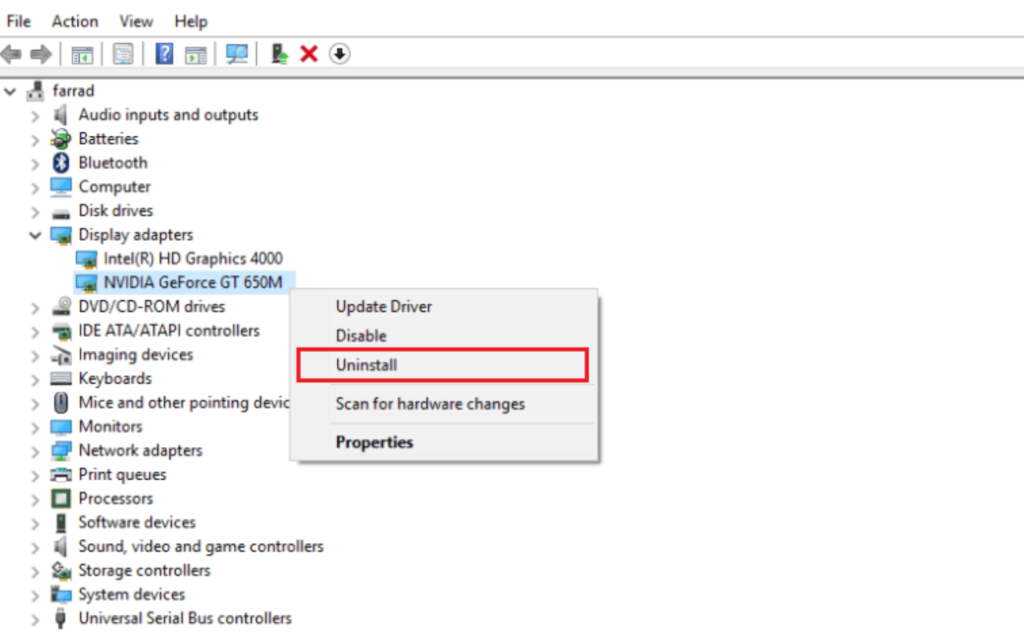
- From the prompt that appears, click on Uninstall again.
- Restart your computer so that Windows will automatically reinstall the driver on your PC. Otherwise, you may also head to the manufacturer’s website and reinstall the driver from there.
7. Modify Display Settings.
If you can’t change your display settings to 144Hz, ensure you’re looking at the right place. The refresh rate can be changed or customized from the monitor display settings.
Use the instructions below to follow this method:
- From the Settings app, click on System.
- Select Display from the left pane and click on Advanced display settings.
- From the next screen, you can view your display’s refresh rate. To change it, select Display adapter properties for Display 1.
- The properties window will appear. Go to the Monitor tab from the top.
- Click on the drop-down menu icon and under Screen refresh rate. Now, select a refresh rate.
- Lastly, click on Apply and OK to save these changes.
You can also refer to the NVIDIA Control Panel if that’s the graphics card embedded in your system. Here’s how:
- Right-click on the desktop and select NVIDIA Control Panel.
- Under the Display section from the left pane, choose Change resolution.
- From the drop-down menu of Refresh rate, click on 144Hz.

- Select Test to test the refresh rate and click on Yes to confirm making this change.
If you own the AMD graphics card instead, use the AMD Catalyst Control Panel to make these changes. Here’s how:
- Right-click on any empty space from your desktop and click on AMD Catalyst Control Center from the options.
- Click on Desktop Management from the left pane and select Desktop Properties.
- Under the Settings section, change the Refresh rate to 144Hz.
- Select the Create option.
This should fix the 144Hz not showing up on Windows 10 problem.
8. Adjust In-Game Settings.
If you’re still unable to resolve 144Hz not showing up on Windows 10, here’s a quick workaround for you. You can change the display settings from the games on your computer.
This brings us to the end of our guide on how to fix 144Hz not showing up on Windows 10. For more questions, refer to the comment section below. We’ll be happy to provide further assistance on the matter.
If this guide helped you, please share it. 😊
-
Aimen Choudhry is an architecture student who has always been fascinated by science. She now finds her therapy researching and writing about the latest technology and the issues that come alongside. Otherwise, you’ll find her playing video games, listening to music, or watching fantasy/sci-fi movies.
View all posts
One of the unidentified reasons for screen flickering issues or display resolution is the lower value of the refresh rate. The issue is termed as 144Hz not showing up Windows 10. As stated earlier, the error in the setting may cause issues with the monitor display screen. In case the refresh rate is set to 60Hz, the article has the answer to the question of how do I fix 144Hz monitor only showing 60Hz. This would fix the issue by setting the refresh rate to a higher rate. Also, the answer to the question of how do I enable 144Hz is explained in this article. Read the article till the end to find out the methods to fix the issue on your PC.

Table of Contents
144Hz refresh rate means that the display would refresh 144 times in a second to display an image on the screen. The 60Hz refresh rate, on the other hand, would refresh the display on the screen for 75 frames per second.
The following are the advantages of using the 144Hz over any other refresh rate in the monitor display.
- The display quality of the visuals on the screen is better.
- The response time taken by the monitor to display any visual is increased.
- The FPS of Frame per Second rate is improved. This would help in resolving the rendering issues in gaming.
- The flickers that occur while any video is played or the input lag or motion blur of the video is reduced.
- On the whole, the overall quality of the visuals on the display screen is improved.
What Causes of 144Hz Not Showing up Issue in Windows 10
The following are the reasons for which the issue with the 144Hz resolution would occur on Windows 10 PC.
- Default monitor setting- At most times, the monitor of the Windows PC may not support the 144Hz refresh rate.
- Hardware Issues- If there are issues with the hardware such as connecting ports or connecting cables of your Windows PC are damaged or connected improperly, you may experience this issue.
- Outdated Display Driver- The refresh rate may not be supported by an outdated Display driver on your PC.
Method 1: Basic Troubleshooting Methods
As a preliminary approach, you can try using the basic troubleshooting methods to enable 144Hz explained in this section.
1A. Fix Hardware Issues
Most of the time the issue is caused due to issues in the hardware of the Windows PC and other connected devices. You can try the following options as an answer to the question of how do I fix 144Hz monitor only showing 60Hz and see if the issue with the hardware connections is resolved.
- To connect the monitor of the Windows PC, try using the DisplayPort instead of the HDMI port.
- Ensure that you are connecting the connection cable to the corresponding ports, that is, the HDMI cable to the HDMI port.
- Use HDMI 2.0 or DisplayPort 1.2 or a dual-link DVI cable for a better visual.
- If the connection port is damaged, connect the cable to another port.
- If the connecting cable is damaged, replace the cable with a new one and use the cable provided with the PC preferably.
1B. Check Configurations of Device
If the connecting device does not support the 144Hz refresh rate, you may experience 144Hz not showing up Windows 10 issue. You can check for the configurations by referring to the user guide manual or on the official website to find out if the question of how do I enable 144Hz is suited to the device.
Option I: On Windows PC
You can check for the specifications of the Windows PC on the official website using your default web browser. For explanatory purposes, Dell is chosen as the PC manufacturer. Choose the version in the drop-down menu and check if the PC monitor can support 144Hz. You can visit the manufacturer support page (e.g. Dell) and check the your monitor specs.
Note: To know your device model, follow our guide to check monitor model in Windows 10.

Also Read: How to Setup 3 Monitors on a Laptop
Option II: On Xbox Console
If you have connected your Xbox console to the Windows PC, ensure that the console supports the 144Hz refresh rate to display the visuals. You can check for the specifications using your default web browser. For explanatory purposes, the screen configurations of the Xbox One console are described as shown below.

1C. Update Windows OS
Another method to fix 144Hz not showing up Windows 10 issue easily is to update the Windows OS on your PC. You can refer to the instructions in the guide to download and install Windows 10 latest updates.

Method 2: Update Display Drivers
If the above methods did not work and you are still thinking how do I enable 144Hz, then outdated display drivers may be stopping you to do so. Since the refresh rate is directly dependent on the visuals, it is necessary to ensure that the display driver on your PC is updated to the latest version. You can use the guide in the link given here to find out the methods to update graphics driver in Windows 10 on your PC.

Also Read: Fix Windows Found Drivers for Your Device but Encountered an Error
Method 3: Rollback Driver Updates
If your system had been working correctly and began to malfunction after an update, rolling back the drivers might help. The rollback of the driver will delete the current driver installed in the system and replace it with its previous version. To Rollback drivers, read out our guide on How to Rollback drivers on Windows 10.

Method 4: Reinstall Display Drivers
If updating the display driver does not solve the issue, you can try reinstalling it on your PC. To do this, follow the instructions in our guide to uninstall and reinstall device drivers on Windows 10.

Also Read: Fix NVIDIA Driver Not Compatible with this Version of Windows
Method 5: Modify Display Settings
Most of the time, the display setting may be configured incorrectly and you may not be able to use the refresh rate. As an answer to the question of how do I fix 144Hz monitor only showing 60Hz, you can check the display settings and alter it on your PC to fix the issue.
Option I: Through Monitor Display Settings
The first option is to alter the monitor display settings on your PC and customize the refresh rate to 144Hz. This is the major answer to the question of how do I enable 144Hz on your Windows PC.
1. Open the Settings app using the Windows + I keys and click on the System option in the menu.

2. In the Display tab, click on the Advanced display settings option in the Multiple displays section.

3. You can find the Refresh rate (Hz) in the Display information section.

4. To alter the refresh rate, click on the Display adapter properties for Display1 option.

5. Navigate to the Monitor tab and click on the required refresh rate in the drop-down menu of the Screen refresh rate.

6. To apply the change, click on the Apply button.

7. Click on the Keep changes button in the confirmation window.
8. Click on the OK button and check if the refresh rate is altered.

Also Read: Change DPI Scaling Level for Displays in Windows 10
Option II: Through NVIDIA Control Panel
If you are using the NVIDIA Graphics card, you can use the NVIDIA Control Panel to alter the display settings to fix 144Hz not showing up Windows 10 issue.
1. Press any empty space on Desktop and click on the NVIDIA Control Panel option.
2. In the Display tab on the left pane, click on the Change resolution option.

3. Select the 144Hz option in the Refresh rate drop-down menu.
4. If you cannot select the refresh rate, click on the Customize… button.
5. Click on the Create Custom Resolution… button.
6. In the Display mode (as reported by Windows) section, type the value 144 in the Refresh rate (Hz) field.
7. Click on the Test button to check the display settings.
8. Click on the Yes button on the confirmation window to save the setting.
Also Read: Fix NVIDIA Display Settings Are Not Available Error
Option III: Through AMD Catalyst Control Center
If you are using a Gaming PC, you can use this option as an answer to the question of how do I fix 144Hz monitor only showing 60Hz. The method to alter the refresh rate on the AMD Radeon Graphics card using the AMD Catalyst Control Center is elaborated here.
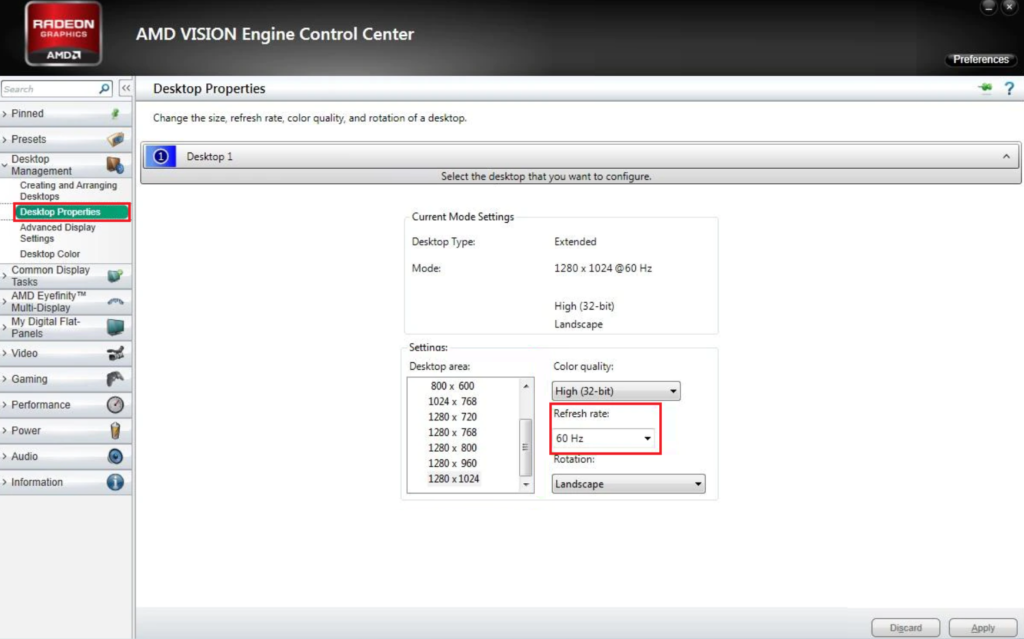
1. In the Desktop, right-click on any empty space, and select the AMD Catalyst Control Center option.
2. Expand the Desktop Management tab on the left pane and click on the Desktop Properties option.

3. Set the Refresh rate to 144Hz in the Settings section and click on the Create button.
Thus, if you were having query on how do I enable 144Hz, then this is the solution.
Pro Tip: Adjust In-Game Settings
As an additional method to fix 144Hz not showing up Windows 10 issue, you can try adjusting the display settings of the gaming apps you have installed on your PC. This would fix the incompatibility between the gaming apps and display settings and help you in finding the answer to the question of how do I enable 144Hz.
Note: For explanatory purposes, the in-game settings of the Skyrim game are used.
1. Launch the Skyrim game in Stream
2. Open the in- game settings.
3. In the Detail section, click on the Advanced… option.

4. In the Detail tab, set the Shadow Quality and Shadow Distance options to Low using the drop-down menu and click on the OK button.
5. Relaunch the Skyrim game using the search bar and see if the issue is resolved.
Recommended:
- Fix Xbox Live Error 8015190e
- How to Increase RAM on Windows 7 & 10
- Fix Not Currently Using Display Attached to NVIDIA GPU Desktop Issue
- Fix Windows 10 DisplayPort Not Working
The methods to fix 144Hz not showing up Windows 10 issue are explained in the article. Let us know which of the methods is a perfect solution for the question of how do I fix 144Hz monitor only showing 60Hz. Also, please use the comments section to share your suggestions and queries.
Guide to Enabling Variable Refresh Rate in Windows 11/10
Published
7 min read
Enable Variable Refresh Rate for Games in Windows 11/10
In the world of competitive gaming, every millisecond counts. Gamers are always looking for ways to enhance their experience, increase performance, and minimize latency. One crucial feature that has been gaining traction among gamers is Variable Refresh Rate (VRR). VRR technology allows a display to synchronize its refresh rate with the frame rate output of the graphics card, resulting in smoother gameplay and a more responsive feel. This article delves deep into what VRR is, why it is important, and how to enable it on Windows 10 and Windows 11 for the best gaming experience.
What is Variable Refresh Rate (VRR)?
Variable Refresh Rate is a technology that dynamically adjusts the refresh rate of a monitor to match the frame rate output of the graphics card (GPU). Traditional monitors have a fixed refresh rate—often 60Hz, 120Hz, or 144Hz. This can lead to experiences like screen tearing, stuttering, or input lag when the frame rate fluctuates.
When the GPU produces frames at a rate that doesn’t match the monitor’s refresh rate, you may experience:
-
Screen Tearing: This occurs when two or more frames are shown in a single screen draw. The monitor displays aspects of different frames, resulting in a mismatched image.
-
Stuttering: Inconsistencies in frame timing can lead to noticeable stutters in gameplay. For example, when a game renders at low frame rates, the experience becomes less fluid.
-
Input Lag: This phenomenon can be detrimental in competitive gaming scenarios, where every millisecond can mean victory or defeat. Input devices like your mouse and keyboard may feel unresponsive if the frame rate doesn’t sync with the refresh rate.
VRS addresses these issues by allowing the monitor to adjust itself dynamically, leading to an overall improvement in performance and feel for gamers.
Benefits of VRR in Gaming
-
Smoother Gameplay: By preventing screen tearing and reducing stuttering, VRR offers seamless visuals and an uninterrupted gaming experience.
-
Improved Responsiveness: With lower input lag, gamers can respond more quickly to in-game events, providing a competitive edge.
-
Enhanced Visual Quality: VRR can make games appear more visually appealing because the synchronization creates a more consistent image without distortion.
-
Comfort during Long Sessions: The steady frame output and reduced stuttering can lower eye strain and fatigue during extended gameplay.
Understanding VRR Technologies
VRR is often branded under different terms by various companies. Here are a few notable technologies that utilize the core concept of VRR:
-
NVIDIA G-Sync: Developed by NVIDIA, G-Sync synchronizes the monitor’s refresh rate with the frame rate of NVIDIA’s compatible graphics cards for a smoother performance. G-Sync monitors come with proprietary hardware that allows this synchronization.
-
AMD FreeSync: Similar to G-Sync, AMD’s FreeSync technology synchronizes the refresh rate of the display with the GPU’s output but operates without proprietary hardware. FreeSync is generally more affordable and supported by a broader range of monitors.
-
VESA Adaptive-Sync: This is a standard established by VESA (Video Electronics Standards Association) for adaptive refresh rates. This technology is widely supported by both NVIDIA and AMD graphics cards, allowing for seamless performance.
Are You Eligible for VRR?
Before you can enable Variable Refresh Rate in Windows 10 or Windows 11, check if the following criteria are met:
-
Hardware Support: Ensure that your monitor supports VRR technologies like G-Sync or FreeSync. You may have to check the manufacturer’s website or product specifications.
-
Graphics Card: A VRR-compatible graphics card is essential. NVIDIA and AMD cards from recent generations generally support these technologies.
-
Cables: Make sure you use high-quality display cables that support high bandwidths, such as DisplayPort or HDMI 2.0 and higher. DVI cables do not support VRR.
-
Drivers: Keeping your graphics card drivers up to date is crucial for the best compatibility and performance. Confirm that you are using the latest drivers from either NVIDIA or AMD.
How to Enable Variable Refresh Rate on Windows 11
To enable Variable Refresh Rate in Windows 11, follow these steps:
-
Open Windows Settings: Click on the Start menu and select «Settings,» or use the shortcut
Windows + I. -
Select System: In the left-hand sidebar, find and click on «System.»
-
Go to Display Settings: Scroll down and choose «Display.» Under the display settings, click on «Advanced display» settings.
-
Choose the Correct Display: If you have multiple monitors, ensure you select the correct one from the dropdown menu.
-
Refresh Rate: Look for the option that shows «Refresh Rate.» Click on it, and if your monitor supports it, you’ll see a selection for lower refresh rates supported by VRR. Make sure to set it to the highest available refresh rate that supports VRR.
-
Graphics Card Control Panel: Open the specific control panel for your GPU (NVIDIA Control Panel or AMD Radeon Settings). You may need to enable VRR options there as well. For NVIDIA:
- Right-click on the desktop and select «NVIDIA Control Panel.»
- Under «Display,» select «Set up G-SYNC.» Check «Enable G-SYNC» or «Enable G-SYNC for windowed and fullscreen mode» based on your preference.
For AMD:
- Right-click on the desktop and select «AMD Radeon Settings.»
- Go to «Display» and look for «Radeon FreeSync.» Toggle it to «Enabled.»
-
Adjust in Games: Some games may have their own settings for VRR. Ensure in-game settings align with your preferences, and switch on VRR options if available.
-
Test VRR in Action: To confirm that VRR is working, run a game that you know has frame rate fluctuations. Use software like MSI Afterburner or other overlays to monitor frame rates and confirm smooth performance.
How to Enable Variable Refresh Rate on Windows 10
For users still on Windows 10, the steps to enable VRR are similar but might differ slightly in navigation. Here’s a step-by-step guide:
-
Open Settings: Press
Windows + Ior click on the Start button and select «Settings.» -
Select System: Choose «System» from the options.
-
Go to Display: Click on «Display.» Scroll down to «Advanced display settings.»
-
Choose Your Display: If multiple displays are connected, select the one you want to adjust.
-
Refresh Rate Settings: Click on the «Display adapter properties for Display X» option where X is the selected monitor.
-
Monitor Tab: In the pop-up window, navigate to the «Monitor» tab, then select the highest refresh rate available.
-
Enable Via Graphics Panel: As with Windows 11, check the NVIDIA Control Panel or AMD Radeon Settings to enable G-Sync or FreeSync.
-
Gameplay Testing: Similar to Windows 11, test your relationship with VRR while gaming to ensure everything is working properly.
Troubleshooting Common Issues
If you encounter issues when trying to enable or use Variable Refresh Rate in Windows, consider the following troubleshooting steps:
-
Ensure Compatibility: Make sure both your display and GPU support VRR. Refer to your manufacturer’s specifications.
-
Check Cables: Sturdy, high-quality cables are essential. If you are using HDMI, it needs to be version 2.0 or above, or DisplayPort 1.2 or higher.
-
Update Drivers: Always ensure your graphics drivers and Windows have the latest updates installed.
-
Monitor Refresh Rates: Confirm that you have selected the appropriate refresh rate (e.g., 120Hz or 144Hz) within Windows settings.
-
Game Settings: Verify game settings for VRR compatibility. Some titles may have VRR settings that need to be manually enabled.
-
Check Gaming Mode: If using Windows 10, enabling Gaming Mode can sometimes improve performance and resolve issues.
-
Reboot: After making changes, reboot your PC to ensure updates take effect automatically.
-
Monitor Test: Use tools like «Nvidia Frame View» or «Continue Testing» in AMD to evaluate how well VRR is functioning.
-
Seek Community Help: If you continue facing issues, consider looking for specific solutions in gaming community forums like Reddit or official support pages.
Conclusion
In the fast-paced world of gaming, ensuring that you have the best possible setting for your graphics is crucial. Variable Refresh Rate technology provides a noticeable improvement in not just performance but also overall enjoyment of gaming. Whether you are battling foes in a competitive first-person shooter or exploring vast worlds in open-world titles, enabling VRR gives you the seamless experience that enhances your capabilities.
Whether you’re on Windows 10 or Windows 11, the steps to enable VRR are straightforward. By ensuring your hardware is compatible, installing the latest drivers, and following the outlined instructions, you’re on your way to enjoying the smoother gameplay experience that VRR has to offer. So, take the time to adjust your settings—your future gaming sessions will thank you!