
You can’t uninstall / reinstall DNS from a Domain Controller so if your DNS server has insurmountable problems, make sure that you have a second DC with a working DNS then dcpromo (demote) the problematic DC, make sure DNS has been removed, then repromote that server to be a DC.
Beyond that the next thing to do is restart the DNS Service which you can do through the DNS MMC console or through SERVICES.MMC .
If you have a DNS server that is not working well or has errors indicating partial corruption there are a few ways to kick the server using simple commands:
- Open PowerShell as an Administrator
- Type:
DNSCMD /Config /BootMethod 2
- Press the ENTER key
- Restart the DNS service, or just reboot the whole server if want
I found that it took about 20 minutes for the errors and problems I was seeing to go away and for DNS to start functioning properly.
You can also try to view the DNS servers basic configuration to look for anomalies:
- Open PowerShell as an Administrator
- Type:
DNSCMD /Info
- Press the ENTER key
- Look for oddities

DNSCMD BACKGROUND:
According to THIS Microsoft article there are four different sources for DNS start up information:
0 – Clears the source of configuration information.
1 – Loads from the BIND file that is located in the DNS directory, which is %systemroot%\System32\DNS by default.
2 – Loads from the registry.
3 – Loads from AD DS and the registry. This is the default setting
If there is a problem with this command you can place the setting directly in the registry manually:
HKEY_LOCAL_MACHINE\SYSTEM\CurrentControlSet\Services\DNS\Parameters\BootMethod
and set it to the number 2.
Here is a complete list of DNSCMD options:
Usage: DnsCmd <ServerName> <Command> [<Command Parameters>]
<ServerName>:
IP address or host name — remote or local DNS server
. — DNS server on local machine
<Command>:
/Info — Get server information
/Config — Reset server or zone configuration
/EnumZones — Enumerate zones
/Statistics — Query/clear server statistics data
/ClearCache — Clear DNS server cache
/WriteBackFiles — Write back all zone or root-hint datafile(s)
/StartScavenging — Initiates server scavenging
/IpValidate — Validate remote DNS servers
/EnumKSPs — Enumerate available key storage providers
/ResetListenAddresses — Set server IP address(es) to serve DNS requests
/ResetForwarders — Set DNS servers to forward recursive queries to
/ZoneInfo — View zone information
/ZoneAdd — Create a new zone on the DNS server
/ZoneDelete — Delete a zone from DNS server or DS
/ZonePause — Pause a zone
/ZoneResume — Resume a zone
/ZoneReload — Reload zone from its database (file or DS)
/ZoneWriteBack — Write back zone to file
/ZoneRefresh — Force refresh of secondary zone from master
/ZoneUpdateFromDs — Update a DS integrated zone by data from DS
/ZonePrint — Display all records in the zone
/ZoneResetType — Change zone type
/ZoneResetSecondaries — Reset secondary\notify information for a zone
/ZoneResetScavengeServers — Reset scavenging servers for a zone
/ZoneResetMasters — Reset secondary zone’s master servers
/ZoneExport — Export a zone to file
/ZoneChangeDirectoryPartition — Move a zone to another directory partition
/ZoneSeizeKeymasterRole — Seize the key master role for a zone
/ZoneTransferKeymasterRole — Transfer the key master role for a zone
/ZoneEnumSKDs — Enumerate the signing key descriptors for a zone
/ZoneAddSKD — Create a new signing key descriptor for a zone
/ZoneDeleteSKD — Delete a signing key descriptor for a zone
/ZoneModifySKD — Modify a signing key descriptor for a zone
/ZoneValidateSigningParameters — Validate DNSSEC online signing parameters for a zone
/ZoneSetSKDState — Set Active and/or Standby keys for a signing key descriptor for a zone
/ZoneGetSKDState — Retrieve dynamic state for a signing key descriptor for a zone
/ZonePerformKeyRollover — Trigger a key rollover in a signing key descriptor for a zone
/ZonePokeKeyRollover — Trigger a key rollover in a signing key descriptor for a zone
/ZoneSign — Signs the zone using DNSSEC online signing parameters
/ZoneUnsign — Removes DNSSEC signatures from a signed zone
/ZoneResign — Regenerate DNSSEC signatures in a signed zone
/EnumRecords — Enumerate records at a name
/RecordAdd — Create a record in zone or RootHints
/RecordDelete — Delete a record from zone, RootHints or cache
/NodeDelete — Delete all records at a name
/AgeAllRecords — Force aging on node(s) in zone
/TrustAnchorAdd — Create a new trust anchor zone on the DNS server
/TrustAnchorDelete — Delete a trust anchor zone from DNS server or DS
/EnumTrustAnchors — Display status information for trust anchors
/TrustAnchorsResetType — Change zone type for a trust anchor zone
/EnumDirectoryPartitions — Enumerate directory partitions
/DirectoryPartitionInfo — Get info on a directory partition
/CreateDirectoryPartition — Create a directory partition
/DeleteDirectoryPartition — Delete a directory partition
/EnlistDirectoryPartition — Add DNS server to partition replication scope
/UnenlistDirectoryPartition — Remove DNS server from replication scope
/CreateBuiltinDirectoryPartitions — Create built-in partitions
/ExportSettings — Output settings to DnsSettings.txt in the DNS server database directory
/OfflineSign — Offline signing zone files, including key generation/deletion
/EnumTrustPoints — Display active refresh information for all trust points
/ActiveRefreshAllTrustPoints — Perform an active refresh on all trust points now
/RetrieveRootTrustAnchors — Retrieve root trust anchors via HTTPS<Command Parameters>:
DnsCmd <CommandName> /? — For help info on specific CommandIn future versions of Windows, Microsoft might remove dnscmd.exe.
If you currently use dnscmd.exe to configure and manage the DNS server, Microsoft recommends that you transition to Windows PowerShell.
To view a list of commands for DNS server management, type “Get-Command -Module DnsServer” at the Windows PowerShell prompt. Additional information about Windows PowerShell commands for DNS is available at http://go.microsoft.com/fwlink/?LinkId=217627 .
Here is a list of the DNSCMD /COMMAND options:
PS C:\Windows\system32> DNSCMD /Config /?
Usage: DnsCmd <ServerName> /Config <ZoneName> <Property> <Value>
Server <Property>:
/RpcProtocol
/LogLevel
/LogFilePath <Log file name>
/LogIPFilterList <IP list>
/LogFileMaxSize
/EventlogLevel
/NoRecursion
/BootMethod
/ForwardDelegations
/ForwardingTimeout
/EnableGlobalQueryBlockList
/EnableGlobalNamesSupport
/GlobalQueryBlockList
/GlobalNamesQueryOrder
/GlobalNamesBlockUpdates
/IsSlave
/SecureResponses
/RecursionRetry
/RecursionTimeout
/MaxCacheTtl
/MaxCacheSize
/MaxNegativeCacheTtl
/RoundRobin
/LocalNetPriority
/AddressAnswerLimit
/BindSecondaries
/WriteAuthorityNs
/NameCheckFlag
/StrictFileParsing
/UpdateOptions
/DisableAutoReverseZones
/SendPort
/XfrConnectTimeout
/DsPollingInterval
/DsTombstoneInterval
/ScavengingInterval
/DefaultAgingState
/DefaultNoRefreshInterval
/DefaultRefreshInterval
/EnableDnsSec
/EnableEDnsProbes
/EDnsCacheTimeout
/DisableNSRecordsAutoCreation
/CacheLockingPercent
/SocketPoolExcludedPortRanges
/EnableForwarderReordering
/RootTrustAnchorsURL
Zone <Property>:
/SecureSecondaries
/AllowUpdate <Value>
<Value> — 0: no updates; 1: unsecure updates; 2: secure updates only
/Aging
/RefreshInterval <Value>
/NoRefreshInterval <Value>
/ForwarderTimeout <Value>
/ForwarderSlave <Value>
/AllowNSRecordsAutoCreation <IP List>
/AllowUpdate
/DsIntegrated
/Aging
/RefreshInterval
/NoRefreshInterval
/SignWithNSEC3
/NSEC3HashAlgorithm
/NSEC3Iterations
/NSEC3RandomSaltLength
/NSEC3UserSalt
/NSEC3OptOut
/MaintainTrustAnchor
/SignatureInceptionOffset
/DNSKEYRecordSetTTL
/DSRecordSetTTL
/SecureDelegationPollingPeriod
/DsRecordAlgorithms
/RFC5011KeyRollovers
/SigningKeyDescriptors
/PropagationTime
<Value>: New property value. Use 0x prefix to indicate hex value.
Note some server and zone DWORD properties must be reset as part of a more complex operation.In future versions of Windows, Microsoft might remove dnscmd.exe.
If you currently use dnscmd.exe to configure and manage the DNS server, Microsoft recommends that you transition to Windows PowerShell.
To view a list of commands for DNS server management, type “Get-Command -Module DnsServer” at the Windows PowerShell prompt. Additional information about Windows PowerShell commands for DNS is available at http://go.microsoft.com/fwlink/?LinkId=217627.
PS C:\Windows\system32> DNSCMD /Config /?
Applies ToWindows Server 2008 R2 Service Pack 1 Windows Server 2008 R2 Datacenter Windows Server 2008 R2 Enterprise Windows Server 2008 R2 Foundation Windows Server 2008 R2 Standard Windows Server 2008 R2 Web Edition Windows Server 2012 Datacenter Windows Server 2012 Datacenter Windows Server 2012 Essentials Windows Server 2012 Foundation Windows Server 2012 Foundation Windows Server 2012 Standard Windows Server 2012 Standard
Symptoms
Consider the following scenario:
-
You have a Domain Name System (DNS) server that supports secure dynamic updates.
-
The Dynamic Host Configuration Protocol (DHCP) Server role is installed on a computer that is running Windows Server 2008 R2 or Windows Server 2012.
-
You click the DNS tab on the Properties dialog box for the DHCP server. Then, you click to select the Dynamically update DNS A and PTR records only if requested by the DHCP clients check box. This setting is applied at the server and scope level.
-
You create a DHCP reservation, and then you click the DNS tab on the Properties dialog box for the reservation. Then, you click to select the Always dynamically update DNS A and PTR records check box.
-
You click the General tab on the Properties dialog box for the reservation, and then you change the settings.
In this scenario, the DNS settings of the DHCP reservation revert to the DNS settings that you applied for the DHCP server at the scope level. Additionally, the DHCP server deletes and then recreates the reservation.
Resolution
Hotfix information
A supported hotfix is available from Microsoft. However, this hotfix is intended to correct only the problem that is described in this article. Apply this hotfix only to systems that are experiencing the problem described in this article. This hotfix might receive additional testing. Therefore, if you are not severely affected by this problem, we recommend that you wait for the next software update that contains this hotfix.
If the hotfix is available for download, there is a «Hotfix download available» section at the top of this Knowledge Base article. If this section does not appear, contact Microsoft Customer Service and Support to obtain the hotfix.
Note If additional issues occur or if any troubleshooting is required, you might have to create a separate service request. The usual support costs will apply to additional support questions and issues that do not qualify for this specific hotfix. For a complete list of Microsoft Customer Service and Support telephone numbers or to create a separate service request, visit the following Microsoft website:
http://support.microsoft.com/contactus/?ws=supportNote The «Hotfix download available» form displays the languages for which the hotfix is available. If you do not see your language, it is because a hotfix is not available for that language.
Prerequisites
To apply this hotfix, you must be running Windows Server 2008 R2 Service Pack 1 (SP1) or Windows Server 2012.For more information about how to obtain a Windows Server 2008 R2 service pack, click the following article number to view the article in the Microsoft Knowledge Base:
976932 Information about Service Pack 1 for Windows Server 2008 R2
Registry information
To use the hotfix, you do not have to change the registry.
Restart requirement
You must restart the computer after you apply this hotfix.
Hotfix replacement information
This hotfix does not replace a previously released hotfix.
File information
The global version of this hotfix installs files that have the attributes that are listed in the following tables. The dates and the times for these files are listed in Coordinated Universal Time (UTC). The dates and the times for these files on your local computer are displayed in your local time together with your current daylight saving time (DST) bias. Additionally, the dates and the times may change when you perform certain operations on the files.
Windows Server 2008 R2 and Windows Server 2012 file information notes
Important Windows 7 hotfixes and Windows Server 2008 R2 hotfixes are included in the same packages. However, hotfixes on the Hotfix Request page are listed under both operating systems. To request the hotfix package that applies to one or both operating systems, select the hotfix that is listed under «Windows 7/Windows Server 2008 R2» on the page. Always refer to the «Applies To» section in articles to determine the actual operating system that each hotfix applies to.
-
The files that apply to a specific product, milestone (RTM,SPn), and service branch (LDR, GDR) can be identified by examining the file version numbers as shown in the following table:
Version
Product
Milestone
Service branch
6.1.760 1.22xxx
Windows Server 2008 R2
SP1
LDR
6.2.920 0.20xxx
Windows Server 2012
RTM
LDR
-
The MANIFEST files (.manifest) that are installed for each environment are listed separately in the «Additional file information for Windows Server 2008 R2 and for Windows Server 2012» section. MANIFEST files and the associated security catalog (.cat) files, are extremely important to maintain the state of the updated components. The security catalog files, for which the attributes are not listed, are signed with a Microsoft digital signature.
|
File name |
File version |
File size |
Date |
Time |
Platform |
|---|---|---|---|---|---|
|
Dhcpmgmt.msc |
Not applicable |
146,694 |
05-Nov-2010 |
01:55 |
Not applicable |
|
Dhcpsnap.dll |
6.1.7601.22156 |
3,582,976 |
09-Nov-2012 |
05:28 |
x64 |
|
File name |
File version |
File size |
Date |
Time |
Platform |
|---|---|---|---|---|---|
|
Dhcp.lnk |
Not applicable |
1,114 |
09-Nov-2012 |
01:02 |
Not applicable |
|
Dhcpmgmt.msc |
Not applicable |
146,654 |
06-Jul-2012 |
19:56 |
Not applicable |
|
Dhcpsnap.dll |
6.2.9200.20558 |
3,963,392 |
09-Nov-2012 |
05:51 |
x64 |
Workaround
To work around the issue, install the update that is described in this article on the DHCP server.
Status
Microsoft has confirmed that this is a problem in the Microsoft products that are listed in the «Applies to» section.
More Information
For more information about secure dynamic updates, please go to the following website:
824684 Description of the standard terminology that is used to describe Microsoft software updates
Additional file information
Additional file information for Windows Server 2008 R2 and for Windows Server 2012
|
File name |
Amd64_55dd8470033d34c1ea1e63e54c3c1fb7_31bf3856ad364e35_6.1.7601.22156_none_88d9700038b50aae.manifest |
|
File version |
Not applicable |
|
File size |
719 |
|
Date (UTC) |
12-Nov-2012 |
|
Time (UTC) |
13:20 |
|
Platform |
Not applicable |
|
File name |
Amd64_microsoft-windows-d..ermanagementconsole_31bf3856ad364e35_6.1.7601.22156_none_db4b126cb12e054d.manifest |
|
File version |
Not applicable |
|
File size |
14,901 |
|
Date (UTC) |
09-Nov-2012 |
|
Time (UTC) |
06:40 |
|
Platform |
Not applicable |
|
File name |
Amd64_7cc50bcf07220eb1eee6c10b13c38c48_31bf3856ad364e35_6.2.9200.20558_none_43c0de74631e428c.manifest |
|
File version |
Not applicable |
|
File size |
719 |
|
Date (UTC) |
09-Nov-2012 |
|
Time (UTC) |
16:28 |
|
Platform |
Not applicable |
|
File name |
Amd64_microsoft-windows-d..ermanagementconsole_31bf3856ad364e35_6.2.9200.20558_none_d63c86962417f563.manifest |
|
File version |
Not applicable |
|
File size |
16,688 |
|
Date (UTC) |
09-Nov-2012 |
|
Time (UTC) |
06:37 |
|
Platform |
Not applicable |
Need more help?
Want more options?
Explore subscription benefits, browse training courses, learn how to secure your device, and more.
DNS (Domain Name System, Система Доменных имен) – система, позволяющая преобразовать доменное имя в IP-адрес сервера и наоборот.
DNS-сервер – это сетевая служба, которая обеспечивает и поддерживает работу DNS. Служба DNS-сервера не требовательна к ресурсам машины. Если не подразумевается настройка иных ролей и служб на целевой машине, то минимальной конфигурации будет вполне достаточно.
Настройка сетевого адаптера для DNS-сервера
Установка DNS-сервера предполагает наличие доменной зоны, поэтому необходимо создать частную сеть в личном кабинете и подключить к ней виртуальные машины.
После того, как машина будет присоединена к двум сетям, важно не перепутать, какое из подключений требует настройки. Первичный сетевой адаптер настроен автоматически с самого начала, через него открыт доступ к интернету, в то время как на дополнительно подключенных сетевых адаптерах доступа в интернет нет, пока не будет произведена ручная настройка:
Наведя курсор на значок сети в системном трее, можно вызвать всплывающую подсказку с краткими сведениями о сетях. Из примера выше видно, что присоединённая сеть это Network 3.
Далее предстоит проделать цепочку действий:
- Необходимо нажать правой клавишей мыши по значку сети в системном трее, в выпадающем меню выбрать Центр управления сетями и общим доступом, в левой части появившегося окна открыть ссылку Изменение параметров адаптера:

- Правой кнопкой мыши нажать на необходимый сетевой адаптер, в меню выбрать Свойства;
- В окне свойств выбрать IPv4 и нажать на кнопку Свойства;
- Заполнить соответствующие поля необходимыми данными:

Здесь в качестве предпочитаемого DNS-сервера машина назначена сама себе, альтернативным назначен dns.google [8.8.8.8].
Установка роли DNS-сервера
Для установки дополнительных ролей на сервер используется Мастер Добавления Ролей и Компонентов, который можно найти в Диспетчере Сервера.
- В левой части окна Диспетчера сервера откройте раздел Роли, после чего в правой части окна отобразится команда Добавить Роли:

- Откроется окно Мастера, в котором рекомендуют убедиться что:
1. Учётная запись администратора защищена надёжным паролем.
2. Настроены сетевые параметры, такие как статические IP-адреса.
3. Установлены новейшие обновления безопасности из центра обновления Windows.
- Убедившись, что все условия выполнены, нажмите Далее;
- Отметьте чек-боксом роль DNS-сервер и перейдите Далее:

- Прочитайте информацию и нажмите Далее:

- Убедитесь, что выбор сделан правильно, и подтвердите нажатием кнопки Установить:

- Дождитесь завершения установки и закройте Мастер установки:

Создание зон прямого и обратного просмотра
Доменная зона — совокупность доменных имён в пределах конкретного домена.
Зоны прямого просмотра предназначены для сопоставления доменного имени с IP-адресом.
Зоны обратного просмотра работают в противоположную сторону и сопоставляют IP-адрес с доменным именем.
Создание зон и управление ими осуществляется при помощи Диспетчера DNS.
Данный инструмент открывается из навигационного дерева Диспетчера Сервера:

Создание зоны прямого просмотра
- Выделите каталог Зоны Прямого Просмотра, запустите Мастер Создания Новой Зоны с помощью кнопки Новая зона на панели инструментов сверху:

- Откроется окно Мастера с приветствием, нажмите Далее:

- Из предложенных вариантов выберите «Основная зона» и перейдите Далее:

- Укажите имя зоны и нажмите Далее:

- При необходимости поменяйте название будущего файла зоны и нажмите Далее:

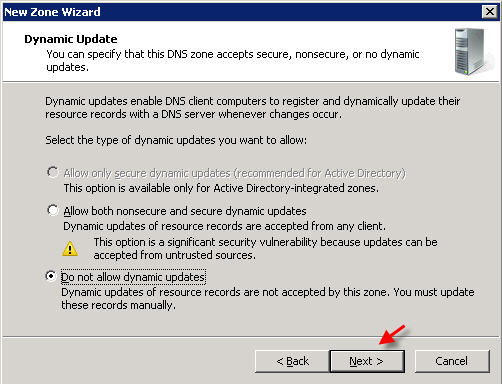
- Выберите, разрешить динамические обновления или нет. Разрешать не рекомендуется в силу значимой уязвимости. Перейдите Далее:

- Проверьте правильность выбранной конфигурации и завершите настройку, нажав кнопку Готово:

Создание зоны обратного просмотра
- Выделите в Диспетчере DNS каталог Зоны Обратного Просмотра и нажатием кнопки Новая зона на панели инструментов сверху запустите Мастер создания новой зоны:

- Выберите тип «Основная Зона», перейдите Далее:

- Выберите назначение для адресов IPv4, нажмите Далее:

- Укажите идентификатор сети (первые три октета сетевого адреса) и следуйте Далее:

- При необходимости поменяйте название будущего файла зоны и перейдите Далее:

- Выберите, разрешить динамические обновления или нет. Разрешать не рекомендуется в силу значимой уязвимости. Перейдите Далее:

- Проверьте правильность выбранной конфигурации и завершите настройку, нажав кнопку Готово:

Создание A-записи
Данный раздел инструкции в большей степени предназначен для проверки ранее проделанных шагов.
Ресурсная запись — единица хранения и передачи информации в DNS, заключает в себе сведения о соответствии какого-либо имени с определёнными служебными данными.
Запись A — запись позволяющая по доменному имени узнать IP-адрес.
Запись PTR — запись обратная A записи.
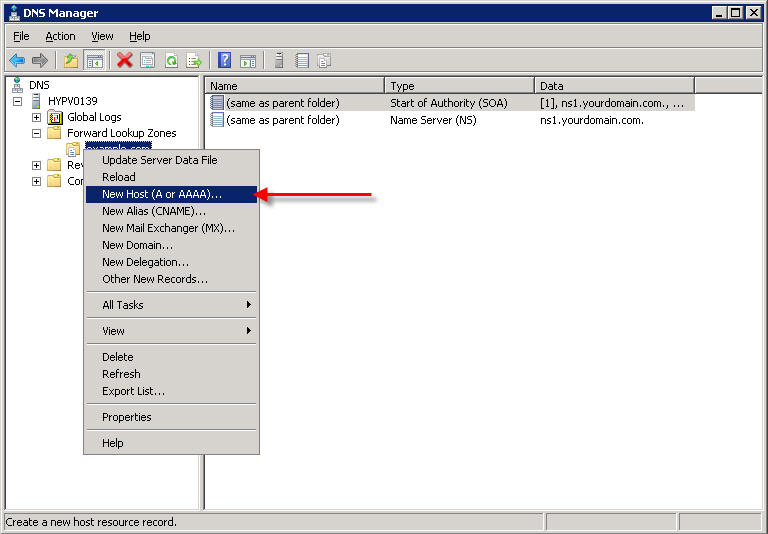
- В Диспетчере DNS выберите каталог созданной ранее зоны внутри каталога Зон Прямого Просмотра. В правой части Диспетчера, где отображается содержимое каталогов, правой кнопки мыши вызовите выпадающее меню и запустите команду «Создать узел (A или AAAA)…»:

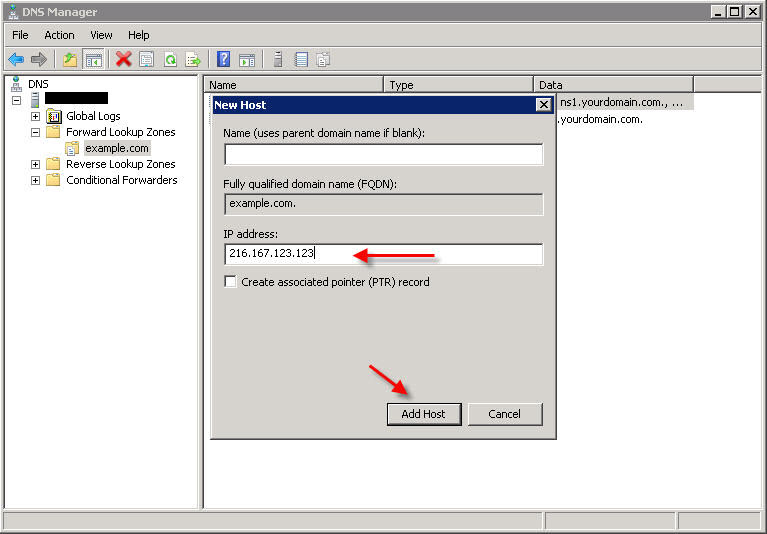
- Откроется окно создания Нового узла, где понадобится вписать в соответствующие поля имя узла (без доменной части, в качестве доменной части используется название настраиваемой зоны) и IP-адрес. Здесь же имеется чек-бокс «Создать соответствующую PTR-запись» — чтобы проверить работу обеих зон (прямой и обратной), чекбокс должен быть активирован:
Если поле имени остается пустым, указанный адрес будет связан с именем доменной зоны.
- Также можно добавить записи для других серверов:
- Добавив все необходимые узлы, нажмите Готово.
Проверка
- Проверьте изменения в каталогах обеих зон (на примере ниже в обеих зонах появилось по 2 новых записи):


- Откройте командную строку (cmd) или PowerShell и запустите команду nslookup:

Из вывода команды видно, что по умолчанию используется DNS-сервер example-2012.com с адресом 10.0.1.6.
Чтобы окончательно убедиться, что прямая и обратная зоны работают как положено, можно отправить два запроса:
- Запрос по домену;
- Запрос по IP-адресу:

В примере получены подходящие ответы по обоим запросам.
- Можно попробовать отправить запрос на какой-нибудь внешний ресурс:

В дополнение к имени домена и адресам появилась строчка «Non-authoritative answer:», это значит, что наш DNS-сервер не обладает необходимой полнотой информации по запрашиваемой зоне, а информация выведенная ниже, хоть и получена от авторитетного сервера, но сама в таком случае не является авторитетной.
Для сравнения все те же запросы выполнены на сервере, где не были настроены прямая и обратная зоны:

Здесь машина сама себе назначена предпочитаемым DNS-сервером. Доменное имя DNS-сервера отображается как неопознанное, поскольку нигде нет ресурсных записей для IP-адреса (10.0.1.7). По этой же причине запрос 2 возвращает ошибку (Non-existent domain).
220140
Минск
ул. Домбровская, д. 9
+375 (173) 88-72-49
700
300
ООО «ИТГЛОБАЛКОМ БЕЛ»
220140
Минск
ул. Домбровская, д. 9
+375 (173) 88-72-49
700
300
ООО «ИТГЛОБАЛКОМ БЕЛ»
This tutorial is for client-managed Dedicated Servers or VPS servers, not running a Control Panel administration (i.e. – not running Plesk or Helm).
** Before you set up DNS on your server, be sure you have registered your private nameservers at your Domain Registrar. Tutorials for the most common domain registrars are available in our Knowledge base.
PART 1 – DNS SERVER INSTALLATION
To install a DNS server from the Control Panel, follow these steps:
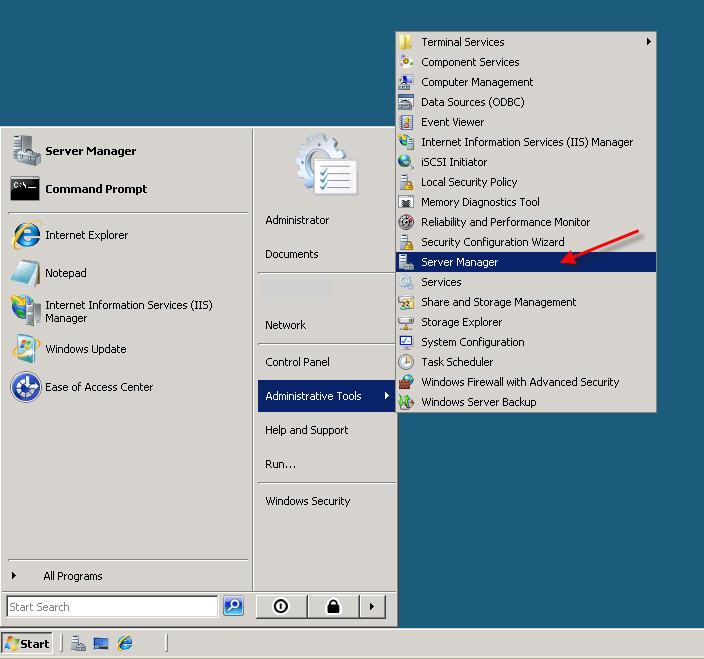
From the Start menu, select Administrative Tools –> Server Manager.
Expand and click Roles from the left window. Choose Add Roles

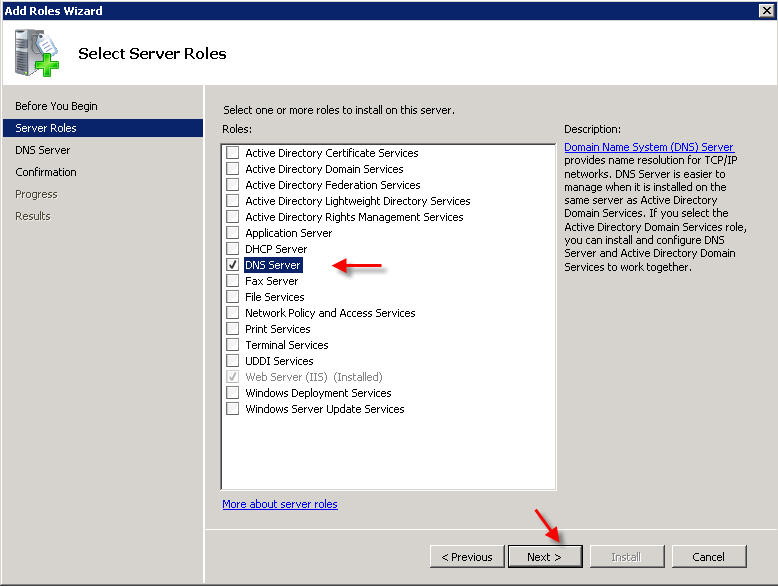
Follow the wizard by selecting the DNS Server role (leave any previously checked items checked)
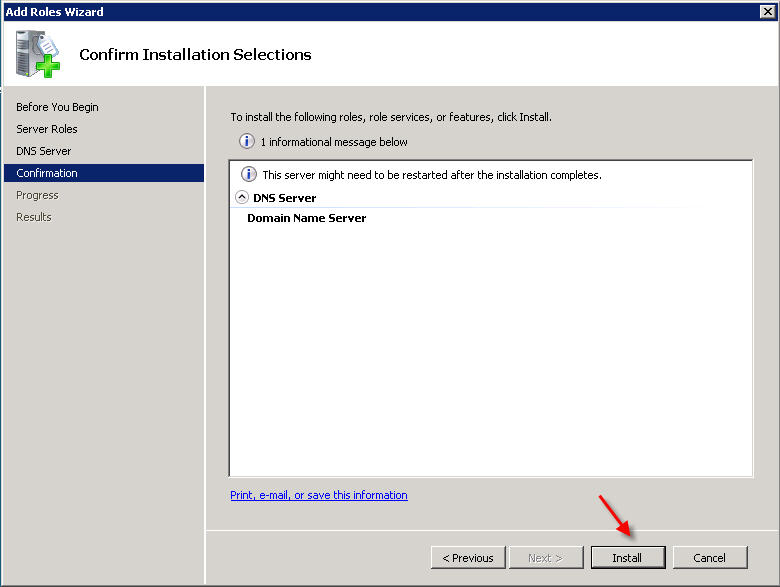
Click NEXT and then INSTALL to install DNS in Windows Server 2008
PART 2 – DNS SERVER CONFIGURATION
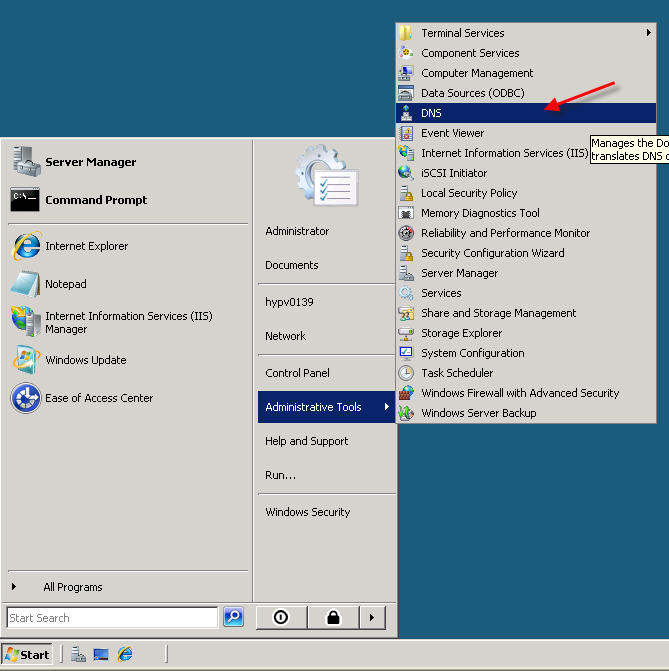
From the Start menu, select Administrative Tools –> DNS to open the DNS console.
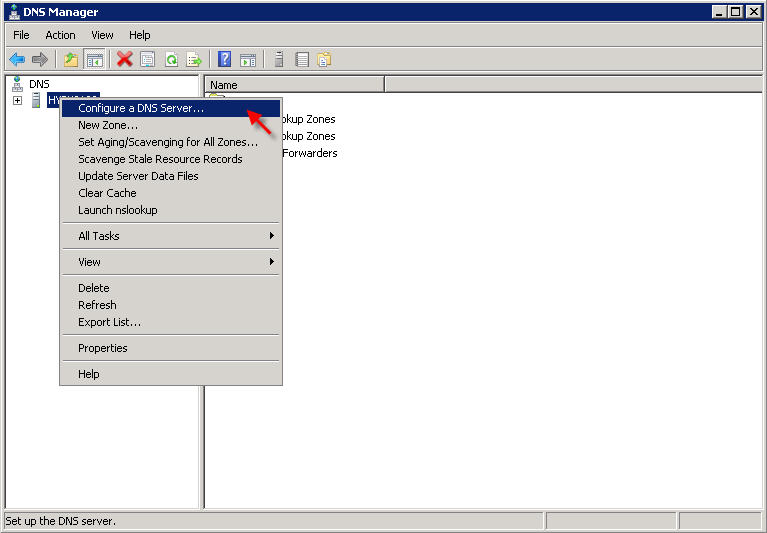
Highlight your computer name and choose Configure a DNS Server to launch the Configure DNS Server Wizard.
Click NEXT and then select the first option, Create a Forward lookup zone

On the next screen, leave the default option selected, This Server maintains the zone, and click NEXT
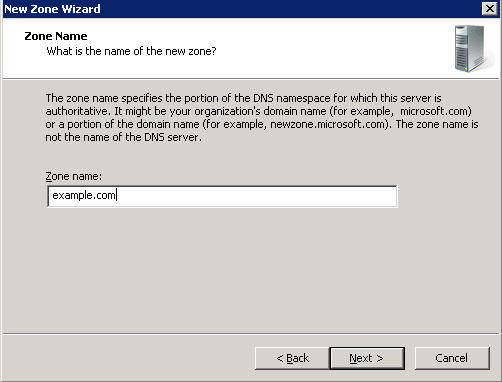
Now you will need to enter the domain name that you want to create your first zone file for. We are using «example.com» in this tutorial:
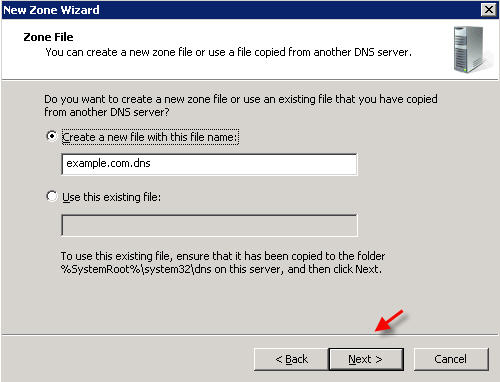
Click NEXT, and NEXT again on the next two screens
Â
On the Forwarders screen, select the option «No, it should not forward queries«
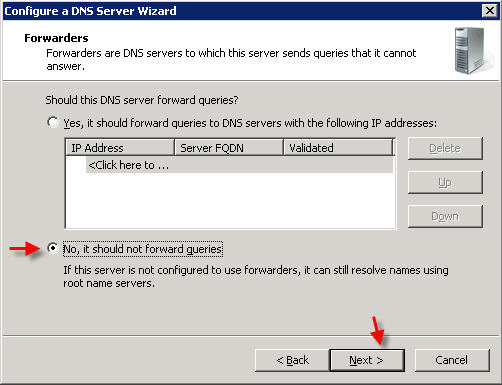
Click FINISH
PART 3 – MANAGING DNS RECORDS
There are many types of DNS records, this is a basic tutorial and will show you how to point your domain name to the IP address you assigned to your web site via an A record. You can also create other types of DNS records (MX, CNAME,etc) in a similar fashion.
In DNS Manager, expand your server name, then expand the ‘Forward Lookup Zones’ , right-click on your domain name and select Properties
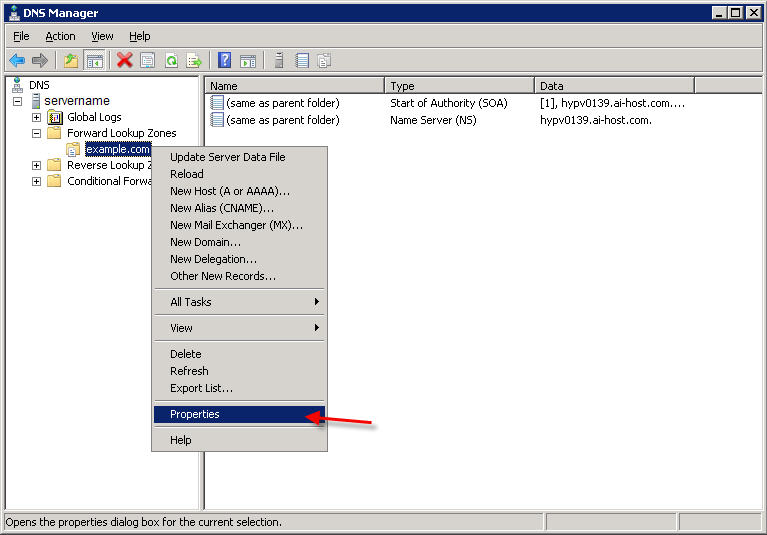
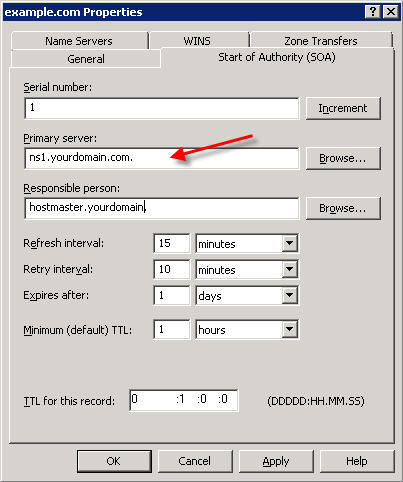
Click on the Start of Authority (SOA) tab.
The SOA resource record is always the first record in a DNS zone. Set the Primary Server to your primary nameserver:
Next, click on the Name Servers tab.
Remove anything currently listed, and click Add and enter your nameservers (i.e. – ns1.yourdomain.com , ns2.yourdomain.com)
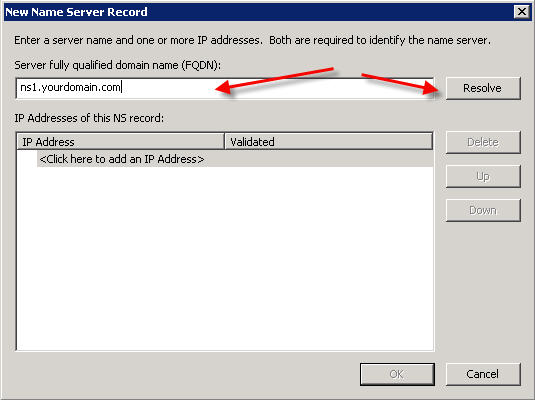
When done, click OK to close the window. You are now ready to set up your zone records.
Right-click on your domain name under Forward Lookup Zones, and select New Host (A or AAAA)…
Leave the Name field blank, and under IP Address, enter the IP address you configured for this web site in IIS, and click Add Host.
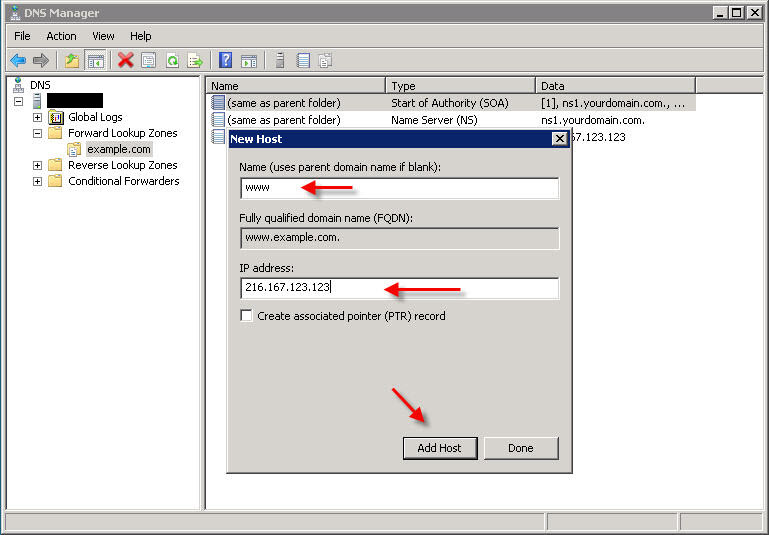
You will most likely also want to make a record for ‘www’, so repeat the above step but this time instead of leaving the Name field blank, enter www in that field:
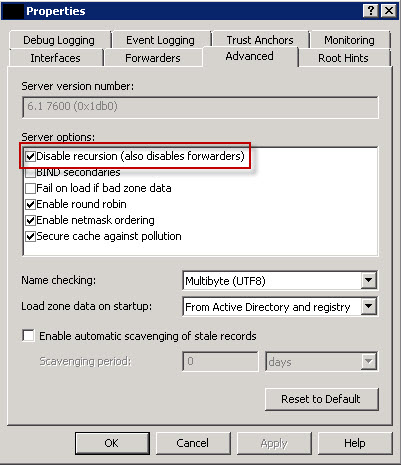
PART 4 – DISABLE DNS RECURSION
The final step you’ll want to perform is to disable DNS recursion. This will help secure your server from a variety of DNS recursion attacks.
To disable recursion, right-click on your DNS server and go to ‘Properties‘.
Click the ‘Advanced‘ tab.
Then check the box labeled «Disable recursion«
Congratulations! You have now set up DNS in Windows Server 2008 and have set up DNS records for your domain name.
You can create additional DNS records as needed (MX, CNAME, etc) by right-clicking on the domain under Forward Lookup Zones and selecting the appropriate type of record you wish to create.
You can test that your DNS server is properly serving DNS from a Windows command prompt, by using the nslookup command in this format:
nslookup example.com ns1.yourdomain.com
For example:
The Domain Name System (DNS) is a hierarchical distributed naming system for computers, services, or any resource connected to the Internet or a private network. It associates various information with domain names assigned to each of the participating entities.
Most importantly, it translates domain names meaningful to humans into the numerical identifiers associated with networking equipment for the purpose of locating and addressing these devices worldwide.
However, most Windows administrators still rely on the Windows Internet Name Service (WINS) for name resolution on local area networks and some have little or no experience with DNS. We’ll explain how to install, configure, and troubleshoot a Windows Server 2008 DNS server.
Installation:
Step 1: Install a DNS server from the Control Panel, follow these steps:
- Go to Start —> Control Panel —> Administrative Tools —> Server Manager.
- Expand and click Roles
- Click on Add Roles

Step 2 : The new window will open with the list of roles available to install. Select DNS server and Click Next.

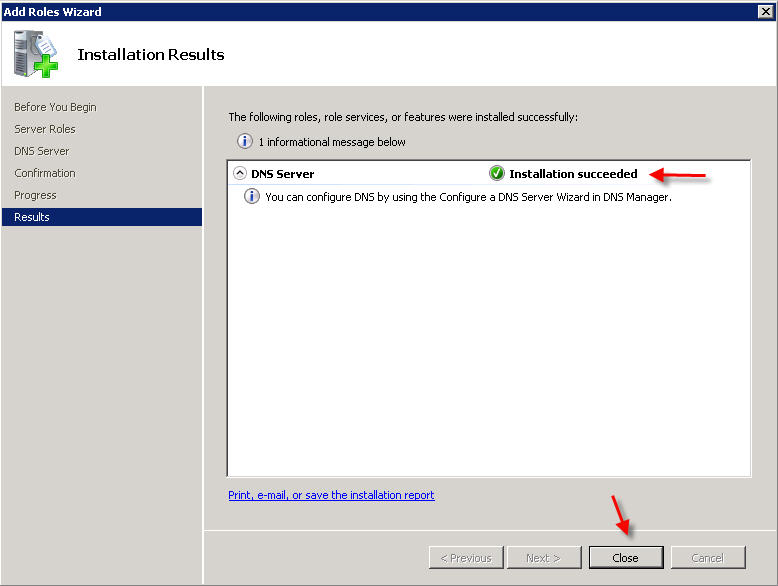
Step 3: Click Next on the introduction windows. In the last window click on install. It will start installation, the following window shows the progress of installation.

Configuring DNS:
After installing DNS, you have to go Start —> All Programs —> Administrative Tools —> DNS for managing DNS server.
Whenever configuring your DNS server, you must be know about following concepts:
- Forward lookup zone
- Reverse lookup zone
- Zone types
A forward lookup zone is helps to resolve host names to IP addresses. A reverse lookup zone allows a DNS server to discover the DNS name of the host. Basically, it is the exact opposite of a forward lookup zone. A reverse lookup zone is not required, but it is easy to configure and will allow for your Windows Server 2008 Server to have full DNS functionality.
When selecting a DNS zone type, you have the following options: Active Directory (AD) Integrated, Standard Primary, and Standard Secondary. AD Integrated stores the database information in AD and allows for secure updates to the database file. This option will appear only if AD is configured. If it is configured and you select this option, AD will store and replicate your zone files.
A Standard Primary zone stores the database in a text file. This text file can be shared with other DNS servers that store their information in a text file. Finally, a Standard Secondary zone simply creates a copy of the existing database from another DNS server. This is primarily used for load balancing.
Step 1: Right Click on the name of the server in the DNS management console, Select on the Configure DNS server.

Step 2: Click on Create forward and reverse lookup zone, then click next.

Step 3: Click on the Yes,create the forward lookup zone now on the forward lookup zone window.

Step 4: Click on the desired zone that you want to create, in this case Primary Zone.

Step 5: Type the Name of the Zone and click Next.

Step 6: Click Next on the Zone File Name.
Step 7: Select the Allow both nonsecure and Secure dynamic updates and click Next to Continue.
Step 8: Select Yes, I want to create reverse lookup zone now, Click Next to continue.
Step 10: Select Primary Zone in Zone creating Window.
Step 11: Choose whether you want to create IPv4 or IPv6 reverse lookup zone.( in mycase IPv4 Reverse lookup zone).

Step 12: Type you netword ID in the following window.

Step 13: Click Next on the Reverse lookup Zone file name window.
Step 14: Select the Allow both nonsecure and Secure dynamic updates and click Next to Continue.
Step 15: Select No, i should not forward queries, then click Next.

Step 16: Click finish on the final window.

Managing DNS Server:
After the installation and configuration of the forward and reverse lookup zone, now the server is ready to create the other records associated with the DNS and Zones. There are several records available, here i am listing some of the important records.
- Start of Authority (SOA)
- Name Servers
- Host (A)
- Pointer (PTR)
- Canonical Name (CNAME) or Alias
- Mail Exchange (MX)
Start of Authority (SOA):
Specifies authoritative information about a DNS zone, including the primary name server, the email of the domain administrator, the domain serial number, and several timers relating to refreshing the zone. The following properties window shows the information about the SOA record of the Geeksite.in Zone.

Name Servers (NS Record):
Name Servers that specify name servers for a particular domain. You set up all primary and secondary name servers through the Properties window of the Zone.
Step 1: Right Click on the Zone name and click on properties.

Step 2: Click on the Name server Tab.
Step 3: If require, add the name server by clicking Add button. You require FQDN of the server name and IP Address.

Host Records (A Record):
It is mainly used for mapping the Host name with IP address, you can able to create Pointer Record at the same time.
Here is the Steps to create the A record.
Step 1: Right click on the Zone name, Select the New Host (A or AAAA)
Step 2: Type the Name of the New Host and IP Address, then Click Add Host.
Following window shows the both Step 1 and Step 2.

Canonical Name (CNAME) or Alias records
A Canonical Name (CNAME) or Alias record allows a DNS server to have multiple names for a single host. For example, an Alias record can have several records that point to a single server in your environment. This is a common approach if you have both your Web server and your mail server running on the same machine.
Here is the Steps to create CNAME record.
Step 1: Right Click on the Zone name and click on New Alias (CNAME )
Step 2: Type your Alias Name.
Step 3: Browse for or Type the Fully Qualified Domain Name (FQDN) of the Target Host.
Step 4: Click OK.
Following window shows Step 1-4.

Mail Exchanger (MX Records):
Mail exchanger records to identify the mail server for the particular domain. We can create the mail servers records with the priority, the mail server with highest priority will be preferred first for receiving the mail.
Here are the Steps to create the Mail Exchanger record.
Step 1: Right click on the Zone name. click on the New Mail Exhanger (MX).
Step 2: Type the Host or child domain name.
Step 3: Browse for or Type FQDN of the mail server.
Following Window Shows Step 1-3.

Testing DNS Server:
The DNS server is now up and ready for resolving the domain names. Change DNS name server ip address in your local area connection, then use the Nslookup utility. Nslookup is the main utility for testing and trouble shooting the DNS server. It helps to get all the information of the prticular domain.
The following image shows the example of the nslookup command.

That’s All!