
When you install Windows 11 for the first time, the first account you create on the system is the administrator account. Using this administrator account, you can create other administrative accounts or standard level user accounts. But if somehow you lost the administrative rights on your system then this becomes a crucial problem because you cannot perform mandatory operations on the system. This article will show you how you can fix lost administrator rights in Windows 11.
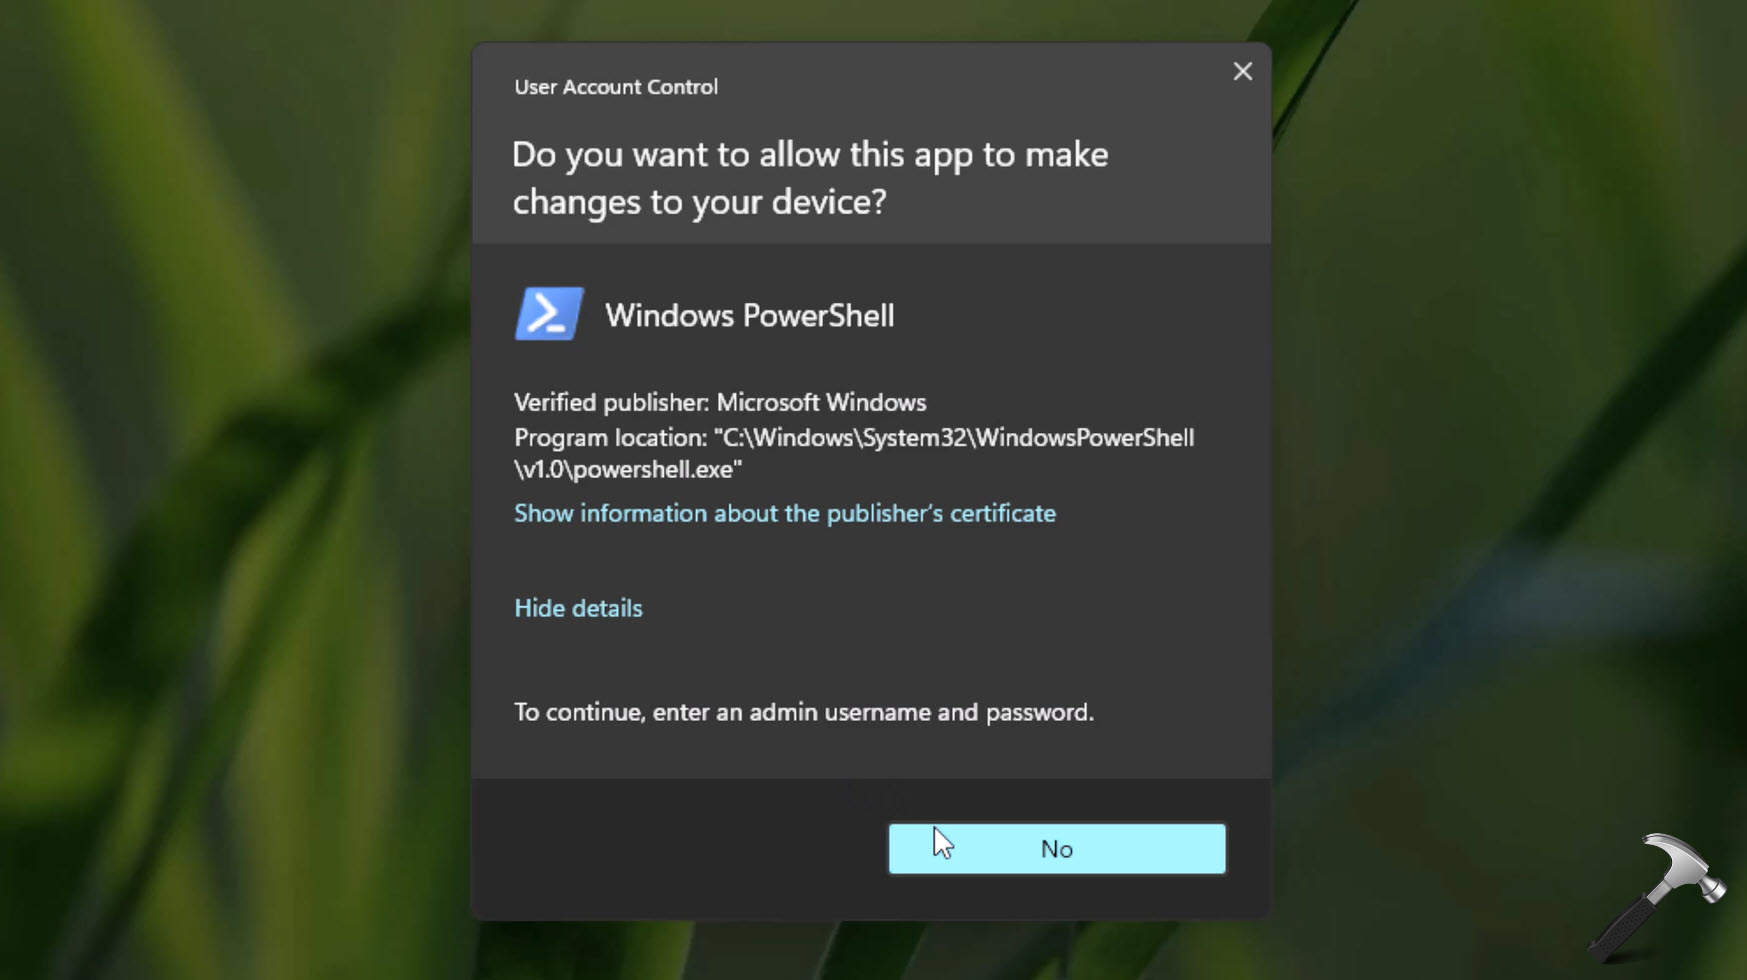
The symptoms of losing administrative rights are quite common. In this case, whenever you try to open any program or app that requires administrative privileges, you get the User Account Control confirmation prompt with missing Yes button. There is no place to enter the administrative account username and password and only No button is available, as shown in the below screenshot.
The problem of losing administrative rights become worst when you have the only account on the system that is no longer administrative account. Now you cannot create any other administrator account nor you can modify existing accounts to set them at administrative level. So how to fix this problem?
Well, we have got two solutions for you which you can follow to fix this problem.
Page Contents
Fix lost administrator rights using Settings app
In this method, we will be restoring our system to an earlier created point. We are assuming that this restore point has been created even before losing the administrative rights. Hence, if we do the System Restore, we should be able to restore the admin rights back. Kindly follow these steps exactly as they are described. If you don’t have any restore points created before, refer FIX 2 instead.
🛈 Note: If you try to perform System Restore via Control Panel, that won’t work because of losing administrative rights.
- Press + X keys and select Settings.
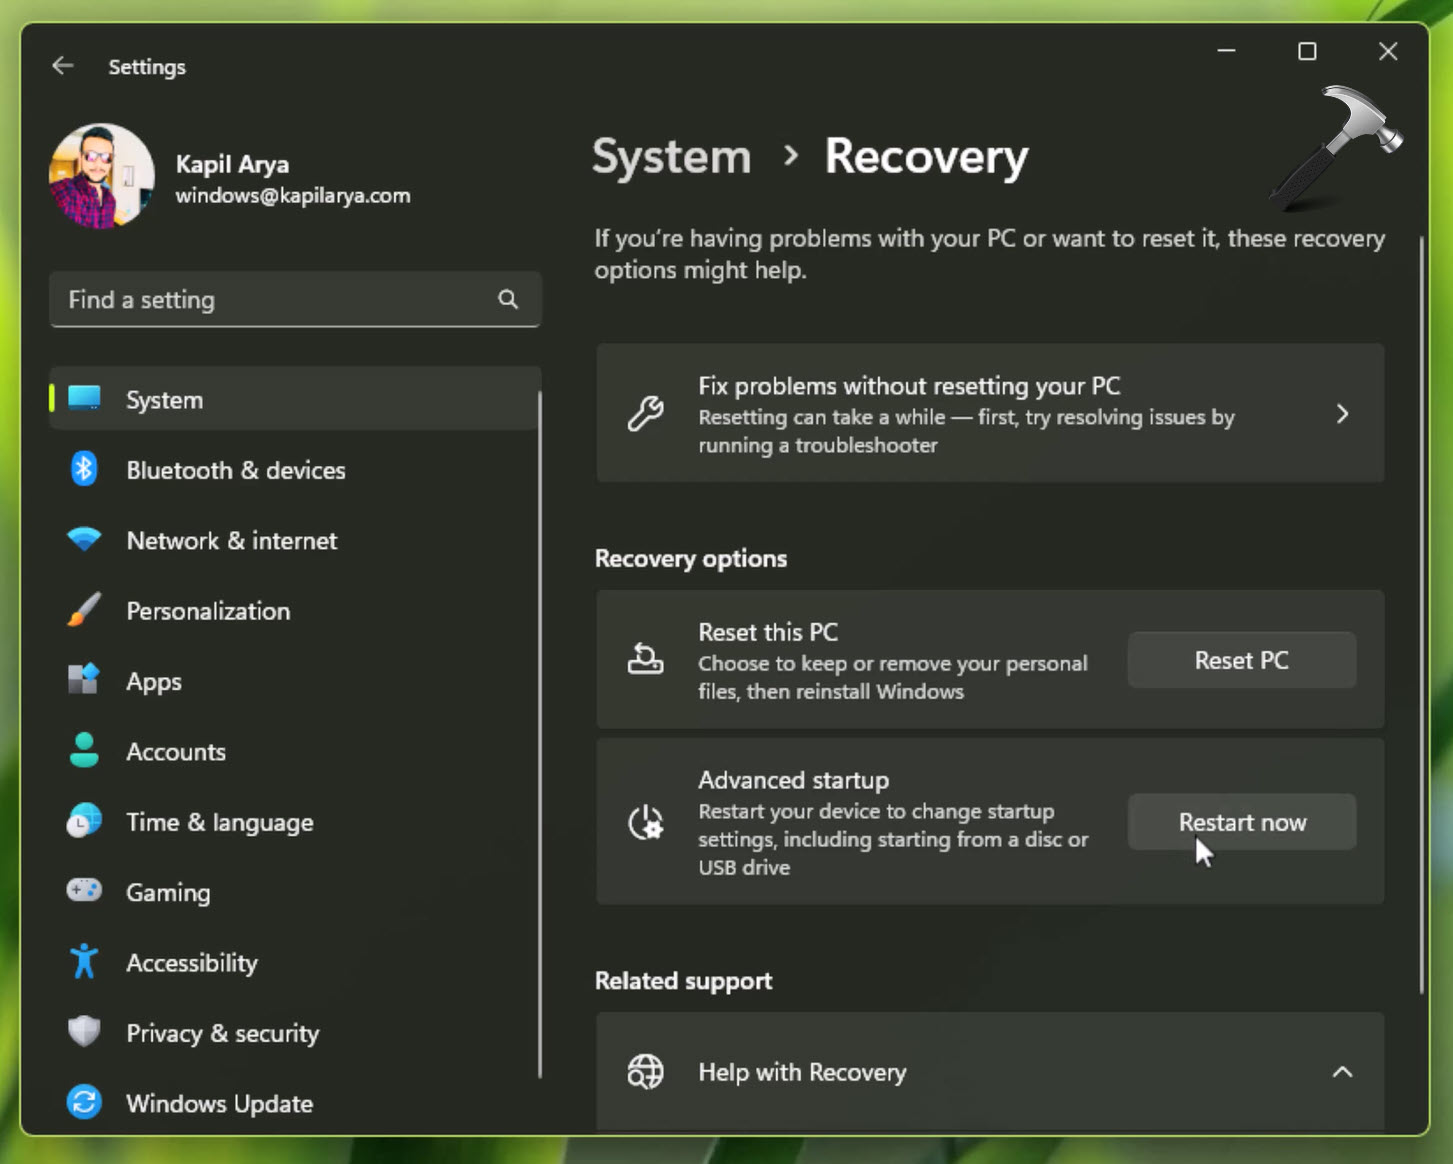
- Go to Accounts > Sign-in options.
- Under Recovery options, click on Restart now next to Advanced startup.
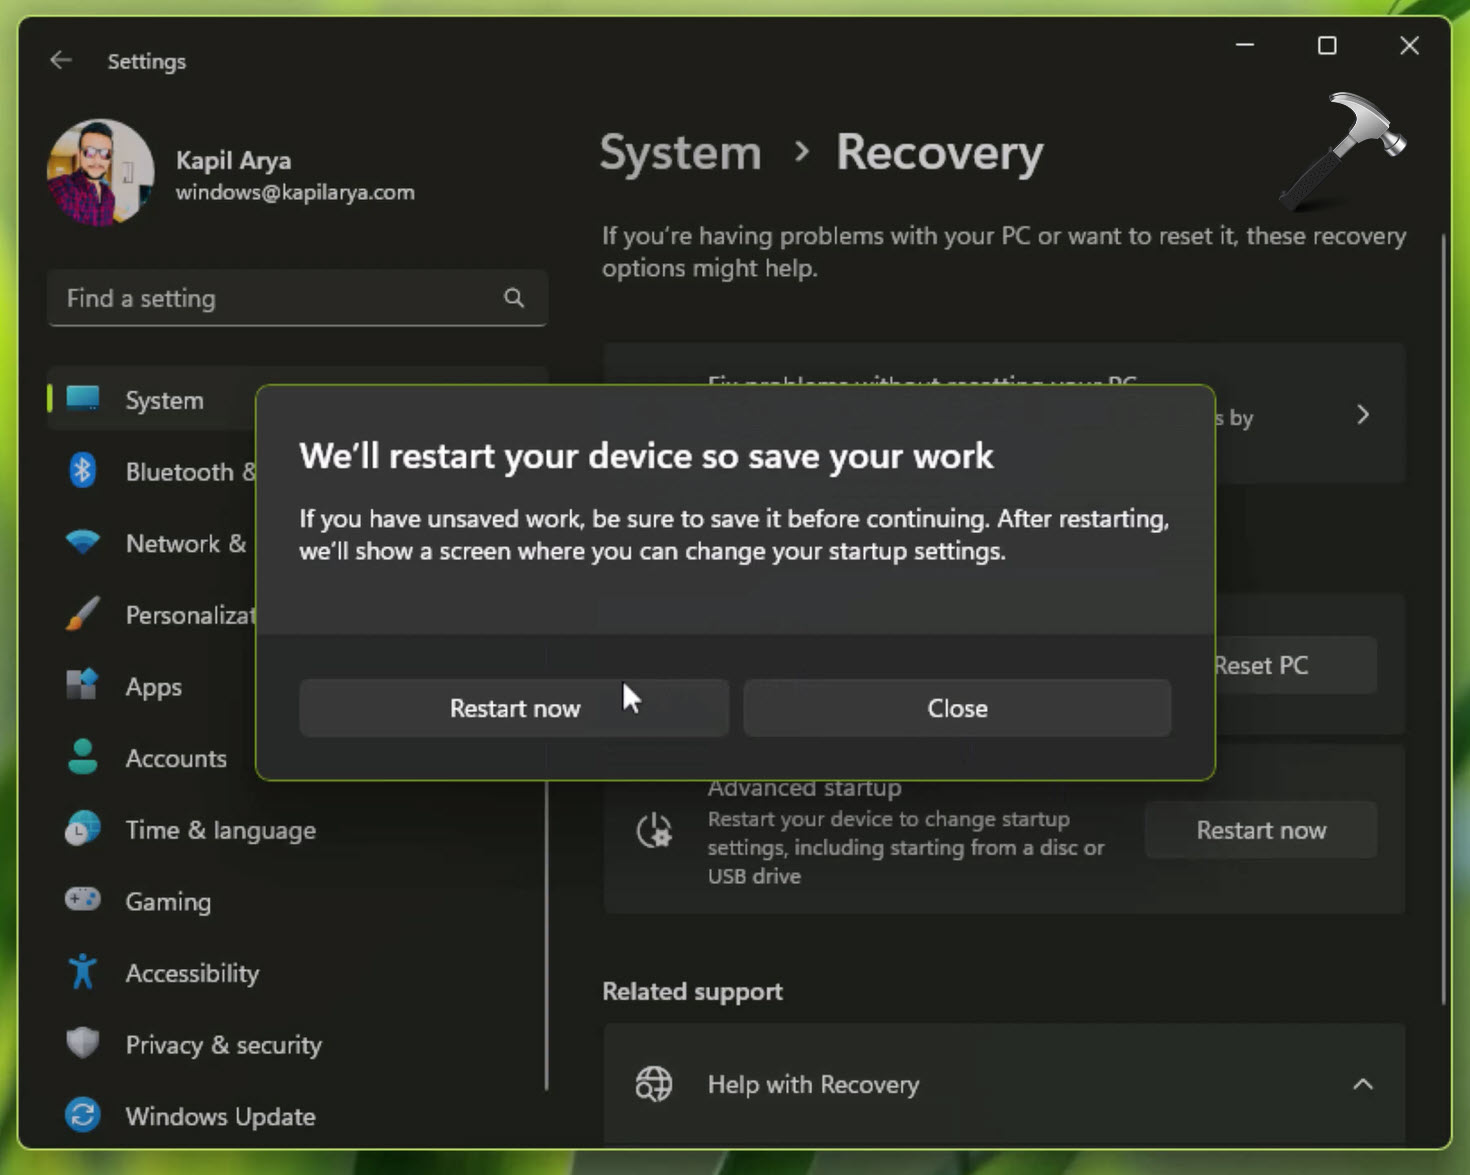
- In the popup window appearing next, click on Restart now button.
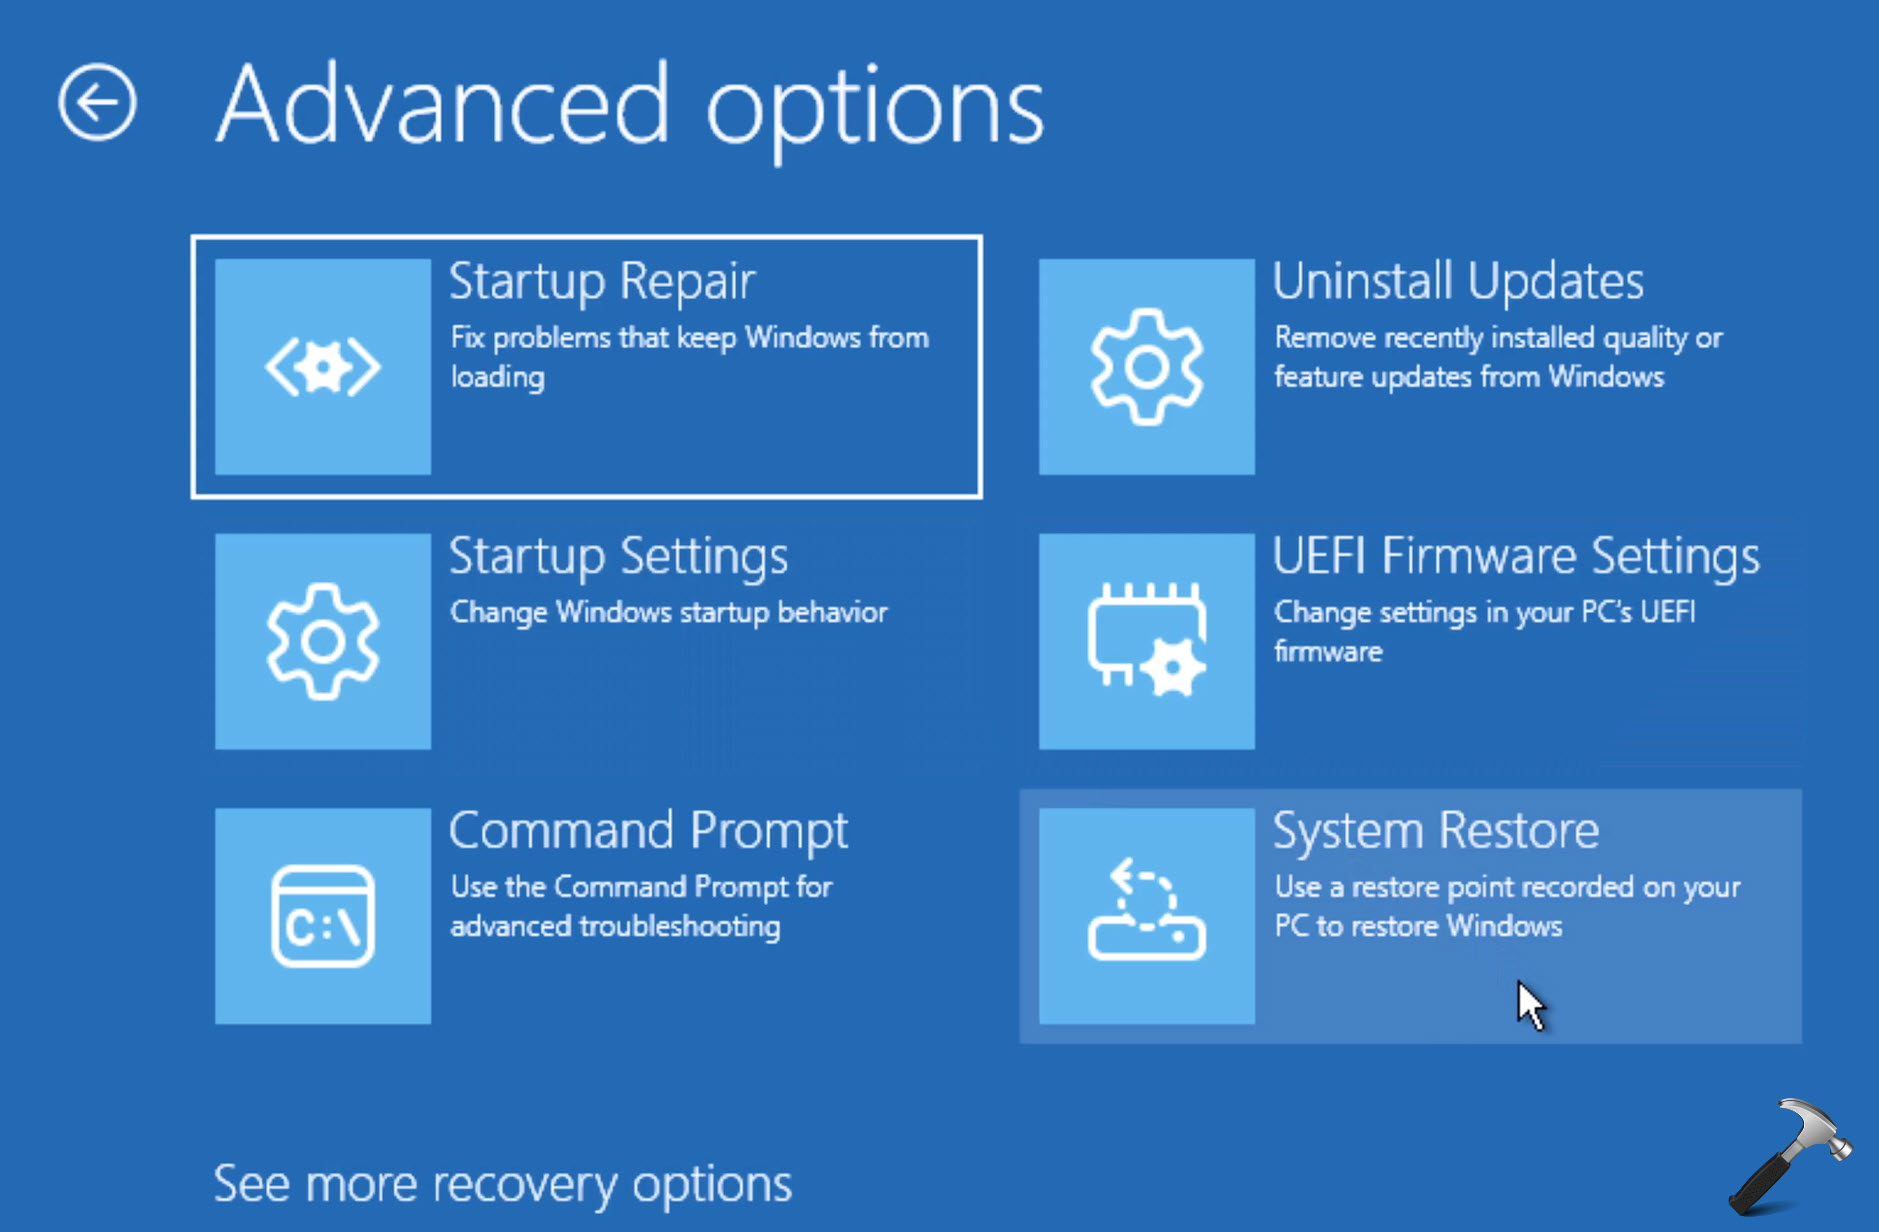
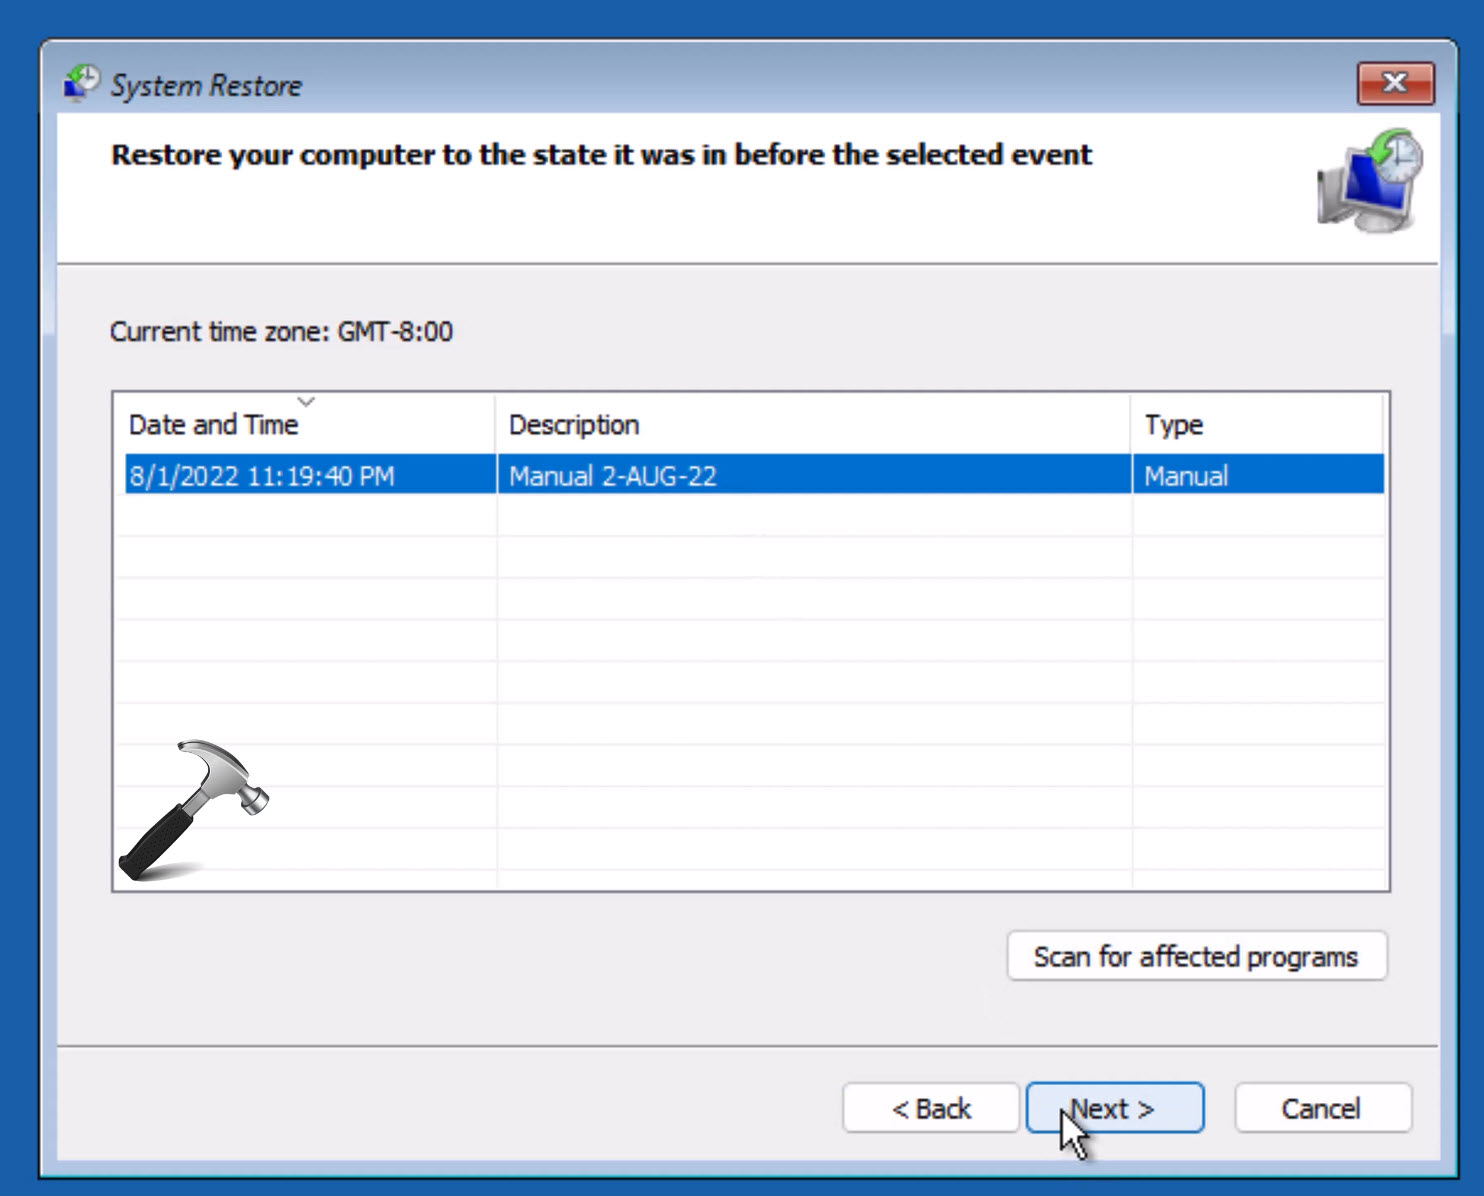
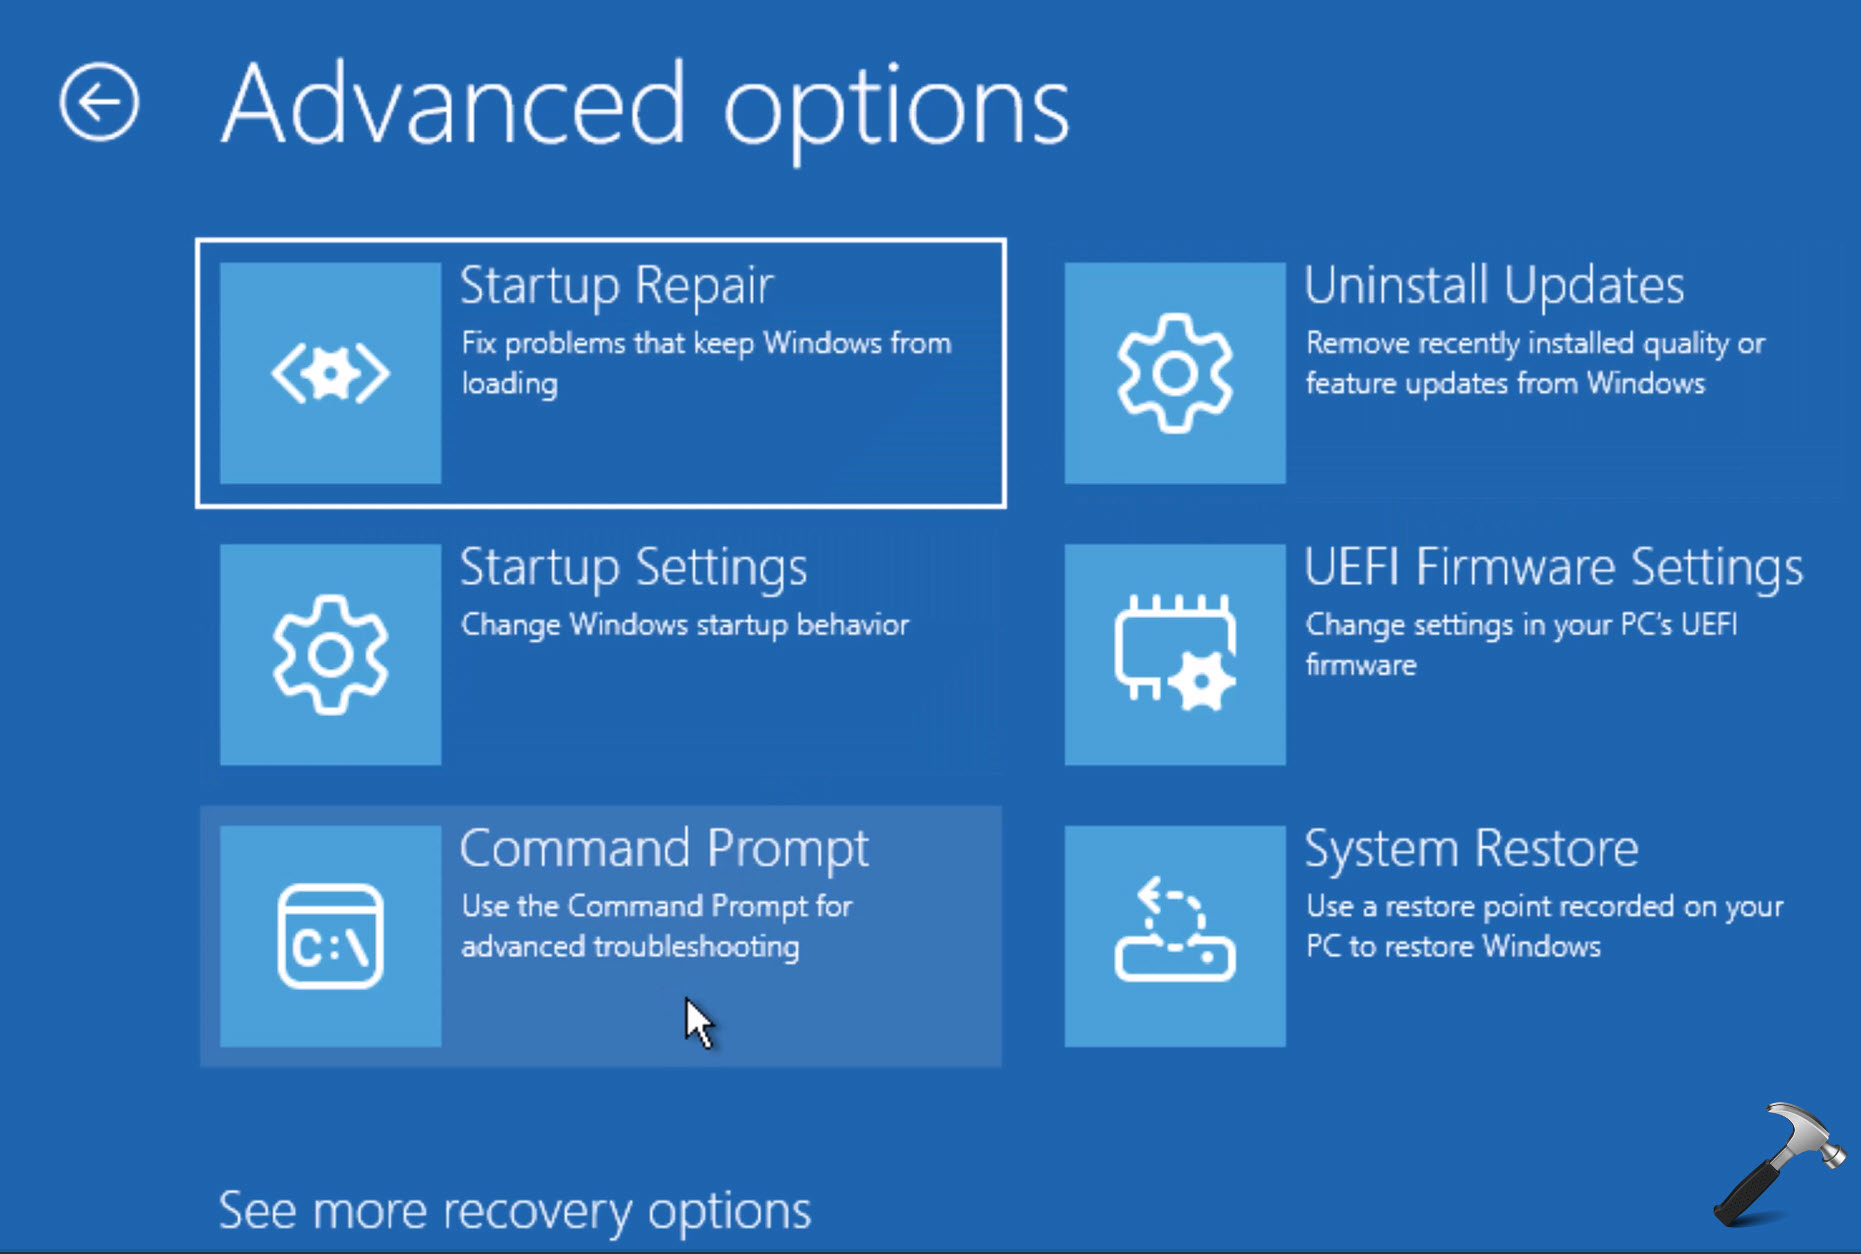
- When your system restarts, under Choose an option click on Troubleshoot then Advanced options. Under Advanced options, click on System Restore.
- When System Restore wizard opens, click on Next button and then select your previously created System Restore point and hit Next.
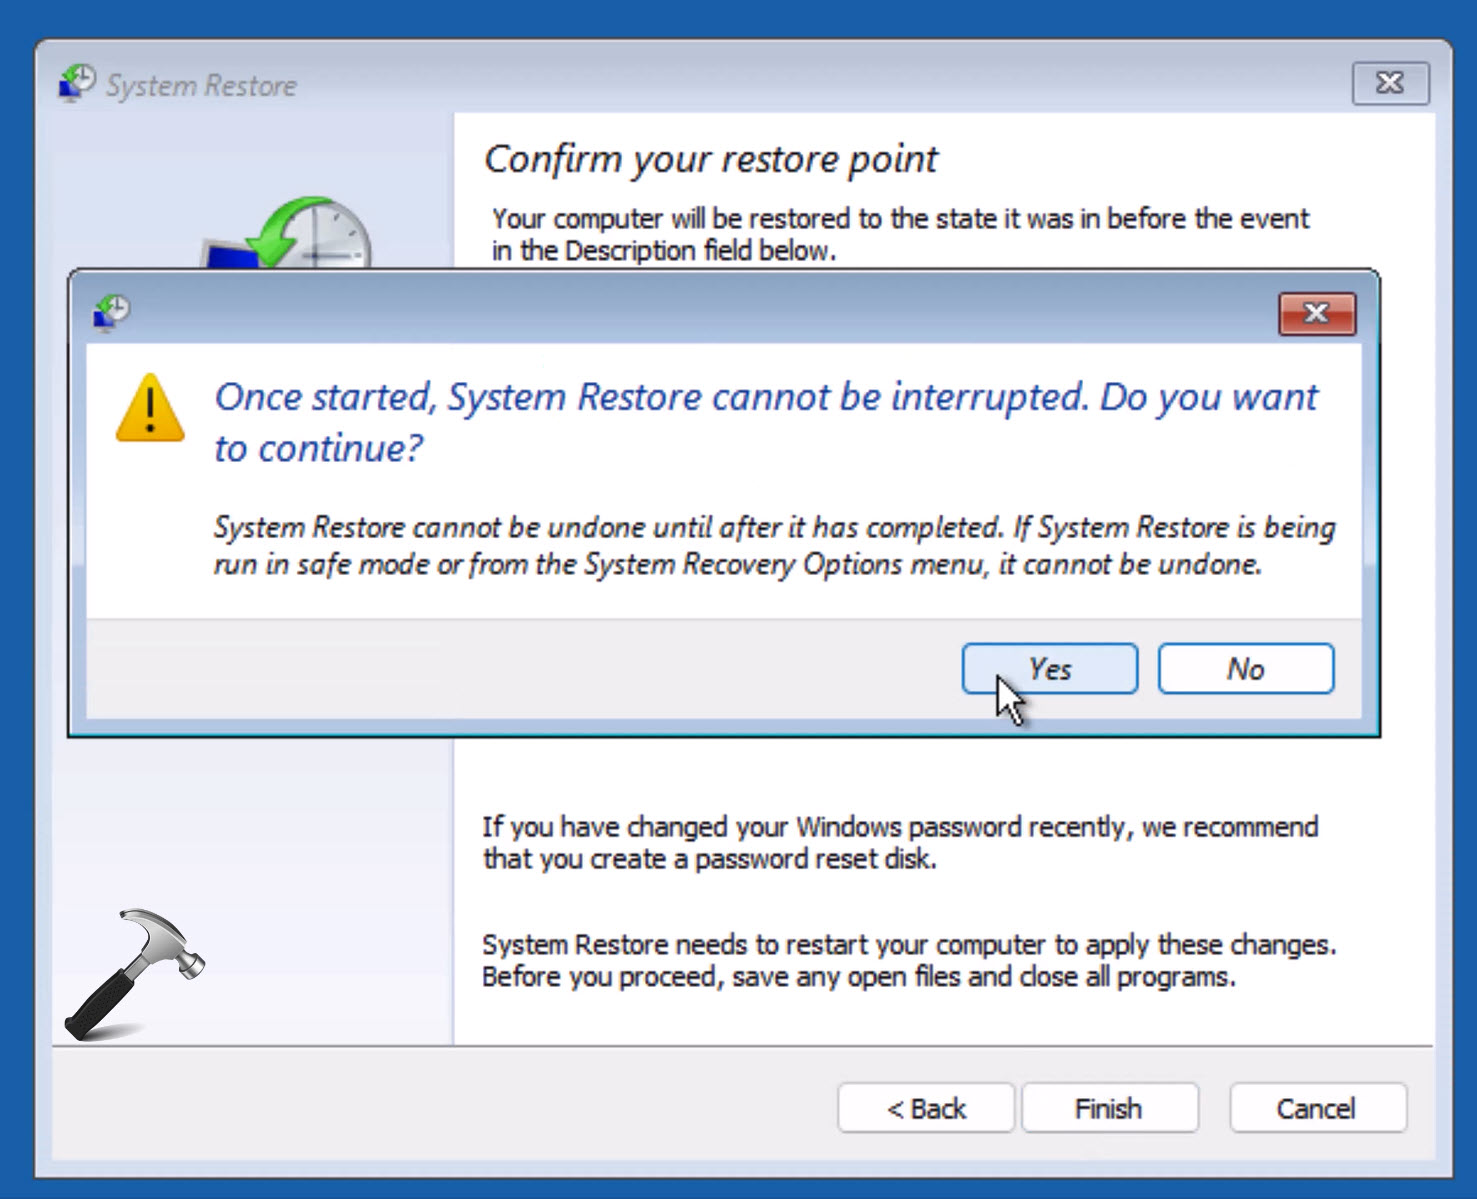
- Once you have confirmed all the details for system restore, click Finish. In the confirmation prompt appearing next, click Yes to continue.
- Now that the System Restore will be working and this may take time depending upon data on your system. Once it is done, you will see System Restore completed successfully message. You can now restart your system.
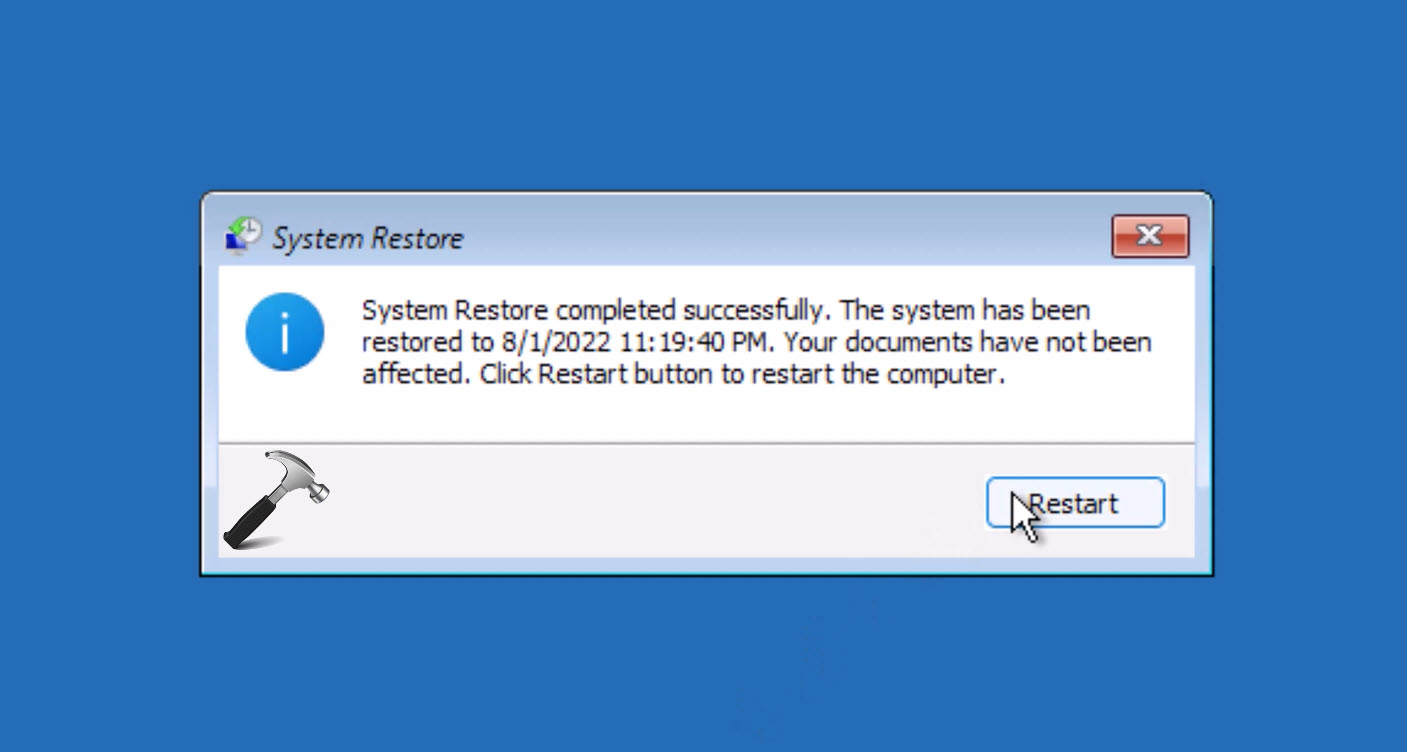
Once your system restarts, you will find that administrative rights are now back.
Fix lost administrator rights using registry
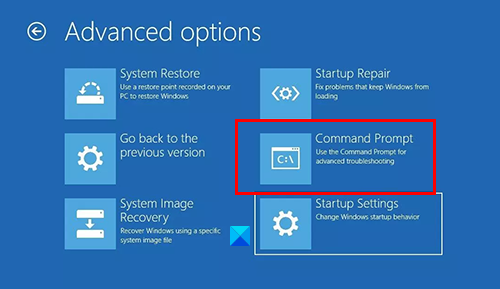
- Go to Advanced recovery options and select Command Prompt this time.
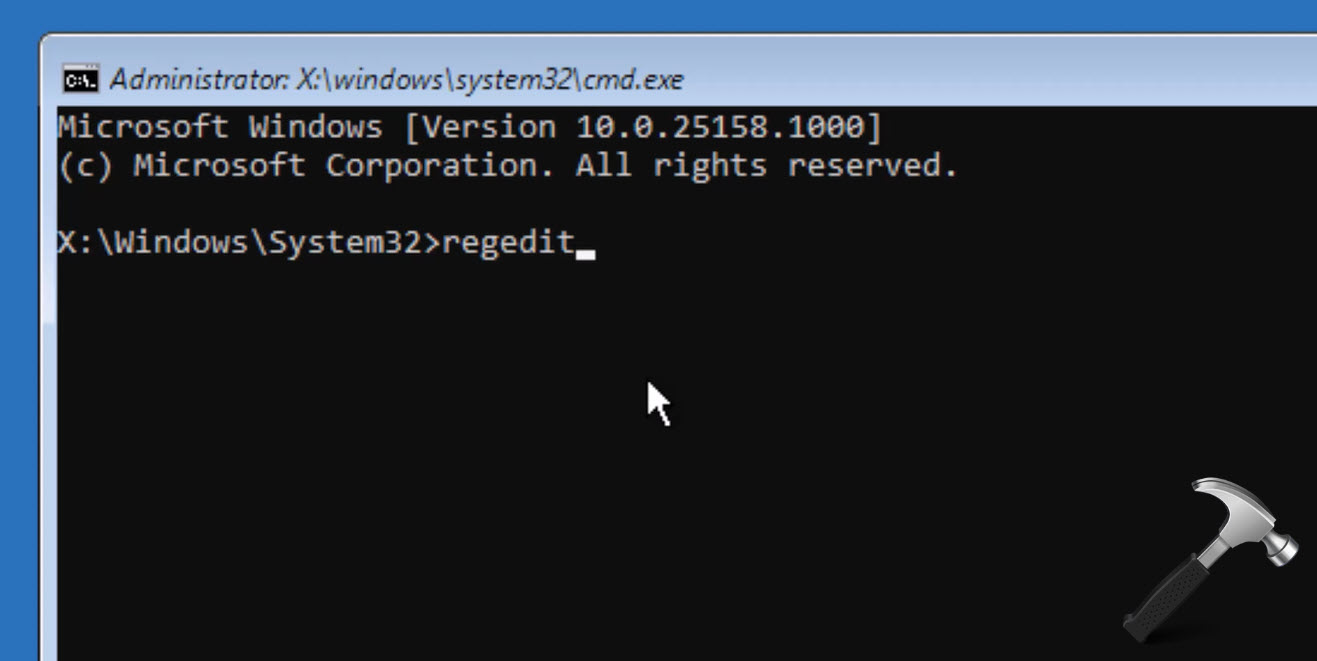
- When the Command Prompt opens, type
regeditand press Enter key, open Registry Editor in Windows Recovery Environment.
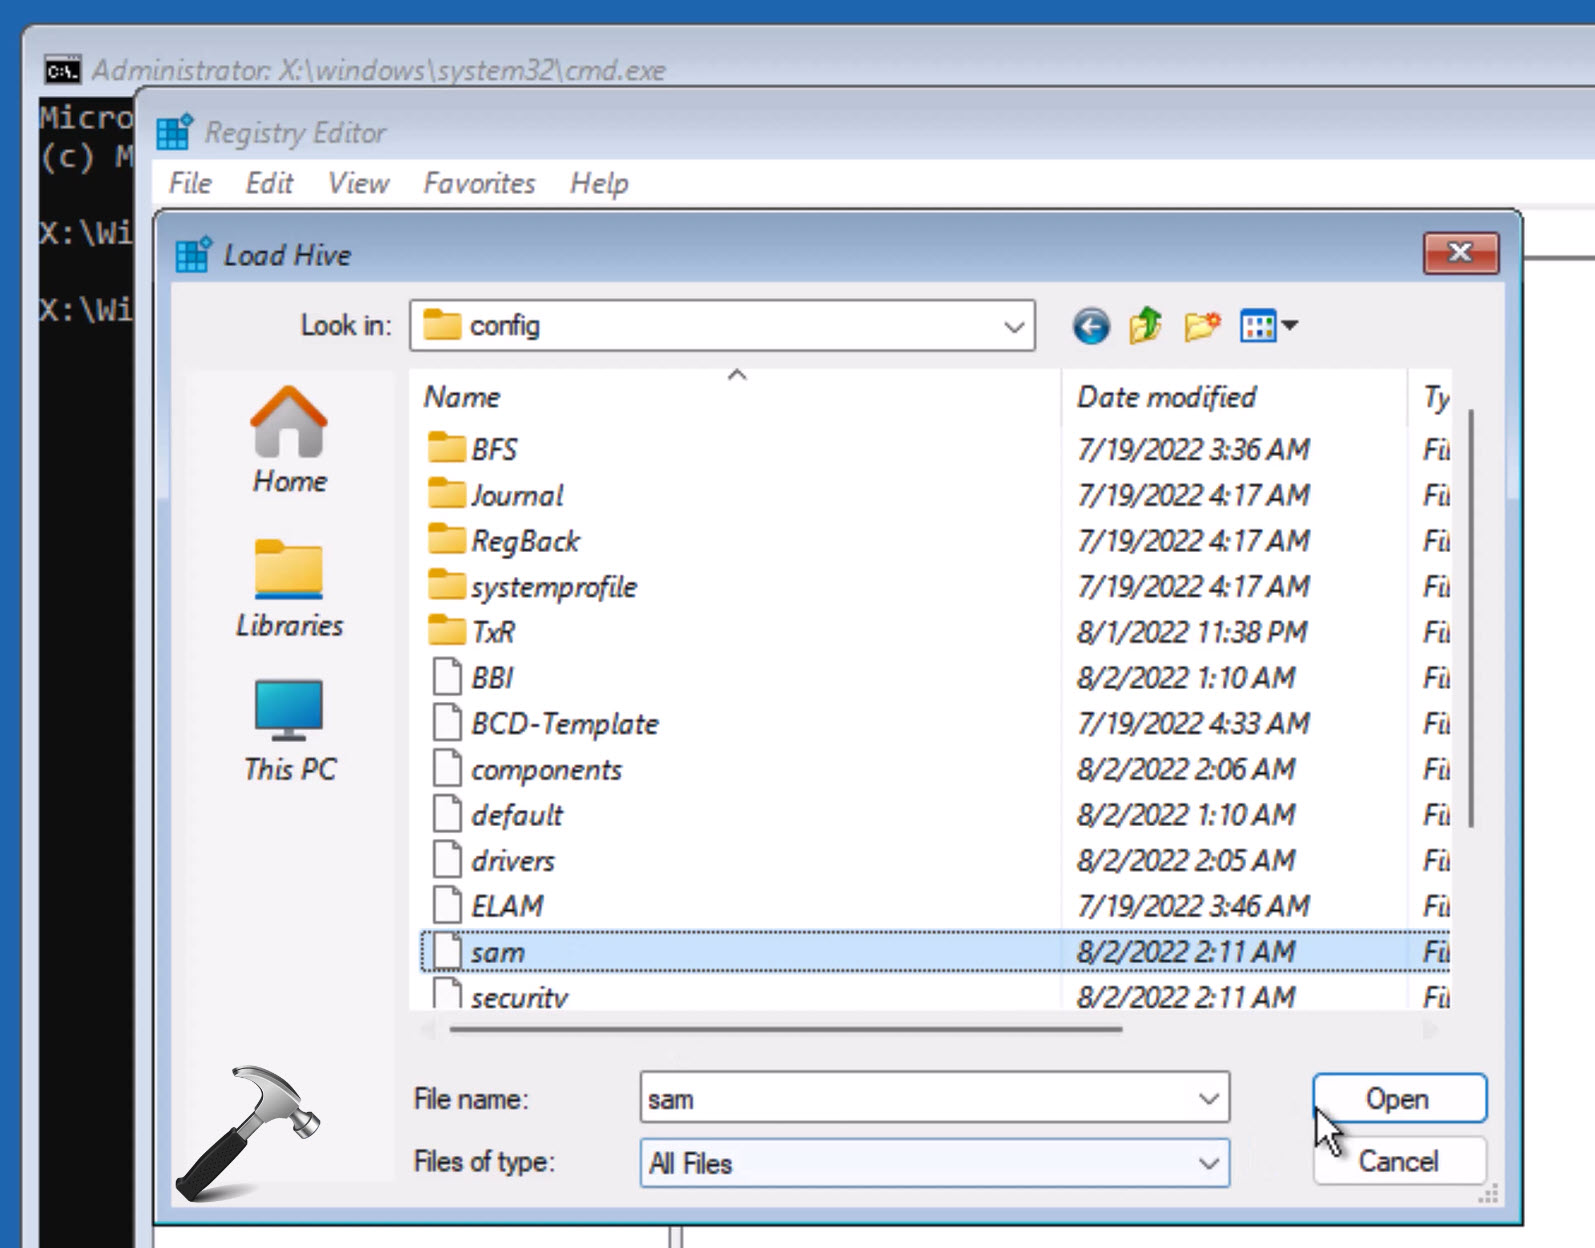
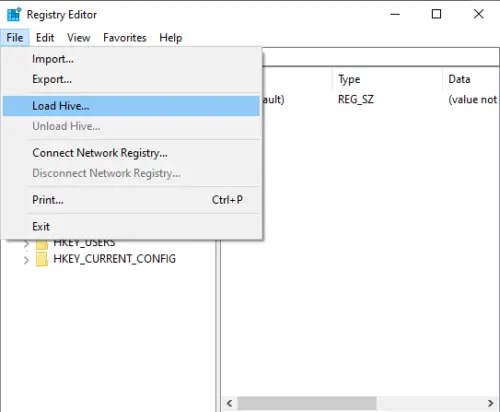
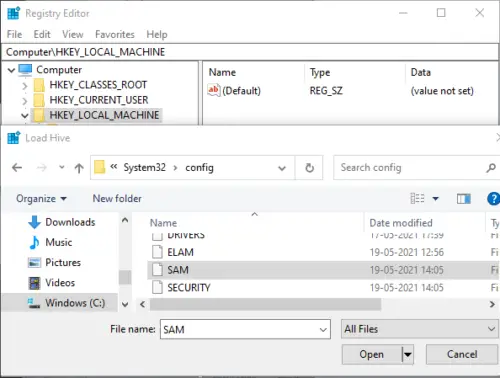
- In the Registry Editor window, highlight HKEY_LOCAL_MACHINE and click File then Load hive. When Load hive popup comes, go to C: drive > Windows > System32 folder > Config folder and open it inside Config folder you will find a file named ‘sam’ select it and then click Open. In the Load hive key name type REM_SAM and click OK.
- Now go to
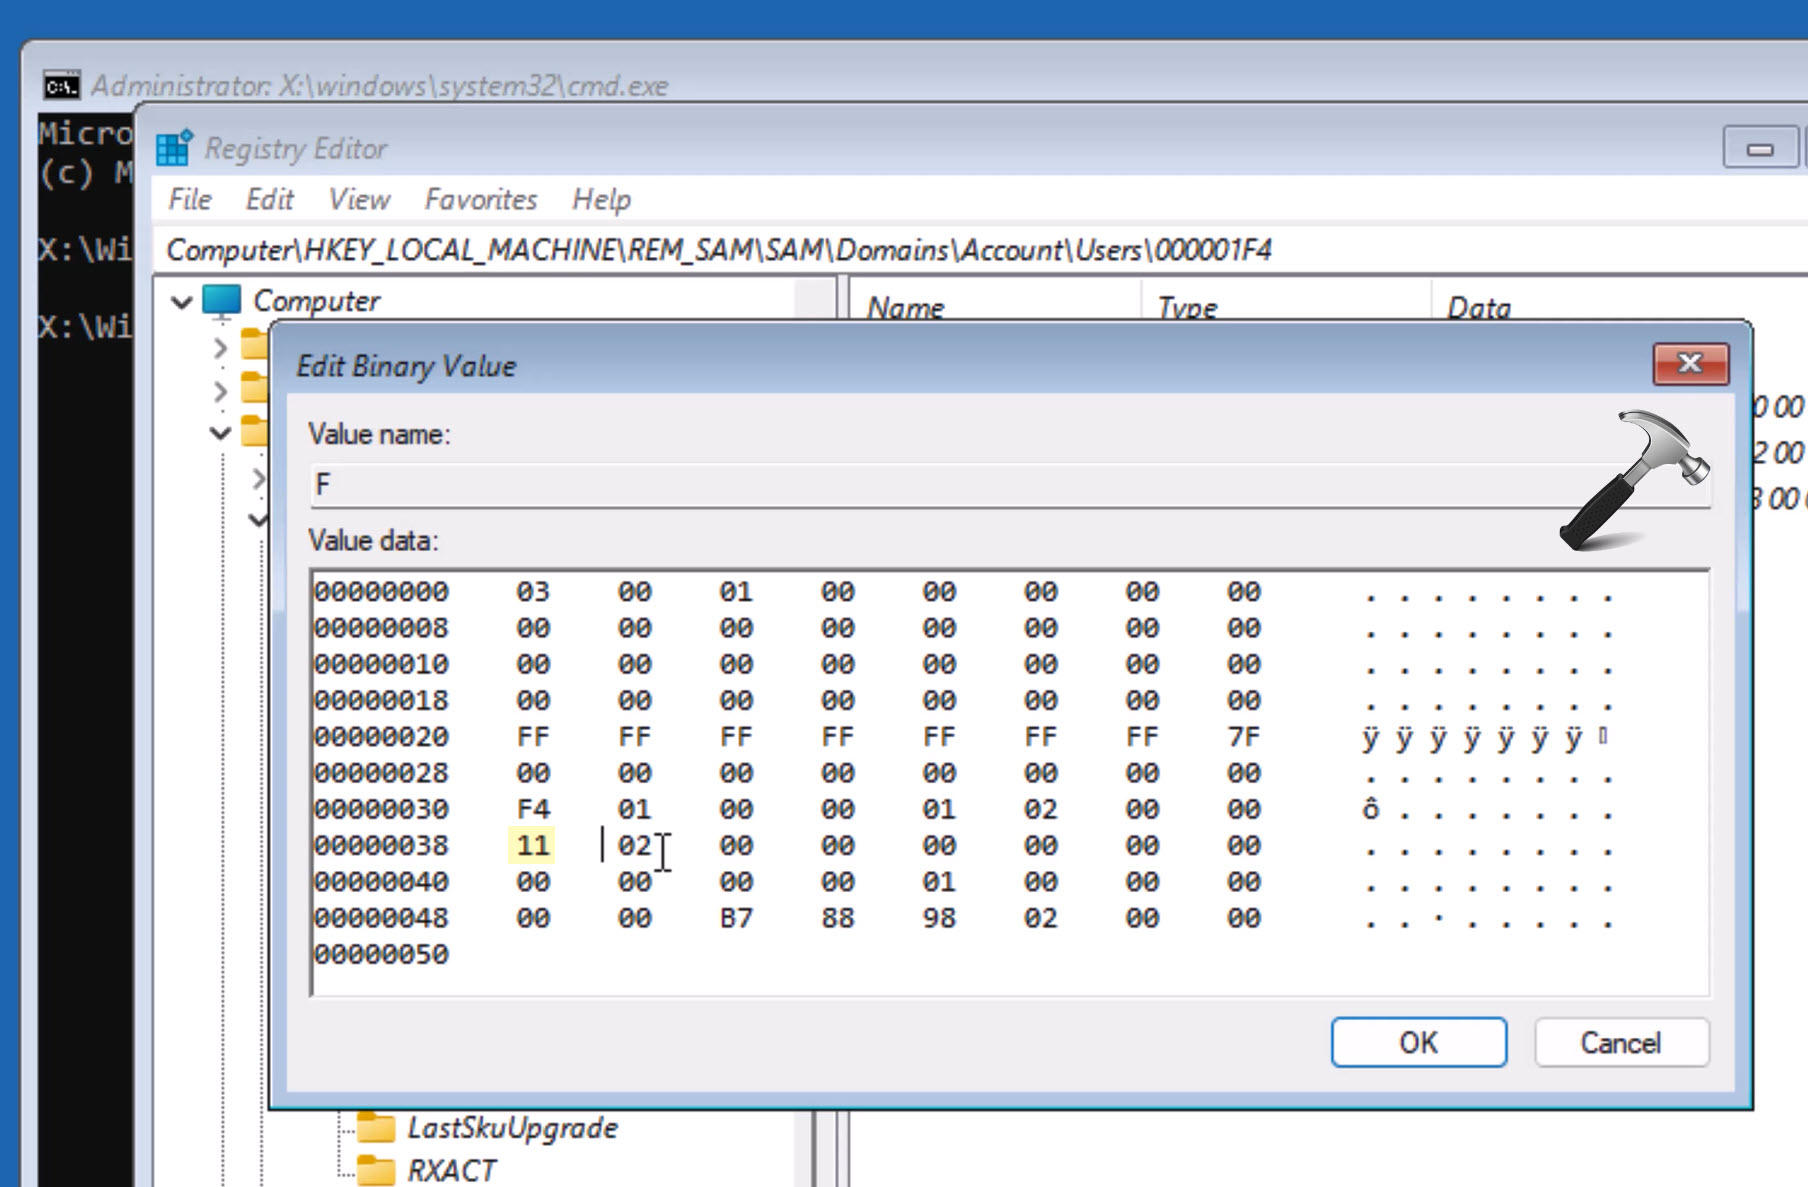
HKEY_LOCAL_MACHINE\REM_SAM\SAM\Domains\Accounts\Users\000001F4and locate F named registry binary DWORD value. Double click on it to edit its value.

- Very carefully, go to line 38, place the cursor in right side of value 11 and press delete key on the keyboard.
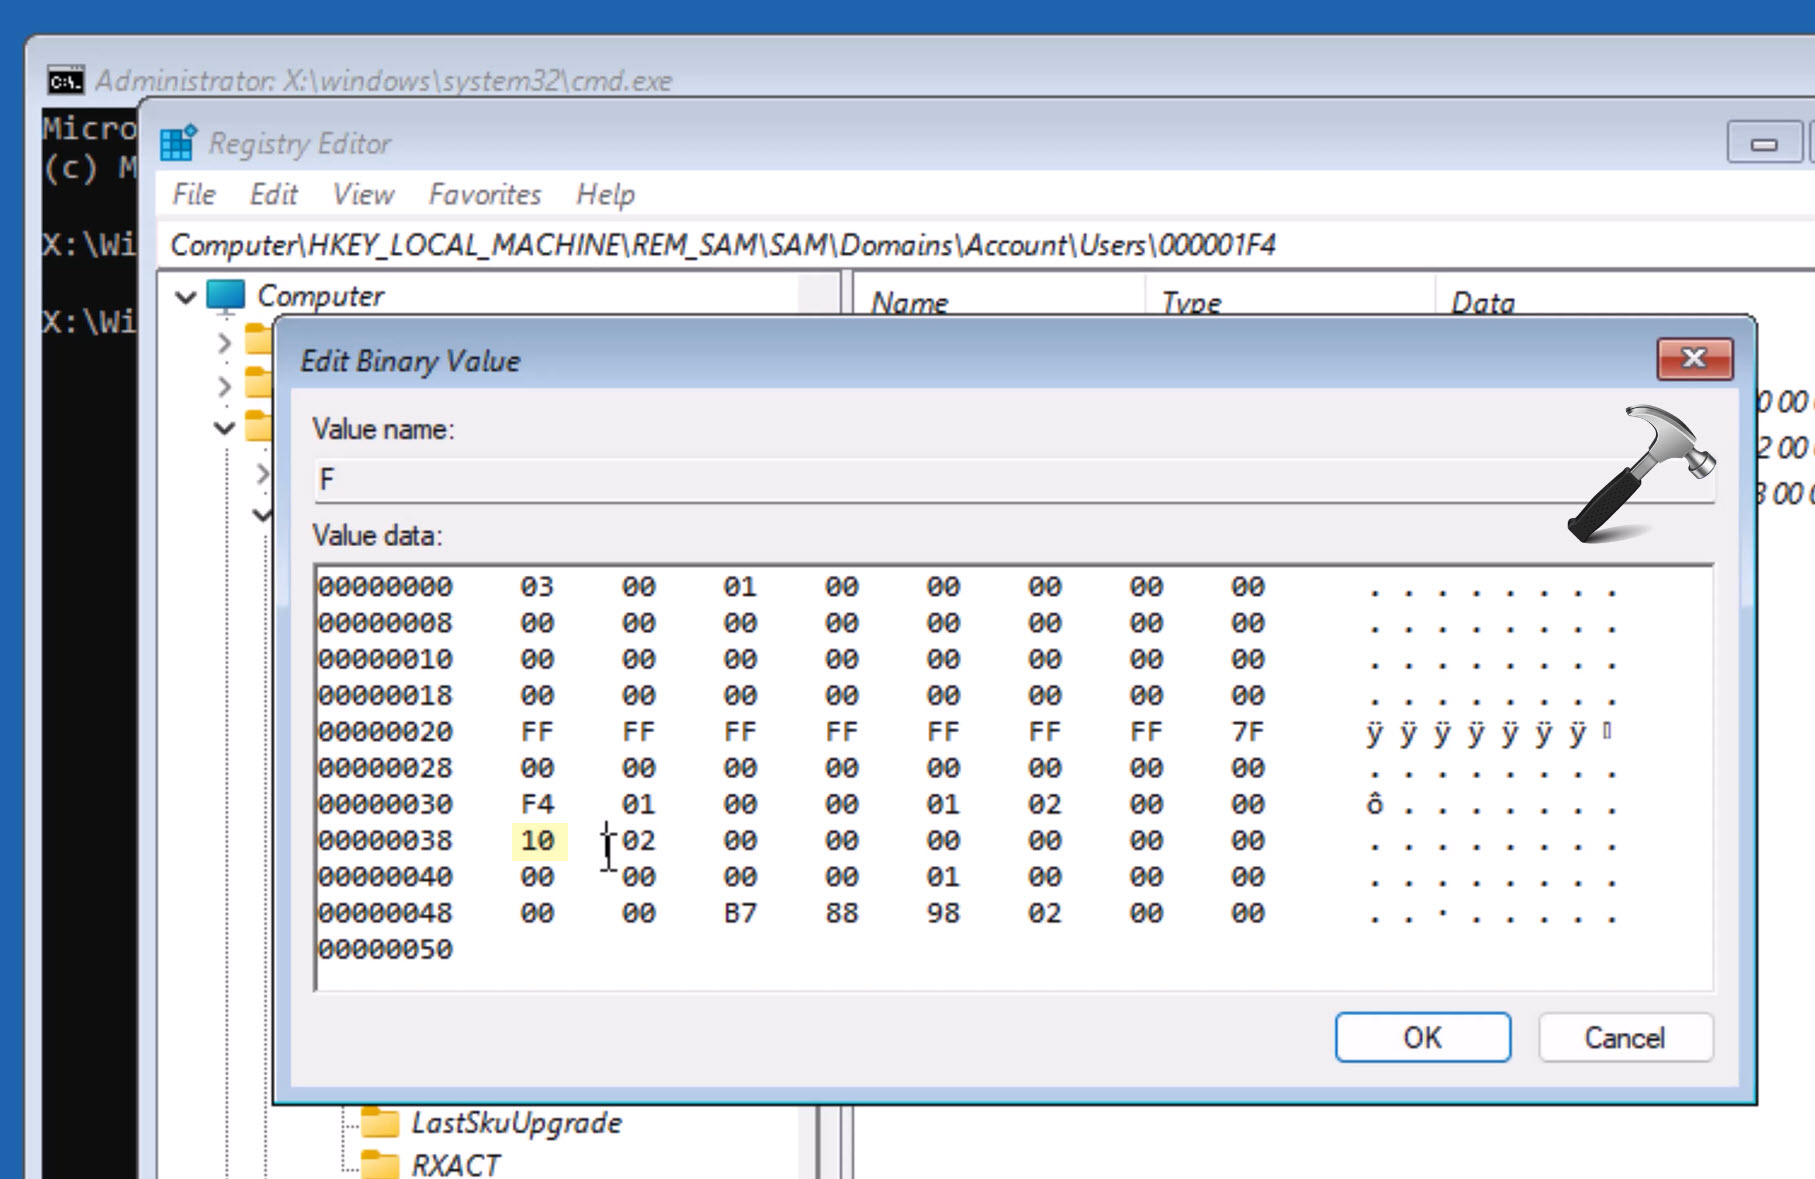
- Now type the value as 10 and then click OK.
- Now you can close the Registry Editor and then Command Prompt and then reboot your system.
When you restart your system after this, you will find that you have built-in administrative account enabled on the system. You can use this built in administrator account to create other administrator accounts or modify the existing ones add convert them to administrative accounts.
In this way, you will be able to get your administrative rights back.
Video fix
If you have any question about above methods, you can check out following video for the live demonstration:
That’s it!
Also check: Lost Administrative Rights In Windows 10.
RELATED ARTICLES
В Windows 11, как и в предыдущих версиях системы присутствует скрытая системная учетная запись «Администратор», отключенная по умолчанию. Иногда, при проблемах с запуском чего-то, требующего прав администратора (несмотря на то, что они есть), включение и использование этой учетной записи может помочь, поскольку встроенный аккаунт имеет больше системных привилегий, чем обычный пользователь с правами администратора.
В этой пошаговой инструкции подробно о том, как включить встроенную учетную запись Администратора в Windows 11: в случае, если система запускается и вход в неё возможен, если войти не удаётся, а также в ситуации, когда вы не знаете пароль имеющихся учетных записей или без прав администратора.
Простое включение встроенной учетной записи Администратор в Windows 11
Прежде чем приступать, одно предупреждение: не следует включать учетную запись «Администратор» без необходимости или использовать её как основную. С одной стороны, у неё больше «прав» (что потенциально небезопасно для обычной работы), с другой стороны, случается, что некоторые функции, в частности, имеющие отношение к приложениям UWP, не работают.
Чтобы включить встроенную учётную запись Администратор этим способом, у вас должны быть права администратора на компьютере и исправно работающая система. Шаги будут следующими:
- Откройте командную строку от имени администратора, PowerShell от имени администратора или Терминал Windows от имени администратора. Для этого можно нажать правой кнопкой мыши по кнопке «Пуск» и выбрать пункт «Терминал Windows (Администратор)».
- Введите команду
net user Администратор /active:yes
и нажмите Enter. В случае, если у вас не русская версия Windows 11 или сборка на базе не русскоязычной системы, замените Администратор на Administrator.

- Скрытая учетная запись включена.

Теперь, если вы выйдете из системы (можно сделать через нажатие по имени пользователя в меню «Пуск») или просто решите сменить пользователя, вы увидите, что появился новый пользователь — Администратор.

По умолчанию пароль для этой учётной записи не установлен, вводить его не нужно.
Включение встроенной учетной записи Администратор, если вход в систему невозможен или без прав администратора
В ситуации, когда по какой-либо причине вы не можете зайти в Windows 11, например, из-за повреждения профиля пользователя, не знаете пароль или не имеете прав администратора на компьютере, также существует возможность включить встроенную учётную запись Администратор.
Учитывайте, что этот способ требует внимательности и определенных навыков, есть риск что что-то пойдёт не так. Шаги для активации скрытого аккаунта Администратор (обновление: есть более простой способ, описан в инструкции Как включить учетную запись Администратор с загрузочной флешки Windows):
- Если это возможно, зайдите в среду восстановления Windows 11, а в ней перейдите в Поиск и устранение неисправностей — Дополнительные параметры — Командная строка.

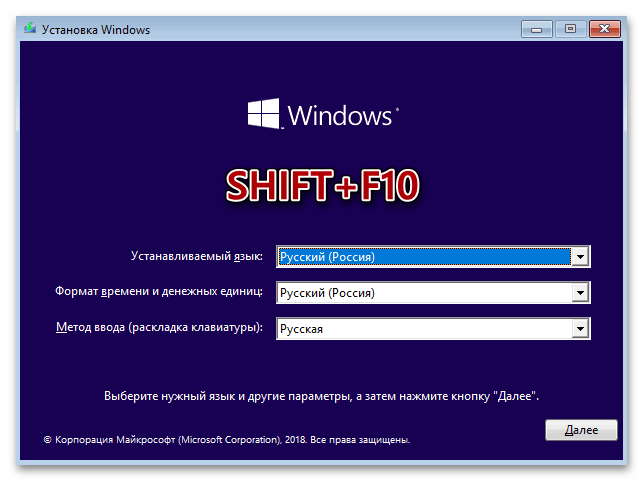
- Если действия в первом шаге вам не подходят или выполнить их не удаётся, создайте загрузочную флешку Windows 11, загрузитесь с неё и на экране с началом установки нажмите клавиши Shift+F10 (иногда — Shift+Fn+F10), это откроет командную строку.
- В командной строке введите команду regedit и нажмите Enter для запуска редактора реестра.
- В редакторе реестра в панели слева выделите HKEY_LOCAL_MACHINE, а затем в меню выберите «Файл» — «Загрузить куст».
- Укажите путь к файлу
C:\Windows\System32\config\SYSTEM
(файл без расширения). Иногда буква системного диска в среде восстановления или при загрузке с флешки отличается от C, но нужный диск легко можно определить по его содержимому (но не используйте диск X — это не он).
- Задайте любое удобное для вас имя раздела. Подраздел с заданным вами именем появится внутри HKEY_LOCAL_MACHINE.

- Внутри созданного вами подраздела откройте подраздел Setup. В панели справа дважды нажмите на параметре SetupType и задайте значение 2 для него.
- Таким же способом измените значение параметра CmdLine на cmd.exe

- Выберите в левой панели изначально созданный вами раздел с тем именем, которое вы задавали на 6-м шаге, а затем в меню выберите «Файл» — «Выгрузить куст». Подтвердите выгрузку.
- Закройте редактор реестра, командную строку, перезагрузите компьютер.
- Теперь при старте Windows 11 автоматически откроется командная строка и начнется «бесконечная загрузка».
- В командной строке введите
net user Администратор /active:yes
и нажмите Enter. Для систем с языком, отличающимся от русского, обычно следует использовать Administrator вместо Администратор.

- Введите regedit в командной строке и в редакторе реестра перейдите к разделу
HKEY_LOCAL_MACHINE\SYSTEM\Setup
- Измените значение параметра SetupType на 0 (с большой вероятностью уже будет изменен), а значение параметра CmdLine — на пустое.

- Закройте редактор реестра и командную строку, компьютер должен будет перезагрузиться автоматически.


В результате встроенная учётная запись «Администратор» будет включена и в неё будет возможен вход без пароля.
On your Windows 11 or Windows 10 PC, you might lose administrative rights. As a result, you won’t be able to perform various things like; unable to install software on your PC, edit settings that require elevation rights, and almost anything that an administrator account can do.
Usually, this occurs when your system is under attack by malware or misconfigured settings in user groups.

If you’re affected by same issue, whenever a UAC dialog box appears, you will see a message “Enter admin username or password” or Yes button will be missing from the UAC dialog or similar. Check screenshot above for an idea.
If you’re affected, then this blog post will share with you possible ways how to fix lost administrator rights issues in Windows 11 as well as in Windows 10. So let’s get started:
Enabling The Built-In Administrator Account
Windows has a built-in administrator which can be used for fixing issues like lost administrator rights. If you have been facing this issue, then you can easily resolve it by enabling the built-in administrator account by following the steps given below-
Boot your Windows PC in Safe mode in Windows 11 and Windows 10
Once you’re in the Safe mode, press the Windows + R key combo to open the Run Dialog box. Here, type netplwiz and hit Enter.
You will see a prompt that will ask you for your superuser admin account password. The password is generally blank, so click on Yes leaving the space blank. If it doesn’t work, then enter the password of the user account and click Yes.
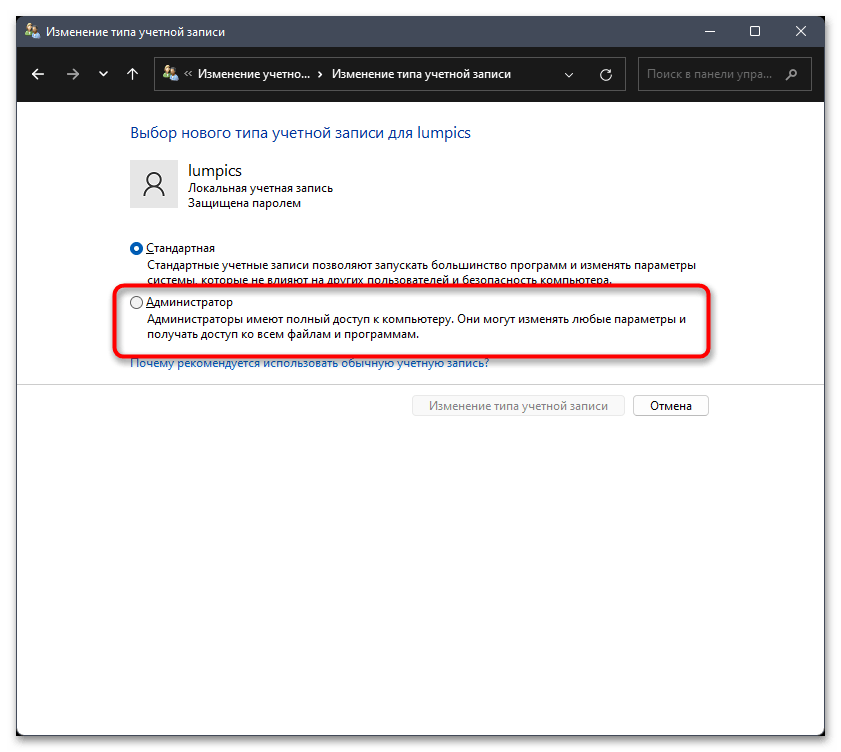
In the User Accounts window, double-click on your username. This will open its Properties.

In the Window that opens switch to the Group membership tab in the Properties window. Here, select the Administrator option, click on Apply, and then click OK to save the changes.
After that restart your computer to boot into regular Windows mode. This will restore the administrative rights on your Windows 11/10 PC.
Using Command Prompt At Boot
Another way to fix this issue is through Command Prompt. However, this method is more difficult than compared to the first method and you should only go for this method if the first method didn’t work out.
Boot your Windows PC to the recovery environment following the instructions discussed here.
In the Windows Recovery Environment window, click on Advanced Options > Command Prompt.

In the Command Prompt, type regedit.exe and hit enter. This will launch the Registry editor.

Here, you need to click HKEY_LOCAL_MACHINE
Next, click on the File option on the ribbon bar and click on Load Hive.
You will have to select the hive from the current Windows installation, which will be C/D:/Windows/System32/Config
Note- SAM file is loaded in Windows Recovery environment by default which is called X drive. Ensure, you select collect SAM file.
Select the SAM file in the Config folder and click on Open.

Name the file as SAM_REG and click on OK. This will load the file with the same name in Registry Editor.

Head to the following address in the Registry Editor: Computer\HKEY_LOCAL_MACHINE\REM_SAME\Domains\Account\Users\00001F4

Now on the right side, double-click on F (REG_BINARY) to edit it.

Now, place your cursor on line 38 on the right of 11 and then press Backspace to remove it and type 10 instead. Click on OK to save the changes.
Now reboot your PC to normal mode for the changes to take effect and the issue will be fixed.
So these are two ways that will definitely fix “Lost Administrator Rights in Windows 11 or Windows 10”. If you need further assistance feel free to contact us.
Viney Dhiman, the mind behind GeekerMag, is a seasoned content writer with over 12 years of experience. Specializing in simplifying complex tech concepts, he covers Windows OS, Android, iOS, web apps, and product reviews. His work can be found on popular tech websites like Gizmodo and The Verge, and he has been interviewed by the Microsoft Edge team.
This article mentions various methods to fix your disabled administrator account on Windows 11/10. To access most of the features, you need administrator privilege on your PC. And, if you are not able to access the administrator account for some reason, it can prevent you from doing a lot of things on your computer. If you are facing a disabled administrator account problem, look no further. Here, I will be discussing some solutions to resolve this issue.

Here are the methods that you can try if you are unable to access the administrator account on Windows 11/10:
- Restart Windows in Safe Mode
- Activate Administrator account through Command Prompt
- Use Registry Editor
- Fix it through Group Policy Editor
- Create a new Administrator Account
- Use PowerShell to Enable Hidden Administrator Account
Let’s discuss these solutions in detail!
1] Restart Windows in Safe Mode
Check if you can log on to Windows as an administrator in Safe Mode even when your administrator account is disabled. To boot Windows in Safe mode:
- Open the Settings app by pressing Windows + I shortcut key and then go to Updates & Security > Recovery tab.
- Go to the Advanced Setup section and click on the Restart now button.
- As Windows attempts to restart your system, you will see some options on the screen including Troubleshoot; click on it.
- Then, click on Advanced options > Startup Settings and you will see an option called Enable Safe Mode.
- Press the key assigned for Enable Safe Mode option and then Windows will start in safe mode.
Once there, see if you can log in. One in, do the following:
- Open Computer Management
- Expand Local Users and Groups
- Click Users, right-click Administrator in the right pane
- Click Properties.
- Click to clear the Account is disabled check box, and then click OK.
2] Activate Administrator account through Command Prompt
Try activating the administrator account using the command prompt and see if it is able to fix the problem. You can follow the below steps for that:
- First, press and hold the Shift key and then tap on the Restart option on your login screen. This will take you to Advanced Boot Options.
- Now, click on the Troubleshoot > Advanced Options > Command Prompt option
- Choose a user account and enter the password to it.
- When the Command Prompt opens up, execute this command in it:
net user administrator /active:yes - Reboot your PC and check.
The above suggestions will help you if it is your admin account that has disabled.
The following suggestions will require you to be signed in as an administrator. So if it is someone else’s Admin account that has been disabled, you can try to re-enable it using the usual method or try these suggestions.
3] Use Registry Editor
Open Command Prompt using steps mentioned in method (2). Now, type regedit in CMD and press Enter button. Doing so will open up Registry Editor.
In Registry Editor, select HKEY_LOCAL_MACHINE present in the left panel and then click File > Load Hive option.
Next, browse the following location on your PC: C:\Windows\System32\config.
Here, you will see a file named SAM; click and open it.
Now, you need to go to the following path in Registry Editor:
HKEY_LOCAL_MACHINE\SAM\Domains\Account\Users
In this location, you will see a 000001F4 key which you need to select. And then, double-click on the F binary value present on the right side.
Now, check for 0038 entry and see the first column showing 11. Replace this value with 11/10.
Finally, press the OK button and then close both Registry Editor and CMD to reboot your PC.
This should fix the disabled administrator account issue on Windows 11/10.
Related: How to Enable or Disable built-in Administrator account in Windows 11/10.
4] Fix it through Group Policy Editor
Group Policy Editor allows you to configure several policies and can be used to control user accounts. You can use it to fix disabled administrator account on Windows PC by following below steps:
Open Run app using Windows Key + R hotkey. Type gpedit.msc and then click on OK to open Group Policy Editor.
In the Group Policy Editor, go to the following option:
Computer Configuration > Windows Settings > Security Settings > Local Policies > Security Options
You will now see an Accounts: Administrator account status option in the right panel. Double click this option and a Properties window will open up.
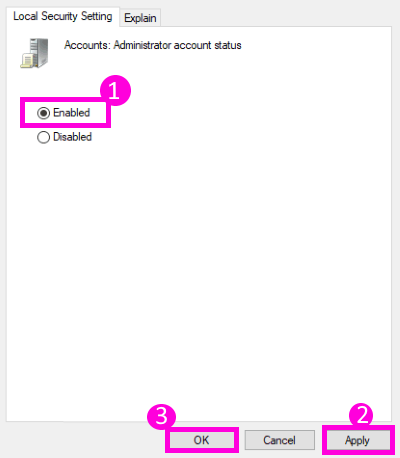
Make sure the Enabled option is selected. If not, click on it and then press Apply > OK button.
5] Create a new Administrator Account
Try creating a new admin account on your PC if you still get a disabled administrator account problem. You can create a user account and then convert it to an Administrator account. Use the Settings app to create a new administrator account by following the below instructions:
- Open the Settings app and go to Accounts > Family & other users option.
- Now, select Add someone else to this PC option from the right panel.
- On the next prompt, select I don’t have this person’s sign-in information option.
- Next, select Add a user without a Microsoft account, then enter the preferred name and password for your account, and then press the Next button.
- You will now see the newly added account on the Accounts page. To make it an Administrator account, click on it and then select the Account Type option under it.
- Set the Account Type to Administrator and press the OK button.
This will create an administrator account that you can start using.
6] Use PowerShell to Enable Hidden Administrator Account
Another trick to fix the disabled administrator account issue is to try enabling the hidden administrator account using Powershell.
Press Windows + X key to open up the shortcut menu and select Windows Powershell (Admin) option from it.
Alternately, go to the search box and type PowerShell and then open the Powershell app using the Run as administrator option.
Next, type and execute this command in Powershell:
Enable-LocalUser -Name "Administrator"
Doing so should enable you to access your administrator account on Windows 11/10.
Hopefully, this guide was helpful in case you were unable to access your administrator account on Windows 11/10.
Now read: Your IT administrator has disabled Windows Security.
How do I fix my disabled administrator account?
To fix your disabled administrator account, access the Computer Management console, navigate to Local Users and Groups, and select Users. Right-click the Administrator account, choose Properties, and uncheck “Account is disabled.” Click OK to enable the account. Restart your computer to ensure changes take effect.
How do I enable the administrator account in Windows?
To enable the administrator account in Windows, open Command Prompt as an administrator. Type net user administrator /active:yes and press Enter. This will activate the hidden admin account. To secure it, set a password by typing net user administrator * and entering a new password.
Все способы:
- Вариант 1: Запуск программ от имени администратора
- Вариант 2: Назначение локальному пользователю прав администратора
- Вариант 3: Добавление собственной учетной записи в группу «Администраторы»
- Вариант 4: Включение учетной записи «Администратор»
- Способ 1: Приложение «Управление компьютером»
- Способ 2: «Командная строка»
- Способ 3: «Терминал Windows»
- Вопросы и ответы: 3
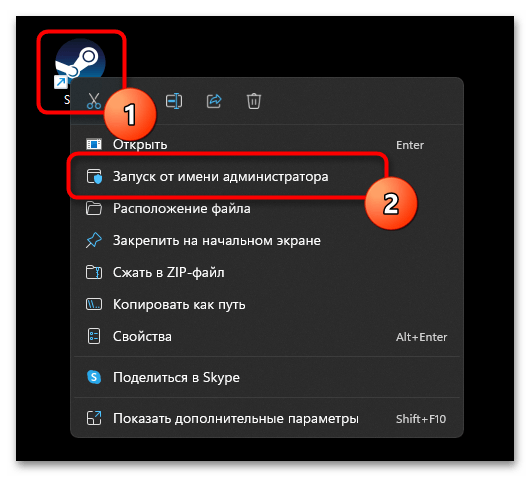
Вариант 1: Запуск программ от имени администратора
По умолчанию пользователь, которого вы создаете первого в Windows 11, и так имеет права администратора, что позволяет вам выполнять большинство действий в операционной системе. Если привилегий для работы с какой-то программой в обычном режиме недостаточно, из-за чего чаще всего и требуется активация администратора, ее необходимо запустить от имени данного пользователя. Обо всех методах выполнения этой задачи читайте в материале ниже.
Подробнее: Открытие от имени администратора в Windows 11
В той же статье рассказано и об управлении контролем учетных записей, что позволяет локальным юзерам обходиться без использования данной функции и не испытывать никаких ограничений при работе со сторонним и штатным ПО. Когда этого все равно недостаточно, понадобится либо назначить локального пользователя администратором, либо добавить свой аккаунт в эту группу, если он в нее по каким-то причинам не входит.
Вариант 2: Назначение локальному пользователю прав администратора
При создании локальной учетной записи, через которые обычно авторизовываются другие пользователи одного и того же компьютера, можно не заметить, что по умолчанию выбирается стандартный тип, а не «Администратор». Соответственно, необходимых привилегий у таких юзеров не будет, что и вызывает некоторые трудности во время выполнения определенных действий внутри ОС. Если вы подразумеваете включение администратора как раз для таких учетных записей, советуем прочитать другой тематический материал на нашем сайте, где разобраны все доступные варианты выполнения этой настройки.
Подробнее: Предоставление пользователю прав администратора в Windows 11
Вариант 3: Добавление собственной учетной записи в группу «Администраторы»
Данный вариант больше подходит в тех случаях, когда отсутствие прав администратора у главного пользователя ПК является ошибкой или системным сбоем, ведь из-за этого не получится выполнить много различных действий в ОС, включая отключение функций или запуск полезных системных утилит. Исправление здесь одно — запуск Windows 11 c загрузочной флешки и использование консоли для добавления себя в группу администраторов.
- Начнем с главного — создания загрузочной флешки. Для этого применяется специальное программное обеспечение, ISO-образ с операционной системой и флеш-накопитель, на котором будет достаточно свободного пространства. ISO можно скачать с официального сайта бесплатно, а далее выбрать ПО и осуществить запись образа. Более детальную информацию об его создании и правильном запуске читайте далее.
Подробнее: Инструкция по созданию загрузочной флешки с Windows
- Как только вы загрузились с такой флешки, то увидите окно установки с предложением выбрать язык. Вам понадобится использовать сочетание клавиш Shift + F10, чтобы из этого окна запустить «Командную строку».
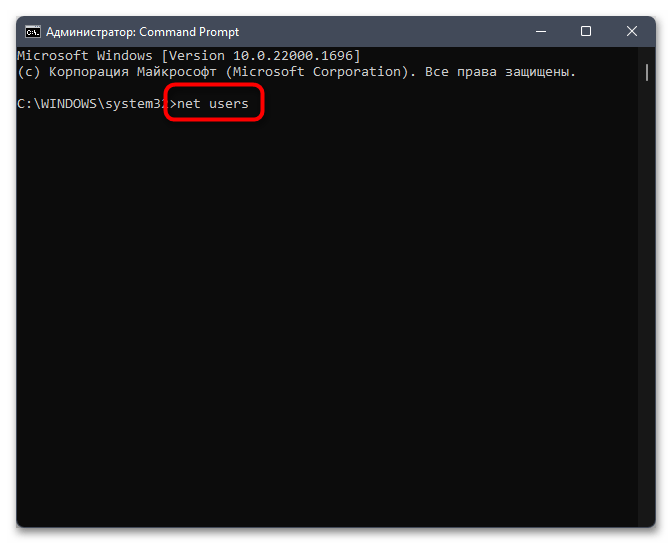
- В ней введите команду
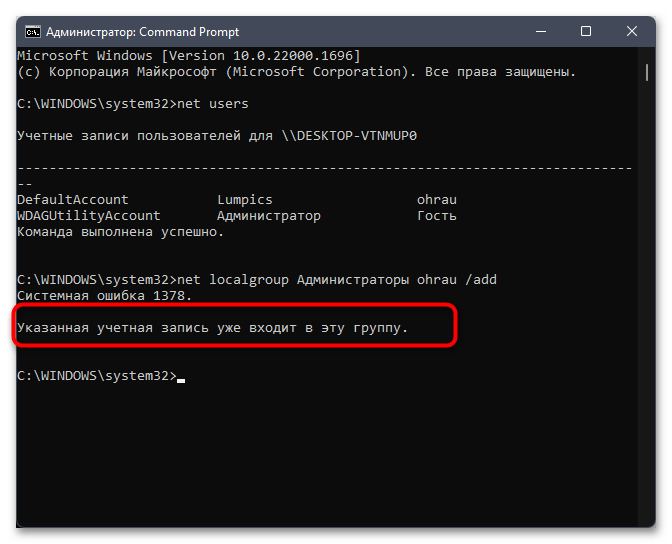
net usersи нажмите Enter, чтобы применить ее. Результатом вывода станет список всех существующих учетных записей. Это нужно для того, чтобы убедиться в отсутствии прав администраторов и узнать точное название своего профиля. - Далее используйте команду
net localgroup Администраторы user_name /add, заменив user_name на имя своего пользователя, чтобы добавить аккаунт в группу администраторов.Администраторызамените наAdmins, если интерфейс вашей Windows 11 на английском языке. - Если вы получили информацию о том, что учетная запись и так входит в указанную группу, значит, ваши проблемы с работой в ОС не связаны с привилегиями учетной записи и их решения нужно искать в другом месте.
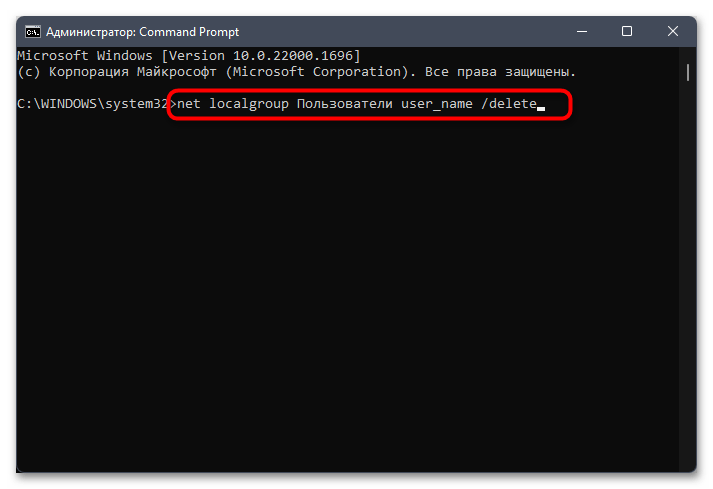
- Если же команда просто выполнилась успешно, остается только удалить свой профиль из группы обычных пользователей, чтобы это не вызывало конфликтов. Используйте команду
net localgroup Пользователи user_name /delete, заменив имя пользователя на свое. Точно так жеПользователизамените наUsers, если используете ОС на английском языке.

Вариант 4: Включение учетной записи «Администратор»
Остается только разобраться с включением стандартной учетной записи Windows 11 под названием «Администратор», которая всегда существует, но по умолчанию отключена, поскольку может представлять угрозу безопасности ОС. Активировать ее стоит только опытным пользователям или системным администраторам, которые более глубоко работают с ОС и изменяют различные параметры, не нужные обычному юзеру. Есть три метода активации «Администратора», которые и будут показаны далее.
Способ 1: Приложение «Управление компьютером»
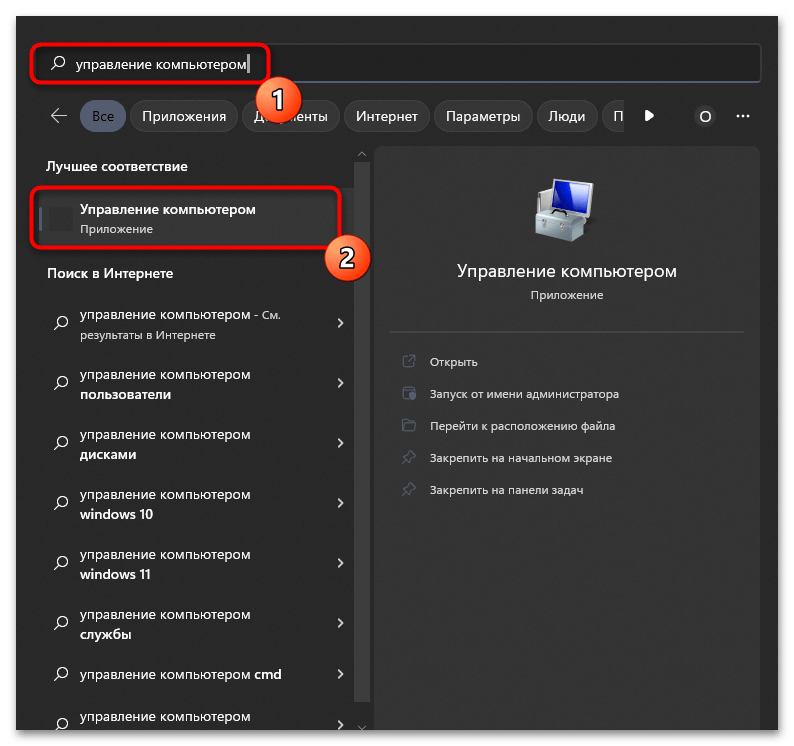
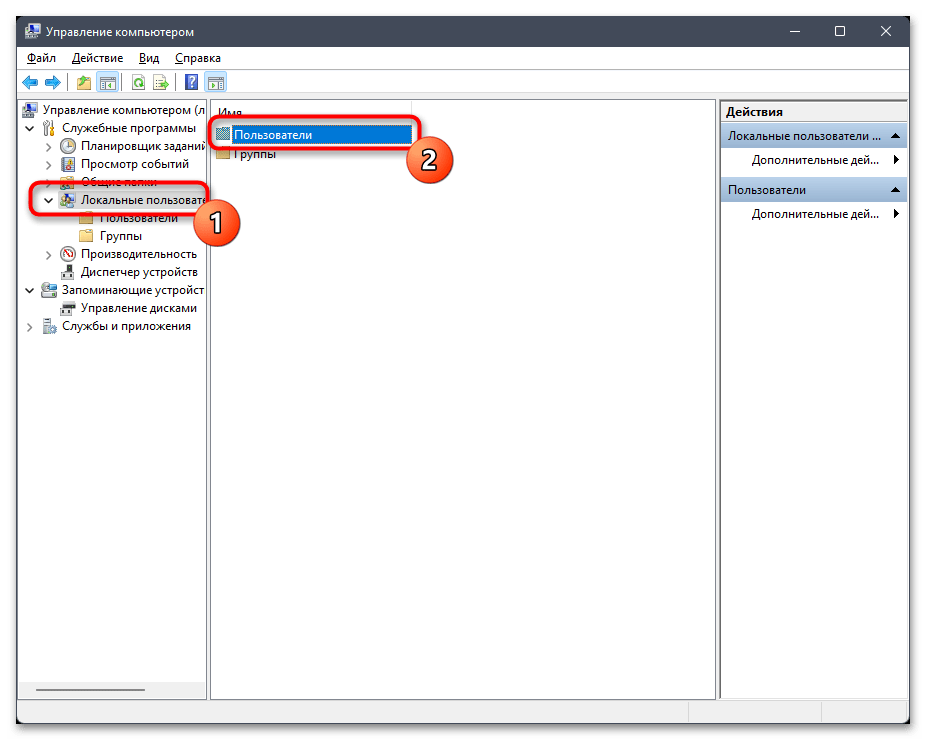
Если вы предпочитаете использовать графический интерфейс операционной системы, а не вводить консольные команды, можете открыть приложение «Управление компьютером». В нем есть весь список с существующими учетными записями, а также доступны все настройки для них, включая и активацию скрытого профиля администратора.
- Вам понадобится через поиск в «Пуске» отыскать «Управление компьютером» и запустить данное приложение.
- В нем выберите раздел «Локальные пользователи», затем перейдите в каталог «Пользователи».
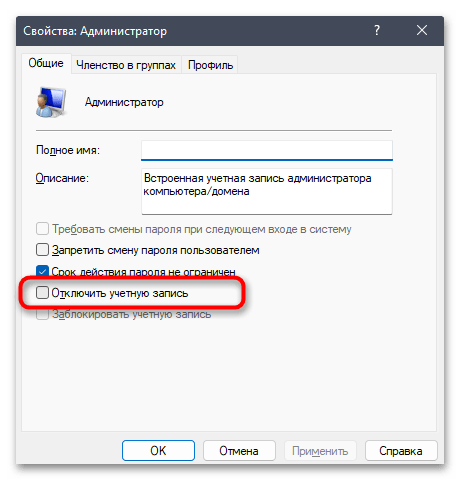
- Найдите пользователя с именем «Администратор» и дважды щелкните по строчке левой кнопкой мыши.
- В новом окне снимите галочку с пункта «Отключить учетную запись» и примените изменения. Теперь администратор активирован и вы можете приступать к выполнению необходимых действий, которые ранее были запрещены в Windows 11.

Способ 2: «Командная строка»
При использовании «Командной строки» будет достаточно ввести всего лишь одну команду, чтобы активировать встроенную учетную запись администратора. К тому же такой метод гораздо удобнее для пользователей, которые изначально выполняют действия по настройке ОС через консоль.
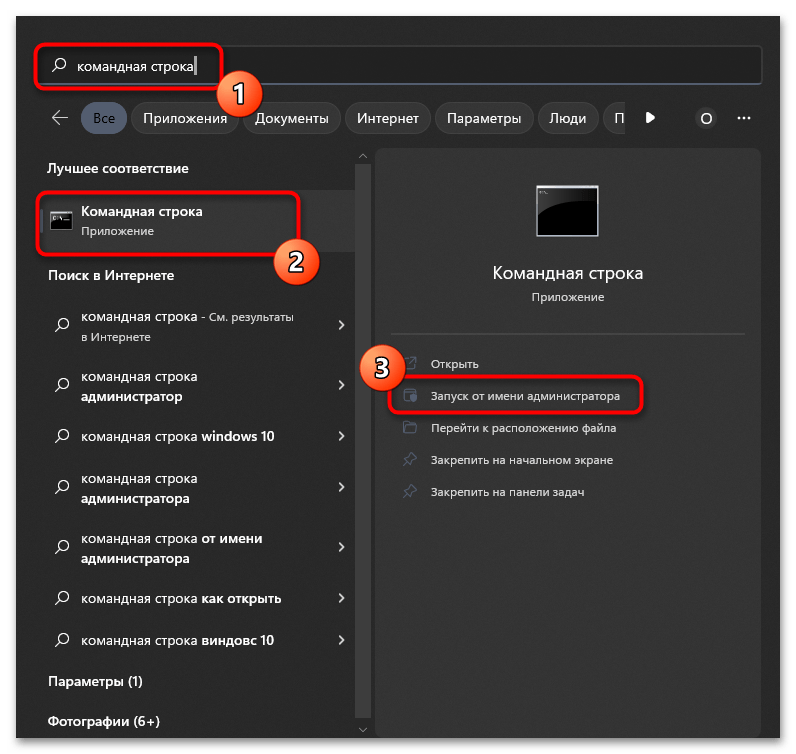
- В «Пуске» отыщите «Командную строку» и запустите ее от имени администратора. Можете сделать это любым другим удобным для вас методом.
Подробнее: Запуск «Командной строки» от имени администратора в Windows 11
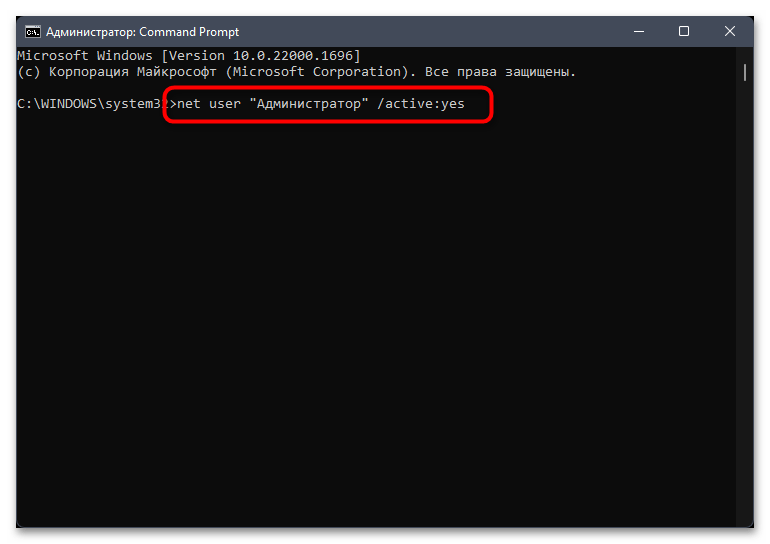
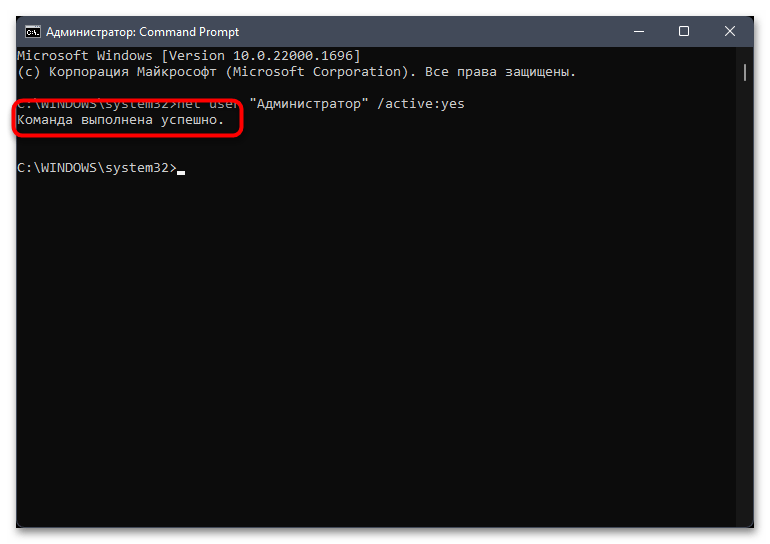
- Введите команду
net user "Администратор" /active:yesи нажмите Enter для ее применения. Если ваша ОС на английском языке, то используйте"Administrator". - Вы должны получить уведомление о том, что команда успешно выполнена. Теперь можете переходить к тестированию встроенной учетной записи.
Способ 3: «Терминал Windows»
Те же самые действия по активации профиля администратора можно сделать и через «Терминал Windows», он же «PowerShell». Сама команда только немного меняется, поскольку работать будем с другой системной утилитой. Впрочем, вы сами все узнаете из следующей инструкции.
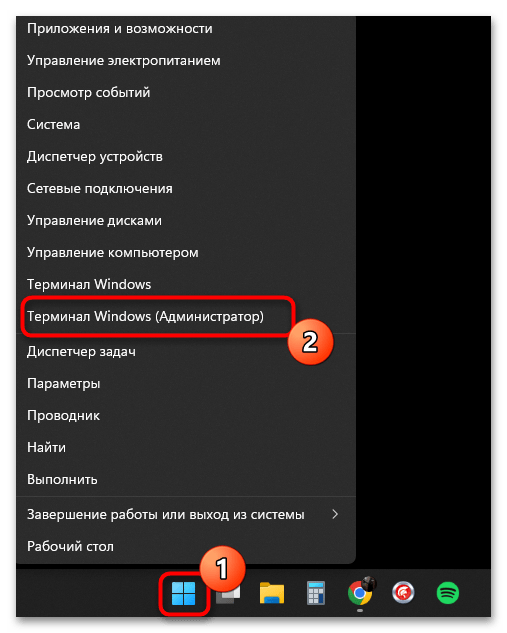
- Щелкните по кнопке «Пуск» правой кнопкой мыши и выберите пункт «Терминал Windows (Администратор)».
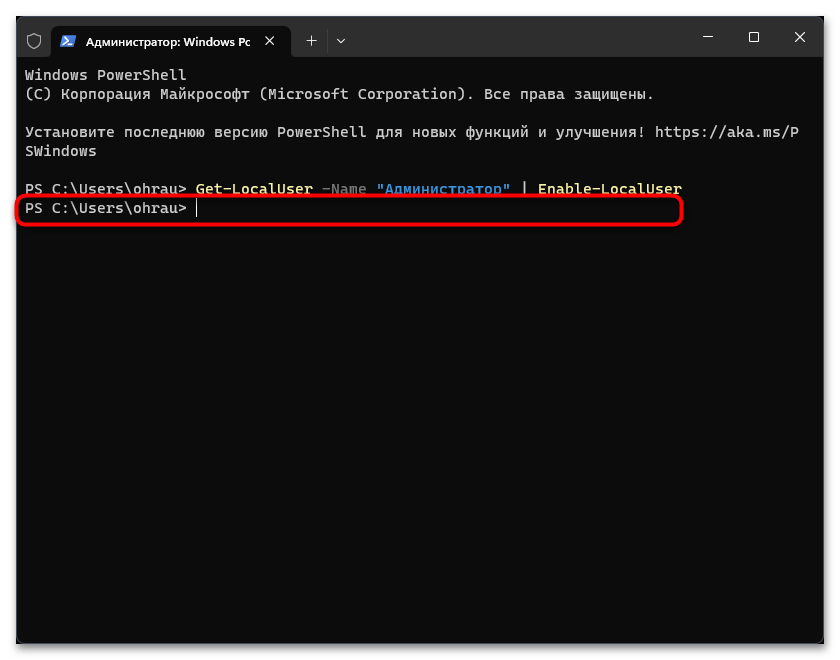
- Введите команду
Get-LocalUser -Name "Администратор" | Enable-LocalUser, заменив на"Administrator"в англоязычной Windows 11. - После активации команды должна просто отобразиться следующая строка ввода, что и обозначает ее успешное выполнение.

Наша группа в TelegramПолезные советы и помощь