
Download Windows Speedup Tool to fix errors and make PC run faster
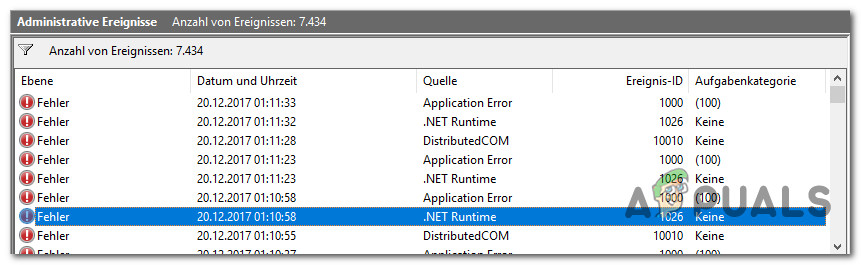
While trying to run an application on your computer, you may find it crashing frequently or just refusing to start. It may also display an error message – .NET Runtime Event 1026 bearing the following description under Event Viewer – The process was terminated due to an unhandled exception, Exception code c00000fd.

Event ID 1026 indicates that the problem lies with the application itself and Runtime error 1026 associated with .NET Framework mainly occurs when the framework fails or crashes while running as it was not programmed to handle properly (an “exception”).To fix this, you can follow any of the methods given below!
- Disable and re-enable the .NET framework
- Re-install Runtime Libraries
- Troubleshoot in a Clean Boot state
Let’s explore the listed methods in a bit of detail!
1] Disable and re-enable the .NET framework
It has been observed in many cases, the reason you keep getting this error message is that Windows 10 comes with .NET Framework 4.7 and 4.5 preinstalled. However, some of the applications might require an earlier iteration of the framework like 2.0, 3.5, or 4.0. You can try the following method and check if it solves your problem.
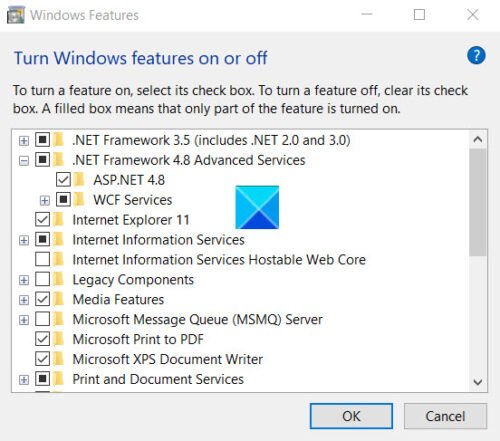
- Type ‘Turn Windows features on or off‘ in the Windows search bar and press Enter.
- When the Windows Features window opens, click on the ‘+’ icon, adjacent to .NET Framework 4.7 Advance Services to expand its menu.
- Uncheck all the options listed under it.
- Uninstall the framework and restart your PC.
- Next, reinstall the .NET Framework, go back to the Windows Features window, and click on the ‘+’ icon, adjacent to .NET Framework 4.7 Advance Services.
- Now, check all the options back and restart the computer again.
Run the application/program to check if the problem is resolved.
Read: How to check .NET Framework version installed.
2] Re-install Runtime Libraries
It’s likely that you are seeing the error because of an update, like the MS Visual C++ package which might not be installed properly or completely. To fix it, uninstall the current package and install a fresh copy.
- Go to Programs and Features, find and highlight the Microsoft Visual C++ Redistributable Package.
- Right-click it and choose the Uninstall option.
- Reboot your computer.
Download the latest redistributable package from Microsoft then install it.
Read: Troubleshoot .NET Framework Installation Issues.
3] Troubleshoot in a Clean Boot State
In Windows, many different drivers, settings, and programs are interacting or communicating with each other simultaneously. This varied environment may lead to software conflicts that can manifest in several ways, as .NET Runtime Error 1026. Performing a clean boot may help in pinpointing the conflict and resolving it.
It is important to note that the same event can be recorded for a wide variety of applications and thus, have multiple solutions.
For instance, the ‘System.Net.HttpListenerException’, may be related to a problem with an HTTP request, caused by the local TCP/IP configuration or a network connection issue and thus have some different solutions.
If you know of any other solutions than the ones described above, please share them with us in the comments section below.
A post-graduate in Biotechnology, Hemant switched gears to writing about Microsoft technologies and has been a contributor to TheWindowsClub since then. When he is not working, you can usually find him out traveling to different places or indulging himself in binge-watching.
Reader Interactions
Если вам по той или иной причине потребовалась загрузочная флешка Windows 10 (или другой версии ОС), при этом на имеющемся компьютере в наличии только Linux (Ubuntu, Mint, другие дистрибутивы), вы сравнительно легко можете записать её.
В этой инструкции пошагово о двух способах создать загрузочную флешку Windows 10 из Linux, которые подойдут как для установки на UEFI-системе, так и для того, чтобы установить ОС в Legacy режиме. Также могут пригодиться материалы: Лучшие программы для создания загрузочной флешки, Загрузочная флешка Windows 10.
Загрузочная флешка Windows 10 с помощью WoeUSB
Первый способ создания загрузочной флешки Windows 10 в Linux — использование бесплатной программы WoeUSB. Созданный с её помощью накопитель работает и в UEFI и в Legacy режиме.
Для установки программы используйте следующие команды в терминале
sudo add-apt-repository ppa:nilarimogard/webupd8
sudo apt update
sudo apt install woeusb
Если эти команды не сработали, попробуйте такой вариант:
wget mirrors.kernel.org/ubuntu/pool/universe/w/wxwidgets3.0/libwxgtk3.0-0v5_3.0.4+dfsg-3_amd64.deb
sudo dpkg -i libwxgtk*_amd64.deb
sudo apt update
sudo apt --fix-broken install
sudo apt install woeusb
После установки порядок действий будет следующим:
- Запустите программу.
- Выберите ISO образ диска в разделе «From a disk image» (также, при желании, можно сделать загрузочную флешку с оптического диска или смонтированного образа).
- В разделе «Target device» укажите флешку, на которую будет записан образ (данные с неё будут удалены).
- Нажмите кнопку Install и дождитесь завершения записи загрузочной флешки.
- При появлении ошибки с кодом 256 «Source media is currently mounted», размонтируйте образ ISO с Windows 10.
- При ошибке «Target device is currently busy», размонтируйте и отключите флешку, затем снова подключите её, обычно помогает. Если не сработало, попробуйте предварительно отформатировать её.
На этом процесс записи завершен, можно использовать созданный USB накопитель для установки системы.
Создание загрузочной флешки Windows 10 в Linux без программ
Этот способ, пожалуй, ещё проще, но подойдет только в том случае, если вы планируете загружаться с созданного накопителя на UEFI-системе и устанавливать Windows 10 на GPT диск.
- Отформатируйте флешку в FAT32, например, в приложении «Диски» в Ubuntu.

- Смонтируйте образ ISO с Windows 10 и просто скопируйте всё его содержимое на отформатированную флешку.


Загрузочная флешка Windows 10 для UEFI готова и с неё можно без проблем загрузиться в EFI-режиме.
В данной статье мы расскажем как создать загрузочную флешку с Windows в системе Linux с помощью утилиты под названием «Ventoy».
Для начала вам потребуется:
— Сама утилита Ventoy под Linux, скачать вы ее можете с официального сайта.
— ISO Образ нужной вам Windows, скачать его можно в нашем каталоге.
— Так же вам потребуется активировать будущую Windows, оригинальные ключи активации вы можете приобрести у нас в магазине по выгодным ценам от 1140 ₽.
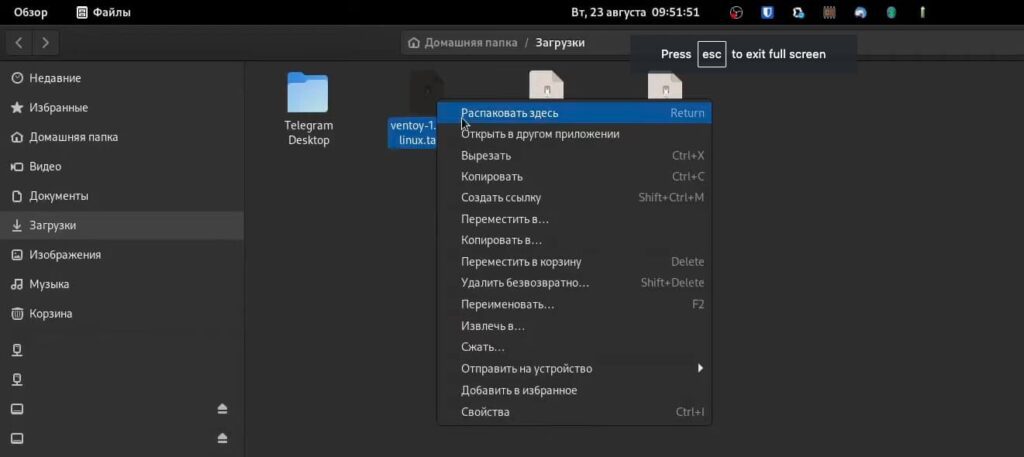
1) После того как вы скачали архив с программой, распаковываем его в удобное для вас место.
2) Переходим в папу с программой, и нажимаем «Свойство» на файле «VentoyGUIx86_x64».
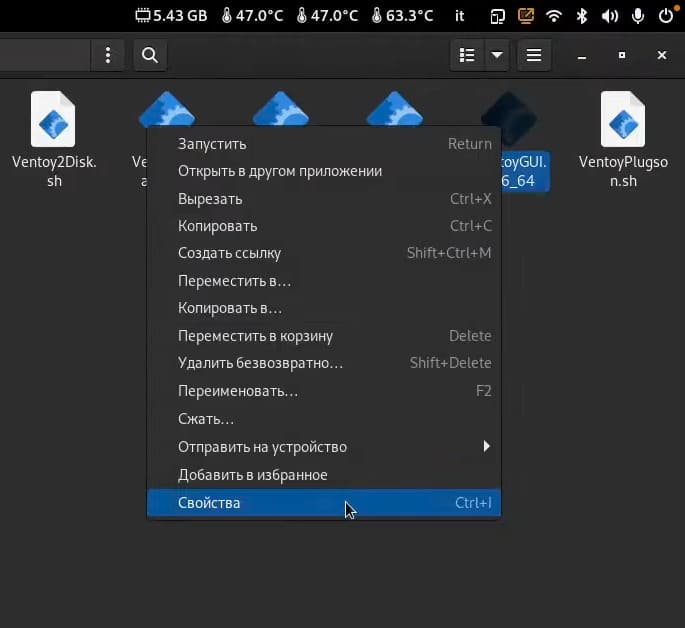
3) В разделе «Права» ставим галочку напротив «Разрешить выполнение файла как программы», чтобы сделать файл исполняемым.

4) После этого запускаем файл.
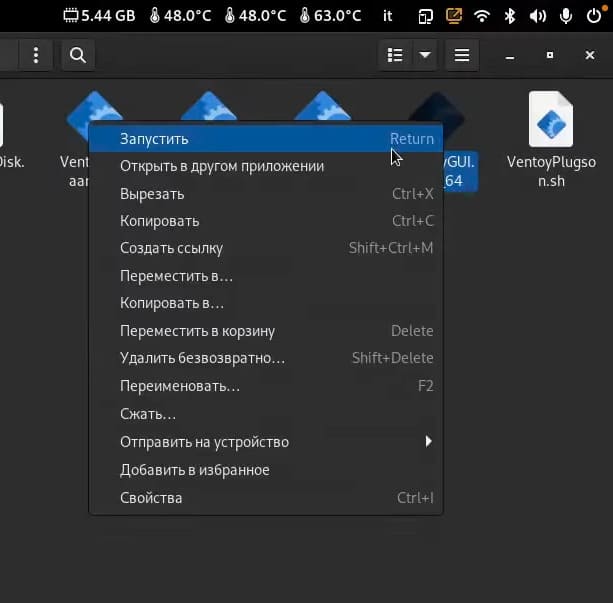
5) После запуска открывается интерфейс утилиты, если вы будете устанавливать Windows на старый ПК c Legacy Boot, то в разделе Option => Partition Style выбираем «MBR». Если же установка будет производиться на новый ПК с UEFI, тогда выбираем разметку «GPT».
6) После выбора нужной вам разметки, жмем «Install» и ждем какое-то время.
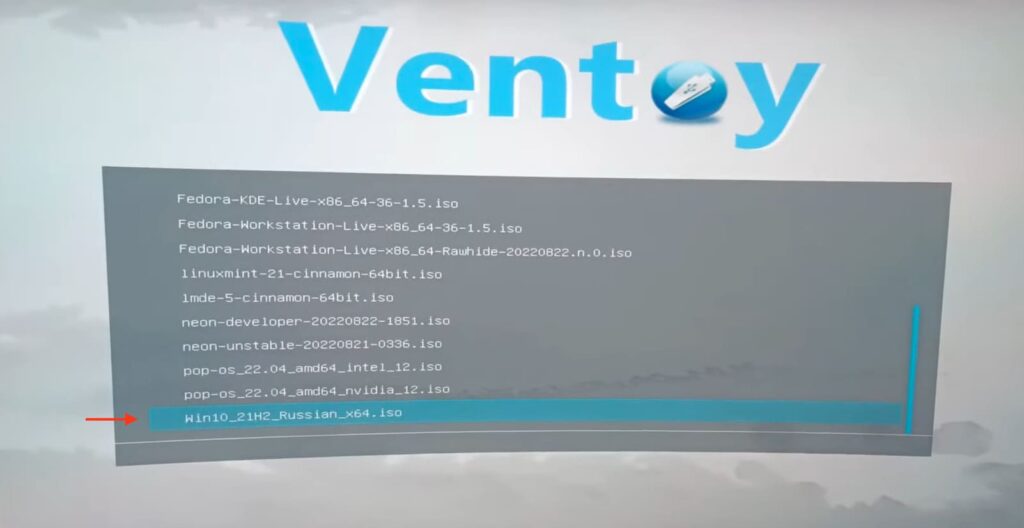
7) После записи программы на флешку, появится два раздела.
— Первый раздел, куда установилась сама утилита с ее файлами.
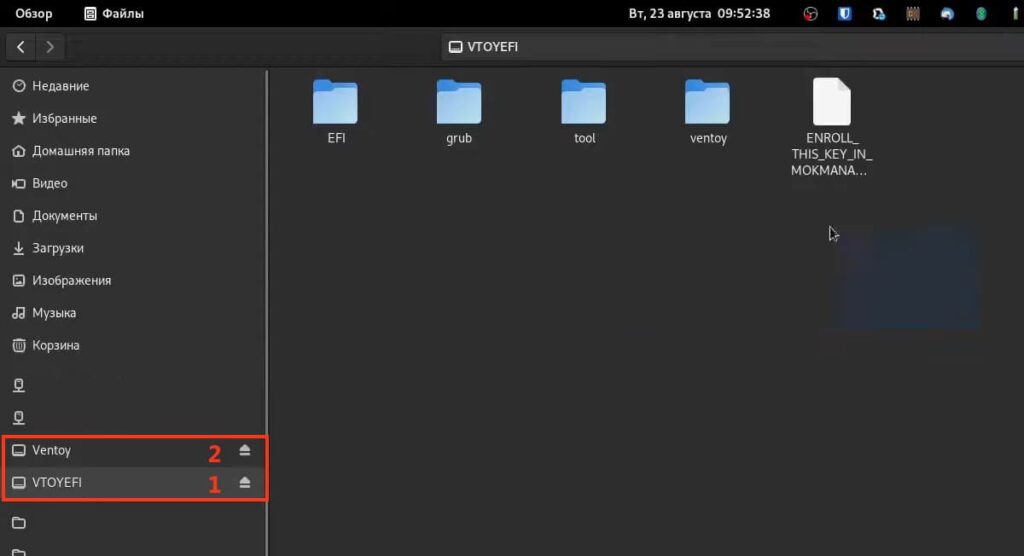
— Второй раздел, куда нужно будет поместить ISO образ Windows.
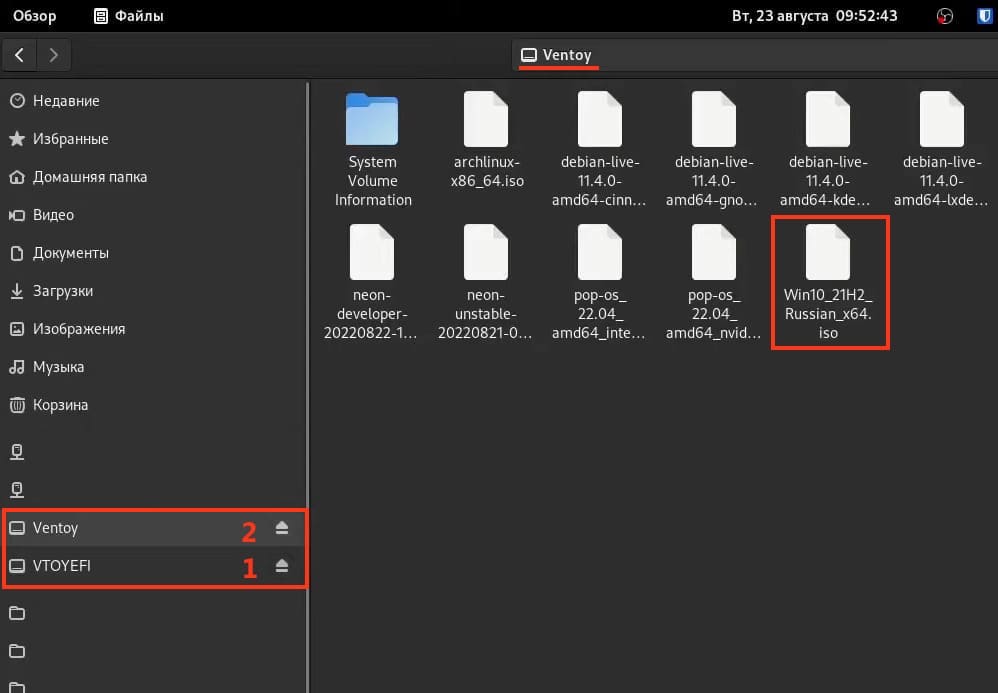
 Все что нам остается, это просто переместить во второй раздел заранее скачанный ISO образ нужной вам Windows.

9) После чего запуститься с этой флешки, выбрать второй раздел и начать процедуру установки системы.
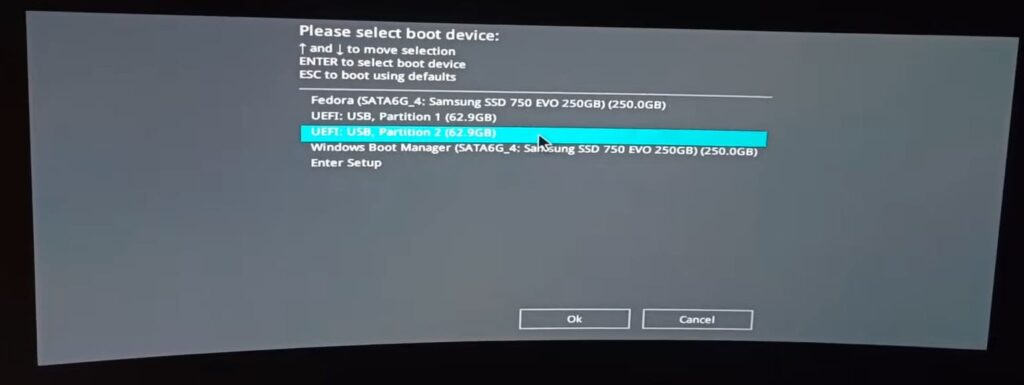
Хотим напомнить что все популярные ISO образы Windows вы можете скачать в нашем каталоге.
— Windows 11
— Windows 10
— Windows 8.1
— Windows 7
В этой инструкции подробно покажем, как самостоятельно создать загрузочную USB флешку для UEFI компьютера с дистрибутивом Windows 10/11 (Windows Server 2022/2019/2016) или Windows 7.
Содержание:
- Media Creation Tool: официальная утилита для записи образа Windows на USB флешку
- Rufus: лучшая утилита для создания загрузочной UEFI GPT флешки Windows
- Diskpart: вручную записываем установочную UEFI флешку с Windows 10
- Как создать загрузочную UEFI флешку с Windows 7?
- Создать загрузочную UEFI флешку с помощью PowerShell
Вам понадобится:
- USB-флешка (v 2.0 или v 3.0) емкостью не менее 4 Гб для Windows 7 или 8+ Гб для Windows 10/11;
- ISO файл с установочным 64-битный дистрибутивом Windows (32 битные версии Windows не получиться установить на UEFI компьютере).
Важная особенность загрузочной USB флешки для UEFI системы, ее обязательно придется отформатировать в файловой системе FAT32. Компьютер с UEFI в native режиме не сможет загрузиться с такого носителя, отформатированного в файловой системе NTFS.
Media Creation Tool: официальная утилита для записи образа Windows на USB флешку
Microsoft рекомендует использовать свою официальную утилиту Media Creation Tool (MCT) для создания установочных носителей и ISO образов с Windows.
Есть отдельные версия Media Creation Tool:
- Для Windows 10 — (cкачать последнюю версию MCT можно здесь https://www.microsoft.com/en-us/software-download/windows10)
- Для Windows 11 — https://www.microsoft.com/software-download/windows11
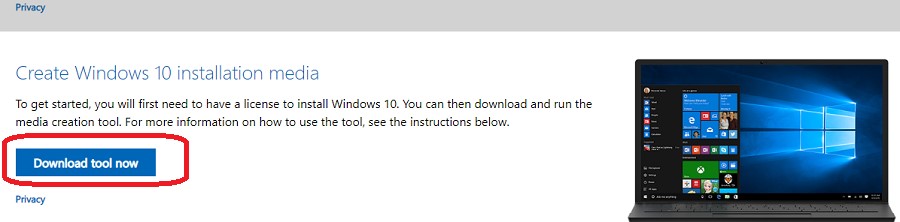
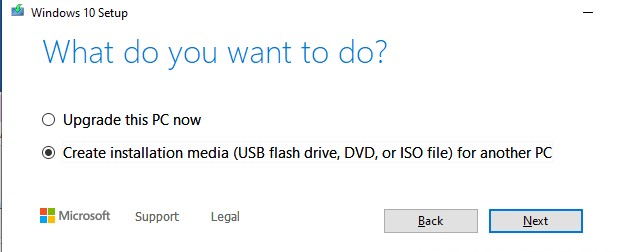
- Скачайте и запустите файл MediaCreationTool22H2.exe;
- Выберите, что вы хотите создать установочный носитель — Create installation media (USB flash drive, DVD, or ISO file) for another PC;

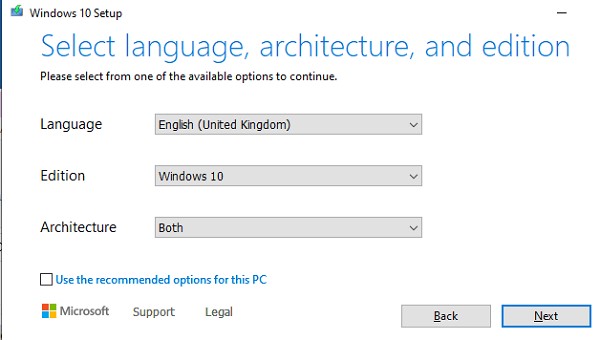
- Выберите язык, разрядность и архитектуру образа Windows 10 (x86 и/или x64), который нужно записать на USB накопитель;

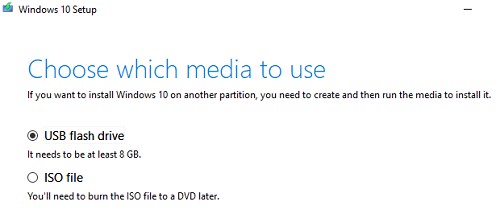
- Затем укажите, что вы хотите записать образ на USB флешку;

- Выберите вашу флешку в списке извлекаемых устройств и USB накопителей.
Все данные с выбранной USB флешки будут удалены.


На этом все. Нажмите Next -> Next -> Finish и дождитесь пока установочный образ Windows запишется на USB накопитель.
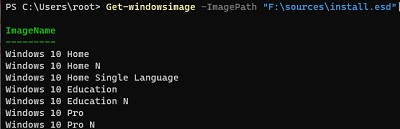
Чтобы узнать версию Windows в установочном WIM/ESD файле или ISO образе, откройте командую строку и выполните:
Get-windowsimage -ImagePath "F:\sources\install.esd"|select imagename
Как вы видите в установочном образе на флешке есть только Home, Education и Professional редакции Windows.
Если вам нужно записать на USB флешку Enterprise редакцию Windows, нужно использовать параметры командной строки Media Creation Tool. Выполните команду:
MediaCreationTool22H2.exe /Eula Accept /Retail /MediaArch x64 /MediaLangCode en-US /MediaEdition Enterprise
Затем должно открыться окно Media Creation Tool, в котором нужно указать ваш ключ Windows 10 Enterprise. Можете указать здесь публичный KMS ключ для Windows 10 (смотри статью FAQ о KMS активации Windows).
Затем выберет USB носитель, на который нужно записать установочный образ Windows 10 Enterprise.
Данную USB флешку можно использовать для загрузки и установки Windows как на UEFI, так и на BIOS компьютерах.
Способ создания загрузочной флешки с Windows при помощи Media Creation tool очень простой и доступен любому пользователю. Однако он всегда записывает только последи билд Windows и не позволяет записать на USB флешку ваш собственный ISO файл с образом Windows.
Rufus: лучшая утилита для создания загрузочной UEFI GPT флешки Windows
Начинающим пользователям гораздо проще создать собственную загрузочную UEFI флешку для установки Windows с помощью графического интерфейса популярной утилиты Rufus. На данный момент на сайте разработчика https://rufus.ie доступна уже третья версия утилиты – Rufus 4.12. Утилита довольно компактная (около 1,4 Мб), не требует установки и полностью бесплатна. Кроме того, работает заметно быстрее аналогов.
Скачайте утилиту Rufus с официального сайта и запустите с правами администратора. Чтобы записать имеющийся ISO образ на флешку:
- Устройство: выберите вашу USB флешку;
- Метод загрузки: укажите файл с ISO образом Windows (можно создать ISO образ с последним билдом Windows 10 с помощью той же Media Creation Tool, см. пример);
- Схема раздела: GPT;
- Параметры образа: Стандартная установка Windows
- Целевая система: UEFI (non-CSM);
- Файловая система: FAT32
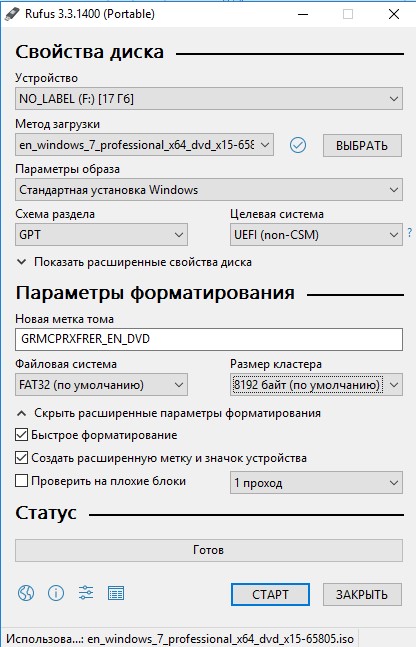
Нажмите СТАРТ для начала записи образа Windows на USB флешку. Через 10-15 минут ваш загрузочный USB накопитесь с образом Windows для установки на UEFI компьютере будет готов
Начиная с версии 3.5 в Rufus доступна загрузка установочных образов Windows. Для этого при запуске Rufus нужно разрешить ежедневную проверку обновлений. После этого в интерфейсе Rufus появится кнопка Download.
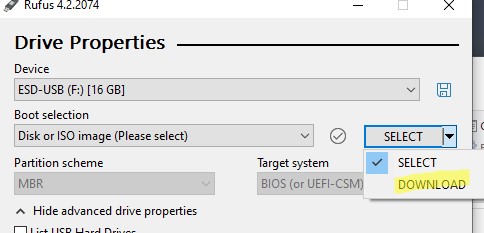
Вы можете выбрать какую версию Windows нужно скачать (доступна загрузка ISO образов с последними релизами Windows 8.1, Windows 10 и Windows 11).
Diskpart: вручную записываем установочную UEFI флешку с Windows 10
Вы можете создать загрузочную UEFI флешку с нужным дистрибутивом Windows вручную. Описанная ниже процедура подходит для опытных пользователей, выполняется из командной строки и позволяет вам полностью контролировать (и понимать) все этапы процесса создания загрузочной USB флешки.

- Вставьте USB флешку в соответствующий порт компьютера;
- Запустите командную строку с правами администратора;
- Запустите утилиту DISKPART, набрав в командной строке:
Diskpart
- Выведите список всех дисков в системе:
list disk
- Найдите диск, соответствующий вашей USB флешке (в нашем примере это Disk 2) и выберите его:
Select Disk 2
-
Предупреждение. Следующая команда полностью уничтожит всю информацию и разделы на USB флешке, поэтому желательно лишний раз убедится, что на предыдущем шаге вы выбрали именно ваше съемное USB устройство, а не один из жестких дисков компьютера.
Очистите диск:
clean
- Создайте на диске первичный раздел:
create partition primary
- Сделайте созданный раздел активным:
active
- Выведите список разделов в системе командой:
list volume
- Выберите созданный вами раздел (в нашем примере это Volume 3):
select volume 3
- Отформатируйте выбранный раздел в файловой системе Fat32:
format fs=fat32 quick
Примечание. В отличии от компьютеров с BIOS, позволяющих загружаться с загрузочных разделов с файловыми системами FAT, FAT32, exFAT или NTFS, UEFI позволяет загрузиться только с загрузчика, находящегося на загрузочном диске, отформатированном в файловой системе FAT32.
- Назначьте отформатированному разделу букву диска (если Windows автоматически не назначает букву флешке — смотри статью):
assign

- Завершите работу с DISKPART:
exit

Теперь нужно скопировать файлы со смонтированного установочного ISO образа диска с Windows x64 на подготовленную вами USB флешку. Сделать это можно с помощью проводника Windows, файлового менеджера или из командной строки, например, так:
xcopy d:\* f:\ /s /e
(где, d:\ установочный DVD диск или смонтированный iso образ с дистрибутивом Windows , f:\ — буква, присвоенная флешке)
Примечание Т.к. максимальный размер файла на файловой системе FAT32 не должен превышать 4 Гб, вы не сможете скопировать файл установочного образа системы install.wim большого размера (чаще всего это проблема возникает с модифицированными образами Windows). Размер файла install.wim, может быть более 4 Гб, если вы интегрировали в установочный образ обновления безопасности, добавили драйвера и т.д. В этом случае файл install.wim придется разбить на несколько файлов размером до 4 Гб (например, 3 Гб файлы). Для этого можно воспользоваться командой:
Dism /Split-Image /ImageFile:D:\sources\install.wim /SWMFile:c:\tmp\install.swm /FileSize:3000
Или с помощью утилиты imagex:
imagex /split D:\sources\install.wim c:\tmp\install.swm 3000
Полученные файлы install.swm, install2.swm, install3.swm … нужно скопировать на флешку в каталог F:\sources. Установщик Windows в процессе установки ОС сам соберет swm файлы и применит полный wim образ к диску.
Как создать загрузочную UEFI флешку с Windows 7?
Если вы создаете установочную USB флешку с Windows 7 / Windows Server 2008 R2 для UEFI компьютера, нужно выполнить дополнительные шаги:
- На USB флешке перейдите в каталог f:\efi\microsoft\boot;
- Целиком скопируйте его содержимое на один уровень выше (в каталог F:\efi\boot)
- Скопируйте файл bootmgfw.efi в каталог f:\efi\boot и переименуйте его в bootx64.efi;
Примечание. Именно файлу bootx64.efi должна передать управление среда UEFI. Файл bootmgfw.efi можно скопировать из уже установленной системы с Windows 7 x64 (находится он в каталоге %windir%\Boot\EFI), также его можно извлечь из файла install.wim в дистрибутиве с помощью архиватора 7ZIP, найти его можно по пути sources\install.wim\1\Windows\Boot\EFI\bootmgfw.efi).

Примечание. Для некоторых материнских плат необходимо дополнительно скопировать файл bootx64.efi в корень USB диска либо с идентичным именем файла или с именем shellx64.efi.

Создать загрузочную UEFI флешку с помощью PowerShell
Также можно использовать командлеты PowerShell для создания загрузочной UEFI флешки.
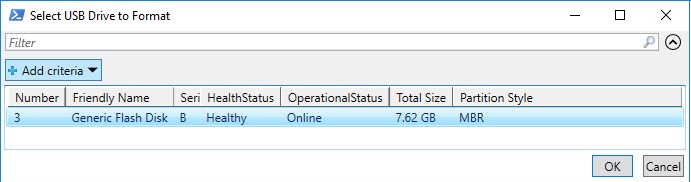
Следующая команда выведет список USB устройств. После того, как вы выберите нужный накопитель, он будет очищен, создан первичный раздел и отформатирован в файловой системе Fat32 (используются командлеты из модуля управления дисками Storage):
$Results = Get-Disk |Where-Object BusType -eq USB |Out-GridView -Title 'Select USB Drive to Create UEFI bootable device' -OutputMode Single |Clear-Disk -RemoveData -RemoveOEM -Confirm:$false -PassThru |New-Partition -UseMaximumSize -IsActive -AssignDriveLetter |Format-Volume -FileSystem FAT32
Смонтируйте установочный ISO образ Windows 10:
$Volumes = (Get-Volume).Where({$_.DriveLetter}).DriveLetter
Mount-DiskImage -ImagePath C:\ISO\Windows10-2004x64.iso
$ISO = (Compare-Object -ReferenceObject $Volumes -DifferenceObject (Get-Volume).Where({$_.DriveLetter}).DriveLetter).InputObject
Т.к. в PowerShell у меня не получилось определить, какая буква диска была назначена смонтированному ISO образу пришлось сравнивать список дисков до и после монтирования с помощью Compare-Object.
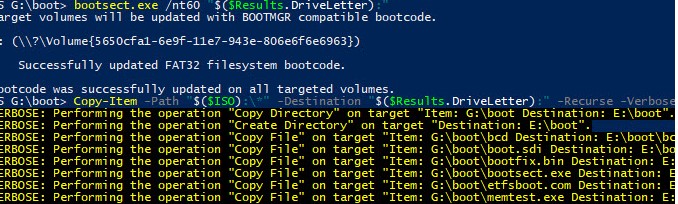
Теперь нужно перейти в каталог Boot и скопировать содержимое на USB флешку с помощью Copy-Item:
Set-Location -Path "$($ISO):\boot"
bootsect.exe /nt60 "$($Results.DriveLetter):"
Copy-Item -Path "$($ISO):\*" -Destination "$($Results.DriveLetter):" -Recurse -Verbose
Обратите внимание, что, для установки операционной системы в UEFI режиме, жесткий диск компьютера должен иметь разметку диска GPT. Для конвертации MBR диска в таблицу разделов GPT без потери данных можно использовать утилиту mbr2gpt).
Теперь вы можете загрузить компьютер с вашей загрузочной USB флешки. Для этого перезагрузите устройство, откройте настройки UEFI и проверьте, что ваш USB накопитель выбран в качестве первичного загрузочного устройства. После этого вы можете начать чистую установку Windows на компьютер или запустить режим восстановления Windows Recovery Environment для исправления проблем с установленной операционной системой.
Several Windows users have opened up Event Viewer and discovered a lot of .NET Runtime Error 1026 errors that are happening in quick succession. Most affected users are reporting that whenever a new event of this kind is created, they also end up seeing an application error pop-up. This issue is confirmed to occur on Windows 7, Windows 8.1, and Windows 10.
After investigating this issue, it turns out that there are several different underlying causes that might be producing the .NET Runtime Error 1026. Here’s a list of potential culprits that might cause this error:
- 3rd party application conflict – As it turns out, you can see this particular issue occurring due to a conflict between two 3rd party processes or between a 3rd party service and a native Windows process. In most situations of this kind, you should be able to fix the issue by achieving a clean boot state and identifying the culprit via trial and error.
- Corrupted .NET Infrastructure files – If you’re constantly seeing new instances of this error inside Event Viewer, it’s possible that you’re dealing with some type of corruption that’s affecting the .NET Framework installation. In this case, the most efficient way of going about solving the issue is to run the .NET Repair Tool.
- Lauchpad.exe conflict with Windows Update – In the past, this issue started occurring as a result of a bad Windows Update that ended up breaking the existing functionality of Launchpad.exe. Affected users facing the same issue have confirmed that they managed to fix the issue by giving the admin account full control over the user’s folder and renaming the Launchpad.exe executable.
- Corrupted Windows Media Installation – Under certain circumstances, it’s possible;e to encounter this kind of issue due to a partially corrupted Windows Media Player dependency. If that’s the case, you should be able to fix the issue by using the Windows Features utility to reinstall the WMP package.
- System File corruption – Keep in mind that you can also experience this issue even if the corruption affecting your device is beyond the scope of the .NET Framework that you’re actively using. In this case, you should take the time to run DISM and SFC scans in an attempt to fix superficial cases of system file corruption. However, in most serious circumstances, you might need to go for a clean install or repair install procedure.
Now that you know every scenario that might be the underlying cause of this issue, here’s a list of methods that other affected users have successfully used to get to the bottom of this issue:
Method 1: Clean Boot Procedure
According to most documented cases, this issue can most likely occur due to some kind of conflict between two 3rd party programs or between a 3rd party program and a native Windows process. This is way more likely if you’re only noticing new instances of the .NET Runtime Error 1026 error popping up when you attempt to open a 3rd party application.
If this scenario is applicable, you can isolate and identify the culprit by starting your computer into clean boot mode and seeing if the issue still occurs.
This operation will ensure that your computer boots up in a mode that disallows the running of any 3rd party service, process, or startup item.
If you boot your computer into a Clean Boot state and you see that the issue stops occurring, you can go ahead and systematically re-enable every process and startup item and do regular restarts until you manage to pinpoint the culprit.
In case the same .NET Runtime Error 1026 error is still occurring even after you boot your PC into the clean boot, move down to the next potential fix below.
Method 2: Running the .NET Repair Tool
If a clean boot didn’t work for you, our recommendation is to proceed with a series of troubleshooting steps that will allow you to fix any underlying issues with the .NET redist packages that are currently installed on your computer.
Several affected users that were also struggling with this issue have reported that they finally managed to prevent new instances of the .NET Runtime Error 1026 error from occurring by running the .NET Framework Repair Tool – This tool will automatically scan your computer and fix any .NET dependencies that might be creating issues.
If you haven’t tried running the .NET Repair tool, follow the instructions below for step by step instructions on doing so:
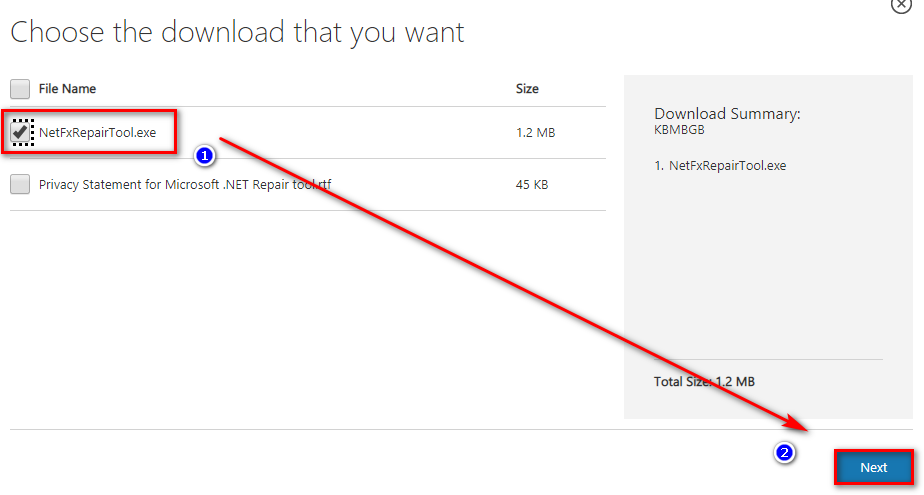
- Open your browser and access the Microsoft .NET Framework Repair tool download page. Once you’re inside the page, click on the Download button (under Microsoft .NET Framework Repair Tool).

Downloading the NET Framework Repair tool - After you get to the next screen, start by checking the box associated with NetFxRepairTool.exe while unchecking everything else. Next, click on Next to advance to the next menu.
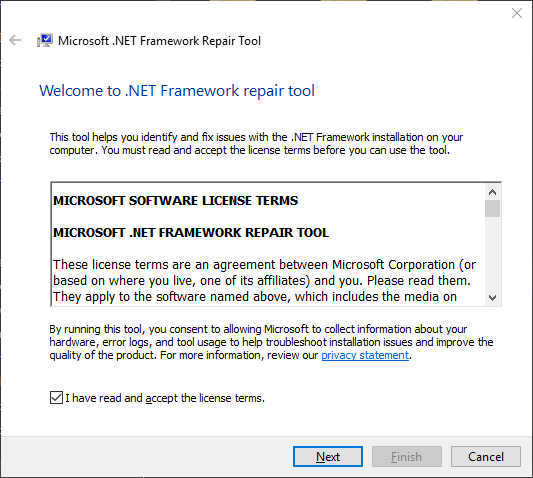
- Once the download is complete, double-click on the installation executable that you’ve just downloaded, then click Yes when prompted at the UAC (User Account Control).
- After you manage to open the Microsoft .NET Framework Repair Tool, follow the on-screen instructions and check the box associated with I have read and accepted the license terms when prompted by the ToS before clicking on Next to move forward.

Initiating a repair using the .NET Repair tool - At this point, the utility should have already begun the scanning of the .NET dependencies installed on your computer. Wait patiently until the process is complete and avoid interrupting it to avoid additional issues.
- Once the operation is finally complete, click on Next to automatically apply the repair strategy that the utility recommends.
Applying the recommended fix for the .NET framework - Once the fix is successfully applied, click on Finish to complete the process. If you’re not prompted to restart automatically, do it yourself and see check Event Viewer once the nest startup is complete to see if the same kind of issue is still occurring.

If you already ran the .NET Framework Repair utility and you’re still seeing this kind of issue, move down to the next potential fix below.
Method 3: Renaming the Launchpad.exe (if applicable)
As it turns out, you can expect to see this error due to a new Windows Update that ended up breaking an existing Windows 10 functionality. Although the .NET Runtime Error 1026 error is not really indicative of this potential culprit, several affected users have confirmed that they were able to get Full Control permissions for the Users directory and renaming the Launchpad.exe to something different in order to prevent Windows from using it.
Note: If you have multiple users account on this computer, you need to do this for every user present inside the C:\Users\ directory.
If you haven’t tried this method yet, follow the instructions below to obtain Full Control permissions in the Users directory and rename the main Launchpad executable:
Update: As far, this particular fix was only confirmed to work for Windows 10.
- Start by ensuring that the user account you’re currently using is an administrator.
- Next, navigate to the root directory of your OS drive (most likely C:/), right-click on the Users folder, and choose Properties from the context menu that just appeared.

Accessing the Properties screen of Users - Once you’re inside the Properties screen, access the Security tab, select the Administrators group from the menu below, then click on Edit.
Editing the permissions of the Administrators tab Note: When prompted by the UAC (User Account Control Prompt), click Yes to grant administrative privileges.
- Inside the Permissions for Users window, select the Administrators tab and ensure that the Allow box associated with Full control is checked.
Modifying the permissions of Users - Click Apply to save the changes and ensure that you have Full Control permissions to the Users folder.
- Return to File Explorer and use the ribbon at the top to access the View tab. From the contextual menu that just appeared, check the box associated with Hidden Items.

Making hidden items visible - Next, use File Explorer to navigate to the following location:
C:\Users\[username]\AppData\Local\Microsoft_Corporation
- Once you’re inside, see if you can spot an executable named Launchpad_XXX.exe
Note: XXX is just a placeholder. In your case, you will see a random number of characters. - If you can locate the correct executable, simply rename it to something different or simply ad the .old extension at the end of the name. This will force Windows to disregard this file and create a new healthy equivalent that will hopefully not create the same kind of issue.
- Open Event Viewer and see if the problem is now fixed.


If you’re still spotting new instances of the .NET Runtime Error 1026, move down to the next potential fix below.
Method 4: Reinstalling Windows Media Player
If you’re encountering this error while attempting to launch an application or game that needs to make use of a Windows Media Player dependency, you might be able to fix this issue by reinstalling the local installation of Windows Media Player.
Typically, you will be able to spot if this scenario is applicable by checking the Event ID log file. If it contains mentions of Microsoft.Xna.Framework.Media.MediaQueue.Play or something different, this fix will most likely allow you to fix the issue.
Several affected users have confirmed that they were able to prevent the apparition of new instances of the .NET Runtime Error 1026 error, by using the Programs and Features menu to essentially reinstall the entire Windows Media Player component.
If you haven’t tried doing this yet, follow the instructions below:
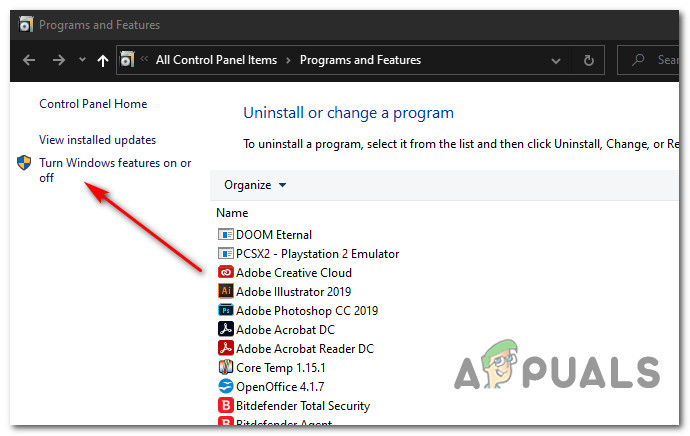
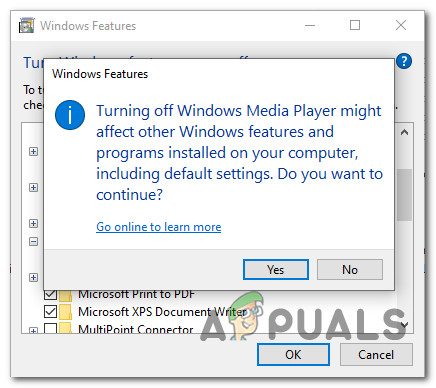
- Press Windows key + R to open up a Run dialog box. Inside the text box, type ‘appwiz.cpl’ inside the text box and press Enter to open up the Programs and Features menu.
Accessing the Programs and Features menu - Once you’re inside the Programs and Features menu, click on Turn Windows features on or off. When you’re prompted by the UAC (User Account Control), click Yes to grant admin access.

Accessing the Windows Features menu - Once you’re inside the Windows Features menu, scroll down through the list of features and expand the drop-down menu associated with Media Features.
- Next, uncheck the box associated with Windows Media Player and click Ok to effectively disable Windows Media Player. At the confirmation prompt, click on Yes to confirm the operation.

Disabling the Windows Media Player component - Wait until the operation is complete, then restart your computer in order to allow your computer to boot without the WMP components.
- Follow steps 1 to 3 to return to the Windows Features screen, then check the box associated with Windows Media Player (under Media Features) to re-enable, then confirm the operation and wait for the process to complete.
- Check Event Viewer and see if you can spot new instances of the .NET Runtime Error 1026.
If the issue is still not resolved, move down to the next potential fix below.
Method 5: Running SFC and DISM Scans
If none of the methods above have worked for you, it’s time to start troubleshooting for some kind of corruption affecting your system files that’s affecting the .NET framework. if the .NET Framework repair tool was not effective in your case, you should proceed by running a couple of built-in utilities that every recent Windows version has (SFC and DISM).
SFC (System File Checker) and DISM (Deployment Image Servicing and Management) are two tools capable of effectively identifying corrupted system files and replacing them with healthy equivalents.
Even though these 2 tools share some similarities, our recommendation is to run both in quick succession in order to improve your chances of fixing the corrupted system files.
Doing an SFC scan is an ideal place to start since it’s an entirely local tool that will not require you to have a reliable internet connection.
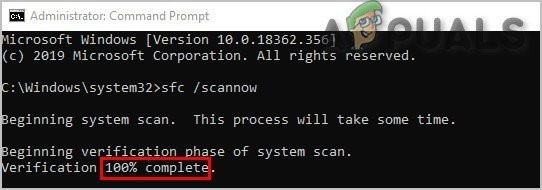
Note: After starting this procedure, it’s important to avoid closing the elevated CMD window even when the utility looks like it froze (this tends to happen with PC’s using traditional HDD). Wai patiently until the process is complete as interrupting the operation might cause logical errors on your HDD.
Once the SFC scan is complete, reboot your computer and deploy a DISM scan once the next startup is complete.
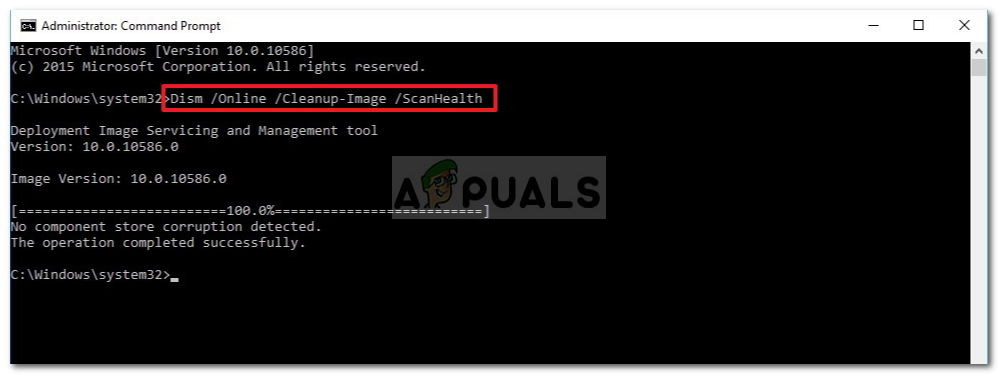
Note: This utility uses a sub-component of Windows Update to download healthy components to replace corrupted instances of system files. Because of this, you need to make sure that you have reliable Internet.
Once the DISM scan has been completed successfully, restart your computer and check Event Viewers to see if you can spot new instances of the .NET Runtime Error 1026.
In case the same issue is still occurring, move down to the next potential fix below.
Method 6: Refresh every Windows Component
If none of the methods above have worked in your case, it’s very likely that you’re dealing with some kind of underlying system corruption issue that is affecting your .NET framework that no built-in utility is able to fix.
If this scenario is applicable, one of the last things you can do is to make sure that you are essentially refreshing every Windows component in order to eliminate any type of corruption that might be responsible for this issue.
When it comes to doing this, there are 2 procedures that you should consider using:
- Repair install (in-place repair) – This is the recommended procedure if you are not short of time and you want to go for a method that will allow you to preserve your personal files present on the OS drive. Doing a repair install procedure will require you to use compatible installation media. But the major advantage is that you get to keep your installed applications, games, personal media, and even some user preferences.
- Clean install – If you’re looking for a quick fix and you don’t have important data on your OS drive (or you have already backed it up), the procedure that makes the most sense is a clean install. This will not require you to use installation media (you can start it directly from the GUI menu of Windows).