
-
System requirements for installing Windows 10
Keeping Windows 10 up-to-date
More information on hard drive space requirements to install or update Windows 10
Feature-specific requirements for Windows 10
Language versions
Feature deprecations and removals
These are the basic requirements for installing Windows 10 on a PC. If your device does not meet these requirements, you may not have the great experience intended with Windows 10 and might want to consider purchasing a new PC.
There may be additional requirements over time for updates, as well as requirements to turn on specific features within the OS.
Windows 10 is designed to deliver updates for the supported lifetime of the device. Two types of updates may be provided: quality updates and feature updates. Quality updates include both security and non-security updates and are typically targeted to be released once a month. Feature updates also include security and non-security fixes as well as new features to Windows 10 and are typically provided twice a year. Ensuring that your device receives these updates and is kept up-to-date is important for your device security. Windows 10 periodically checks for updates so you don’t have to. When an update is available—and sufficient free disk space is available on your device—it will be automatically installed. So that Windows 10 continues to stay updated, it’s important to ensure your device has sufficient free space. See additional applicable details in the following notes.
Important notes about updates:
- A device might not be able to receive updates if the device hardware is incompatible, if it lacks current drivers or sufficient available hard drive space, or if it’s otherwise outside of the Original Equipment Manufacturer’s (“OEM”) support period. Visit the Windows Lifecycle Fact Sheet or the Lifecycle FAQ for Windows products to learn more about the servicing timeline for each feature update.
- Some of the disk space needed for installing updates is only temporarily required. Typically, ten days after installing an update, a disk cleanup will be automatically performed to delete copies of the older, unneeded Windows files and free up space again.
- Some of the disk space needed for installing updates is only temporarily required. Typically, ten days after installing an update, a disk cleanup will be automatically performed to delete copies of the older, unneeded Windows files and free up space again.
- Not all features in an update will work on all devices.
- An internet connection is required to perform updates and Internet access (ISP) fees might apply.
- If you need assistance installing an update, Windows 10 Update Assistant may be able to help.
The size of the Windows operating system that comes with your device and the amount of space needed to download and install Windows updates, are highly variable as they depend on a variety of factors. Visit here to learn why. The factors that impact the amount of free hard drive space needed to take an update include: the versions of Windows previously installed on the machine, the amount of disk space available to reuse from Windows files, such as the virtual memory pagefile or hibernation file, which applications are installed on your device and how those applications store data. Starting with the May 2019 Update, the system requirements for hard drive size for clean installs of Windows 10 as well as new PCs changed to a minimum of 32GB. The 32GB or larger drive requirement is set to leave space for users to install apps and to keep data on the device. Installing Windows or updating from a previous version of Windows on devices with less than 32GB storage will continue to work if the device has enough free space available. When updating, Windows will attempt to automatically free up enough hard drive space and guide you through freeing up even more if the automatic cleanup is not sufficient. You can also take steps to free up space on your own. For more information, see Free up space to install the latest Windows 10 update or visit the related FAQ.
In addition to the requirements above that are needed to run Windows, some features have additional requirements. In some cases, features included with updated versions of Windows 10 will be best experienced with newer processors. For specific hardware support please refer to your Original Equipment Manufacturer (OEM). Below are some additional details regarding requirements for key features:
- BitLocker Drive Encryption (available with Windows 10 Pro or Windows 10 Enterprise only) requires a Trusted Platform Module (TPM) 1.2 or higher and Trusted Computing Group (TCG)-compliant BIOS or UEFI. BitLocker can be used on devices without TPM, but you will need to save a startup key on a removable device such as a USB flash drive. TPM 2.0 and InstantGo support is required when you want to automatically encrypt the local drive when joining a device to Azure Active Directory (AAD). Check with your PC manufacturer to confirm if your device supports the correct TPM version and InstantGo for the scenario you want to enable.
- BitLocker To Go requires a USB flash drive (available in Windows 10 Pro and Windows 10 Enterprise only).
- Client Hyper-V requires a 64-bit system with second level address translation (SLAT) capabilities and additional 2 GB of RAM (available in Windows 10 Pro and Windows 10 Enterprise only).
- Copilot in Windows 10 requires greater than 4 GB of RAM and a minimum 720p display resolution. Copilot is currently available in preview in select global markets on compatible Windows 10 Home and unmanaged Pro devices running version 22H2 or higher. It is our intention to add additional markets and compatibility over time.
- Cortana is only currently available on Windows 10 for the United States, United Kingdom, China, France, Italy, Germany, Brazil, Mexico, Japan, Canada, Spain, Australia and India.
- Microsoft account is required for some features.
- Miracast requires a display adapter which supports Windows Display Driver Model (WDDM) 1.3, and a Wi-Fi adapter that supports Wi-Fi Direct.
- Movies & TV application is not available in all regions. For the most up-to-date list of regions, please go to the Movies & TV information page.
- Secure boot requires firmware that supports UEFI v2.3.1 Errata B and has the Microsoft Windows Certification Authority in the UEFI signature database.
- Skype is available only in select countries and regions. Calling to select countries and regions only. Excludes special, premium and non-geographic numbers. For details, visit the Office FAQ page.
- Snap: The number of applications that can be snapped will depend upon the minimum resolution for the application with a limit of two applications in Tablet mode and four applications in Desktop mode.
- Speech recognition will vary by device microphone. For a better speech experience, you will need a:
- High fidelity microphone array
- Hardware driver with microphone array geometry exposed
- Tablet mode is available on tablets and 2-in-1s with GPIO indicators or those that have a laptop and slate indicator will be able to be configured to enter «tablet mode» automatically.
- Touch: To use touch, you need a tablet or a monitor that supports multi-touch.
- Two-factor authentication requires the use of a PIN, Biometric (finger print reader or illuminated infrared camera), or a phone with Wi-Fi or Bluetooth capabilities.
- Windows Hello requires a camera configured for near infrared (IR) imaging or fingerprint reader for biometric authentication. Devices without biometric sensors can use Windows Hello with a PIN or a portable Microsoft compatible security key.
- Xbox application requires an Xbox Live account, which is not available in all regions. For the most up-to-date list of regions, please go to Xbox Live Countries and Regions website.
- Wi-Fi Direct Printing requires a Wi-Fi adapter that supports Wi-Fi Direct and a device that supports Wi-Fi Direct Printing.
Windows 10 full localization languages include: Arabic (Saudi Arabia), Bulgarian (Bulgaria), Chinese (PRC), Chinese (Taiwan), Croatian (Croatia), Czech (Czech Republic), Danish (Denmark), Dutch (Netherlands), English (United Kingdom), English (United States), Estonian (Estonia), Finnish (Finland), French (France), French (Canada), German (Germany), Greek (Greece), Hebrew (Israel), Hungarian (Hungary), Italian (Italy), Japanese (Japan), Korean (Korea), Latvian (Latvia), Lithuanian (Lithuania), Norwegian, Bokmål (Norway), Polish (Poland), Portuguese (Brazil), Portuguese (Portugal), Romanian (Romania), Russian (Russia), Serbian (Latin, Serbia), Slovak (Slovakia), Slovenian (Slovenia), Spanish (Spain), Spanish (Mexico), Swedish (Sweden), Thai (Thailand), Turkish (Turkey), Ukrainian (Ukraine).
Additional languages available as Language Interface Packs
When upgrading to Windows 10 from a previous version of Windows such as Windows 7 or Windows 8.1 as well as when installing a newer update to Windows 10, some features may be deprecated or removed. Please see below for information regarding some of the key removed features:
- Desktop Messaging App: The messaging app on Desktop has a sync feature that can be used to sync SMS text messages received from Windows Mobile and keep a copy of them on the Desktop. Starting with the May 2019 Update (Windows 10, version 1903), the sync feature has been removed from all devices. Due to this change, you will only be able to access messages from the device that received the message.
- Wi-Fi WEP and TKIP: Starting with the May 2019 Update (Windows 10, version 1903), a warning message will appear when connecting to Wi-Fi networks secured with WEP or TKIP, which are not as secure as those using WPA2 or WPA3. In a future release, any connection to a Wi-Fi network using these old ciphers will be disallowed. Wi-Fi routers should be updated to use AES ciphers, available with WPA2 or WPA3.
- Cortana: Cortana has been updated and enhanced in the Windows 10 May 2020 Update (Windows 10, version 2004). With these changes, some previously available consumer skills such as music, connected home, and third-party skills will no longer be available. Get detailed information here.
- Phone Companion: As of the October 2018 Update (Windows 10, version 1809), Phone Companion is removed from your PC. Use the Phone page in the Settings app to sync your mobile phone with your PC. It includes all the Phone Companion features.
- HomeGroup: HomeGroup was removed starting with the April 2018 Update (Windows 10, version 1803), but you still have the ability to share printers, files, and folders. When you update from an earlier version of Windows 10, you won’t see HomeGroup in File Explorer, the Control Panel, or Troubleshoot (Settings > Update & Security > Troubleshoot). Any printers, files, and folders you shared using HomeGroup will continue to be shared. Instead of using HomeGroup, you can now share printers, files, and folders by using features that are built into Windows 10:
- Share your network printers
- Share files in File Explorer
- For Xbox 360 and HomeGroup users, please see more information on streaming media
- People app: In Windows 10, the People app shows mail from Microsoft 365 contacts and contacts from your school or work organization under Conversations. Starting with the April 2018 Update (Windows 10, version 1803), in order to see new mail in the People app from these specific contacts, you need to be online, and you need to have signed in with either a Microsoft 365 account or, for work or school organization accounts, through the Mail, People, or Calendar apps. Please be aware that you’ll only see mail for work and school organization accounts and some Microsoft 365 accounts.
- Reader app: The Reader app was removed from Windows 10 starting with the Fall Creators Update (Windows 10, version 1709). For reading PDF files, Microsoft Edge is the recommended replacement app and offers similar functionality as well as additional features including improved accessibility support, improved Inking, and support for AskCortana. Similarly, Windows XPS Viewer is recommended when reading XPS files and Windows Photos app for viewing TIFF files. Note that users of earlier Windows 10 versions can continue using the Reader app.
- Windows Journal: Windows Journal was removed starting with the Windows 10 Anniversary Update (Windows 10, version 1607). After Windows Journal is removed, you will no longer be able to open or edit Journal files (with .JNT or .JTP extensions). In place of Windows Journal, we encourage you to switch to OneNote. If you need to open or edit your journal files, more information is available here.
- Windows Media Digital Rights Management (WMDRM): WMDRM is no longer supported starting with the Windows 10 Anniversary Update (Windows 10, version 1607). You are no longer able to play music or video files that were protected by this rights management technology. Click here to learn more.
The following changes impact devices that are upgrading to Windows 10 from Windows 7, Windows 8 or Windows 8.1:
- Windows Media Center: If you have Windows 7 Home Premium, Windows 7 Professional, Windows 7 Ultimate, Windows 8 Pro with Media Center, or Windows 8.1 Pro with Media Center and you install Windows 10, Windows Media Center will be removed.
- Mobile Device Management (MDM): MDM functionality will not be available in Windows 10 Home edition.
- Windows 7 desktop gadgets: These will be removed as part of installing Windows 10.
- Solitaire, Minesweeper, and Hearts Games: These games that came pre-installed on Windows 7 will be removed as part of installing the Windows 10 upgrade. Microsoft has released our version of Solitaire and Minesweeper called the «Microsoft Solitaire Collection» and «Microsoft Minesweeper».
- Floppy drives: If you have a floppy drive, you will need to download the latest driver from Windows Update or from the manufacturer’s website.
- If you have Windows Live Essentials installed on your system, the OneDrive application is removed and replaced with the inbox version of OneDrive.
- OneDrive place holder files: OneDrive placeholder files are not supported in Windows 10. Windows 8.1 displayed placeholders for files available in OneDrive but not locally on the device. In Windows 10, users can choose which folders to sync from OneDrive settings.
- Snap: Snap is limited to two applications in Tablet mode.
Через несколько лет, а иногда и месяцев после покупки ноутбука или компьютера его конфигурация легко может выветриться из нашей памяти. А, между тем, эта информация может понадобиться и для того, чтобы понять пойдет ли на нем та или иная игра и программа, и для апгрейда, и для возможного ремонта устройства. Рассказываем, как всего за пару минут узнать характеристики ноутбука или компьютера на базе Windows.
Узнаем базовые характеристики ноутбука
Если вам нужно узнать лишь базовые характеристики ноутбука или ПК вроде модели его процессора, объема оперативной памяти или версии операционной системы, достаточно воспользоваться системной утилитой «О системе».
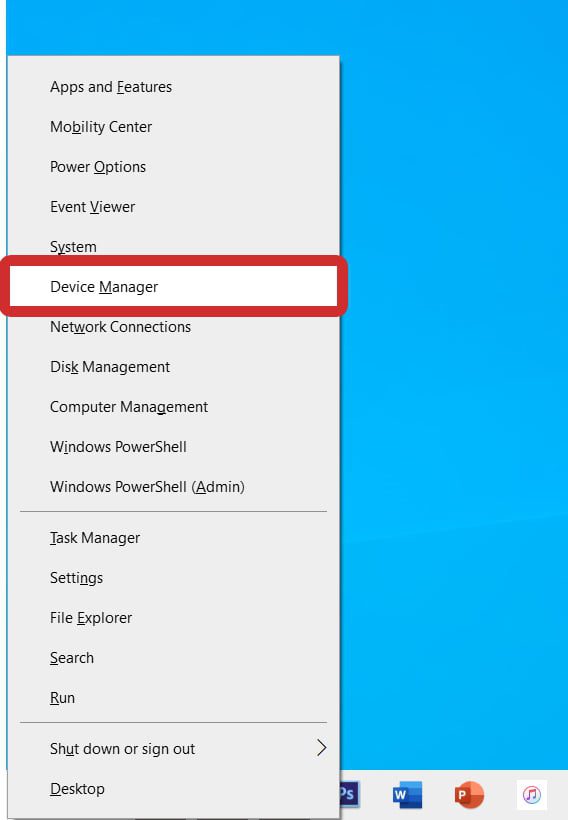
- Кликните правой кнопкой мыши по меню «Пуск».
- Выберите «Система» в выпадающем меню.
Если базовых характеристик недостаточно
Если этого недостаточно, вы можете воспользоваться утилитой со схожим названием: «Сведения о системе. Для ее запуска:
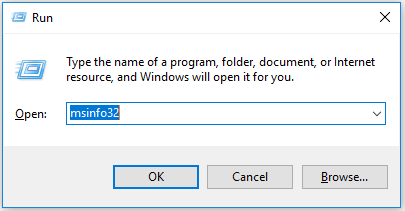
- нажмите сочетание клавиш Win+R
- введите в открывшемся окне команду msinfo32 и нажмите Enter.
Помимо указанного выше здесь можно узнать модель используемой в ноутбуке или ПК материнской платы, увидеть какие накопители установлены в системе, посмотреть модель сетевой платы компьютера и узнать много другой полезной информации о его конфигурации.
Используем специализированные утилиты
Для получения еще более подробной информации о характеристиках ноутбука лучше воспользоваться специализированными утилитами.
AIDA64
Одна из самых универсальных программ, позволяющая и узнать характеристики ноутбука, и провести тестирование его компонентов. Информация о конфигурации здесь разбита на разделы, доступ к которым можно получить из меню в левой части окна. Общие же данные о системе представлены на вкладке «Суммарная информация».
CPU-Z
Это более специализированная программа, заточенная на предоставление подробной информации о процессоре, материнской плате и оперативной памяти компьютера. Она позволяет узнать всю их подноготную вплоть до того какие тайминги и частоты использует оперативка устройства, в какие слоты системной платы она установлена, а какие их них остаются свободными.

Это особенно важно, если вы собираетесь увеличить объем ОЗУ ноутбука или ПК, но не уверены можно ли это сделать. Поможет она и подобрать совместимую с уже установленной планку оперативной памяти для их переключения в двухканальный режим.

Что до системной платы, то информация о ней поможет выбрать более мощный процессор, совместимый с этой платой, без необходимости менять вместе с CPU и столь дорогостоящий компонент компьютера.
Читайте также
- Где берут стикеры для Ватсапа: пошаговая инструкция
- Как открыть файл APK: разные способы для Android, iOS и Windows
With the numerous companies that manufacture Windows computers and components, it can be difficult to find out what kind of CPU you have, how much RAM you have, and more. Checking your computer’s specifications also makes it easier to upgrade your hardware and understand the system requirements for new programs you want to install. Here are several ways to check your CPU, GPU, RAM, hard drives, internet adapters, and other specs on your Windows 10 PC.
Read More: How to check your specs on a Windows 11 PC
How to Quickly Check Your Specs in Windows 10
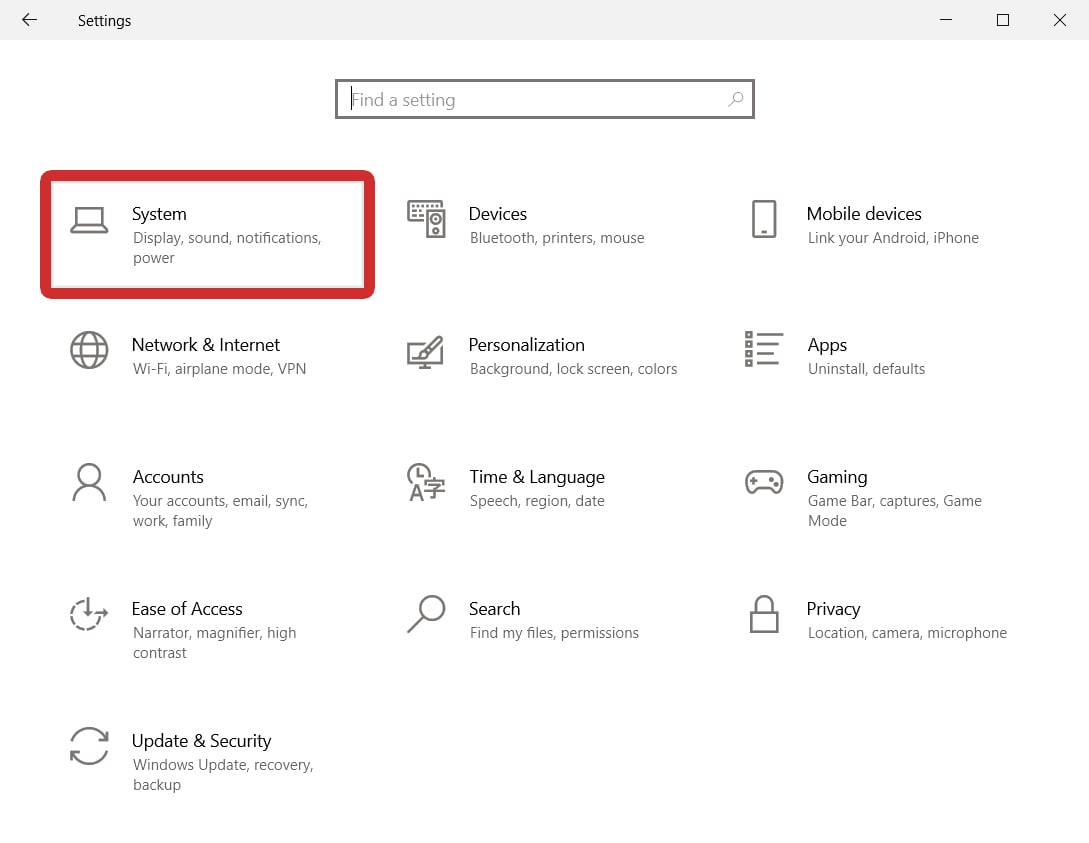
To check your general specs on a Windows 10 PC, press the Windows + I keys on your keyboard to open a settings window. Then go to System, scroll down the left sidebar, and select About. From here, you can check your CPU, RAM, and which version of Windows 10 you are running.
- Press the Windows + I keys on your keyboard. When you press these keys at the same time, a settings window will open. Alternatively, you can open settings by left-clicking the Windows logo at the bottom of your screen, typing “settings,” and selecting Open.
- Then, select System.

- Next, click About. You can find this by scrolling down to the bottom of the left sidebar.
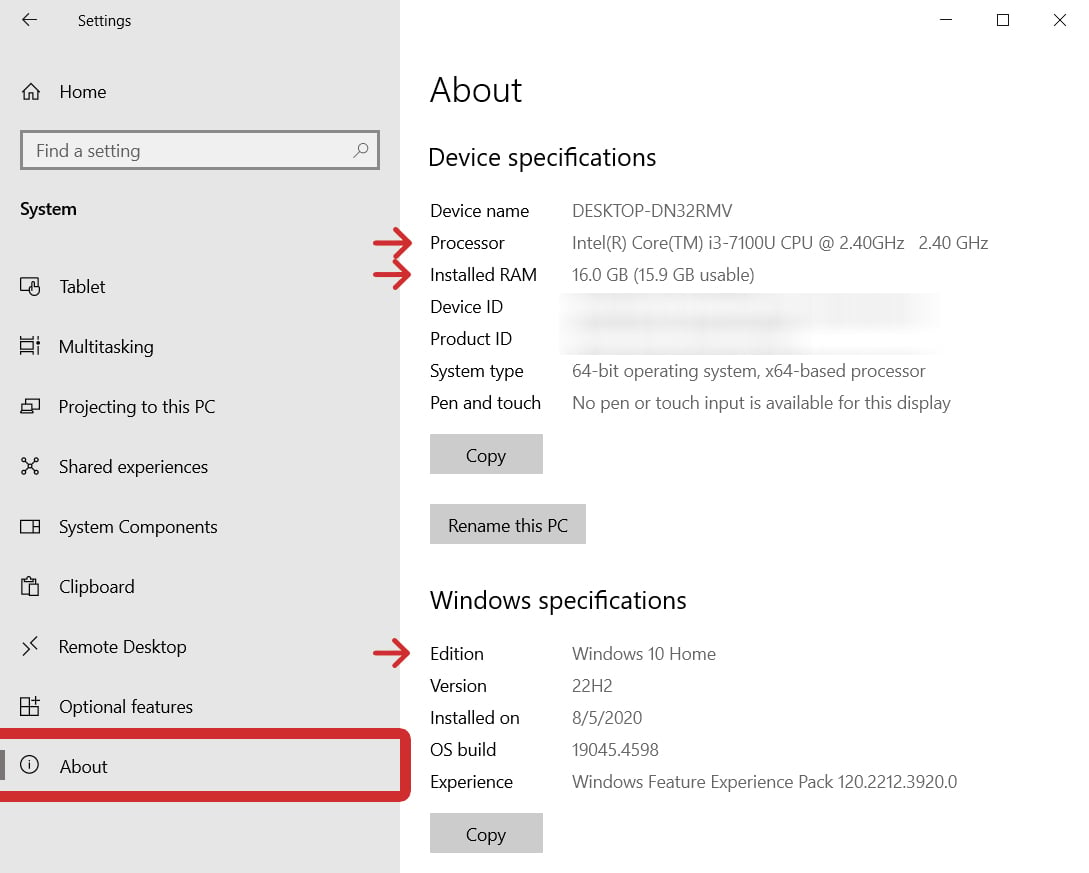
- Finally, check your specs on the right side of the window. Here you can find details about your CPU, RAM, the version of Windows you are running, and more.
If you need more information about your specs, there’s an easy way to find out how your hardware is performing in real-time. This is especially important information if you are wondering whether you need to upgrade any hardware.
How to Check Real-Time Specs in Windows 10
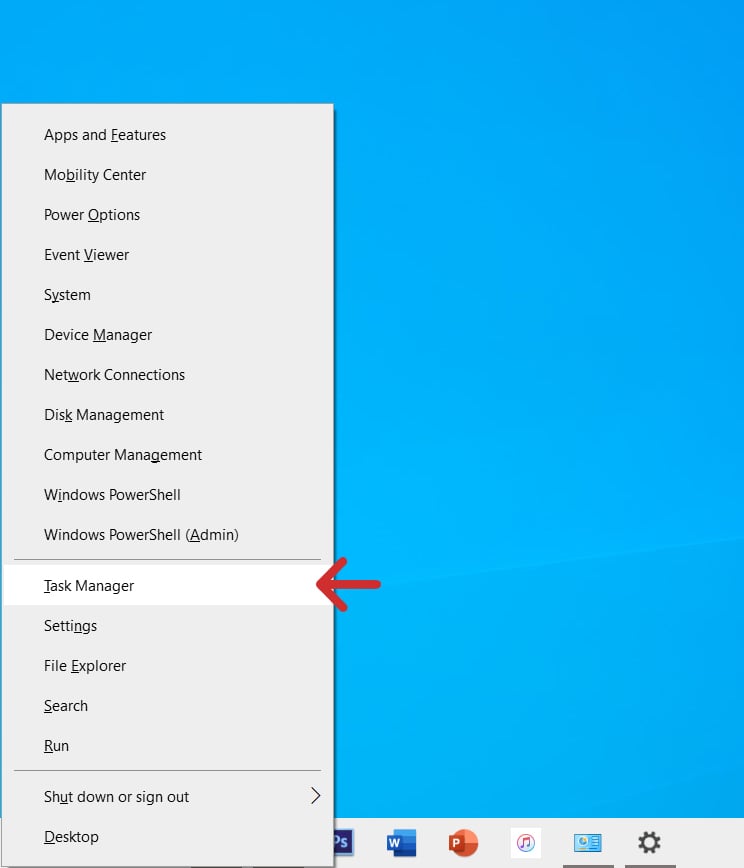
To check your specs on a Windows 10 PC, press the Windows + X keys on your keyboard and select Task Manager from the pop-up menu. Then select the Performance tab to check your CPU, Memory, Disk, Ethernet, Wi-Fi, and GPU usage in real-time.
- Press the Windows + X keys on your keyboard. This will open a ‘Quick Link’ menu in the bottom-left corner of your screen.
- Then, select Task Manager. You can also press the “T” key on your keyboard when the Quick Link menu is open.
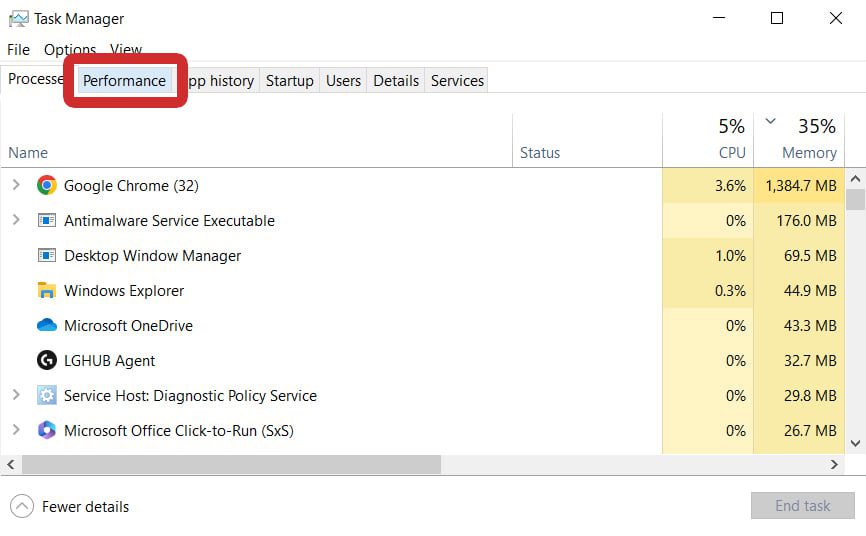
- Next, select the Performance tab. You will see this at the top of the window next to Processes.
- Then, choose CPU, Memory, Disk, Ethernet/Wi-Fi, or GPU. You will see these options in the left sidebar of the Task Manager window.
- Finally, check your general specs in the top-right corner of the window and your real-time specs below.
How to Check Your CPU Specs in Windows 10
To check your CPU specs, press the Windows + X keys on your keyboard and go to Task Manager > Performance > CPU. Then you will see your processor’s name in the top-right corner. Below that, check your CPU base speed, how many cores it has, and more.
Read More: What is a CPU?
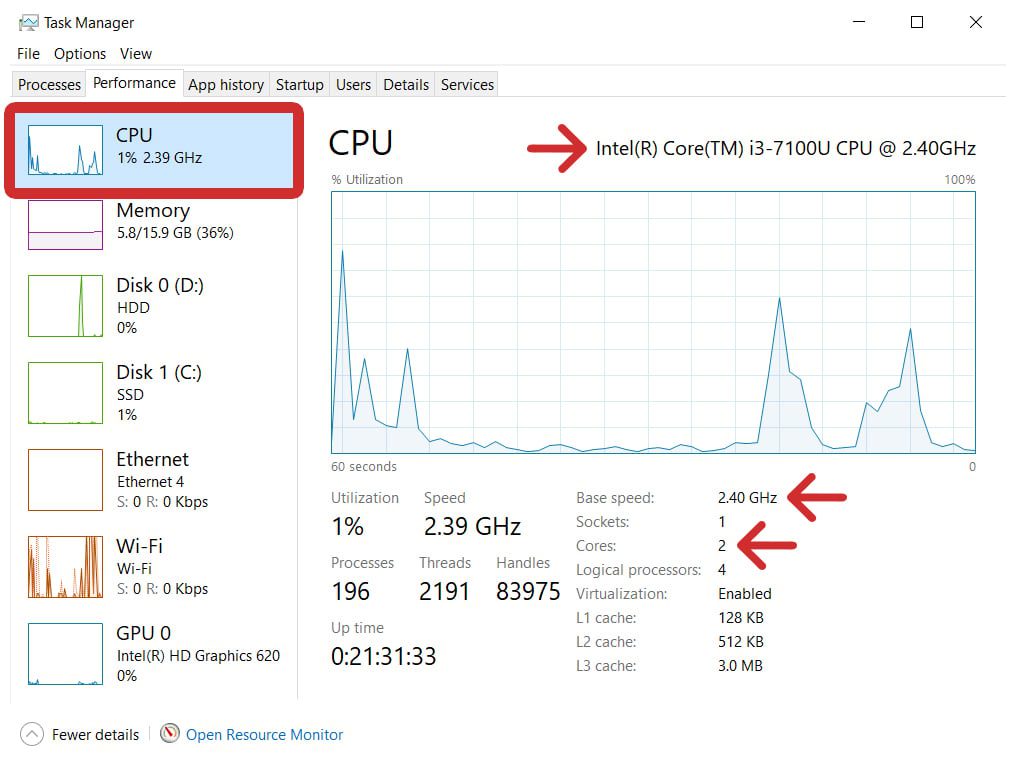
Note: If you’re looking for more detailed information for your CPU and other hardware specs, scroll to the sections below on using System Information, Device Manager, and Windows PowerShell.
How to Check Your RAM Specs in Real-Time
To check your RAM specs, press the Windows + X keys on your keyboard and go to Task Manager > Performance > Memory. Then, you will see your total RAM capacity in the top-right corner. Below that, you can check how much RAM is ‘In Use’ and how much is ‘Available.’
Read More: How much RAM do you really need?
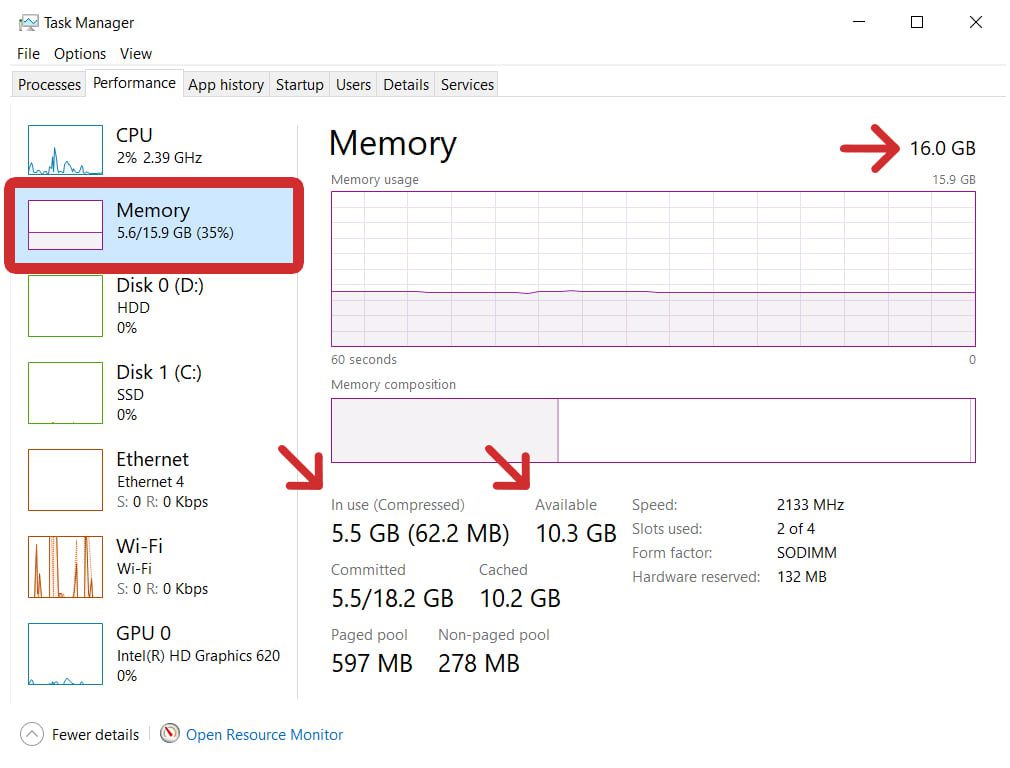
In the bottom-right corner of this window, you’ll also find other important information about your RAM, including its speed, how many memory slots your computer has available, and more.
How to Check Your Hard Drive Specs in Real-Time
To check your hard drive specs, press the Windows + X keys and go to Task Manager > Performance > Disk. In the top-right corner, you will see the name of your hard drive. In the bottom-right corner, you can check your drive’s total storage capacity and the type of drive it is.
Read More: What’s the difference between SSD and HDD?
Note: If you have more than one drive, your main drive will usually be labeled as “(C:).” This is typically where your Windows 10 operating system will be installed, as well as most of your apps. Other disks can include external hard drives, USB sticks, or secondary internal drives.
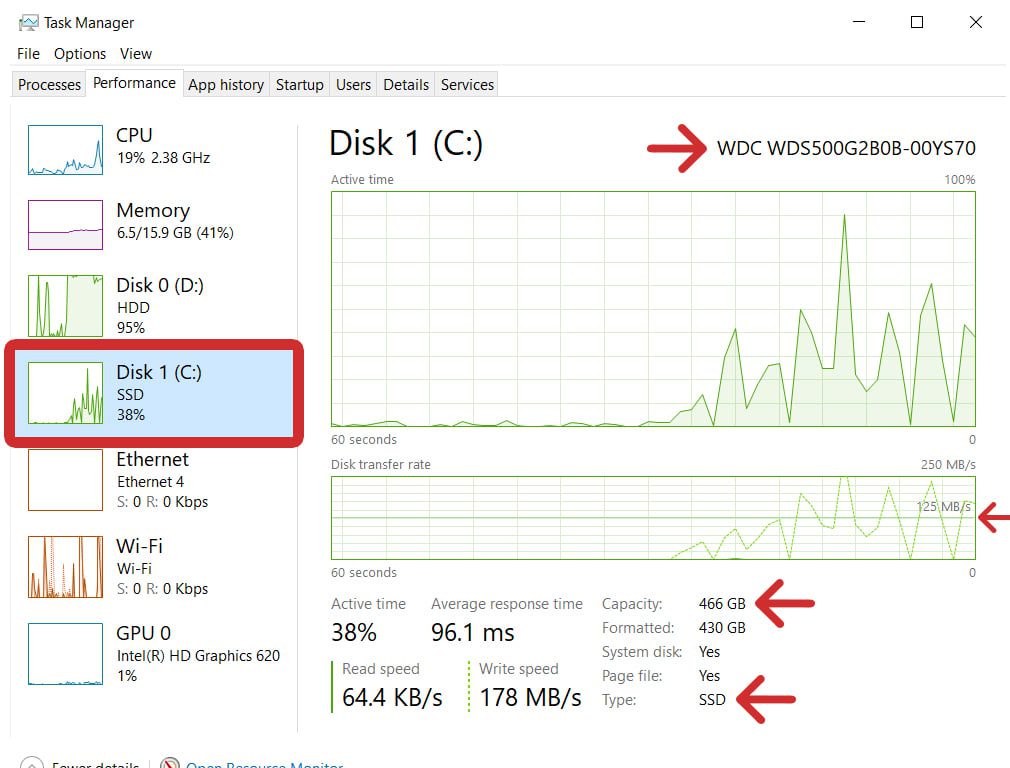
You’ll see real-time information about your hard drives while files are being transferred. Then, you will be able to see its Read/Write speed at the bottom of the window. While these speeds fluctuate, you can use the line in the second graph to see the drive’s average transfer rate.
How to Check Your Internet Specs in Real-Time
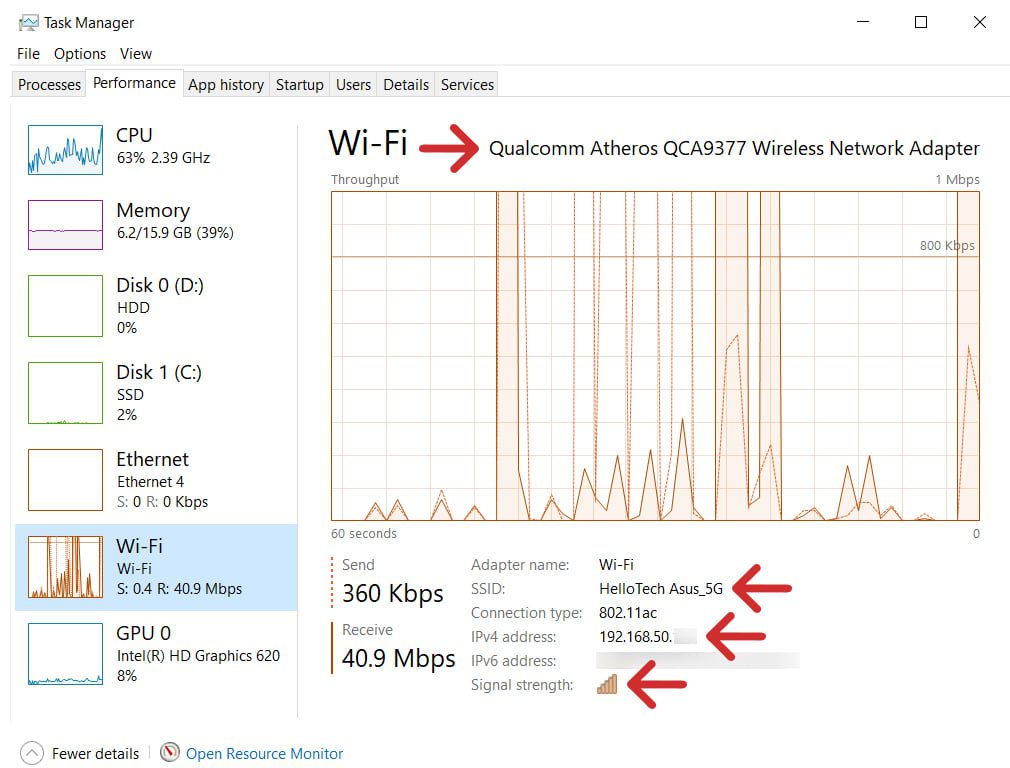
To check your internet specs, press the Windows + X keys and go to Task Manager > Performance > Wi-Fi or Ethernet. Then you will see your adapter’s name in the top-right corner and your network name (SSID), router IP address, and signal strength below.
Read More: How to test your WiFi speed at home
How to Check Your GPU Specs in Real-Time
To check your GPU specs, press the Windows + X keys on your keyboard and go to Task Manager > Performance > GPU. Then you will see the name of your GPU in the top-right corner, as well as information about the utilization and temperature of your GPU below.
Read More: How to set up dual monitors on a Windows 10 PC

How to Check Your Specs with System Information
To check detailed specs for any device on your Windows 10 PC, left-click the Windows logo at the bottom of your screen, type “system information” and click Open. Then use the menu in the left sidebar and the search bar at the bottom of the window to search for specs.
- Click the Windows logo at the bottom of your screen. This is the logo with 4 squares, usually located in the bottom-left corner of the screen. Alternatively, you can press the Windows + R keys on your keyboard, type “msinfo32” into the Run box, and hit Enter on your keyboard.
- Then, type “System Information.”
- Next, click Open. You can also press the Enter key on your keyboard.
- Finally, use the menu in the left sidebar and the search bar at the bottom of the window to check for any specs.
If you want to find information for certain devices, here are some common paths:
- CPU: Under System Summary next to Processor
- GPU: UnderSystem Summary > Components > Display
- Motherboard: Under System Summary next to BaseBoard Manufacturer/Product/Version
- RAM: Under System Summary next to Installed/Total/Available Physical Memory
- Hard Drives: Under System Summary > Components > Storage > Drives
How to Check Your Specs Using Device Manager
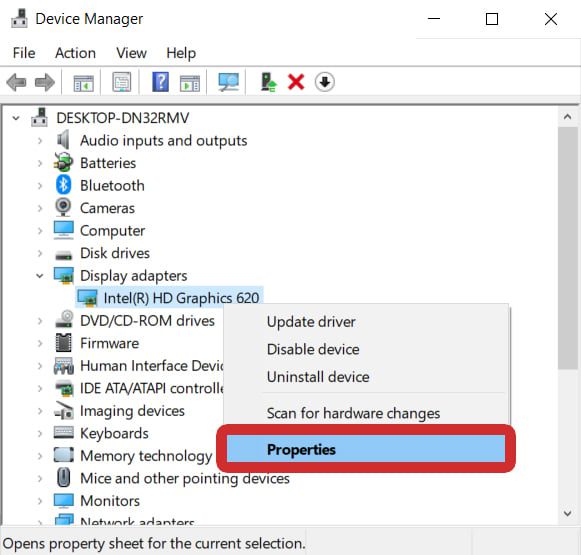
To check the specs for any device on your Windows 10 PC, press the Windows + X keys on your keyboard and select Device Manager. Then click the arrow icon next to a hardware category, right-click a device, and select Properties to check its name, status, and more.
- Press the Windows + X keys on your keyboard.
- Then, select Device Manager.
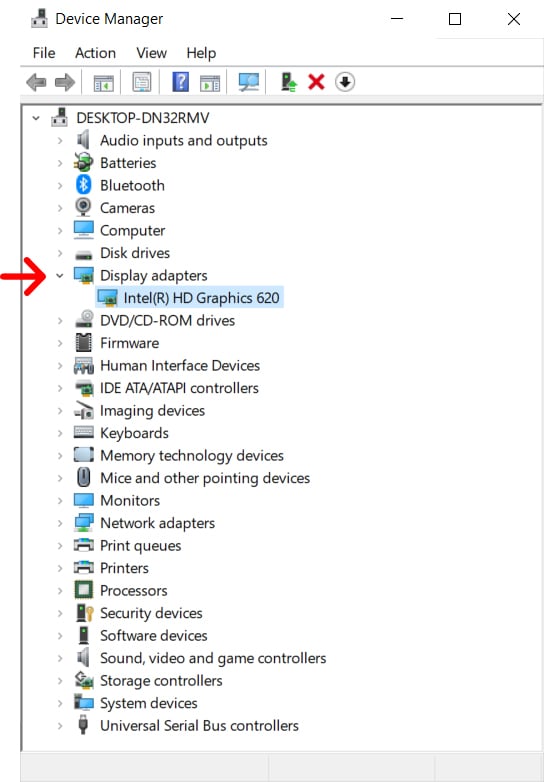
- Next, click the arrow next to the hardware you want to check. For example, the entry below Display adapters shows what GPU you have. You can also find your CPU under Processors, your RAM under Memory technology devices, and your hard drives under Disk drives.
- Then, right-click the device and select Properties. If your device isn’t working properly, you can try selecting Update driver from this menu.
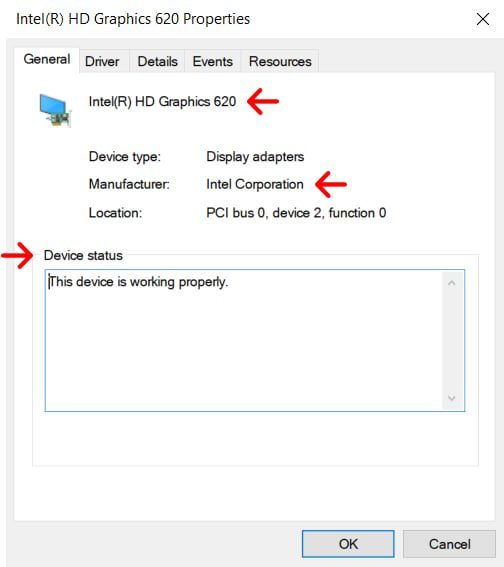
- Finally, check the specs in the General tab. From here, you can see your device name at the top, the type, manufacturer, and location below, and the Device status at the bottom.
If you still can’t find the specs you’re looking for, you can use the Windows Management Instrumentation command (wmic) to get specific information about your hardware devices, including serial numbers, power requirements, and more.
How to Check Your Specs with Windows PowerShell
To check the most detailed specs on a Windows 10 PC, press the Windows + R keys on your keyboard, type “PowerShell” into the Run box, and click OK. Then enter this text into the window “wmic CPU get /format:list” or replace “CPU” with MEMORYCHIP, DISKDRIVE, or GPU.
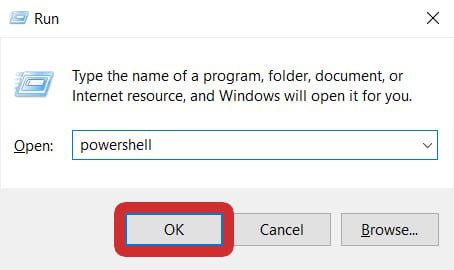
- Press the Windows + R keys on your keyboard. When you press these keys at the same time, a Windows Run box will open.
- Then, type “powershell” into the Run box and click OK. You can also press the Enter key on your keyboard.
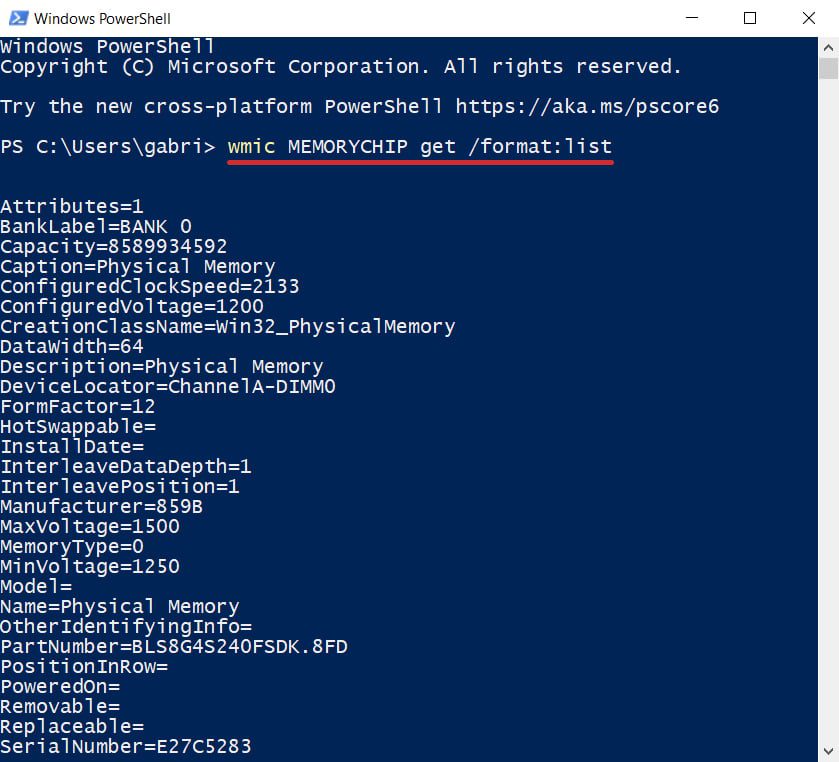
- Finally, type “wmic CPU get /format:list” into the PowerShell window and hit Enter. You can also copy and paste it into the window instead.
Here are some other helpful PowerShell commands you can use to check the specs on your Windows 10 computer:
- Basic Info: systeminfo
- Whole Computer: Get-ComputerInfo
- CPU: Get-ComputerInfo -ClassName Win32_Processor
- RAM: wmic MEMORYCHIP get /format:list
- GPU: wmic GPU get /format:list
- Hard Drives: wmic DISKDRIVE get /format:list
- Motherboard: wmic BASEBOARD get /format:list
- Battery: powercfg /batteryreport
No matter when you want to check the full specifications in Windows 10 PC/laptop/tablet, you can check the 5 ways in this post from MiniTool Software. It gives step-by-step guide on how to check PC specs Windows 10.
When you are buying a new Windows 10 computer, you may want to check the full specs of the Windows 10 computer. Still, if your Windows 10 PC has problems, you also need to check the detailed computer specs Windows 10 to help troubleshoot the problem. Besides, to check if an application can run on your Windows 10 PC, you may also need to check the computer system configuration for the software compatibility.
So here come to the chase, how to check PC specs Windows 10?
In this tutorial, it provides 5 ways to help you find the full computer specs Windows 10, including all hardware and software specifications.
You can easily check Windows 10 computer OS version, model number, processor, RAM, drive, graphics card, BIOS (Basic Input/Output System), UEFI (Unified Extensible Firmware Interface) firmware, and more with these 5 ways.
Tip: MiniTool Power Data Recovery – A 100% clean and free data recovery program for Windows lets you easily recover any deleted or lost files, photos, videos, etc. from PC, laptop, USB, memory card, external hard drive, etc.
MiniTool Power Data Recovery FreeClick to Download100%Clean & Safe
Quick Video Guide:
How to Check PC Specs Windows 10 through System Properties
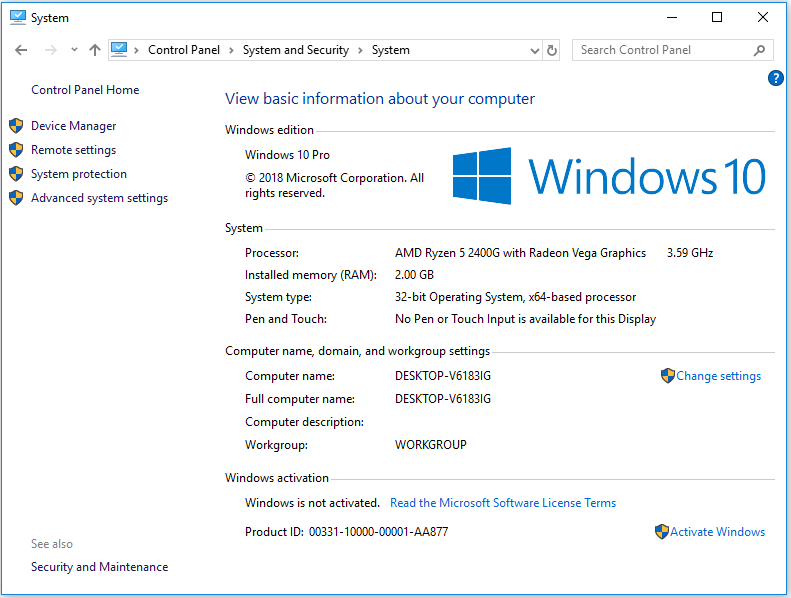
One of the most common ways to check Windows 10 PC specifications is through the System Properties. You can check basic computer specs like Windows 10 edition, system information of your Windows 10 computer.
Step 1. Open Windows System Window
Normally you have two ways to open Windows 10 System window.
- You can right-click This PC on computer screen and choose Properties to open computer system window.
- You can also quickly open Windows System window by pressing the shortcut key: press Windows and Pause/Break key on the keyboard at the same time.
Step 2. Check Computer Specs Windows 10
Here in the System Window, you can view basic information about your Windows 10 computer incl. Windows edition, processor, RAM, system type, computer name, domain, product ID, Windows activation status, etc.
How to Find Computer Specs Windows 10 from Settings
Through Windows 10 Settings, you can also check basic specs of Windows 10 computer.
You can click Start -> Settings -> System -> About, to check the computer and Windows 10 system specifications.
Under Device specifications, you can find device name, processor, RAM, device ID, product ID, system type, pen and touch.
In Windows specifications section, you can check the system edition, version, installation date, Windows 10 OS build.

How to Check PC Specs Windows 10 Using System Information
Through System Information, you can check the entire computer specs of your Windows 10 PC. Check the guide below.
Step 1 – Open System Information Window
You also have two ways to open Windows System Information Window.
- You can press Windows + R key on the key board to open Windows RUN window first. Then type msinfo32, and hit Enter button.
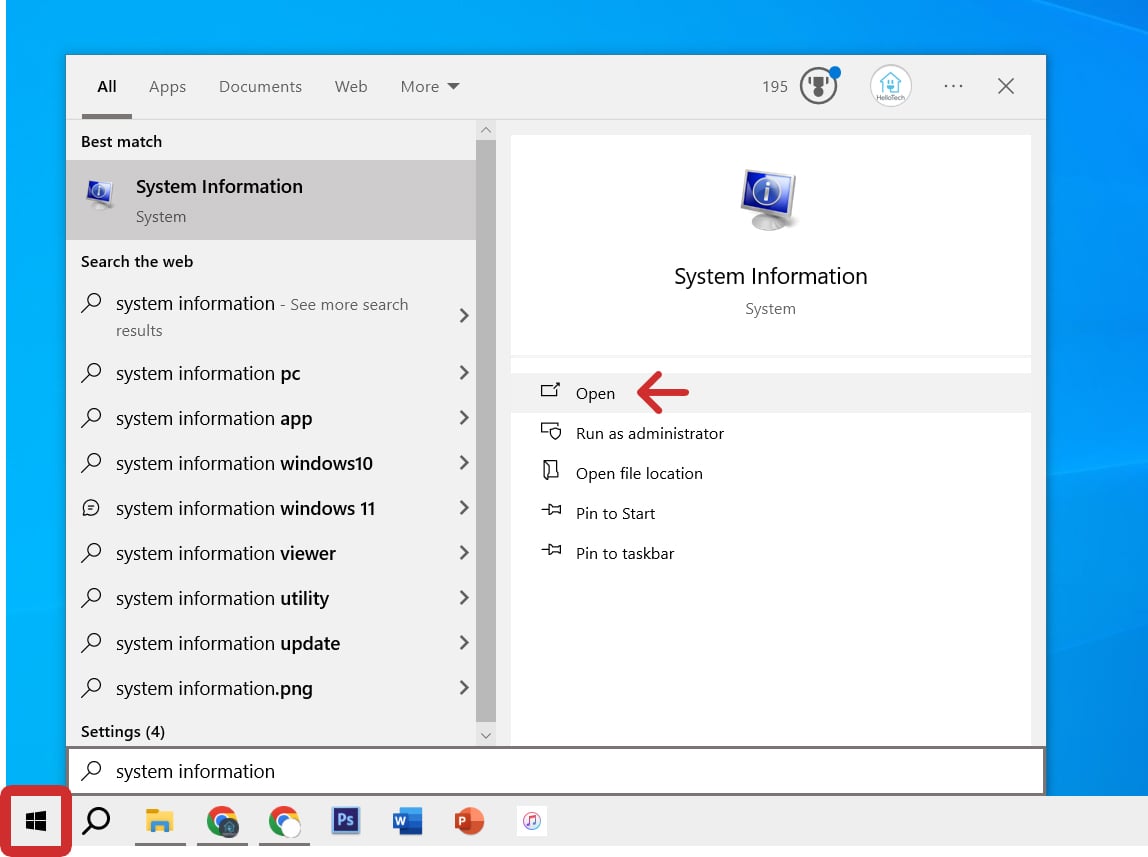
- You can also click Start and type System Information. And choose the best match result System Information.
Step 2 – Find Full Computer Specs Windows 10
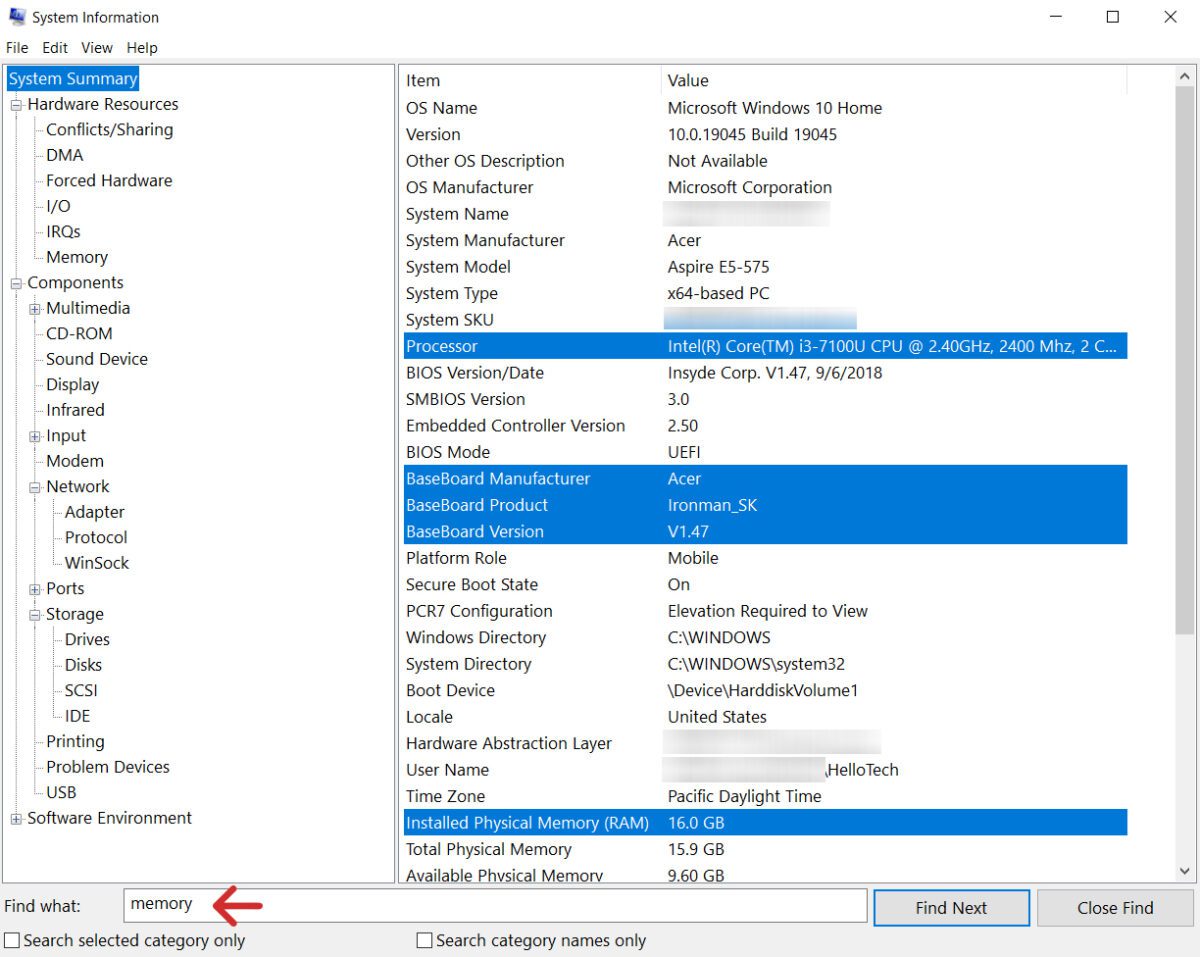
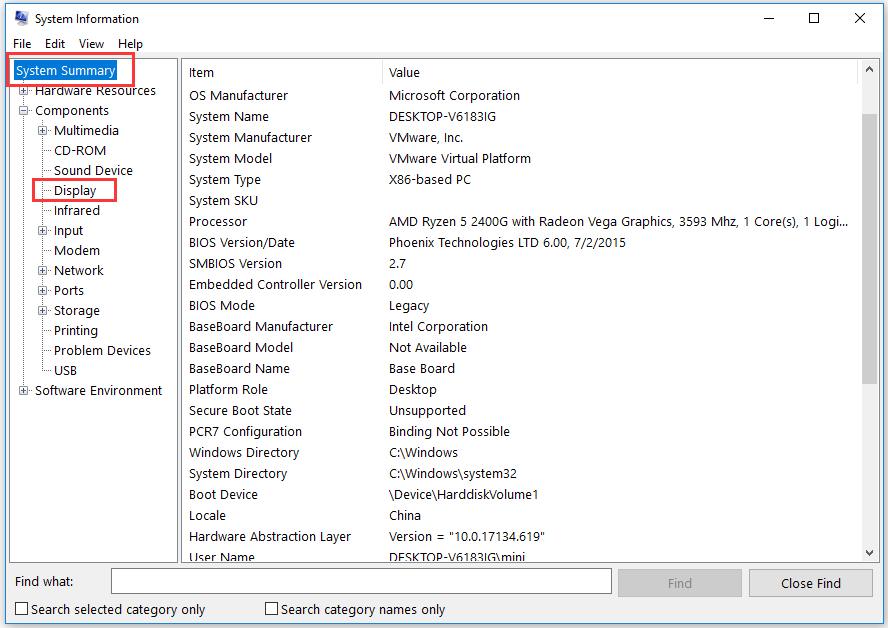
In the System Summary, you could check full specifications of Windows 10 device, e.g. OS version, system model/type, processor, BIOS, RAM details, and more.
In the left panel, there are three categories under System Summary: Hardware Resources, Components, Software Environment. If you don’t find the graphics card info, you can expand Components category and click Display to view the information of the graphics in Windows 10 computer.
Tip: You can click File menu in System Information window, and choose Export. Then choose a destination and type a name to save the system information file into a text file.
How to Check PC Specs Windows 10 with Command Prompt
Another way to find computer specs Windows 10 is to use Command Prompt.
Step 1. Open Command Prompt Tool
At first, you need to open this PC specs checker – Command Prompt. You have two ways to open it.
- Just press Windows + R key, then type cmd in the RUN window to open Command Prompt window.
- Or you can just click Start and type Command Prompt. Then right-click the Command Prompt result and choose Run as administrator option.
Step 2. Check Windows 10 Computer Specs
Next you can type systeminfo and hit Enter. Then all your Windows 10 computer specs will be listed in the window, including OS/system information, processor, RAM, BIOS, Windows 10 update, network information and more.
How to Check Laptop Specs Windows 10 through PowerShell
The last feasible way to find Windows 10 computer specs is using Windows PowerShell.
Step 1 – Open Windows PowerShell
You can right-click Start and choose Windows PowerShell (Admin) to run PowerShell as administrator.
Step 2 – Get Windows 10 Computer Specs Information
Then you can type this command line: Get-ComputerInfo. Hit Enter. And then you can check the computer full specifications in Windows 10.

Through these 5 ways, you can easily check the full specs and system information of your Windows 10 computer.
Best PC Benchmark Software to Test PC Hard Drive Speed
As for PC speed test, you can easily check hard drive speed in Windows 10 with the best PC benchmark software – MiniTool Partition Wizard.
MiniTool Partition Wizard is a 100% clean and free hard drive partition manager which is compatible with Windows 10/8/7. You can easily use it to test hard drive/SSD speed on your Windows 10 PC, create/resize/extend/merge/split/delete/format/copy/wipe partition, copy/convert disk, migrate OS, recover data (recover my files), and more.
Download this 100% clean free PC drive partition manager on your Windows 10/8/7 computer, and follow the simple steps below to check your computer HHD speed for free.
MiniTool Partition Wizard FreeClick to Download100%Clean & Safe
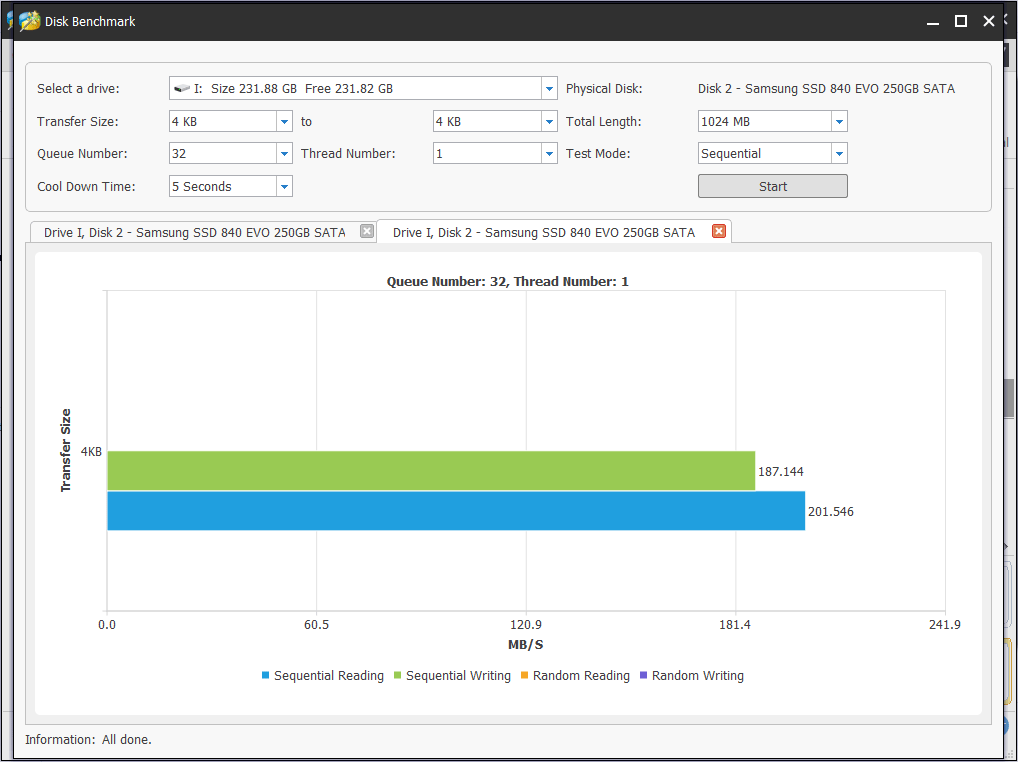
Step 1. Open MiniTool Partition Wizard, and click Disk Benchmark button in the toolbar.
Step 2. In the Disk Benchmark window, you can select the PC drive or partition, and set the Transfer Size, Total Length, Queue Number, Thread Number, Cool Down Time, and Test Mode (Sequential, Random, and Sequential & Random).
Step 3. Click Start button to start to benchmark PC hard drive read and write speed.
PC Drive Is Full? Use Space Analyzer to Release Free Space
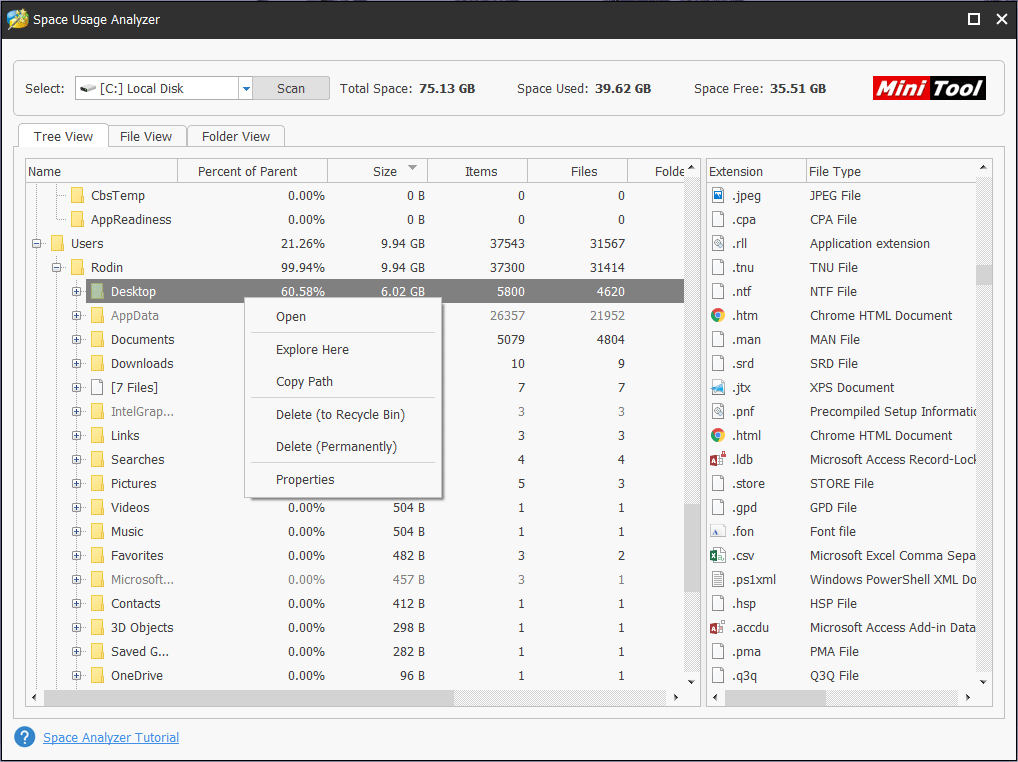
MiniTool Partition Wizard also equips a Space Analyzer function to allow you to analyze the PC hard drive storage space to dig out what occupies the most space of your computer, and lets you directly delete unnecessary files, folder, programs, etc. in Space Analyzer window.
Step 1. After you enter into the main interface of MiniTool Partition Wizard, you can click Space Analyzer function in the toolbar.
Step 2. Then choose a drive or partition and click Scan to analyze the Windows 10 PC disk space usage.
Step 3. After the scan is finished, if will list all files in the scan result window. You can check the usage rate, size, number of items of each folder. You can find out and delete those unnecessary large files and folders to release more free space for your PC.
Tips:
Discover MiniTool System Booster: Unlock Disk Space and Deep-Clean Your PC.
MiniTool System Booster TrialClick to Download100%Clean & Safe
PC Specs Test – Check If Your PC Can Run a Game
After you use the ways above to check the full PC specs in Windows 10, now you know your computer processor, CPU, GPU, RAM, etc. If you want to check if a game can run on your PC, you can check the system requirements for the game to run on PC.
Generally you can quickly find the system requirements for running this game on the game’s website or on a site where it is selling, for instance, you can find the information on each game’s page on the Steam store.
Then you can compare your PC specs with the system requirements of the game, pay attention to the processor, RAM and GPU requirements particularly.
There are some differences between the minimum and recommended requirements. You can run the game on your PC if your Windows 10 computer meet the minimum requirements of the game. But if you want to have a better game playing experience, meeting the recommended requirements would be better.
Verdict
As for how to check PC specs Windows 10, this post provides 5 ways with detailed step-by-step guides for you. You can also easily conduct a PC benchmark, analyze PC space usage, and manage PC hard drive/partition using MiniTool Partition Wizard if you need.