
Все способы:
- Способ 1: «Командная строка»
- Способ 2: «Windows PowerShell»
- Способ 3: Фирменное программное обеспечение
- Вопросы и ответы: 3
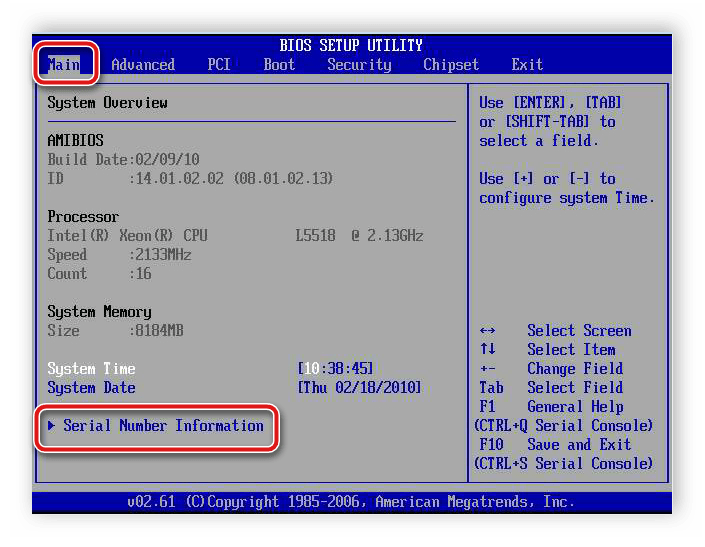
Важно! В этой статье речь будет идти о просмотре серийного номера компьютера средствами операционной системы Windows 10, что не предполагает такие методы, как просмотр надписи на наклейке устройства и поиск информации в BIOS. Поэтому, в случае необходимости, рекомендуем обратиться за помощью к другой статье на нашем сайте. Несмотря на то, что в ней речь идет о ноутбуке, перечисленные способы в большинстве своем будут полезны и для владельцев стационарных компьютеров.
Подробнее: Как узнать серийный номер ноутбука
Способ 1: «Командная строка»
Наиболее распространенный способ просмотра серийного номера устройства — выполнение специального запроса в «Командной строке» операционной системы. Первостепенно необходимо будет запустить саму консоль. Сделать это можно многими способами, например, выполнив поиск по системе. Для этого установите курсор в поисковую строку на панели задач и введите запрос «Командная строка». Затем в результатах выдачи кликните по одноименному приложению.
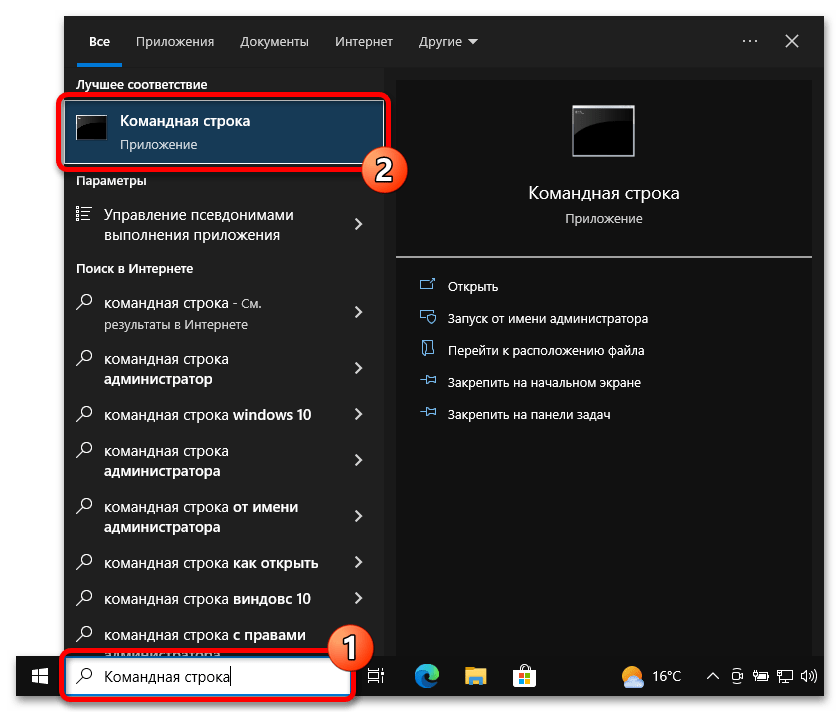
Читайте также: Все способы запуска «Командной строки» в Windows 10
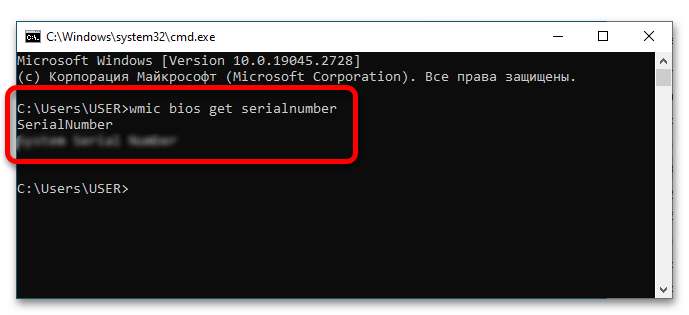
После того как на экране появится черное окно консоли, необходимо ввести вручную или скопировать приведенную ниже команду и нажать по клавише Enter:
wmic bios get serialnumber
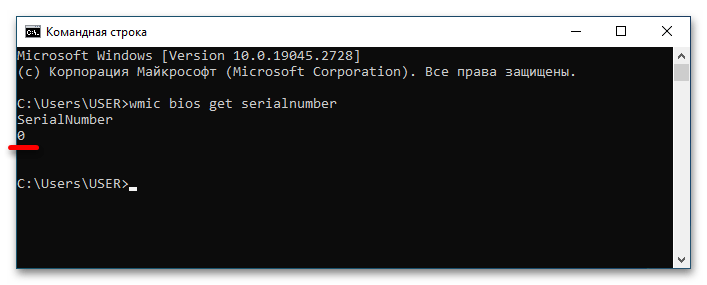
Обратите внимание! Этот способ подразумевает обращение системы к утилите ввода и вывода (BIOS), в которой серийный номер должен быть прописан поставщиком оборудования. Если в консоли после выполнения команды указан «0» (ноль), это означает, что нужных данных нет, тогда этот способ становится попросту бесполезным.
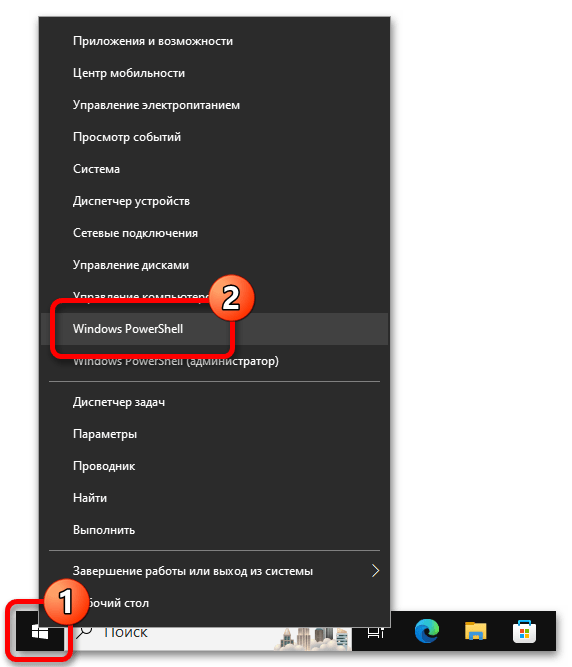
Способ 2: «Windows PowerShell»
«Windows PowerShell» тоже позволяет просмотреть серийный номер компьютера путем ввода специальной команды, более того, в отличие от «Командной строки», доступны две версии запроса.
Для начала следует открыть непосредственно «PowerShell» любым доступным способом. В последних версиях Windows 10 проще всего это сделать через контекстное меню кнопки «Пуск». Для этого сначала нажмите по ней правой кнопкой мыши, а затем щелкните по строке «Windows PowerShell».
Читайте также: Все способы запуска «PowerShell» в Windows 10
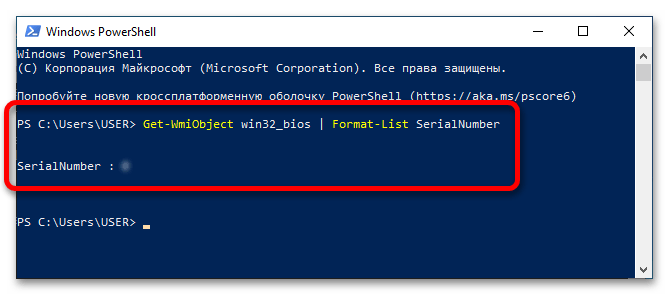
После появления окна вызываемого приложения дождитесь, пока отобразится строка запроса, в данном случае это «PS C:\Users\USER>», но у вас она может отличаться. Затем скопируйте и вставьте приведенную ниже команду и нажмите Enter:
Get-WmiObject win32_bios | Format-List SerialNumber
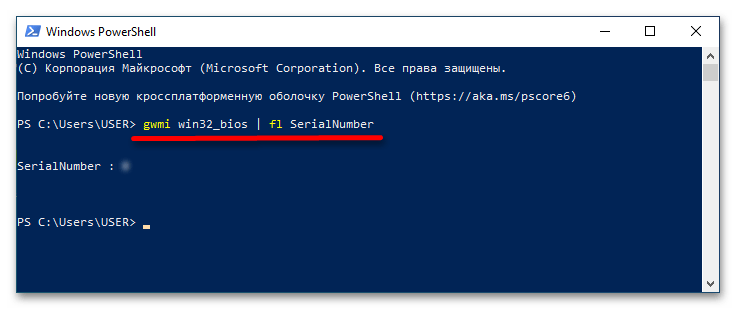
Если после выполнения команды по каким-то причинам серийный номер компьютера не выведется на экран, рекомендуется повторить попытку, только на этот раз отправить другой запрос, приведенный ниже:
gwmi win32_bios | fl SerialNumber
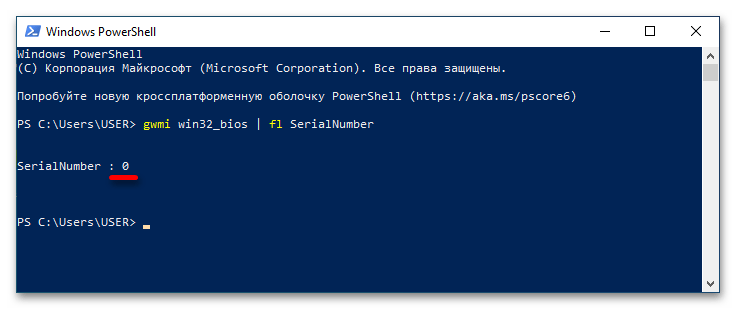
Важно! Как и в случае с «Командной строкой», после выполнения команды в Windows PowerShell следует обращение в BIOS для получения нужной информации. Если ее там не оказалось, в результатах будет отображаться «0» (ноль). В таком случае этот способ выполнения поставленной задачи неэффективен.
Способ 3: Фирменное программное обеспечение
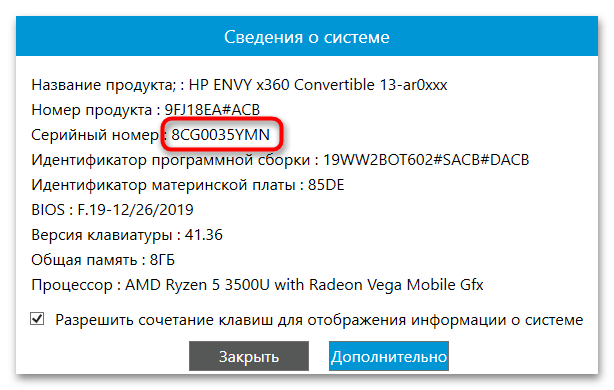
Современные компьютеры зачастую имеют фирменное программное обеспечение для настройки отдельных компонентов устройства и просмотра дополнительной информации о нем. С помощью таких приложений можно узнать в частности и серийный номер. Например, компьютеры от HP поставляются с предустановленной утилитой «HP System Event Utility», которая подходит для выполнения поставленной задачи.
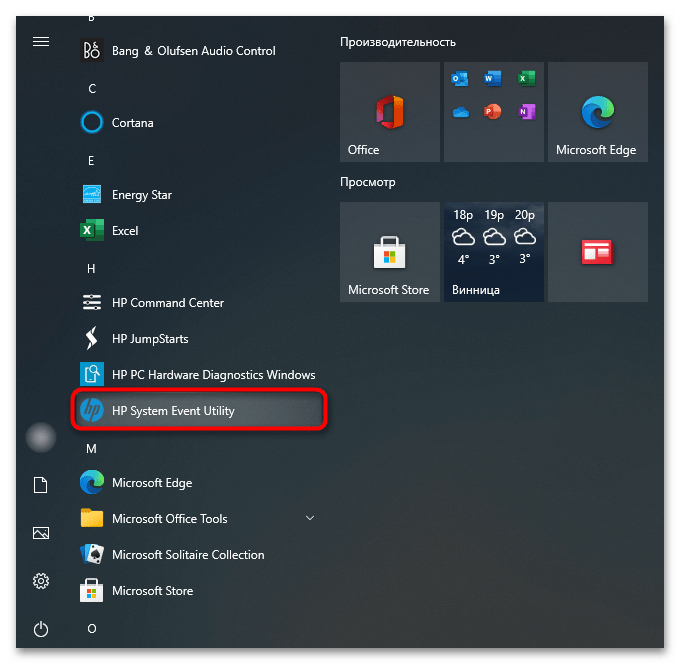
Достаточно просто найти ее в списке приложений меню «Пуск» и запустить. На экране сразу откроется информационное окно, в котором будет находиться серийный номер компьютера.
Примечание! В случае отсутствия фирменной программы на компьютере, загружать ее рекомендуется только с официальных ресурсов производителя компьютера, иначе имеется риск проникновения вредоносного ПО в операционную систему.
Читайте также: Методы удаления вируса с компьютера под управлением Windows 10
Наша группа в TelegramПолезные советы и помощь
Сразу после выхода новой ОС, все стали интересоваться, как узнать ключ установленной Windows 10, хотя в большинстве случаев он не требуется. Тем не менее, если вам все-таки требуется ключ для тех или иных целей, его сравнительно просто определить, как для установленной ОС, так и зашитый производителем в UEFI ключ продукта (они могут отличаться).
В этой инструкции описаны простые способы узнать ключ продукта Windows 10 с помощью командной строки, Windows PowerShell, а также сторонних программ. Заодно упомяну о том, почему разные программы показывают разные данные, как отдельно посмотреть OEM ключ в UEFI (для ОС, которая изначально была на компьютере) и ключ установленной в данный момент системы.
Примечание: если вы произвели бесплатное обновление до Windows 10, а теперь хотите узнать ключ активации для чистой установки на том же компьютере, вы можете это сделать, но это не обязательно (к тому же у вас будет ключ такой же, как и у других людей, получивших десятку путем обновления). При установке Windows 10 с флешки или диска, вас попросят ввести ключ продукта, но вы можете пропустить этот шаг, нажав в окне запроса «У меня нет ключа продукта» (и Майкрософт пишет, что так и нужно делать).
После установки и подключения к Интернету, система будет автоматически активирована, поскольку активация «привязывается» к вашему компьютеру после обновления. То есть поле для ввода ключа в программе установки Windows 10 присутствует только для покупателей Retail-версий системы. Подробнее про такую активацию: Активация Windows 10. А при желании, можно использовать Windows 10 и без активации.
Просмотр ключа продукта установленной Windows 10 и OEM-ключа в ShowKeyPlus
Есть множество программ для описываемых здесь целей, о многих из которых я писал в статье Как узнать ключ продукта Windows 8 (8.1) (подойдет и для Windows 10), но мне больше других приглянулась найденная недавно ShowKeyPlus, которая не требует установки и отдельно показывает сразу два ключа: установленной в текущий момент системы и OEM ключ в UEFI. Заодно сообщает, для какой именно версии Windows подходит ключ из UEFI. Также с помощью этой программы можно узнать ключ из другой папки с Windows 10 (на другом жестком диске, в папке Windows.old), а заодно проверить ключ на валидность (пункт Check Product Key).
Все, что нужно сделать — запустить программу и посмотреть отображаемые данные:
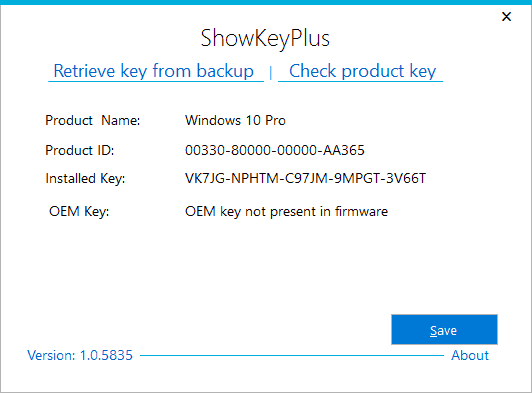
- Installed Key — ключ установленной системы.
- OEM Key (Original Key) — ключ предустановленной ОС, если она была на компьютере, т.е. ключ из UEFI.
Также эти данные можно сохранить в текстовый файл для дальнейшего использования или архивного хранения, нажав кнопку «Save». Кстати, проблема с тем, что порой разные программы показывают разные ключи продукта для Windows, как раз и появляется из-за того, что некоторые из них смотрят его в установленной системе, другие в UEFI.
Скачать ShowKeyPlus можно со страницы https://github.com/Superfly-Inc/ShowKeyPlus/releases/, также с недавних пор приложение доступно для загрузки в Microsoft Store.
Еще две программы, чтобы узнать ключ продукта Windows 10
Если по той или иной причине ShowKeyPlus для вас оказался неподходящим вариантом, можно использовать следующие две программы:
Просмотр ключа установленной Windows 10 с помощью PowerShell
Там, где можно обойтись без сторонних программ, я предпочитаю обходиться без них. Просмотр ключа продукта Windows 10 — одна из таких задач. Если же вам проще использовать бесплатную программу для этого, пролистайте руководство ниже. (Кстати, некоторые программы для просмотра ключей отправляют их заинтересованным лицам)
Простой команды PowerShell или командной строки, для того чтобы узнать ключ установленной в настоящий момент времени системы не предусмотрено (есть такая команда, показывающая ключ из UEFI, покажу ниже. Но обычно требуется именно ключ текущей системы, отличающийся от предустановленной). Но можно воспользоваться готовым скриптом PowerShell, который отображает необходимую информацию (автор скрипта Jakob Bindslet).
Вот что потребуется сделать. Прежде всего, запустите блокнот и скопируйте в него код, представленный ниже.
#Main function
Function GetWin10Key
{
	$Hklm = 2147483650
	$Target = $env:COMPUTERNAME
	$regPath = "Software\Microsoft\Windows NT\CurrentVersion"
	$DigitalID = "DigitalProductId"
	$wmi = [WMIClass]"\\$Target\root\default:stdRegProv"
	#Get registry value
	$Object = $wmi.GetBinaryValue($hklm,$regPath,$DigitalID)
	[Array]$DigitalIDvalue = $Object.uValue
	#If get successed
	If($DigitalIDvalue)
	{
		#Get producnt name and product ID
		$ProductName = (Get-itemproperty -Path "HKLM:Software\Microsoft\Windows NT\CurrentVersion" -Name "ProductName").ProductName
		$ProductID =  (Get-itemproperty -Path "HKLM:Software\Microsoft\Windows NT\CurrentVersion" -Name "ProductId").ProductId
		#Convert binary value to serial number
		$Result = ConvertTokey $DigitalIDvalue
		$OSInfo = (Get-WmiObject "Win32_OperatingSystem"  | select Caption).Caption
		If($OSInfo -match "Windows 10")
		{
			if($Result)
			{

				[string]$value ="ProductName  : $ProductName `r`n" `
				+ "ProductID    : $ProductID `r`n" `
				+ "Installed Key: $Result"
				$value
				#Save Windows info to a file
				$Choice = GetChoice
				If( $Choice -eq 0 )
				{
					$txtpath = "C:\Users\"+$env:USERNAME+"\Desktop"
					New-Item -Path $txtpath -Name "WindowsKeyInfo.txt" -Value $value   -ItemType File  -Force | Out-Null
				}
				Elseif($Choice -eq 1)
				{
					Exit
				}
			}
			Else
			{
				Write-Warning "Запускайте скрипт в Windows 10"
			}
		}
		Else
		{
			Write-Warning "Запускайте скрипт в Windows 10"
		}

	}
	Else
	{
		Write-Warning "Возникла ошибка, не удалось получить ключ"
	}

}
#Get user choice
Function GetChoice
{
    $yes = New-Object System.Management.Automation.Host.ChoiceDescription "&Yes",""
    $no = New-Object System.Management.Automation.Host.ChoiceDescription "&No",""
    $choices = [System.Management.Automation.Host.ChoiceDescription[]]($yes,$no)
    $caption = "Подтверждение"
    $message = "Сохранить ключ в текстовый файл?"
    $result = $Host.UI.PromptForChoice($caption,$message,$choices,0)
    $result
}
#Convert binary to serial number
Function ConvertToKey($Key)
{
	$Keyoffset = 52
	$isWin10 = [int]($Key[66]/6) -band 1
	$HF7 = 0xF7
	$Key[66] = ($Key[66] -band $HF7) -bOr (($isWin10 -band 2) * 4)
	$i = 24
	[String]$Chars = "BCDFGHJKMPQRTVWXY2346789"
	do
	{
		$Cur = 0
		$X = 14
		Do
		{
			$Cur = $Cur * 256
			$Cur = $Key[$X + $Keyoffset] + $Cur
			$Key[$X + $Keyoffset] = [math]::Floor([double]($Cur/24))
			$Cur = $Cur % 24
			$X = $X - 1
		}while($X -ge 0)
		$i = $i- 1
		$KeyOutput = $Chars.SubString($Cur,1) + $KeyOutput
		$last = $Cur
	}while($i -ge 0)

	$Keypart1 = $KeyOutput.SubString(1,$last)
	$Keypart2 = $KeyOutput.Substring(1,$KeyOutput.length-1)
	if($last -eq 0 )
	{
		$KeyOutput = "N" + $Keypart2
	}
	else
	{
		$KeyOutput = $Keypart2.Insert($Keypart2.IndexOf($Keypart1)+$Keypart1.length,"N")
	}
	$a = $KeyOutput.Substring(0,5)
	$b = $KeyOutput.substring(5,5)
	$c = $KeyOutput.substring(10,5)
	$d = $KeyOutput.substring(15,5)
	$e = $KeyOutput.substring(20,5)
	$keyproduct = $a + "-" + $b + "-"+ $c + "-"+ $d + "-"+ $e
	$keyproduct


}
GetWin10Key
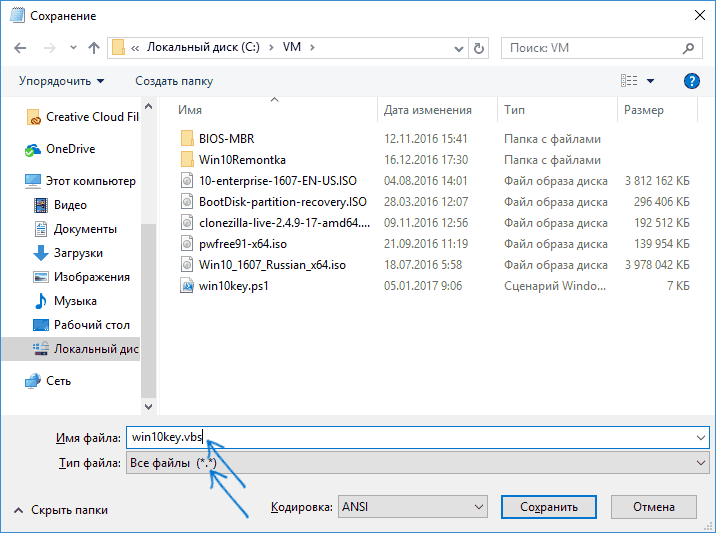
Сохраните файл с расширением .ps1. Для того, чтобы сделать это в блокноте, при сохранении в поле «Тип файла» укажите «Все файлы» вместо «Текстовые документы». Сохранить можно, например, под именем win10key.ps1
После этого, запустите Windows PowerShell от имени Администратора. Для этого, можно начать набирать PowerShell в поле поиска, после чего кликнуть по нему правой кнопкой мыши и выбрать соответствующий пункт.
В PowerShell введите следующую команду: Set-ExecutionPolicy RemoteSigned и подтвердите ее выполнение (ввести Y и нажать Enter в ответ на запрос).
Следующим шагом, введите команду: C:\win10key.ps1 (в данной команде указывается путь к сохраненному файлу со скриптом).
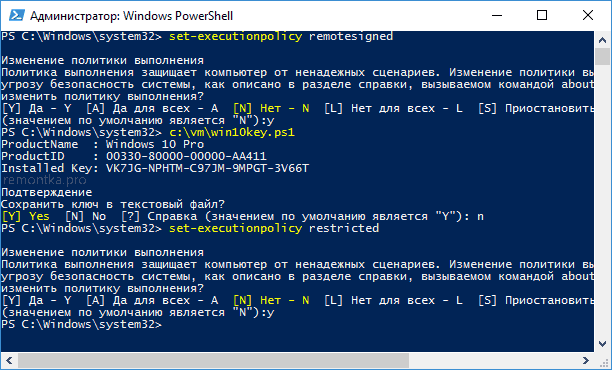
В результате выполнения команды вы увидите информацию о ключе установленной Windows 10 (в пункте Installed Key) и предложение сохранить ее в текстовый файл. После того, как вы узнали ключ продукта, можете вернуть политику выполнения скриптов в PowerShell к значению по умолчанию с помощью команды Set-ExecutionPolicy restricted
Как узнать OEM ключ из UEFI в PowerShell
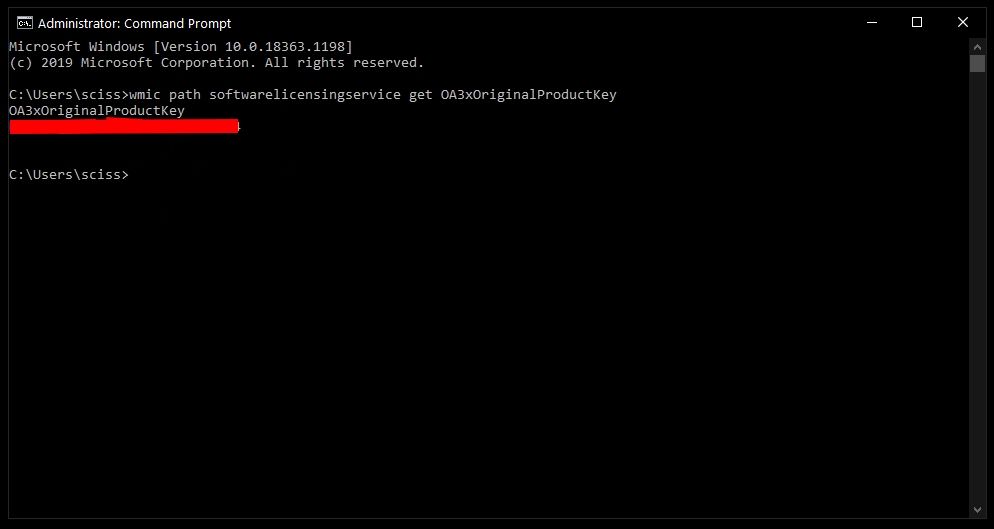
Если на вашем компьютере или ноутбуке была предустановлена Windows 10 и требуется просмотреть OEM ключ (который хранится в UEFI материнской платы), вы можете использовать простую команду, которую необходимо запустить в командной строке от имени администратора.
wmic path softwarelicensingservice get OA3xOriginalProductKey
В результате вы получите ключ предустановленной системы при его наличии в системе (он может отличаться от того ключа, который используется текущей ОС, но при этом может использоваться для того, чтобы вернуть первоначальную версию Windows).
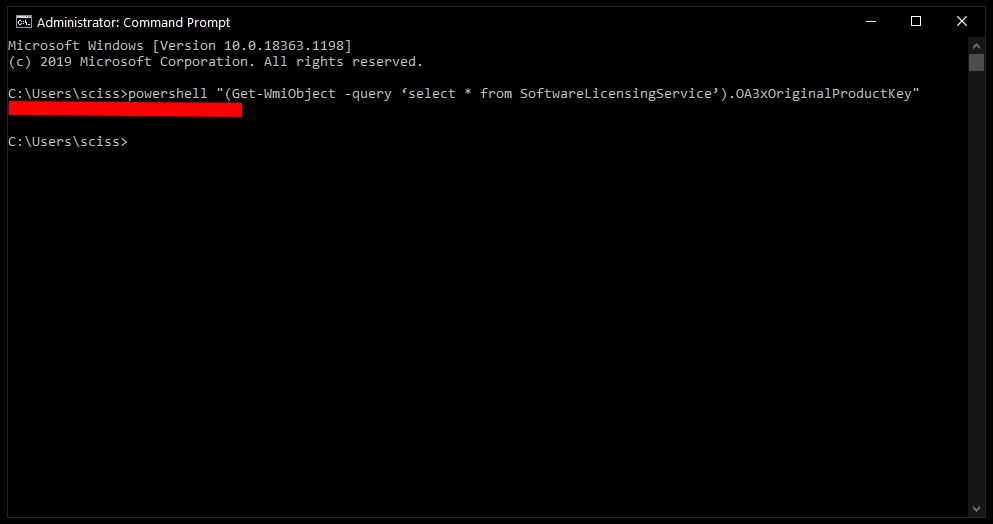
Еще один вариант этой же команды, но для Windows PowerShell
(Get-WmiObject -query "select * from SoftwareLicensingService").OA3xOriginalProductKey
Как посмотреть ключ установленной Windows 10 с помощью скрипта VBS
И еще один скрипт, уже не для PowerShell, а в формате VBS (Visual Basic Script), который отображает ключ продукта установленной на компьютере или ноутбуке Windows 10 и, возможно, удобнее для использования.
Скопируйте в блокнот строки, представленные ниже.
Set WshShell = CreateObject("WScript.Shell")
regKey = "HKLM\SOFTWARE\Microsoft\Windows NT\CurrentVersion\"
DigitalProductId = WshShell.RegRead(regKey & "DigitalProductId")
Win10ProductName = "Версия Windows 10: " & WshShell.RegRead(regKey & "ProductName") & vbNewLine
Win10ProductID = "ID продукта: " & WshShell.RegRead(regKey & "ProductID") & vbNewLine
Win10ProductKey = ConvertToKey(DigitalProductId)
ProductKeyLabel ="Ключ Windows 10: " & Win10ProductKey
Win10ProductID = Win10ProductName & Win10ProductID & ProductKeyLabel
MsgBox(Win10ProductID)
Function ConvertToKey(regKey)
Const KeyOffset = 52
isWin10 = (regKey(66) \ 6) And 1
regKey(66) = (regKey(66) And &HF7) Or ((isWin10 And 2) * 4)
j = 24
Chars = "BCDFGHJKMPQRTVWXY2346789"
Do
Cur = 0
y = 14
Do
Cur = Cur * 256
Cur = regKey(y + KeyOffset) + Cur
regKey(y + KeyOffset) = (Cur \ 24)
Cur = Cur Mod 24
y = y -1
Loop While y >= 0
j = j -1
winKeyOutput = Mid(Chars, Cur + 1, 1) & winKeyOutput
Last = Cur
Loop While j >= 0
If (isWin10 = 1) Then
keypart1 = Mid(winKeyOutput, 2, Last)
insert = "N"
winKeyOutput = Replace(winKeyOutput, keypart1, keypart1 & insert, 2, 1, 0)
If Last = 0 Then winKeyOutput = insert & winKeyOutput
End If
a = Mid(winKeyOutput, 1, 5)
b = Mid(winKeyOutput, 6, 5)
c = Mid(winKeyOutput, 11, 5)
d = Mid(winKeyOutput, 16, 5)
e = Mid(winKeyOutput, 21, 5)
ConvertToKey = a & "-" & b & "-" & c & "-" & d & "-" & e
End Function
Должно получиться как на скриншоте ниже.

После этого сохраните документ с расширением .vbs (для этого в диалоге сохранения в поле «Тип файла» выберите «Все файлы».
Перейдите в папку, где был сохранен файл и запустите его — после выполнения вы увидите окно, в котором будут отображены ключ продукта и версия установленной Windows 10.
Как я уже отметил, программ для просмотра ключа есть множество — например, в Speccy, а также других утилитах для просмотра характеристик компьютера можно узнать эту информацию. Но, уверен, тех способов, что описаны здесь, будет достаточно практически в любой ситуации.
Quick Tips
- Use Command Prompt: Open Command Prompt and type wmic path softwarelicensingservice get OA3xOriginalProductKey to retrieve your Windows product key.
- Registry Method: Navigate to HKEY_LOCAL_MACHINE\SOFTWARE\Microsoft\Windows NT\CurrentVersion\SoftwareProtectionPlatform in the Registry Editor to find your product key.
- Third-Party Tools: Use reliable third-party software like ProduKey or ShowKeyPlus to quickly find and back up your product key.
1. Using Command Prompt
Step 1: Press the Windows key, type Command Prompt, and click on Run as administrator.
Select Yes in the prompt.
Step 2: Type the following command and press Enter.
wmic path softwareLicensingService get OA3xOriginalProductKey

There you go. You will be shown your Windows product key when you press Enter. Pretty straightforward, right? There’s one more command line way to find the product key, but with Windows PowerShell.
2. Using Windows PowerShell
Step 1: Press the Windows key, type Windows PowerShell, and select Run as Administrator.
Select Yes in the prompt.
Step 2: Enter the following command and press Enter.
powershell "(Get-WmiObject -query 'select * from SoftwareLicensingService').OA3xOriginalProductKey"

There you go. This method is as easy as pie. We recommend you copy the above command, but if you are typing it, ensure you leave spaces and add dots, as shown above.
If Windows PowerShell begins behaving strangely, check out different ways to fix PowerShell popping up on Windows.
3. Using Registry Files
Step 1: Press the Windows key, type Registry Editor, and click on Run as administrator.
Select Yes in the prompt.
Step 2: Enter the below address into the Registry’s address bar.
Computer\HKEY_LOCAL_MACHINE\SOFTWARE\Microsoft\Windows NT\CurrentVersion\SoftwareProtectionPlatform
Step 3: In the right side panel, under Name, you will find BackupProductKeyDefault; right beside it, you will see your Windows product key.

Note: You may find the product key coming from the Command Prompt or PowerShell different from the product key coming from the Registry Editor. It might happen because you have upgraded or changed your Windows version.
1. What is a product key finder?
The product key finder is a tool for displaying Microsoft Windows product keys and other important information.
2. Are Windows keys stored in BIOS?
The Windows key is stored in the BIOS and invoked when there is an event that restores your operating system. The BIOS key is used to activate Windows automatically if you use the same edition of Windows.
3. Is the product ID the same as the product key?
They are not. The product ID is used to determine the level of service you are entitled to, whereas the product key is used to pair your license with your PC and validate its authenticity.
4. Is Windows 10 illegal without activation?
The installation of Windows without a license is acceptable. Activating it through unsolicited means without purchasing the key is, however, unlawful.
Although there are third-party tools that let you find your Windows product key, they pose the risk of a privacy breach. Besides, it is also worth considering that you can do it on your own without the need for a third-party tool.
Was this helpful?
Thanks for your feedback!
The article above may contain affiliate links which help support Guiding Tech. The content remains unbiased and authentic and will never affect our editorial integrity.
By default, Windows computers can’t see their PC serial number by looking at the system interface, or by using known system information tools. However, you can still find the serial number using the Command Prompt, a built-in application in every Microsoft operating system.

Tip: If you’re not familiar with the Windows 10 interface, we recommend reading the How to Get Started with Windows 10 article on our website.
In this article, you’ll learn how to find your Windows PC’s serial number using the Command Prompt. Our step by step guide aims to teach you how to work with the tool in order to locate your PC’s unique serial number.
Look up your PC serial number on Windows 10 with the Command Prompt
The guide below shows the steps required to find your Windows 10 PC’s serial number using the Command Prompt app. The steps also work on Windows 8 and Windows 8.1, with little to no differences in the process.
Note: You might be required to have access to an administrator account to perform all of the steps described below. If the account you’re currently using doesn’t have administrative permissions, make sure to change this in your settings or contact your IT professional.
-
Open the Command Prompt in one of the following ways:
- Open the Search function in your taskbar, or alternatively use the Ctrl + S keyboard shortcut to bring up the search bar and look up “Command Prompt”.
-
When you see it in the results, right-click on it and choose Run as Administrator.

- Press the Windows + R keys on your keyboard to bring up the Run utility.
- Type in “cmd” and press the Ctrl + Shift + Enter keys on your keyboard. Doing so, you’re launching the Command Prompt with administrative permissions.
- Press the Windows + X keyboard shortcut, then select Command Prompt (Admin).
-
When prompted by the User Account Control (UAC), click Yes to allow the app to launch with administrative permissions.
- Need help? Check out our How to make a local user an administrator in Windows 10 guide.
-
Once the Command Prompt is open, you’ll need to input the following command and press the Enter key on your keyboard to execute it:
wmic bios get serialnumber
-
Alternatively, use the following command if the first one didn’t yield your computer’s serial number:
wmic csproduct get identifyingnumber - If your computer’s serial number is coded into your BIOS, it will appear here on the screen. Otherwise, you might have to look for the serial number on the physical computer, most commonly found on a sticker.


Look up your PC serial number on Windows 7 with the Command Prompt
The process of finding your computer’s serial number on a Windows 7 operating system is similar to the new method. Lets review the steps you need to take in order to successfully look up this number with the Command Prompt.

- Click on the large, circular Windows logo in the bottom left of your screen. This will bring up the Start menu and the search bar.
-
Type “cmd” without the quotation marks into the search bar. You should see the command prompt appear under Programs in the search results.

-
Right-click on the cmd application, and choose either Open or Run as administrator. For the latter, you’re required to have administrative permissions on your Windows 7 computer.
-
A Command Prompt window will open up. Here, type in the following command, then press Enter on your keyboard to run the command:
wmic bios get serialnumber -
You should see your device’s serial number show up on the screen. If not, try the following command and once again execute it with the Enter key:
wmic csproduct get identifyingnumber - If your computer’s serial number is coded into your BIOS, it will appear here on the screen. Otherwise, you might have to look for the serial number on the physical computer, most commonly found on a sticker.

Final thoughts
If you need any further help with Windows 10, don’t hesitate to reach out to our customer service team, available 24/7 to assist you. Return to us for more informative articles all related to productivity and modern day technology!
Would you like to receive promotions, deals, and discounts to get our products for the best price? Don’t forget to subscribe to our newsletter by entering your email address below! Receive the latest technology news in your inbox and be the first to read our tips to become more productive.

If you’re having trouble finding your Windows 10 product key, we’ve got you covered.
In this quick tutorial we’ll go over what a Windows product key is, and I’ll share several ways to find the product key on modern Windows machines.
A Windows product key or license is a 25 digit code used to activate your installation of Windows.
Back in the day, all you had to do to find your Windows product key was look for a sticker somewhere on the machine.
Usually you could find the sticker on the side of a desktop PC, or stuck to the bottom of a laptop:

_An old-school Windows product key sticker – Source_
Or if you bought a physical copy of Windows, your product key would be included somewhere in the box:
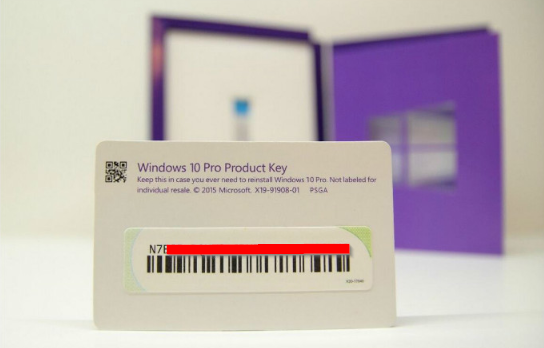
_A Windows 10 product key label — Source_
These days, if you buy a Windows 10 Home or Pro from the Microsoft Store or another online retailer like Amazon, it’ll include a digital copy of your product key.
But if your computer is relatively new and came with Windows preinstalled, you might be wondering how to find your key – there’s likely no sticker on the machine, and the computer manufacturer probably didn’t include one in the box.
Whether you installed and activated Windows yourself, or it came preinstalled, your product key is stored in the BIOS. This makes it really easy if you ever want to reinstall or upgrade Windows – there’s no sticker on the machine that could get damaged, and no small label to lose.
Still, there are times when you might need your product key, like if you want to transfer a Windows Home or Pro license to another machine.
Whatever the reason, here are a few ways to get your Windows 10 product key.
How to get your Windows 10 product key with the Command Prompt
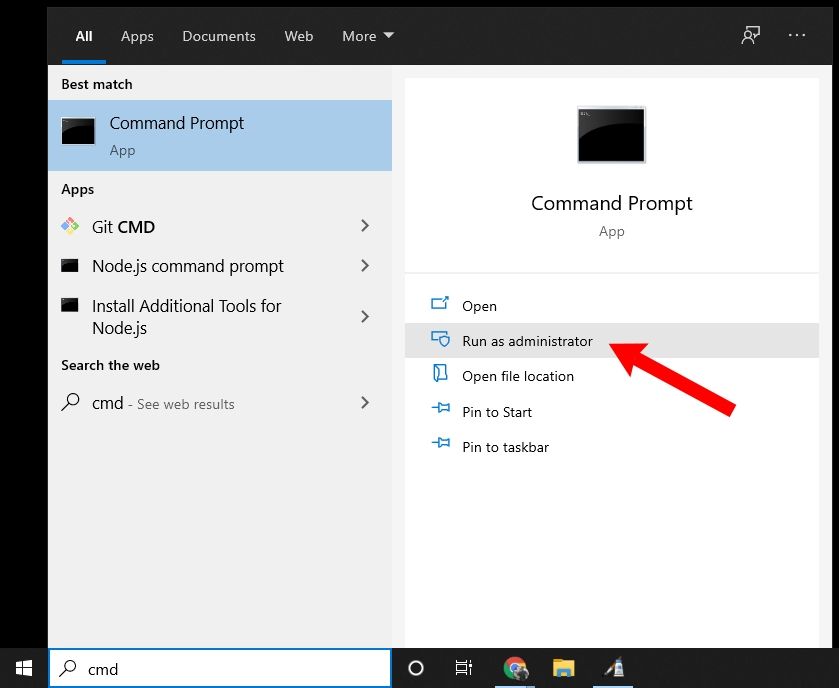
If you want to get your product key from Windows, the easiest way is to do that is through the Windows Command Prompt.
First, press the Windows key, search for «cmd», and click on «Run as administrator»:
Then, run the following command:
wmic path softwarelicensingservice get OA3xOriginalProductKey
After that, you’ll see your Windows 10 product key:
Alternatively, you can run this command in the Command Prompt terminal:
powershell "(Get-WmiObject -query ‘select * from SoftwareLicensingService’).OA3xOriginalProductKey"
Both of these commands attempt to read your Windows product key from something called the OA3 BIOS marker. In other words, they may only work if Windows came preinstalled, and not if you built the machine yourself and installed/activated Windows.
If your product key isn’t saved to your BIOS/UEFI for some reason, then these commands will either throw an error or return an empty string. In this case, or if you prefer a GUI, give the next method a try.
How to get your Windows 10 product key with a third-party program
There are a few tools out there like Belarc Advisor or Magical Jelly Bean KeyFinder that can detect your Windows product key.
We’ll use Magical Jelly Bean KeyFinder for this tutorial because, well – come on, that name, right?
All you have to do is download and install Magical Jelly Bean KeyFinder. Then open the KeyFinder program to see your product key:

Once you’ve copied your product key somewhere safe, feel free to uninstall Magical Jelly Bean KeyFinder.
So those are some quick ways to find your Windows 10 product key.
Did any of these methods or programs work for you? Did you find another way to get your product key? Let me know over on Twitter.
Learn to code for free. freeCodeCamp’s open source curriculum has helped more than 40,000 people get jobs as developers. Get started