
Все способы:
- Способ 1: Параметры дисплея
- Способ 2: Приложение «Сведения о системе»
- Способ 3: Утилита «dxdiag»
- Способ 4: Консольная утилита
- Способ 5: Онлайн-сервисы
- Способ 6: Программы для определения характеристик компьютера
- Решение частых проблем
- Отсутствует нужное разрешение
- Не меняется разрешение
- Вопросы и ответы: 0
Способ 1: Параметры дисплея
Самый простой и надежный метод определения как текущего, так и максимального разрешения экрана в Windows 11 — просмотр параметров дисплея через системное меню с настройками. В нем вы увидите как список доступных разрешений, так и установленное, что позволит определить все значения, потратив на это минимальное количество времени.
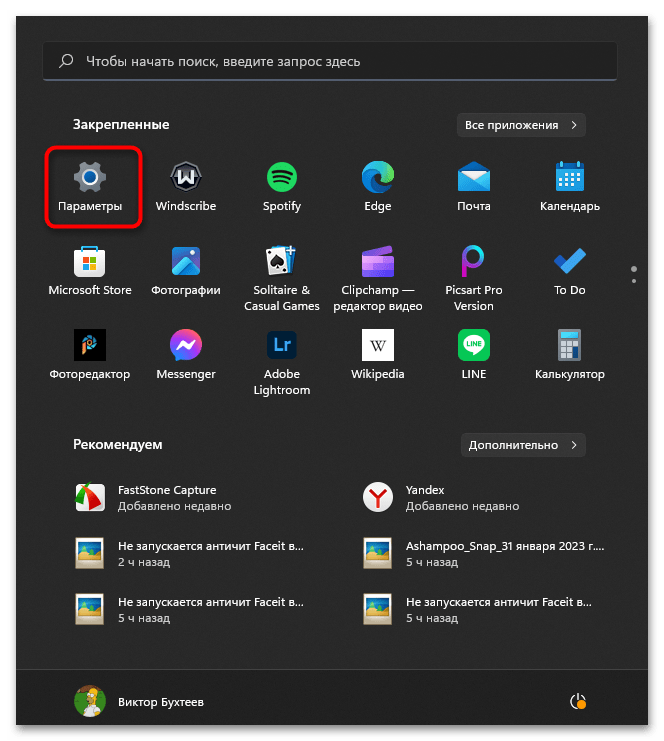
- Откройте меню «Пуск» и перейдите в «Параметры», щелкнув по значку с изображением шестеренки.
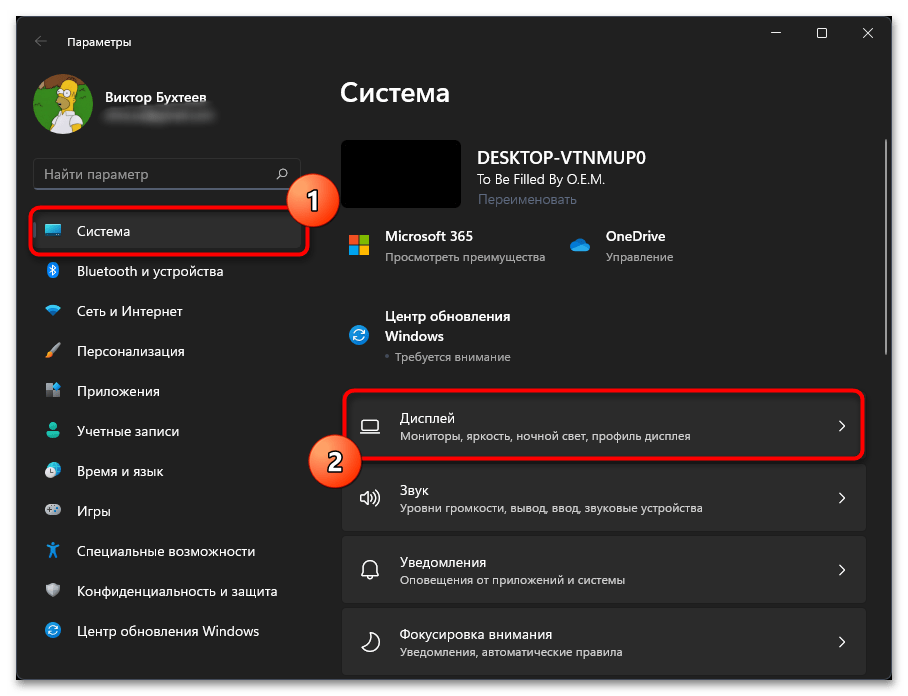
- На панели слева выберите раздел «Система», затем щелкните левой кнопкой мыши по категории «Дисплей».
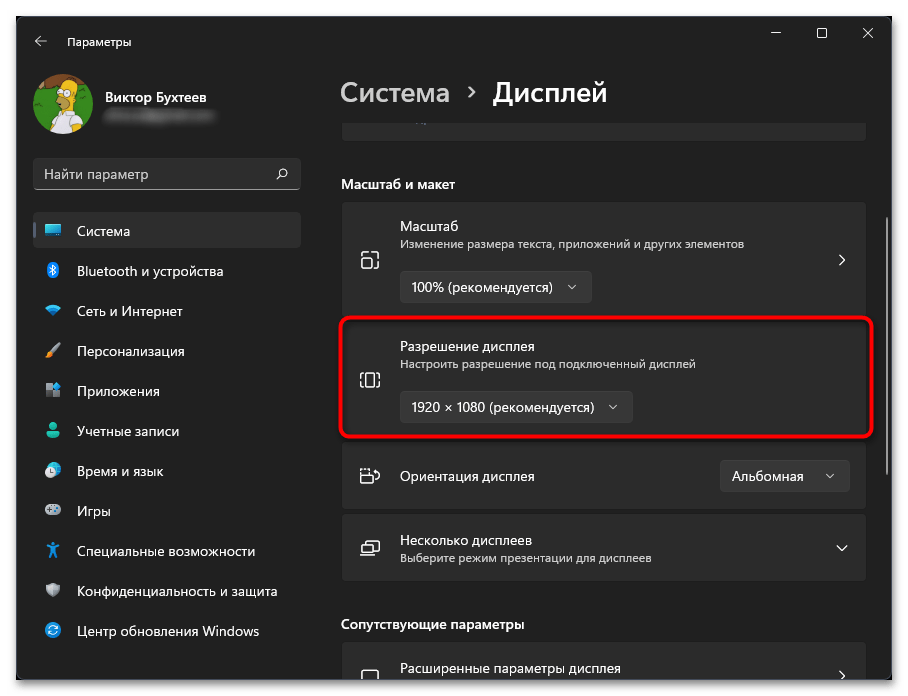
- Обратите внимание на блок «Разрешение дисплея» и значение, выбранное в списке ниже. Оно показывает, какое разрешение установлено на текущий момент.
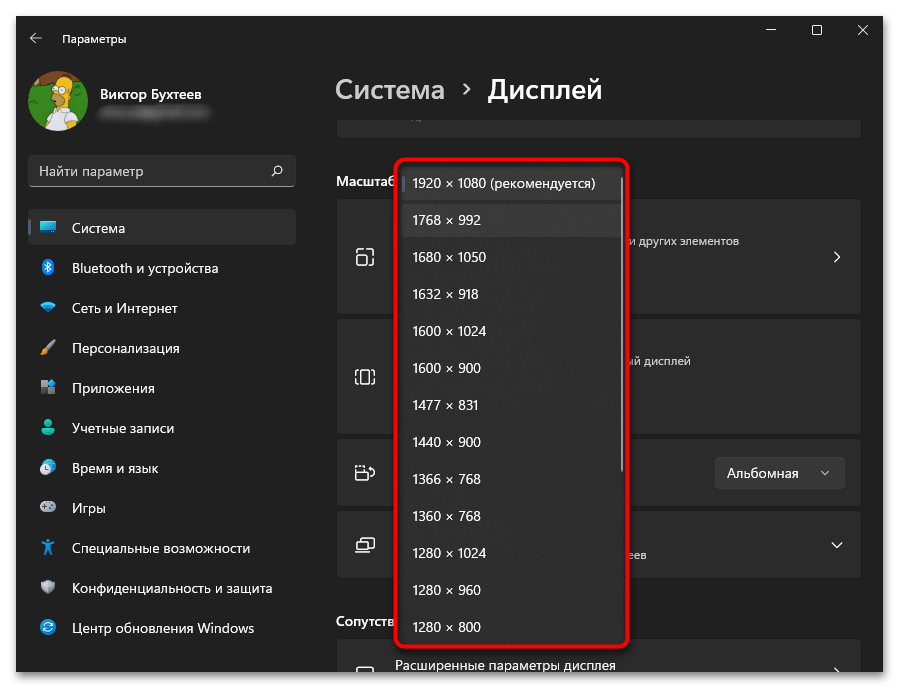
- Можете развернуть этот список, чтобы посмотреть все доступные значения, от минимального до максимального.
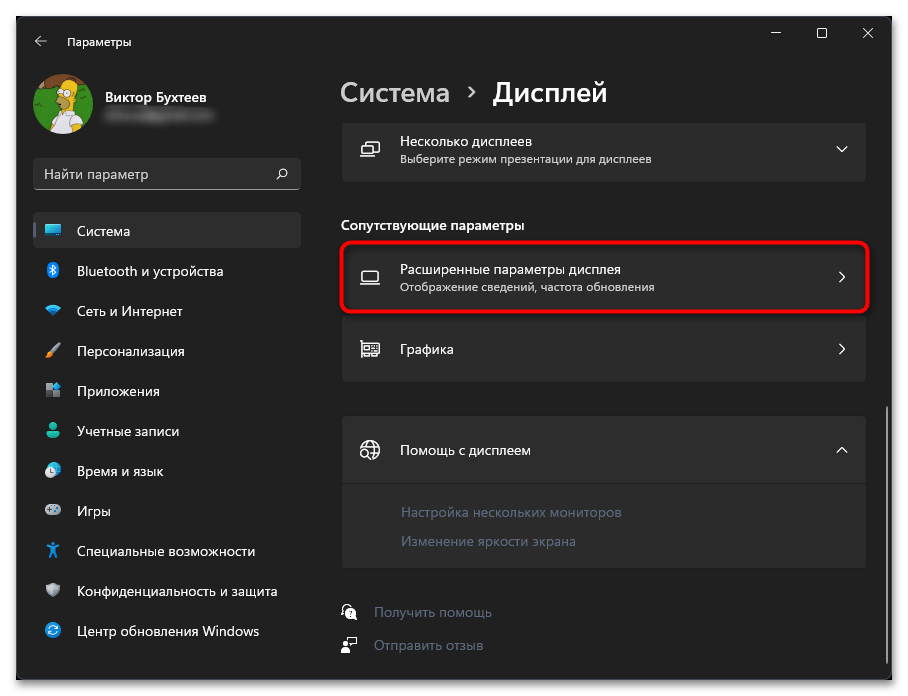
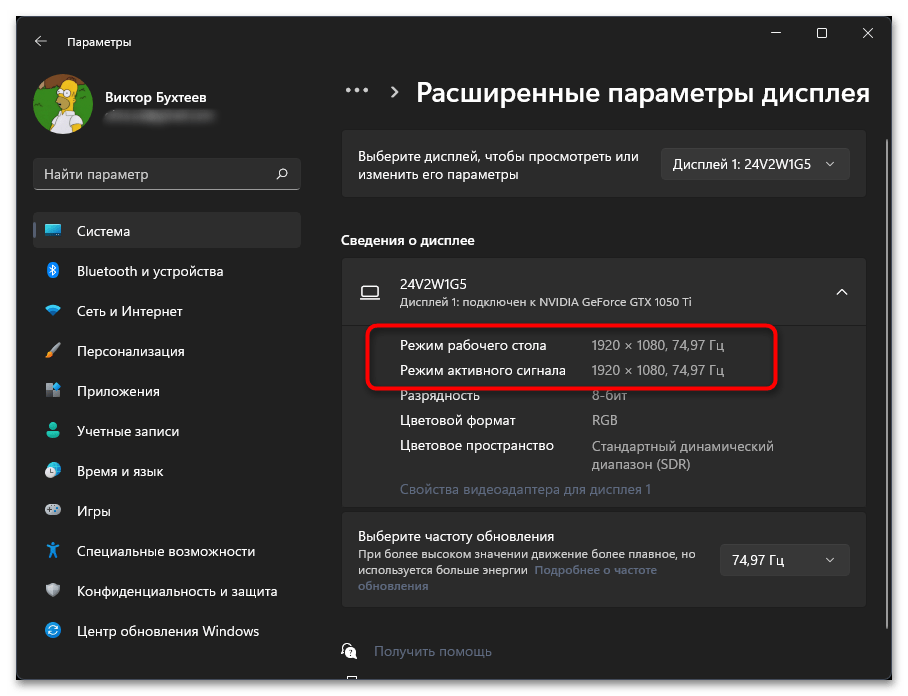
- Примерно эту же информацию можно получить и через другое окно со сведениями, если нажать по кнопке «Расширенные параметры дисплея».
- Вы видите, в каком режиме настроен рабочий стол и какой активный сигнал подается для монитора. Скорее всего, эти два значения у вас будут одинаковыми, если вы не устанавливали разрешение меньше максимального.
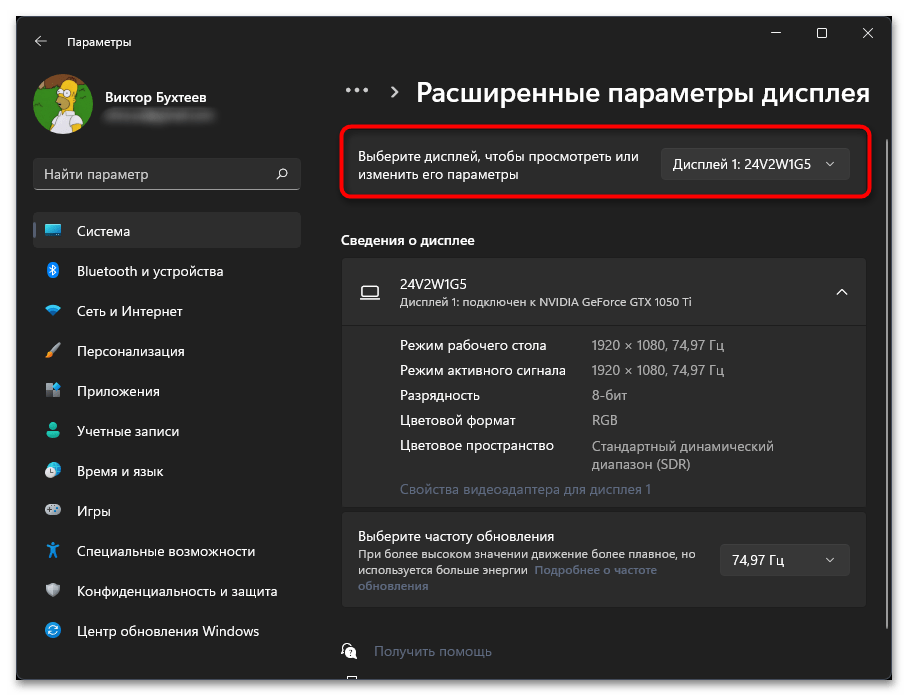
- При использовании нескольких дисплеев одновременно на компьютере с Windows 11 в этом же окне выше вы можете развернуть список с дисплеями, выбрать нужный и просмотреть те же самые параметры.
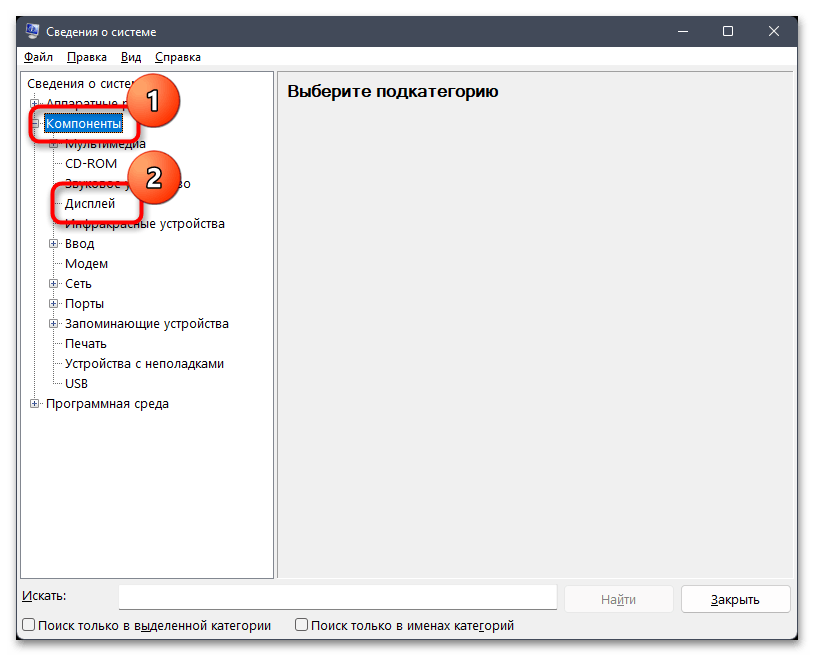
Способ 2: Приложение «Сведения о системе»
Рассмотрим еще один системный метод, который поможет без установки дополнительных программ узнать разрешение экрана в Windows 11. Он подразумевает обращение к классическому приложению «Сведения о системе», в котором отображается основная информация о комплектующих и их характеристиках. Поиск необходимых сведений о дисплее выполняется буквально в пару шагов.
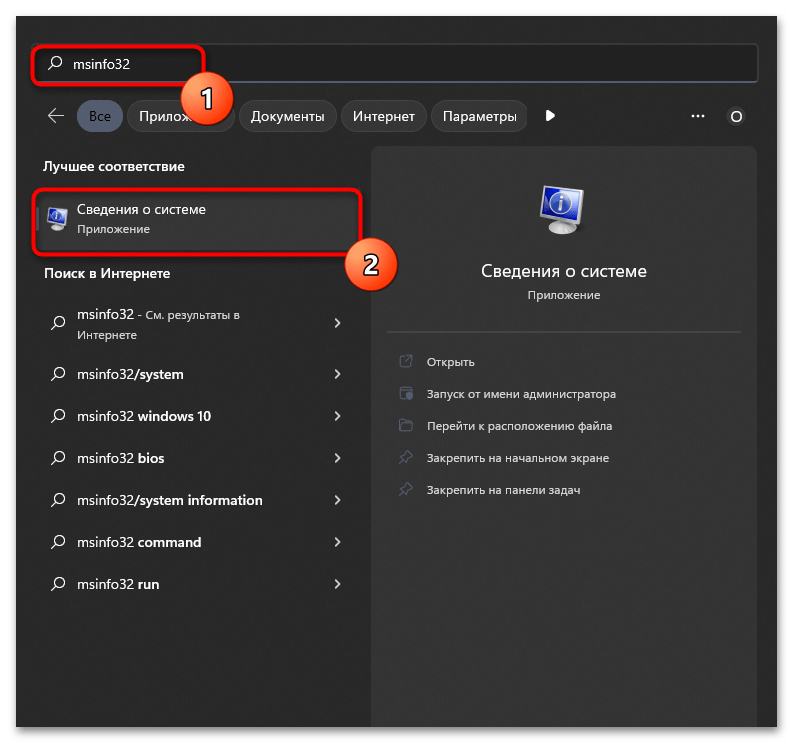
- Запустите приложение «Сведения о системе», отыскав его через поиск в «Пуске» по команде
msinfo32. - На панели слева разверните «Компоненты» и выберите нажатием левой кнопкой мыши категорию «Дисплей».
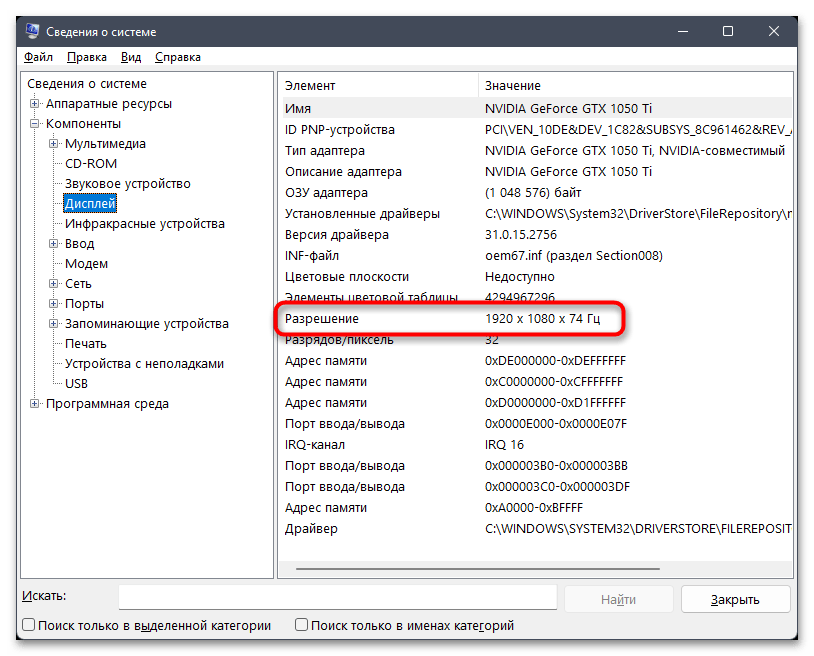
- Справа вы видите список с параметрами, среди которых есть и «Разрешение». «Сведения о системе» показывают то разрешение, которое установлено на текущий момент, а не максимально доступное для монитора.
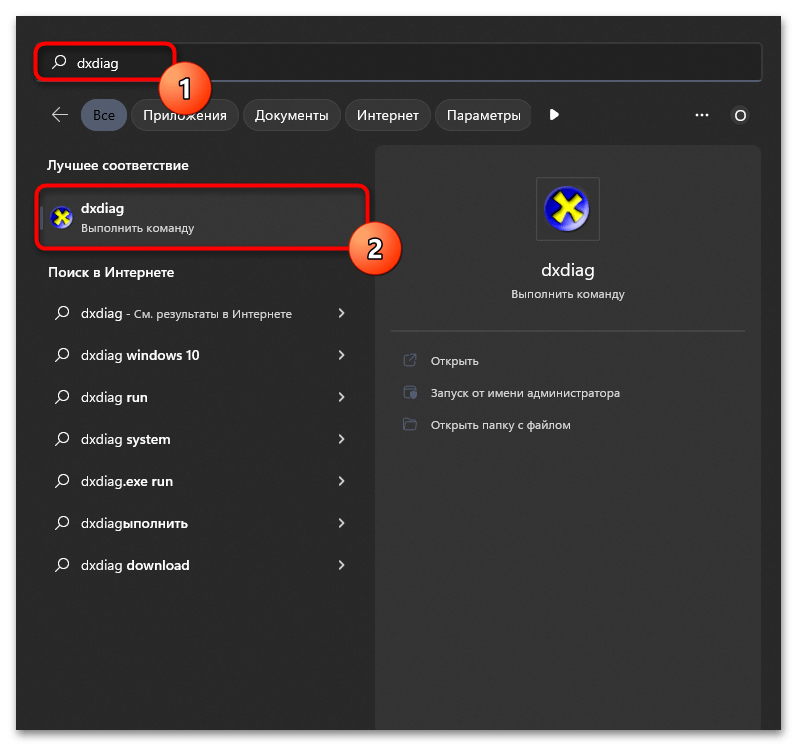
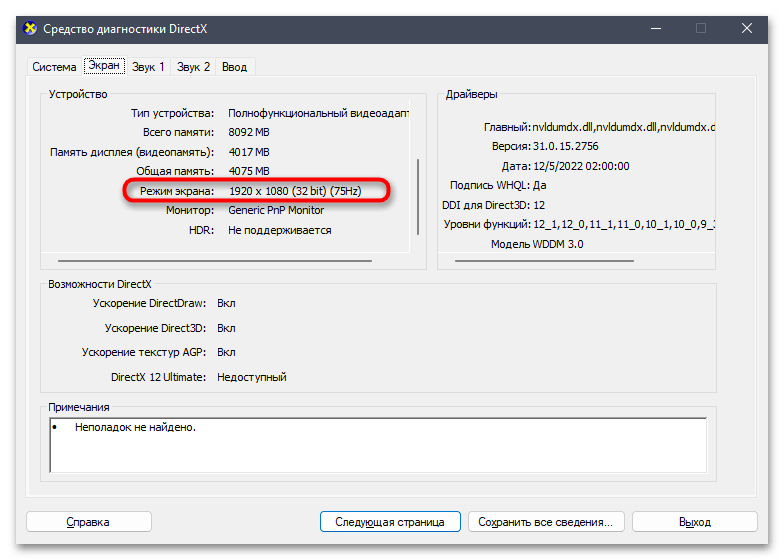
Способ 3: Утилита «dxdiag»
В операционной системе есть еще одно средство, отображающее характеристики комплектующих. Оно связано с DirectX, поэтому предоставит и сведения о дисплее с видеокартой. Через данную утилиту можно запросто узнать разрешение экрана, и для этого понадобится произвести такой алгоритм действий:
- В поиске «Пуска» введите
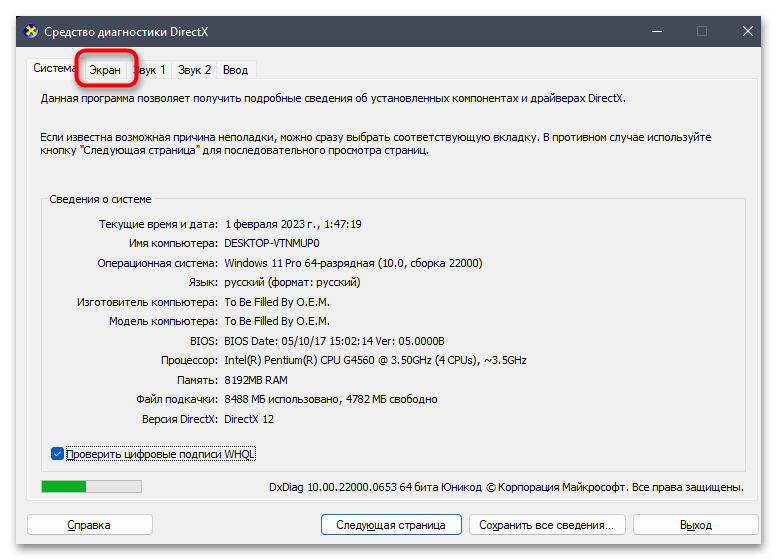
dxdiagи выполните данную команду. - В новом окне перейдите на вкладку «Экран».
- Далее остается только найти параметр «Режим экрана» и ознакомиться со значением установленного разрешения.
Способ 4: Консольная утилита
Существует стандартная консольная утилита, задав определенные аргументы для которой, можно вывести на экран исключительно сведения о текущем разрешении монитора. Если вам по душе использование «Командной строки» для выполнения разных задач в Windows 11, можете смело использовать и этот метод, связанный с получением информации о характеристиках дисплея.
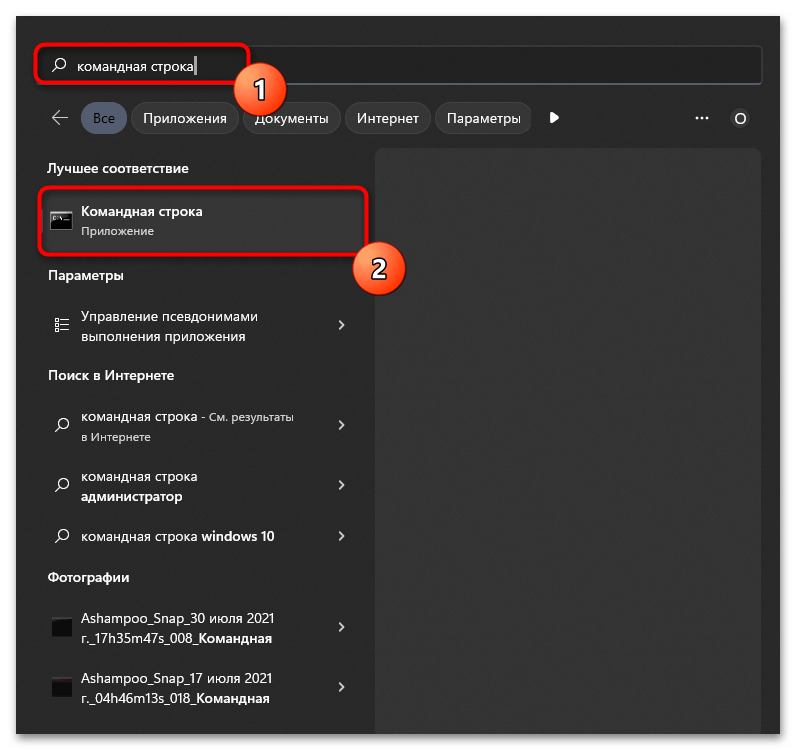
- Откройте «Пуск», через поиск найдите «Командную строку» и запустите приложение.
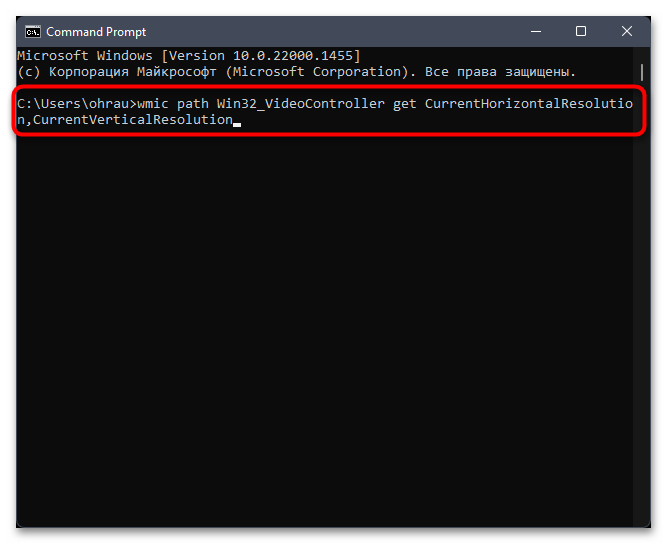
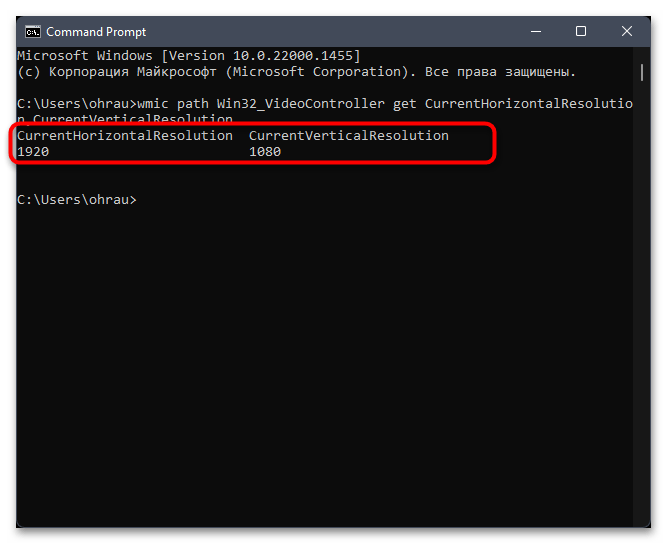
- В нем укажите команду
wmic path Win32_VideoController get CurrentHorizontalResolution,CurrentVerticalResolutionи активируйте ее нажатием по клавише Enter. - Через секунду вы увидите два параметра: текущее разрешение по горизонтали и вертикали.
Способ 5: Онлайн-сервисы
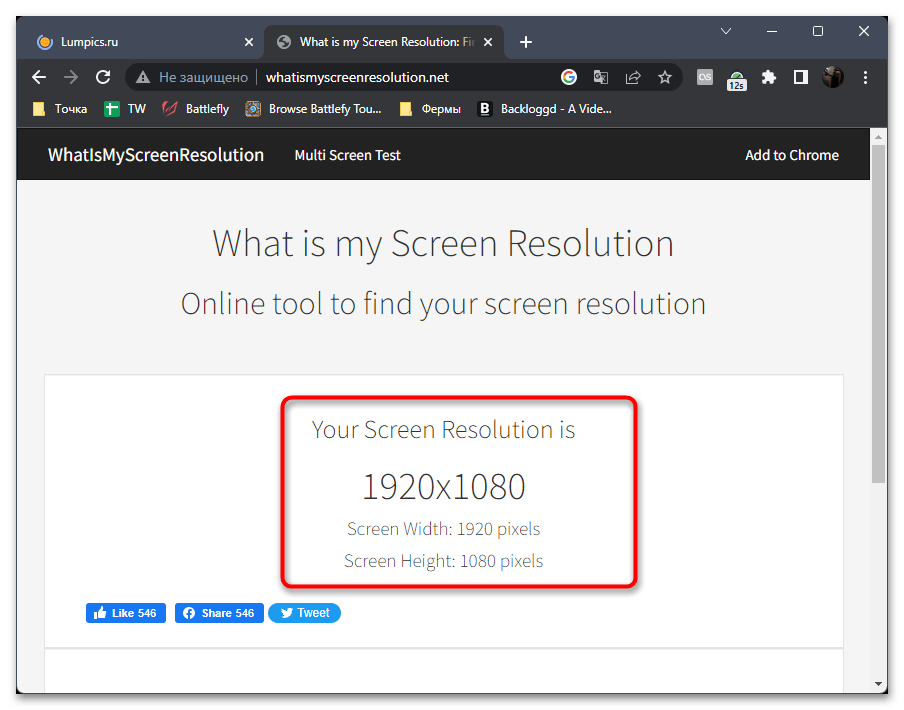
Если вы пользуетесь веб-приложениями или браузером, то разрешение вашего экрана автоматически передается на серверы, чтобы сайты могли корректно отображать содержимое, подстраивая его под ваши значения. Конечно, эти сведения можно использовать и для их банального вывода, чтобы пользователь получил информацию о своем текущем разрешении дисплея. Для этого можете использовать любой тематический онлайн-сервис, введя в удобном поисковике соответствующий запрос.
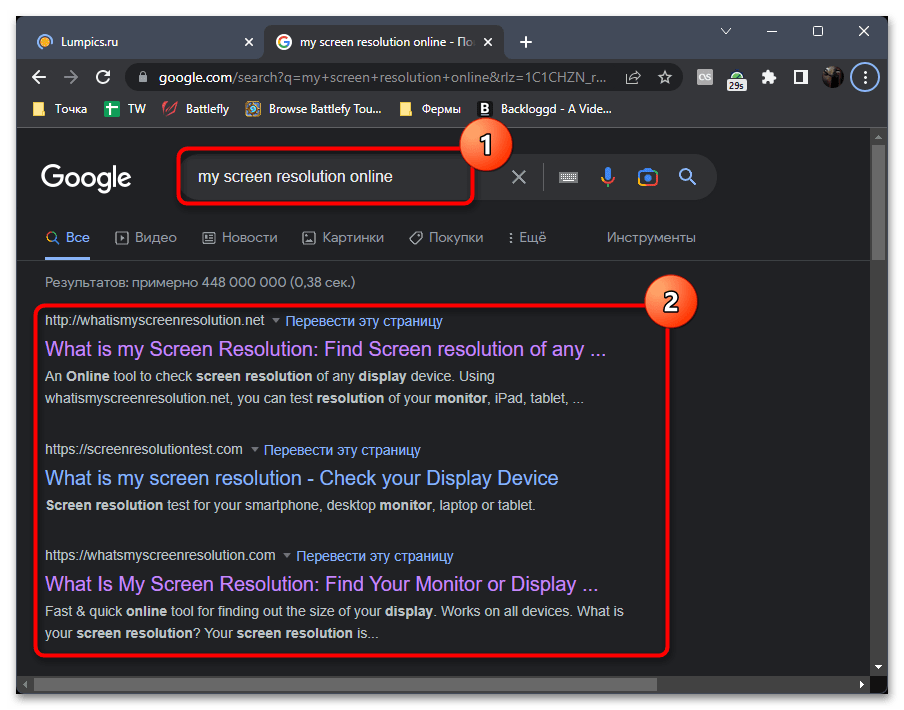
На следующем скриншоте вы видите, что функциональность таких веб-сервисов весьма ограничена, поскольку на экране отображается только значение разрешения. Впрочем, конкретно в этом случае никакие дополнительные сведения и не нужны, поэтому можно сказать, что сайты прекрасно справляются со своей задачей.
Способ 6: Программы для определения характеристик компьютера
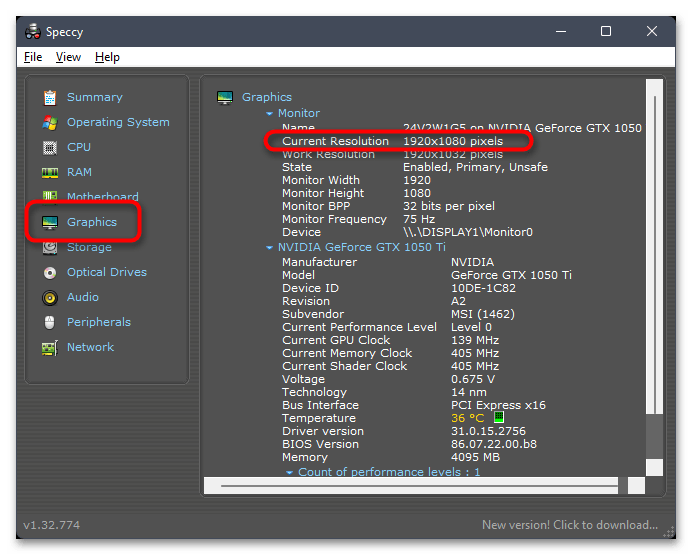
Есть целый ряд сторонних программ, основная функциональность которых направлена на предоставление базовых и максимально расширенных сведений об установленных в ПК комплектующих, периферийных устройствах и системных характеристиках. Сюда можно отнести и разрешение экрана, поскольку почти все такие программы поддерживают определение монитора и видеокарты. Разберем метод на примере бесплатного софта под названием Speccy.
Скачать Speccy
- После выбора и установки программы запустите ее и обратите внимание на общие сведения. Уже здесь в разделе графики вы видите информацию об используемой видеокарте, дисплее и его текущем разрешении. Иногда этих сведений достаточно, и взаимодействие с софтом заканчивается.
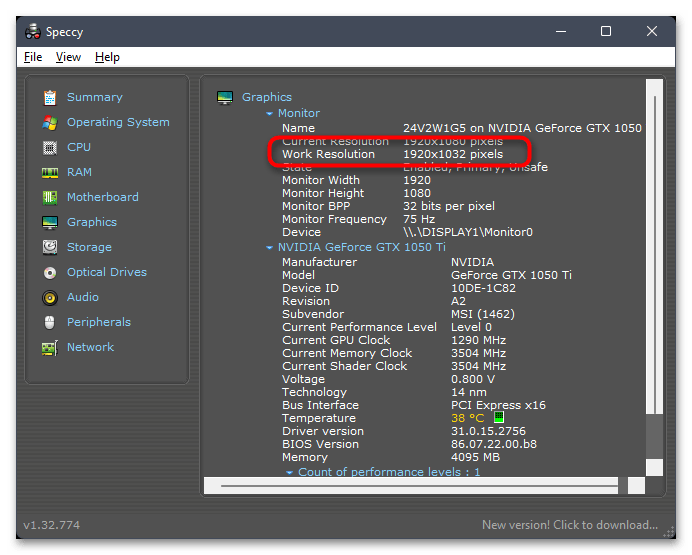
- Можете перейти на вкладку «Graphics», чтобы получить больше информации. В строке «Current Resolution» вы увидите текущее установленное разрешение, которое меняется пользователем через системные параметры.
- Строка «Work Resolution» показывает максимальное разрешение вашего монитора.

С другими похожими программами работа выглядит примерно так же. Вам достаточно найти нужный раздел, чтобы узнать текущее и максимальное разрешения. Обзоры на популярные решения, которые могут оказаться полезными в этом случае, вы найдете в другой статье на нашем сайте, перейдя по следующей ссылке.
Подробнее: Программы для определения железа компьютера
Решение частых проблем
Если при просмотре разрешения экрана вы столкнулись с тем, что параметр не соответствует требуемому или разрешение не является максимальным, сначала стоит попробовать вручную изменить настройки. При возникновении ошибок или отсутствии необходимого разрешения перейдите к следующим разделам статьи, чтобы найти подходящее для себя решение.
Отсутствует нужное разрешение
Отсутствие необходимого разрешения в списке доступных обычно связано с драйвером графического адаптера. Его нужно установить или обновить, используя доступные методы. Иногда это не помогает и нужно проверить настройки через панель управления видеокартой или открыть дополнительные параметры дисплея. Обо всем этом читайте в отдельной инструкции на нашем сайте, кликнув по следующему заголовку.
Подробнее: Решение проблемы с отсутствием нужного разрешения экрана в Windows
Не меняется разрешение
Проблемы с постоянным сбросом разрешения или невозможностью принять изменения при выборе другого тоже обычно связаны с некорректно работающим графическим драйвером. Однако может оказаться, что настройку нужно изменить непосредственно через настройки графического адаптера, и тогда все будет работать корректно. На эту тему уже написана полезная статья, перейти к чтению которой можно по следующей ссылке.
Подробнее: Решение проблем с изменением разрешения экрана в Windows 11

Наша группа в TelegramПолезные советы и помощь
How do I check Screen Resolution in Windows 11? Due to some reason, if you want to see the screen resolution in Windows 11, it is possible using the built-in settings app. The settings app is exceptionally influential on Windows 11 and helps you perform several tasks, including viewing screen resolution. Using this settings app, you can view and change the screen resolution.
How to View and Change Screen Resolution in Windows 11?
To view and change Screen Resolution in Windows 11, follow these steps:-
Step 1. Open the Settings app by pressing the Windows + I keys altogether from the keyboard or using any other method.
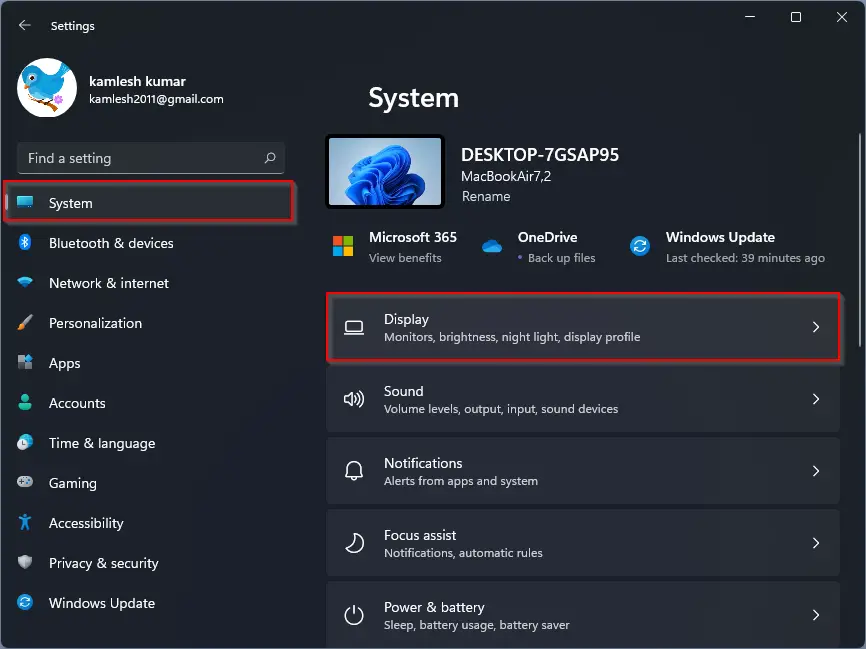
Step 2. In the Settings window, click on the System category from the left side pane.
Step 3. On the right side of the System category, click on the Display tab.
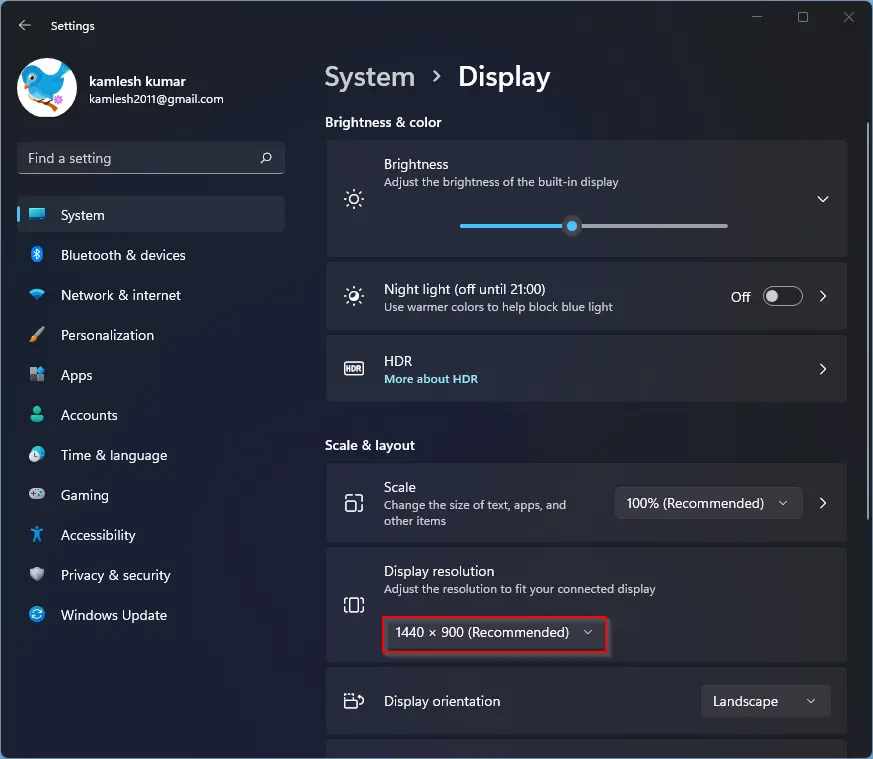
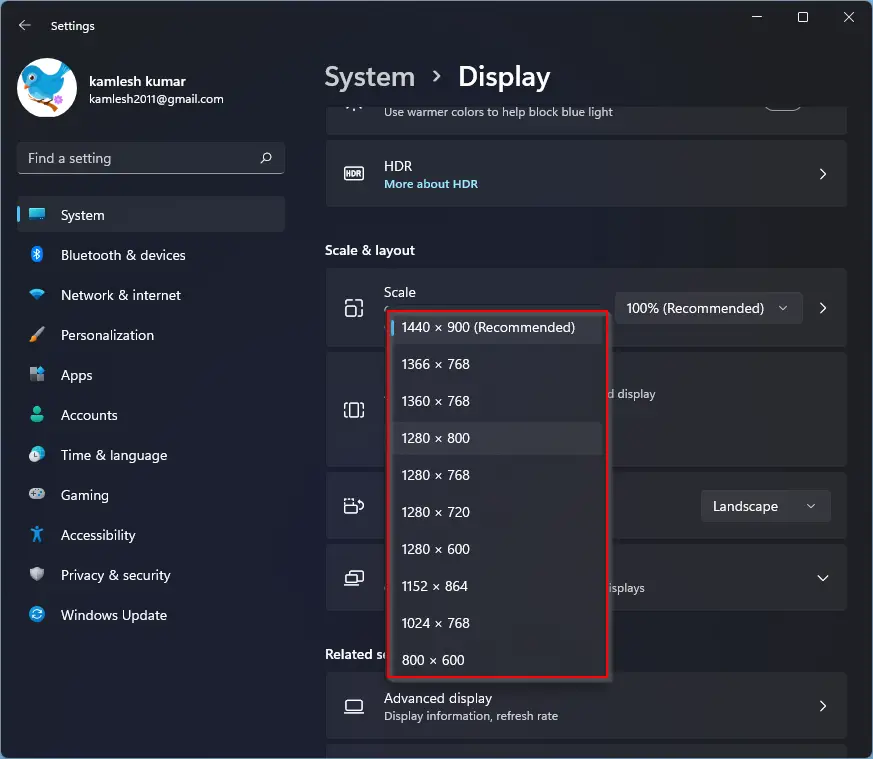
Step 4. Under the Scale & layout section, in Display resolution, you can see the current screen resolution fixed for your monitor. For instance, on my PC, the screen resolution set by Windows 11 is 1440 x 900 pixels.
Step 5. If you would like to change the screen/display resolution due to some reason, click on the drop-down menu under the Display resolution option and select the desired resolution that you want to set for your monitor.
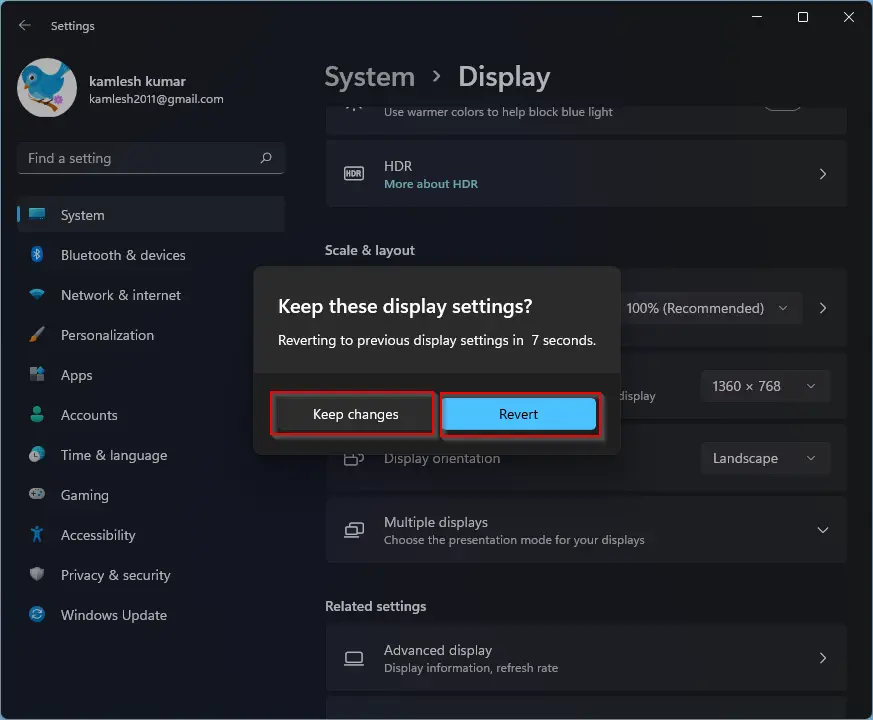
Step 6. Once a new resolution is selected for your screen, you will be prompted to keep changes or revert. Here, Windows 11 gives you 10 seconds to make the changes; if you don’t select any of the options, it will be reverted to the default screen resolution settings. Windows will also show a preview of the new resolution; if you are happy with the changes, click on the Keep changes button; otherwise, you have the option to click on the Revert button.
Although the option is available to change the screen resolution, you will not require these settings to change in most cases. Because Windows automatically select the best screen resolution based on the graphics/hardware you are using.
Conclusion
In conclusion, checking the screen resolution in Windows 11 is a simple task that can be done through the built-in settings app. The settings app is an essential tool in Windows 11 and offers a wide range of functionalities, including the ability to view and change the screen resolution. By following the steps mentioned in this article, you can easily check your current screen resolution and modify it according to your needs. However, in most cases, Windows automatically selects the best screen resolution based on your hardware and graphics, so changing it may not be necessary.
Checking your screen resolution in Windows 11 is a straightforward process that takes just a few clicks. First, you’ll need to access the Settings menu, then navigate to the Display settings. Once there, you can easily find and adjust your screen resolution. Here’s how you can do it step-by-step.
In this section, we’ll walk you through checking your screen resolution in Windows 11. Follow these simple steps, and you’ll know your screen resolution in no time.
Step 1: Open Settings
Click on the Start button and select “Settings” from the menu.
The Start button is located at the bottom-left corner of your screen. Once you click it, you’ll see a gear icon labeled “Settings.” This is where you’ll find all the settings for your computer, including display options.
Step 2: Navigate to System
In the Settings window, click on “System.”
The “System” option is usually the first one listed and is marked with a computer monitor icon. Clicking on it will take you to another menu where you can adjust various system settings.
Step 3: Go to Display
Select “Display” from the list of options on the left side of the System settings window.
The “Display” option is where you can manage all your screen-related settings, including resolution, orientation, and brightness. Click on it to proceed to the next step.
Step 4: Check Screen Resolution
Scroll down to the “Display resolution” section to see your current screen resolution.
In the “Display” settings, you will find a dropdown menu labeled “Display resolution.” The value displayed here is your current screen resolution, for example, 1920 x 1080.
Step 5: Adjust if Necessary
If you need to change the resolution, click on the dropdown menu and select a different resolution.
After selecting a new resolution, Windows will give you a preview. If it looks good, click “Keep changes.” If not, you can revert to the original resolution.
After completing these steps, your screen resolution will be displayed or adjusted according to your preference. You can now enjoy a display setting that best suits your needs.
Tips for Checking Screen Resolution in Windows 11
- Always make sure to update your graphics drivers to prevent any display issues.
- Use the recommended resolution for the best display quality.
- If you experience any display problems, restarting your computer can sometimes fix the issue.
- Check the manufacturer’s website for your monitor’s optimal resolution settings.
- Avoid resolutions that distort the display or make text hard to read.
Frequently Asked Questions
How do I revert to the previous screen resolution?
After changing your resolution, if it doesn’t look right, you have around 15 seconds to click “Revert” to go back to the previous resolution.
Can I check the screen resolution using a shortcut?
Yes, you can use the shortcut “Win + I” to open the Settings menu directly.
Why is the recommended resolution grayed out?
If the recommended resolution is grayed out, it may be due to outdated graphics drivers. Updating your drivers often fixes this issue.
Will changing the resolution affect my apps?
Changing the resolution might cause some apps to display differently. If you notice any issues, try resizing or restarting the apps.
What’s the best resolution setting for gaming?
The optimal resolution for gaming depends on your monitor and graphics card. Generally, 1920 x 1080 is a good starting point, but higher resolutions can offer better visuals if supported by your hardware.
Summary
- Open Settings.
- Navigate to System.
- Go to Display.
- Check Screen Resolution.
- Adjust if Necessary.
Conclusion
Checking and adjusting your screen resolution in Windows 11 is easy once you know where to look. Whether you’re new to the operating system or just need a refresher, this guide has you covered. Always remember to use the recommended resolution for the best performance and visual quality. If you ever run into issues, updating drivers or restarting your computer can often resolve them. For more tips and tricks on optimizing your Windows 11 experience, keep exploring!
Matthew Burleigh has been writing tech tutorials since 2008. His writing has appeared on dozens of different websites and been read over 50 million times.
After receiving his Bachelor’s and Master’s degrees in Computer Science he spent several years working in IT management for small businesses. However, he now works full time writing content online and creating websites.
His main writing topics include iPhones, Microsoft Office, Google Apps, Android, and Photoshop, but he has also written about many other tech topics as well.
Read his full bio here.
Readers help support Windows Report. We may get a commission if you buy through our links.
Read our disclosure page to find out how can you help Windows Report sustain the editorial team. Read more
In this piece, we’ll show you how to check your monitor model on Windows 11 as well as related specs.
Besides the monitor name and the graphics card it’s connected to, you may need information related to the Active signal mode, Bit depth, Color format, and Color space.
All this can be found in the display settings, but a third-party tool is usually more helpful. Let’s learn about both!
How do I find my display information on Windows 11?
1. View the Display settings
- Press Windows + I to open the Settings app, and click Display on the right in the System tab.

- Scroll down and click on Advanced display under Related settings.
- You will now find the various configurations listed under the monitor name set as Display 1. This includes:
- Desktop mode: Available display resolution and refresh rate
- Active signal mode: Current display resolution and refresh rate
- Bit depth: Number of bits required to indicate the color of a single pixel in an image. The higher it is, the better. Modern monitors have it at 8 or higher.
- Color format: Current color format. It should be RGB in most cases.
- Color space: Signifies the array of colors the monitor can display. It could be Standard Dynamic Range (SDR) or High Dynamic Range (HDR).
- If you want to view the screen resolution or monitor information for another display, choose the monitor name from the Select a display to view or change its settings dropdown menu.
- To access the monitor settings in Windows 11, click on Display adapter properties for Display X, where X is the number assigned to the monitor.


The advanced display settings are one of the easiest ways to view the screen resolution settings and monitor details. Remember, it works for wireless displays as well.
2. Check the System Information app
- Press Windows + S to open Search, type System Information in the search box, and click on the relevant result.
- Expand Components from the navigation pane, and then select Display.

- You will now find the display Resolution, Bits/Pixel, Color Table Entries, and Color Planes. Besides, there will be details for the available graphics adapter, including Adapter RAM and display Driver Version.


The System Information app is a built-in tool that lists everything about the PC in an orderly manner. Apart from the monitor details, you will also find information related to Sound, Network, Storage, and Printing, amongst others.
3. Use a third-party software
- Go to Speccy’s webpage and download the free version of the tool.
- Run the setup and follow the on-screen instructions to complete the installation.
- Launch Speccy, head to Graphics from the navigation pane, and you will find the monitor name and other relevant details listed here.


While the built-in settings do the job, you could use Speccy, a reliable PC information software, to find the display information, monitor name, and specs in Windows 11.
- Microsoft releases Windows 11 (KB5058411, KB5058405) May 2025 Patch Tuesday
- You can now share an app/browser window with Copilot Vision to help you with different tasks
4. Search the Internet
If you want to find out more details about the monitor, say compatibility, various features, or things only advanced users require, head to the manufacturer’s website and open the monitor’s official page. It will list out all the information you would ever need.
Even third-party sellers and e-commerce platforms provide device details, so you could check that as well. But we wouldn’t blindly rely on the information provided on these websites.
How do I rename my monitor on Windows 11?
Tip
The process requires editing the Registry. We recommend you be extra cautious and create a restore point before proceeding to revert the changes if something goes wrong.
- Press Windows + X to open the Power User menu, and select Device Manager from the list of options.
- Expand the Monitors entry here, right-click on the monitor name you want to change, and select Properties.

- Head to the Details tab, and from the Property dropdown menu, choose Driver key.

- Right-click on the alpha-numeric string that appears, and select Copy.
- Now, press Windows + R to open Run, type regedit in the text field, and hit Enter.

- Click Yes in the UAC prompt.
- Paste the following path in the address bar and hit Enter:
Computer\HKEY_LOCAL_MACHINE\SYSTEM\ControlSet001\Enum
- Select the Enum key in the left pane, press Ctrl + F, paste the Driver key you copied earlier, and click on Find Next.

- You will now be redirected to the registry keys for the monitor. Double-click the FriendlyName string, enter the desired name in the Value data text field, and click OK.

- Once done, head back to Device Manager, click the Action menu, then select Scan for hardware changes, and the new monitor name should now reflect.


It’s neither that easy to change the name of the built-in display or an external monitor in Windows 11, nor do we recommend that you do it frequently. But just as you can rename the PC, you can also change the monitor or display name in Windows 11.
With proper knowledge of the monitor details, specifications, and other display information, you would be in a far better position to asses things. Besides, you may want to check the other PC specifications for an even deeper understanding of the computer.
Do tell us in the comments section what prompted you to check the display information in Windows 11 and whether the methods listed here proved helpful.
Kazim Ali Alvi
Windows Hardware Expert
Kazim has always been fond of technology, be it scrolling through the settings on his iPhone, Android device, or Windows PC. He’s specialized in hardware devices, always ready to remove a screw or two to find out the real cause of a problem.
Long-time Windows user, Kazim is ready to provide a solution for your every software & hardware error on Windows 11, Windows 10 and any previous iteration. He’s also one of our experts in Networking & Security.
How to find your Laptop Screen Size in Windows 11
How to find your Laptop Screen Size in Windows 11? 3 Easy Ways
Laptops have become an essential part of our daily lives, providing us with the convenience of working, learning, and entertaining ourselves from almost anywhere. With such a wide variety of laptops available in the market, choosing one with the correct size that suits your needs is crucial. But how do you determine your computer’s screen size, especially using Windows devices? Fret not, as we have got you covered with this comprehensive guide.
In this article, we’ll guide you through various techniques for determining the screen size of your laptop on Windows 10 and 11. We’ll discuss ways to locate your screen resolution, verify your device’s display settings, examine device specifications, calculate the screen size using diagonal measurements, and aid you in selecting the ideal laptop based on the desired screen dimensions. Let’s dive in.
Why do you need to know the screen size?
Understanding the dimensions of your laptop screen holds utmost importance when selecting a new laptop or acquiring accessories like Laptop screen replacement, cases, or protectors. Moreover, it enables you to customize the settings and resolution according to your viewing preferences, ensuring an optimal visual experience.
How to check laptop screen size without measuring?
Check the Screen Size of the Laptop Using Google
If you’re looking to determine your laptop’s screen size, there are a few convenient methods you can explore by delving into its specifications. For a quick and hassle-free solution, consider entering your device model number into a search engine like Google. This straightforward approach will promptly provide you with the precise screen size you’re seeking. To locate your laptop’s model number, follow these simple steps:
- Press the Windows key and simultaneously press “R” on your keyboard. This will open the Run dialog box.
- Type “msinfo32” in the Run dialog box and press Enter.
- On the displayed page, locate the System Model name.

Open a web browser and search for the System Model name you found. You will be directed to the manufacturer’s website, where you can explore the comprehensive specifications of your laptop.
Check the Screen Size of the Laptop Using the Manufacturer’s Manual
When you purchase a new laptop, you’ll receive a manufacturer’s manual in the form of a small booklet. This manual includes all your specifications, including the notebook’s screen size. However, it can be time-consuming to search through the manual, especially if you need to become more familiar with technical terms.
How to measure a laptop screen manually?
To measure the screen of your laptop, you’ll need a measuring tape or ruler. The process is simple:
- Start from one corner of the screen and measure diagonally to the opposite corner.
- Include the bezel in your measurement for an exact size.
- Round the measurement to the nearest tenth of an inch or centimetre.
Once you have determined your screen size, you can choose the best laptop that fits your needs and preferences. A bigger screen is advantageous for individuals who frequently manoeuvre multiple applications simultaneously. Conversely, individuals who are often on the go and require a portable laptop find a smaller screen size more suitable.
Determining Your Screen Resolution
To find your screen resolution on a Windows 11 laptop, right-click on your desktop’s empty area and select “Display settings” from the context menu. This will open the settings app, where you can see your current resolution under the “Scale and Layout” section. Alternatively, you can type “Display settings” into the search bar next to the Start button and press Enter to access the same section. If you need to change your resolution, click the dropdown menu under “Resolution” and select the desired option. Remember to click “Keep changes” if you are satisfied with the new resolution or “Revert” if you wish to return to the previous setting.
Frequently Asked Questions
What type of measuring tape do you need?
A standard measuring tape or ruler is sufficient for measuring your laptop screen. However, you may need a longer measuring tape if you’re measuring a larger screen or monitor.
Common mistakes to avoid when measuring screen size
When measuring the size of your laptop screen, it’s important to avoid common mistakes. Start from one corner and carefully extend the tape diagonally across the screen. Ensure the measuring tape is straight and tight, and avoid tilting it, as this may lead to inaccurate measurements. By following these guidelines, you can ensure accurate and precise measurements of your laptop screen size.
Which screen sizes are trending?
Lately, there’s been a trend towards larger screens, with 15.6-inch and 17.3-inch displays becoming more common. This is because remote work and online learning require more extensive displays. However, smaller laptops remain popular for their portability. The most popular laptop screen sizes range from 11.6 inches to 17.3 inches. Smaller screens are great for portability, while larger screens offer better visibility and an immersive viewing experience.
Is Screen Size the Same as Screen Resolution?
It’s important to note that screen size and screen resolution are different. Your laptop’s hardware LCD part determines the screen size in inches, such as 13, 14, or 17 inches. On the other hand, screen resolution refers to the number of pixels on the screen, which affects picture quality.
Conclusion
In conclusion, it’s easy to determine the screen size of your Windows laptop. This information can be helpful when purchasing a new notebook or replacement screens.
Share This Story, Choose Your Platform!
Related Posts
Page load link
Ok
Go to Top