
Проверьте компьютер на наличие проблем с питанием
ПК может произвольно перезагружаться из-за неисправности блока питания. На это указывают следующие признаки.
- Иногда устройство не перезапускается после автоматического выключения и может даже не включаться.
- Отображается «синий экран смерти».
- Блок питания перегревается, издает странные звуки, от него исходит запах гари или дым.
Обратитесь к специалисту — он либо отремонтирует блок питания, либо порекомендует его заменить.
Еще одна возможная причина — блок питания не справляется с нагрузкой, из-за чего некоторые компоненты получают недостаточно энергии. Это может привести к нестабильности системы и случайным перезагрузкам. Чтобы это исправить, уменьшите нагрузку на блок питания или замените его на более мощный.
Убедитесь, что компьютер не перегревается
Когда перегреваются такие аппаратные составляющие, как процессор и графический процессор, компьютер переходит в режим самосохранения, чтобы защитить от теплового повреждения другие компоненты. Один из признаков перегрева ПК — автоматические перезагрузки.
Чтобы выяснить, связана ли проблема с перегревом, прикоснитесь к компьютеру после автоматической перезагрузки. Если он горячий, то во время использования следите за температурой процессора и графического процессора (они производят больше всего тепла) и старайтесь избегать перегревов.
Просканируйте компьютер на наличие вирусов
Причиной произвольных перезагрузок также могут быть некоторые типы вирусов. При этом могут возникать и другие проблемы, такие как снижение производительности, а также частые сообщения об ошибках и сбои.
Чтобы избавиться от вирусов, просканируйте компьютер с помощью встроенного Microsoft Defender или стороннего антивируса.
Обновите систему
Windows содержит ошибки, и иногда они могут влиять на производительность и стабильность ПК, заставляя его перезагружаться. Обновления помогают исправить эти ошибки. Просто установите их и посмотрите, прекратятся ли случайные перезагрузки.
Запустите команды SFC, DISM и CHKDSK
Причина может быть и в проблеме с системными файлами. Исправить это поможет быстрое сканирование SFC (восстанавливает поврежденные системные файлы) и DISM (заменяет отсутствующие). Если эти способы не сработали, выполните сканирование CHKDSK.
Удалите недавно установленное ПО
Если проблема возникла после установки определенного приложения, то удалите его и проследите за поведением компьютера. Если он по-прежнему перезапускается, причина может быть в том, что приложение внесло катастрофические изменения в настройки еще до удаления. Чтобы устранить их, восстановите систему.
Отключите автоматическую перезагрузку
Если эта функция включена, компьютер перезагружается при возникновении сбоев в системе. Чтобы ее отключить, нажмите Win + R, в текстовое поле введите sysdm.cpl и нажмите «ОК».
Перейдите на вкладку «Дополнительно» и в разделе «Загрузка и восстановление» нажмите «Параметры». В разделе «Отказ системы» уберите флажок рядом с «Выполнить автоматическую перезагрузку», а затем нажмите «ОК», чтобы применить изменения.
Помните, что это лишь маскирует проблему, вызывающую произвольную перезагрузку ПК. Даже если с компьютером все в порядке, рекомендуется выполнить и описанные ниже шаги.
Проверьте компьютер на наличие проблем с памятью
Если ПК не может сохранять данные в оперативную память, он будет использовать вторичную (диск). Проблема в том, что это может повлиять на производительность устройства, и в конечном итоге оно будет работать нестабильно и перезагружаться случайным образом.
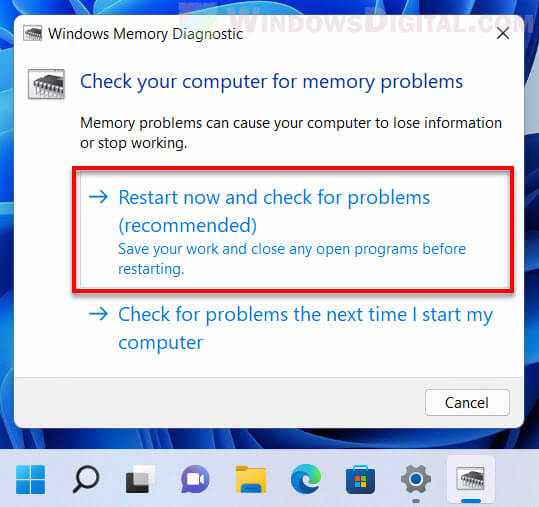
Чтобы проверить компьютер на наличие проблем с памятью, воспользуйтесь средством проверки памяти. Нажмите Win + R, в текстовое поле введите mdsched.exe и нажмите «ОК». Затем выберите «Выполнить перезагрузку и проверку».
Читайте по теме:
7 способов сделать скриншот на Windows 11
Как отключить уведомления с советами и предложениями на Windows 11
Как узнать пароль от Wi-Fi на Windows 11
Во время перезагрузки будет выполнена проверка памяти. Обратите внимание на обнаруженные ошибки и выясните, как их исправить (информацию можно найти на сайте производителя).
Во время сканирования можно нажать F1, и вам будет предложено три варианта теста: «базовый», «обычный» (по умолчанию) и «широкий». Выберите нужный с помощью клавиш со стрелками вверх и вниз, а затем нажмите F10, чтобы начать (инструмент запустится заново).
Удалите последние обновления
Иногда ПК начинает произвольно перезапускаться после установки обновлений. Это может произойти, например, из-за того, чтобы они содержат ошибку или установлены неправильно. Попробуйте удалить их.
Примечание. Удаление обновлений может привести к нестабильной работе компьютера и множеству проблем (возникнут ошибки и сбои, приложения перестанут работать). Если обновление касается безопасности, его удаление может поставить компьютер под угрозу.
Чтобы удалить последние обновления, откройте приложение «Параметры» с помощью команды Win + i. Перейдите в «Центр обновления Windows» → «Журнал обновлений» → «Удалить обновления». Отобразится список обновлений, которые, по мнению Windows, можно удалить.
Найдите нужное обновление и рядом с ним нажмите «Удалить». Если вы не знаете, какое именно вызывает проблему, попробуйте удалить то, что было установлено непосредственно перед тем, как компьютер начал перезагружаться. После этого перезагрузите устройство.
Переустановите систему или выполните сброс до заводских настроек
Еще один способ решить проблему — выполнить обновление на месте. При этом система Windows будет переустановлена без удаления файлов и приложений.
Если это не помогло, можно сбросить систему до заводских настроек. В таком случае все приложения, данные и настройки будут удалены, поэтому создайте резервную копию наиболее важной информации.
Убедитесь в отсутствии проблем с оборудованием
Если перечисленные выше способы не помогли, причина может быть в неисправности оборудования. Возьмите ноутбук или системный блок и аккуратно потрясите его. Если внутри что-то движется или гремит, это может означать, что какой-либо из компонентов сломан или плохо закреплен.
В таком случае его потребуется отремонтировать или заменить — это можно сделать как самостоятельно, так и при помощи специалиста.
Источник.
Фото на обложке: Rokas Tenys / Shutterstock
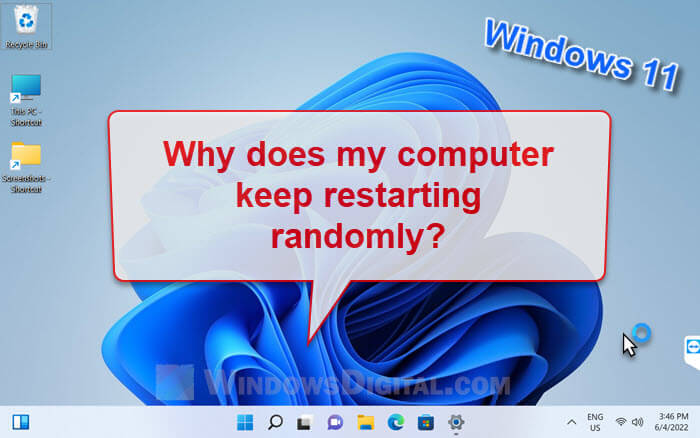
Windows 11 won’t usually restart your computer without any prior warning or your consent. When this happens, something is going wrong with your computer. For example, an overheating hardware part, a failing hardware, power supply issue, memory issue, etc. can all cause Blue Screen of Death (BSoD), which ultimately forces Windows to automatically reboot your computer.
In this guide, we will explain what could be the cause of computer restarting randomly on Windows 11, what you can do to fix the issue and how to prevent it from happening in the future.
Related: How to Fix Blue Screen With Sad Face on Windows 11/10
Computer restarts randomly on Windows 11
Overheat issue
Windows will always reboot your computer when it detects one of the PC parts is at a dangerous level of temperature. This is to prevent further damage to the particular overheating hardware and also other parts that it may cause damage to.
If you computer keeps restarting randomly without warning and especially when you run a game or an intensely heavy app, it may possibly signal an overheat issue of a certain hardware part in your PC.
To find out if your PC is overheating, use a temperature monitor app to monitor the temperature of both your CPU and graphics card (GPU). For CPU temperature monitor, we recommend Core Temp. As for GPU, we recommend GPU Temp. You can do a quick search on Google for the apps.
If you come to conclusion that there is really a hardware (most commonly CPU or GPU) that is overheating whenever you run a game or an app, you should check what actually causes the hardware part to overheat. In most cases, it is just because of the hardware part being near the end of its life span. In other cases, it could be due to overclocking setting that you may or may not aware of. It could also be due to the heat sink that is cooling the part has malfunctioned and has stopped to cool the hardware part.
If it is the former, you should consider replacing the problem hardware part. If it is the latter, read more about computer overclocking in the next section below.
Also see: Game Stuttering and Lag on Dual Monitor
Overclocking
What is overclocking in computing? Overclock is a term used when a hardware part, particularly the CPU, GPU or RAM, is being set to run beyond what it is capable of. It is usually accompanied by how well your computer’s cooling system is. This is because overclocking will always increase the temperature of the hardware part. When that happens, you need to have a better and sufficient cooling system to cool the hardware so that it doesn’t overheat.
If you did overclock your CPU or GPU before, try to tune down the overclock setting or revert it back to their default clock speeds and see if it resolves the issue.
Check your computer to see if there is any overclock related software or tool running in the background, for example, MSI Afterburner, Intel Extreme Tuning Utility, AMD Ryzen Master, NVIDIA Inspector, CPU Tweaker, EVGA Precision X, ASUS GPU Tweak, etc.
If you find any of them running on your Windows 11, check the software to see if there is any overclock setting currently being applied. Try to remove any overclock setting or revert the clock speed back to its default.
Overclock can also be applied through BIOS settings. Boot into your computer’s BIOS settings and disable any overclock setting or set the clock speeds back to their defaults.
Read: Game Lag When Watching YouTube or Twitch on Chrome
Hardware failure
While some hardware may have a long life span, certainly no hardware can last forever. Eventually, some of the parts will start to fail and require a replacement or an upgrade. A failing hardware, especially the CPU or GPU that overheats for no reason, the RAM, SSD or hard disk drive that randomly fails, can all result in BSoD and random restarts on your PC.
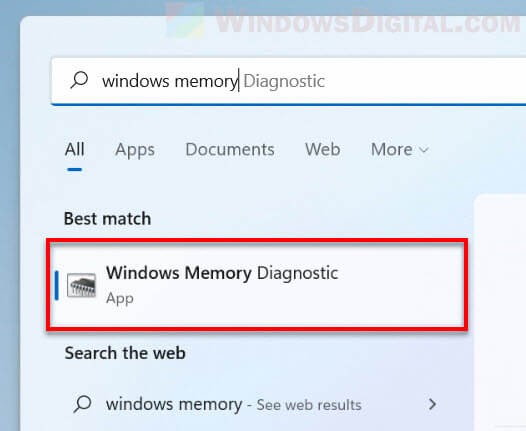
Run memory diagnostic
A failing memory (RAM) can also cause computer to randomly restart. You can check and diagnose your memory by running Windows Memory Diagnostic in Windows 11 to check for memory problems.

To run Windows Memory Diagnostic in Windows 11, follow the steps below.
1. While you can still boot into Windows 11, click Start, search for “Windows Memory Diagnostic” and run it.
2. Next, select “Restart now and check for problems” to allow Windows to automatically restart your computer and run a diagnostic on your memory.
Note: RAM can also be overclocked. A misconfigured memory clock speed or overheating memory caused by overclocking would result in failing memory and causes computer to restart randomly. Check your BIOS and make sure the RAM clock speed is at their defaults.
Also read: How to Clear RAM Cache in Windows 11
Check power supply
Insufficient power supply in a PC can cause a computer to not be able to boot at all or restart randomly. Check your power supply to make sure it has enough wattage for all your hardware parts.
If you have recently added new hardware part(s) such as RAM, HDD or SSD, or upgraded your graphics card to a high-end and more power consuming one, you need to make sure your power supply unit (PSU) can supply enough wattage to your computer.
Computer keeps restarting randomly? What else you can do
Back up your important files
In case the worst-case scenario happens, you should back up all your important files while you still can (there is always a possibility and the signal is strong when PC starts to restart randomly without warning).
Also, it’s best to create a system restore point now before you make further changes to Windows so that you can restore Windows to an earlier point of time in the event of system failure or instability.
Disable Windows 11 automatic restart
There is a setting in Windows 11 that controls if Windows should automatically restart your computer in the event of a system failure. You can disable this setting to disallow Windows to restart your PC when it detects system failure. Follow the steps below to disable Windows 11 automatic restart.
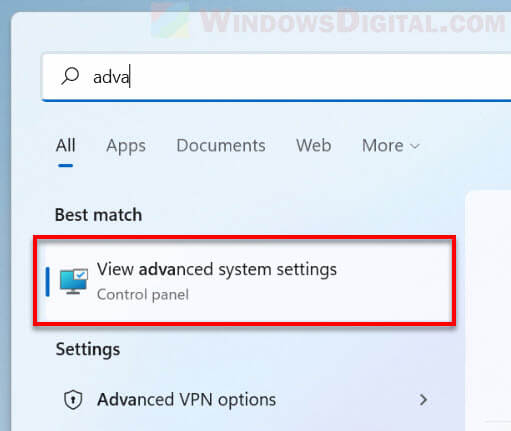
1. Search for and open “Advanced system settings” via Start menu.
2. In the System Properties window, click the Settings button under Startup and Recovery.
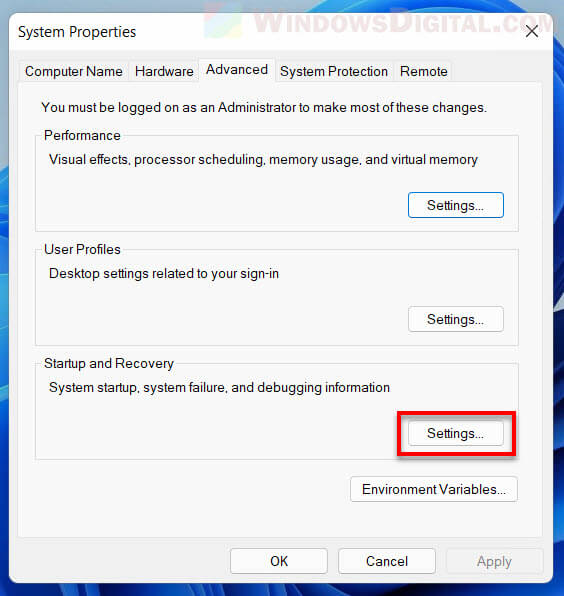
3. Under System failure, uncheck the option for “Automatic restart“. Click OK to apply the changes and restart your computer.
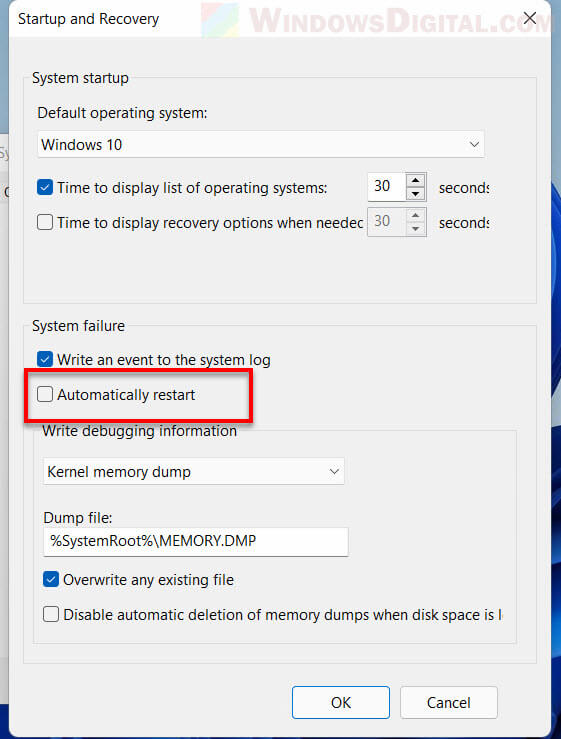
Disabling automatic restart in Windows 11 can only tell Windows to not restart in the event of a system failure. It does not solve the root of the problem.
Change minimum processor state
Another workaround would be to change the minimum processor state to a lower percentage so that processor doesn’t always run at 100% even when it is not needed. Follow the steps below to change the minimum processor state setting.
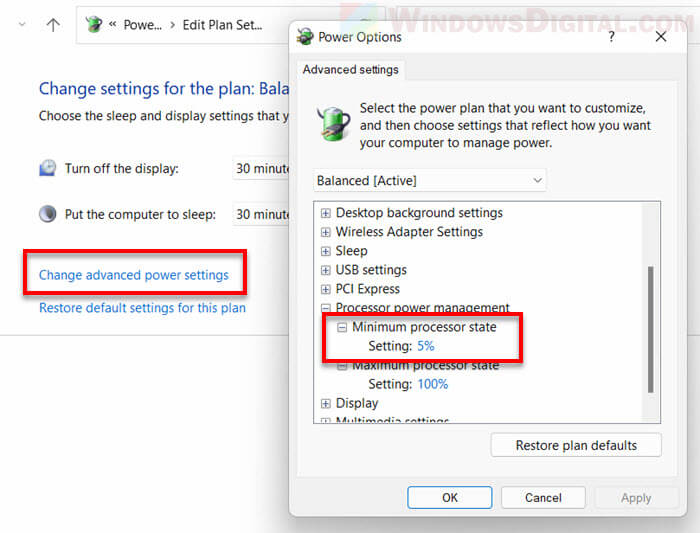
1. Search for “Edit power plan” via Start and open it.
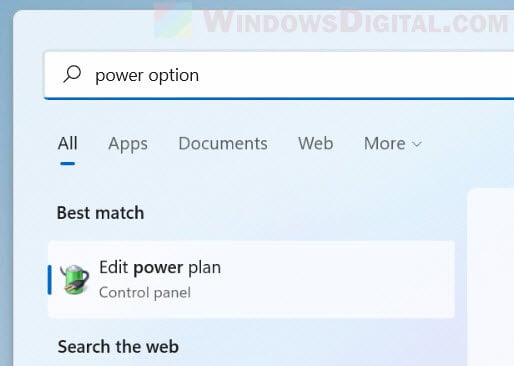
2. Click Change advanced power settings. Next, in the Power Options window, expand Processor power management, then set the minimum processor state to 5% or lower.
Update your graphics card driver
Though rare, an outdated or incorrect graphics card driver may also cause Windows 11 to restart randomly. Try to update your graphics card driver and see if it resolves the issue.
For a detailed guide on how to correctly update graphics driver in Windows 11, see: How to Update Graphics Driver in Windows 11.
Roll back Windows 11 to an earlier build
If the computer restarts randomly issue only happens after a major Windows update and if you suspect this could be the cause of the problem, you can try to roll back Windows to an earlier build. Read: How to Roll Back Windows 11/10 Update to Previous Version.
Restore your computer to an earlier date (restore point)
If you think there may be changes you have made recently that may have caused the computer to restart randomly, you can try to restore your computer to an earlier point of time and see if it resolves the issue. This is only possible if you have previously saved a restore point in Windows 11 prior to the occurrence of the random restart issue.
To learn how to restore Windows 11 to an earlier date, go to: How to System Restore Windows 11/10 to a Previous Date or to Factory.
Windows 11 random restart is a common problem that is reported by many users in forums. If the system keeps restarting after upgrading to Windows 11, how can you get rid of this situation from your PC? Take it easy and you can find some methods from this post on the MiniTool website.
Windows 11 Restarting Loop
Windows 11 is the latest and most advanced operating system from Microsoft. Now, it has been out for the public for several months. You may be interested in this new OS. To enjoy the brand-new user interface, features, settings, and more, you choose to upgrade to Windows 11 from Windows 10/8/7.
However, after the update, you may run into a common problem – Windows 11 random restart. You are not the only one to have this issue and many users also complain about the restarting loop in forums like Reddit, Microsoft, etc.
It can be caused by an overheated graphics card, incorrect group policies, misconfigured settings, overclocking, system infected with malware, faulty storage, and more. When the system restarts automatically without any information, it can be annoying at times. You always lose the unsaved work due to this.
Fortunately, you can get rid of the trouble. To fix the Windows 11 restart problem, try the solutions below.
Tip: If you are running Windows 10 and the system reboots randomly, you can find solutions from this post – Detailed Steps to Fix Windows 10 Endless Reboot Loop.
Fixes for Windows 11 Random Restart
Disable Automatic Restart
When Windows 11 keeps restarting, an auto-restart task may have been created by you to run on the scheduled time. To fix the Windows 11 restart problem, go to perform the following operations to disable automatic restart.
Step 1: Open the Settings app by pressing the Win and I keys on the keyboard.
Step 2: Under the System tab, click About > Advanced system settings.
Step 3: In the System Properties window, click Advanced and choose Settings from the Startup and Recovery section.
Step 4: In the new window, uncheck the box of Automatically restart under System failure.

Step 5: Click OK to save the change.
Step 6: Reboot your computer manually and let the change take effect.
Disable Fast Startup
Fast Startup is a feature that allows the PC to start up faster after a shutdown. When powering off your computer, this feature will put the machine into a hibernation state rather than a full shutdown. But sometimes Fast Startup goes wrong. For instance, you want to shut down the PC but this feature may restart the system.
To fix Windows 11 random restart, disable Fast Startup by following the wizards below.
Step 1: Press Win + R, type powercfg.cpl and click OK to open the Power Options window.
Step 2: Click Choose what the power button does from the left pane.

Step 3: Click Change settings that are currently unavailable.
Step 4: Uncheck the box of Turn on fast startup (recommended) and click Save changes.
Update Graphics Card Driver
A faulty video card driver may also lead to Windows 11 random restart. In this situation, you may find the computer reboots when the GPU loads, for example, you play a big game with heavy video rendering. To get rid of a Windows 11 restarting loop, reinstall or update your graphics card driver.
Step 1: Open Device Manager via the Win + X menu.
Step 2: Expand Display adapters and right-click on the GPU driver to choose Update driver.
Step 3: Click Search automatically for drivers and Windows will detect and install the driver for your PC.

Alternatively, you can right-click on the GPU driver and choose Uninstall device. Then, click Uninstall to remove the driver. After restarting your PC, Windows will install it again.
Besides, you can choose to install the latest version of the graphics card driver via downloading the driver from the manufacturer’s website (like NVIDIA, AMD, etc.). To know more information, refer to the related article – How to Update Graphics Card Drivers (NVIDIA/AMD/Intel).
Change Windows Update Settings Causing Random Restarts
Compared with other Windows versions, Windows 11 is more aggressive when installing pending updates and doesn’t shy away from rebooting your PC even without your consent while there are certain important updates. To fix Windows 11 random restart caused by Windows Update, modify your registry.
Tip: Making changes to the registry is a crucial thing and you should make a backup for the registry since incorrect changes can lead to an unbootable system. (Related article: How to Back up Individual Registry Keys Windows 10/11.) Then, do this task by following the steps below.
Step 1: Ge the Run dialog by pressing Win + R, type regedit, and click OK to launch Registry Editor.
Step 2: Click Yes to grant admin access in the pop-up window.
Step 3: Go to the path – Computer\HKEY_LOCAL_MACHINE\SOFTWARE\Microsoft\Windows.
Step 4: Right-click on the Windows folder and choose New > Key. Name it as Windows Update.
Step 5: Right-click on Windows Update and select New > Key. Name the new key as AU.
Step 6: Click on the newly created key, right-click on the empty space and choose New > DWORD (32-bit Value). Name it as NoAutoRebootWithLoggedOnUser.
Step 7: Double-click on the new item, set Base to Hexadecimal, set Value data to 1, and click OK to save the modification.

After finishing these operations, reboot your PC. Then, use your PC and check if Windows 11 keeps restarting again. If this won’t work, try another way.
Update Group Policies
If Windows 11 restarts automatically at once after you upgrade to Windows 11 from an old version, you should do firstly is to make sure if this issue is caused by incorrectly migrated group policies. Go to update these policies by following the steps below.
Step 1: Right-click on the Start icon and choose Windows Terminal (Admin). Click Yes when getting the UAC prompt.
Step 2: In the new window, click the arrow at the top and choose Command Prompt.
Step 3: Type the gpupdate command and press Enter to execute it.

Scan for Malware
Malware or viruses in your computer may be the possible cause for Windows 11 to reboot automatically. And you should run a deep system scan and get rid of the threats from your computer. To do this task, you can run the built-in antivirus software in Windows 11 and it is Windows Security or Windows Defender.
Step 1: Go to Settings > Privacy & Security.
Step 2: Click Windows Security > Open Windows Security to open this antivirus software.
Alternatively, you can press Win + S, type Windows Security and click the result to launch this app.
Step 3: Click Virus & threat protection, click Scan options and choose Full scan to perform a deep scan.
Step 4: Click Scan now. This process will take some time and scan for all files and running programs on your hard disk.

If some threats are detected, Windows Security will remove them. Then, see if the Windows random restart is fixed when using your computer.
Run an SFC Scan
If your Windows PC has corrupted system files, it may keep restarting automatically and randomly. To fix the Windows 11 restart problem, perform an SFC scan by using System File Checker.
Step 1: Launch Command Prompt as an administrator in Windows 11.
Step 2: Type sfc /scannow and press Enter. The tool will start to scan your system for corruption and fix it.
Run a CHKDSK Scan
If your hard drive goes wrong, perhaps Windows 11 keeps rebooting. You can perform a disk check for troubleshooting.
Step 1: Open Command Prompt with admin rights.
Step 2: Type in chkdsk /f /r and press Enter.
Step 3: You will be asked to schedule the check to run the next time you reboot the PC. Type Y and press Enter to confirm this.
Other Tips
In addition, there are some other ways mentioned by some users and you can also have a try to fix the Windows 11 restart problem:
1. Undo Overlocking
A potential cause for Windows 11 random restart is that you overlock your RAM, CPU, or GPU to let the computer perform faster than what’s it’s able to do. To fix your issue, undo the change.
Related article: Is Overclocking Safe? Whether to Overclock or Not? Look Here
2. Change power settings
If your laptop keeps restarting, the potential reason may be an aggressing power management setting. The setting can power off the PC when it is forced to run resource-intensive tasks while using the battery’s power.
To remove Windows 11 restarting loop, open Power Options by typing powercfg.cpl in Run, click Change plan settings > Change advanced power settings, expand Processor power management > Minimum processor state and ensure On Battery % is 5% or lower.
“Windows 11 keeps restarting? How can you get rid of the restarting loop? Try these solutions and you can share these ways on Twitter to let more persons know.”Click to tweet
Recover Lost Files after Random Restart
A random restart can lead to data loss. To get your crucial files back, you can run a data recovery software. Here, we recommend using MiniTool Power Data Recovery that is compatible with Windows 11/10/8/7. With it, you can recover files from your hard drive, SD card, USB drive, pen drive, CD/DVD, and more. To know much information, refer to this post – Files Missing after Reboot Windows? How to Recover Them.
Back up Your System
System issues are very common, which makes you very annoyed. After fixing the random restart issue, you had better create a system backup for your PC so that you can restore the system to a normal state in case of system issues. With the backup, you won’t spend much time finding solutions.
How can you back up your system for quick disaster recovery? It is an easy task if you use a professional PC backup software. You can also run a MiniTool program – MiniTool ShadowMaker.
This software can be used on your Windows 11 PC. It allows you to create a system image, back up files, folders, disks, and partitions. Besides, full backup, differential backup, incremental backup, and automatic backup are supported. Now, download the trial edition of this software to have a trial within 30 days.
MiniTool ShadowMaker TrialClick to Download100%Clean & Safe
Step 1: Double-click on the shortcut on your PC’s desktop to open MiniTool ShadowMaker Trial Edition.
Step 2: Click Keep Trial to continue using this edition.
Step 3: By default, MiniTool ShadowMaker backs up your system. When seeing the Source section under the Backup tab, you can find this software has chosen system partitions as the backup source. You only need to click Destination and specify an external hard drive or USB drive as the storage path.
Step 4: Click Back Up Now to execute the system backup at once.

After creating a system image, go to Tools > Media Builder to create a bootable USB drive or CD/DVD so that you can perform a system image recovery in case of a system crash or restarting loop.
Final Words
Does your PC keep rebooting in Windows 11? If you are encountering this common issue, try the solutions mentioned above to easily get rid of the Windows 11 random restart. As a suggestion, you had better back up your Windows for fast recovery in case of a system accident.
If you have any other ways to fix the restarting issue, let us know by leaving a comment below. Thanks in advance.
Windows 11 desktops can get stuck in a reboot loop that makes it impossible for users to work, and sometimes it’s unclear why the problem occurs or how to fix it.
This can hinder productivity to the point that users experiencing a reboot loop must find another machine to work on until IT can solve the problem. Users may lose unsaved work or files and have to work on a desktop or other device that isn’t optimized for their preferences and needs.
A failed update, faulty hardware, new application or any number of other issues may cause Windows 11 to keep restarting. As an IT administrator, you may have to try many different strategies when troubleshooting a restart issue.
Why Windows 11 keeps restarting
It can be difficult to track down the underlying root causes of a reboot issue, especially if the problem occurs on some managed computers and not others. You should consider a wide range of possibilities during the troubleshooting process, including the following:
- Improper group policy settings. If admins have misconfigured group policies or failed to properly update them, a system may experience reboot issues.
- Inappropriate system settings. A few system configuration settings can cause a Windows 11 computer to keep restarting. For example, reboot problems can occur if users are overly aggressive with the power management settings or disable the secure boot function. Automatic restarts and fast startups, which are enabled by default, can also cause reboot issues.
- System instability. Problems at the system level, such as missing or corrupt OS files, can cause problems. Third-party applications can sometimes lead to reboot issues as well, especially if users installed or updated them recently. Even a Windows update can potentially cause restart problems, as can upgrading from Windows 10 to Windows 11.
- Malfunctioning hardware. Hardware drivers and peripheral devices can create restart issues. Potential causes include failing storage devices — especially if they impact OS or application files — and hardware overheating, which often worsens with high-intensity workloads.
- Malware infection. A malware infection may cause a computer to keep restarting. A reboot problem can even be one of the only signs that malware has infected a computer.
There can be other sources for the issue as well, but these common causes give admins a few places to start when up against reboot problems. The causes are not necessarily mutually exclusive, however. Multiple factors might contribute to a Windows 11 reboot loop.
What to do if Windows 11 keeps restarting
Because there are so many possible reasons why Windows 11 keeps restarting, there are also many steps admins can take to resolve reboot issues. You should look at three broad areas to identify the source of the problem: software environment, hardware environment and system settings. By assessing the desktop through these three categories, you can determine what the best way to solve the issue is — whether that is pausing updates, replacing the local drive or changing group policy settings, for example.
Whether trying to address reboot issues directly or working with a user remotely, you should understand how to use Windows 11 safe mode to access the Windows system — especially if the restart issue prevents the user from booting normally into the computer. Safe mode is a diagnostic and troubleshooting operating environment that runs a pared-down version of the OS to help isolate and identify system issues.
Safe mode runs Windows 11 in a basic state that operates with a limited set of files, drivers, services and features. You can use safe mode to carry out several tasks, such as updating drivers, removing hardware components, uninstalling new applications or scanning for malware — all of which may cause Windows 11 to keep restarting.
Assess the software environment
When troubleshooting reboot issues in Windows 11, you should look closely at the software environment. There is no single approach to take with software-related issues, and it will likely come down to some trial and error to discover the underlying cause. In some situations, though, the problem may be readily apparent. For example, it might have started right after applying a Windows update or installing a new application.
If the cause isn’t clear, a good place to start is with Windows Update. Even if you centrally control updates on managed desktops, you might still need to assess an individual computer to determine whether a specific update has been properly installed. If you access the managed computer directly, you can check for updates or view the update history through the Windows Update feature in Settings (Figure 1).
Here, you can see if an update failed. If it did, check whether any temporary files have been left behind in the software distribution folder. You might need to delete the files before trying to run the update again.
In some cases, a successful update still appears to be the root of the reboot problem. If this occurred, you can uninstall the update through the Update history utility. If the computer then boots up normally, this at least helps get the computer operational while giving you more time to figure out why the update might be causing problems.
You can also consider placing controls on when your organization’s managed Windows 11 computers should restart after an update. For this, you can use group policy settings or a mobile device management (MDM) tool to set restart policies that will take effect after an update.
Temporarily deferring updates may also help resolve startup issues. Under Windows Update, users have the option to pause updates for up to three weeks.
Another option for addressing reboot issues is to restore the computer to a specific point in time. This is only possible if Windows has automatically created restore points on the system or if IT has done so manually. When working on an individual computer, you can use the System Restore utility to revert the system to a specific restore point.
If you suspect that a recently installed application might be causing the reboot problem, uninstalling the application and rebooting the computer may address the issue. If working directly on the computer, you can use the Apps & features screen to uninstall the suspected application (Figure 2).
Consider using the Deployment Image Servicing and Management (DISM) tool and the System File Checker (SFC) to scan the Windows 11 computer as well. The DISM scan should run before the SFC scan. Together, these tools allow IT to identify and replace missing or corrupted Windows 11 system files. However, it’s important to fully understand how these tools work before running either type of scan.
You should also scan the computer for malware, which can lead to reboot issues and result in even more serious consequences. The approach IT teams take here will depend on how they’ve implemented security protection on their networks and desktops.
Another software-related option for addressing reboot issues is to reset Windows, which returns the OS to its original factory settings. To do this, navigate to Start > Settings > System > Recovery. After selecting Reset this PC, you can choose whether or not to retain personal files (Figure 3). In either case, you should back up the files before resetting Windows.
You should not reset Windows until you’ve tried all other options, including those related to hardware and system settings. If resetting Windows doesn’t work, you may need to reinstall the OS, effectively starting from scratch.
Assess the hardware environment
As with the software environment, you should evaluate the computer’s hardware to determine whether it’s part of the reason why Windows 11 keeps restarting. One possible culprit is a hardware driver, which can become corrupted or outdated. An administrator working directly on a Windows 11 PC can use the Device Manager to update drivers or remove a device that might be causing issues.
In addition to the drivers, you should test other aspects of the hardware. For example, a peripheral device might be causing the reboot problem. For this reason, it’s a good idea to unplug external devices when troubleshooting a system. You should also monitor hardware components — particularly CPUs and graphic cards — for signs of overheating. Overheating can cause a system to continuously restart, attempting to avoid any damage to the hardware.
You should also run diagnostics against the power supply to ensure that it is delivering sufficient voltage to the computer and operating within recommended parameters. Additionally, make sure to verify that there are no problems with the local drive that might be causing random restarts. To do this, you can use the CHKDSK (check disk) utility to check the file system and the volume’s metadata for logical and physical errors.
The CHKDSK utility locates bad sectors and physical disk errors and attempts to recover readable information, which might include data that the OS is trying to access. In some cases, running a scan to check for errors can resolve reboot issues. However, if bad sectors are behind the problem, it might be time to replace the drive.
Assess the system settings
The computer’s system configuration settings can sometimes lead to continuous restarts. For example, misconfigured group policies can cause reboot issues. So can policies that are not properly updated, which can occur when updating Windows or migrating from Windows 10 to Windows 11. IT must properly configure and update group policies on managed computers as necessary.
A Windows 11 computer can also run into reboot issues if secure boot has been disabled for any reason, which is possible even if it is a system requirement. You can verify whether secure boot is enabled through the system summary available in the System Information app (Figure 4). The Secure Boot State feature should be set to On. If it’s not, you will need to update the Unified Extensible Firmware Interface (UEFI) settings.
Another troubleshooting option is to disable the automatic restart feature on the Startup and Recovery screen (Figure 5). The Automatically restart option is enabled by default, so restart issues might occur, no matter what the underlying problem is, making it difficult to diagnose. If you disable this feature, the computer might instead display an error message or perform some other behavior that can help isolate the problem.
You might also consider disabling fast startup, which enables Windows to boot up more quickly after the computer shuts down. This feature can sometimes cause issues, including repeated bootups. By disabling it, you can at least determine whether this might be part of the problem.
Additionally, check whether users have configured overclocking on any of the hardware. If so, you should disable it. On laptop computers, you should review the power management settings, particularly as they pertain to the battery. In some cases, such as when performing resource-intensive operations, the power options might be causing the reboot issue.
When reviewing the configuration settings, you should make one change at a time and check whether it makes a difference. If not, revert the setting to its original configuration and move on to another strategy. You can also choose to check system settings before focusing on the software or hardware. It depends on the circumstances and what seems to be the most likely source of the problem.
There can be several internal issues for your Windows 11 to restart in loops without warning. This can be quite frustrating as you can lose your unsaved work during sudden restarts.
Turning off the automatic restart from system settings has fixed this issue for most users. Likewise, running SFC, DISM, and CHSDSK scans can also help.
If these do not help, it’s possible that you’re having these issues due to memory failure. In fact, Windows restarting frequently can be a sign of a failing PSU or motherboard too.
Let’s try to solve this problem step-by-step.
Turn Off the Automatic Restart
Under advanced system settings, there is an option that allows Windows to automatically restart in case of system failures. Thus, make sure to disable that option if you have it turned on.
- Search and open Advanced system settings from the search bar.

- In the Advanced Tab click on Settings under Startup and Recovery.

- Under System Failure, uncheck the Automatically Restart option.
- Click OK to apply changes.


Note: You should now get an error screen. Take note of the message and proceed with the solution accordingly. Even if you do not encounter an error message, your PC might be experiencing some form of system instability which you want to fix. Try to see if you can find the source of the error using Event Viewer.
Use SFC, DISM, and CHKDSK
You can run a DISM, CHKDSK, SFC scan to check for potential faults in your hard drive.
SFC(System File Checker) scans for any corrupted system files and repairs them. This command can be run when any protected files or services don’t work. Here’s how to do it from Command Prompt.
- Press
Win + Rto open the Run prompt. - In the command prompt, type
cmdthen pressCtrl + Shift + Enter. It will run Command Prompt as Administrator. - Type the command
sfc /scannowand hit enter to repair corrupt files.

The DISM (Deployment Image Servicing and Management) tool repairs the system image by replacing the damaged files from that system image.
You should run DISM if SFC can’t resolve the existing system issue. However, DISM will only repair the Windows image. Thus, to fix additional system files you will have to re-run SFC after DISM. Here’s how you can run DISM.
- Press
Win + Rto open the Run prompt. - In the command prompt, type
cmdthen pressCtrl + Shift + Enter. This will open it as administrator. - Type the command
dism /online /cleanup-image /restorehealthand hit enter.

The CHKDSK utility on the Windows Operating System performs a scan on your hard disk and repairs any bugs on its system. Follow these instructions to perform the CHKDSK scan on Command Prompt.
- Search for Command Prompt in the Windows search bar.
- Right-click on it and select Run as Administrator.
- In the Command Prompt Window, type in the command
chkdsk C: /rthen hit enter. Now, pressYand hit enter, this will automatically scan for disk corruption on the next restart.

Note: Some manufacturers have a built-in diagnostic tool to monitor and fix potential hardware problems. This can also sometimes fix the Windows 11 restart issue.
Update/Reinstall your Corrupted Drivers
Although it is rare, an outdated or corrupted driver can also sometimes cause Windows 11 to restart. Follow these instructions to update and reinstall your drivers and check if it resolves your issue:
- Type Device Manager on the Windows search bar, then open it.
- Click on the arrow icon beside the Display Adapters icon to expand it.

3. If nothing helps, inspect your Device Manager. If you find any exclamation marks in any of the drivers, try updating/reinstalling them as well. Chipest drivers are ones to keep an eye on!
Note: If the above fix is not working, it’s best to install AMD/NVIDIA drivers manually from the manufacturer’s website.
Run Memory Diagnostic
Another reason to encounter random restart issues is due to a failing memory (RAM). Your PC’s memory in Windows 11 can be diagnosed by running the Windows Memory Diagnostic. Here’s how:
- Type Windows Memory Diagnostic in the Windows search bar and open it.
- Select Restart now and check for problems.

- Now Windows will automatically run the diagnostic on your memory.


Delete Recent Windows Update
Due to some glitches in the Windows update itself, your OS could be encountering abrupt restarts. Hence, rolling back the update could fix this issue in such cases. Here’s how you can do it.
- Press Win + I to open Windows settings and navigate to the Windows Update.
- Now, click on Update History.

- Under Related Settings click on Uninstall Updates.

- Select the latest update and click on Uninstall. Select Yes in the confirmation box that follows.

- Windows will now roll back the update to a previous date.


Alternatively, you can opt for system restore which monitors system changes and saves the system state as a restore point. It can oftentimes fix certain issues after an update.
- Open Win Run, input the command
rstrui.exe, and hit enter. - Click Next on the System Restore tool.

- Select a date to System Restore and click Next.

- Lastly, click Finish to apply your changes.


Addressing Hardware Issues
Your PC could be experiencing sudden restarts if there are issues with the internal hardware components. Thus, try these additional fixes to address this issue.
- First, reseat RAM and graphics card. Confirm they are installed properly on your motherboard.
- Make sure your system is not overheating. This could occur while using CPU/GPU-intensive programs.
- Ensure your CPU cooler is working properly. Check the header connection or reinstall it.
- Try updating your system’s BIOS. This should fix system instabilities.
- Check for a failing PSU or motherboard as this could also cause your PC to restart.
Final Verdict
If you have ruled out the hardware fixes as well and if the problem still persists, I’m afraid the only solution is to roll back to Windows 10. This should be relevant for users who have recently switched to Windows 11.