
SNMP в Windows Часть 3. Snmpwalk и все все все OID.
Всем привет! Если Вы прочитали две мои предыдущие статьи, посвященные протоколу SNMP, то вы наверное уже задались вопросом, а где же искать коды OID для того чтобы мониторить (или изменять) требуемые Вам параметры устройств. Конечно я уже несколько раз упоминал что необходимо искать MIBы и знакомиться с их содержимым, но есть более простой способ позволяющий быстро получить все значения OID поддерживаемые устройством — это применение утилиты snmpwalk.
Утилита snmpwalk входит в состав набора программного обеспечения Net—SNMP и позволяет получить все поддерживаемые устройством OID при помощью SNMP GetNext запросов. Скачаем данную утилиту и поместим её в корне диска C. Далее откроем командную строку с правами администратора и выполним в ней следующие команды:
cd c:\
snmpwalk.exe -r:192.168.1.12 -c:Test > 2.txt
Вторая из этих команд запускает утилиту snmpwalk.exe с параметрами. Параметр —r: отвечает за указание IP адреса агента SNMP, а параметр —c: отвечает за указание используемого для опроса community. Конструкция > 2.txt позволяет вывести результат выполнения команд не в консоль а в текстовый файл 2.txt.
Теперь, если мы перейдем в корень диска С и откроем файл 2.txt, то увидим в нем полный перечень OID поддерживаемых устройством, их тип и значения которые они имеют в данный момент. К сожалению, описания того за что какой OID отвечает нет. Для того чтобы в этом разобраться вам придется гуглить или все же просматривать mibы. Хотя о назначение некоторых OID нетрудно догадаться по их значениям.
Удачи и не бойтесь эксперементировать.
What is SNMP?
SNMP also known as “Simple Network Management Protocol” is an application-layer protocol used to measure and monitor the performance of the devices within a network. It helps the system administrator to ensure that networks stay up and running. Today, SNMP is one of the most popular networking protocols in the world. All modern manufacturers create SNMP-enabled devices that enterprises can use to obtain performance data from the devices.
How SNMP Works?
SNMP uses the device’s Management Information Database (MIB) to collect the performance data. The MIB is a database that records information about the hardware and contains MIB files. The MIB resides within the SNMP manager designed to collect information and organize it into a hierarchical format. SNMP uses this information from the MIB to interpret messages before sending them onwards to the end-user.
There are different types of queries managers used to poll the information from the SNMP agent including, GET or GET-NEXT commands. The GET command uses the agent’s hostname and Object Identifiers (OID) to obtain the information from the MIB. The GET-NEXT command obtains the data from the next OID.
What is SNMPWALK?
SNMPWALK is a command-line utility used to collect the information from remote SNMP-enabled devices including, routers and switches. It allows you to see all the OID variables available on remote devices. It sends multiple GET-NEXT commands to OIDs then the manager collects the data from all OIDs. SNMPWALK is a command-line utility that can be installed on Linux and Windows operating systems.
In this guide, we will show you how to install SNMPWALK on Windows and Linux. We will also explain how to use it to get the information from the remote devices.
Install SNMP and SNMPWALK on Linux
In this section, we will show you how to install SNMP and SNMPWALK on Debian and RPM-based Linux operating systems.
For RPM-based operating system including, RHEL/CentOS/Fedora, install the SNMP and SNMPWALK using the following command:
yum install net-snmp net-snmp-libs net-snmp-utils -y
For Debian based operating system including, Debian/Ubuntu, install the SNMP and SNMPWALK using the following command:
apt-get install snmpd snmp libsnmp-dev -y
Once the installation has been finished, start the SNMP service and enable it to start at system reboot with the following command:
systemctl start snmpd

systemctl enable snmpd
You can check the status of the SNMP with the following command:
systemctl status snmpd
You should get the following output:
● snmpd.service - Simple Network Management Protocol (SNMP) Daemon.
Loaded: loaded (/lib/systemd/system/snmpd.service; enabled; vendor preset: enabled)
Active: active (running) since Fri 2021-05-14 06:36:48 UTC; 3min 22s ago
Main PID: 36724 (snmpd)
Tasks: 1 (limit: 4691)
Memory: 8.7M
CGroup: /system.slice/snmpd.service
└─36724 /usr/sbin/snmpd -LOw -u Debian-snmp -g Debian-snmp -I -smux mteTrigger mteTriggerConf -f -p /run/snmpd.pid
May 14 06:36:48 ubuntu2004 systemd[1]: Starting Simple Network Management Protocol (SNMP) Daemon....
May 14 06:36:48 ubuntu2004 systemd[1]: Started Simple Network Management Protocol (SNMP) Daemon..
By default, SNMP does not allow retrieving all available SNMP information. So you will need to edit the SNMP default configuration file and make some changes so we can retrieve all information using the SNMPWALK command.
nano /etc/snmp/snmpd.conf
Find the following lines:
rocommunity  public default -V systemonly

rocommunity6 public default -V systemonly
And, replace them with the following lines:
rocommunity  public default

rocommunity6 public default
Save and close the file then restart the SNMP service to apply the changes:
systemctl restart snmpd
Now, open your command-line interface and print help information of SNMPWALK command as shown below:
snmpwalk -h
You should get the following output:
USAGE: snmpwalk [OPTIONS] AGENT [OID]
Version:  5.8

Web:      http://www.net-snmp.org/

Email:    net-snmp-coders@lists.sourceforge.net
OPTIONS:

-h, --help		display this help message

-H			display configuration file directives understood

-v 1|2c|3		specifies SNMP version to use

-V, --version		display package version number

SNMP Version 1 or 2c specific

-c COMMUNITY		set the community string

SNMP Version 3 specific

-a PROTOCOL		set authentication protocol (MD5|SHA|SHA-224|SHA-256|SHA-384|SHA-512)

-A PASSPHRASE		set authentication protocol pass phrase

-e ENGINE-ID		set security engine ID (e.g. 800000020109840301)

-E ENGINE-ID		set context engine ID (e.g. 800000020109840301)

-l LEVEL		set security level (noAuthNoPriv|authNoPriv|authPriv)

-n CONTEXT		set context name (e.g. bridge1)

-u USER-NAME		set security name (e.g. bert)

-x PROTOCOL		set privacy protocol (DES|AES)

-X PASSPHRASE		set privacy protocol pass phrase

-Z BOOTS,TIME		set destination engine boots/time

General communication options

-r RETRIES		set the number of retries

-t TIMEOUT		set the request timeout (in seconds)

Debugging

-d			dump input/output packets in hexadecimal

-D[TOKEN[,...]]	turn on debugging output for the specified TOKENs

(ALL gives extremely verbose debugging output)
Install SNMP and SNMPWALK on Windows 10 Windows Server 2016 and Windows Server 2019
In this section, we will show you how to install SNMP and SNMPWALK on the Windows operating system.
Follow the below steps to install SNMP on Windows:
Step 1 – Open the Control Panel as shown below:
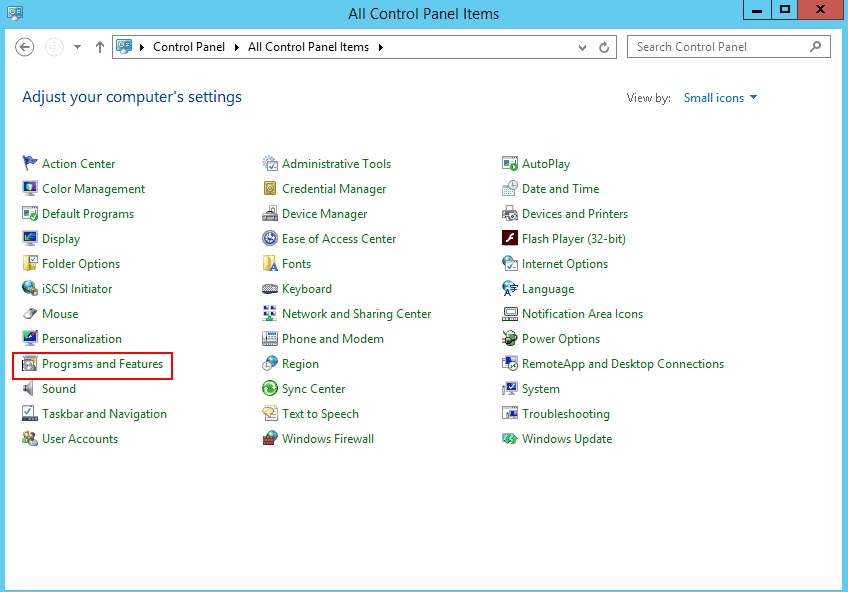
Step 2 – Click on the Programs and Features you should see in the page below:
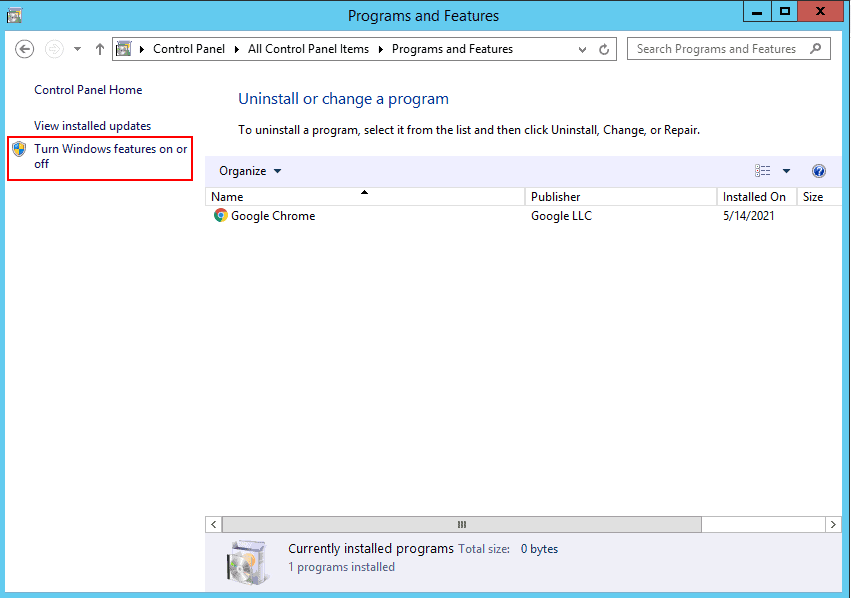
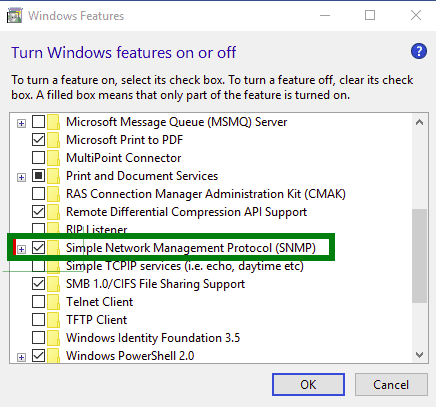
Step 3 – Click on the Turn Windows features on or off.
Step 4 – On Windows 10, select Simple Network Management Protocol (SNMP) and install it.
Step 5 – On Windows Server 2016 and 2019, click on the Add Roles and Features Wizard until you reach the Features section then select SNMP service.
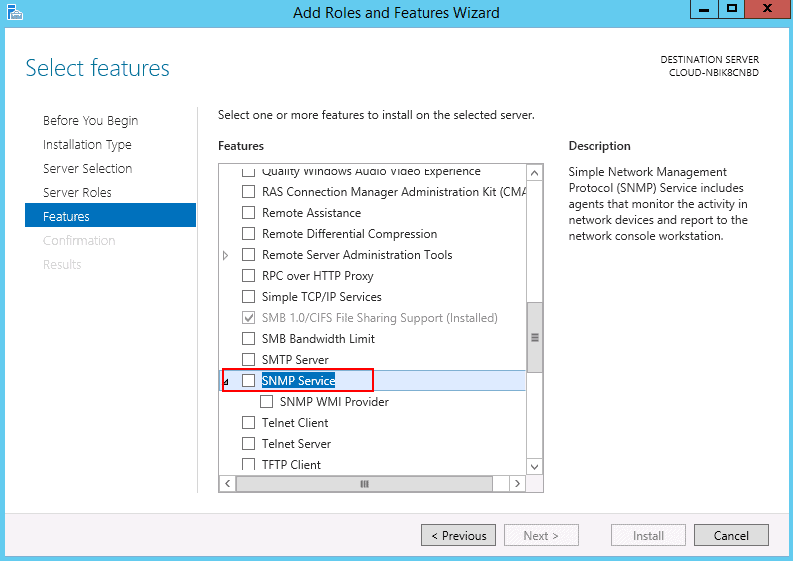
Step 6 – Install SNMP Service.
This will automatically install the SNMP service on your Windows system.
After installing SNMP, you will need to configure it.
Follow the below steps to configure the SNMP service:
Step 1 – Press Windows + R and type services.msc as shown below:
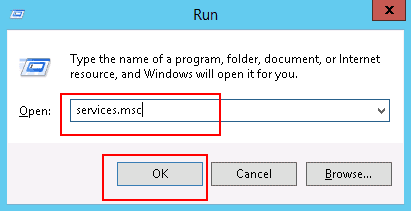
Step 2 – Press OK to open the Windows service configuration wizard.
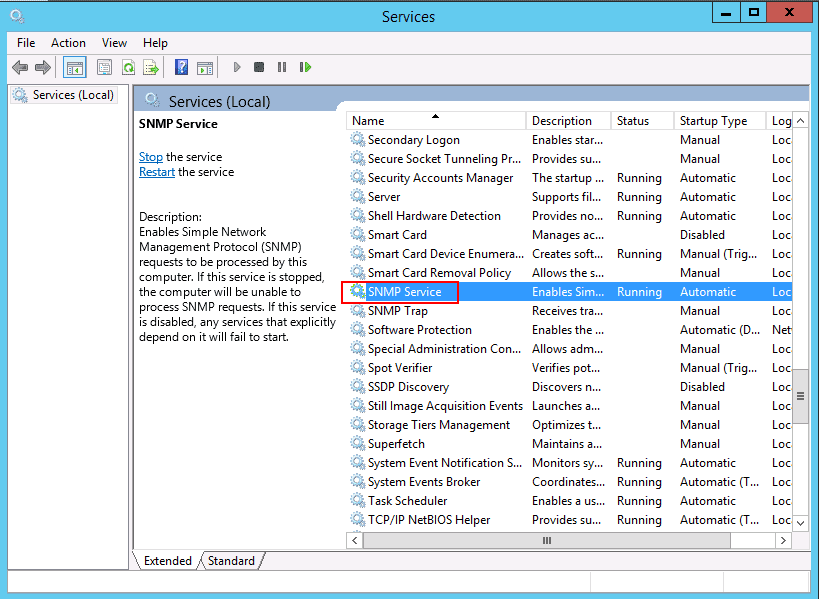
Step 3 – Select the SNMP service, right-click and click on the properties as shown below:

Step 4 – In the Log On tab, select “Allow service to interact with desktop”. Then click on the Agent tab as shown below:
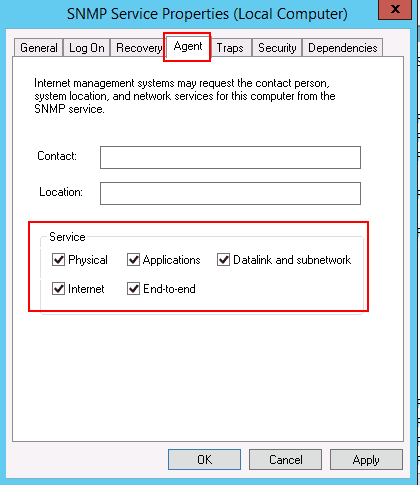
Step 5 – Select all services and click on the Security tab as shown below:
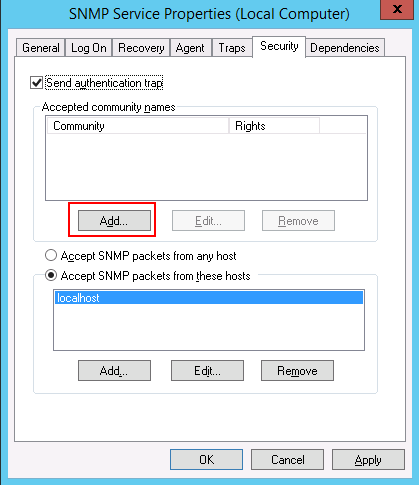
Step 6 – Click on the Add button. You should see the following screen:
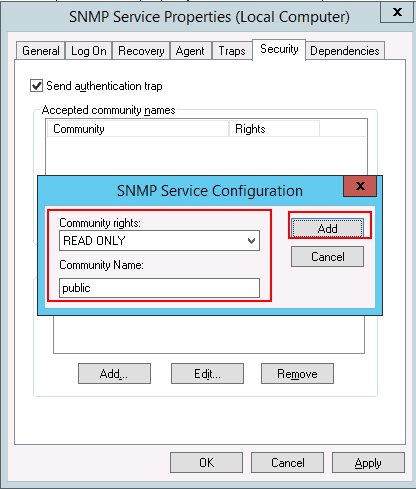
Step 7 – Provide community rights and community name then click on the Add button. You should see the following page:

Step 8 – Click on the Apply button to apply the changes.
For full SNMP functionality, you will need to download the SolarWinds MIB Walk module from their Engineer’s Toolset to your windows system. However, you can download the free snmpwalk files from the SourceForge website and follow along with this post.
Once SNMPWALK is downloaded, extract it to the download folder. You can now use snmpwalk.exe to launch and use the SNMPWALK.
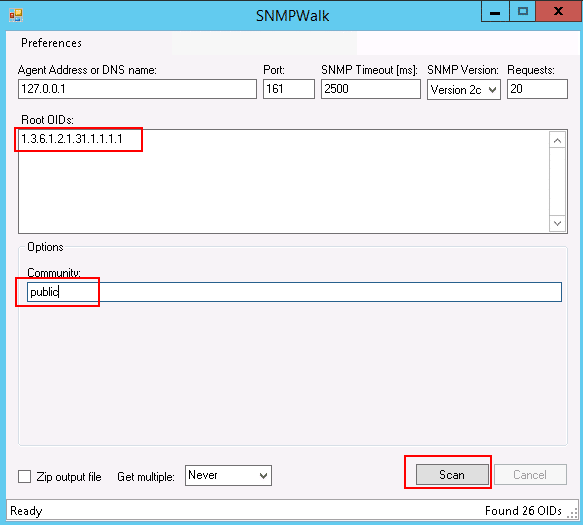
Provide your agent address, OID, community, and click the Scan button. This will generate a complete system information report based on the OID.
How to Use SNMPWALK to Retrieve the System Information
In this section, we will show you how to use the SNMPWALK command in Linux to retrieve the system information.
You can use the following options with the SNMPWALK command to retrieve the system information:
- -v: Specify the SNMP version.
- -c: Specify the community string which you have configured on the SNMP.
- hostname: Specify the hostname or IP address of the system where the SNMP agent is installed.
- OID: Specify the OID to return all SNMP objects.
Now, open your command-line interface and run the following command to list all existing OIDs on the network..
snmpwalk -v 2c -c public localhost
You should get the following output:
iso.3.6.1.2.1.1.1.0 = STRING: "Linux ubuntu2004 5.4.0-29-generic #33-Ubuntu SMP Wed Apr 29 14:32:27 UTC 2020 x86_64"

iso.3.6.1.2.1.1.2.0 = OID: iso.3.6.1.4.1.8072.3.2.10

iso.3.6.1.2.1.1.3.0 = Timeticks: (19907) 0:03:19.07

iso.3.6.1.2.1.1.4.0 = STRING: "Me <me@example.org>"

iso.3.6.1.2.1.1.5.0 = STRING: "ubuntu2004"

iso.3.6.1.2.1.1.6.0 = STRING: "Sitting on the Dock of the Bay"

iso.3.6.1.2.1.1.7.0 = INTEGER: 72

iso.3.6.1.2.1.1.8.0 = Timeticks: (3) 0:00:00.03

iso.3.6.1.2.1.1.9.1.2.1 = OID: iso.3.6.1.6.3.10.3.1.1

iso.3.6.1.2.1.1.9.1.2.2 = OID: iso.3.6.1.6.3.11.3.1.1

iso.3.6.1.2.1.1.9.1.2.3 = OID: iso.3.6.1.6.3.15.2.1.1

iso.3.6.1.2.1.1.9.1.2.4 = OID: iso.3.6.1.6.3.1

iso.3.6.1.2.1.1.9.1.2.5 = OID: iso.3.6.1.6.3.16.2.2.1

iso.3.6.1.2.1.1.9.1.2.6 = OID: iso.3.6.1.2.1.49

iso.3.6.1.2.1.1.9.1.2.7 = OID: iso.3.6.1.2.1.4

iso.3.6.1.2.1.1.9.1.2.8 = OID: iso.3.6.1.2.1.50

iso.3.6.1.2.1.1.9.1.2.9 = OID: iso.3.6.1.6.3.13.3.1.3

iso.3.6.1.2.1.1.9.1.2.10 = OID: iso.3.6.1.2.1.92

iso.3.6.1.2.1.1.9.1.3.1 = STRING: "The SNMP Management Architecture MIB."

iso.3.6.1.2.1.1.9.1.3.2 = STRING: "The MIB for Message Processing and Dispatching."

iso.3.6.1.2.1.1.9.1.3.3 = STRING: "The management information definitions for the SNMP User-based Security Model."

iso.3.6.1.2.1.1.9.1.3.4 = STRING: "The MIB module for SNMPv2 entities"

iso.3.6.1.2.1.1.9.1.3.5 = STRING: "View-based Access Control Model for SNMP."

iso.3.6.1.2.1.1.9.1.3.6 = STRING: "The MIB module for managing TCP implementations"

iso.3.6.1.2.1.1.9.1.3.7 = STRING: "The MIB module for managing IP and ICMP implementations"

iso.3.6.1.2.1.1.9.1.3.8 = STRING: "The MIB module for managing UDP implementations"

iso.3.6.1.2.1.1.9.1.3.9 = STRING: "The MIB modules for managing SNMP Notification, plus filtering."

iso.3.6.1.2.1.1.9.1.3.10 = STRING: "The MIB module for logging SNMP Notifications."
You can see the different OIDs in the above output. The typical format of an OID is shown below:
1.3.6.1.4.1.2021.10.1
A brief explanation of the most commonly used OIDs are shown below:
- 1 – ISO – International Organization for Standardization (ISO)
- 3 – org – Organizations according to ISO/IEC 6523-2
- 6 – dod – US Department of Defense (DOD)
- 1 – Internet protocol
- 4 – Private – Device manufactured by a private company
- 2021 – It is the particular device manufacturer number.
To get the hostname of the system, run the following command:
snmpwalk -v 2c -c public 127.0.0.1 .1.3.6.1.2.1.1.5
You should get the following output:
iso.3.6.1.2.1.1.5.0 = STRING: "ubuntu2004"
To get the hostname and kernel information, run the following command:
snmpwalk -v 2c -c public 127.0.0.1 .1.3.6.1.2.1.1.1
You should get the following output:
iso.3.6.1.2.1.1.1.0 = STRING: "Linux ubuntu2004 5.4.0-29-generic #33-Ubuntu SMP Wed Apr 29 14:32:27 UTC 2020 x86_64"
To get the network interface information, run the following command:
snmpwalk -v 2c 127.0.0.1 -c public .1.3.6.1.2.1.2.2.1.1
You should get the following output:
iso.3.6.1.2.1.2.2.1.1.1 = INTEGER: 1

iso.3.6.1.2.1.2.2.1.1.2 = INTEGER: 2

iso.3.6.1.2.1.2.2.1.1.3 = INTEGER: 3
To get the MAC address information, run the following command:
snmpwalk -v 2c 127.0.0.1 -c public .1.3.6.1.2.1.2.2.1.6
You should get the following output:
iso.3.6.1.2.1.2.2.1.6.1 = ""

iso.3.6.1.2.1.2.2.1.6.2 = Hex-STRING: 00 00 2D 3A 26 A4

iso.3.6.1.2.1.2.2.1.6.3 = Hex-STRING: 00 00 0A 3A 26 A4
To get a list of all network interface, run the following command:
snmpwalk -v 2c -c public 127.0.0.1 .1.3.6.1.2.1.31.1.1.1.1
You should get the following output:
iso.3.6.1.2.1.31.1.1.1.1.1 = STRING: "lo"

iso.3.6.1.2.1.31.1.1.1.1.2 = STRING: "eth0"

iso.3.6.1.2.1.31.1.1.1.1.3 = STRING: "eth1"
To get an IP address of the system, run the following command:
snmpwalk -v 2c -c public 127.0.0.1 .1.3.6.1.2.1.4.20.1.1
You should get the following output:
iso.3.6.1.2.1.4.20.1.1.45.58.38.164 = IpAddress: 45.58.38.164

iso.3.6.1.2.1.4.20.1.1.127.0.0.1 = IpAddress: 127.0.0.1
To get the Subnet Mask of the system, run the following command:
snmpwalk -v 2c -c public 127.0.0.1 .1.3.6.1.2.1.4.20.1.3
You should get the following output:
iso.3.6.1.2.1.4.20.1.3.45.58.38.164 = IpAddress: 255.255.255.0

iso.3.6.1.2.1.4.20.1.3.127.0.0.1 = IpAddress: 255.0.0.0
To get the CPU information, run the following command:
snmpwalk -v 2c -c public 127.0.0.1 .1.3.6.1.2.1.25.3.2.1.3 |grep -i cpu
You should get the following output:
iso.3.6.1.2.1.25.3.2.1.3.196608 = STRING: "GenuineIntel: QEMU Virtual CPU version 2.5+"

iso.3.6.1.2.1.25.3.2.1.3.196609 = STRING: "GenuineIntel: QEMU Virtual CPU version 2.5+"
To get the system load information, run the following command:
snmpwalk -v 2c -c public 127.0.0.1 .1.3.6.1.4.1.2021.10.1
You should get the following output:
iso.3.6.1.4.1.2021.10.1.1.1 = INTEGER: 1

iso.3.6.1.4.1.2021.10.1.1.2 = INTEGER: 2

iso.3.6.1.4.1.2021.10.1.1.3 = INTEGER: 3

iso.3.6.1.4.1.2021.10.1.2.1 = STRING: "Load-1"

iso.3.6.1.4.1.2021.10.1.2.2 = STRING: "Load-5"

iso.3.6.1.4.1.2021.10.1.2.3 = STRING: "Load-15"

iso.3.6.1.4.1.2021.10.1.3.1 = STRING: "0.00"

iso.3.6.1.4.1.2021.10.1.3.2 = STRING: "0.01"

iso.3.6.1.4.1.2021.10.1.3.3 = STRING: "0.00"

iso.3.6.1.4.1.2021.10.1.4.1 = STRING: "12.00"

iso.3.6.1.4.1.2021.10.1.4.2 = STRING: "12.00"

iso.3.6.1.4.1.2021.10.1.4.3 = STRING: "12.00"

iso.3.6.1.4.1.2021.10.1.5.1 = INTEGER: 0

iso.3.6.1.4.1.2021.10.1.5.2 = INTEGER: 1

iso.3.6.1.4.1.2021.10.1.5.3 = INTEGER: 0

iso.3.6.1.4.1.2021.10.1.6.1 = Opaque: Float: 0.000000

iso.3.6.1.4.1.2021.10.1.6.2 = Opaque: Float: 0.010000

iso.3.6.1.4.1.2021.10.1.6.3 = Opaque: Float: 0.000000

iso.3.6.1.4.1.2021.10.1.100.1 = INTEGER: 0

iso.3.6.1.4.1.2021.10.1.100.2 = INTEGER: 0

iso.3.6.1.4.1.2021.10.1.100.3 = INTEGER: 0

iso.3.6.1.4.1.2021.10.1.101.1 = ""

iso.3.6.1.4.1.2021.10.1.101.2 = ""

iso.3.6.1.4.1.2021.10.1.101.3 = ""
To get the system uptime information, run the following command:
snmpwalk -v 2c -c public 127.0.0.1 .1.3.6.1.2.1.1.3.0
You should get the following output:
iso.3.6.1.2.1.1.3.0 = Timeticks: (66282) 0:11:02.82
Conclusion
In the above post, you learned how to install and use SNMP and SNMPWALK on Windows and Linux to get the system information across the connected devices. I hope this will help you to monitor the network devices.
SNMPWALK FAQs
What is a snmpwalk tool?
SNMPWALK is a process of exploring the Management Information Base (MIB) structure of an SNMP report. The MIB has a tree structure that is denoted by a dot-notation number and the “walk” crawls through these numbers, recreating the tree. An SNMPWALK tool can construct a MIB tree by mapping the relationship between the values in a MIB. Each number that identifies a node on the MIB tree will have a label and a value. The OID (Object ID) is a reference code for the label.
Is SNMP v3 TCP or UDP?
All versions of SNMP use the same ports – there are two and they are both UDP. Regular SNMP transactions involve the SNMP Manager sending out a broadcasted request, to which the SNMP device agents reply with a MIB. This communication occurs on UDP port 161. The SNMP agent can send out a warning message without waiting for a request. This is called a Trap and it goes to UDP port 162.
What is OID in Linux?
OID is short for Object ID. It is the level code that identifies a node in a tree structure that is used for reporting in SNMP. An SNMP report is called a Management Information Base (MIB). It has a set number of fields that are identified by OIDs. The OID uses a dot-notation format to indicate the inheritance of a node on the tree.
Let’s look into other interfaces. Sometimes you will need to monitor something that doesn’t work with an agent: printer, router, etc. SNMP can help you with that.
First, you will need is to find the variable’s OID (Object Identifier) the numeric code that will help the server to request the specific things we will monitor.
To do so you can look it up in the device’s manual or discover it with snmpwalk utility or use any MIB browser you like. For this article we will look into using snmpwalk.
snmpwalk
Let’s look into getting OIDs with snmpwalk.
Install the SNMP package: you’ll need to install the SNMP package. On Debian-based systems, you can install it with:
sudo apt-get install snmp
On Red Hat-based systems, you can use:
sudo yum install net-snmp
On Windows system, you can use the Net-SNMP package for Windows, which is available at Net-SNMP website (https://www.net-snmp.org/download.html).
Check the IP address or hostname of the device you want to query, as well as the SNMP version this device supports (usually SNMPv1 or SNMPv2c).
You’ll also need to find out the SNMP community for the device. This works like a password that allows to access the SNMP data on this host. You should be able to find this in the device’s documentation or configuration, the usual default option is ‘public’.
If you learned the OID you need from manual, run the snmpwalk command to check if everything’s fine. The basic syntax for snmpwalk is the same on Windows as on Linux or Unix:
snmpwalk -v [SNMP version] -c [community string] [device IP/hostname] [OID or MIB name]
for example
snmpwalk -v2c -c public 192.168.1.1 .1.3.6.1.2.1.1.5.0
Here, the OID .1.3.6.1.2.1.1.5.0 specifies the hostname, and the snmpwalk command will return the MIB name along with the current value and the variable type.
To discover an OID with snmpwalk you could run it without an OID or MIB name to search the one you interested in manually.

After finding out its name run the same command adding — On
Note that some variables have more than one port the last number in OID shows this port.
Hosts
Next, we will need to add a host with an SNMP interface configured and enter your device’s IP, SNMP version, and SNMP community. SNMP templates can be handy, but compatibility is not granted. Otherwise it’s a usual host creation.

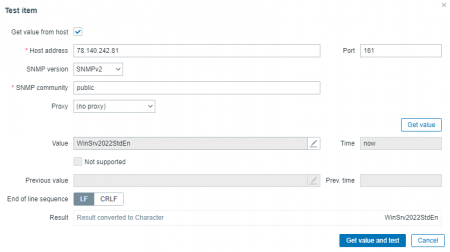
Items
The only thing left is to create an SNMP item: Go to Configuration > Hosts and click on the device you want to monitor. Go to the Items tab and click on the «Create item» button. Fill in the necessary information: item name, type (for our example, SNMPv2 agent), information type, and OID. Fill the Key line with OID number.
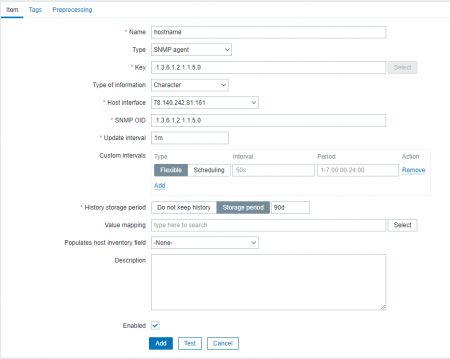
Press test to see if it works.
Once everything is set up, you should start seeing data from the device in Zabbix. You can use Zabbix’s graphs, triggers, and other features to monitor the device and be alerted if there are any issues.
Conclusion
We learned how to get the OIDs we need, and how to create SNMP hosts and items to monitor them with Zabbix.
1101
CT Amsterdam
The Netherlands, Herikerbergweg 292
+31 20 262-58-98
700
300
ITGLOBAL.COM NL
1101
CT Amsterdam
The Netherlands, Herikerbergweg 292
+31 20 262-58-98
700
300
ITGLOBAL.COM NL
Simple Network Management Protocol, or SNMP in short, is a framework used to manage a wide range of devices on the Internet. Typically, it monitors these devices and detects any problems or network faults in them.
This Internet Standard protocol works on the Application layer of the OSI model and gathers details from applications that support SNMP.
This information gathered by SNMP devices is used by different software to assess the health and performance of each device, and changes or fixes are done as needed. Sometimes, these SNMP devices can also be used to configure remote devices.
SNMP Components
SNMP gathers the required details from every device due to the presence of three components, namely:
- SNMP Manager – Also known as the Network Management System (NMS), a centralized system that monitors the network. This is often installed on a single device.
- SNMP agent – This component is a software module installed on the device that needs to be monitored like switches, routers, PCs, workstations, etc.
- Management Information Database – This is the repository of object instances, one for each device connected to the network.
Working of SNMP
SNMP communicates through the User Datagram Protocol (UDP), mainly on UDP port 161. It all starts when the NMS sends a request via port 161 to the agent, and the response is sent back to NMS on port 162. This information is accordingly stored in the MIB.
In every transmission, a single piece of information is sent from one device to another, called the Protocol Data Unit (PDU). There are a total of eight PDUs that SNMP uses. Five of these are available on SNMP1. Two more were added to SNMP2, and one more in SNMP3 respectively.
These PDUs are as follows:
- GetRequest – A message from the NMS to the agent to get the value of a particular variable.
- SetRequest – A message from the NMS to the agent to set a value to a variable.
- GetNextRequest – A message from the NMS to the agent to get the value of all variables. It is similar to running through the MIB starting from Object ID (OID) 0, but one value is returned for every request.
- GetBulkRequest – This is an optimized use of the GetNextRequest where all the values and their bindings of a variable are returned.
- Response – An acknowledgment from the agent to the NMS for every command sent.
- Trap – A message sent asynchronously from the agent to the manager without being explicitly asked for it.
- InformRequest – Since SNMP uses UDP where there is a possibility for dropped packets, InformRequest acts as an acknowledgment.
- ReportPDU – This PDU is mainly used to determine a problem and its cause.
Now that you have a grasp of the SNMP basics let’s dive into what SNMPwalk is.
What is SNMPwalk?
SNMPwalk is a process to collect information from your SNMP-enabled devices automatically. It allows you to see all the OID parameters of your MIB database and set rules against each of them.
SNMPwalk aims to set up a library of MIBs, so there is a defined workflow to SNMP.
To understand this, let’s go back to our MIB. As mentioned earlier, it is a file or a repository that informs the NMS of the information that an agent can send or receive from each device. Accordingly, the NMS can be programmed to act in a certain way for each event.
For example, if it gets a trap message from a device, it immediately looks up the MIB to know if it can send a SET value to that device and acts accordingly. This sequence can be programmed, but it requires a library of SNMP MIBs.
Further, the SNMPwalk can be used to ensure a stream of communication between the agents and NMS to reduce the possibility of unexpected shutdowns and device failures. In some ways, it also tests the effectiveness of each response by empowering you with the required information from SNMP-related queries.
So, you might wonder why it’s called a “walk”? It is likely to signify that you walk through every situation and condition in your network with a test of different parameters to enable the devices and eventually the applications and network to run smoothly.
Here is a practical scenario of how SNMPwalk can help:
Let’s say you have an SNMP-enabled server, and the temperature is high. So, the SNMP agent sends a trap message. Your SNMPwalk is programmed to send a GET message for this trap message, and the NMS sends that to the agent.
The response for the GET looks terrible, so as per the SNMPwalk, the NMS now sends a SET message to the agent. This back and forth communication is possible only because the SNMPwalk leads through the Management Information Database.
It is also popularly used to replace multiple GetNext commands, thereby saving some time and effort. However, note that this SNMPwalk command should be on the root node to ensure that the value loops through all the nodes in the sub-tree.
Thus, this is how a SNMPwalk works, and it can significantly bring down the efforts needed for monitoring and maintaining devices.
Examples of SNMPwalk for Windows
Moving on, let’s look at some SNMPwalk for Windows.
Installing SNMPwalk
First off, we’ll talk about installing SNMPwalk, and in Windows, this is a relatively straightforward process.
Start by downloading the SNMP tool and following extract its contents from the archive. Next, look for the snmpwalk.exe and run it on Command Prompt. You can also open Command Prompt and drag and drop the snmpwalk.exe file to it.
This will install SNMPwalk in your Windows.
SNMPwalk commands
After installation, you are all set to start using these commands.
While there are many parameters, the most straightforward SNMPwalk command is,
snmpwalk -v 2c -c public -On 192.1.1.0
In this command, -v stands for version, and you’re specifying the system to use SNMP v2 while -c is the community string that can take the “public” or “private” value. Finally, mention the IP address or the local host you want to poll.
This command will list all the existing OIDs on the network, and you can run through this list to find the OID you want. Once you identify that value, all that you have to do is run diagnostics on it.
The command will be like this.
snmpwalk -v 2c -c public -On 192.1.1.0 -iso.1.3.2.4.5.6.0.1
This command will fetch the details associated with a device that has the above OID.
There are many variations to this command. You can replace the IP address with the ID of the MIB if that works better for you.
snmpwalk -c public -v1 192.1.2.0 MIB [MIB name]
If your connection were successful, you would get the information you want. On the other hand, if the link was unsuccessful, you will see a timeout message like this:
Timeout: No response from 192.1.1.0
You can get this message if a firewall blocks the requests or even if the network is latent.
Many other parameters come with SNMPwalk, and the best way is to run a-h to get the list on your Command Prompt. Then, from the list, you can choose the commands you want.
SNMPwalk on Linux
Next, let’s see how to use SNMPwalk on Linux.
To install it on Linux, use the following command.
Yum install net -snmp -utils
Though this command works on Fedora and Red Hat, it may differ on different versions and editions.
Once you install, the generic format of the command will be,
snmpwalk [APPLICATION] [COMMON] [OID]
An example is,
snmpwalk -Os -c public -v 2c rome system
This command will retrieve all the values under this system.
Some of the other parameters that can be used are:
| -cc | Will does not check whether the returned OIDs are increasing or not |
| -ce {OID} | Will end the walk with the specified OID |
| -ci | Will include the given range in its search |
| -cp | Will print the number of variables |
| Ct | Will print the time it took to collect the data |
Thus, these are some examples of how you can use snmpwalk on Linux.
Conclusion
In all, snmpwalk replaces a string of GetNext SNMP commands, and besides saving time and effort, it also helps you find just what you want. It works well on both Windows and Linux, though minor variations in the command’s syntax.
We hope this was useful for you to monitor the health and performance of devices in your network.
SNMPwalk FAQs
How does SNMPWalk work?
SNMPWalk works by sending SNMP requests to a network device and then displaying the response values in a hierarchical format.
What are some common uses of SNMPWalk?
SNMPWalk is commonly used for troubleshooting and debugging network devices, and for monitoring network performance and availability.
What types of network devices can be queried using SNMPWalk?
SNMPWalk can be used to query various types of network devices, including routers, switches, servers, and printers.
What types of information can be retrieved using SNMPWalk?
Information that can be retrieved using SNMPWalk includes device configuration settings, system and network performance metrics, and device status and availability.
How can I use SNMPWalk to retrieve information from a network device?
To use SNMPWalk to retrieve information from a network device, you must specify the device’s IP address or hostname, and the SNMP community string or password.
What is an SNMP community string?
An SNMP community string is a string of characters that is used as a password to authenticate SNMP requests and responses between a network device and an SNMP manager.
What are some common alternatives to SNMPWalk?
Common alternatives to SNMPWalk include SNMPGet, SNMPSet, and SNMPTrap.
What are some best practices for using SNMPWalk?
Best practices for using SNMPWalk include ensuring that the correct SNMP community string or password is used, specifying the correct OID (Object Identifier) for the desired SNMP variable, and using the correct version of SNMP (SNMPv1, SNMPv2c, or SNMPv3).
How can I troubleshoot SNMPWalk issues?
Common issues that can be encountered when using SNMPWalk include incorrect community strings, incorrect OIDs, and network connectivity issues. Troubleshooting steps include verifying the community string, verifying the OID, and testing network connectivity using other tools such as ping or traceroute.
Command Line vs Graphical Tools
To get SNMP data from your devices you can use command line tools or graphical tools.
In the category of graphical tools, there are a number of different options. Searching for «SNMP browser» in Google or your favorite search engine will turn up a number of options, some free and some paid.
Most Linux distros have command line SNMP tools built-in by default or they are easily installed using the distro’s package manager. For Windows, we recommend downloading the Net-SNMP set of tools which can be found at http://www.net-snmp.org. All recent versions of MacOS come with command line SNMP tools installed by default.
Most graphical SNMP browsers use the standard command line tools under the hood so the examples in this ebook will use the command line tools as well.
By understanding how the command line versions work you will get a better understanding of how the SNMP protocol works and what options are available for it.
Using «snmpget»
The first command line tool you want to become familiar with is called «snmpget». This tool is used to retrieve values from a device and display them on the command line.
Let’s use snmpget to retrieve the system name for a device by opening a command line window and running the following command:
snmpget -v 1 -c public 10.0.1.1 1.3.6.1.2.1.1.0
In the above example, the -v parameter tells snmpget to use SNMPv1 and the -c parameter tells it to use «public» for the community string.
Following the community string is the IP address of the device to query and lastly, we have the OID whose value we want to retrieve.
Running the above command should result in something like the following output:
SNMPv2-MIB::sysName.0 = STRING: My Router
As you can see, the snmpget tool found the value we asked for. It not only found it but also detected that the value was a string type and it gave us the string value which is «My Router».
In our example, we used the numeric OID but we could have used the symbolic name instead. Here is how the command looks using the symbolic name for the same value:
snmpget -v 1 -c public 10.0.1.1 SNMPv2-MIB::sysName.0
Since the symbolic name and the numeric OID refer to the same value, the output from this command is exactly the same:
SNMPv2-MIB::sysName.0 = STRING: My Router
You can easily get other values. Below is an example of how to get the system’s description, which is a longer value that tells us a bit more about the device. This example and the ones that follow in this ebook will show both the command and the resulting output:
                    command:
                    snmpget -v 1 -c public 10.0.1.1 SNMPv2-MIB::sysDescr.0

                    result:
                    SNMPv2-MIB::sysDescr.0 = STRING: Demo Router in Lab 4
As with the system name, the snmpget command reported that it found a string value, this case «Demo Router in Lab 4».
Getting Multiple Values
In the above examples, we showed you how to use snmpget to retrieve a single value. You can also use snmpget to retrieve multiple values by including more OIDs or symbolic values after the first one.
For example, this will retrieve the system and description in one command:
                    command:
                        snmpget -v 1 -c public 10.0.1.1 SNMPv2-MIB::sysName.0 	SNMPv2-MIB::sysDescr.0

                    result:
                        SNMPv2-MIB::sysName.0 = STRING: My Router
                        SNMPv2-MIB::sysDescr.0 = STRING: Demo Router in Lab 4
Lists of Values
In the previous section we showed you how to get multiple values using snmpget, but the assumption was that you already knew which individual values you were looking for.
Of course, there are some cases where you don’t know in advance which values are available in the first place.
For example, although a switch or a router might have a fixed set of physical interfaces where you can connect network cables, almost all switches also have support for what are called virtual interfaces.
Virtual interfaces have many different uses and applications in the world of networking but, for the purposes of this ebook, the most important thing to know is that the total number of interfaces on a device might not correspond to the number of interfaces that are physically present on the hardware.
To give some context to this, look at the following snmpget command which retrieves the description for one interface:
                    command:
                    snmpget -v 1 -c public 10.0.1.1 IF-MIB::ifDescr.1

                    result:
                    IF-MIB::ifDescr.1 = STRING: eth0
In the above example, we asked for the description for the first interface (as defined by the .1 at the end of the symbolic name) and snmpget returned «eth0».
To get the name of the next interface, we can use this snmpget command which uses .2 in the symbolic name:
                    command:
                    snmpget -v 1 -c public 10.0.1.1 IF-MIB::ifDescr.2

                    result:
                    IF-MIB::ifDescr.3 = STRING: itf0
The problem is that we don’t know how many interfaces the device has. We can guess based on the number of ports on the device but the number of virtual interfaces is unknown.
Of course we could just keep trying «ifDescr.3», «ifDescr.4», etc., until we stop getting results, but that doesn’t sound like a very efficient approach.
Instead, we can use a different SNMP tool called «snmpwalk».
Using «snmpwalk»
The snmpwalk tool solves the problem of finding values when you don’t know exactly how many are present. It can even be used to scan an unknown device and find the complete list of values it supports. In this section, we’ll show you how to achieve both of these goals, but first, we’ll look at the syntax and options used with snmpwalk.
The syntax of the snmpget and snmpwalk commands can be confusingly similar but with experience, you will gain familiarity with both.
Compare the following snmpwalk example with the ones provided earlier for snmpget:
                command:snmpwalk -v 1 -c public 10.0.1.1 1.3.6.1.2.1.1result:SNMPv2-MIB::sysDescr.0 = STRING: Demo Router in Lab 4
                    SNMPv2-MIB::sysContact.0 = STRING: Network Admin
                    SNMPv2-MIB::sysName.0 = STRING: My Router
                    SNMPv2-MIB::sysLocation.0 = STRING: Main Office
                    SNMPv2-MIB::sysServices.0 = INTEGER: 14
The command is almost the same but the meaning of the last parameter is different. With snmpget, the last value you specify is the exact OID or symbolic name of the value you want to retrieve. With snmpwalk the last parameter is instead a starting point where the utility should begin looking for values.
As you can see in the result, snmpwalk returned a list of items showing both the symbolic name and the associated value for each.
Most SNMP-enabled devices make hundreds and sometimes thousands of values available for monitoring. In the above example, we saw that just 5 values were returned.
That’s because we used a fairly specific starting point. The OID 1.3.6.1.2.1.1 specifies the base of the «system» section so that’s why we see only those values.
If we use a more general starting point, we get more values:
                    command:snmpwalk -v 1 -c public 10.0.1.1 1.3.6.1.2.1result:SNMPv2-MIB::sysDescr.0 = STRING: Demo Router in Lab 4
                    SNMPv2-MIB::sysContact.0 = STRING: Network Admin
                    SNMPv2-MIB::sysName.0 = STRING: My Router
                    SNMPv2-MIB::sysLocation.0 = STRING: Main Office
                    SNMPv2-MIB::sysServices.0 = INTEGER: 14IF-MIB::ifPhysAddress.1 = STRING:
                    IF-MIB::ifPhysAddress.2 = STRING: 44:d9:e7:7:40:68
                    IF-MIB::ifPhysAddress.3 = STRING:
                    IF-MIB::ifPhysAddress.4 = STRING: 44:d9:e7:7:40:62
                    IF-MIB::ifAdminStatus.1 = INTEGER: up(1)
                    IF-MIB::ifAdminStatus.2 = INTEGER: up(1)
                    IF-MIB::ifAdminStatus.3 = INTEGER: up(1)
                    IF-MIB::ifAdminStatus.4 = INTEGER: up(1)...
We’ve truncated the output to just 14 entries but on our test device, a total of about 2000 items were returned.
If you want to get all values that the device supports then you can leave out the last parameter as shown in this example:
command:snmpwalk -v 1 -c public 10.0.1.1
As you can see, snmpwalk provides a great mechanism to see what values a device supports. The length of the starting point you specify allows you to select how specific you want to be.
When running an snmpwalk command, it’s often useful to redirect the output to a text file. The following example shows how to accomplish this:
command:snmpwalk -v 1 -c public 10.0.1.1 > output.txt
After the above command has finished running, the complete results will be stored in the output.txt file which you can view using your preferred text editor.
Most of the time, snmpwalk will be able to use its default set of MIB files to translate the number OIDs it finds into more readable symbolic names.
When it can’t you will instead see full or partial number OIDS listed.
Here is an example of a part OID:
SNMPv2-SMI::mib-2.3.1.1.1.11.1.10.77.251.4 = INTEGER: 11
Based on the first portion of the OID, snmpwalk was able to determine that it is part of the SNMPv2-SMI::mib-2 set of OIDs but could not be more specific. This is because the MIB file(s) required for further translation were not present.
Sometimes full numeric OIDs might be returned as shown in this example:
.1.3.6.1.2.1.4.31.3.1.30.2.11 = Counter32: 90659
If the required MIB files were present then snmpwalk would be able to return this instead:
IP-MIB::ipIfStatsOutTransmits.ipv6.11 = Counter32: 90659
Without the MIBs, all we have to work with is a string of numbers. With the MIBs, we get enough information in the symbolic name to better understand what we are looking at.
The «ipIfStats» portion suggests that the value is related to TCP/IP interface statistics. The portion that reads «OutTransmits» suggests that this is a value counting the number of outgoing transmissions. The last portion «ipv6.11» tells us it’s related to IPv6 networking and the counter is for the interface with index 11.
Armed with the MIB files we can get even more detail. Recall that MIB files are just text files so you can view them with any text editor. If you search for and download the IP-MIB file and search for «ipIfStatsOutTransmits» you will find the following description of the value:
                    ipIfStatsOutTransmits OBJECT-TYPE
                            SYNTAX     Counter32
                            MAX-ACCESS read-only
                            STATUS     current
                     DESCRIPTION
                    "The total number of IP datagrams that this entity 	supplied to the lower layers for transmission.
                    This includes datagrams generated locally and those forwarded by this entity.
                    Discontinuities in the value of this counter can occur at
                    re-initialization of the management system, and at other
                    times as indicated by the value of ipIfStatsDiscontinuityTime."
Using the MIB file we now have a complete understanding of the counter’s meaning and even information about another value that is related to its use.
As you have seen, MIB files can help substantially to interpret the results that you get from snmpwalk.
Whenever you are dealing with a new piece of hardware, visit the support section of the manufacturer’s website. There you will find the MIB files for the device.
Most versions of snmpwalk will look for MIB files in a folder called «MIBS» which is either located under the folder where the snmpwalk is located or at another location defined by a command line environment variable.
If you don’t see a MIBs folder, check the documentation for the toolset that you are using and follow the instructions provided there.
Next Chapter: SNMP Versions