
Reading time7 min
Views23K
Read this article to find out how to find specifications for the system memory installed on your computer, including information about its manufacturer, part number, serial number, effective speed, capacity, form factor, type etc.

Introduction
There are many scenarios when the ability of Windows 10 to supply specifications data on installed computer hardware may come in handy. Getting to know the detailed information on system memory (also known as random-access memory, or RAM) can sometimes be very useful in helping you to take the correct decision if any problems arise. For example, if a computer works slowly because it has to run memory-intensive applications or games, then adding more system memory may give it a considerable boost. Knowing certain peculiarities and required standards of the system memory can help you decide on the correct capacity, speed and brand of RAM to buy a piece of compatible hardware for an upgrade.
If you are having issues with system memory, knowing the information on its manufacturer, part number and serial number will help you to contact the tech support and solve the problem. At least, you will be able to find a memory module of the same type which, as you already know, is fully compatible with your PC. Besides, when you are configuring memory settings in the basic input / output system (BIOS) or in the unified extensible firmware interface (UEFI), a chance to have a look at memory information can help you to understand if a particular configuration was applied correctly.
Whatever might be your reasons, Windows 10 can provide you with all the information you may need; what is more, it saves you the trouble of having to open the computer case or install third-party tools, which may trigger a conflict of interest or cause compatibility issues.

In this tutorial, we will try to show you how to find specifications for the system memory installed on your computer, including information about its manufacturer, part number, serial number, effective speed, capacity, form factor, type etc.
A brief note: Despite the fact that Windows 10 lets users see detailed information on the system memory in their devices, some data may be unavailable due to peculiarities of specific hardware.
How to get detailed information on system memory with the command prompt console

If you suspect that Task Manager displays inaccurate or wrong information on your RAM specifications, or if you need to learn more detailed data such as serial number, part number, manufacturer etc on every memory module, Windows 10 is here to help you find all that information by using a certain set of system commands.
To start searching and find specific data on memory modules installed on your desktop PC or laptop, you need to use the functions of the command prompt with administrator rights in Windows 10. There are a few ways to open the Command Prompt application, the rich functionality of which we are going to explore today.
Click the Search button, shaped as a magnifying glass and located on the Taskbar next to the Start button, and open the search panel. There, type command prompt or cmd. The Best match section will show you the app you are looking for. Right-click on it and select Run as administrator from the context menu.

Identify the manufacturer
Here is what you do to identify the manufacturer company (brand or trademark) that produced the RAM modules installed on your PC.
Open the Command Prompt with administrator rights using the way you prefer.
To find out the manufacturer’s name, type the following command and press the Enter key (make sure there are no quotation marks):
wmic memorychip get devicelocator, manufacturer

Read the RAM module manufacturer name under the column Manufacturer.
Identify the part number
To find data on the part number that the manufacturer assigned to a specific RAM module, here’s a simple sequence of steps to take.
Use any method you prefer to open the command prompt console with extended rights.
In the window that appear, type the command to run (without quotation marks) and press the Enter key.
wmic memorychip get devicelocator, partnumber

Under the column PartNumber you will see the product identifier you are looking for.
Note: If the speed of data processing and overall performance of your computer is decreasing, upgrading your RAM modules might be one of the best way to solve the issue. Using modern memory sticks, you can add high-quality components to your machine, with a pleasant bonus of higher bandwidth and advanced settings at an affordable price.
Check the serial number of your memory module
Take these steps to find out the serial numbers for every memory stick currently installed in your computer:
Open Command Prompt with administrator rights using any way you prefer.
In the corresponding line, type the command for identification of RAM serial number (make sure there are no quotation marks) and hit the Enter key to begin.
wmic memorychip get devicelocator, serialnumber

Hint: In the command for identification of the serial number, you can replace the part devicelocator by banklabel to see the serial number of the physical label of the bank where the memory is installed on the motherboard.

The result will be displayed in the Command Prompt window under the column SerialNumber.
Identify RAM capacity
In Windows 10 you can use a variable set of commands to find out total capacity for every RAM module, and for the entire system memory.
Discover capacity of each RAM module
To learn capacity of each memory stick in your configuration, take a few steps.
Open Command Prompt with administrator rights, using any method you prefer.
In the program’s window, type the following command for displaying the memory capacity, and then press the Enter key to run it (make sure the command doesn’t contain any quotation marks).
wmic memorychip get devicelocator, capacity

The total capacity of RAM installed on your computer will be shown under the column Capacity.
Note: The memory module capacity is represented in bytes, so to understand the figure properly you need to convert it into gigabytes (divide the value shown in the Command Prompt window by 1073741824, which is how many bytes are there in one gigabyte).
Displaying total amount of RAM
In addition, you can quickly learn the total size of system memory on your computer by taking another sequence of simple steps.
Open Command Prompt with administrator rights.
When the corresponding window opens, type the following command to see the total system memory size installed on your computer with Windows 10, and press the Enter key to run the command (remove any quotation marks).
systeminfo | find “Total Physical Memory”

Note: If the total memory size is not displayed, try a similar command:
systeminfo | findstr /C:”Total Physical Memory”
With every command, make sure there are no quotation marks.
The total size of physical system memory (in megabytes) available on this computer will be shown in the corresponding line.
Check RAM speed
To find out the speed that the memory modules are operating at, here are the steps to use:
Open the Command Prompt console with administrator rights in any way you prefer.
Type the command to determine the RAM speed and press Enter on your keyboard (make sure there are no quotation marks):
wmic memorychip get devicelocator, speed

In the corresponding Speed column, the program will display the speed of your memory modules (in MHz).
Check RAM type
To check the system memory type (generation) in Windows 10, take these steps:
Open Command Prompt with administrator rights, using any method you prefer.
In the corresponding line, type the following command to determine the memory type and press Enter on your keyboard (make sure there are no quotation marks):
wmic memorychip get devicelocator, memorytype

The MemoryType column will contain a digit from zero to twenty-five that denotes a certain memory type. For example, if you see 24 in the column, it means this computer is using DDR3memory modules.
Also, you may see zeroes in the MemoryType column: it means the Windows system tool wmic.exe cannot identify the memory generation properly (it may happen if you’re using DDR4 modules), as such values are not provided in the specifications.
The comprehensive list of supported memory types
Below, find the comprehensive list of file types that can be identified by this command:
- 0: Unknown.
- 1: Other.
- 2: DRAM.
- 3: Synchronous DRAM
- 4: Cache DRAM.
- 5: EDO.
- 6: EDRAM.
- 7: VRAM.
- 8: SRAM.
- 9: RAM.
- 10: ROM.
- 11: Flash.
- 12: EEPROM.
- 13: FEPROM.
- 14: EPROM.
- 15: CDRAM.
- 16: 3DRAM.
- 17: SDRAM.
- 18: SGRAM.
- 19: RDRAM.
- 20: DDR.
- 21: DDR2.
- 22: DDR2 FB-DIMM.
- 24: DDR3.
- 25: FBD2.
Check RAM form factor
The word “form factor” (standard size) suggests certain standard dimensions of a memory module which also includes additional characteristics such as the module shape. By form factor, there are twenty-five types of system memory. However, the two most widespread categories are DIMM and SODIMM.
To find out if your RAM sticks are DIMM or SODIMM, follow these steps:
Use your preferred method to open Command Prompt with administrator rights.
In the window Administrator: Command Prompt, type the following command to identify the memory form factor and press the Enter key (make sure there are no quotation marks):
wmic memorychip get devicelocator, formfactor

If the result in the FormFactor column is 8, then your computer is using DIMM modules (the default option for desktop computers). Otherwise, if the command displays the number 12, then your computer is using SODIMM modules (the typical choice for laptops).

The comprehensive list of supported memory form factors
Here is the list of form factors that this command can identify:
- 0: Unknown.
- 1: Other.
- 2: SIP.
- 3: DIP.
- 4: ZIP.
- 5: SOJ
- 6: Proprietary.
- 7: SIMM.
- 8: DIMM.
- 9: TSOP.
- 10: PGA.
- 11: RIMM.
- 12: SODIMM.
- 13: SRIMM.
- 14: SMD.
- 15: SSMP.
- 16: QFP.
- 17: TQFP.
- 18: SOIC.
- 19: LCC.
- 20: PLCC.
- 21: BGA.
- 22: FPBGA.
- 23: LGA.
- 24: FB-DIMM.
Displaying all RAM details
The commands described above allow you to identify the most important data about memory modules. However, if you want to find all the information, here’s what you do:
Open Command Prompt with administrator rights in any way you prefer.
In the corresponding line, type the following command to display all memory details and press Enter to run it (don’t forget to remove any quotation marks):
wmic memorychip list full

View all the available information for each RAM module installed on your computer.
(Optional) if the list of data is too big and you don’t actually need all that stuff, type the following command to view only the necessary things and press Enter (everything should be typed into one line; remember to remove the quotation marks):
wmic memorychip get devicelocator, manufacturer, partnumber, serialnumber, capacity, speed, memorytype, formfactor

Now you can view the memory information you prefer.
Conclusion
Using the steps described in this article, you’ll get an impressive amount of data on the RAM modules installed on your computer. These hints will come in handy when troubleshooting PC issues, tweaking configuration (e.g. when overclocking), or when you’re planning to upgrade your system memory to improve overall computer performance.
See the full article with all additional video tutorials
Все способы:
- Способ 1: «Командная строка»
- Способ 2: AIDA64
- Способ 3: CPU-Z
- Способ 4: Speccy
- Способ 5: HWiNFO
- Вопросы и ответы: 4
Важно! В этой статье будет рассказано только о том, как узнать модель установленной в компьютере оперативной памяти, если вам необходимо найти другую информацию об этом компоненте, обратитесь за помощью к соответствующей статье на нашем сайте, перейдя по ссылке ниже.
Подробнее: Просмотр информации об оперативной памяти в Windows 10
Способ 1: «Командная строка»
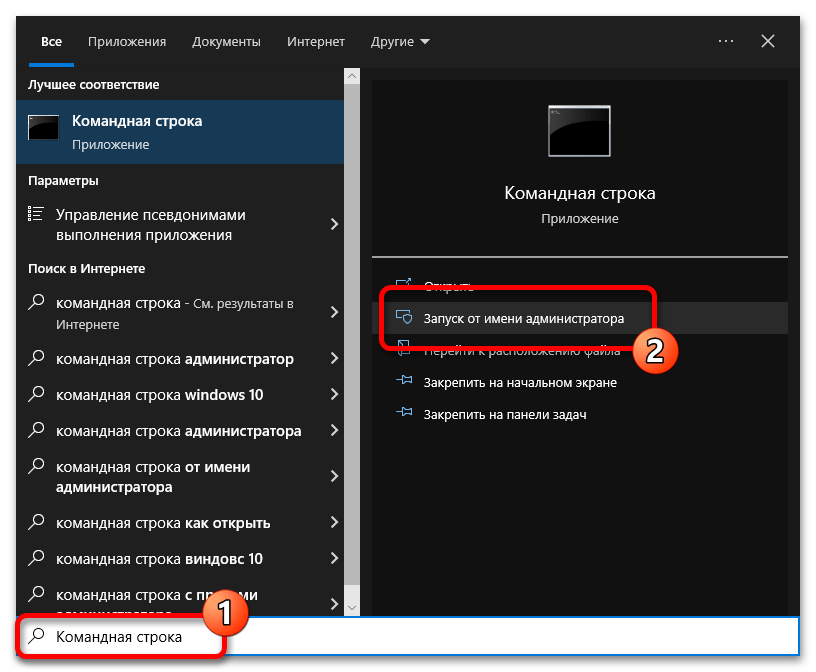
В операционной системе Windows 10 нет предустановленных приложений с графическим интерфейсом, в которых можно было бы посмотреть информацию о модели установленной оперативной памяти. По этой причине потребуется воспользоваться «Командной строкой», но ее необходимо запускать с повышенными привилегиями. Сделать это можно, например, посредством поискового запроса. Сначала установите курсор в соответствующее поле на панели задач, а затем введите Командная строка и в результатах кликните по пункту «Запуск от имени администратора». Если после этого появится диалоговое окно контроля учетных записей, нажмите в нем по кнопке «Да».
Читайте также: Как открыть «Командную строку» от имени администратора в Windows 10
В появившемся окне консоли введите представленную ниже команду и нажмите Enter для ее выполнения.
wmic memorychip get devicelocator, manufacturer, partnumber
Примечание! Вручную вводить команду не обязательно, вы можете ее вставить в консоль, предварительно скопировав в буфер обмена. Вставка в «Командной строке» выполняется посредством правой кнопки мыши.
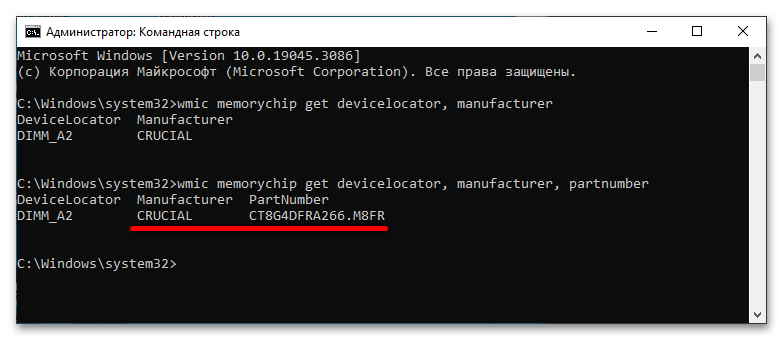
В результате после проделанных действий вы увидите три столбца информации об установленных модулях оперативной памяти. Нужные данные находятся в столбце «PertNumber» — это и есть модель ОЗУ. Обратите внимание, что в столбце «Manufacturer» расположено название производителя комплектующего.
Читайте также: Определяем частоту работы оперативной памяти в Windows 10
Способ 2: AIDA64
Посмотреть нужную информацию об оперативной памяти можно посредством стороннего приложения AIDA64, которое собирает все данные о компьютере и предоставляет их в удобном интерфейсе. Также программа имеет инструменты для тестирования комплектующих.
Скачать AIDA64
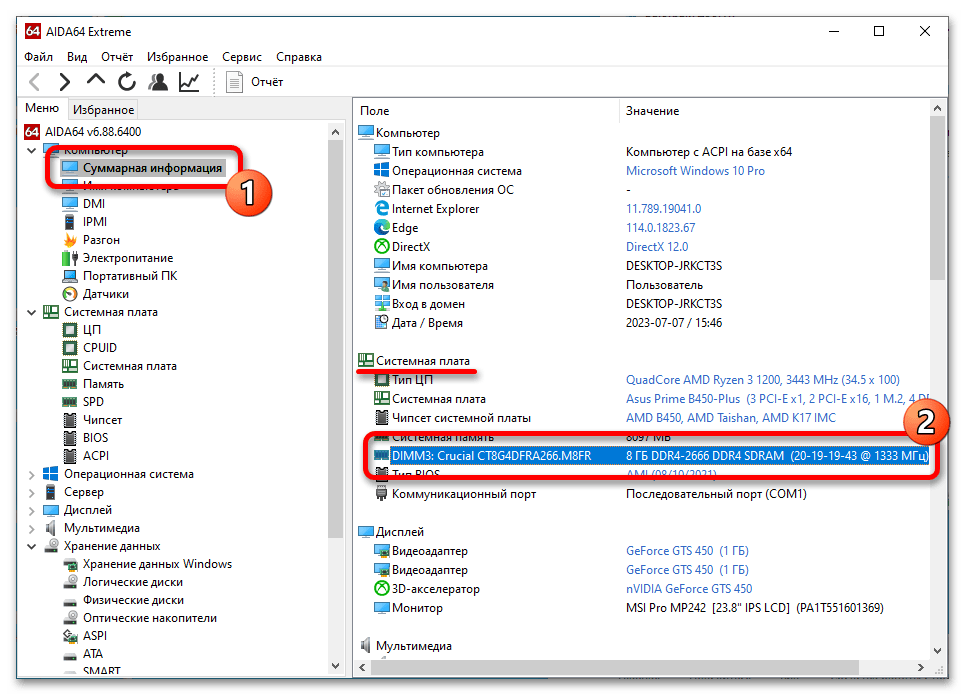
Для выполнения поставленной задачи после запуска программы воспользуйтесь навигационной панелью в левой части интерфейса, чтобы перейди в раздел «Суммарная информация». При необходимости предварительно разверните вкладку «Компьютер». Модель оперативной памяти будет располагаться в основной области окна в блоке «Системная плата».
Способ 3: CPU-Z
CPU-Z тоже предоставляет информацию о комплектующих компьютера, включая модель оперативной памяти.
Скачать CPU-Z
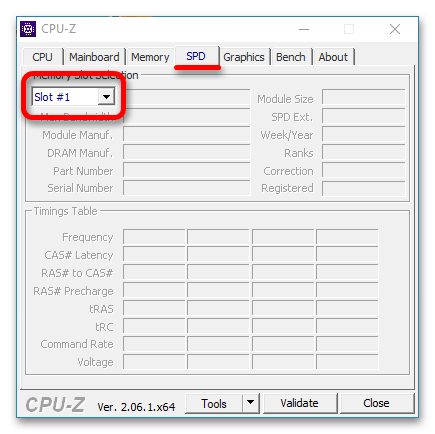
После запуска приложения проследуйте во вкладку «SPD». Если вы увидите, что никакой информации там не отображается, значит, был выбран пустой слот оперативной памяти. Измените его на другой, воспользовавшись выпадающим списком.
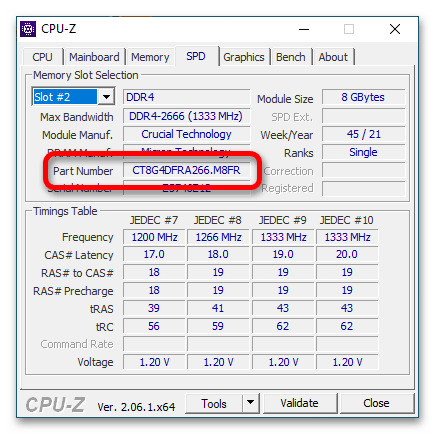
После определения правильного слота все поля этой вкладки заполнятся информацией об ОЗУ. Модель указана в строке «Part Number».
Способ 4: Speccy
Speccy — это еще одно приложение для просмотра данных о комплектующих компьютера. В нем можно посмотреть информацию о каждом модуле оперативной памяти в отдельности.
Скачать Speccy
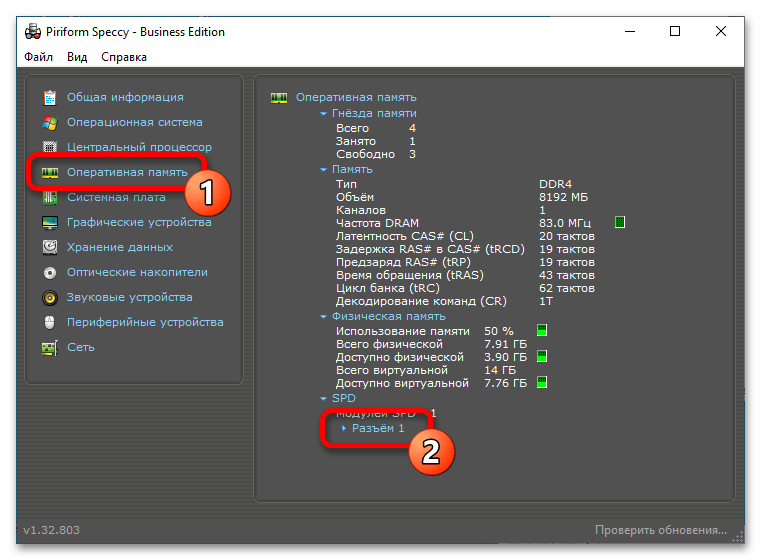
После запуска программы воспользуйтесь навигационной панелью слева, чтобы перейти в раздел «Оперативная память». Находясь в нем, разверните выпадающий список «Разъем» с тем номером слота модуля оперативной памяти, информацию о котором хотите получить. В нашем примере есть всего один пункт, так как в компьютере установлена всего одна планка ОЗУ.
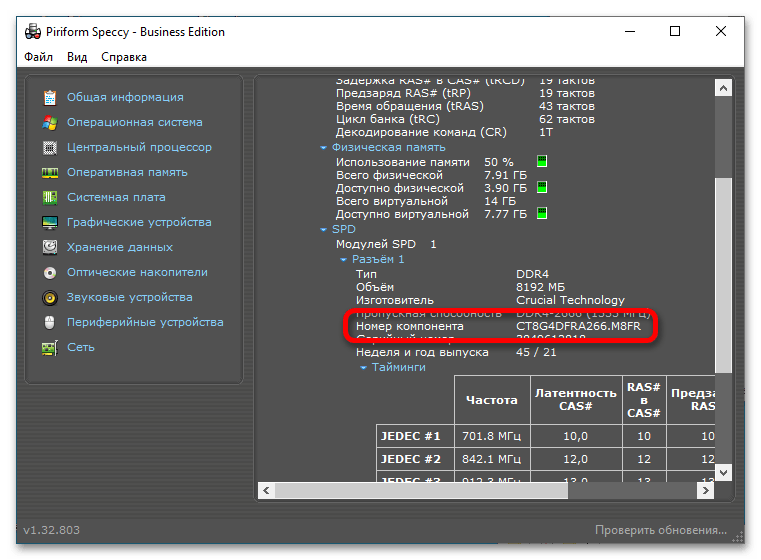
По итогу модель будет указана в строке «Номер компонента». Здесь вы также можете узнать и другую информацию о комплектующем.
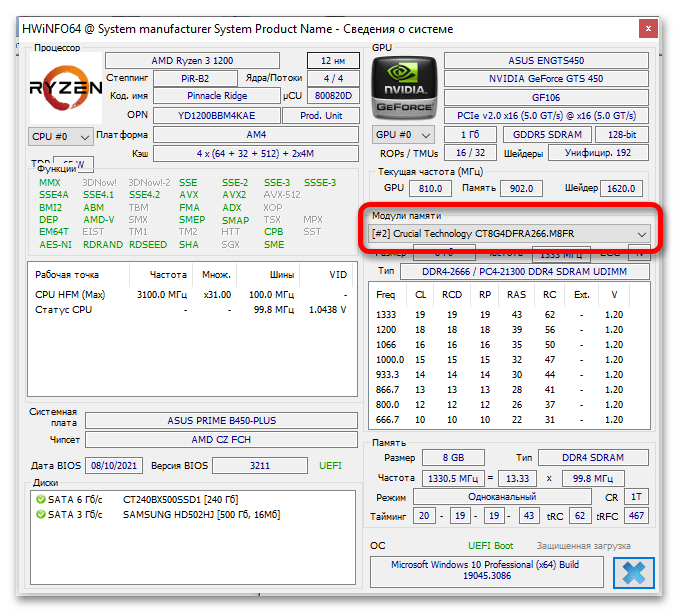
Способ 5: HWiNFO
HWiNFO — это многофункциональная программа, которая предоставляет не только информацию о комплектующих компьютера, но и инструменты для их тестирования. Также в ней можно посмотреть показатели всех датчиков, установленных в системном блоке или ноутбуке.
Сразу после запуска программы появится основное окно и два дополнительных. В одном из таких, которое вы можете видеть на изображении ниже, предоставляется информация о модуле оперативной памяти. Находится она в выпадающем списке «Модули памяти». Чтобы узнать модель другой планки ОЗУ, выберите ее из списка.
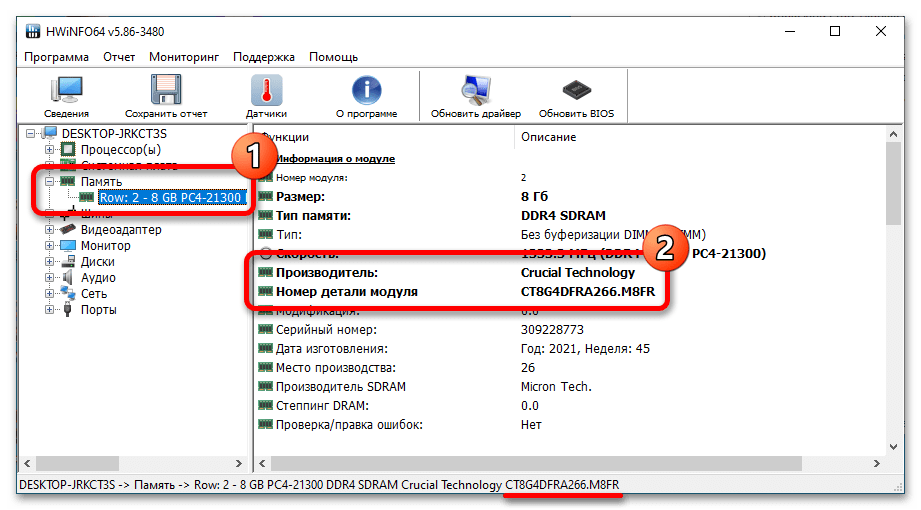
Если открылось всего одно окно, воспользуйтесь навигационной панелью слева, чтобы перейти в раздел «Память». Там выберите планку оперативной памяти, информацию о которой хотите просмотреть. Модель будет указана в основной области окна напротив строки «Номер детали модуля». Там же вы можете узнать производителя.
Наша группа в TelegramПолезные советы и помощь
Следуйте этим шагам:
- Откройте командную строку. Для этого нажмите клавиши Win + R, введите
cmdи нажмите Enter. - Введите следующую команду и нажмите Enter:
wmic MEMORYCHIP get BankLabel, Capacity, DeviceLocator, Manufacturer, PartNumber, Speed
Это будет выглядеть так:

Что обозначается каждый параметр?
-
BankLabel — слот памяти на материнской плате, в котором установлен модуль. Это удобно, когда вам нужно быстро определить сколько занятых или свободных слотов.
*на картинке выше, это ноутбук, там оба слота обозначены нулем. Но, если бы это был сервер в 24 слотами, то пользы становится гораздо больше. -
Capacity — объем оперативной памяти планки в байтах…, тут к сожалению wmic не умеет показывать сразу в гигабайтах. Но, обычно размер в гб. планки пользователь знает всегда. К тому же можно перевести байты в гигабайты, например: 8 589 934 592 байт / (1024 * 1024 * 1024) ≈ 8 ГБ
-
DeviceLocator — почти тоже самое что и BankLabel. Обычно может совпадать с BankLabel или содержать дополнительную информацию о расположении модуля памяти на материнской плате.
-
Manufacturer — бренд оперативной памяти (в моем случае это Samsung). Это нужно учитывать если собираетесь расширять память добавив дополнительную планку. Всегда рекомендуется использвоать память от одного бренда. Не делать в перемешку.
*да, память от разных брендов будет работать, но вероятность получить сбой повышается в разы в сравнении когда память одного производителя. -
PartNumber — партномер, по нему лекго искать деталь. В целом у каждой детали в сервере, ноутбуке, принтере и других деталей всегда есть парт номер. Зная парт номер можно легко найти спецификацию детали или сделать заказ где угодно. Подорать идентичную деталь.
-
Speed — скорость или частота работы памяти, в мегагерцах (МГц). Вот, этот парамет тоже важен при выборе или добавлении памяти. Она должна совпадать с уже существующей памятью. Или нужно подбирать исходя из процессора, какую частоту оперативной памяти он поддерживает. В целом, чем больше тем лучше :). Но, чем выше частота тем дороже планка.
Надеемся информация была полезна. Если у Вас есть вопросы или предложения, будем рады обсудить.
- Open Command Prompt and run this command to see the total installed RAM, capacity, speed, and type:
wmic MEMORYCHIP get BankLabel, DeviceLocator, MemoryType, TypeDetail, Capacity, Speed - You can also check RAM using systeminfo command:
systeminfo |find “Available Physical Memory” - To visually check RAM, open Task Manager and navigate to Performance > Memory for real-time RAM details.
RAM is one of the most crucial factors influencing the speed of your computer. When you notice that your system is running slowly even though you are using a good system and a fast SSD drive, you should probably examine the amount of RAM on your system.
Table of Contents
What is RAM/Memory?
Random Access Memory, or RAM, is a type of memory that is used by processors to run the data and information this is currently being used by the system. Examples of these include running operating system files, device drivers, application data, etc.
As soon as the computer is powered off, the data in the RAM is erased. This is because RAM is a volatile memory, which loses its data as soon as it loses power.
Let us now continue to see how to check the different RAM-related details on your computer.
Check Complete RAM Details using WMIC Command
Using the WMIC cmdlet, you can obtain some information about the RAM on your computer, such as its capacity, speed, which bank it is installed in, etc. Here is how:
-
Launch the Command Prompt with elevated privileges.
-
Command Prompt will now open. Type in the following command and then hit Enter:
wmic MEMORYCHIP get BankLabel, DeviceLocator, Capacity, Speed
Get RAM details from Command Prompt The three columns will be shown in front of you. The BankLabel column will tell you which slots the RAM chips are installed in. The Capacity column will tell you the size of each module in bytes. The DeviceLocator is another entity that tells which slots the RAM chips are installed in.
-
You can also get more information through the WMIC cmdlet, such as its MemoryType and TypeDetail. To do this, enter the following command:
wmic MEMORYCHIP get BankLabel, DeviceLocator, MemoryType, TypeDetail, Capacity, Speed
Get additional RAM details from Command Prompt MemoryType tells you the type of your physical memory. In this case, we get 24 which means DDR3. The value comes from the TypeDetail member of the Memory Device structure in the SMBIOS information. We got “128” which says my RAM TypeDetail is synchronous.
-
To get complete details about the memory modules, run the following command:
wmic memorychip list fullThis command may not give you a user-friendly list of details but it will give you complete details about the hardware.


Moreover, you can also use the following list of switches to obtain other information about the memory:
- Attributes
- BankLabel
- Capacity
- Caption
- ConfiguredClockSpeed
- ConfiguredVoltage
- CreationClassName
- DataWidth
- Description
- DeviceLocator
- FormFactor
- HotSwappable
- InstallDate
- InterleaveDataDepth
- InterleavePosition
- Manufacturer
- MaxVoltage
- MemoryType
- MinVoltage
- Model
- Name
- OtherIdentifyingInfo
- PartNumber
- PositionInRow
- PoweredOn
- Removable
- Replaceable
- SerialNumber
- SKU
- SMBIOSMemoryType
- Speed
- Status
- Tag
- TotalWidth
- TypeDetail
- Version
Get RAM Details using SystemInfo Command
Here is another way to find the RAM details for your system through the SystemInfo command. This method also gives you similar information to the WMIC cmdlet.
-
To find the total physical memory of your system, enter the following command. This command easily displays the total amount of memory that is on your system.
systeminfo | findstr /C:"Total Physical Memory"
Get Total Physical Memory -
If you want to get the information about the available memory of your system then run the following command and immediately get the results:
systeminfo |find "Available Physical Memory"
Get Available Physical Memory


Get RAM Details using PowerShell
If you want to get complete RAM details, you can use the following PowerShell command:
Get-WmiObject Win32_PhysicalMemory | Format-List *
This command will give you a wealth of information about your memory, as in the image below.

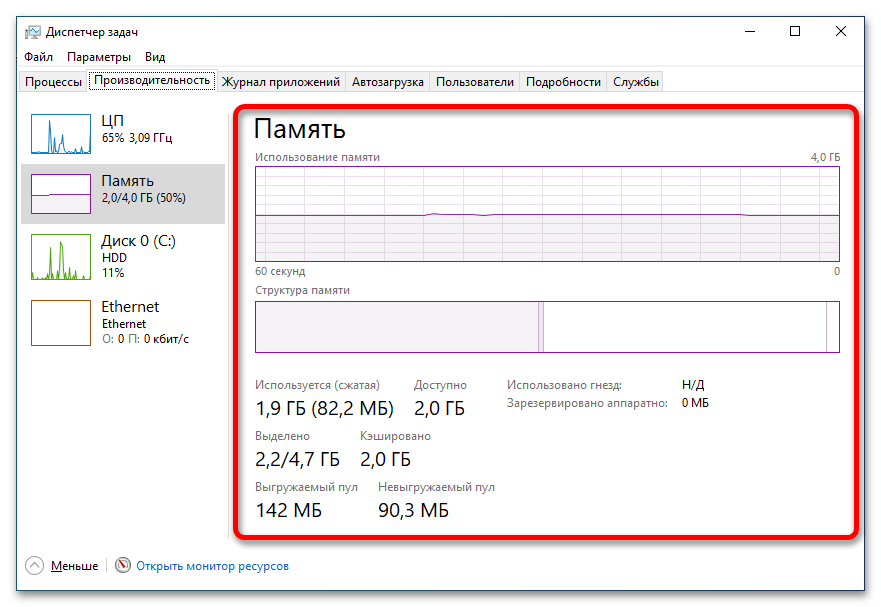
How do you see how much RAM is in your computer?
You can easily check the details of RAM in Windows 10 using Task Manager. The task manager performance tab shows the majority of memory details including the total amount of RAM, how much is in use, committed/cached and paged/non-paged amount of RAM, RAM speed and frequency, form factor, hardware reserved, and even how many slots are being used in the system.
To check how much RAM you have on your computer, open the Task Manager by pressing Ctrl + Shift + Esc keys and go to the Performance tab. Select Memory from the left-hand pane. The right-hand pane will open RAM details.

If the RAM usage is more than 90%, you should think of upgrading the RAM capacity in your system, reducing the memory load, and bringing it below 80% for optimal performance.
To check how much RAM you have using the command line, open Command Prompt and run the following command:
wmic MEMORYCHIP get BankLabel, Capacity
This will show the RAM capacity of all RAM modules separately and in bytes.
To check the total RAM capacity in your system, run the following command in Command Prompt:
systeminfo | find "Total Physical Memory"
This will show you the total physical memory installed in Megabytes.
If you are using PowerShell, you can run the following command to get the RAM size:
Get-WmiObject Win32_PhysicalMemory | Select-Object Capacity
Check Installed and Available RAM/Memory from System Information
System Information is a tiny applet in the Windows operating system that displays the different information about the computer as a whole. It gives both hardware and software information. It can be used to find out what amount of RAM is on your computer, and how much of it is available for you to use. Here is how:
-
Type in msinfo32 in the Run Command box to open System Information.
Open System Information -
Now you will find the following information on the starting page under the System Summary category:
- Installed Physical memory
- Total Physical memory
- Available Physical Memory

Memory details

Check RAM/Memory Size using DirectX Diagnostics Tool
The DirectX diagnostic tool is a built-in tool in the Windows operating system used to check and troubleshoot video or sound-related hardware problems. With that, it also displays other hardware information, such as the amount of RAM installed on your PC. Here is how to check your RAM details using the DirectX diagnostic tool:
-
Open the tool by typing in dxdiag in the Run Command box.
Open the DirectX diagnostic tool -
Under the System tab, you should be able to see Memory,

Memory details using DirectX diagnostic tool

How to Check RAM Speed?
Windows 10 Task Manager gives the option to check RAM speed with ease.
To check RAM speed, open the Task Manager by pressing Ctrl + Shift + Esc keys and go to the Performance tab. Select Memory from the left-hand pane. On the right-hand page, you should see the Speed of RAM in MHz.

Please note that if you have multiple RAM modules, Windows 10/11 will report the operating RAM speed which is the lowest of all installed modules. If you want to check the speed of each individual module, just hover your mouse cursor over the slots used. This will show a pop-up with the speed of each module.

To check RAM speed using the command line, open Command Prompt and run the following command:
wmic MEMORYCHIP get BankLabel, Speed
This will show the speed of all installed RAM modules.
If you are using PowerShell, you can run the following command to check the speed of RAM modules:
Get-WmiObject Win32_PhysicalMemory | Select-Object Speed
How do you check what type of RAM you have? DDR3 or DDR4?
Unfortunately, the Task Manager doesn’t give very useful information about the RAM type. We can use PowerShell commands to accurately determine the RAM type.
To check the RAM type from the command line, open PowerShell and run the following command:
Get-WmiObject Win32_PhysicalMemory | Select-Object SMBIOSMemoryType
This command will give you a number. This number corresponds to the appropriate RAM type. Here are the codes and their corresponding RAM types:
| Code | RAM Type |
| 26 | DDR4 |
| 25 | DDR3 |
| 24 | DDR2-FB DIMM |
| 22 | DDR2 |
For more information on these codes, you can refer to Microsoft documentation here.
You can also use the WMIC MEMORYCHIP command in Command Prompt to check the memory type:
wmic memorychip get memorytype
Please note that wmic MEMORYCHIP is an old command and does not always detect the correct RAM type. If you see 0 as a memory type code, it means the MEMORYCHIP command was not able to determine the RAM type.
Using commands is a very convenient, time-saving method for any task. It is as simple as typing a command and getting the task done. Use the commands I described above to get detailed information about your RAM. Upgrade the RAM if your system is slow or has insufficient RAM so that all operations will be performed smoothly and rapidly.
Frequently Asked Questions (FAQs)
When should I upgrade my RAM?
If you believe that your computer is now running slower than before, then check to see how much RAM is in use. If it is continuously consuming nearly 80-90% of your total RAM, then it is time to change, or maybe upgrade your current RAM modules.
What is the maximum amount of RAM I can put in my computer?
The maximum amount of RAM your system supports is usually limited by your hardware; the motherboard to be precise. Therefore, we recommend that you read your motherboard’s manual before upgrading your RAM capacity. Moreover, the operating system also limits the amount of RAM.
However, modern operating systems support sufficient amounts of RAM capacity as long as it is a 64-bit OS.
Sometimes it becomes essential to know How to Check Ram Type in Windows 10 or 11 before you change or add a new memory stick or buy a new system. There are 24 RAM specifications like DDR, DDR2, SDRAM, EDRAM you might need to find out at this moment. Several built-in utilities help you to find out this info such as task manager, Command Prompt, PowerShell.
You will get here a few methods using these including 3rd party tools so that you could find out the memory type easily on your system.
How to Check Ram Type in Windows 11 or 10
Random Access Memory in short RAM is utilized by CPU as temporary memory storage to make the performance faster. RAM type determines the quality of memory chip and DDR, RDRAM, and SDRAM are supposed to be better.
Below methods will be thoroughly helpful to know How to Check Ram Type in Windows 11 or 10.
Find using Task Manager
When you want to check Ram Type in Windows 10 or 11, the task manager is the easiest and effective native utility. We have already written an article in some different contexts – How to Analyze Resources Performance in Task Manager Windows 10. You will get your requisite information from here in only a few clicks on your system.
- Right-click on Start on the Taskbar and select Task Manager from the list.
- The tool opens with Processes tab by default, so select Performance (just next).
- Once the Task Manager comes, click on Memory from the left pane.
- You will observe RAM type and size from the upper section which clearly reveals at the top.
- If you want extra information such as numbers of slots, committed memory, cached memory then go down just below the graphical view.
How to Check Ram Type in Windows 11 or 10 through Command Prompt (Admin)
Another way to check the ram type is possible through running a simple command in Command Prompt. This will output your RAM type in numeral form so we are giving a table deciphering the meaning of each number.
Step-1: Type cmd in the search.
Step-2: At once a UAC pop up will appear, choose Yes.
Step-3: Once “Command Prompt” appears at the top, put a right click on it and choose “Run as Administrator”.
Step-4: Type the below command here and Hit the Enter button:
wmic MemoryChip get MemoryType
or
wmic MemoryChip get BankLabel, Capacity, MemoryType, TypeDetail, Speed
Description will not appear after the command runs instead you see number representation. Match the number with the following list to ascertain your RAM type.
| RAM type in Number | Type of Physical Memory |
| 0 | Unknown |
| 1 | Other |
| 2 | DRAM |
| 3 | Synchronous DRAM |
| 4 | Cache DRAM |
| 5 | EDO |
| 6 | EDRAM |
| 7 | VRAM |
| 8 | SRAM |
| 9 | RAM |
| 10 | ROM |
| 11 | Flash |
| 12 | EEPROM |
| 13 | FEPROM |
| 14 | EPROM |
| 15 | CDRAM |
| 16 | 3DRAM |
| 17 | SDRAM |
| 18 | SGRAM |
| 19 | RDRAM |
| 20 | DDR |
| 21 | DDR2 |
| 22 | DDR2 FB=DIMM |
| 24 | DDR3 |
| 25 | FBD2 |
How to Check Ram Type in Windows 11 or 11 or 10 via PowerShell
Fortunately, a few PowerShell commands tell you the whole story of the Ram Type, size, number, slots manufacturer, serial number, speed and a lot more. And it needs the lesser effort rather than the command prompt because you can open it simply from Power user menu. So we suggest using PowerShell when you are going to Check Ram Type in Windows 10.
- Press Windows logo and X keys altogether and let the Power menu appear. Select Windows PowerShell (Admin) from the list.
- Select “Yes” on the “User account control” pop up covering the system screen.
- Soon you will experience Administrator: Windows PowerShell on your computer. Copy the following piece of command, paste there and then press Enter:
Get-WmiObject Win32_PhysicalMemory
- One more command also works pretty effectively, so copy (without quotes) it from underneath, paste, and hit Enter as an alternative:
"Get-WmiObject Win32_PhysicalMemory | select BankLabel,DeviceLocator,Capacity,SMBIOSMemoryType,Manufacturer,PartNumber,SerialNumber,TotalWidth,Speed"
If you need to detect only the size of RAM there are two additional methods further.
Check Ram Size in Windows 10 using Settings
The Settings application has About section that includes the info about the Installed RAM. See the method –
- Hold down the Windows logo key and I letter on your keyboard at the same time.
- Once the Windows Settings appears, select System.
- Go to the left pane on the next screen, scroll down and make a click on About. Move to the opposite side and Locate Installed RAM to find the magnitude of the memory.
- If you want to see the same information on the Control panel then click on System info.
- Alternatively, You can get access the same location following this path – Control panel => System.
Find RAM Size using System Information
System information tool reveals a report of your PC configuration that includes RAM, Hardware resources, “components”, software environment. So far as the question of memory, you can find its volume installed on your computer.
- Perform a Click in the search bar located at the taskbar just before the Task view icon, type
msinfo32and then hit Enter.
- Once the System information window comes up, find Installed Physical Memory (RAM) and its volume.
This was all about How to Check Ram Type in Windows 11 or 10 using the built-in tools,
Using 3rd Party tools
Few third party tools play outstanding roles to check Ram type in Windows 11 or 10 when you are going to memory upgrade on your system. We are here sorting the foolproof applications taking into account that you could gain the info without a hitch.
CPU-Z
CPU-Z is the most popular freeware and provides all the information about hardware in your computer. You get Ram type, channel #, size, NB frequency, cycle time, and lots more on a simple interface. The powerful hardware detection tool is based on kernel-mode software driver and collects the information in real time. Qusere engine of this app is very prompt so you don’t need to wait anymore. So you can use this utility without hesitation to check the memory type on your Windows system.
1. Download CPU Z from here and install following the onscreen instructions.
2. Launch the tool and go to Memory tab to see all the specifications.
RAMMon
This is a simple working Windows-based application that allows seeing the details of Ram modules. RAMMon uses system information dll SDK to retrieve data of memory installed on your device. You will find the RAM type such as DDR, DDR2, DDR4, XMP, EPP, write recovery time, maximum capacity, bandwidth speed comic locker speed and everything you need. Hinging on RAM type, and other distinct SPD data can be reclaimed as well, for example, the module thickness, width, and other. RAMMon is absolutely free for personal use and has a very small size.
- Navigate to RAMMon official website and download the utility https://www.passmark.com/ftp/rammon.exe.
- Open the tool and perceive all the data you wanted.
SIW
SIW is one more tool that lets you check ram type with a lot of additional information on Windows. If you need to find out Memory type, manufacturer name, total and used volume, number of slots, serial number then this is an ideal application. An extra feature is you can create XML report of the info provided by SIW. The software comes as trial version for 30 days, so grab it at current time without paying any cost.
1. Take SIW from https://www.gtopala.com/thank-you/siwviewer.php, download and install on your system. Double click on the Setup icon and allow to expand on the system screen.
2. Select Memory tab from the left pane and find the RAM Type in the Properties column.
ScanMyPC
ScanMyPC is one of the easy-going tools that displays RAM Type on the browser window. The app reads details set on your computer by the manufacturer with the model and throws out on its website. When you run ScanMyPC it automatically sends there and asks you to click on View results. You comprehend the description of System Manufacturer, System Series / Model, Motherboard, Total Installed Memory, Memory Type, Modules Installed, Operating System. If you need to get more about your RAM click on Show Advanced Details.
Closing words
When you have performed finding out with the help of How to Check Ram Type in Windows 11 or 10 like DDR, DDR2, SDRAM etc, choosing best one is easy. Now check the capacity that will fulfill your need and upgrade or purchase your memory chip to have a good computing experience. We hope the methods will help you to enjoy Windows 10 PC.