
How to Check Monitor Model in Windows 11
Finding out the model of your monitor in Windows 11 is a straightforward task. You can do this through the Display Settings, Device Manager, or even by checking the monitor’s physical information. This guide will walk you through each method step by step, ensuring you know exactly what model you’re working with.
By following the steps below, you will be able to identify the model of your monitor using Windows 11’s built-in tools. This will be useful for troubleshooting, obtaining drivers, or just satisfying your curiosity.
Step 1: Open Display Settings
Right-click on the desktop and select «Display settings.»
Once you right-click, a context menu will appear. Display settings are your go-to for all things related to screen configuration. This makes it a primary place to start our search.
Step 2: Scroll Down to Advanced Display Settings
Scroll down and click on «Advanced display settings.»
In the Display settings window, you’ll notice various options and sliders. Keep scrolling until you find the «Advanced display settings.» Clicking this opens a new window with more detailed information about your display.
Step 3: View Display Information
Look for «Display information» to find your monitor’s model.
In the Advanced display settings, you should see a section labeled «Display information.» Here, you’ll find the model name of your monitor listed. This information is crucial for finding drivers or specs online.
Step 4: Open Device Manager
Press Windows + X and select «Device Manager.»
The Device Manager is another excellent tool for checking your monitor’s model. It provides a list of all hardware connected to your computer, including your monitor.
Step 5: Expand the Monitors Section
Expand the «Monitors» section to see the connected monitors.
In Device Manager, you’ll see a list of device categories. Click the arrow next to «Monitors» to expand it, revealing all monitors currently connected to your system.
Step 6: View Monitor Properties
Right-click your monitor and select «Properties.»
Once you’ve located your monitor under the Monitors section, right-click on it and choose «Properties.» A new window will open, showing detailed information about your monitor.
After completing these steps, you will have successfully identified your monitor’s model. This information can be used for various purposes, such as updating drivers or verifying compatibility with software.
Tips for How to Check Monitor Model in Windows 11
- Check Manufacturer’s Label: Sometimes the easiest way is to look at the back of your monitor for a label with the model number.
- Use System Information Tool: Press Windows + R, type «msinfo32,» and hit Enter. Look under the «Components» section.
- Online Resources: Use online databases and tools that can identify hardware from model numbers and other specs.
- Keep Drivers Updated: Always ensure your display drivers are up-to-date to avoid compatibility issues.
- Monitor Manuals: Refer to the manual that came with your monitor; it usually includes the model number.
Frequently Asked Questions
How can I find my monitor’s serial number?
The serial number is usually found on the back of the monitor on a sticker or label. You can also check the monitor’s documentation.
Can I check the monitor model in BIOS?
No, BIOS typically does not provide information about the monitor model. You need to check this within the operating system.
What if my monitor doesn’t show up in Device Manager?
Make sure all cables are connected properly and the monitor is turned on. Restart your computer if necessary.
Can I use third-party software to find my monitor model?
Yes, tools like Speccy or HWMonitor can provide detailed information about your system’s hardware.
Is the display model the same as the monitor model?
Not necessarily. The display model usually refers to the configuration and capabilities, while the monitor model refers to the specific make and model number.
Steps Summary
- Right-click on the desktop and select «Display settings.»
- Scroll down and click on «Advanced display settings.»
- Look for «Display information.»
- Press Windows + X and select «Device Manager.»
- Expand the «Monitors» section.
- Right-click your monitor and select «Properties.»
Conclusion
So, there you have it – a comprehensive guide on how to check your monitor model in Windows 11. Whether you’re a tech guru or someone just getting started, knowing your monitor’s model can be incredibly useful. It helps with everything from updating drivers to ensuring compatibility with your favorite software. Don’t forget, there are multiple ways to find this information, from checking the physical label on your monitor to diving into Windows’ built-in tools.
Take a few minutes to follow these steps, and you’ll have the information you need in no time. If this guide helped you, consider sharing it with others who might find themselves in the same boat. Happy computing!
Matt Jacobs has been working as an IT consultant for small businesses since receiving his Master’s degree in 2003. While he still does some consulting work, his primary focus now is on creating technology support content for SupportYourTech.com.
His work can be found on many websites and focuses on topics such as Microsoft Office, Apple devices, Android devices, Photoshop, and more.
This article helps you effortlessly see what monitor you have if you are confused about it.
Being familiar with the make and model of a device is a prerequisite if you want to update drivers or configure it correctly. However, if you need clarity on how to check the monitor model without even opening the monitor, this article is for you.
Here, in this article, we are going to elaborate on many easy-to-follow methods to check what monitor you have. Let us save precious time and begin with it right away.
Top Methods to Check Monitor Model
You can follow these methods if you are looking for answers to the question, “How to see what monitor I have.”
Method 1: Identify the monitor model via the Control Panel
You can effortlessly find the model of your monitor through the Control Panel. The following steps explain how to check what monitor you have through this built-in Windows utility.
- The first step is to open the Control Panel. You can search the Control Panel using Windows search to access it.
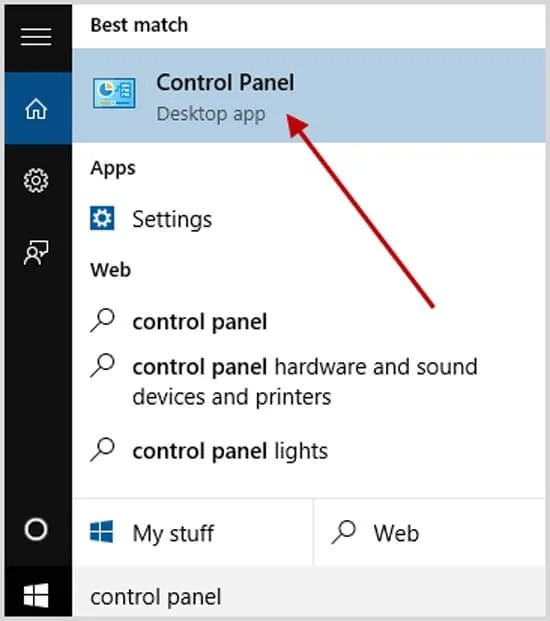
- After opening the Control Panel, choose Devices and printers from the Hardware and Sound category.
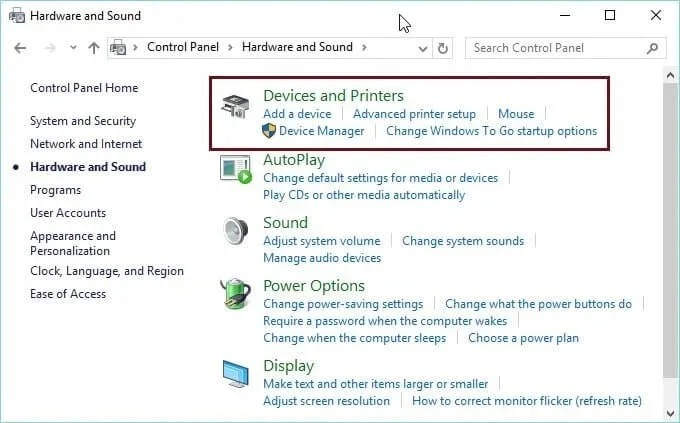
- You can now select your monitor from the available devices.
- Next, right-click on the monitor and choose Properties from the on-screen menu to view the monitor model.
Also know:Best Free Monitor Calibration Software
Method 2: Use Device Manager to check the monitor model
Device Manager is another answer to your question, “How to tell what monitor I have.” This tool allows you to find the required information about all devices connected to the computer, including your monitor. Hence, you can follow these directions to use it.
- First, right-click the Windows icon and choose Device Manager from the on-screen menu to open it.
- Next, double-click on the Monitors section to expand it.
- In this step, right-click the monitor to view its Properties.
- Lastly, you can note the monitor model from the on-screen properties.
Method 3: Discern the monitor model via settings
Another way to answer the question, “What kind of monitor do I have” is through the settings application. You can follow this simple series of steps to find the monitor details via Windows settings.
- The first step requires you to click on the Start button.
- Secondly, click the cogwheel icon (settings) in the lower-left of the Start menu. If the settings icon is not visible, you can scroll down the list of available programs to find and choose settings from the list.
- The settings window will appear on your screen. You can now navigate to the System settings.
- Next, choose Display from the System menu to check what monitor you have.
Method 4: Find the monitor model via Command Prompt
A little complicated for non-technical users, Command Prompt also allows you to check the model of your monitor. Here are the steps you can take to tell what kind of monitor you have.
- First, open Windows search using Win+S hotkey.
- Next, input Cmd in the search bar and press Enter to open the Command Prompt.
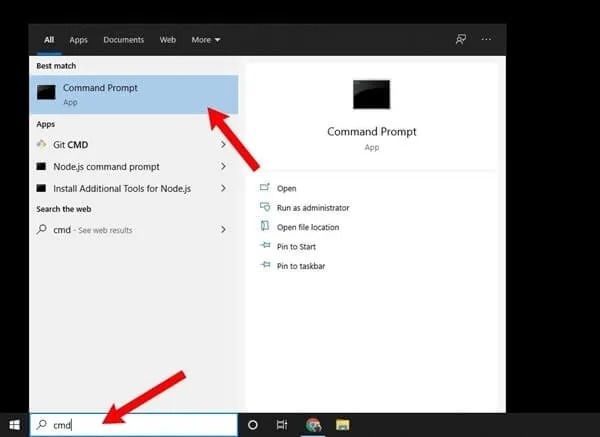
- You can now input the wmic path win32_videocontroller get description in the command line and press Enter.
- Lastly, find the Description line with your monitor’s model.
Method 5: Note the monitor model through the manufacturer’s website
The manufacturer’s website is perhaps the easiest way to get the required monitor information. You can simply navigate to the website of the manufacturer and search for their product details to know what kind of monitor you have.
Also know: How to Fix Vertical Lines on Monitor Screen (Guide)
Method 6: Use Task Manager to find the monitor model
The Task Manager utility in Windows also allows you to identify what monitor is connected to the system. Here are the directions you can follow to use it.
- First, right-click on the empty taskbar and choose Task Manager from the on-screen options.
- The Task Manager windows will appear on your screen.
- Next, choose Performance from the Task Manager tabs.
- You can now click the GPU 0 option.
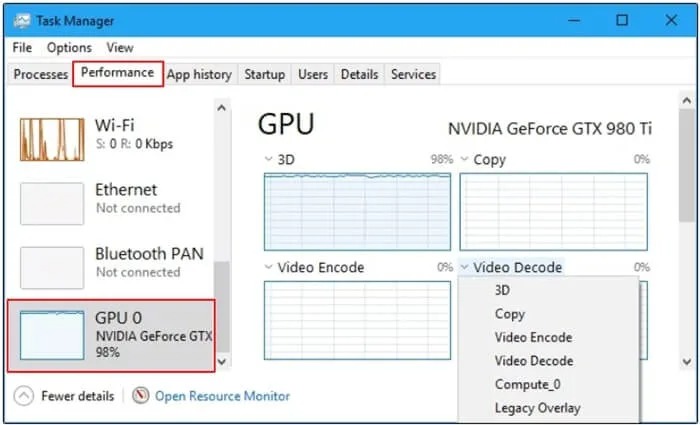
- Next, navigate to the Details tab in the bottom-right of the Task Manager window.
- In this step, locate and click the Monitor section to know your current monitor.
Summing Up
This article answered your question, “What monitor do I have”, by sharing various simple ways to check the monitor model. We hope you are no longer confused about what monitor you are using. However, feel free to write us a comment if you have any doubts or questions.
Readers help support Windows Report. We may get a commission if you buy through our links.
Read our disclosure page to find out how can you help Windows Report sustain the editorial team. Read more
In this piece, we’ll show you how to check your monitor model on Windows 11 as well as related specs.
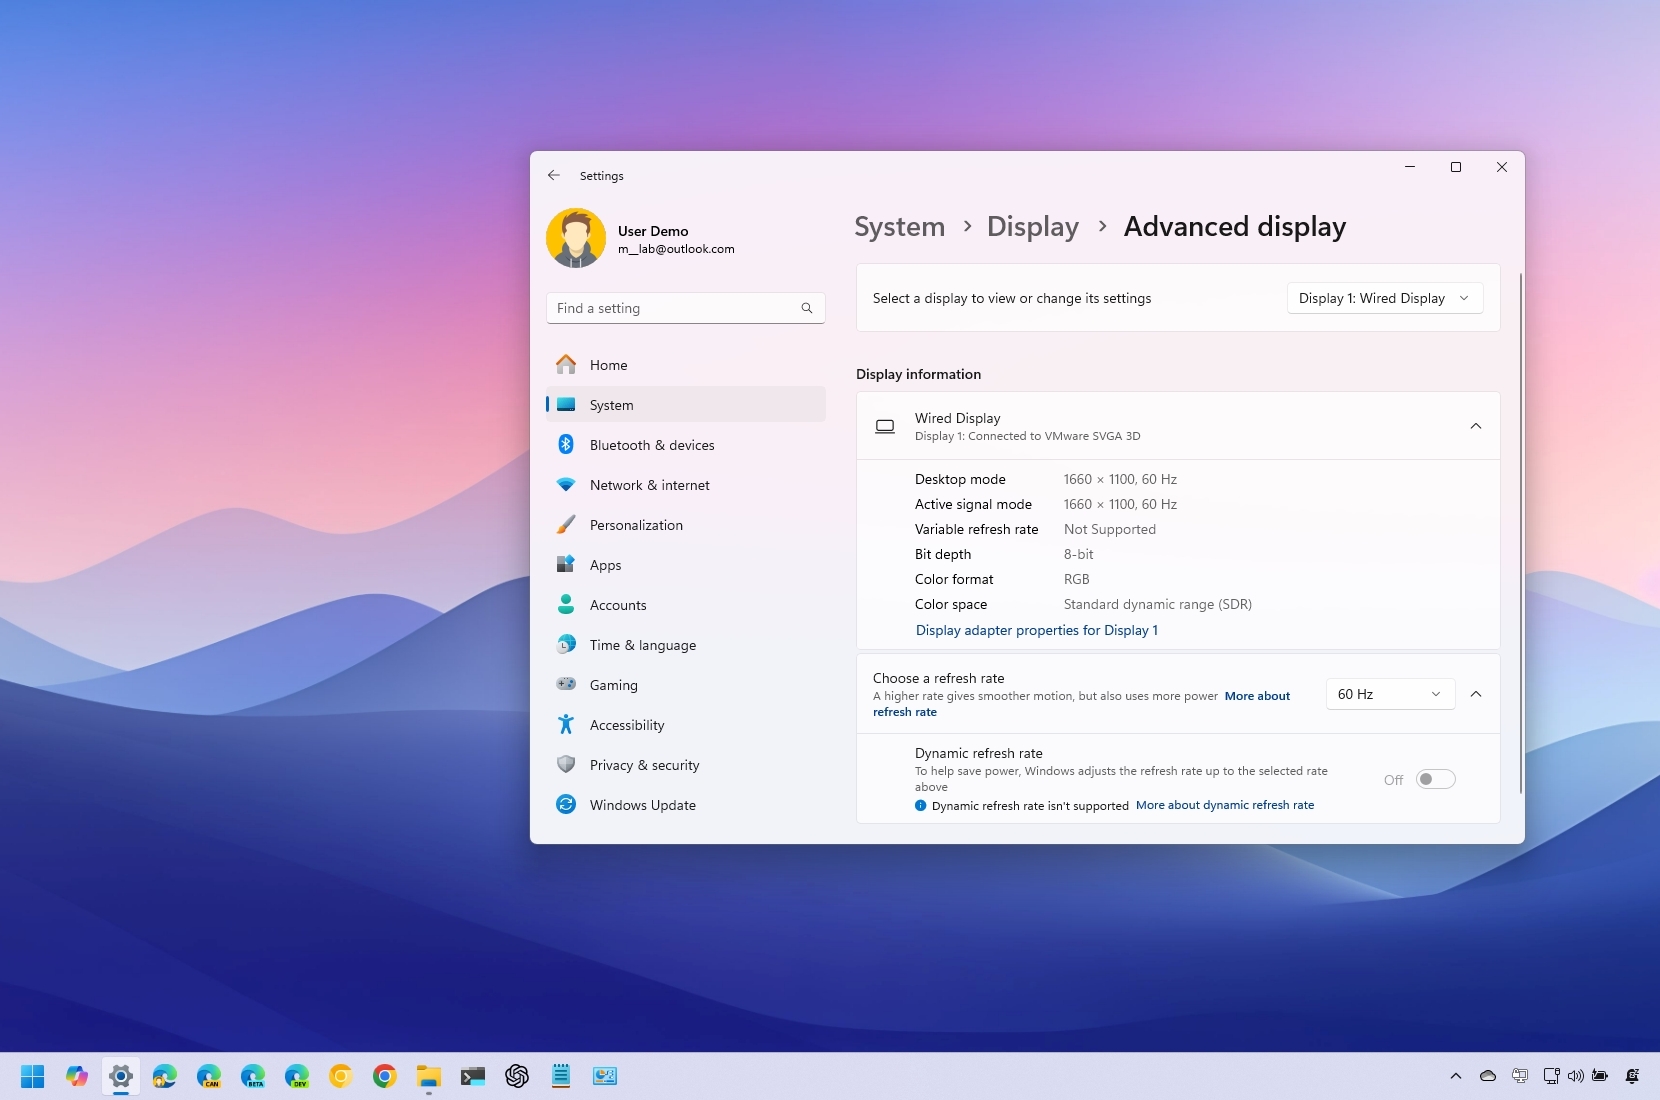
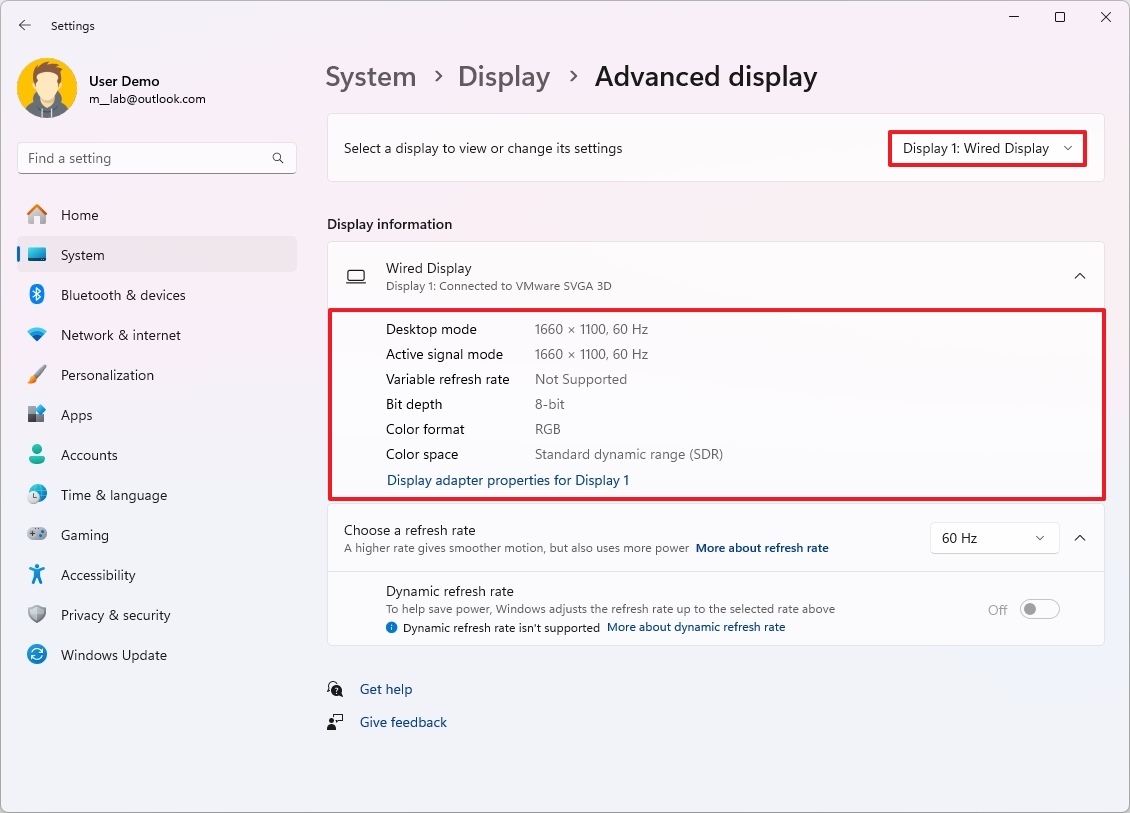
Besides the monitor name and the graphics card it’s connected to, you may need information related to the Active signal mode, Bit depth, Color format, and Color space.
All this can be found in the display settings, but a third-party tool is usually more helpful. Let’s learn about both!
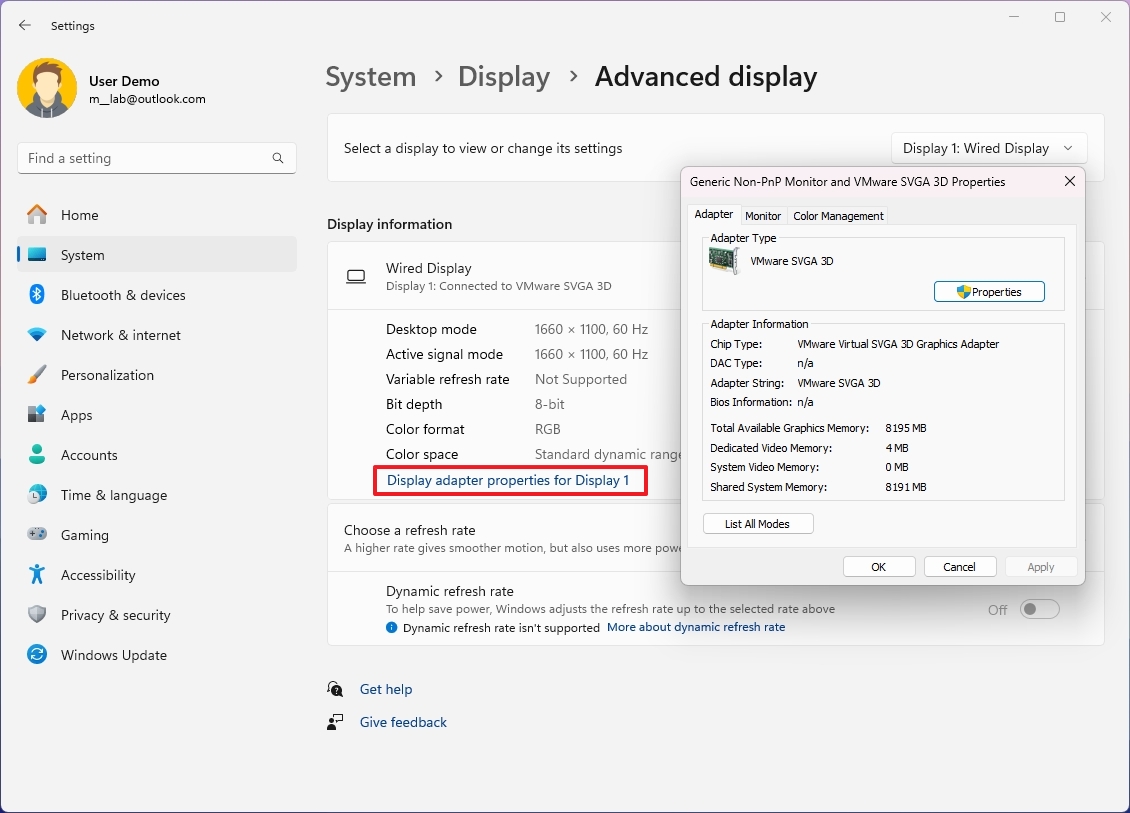
How do I find my display information on Windows 11?
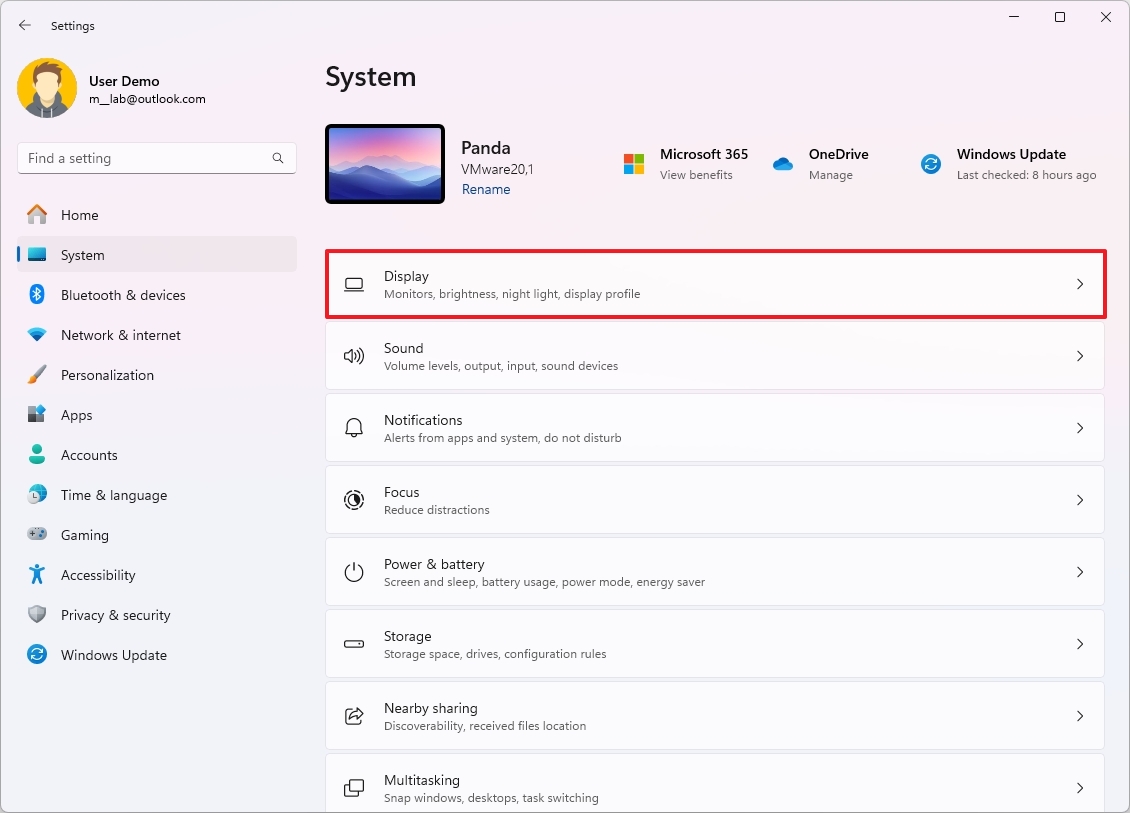
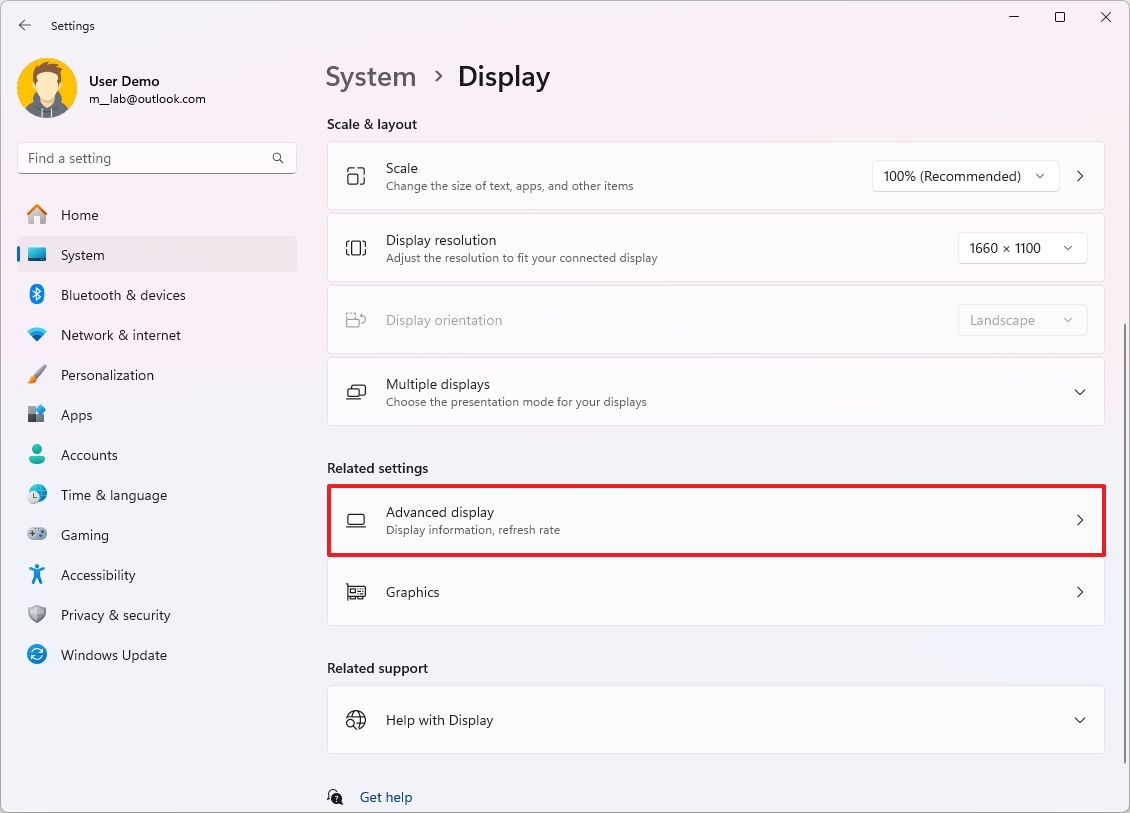
1. View the Display settings
- Press Windows + I to open the Settings app, and click Display on the right in the System tab.

- Scroll down and click on Advanced display under Related settings.
- You will now find the various configurations listed under the monitor name set as Display 1. This includes:
- Desktop mode: Available display resolution and refresh rate
- Active signal mode: Current display resolution and refresh rate
- Bit depth: Number of bits required to indicate the color of a single pixel in an image. The higher it is, the better. Modern monitors have it at 8 or higher.
- Color format: Current color format. It should be RGB in most cases.
- Color space: Signifies the array of colors the monitor can display. It could be Standard Dynamic Range (SDR) or High Dynamic Range (HDR).
- If you want to view the screen resolution or monitor information for another display, choose the monitor name from the Select a display to view or change its settings dropdown menu.
- To access the monitor settings in Windows 11, click on Display adapter properties for Display X, where X is the number assigned to the monitor.


The advanced display settings are one of the easiest ways to view the screen resolution settings and monitor details. Remember, it works for wireless displays as well.
2. Check the System Information app
- Press Windows + S to open Search, type System Information in the search box, and click on the relevant result.
- Expand Components from the navigation pane, and then select Display.

- You will now find the display Resolution, Bits/Pixel, Color Table Entries, and Color Planes. Besides, there will be details for the available graphics adapter, including Adapter RAM and display Driver Version.


The System Information app is a built-in tool that lists everything about the PC in an orderly manner. Apart from the monitor details, you will also find information related to Sound, Network, Storage, and Printing, amongst others.
3. Use a third-party software
- Go to Speccy’s webpage and download the free version of the tool.
- Run the setup and follow the on-screen instructions to complete the installation.
- Launch Speccy, head to Graphics from the navigation pane, and you will find the monitor name and other relevant details listed here.


While the built-in settings do the job, you could use Speccy, a reliable PC information software, to find the display information, monitor name, and specs in Windows 11.
- Microsoft pushes Windows 11, but this project wants you to switch to Linux instead
- Windows 11 Search will soon let you install your favorite apps from Microsoft Store
4. Search the Internet
If you want to find out more details about the monitor, say compatibility, various features, or things only advanced users require, head to the manufacturer’s website and open the monitor’s official page. It will list out all the information you would ever need.
Even third-party sellers and e-commerce platforms provide device details, so you could check that as well. But we wouldn’t blindly rely on the information provided on these websites.
How do I rename my monitor on Windows 11?
Tip
The process requires editing the Registry. We recommend you be extra cautious and create a restore point before proceeding to revert the changes if something goes wrong.
- Press Windows + X to open the Power User menu, and select Device Manager from the list of options.
- Expand the Monitors entry here, right-click on the monitor name you want to change, and select Properties.

- Head to the Details tab, and from the Property dropdown menu, choose Driver key.

- Right-click on the alpha-numeric string that appears, and select Copy.
- Now, press Windows + R to open Run, type regedit in the text field, and hit Enter.

- Click Yes in the UAC prompt.
- Paste the following path in the address bar and hit Enter:
Computer\HKEY_LOCAL_MACHINE\SYSTEM\ControlSet001\Enum
- Select the Enum key in the left pane, press Ctrl + F, paste the Driver key you copied earlier, and click on Find Next.

- You will now be redirected to the registry keys for the monitor. Double-click the FriendlyName string, enter the desired name in the Value data text field, and click OK.

- Once done, head back to Device Manager, click the Action menu, then select Scan for hardware changes, and the new monitor name should now reflect.


It’s neither that easy to change the name of the built-in display or an external monitor in Windows 11, nor do we recommend that you do it frequently. But just as you can rename the PC, you can also change the monitor or display name in Windows 11.
With proper knowledge of the monitor details, specifications, and other display information, you would be in a far better position to asses things. Besides, you may want to check the other PC specifications for an even deeper understanding of the computer.
Do tell us in the comments section what prompted you to check the display information in Windows 11 and whether the methods listed here proved helpful.
Kazim Ali Alvi
Windows Hardware Expert
Kazim has always been fond of technology, be it scrolling through the settings on his iPhone, Android device, or Windows PC. He’s specialized in hardware devices, always ready to remove a screw or two to find out the real cause of a problem.
Long-time Windows user, Kazim is ready to provide a solution for your every software & hardware error on Windows 11, Windows 10 and any previous iteration. He’s also one of our experts in Networking & Security.
(Image credit: Mauro Huculak)
On Windows 11, finding display information can be useful in various situations. For example, you can identify the brand and model to purchase a replacement or add a second monitor for a multi-monitor setup. You can also quickly check if the device supports advanced features like High Dynamic Range (HDR) or Dynamic Refresh Rate (DRR). Additionally, you can review the specifications—such as refresh rate, bit depth, color format, and resolution—to ensure your device meets the requirements for tasks like gaming or video editing.
Whatever your need, Windows 11 offers a dedicated page in the Settings app that simplifies viewing display specifications and capabilities.
In this how-to guide, I’ll explain how to find the built-in display or external monitor connected to your computer.
Recent updates
These instructions has been updated to ensure accuracy and reflect changes to the process in the operating system.
How to view display specs on Windows 11
To view the display or external monitor specifications, use these steps:
- Open Settings.
- Click on System.
- Click the Display page on the right side.
- Click on the Advanced display setting under the «Related settings» section.
- Use the «Select a display to view or change its settings» drop-down menu to choose the monitor to view its information (if applicable).
- Under the «Display information» section, confirm the brand and model number.
- Confirm the display specification, including:
- Desktop mode: Shows the pixel resolution and refresh rate mode.
- Active signal mode: Specifies the current pixel resolution and refresh rate the system uses.
- Bit depth: Describes the number of bits the display can use to represent each pixel of an image. Usually, this number would be 8-bit for most regular panels and 10-bit or higher for premium panels.
- Color format: Shows the color format that the display is currently using — for example, RGB.
- Color space: Specifies whether the display uses Standard Dynamic Range (SDR) or High Dynamic Range (HDR).
- Turn on the «Dynamic refresh rate» toggle switch (if necessary).
- Quick note: If the «Dynamic» option is present, the display supports Dynamic Refresh Rate (DRR). This feature allows Windows 11 to dynamically increase or decrease the refresh rate on supported hardware. Usually, this option is available for monitors with 120hz or higher.
- Confirm whether the display is certified as an HDR-capable device.
- Quick note: On high-quality HDR displays, the page will show its HDR certifications.
- Click the «Display adapter properties for» option to view the graphics card brand, model, and other information (if applicable).
Once you complete the steps, you will better understand the monitor’s capabilities and configuration.
More resources
If your second monitor isn’t detected on Windows 10 or Windows 11, follow our guide to solve that first. You can find more in-depth guides, troubleshooting tips, and the latest updates on Windows 11 and 10 here:
- Windows 11 on Windows Central — All you need to know
- Windows 10 on Windows Central — All you need to know
All the latest news, reviews, and guides for Windows and Xbox diehards.
Mauro Huculak has been a Windows How-To Expert contributor for WindowsCentral.com for nearly a decade and has over 15 years of experience writing comprehensive guides. He also has an IT background and has achieved different professional certifications from Microsoft, Cisco, VMware, and CompTIA. He has been recognized as a Microsoft MVP for many years.
Многие пользователи выбрасывают коробку и инструкцию от монитора чуть ли не в первый же день после покупки. И потом забывают, что у них за модель. Если вам по каким-то причинам нужна данная информация, то в этом материале мы расскажем о способах ее получения.
Наклейка на корпусе монитора
Простой, но не всегда доступный способ. Наклейка может крепиться на лицевой стороне, но это редкость. В большинстве ситуаций она располагается на задней части корпуса, недалеко от разъемов HDMI, VGA и пр.
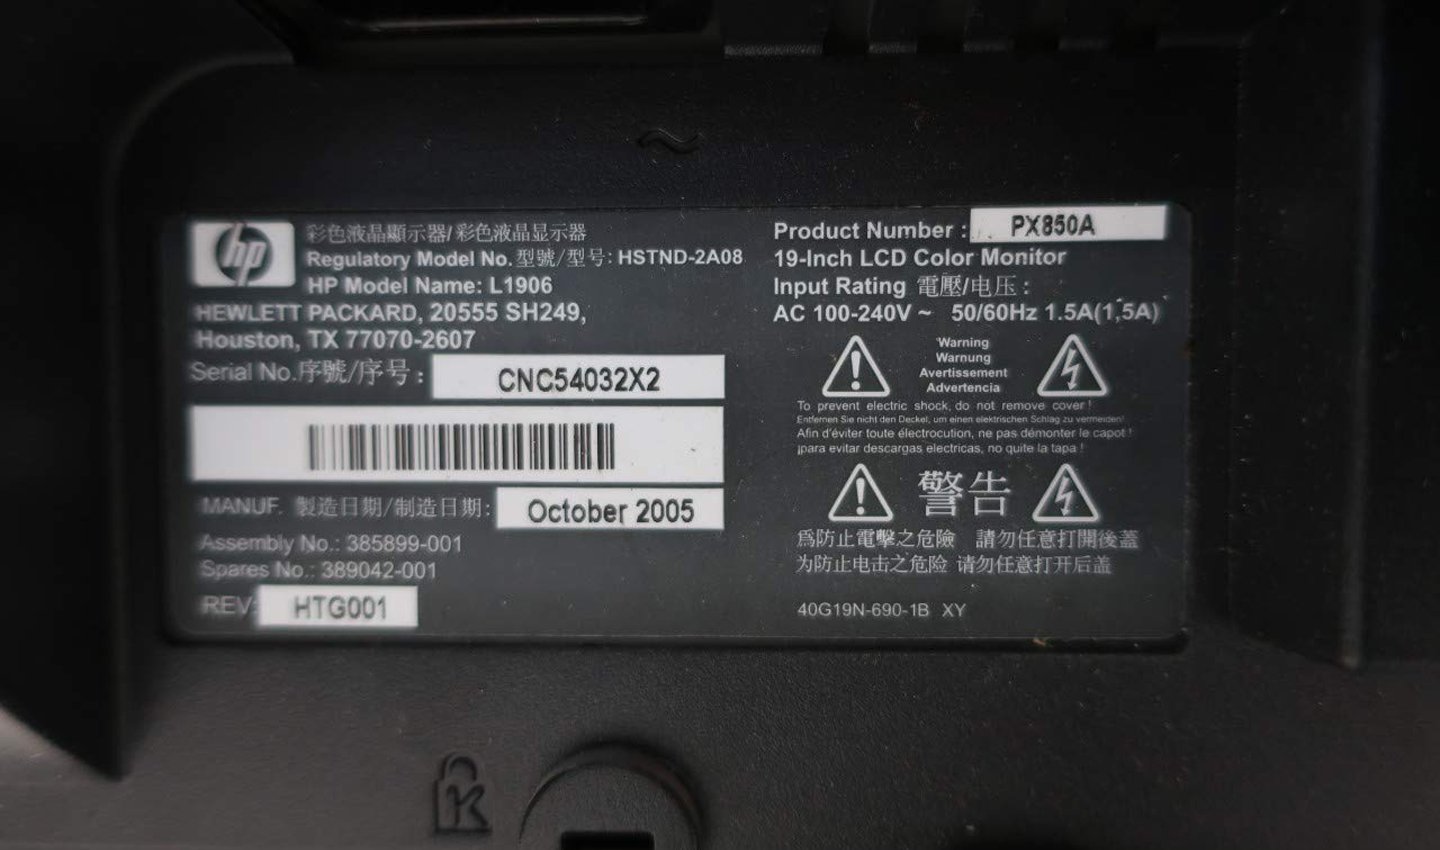
Фото: www.amazon.com
На наклейке указывают наименование устройства, его модель, минимальные характеристики, например, частоту обновления экрана. Хватит даже только названия монитора – всю необходимую информацию о нем можно позже узнать в интернете.
Используем «Устройства и принтеры»
Ещё один достаточно простой способ, позволяющий узнать название монитора – это средства операционной системы.
Скриншот: CQ.ru
Последовательность действий такая:
- Откройте диалоговое окно быстрого запуска (комбинация клавиш Win + R).
- В открывшемся окне введите команду: control /name Microsoft.DevicesAndPrinters, после чего нажмите Enter.
- Перед вами откроется окно «Устройства и принтеры». Выберите в нем значок монитора или дисплея.
- После появятся свойства, где указано не только название устройства, но и его номер, а также производитель.
Если выдало исключительно название, используйте его, чтобы найти в интернете точные характеристики.
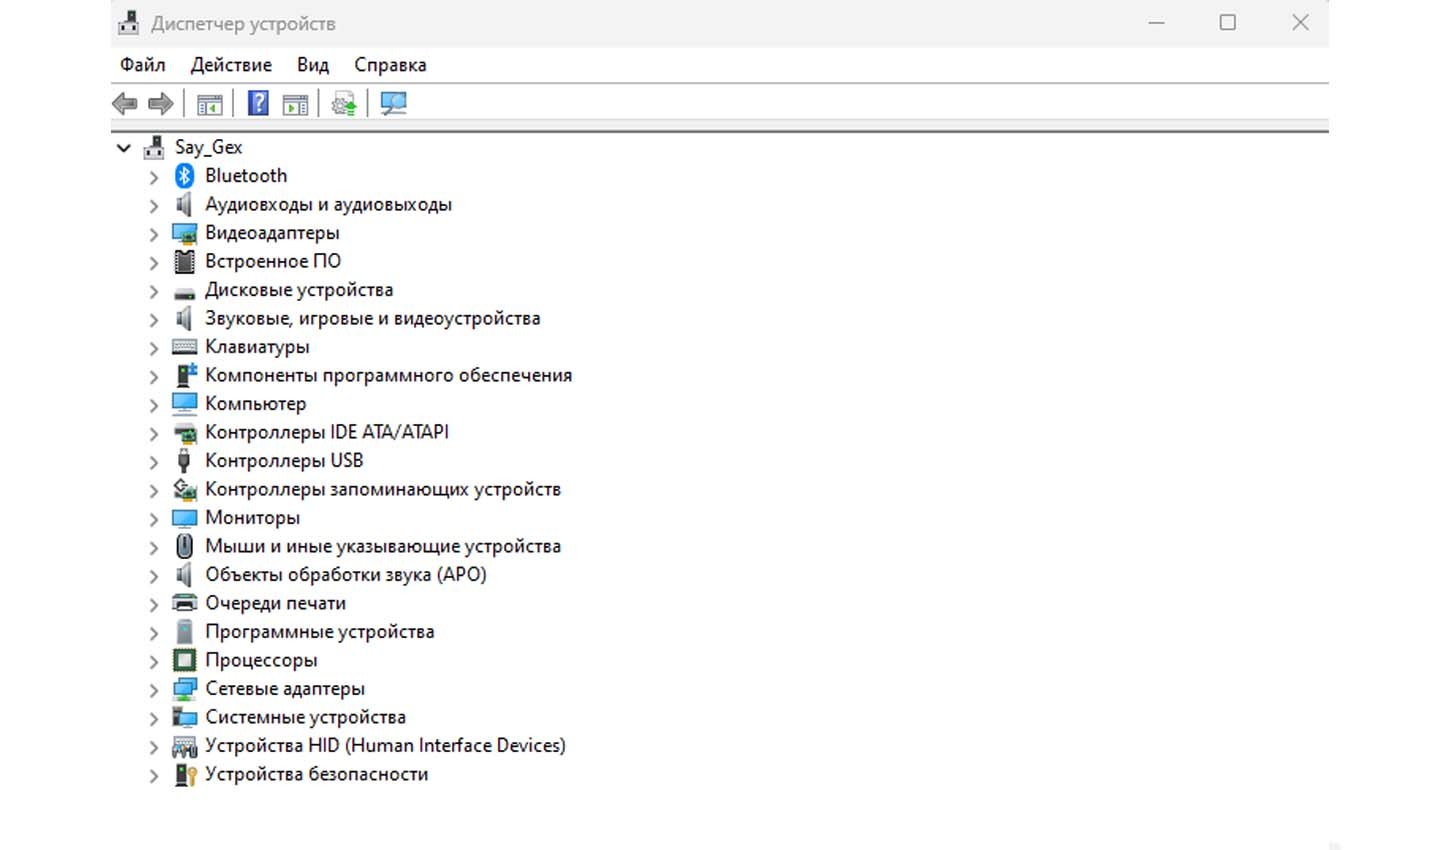
Альтернативное решение – «Диспетчер устройств»
Данный способ подходит для поиска названия монитора и на обычных компьютерах, и на ноутбуках.
Скриншот: CQ.ru
Выполняется задача следующим образом:
- Откройте меню «Пуск».
- Отыщите в списке пункт «Диспетчер устройств».
- В открывшемся перечне находите строку «Мониторы», далее кликаете на надпись «Свойства».
- Откройте вкладку «Сведения». Снизу располагается выпадающий список «Свойство». В нем нужно выбрать «ИД оборудования».
- Появившееся значение скопируйте в буфер обмена.
- Вставьте содержимое буфера обмена в поисковую строку любого браузера, ознакомьтесь с результатами выдачи.
Сторонние сервисы
Если предыдущие способы не принесли результата, или по каким-то причинам не удается ими воспользоваться, можно решить проблему с помощью сторонних программ. Рассмотрим пару примеров.
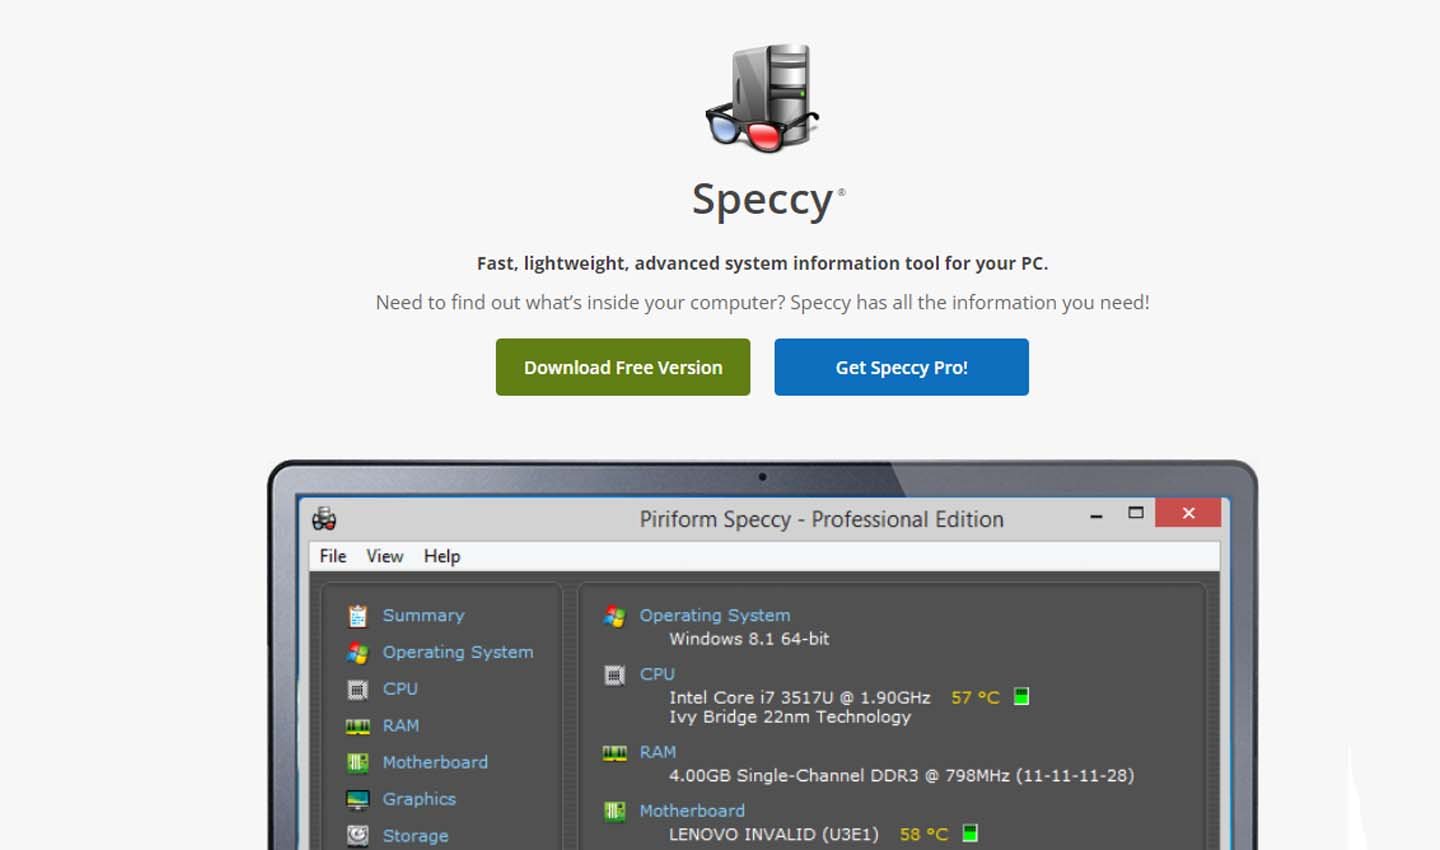
Speccy
Это бесплатный сервис, позволяющий получить сведения о системе и ключевых составляющих компьютера.
Скриншот: www.ccleaner.com
Работать с сервисом нужно так:
- Скачайте программу с официального сайта, установите на устройство.
- Запустите приложение. Отыщите в меню слева раздел «Графические устройства», нажмите на него.
- На панели справа выведется информация обо всех графических устройствах, используемых на ПК, ведь может быть подключено несколько мониторов. В пункте «Name» располагается его название.
Сервис позволяет узнать только наименование устройства, но не его серийную модель. Более подробную информацию можно получить при использовании поиска браузера.
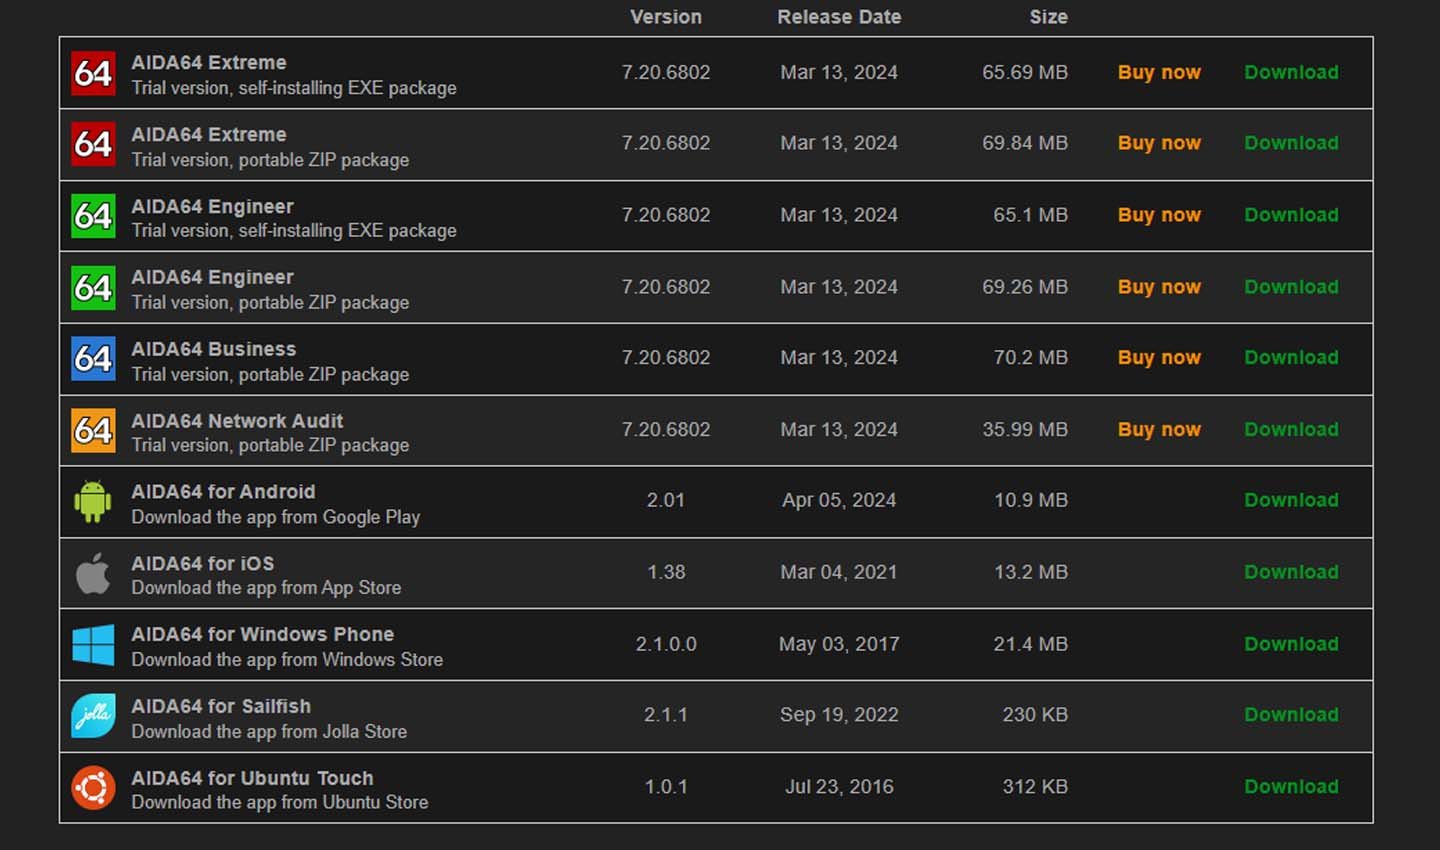
AIDA64
Данное приложение отличается от предыдущего решения большим количеством предоставляемых сведений. С помощью сервиса можно узнать не только название, но и идентификатор устройства.
Скриншот: www.aida64.com
Для получения данных потребуется:
- Установить приложение непосредственно с официального сайта. На выбор доступно две версии – обычная или портативная. Выберите подходящую.
- Запустите сервис. В меню слева найдите пункт «Дисплей», в нем же, чуть ниже, нажмите на строку «Дисплей».
- В правой половине экрана высветится вся информация об устройстве, включая наименование монитора и его идентификатор.
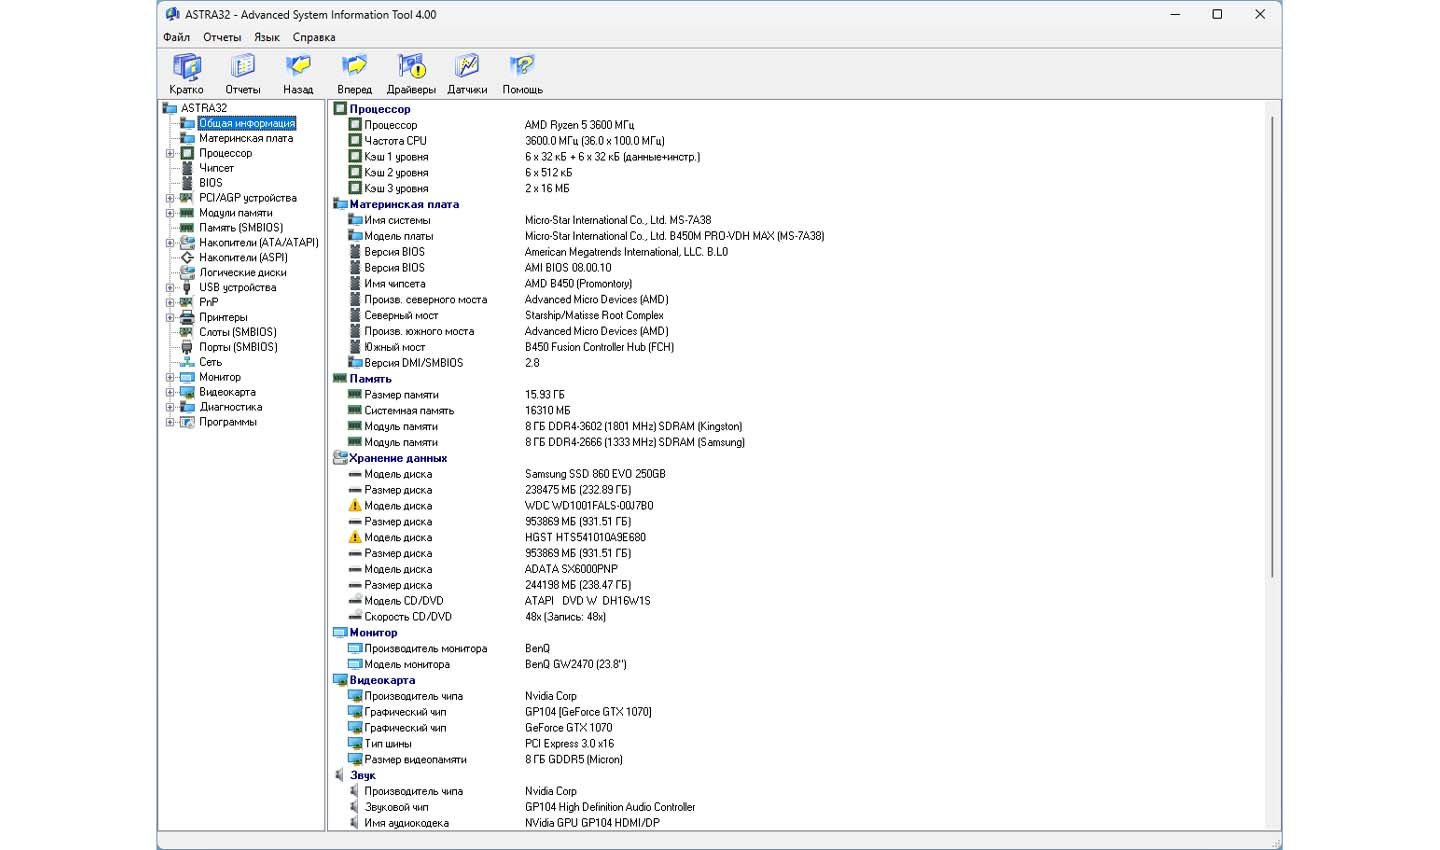
ASTRA32
Хорошая альтернатива двум предыдущим сервисам. Сервис предоставляет обширную информацию. Столько данных можно получить только из паспорта на устройство. Единственный недостаток – приложение условно-бесплатное, но в интернете есть демо-версии для ознакомления.
Скриншот: www.astra32.com
Использовать сервис необходимо точно так же, как и предыдущие решения. Скачиваете и устанавливаете приложение, в левой колонке находите пункт «Монитор», выбираете необходимое устройство (если к ПК подключено несколько гаджетов). В правой колонке высветится подробная информация о модели. Можно узнать и название, и дату выпуска, размеры, и даже тип дисплея.
Заглавное фото: www.pexels.com