
Привет, друзья. В этой публикации мы с вами рассмотрим такой вопрос: как узнать, какой SSD стоит. Даже если вы лично выбирали и покупали твердотельный накопитель, вряд ли держите в памяти точное указание его модели. А знать, что у вас за SSD стоит, непременно нужно, если вы собираетесь приобрести ещё один SSD. В таком случае вы сможете сравнить его характеристики, его тесты скорости и чтения данных с теми вариантами, которые вы предполагаете к покупке. Ниже мы рассмотрим варианты, как узнать не только модель накопителя, но также отдельные его характеристики с помощью программ для диагностики компьютерных комплектующих.
Итак, друзья, у вас установлен в ПК или ноутбук твердотельный накопитель SSD, и вы хотите узнать о нём информацию. Возможно, просто, возможно, для сравнения при покупке нового SSD, возможно, в иных целях. Если знать модель хотите для сравнения с SSD, планируемых к покупке, настоятельно рекомендую статьи нашего сайта о выборе накопителей:
- Как выбрать SSD,
- SSD NVMe или SSD SATA: какой выбрать накопитель,
- Как узнать, какой SSD подойдёт для ноутбука.
Ну и давайте теперь непосредственно к теме статьи. Узнать, какой SSD стоит, можно с помощью штатных средств Windows. Более же расширенную информацию получим с помощью программ для диагностики компьютерных комплектующих.
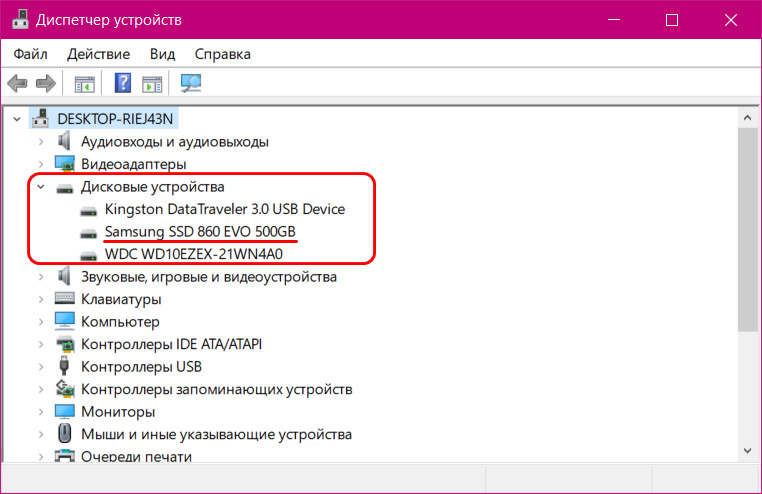
Если вам нужно узнать только модель твердотельного накопителя, установленного в вашем ПК или ноутбуке, в любой из версий Windows обратитесь в диспетчер устройств. Либо введите его название в системный поиск, либо в Windows 8.1 и 10 воспользуйтесь опцией отсылки в него в меню, что вызывается клавишами Win+X. В разделе дисковых устройств будут указаны все подключённые к компьютеру жёсткие диски, и SSD-накопители в частности.
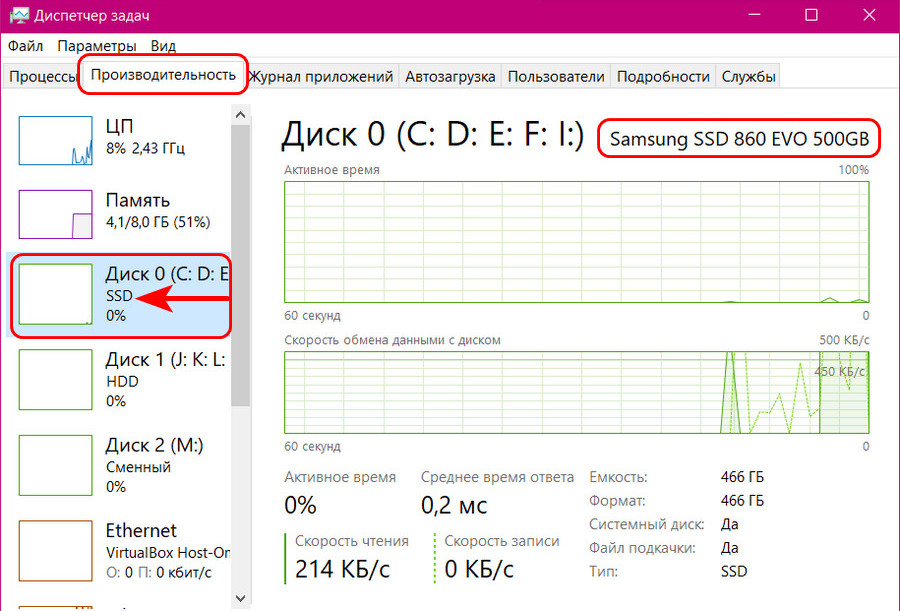
Что у вас за накопитель, в Windows 10 вы можете также узнать в диспетчере задач, он вызывается клавишами Shift+Ctrl+Esc. Во вкладке «Производительность» переключаемся на диск SSD и смотрим его модель.
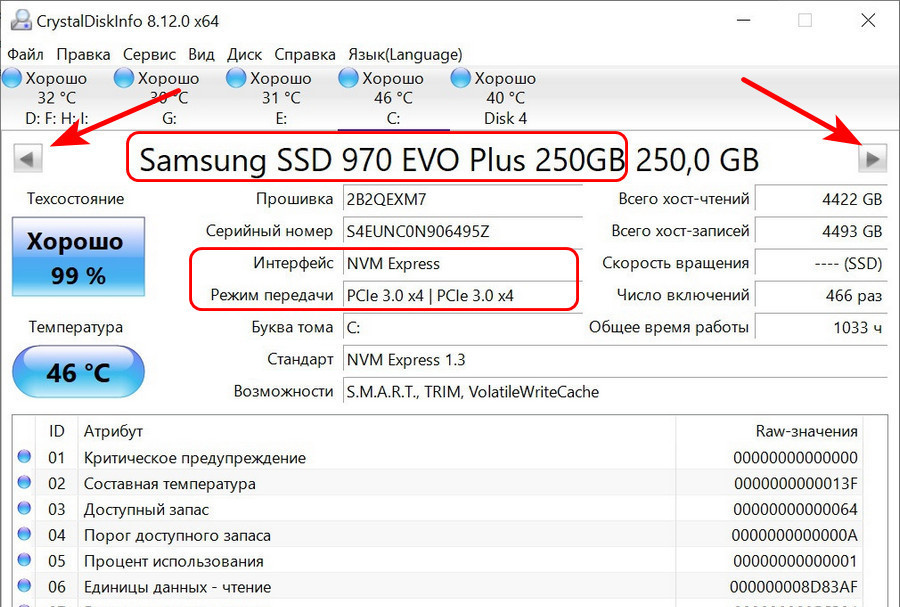
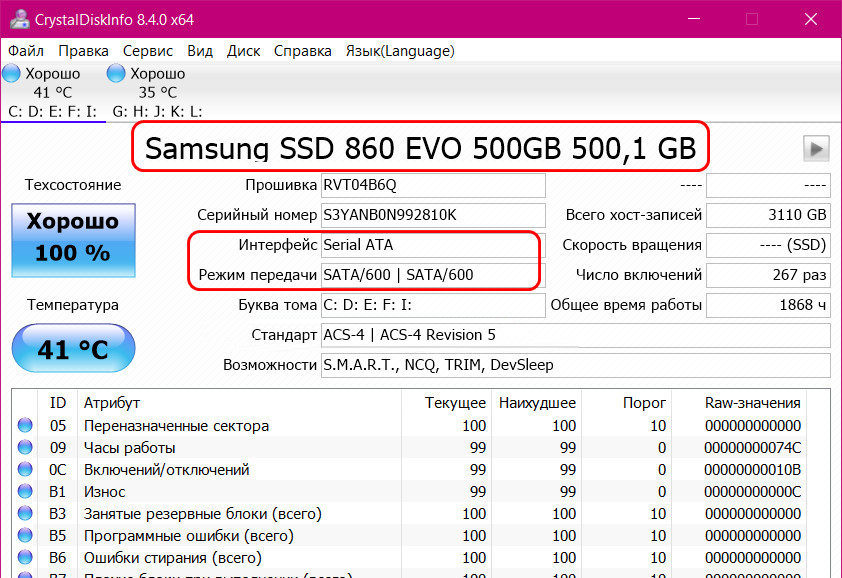
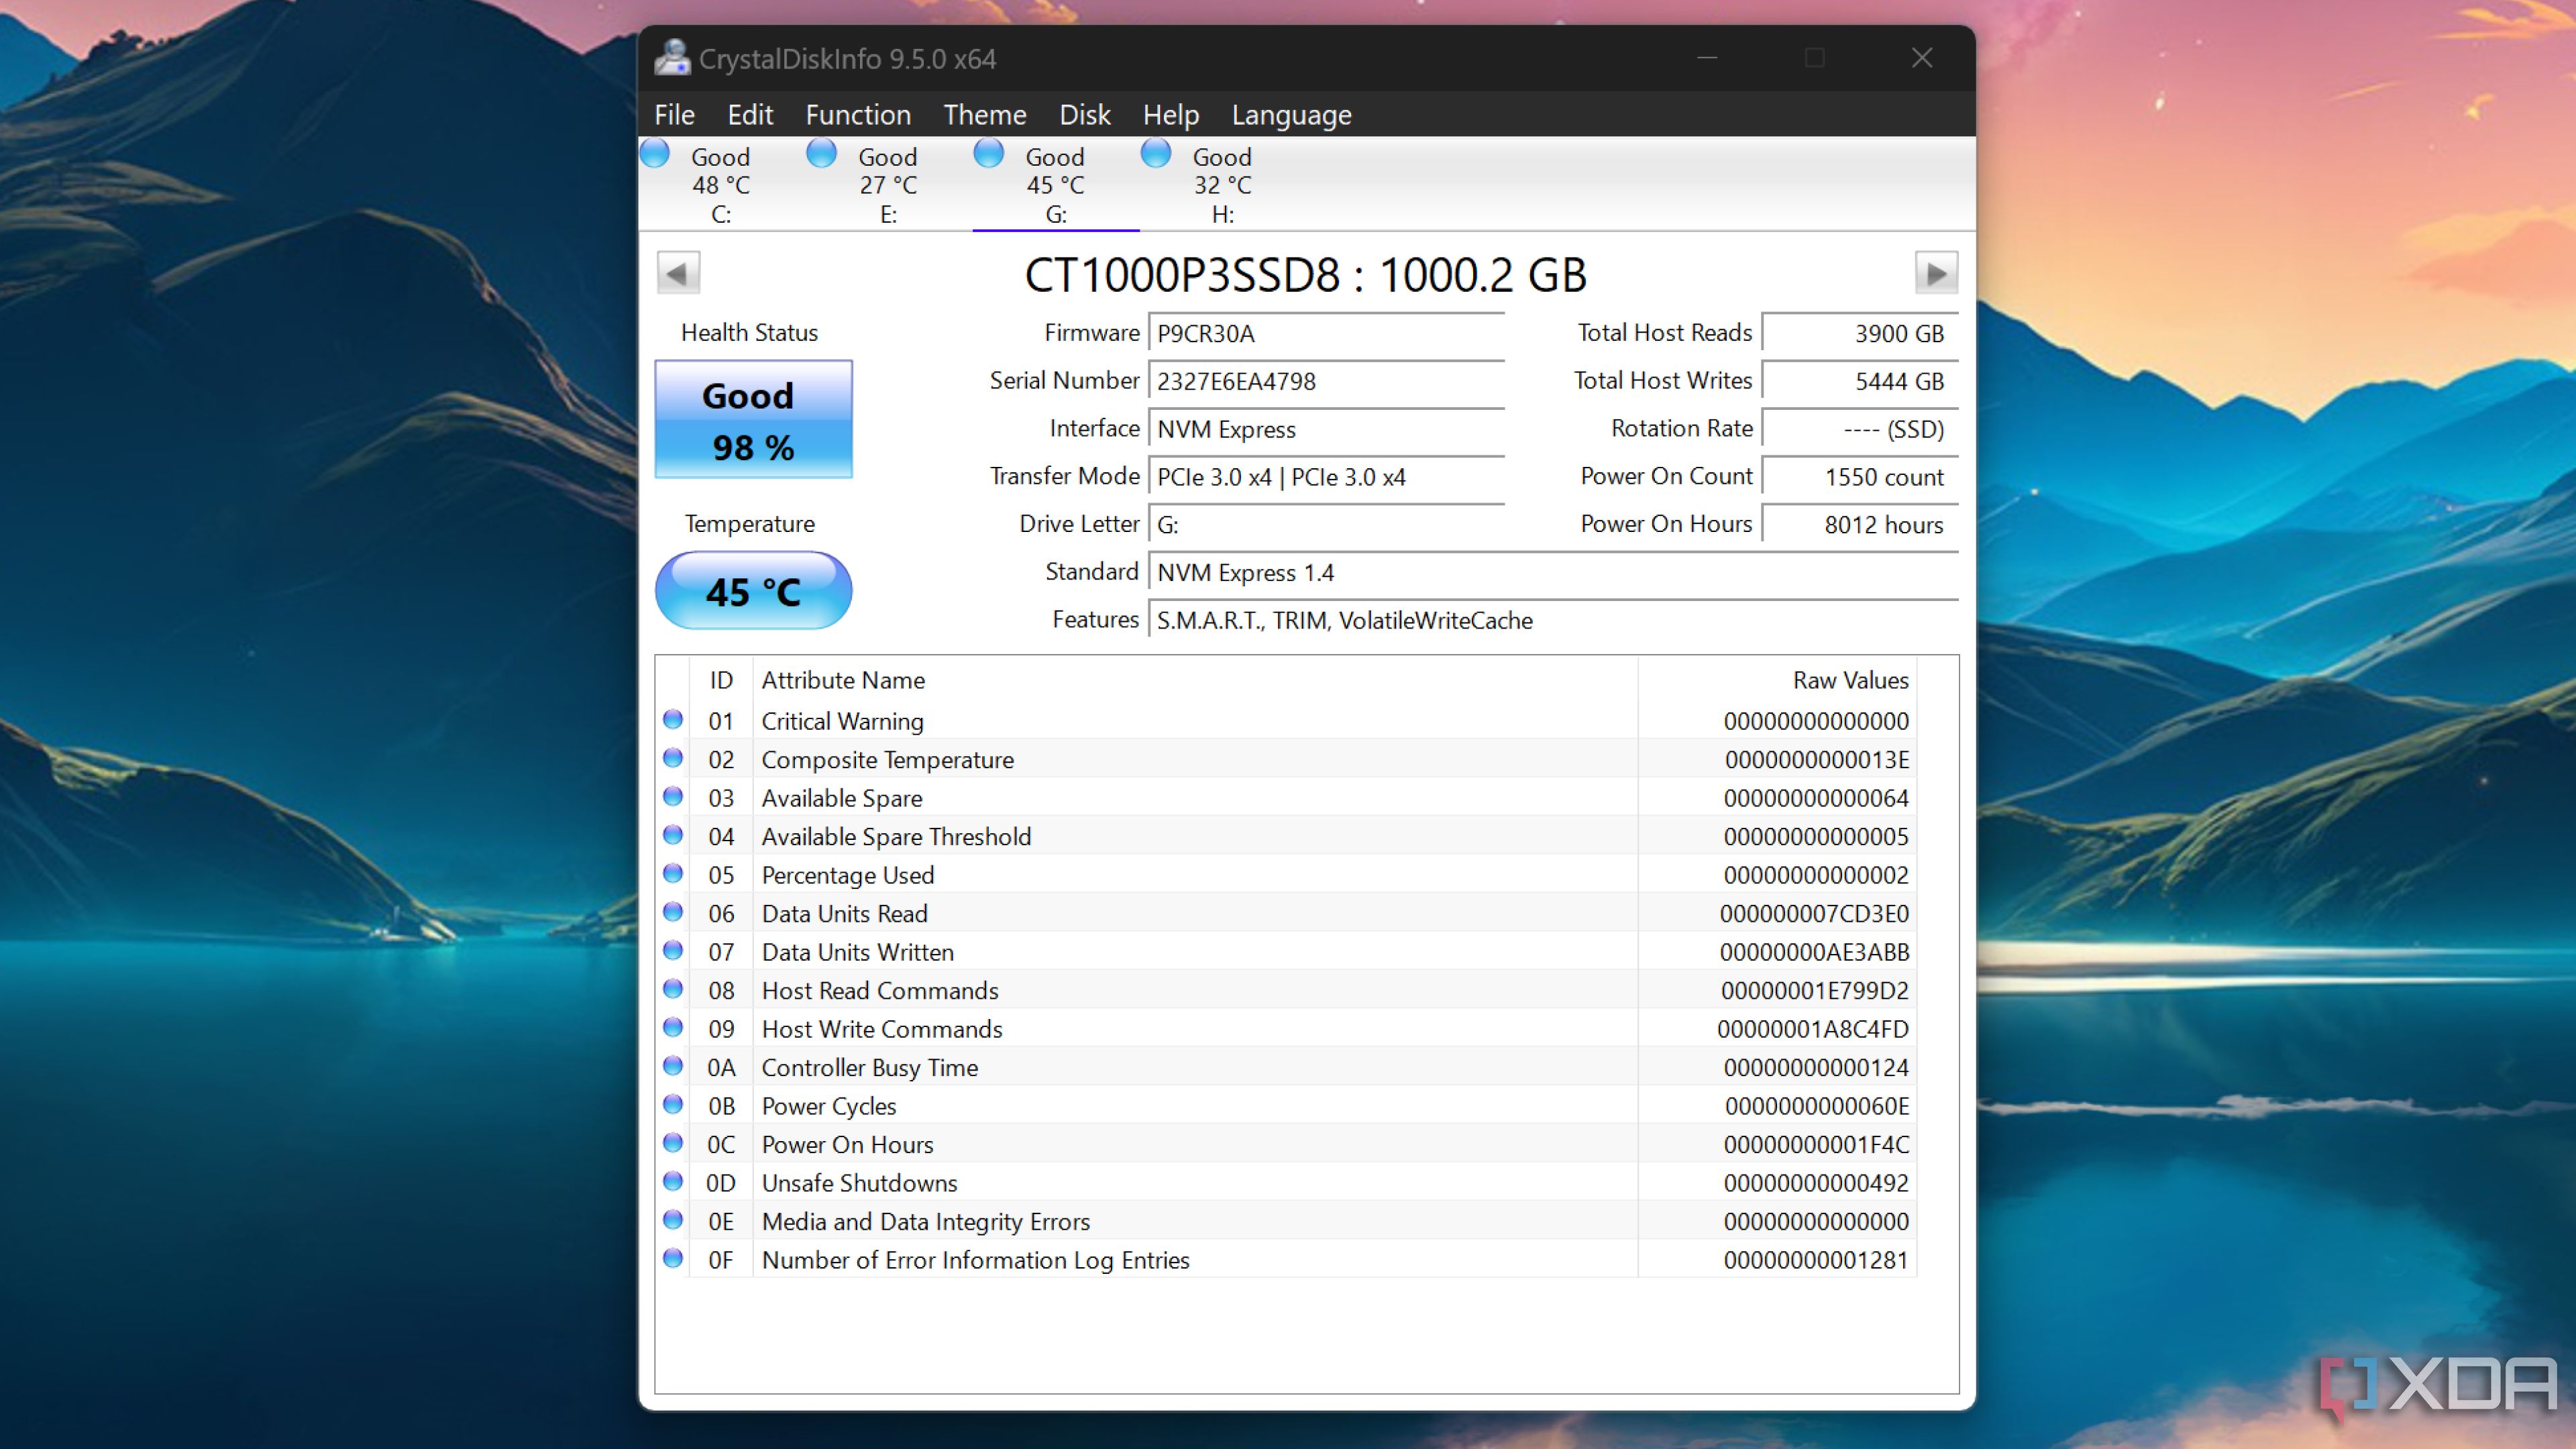
Больше сведений об установленном на компьютере SSD нам подскажет бесплатная утилита CrystalDiskInfo. Это профильная утилита для диагностики жёстких дисков HDD и твердотельных накопителей. Как узнать, какой SSD стоит, с её помощью? Просто запустите утилиту и отобразите нужный вам SSD. С помощью CrystalDiskInfo о накопителе можем узнать его модель, прошивку, серийный номер, данные о работе устройства и показатели S.M.A.R.T. Это всё, конечно, хорошо, но в плане базовых сведений о SSD примечательность CrystalDiskInfo заключается в том, что утилита поставляет информацию о типе накопителя – его интерфейс PCI-E или SATA, а также его поколение, причём поддерживаемое устройством и по факту используемое. Так, для накопителей PCI-E в графе «Интерфейс» указывается поддержка технологии передачи данных NVMe, а в графе «Режим передачи» — поколение и линии этого интерфейса, первые данные — это текущий режим передачи, вторые данные – поддерживаемый накопителем, т.е. максимально возможный.
Для SATA SSD будет указан их интерфейс SATA, соответственно, в графе «Интерфейс». В графе «Режим передачи» будет указано поколение SATA II или III, опять же, первые данные — это текущий режим подключения, вторые – поддерживаемый накопителем.
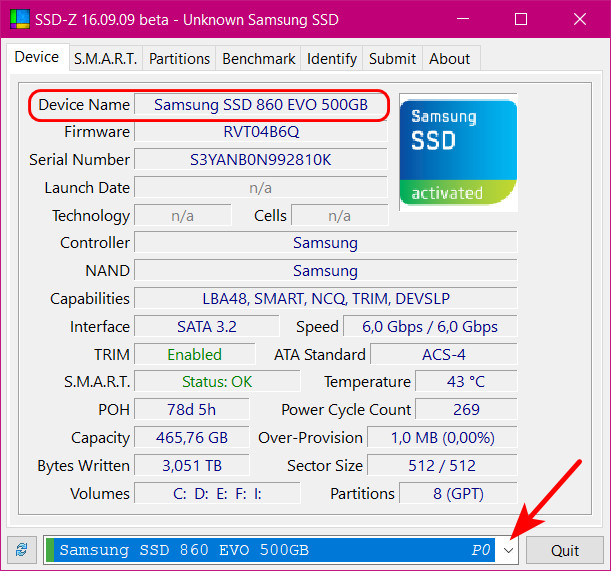
Ещё одна профильная бесплатная утилита-диагност — SSD-Z. Также отображает модель накопителей, прошивку, серийный номер, данные о работе устройства. В числе сведений могут быть данные о типе флеш-памяти и контроллере, но эти данные доступны только для тех накопителей, по которым в базу программы заранее внесена такая информация. Чтобы отображался нужный SSD, если у вас на компьютере их несколько, выберите его внизу главного окошка утилиты.
Ну и, друзья, ещё один способ, как узнать, какой SSD стоит – программа AIDA64. Это комплексная программа для диагностики содержимого компьютеров, и она является самым мощным информатором о характеристиках SSD. В ней идём по пути «Хранение данных > ATA», выбираем SSD, смотрим его модель и прочие интересующие сведения.
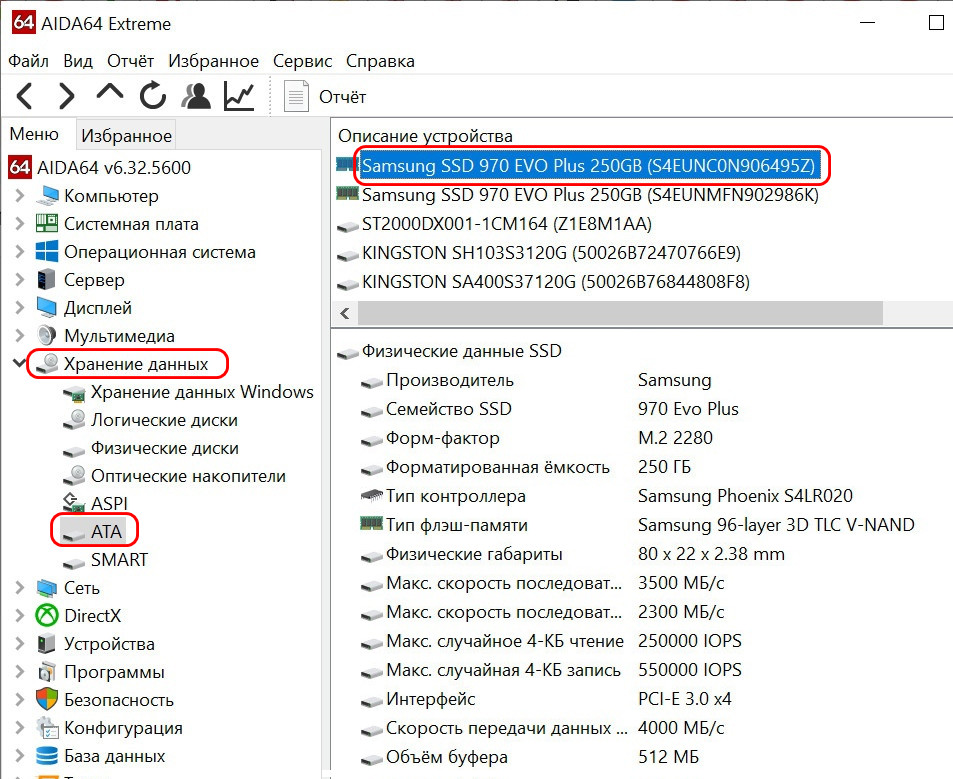
В числе данных, отображаемых AIDA64 по накопителям, многое: модель, прошивка, серийный номер, интерфейс, поколение, линии (для PCI-E), форм-фактор, тип флеш-памяти и контроллер (если программа располагает информацией), максимальные скорости обработки данных, показатели IOPS, объём буфера, поддерживаемые технологии.
SSDs come in various types depending on the generation, form factor, bus connection, etc. So, it’s better to know your current SSD to know whether you need to upgrade it or not.
The model name itself gives out a lot of information on the SSD. But you may need other details like the serial number for servicing, warranty information, or RMA purposes.

If you still have the packaging, you may find the model name and the specs on the package or the user manual.
Windows offers many ways to check your SSD’s details, like System Settings, Task Manager, Device Manager, and command-line options. However, most built-in methods will not show all the information of the SSD.
So you have to use a combination of a few methods or search the model name online and check its official specs for more complete information. You can also use relevant third-party apps for this purpose.
Through Windows Settings

The easiest way to get information about your SSD is through your system’s storage settings. It lists your drives and allows you to check most of the properties.
However, keep in mind that while it does list out the property— Serial number, this field will most likely remain blank. If you want this info, try out other methods like Command Prompt or PowerShell.
To check your SSD through your Windows settings,
- Open Windows Settings by pressing Windows key + I.
- Go to System > Storage > Advanced storage settings > Disks & volumes. (On Windows 10, go to System > Storage > Manage Disks and Volumes.)
- Look for your disk and click on Properties next to it.
- Check Name, Serial number, Bus type and other details.
If you have a hard drive together with an SSD, check the properties of all the disks and look at Media to see if it is the SSD.
Using Task Manager

It is also possible to quickly check out your SSD’s model name using the Task Manager. You won’t get other details, but if you just want to know the name, follow the steps below:
- Press Ctrl + Shift + Esc to open the Task Manager.
- Go to the Performance tab and click on your Disk. If you have multiple disks, select them one at a time.
- You can find the model name in the top-right position and the type of the disk (SSD or HDD) at the bottom.
Using Device Manager

You can also use the Device Manager to check your SSD’s model name. It also allows you to check if you have a SATA SSD or an NVMe one, but not in a direct way. Regardless, here’s what you need to do:
- Press Windows key + R to open Run.
- Type
devmgmt.mscand press Enter. - Expand Disk drives and check out the model name of your SSD.
- Double-click on it to open its Properties and go to the Details type.
- Set the Property to Hardware Ids. If your SSD is an NVMe drive, you will find NVMe on the Ids. Otherwise, it’s a SATA drive.
Using Command Prompt

Windows Management Instrumentation Command (wmic) on Command Prompt allows you to check out the specifications and details on all your devices. You can use it with the diskdrive class to get information on any connected storage devices.
One advantage this command-line method has over the previous ones is that you can properly see your SSD’s serial number.
However, you won’t be able to see if the disk is HDD or SSD or even check the bus type of SSD using Command Prompt. You can only distinguish between removable and fixed drives.
Here’s how to do it:
- Open Run.
- Type
cmdand press Enter. - Type
wmic diskdrive get model, name, serialnumber, mediaType, sizeand press Enter. - Check the relevant details. (See how MediaType shows Fixed hard disk media)
Using PowerShell

You can also use the Get-PhysicalDisk cmdlet on PowerShell, which uses the same WMI class as that of the Command Prompt, to check your SSD. While it does provide more information such as whether the disk is an HDD or an SSD, you can’t determine the bus type of the SSD (i.e., NVMe or SATA)
To use PowerShell to get your SSD details,
- Open Run.
- Type
powershelland press Enter. - Type
Get-PhysicalDiskand press Enter. It’s better to maximize PowerShell’s window beforehand to view all the default information. - Look under FriendlyName, SerialNumber, MediaType, Size and other information.
Using Third-Party Tools

All the above built-in methods give incomplete details about the SSD. It is possible to search the model name on the internet and check its official specs to get all the details.
But you can also use reliable free applications like HWiNFO or SSD-Z to access all the information about the SSD.
Checking the Actual Hardware

You can also physically access the SSD on your computer and check its sticker to learn its model name, serial number, size, and so on.
However, since there are other easier methods to check the SSD, it’s better to use this method only if you can’t get inside your operating system.
You need to open up your computer to access the SSD. If you don’t have prior experience, I would recommend seeking help from someone who does. You can also check out our following guides for additional help:
- How to Connect SSD to Motherboard
- How To Upgrade Your Laptop With an SSD
- How to Install a Second SSD
With the PC industry filled with wacky (and borderline insane) naming conventions, it’s not easy to remember the names of all your components. Even if you have memorized the names of the expensive parts like the graphics card and processor, you may not be able to recall the finer details about the other components, like the solid-state drive running your favorite OS.
Despite their usual irrelevance in day-to-day usage, there are times when you’d want to identify your SSD specs. Perhaps you’re in the middle of upgrading your system and want to check if the current SSD is worth swapping out with a newer drive. Or maybe you want to know your SSD’s specs before selling it off.

Related
How to check SSD health on a Windows PC
Keep tabs on your SSD’s health to ensure smooth performance
The easiest way to identify your SSD is to examine the label attached to it or check its box. But if you don’t have the original box and are unwilling to tear down your laptop/desktop, no worries! This guide will include all possible methods to find the name, serial number, and other details of your SSD.
How to check your SSD using the Device Manager
If you’re on a Windows OS, you can use the Task Manager to view the name of the SSD. To do so,
-
Right-click on the Start button and choose Device Manager.

-
Click on the drop-down arrow next to Disk drives to reveal the model name of all your storage drives.

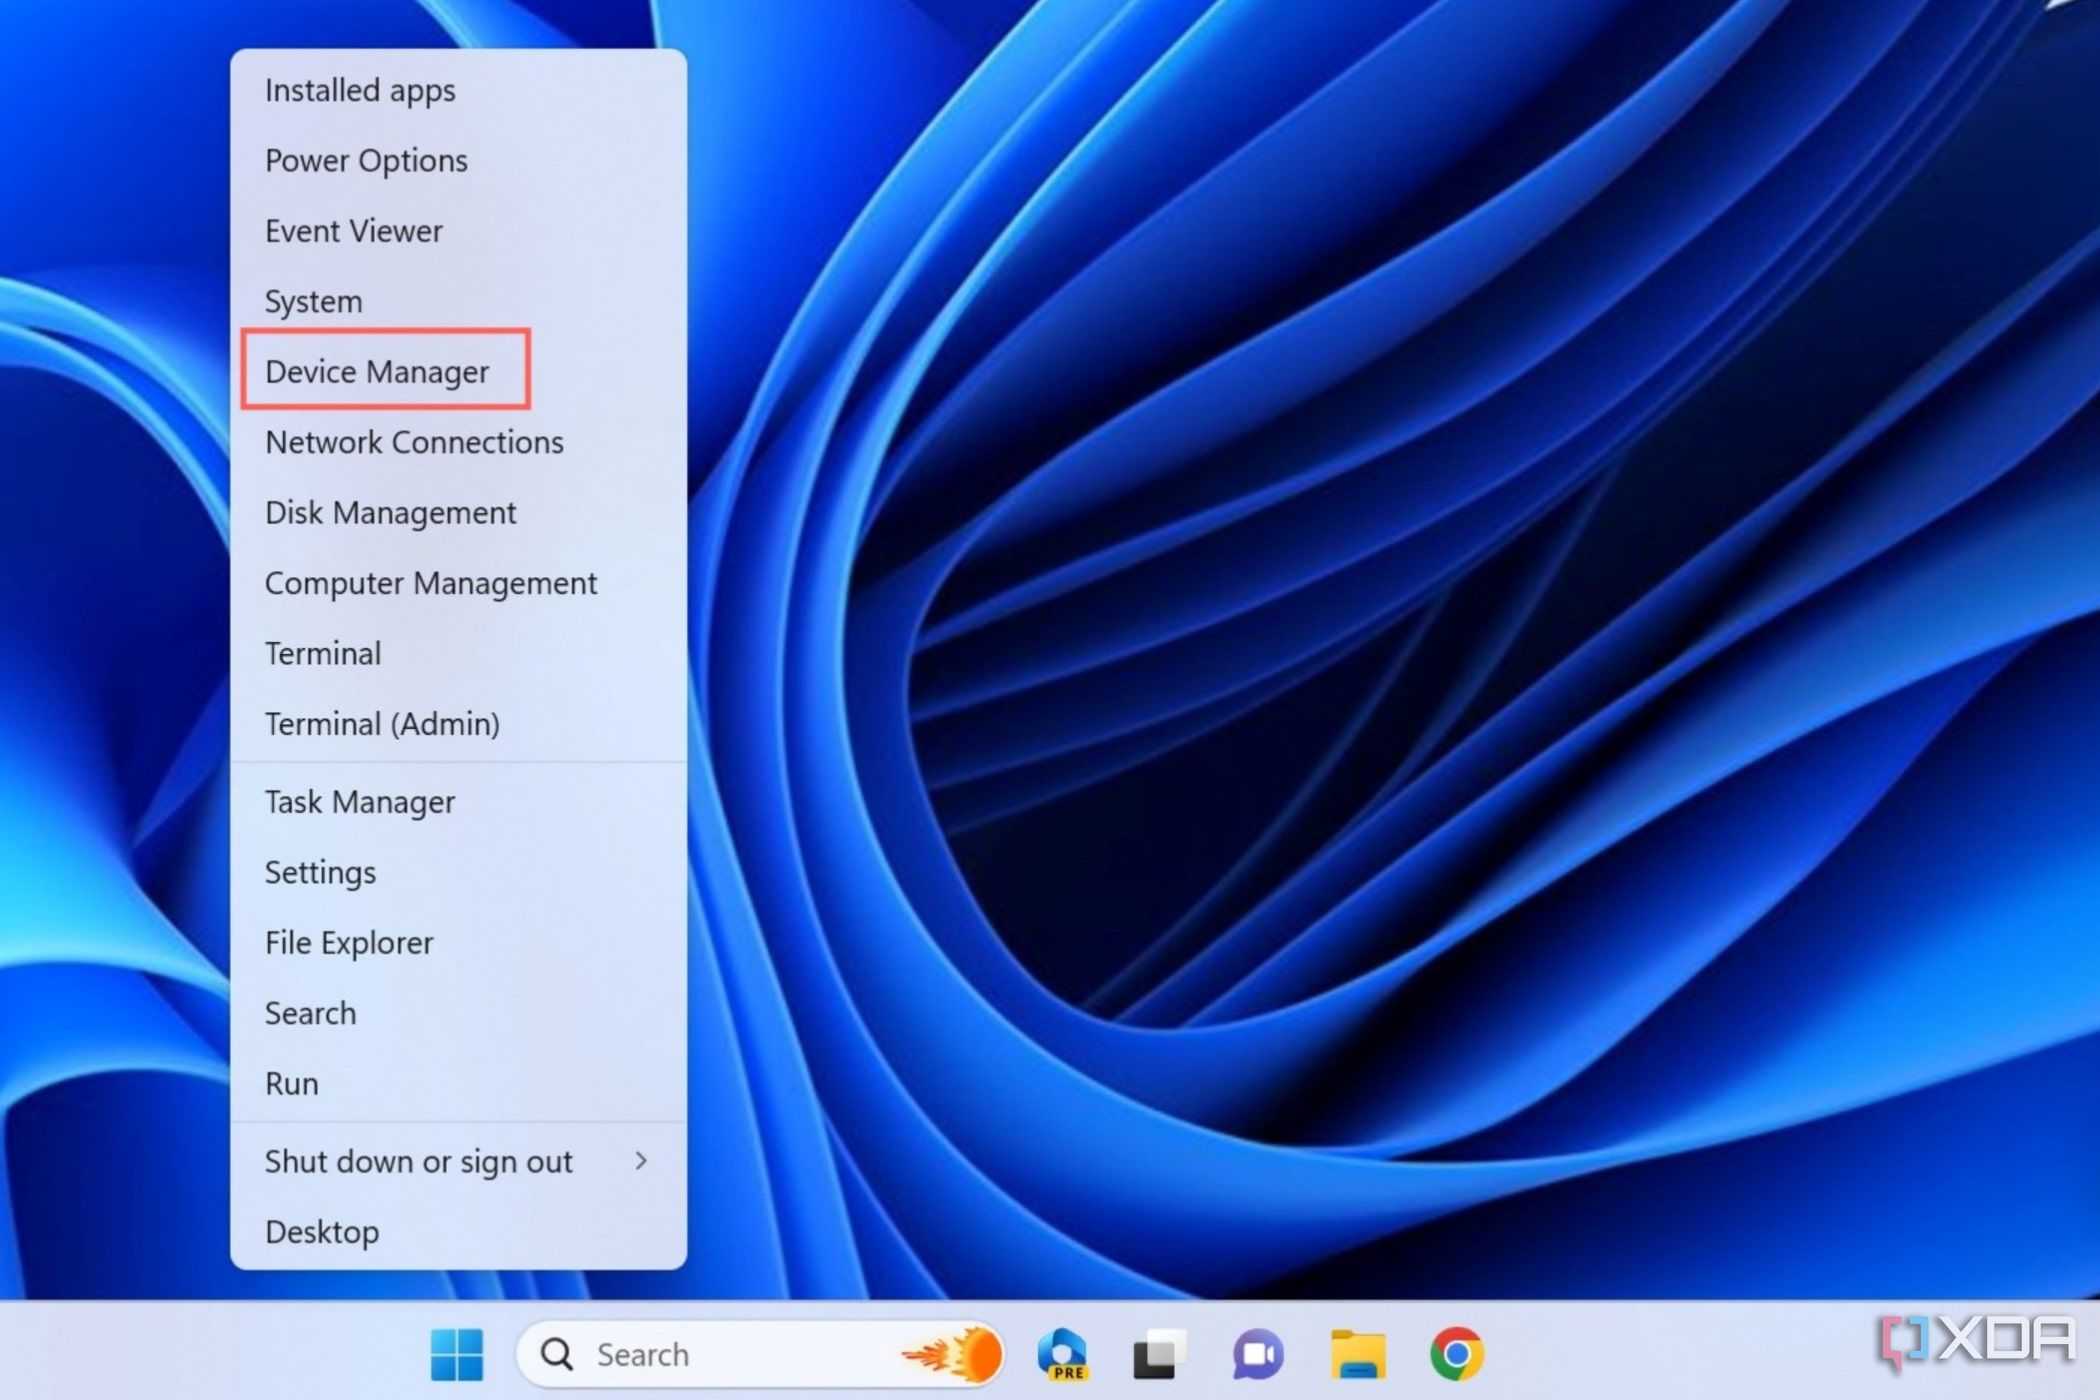

Since the Device Manager doesn’t reveal whether a drive is an HDD or an SSD, you’ll have to search the model name online to ensure you’re looking at an SSD.
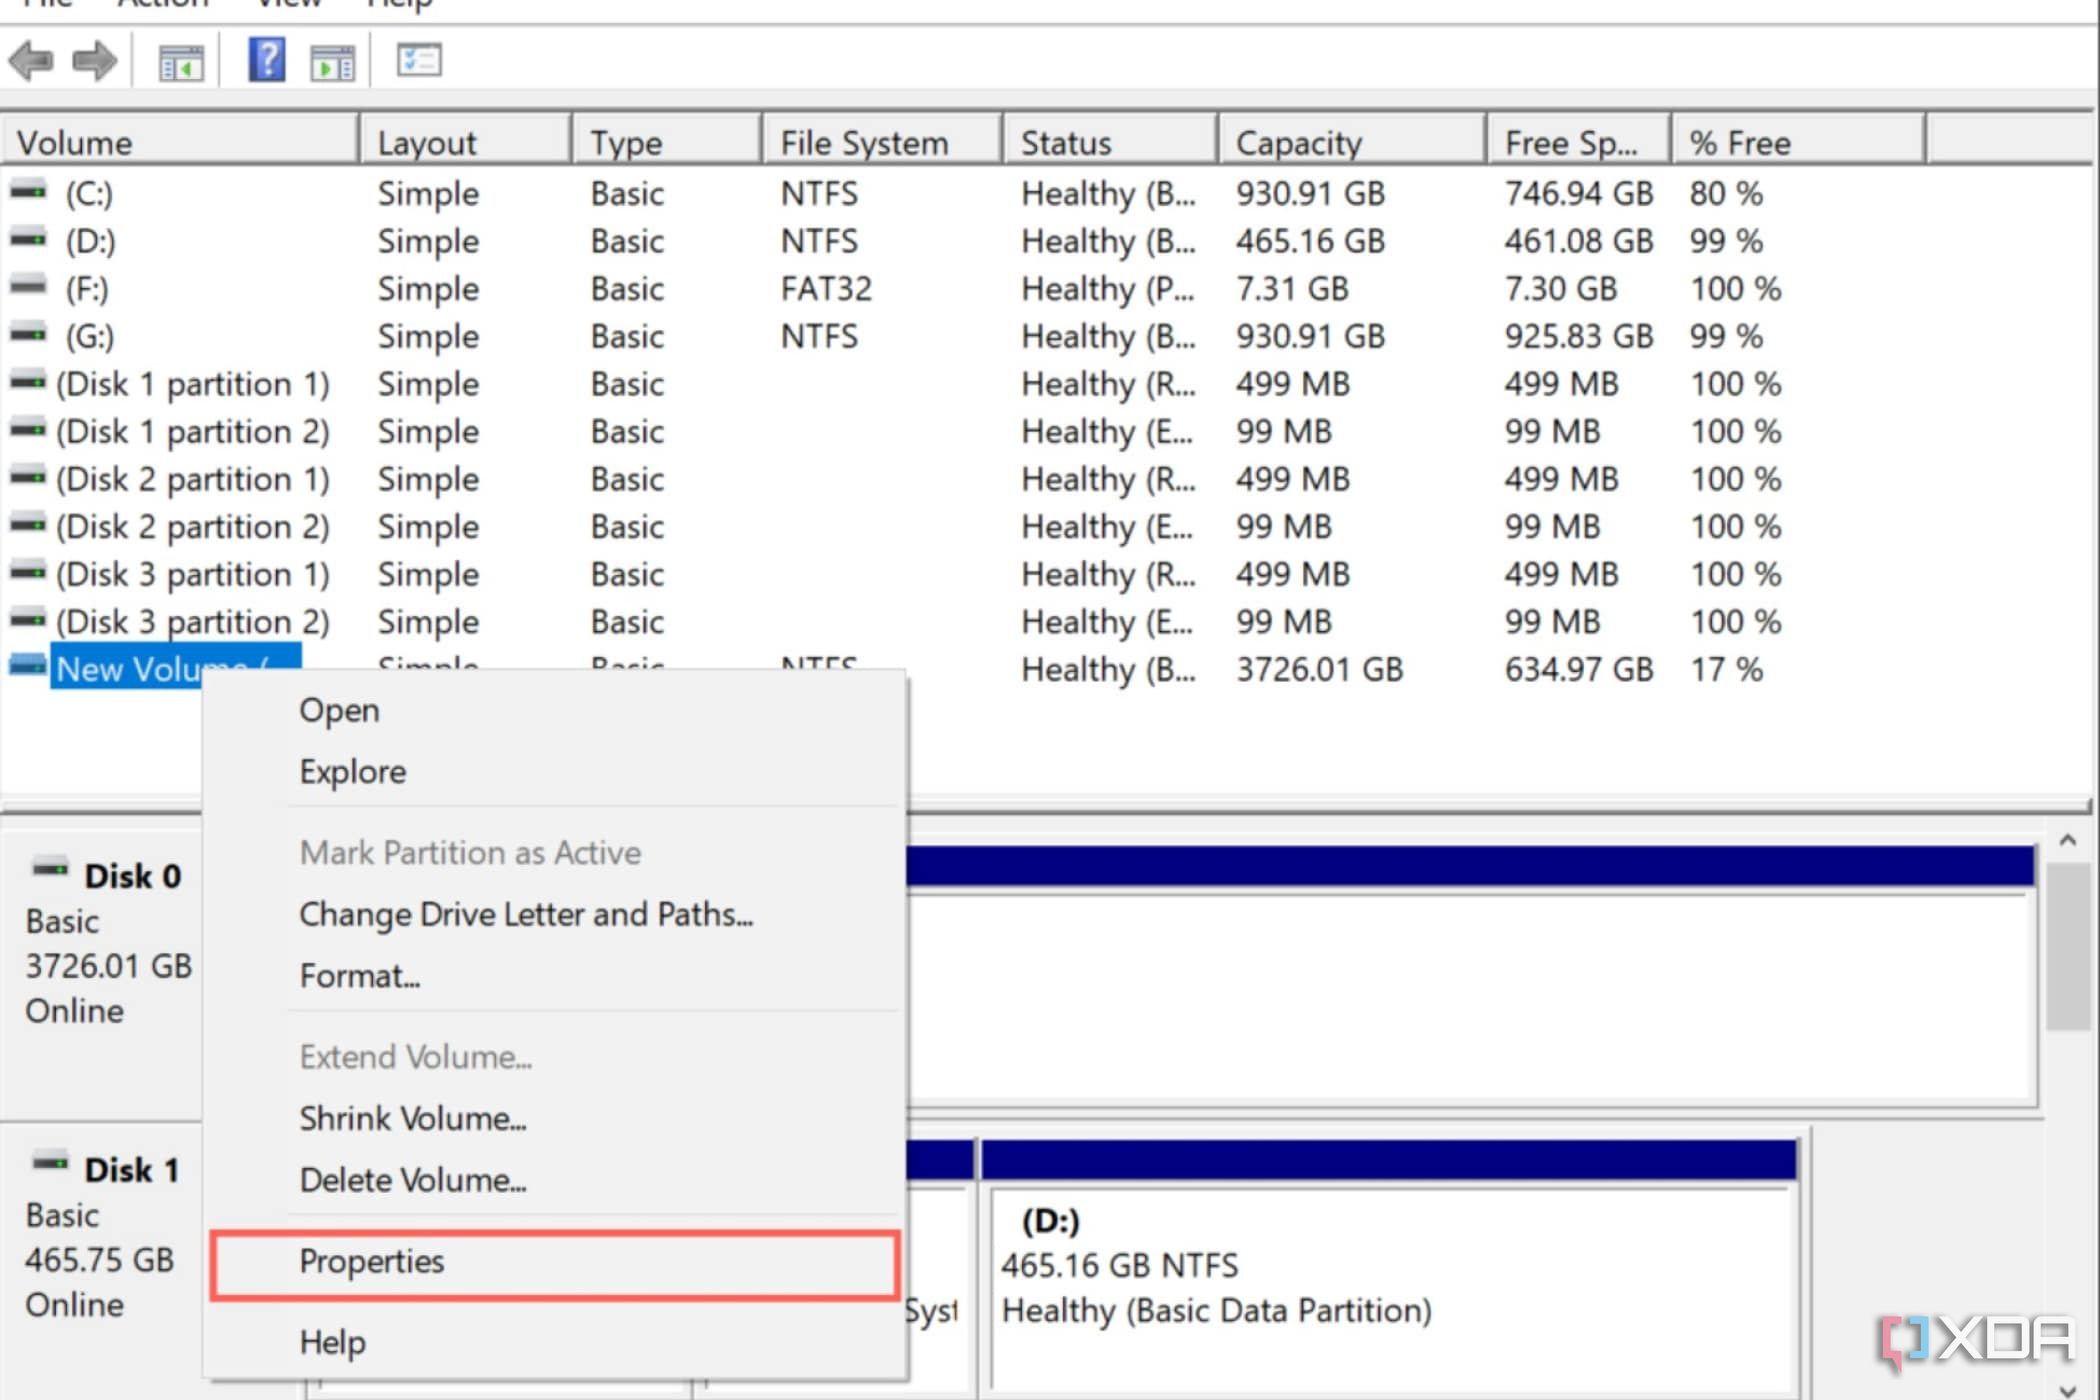
How to check your SSD using Disk Management
The Disk Management utility is typically used to manage the drives and their partitions, but you can also use it to find out the name of your SSD.
-
Right-click on the Start button and pick Disk Management.
-
Right-click on any Storage Volume and select Properties.
-
The names of all storage drives will show up once you navigate to the Hardware tab.


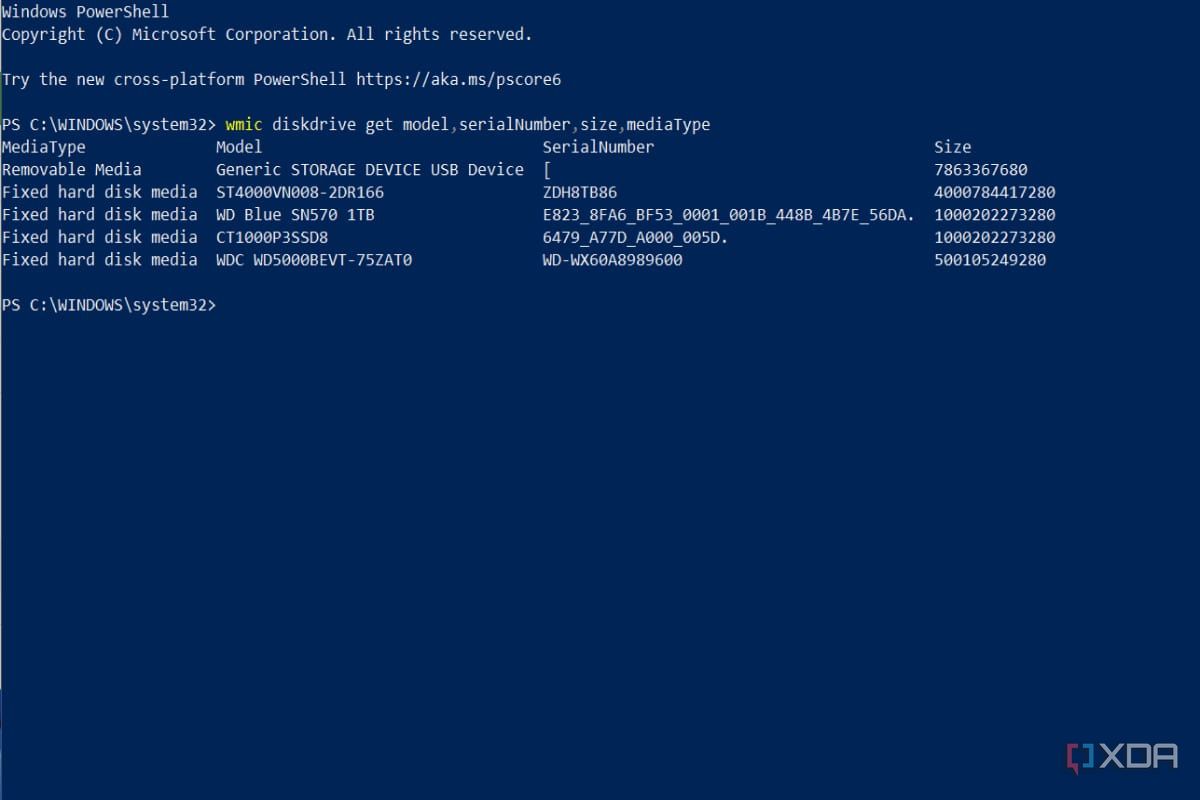
How to check your SSD using Windows Terminal
The Terminal in Windows 11 is a powerful tool that lets you execute various commands to view the SSD details, including wmic disk drive and Get-PhysicalDisk.
-
Right-click on the Start button and select Terminal (Admin).
- Grant administrator privileges to the Terminal when prompted.
-
Type the following command and press Enter:
wmic diskdrive get model,serialNumber,size,mediaType
-
The details of the SSD, HDD, and other storage drives will appear.
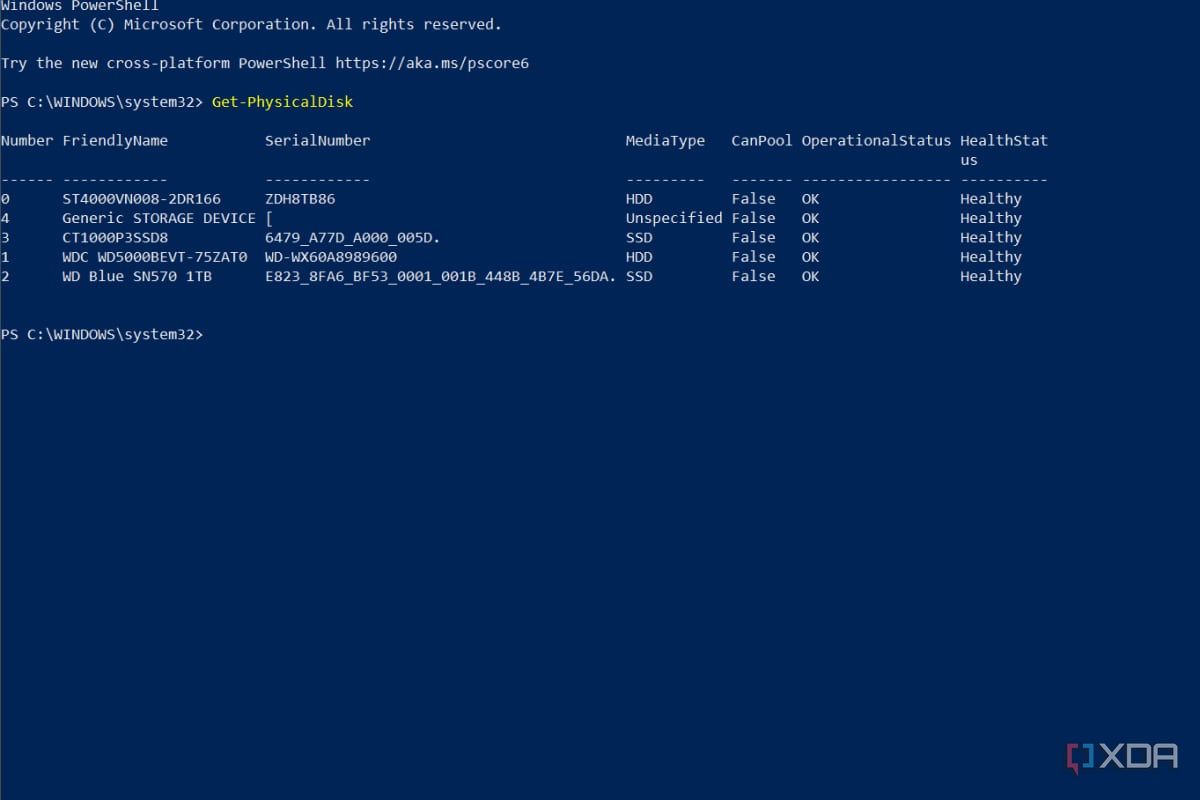
-
Alternatively, you can run the Get-PhysicalDisk command to get your drives’ operational status, media type, and health status.

How to check your SSD using HWiNFO64
If you want even more information than the Windows Terminal can provide, you should focus on third-party apps. I regularly use HWiNFO64 as it’s one of the least intrusive free-to-use applications for checking hardware details. All you have to do is:
- Download the portable version of the app from this link.
- Run HWiNFO64.exe with admin privileges.
- Click on the Plus icon next to Drives.
-
Your hard drives and SSDs will be visible under the NVMe Drives and the (S)ATA/ATAPI Drives.
The former (typically) only contains SSDs, while the latter includes all the storage drives connected to your PC’s SATA ports.
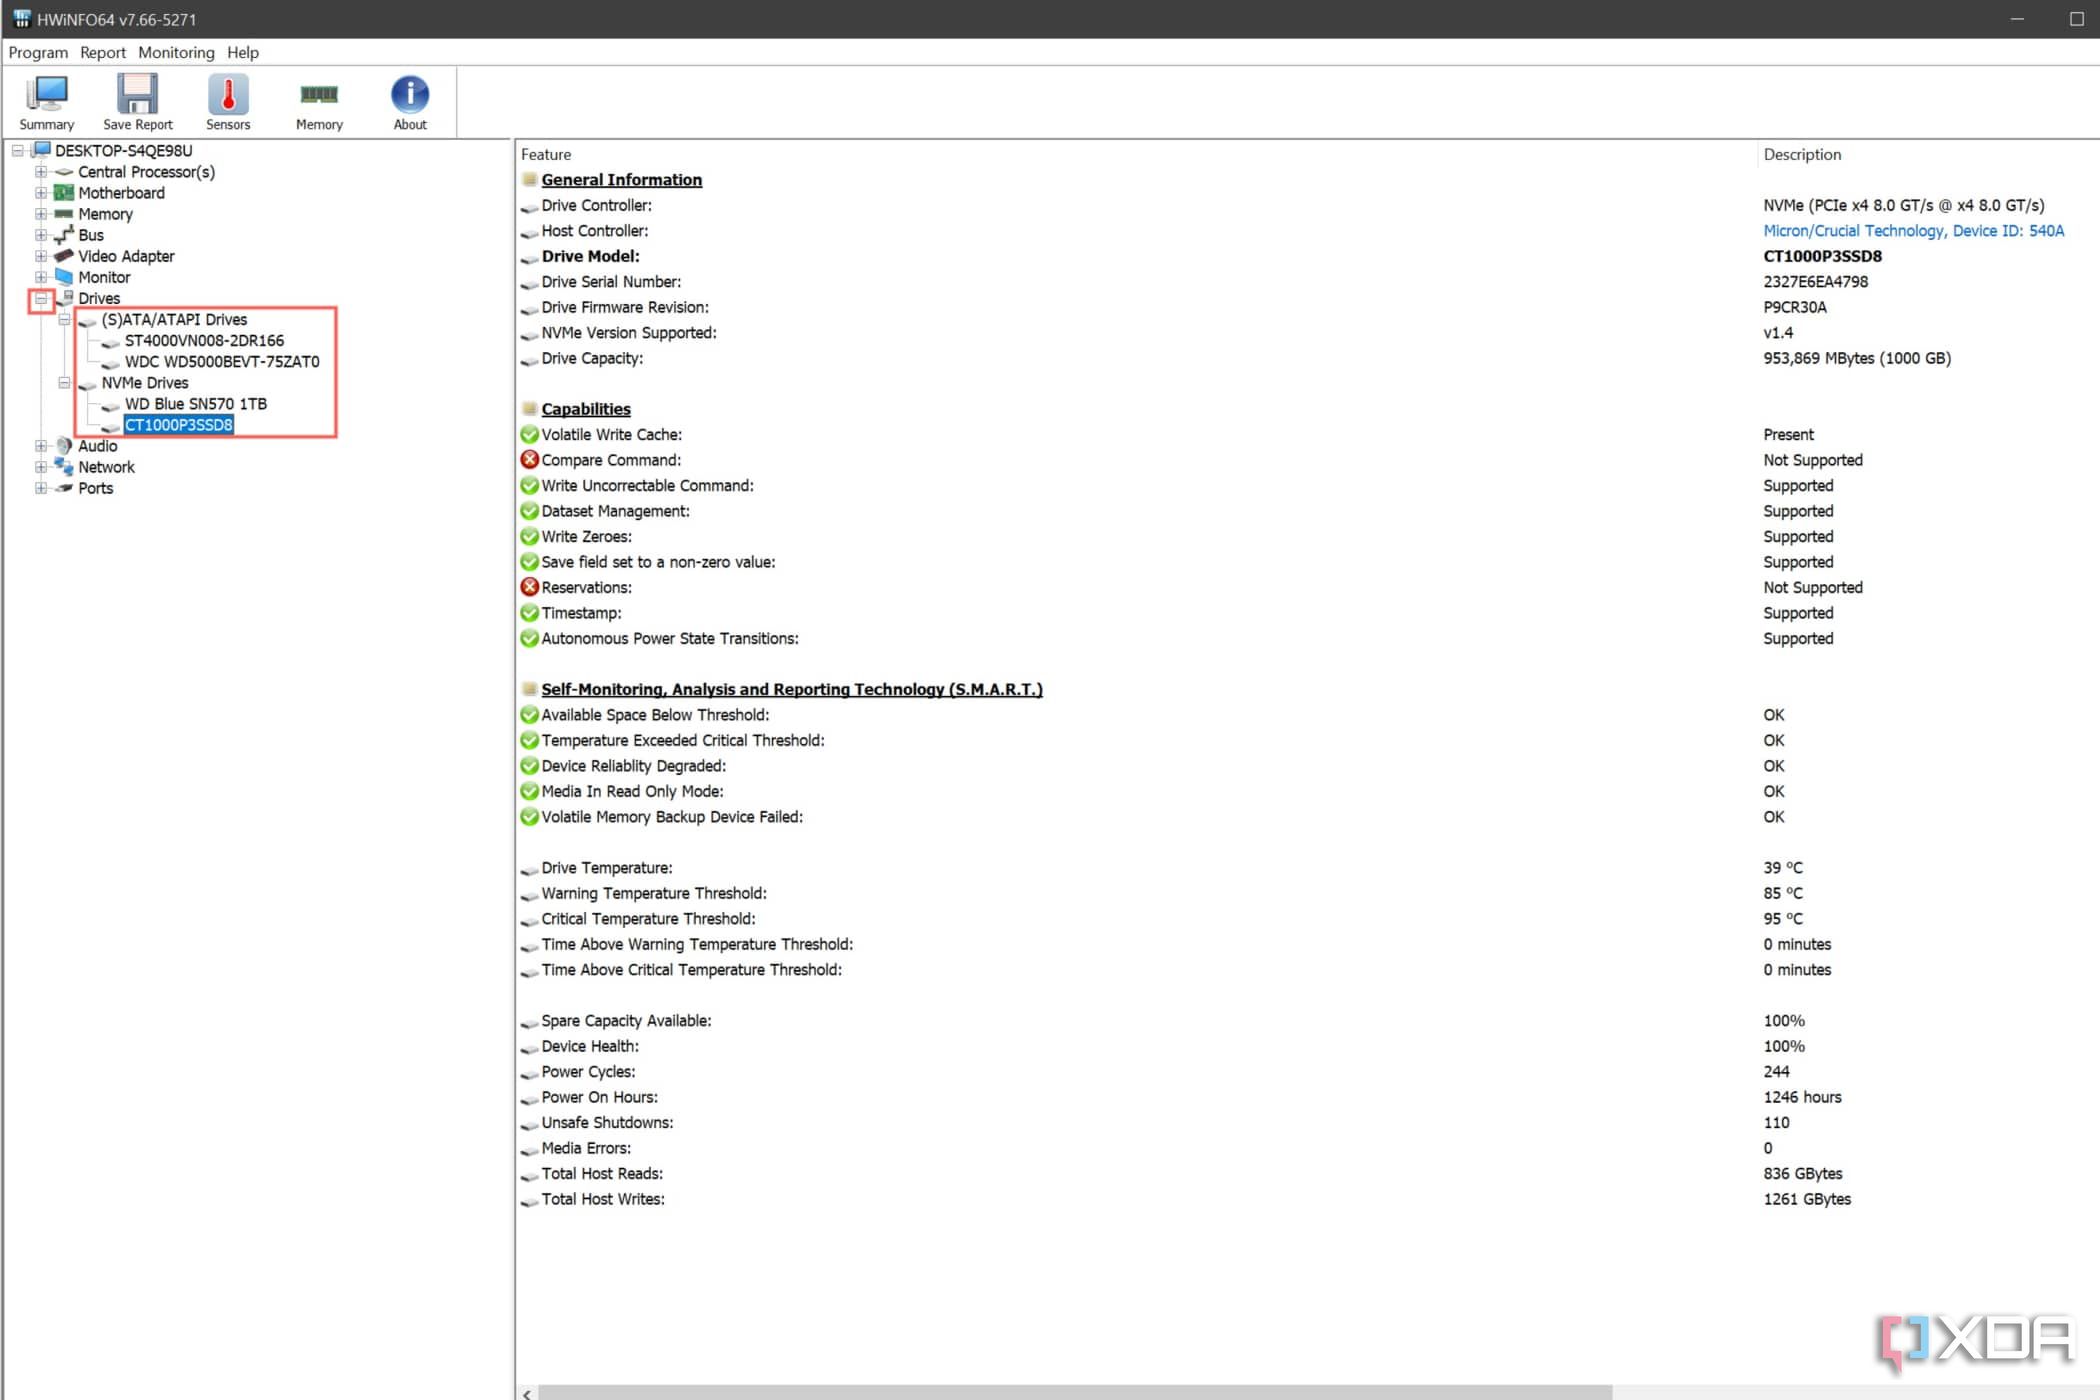
You can view the detailed statistics of all the drives on the right-hand side of the HWiNFO64 application.
How to check your SSD using CrystalDiskInfo
Whereas HWiNFO64 is an all-in-one app for checking your PC specs, CrystalDiskInfo is the better tool if you want even more details about your SSD.
- Download the .zip version of CrystalDiskInfo from the official link before extracting it to your desired location.
- Run DiskInfo64.exe as an administrator.
-
Your SSD name, specs, and the results of the S.M.A.R.T. test will appear inside CrystalDiskInfo.

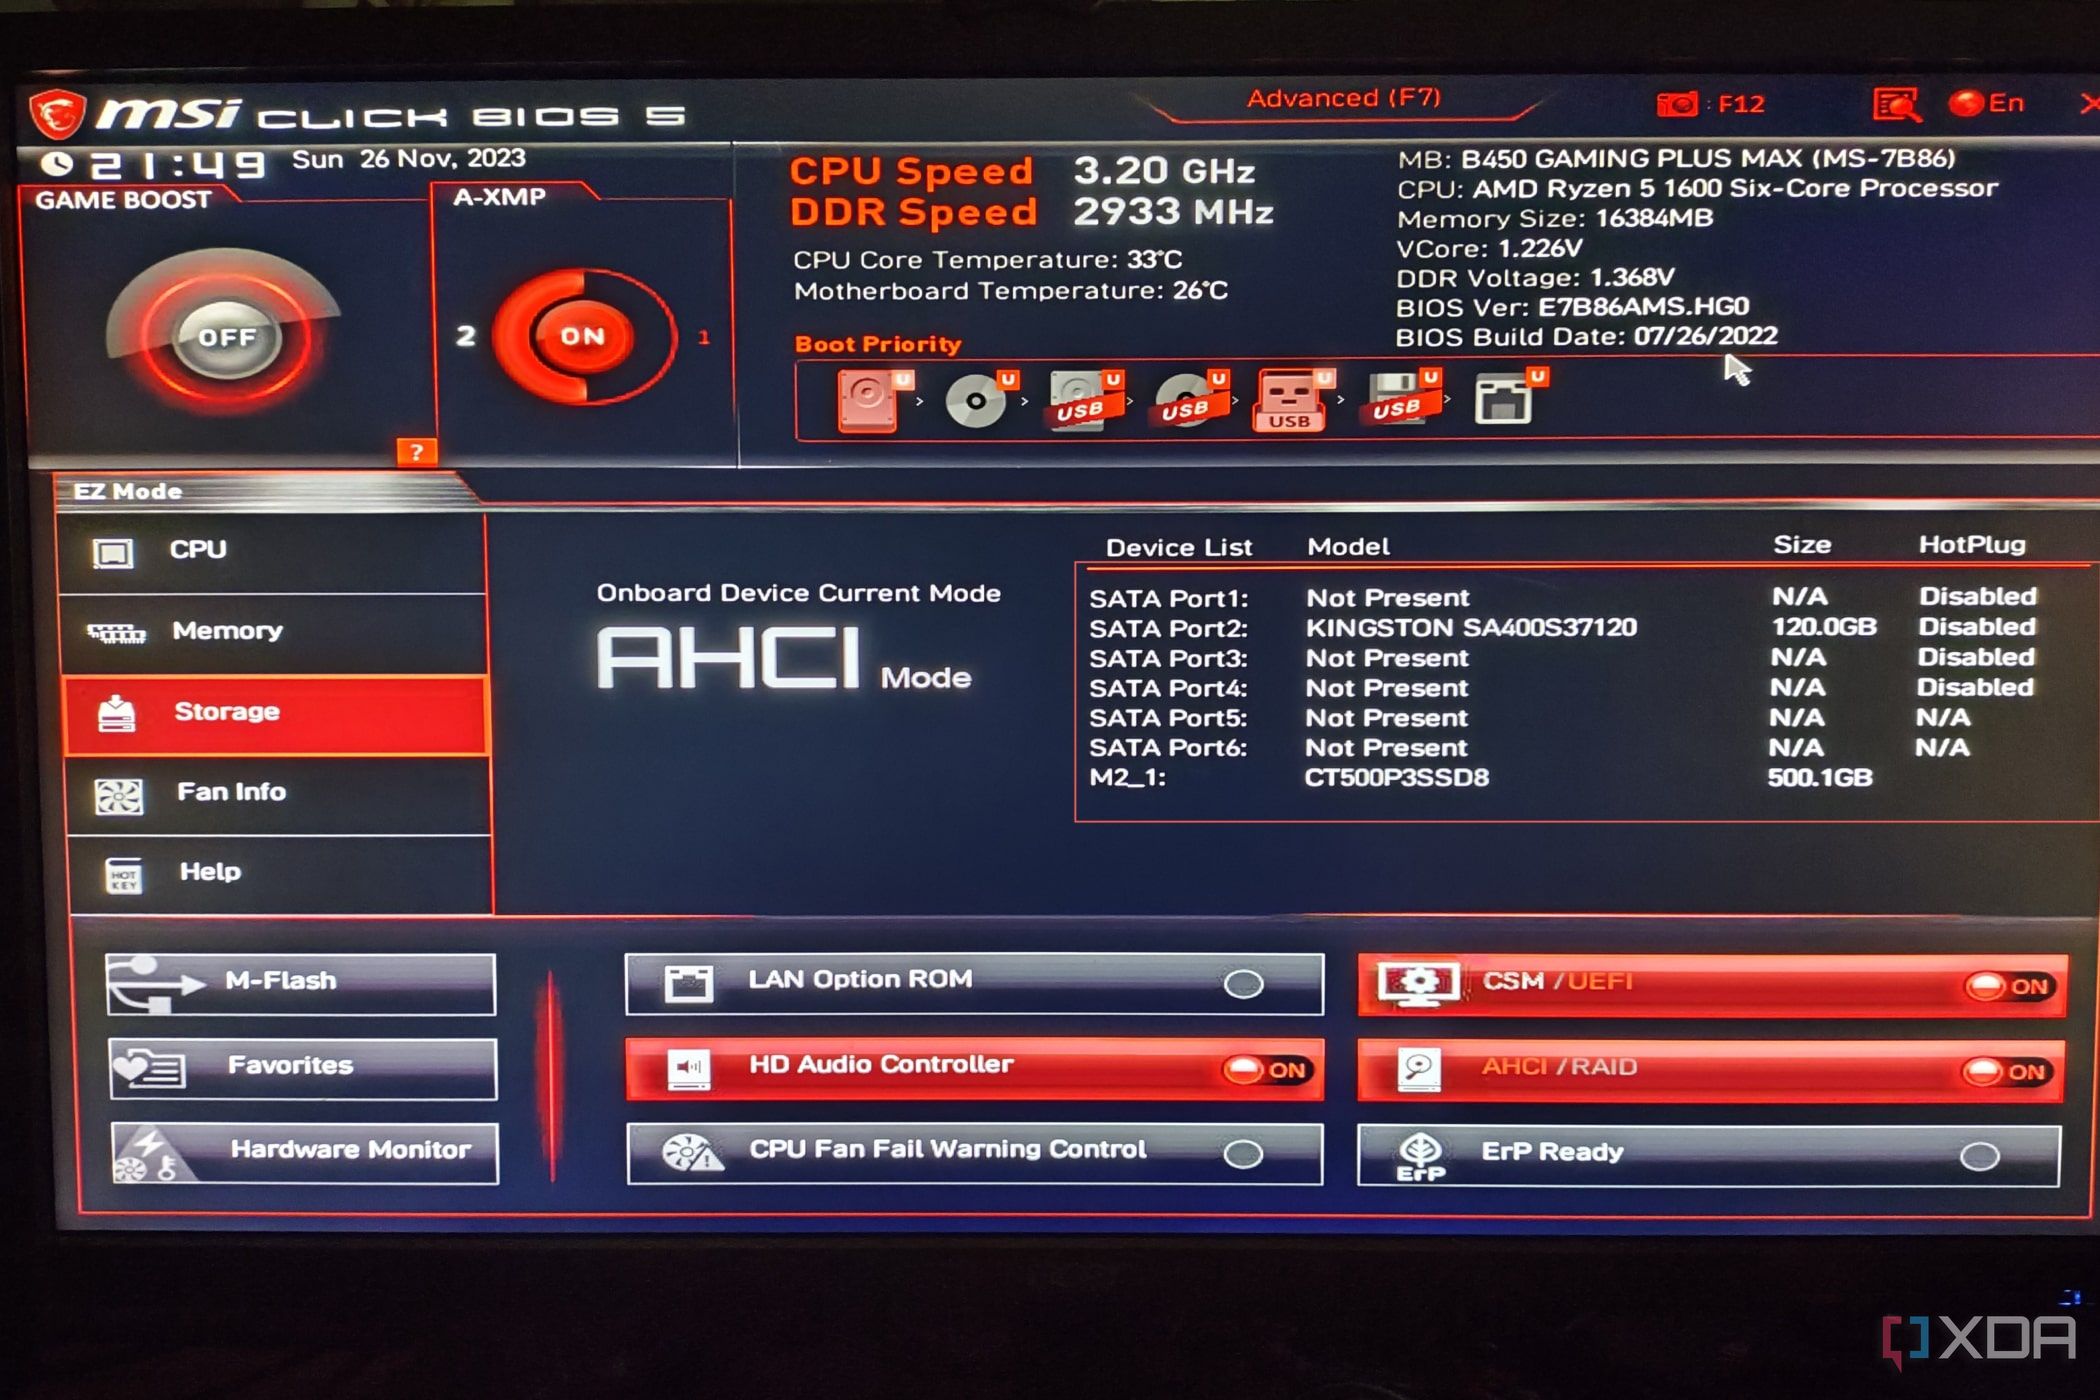
How to check your SSD using BIOS
If you cannot boot into the OS, you can use the BIOS to identify all the SSDs, HDDs, and USB drives connected to your system.
- When your PC starts, keep pressing the Del key on your keyboard.
- Head to the System Info tab.
-
The model names of all storage drives will be visible under SATA Slot Info and M.2 Slot Info.
-
Alternatively, you can see the storage drives listed under the Storage tab in the EZ Mode.

Which drive do you have?
Viewing the drives’ names is an easy task; what’s difficult is identifying whether the drive in question is a hard drive or an SSD. Google and other search engines are your best friends. Unless the drive shows up as a «Generic Storage Disk,» a quick search will reveal most of its specifications.
Now that you know how to check the SSD details, maybe you want to grab a faster one to replace the old, beaten-up drive. Be sure to look into our favorite SSDs if you need help picking out a new high-speed drive for your system. Alternatively, if your SSD is running out of space, you can use WizTree to analyze the large, unnecessary files hogging up all the space.

Related
How to update your SSD firmware on Windows
It’s a fairly simple process to ensure the smooth performance of your SSDs
Некоторые начинающие пользователи задают вопрос: как определить, оснащен ли компьютер обычным жестким диском HDD или же твердотельным накопителем SSD, не вскрывая компьютер. Сделать это сравнительно просто, но для начинающих пользователей методы могут быть неочевидными.
В этой инструкции подробно о способах узнать какой диск: SSD или HDD установлен на вашем ПК или ноутбуке. Рассматриваются методы для Windows 10 и Windows 11, но большинство из них будут работоспособны и в предыдущих версиях системы.
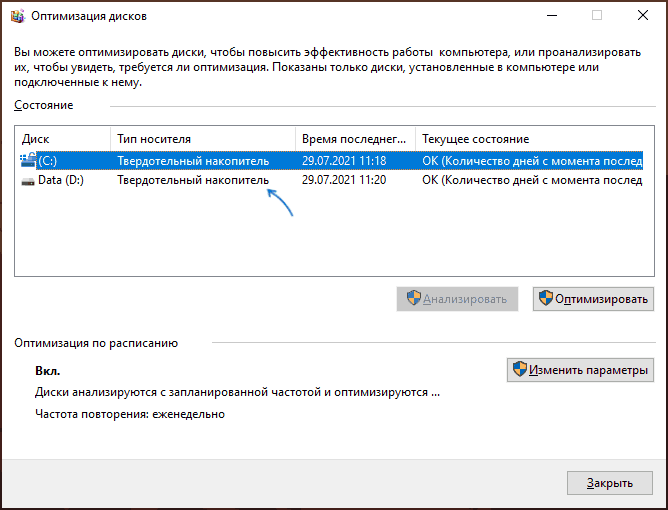
Окно «Оптимизация дисков»
Первый из способов посмотреть, жесткий диск или твердотельный накопитель установлен на вашем компьютере — полагаться на то, как сама Windows определила тип диска и посмотреть «выводы» системы в окне оптимизации дисков. Плюсы подхода — он простой и быстрый. Минусы: иногда SSD может быть ошибочно определен как жесткий диск. Для просмотра типа дисков достаточно использовать следующие шаги:
- В проводнике откройте свойства диска: нажмите правой кнопкой мыши по диску и выберите соответствующий пункт контекстного меню.
- Перейдите на вкладку «Сервис» и нажмите кнопку «Оптимизировать». Еще один способ быстро попасть в нужное расположение — нажать сочетание клавиш Win+R, после чего ввести dfrgui и нажать Enter.
- В окне оптимизации накопителей вы увидите список дисков, а также столбец «Тип носителя». Если в нём мы видим «Твердотельный накопитель» — это SSD.

При определении типа диска в указанном расположении система опирается на проводимый автоматически тест производительности системы и, если он не проводился или по какой-то причине скорость накопителя оказалась низкой, то тип может быть определён неверно.
В случае, если оценка производительности не производилась, вы можете запустить её вручную: в командной строке, запущенной от имени администратора введите команду
winsat formal -restart clean
и нажмите Enter. Дождитесь завершения выполнения оценки производительности, перезагрузите компьютер и проверьте, обновилась ли информация о типе установленных накопителей.
Определение типа диска по модели
Следующий способ — использование имени устройства и поиска в Интернете. Почти абсолютно надёжный, при условии, что ваш диск достаточно не является слишком уникальным. Это можно сделать и с помощью диспетчера устройство, но я рекомендую окно «Сведения о системе», поскольку оно позволяет копировать нужные данные:
- Откройте сведения о системе, для этого нажмите клавиши Win+R на клавиатуре, введите msinfo32 и нажмите Enter.
- Перейдите в раздел «Компоненты» — «Запоминающие устройства» — «Диски» (второй из двух повторяющихся пунктов).
- Выберите строку «Модель» и нажмите клавиши Ctrl+C для копирования модели.
- В поиске в интернете введите модель диска (само слово «Модель», которое также скопируется, удалите из запроса) и с большой вероятностью результаты поиска позволят вам определить, SSD или HDD установлен на вашем ПК или ноутбуке.


В выдаче поискового сервиса вы сможете найти информацию о конкретном накопителе, его типе и характеристиках.
Команда PowerShell
Существует возможность определения типа диска с помощью PowerShell, но недостатки метода те же, что и в первом случае. Достаточно запустить Windows PowerShell и ввести команду:
Get-PhysicalDisk

Если в столбце MediaType будет указано SSD — это именно он и есть.
Сторонние программы
Многие программы, предназначенные для просмотра аппаратных характеристик компьютера (даже самые простые наподобие Speccy), а также утилиты для проверки дисков, такие как CrystalDiskInfo отображают, помимо прочего, и тип диска, а также его точную модель.

Про CrystalDiskInfo (именно её я рекомендую для рассматриваемой задачи) вы можете прочесть в обзоре Программы для SSD.
Надеюсь, предложенных способов будет достаточно для ваших задач. Если же остаются вопросы или необходимость уточнения информации, вы можете использовать комментарии ниже, я постараюсь помочь.