
Главная страница решений
LCD Monitor
General Questions
Изменено: Ср, 27 Янв, 2021 на 10:54 PM
1. На «Панели управления» откройте «Диспетчер устройств».

2. Найдите видеоадаптеры и дважды нажмите на него, затем дважды нажмите на показанное устройство:
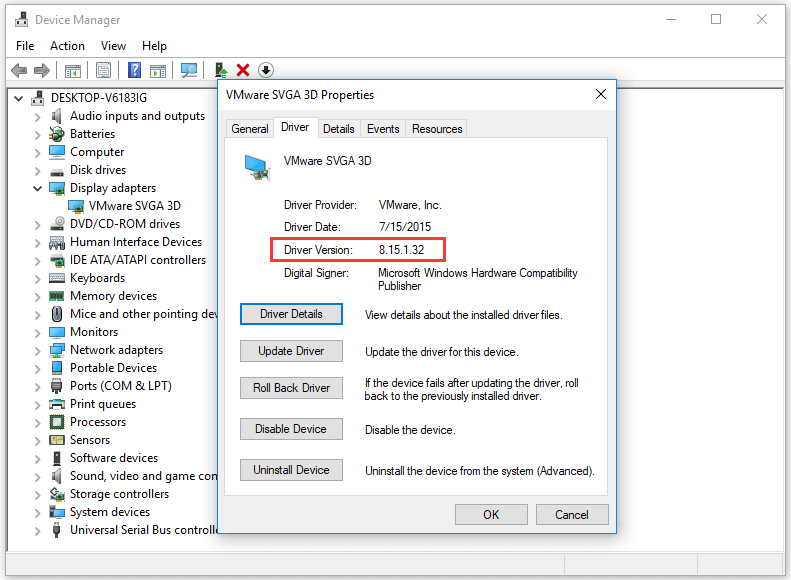
3. Выберите вкладку Драйвер, здесь будет указана версия драйвера.
Была ли эта статья полезной?
Да
Нет
Отправить отзыв
Извините, что не удалось помочь. У вас есть идеи, что можно улучшить в этой статье?
Статьи по теме
Drivers are the next most essential thing a computer needs after its Operating System. Without the drivers, all the individual components inside of your computer, or the peripherals outside of it would become useless.
A driver is a piece of code, or a file, that acts as a communication medium between the operating system and the hardware. Or as Microsoft puts it:
A driver is a software component that lets the operating system and a device communicate with each other.
Any piece of hardware, may it be the RAM or hard drive inside your PC, or an attached keyboard or printer, requires a driver to help it communicate with the OS. Without the driver, the hardware would not understand what the operating system is demanding from, and vice versa. Therefore, an up-to-date and error-free driver is essential for the smooth functioning of each hardware.
Drivers are consistently being updated with new improvements through patches, which consequently change a driver’s associated version. This article discusses how you can check the versions of all the different drivers that are installed on your computer and why it is important to keep tabs on them.
Table of Contents
What is Driver Version and Why is it Important
The driver version is a combination of numbers that signifies the release of the driver itself. A version can have decimals in it to separate major version changes from the minor ones.
For example, if we were to release a new driver for the first time, we would proudly name it Itechtics 1.0.0. After making some minor improvements to the driver, we would then republish the driver and change its version number to Itechtics 1.0.1 (or Itechtics 1.0.3, depending upon the number of iterations made to the release).
If we were to make a major update to the driver, we may as well name it Itechtics 2.0.0. As you may notice, the version number(s) started from the smaller ones and then made incremental changes depending upon how big the update is.
Now that that’s understood, it is important to keep tabs on what version of the driver you are running on your computer. This will help differentiate between your driver and the latest one available. If your system has not updated the driver in some time, then there ought to be a significant version difference between the one being offered by the vendor and the one you have on your device.
Therefore, cross-checking the driver versions for all your hardware is important, since the latest drivers include security patches that fix vulnerabilities that can be exploited through attacks and other performance improvements for you to benefit from.
Let us now move on to show you how you can check the driver version for the different components on your PC.
Check Installed Driver Version using Device Manager Console
One way to check the version of the installed drivers on your computer is through the Device Manager – a Microsoft Management Console (MMC) to manage your system’s hardware. Note that using this method, you can only get the version of one component driver at a time. If you want to know the versions of all the installed drivers, continue to the next section of this post.
- Launch the Device Manager by typing in devmgmt.msc in Run.
- You will see the name of your computer at the very top, and then the different branches of hardware under it. Expand the associated branch of the hardware whose driver version you want to know by clicking on it.

- Now right-click on the item and then click Properties from the context menu.
- From the Properties window, switch to the Driver tab. There, you will find the version of the driver written, as highlighted in the image below.


You can now cross-check the manufacturer’s website for the latest available drivers. If a newer one is available, you can update it using the guide given further down this post.
From the Properties window in step 3 above, you can also find other useful information, such as the name of the manufacturer, the date the driver was installed on, etc.
Check Installed Driver Version using PowerShell
Another method to check the version of the installed drivers is through Windows PowerShell. You can get the versions of all the drivers installed on your PC for all the hardware with just one command.
To obtain the driver version, launch Windows PowerShell with administrative privileges and then paste the following command:
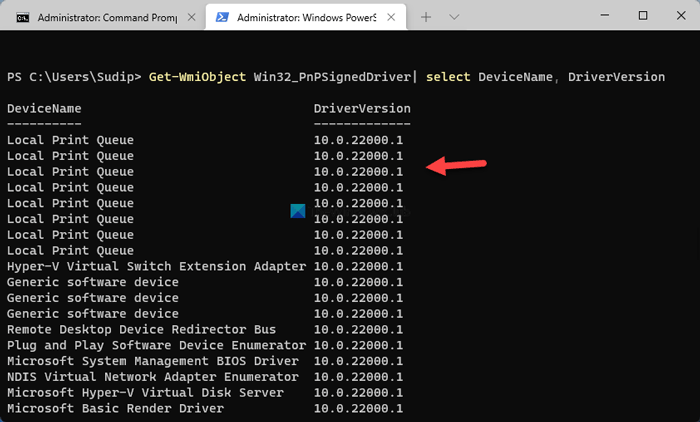
Get-WmiObject Win32_PnPSignedDriver| select DeviceName, Manufacturer, DriverVersion
This command will display all of the drivers installed on your computer, as in the picture below:

This is a quick way to get information on the current drivers installed all at once!
Now that you have the information needed regarding the current drivers installed, how would you know when an update is required?
When Does a Driver Need to be Updated
It is not always necessary to update a driver. Your drivers are typically updated automatically by Windows Update. Nevertheless, there is no benchmark that will determine whether a driver needs to be updated or not.
In most cases, a driver needs to be updated if the associated hardware becomes glitchy. For example, the network driver may need to be updated if you are experiencing weak signals while the other devices around you are not.
Another indicator for the driver update requirement is the date it was installed. Again, there is no time frame during which a driver should be updated, as all manufacturers release drivers for different components after different durations. However, we suggest that you update the driver manually (guide given below) if it is older than 1 year.
You can check the date of installation of the driver from the Properties window of the hardware, as discussed above in the section for “Checking installed driver version using Device Manager console.”

How to Reinstall a Driver
It may be possible that you are already running the latest version of the driver, yet the hardware could be glitchy. In such scenarios, it may be possible that the driver did not install correctly, or has been corrupted. You can then try reinstalling the driver using the following steps:
- Open the Device Manager console by typing in devmgmt.msc in Run.
- Now expand the associated branch of the hardware whose driver you think is faulty.
- Right-click on the item and click Uninstall device from the context menu.
- In the confirmation dialog box, check the box next to “Attempt to remove the driver for this device” and then click Uninstall.
- Now click on the Scan for hardware changes button at the top.
- Now restart your computer. This step is optional and would only reassure the driver reinstallation.


Your associated driver will now be reinstalled. Check to see if the issue you were facing has been resolved (if any).
How to Update Driver Automatically
You can try to update your driver automatically in Windows. The process uses Windows Update to automatically search for any updates for the associated driver and then install them if found.
Here’s how to automatically update a driver in Windows:
- Open the Device Manager console by typing in devmgmt.msc in Run.
- Now expand the associated branch of the hardware whose driver you want to update.
- Right-click on the item and click Update driver from the context menu.
- From the pop-up window, click Search automatically for drivers.
- The wizard will now start searching for an update for the driver on the internet. Once found, it will automatically install the update. If not, you will be prompted with “The best drivers for your device are already installed.” Either way, close the wizard.


How to Update Driver Manually
You can also manually update the driver if a newer version is available than your already-installed one. However, this method requires that you download the correct driver for the hardware before performing the steps given below. We suggest that you visit the manufacturer’s website and download the driver. Once done, follow the steps below to install it:
- Open the Device Manager console by typing in devmgmt.msc in Run.
- Now expand the associated branch of the hardware whose driver you want to update.
- Right-click on the item and click Update driver from the context menu.
- From the popup window, click Browse My Computer for drivers.
- On the next screen, click the Browse button and navigate to the downloaded driver and select it. Click Next when done.
- The driver will then begin installing. When it finishes, close the wizard.


How to Roll Back Driver
If a driver has been updated, Windows still keeps the previous version of the driver just in case. This will be made available in case you decide to roll back to it at a later time.
You may require to go back to the previous version of the driver if you find that the newer one is having issues, or is just not compatible with your setup.
That said, Windows only keeps the last installed version of the driver and discards the rest. You can roll back to the latest version through the following steps:
- Launch the Device Manager by typing in devmgmt.msc in Run.
- You will see the name of your computer at the very top, and then the different branches of hardware under it. Expand the associated branch of the hardware whose driver version you want to know by clicking on it.
- Now right-click on the item and then click Properties from the context menu.
- From the Properties window, switch to the Driver tab and click Roll Back Driver.
- From the pop-up window, select the reason for rolling back and then click Yes.


The window will now close. Give your system a few seconds for the driver to successfully rollback. Note that you will not be prompted whether the driver has rolled back or not. You can confirm this by checking that the Roll Back Driver button has been greyed out in the Properties window. Proceed to close the Properties window and the Device Manager console.

Final Thoughts
As you may have already understood, healthy drivers are very important for a device to run smoothly. Thus, keeping an eye out for a new driver version is equally significant.
Although Windows updates most drivers automatically, we recommend that you occasionally check for updated drivers manually as well, just to make sure.
Usually, the latest drivers are pre-checked by the vendor and are mostly error-free. If there are any anomalies discovered, they are usually fixed in a later update.
-
Home
-
News
- How to Check Nvidia Driver Version Windows 10 – 2 Ways
By Alisa |
Last Updated
This post introduces 2 ways to allow you easily check Nvidia driver version on Windows 10. You can check driver version through Device Manager or Nvidia Control Panel. Check the step-by-step guide below. MiniTool software also provides free data recovery software, hard drive partition manager, system backup and restore software if you need.
If you want to check if your Nvidia driver is in up-to-date and find out the current Nvidia driver version of your Windows computer, you can check the 2 ways below. Each way is attached with a step-by-step guide.
#1. How to Check Nvidia Driver Version Windows 10 in Device Manager
You can access Windows Device Manager that allows you to manage computer hardware devices and drivers, and check driver version on Windows 10. Below is the guide for how to check drivers Windows 10.
Step 1. Press Windows + R, type devmgmt.msc in Run dialog, and click OK to open Device Manager in Windows 10.
Step 2. In Device Manager window, you can see all computer hardware devices are listed. You can expand the device category which you want to check the driver version. Here we click Display adapters since we want to check Nvidia driver version.
Next you can right-click the Nvidia graphics card, and choose Properties.
Step 3. Then you can click Driver tab in Properties window, and you can see the current version of the Nvidia driver.
In the driver properties window, you can also check the driver details, update driver, roll back Nvidia drivers, disable the device, uninstall the driver, etc.
#2. Check Nvidia Driver Version in Windows 10 from Nvidia Control Panel
If your computer uses Nvidia graphic cards, then an Nvidia Control Panel application is installed on your computer. You can check Nvidia driver version through Nvidia Control Panel.
Step 1. Right-click the empty area on computer desktop screen, and choose Nvidia Control Panel to open it.
Step 2. Next click System Information link at the bottom-left. And you can check the Nvidia driver version under Details.
How to Recover Lost Data on Windows 10 Computer
Data loss frequently occurs when your computer has problems like system crash, blue/black screen error. You can easily restore lost data from Windows 10 computer only if you have the professional data recovery software at hand.
MiniTool Power Data Recovery, best data recovery software for Windows, helps you easily recover any deleted/lost files from Windows 10 computer, external hard drive, SSD, USB flash drive, SD card, etc. Novice users can use this data recovery software with ease due to its extremely intuitive interface and simple operation. The easy user guide is attached below.
- You can download and install MiniTool Power Data Recovery on your Windows computer. Then launch it.
- Next choose the device you’d like to recover data from in the left pane. If you want to recover data from external storage device like external hard drive or USB, you should connect it to your computer beforehand.
- In the right window, you can select the target partition or storage device, and click Scan MiniTool Power Data Recovery will start scanning the chosen device.
- After it finishes the scan, you can check the scan result to find wanted files, and click Save button to choose a new destination to store the recovered files.
About The Author
Position: Columnist
Alisa is a professional English editor with 4-year experience. She loves writing and focuses on sharing detailed solutions and thoughts for computer problems, data recovery & backup, digital gadgets, tech news, etc. Through her articles, users can always easily get related problems solved and find what they want. In spare time, she likes basketball, badminton, tennis, cycling, running, and singing. She is very funny and energetic in life, and always brings friends lots of laughs.
Download Windows Speedup Tool to fix errors and make PC run faster
If you want to check the driver version in Windows 11/10, here is how you can do that. There are multiple ways to find out the version of installed drivers in Windows 11 and Windows 10. This article lists three such methods you can follow to get the job done.
Why do you need a driver version?
There could be multiple reasons why you need to know the version of the driver installed on your computer.
- Let’s assume that you have installed an update, and following that, your computer is acting weirdly. At such a moment, you might need to inform a professional, and that person might want to know the things you have done recently. If so, you need to mention the driver update along with the version so that the professional can check the compatibility.
- Let’s assume that you have just found out that you haven’t updated your driver a long time back, and there is some malware attack going on around your driver. At such a moment, you need to know whether you have the accused version of the driver or not.
To check the driver version in Windows 11/10, follow these methods:
- Using Device Manager
- Using Windows PowerShell
- Using third-party software
To learn more about these steps, continue reading.
1] Using Device Manager

It is the easiest way to find the version of any driver installed on your computer. Whether it is a network driver or an audio driver, you can easily find out your driver’s version. For that, do the following:
- Press Win+X to WinX menu on your computer.
- Select the Device Manager from the list.
- Select a driver you want to know the version of.
- Right-click on the driver and select Properties.
- Switch to the Driver tab.
- Check the Driver Version entry.
It is the version of the installed and selected driver. You can repeat the same steps to find out any driver’s version using Device Manager.
2] Using Windows PowerShell
Windows PowerShell helps you obtain a list of all installed drivers on your computer. The best thing is that you can find online as well as offline drivers on the list. Online drivers are those, which are currently in use, and offline driver denotes the drivers that are currently not in use. To use Windows PowerShell or Windows Terminal’s Windows PowerShell instance to find out driver version, follow these steps:
- Press Win+X to open the WinX menu.
- Select Windows Terminal (Admin) option.
- Click on the Yes option.
- Enter this command:
Get-WmiObject Win32_PnPSignedDriver| select DeviceName, DriverVersion - Find the driver version in the DriverVersion column.
You can also use the elevated window on Windows PowerShell. For that, you need to search for windows powershell in the Taskbar search box, click on the Run as Administrator option, click the Yes option, and enter the aforementioned command.
3] Using third-party software
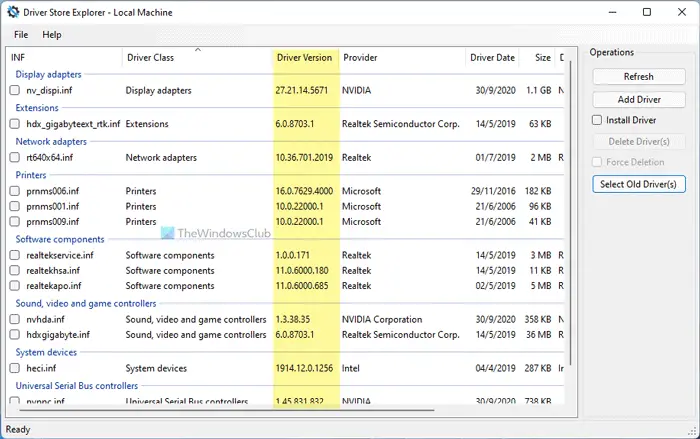
There are some third-party software that help you find the version of the installed drivers. For example, you can use the Driver Store Explorer. It is free and open-source software you can download from github.com. After downloading and opening this tool on your Windows 11/10 computer, you need to check the Driver Version column. Apart from the driver version, it also displays the driver class, manufacturer, date, size, device name, etc.
Read: Free software to list installed Drivers on Windows.
How do I check my drivers on Windows 11/10?
To check your drivers on Windows 11/10, you can use the Device Manager. For that, press Win+X to open the menu and select the Device Manager option. Here you can find all the installed devices and their corresponding drivers. You can expand each option to find out all the drivers.
How do I check my NVIDIA driver version?
To check the NVIDIA driver version on Windows 11/10 computer, you can use any of the three aforementioned methods. The easiest way to check the driver version is by using Device Manager. However, you can also use Windows PowerShell and some third-party tools.
That’s all! Hope this guide helped.
When he is not writing about Microsoft Windows or Office, Sudip likes to work with Photoshop. He has managed the front end and back end of many websites over the years. He is currently pursuing his Bachelor’s degree.