
Все способы:
- Способ 1: MSinfo
- Способ 2: DirectX
- Способ 3: Консоль
- Способ 4: «Редактор реестра
- Способ 5: Сторонний софт
- Вариант 1: CPUID CPU-Z
- Вариант 2: AIDA64
- Вопросы и ответы: 1
Способ 1: MSinfo
Пожалуй, самый простой и быстрый способ выяснения версии BIOS управляемого Windows 11 компьютера заключается в просмотре характеристики через встроенное в операционку средство получения информации о компонентах системы, оборудовании и программной среде под названием MSinfo. Вызывать данный, как будто бы скрытый, инструментарий совсем несложно.
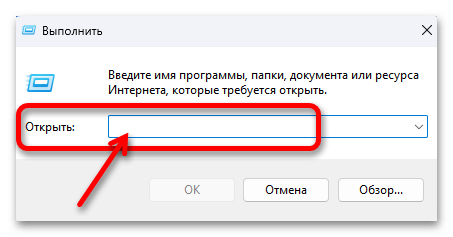
- Нажимаем одновременно клавиши «Windows»+«R» на клавиатуре компьютера или кликаем по элементу «Пуск» на Панели задач Win 11, а затем выбираем пункт «Выполнить» в отобразившемся поверх интерфейса ОС меню.
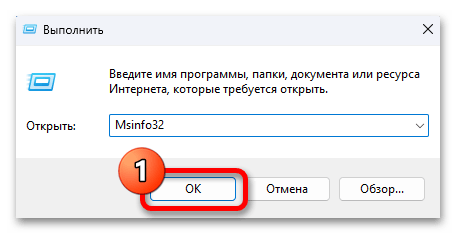
- В единственное поле открывшейся оснастки «Выполнить» вводим следующую команду:
Msinfo32 - Нажимаем «Enter» на клавиатуре или кликаем по кнопке «ОК» в окошке «Выполнить» мышкой –

в результате откроется озаглавленное «Свойства системы» окно, что и является целевой в нашем случае программой MSinfo от Microsoft.
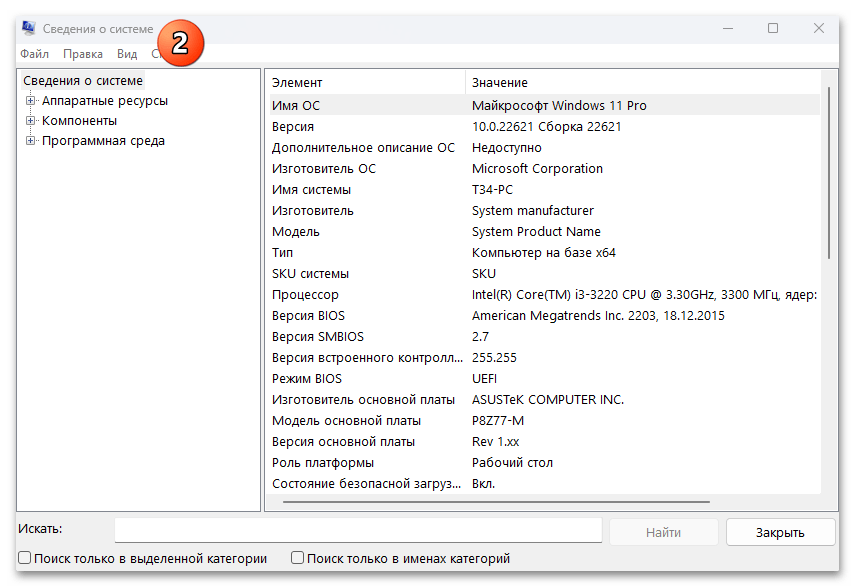
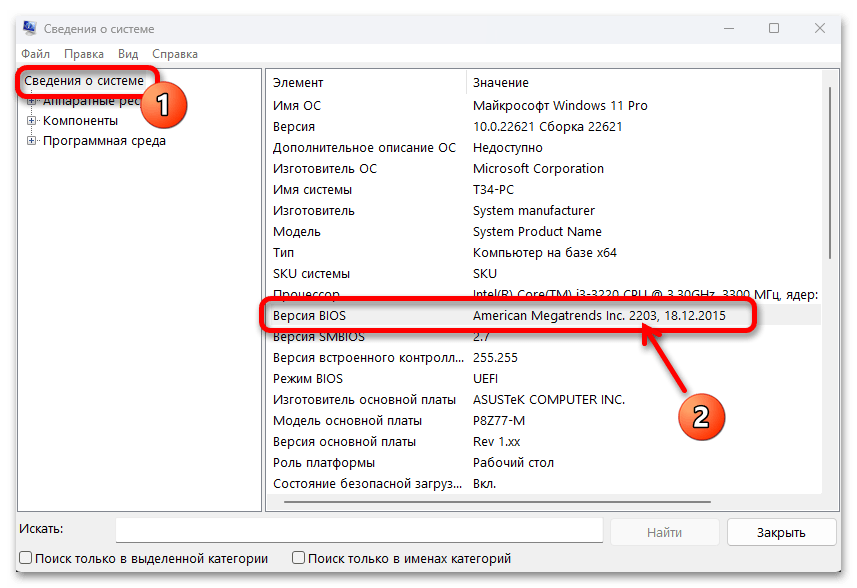
- Щёлкаем «Сведения о системе» в панели слева окна Msinfo, затем перемещаемся в его правую часть и ищем в отображающемся здесь перечне характеристик пункт «Версия BIOS». «Значение» указанного «Элемента» даёт полную информацию об искомой характеристике – состоит из наименования разработчика микропрограммы BIOS, номера её версии и даты выпуска.

Читайте также: Как открыть «Свойства системы» в Windows 11
Способ 2: DirectX
Ещё одно входящее в комплект поставки Windows 11 и эффективно решающее задачу определения версии BIOS средство используется по аналогии с предложенным выше приложением Msinfo, то есть так же просто и быстро (но стоит сразу отметить, что DxDiag менее информативен).
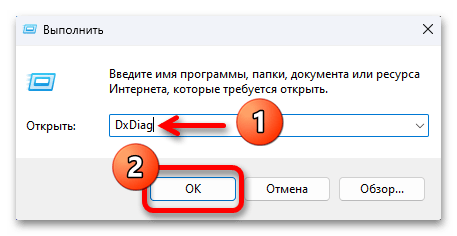
- Тем же путём, что описан в первом пункте предыдущей инструкции из этой статьи, вызываем на экран окошко «Выполнить».
- В поле «Открыть» оснастки пишем указанную ниже команду запуска «Средства диагностики DirectX», после чего нажимаем «Enter» на клавиатуре либо щёлкаем по кнопке «ОК» мышью.
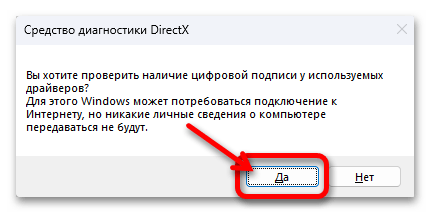
DxDiag - При своём первом открытии запустившаяся по результату выполнения предыдущего пункта этой инструкции утилита DxDiag.exe может запросить проверку цифровой подписи инсталлированных в системе драйверов – кликаем «Да» в окошке с таким требованием (если появится).
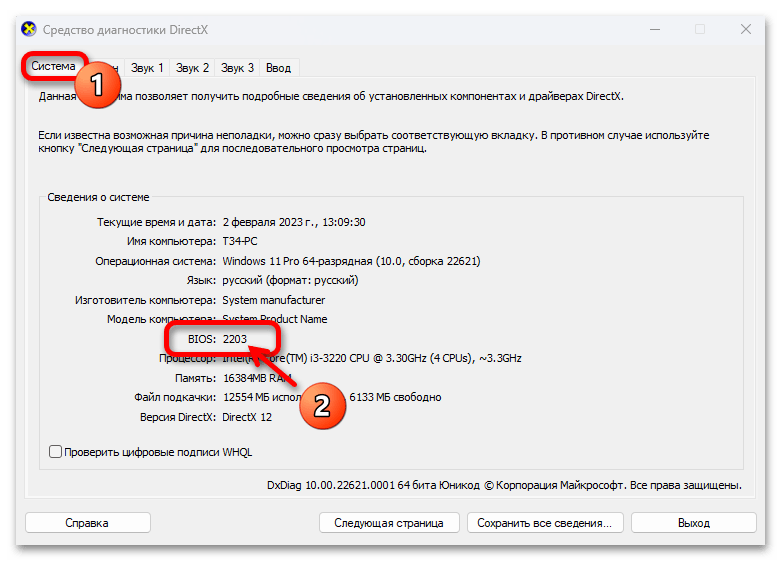
- На этом нашу цель фактически можно считать достигнутой. Никуда не переходя с вкладки «Система» окна «Средство диагностики DirectX», перемещаемся в область «Сведения о системе», смотрим на значение пункта «BIOS» демонстрируемого здесь перечня характеристик, – оно и является текущей версией микропрограммы управления базовой системой ввода-вывода компьютера.

Способ 3: Консоль
Следующий доступный в Win 11 вариант действий по определению версии BIOS ПК подразумевает эксплуатацию встроенной в ОС программы командной строки SystemInfo либо инструментария управления Windows (WMI). Объединяет эти решения тот факт, что для получения нужной нам информации потребуется запуск определённой консольной (текстовой) команды.
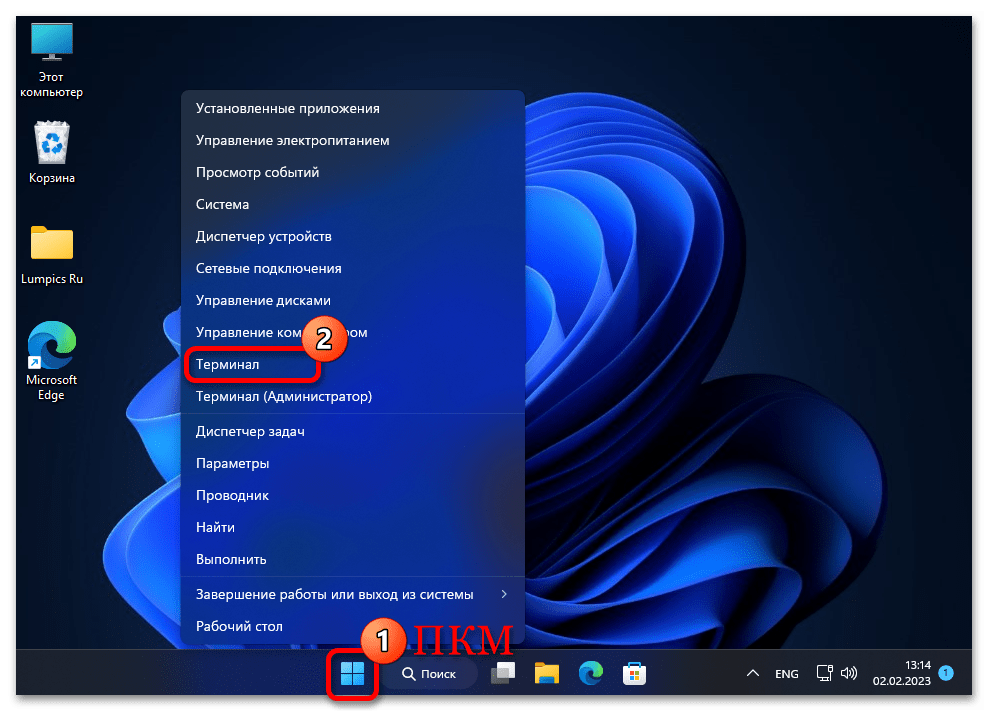
- Открываем появившееся в ОС от Майкрософт с выходом её 11-ой версии приложение «Терминал». С этой целью проще всего будет нажать «Win»+«X» на клавиатуре и затем кликнуть мышкой по наименованию средства в отобразившемся меню дополнительных функций кнопки «Пуск» на Панели задач Windows.

Подробнее: Как открыть «Терминал» в Windows 11

Примечание: Представленные далее команды при желании можно запускать и через классическую «Командную строку» Windows, эффективность при этом та же, что и в «Терминале» (т.е., по сути, — «PowerShell»).
Читайте также: Запуск «Командной строки» от имени Администратора в Windows 11
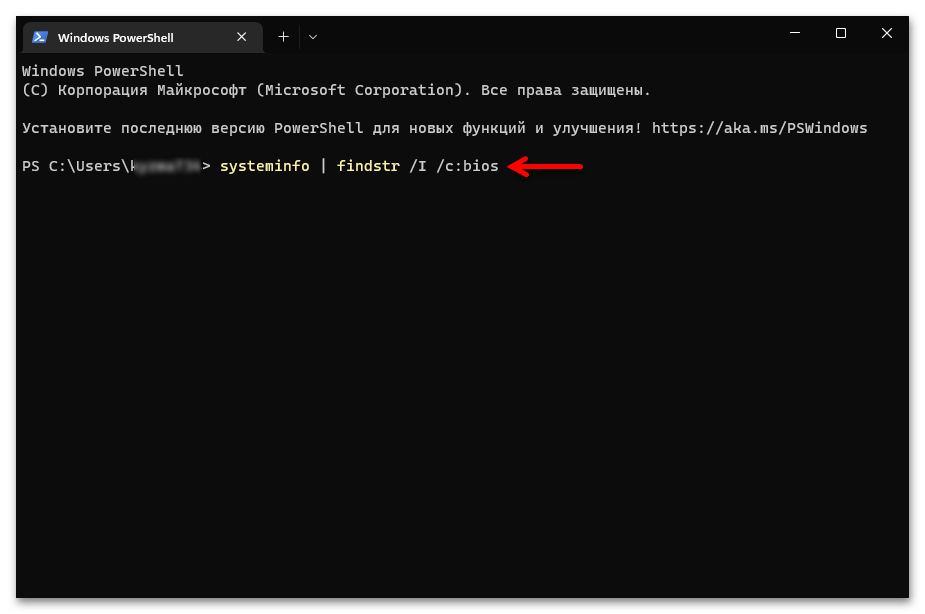
- Пишем в консоли (удобнее и «надёжнее» будет скопировать из текста этой статьи и вставить в окно «Терминала») одну из запрашивающих версию BIOS компьютера команд, затем отправляем её на выполнение путём нажатия кнопки «Enter» на клавиатуре:
systeminfo | findstr /I /c:bioswmic bios get smbiosbiosversion

или

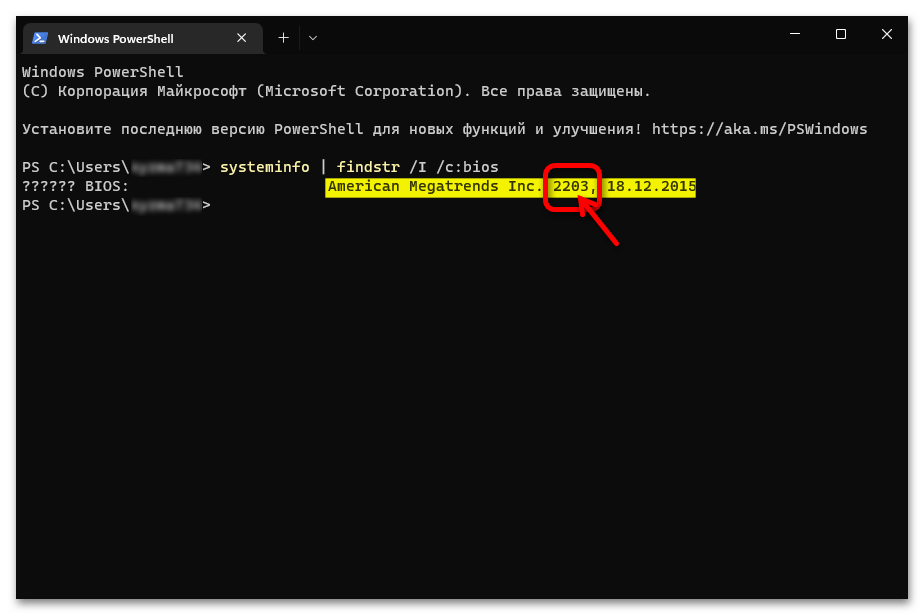
- При использовании Systeminfo в виде ответа консоли получаем расширенные сведения о микропрограмме управления BIOS ПК:
РАЗРАБОТЧИК ВЕРСИЯ, ДАТА_ВЫПУСКА.
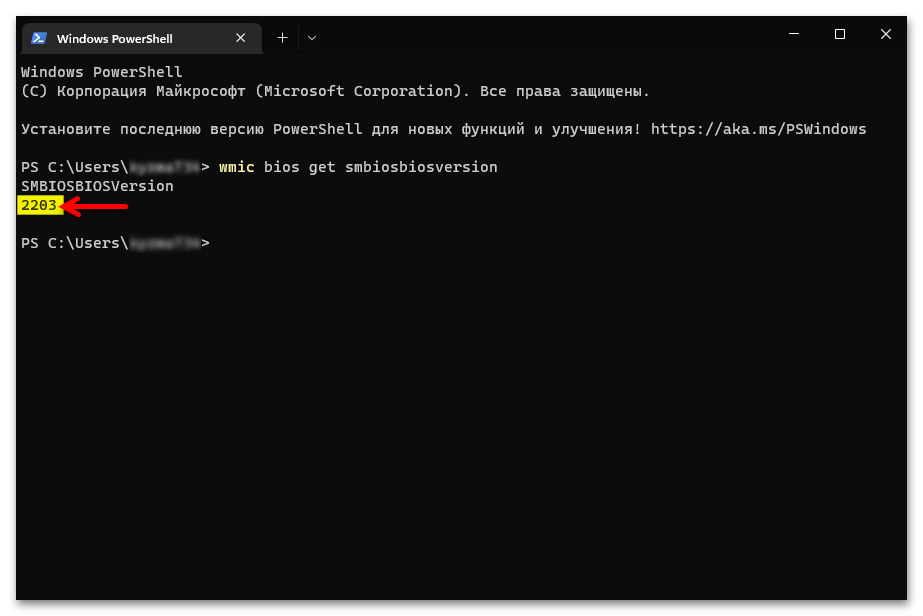
Если задействован инструментарий WMI, отобразится только целевой в нашем случае параметр — номер версии микропрограммы BIOS.

Способ 4: «Редактор реестра
Ещё одним «местом» в Виндовс 11, где хранятся данные БИОС компьютера, является главная база всех параметров и настроек операционной системы – реестр. Соответственно, получив доступ к просмотру системного реестра, можно выяснить и рассматриваемую в этой статье характеристику.
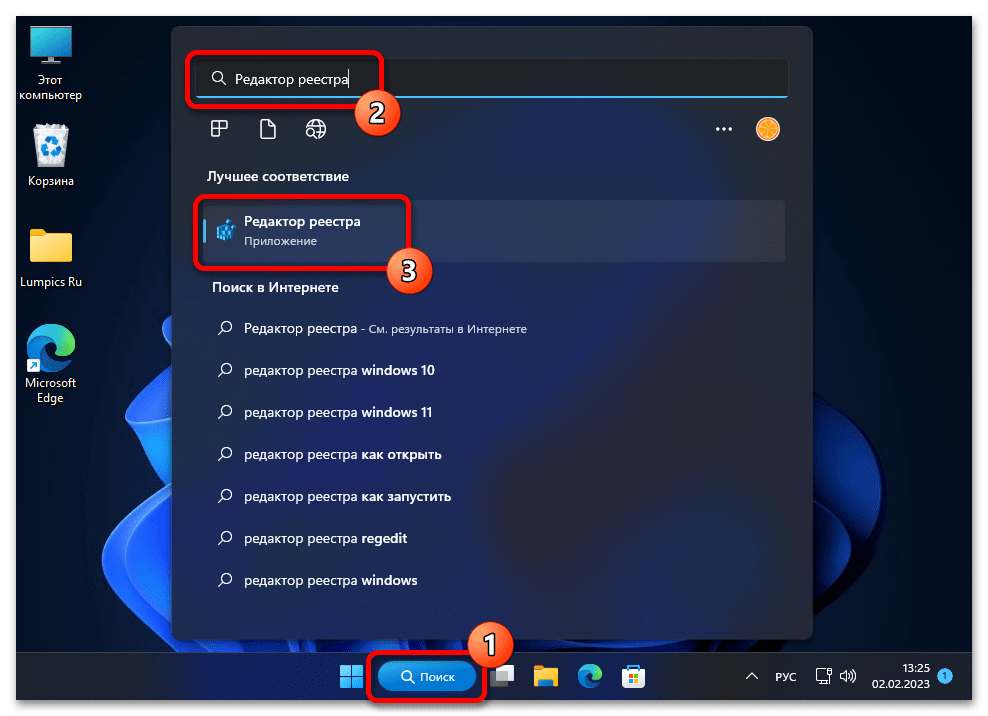
- Открываем приложение для просмотра и редактирования системного реестра Win 11. Проще всего с такой целью будет воспользоваться системным поиском: кликаем «Поиск» на Панели задач Windows 11 или нажимаем «Win»+«S» на клавиатуре, вводим запрос
Редактор реестрав поле вверху отобразившегося средства, кликаем по наименованию целевого инструмента (с отметкой «Приложение») в перечне поисковых результатов.Подробнее: Как открыть «Редактор реестра» в Windows 11
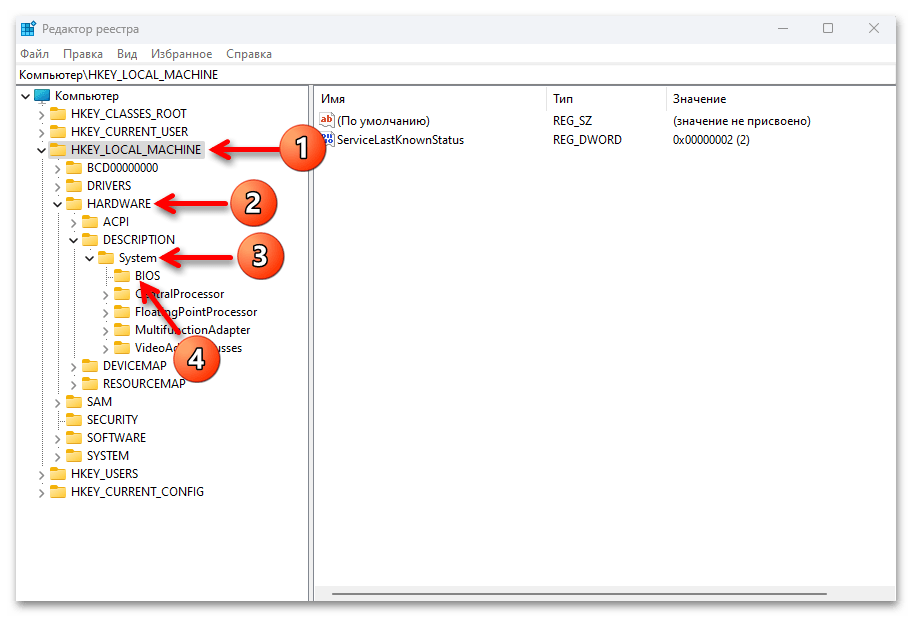
- В панели слева открывшегося «Редактора» по очереди двойным кликом разворачиваем директории: «HKEY_LOCAL_MACHINE», «HARDWARE», «DESCRIPTION», «System», «BIOS».

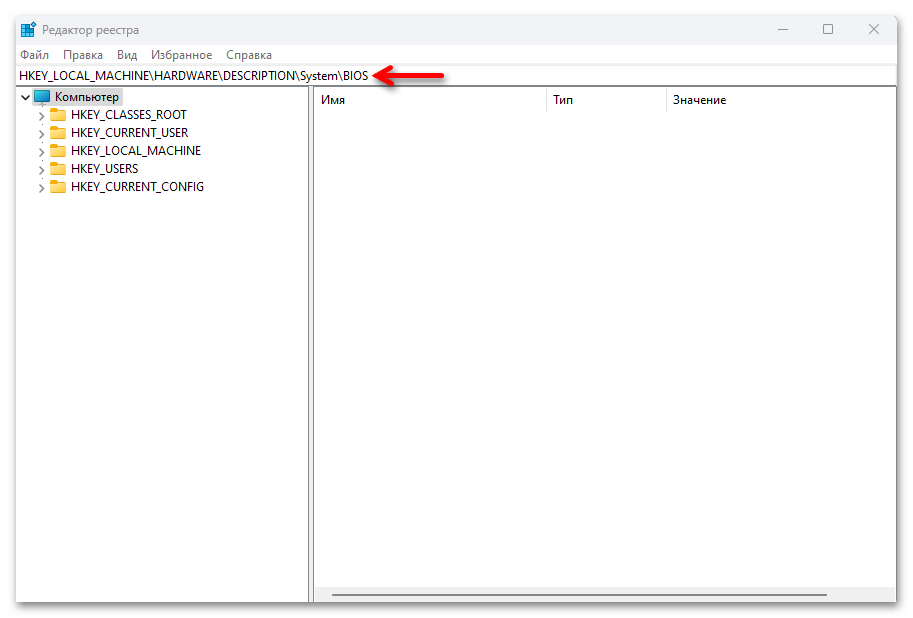
Другой вариант открытия целевого раздела в реестре Виндовс: копируем указанный далее путь в буфер обмена Windows, вставляем его в поле вверху окна «Редактора» под строкой меню, нажимаем «Ввод» на клавиатуре.
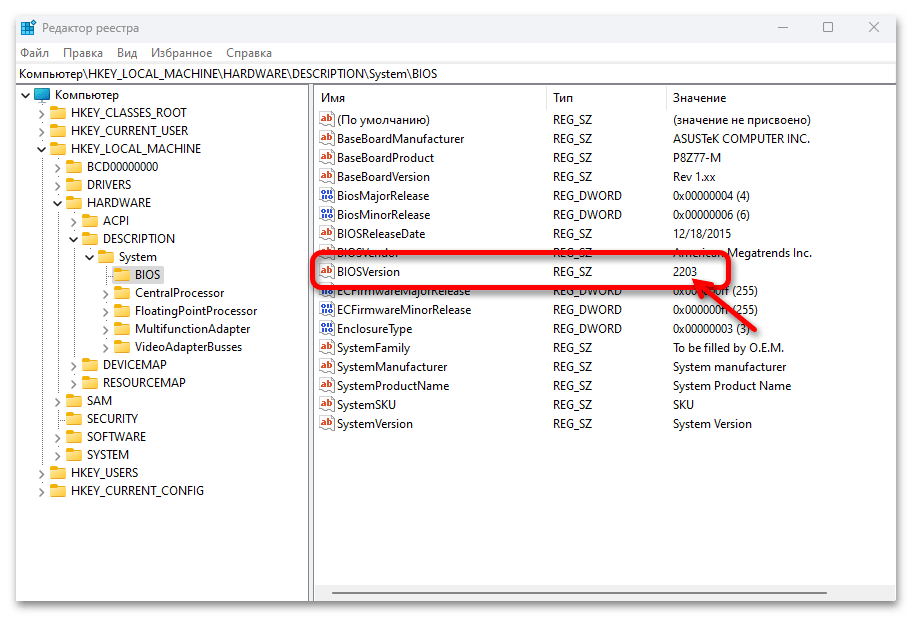
HKEY_LOCAL_MACHINE\HARDWARE\DESCRIPTION\System\BIOS - Далее перемещаемся в правую часть окна средства просмотра реестра, находим среди содержимого раздела «BIOS» носящий «Имя» BIOSVersion параметр – его «Значение» и является искомыми нами данными.
Способ 5: Сторонний софт
Конечно, версия управляющей БИОС микропрограммы – важная характеристика, знание которой позволяет в том числе определить возможность программного апгрейда системы, и поэтому её определение фактически обязательно включается в функциональность программ для получения сведений об аппаратных и программных компонентах компьютера, а также его диагностики.
Читайте также: Программы для определения аппаратных компонентов компьютера
Софта вышеуказанного типа сторонними разработчиками создано множество, а далее рассмотрим решение озвученной в заголовке этого материала задачи с помощью двух наиболее популярных его представителей.
Вариант 1: CPUID CPU-Z
CPU-Z — очень компактный и простой, но при этом чрезвычайно эффективный в деле выяснения технической информации центрального процессора, материнской платы, памяти и других компонентов компьютера софт. С целью определения версии BIOS утилита задействуется следующим образом.
Скачать CPUID CPU-Z
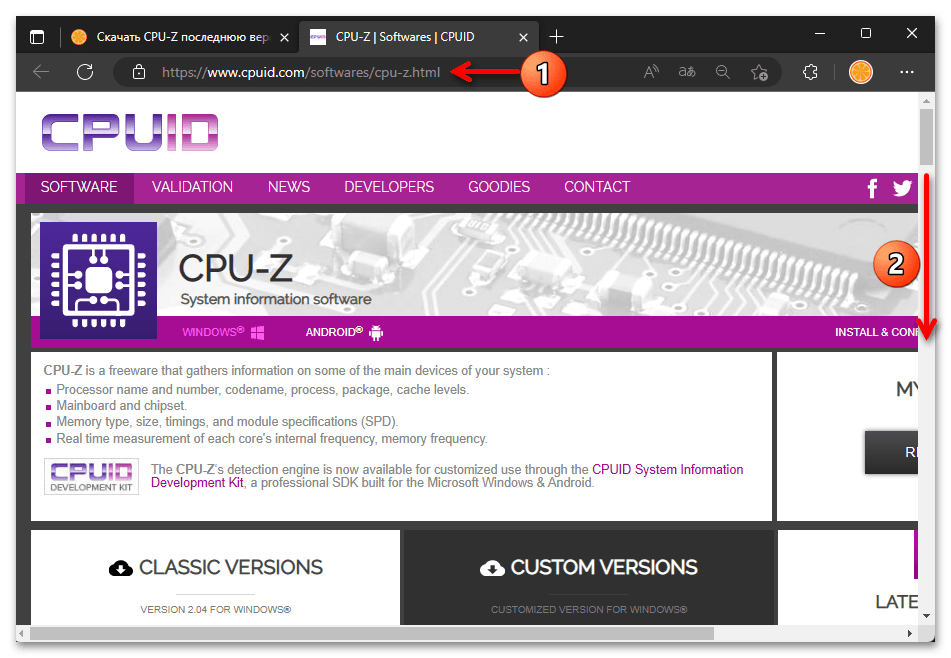
- Открываем (ссылка доступна в статье-обзоре приложения от авторов нашего сайта) страницу загрузки CPU-Z на официальном веб-ресурсе его разработчиков — компании CPUID.

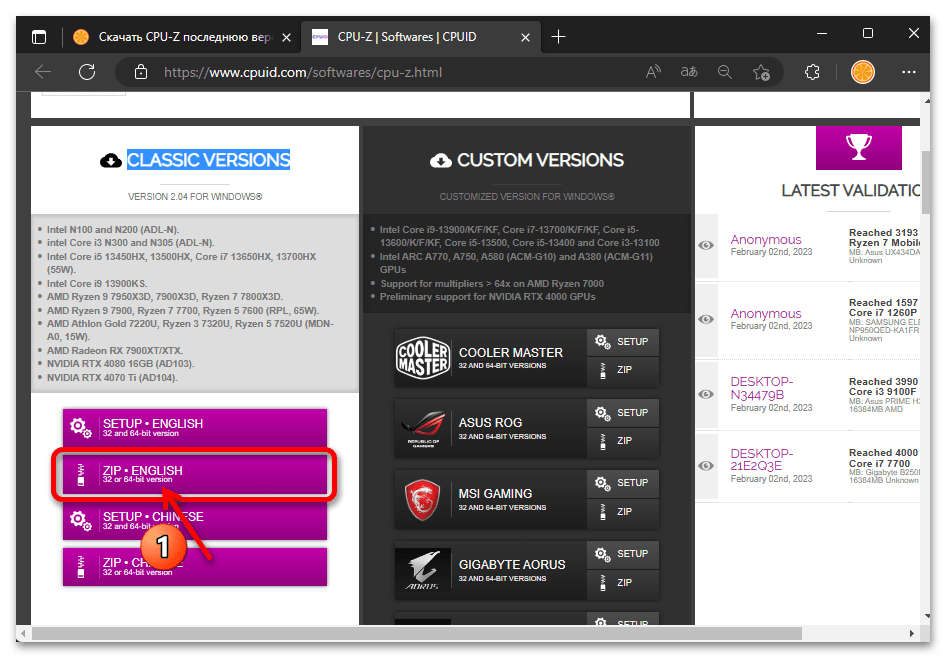
Далее можно скачать инсталлятор программы (кнопка «SETUP — ENGLISH» в блоке «CLASSIC VERSIONS»), но субъективно более предпочтительным будет получение не требующей установки на ПК версии CPU-Z: нажимаем «ZIP — ENGLISH»,

загружаем предоставляемый сайтом CPUID архив на диск ПК.
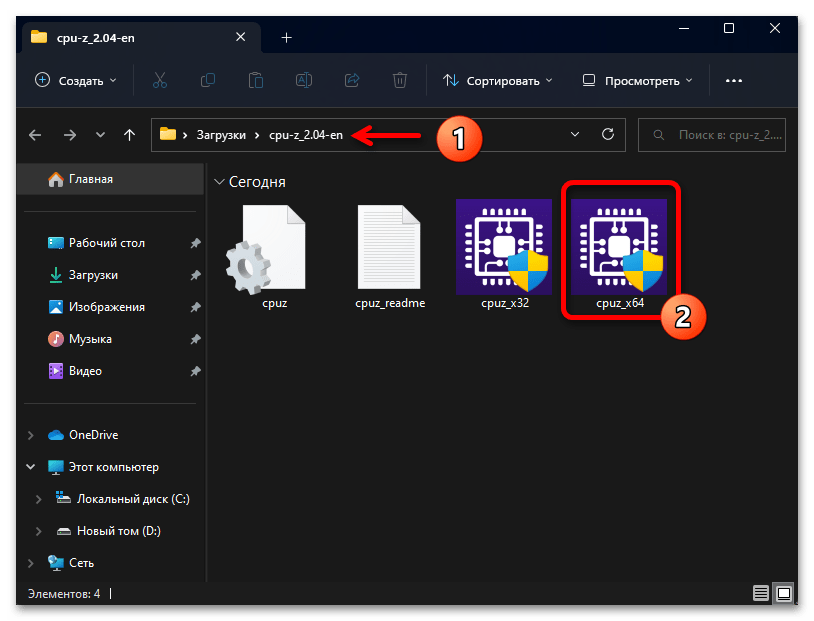
- Распаковываем содержащий софт ZIP-пакет, из получившейся папки открываем файл cpuz_x64.exe.
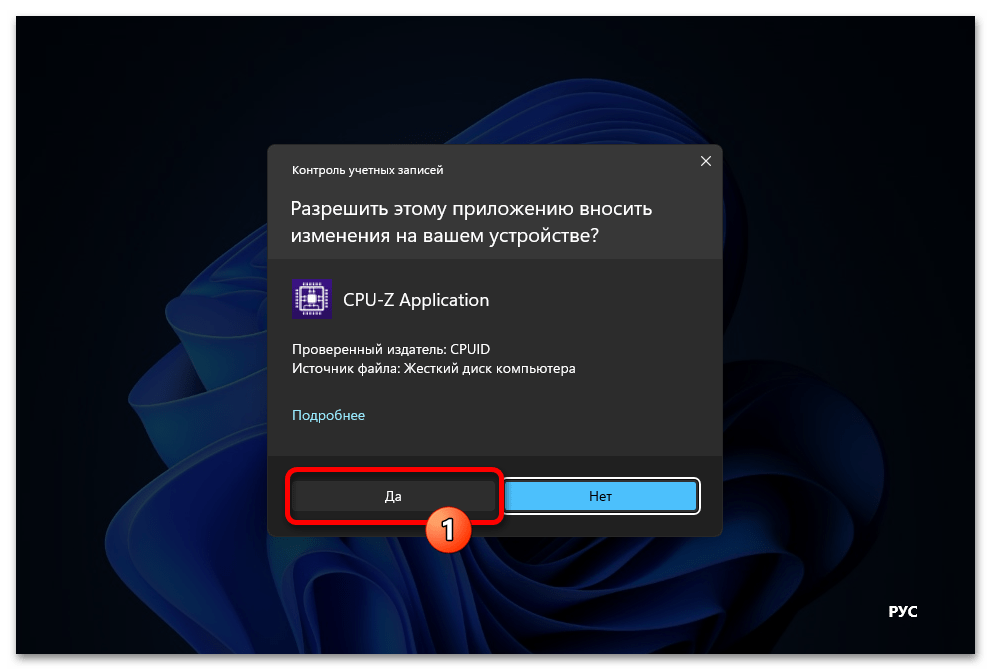
- Подтверждаем запрос системного «Контроля учётных записей»,

немного ожидаем, пока запущенное средство проанализирует систему.
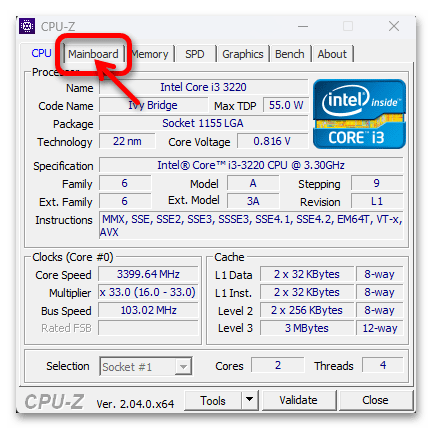
- В открывшемся по итогу окне CPU-Z переходим на вкладку «Mainboard».
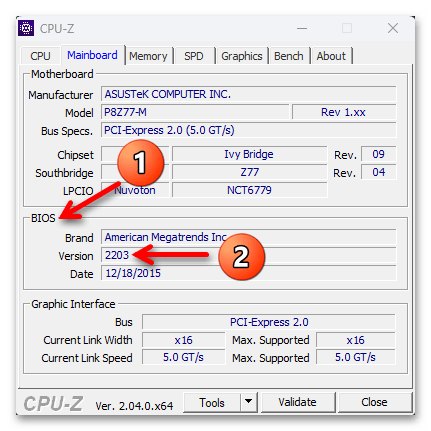
- Далее перемещаемся в область «BIOS», смотрим на значение параметра «Version».

Вариант 2: AIDA64
Эта программа характеризуется коммерческой направленностью, но и значительно более широкими, нежели вышепредложенный CPU-Z, возможностями в плане определения технических характеристик компонентов компьютерных систем. По сути, использовать AIDA64 имеет смысл, когда требуется многофункциональный (а не для выяснения одной-единственной характеристики) инструмент диагностики и мониторинга ПК, но при этом определить версию BIOS с помощью данного продукта можно довольно коротким путём и в рамках бесплатного пробного периода его эксплуатации.
Скачать AIDA64
Читайте также: Использование программы AIDA64
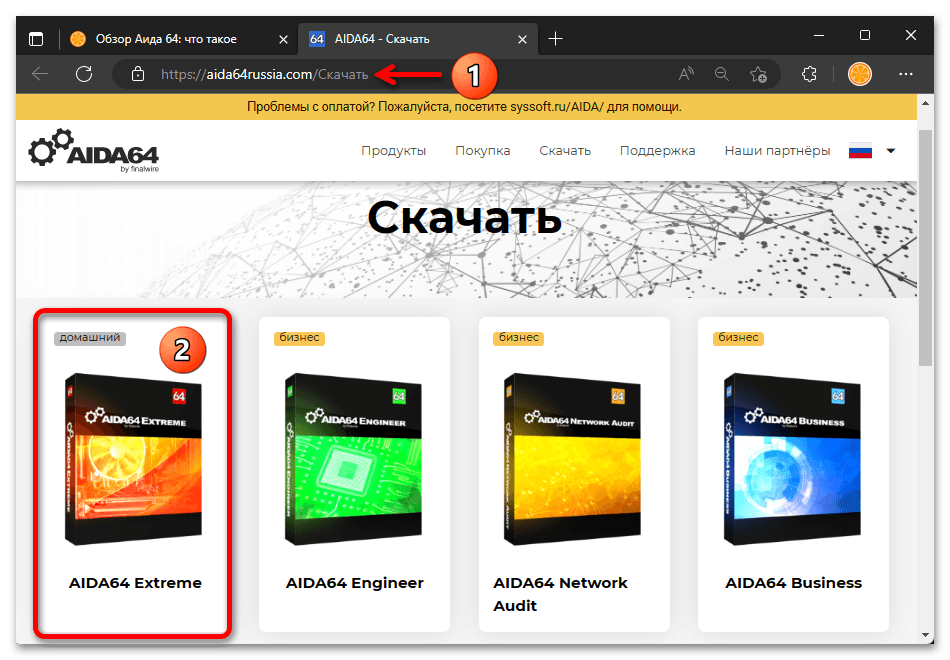
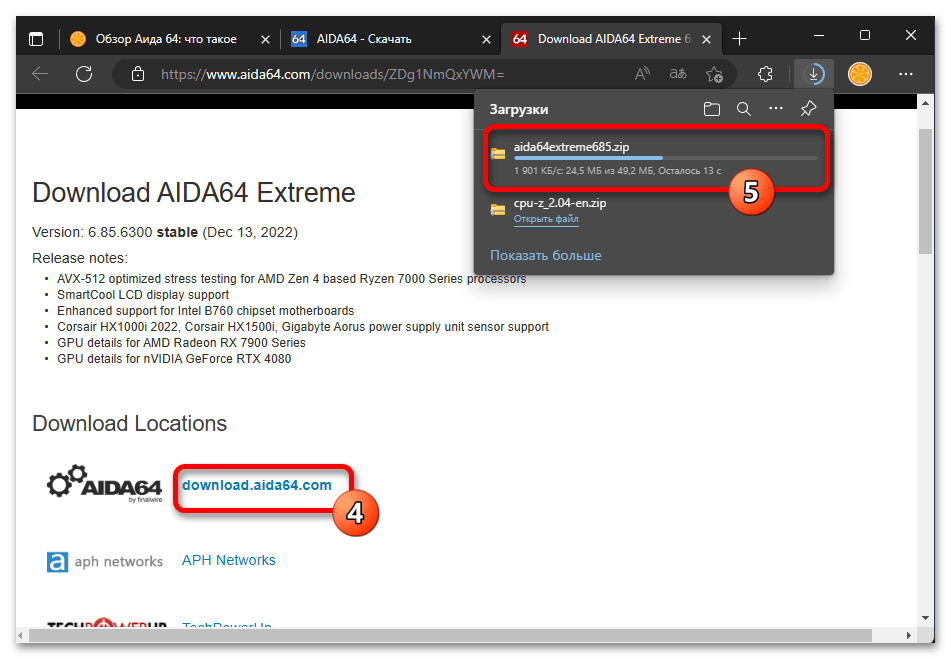
- По ссылке из обзора AIDA64 переходим на страницу загрузки продукта в рамках официального сайта его создателей, щёлкаем по блоку «AIDA64 Extreme»,

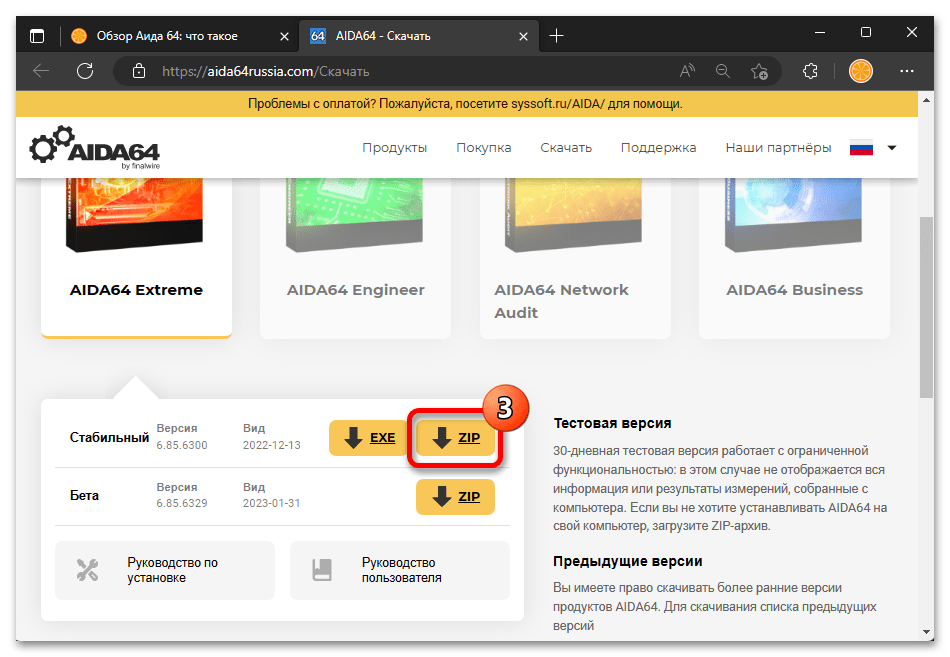
затем нажимаем на кнопку «ZIP» напротив пункта «Стабильный» отобразившейся области.

Предложенный путь приведёт к возможности скачивания архива с не требующей установки версией Аида64, – сохраняем его на диск ПК.
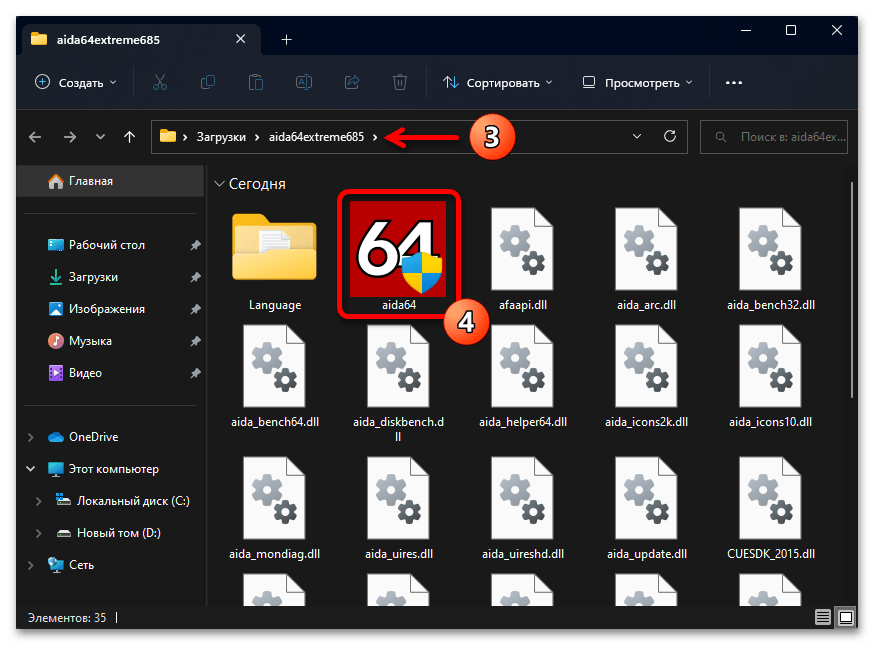
- Распаковываем скачанный ZIP-пакет,

находим в содержимом получившегося каталога и запускаем исполняемый файл программы — aida64.exe.
- Щёлкаем «Да» в окне с запросом «Контроля учётных записей»,

ожидаем открытия окна AIDA64 (программе потребуется некоторое время, чтобы проанализировать систему и «вычитать» её технические параметры).
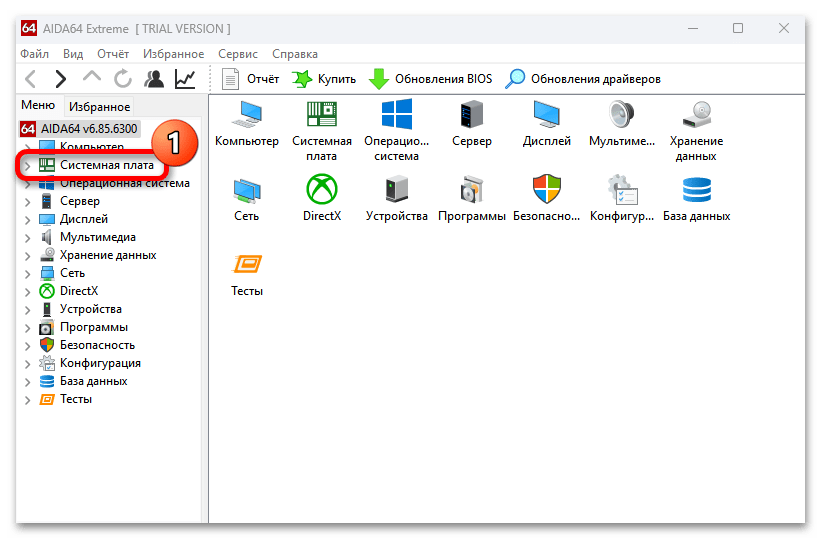
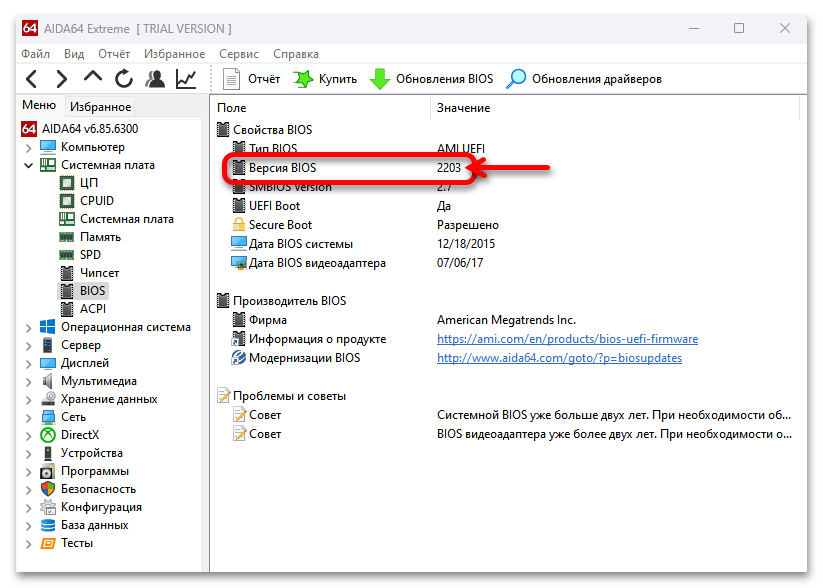
- В меню слева разворачиваем перечень «Системная плата»,

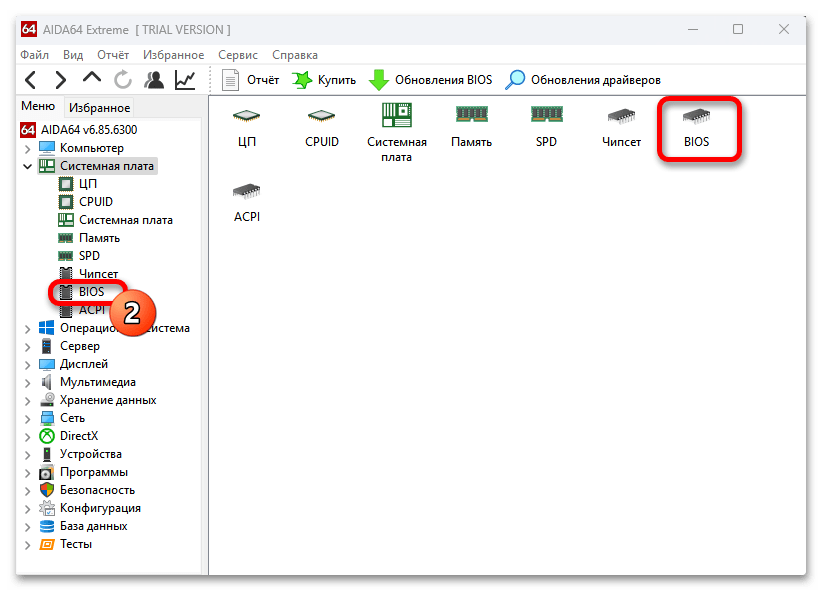
затем кликаем по имеющемуся в нём пункту «BIOS».
- Перемещаемся в правую часть окна средства диагностики, — в списке «Свойства BIOS» доступен целевой в нашем случае пункт – «Версия BIOS».


Наша группа в TelegramПолезные советы и помощь
In this article, we’ll show you how to check your BIOS version on Windows 11. The process is super easy and involves using built-in tools like Command Prompt or System Information. We’ll walk you through each step, so you can get the info you need in no time.
Knowing your BIOS version can be crucial, especially if you need to update it or troubleshoot hardware issues. Following these steps will help you find your BIOS version quickly and easily.
Step 1: Open the Start Menu
Click on the Start Menu button located at the bottom-left corner of your screen.
The Start Menu is your gateway to all the apps and settings in Windows 11. It’s the first place you’ll need to go to begin checking your BIOS version.
Step 2: Type ‘System Information’
In the search bar, type “System Information” and press Enter.
This will bring up the System Information app, which provides detailed information about your computer’s hardware and software, including the BIOS version.
Step 3: Select ‘System Information’
Click on the System Information app from the search results.
Opening this app will give you access to a wealth of data about your computer system, so it’s an essential tool for this task.
Step 4: Locate ‘BIOS Version/Date’
In the System Information window, look for the entry labeled “BIOS Version/Date.”
This entry will show you the current BIOS version installed on your computer, along with the date it was released.
Step 5: Read Your BIOS Version
Check the information next to “BIOS Version/Date” to find out your BIOS version.
Once you locate this information, you’ll have all the details you need about your BIOS version. You can use this info for updates or troubleshooting issues.
After completing these steps, you’ll have your BIOS version right in front of you. This information is helpful for many reasons, such as ensuring your system is up-to-date or diagnosing hardware compatibility issues.
Tips for How to Check BIOS Version Windows 11
-
Use Command Prompt: If you’re comfortable with using command-line tools, you can also check the BIOS version by opening Command Prompt and typing
wmic bios get smbiosbiosversionand pressing Enter. -
Keep BIOS Updated: Regularly check for BIOS updates from your motherboard manufacturer to ensure your system runs smoothly.
-
Back Up Data: Before updating your BIOS, always back up your important data. BIOS updates can sometimes go wrong, and it’s better to be safe than sorry.
-
Check Manufacturer’s Website: Different motherboard manufacturers have specific methods for updating BIOS. Visit their official website for detailed instructions.
-
Note Down the Version: Write down your current BIOS version before updating, so you can compare it with the new version and ensure the update was successful.
Frequently Asked Questions
How do I open Command Prompt in Windows 11?
Press the Windows key and type “cmd” in the search bar, then hit Enter.
Is it safe to update my BIOS?
Yes, but make sure to follow the manufacturer’s instructions carefully and back up your data beforehand.
Can I check my BIOS version without opening System Information?
Yes, you can use Command Prompt with the command wmic bios get smbiosbiosversion.
What should I do if my BIOS version is outdated?
Visit your motherboard manufacturer’s website to download and install the latest BIOS update.
Do I need to check my BIOS version regularly?
Not necessarily, but it’s useful to know if you’re experiencing hardware issues or planning to update.
Summary
- Open the Start Menu.
- Type ‘System Information’.
- Select ‘System Information’.
- Locate ‘BIOS Version/Date’.
- Read Your BIOS Version.
Conclusion
Checking your BIOS version on Windows 11 is a straightforward task that can provide valuable information for keeping your system up-to-date and troubleshooting hardware issues. By following the steps outlined in this article, you’ll be able to easily find your BIOS version using the System Information tool.
Regularly checking and updating your BIOS ensures that your computer runs smoothly and efficiently. Always remember to back up your data before making any updates and consult your motherboard manufacturer’s guidelines for the best results.
Stay informed and proactive about your system’s health, and your computer will thank you in the long run. For more tips and tutorials on how to get the most out of Windows 11, be sure to check out our other articles. Happy computing!
Matthew Burleigh has been writing tech tutorials since 2008. His writing has appeared on dozens of different websites and been read over 50 million times.
After receiving his Bachelor’s and Master’s degrees in Computer Science he spent several years working in IT management for small businesses. However, he now works full time writing content online and creating websites.
His main writing topics include iPhones, Microsoft Office, Google Apps, Android, and Photoshop, but he has also written about many other tech topics as well.
Read his full bio here.
FAQ
[Windows 11/10] Как определить модель устройства и версию BIOS?
Применимо для продуктов: Ноутбук, Настольный компьютер, Моноблочный компьютер, Игровая консоль, Мини-компьютер.
Когда требуется скачать драйверы или прошивку BIOS, Вам нужно знать модель устройства. Например, когда выполняется поиск по модели X412FJ/FJC/FJG, Вам нужно выбрать точную модель устройства из списка, как показано на изображении ниже:
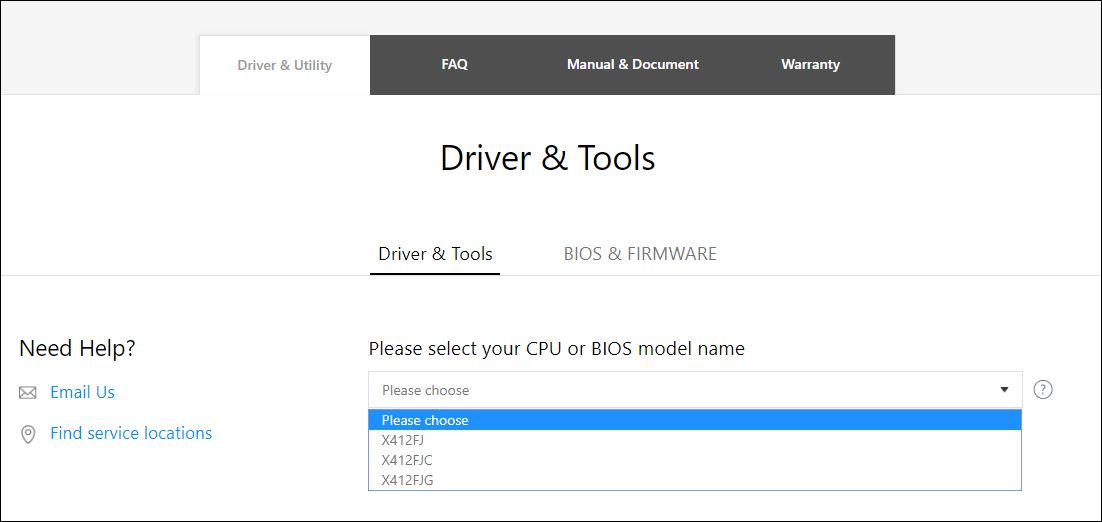
Приведенные ниже сведения помогут вам определить верное наименование модели:
Есть несколько способов узнать название модели и версию BIOS Вашего устройства — Вы можете выбрать один из них:
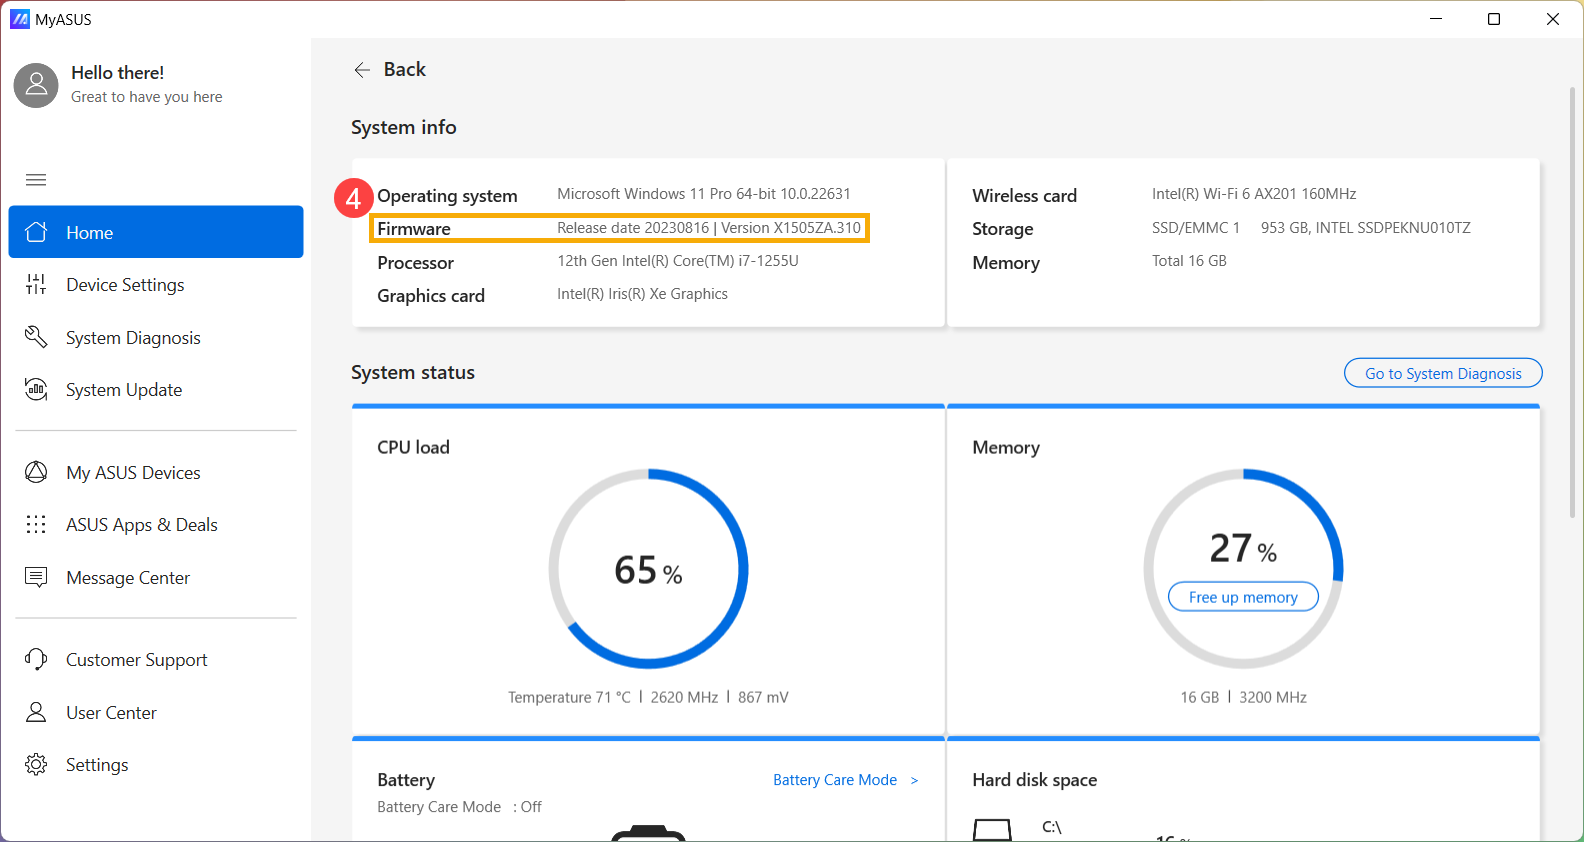
Способ 1: Найти модель и версию BIOS в MyASUS
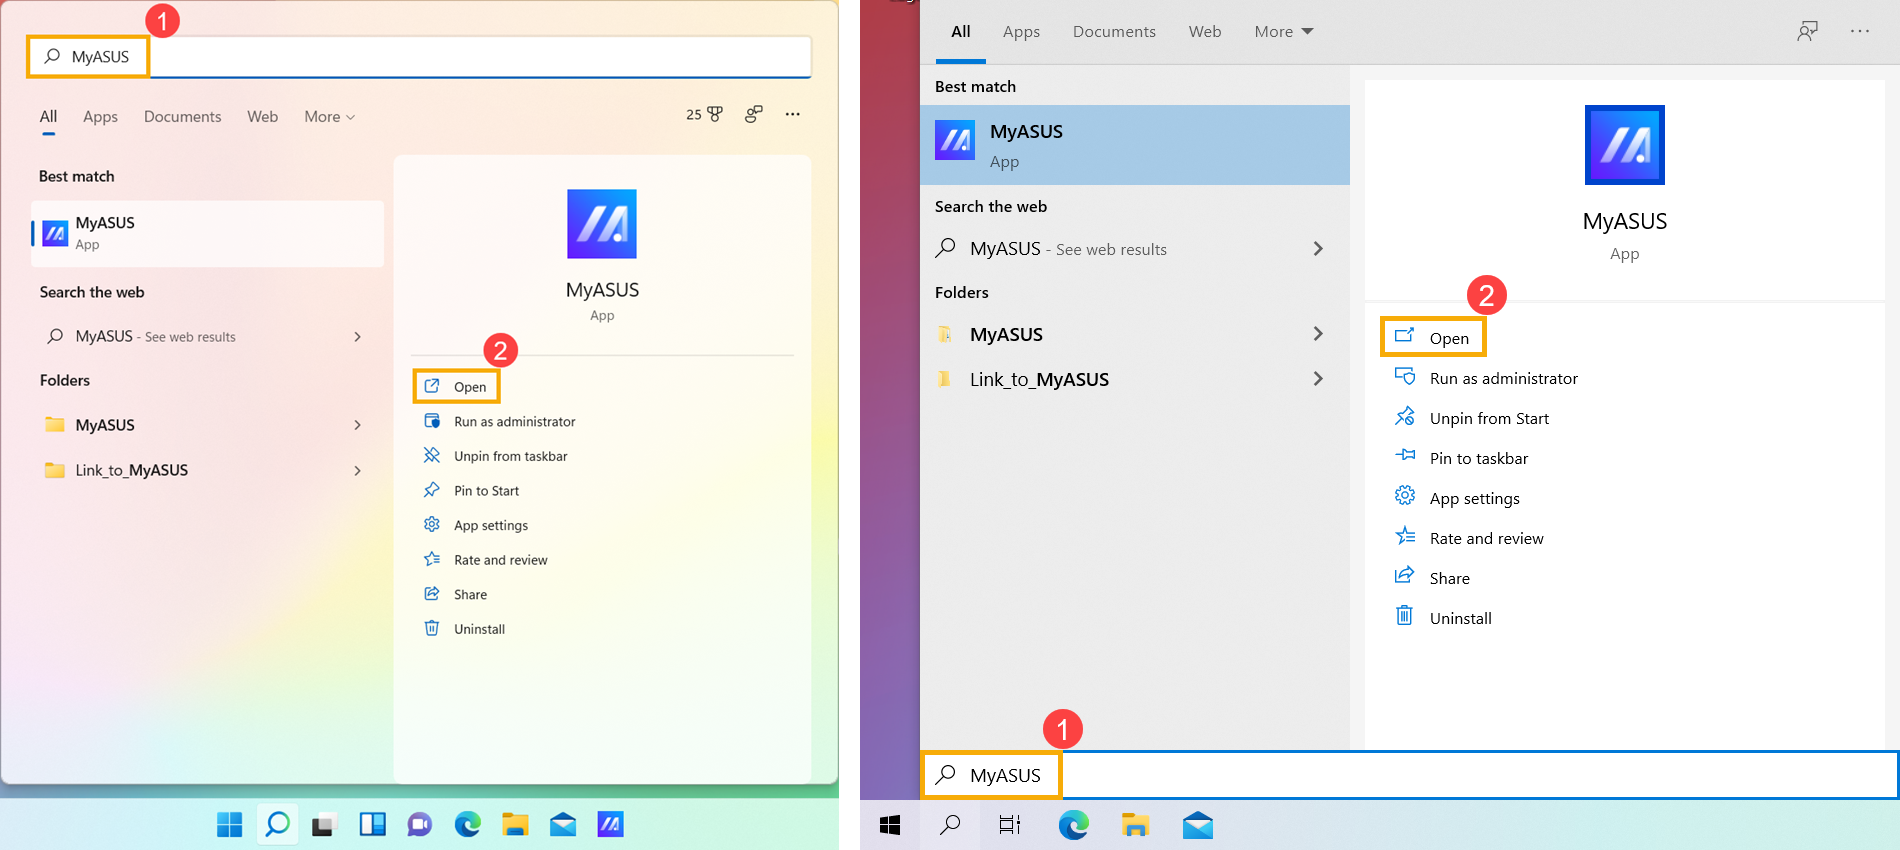
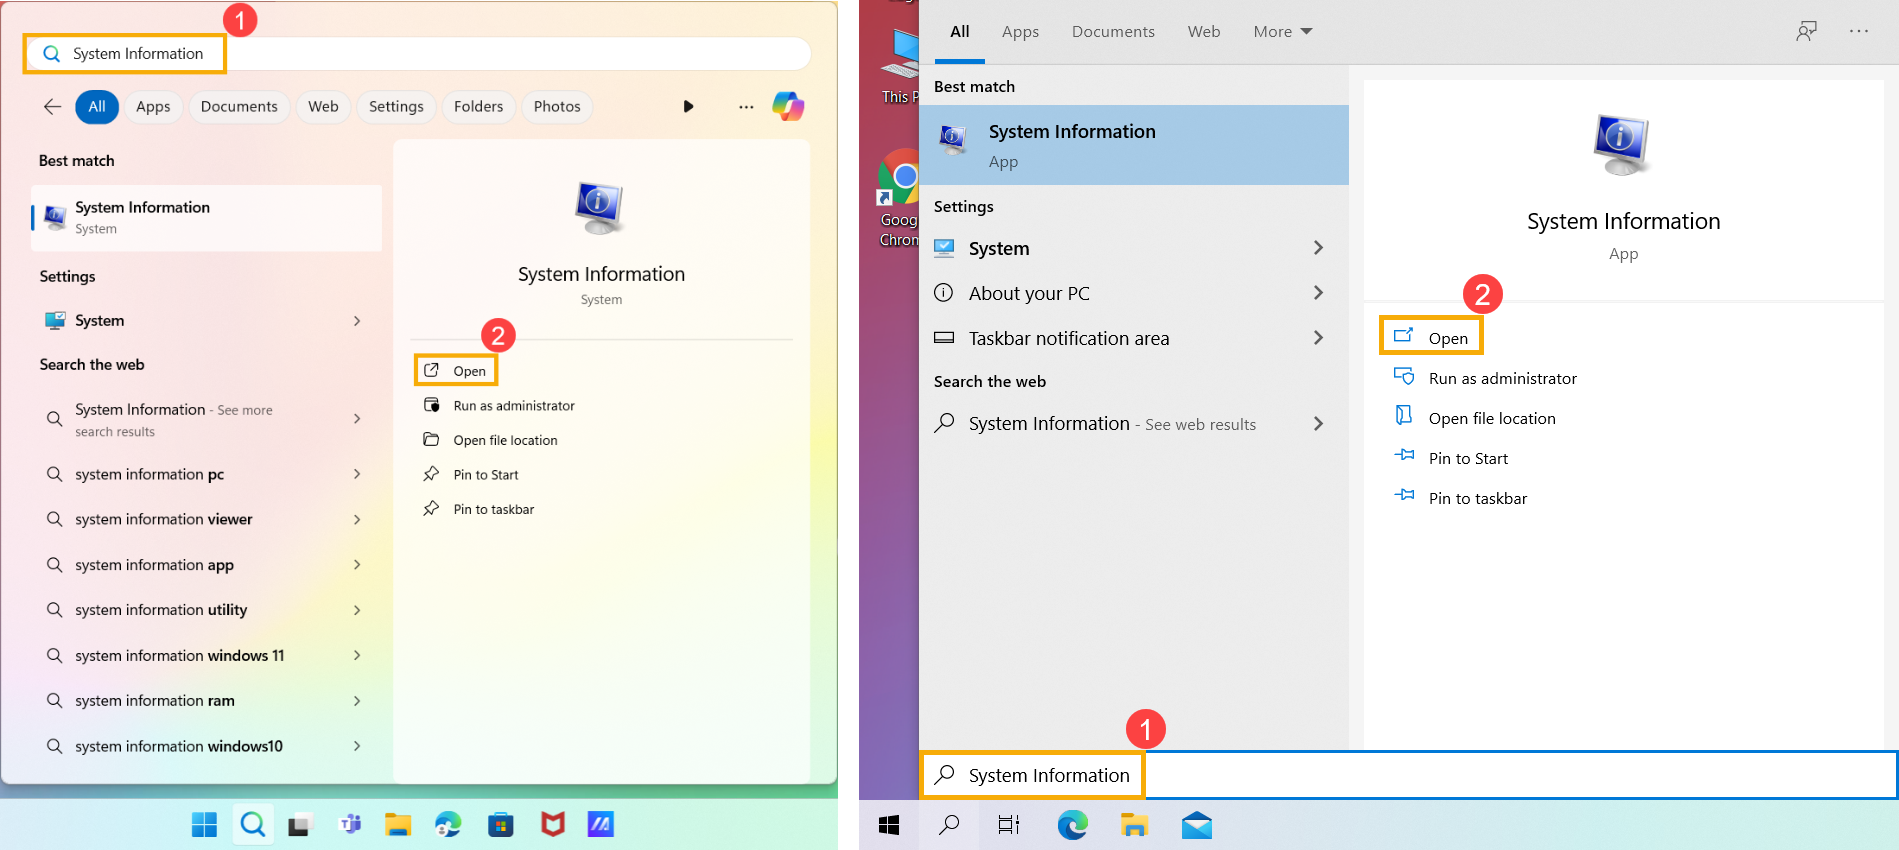
- В строке поиска Windows① введите [MyASUS], чтобы найти приложение, потом нажмите [Открыть]② (изображение слева показывает интерфейс системы Windows 11, справа — интерфейс системы Windows 10).
Примечание: Если найти приложение MyASUS не получилось, значит оно не установлено на Вашем устройстве. Пожалуйста, обратитесь к статье Как установить MyASUS.
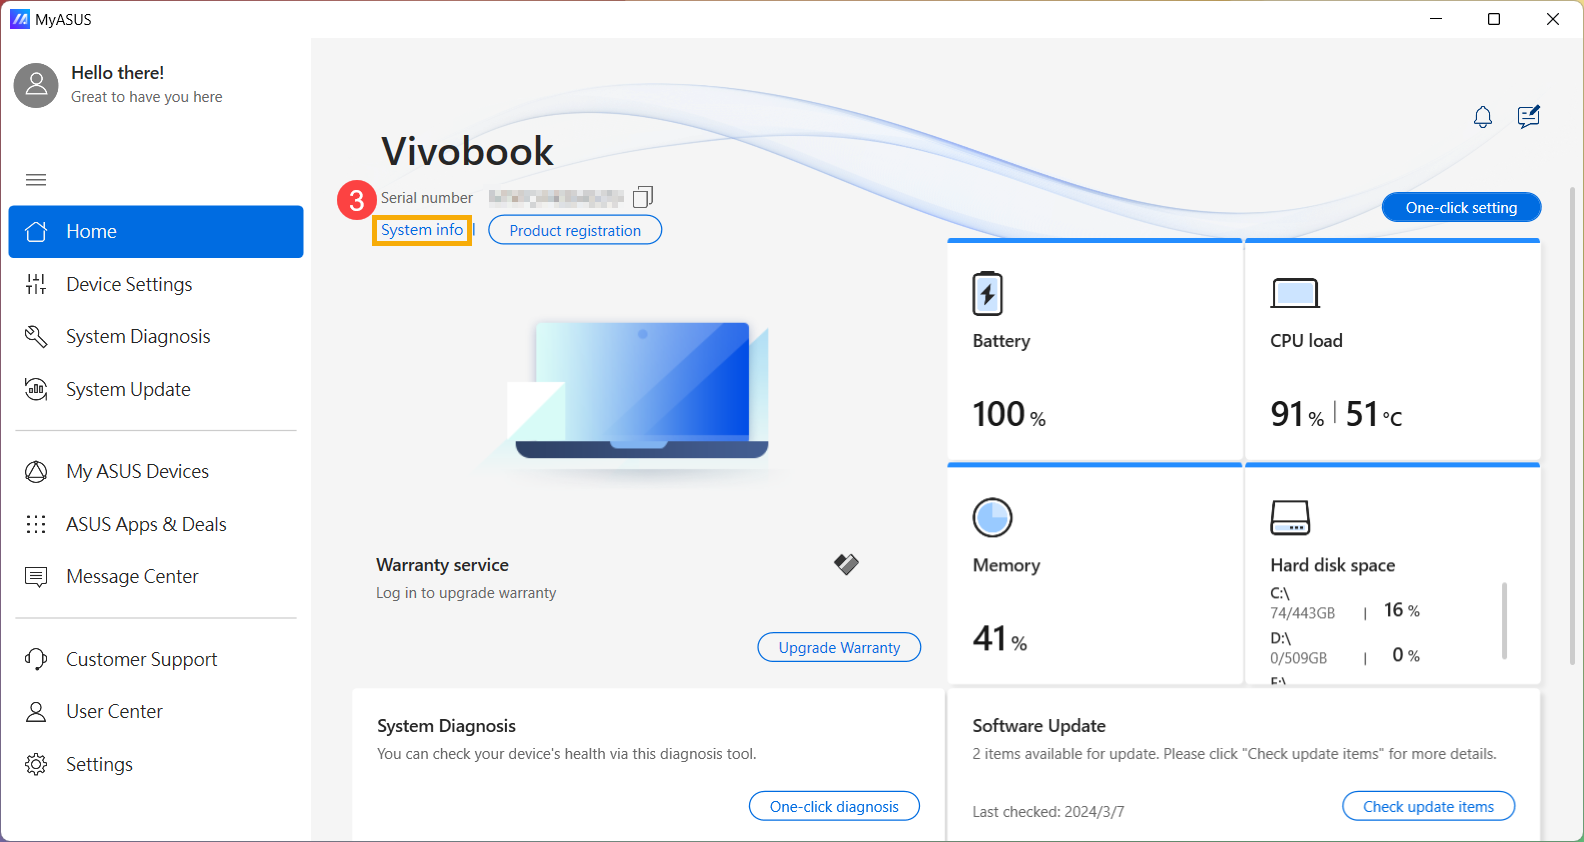
- В приложении MyASUS, перейдите в раздел [Информация о системе]③.
- В разделе Firmware, Вы можете увидеть модель Вашего устройства и версию прошивки BIOS④.
Как показано на примере ниже (версия X1505ZA.310) — это означает, что модель устройства (ноутбук) — X1505ZA и версия прошивки BIOS — 310.
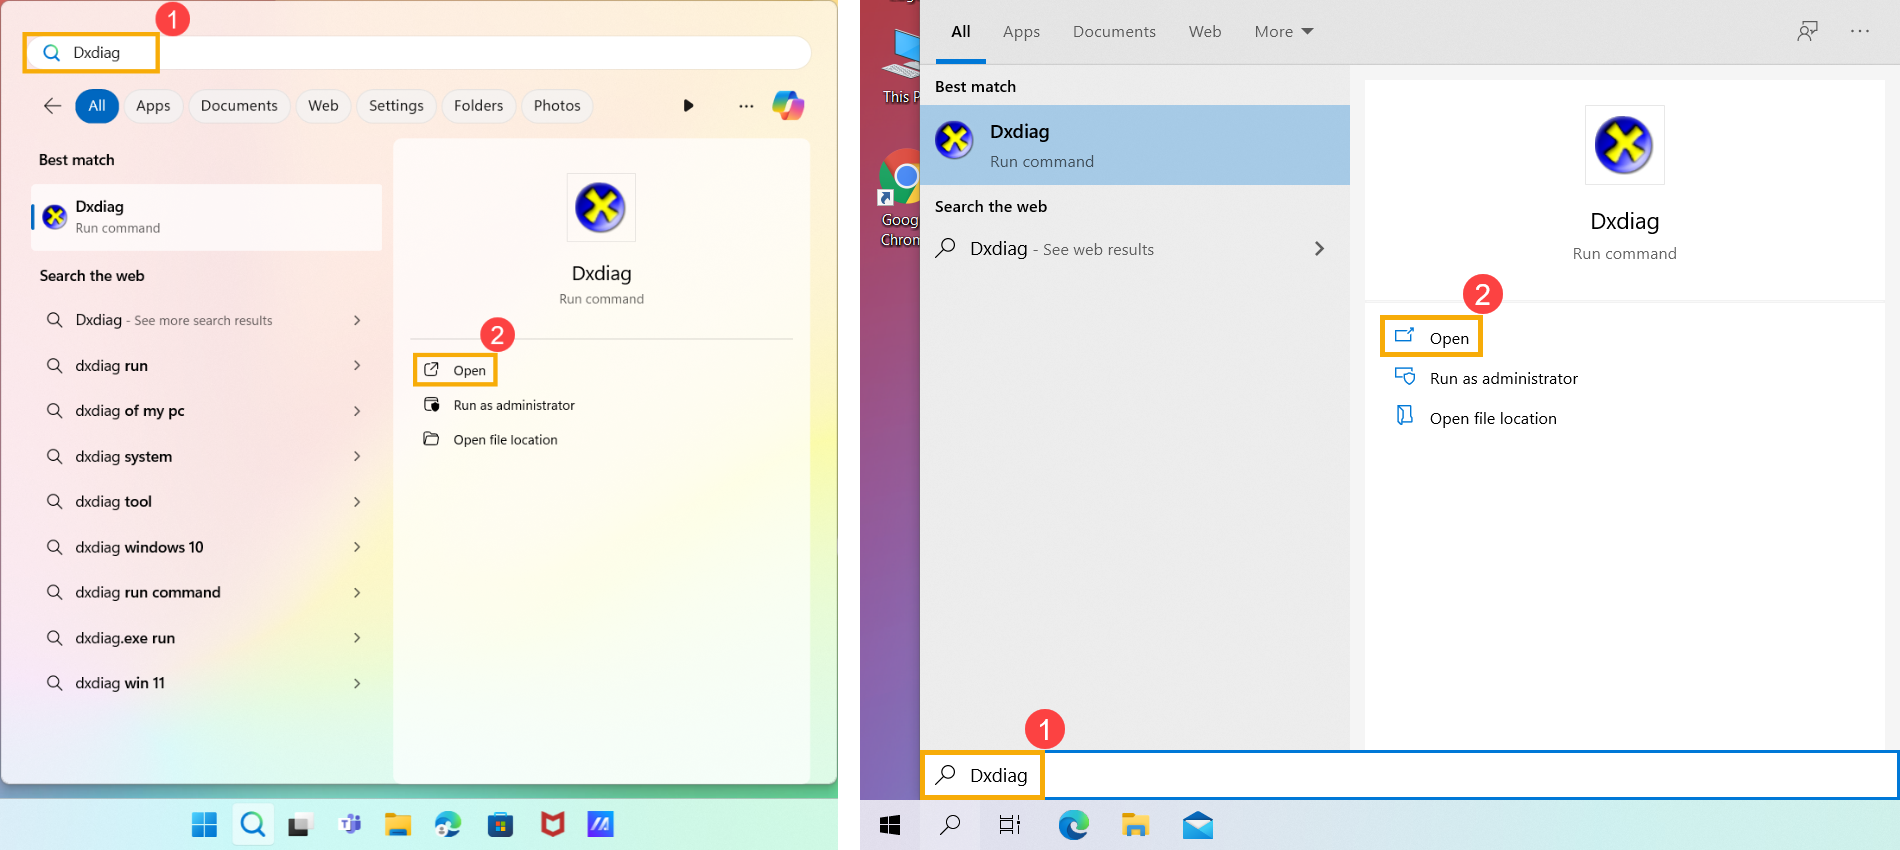
Способ 2: Найти модель и версию BIOS в Dxdiag
- Введите в строке поиска Windows① и найдите утилиту [Dxdiag], потом нажмите [Открыть]② (изображение слева показывает интерфейс системы Windows 11, справа — интерфейс системы Windows 10).
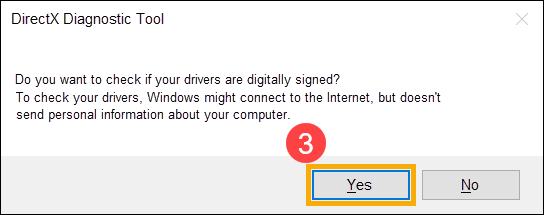
- Если вы получили уведомление ниже, выберите [Да], чтобы продолжить.
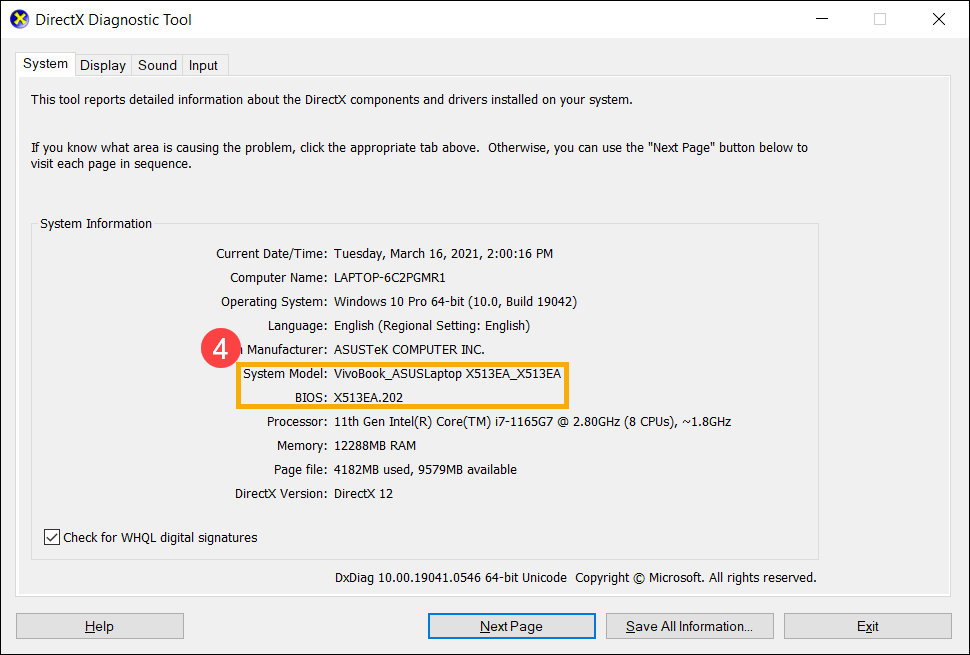
- В разделе Модель системы вы найдете название модели, а затем версию BIOS в разделе BIOS④. Как показано на следующем изображении, название модели — X513EA, а версия BIOS — 202.
Способ 3: Найти модель и версию BIOS в информации о системе
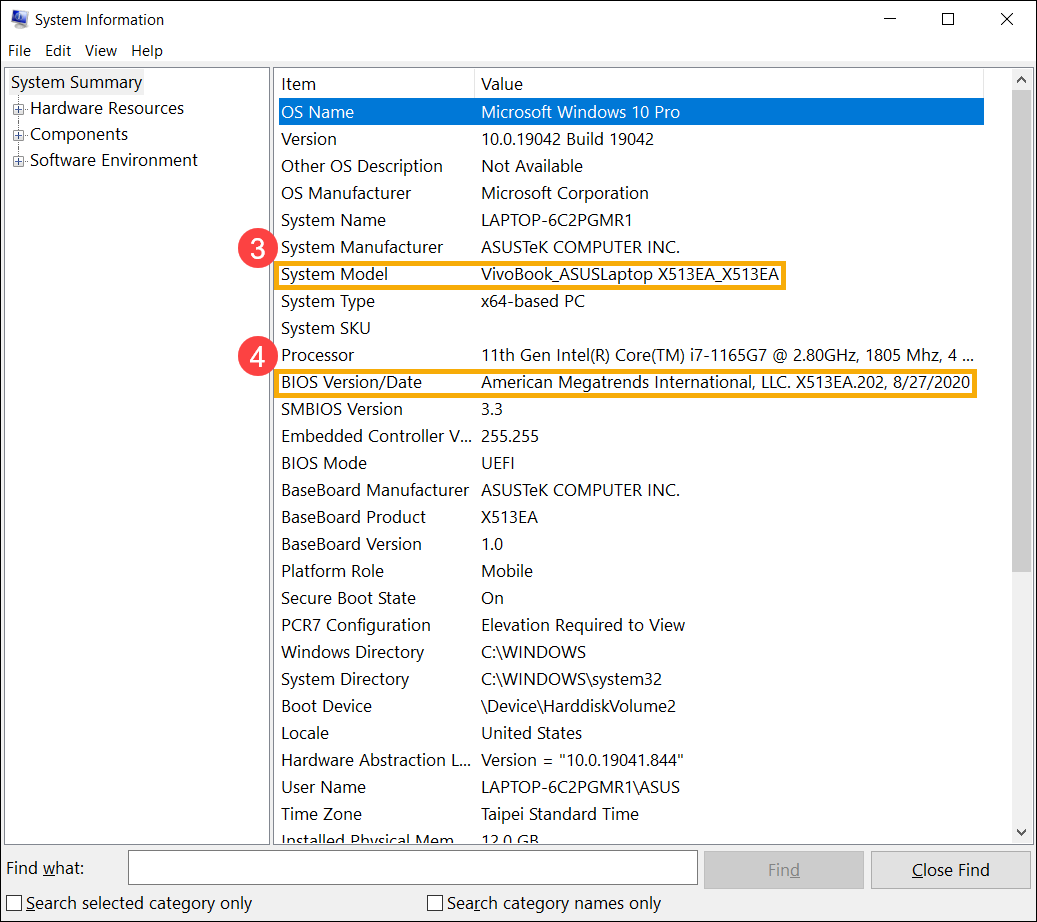
- Введите в строке поиска Windows① и найдите средство [Информация о системе], потом нажмите [Открыть]② (изображение слева показывает интерфейс системы Windows 11, справа — интерфейс системы Windows 10).
- В разделе Модель системы Вы найдете название модели③, и версию прошивки BIOS в разделе Версия / дата BIOS.
Как показано на следующем изображении, название модели — X513EA, а версия BIOS — 202.
Способ 4: Найти модель и версию BIOS в параметрах BIOS
- Зайдите в настройки BIOS устройства.
Когда устройство выключено, нажмите и удерживайте клавишу [F2] на клавиатуре, потом нажмите кнопку питания, чтобы включить устройство. Удерживайте клавишу [F2] нажатой до появления экрана BIOS, потом отпустите клавишу [F2]. Узнайте больше о том, Как войти в настройки BIOS.
Примечание: на игровых консолях нужно нажать и удерживать клавишу уменьшения громкости Volume (-) и потом включить устройство. - Интерфейс настроек BIOS бывает трех видов: интерфейс UEFI, интерфейс Legacy, интерфейс MyASUS в UEFI. Пожалуйста, выполните следующие действия в зависимости от экрана BIOS Вашего устройства.
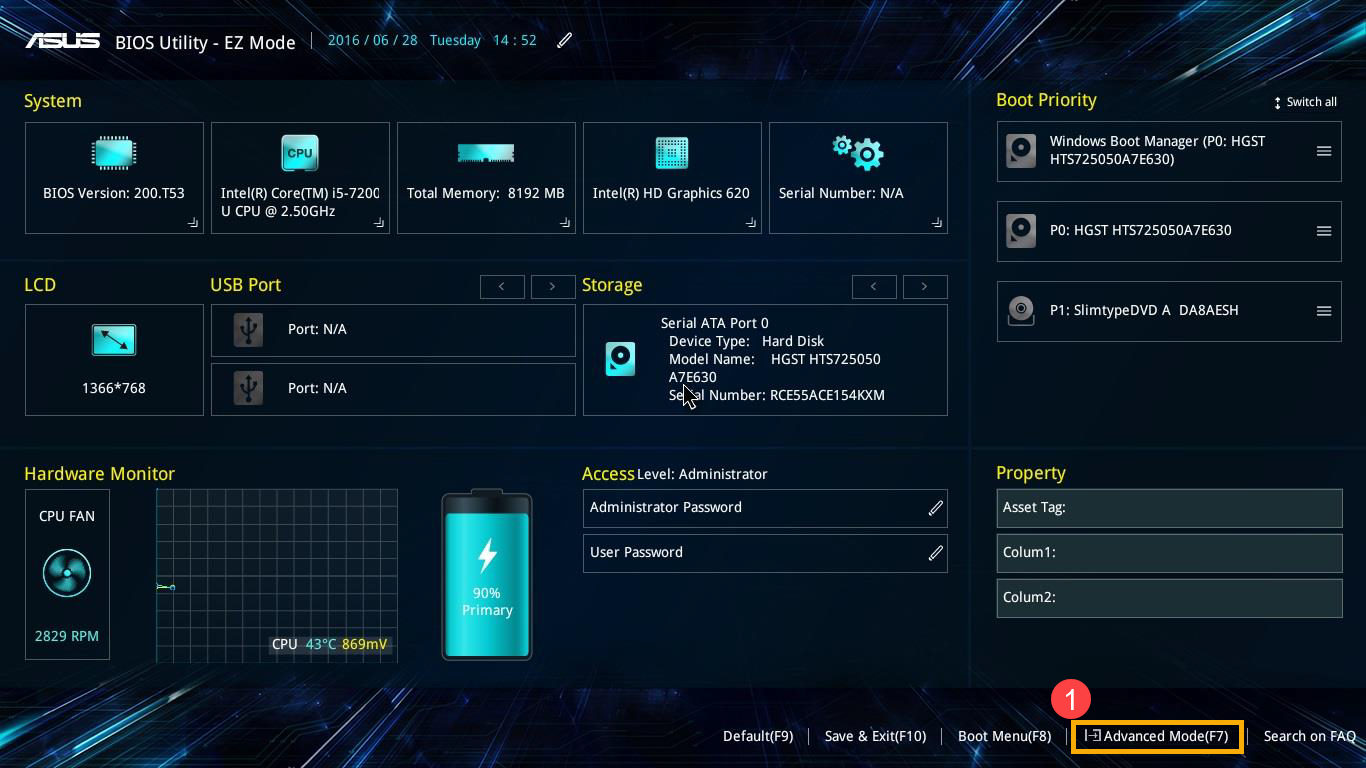
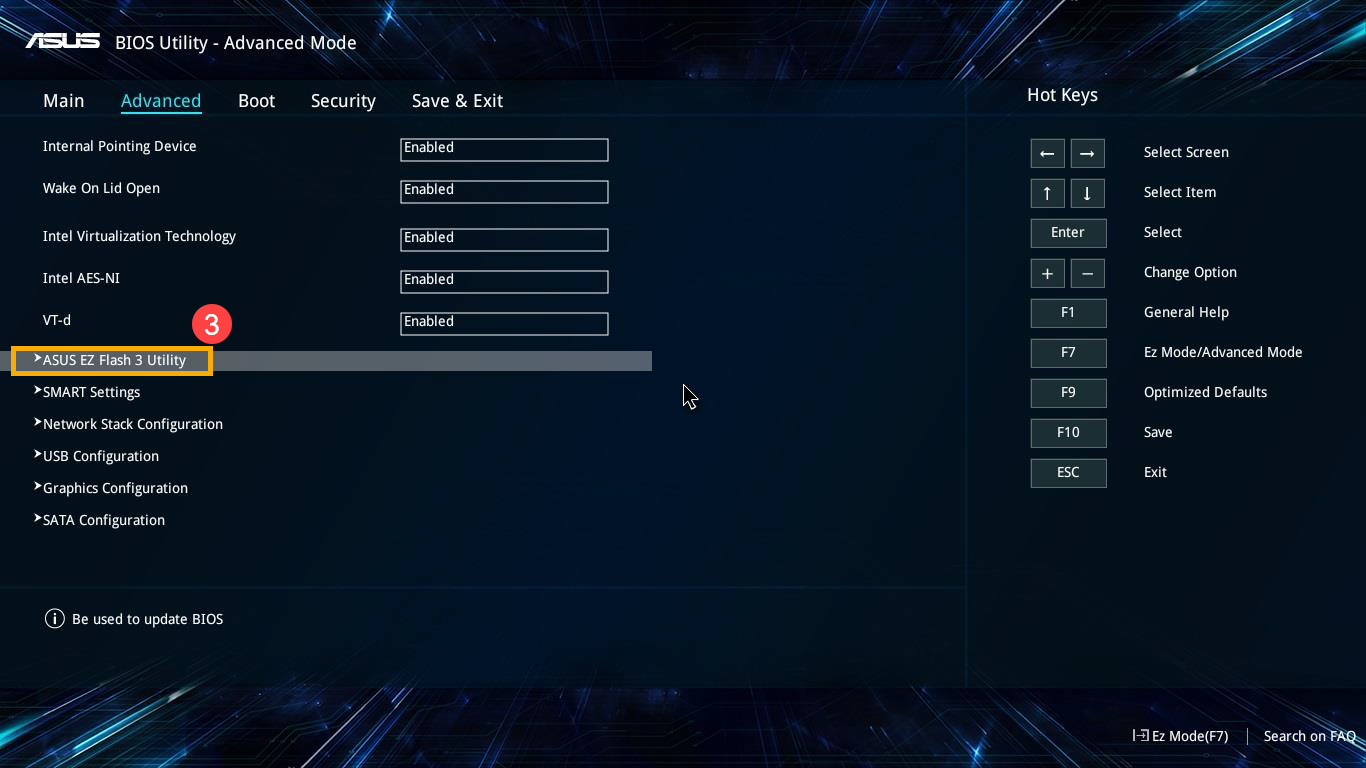
Как найти модель устройства и версию прошивки BIOS в интерфейсе UEFIВ интерфейсе UEFI Вы можете управлять настройками BIOS с помощью клавиш стрелок и клавиши Enter на клавиатуре, мышкой или тачпадом.
- После входа в BIOS перейдите в расширенный режим отображения настроек, нажав горячую клавишу [F7], или используйте курсор, чтобы щелкнуть①.
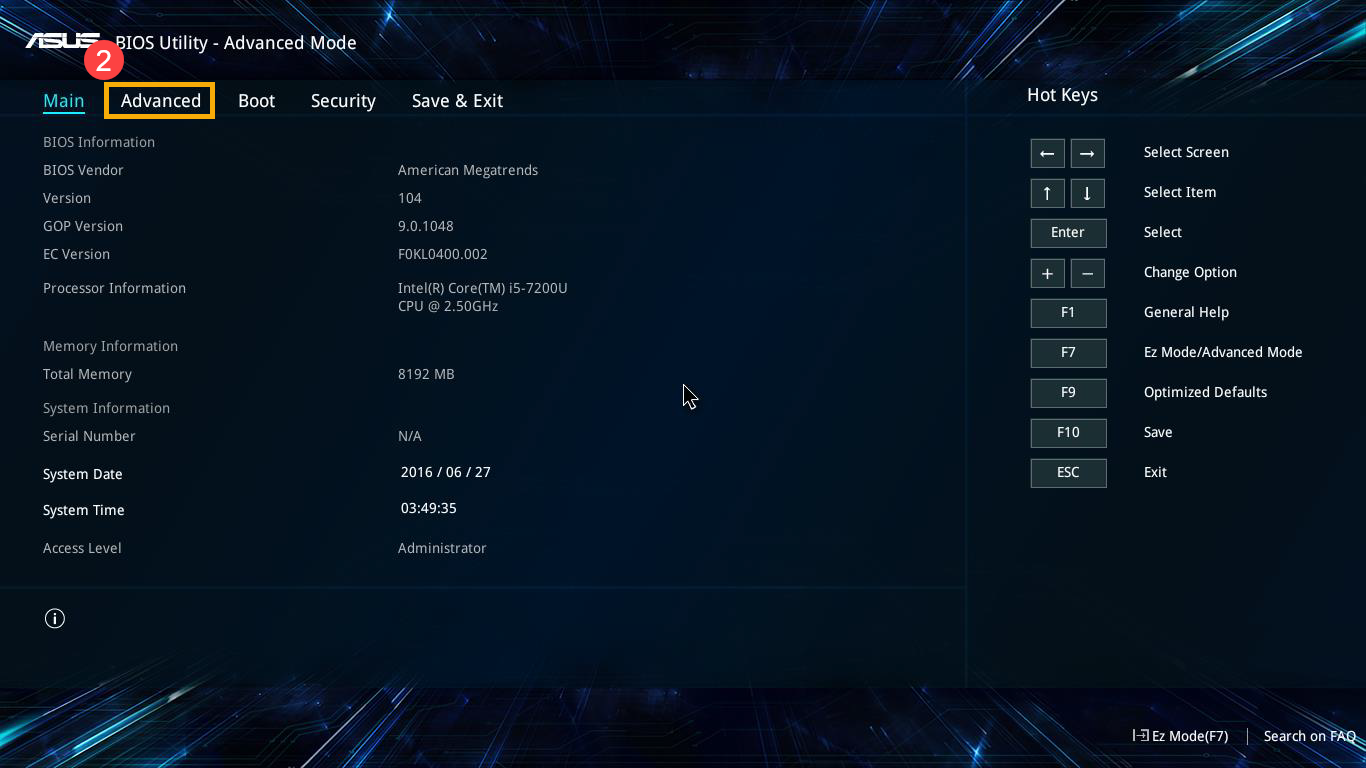
- Теперь перейдите в раздел настроек [Advanced]②.
- Выберите [ASUS EZ Flash 3 Utility]③.
- В разделе Model вы найдете название модели④, и версию BIOS в разделе Version⑤.
Как показано на следующем изображении, название модели — B9450FA, и версия BIOS — 205.

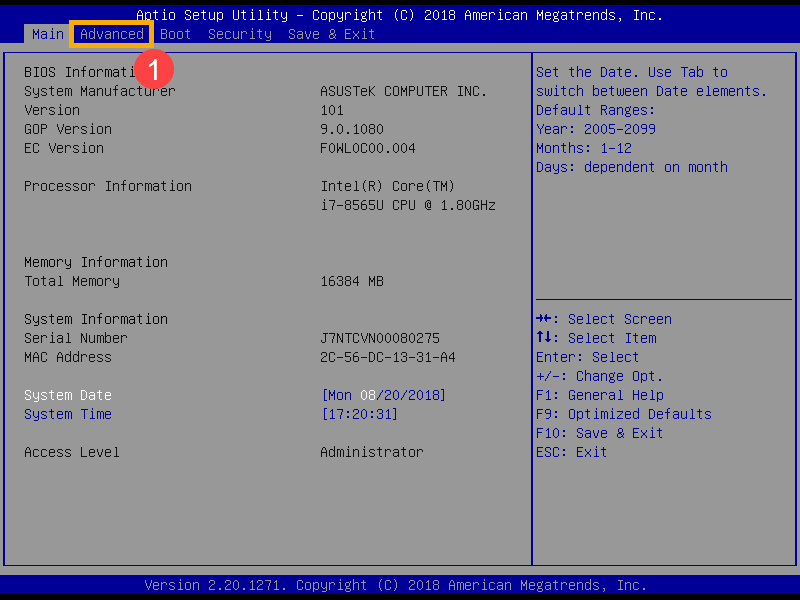
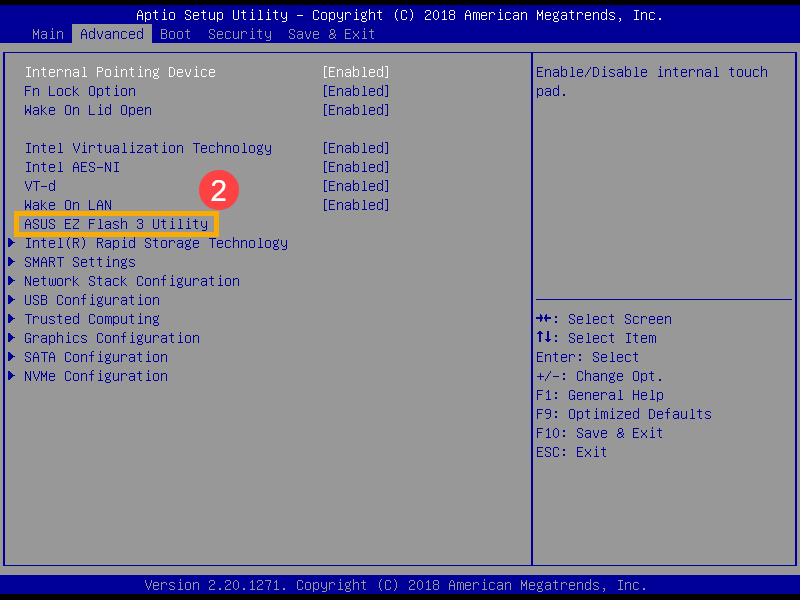
Как найти модель устройства и версию BIOS в интерфейсе Legacy
В режиме Legacy Вы можете выбирать элементы настроек BIOS только с помощью клавиш со стрелками и клавиши Enter на клавиатуре.
- После входа в меню BIOS перейдите в раздел [Advanced]①.
- Выберите [ASUS EZ Flash 3 Utility] и нажмите клавишу Enter②.
- В разделе Platform Вы найдете название модели, а версию BIOS в разделе Version.
Как показано на следующем изображении, название модели — B9440FA, версия BIOS — 101.

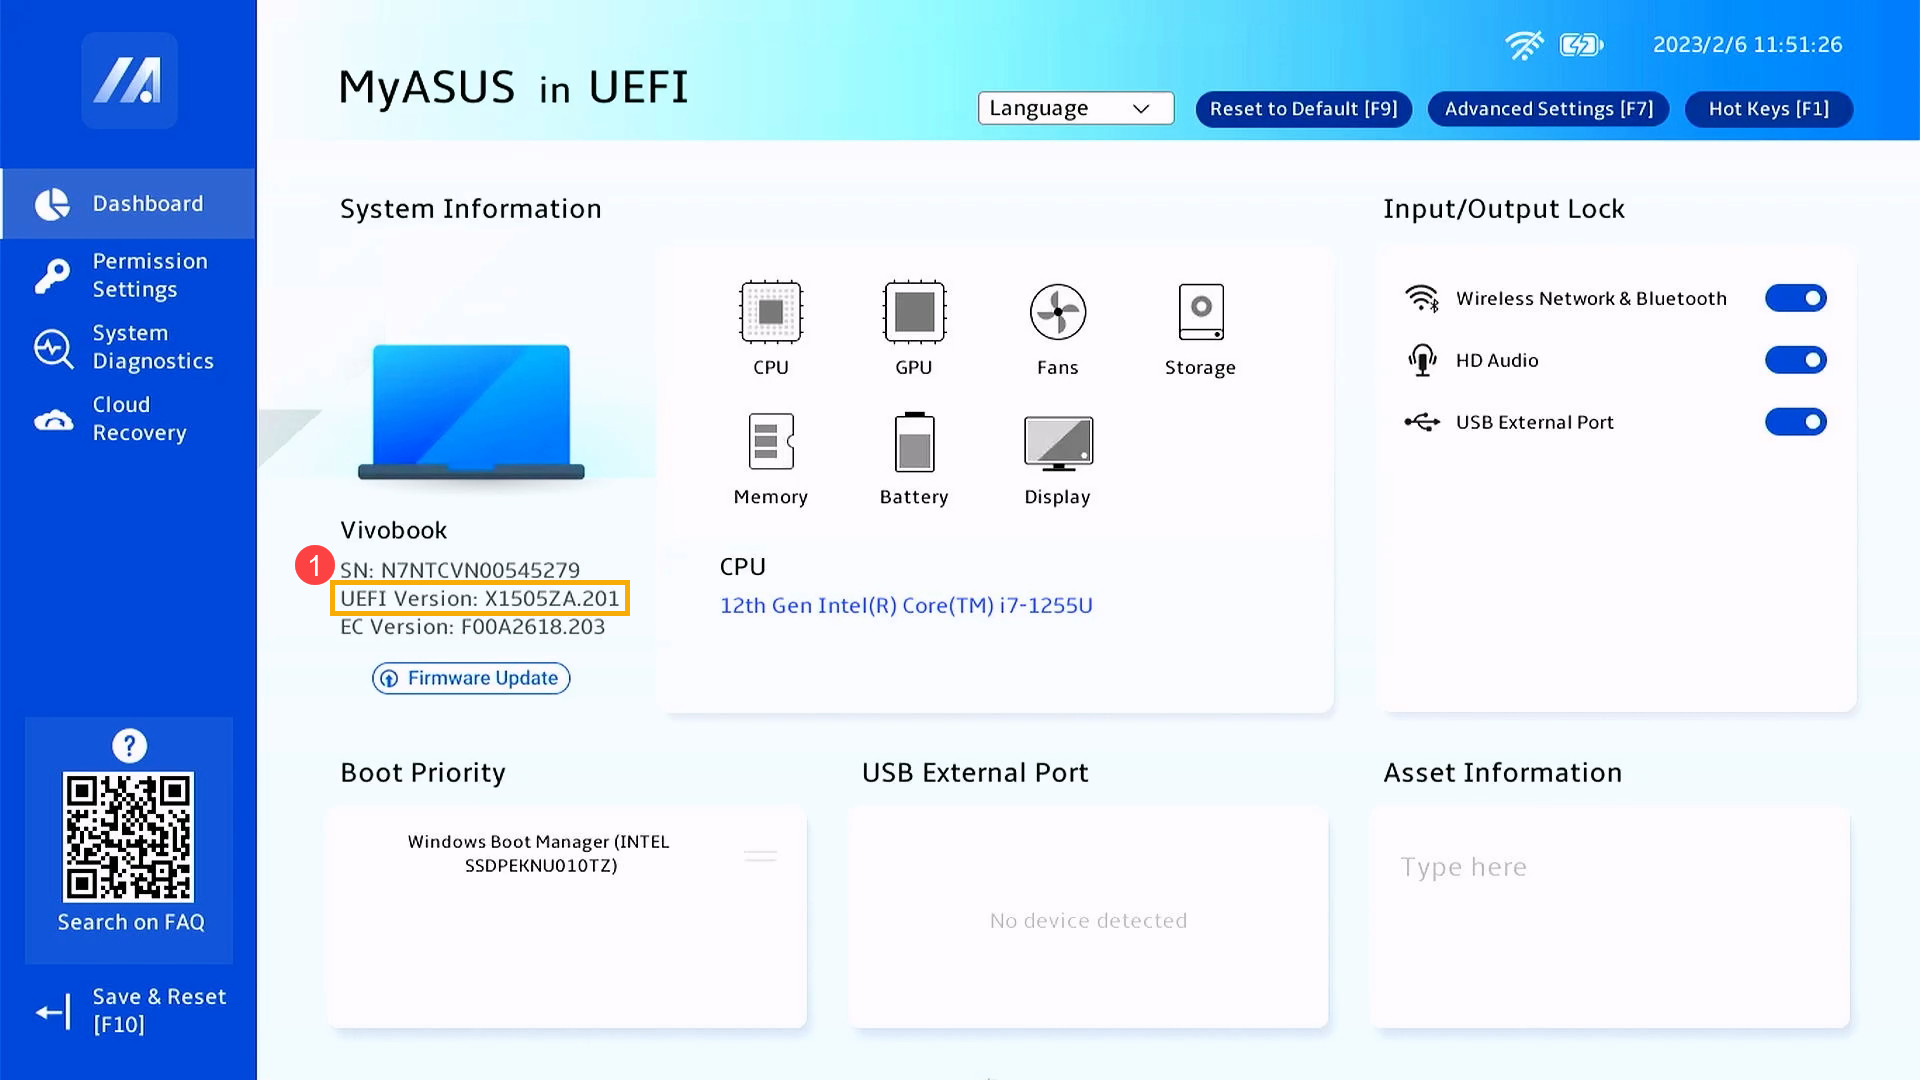
Как найти модель устройства и версию BIOS в интерфейсе MyASUS в UEFI
В интерфейсе MyASUS в UEFI Вы можете управлять настройками BIOS с помощью клавиш стрелок и клавиши Enter на клавиатуре, мышкой или тачпадом.
После входа в настройки BIOS, Вы можете найти модель устройства и версию BIOS в поле UEFI Version①.
В примере, который показан ниже (version X1505ZA.201), показана модель устройства — X1505ZA, и версия BIOS — 210.
Эта информация была полезной?
Yes
No
- Приведенная выше информация может быть частично или полностью процитирована с внешних веб-сайтов или источников. Пожалуйста, обратитесь к информации на основе источника, который мы отметили. Пожалуйста, свяжитесь напрямую или спросите у источников, если есть какие-либо дополнительные вопросы, и обратите внимание, что ASUS не имеет отношения к данному контенту / услуге и не несет ответственности за него.
- Эта информация может не подходить для всех продуктов из той же категории / серии. Некоторые снимки экрана и операции могут отличаться от версий программного обеспечения.
- ASUS предоставляет вышеуказанную информацию только для справки. Если у вас есть какие-либо вопросы о содержании, пожалуйста, свяжитесь напрямую с поставщиком вышеуказанного продукта. Обратите внимание, что ASUS не несет ответственности за контент или услуги, предоставляемые вышеуказанным поставщиком продукта.
Download Windows Speedup Tool to fix errors and make PC run faster
This post shows you how to check the current BIOS version in a Windows 11/10/8/7 computer, using Windows Registry, WMI Command, System Information Tool (MSINFO32.exe) or DirectX Diagnostic Tool (DXDiag). BIOS stands for Basic Input/Output System and is a type of firmware that is built into the hardware, used during and for the booting process of a computer.
Read: Check if your PC uses UEFI or BIOS.
You may need to check your BIOS version if you plan to update the BIOS. Of course, whether you want to do it or whether you should do it is another question. Anyway, there are several ways you can do this. Lets us have a look at them.
1] Using WMI Commands
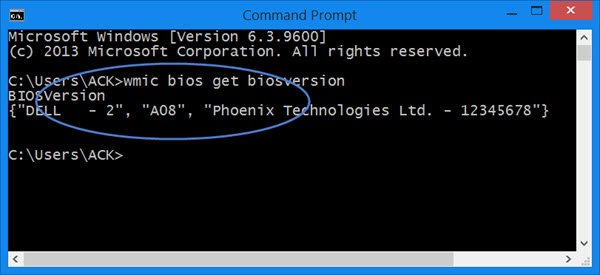
You can use Windows Management Instrumentation to find out the details of your BIOS. To do so, open an elevated command prompt windows, type the following and hit Enter:
wmic bios get biosversion
2] Using MSINFO32
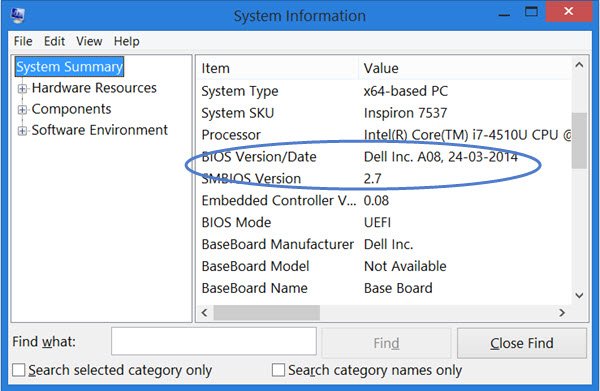
The built-in MSINFO32 or System Information Tool displays this information under System Summary. To open this tool, Run msinfo32 and hit Enter.
3] Using Registry Editor
When Windows loads, it stores the BIOS information and other details under the following registry key:
HKEY_LOCAL_MACHINE\HARDWARE\DESCRIPTION\System
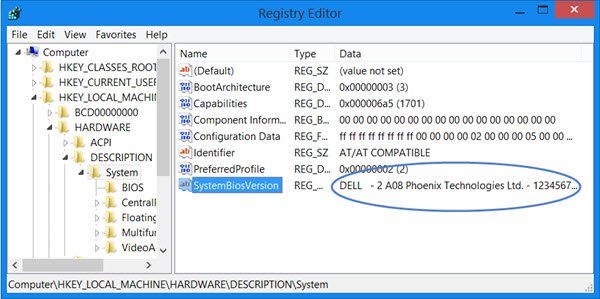
Here you will see the details under System. You will also see additional details under SystemBiosDate, SystemBiosVersion, VideoBiosDate and VideoBiosVersion subkeys.
To see the BIOS version Run regedit and navigate to the mentioned registry key.
4] Using DXDiag
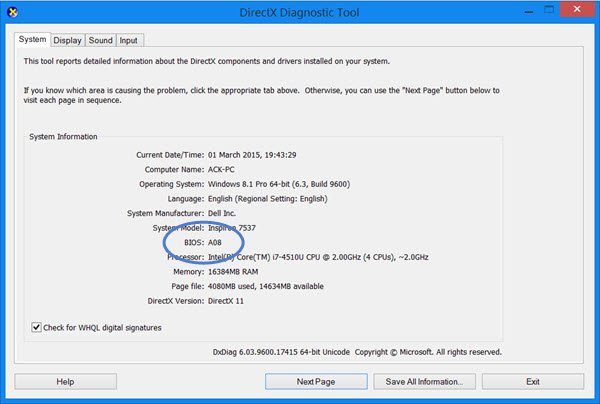
DirectX Diagnostic Tool or DXDiag.exe is basically meant to help you troubleshoot DirectX issues. But if you Run dxdiag to open it, you will see the BIOS version mentioned under the System tab.
Of course, apart from this, you can also use some 3rd-party system information tool like Speccy to see your BIOS version or see it when you enter your machine’s BIOS setup by pressing F10/F12 keys during boot-time.
Check this post if you want to find out Computer RAM, Graphics Card / Video memory of your Windows PC.
Anand Khanse is the Admin of TheWindowsClub.com, a 10-year Microsoft MVP (2006-16) & a Windows Insider MVP (2016-2022). Please read the entire post & the comments first, create a System Restore Point before making any changes to your system & be careful about any 3rd-party offers while installing freeware.
When it comes to checking the BIOS version on Windows 11, it’s important to stay up-to-date and ensure your system is running smoothly. And while this may not be the most thrilling topic, understanding how to check your BIOS version can provide valuable information about your computer’s hardware and compatibility. So, let’s dive in and explore the simple steps to check your BIOS version in Windows 11.
Checking the BIOS version in Windows 11 is a straightforward process that can be done in just a few clicks. By accessing the System Information utility, you can quickly gather information about your computer, including the BIOS version. This can be helpful when troubleshooting or determining if a BIOS update is necessary. Keeping your BIOS up-to-date ensures that your system is equipped with the latest features, bug fixes, and security patches. So, whether you’re a tech enthusiast or simply want to ensure the optimal performance of your Windows 11 device, knowing how to check your BIOS version is a valuable skill to have.
To check the BIOS version on Windows 11, follow these steps:
- Press the Windows key + R to open the Run dialog box.
- Type «msinfo32» and click OK.
- In the System Information window, look for the «BIOS Version/Date» entry.
- The BIOS version will be listed next to it.
This method allows you to quickly check the BIOS version on your Windows 11 system.

Why Check BIOS Version in Windows 11?
Checking the BIOS version in Windows 11 is an essential task for users who want to ensure their computer’s stability, compatibility, and performance. The BIOS (Basic Input/Output System) is firmware that initializes hardware components during boot, allowing them to communicate with the operating system. The BIOS version contains important updates, bug fixes, and compatibility improvements. By checking the BIOS version, users can determine if updates are available to enhance their system’s functionality and security. This article will provide a step-by-step guide on how to check the BIOS version in Windows 11.
Method 1: Using System Information
System Information is a built-in utility in Windows 11 that provides detailed information about your computer’s hardware and software configurations. It is also a convenient tool for checking the BIOS version. Here’s how:
1. Press the Windows key + R to open the Run dialog box.
2. Type «msinfo32» (without the quotes) and press Enter. The System Information window will open.
3. In the System Information window, navigate to the «BIOS Version/Date» field. This field will display the BIOS version currently installed on your Windows 11 computer.
4. Take note of the BIOS version for reference or to check for updates.
Method 1: Pros
— System Information is a built-in utility, eliminating the need for additional software.
— Provides detailed information about the system, including the BIOS version.
— Easy to navigate and find the BIOS version.
Method 1: Cons
— Limited functionality beyond displaying BIOS information.
— May not be suitable for users who prefer a more detailed BIOS management interface.
Method 2: Using Command Prompt
Command Prompt is a command-line interface in Windows that allows users to interact with the operating system using text commands. It can also be used to check the BIOS version. Here’s how:
1. Press the Windows key + R to open the Run dialog box.
2. Type «cmd» (without the quotes) and press Enter. The Command Prompt window will open.
3. In the Command Prompt window, type «wmic bios get smbiosbiosversion» (without the quotes) and press Enter.
4. The Command Prompt will display the BIOS version currently installed on your Windows 11 computer.
Method 2: Pros
— Command Prompt is a built-in utility, eliminating the need for additional software.
— Allows users to interact with the operating system using text commands.
— Quick and straightforward way to check the BIOS version.
Method 2: Cons
— Requires typing specific commands, which may be intimidating for some users.
— Limited functionality beyond displaying BIOS information.
Method 3: Using System BIOS Settings
Checking the BIOS version directly in the system BIOS settings is another method to verify the installed version. Here’s how:
1. Restart your computer and access the BIOS settings. The key to enter BIOS may vary depending on the manufacturer, but it is usually displayed during the boot process (e.g., «Press DEL to enter BIOS»).
2. Once you enter the BIOS settings, navigate to the «Main» or «System» tab. Look for the «BIOS Version» or «UEFI Version» option.
3. The BIOS version will be displayed next to the corresponding option. Take note of the version for reference or further troubleshooting.
Method 3: Pros
— Provides direct confirmation of the BIOS version from the system settings.
— Allows users to access additional BIOS settings if needed.
— Useful for troubleshooting or identifying specific BIOS-related issues.
Method 3: Cons
— Requires restarting the computer to access the BIOS settings.
— The process may vary depending on the manufacturer and BIOS version.
Method 4: Using Third-Party Software
For users who prefer a more comprehensive and user-friendly interface, third-party software can be utilized to check the BIOS version. These software solutions provide additional features and functionalities beyond checking the BIOS version. Here are a few popular options:
- CPU-Z: A free utility that provides detailed information about the computer’s hardware, including the BIOS version. It also displays information about the CPU, memory, and motherboard.
- Speccy: A system information tool that provides detailed hardware and software information, including the BIOS version. It offers a user-friendly interface and additional features like temperature monitoring.
- HWiNFO: A comprehensive system information utility that provides detailed hardware monitoring, including the BIOS version. It also offers advanced features for power users and enthusiasts.
Before installing and using third-party software, it is recommended to download them from official sources and ensure they are compatible with Windows 11.
Method 4: Pros
— User-friendly interface and additional features beyond BIOS checking.
— Provides detailed hardware and software information.
— Can be useful for users who prefer a more comprehensive system information utility.
Method 4: Cons
— Requires installation of third-party software, which may not be suitable for all users.
— Some features may only be available in paid versions.
The Importance of Checking the BIOS Version
Checking the BIOS version is crucial for several reasons:
1. Compatibility and Stability: Manufacturers often release BIOS updates to improve compatibility with new hardware or resolve stability issues. By checking the BIOS version, users can ensure that their computer is running the latest firmware, minimizing compatibility issues and enhancing system stability.
2. Performance and Features: BIOS updates can also introduce performance enhancements and new features. Checking the BIOS version allows users to identify if updates are available to optimize their system’s performance and access new functionalities.
3. Security: BIOS updates often include security patches and fixes that address vulnerabilities. By checking the BIOS version, users can ensure their system is protected against potential security threats.
4. Troubleshooting: In case of hardware or software issues, checking the BIOS version can help determine if outdated firmware is causing the problem. Updating the BIOS to the latest version can often resolve compatibility and stability issues.
Overall, checking the BIOS version is an essential task to keep your Windows 11 computer up to date, secure, and performing optimally.
Checking BIOS Version in Windows 11
If you need to check the BIOS version on your Windows 11 computer, follow these steps:
- Press the Windows key + R to open the Run dialog box.
- Type «msinfo32» and press Enter.
- In the System Information window that opens, scroll down until you find the «BIOS Version/Date» information.
- Note the BIOS version and date for reference.
- You can also check the BIOS version by restarting your computer and entering the BIOS setup. The BIOS version is usually displayed on the main BIOS screen or in the System Information section.
Knowing your BIOS version can be helpful when troubleshooting compatibility issues, updating drivers, or identifying potential security vulnerabilities. It is recommended to keep your BIOS up to date by visiting your computer manufacturer’s website and downloading the latest BIOS version if available.
Key Takeaways — How to Check Bios Version Windows 11
- You can check your BIOS version in Windows 11 by using the System Information tool.
- Open the Start menu, type «System Information,» and select the app from the search results.
- In the System Information window, look for the «BIOS Version/Date» field.
- The BIOS version will be displayed next to the field.
- Updating your BIOS can improve system stability and compatibility with new hardware.
Frequently Asked Questions
Need to check your BIOS version in Windows 11? Here are some commonly asked questions and answers to help you out.
1. How can I check the BIOS version on my Windows 11 computer?
To check the BIOS version on your Windows 11 computer, follow these steps:
1. Press the Windows key + R on your keyboard to open the Run dialog box.
2. Type «msinfo32» in the Run dialog box and press Enter.
3. In the System Information window that opens, look for the BIOS Version/Date under the System Summary section.
4. The BIOS version and date will be displayed in the right-hand pane.
It’s important to note that the steps to check the BIOS version may vary slightly depending on your computer manufacturer or motherboard.
2. Can I check the BIOS version in Windows 11 from the Command Prompt?
Yes, you can check the BIOS version in Windows 11 using the Command Prompt. Here’s how:
1. Press the Windows key + X on your keyboard to open the Power User Menu.
2. Select «Command Prompt» or «Windows PowerShell» from the menu.
3. In the Command Prompt window, type «wmic bios get smbiosbiosversion» without the quotes and press Enter.
4. The BIOS version will be displayed in the output below the command you entered.
Please note that the Command Prompt method requires administrative privileges.
3. Is there a way to check the BIOS version without rebooting the computer?
Yes, you can check the BIOS version without rebooting the computer. Here’s how:
1. Press the Windows key + R on your keyboard to open the Run dialog box.
2. Type «cmd» in the Run dialog box and press Enter.
3. In the Command Prompt window, type «wmic bios get smbiosbiosversion» without the quotes and press Enter.
4. The BIOS version will be displayed in the output below the command you entered.
This method allows you to check the BIOS version without restarting or shutting down your computer.
4. Can I check the BIOS version in Windows 11 from the Settings app?
No, currently there is no direct option to check the BIOS version in Windows 11 from the Settings app. However, you can still use other methods, such as the ones mentioned earlier, to check the BIOS version on your computer.
5. Why is it important to check the BIOS version on Windows 11?
Checking the BIOS version on Windows 11 is important for several reasons:
1. Compatibility: Knowing your BIOS version can help ensure compatibility with hardware devices and software updates.
2. Security: Updating the BIOS to the latest version can protect your computer from security vulnerabilities.
3. Stability: Updating the BIOS can improve system stability and performance.
4. Troubleshooting: When experiencing hardware or software issues, checking the BIOS version can provide useful information for troubleshooting and finding solutions.
Therefore, regularly checking and updating your BIOS version is recommended for optimal performance and security.
In conclusion, checking the BIOS version on Windows 11 is a straightforward process that can provide valuable information about your computer’s hardware. By following the steps outlined in this article, you can easily access the BIOS settings and locate the BIOS version number. This knowledge can be helpful when troubleshooting or updating your system.
Remember to consult your computer’s manufacturer or the Windows Support website for specific instructions or troubleshooting steps related to your device. Keeping your BIOS up to date is important for optimal system performance and compatibility with new software and hardware.