
If you have come across an error message such as “A codec is required to play this file” or “Windows Media Player encountered an error,” it is likely that you have a missing or broken codec. If so, this article is for you.
Codecs are a necessary piece of software required to compress, transport, and then decompress any files comprising of video, audio, or both. You can check which codecs are installed on your Windows 10 device using the given guide.

But before that, let’s discuss in detail what codecs are, and how they work.
Table of Contents
What is a codec
As we mentioned, a codec is a part of the software that encodes (compresses) a file and then decodes (decompresses) it to make it playable again. Some codecs contain only the encoder, some only the decoder, and some comprise both.
There are separate codecs for audio and video files. Consider it like encryption; a public key is required to encrypt data whilst a private key is required to decrypt it. The private key will only be able to unlock the data and decrypt it if it was using the same mechanism as the encryption key.
It is the same scenario with codecs that are installed on your machine. If it does not contain the same codec technology with which the file was encoded initially, your device will be unable to play it, resulting in an error message.
So how would you know which codecs are installed on your PC, and which one is required to play the file that you are unable to play?
Check which codecs are installed in Windows 10
There are multiple ways to check which codecs are installed on your PC, as Windows 10 comes with a few pre-installed codecs created by Microsoft, while many others are created by other organizations and companies.
Check installed codecs from System Information
You can check which codecs are installed on your device using the System Information page in Windows. However, this only displays very limited information and not all of the installed codecs are visible here.
If you still prefer to use this information, follow the guide below or skip to the next method for more reliable information.

- Type msinfo32 in Run dialog to open the system information utility.
- Expand Components and then Multimedia section from the left pane.
- You will then see the options “Audio Codecs” and “Video Codecs” Click on either option to view information on respective codecs installed in the system.
As we said, this page does not give the most reliable information about the installed codecs. It does, however, display the manufacturer, version, size, and the date of creation of the codecs that are visible.
Check installed codecs from Windows Media Player
Since Windows Media Player comes pre-installed in Windows 10, it is also the default audio and video player. You can obtain a detailed list of the installed codecs using this software.
To do so, open Windows Media Player by typing in wmplayer in Run. Next, right-click on an empty space in the bar at the top (just below the title bar), expand Help in the context menu, and then click About Windows Media Player.

On the About pop-up, click Technical Support Information.

This will now open a detailed tab on your web browser. Scroll down and you shall find the audio and video codecs installed on your PC, amongst other useful information, like DVD codecs.

Check installed codecs using third-party applications
If what we have already discussed is not your preferred method, you can also check the codecs installed using third-party applications.
InstalledCodec
InstalledCodec is a tiny, portable software by Nirsoft that allows you to view detailed information about the codecs installed on your system. You can also apply various filters such as displaying only 64-bit codecs, etc. You can also disable and enable these codecs through the context menu.

Video Inspector
Video Inspector is another great software for you to check which codecs are installed on your device. Simply open the website by clicking on the provided link and then click Download. Unlike InstalledCodec, Video Inspector needs to be installed on your PC and is not portable.
Open the app and click the Codecs button on the left. This will then open another window where you can see the installed video and audio codecs. You can shift between them using the drop-down menu.

This application can do much more than displaying the installed codecs on your device, which are discussed further down the article.
How to install missing codec
Most users find it difficult to determine what codec is missing or broken on their device so that the audio/video file can be played. However, it is quite possible. If you do not already know the name of the codec, it can be determined. If, however, you know the name of the codec, simply search for it on the internet and install it.
Determine codec information for file
Most media files contain codec information in their metadata, which can be seen through their properties. Right-click the file you want to find the encoding codec for and click Properties from the context menu. Switch to the Details tab and there look for Audio Codec and Video Codec information.
If you do not find any such information, you can use the Video Inspector tool to determine these codecs and download them too. Download and install the application from the given link and launch it. From the app, click Browse and then select the file to determine its codec information. The Video Inspector app will then display the desired information, as shown in the image below:

As you may find in the image, the desired codecs are not available on my machine. If you have a similar scenario, simply click on the Download button beneath each codec and you will be automatically taken to a web search for the codec. Browse to the right file, download and install it and you’re done!
Closing
Although codecs are tiny pieces of software, they still play an important role in almost everyone’s lives without them knowing it. It is very unlikely that users will experience such codec errors on a Windows 10 PC that has not been altered. However, if you still do, getting over the error should not be a problem since we have applications like Video Inspector to save the day.
When working with multimedia files on Windows 10 or Windows 11, you may occasionally encounter an error indicating that a specific codec is missing. Codecs are essential for encoding and decoding digital media files, and with the ever-growing variety of file formats, understanding how to manage and check installed codecs is vital for a seamless media experience. In this article, we will explore various methods to check the installed codecs on your Windows 10 and Windows 11 systems.
Understanding Codecs
Before we delve into how to check codecs, it’s essential to understand what they are. A codec (coder-decoder) is a software component that compresses and decompresses digital audio or video. Codecs are available in two main types:
-
Lossless Codecs: These maintain the original quality of the audio or video but may create larger file sizes. Examples include FLAC for audio and HuffYUV for video.
-
Lossy Codecs: These discard some data during compression, resulting in smaller file sizes, at the expense of some quality. Examples include MP3 for audio and H.264 for video.
Importance of Codecs
Codecs remove redundancy in audio and video files to facilitate storage and transmission. The right codec ensures that the media plays smoothly without glitches or distortions. If you often work with different media formats, knowing how to manage codecs can save a lot of hassle.
Getting Started: Checking Installed Codecs
Method 1: Using Windows Media Player
Windows Media Player (WMP) can serve as a basic tool to check installed codecs on your system, even if you don’t primarily use it for media playback.
-
Open Windows Media Player: You can do this by searching for ‘Windows Media Player’ in the Start Menu.
-
Play a File: Load a media file that you suspect may require a specific codec.
-
Access the Codec Information: Within Windows Media Player, right-click on the playing area, select ‘Properties,’ and navigate to the ‘File’ tab. This will display details about the media file, including the codecs used.
-
Advanced Codec Details: For advanced codec information, press
Altto access the menu bar, click on the ‘Help’ menu, and select ‘About Windows Media Player.’ Click on ‘Technical Support Information’ to view a list of all codecs installed on your system.
Method 2: Using the DirectShow Filter Manager
Windows has a built-in utility called DirectShow Filter Manager, which can show you the codecs installed on your system.
-
Open the Run Dialog: Press
Windows Key + Rto open the Run dialog. -
Enter the Command: Type
dxdiagand press Enter. This opens the DirectX Diagnostic Tool. -
Check the Rendered Tab: Navigate to the ‘Sound’ and ‘Display’ tabs for relevant codec information. This tool displays details about audio and video renderers, filters, and codecs currently installed.
-
Filter Details: For detailed codec information, you might need to download extra tools like ‘GraphEdit’ or third-party tools that work with DirectShow filters.
Method 3: Using Codec Tweak Tool
Codec Tweak Tool is a third-party application that can provide an extensive overview of the codecs installed on your system.
-
Download Codec Tweak Tool: The tool is available for free from reputable sites like CNet or the official Codec Guide website. Install it following the on-screen instructions.
-
Launch the Application: After installation, open the Codec Tweak Tool.
-
Analyze Installed Codecs: The interface will show you a list of installed codecs and splitters, and highlight any issues with them. The utility also allows you to fix problems and uninstall unnecessary codecs.
Method 4: Windows Registry
If you’re comfortable working with the Windows Registry, you can find codec information there.
-
Open the Registry Editor: Press
Windows Key + R, typeregedit, and hit Enter. -
Navigate to Codec Keys: You can find codec-related information in:
HKEY_LOCAL_MACHINESOFTWAREMicrosoftWindowsCurrentVersionUninstallHKEY_LOCAL_MACHINESOFTWAREMicrosoftWindowsCurrentVersionUninstall{Installed_Codec_Name}
-
Check Installed Codecs: Each codec retains its information regarding the version, publisher, and sometimes file locations.
-
Be Cautious: Editing the registry can cause system instability if not done carefully, so it’s advisable to back up the registry before making any changes.
Method 5: Using Windows Settings
On Windows 10 and 11, you can check for installed codecs directly through the Settings app in some cases.
-
Open Settings: Click on the Start menu and select the gear icon to open Settings.
-
Go to Apps: Click on ‘Apps.’
-
Installed Apps: Scroll down to find installed applications that may include codec packs or players. You can check their versions and whether they include a codec.
Common Media Players and Their Codec Information
VLC Media Player
VLC is one of the most versatile media players available which supports various codecs out of the box.
-
Open VLC: Launch VLC Media Player.
-
Access Codec Information: Open a media file, then go to
Tools > Codec Information. Here, you can see the codecs used for both audio and video tracks.
MPC-HC (Media Player Classic – Home Cinema)
MPC-HC is another player that gives robust codec support.
-
Open MPC-HC: Start the Media Player Classic.
-
Check Codec Info: Play a file and select
File > Properties. The Properties window will provide you with the codec details for the media file.
Troubleshooting Missing Codecs
If you encounter problems with missing codecs while trying to play certain files:
-
Install Codec Packs: Consider installing complete codec packs like K-Lite Codec Pack, which includes all major codecs and is regularly updated.
-
Keep Players Updated: Ensure that your media players are updated to the latest versions, as they may contain built-in codec updates.
-
Online Resources: Websites like Codec Guide provide extensive documentation and troubleshooting assistance regarding codecs and configurations.
Conclusion
Understanding how to check installed codecs on Windows 10 and Windows 11 is crucial for any user dealing with multimedia. Having up-to-date codecs can significantly improve your experience when playing or editing audio and video files. Using native tools like Windows Media Player, DirectShow Filter Manager, and the Codec Tweak Tool, users can easily analyze and manage their installed codecs. Moreover, being aware of third-party media players and codec packs can safeguard against common codec-related issues. Always keep your system and players updated to ensure the best playback experiences. With the right codecs at your disposal, you can enjoy the seamless media playback that Windows has to offer.
Для работы проектов iXBT.com нужны файлы cookie и сервисы аналитики.
Продолжая посещать сайты проектов вы соглашаетесь с нашей
Политикой в отношении файлов cookie
И Windows 10, и Windows 11 обладают крайне аскетичным набором функций, когда речь заходит о передаче звука по Bluetooth. Штатными средствами определить используемый операционной системой Bluetooth-кодек не получится, тем более не получится найти где-либо в интерфейсе Windows кнопку «поменять кодек». В этой статье мы разберемся, каким образом можно определить активный кодек, а также рассмотрим способы переключения и изменения параметров Bluetooth-кодеков в Windows.

Содержание
- Какие кодеки поддерживает Windows
- Как увидеть используемый кодек
- Как поменять выбранный системой Windows кодек
-
- Как переключить Windows 11 с AAC на aptX (бесплатно)
- Как добавлять / модифицировать кодеки и переключаться между ними (платно)
-
- Повышаем битрейт SBC до 600 кбит/с и выше (SBC-XQ)
Windows 11 нативно поддерживает кодеки SBC, aptX и AAC, также в этом году в свежих устройствах начала появляться поддержка кодека LC3. В Windows 10 реализована поддержка SBC и aptX, а AAC доступен в инсайдерских билдах. При выборе кодека Windows 11 отдает предпочтение AAC. Если подключаемое устройство не поддерживает данный кодек, тогда выбор падает на aptX, а SBC является кодеком «последней надежды».
Windows 10 предпочитает aptX, а SBC является запасным вариантом. Также существует способ подружить Windows 10/11 с кодеками aptX HD, aptX Low Latency и LDAC, но об этом чуть позже.
Чтобы понять, какой Bluetooth-кодек использует Windows для передачи аудио, устанавливаем программу Bluetooth Tweaker. Это платное ПО, но в течение 7 дней можно пользоваться бесплатной демоверсией.
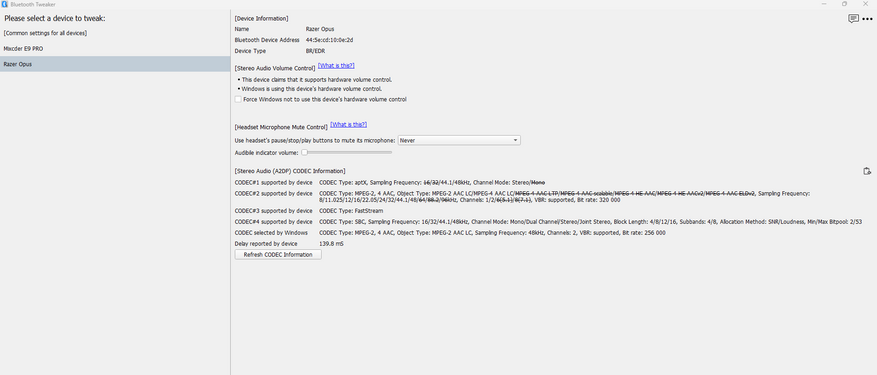
В окне программы мы видим перечень кодеков, с которыми может работать конкретное устройство (в данном случае наушники Razer Opus), а также тот кодек, которому отдала предпочтение Windows (в моем случае AAC 256 кбит/с).
Обычный кодек SBC сегодня мало кто считает лучшим решением для беспроводной передачи аудио. «Модифицированный» SBC, он же SBC-XQ — совсем другое дело, но об этом речь пойдет позже. Итак, большинство пользователей Windows 10 используют aptX, если их наушники его поддерживают, или SBC, если нет. Тут никаких проблем. А вот Windows 11 обычно предпочитает кодек AAC, да зачастую ещё и со сравнительно низким битрейтом в 256 кбит/с (вместо максимально возможного для этого кодека 320 кбит/с), в то время как на aptX можно получить более солидные 384 кбит/с.
Пользователь reddit с никнеймом BugMuzzy нашел бесплатный способ переключения кодека в Windows 11 через редактор реестра.
- Для начала следует убедиться, что ваша модель наушников сама по себе поддерживает кодек aptX, в противном случае после выполнения следующих действий Windows 11 будет использовать кодек SBC.
- Открываем редактор реестра и переходим по пути HKEY_LOCAL_MACHINE\SYSTEM\CurrentControlSet\Services\BthA2dp.

- Создаем раздел Parameters (если его нет по указанному пути) и в нем создаем параметр BluetoothAacEnable, которому присваиваем значение 0. После этого в настройках Windows выключаем и обратно включаем Bluetooth, заново подключаемся к наушникам (или другой используемой акустике), и теперь вместо AAC будет использоваться кодек aptX. Убедиться в этом можно с помощью упомянутой ранее утилиты Bluetooth Tweaker.
Следующий способ связан с использованием альтернативного драйвера A2DP от создателей Bluetooth Tweaker. Он также поставляется с 7-дневным триалом, так что оценить все его прелести можно и бесплатно, но для продолжительного использования понадобится приобрести лицензию.
Что умеет этот альтернативный Bluetooth стек:
- Добавляет поддержку кодеков aptX HD, aptX LL и LDAC;
- Позволяет в любое время переключаться между любыми кодеками отдельно для каждого устройства воспроизведения;
- Позволяет менять различные параметры для каждого из кодеков (см. скриншоты), что особенно важно для SBC и LDAC.
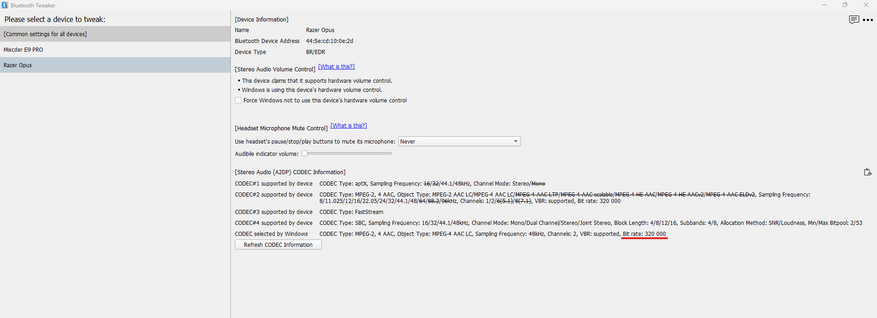
Также альтернативный драйвер автоматически переключает кодек AAC в вариант с битрейтом 320 кбит/с. В моем случае Win 11 использовала AAC 256 кбит/с, в то время как наушники поддерживают и 320 кбит/с. После установки альтернативного драйвера битрейт автоматически увеличился до 320 кбит/с. В этом можно убедиться с помощью утилиты Bluetooth Tweaker, см. скрин ниже.
Едва ли не самая «вкусная» функция альтернативного драйвера A2DP — это возможность гибко настраивать кодек SBC, превращая его в достойную альтернативу aptX HD или даже LDAC. Переопределяя битпул, можно поднять битрейт кодека SBC до значений свыше 1000 кбит/с и улучшить качество звука в устройствах, не имеющих поддержки современных «премиальных» кодеков.
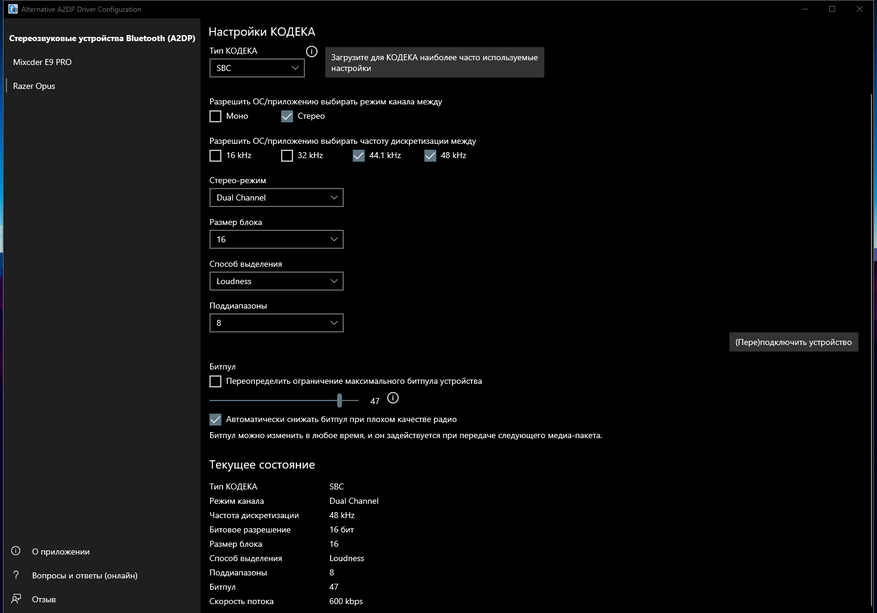
Следует понимать, что чем выше установленный битрейт, тем хуже стабильность сигнала в сложных условиях. Здесь всё зависит от конкретного сетапа, и у некоторых юзеров получается на практике использовать SBC с битрейтом 1100 кбит/с. В целом оптимальным по качеству звука/стабильности сигнала для SBC-XQ принято считать значение 551 кбит/с либо 600 кбит/с (в зависимости от частоты дискретизации — 44.1 кГц либо 48 кГц) в режиме Dual Channel. О причинах этого можно почитать в обстоятельной статье на Хабре.
Сейчас на главной
Новости
Публикации

Изящные розовые птицы, застывшие на одной ноге в зеркальной глади соленого озера, — картина почти медитативная. Кажется, будто фламинго, опустив свои причудливо изогнутые шеи и головы в…

Модель часов «Танк» от часовой компании Слава сегодня, на мой взгляд, несколько теряется в основном ассортименте, чему, кстати, есть логичное объяснение. Поэтому сделать на ней небольшой…

В середине девяностых годов у нас в стране в
продаже появилось множество новых современных строительных материалов, которые
практичны и удобны в работе. Они применяются как профессиональными…

Когда речь заходит о щуке, большинство представляет себе стандартную зубастую хищницу из речки у деревни: килограмма на три, с пятнистым зеленоватым телом и злобным взглядом. Но в российских…

В эпоху, когда человечество только осваивало космические просторы, Франция сделала неожиданный выбор, отправив в полет не собаку или обезьяну, а кошку по имени Фелисетт. В октябре 1963 года она…

Нержавеющая
сталь — материал, который ассоциируется
с прочностью, долговечностью и
устойчивостью к коррозии. На первый
взгляд, кажется, что это идеальный выбор
для производства…
Если вы видите это сообщение, значит, произошла проблема с загрузкой файлов в стилей (CSS) нашего сайта. Попробуйте сбросить кэш браузера (Ctrl+F5).
Если это не поможет, а вы находитесь в регионе, где возможны ограничения интернет-трафика с российских серверов — воспользуйтесь VPN.
|
В меню Пуск->Все программы->Стандартные->Служебные->Сведения о системе. Далее в разделе Компоненты->Мультимедиа будут две варианта — аудиокодеки и видеокодеки. Это даст как минимум имена файлов кодеков. Дальше догадываться по имени, либо смотреть в интернете что за кодек представляет тот или иной файл. автор вопроса выбрал этот ответ лучшим Есть маленькая бесплатная программа GSpot (скачать можно здесь: http://gspot.headbands.com/). Она показывает все кодеки, установленные в системе, кроме того в ней можно открыть медиа-файл, и она покажет какие кодеки использовались при его кодировании и установлены ли они в системе. Знаете ответ? |