
SID (Security IDentifier) – это уникальный идентификатор, который присваивается пользователям, группам, компьютерам или другим объектам безопасности при их создании в Windows или Active Directory. Windows использует SID, а не имя пользователя для контроля доступа к различным ресурсам: сетевым папкам, ключам реестра, объектам файловой системы (NTFS разрешения), принтерам и т.д. В этой статье мы покажем несколько простых способов получить SID пользователя, группы или компьютера, и обратную процедуру – получить объект по известному SID.
Содержание:
- Что такое SID объекта в Windows?
- Как получить SID локального пользователя?
- Узнать SID пользователя или группы в домене Active Directory
- Получить SID компьютера
- Как узнать имя пользователя или группы по известному SID?
- Поиск объектов в Active Directory по SID
Что такое SID объекта в Windows?
Как мы уже сказали, SID (security identifier) позволяет уникально идентифицировать пользовали, группу или компьютер в пределах определенной области (домена или локального компьютера). SID представляет собой строку вида:
S-1-5-21-2927053466-1818515551-2824591131—1103.
В данном примере:
- 2927053466-1818515551-2824591131 – это уникальный идентификатор домена, выдавшего SID (у всего объекта в одном домене эта часть будет одинакова)
- 1103 – относительный идентификатор безопасности объекта (RID). Начинается с 1000 и увеличивается на 1 для каждого нового объекта. Выдается контроллером домена с FSMO ролью RID Master)
SIDы объектов Active Directory хранятся в базе ntds.dit, а SIDы локальных пользователей и групп в локальной базе диспетчера учетных записей Windows (SAM, Security Account Manager в ветке реестра HKEY_LOCAL_MACHINE\SAM\SAM).
В Windows есть так называемые известные идентификаторы безопасности (Well-known SID). Это SID встроенных (BuiltIn) пользователей и групп, которые есть на любых компьютерах Windows. Например:
-
S-1-5-32-544
– встроенная группу Administrators -
S-1-5-32-545
– локальные пользователи -
S-1-5-32-555
– группа Remote Desktop Users, которым разрешен вход по RDP -
S-1-5-domainID-500
– учетная запись встроенного администратора Windows - И т.д.
В Windows можно использовать различные средства для преобразования SID -> Name и Username -> SID: утилиту whoami, wmic, WMI, классы PowerShell или сторонние утилиты.
Как получить SID локального пользователя?
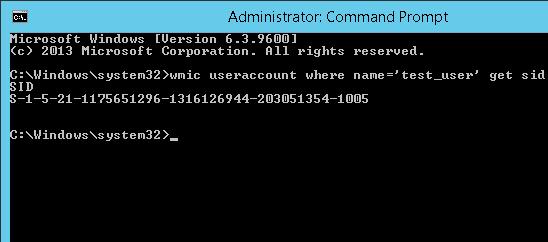
Чтобы получить SID локальной учетной записи, можно воспользоваться утилитой wmic, которая позволяет обратится к пространству имен WMI (Windows Management Instrumentation) компьютера.
wmic useraccount where name='test_user' get sid
Команда может вернуть ошибку, если репозиторий WMI поврежден. Воспользуйтесь этой инструкцией для восстановления WMI репозитория.
Команда вернула SID указанного пользователя —
S-1-5-21-1175651296-1316126944-203051354-1005
.
Чтобы вывести список SID всех локальных пользователей Windows, выполните:
wmic useraccount get name,sid.
Если нужно узнать SID текущего пользователя (под которым выполняется команда), используйте такую команду:
wmic useraccount where name='%username%' get sid
Можно обратится к WMI напрямую из PowerShell:
(Get-CimInstance -Class win32_userAccount -Filter "name='test_user' and domain='$env:computername'").SID
В новых версиях PowerShell Core 7.x вместо команды Get-WmiObject нужно использовать Get-CimInstance.
Но еще проще получить SID локального пользователя с помощью встроенного PowerShell модуля управления локальными пользователями и группами (Microsoft.PowerShell.LocalAccounts).
Get-LocalUser -Name 'test_user' | Select-Object Name, SID

По аналогии можно получить SID локальной группы:
Get-LocalGroup -Name tstGroup1 | Select-Object Name, SID
Также вы можете использовать.NET классы System.Security.Principal.SecurityIdentifier и System.Security.Principal.NTAccount для получения SID пользователя с помощью PowerShell:
$objUser = New-Object System.Security.Principal.NTAccount("LOCAL_USER_NAME")
$strSID = $objUser.Translate([System.Security.Principal.SecurityIdentifier])
$strSID.Value
Узнать SID пользователя или группы в домене Active Directory
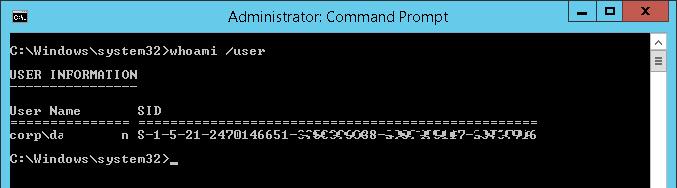
Вы можете узнать SID своей доменной учетной записи командой:
whoami /user
Получить SID пользователя домена Active Directory можно с помощью WMIC. В этом случае в команде нужно указать имя домена:
wmic useraccount where (name='jjsmith' and domain=′corp.winitpro.ru′) get sid
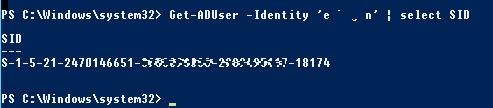
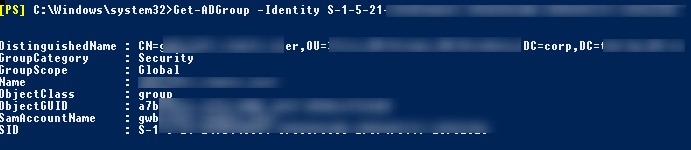
Для получения SID доменного пользователя можно воспользоваться командлетом Get-ADUser, входящего в состав модуля Active Directory Module для Windows PowerShell. Получим SID для доменного пользователя jjsmith:
Get-ADUser -Identity 'jjsmith' | select SID
Вы можете получить SID группы AD с помощью командлета Get-ADGroup:
Get-ADGroup -Filter {Name -like "msk-admin*"} | Select SID

Если на вашем компьютере не установлен модуль AD для PowerShell, вы можете получить SID пользователя с помощью классов .Net:
$objUser = New-Object System.Security.Principal.NTAccount("corp.wintpro.ru","jjsmith")
 $strSID = $objUser.Translate([System.Security.Principal.SecurityIdentifier])
$strSID.Value

Эта же команда PowerShell в одну строку:
(new-object security.principal.ntaccount “jjsmith").translate([security.principal.securityidentifier])
Получить SID компьютера
Если компьютер с Windows добавлен в домен Active Directory, у него будет два разных SID. Первый SID – идентификатор локального компьютера (Machine SID), а второе – уникальный идентификатор компьютера в AD.
SID компьютера в домене Active Directory можно получить с помощью команды:
Get-ADComputer srv-rds1 -properties sid|select name,sid

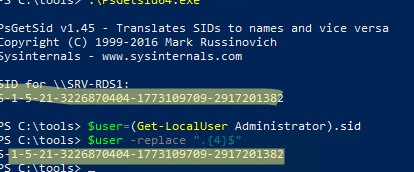
SID локального компьютера (Machine SID) можно получить с помощью бесплатной утилиты PsGetsid (https://docs.microsoft.com/en-us/sysinternals/downloads/psgetsid): Но ее придется скачивать и устанавливать на каждый компьютер вручную.
.\PsGetsid64.exe
Или просто, обрезав последние 4 символа RID и SID любого локального пользователя:
$user=(Get-LocalUser Administrator).sid
$user -replace ".{4}$"
Важно, чтобы у каждого компьютера в домене был уникальный локальный SID. Если вы клонируете компьютеры или виртуальные машины, или создаете их из одного шаблона, то перед тем как добавить их в домен нужно выполнить команду sysprep. Эта утилита сбрасывает локальный Machine SID. Это избавит вас от частых ошибок “Не удалось восстановить доверительные отношения между рабочей станцией и доменом”.
Как узнать имя пользователя или группы по известному SID?
Чтобы узнать имя учетной записи пользователя по SID (обратная процедура), можно воспользоваться одной из следующих команд:
wmic useraccount where sid='S-1-3-12-12452343106-3544442455-30354867-1434' get name
Для поиска имени доменного пользователя по SID используйте командлеты из модуля
RSAT-AD-PowerShell
:
Get-ADUser -Identity S-1-5-21-247647651-3952524288-2944781117-23711116
Чтобы определить имя группы по известному SID, используйте команду:
Get-ADGroup -Identity S-1-5-21-247647651-3952524288-2944781117-23711116
Также можно узнать получить SID группы и пользователя с помощью встроенных классов PowerShell (без использования дополнительных модулей):
$objSID = New-Object System.Security.Principal.SecurityIdentifier ("S-1-5-21-2470456651-3958312488-29145117-23345716")
$objUser = $objSID.Translate( [System.Security.Principal.NTAccount])
$objUser.Value
Поиск объектов в Active Directory по SID
Если вы не знаете к какому типу объекта AD относится SID и какой точно командлет нужно использовать для его поиска (Get-AdUser, Get-ADComputer или Get-ADGroup), вы можете использовать универсальный метод поиска объектов в Active Directory по SID с помощью командлета Get-ADObject
$sid = ‘S-1-5-21-2470146651-3951111111-2989411117-11119501’
Get-ADObject –IncludeDeletedObjects -Filter "objectSid -eq '$sid'" | Select-Object name, objectClass

В нашем случае объект AD, который имеет данный SID, является компьютером (objectClass=computer).
A Security Identifier (SID) is a unique identifier assigned to each user account in Windows, used to control permissions and manage user access. Knowing the SID of a user can be helpful for various administrative tasks, including troubleshooting permissions issues or configuring settings for specific users. This tutorial provides a step-by-step explanation of how to find the SID of a user in Windows 11 , covering multiple methods for accuracy and convenience.
The SID is crucial in Windows because it uniquely identifies user accounts within the system. If you’re managing permissions, accessing specific settings, or configuring user-specific policies, the SID helps ensure that the correct permissions are applied to the correct user.
Available Methods:
We can find the SID of a user in windows 11 using PowerShell command, Command Prompt Commands, & Registry editor.
| PowerShell Commands | Command Prompt Commands |
|---|---|
| GetCurrent | WhoAmI |
| Get-WmiObject | wmic useraccount (Current User) |
| Get-LocalUser | wmic useraccount (Specific User) |
| Get-CimInstance | wmic useraccount (User Name) |
| — | wmic useraccount (SID of All Users) |
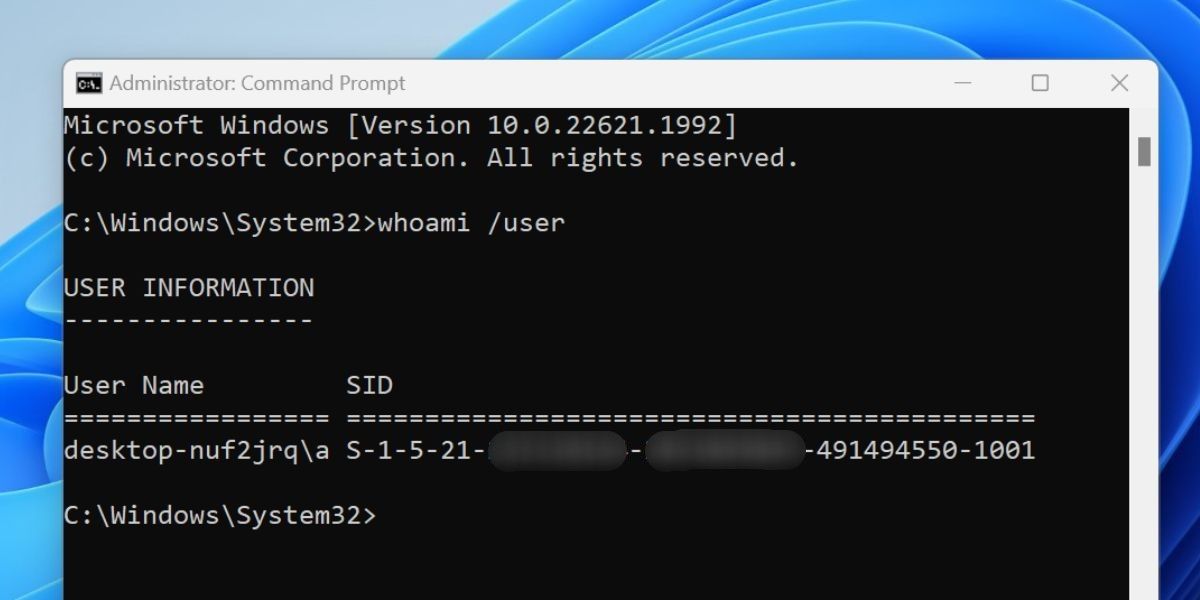
Method 1: Find SID of Current User Using the whoami Command:
- Open Command Prompt by typing “cmd” in the Windows search bar and selecting Run as administrator.

Open Command Prompt using Run as Administrator
- Enter the following command and press Enter:
whoami /user

Whoami user command to find SID value
The command will display the Username and SID of the currently active user.
Method 2: Find SID of Current User Using wmic useraccount Command:
- Open Command Prompt by typing “cmd” in the Windows search bar and selecting Run as administrator.
Open Command Prompt using Run as Administrator
- Enter the command below, replacing
UserNamewith the currently logged-in user’s name:wmic useraccount where name="UserName" get sid

wmic useraccount command to display current user SID Value
- Press Enter, and the SID for the specified user will be displayed.
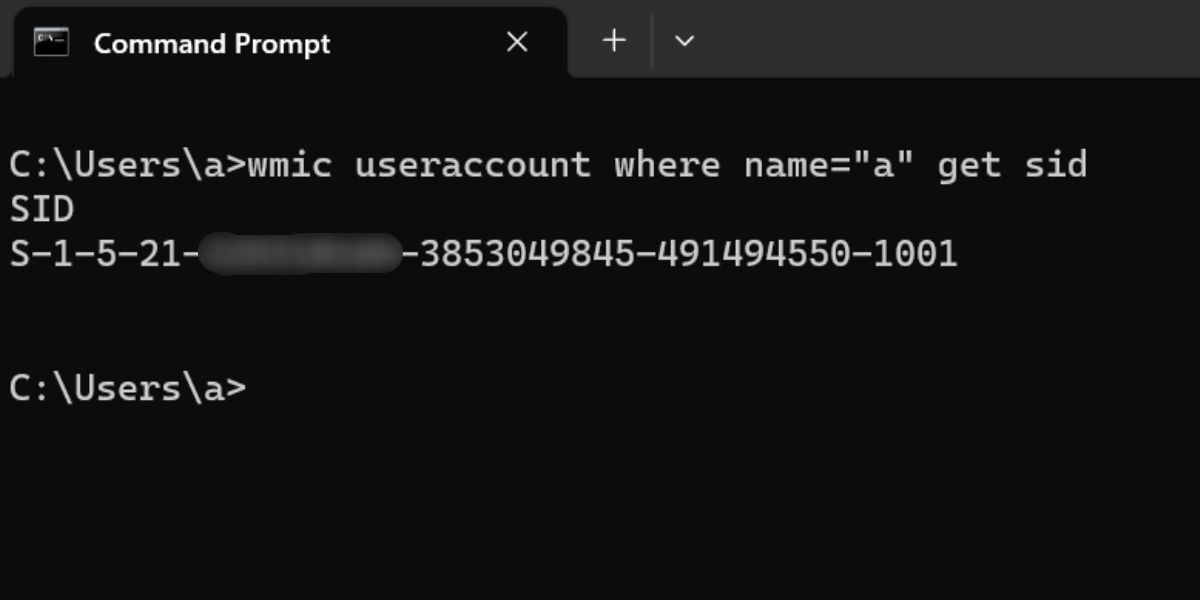
Method 3: Find SID of Specific User Using wmic useraccount Command:
- Open Command Prompt by typing “cmd” in the Windows search bar and selecting Run as administrator.
Open Command Prompt using Run as Administrator
- Type the following command, replacing
UserNamewith the username of the account you wish to query:wmic useraccount where name="UserName" get sid

Finding other accounts SID value using command
- The SID for the specified user will appear.
Method 4: Find Username for a Given SID Using wmic useraccount Command:
- Open Command Prompt by typing “cmd” in the Windows search bar and selecting Run as administrator.
Open Command Prompt using Run as Administrator
- Enter the following command, replacing
SIDValuewith the actual SID:wmic useraccount where sid="SIDValue" get name

Using SID value to find the Username
- You can get the SID value from the above methods.
- The command will output the Username associated with the specified SID.
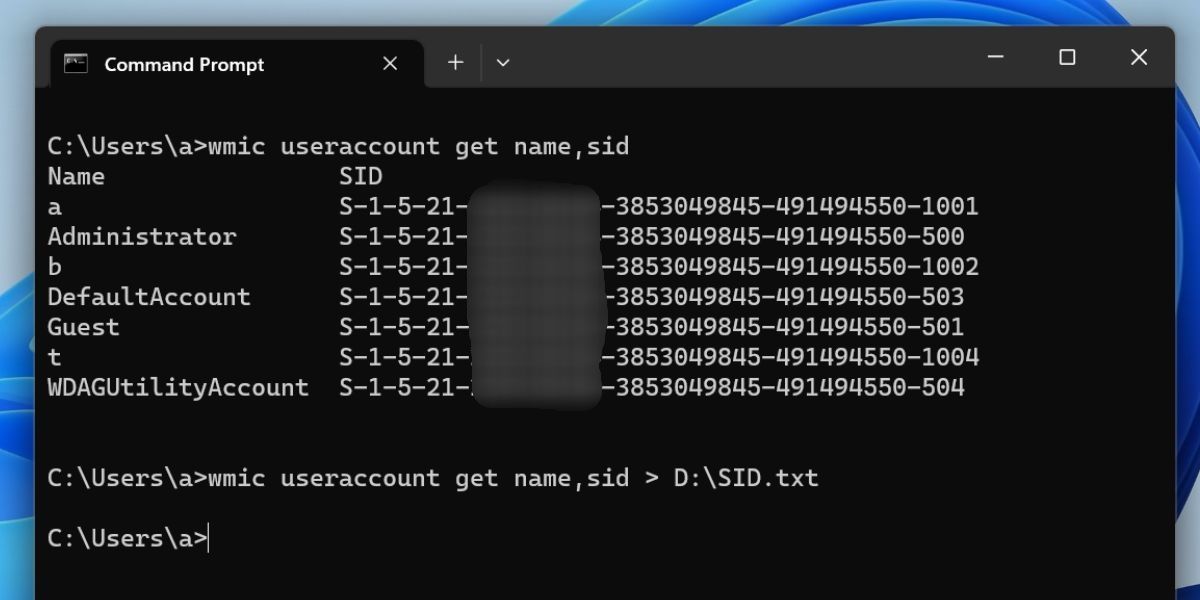
Method 5: Find SID of All Users Using wmic useraccount Command:
- Open Command Prompt by typing “cmd” in the Windows search bar and selecting Run as administrator.
Open Command Prompt using Run as Administrator
- Enter this command:
wmic useraccount get name,sid

Command to display all available users and their SID values
- This command will display a list of all users and their corresponding SIDs.
Method 6: Find SID of Current User Using GetCurrent in PowerShell:
- Open PowerShell as Administrator by right-clicking the Start button and selecting Windows Terminal (Admin).

Opening PowerShell as Admin Mode
- Enter the following command:
[System.Security.Principal.WindowsIdentity]::GetCurrent().User.Value
 user command to display current user SID value")
GetCurrent() user command to display current user SID value
- This command will output the SID of the currently logged-in user.
Method 7: Find SID of All Users Using Get-WmiObject in PowerShell:
- Open PowerShell as Administrator by right-clicking the Start button and selecting Windows Terminal (Admin).
Opening PowerShell as Admin Mode
- Run the following command:
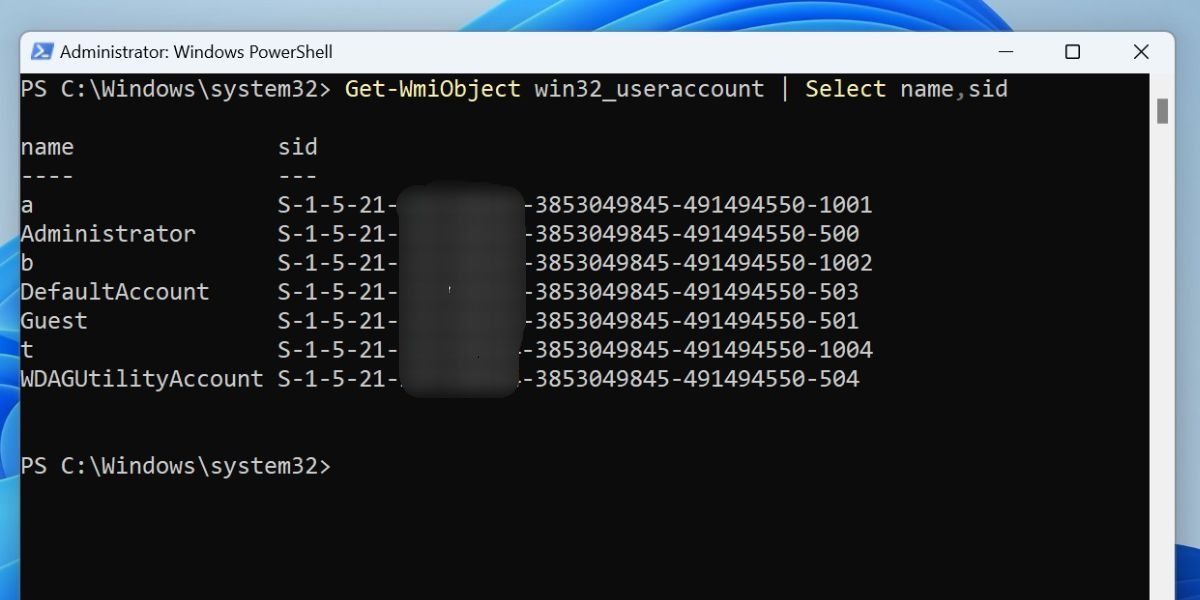
Get-WmiObject -Class Win32_UserAccount | Select-Object Name, SID

Command will display all list of users and SID values
- PowerShell will output a list of usernames along with their corresponding SIDs.
Method 8: Find SID of All Users Using Get-LocalUser in PowerShell:
- Open PowerShell as Administrator by right-clicking the Start button and selecting Windows Terminal (Admin).
Opening PowerShell as Admin Mode
- Run this command:
Get-LocalUser | Select-Object Name, SID

Get-LocalUser command to display all users and their SID values
- The output will show each user along with their SID.
Note: This command works for local accounts on Windows 11 and is suitable if you don’t require domain user accounts.
Method 9: Find SID of All Users Using Get-CimInstance in PowerShell:
- Open PowerShell as Administrator by right-clicking the Start button and selecting Windows Terminal (Admin).
Opening PowerShell as Admin Mode
- Now you need to execute the following command:
Get-CimInstance -ClassName Win32_UserAccount | Select-Object Name, SID

Get-CimInstance command to display all users and their SID values
Method 10: Find SID of Users in the Registry Editor:
The Registry Editor stores SIDs for each user profile, which can be accessed manually.
- Press Winkey + R, type
regedit, and press Enter to open the Registry Editor.

Running Regedit Command in Run Window
- Navigate to the following path:
HKEY_LOCAL_MACHINE\SOFTWARE\Microsoft\Windows NT\CurrentVersion\ProfileList

Navigate to the desired directory in Registry editor
- Under ProfileList , you’ll find a list of SIDs. Each SID corresponds to a user profile on the system.

UNder Profile list you can find SID values
- Click on each SID folder and check the ProfileImagePath entry to identify which user profile corresponds to each SID.
Caution: Be careful when using the Registry Editor, as making incorrect changes can affect system performance.
Conclusion
Finding the Security Identifier (SID) of a user in Windows 11 is essential for administrators and advanced users who need precise control over permissions and configurations. This tutorial covers several methods to retrieve a user’s SID, including Command Prompt , PowerShell , Registry Editor , and the whoami command. By following these methods, you’ll be able to quickly and accurately identify SIDs for any user account on your system.
Commonly Asking Queries:
Can I change the SID of a user in Windows 11?
No , the SID is unique to each user and is assigned automatically. Changing it can cause access issues and is not recommended.
Is it safe to use the Registry Editor to find SIDs?
Yes , it’s safe to view SIDs in the Registry. However, avoid editing registry entries unless necessary, as incorrect changes can impact system performance.
Does each user have a unique SID across different computers?
No , SIDs are unique within each Windows installation. A user on one computer will have a different SID on another computer.
Why can’t I find a specific SID in the Registry Editor?
If the user account doesn’t have a local profile on the computer, their SID may not appear in the Registry under ProfileList.
What should I do if I accidentally delete or modify a SID in the registry?
Restoring from a recent registry backup or system restore point can often resolve issues if an SID is accidentally modified.
on October 24, 2011
In Windows environment, each user is assigned a unique identifier called Security ID or SID, which is used to control access to various resources like Files, Registry keys, network shares etc. We can obtain SID of a user through WMIC USERACCOUNT command. Below you can find syntax and examples for the same.
Get SID of a local user
wmic useraccount where name='username' get sid
For example, to get the SID for a local user with the login name ‘John’, the command would be as below
wmic useraccount where name='John' get sid
Get SID for current logged in user
To retrieve the SID for current logged in user we can run the below command. This does not require you to specify the user name in the command. This can be used in batch files which may be executed from different user accounts.
wmic useraccount where name='%username%' get sid
Get SID for current logged in domain user
Run the command ‘whoami /user’ from command line to get the SID for the logged in user.
Example:
c:\>whoami /user
USER INFORMATION
----------------
User Name      SID
============== ==============================================
mydomain\wincmd S-1-5-21-7375663-6890924511-1272660413-2944159
c:\>
Get SID for the local administrator of the computer
wmic useraccount where (name='administrator' and domain='%computername%') get name,sid
Get SID for the domain administrator
wmic useraccount where (name='administrator' and domain='%userdomain%') get name,sid
Find username from a SID
Now this is tip is to find the user account when you have a SID. One of the readers of this post had this usecase and he figured out the command himself with the help of the commands given above. Adding the same here.
wmic useraccount where sid='S-1-3-12-1234525106-3567804255-30012867-1437' get name
Sign in to your MUO account

The Security Identifier (SID) is a unique number tied to a user account on a Windows PC. It comes in handy while finding and identifying a user on Windows, and no two SIDs can be identical.
The most common means to find a SID on Windows is using the «whoami» command. But there are several other ways to view the SID of one or all users on your Windows PC. Let’s discuss them in detail.
1. Using the Command Prompt
The simplest way to check the SID of the currently logged-in user on your PC is by using the whoami command. It will display the SID with the help of the “user” argument with the command. The only drawback is that it cannot display more than one user’s SID.
Here’s how to do it:
- Press Win + R to launch the Run dialog box. Type cmd in the text box and press the Ctrl + Shift + Enter keys to open Command Prompt.
- The User Account Control window will pop up. Click on the Yes button to open the app with admin rights if prompted.
-
Now, type the following command to view the SID of the currently logged-in user account:
whoami /user

-
You will see the currently logged-in user’s name and the corresponding SID. You can directly select and copy the text from the Command Prompt window. But if you want to export the details to a text file for future use, you can do so by entering the following command:
whoami /user > C:\SID.txt
- The above command will create a text file named SID in the C drive. You can open it with Notepad or any other text editor app.
- Close the Command Prompt window.
2. Using WMIC
You can easily view the SID of all the users or a single user on your PC using the WMIC command-line tool. You don’t need to open an elevated Command Prompt window for using WMIC to view the SIDs.
Repeat the following steps to do so:
- Right-click on the Start button to open the Power User menu. Click on the Terminal option.
-
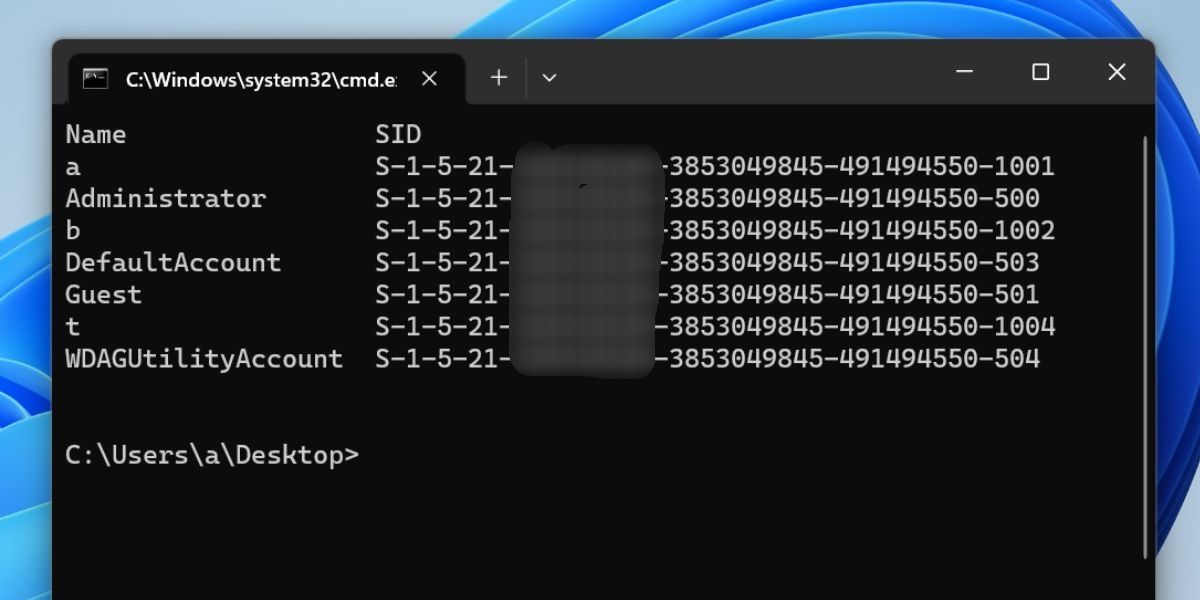
Type the following command and press the Enter key to execute it:
wmic useraccount get name,sid
- The above command will display the user name and the corresponding SID of all the user accounts. In our instance, it shows three local accounts (a,b, and t), and the administrator, guest, default account, and WDAGUtility account.
-
You can export all this data into a text file on the D drive by executing the following command:
wmic useraccount get name,sid > D:\SID.txt
-
If you want to get the details of a specific user account on your PC, the syntax of the command is:
wmic useraccount where name="USER" get sid
-
Replace the USER part of the command with an actual username. In our case, the command becomes:
wmic useraccount where name="a" get sid
- Close the Command Prompt window.
3. Using a PowerShell Cmdlet
PowerShell offers the Get-WmiObject cmdlet using which you can view the SID of all the user accounts on a Windows PC. Like the WMIC method, you can view the SIDs of all users with a single command.
Repeat the following steps to do so:
- Press Win + R to launch the Run dialog box. Type powershell in the text box and press the Ctrl + Shift + Enter keys to open PowerShell.
- The User Account Control window will pop up. Click on the Yes button to open the app with admin rights if prompted.
-
Type the following command and press the Enter key:
Get-WmiObject win32_useraccount | Select name,sid
-
The above command will display all the user accounts and their respective SIDs. To export the results in a text file, execute the following command:
Get-WmiObject win32_useraccount | Select name,sid > C:\SID.txt
- The command will save the file in the C drive. Visit the location using File Explorer and open the file in a text editor app.
- Close the PowerShell window.
4. Using the Registry Editor
If the Command Prompt or PowerShell isn’t working on your PC, you can use the Registry Editor to view all the SIDs on your PC. This method isn’t as convenient as viewing the complete SID list in the terminal or in a text file. You will have to do some manual digging to find the SIDs and their user name.
Here’s how to do it:
- Press Win + R to launch the Run dialog box. Type regedit in the text box and press the Ctrl + Shift + Enter keys simultaneously.
- The User Account Control window will pop up. Click on the Yes button.
-
Go to the address bar at the top, paste the following path, and press the Enter key:
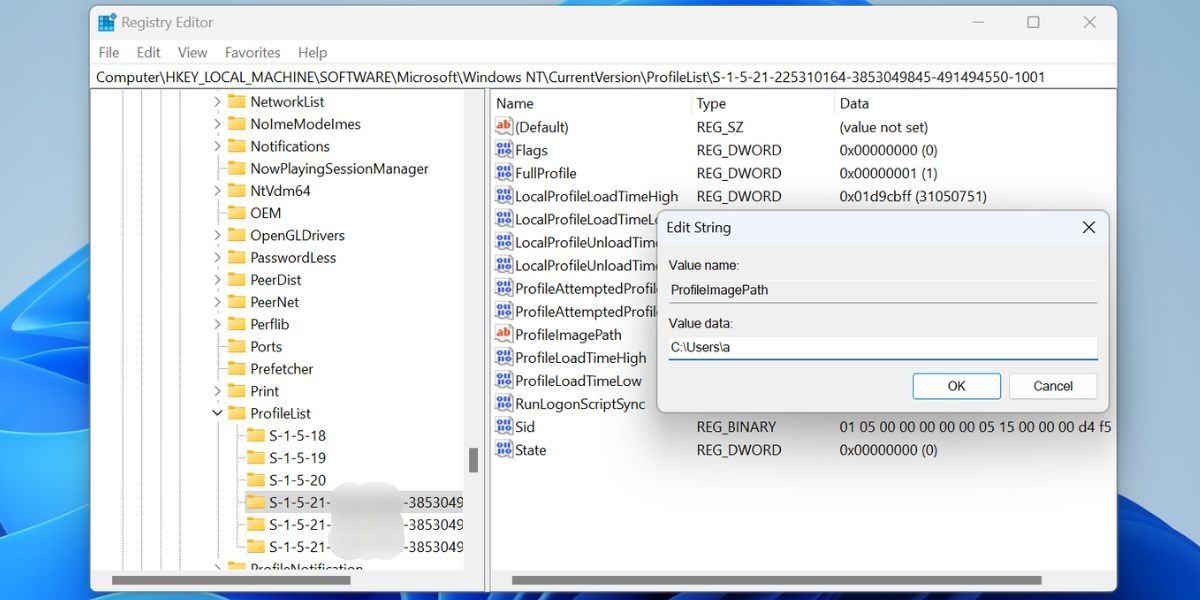
HKEY_LOCAL_MACHINE\SOFTWARE\Microsoft\Windows NT\CurrentVersion\ProfileList
- Click on any SID subkey to select it and go to the right pane.
-
Now, find the ProfileImagePath value and double-click on it to open the Edit window. You will see the user name of the SID in the Value Data field.
- Similarly, you can check the other SID keys and open their ProfileImagePath value to find their corresponding user name.
- Close the Registry Editor app afterward.
5. Using a Batch File
If you find the Terminal route cumbersome, you can create a batch file to display the SID of all the users at once. Repeat the following steps to create a batch file:
- Press Win + D to switch to the Desktop.
- Right-click on an empty space on the desktop and click on the New > Text Document option.
- A new text file will appear on the desktop. Double-click on the file to open it in a Notepad window.
-
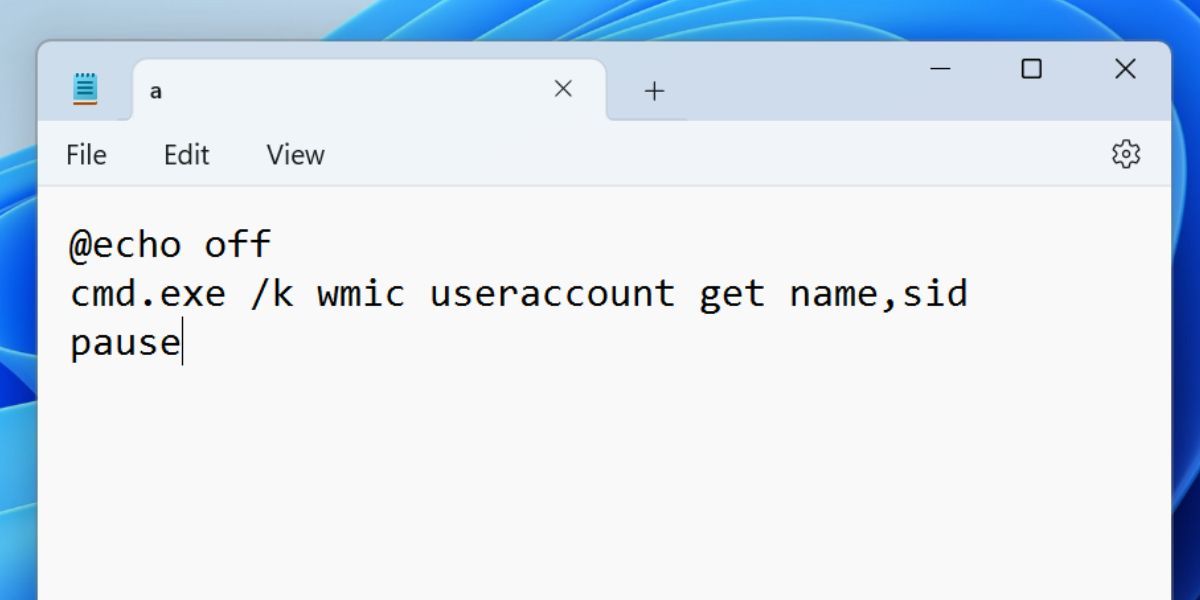
Now, paste the following code snippet into the Notepad file:
        @echo off
	cmd.exe /k wmic useraccount get name,sid
pause -
Press Ctrl + Shift + S to open the Save as window. Keep the file name as SID.bat and the Save as Type field as All Files.
- Navigate to the folder location where you saved the batch file. Double-click on it to run it.
-
A Terminal window will launch and display all the users on your PC and their respective SIDs.
Check SIDs in a Jiffy
These were the methods to check the SID of a user or all the users on your Windows PC. Use the first method if you only want to see the currently logged-in user’s SID.
The rest of the methods will display the SID of one or all the users on your PC. Lastly, create a batch file to display the SIDs of all users whenever you need it.
Any user, group or computer in Windows has a unique SID (security identifier) assigned.
The SIDs are used to control access to various Windows resources like files, registry keys, network shares, etc.
Below i will show you how to get the user’s SID and how to do the reverse SID lookup (get the user name by SID) using the Windows command prompt or PowerShell.
Cool Tip: How to determine whether the current user is a Domain User account or a Local User account! Read more →
Get the SIDs of the all local user accounts:
C:\> wmic useraccount get name,sid
- sample output -
Name                SID
admin               S-1-5-21-615456588-3658538152-758053764-1009
myUser              S-1-5-21-615456588-3658538152-758053764-1008
Get the SID of the current user:
C:\> whoami /user
- or -
C:\> wmic useraccount where name='%username%' get sid
Find the user’s SID by name:
C:\> wmic useraccount where name='<username>' get sid
- example -
C:\> wmic useraccount where name='myUser' get sid
- sample output -
SID
S-1-5-21-615456588-3658538152-758053764-1008
Find the user by SID (reverse SID lookup):
C:\> wmic useraccount where sid='<sid>' get name
- example -
C:\> wmic useraccount where sid='S-1-5-21-615456588-3658538152-758053764-1008' get name
- sample output -
Name
myUser
Was it useful? Share this post with the world!