
FPS, short for frames per second, is a unit that measures how many frames (consecutive images) are displayed on the screen per second (usually refers to video games). It is also sometimes called “Frame rate”.
FPS is a common indicator that tells you the performance of the game on your computer. The higher the FPS, the smoother the gameplay. Lower frame rate usually result in game feeling laggy, choppy, stuttering or simply not smooth.
Also see: Game Stuttering and Lag on Dual Monitor
Show FPS in Games (Windows 11)
While some games do offer the settings to display FPS counter on the screen when you play the game, majority of the games do not have this option. In that case, you can use an external tool such as Fraps or NVIDIA Shadowplay to display FPS overlay in any game or app. This guide will show you 3 methods on how to show FPS in games on Windows 11.
Display FPS while gaming using NVIDIA Shadowplay
If you are using an NVIDIA graphics card in your PC, you can use the performance indicator that allows you to show FPS and other performance stats such as latency, etc. through its built-in tool called NVIDIA Shadowplay, also known as NVIDIA share, which comes with GeForce Experience – a companion software when you install NVIDIA driver.
Related: How to Force Game to Use Nvidia GPU or Integrated Graphics
To show FPS in any game on Windows 11 using NVIDIA Shadowplay, follow the steps below.
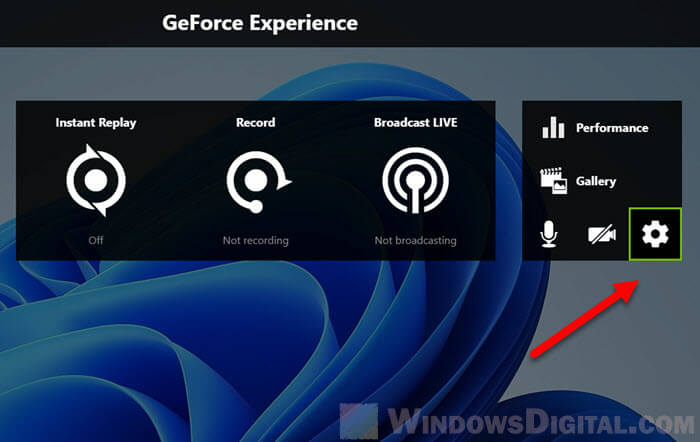
1. While you are in a full-screen or windowed mode game, press Alt + Z to open the NVIDIA Share interface, and click the Settings (gear icon) button.
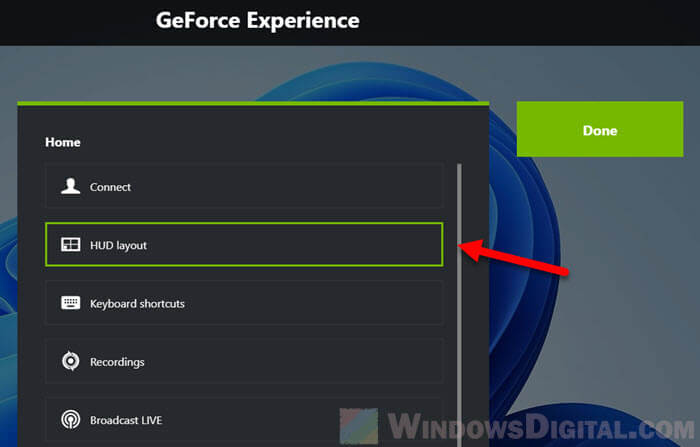
2. Next, select HUD layout from the list of settings.
3. In the HUD layout settings, select Performance and then select FPS. Next, choose a position where you want the FPS counter to display – top right, top left, bottom right or bottom left.
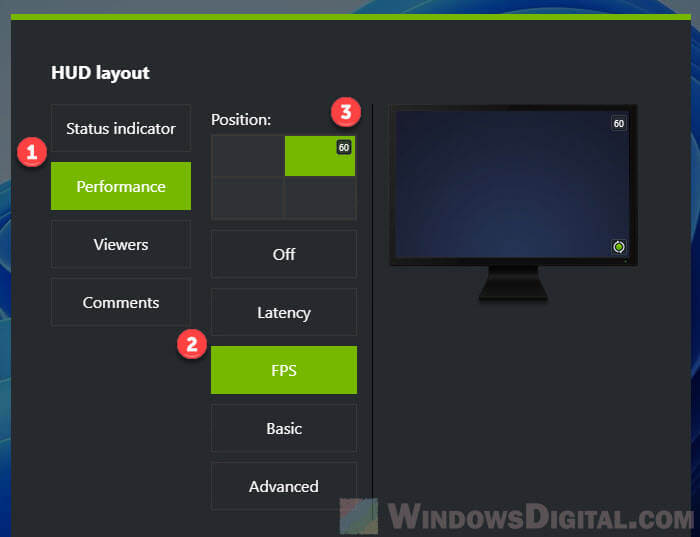
Alternatively, you can select Basic or Advanced to allow the overlay to display even more information such as FPS, Render Latency, CPU and GPU Usage, GPU Temperature, Fan Speed, etc.
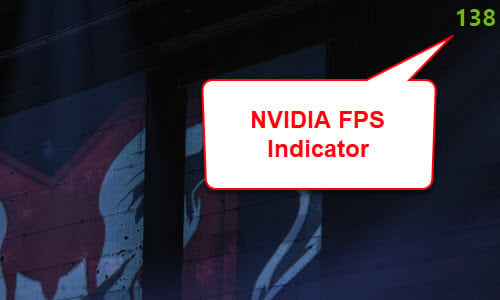
4. Once you have enabled the FPS indicator, press Alt + Z again to close the NVIDIA Shadowplay interface. The FPS indicator should now display at the position you specified earlier in the game. You can open the Shadowplay interface and re-configure the settings any time and in any game or app by simply pressing Alt + Z.
Read: Game Lag When Watching YouTube or Twitch on Chrome
FRAPS – a tool to show Frames Per Second
FRAPS is a wildly popular app known for its ability to show FPS in literally any game or app, windowed or full-screen mode. It also offers other features such as screen capture and video capture while you are in game. The app was last updated for Windows 7 but it still works perfectly on Windows 11.
https://fraps.com/download.php
Once installed, open FRAPS and select FPS tab. From there, you can configure the hotkey to enable the overlay (F12 is the default key).
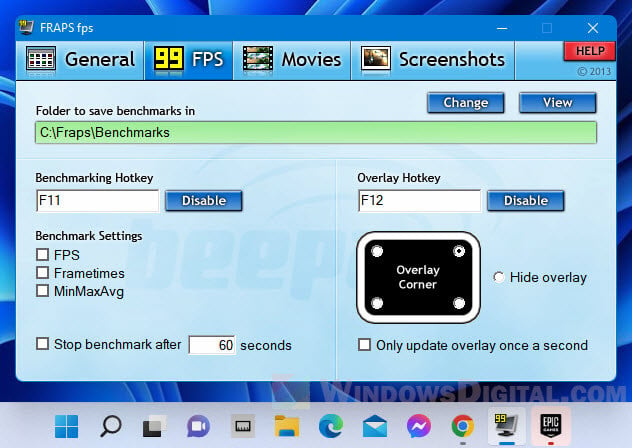
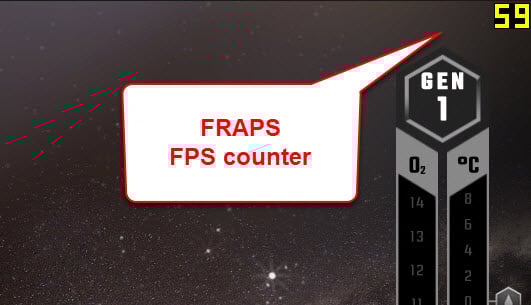
To start showing FPS in a game, launch the game and the press F12 while you’re in game to enable the FPS overlay by FRAPS.
The only downside of using FRAPS is that you will need to keep it running in the background in order to display the FPS in your games. In the General tab, you can configure if you want to allow FRAPS to run on Windows startup so that you don’t need to re-open FRAPS every time you want to play a game.
Enable FPS display via in-game settings
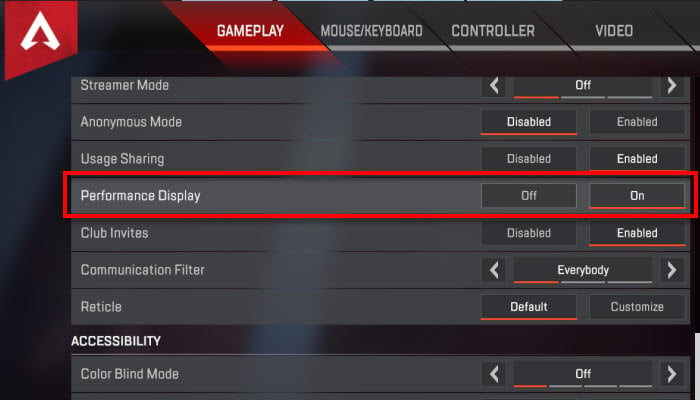
Some modern games provide the option to display performance stats such as FPS and latency through their own in-game settings. If such option is available, you don’t need to use any third-party software or tool just to show frame rate for the game.

Try to look for the option usually called Performance Display, Performance Stats or Show FPS, in the General or Gameplay settings. For example, in a game called Apex Legends, you can enable the Performance Display via the Gameplay settings.
Frames Per Second (FPS) is one of the most common terms among PC gamers, which defines how a game looks and runs. It becomes crucial to keep an eye on the FPS while playing gaming. Most games show the FPS while gaming. But at the same time, some also don’t.
In that case, FPS counters come into play. There are several FPS counters for Windows 11, but you should only choose and use the best. So, keeping this in mind, we tested many FPS counters and added the best ones in this detailed FPS counter for Windows 11 guide. Continue reading and choose the best FPS counter program for your Windows 11 PC.
Best FPS Counter for Windows 11
There are a number of FPS counters for Windows 11. However, there are only a few that are worth trying. In this section, we’ll mention the best ones that we tried and actually found worth using in Windows 11. So read about all the best FPS counters for Windows 11 below in detail:
1. FRAPS
The first FPS counter on this best FPS counter for Windows 11 list is FRAPS. To start, FRAPS is a free FPS counter tool for Windows 11 that shows the FPS counters in the top right corner of the screen while gaming. Besides this, it also displays other essential information like frame times and average frames per second. The best part about this FPS viewing tool is that it displays the benchmarks by pressing a single key on the keyboard.
You can also customize this keyboard shortcut as per your preferences. Also, the benchmark automatically disappears after 60 seconds to let focus on your video game without any distractions.
Other than letting you view frame rates while gaming, it enables you to capture your PC’s screen into an image and video, so you don’t need to install a separate tool to do so. For instance, to take a screenshot with the FRAPS app, you only need to press F10. If you want to include the frame rate overlay in them, you can also do that. One great thing about this tool is that it lets you save images in varied image formats, such as BMP, JPG, PNG, and more.
Coming over to its screen recording function. You need to press the F9 key on your keyboard to start the screen recording. One thing that’s worth mentioning is that you can also change the hotkey.
Last but not least, it also has an intuitive user interface, which makes it easy to use for all. Overall, FRAPS is a great FPS counter for Windows 11 that’s definitely worth trying due to its great features.
Pros:
- Free to Use
- Easy to Use
- Show FPS
- Capture Screenshots
- Record PC’s Screen
- Change Hotkey
- Automate Screen Capture
- Split Recording Into 4 GB Files
Cons:
- Restricted to a Maximum of 30 Seconds of Video Recording
2. NZXT Cam
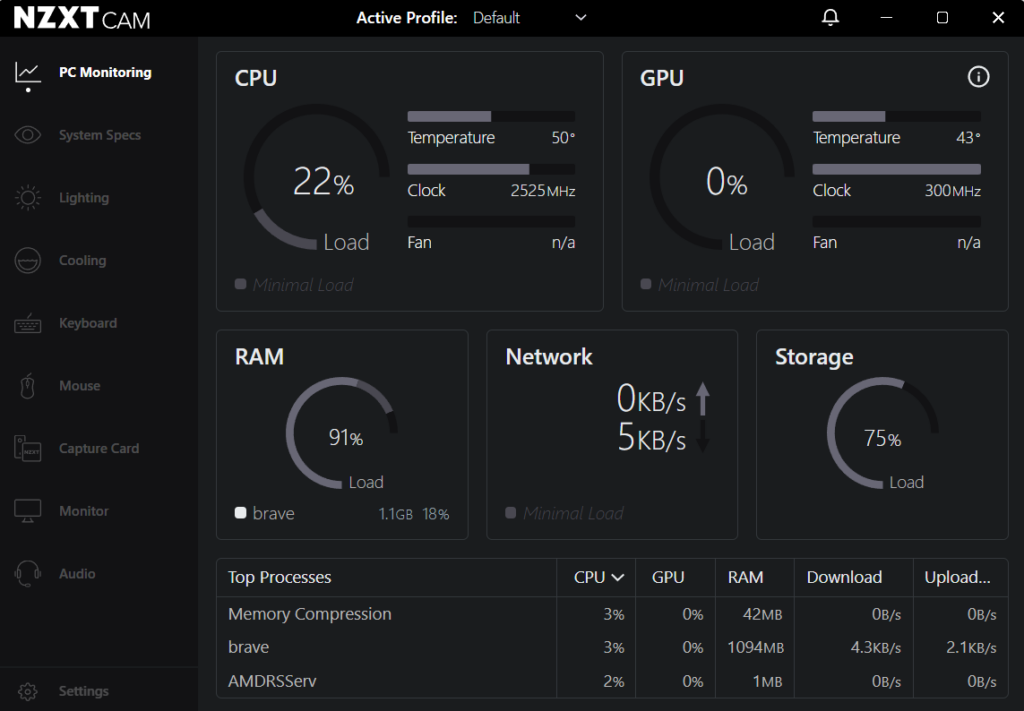
The next Windows 11 FPS counter on this list is NZXT Cam, which is again a free FPS counting app that comes with an intuitive user interface, making it easy to use for all kinds of users. Like other tools, it also lets you view the frame rates per second on your screen.
Not only this, but it also shows CPU, GPU, temperature, clock speed, and others under one roof. The best part about this tool is that it lets you choose what you want to view. Besides, it also shows the top processes that consume the most number of Windows PC’s resources.
Unlike other FPS counters, it also supports shortcuts. For instance, you can open the NZXT Cam overlay on your Windows 11 PC while gaming using the Windows key + O shortcut.
Unlike other similar tools, it offers some customization options. Like, you can switch the UI’s Light Mode to Dark Mode. Not only this, but you can also allow it to start at the PC’s startup, so you don’t need to open the program repeatedly to enable the overlay on your PC.
It also comes with an option that automatically shows the overlay after opening the video game. Overall, it’s a great FPS counter, which you can easily download and use on your PC.
Pros:
- Completely Free to Use
- Easy to Operate
- Supports Keyboard Shortcut
- Has Some Customization Options
- Show Up Automatically
- Displays System Specifications
Cons:
- No Cons (According to Us)
3. Nvidia GeForce Experience Performance Overlay
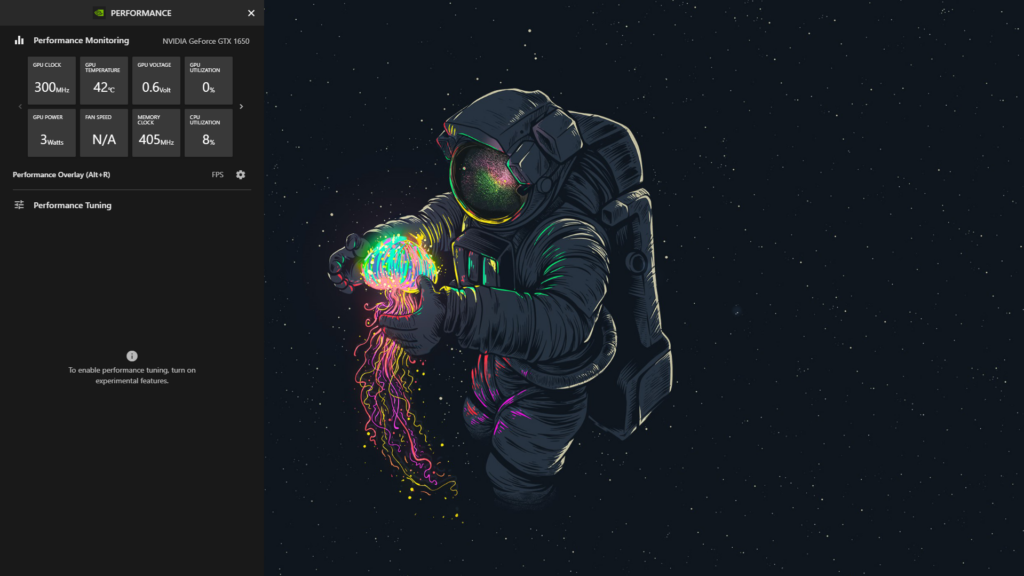
If your Windows 11 PC has a Nvidia graphics card, it must have the GeForce Experience app. GeForce Experience is one place to find the game-ready adapters and optimize the game settings for better performance, along with capturing and sharing the gameplay.
The best part about GeForce Experience is its Performance tab, which shows essential system benchmarks, like GPU model, FPS, GPU and CPU resources utilization, and much more. You can access the GeForce Experience overlay on your Windows 11 PC with the Alt + Z hotkey.
To view all the system benchmarks, choose the Performance option in the overlay. If you want to see FPS while in-game, use the Alt + R shortcut while doing so. Other than viewing FPS, you can also record your gameplay right from the GeForce Experience overlay. Not only this, but you can also take screenshots and photos from the same prompt.
Besides, the overlay has an option called Instant Replay, which automatically records up to 20 minutes of gameplay. You can use that recording to share on YouTube, Instagram, etc., or analyze the gameplay. Lastly, it also comes with a Photo Mode feature to take photos in the games. To sum up, it’s a great utility to easily view FPS while playing games.
Pros:
- Comes Pre-installed
- Take Screenshots
- Record Screen
- Has the Instant Replace Feature
- Shows Other Essential Information Besides FPS
- Built-In Photo Mode
- Easy to Use & Access
- Supports Hotkeys
Cons:
- Overwhelmed With Many Features
4. FPS Monitor
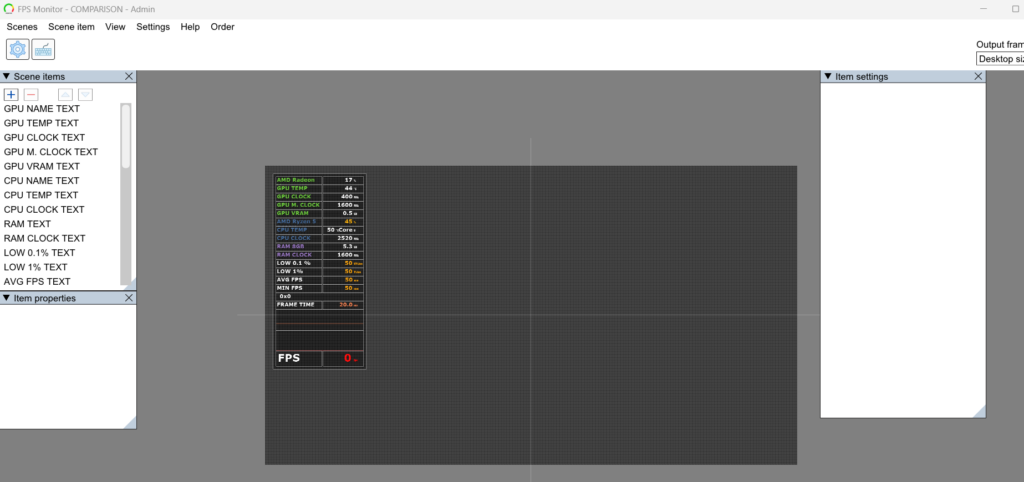
The next FPS counter on this best FPS counter for Windows 11 list is the FPS Monitor, a freemium tool. FPS Monitor is a great FPS counter that has a very easy-to-use user interface.
The most highlighting part about this tool is that it not only shows FPS. But other than this, it also reports some other important information such as CPU, GPU, RAM, HDD, and others.
Moving ahead, the best part about this FPS counter is that you can place its overlay anywhere on the screen. Not only this, but you can also customize the overlay font, size, style, colors, and other options for each sensor value in the FPS Monitor app with ease.
One thing that we liked the most about this tool is that it also lets you add an image to the overlay. In case you want to live stream on YouTube with the overlay, you can use this image option to add the channel’s logo. To do so, you only need to select the image you want to add.
Another thing that’s worth mentioning about this FPS counter is that it lets you create multiple scenes or overlays for different purposes. Like, you can create a separate scene for YouTube, comparisons, etc. Also, it comes with some built-in scenes for varied purposes. By the way, the process of making the overlay manually is also pretty easy to do.
It also comes with a built-in screenshot tool to capture screenshots by pressing a custom hotkey. Overall, the FPS Monitor is an excellent FPS counter for Windows 11 that has many amazing features.
Pros:
- Very Easy to Use
- Has a Free Version
- Many Customization Options
- Best For Live Streamers
Cons:
- Free Version Is Available for a Limited Time
5. Steam’s FPS Counter

You may not know but you already have a FPS counter on your Windows 11 PC. In short, you can find it in the Steam program. Also, if you’re a gamer, you must have Steam on your PC. Notably, the FPS counter option doesn’t come pre-enabled in it. You need to enable it from the Settings section of the Steam program on your Windows 11 PC or laptop:
Open the Steam App > Settings > In-Game Tab > Settings In-Game FPS Counter > Select Top-Left > OK.
Once you’ve enabled the FPS counter in Steam, open any Steam game and you’ll see that the FPS rate is visible in the top left corner of your screen. Also, you’ll see it in the green color in the same position.
No doubt, it’s a great feature in Steam that enables you to view FPS while gaming without needing any third-party FPS controller. But it doesn’t show CPU, GPU, temperature, and other necessary data. So this could be a drawback for you. Lastly, it’s a worthy feature to try in the Steam program. So consider trying it.
Pros:
- No Need to Download Any Third-Party App
- Easy to Enable and Use
- Free for All
- Best for Beginners
Cons:
- Limited Functions
6. Razer Cortex
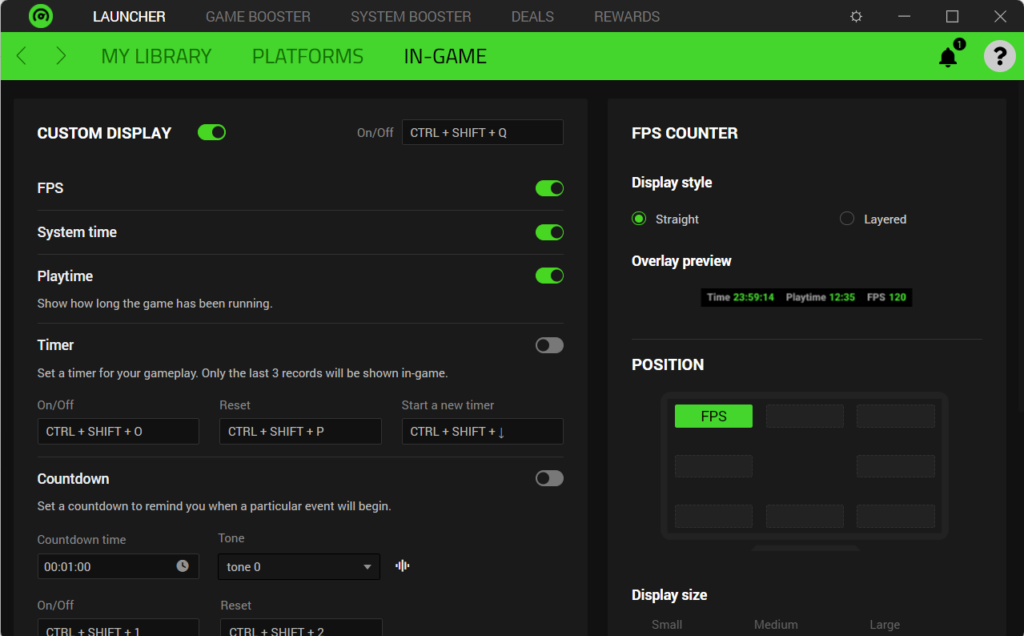
Another FPS counting tool that’s worth trying in Windows 11 is Razer Cortex. Razer Cortex isn’t an FPS counter. But it’s a game FPS booster tool that optimizes the game for better performance and shows the frame per second (FPS) on the edge of the computer’s screen.
Besides, it also shows system time, as well as playtime in the overlay to be informed while gaming. Also, one thing that’s worth mentioning is that it only shows FPS while playing games on the PC. After installing Razer Cortex, you need to enable the FPS counter in it manually.
Also, you can customize the FPS rate overlay as per your preferences. Like, you can change its appearance, position size, display size, font color, etc., with ease. You can even customize the shortcut to open the FPS overlay on your PC.
Other than this, it also comes with a built-in Game Booster that optimizes your system’s gaming performance. Not only this, but it also has a System Booster that boosts the PC’s overall performance by deleting the app junk files, game junk files, unnecessary and broken registries, etc.
Moving ahead, you can also connect Razer Cortex to third-party gaming platforms, like Ubisoft Connect, Steam, Origin, Gog.com, Humble Bundle, etc., to sync your game libraries. Overall, Razer Cortex is a great game FPS booster tool with many great features.
Pros:
- Feature Packed
- Intuitive User Interface
- Easy to Understand for All
- Good for All Kinds of Users
Cons:
- No Cons At All (According to Us)
FAQs
How Do I Show FPS in Windows 11?
You can use the GeForce Experience app to show FPS and other essential data on your Windows 11 PC.
Does Windows 11 Have a FPS Counter?
If your Windows 11 PC has a Nvidia graphics card, then yes, it does have an FPS counter. You can access the FPS counter in the GeForce Experience’s Performance overlay.
How Do I Show FPS in GTA 5 Windows 11?
You can use a third-party FPS counter on your Windows 11 PC or laptop to show FPS in GTA 5.
What Is the Best FPS Counter?
As per our experience, FPS Monitor is the best FPS counter app for Windows 11 as it has all great features.
Is FPS Monitor Free?
FPS Monitor isn’t free. It comes at some cost. But it does come with a free trial. You can download the FPS Monitor app’s Demo version on your Windows 11 PC or laptop.
Final Words
FPS counters are indeed useful applications that show FPS while gaming on our Windows 11 PC screens. However, the thing is that there are several FPS counters for Windows 11, and all come with different features. As a result, it becomes difficult to choose the best one.
Thus, to make the selection process easier, we talked about the best FPS counter for Windows 11 in detail in this in-depth guide. If you were also confused about which FPS counter you should choose for your Windows 11 PC, we hope this guide helped you do so. In case yes, do let us know which FPS counter you picked for your PC.
Ever wonder how smooth your game is running on your new Windows 11 PC? You need to check your FPS (frames per second) to find out. FPS measures how many frames your computer can display per second, and it’s a good indicator of game performance. With the built-in Xbox Game Bar, it’s super easy to check your FPS on Windows 11.
Checking your FPS on Windows 11 can help you understand your game’s performance. Here’s a simple step-by-step guide to get you started.
Step 1: Press Windows + G to Open Xbox Game Bar
To open the Xbox Game Bar, press the Windows key and the G key at the same time.
When you press Windows + G, the Xbox Game Bar interface will appear on your screen. This interface includes various widgets that can help you monitor your system performance, including FPS.
Step 2: Click on the Performance Widget
In the Xbox Game Bar, find and click on the Performance widget.
The Performance widget is like a dashboard that shows CPU, GPU, RAM, and FPS metrics. Clicking on it will expand the widget and display more detailed information about each metric.
Step 3: Pin the Performance Widget
Click the pin icon on the Performance widget to keep it visible while you play.
Pinning the Performance widget makes it easy to keep an eye on your FPS without having to reopen the Xbox Game Bar. This way, you can monitor your FPS in real-time as you play your game.
Step 4: Go to the FPS Tab
Within the Performance widget, navigate to the FPS tab to see your current FPS.
The FPS tab will show you a real-time graph of your frames per second, helping you to see how your game is performing at any given moment.
Step 5: Start Your Game
Begin playing your game to see the FPS displayed on your screen.
Once you start your game, you’ll be able to see the FPS counter in the Performance widget you pinned earlier. This can help you understand if your game is running smoothly or if you need to tweak some settings.
After you’ve completed these steps, you’ll see an FPS counter in real-time while you’re gaming. This can help you adjust your settings for a smoother experience.
Tips for Checking FPS on Windows 11
- Make sure your Game Bar is updated: An outdated Game Bar might not show the FPS counter accurately.
- Close unnecessary applications: Running too many programs in the background can lower your FPS.
- Adjust in-game settings: If your FPS is low, try lowering your game’s graphics settings.
- Update your GPU drivers: Keeping your GPU drivers up to date can improve your FPS.
- Monitor other metrics: CPU and GPU usage can also affect your FPS, so keep an eye on those too.
Frequently Asked Questions
Can I check FPS without Xbox Game Bar?
Yes, there are third-party tools like FRAPS or MSI Afterburner that can display FPS.
Is checking FPS harmful to my PC?
No, checking FPS is just monitoring performance and has no negative effects on your PC.
Can I use the Game Bar on older versions of Windows?
The Xbox Game Bar is available on Windows 10, but the steps might be slightly different.
Why is my FPS so low?
Low FPS can be due to high graphic settings, outdated drivers, or hardware limitations.
Does higher FPS mean better performance?
Generally, yes. Higher FPS means smoother gameplay, but other factors like screen refresh rate also play a role.
Summary
- Press Windows + G to Open Xbox Game Bar
- Click on the Performance Widget
- Pin the Performance Widget
- Go to the FPS Tab
- Start Your Game
Conclusion
Checking your FPS on Windows 11 is a straightforward task that can significantly enhance your gaming experience. By using the Xbox Game Bar, you get real-time insights into how well your game is running. This tool is not only convenient but also essential for serious gamers who want to optimize performance.
If you notice your FPS is lower than expected, you can make adjustments, such as lowering graphic settings or closing unnecessary applications. For those who crave even more control, third-party software options are available too. Keeping an eye on FPS, along with CPU and GPU usage, can provide a comprehensive view of your system’s performance.
Ready to dive deeper into the world of gaming performance? Check out our other guides on optimizing game settings and upgrading hardware. Understanding FPS is just the beginning—there’s a whole world of performance optimization out there waiting for you.
Kermit Matthews is a freelance writer based in Philadelphia, Pennsylvania with more than a decade of experience writing technology guides. He has a Bachelor’s and Master’s degree in Computer Science and has spent much of his professional career in IT management.
He specializes in writing content about iPhones, Android devices, Microsoft Office, and many other popular applications and devices.
Read his full bio here.
Checking the frames per second (FPS) on Windows 11 is a quick and simple process that can help you ensure your computer is running smoothly, especially during gaming or video playback. By following a few steps, you can easily access this information and make any necessary adjustments to your settings.
Before we dive into the steps, let’s understand what we’re aiming to achieve. Checking the FPS on Windows 11 will give you an insight into how well your graphics card is performing. It’s particularly useful for gamers who want to optimize their gaming experience.
Step 1: Open the Xbox Game Bar
Press the Windows key + G on your keyboard to open the Xbox Game Bar.
The Xbox Game Bar is a built-in feature of Windows 11 that offers various widgets, including one that shows your current FPS. If the Game Bar doesn’t open, make sure it’s enabled in the Windows Settings under Gaming > Xbox Game Bar.
Step 2: Navigate to the Performance Widget
Click on the Performance widget within the Xbox Game Bar.
The Performance widget is easily identifiable with a graph icon. If you don’t see the widget, you may need to click on the «Widgets» menu to find it.
Step 3: Turn on the FPS Counter
In the Performance widget, click on the FPS tab and toggle on the «Request access» option.
You might be prompted to restart your game or application to start seeing the FPS counter. This counter will now display in real-time, giving you live updates on your FPS.
Step 4: Check Your FPS
Play your game or run your application, and the FPS counter will show up in the corner of your screen.
The FPS counter is unobtrusive and will give you a clear indication of how well your system is performing. It’s a good idea to monitor it regularly, especially if you’re trying to fine-tune your settings for optimal performance.
After completing these steps, you should be able to see your FPS in real-time while running games or other graphics-intensive applications. This will help you to gauge the performance of your system and make necessary adjustments.
Tips: Maximizing FPS on Windows 11
- Keep your graphics drivers up to date to ensure the best performance.
- Close unnecessary programs running in the background to free up system resources.
- Lower the resolution or graphics settings in your game to boost FPS.
- Consider upgrading your graphics card if you consistently get low FPS.
- Use wired connections over wireless for a more stable gaming experience.
Frequently Asked Questions
What is FPS?
Frames per second (FPS) is a measurement of how many unique consecutive images a camera can handle each second, or how many frames you can see on your screen every second. Higher FPS generally translates to a smoother image.
Why is knowing my FPS important?
Knowing your FPS is important because it indicates the performance of your computer, particularly the graphics card. A higher FPS means a smoother and more enjoyable experience, especially in fast-paced games.
Can I check FPS without the Xbox Game Bar?
Yes, there are third-party applications like FRAPS and MSI Afterburner that can also display your FPS during gameplay.
Will checking my FPS affect my computer’s performance?
No, checking your FPS using the Xbox Game Bar is a lightweight process and should not significantly affect your computer’s performance.
What is a good FPS to aim for?
A good FPS to aim for is 60, as this is generally considered the benchmark for a smooth gaming experience. However, a higher FPS up to 144 or more is ideal for competitive gaming or monitors with higher refresh rates.
Summary
- Open the Xbox Game Bar.
- Click on the Performance widget.
- Enable the FPS counter.
- Check FPS during gameplay.
Conclusion
In conclusion, monitoring your FPS on Windows 11 is an essential part of maintaining a high-quality gaming experience. It’s a simple process that can make a significant difference in how you enjoy your favorite games. By following the steps outlined in this article, you’ll be able to keep an eye on your system’s performance and make necessary tweaks to enhance your gameplay.
Furthermore, with the tips provided, you can potentially increase your FPS and improve overall system efficiency. Remember to keep your system updated and consider hardware upgrades if necessary. Gaming is all about the experience, and knowing how to check FPS on Windows 11 is one way to ensure that experience remains top-notch.
Whether you’re a casual gamer or a competitive player, understanding and optimizing your FPS can give you the edge you need. So go ahead, give these steps a try, and take control of your gaming performance today.
Matt Jacobs has been working as an IT consultant for small businesses since receiving his Master’s degree in 2003. While he still does some consulting work, his primary focus now is on creating technology support content for SupportYourTech.com.
His work can be found on many websites and focuses on topics such as Microsoft Office, Apple devices, Android devices, Photoshop, and more.
As gaming enthusiasts, knowing our frame rates (FPS) is essential for optimizing performance and ensuring a smoother gaming experience. Frame rates reflect the number of frames displayed per second on your screen. In Windows 11, numerous built-in tools and third-party applications help you monitor FPS. Additionally, various settings can enhance gaming performance by impacting your computer’s capability to render frames. In this guide, we will explore the methods to show FPS in Windows 11, addressing both built-in tools and external applications.
Understanding FPS
Before diving into how to show FPS in Windows 11, it’s essential to understand what FPS represents and why it matters. FPS is a critical metric in gaming that quantifies how many unique consecutive frames your graphics card can render every second. The higher the FPS, the smoother and more visually appealing your gaming experience is. For most gamers:
- 30 FPS is the minimum threshold for a playable experience.
- 60 FPS is widely seen as the standard, providing smooth gameplay.
- 120 FPS and above can deliver an ultra-smooth experience, particularly crucial in competitive gaming.
Prolonged gaming at lower FPS can lead to a choppy experience, potentially hindering gameplay and reaction times, particularly in fast-paced genres such as first-person shooters and racing games.
Built-in FPS Counter in Windows 11
Windows 11 incorporates features that help gamers monitor their FPS directly from the operating system. One of the easiest ways to display FPS is through the Xbox Game Bar.
Using Xbox Game Bar
The Xbox Game Bar is a built-in feature in Windows 11 designed for gamers. To enable and use its FPS counter, follow these steps:
-
Open Xbox Game Bar: Start a game, and press
Win + Gto launch the Xbox Game Bar. -
Access the Settings: Click on the gear icon located on the Game Bar overlay to open the settings menu.
-
Show FPS Counter:
- In the settings menu, navigate to the ‘Game Features’ tab.
- Toggle the ‘FPS Counter’ option to ‘On’. You may choose different positions for the FPS display on your screen, such as the top-left, top-right, bottom-left, or bottom-right.
-
Close the Settings: Once you’ve enabled the FPS counter, close the settings window.
Now, when you play any game, the FPS counter should display in the designated area of your screen, providing real-time information as you play.
Additional Xbox Game Bar Features
Aside from the FPS counter, the Xbox Game Bar includes a multitude of features for gamers, such as:
- Performance Monitoring: Keep track of CPU and GPU performance, memory usage, and more.
- Audio Controls: Manage audio output and input settings for different applications.
- Capture and Share: Record gameplay, take screenshots, and share them effortlessly.
The Xbox Game Bar is a valuable all-in-one tool for gaming on Windows 11, making it a popular choice for players hitting the virtual battlegrounds.
Using Steam Overlay for FPS Monitoring
If you primarily play your games through Steam, the platform has a built-in FPS counter as part of its overlay. Here’s how to enable it:
-
Open Steam: Launch the Steam client on your PC.
-
Navigate to Settings:
- Click on ‘Steam’ in the top-left corner and select ‘Settings’ from the dropdown menu.
-
In-Game Settings:
- In the settings window, navigate to the ‘In-Game’ tab.
- Look for the ‘In-game FPS counter’ dropdown menu.
-
Enable FPS Counter:
- Choose the desired position for the FPS counter from the dropdown menu—this will be similar to options available in the Xbox Game Bar (top-left, top-right, bottom-left, bottom-right).
- You can also customize the ‘High Contrast color’ to improve visibility if needed.
-
Applying Changes: Click ‘OK’ to apply your changes.
When you play any game through Steam afterward, the FPS counter will appear in your chosen location, giving you real-time frame rate feedback during your gaming sessions.
Third-Party FPS Monitoring Applications
While Windows 11 and gaming platforms like Steam offer built-in FPS tools, you may prefer more detailed information and features through third-party applications. Here are a few popular FPS monitoring tools:
1. Fraps
Fraps is a classic tool used for FPS monitoring and video capture. Though it hasn’t been updated in years, it still works well for many users.
- Installation: Download and install Fraps from the official website.
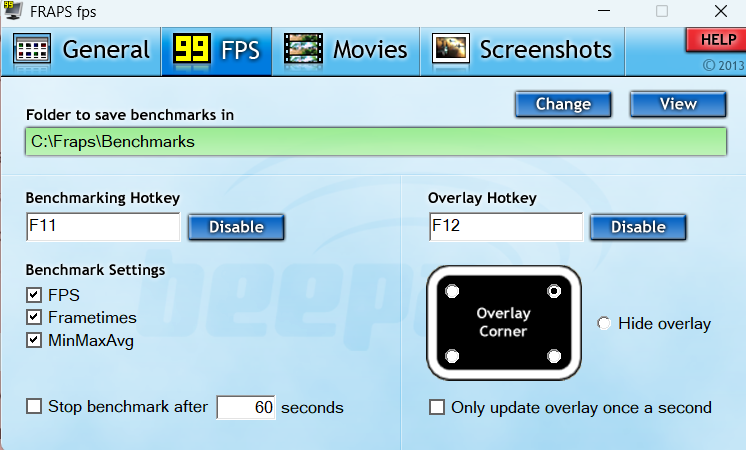
- Launch Fraps: Open the application and navigate to the ‘FPS’ tab.
- Enable FPS Counter: Check the ‘Show FPS’ option and select your preferred display corner.
- Minimize Fraps: You can minimize Fraps while playing your game, and it will continue displaying the FPS counter.
2. MSI Afterburner
MSI Afterburner is not just an FPS counter, but a full-featured GPU overclocking utility. It provides in-depth statistics, including temperature, GPU usage, and more, alongside FPS.
- Installation: Download MSI Afterburner and install it on your PC.
- Configuration: Open Afterburner, and click on the gear icon to access settings.
- Monitoring Settings: In the ‘Monitoring’ tab, look for ‘Framerate’ or ‘Framerate (FPS)’.
- Enable On-Screen Display: Check the ‘Show in On-Screen Display’ option.
- Customize Display Settings: This tool allows you to customize the appearance and other metrics displayed alongside your FPS.
3. RivaTuner Statistics Server
RivaTuner Statistics Server (RTSS) is often bundled with MSI Afterburner but can be used independently. It offers extensive customization for displaying FPS, and you can adjust which metrics you want to monitor.
- Installation: If you have MSI Afterburner installed, RTSS is included. If not, you can download it separately.
- Open RTSS: Launch the application; it runs in the background.
- Setup FPS Monitoring: You can customize the appearance and position by adjusting the settings in the RTSS interface.
4. GeForce Experience
For NVIDIA graphics card users, GeForce Experience can be used to display FPS and optimize gaming settings.
- Install and Open GeForce Experience: If you have an NVIDIA GPU, GeForce Experience is a great resource.
- Overlay Settings: Navigate to the ‘Settings’ menu and go to the ‘In-Game Overlay’ option.
- Keyboard Shortcut: Click on ‘Settings’ under the In-Game Overlay option and choose ‘HUD Layout’. Here, you can enable the FPS counter and adjust its position.
5. Discord Overlay
Lastly, Discord can also be used to show FPS in games if you’re chatting while gaming. However, it’s not as focused on performance metrics as the previously mentioned tools.
- Open Discord and Settings: Go to User Settings > Overlay.
- Enable Overlay: Turn on the game overlay.
- In-Game Overlay Display: Further customize what appears using the Overlay settings.
Enhancing FPS Performance in Windows 11
While knowing how to display FPS is crucial, several tweaks can help improve your FPS performance in Windows 11, ensuring that your gameplay experience is as smooth as possible.
1. Update Graphics Drivers
Keeping your graphics drivers up-to-date is essential for the best performance. To update drivers:
- Open Device Manager: Right-click on the Start menu and select Device Manager.
- Expand Display Adapters: Find your graphics card under ‘Display adapters’.
- Check for Updates: Right-click on your graphics card and select ‘Update driver’. Follow the prompts to search for and install any available updates.
2. Optimize Game Settings
Adjusting in-game settings can have a profound effect on your FPS.
- Lower Resolution: Reducing your display resolution can significantly increase FPS.
- Reduce Graphic Settings: Set textures, shadows, and other graphical properties to lower settings.
- Disable V-Sync: Disabling V-Sync may offer higher FPS as it limits your frame rate to the refresh rate of your monitor.
3. Adjust Windows Graphics Settings
Windows 11 has options for optimizing graphic performance:
- Open Graphics Settings: Right-click on the desktop and select ‘Display settings’.
- Scroll Down: Find ‘Graphics settings’ at the bottom of the page.
- Choose Your Game: Select the application/game, then click ‘Add’. You can choose ‘High performance’ for graphics settings.
4. Enable Game Mode
Windows 11 has integrated Game Mode designed to optimize performance:
- Open Settings: Open the Settings app (
Win + I). - Gaming Section: Navigate to the ‘Gaming’ section.
- Toggle On Game Mode: Click on ‘Game Mode’ and turn it on to allow Windows to allocate resources better during gameplay.
5. Disable Background Applications
Background applications can consume valuable resources:
- Task Manager: Press
Ctrl + Shift + Escto open Task Manager. - Disable Unnecessary Apps: Under the ‘Processes’ tab, identify and right-click on games or applications that are not needed, then select ‘End task’.
6. Use SSD for Games
If you have the option, running your games on an SSD instead of an HDD can significantly enhance load times and performance.
7. Overclocking
For advanced users, overclocking your GPU or CPU can provide an uplift in performance. However, this process can overheat your components, so careful monitoring and consideration are necessary.
8. Cooling Solutions
Ensure your PC has good airflow and adequate cooling solutions. High temperatures can lead to thermal throttling, which adversely affects performance.
Conclusion
Monitoring FPS in Windows 11 is straightforward, thanks to built-in tools like Xbox Game Bar and extra features provided by platforms like Steam. Furthermore, countless third-party applications offer even more detailed statistics, helping you gauge performance during gameplay.
However, displaying FPS is only part of optimizing your gaming experience. Awareness of your settings, regular updates, and tweaks will ensure you achieve the best possible performance.
By implementing the methods outlined in this guide, you can effectively monitor FPS and take significant steps toward elevating your gaming experience in Windows 11. As always, the landscape of technology is ever-evolving, so staying informed about potential tools and techniques can only enhance your gameplay. Happy gaming!