
Как узнать частоту оперативной памяти
Если вам требуется посмотреть активную частоту установленной оперативной памяти, а также поддерживаемые модулями частоты на компьютере или ноутбуке в Windows 10, 8.1 или Windows 7, сделать это можно самыми различными способами: как встроенными средствами системы, так и с помощью сторонних программ, которые позволяют узнать более подробную информацию о RAM.
В этой инструкции подробно о том, как узнать частоту оперативной памяти: сначала способы, доступные в Windows, затем — сторонние инструменты с более подробными сведениями.
- Как посмотреть текущую частоту памяти средствами Windows
- CPU-Z
- AIDA64
- Видео инструкция
Как посмотреть частоту памяти в Windows
В Windows предусмотрено несколько методов, позволяющих определить, на какой частоте работает оперативная память. Если вы пользователь Windows 10, самый простой способ — диспетчер задач: откройте его (можно использовать меню по правому клику на кнопке Пуск), перейдите на вкладку «Производительность» и выберите пункт «Память».

На указанной вкладке, помимо прочей информации, вы увидите пункт «Скорость», где и будет отображаться частота в МГц.
Дополнительно, как в Windows 10, так и в предыдущих версиях системы вы можете посмотреть частоты модулей памяти в командной строке или PowerShell, команды будут следующими (параметры в командах могут варьироваться, в зависимости от того, какие сведения требуется получить):
- В CMD —
wmic MEMORYCHIP get BankLabel, Capacity, DeviceLocator, MemoryType, TypeDetail, Speed

- В PowerShell —
Get-WmiObject win32_physicalmemory | Format-Table Manufacturer,Banklabel,Configuredclockspeed,Devicelocator,Capacity -autosize


Примечание: на случай, если у вас есть лишь физический доступ к модулям оперативной памяти, а операционная система не установлена — вы можете поискать технические характеристики модуля RAM по его модели (обычно присутствует на маркировке) в Интернете или, если планки установлены на компьютере, посмотреть, доступны ли сведения о частоте в БИОС/UEFI.
Текущая частота и поддерживаемые частоты в CPU-Z
Чаще всего, при необходимости максимально быстро ознакомиться с характеристиками RAM, в том числе узнать частоту памяти, используют простую бесплатную утилиту CPU-Z и это действительно отличный выбор:
- Скачайте CPU-Z с официального сайта https://www.cpuid.com/softwares/cpu-z.html и запустите программу в нужной версии — 64-бит или 32-бит.
- В программе на вкладке «Memory» вы увидите текущую активную конфигурацию памяти. Верхнее поле — DRAM Frequency — это и есть частота модуля памяти для одного канала. В случае, если в поле Channel указано «Dual», память работает в двухканальном режиме и частоту DRAM Frequency мы умножаем на два.

- Вкладка SPD позволяет получить детальную информацию о каждом установленном модуле оперативной памяти, включая поддерживаемые им частоты и тайминги, производителя, напряжение, ранг и другие параметры.

AIDA64
AIDA64 — более серьёзное ПО для анализа аппаратной конфигурации компьютера, не бесплатное, но даже пробная версия позволяет получить нужные сведения:
- Скачайте AIDA64 с официального сайта https://www.aida64.com/downloads
- После запуска программы получить информацию о поддерживаемых частотах вы можете в разделе «Системная плата» — «SPD».

- Сведения о текущей частоте доступны в нескольких разделах, например, «Компьютер» — «Разгон». Но на мой взгляд, удобнее заглянуть в меню «Сервис» — «AIDA64 CPUID», где в полях Memory Type и Memory Clock мы увидим номинальную и фактическую частоту памяти (во втором поле — для одного канала).

- Дополнительно, в меню «Сервис» — «Тест кэша и памяти» вы можете не только увидеть те же частоты, но и протестировать скорость работы RAM, один из важных пунктов здесь — Latency (меньше — лучше).


Видео
Если предложенные варианты вам по какой-то причине не подошли, помните, что почти любая программа для определения характеристик компьютера позволяет посмотреть в том числе и частоту ОЗУ, разница обычно лишь в детализации и доступных сведениях.
Все способы:
- Методы определения частоты ОЗУ в Windows 10
- Способ 1: Специализированный софт
- Способ 2: Системная утилита
- Способ 3: BIOS
- Вопросы и ответы: 1
Каждое комплектующее компьютера или ноутбука имеет собственные технические характеристики, и пользователь должен уметь узнавать эту информацию. Из данной статьи вы узнаете о том, как правильно определить частоту работы оперативной памяти на устройствах под управлением Windows 10.
Методы определения частоты ОЗУ в Windows 10
Существует достаточно много ситуаций, в которых может потребоваться информация о частоте работы оперативной памяти – от банального любопытства до необходимости заменить ОЗУ. Получить нужную информацию можно тремя основными способами. О каждом из них мы и расскажем далее во всех подробностях.
Способ 1: Специализированный софт
В сети можно найти множество программ, которые предоставляют пользователю детальную информацию о каждом комплектующем компьютера. Ознакомиться с перечнем самых популярных приложений такого рода можно по ссылке ниже.
Подробнее: Программы для определения железа компьютера
В качестве примера мы покажем, как узнать частоту ОЗУ с помощью программ CPU-Z и AIDA64.
CPU-Z
Несмотря на свое название, данная программа позволяет получить информацию не только о процессоре компьютера, но и о других комплектующих. Распространяется она абсолютно бесплатно.
Скачать CPU-Z
Для получения информации об ОЗУ с ее помощью нужно сделать следующее:
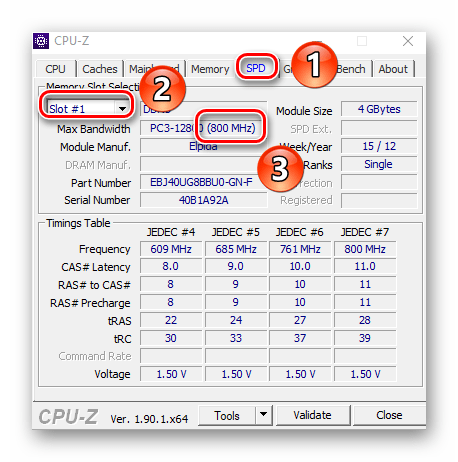
- Запустите программу CPU-Z. В открывшемся окне перейдите во вкладку «SPD».
- В левой части окна выберите слот, в котором находится интересующая вас планка оперативной памяти. После этого правее будет отображена вся информация о ней. Обратите внимание на поле «Max Bandwidth» — в нем в скобках в мегагерцах будет указана частота оперативной памяти. Однако учтите, что это частота шины. Чтобы узнать значение скорости передачи данных, необходимо частоту шины умножить на два. В нашем случае это будет равно 1600 Mhz.
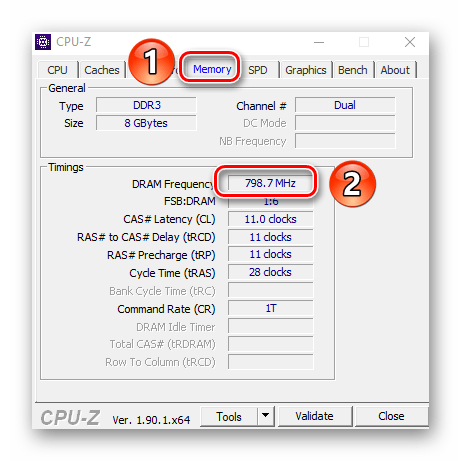
- При необходимости перейдите в программе во вкладку «Memory» — в ней будет отображена общая информация об объеме оперативной памяти и ее частоте. Это важно знать, так как если у вас в системе используется несколько модулей ОЗУ с разной частотой, то общая скорость передачи данных будет «подгоняться» под параметры слабейшего из них.

AIDA64
Данная программа предоставляет гораздо больше информации, чем CPU-Z. Она платная, но имеет пробный период 30 дней, и этого явно хватит для того, чтобы узнать частоту оперативной памяти.
Скачать AIDA64
Для определения скорости передачи данных ОЗУ с помощью AIDA64 нужно сделать следующее:
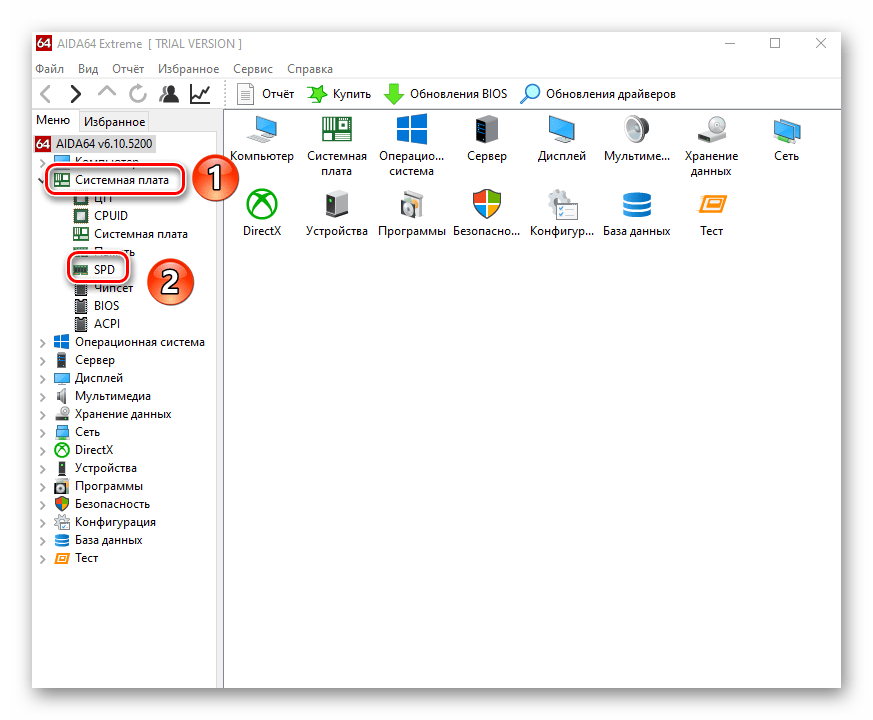
- Запустите приложение. В левой части открывшегося окна откройте ветку «Системная плата», а затем из выпадающего списка выберите пункт «SPD».
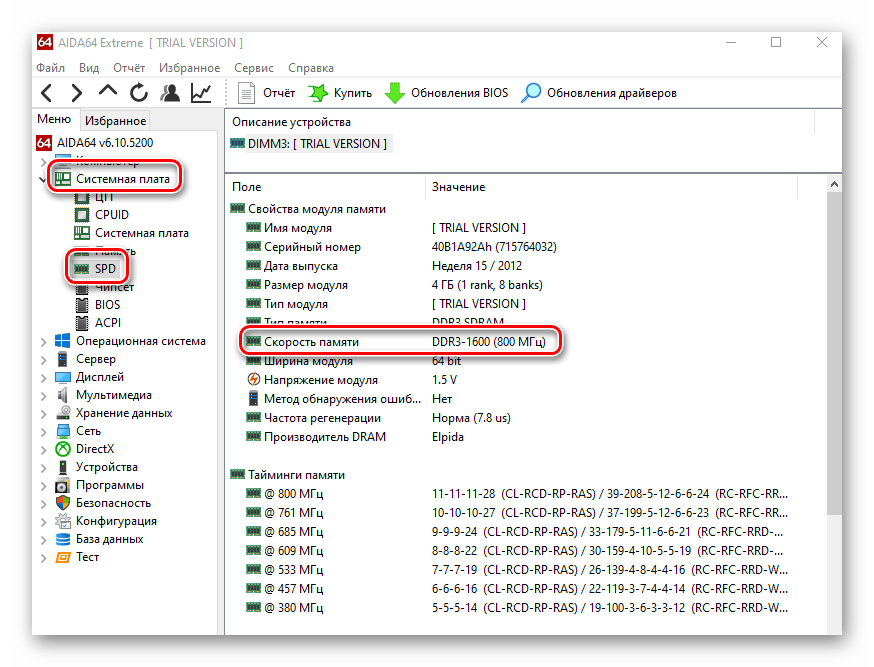
- В правой части экрана отображена сводная информация о конкретном модуле оперативной памяти. Сам модуль можно выбрать в самом верху окна. Частота будет указана напротив строки «Скорость памяти». Обратите внимание, что в скобках отображается реальная частота, а перед ними – эффективная. В нашем случае это значение 1600. Именно его и следует искать.
Способ 2: Системная утилита
Если вы относитесь к тем пользователям, которые не любят устанавливать сторонний софт, тогда этот метод для вас. Он позволяет узнать частоту работы оперативной памяти через встроенную утилиту «Командная строка». Сделать это можно следующим образом:
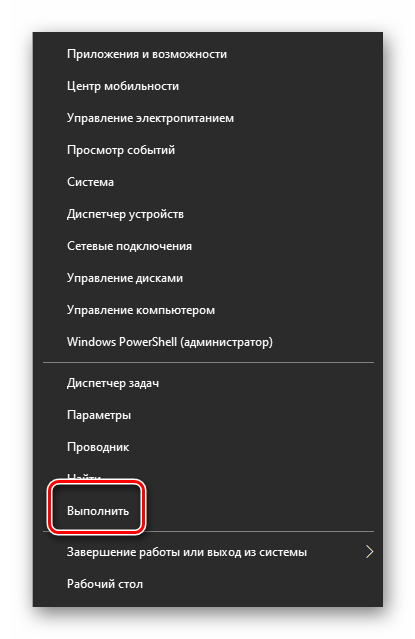
- Нажмите по кнопке «Пуск» правой кнопкой мышки, а затем выберите из контекстного меню пункт «Выполнить».
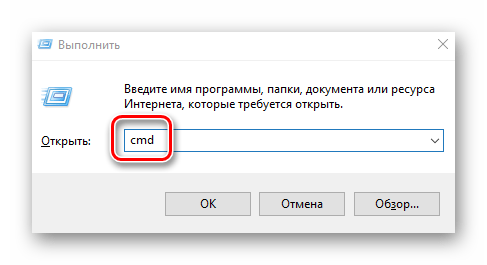
- В текстовое поле появившегося окна введите команду
cmdи нажмите кнопку «Enter».
Читайте также: Открытие «Командной строки» в Windows 10
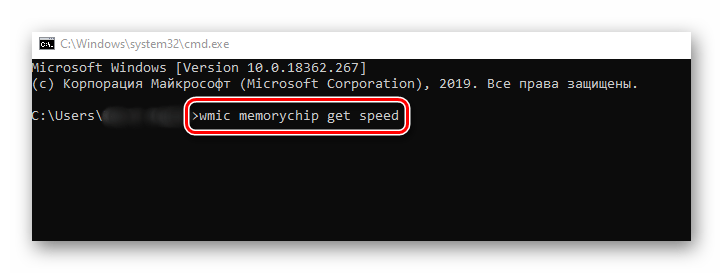
- В открывшееся окно консоли введите следующую команду и нажмите «Enter» для ее выполнения:
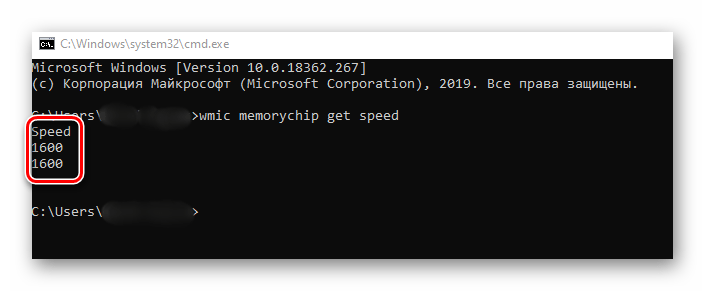
wmic memorychip get speed - В результате немного ниже появится число, которое и является частотой работы оперативной памяти. В данном случае это будет эффективное значение, а это значит, что умножать его на два не нужно. Если модулей памяти установлено несколько, значений в «Командной строке» будет столько же.
- После получения информации закройте все открытые ранее окна.
Способ 3: BIOS
Данный метод подойдет лишь опытным пользователям, так как предполагает под собой использование БИОСа. Узнать частоту работы ОЗУ можно следующим образом:
- При перезагрузке компьютера нажмите специальную кнопку, которая позволит войти в БИОС. Как правило, это «Esc», «F2» или «Del».
Читайте также: Как попасть в BIOS на компьютере
- Найдите в перечне разделов вкладку «Chipset» и зайдите в нее. Искомый параметр будет отображен напротив строчки «Memory Frequency».
- Обратите внимание, что расположение строки с информацией о частоте ОЗУ зависит от версии и производителя БИОСа.

Таким образом, использовав любой из описанных методов, вы без труда сможете определить частоту работы оперативной памяти компьютера или ноутбука.
Наша группа в TelegramПолезные советы и помощь
Reading time7 min
Views23K
Read this article to find out how to find specifications for the system memory installed on your computer, including information about its manufacturer, part number, serial number, effective speed, capacity, form factor, type etc.

Introduction
There are many scenarios when the ability of Windows 10 to supply specifications data on installed computer hardware may come in handy. Getting to know the detailed information on system memory (also known as random-access memory, or RAM) can sometimes be very useful in helping you to take the correct decision if any problems arise. For example, if a computer works slowly because it has to run memory-intensive applications or games, then adding more system memory may give it a considerable boost. Knowing certain peculiarities and required standards of the system memory can help you decide on the correct capacity, speed and brand of RAM to buy a piece of compatible hardware for an upgrade.
If you are having issues with system memory, knowing the information on its manufacturer, part number and serial number will help you to contact the tech support and solve the problem. At least, you will be able to find a memory module of the same type which, as you already know, is fully compatible with your PC. Besides, when you are configuring memory settings in the basic input / output system (BIOS) or in the unified extensible firmware interface (UEFI), a chance to have a look at memory information can help you to understand if a particular configuration was applied correctly.
Whatever might be your reasons, Windows 10 can provide you with all the information you may need; what is more, it saves you the trouble of having to open the computer case or install third-party tools, which may trigger a conflict of interest or cause compatibility issues.

In this tutorial, we will try to show you how to find specifications for the system memory installed on your computer, including information about its manufacturer, part number, serial number, effective speed, capacity, form factor, type etc.
A brief note: Despite the fact that Windows 10 lets users see detailed information on the system memory in their devices, some data may be unavailable due to peculiarities of specific hardware.
How to get detailed information on system memory with the command prompt console

If you suspect that Task Manager displays inaccurate or wrong information on your RAM specifications, or if you need to learn more detailed data such as serial number, part number, manufacturer etc on every memory module, Windows 10 is here to help you find all that information by using a certain set of system commands.
To start searching and find specific data on memory modules installed on your desktop PC or laptop, you need to use the functions of the command prompt with administrator rights in Windows 10. There are a few ways to open the Command Prompt application, the rich functionality of which we are going to explore today.
Click the Search button, shaped as a magnifying glass and located on the Taskbar next to the Start button, and open the search panel. There, type command prompt or cmd. The Best match section will show you the app you are looking for. Right-click on it and select Run as administrator from the context menu.

Identify the manufacturer
Here is what you do to identify the manufacturer company (brand or trademark) that produced the RAM modules installed on your PC.
Open the Command Prompt with administrator rights using the way you prefer.
To find out the manufacturer’s name, type the following command and press the Enter key (make sure there are no quotation marks):
wmic memorychip get devicelocator, manufacturer

Read the RAM module manufacturer name under the column Manufacturer.
Identify the part number
To find data on the part number that the manufacturer assigned to a specific RAM module, here’s a simple sequence of steps to take.
Use any method you prefer to open the command prompt console with extended rights.
In the window that appear, type the command to run (without quotation marks) and press the Enter key.
wmic memorychip get devicelocator, partnumber

Under the column PartNumber you will see the product identifier you are looking for.
Note: If the speed of data processing and overall performance of your computer is decreasing, upgrading your RAM modules might be one of the best way to solve the issue. Using modern memory sticks, you can add high-quality components to your machine, with a pleasant bonus of higher bandwidth and advanced settings at an affordable price.
Check the serial number of your memory module
Take these steps to find out the serial numbers for every memory stick currently installed in your computer:
Open Command Prompt with administrator rights using any way you prefer.
In the corresponding line, type the command for identification of RAM serial number (make sure there are no quotation marks) and hit the Enter key to begin.
wmic memorychip get devicelocator, serialnumber

Hint: In the command for identification of the serial number, you can replace the part devicelocator by banklabel to see the serial number of the physical label of the bank where the memory is installed on the motherboard.

The result will be displayed in the Command Prompt window under the column SerialNumber.
Identify RAM capacity
In Windows 10 you can use a variable set of commands to find out total capacity for every RAM module, and for the entire system memory.
Discover capacity of each RAM module
To learn capacity of each memory stick in your configuration, take a few steps.
Open Command Prompt with administrator rights, using any method you prefer.
In the program’s window, type the following command for displaying the memory capacity, and then press the Enter key to run it (make sure the command doesn’t contain any quotation marks).
wmic memorychip get devicelocator, capacity

The total capacity of RAM installed on your computer will be shown under the column Capacity.
Note: The memory module capacity is represented in bytes, so to understand the figure properly you need to convert it into gigabytes (divide the value shown in the Command Prompt window by 1073741824, which is how many bytes are there in one gigabyte).
Displaying total amount of RAM
In addition, you can quickly learn the total size of system memory on your computer by taking another sequence of simple steps.
Open Command Prompt with administrator rights.
When the corresponding window opens, type the following command to see the total system memory size installed on your computer with Windows 10, and press the Enter key to run the command (remove any quotation marks).
systeminfo | find “Total Physical Memory”

Note: If the total memory size is not displayed, try a similar command:
systeminfo | findstr /C:”Total Physical Memory”
With every command, make sure there are no quotation marks.
The total size of physical system memory (in megabytes) available on this computer will be shown in the corresponding line.
Check RAM speed
To find out the speed that the memory modules are operating at, here are the steps to use:
Open the Command Prompt console with administrator rights in any way you prefer.
Type the command to determine the RAM speed and press Enter on your keyboard (make sure there are no quotation marks):
wmic memorychip get devicelocator, speed

In the corresponding Speed column, the program will display the speed of your memory modules (in MHz).
Check RAM type
To check the system memory type (generation) in Windows 10, take these steps:
Open Command Prompt with administrator rights, using any method you prefer.
In the corresponding line, type the following command to determine the memory type and press Enter on your keyboard (make sure there are no quotation marks):
wmic memorychip get devicelocator, memorytype

The MemoryType column will contain a digit from zero to twenty-five that denotes a certain memory type. For example, if you see 24 in the column, it means this computer is using DDR3memory modules.
Also, you may see zeroes in the MemoryType column: it means the Windows system tool wmic.exe cannot identify the memory generation properly (it may happen if you’re using DDR4 modules), as such values are not provided in the specifications.
The comprehensive list of supported memory types
Below, find the comprehensive list of file types that can be identified by this command:
- 0: Unknown.
- 1: Other.
- 2: DRAM.
- 3: Synchronous DRAM
- 4: Cache DRAM.
- 5: EDO.
- 6: EDRAM.
- 7: VRAM.
- 8: SRAM.
- 9: RAM.
- 10: ROM.
- 11: Flash.
- 12: EEPROM.
- 13: FEPROM.
- 14: EPROM.
- 15: CDRAM.
- 16: 3DRAM.
- 17: SDRAM.
- 18: SGRAM.
- 19: RDRAM.
- 20: DDR.
- 21: DDR2.
- 22: DDR2 FB-DIMM.
- 24: DDR3.
- 25: FBD2.
Check RAM form factor
The word “form factor” (standard size) suggests certain standard dimensions of a memory module which also includes additional characteristics such as the module shape. By form factor, there are twenty-five types of system memory. However, the two most widespread categories are DIMM and SODIMM.
To find out if your RAM sticks are DIMM or SODIMM, follow these steps:
Use your preferred method to open Command Prompt with administrator rights.
In the window Administrator: Command Prompt, type the following command to identify the memory form factor and press the Enter key (make sure there are no quotation marks):
wmic memorychip get devicelocator, formfactor

If the result in the FormFactor column is 8, then your computer is using DIMM modules (the default option for desktop computers). Otherwise, if the command displays the number 12, then your computer is using SODIMM modules (the typical choice for laptops).

The comprehensive list of supported memory form factors
Here is the list of form factors that this command can identify:
- 0: Unknown.
- 1: Other.
- 2: SIP.
- 3: DIP.
- 4: ZIP.
- 5: SOJ
- 6: Proprietary.
- 7: SIMM.
- 8: DIMM.
- 9: TSOP.
- 10: PGA.
- 11: RIMM.
- 12: SODIMM.
- 13: SRIMM.
- 14: SMD.
- 15: SSMP.
- 16: QFP.
- 17: TQFP.
- 18: SOIC.
- 19: LCC.
- 20: PLCC.
- 21: BGA.
- 22: FPBGA.
- 23: LGA.
- 24: FB-DIMM.
Displaying all RAM details
The commands described above allow you to identify the most important data about memory modules. However, if you want to find all the information, here’s what you do:
Open Command Prompt with administrator rights in any way you prefer.
In the corresponding line, type the following command to display all memory details and press Enter to run it (don’t forget to remove any quotation marks):
wmic memorychip list full

View all the available information for each RAM module installed on your computer.
(Optional) if the list of data is too big and you don’t actually need all that stuff, type the following command to view only the necessary things and press Enter (everything should be typed into one line; remember to remove the quotation marks):
wmic memorychip get devicelocator, manufacturer, partnumber, serialnumber, capacity, speed, memorytype, formfactor

Now you can view the memory information you prefer.
Conclusion
Using the steps described in this article, you’ll get an impressive amount of data on the RAM modules installed on your computer. These hints will come in handy when troubleshooting PC issues, tweaking configuration (e.g. when overclocking), or when you’re planning to upgrade your system memory to improve overall computer performance.
See the full article with all additional video tutorials
How do I check RAM speed or frequency on Windows 11/10? If you are planning to add some more RAM to your computer or laptop, you should check your RAM speed and see if your PC has empty slots available.
Let’s take an example and see how it works. Suppose you have 4GB 2400 MHz RAM installed on your computer, and you want to upgrade it to 8GB. If you purchase a 3200 MHz RAM and install it alongside the 2400 MHz RAM, your PC will start misbehaving. You might also not be able to boot into your computer after installing improper RAM on your PC. That is why you should check the RAM speed before purchasing or installing another RAM.
In this gearupwindows article, we will guide you with three different methods to check the RAM speed or frequency on your Windows 11/10 PC. These are the following:-
- Using Task Manager
- Via PowerShell
- Through Command Prompt
How to Check RAM Speed or Frequency on Windows 11/10 using Task Manager?
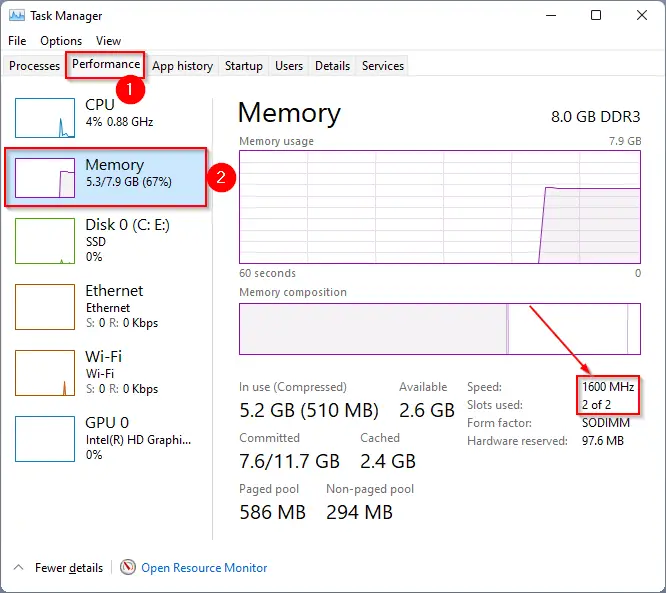
Open the Task Manager by pressing Ctrl + Shift + Esc shortcut keys from the keyboard. Now, navigate to the Performance tab and then click on the Memory option from the left side pane. On the right side of it, you can see the RAM speed and Slots used.
How to See RAM Speed or Frequency on Windows 11/10 through Windows PowerShell?
Follow these steps to view RAM Speed or Frequency on Windows 11/10 through Windows PowerShell:-
Step 1. Open Windows PowerShell.
Step 2. On the PowerShell prompt, copy and paste the following command and then hit Enter from the keyboard:-
Get-CimInstance -ClassName Win32_PhysicalMemory | Format-Table Devicelocator, Manufacturer, Speed
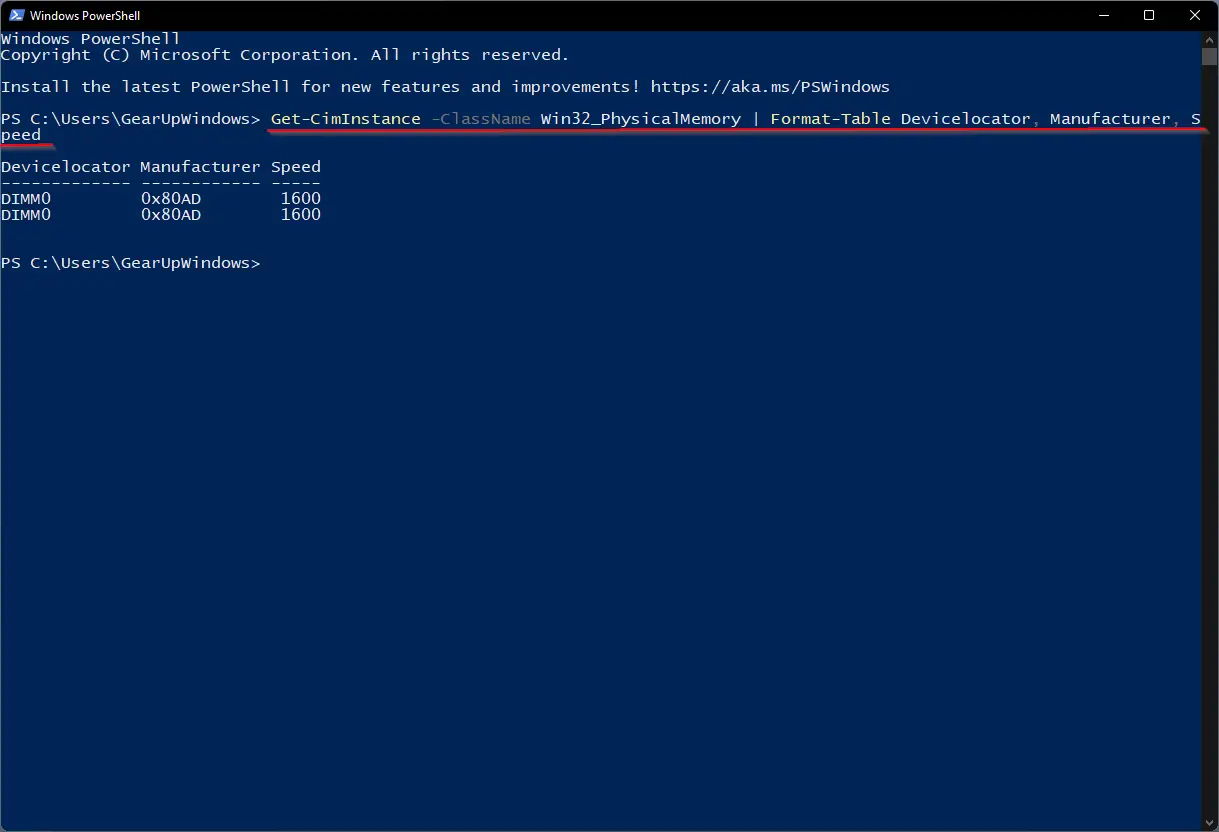
After executing the above steps, you will see the RAM speed of each slot.
How to View RAM Speed or Frequency on Windows 11/10 using Command Prompt?
Follow these steps to know RAM Speed or Frequency on Windows 11/10 using Command Prompt:-
Step 1. Open the Command Prompt.
Step 2. On the Command Prompt, type the following and hit Enter from the keyboard:-
wmic MemoryChip get DeviceLocator, Manufacturer, Speed
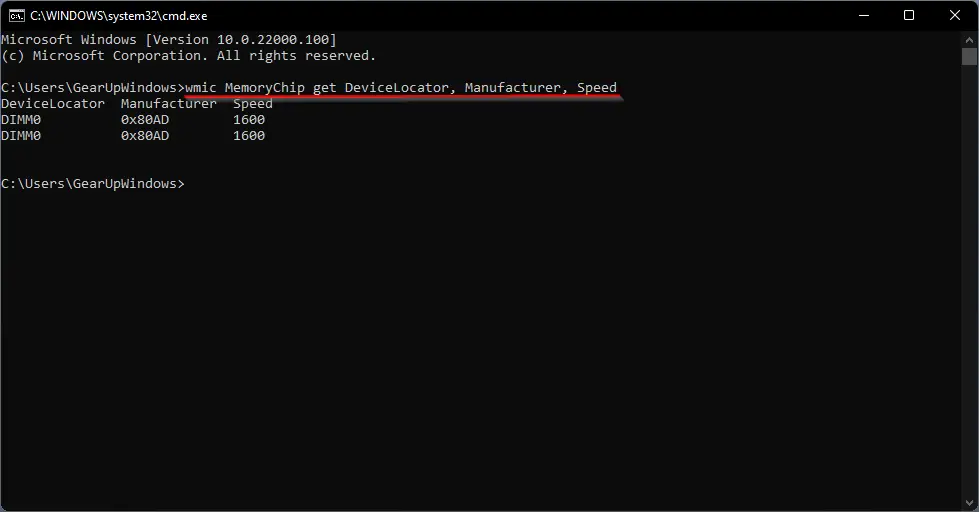
Once you execute the above steps, you should see the RAM speed of the slot in use.
Conclusion
In conclusion, checking the RAM speed or frequency is crucial when upgrading or adding RAM to your computer or laptop. Installing improper RAM can cause your PC to misbehave or fail to boot. In this article, we have provided three different methods to check the RAM speed or frequency on your Windows 11/10 PC. You can use the Task Manager, Windows PowerShell, or Command Prompt to view the RAM speed of each slot. By following these simple steps, you can ensure that you purchase.