
- Home
- Windows Tips
- Folder size windows 10
Keeping files organized and your drive storage optimized means you have to get rid of files you don’t need. Hard drives have gotten big; you can easily find systems with 1TB drives, but users who are now moving to an SSD have to make do with less storage space if they do not have a hard drive to go with it.
Regardless of your storage situation, you should still keep unnecessary folders off your desktop. It’s a good idea to start with large folders and move them to external storage.
Start off from the root of a drive and check the size of the folders there.
To show folder size in Windows 10, try these methods
1. Mouse tool-tip
- Open File Explorer.
- Select the folder that you want to view the size for.
- Wait a second or two, and a tool-tip will appear.
- The tool-tip will show you the size of the folder.
2. Folder properties
- Open File Explorer and navigate to the folder that you want to view the size of.
- Right-click it, and select Properties from the context menu.
- On the General tab, check the Size field to view folder size.
3. Settings Storage
If you need a more holistic view of how storage is being used on your Windows 10 PC, the Settings app has an excellent tool that lets you visualize how storage is used.
- Open the Settings app.
- Go to the System group of settings.
- Select the Storage tab.
- Allow the tab to load the storage usage.
- Once loaded, click the Show more categories.
- You will get a list of how storage is used on the drive. Select a category to view folders under it.
- For non-Windows drive, scroll a little further down and select ‘View storage on other drives.’
4. TreeSize Free
There are lots of third-party tools that you can use to view the folder size on Windows 10. It’s an area where the OS generally lacks, so plenty of tools have been developed to fill the gap.
- Install a free app called TreeSize Free from the Microsoft Store.
- Run the app, and click the Select Directory button.
- Pick a folder or a drive to scan for folders.
- The app will show you each folder and its size. You can sort the results by folder size.
- Expand each folder, and you can see the size of the folders nested under it.
5. Folder size in File Explorer search
You can use File Explorer to search for files and folders, and the results can be sorted by size.
- Open File Explorer and navigate to the folder you want to search in.
- Click inside the search bar, and enter a search term. Tap Enter.
- When the Search completes, go to the Search Tools tab.
- Open the Size dropdown, and select one of the size presets to narrow the results down.
- Alternatively, you can use the size: search modifier to enter a custom size e.g. size:1MB. Add it at the end of the search term.
Folder size in File Explorer
If you set the folder view of a particular folder to ‘Details,’ File Explorer adds a Size column to it. Unfortunately, this column remains empty for any and all folders. Windows 10 and its many predecessors do not show the folder size in File Explorer, and it doesn’t plan on doing so in the future even though users have been asking for the feature.
The reason the feature doesn’t extend to folders is that it can take time to calculate folder size, and that would slow File Explorer down. It’s not a big deal for smaller folders that do not have a complex folder structure but for large folders with many files and many nested folders under it, it can become a problem that Windows would like to avoid.
Deleting unnecessary folders
It’s a good idea to keep junk files and folders off your system. Here are a few ways to do that;
- Clean/empty the Recycle Bin often.
- Enable Storage Sense from the Settings app under System>Storage.
- Remove junk files and delete Windows update files. You can do this by right-clicking the Windows drive, and selecting properties. Click ‘Disk Cleanup’ and delete anything that isn’t needed.
- If you take a lot of screenshots, make sure you delete the ones you don’t need because the folder can get quite big over time.
- Check folders like those created by Apple and remove anything you don’t need e.g., multiple backups for a device.
Conclusion
Folders, especially those generated by apps, can get out of hand. Users may be aware of how big a folder they’ve personally created has gotten, but those created by an app like iTunes can get quite big without warning. Before you know it, your drive has turned red, and your OS is lagging. That’s why it’s a good idea to check in on them from time to time.

Fatima Wahab
Fatima has been writing for AddictiveTips for six years. She began as a junior writer and has been working as the Editor in Chief since 2014.
Fatima gets an adrenaline rush from figuring out how technology works, and how to manipulate it. A well-designed app, something that solves a common everyday problem and looks
Follow these instructions to easily show folder sizes in Windows 11, 10, 8, or 7. Display folder sizes in File Explorer and locate missing disk space easily. View the sizes of all directories and sort them by size.
List of top 5 ways to show folder sizes in Windows:
- Show Folder Sizes in File Explorer
- View Folder Size From Folder Properties
- Show Folder Size From the Command Line
- Display Folder Sizes Using PowerShell
- Show All Folder Sizes Using a Free Disk Analysis App
- Conclusion
- Show Folder Size Windows FAQ
Why isn’t the folder size visible in File Explorer? Can I display folder size in Windows File Explorer? You can utilize the 5 methods listed below to view folder sizes in Windows.
Show Folder Sizes in File Explorer
Displaying folder size information in File Explorer folder tips is a valuable feature that enhances user productivity by providing quick insights into the storage space usage of folders without the need to open properties or third-party software. Here’s a detailed guide on how to show folder sizes tooltips.
Enable Folder Size Information:
-
- Open Windows File Explorer.
- Navigate to the “View” tab on the ribbon menu.
- Click on “Options” located on the right side of the ribbon.
- In the Folder Options dialog box, switch to the “View” tab.
- Scroll down and locate the checkbox labeled “Display file size information in folder tips.“
- Check the box to enable this feature and then click “Apply” and “OK” to save the changes.
Show Folder Sizes Tooltip
View Folder Size Information:
-
- Once enabled, navigate to a folder in File Explorer.
- Hover your mouse cursor over the folder icon, and after a moment, a tooltip will appear.
- The tooltip will display information about the folder, including its size.
- The folder size information provided in the tooltip is typically displayed in bytes, kilobytes, megabytes, or gigabytes, depending on the folder’s size.
Advantages
-
- Instant Insight: Displaying folder size information in folder tips provides instant insights into the storage space usage of folders, allowing users to quickly identify large or space-consuming folders.
- Efficient Workflow: With this feature enabled, users can assess folder sizes without interrupting their workflow by avoiding the need to open properties or launch third-party applications.
- No Additional Software: Unlike some other methods that require the use of third-party software or scripts, displaying folder size information in folder tips is a built-in feature of Windows File Explorer, eliminating the need for additional software installations.
Disadvantages
-
- Limited Customization: While folder tips provide basic folder size information, they may lack customization options and detailed breakdowns available in third-party software or scripts.
- Tooltip Clutter: Depending on your folder structure and browsing habits, the constant display of tooltips may clutter the interface, especially if you frequently hover over folders while navigating File Explorer.
- Tooltip Delay: In some cases, there may be a slight delay before the tooltip appears when hovering over a folder, which could affect workflow efficiency for some users.
Conclusion
In conclusion, enabling folder size information in File Explorer folder tips is a convenient way to quickly assess the storage space usage of folders without the need for additional software or complex procedures. By leveraging this feature, users can streamline their workflow and make more informed decisions when managing disk space in Windows File Explorer.
View Folder Size From Folder Properties
Steps to view folder sizes from File Explorer properties menu:
- Right-click on the folder you want to inspect.
- Select “Properties” from the context menu.
- In the Properties dialog box, navigate to the “General” tab.
- The size of the folder, including its contents, will be displayed.
The screenshot below lists the size of the “MISC DOCS” folder that I have right-clicked and have chosen “Properties”.
Show Folder Size From Properties
Advantages:
- Simple and Quick: Accessing folder properties is straightforward and can be done with just a few clicks.
- Detailed Information: The Properties dialog box provides additional information about the folder, such as its location, creation date, and attributes.
- No Third-party Software Required: Unlike some other methods, such as using third-party software or command-line tools, accessing folder properties is built into Windows and does not require any additional software installations.
Disadvantages:
- Limited Customization: While you can view basic information about the folder, such as its size, the Properties dialog box does not offer advanced customization options or detailed breakdowns of the contents.
- Manual Process: Viewing folder properties for multiple folders or monitoring changes over time can be time-consuming as it requires manual intervention for each folder.
- Limited Compatibility: While this method works well for folders on local drives, it may not provide accurate information for network or cloud-based folders, depending on the configuration.
Show Folder Size From the Command Line
Using Command Prompt to check the size of a folder and its contents offers a flexible and powerful method for users who prefer command-line interfaces or need to automate tasks. Here’s a detailed explanation of how to do it, along with some examples:
To show folder sizes from Command Prompt:
- Open Command Prompt:
- Press the Windows key + R to open the Run dialog.
- Type “cmd” and press Enter, or search for “Command Prompt” in the Start menu and click on it to open.
- Navigate to the Directory:
- Use the cd command followed by the path of the directory containing the folder whose size you want to check.
- For example, if the folder is located in the “Documents” directory on your C drive, you would type:
cd C:\Users\YourUsername\Documents - Replace “YourUsername” with your actual username.
- Use the dir /s Command:
- Once you’ve navigated to the correct directory, type the following command:
dir /s FolderName - Replace “FolderName” with the name of the folder you want to check.
- Once you’ve navigated to the correct directory, type the following command:
- View the Folder Size:
- After pressing Enter, Command Prompt will list all the files and subdirectories within the specified folder, along with their sizes.
- At the end of the output, Command Prompt will display the total size of the folder and its contents.
Show Folder Sizes From Command Line Example
Suppose you want to check the size of a folder named “Photos” located in the “Pictures” directory of your user profile. Here’s how you would do it:
- Open Command Prompt.
- Navigate to the “Pictures” directory using the cd command:
cd C:\Users\YourUsername\Pictures - Type the following command to check the size of the “Photos” folder:
dir /s Photos
Command Prompt will then display a detailed list of files and subdirectories within the “Photos” folder, along with their respective sizes. Finally, it will provide the total size of the “Photos” folder and its contents.
Advantages:
- Powerful and Scriptable: Command Prompt offers powerful scripting capabilities, allowing users to automate tasks and perform advanced operations on files and directories.
- Quick Access: Users familiar with the command-line interface can quickly check folder sizes without the need for graphical user interfaces or third-party software.
- Detailed Information: The dir /s command provides detailed information about the folder’s contents, including file sizes, modification dates, and attributes.
Disadvantages:
- Steep Learning Curve: Command Prompt commands may be unfamiliar to users who are not comfortable with the command-line interface, requiring a learning curve to master.
- Limited Graphical Representation: Unlike graphical file explorers, Command Prompt does not provide visual representations of folder sizes, which may make it less intuitive for some users.
- Risk of Mistakes: Due to the nature of command-line interfaces, there is a risk of accidentally executing commands that can modify or delete files if not used carefully.
In summary, using Command Prompt to check folder sizes offers a versatile and efficient method for users who prefer command-line interfaces or need to automate tasks. While it may require some familiarity with command-line syntax, it provides detailed information and can be a valuable tool in a user’s toolkit for managing files and directories.
Display Folder Sizes Using PowerShell
Displaying folder sizes using PowerShell provides a robust and flexible approach for users who prefer command-line environments or need to perform bulk operations efficiently. PowerShell, with its scripting capabilities and integration with Windows systems, offers powerful tools for managing files and folders. Here’s a detailed guide on how to display folder sizes using PowerShell, along with its advantages and disadvantages:
1. Open PowerShell:
- Press the Windows key + X and select “Windows PowerShell” from the menu, or search for “PowerShell” in the Start menu and click on it to open.
2. Navigate to the Directory:
- Use the cd (Change Directory) command followed by the path of the directory containing the folder whose size you want to check.
- For example, if the folder is located in the “Documents” directory on your C drive, you would type:
cd C:\Users\YourUsername\Documents - Replace “YourUsername” with your actual username.
3. Use the Get-ChildItem Cmdlet:
- Once you’re in the correct directory, you can use the Get-ChildItem cmdlet to retrieve information about the folder and its contents.
- Type the following command:
Get-ChildItem -Directory -Recurse | Measure-Object -Property Length -Sum
4. View the Folder Size:
- PowerShell will calculate the total size of the folder and its contents and display it in bytes.
- You can format the output to display the size in a more readable format, such as kilobytes (KB), megabytes (MB), or gigabytes (GB).
How to Show Folder Sizes in PowerShell Example
Suppose you want to check the size of a folder named “Photos” located in the “Pictures” directory of your user profile. Here’s how you would do it in PowerShell:
-
- Open PowerShell.
- Navigate to the “Pictures” directory:
cd C:\Users\YourUsername\Pictures - Type the following command to check the size of the “Photos” folder:
Get-ChildItem -Directory -Recurse | Measure-Object -Property Length -Sum
PowerShell will then calculate the total size of the “Photos” folder and its contents and display it in bytes.
Advantages:
- Scripting Capabilities: PowerShell offers powerful scripting capabilities, allowing users to automate tasks and perform complex operations on files and folders.
- Integration with Windows: PowerShell is tightly integrated with Windows systems, making it a convenient tool for managing files and folders in a Windows environment.
- Detailed Information: The Get-ChildItem cmdlet provides detailed information about the folder’s contents, including file sizes, modification dates, and attributes.
- Flexibility: PowerShell allows users to customize and format the output according to their preferences, providing flexibility in displaying folder sizes.
Disadvantages:
- Learning Curve: PowerShell commands may be unfamiliar to users who are not comfortable with command-line interfaces, requiring a learning curve to master.
- Potential for Mistakes: Due to its scripting capabilities, there is a risk of accidentally executing commands that can modify or delete files if not used carefully.
- Less Intuitive: For users accustomed to graphical file explorers, PowerShell’s command-line interface may be less intuitive and require more effort to navigate.
In summary, using PowerShell to display folder sizes offers a powerful and flexible method for managing files and folders in a Windows environment. While it may require some familiarity with PowerShell commands, it provides detailed information and can be a valuable tool for users who prefer command-line interfaces or need to perform bulk operations efficiently.
Show All Folder Sizes Using a Free Disk Analysis App
Show folder sizes and locate missing disk space easily. Find the largest files and largest folders. Sort folders and files by size. Delete large unused files and folders and free up disk space. Visualize disk space distribution using pie or bar charts to easily spot space hogs. Print folders and file lists and print folder tree.
Your favorite Folder Size tool just got better. You could already show folder sizes and delete files and folders. This major update provides all the flexibility that you have in Windows Explorer. It adds the complete Windows Explorer context menu to Folder Size.
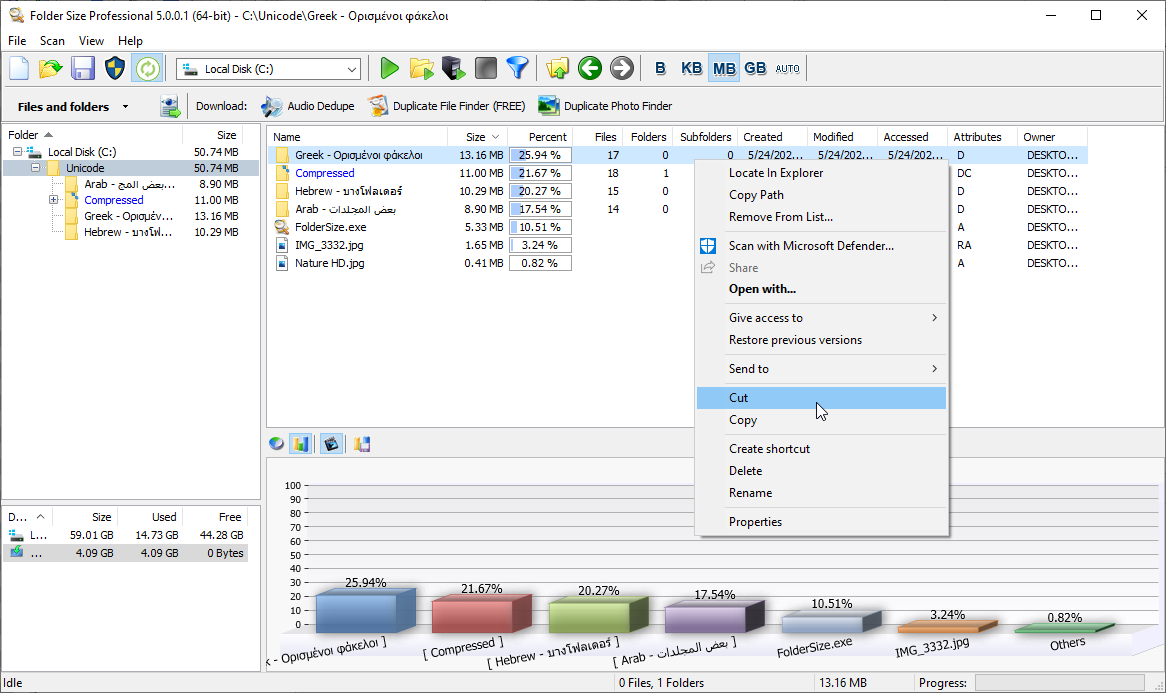
Show Folder Sizes
Folder Sizes – Copy, Cut, Paste, Delete, and Rename
In past releases of Folder Size, you could only delete files and folders. While this was sufficient to free up space, having Copy, Cut, Paste, and Rename features make it easier to reorganize files and folders. You can now use all those new features to rearrange folders and files.
Having Copy, Cut, and Paste options is great, but we have taken those features a step further. You can now Copy, Cut, and Paste from and to Windows Explorer. This means that you can now go to Windows Explorer and use the context menu to Copy an item and then go to Folder Size and use the context menu to paste it there. This is so flexible and convenient that, using Folder Size is like having a Windows Explorer with folder sizes.
Shell Context Menu in Folder Size
The shell context menu is the menu that is displayed when you right-click an item or empty space in Windows Explorer. We have integrated the entire Windows Explorer context menu in the latest version of Folder Size. You can easily understand that this will let you use all the features that you have inside Windows Explorer in Folder Size.
For example, you can use the shell context menu to create new folders and then copy or move items in them. You can use the third-party applications that have entries in it to manipulate files and folders. Such tools can extract or create archives, scan files and folders for viruses, play, view, or edit files, etc. Now you have all the flexibility of Windows Explorer inside Folder Size.
Monitor File System Changes and Update Folder Sizes Automatically
Another great new feature of Folder Size is the ability to monitor the file system changes. It will update the scan results automatically. This means that if you copy, cut, rename, delete, or move files using Windows Explorer the changes will be applied to the Folder Size results immediately. You no longer have to rescan the folders if you have modified the file system outside of the application.
While this is a great feature there are certain cases in which you wouldn’t want such changes to be applied automatically. For example, if you have loaded a project file that you have saved earlier you may not want its contents to be altered. That is why we have made this feature optional. Loading a saved project will automatically disable the feature. If you want to use it on a saved project, you can simply press the toolbar button to enable it.
Disabling the option for monitoring the file system changes, disables also the shell context menu. This is just a precaution as the loaded project may contain drives, folders, and files that do not exist on the local computer at all. Invoking the context menu on such missing items may cause issues. Nevertheless, if you load a project that you have saved from the local computer, you can simply use the toolbar button to enable the shell menu.
Show Folder Sizes Instantly – Without Rescan
The new feature for monitoring the file system changes has another great benefit. If you scan your drives and keep the application running, all the changes to the file system will be updated in Folder Size automatically. This means that you have up-to-date information about all folders and file sizes at any point in your work. All you need to do is to switch to the Folder Size application and take a look at the items that you are interested in.
The best part is that this has a ZERO impact on the performance of your system. Unlike other tools that install services or shell hooks, Folder Size uses native Windows features to detect modifications to the file system.
Folder Size Does Not Install Services
A service is an application that has no user interface and starts when Windows is started and works in the background to do tasks. Tools that use services are slowing down your system even if you are not using them. That is because the service that they have installed is working regardless if you are using the tool or not. The service is gathering information on files and folders at all times and the application that uses the service just requests that data when started.
Folder Size Does Not Install Shell Hooks
A shell hook can have an even worse performance impact on a system. A shell hook is similar to a service, but every file operation calls a function from the application that has installed the hook. If the hook is not developed properly it may cause huge performance issues. Another potential issue is that it may leak memory – use memory without freeing it properly. As such a hook is called for every file operation, even the smallest memory leak may deplete all the memory of the system in a short time.
Folder Size does not install services or shell hooks and you will never run into such issues.
Excessively Long File Path and Names Support
Many users are not aware of the fact that Windows has a limit of 260 characters for folder paths. This is the maximum count of characters for the folder plus the file name. Nevertheless, Windows Explorer does allow you to create longer paths. Unfortunately, they cause issues when accessed both in applications and in Windows itself.
Microsoft lifted this limit in newer Windows versions. They have not officially announced and enabled it yet though. In Windows 10 and later you can manually enable support for long paths. Nevertheless, we do not recommend using excessively long paths and file names. Folder Size supports long paths, but you may experience issues in many applications including Windows itself.
Conclusion
We have listed the top 5 ways to show folder sizes in Windows. In conclusion, when it comes to displaying folder sizes in Windows, the Folder Size app emerges as your top choice. It has intuitive interface, extensive features, and seamless integration with Windows Explorer. Therefore, that makes it the ideal tool for managing disk space and optimizing storage usage. Whether you’re a casual user seeking to free up space on your hard drive or a power user handling large volumes of data, Folder Size offers the perfect balance of functionality and ease of use. Best of all, it’s available as a free download, enabling you to take control of your storage space effortlessly. Say goodbye to the hassle of manually calculating folder sizes or navigating complex command-line interfaces. Download Folder Size today and start managing your storage space more efficiently.
Show Folder Size Windows FAQ
Q: How can I view the size of a folder in Windows File Explorer?
A: You can view the size of a folder in Windows File Explorer by right-clicking on the folder. Then select “Properties” from the context menu, and navigating to the “General” tab. As a result, the size of the folder, including its contents, will be displayed.
Q: Is there a way to quickly view folder sizes without opening Properties in File Explorer?
A: Yes, you can hover your mouse over the target folder in File Explorer. As a result, the folder size will be displayed in a tooltip.
Q: Can I use Command Prompt to check the size of a folder?
A: Yes, you can use Command Prompt to check the size of a folder. First open Command Prompt. Then navigate to the directory containing the folder using the “cd” command. Finally, type “dir /s” followed by the folder name to display the total size of the folder and its contents.
Q: Is PowerShell another option for displaying folder sizes?
A: Yes, PowerShell can also be used to display folder sizes. You can open PowerShell and navigate to the directory containing the folder. Then use commands such as “Get-ChildItem” to retrieve folder size information.
Q: Are there any third-party applications available for showing folder sizes in Windows?
A: Yes, there are several third-party applications available for displaying folder sizes in Windows. These applications often provide additional features and customization options beyond what is available through built-in Windows tools.
Please share this article with your friends – they will thank you!
The File Explorer in Windows 11 or Windows 10 doesn’t have the feature to display folder size in the “Details” view. The “size” column in the file explorer will only show the sizes of files, but not folders. The only way to view the folder size without using a third party app is by looking at the folder’s tooltip or properties window (will be explained below).
To be able to view the folder size as you browse the files and folders, we will need the help of third party software. In this guide, other than showing you the basic ways to view folder size in file explorer, we will also show you two simple apps that can achieve displaying folder size in Windows 11/10 file explorer.
Check folder size without software
Depending on what you want to achieve, if you simply want to check the size of a certain folder, you don’t need to use any software to help you do so. Below are two ways to quickly check the size of a folder in Windows 11/10 file explorer.
Folder size via Tooltip
The simplest method to check the size of a folder is to hover your mouse cursor onto the folder and wait for a second or two until the tooltip shows up.
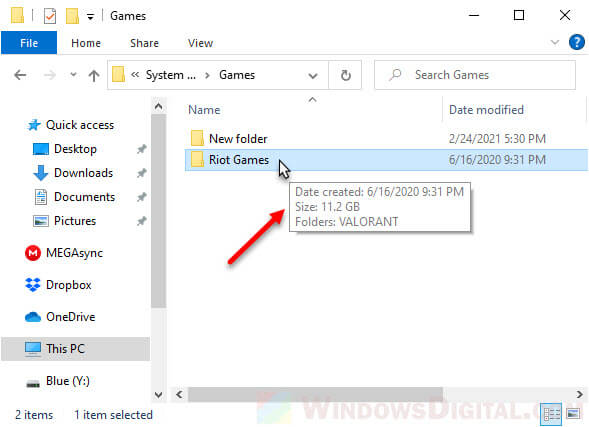
The size of the folder will be shown as part of the information in the folder’s tooltip.
Folder size via Properties
Another method to quickly check the size of a folder is to right-click the folder and select Properties.
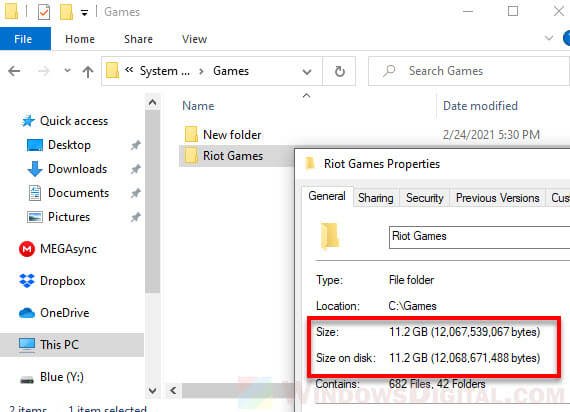
In the folder’s Properties window, you can view the total size of the selected folder along with all other relevant information about the folder.
Show folder size in Windows 10/11 file explorer using “Folder Size”
“Folder Size” is a simple free software that adds a separate window to the file explorer in Windows 11/10 to show folder size as you browse the folders.
It was made more than a decade ago and was able to show folder size in a column in the file explorer in Windows prior to Vista, 7 and 8. Since Vista, there is no longer any way to add the size column to the explorer. Thus, it adds a separate window instead. The best thing about the app is that it works perfectly on Windows 11 and Windows 10.
To show folder size on Windows 11/10, download “Folder Size” from the following page and install it.
http://foldersize.sourceforge.net/
Once installed, open File Explorer or This PC and browse to any folder. You should then be able to see a separated window that display all the sizes of folder in the current directory.
If you close the folder size window, to bring it up again, you need to close the file explorer too and re-open it again.
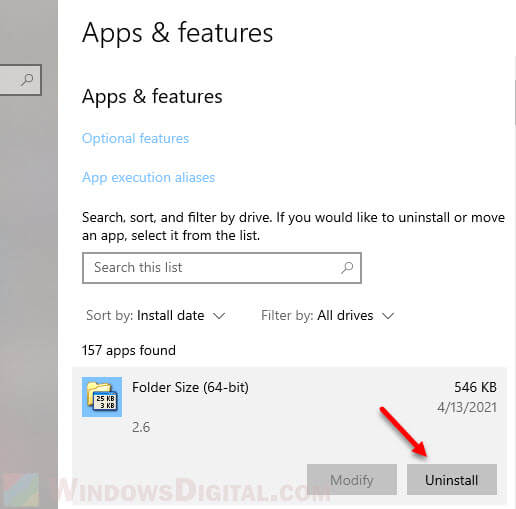
How to uninstall the app? Since it’s a program that requires installation, if you no longer need the program or it simply doesn’t suit your need, you can uninstall it from the “Add or remove programs” window, or Settings > Apps. Search for folder size from the list of apps, select it and click on Uninstall.
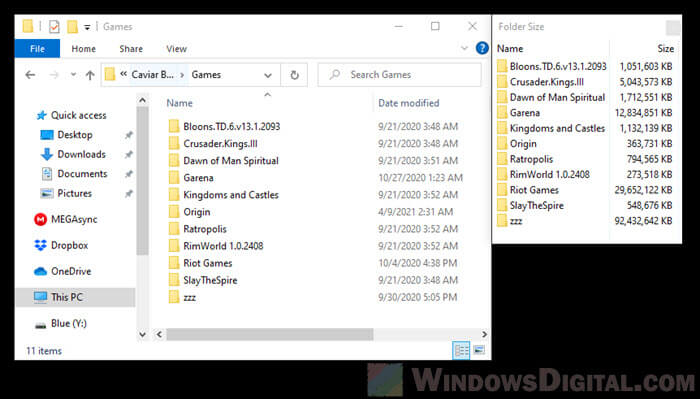
Display folder size using Folder Size explorer
The following app is also called “Folder Size”, but is an entirely different app than the one mentioned above. Both apps simply have the same name, but were made by two different developers.
This Folder Size app is a standalone file explorer that is able to display folder size in a column as you browse your PC using the app. Since the folder size can be a properties in a column, you can also sort folders by their sizes in the app, which is something that cannot be done using the default Windows File Explorer.
To learn more about the app and how to use it to show folder size and sort folders by their sizes, read: How to Sort Folders by Size in Windows 11/10.
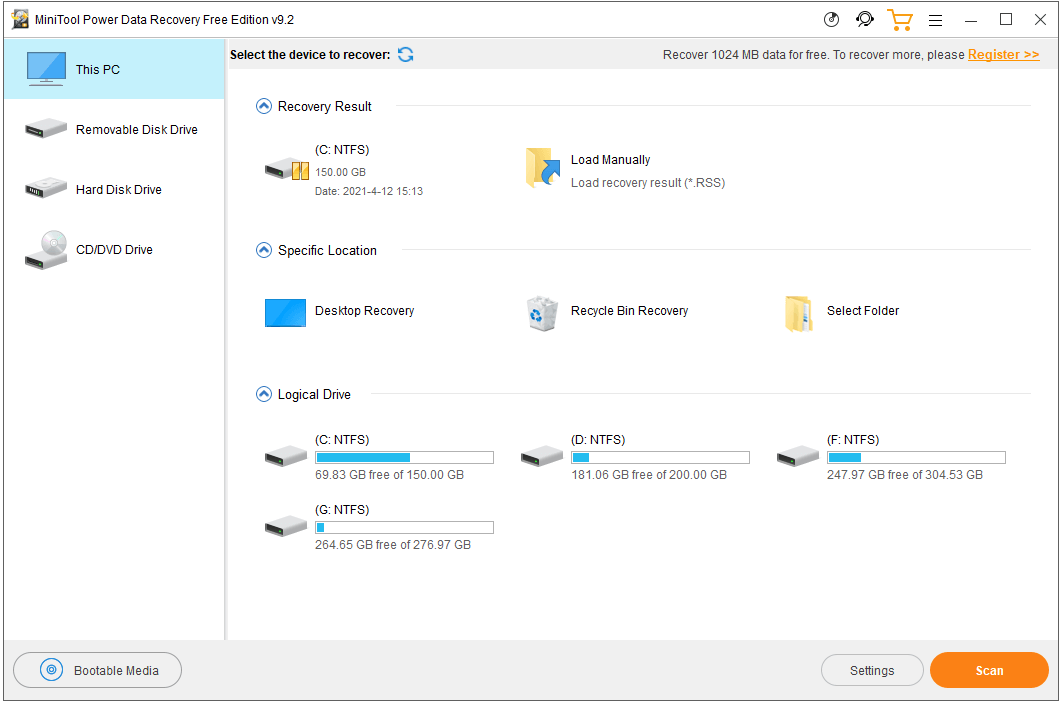
You can see a size column in Windows File Explorer and you can see the size of files, but the size of folders is not shown. How to show folder size in Windows 10 File Explorer? This post provides 4 ways with detailed guides. To recover deleted or lost files from Windows 10 computer or external devices, you can use the 100% clean and free MiniTool Power Data Recovery.
Why can’t I see size of folders in File Explorer? Is it possible to show folder size in Windows 10 File Explorer? You can use the 4 ways below to view folder size in Windows 10.
Also read: Learn the best tips and tricks for data recovery hard drive on Windows 11/10/8/7.
Way 1. View Folder Size in File Explorer
It is not possible to show the size of folders in File Explorer.
Windows doesn’t offer an option to also display folder size in File Explorer just as displaying the size of files. It might because it would take extra time to process, calculate and display the size of folders and it will slow down the system. A lot of background activity in the system may be needed.
However, you can adjust a setting to easily show the size of a folder when you hover your mouse on it. Check how to do it below.
- Open File Explorer and go to a directory that contains folders.
- Click View tab at the top toolbar.
- Click Options at the end to open Folder Options window.
- Click View tab in Folder Options.
- Under Advanced settings, make sure the “Display file size information in folder tips” option is ticked.
- Click OK to save the settings.
- Then hover your mouse to the target folder and you will see the folder size of that folder.
Way 2. See Folder Size from Folder Properties
Another easy way to check the size of folders on Windows 10 is to access the properties window. Check how to do it.
- Open File Explorer and find the target folder.
- Right-click the folder and click Properties to open its properties window.
- In the folder Properties window, under General tab, you should be able to see the folder size, location, number of subfolders and subfiles it contains, creation date, attributes, and more.
How to Check Multiple Folders’ Size in Windows 10
- Here, if you want to check the size of multiple folders, you can press Ctrl key and select all the folders.
- Then right-click and select Properties.
- In the pop-up folder properties window, you can see the total size of the selected folders.
Tip: MiniTool Power Data Recovery – 100% clean and safe data recovery software helps you easily recover any deleted or lost files from Windows computer, USB, memory card, external hard drive, etc.
MiniTool Power Data Recovery FreeClick to Download100%Clean & Safe
Way 3. Show Folder Size Windows 10 with CMD
You can also use a command in CMD to check the size of a folder in Windows 10. Check how to view folder size in Windows 10 with CMD.
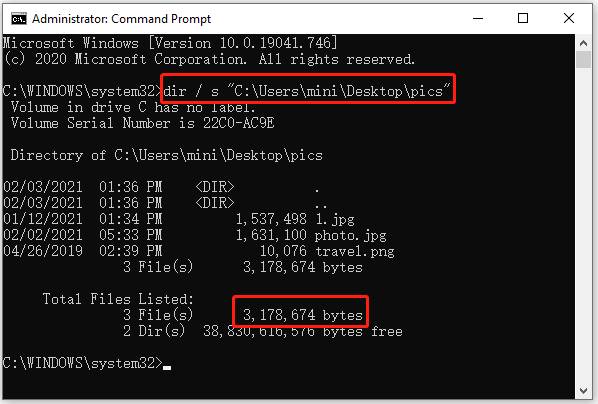
- Press Windows + R, type cmd, and press Enter to open Command Prompt in Windows 10.
- Next type dir /s “folder path” command, for example, dir /s “C:\Users\mini\Desktop\pics”, and press Enter. This will list the subfolders and files in the “pics” folder, and the total size of all the files and folders in the “pics” folder is displayed at the end. That is also the size of the “pics” folder.
Way 4. Utilize a Third-party Folder Size Software for Windows 10
Windows 10 folder size is not showing by default, but you can utilize some third-party software to show folder size in Windows 10. Below we sift some tools for you.
TreeSize
TreeSize is a free disk space analyzer for Windows. This program can determine and display drive and folder sizes. TreeSize scans your drives in seconds and displays the size of all folders including all subfolders (to the file level). This tool also lets you check the size of the folders on USB drive, external hard drive, etc.
- You can download and install TreeSize Free edition on your Windows computer. Run it.
- Click Select Directory button and choose a drive or folder to scan folders in it.
- After scanning, this program will show each folder and its size. You can expand each folder and check the size of subfolders under it. You can also sort the folders by size to find out what folders eat the most storage.
Folder Size Explorer
Folder Size Explorer is another free tool that can calculate and display folder sizes on Windows 10. It can show the file and folder size in KB, MB, GB, or TB in File Explorer. It lets you quickly see which directories use the most disk space.
Folder Size
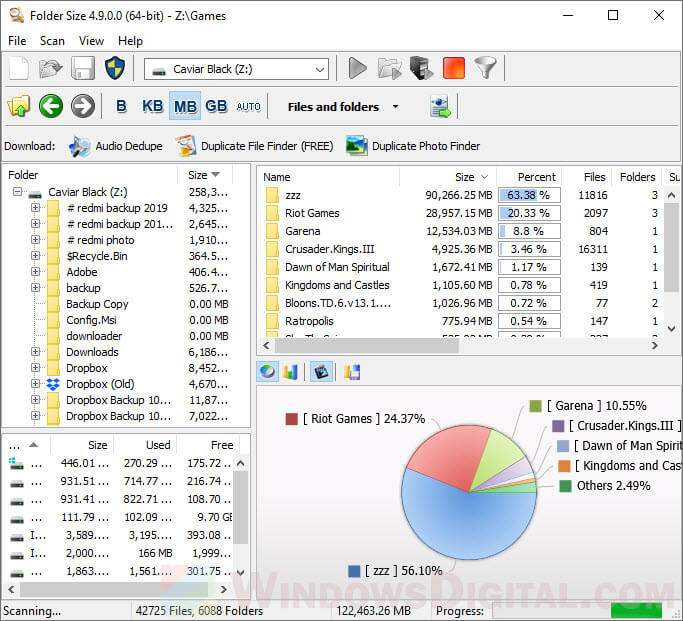
This software can also scan your hard drives and show folder sizes and file sizes to let you know the distribution of your hard drive space. It lets you scan the entire storage device or a chosen folder. You can choose to display the file and folder sizes in Bar Chart, Pie Chart, etc. Aside from showing folder size in Windows 10, it also displays some other detailed information for all the files and folders.
WinDirStat
WinDirStat is another free disk space analyzing and cleanup tool for Windows. It displays the tree view of Windows File Explorer but it also sorts and displays the files and folders by size.
How to Sort Folders by Size on Windows 10
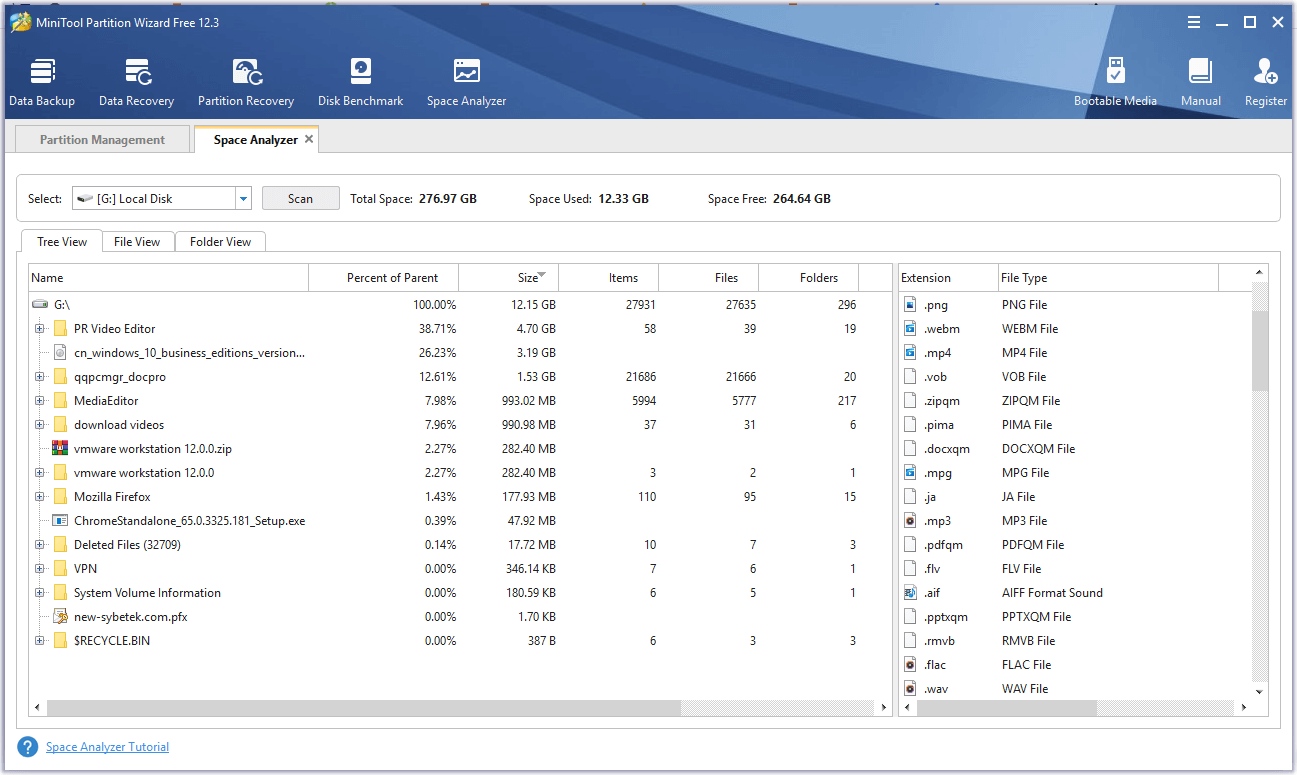
MiniTool Partition Wizard is one of the most popular free disk managers for Windows.
The Space Analyzer function of this program lets you see how the drives are being used and check which file/folder uses the most disk space on your computer. It can list all files and folders of the specific drive in Tree View, File View, or Folder View. You can choose to display the size of folders in a descending or ascending order. It also lets you directly delete unnecessary files/folders on your computer to free up disk space.
Download and install free MiniTool Partition Wizard on your Windows computer, and check below for how to use its Space Analyzer function to show folder size in Windows 10, analyze and manage files/folders on your computer.
MiniTool Partition Wizard FreeClick to Download100%Clean & Safe
- Launch MiniTool Partition Wizard.
- Click Space Analyzer module on the top.
- Select the drive and click Scan button to scan the drive.
- After scanning, you can see the total space, used space, and free space of the drive. And all files and folders in this drive are listed below. You can see a Size column showing the size of all folders and files. You can sort folders by size on Windows 10.
- You can right-click a particular folder or file and choose to open or delete it, copy its path, open its properties, etc.
Other useful functions of MiniTool Partition Wizard:
- Manage disk partitions. Create/resize/extend/delete/format/wipe partitions, etc.
- Convert disk between MBR and GPT. Convert partition between FAT and NTFS.
- Check and fix disk errors.
- Test hard drive speed.
- And more…
Click to Tweet
How to Recover Deleted/Lost Files and Folders on Windows 10
Sometimes you may mistakenly delete a file and empty the recycle bin. How to restore the deleted file? Still, you may lose some needed files due to various data loss situations like power outage, system crash, etc.
Don’t worry, you can easily recover the permanently deleted files or lost files from computer by using a professional data recovery program.
MiniTool Power Data Recovery, the professional data recovery software for Windows, allows you to easily recover deleted or lost files from Windows computer, USB flash drive, memory card, external hard drive, SSD, etc. in a few clicks.
Download and install MiniTool Power Data Recovery on your Windows computer, and check the simple steps below to recover deleted/lost files and folders.
MiniTool Power Data Recovery FreeClick to Download100%Clean & Safe
- Launch MiniTool Power Data Recovery.
- Select the drive or select the specific location/folder, and click Scan button to scan.
- Let the scan process automatically finish. After that, find needed files and click Save button to choose a new destination to store the recovered files.
To Sum Up
This post explains how to show folder size in Windows 10 and how to sort and manage folders on your Windows computer by size. Hope it helps.
If you have any questions about how to use MiniTool Partition Wizard, MiniTool Power Data Recovery, and other MiniTool Software products, please contact [email protected].
Show Folder Size Windows 10 FAQ
How can I see folder size in details?
Hover your mouse onto the target folder and you will see the folder size.
Why can’t I see size of folders?
Windows OS originally doesn’t show the size of folders in Windows 10. To show folder size in Windows 10, you can go to the properties window of the folder. You can also use a third-party folder size program to display the size of Windows folders.
How can I see the size of a folder in Windows?
You can try to hover your mouse on that folder to see its size. You can also right-click the folder and select Properties to view its size in properties window.
How do I view file sizes in Windows 10?
The file size is displayed in Windows File Explorer in Size column. If you want to view folder size, you can check the detailed solutions in this post.
First published on TECHNET on May 08, 2009
Good morning AskPerf. Today’s post is a very short one, but it does address one of our most common Shell / Windows UI questions. That question is, “Why can’t I see the size of folders in Windows Explorer?” The simple answer is that the behavior is by design. You can view the size of folders by hovering over the folders in Windows Explorer (as shown below):
The primary reason why the Windows UI does not provide this functionality is performance. Every time you navigate through a folder structure in Windows Explorer, the OS would have to perform a recursive scan of the subfolder structure within each folder to get the file and folder sizes and add them up. This would create significant processor overhead – especially if you think about scenarios (home folders for example), where the nested directory structure
for each user
may be several levels deep and consist of thousands of files and folders. Extend the scenario from the local machine and add in users who are browsing through a directory structure across the network and the performance hit would grow exponentially.
The hover behavior above is governed by the “Display file size information in folder tips” setting on the View tab in Folder Options:
There are instances where turning this option off may provide a performance increase (for example, complex, multi-level nested folder structures) on the local system. When viewing complex folder structures across the LAN/WAN, client machines may experience significant delays. One other setting to be aware of is the
NoRemoteRecursiveEvents
registry setting (HKLM\Software\Microsoft\Windows\CurrentVersion\Policies\Explorer). When this value is set to
1
, Change Notify requests are turned off for file and folder changes occurring in mapped network share subfolders. If a file or folder is change in the root and first folder level of the mapped share, a Change Notify event is still sent by the server. However if a change is made at the second level (or deeper) in the structure, no Change Notify is sent. This registry setting is set on the client machines.
Additional Resources:
-
Microsoft KB 831129: Folder tree flickers when you view a mapped network drive in Microsoft Windows Explorer
-
Microsoft KB 885189: Slow performance when you use a mapped drive to copy files to a remote server from a Windows Server 2003-based computer
— Prabhakar Shettigar