
217595
В этой статье мы рассмотрим несколько решений проблемы, когда после подключения ноутбука или компьютера к интернету по кабелю очень низкая скорость подключения. А в свойствах Ethernet подключения в Windows отображается скорость линии 100 Мбит/с вместо 1000 Мбит/с. Нет гигабитного подключения и скорость ограничивается 100 Мбит/с, при этом компьютер и роутер, или интернет-провайдер (если подключение напрямую) поддерживает скорость выше 100 Мбит/с.
Проблема именно в низкой скорости подключения к интернету с помощью сетевого кабеля (витой пары). При этом, очень часто, скорость по Wi-Fi, или же скорость по кабелю на другом устройстве намного выше. В комментариях к другим статьям на этом сайте было уже много вопросов по этой проблем. И исходя из этого опыта я хочу пояснить несколько важных моментов:
- Сетевая карта в вашем компьютере или в ноутбуке (это может быть внешний USB адаптер) должна быть гигабитной. Она должна поддерживать скорость до 1 Гбит/с или выше. Сейчас уже есть сетевые карты, которые поддерживают скорость до 2.5 Гбит/с или даже до 10 Гбит/с. Во всех новых ПК или ноутбуках, и даже не очень новых, сетевые карты гигабитные. Это можно посмотреть в характеристиках. Так же в диспетчере устройств. В названии сетевого адаптера скорее всего будет написано Gigabit Ethernet.
- Если у вас подключение через роутер, то для того, чтобы скорость была выше 100 Мбит/с, в роутере должны быть гигабитные порты (LAN и WAN). Они должны поддерживать скорость до 1000 Мбит/с или выше.
- Скорость по тарифу интернет-провайдера. У многих она до 100 Мбит/с. Вы должны быть уверены, что ваш провайдер предоставляет скорость выше 100 Мбит/с. Это может быть до 300 Мбит/с, до 500 Мбит/с и т. д. Зависит от вашего провайдера и тарифа. Можете проверить скорость по Wi-Fi. При этой проблеме скорость по Wi-Fi может быть выше, чем по сетевому кабелю.
- Сетевой кабель (витая пара), которым вы соединяете компьютер с роутером. Или кабель от интернет-провайдера. Чтобы скорость была выше 100 Мбит/с, он должен быть 8-жильным. Для получения скорости выше 100 Мбит/с должны использоваться все 4 пары. И они должны быть правильно обжаты. Должны быть задействованы все проводки. Очень часто проблема именно в неправильно или плохо обжатом кабеле. Или когда нет контакта на одном проводнике. Подробнее в статье как обжать витую пару в RJ-45.
Значит мы выяснили, что у вас должен быть ПК/ноутбук с гигабитной сетевой картой, роутер с гигабитными портами, провайдер должен предоставлять скорость выше 100 Мбит/с, а кабель должен быть 8-жильным и желательно заводским, а не самодельным. Обычно это кабель категории 5e. Если все так, а скорость Ethernet соединения на компьютере не выше 100 Мбит/с (при этом на других устройствах через это подключение скорость выше, в том числе по Wi-Fi), тогда пробуйте применить решения из статьи.
Почему скорость линии Ethernet в Windows 11, 10, 7 100 Мбит/с и как поднять до 1000 Мбит/с?
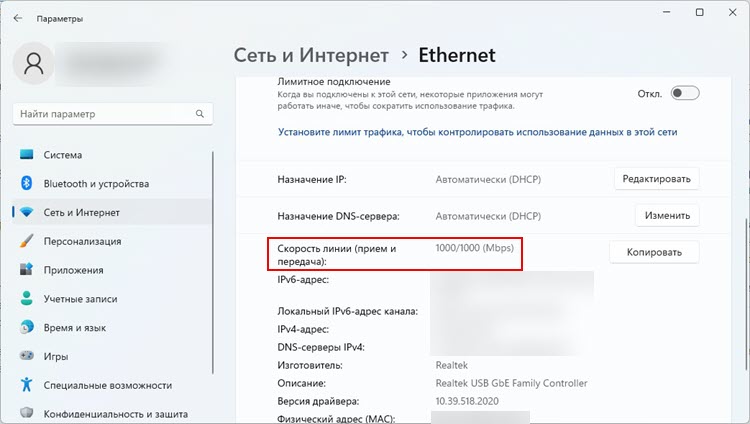
Хочу показать, как эта проблема выглядит в Windows 11, Windows 10 и Windows 7. Когда должно быть гигабитное соединение, а в свойствах «Скорость линии (прием/передача)» указана всего 100 Мбит/с вместо 1000 Мбит/с.

В моем случае Windows 11 не определяет это Ethernet соединение как гигабитное. Хотя сетевая карта и LAN-порты в роутере гигабитные. Если у вас в свойствах (состояние) Ethernet подключения указана скорость 1000 Мбит/с, но реальная скорость при проверке не выше 100 Мбит/с, то скорее всего скорость ограничивает ваш интернет-провадйер.
Наша задача сделать так, чтобы в Windows скорость проводного соединения была 1000 Мбит/с (1 Гбит/с). Это будет означать, что система использует все возможности гигабитного соединения, и скорость будет ограничиваться только интернет-провайдером (тарифом).
Несколько простых решений
- Перезагрузите маршрутизатор и компьютер.
- Отключите сетевой кабель от компьютера и роутера и подключите обратно. На роутере можете попробовать подключить в другой порт.
- Попробуйте подключить другое устройство. Другой компьютер, или ноутбук. Проверьте, работает ли на нем гигабитное Ethernet соединение. Так мы сможем выяснить в чем причина.
- Замените кабель. Выполните это соединение другим кабелем. Лучше всего использовать кабель, который поставлялся в комплекте с роутером. Можно заново обжать коннекторы на кабеле. Я видел случаи, когда скорость была максимум 100 Мбит/с из-за плохо изготовленного кабеля. Скорее всего не было контакта на одной из жил.
- Если вы подключаете внешний гигабитный сетевой адаптер по USB, то подключайте его в порт USB 3.0.
- Подключите интернет напрямую от провайдера к компьютеру. Без маршрутизатора.
Настройка «Скорость и дуплекс» в Windows 11, 10, 7
В свойствах сетевой карты в диспетчере устройств есть настройки «Скорость и дуплекс» («Spped & Duplex»). По умолчанию там обычно установлено Авто. Можно попробовать выставить конкретную скорость в свойствах этого пункта.
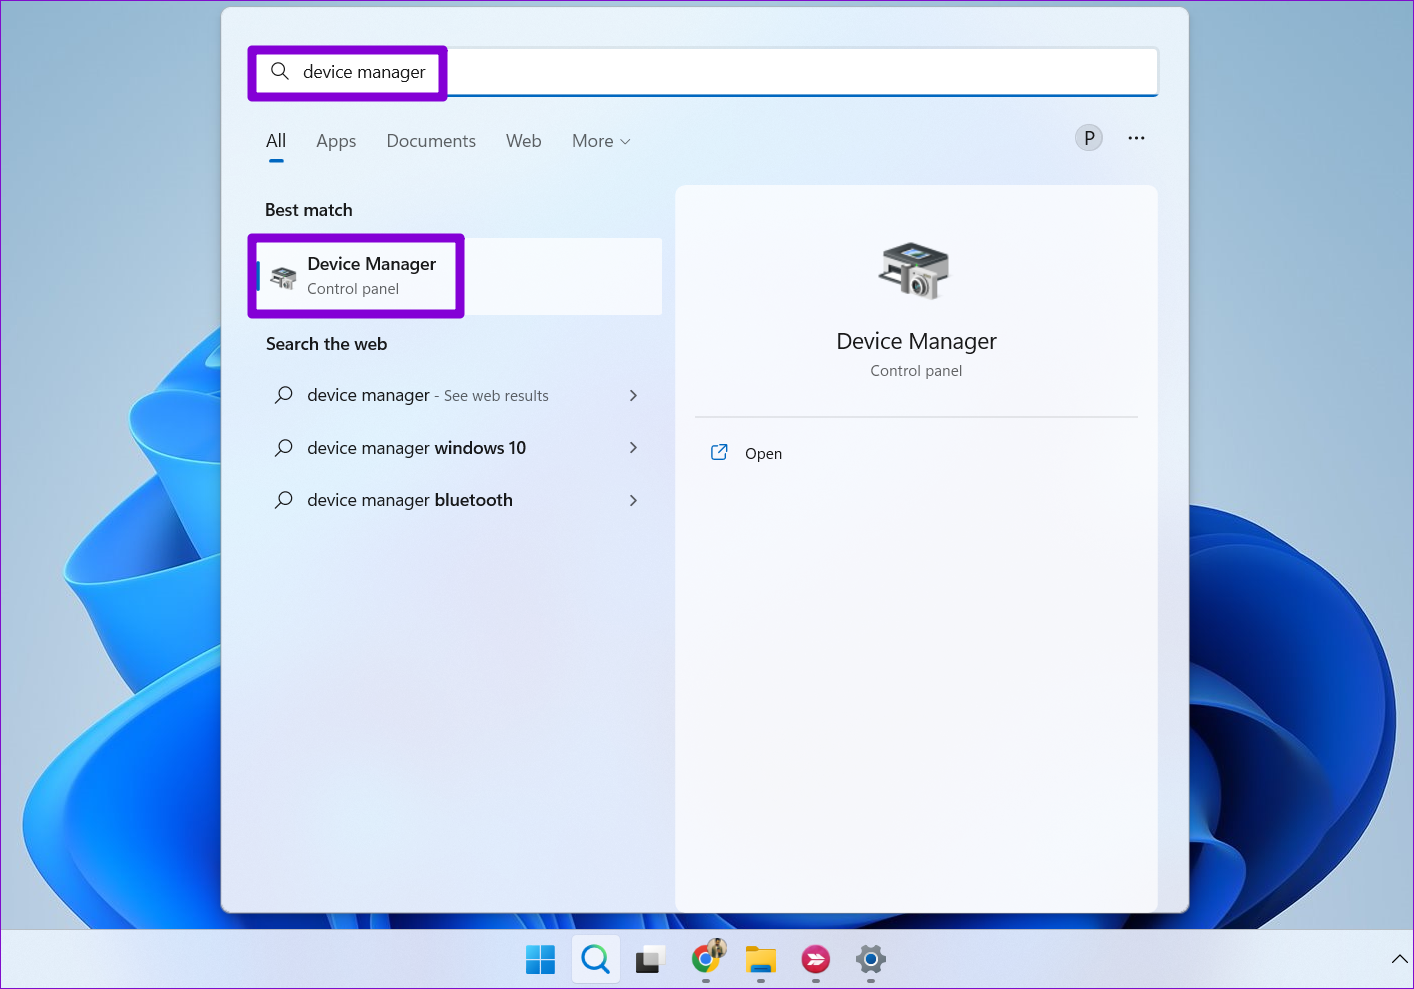
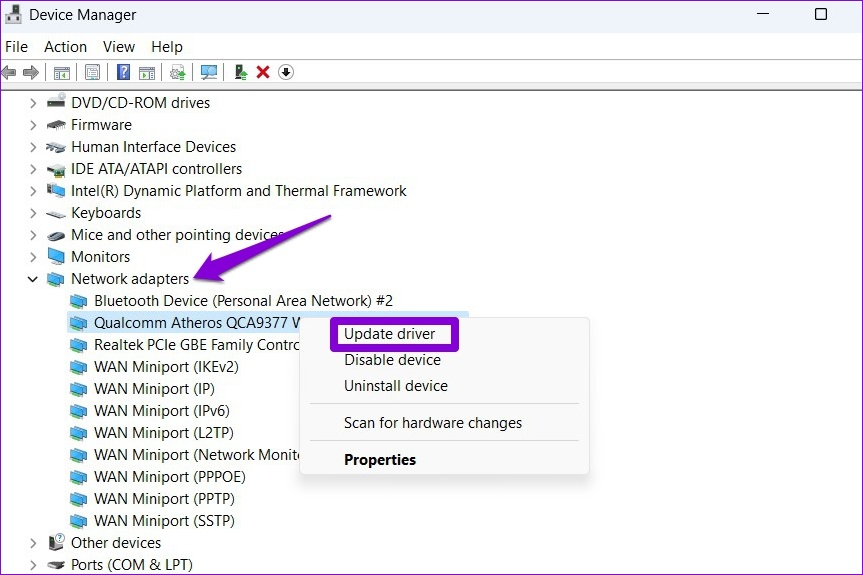
- Откройте диспетчер устройств. Можно нажать на кнопку меню Пуск правой кнопкой мыши и выбрать «Диспетчер устройств».
- Дальше откройте вкладку «Сетевые адаптеры». Нажмите правой кнопкой мыши на сетевой адаптер (в названии скорее всего будет Gigabit Ethernet, или GBE Family Controller) и откройте свойства.

- В новом окне нужно перейти на вкладку «Дополнительно», найти свойство «Скорость и дуплекс» («Spped & Duplex») и установить для него значение «1.0 Gbps Full Duplex». Если там уже было установлено какое-то значите, то попробуйте поставить «Auto Negotiation».

После изменения настроек нажмите Ok, перезагрузите компьютер и проверьте подключение. Можете поэкспериментировать с разными значениями.


Скорость линии (прием/передача) в свойствах должна быть 1000/1000 Mbps.
Если вы установили в свойствах конкретную скорость (например, 1.0 Gbps Full Duplex), но это никак не повлияло на реальную скорость и показатели в настройках Windows, тогда лучше установить автоматическую настройку «Auto Negotiation» и искать другую причину низкой скорости Ethernet подключения.
Обновление драйвера сетевой карты
Обязательно нужно обновить драйвер Ethernet адаптера. Если обновление драйвера не дало результата, тогда можно попробовать сделать откат драйвера, или замену из списка установленных.
Обновлять нужно не через диспетчер устройств (когда мы нажимаем на адаптер и выбираем «Обновить драйвер»), а скачать драйвер с сайта производителя адаптера, ноутбука, материнской платы и установить его. Так как при обновлении через диспетчер устройств Windows практически всегда сообщает о том, что самый подходящий драйвер уже установлен.
У меня есть две инструкции, которые вам в этом помогут:
- Realtek PCIe GBE Family Controller: что это, как скачать драйвер, как установить и настроить, почему не работает?
- Какой драйвер нужен для сетевой карты (Ethernet-контроллера)? Загрузка и установка
Откат или замену драйвера сетевой карты можно сделать в диспетчере устройств, в свойствах адаптера на вкладке «Драйвер».
Отключение режима «Power Saving Mode»
Решение от Вячеслава, которым он поделился в комментариях. Необходимо в свойствах сетевой карты в диспетчере устройств открыть кладку «Дополнительно», найти свойство «Power Saving Mode» и установить значение «Выкл».
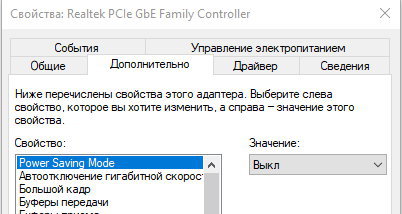
Примените настройки и нажмите Ok.
Дополнительная информация
На некоторых роутерах так же есть настройки скорости и дуплекса для LAN-портов. Правда, я видел их только на некоторых моделях от TP-Link. LAN-порты на роутерах работают в режиме автосогласования. Автоматически устанавливается максимальная скорость в зависимости от возможностей кабеля и сетевого адаптера.
По своему опыту могу сказать, что очень часто причина низкой скорости при проводном подключении к роутеру именно в кабеле. Просто плохой контакт на проводниках. Поэтому, я рекомендую первым делом исключать эту причину.
Quick Tips
- Using a VPN connection can often result in slower internet speeds, so it’s best to turn it off.
- Ensure the metered connection option is turned off for your network and terminate any data-consuming processes on your PC.
- If the issue persists, consider changing the default DNS server or resetting the network settings.
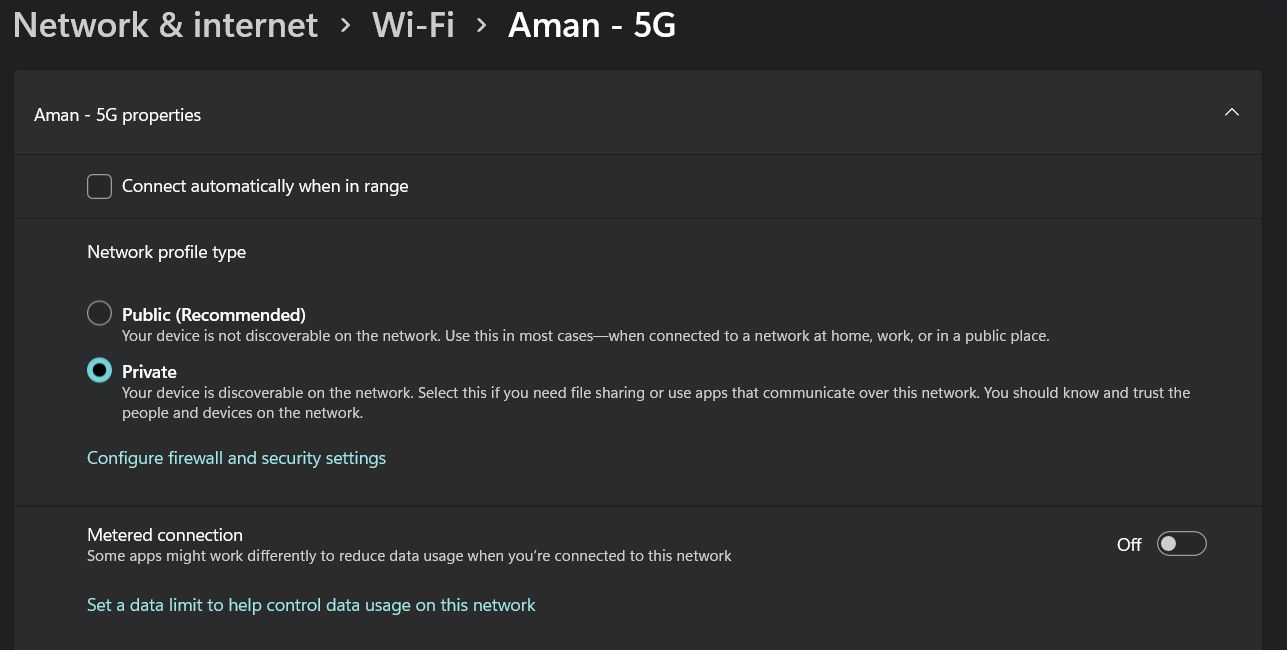
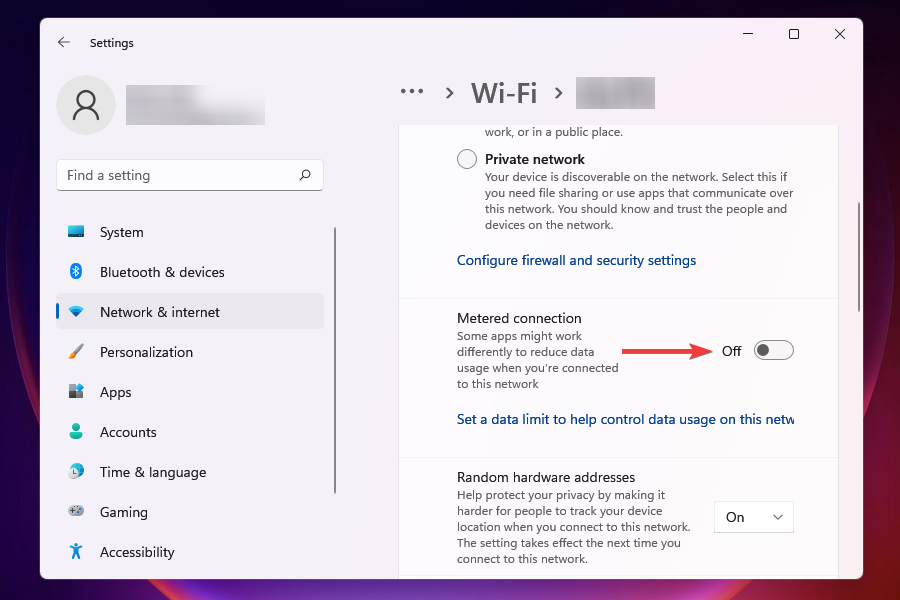
Fix 1: Turn Off the Metered Connection
Setting your internet connection as metered on Windows can prevent apps from using the internet proficiently, leading to slow internet speeds. Hence, the first thing you should do is disable the metered connection option for your network.
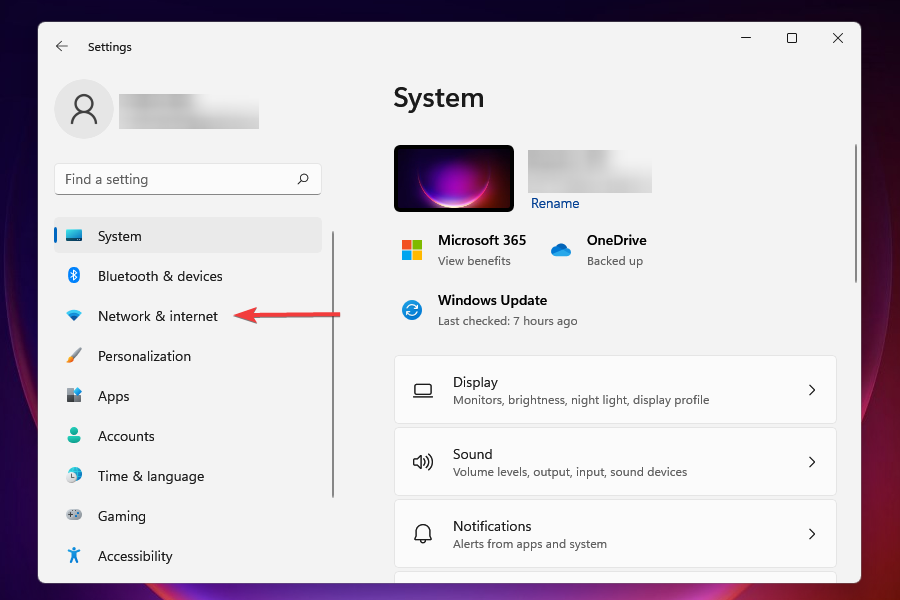
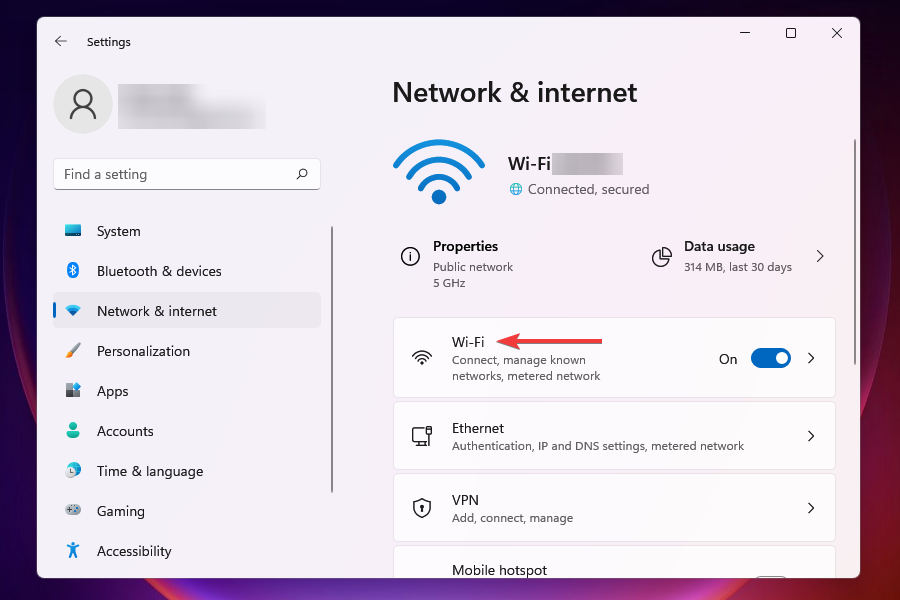
Step 1: Press the Windows key + I to open the Settings app and navigate to Network & internet > Wi-Fi.

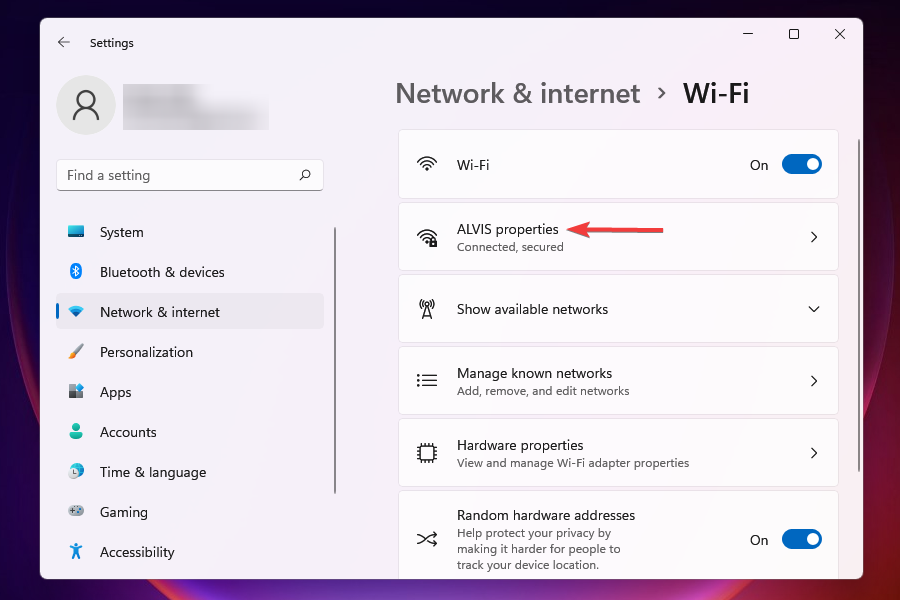
Step 2: Click on your Wi-Fi network to open its properties.

Step 3: Turn off the Metered connection option.

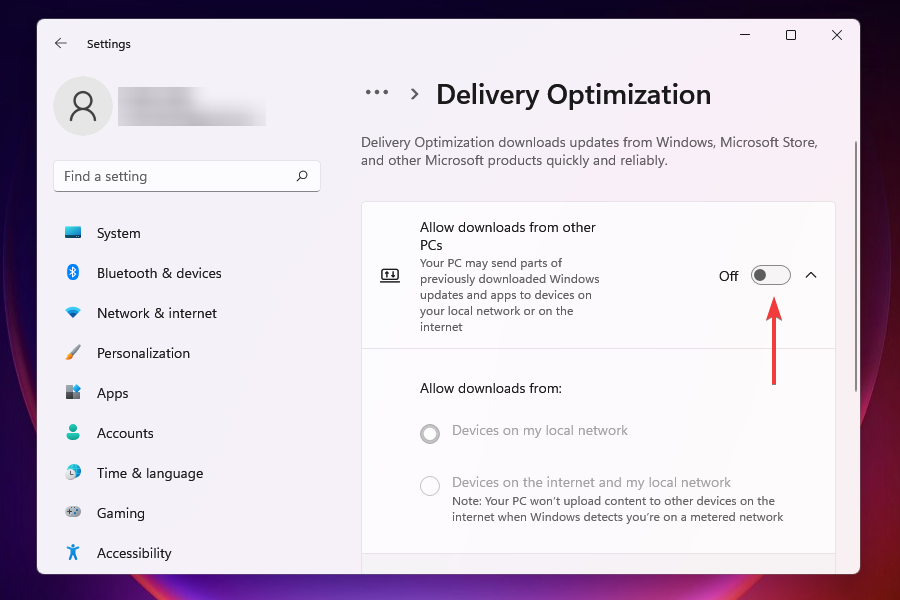
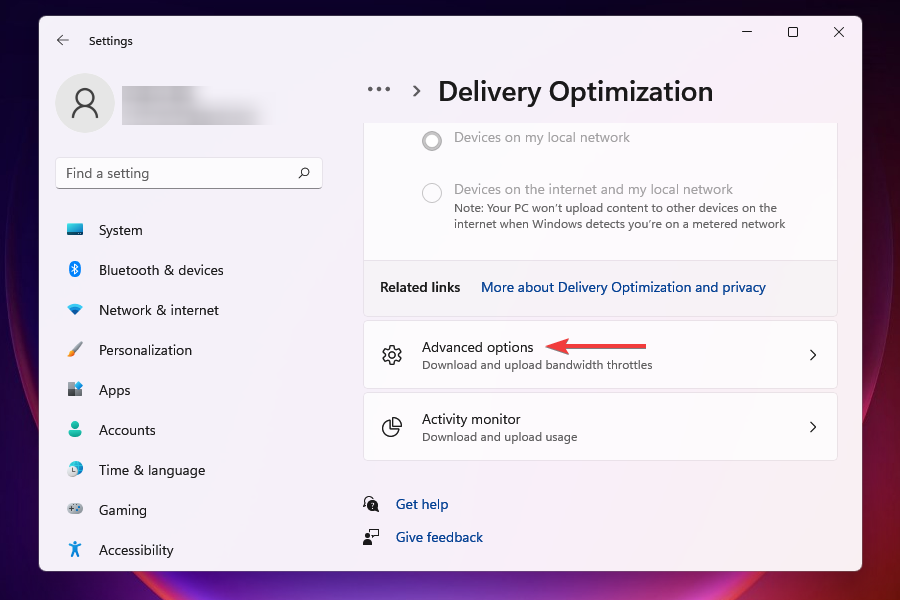
Fix 2: Turn Off Delivery Optimization
Delivery Optimization is a nifty feature that allows your PC to share parts of previously downloaded Windows updates and apps with other computers on your local network. However, this feature can sometimes consume too much bandwidth and slow down the internet speed on your Windows 11 PC. Hence, it’s best to turn it off.
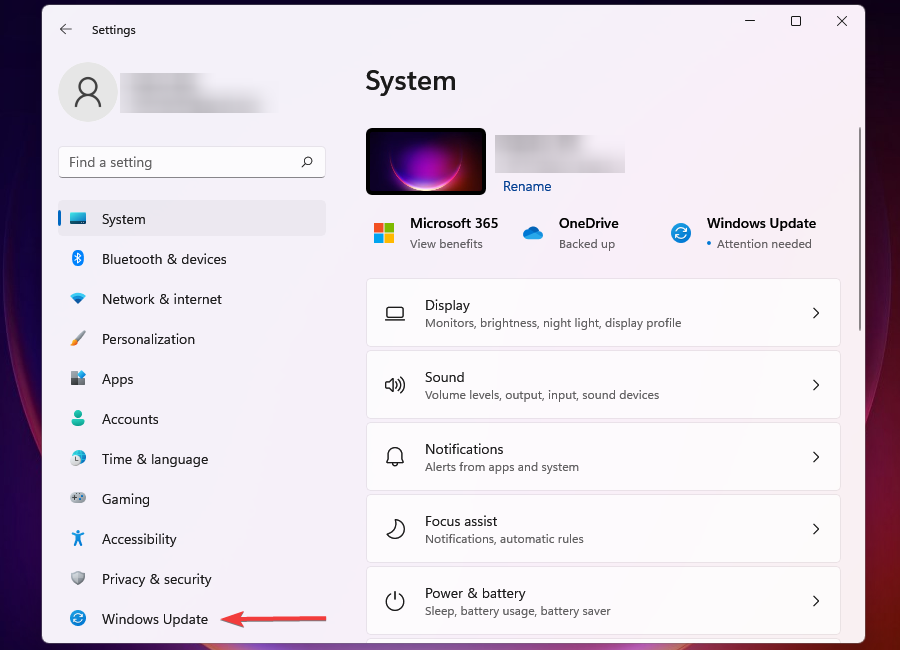
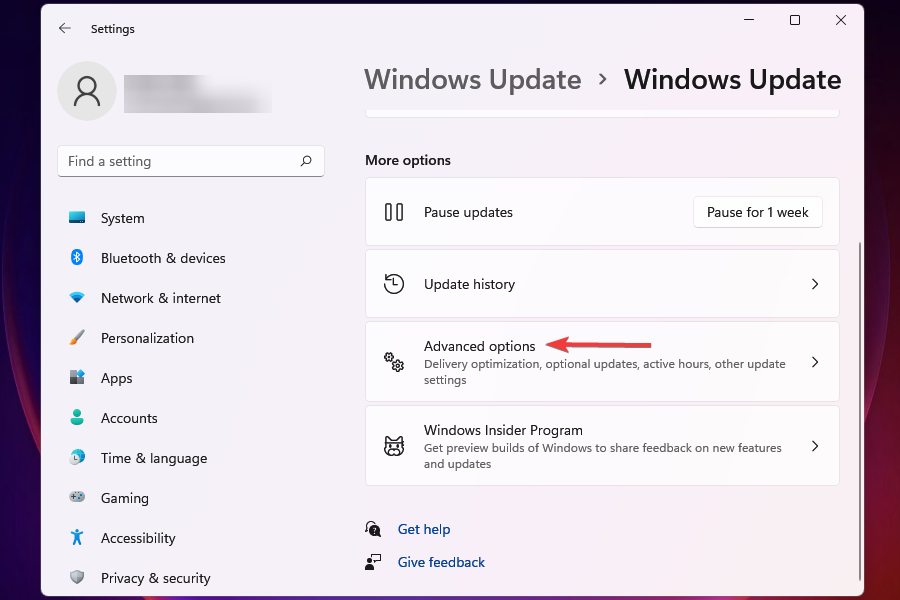
Step 1: Press the Windows key + I to open the Settings app. Switch to the Windows Update tab and click on Advanced options.

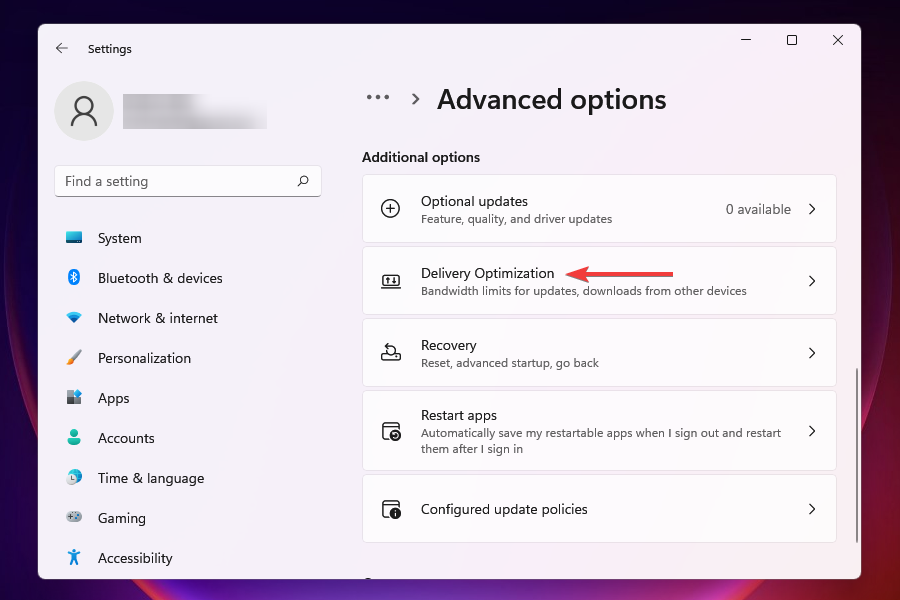
Step 2: Under Additional options, click on Delivery Optimization.

Step 3: Turn off the toggle next to Allow downloads from other PCs.

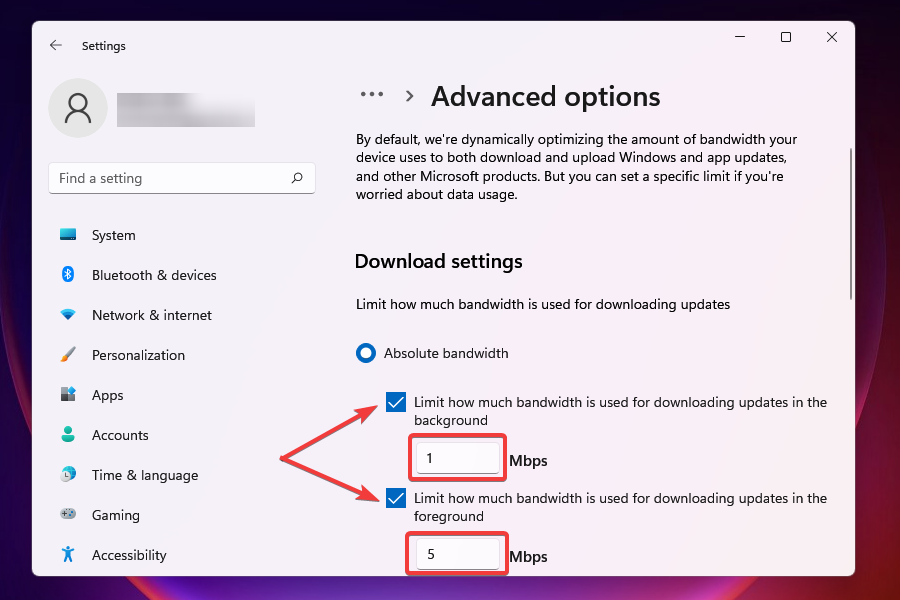
Fix 3: Limit Bandwidth for System Updates
Windows 11 allows you to set a specific amount of bandwidth for system updates. If the allocated bandwidth is too high, you may experience slow internet speeds while browsing or streaming. Here’s how to change it.
Step 1: Press the Windows key + I to open Settings and go to Windows Update > Advanced options > Delivery optimization.
Step 2: Select Advanced options.

Step 3: Under Download settings, select the Absolute bandwidth option and tick both checkboxes. Then, specify how much bandwidth you want to allocate in the relevant fields.

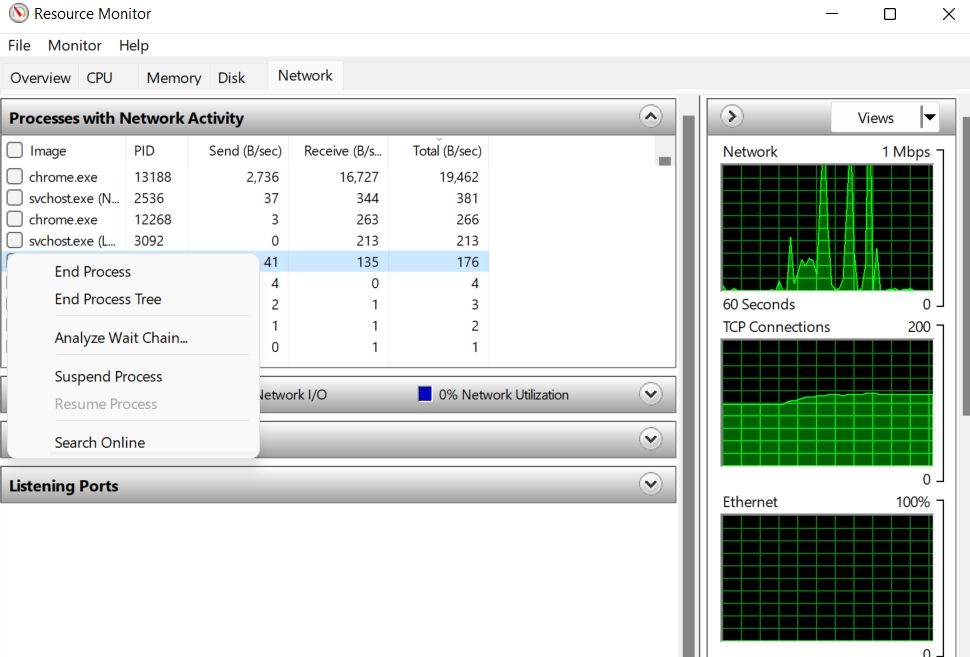
Fix 4: Terminate Any Data Consuming Processes
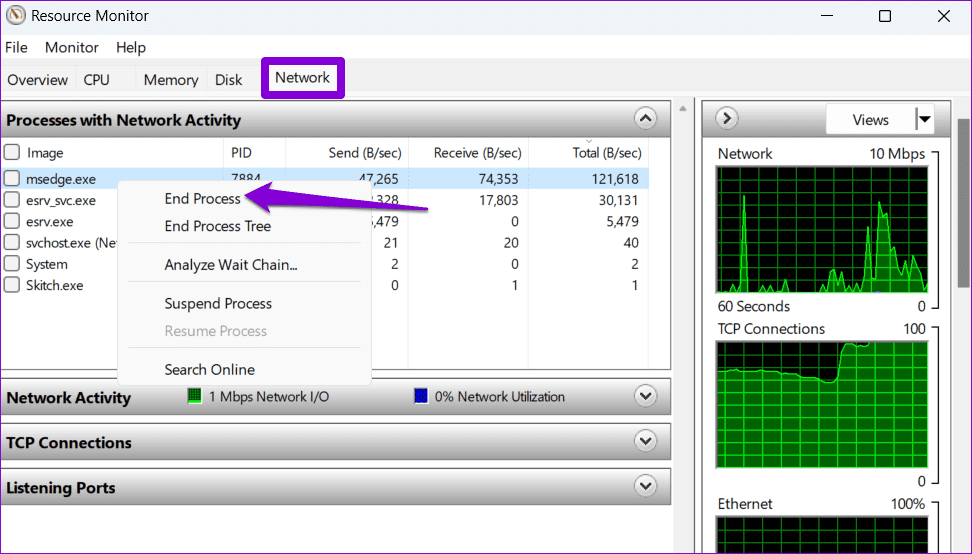
At times, background processes running on your PC could end up consuming a lot of bandwidth. In that case, you can use the Resource Monitor app to identify and terminate such processes to fix the slow internet issue in Windows 11.
Step 1: Press the Windows key + S to open the search menu. Type resource monitor in the box and press Enter.

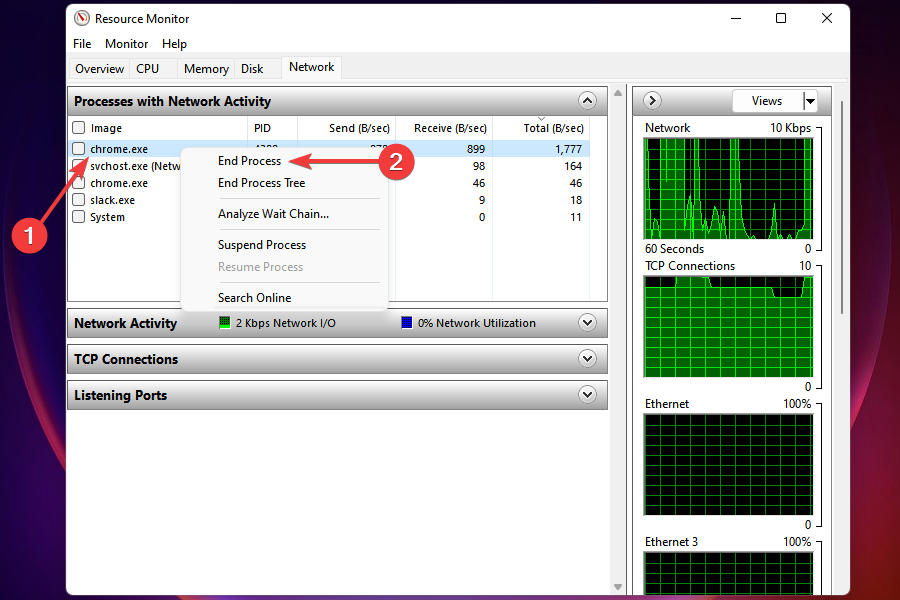
Step 2: Under the Network tab, identify the process using a large amount of data. Right-click on it and select End process from the list.
Fix 5: Disable Background Apps
Another thing you can do to fix this particular issue is to prevent unwanted apps from running in the background. Here’s how you can go about it.
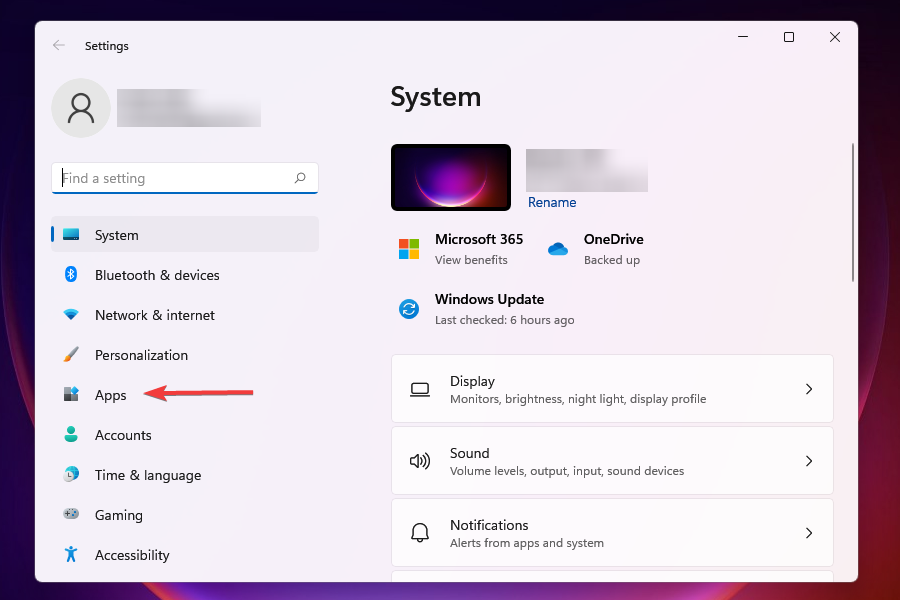
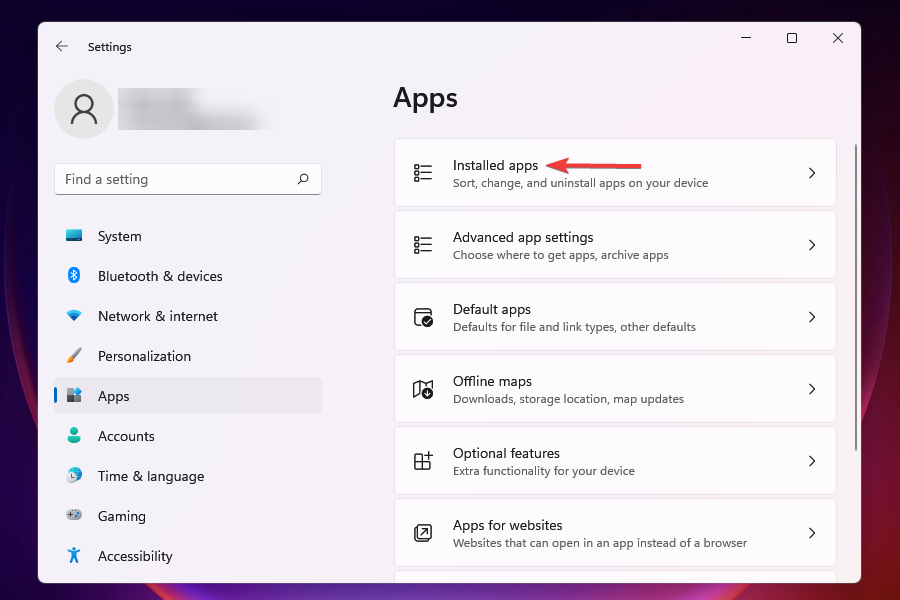
Step 1: Press the Windows key + I to open the Settings app. Switch to the Apps tab and click on Installed apps.
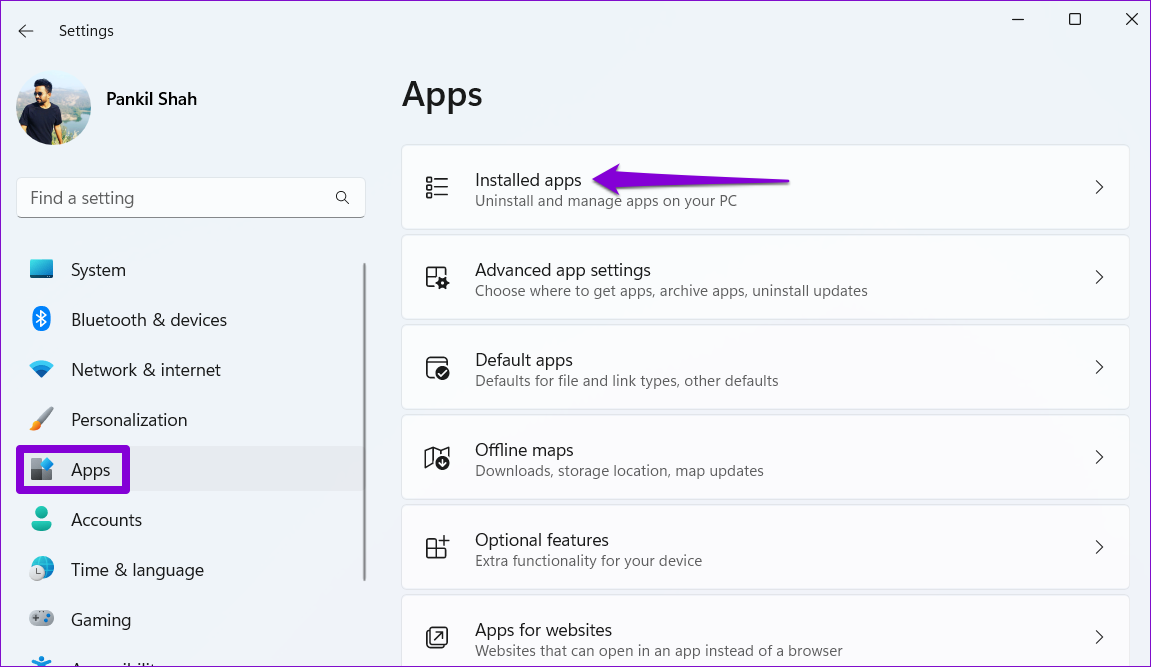
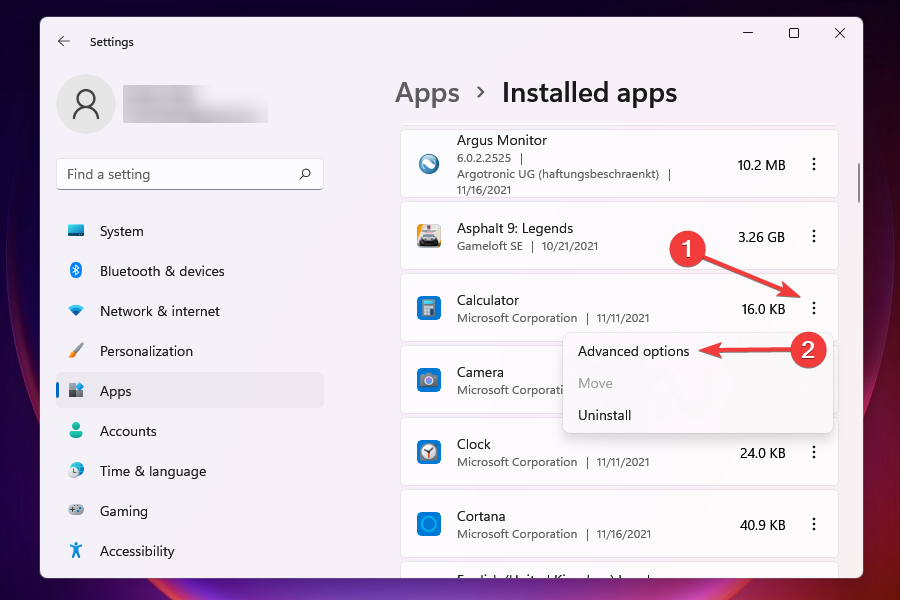
Step 2: Scroll down to locate the app you wish to prevent from running in the background. Click the three-dot icon next to it and select Advanced options.

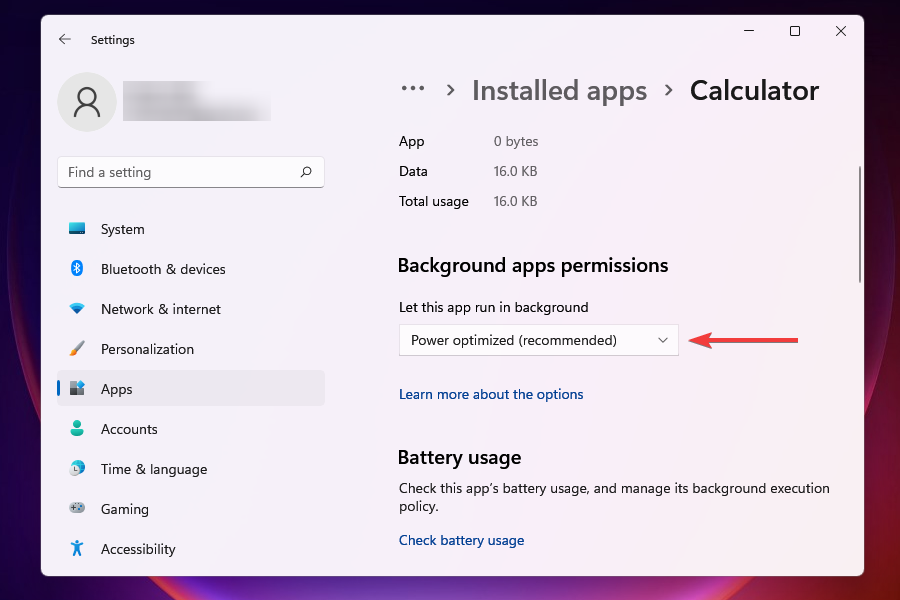
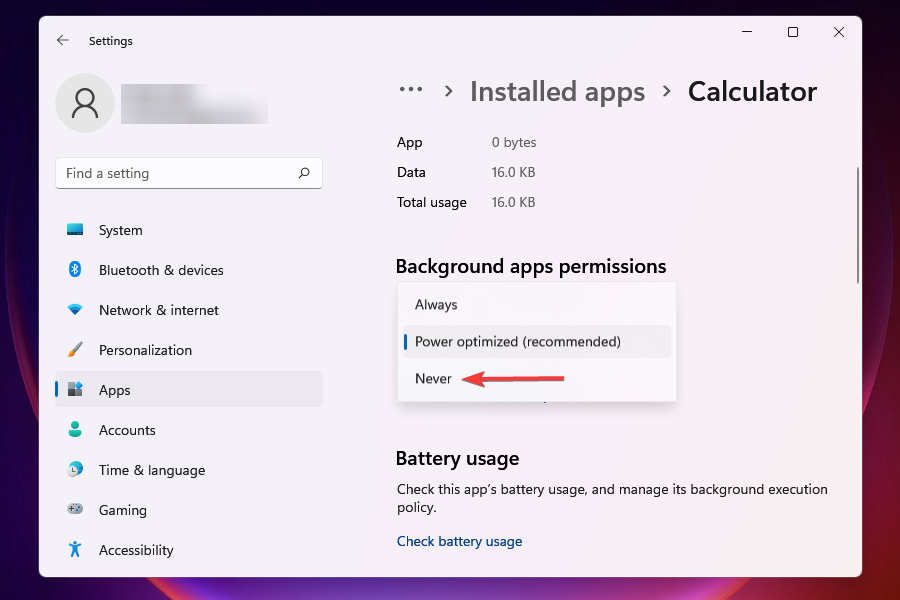
Step 3: Under Background apps permissions, use the drop-down menu to select Never.

Fix 6: Update the Network Adapter Driver
Outdated network adapter drivers can also affect the internet speed of your Windows PC. To fix this, you can update the network adapter driver using Device Manager.
Step 1: Press the Windows key + S to open the search menu, type in device manager, and press Enter.
Step 2: Expand Network adapters, right-click on the network driver, and select Update driver.
Now follow the on-screen instructions to update the driver and see if that solves the issue.
Fix 7: Change the DNS Server
Problems with your default DNS server can also cause slow internet speeds or connection issues on Windows 11. You can try switching to a different DNS server to see if that fixes the problem.
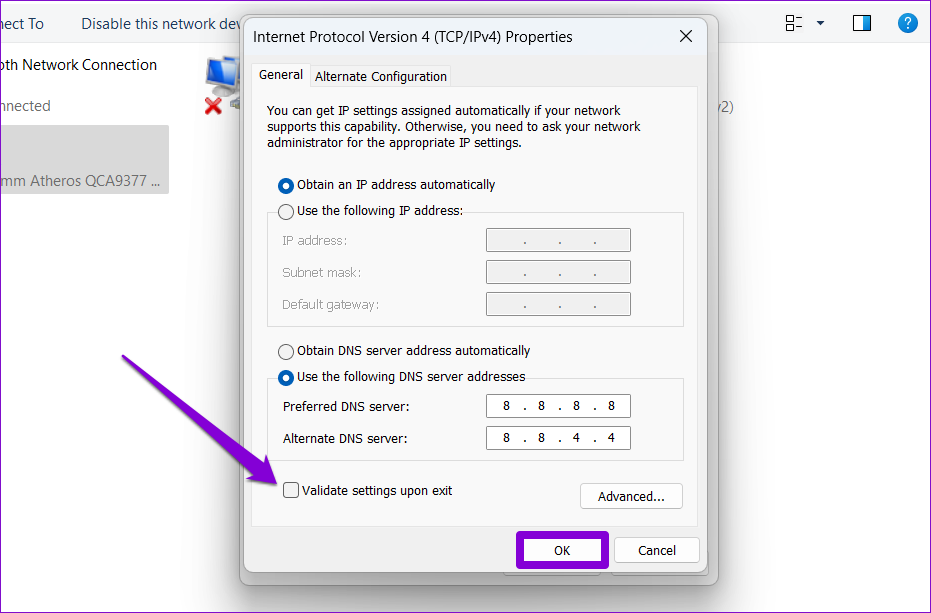
Step 1: Press the Windows key + R to launch the Run dialog, type in ncpa.cpl, and press Enter.
Step 2: In the Network Connections window, right-click on your internet connection and select Properties.

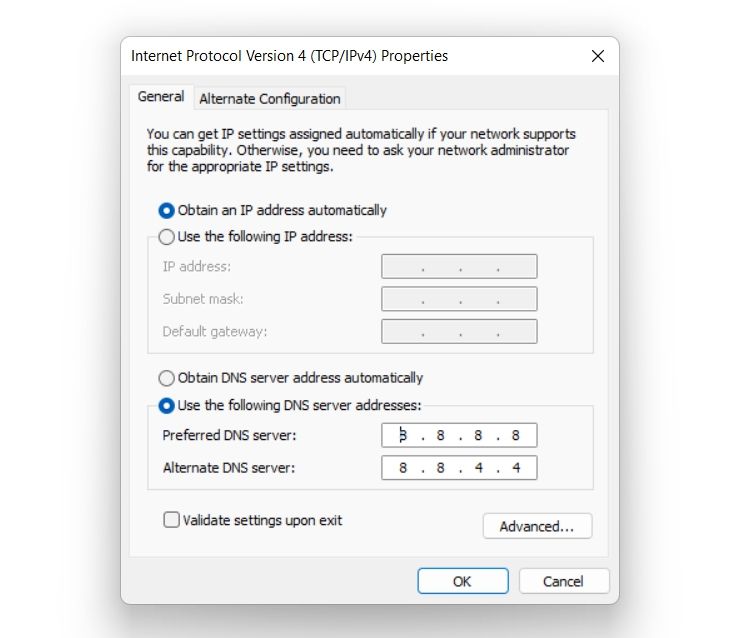
Step 3: Double-click on Internet Protocol Version 4 (TCP/IPV4).
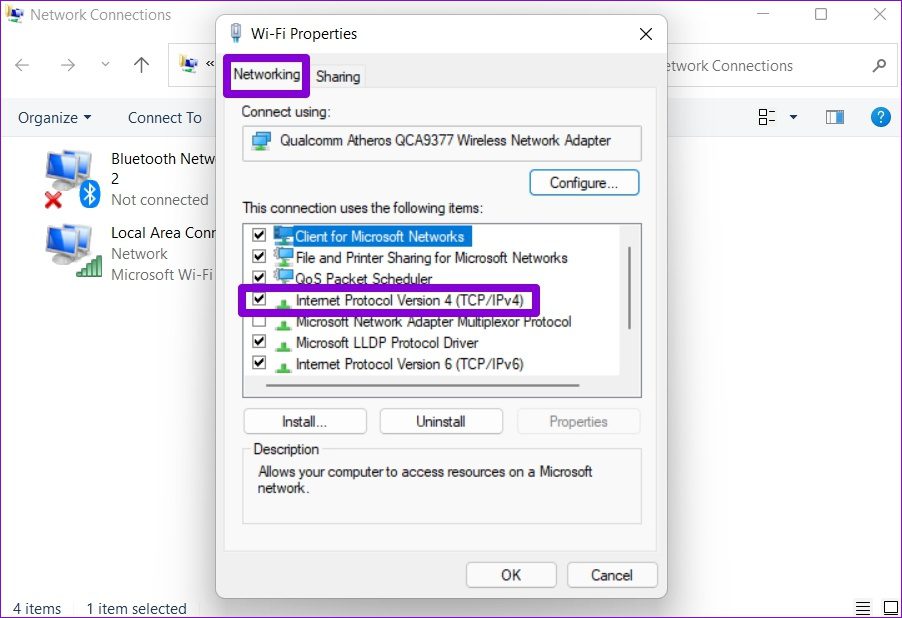
Step 4: Under the General tab, select Use the following DNS server addresses. In the Preferred DNS Server and Alternate DNS Server fields, enter 8.8.8.8 and 8.8.4.4, respectively.
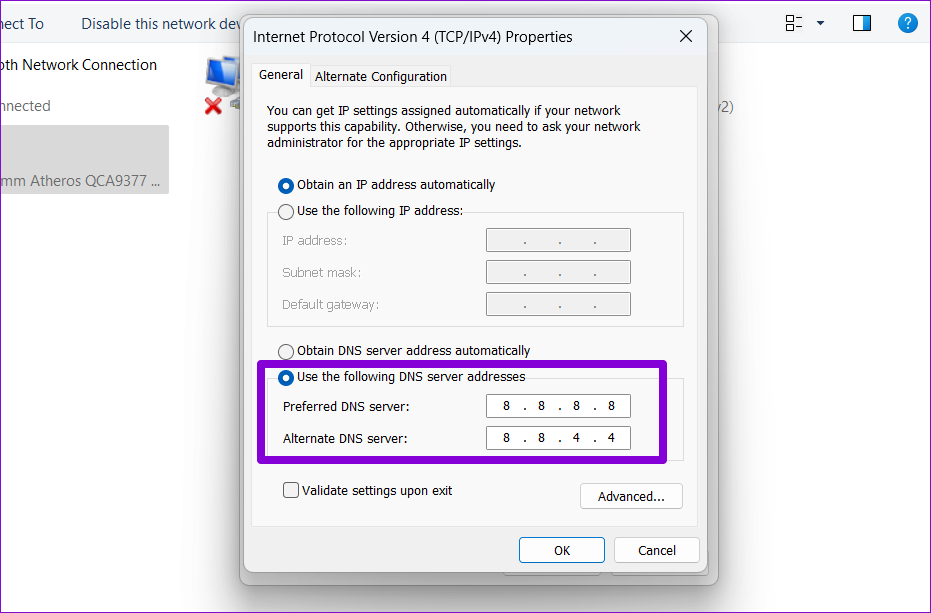
Step 5: Tick the Validate settings upon exit checkbox and click OK.
Fix 8: Reset Network Settings
If none of the above tips help, resetting your network settings on Windows may be your only option. Keep in mind that this will erase all of your saved Wi-Fi networks, paired Bluetooth devices, and other network settings.
Step 1: Press the Windows key + I to open the Settings app. Select the Network & internet tab on your left and click on Advanced network settings.

Step 2: Under More settings, click on Network reset.

Step 3: Click the Reset now button next to Network reset.
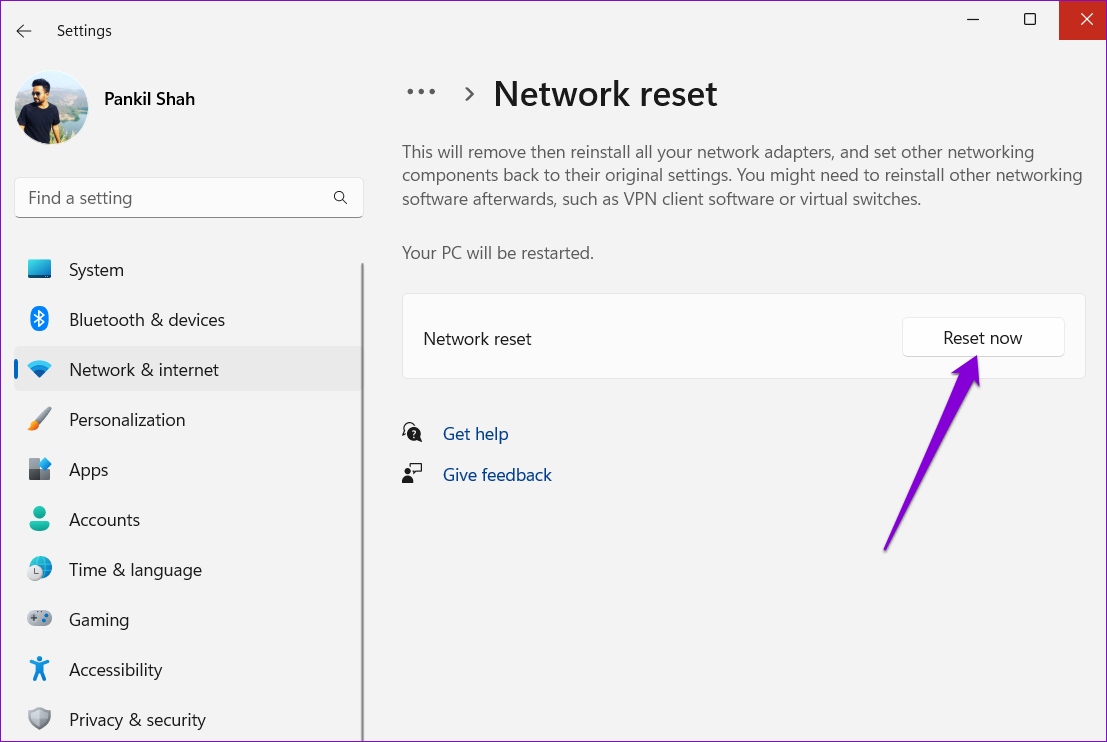
Restart your PC after resetting the network settings and see if the internet speed has improved.
Was this helpful?
Thanks for your feedback!
The article above may contain affiliate links which help support Guiding Tech. The content remains unbiased and authentic and will never affect our editorial integrity.
Sign in to your MUO account

Since the internet is the fastest way to connect with people, having the fastest possible connectivity is more important than ever. A fast internet ensures that you enjoy lag-free streaming and instant downloads.
As such, here are different changes you can make to increase your internet speed in Windows 11.
What Causes a Slow Internet Connection?
There can be multiple reasons why you’re experiencing low connectivity on Windows 11. But among all, some of the common culprits are listed below.
- One of the significant reasons behind slow connectivity is the bad router position.
- A slow internet connection can result from misconfigured bandwidth.
- Unnecessary tabs and applications open in the background can also cause the problem.
- VPNs are often the primary culprit behind a slow internet connection.
It’s pretty easy to boost the internet speed on Windows 11. Let’s check out how to do it.
1. Update to the Latest Windows Update
Before performing any of the below changes, ensure that you are using an updated system. Each Windows update comes with performance improvements and can affect the internet connectivity.
Here’s how to download the latest Windows 11 update.
- Open Settings using Win + I.
- Choose Windows Update from the left pane.
- Click on Check for updates.
- Windows will look for and download any available update.
After updating the system, check if there’s any improvement in the internet speed.
2. Change Router Position
A poor router position is another culprit for a slow internet connection. The range of the Wi-Fi signal depends on the specs and design of the router. But the further the signal has to travel, the weaker it will get. Additionally, the signal strength can get affected by physical objects like walls and floors.
So, make sure the system is near the router and no major physical obstruction exists between the source and the receiver.
3. Close Unnecessary Background Running Applications
A slow internet speed often results from unnecessary background running applications. As it turns out, these applications constantly keep consuming bandwidth, leaving the main application with limited resources. You will have to close all such applications to fix the problem.
Here’s how to do it.
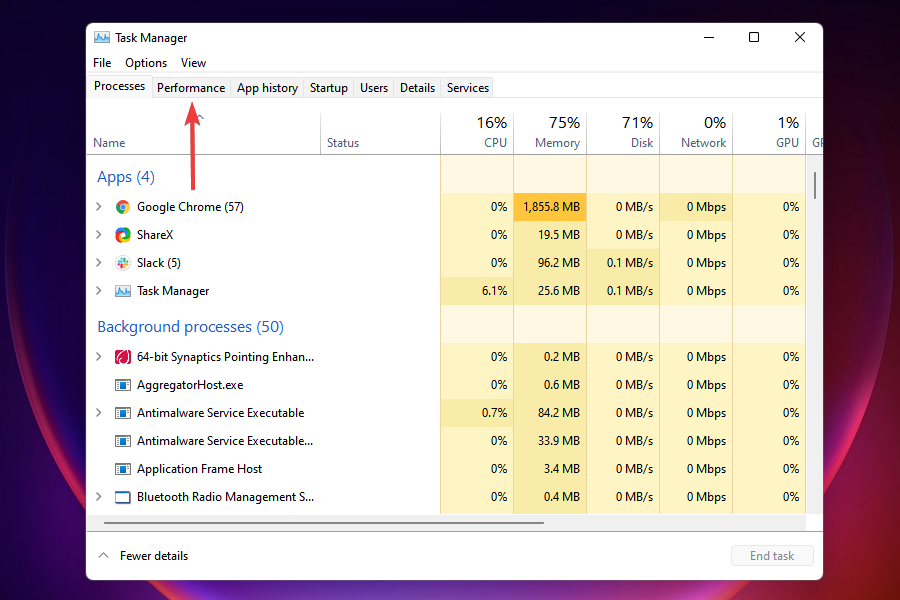
- Open the Task Manager using Ctrl + Shift + Esc.
- Switch to the Performance tab.
- Click on Open Resource Monitor.
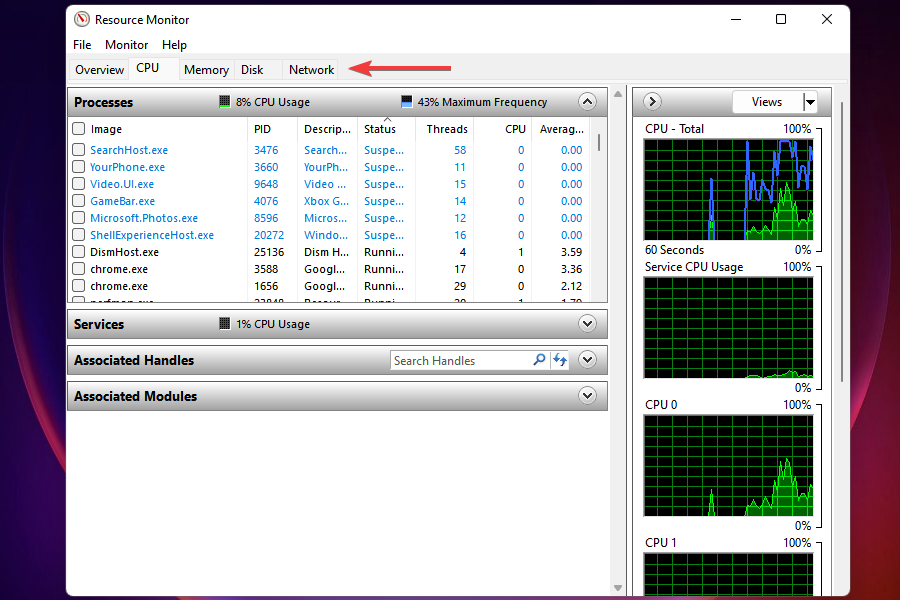
- In the Resource Monitor window, switch to the Network tab.
- Look for the services that are consuming the maximum bandwidth/second.
-
Right-click on the services and choose End Process.

Check if there’s an improvement in the internet speed or not.
4. Disable the Metered Connection
Windows 11 comes with a metered connection functionality. It helps to save the internet data. But on the negative side, it can be a primary reason behind a slow internet connection. You will have to disable metered connection on Windows 11 to increase the speed.
Here’s how to do it.
- Open Settings on your system.
- Choose Network & Internet from the left panel.
- Click on Wi-Fi.
- Click on your Wi-Fi connection.
-
Disable the toggle next to the Metered connection.

Restart the system and check if there’s any improvement in the internet speed.
5. Change the DNS server
By default, the DNS Server is set to automatic, which can be the reason behind the slow internet connectivity. You will have to connect to an open-source DNS server to enjoy fast internet speed.
Here are the steps to change the DNS server on Windows 11.
- Open the Run dialogue box using Win + R hotkeys.
- Type Control Panel and click on OK.
- Choose Network and Internet.
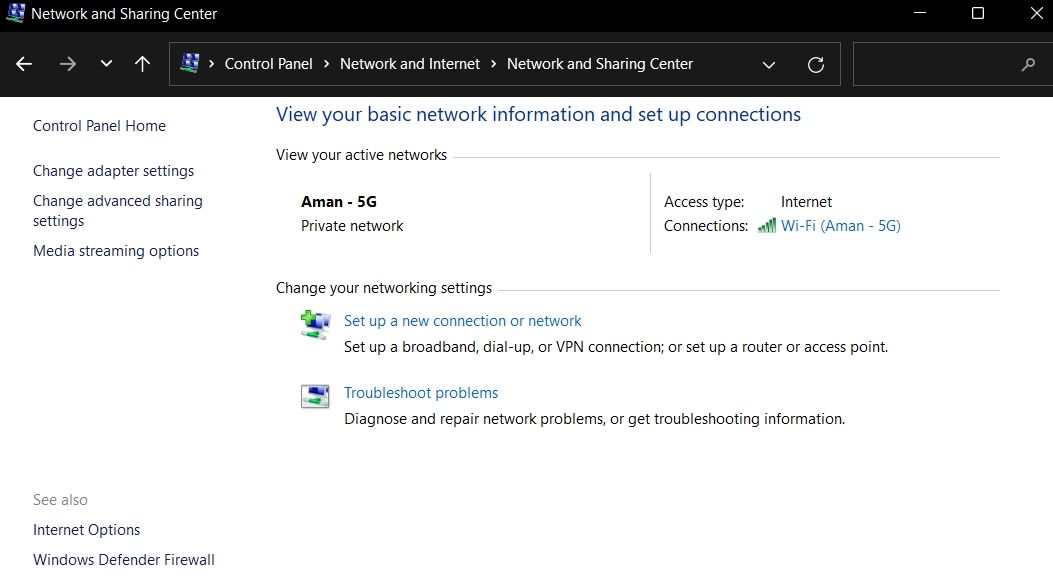
- Click on Network and Sharing Center.
-
Click on Change adapter settings from the left pane.

- Right-click on the connected network and choose Properties.
- Double-click on Internet Protocol Version 4 (TCP/IPv4).
- Click on Use the following IP address bulletin.
-
Enter 8.8.8.8 in the Preferred DNS server and 8.8.4.4 in the Alternative DNS server.

- Click on OK to save the changes.
Reboot the system, and check the internet speed using an internet speed checking website.
6. Change the Limit Reservable Bandwidth
On Windows, 20% of the internet bandwidth is reserved for Windows-related services, whereas the rest, 80%, is used for general tasks. But you can change the bandwidth to increase internet speed.
Here’s how to do it.
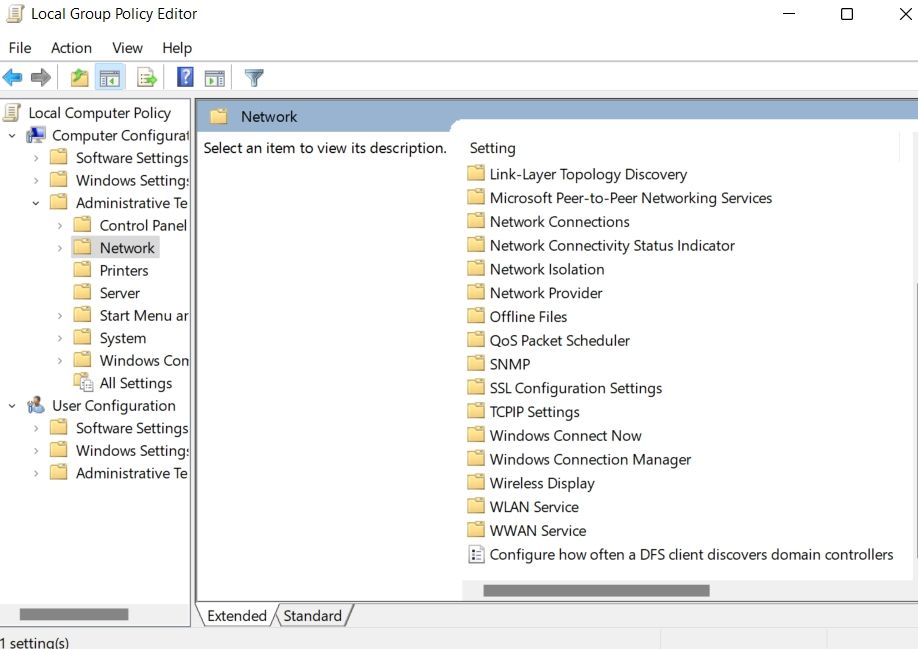
- Open the Run dialogue box.
- Type gpedit.msc and click on OK.
- Choose Administrative Templates under Local Computer Policy.
- Open the Network folder.
-
Double-click on QoS Packet Scheduler.

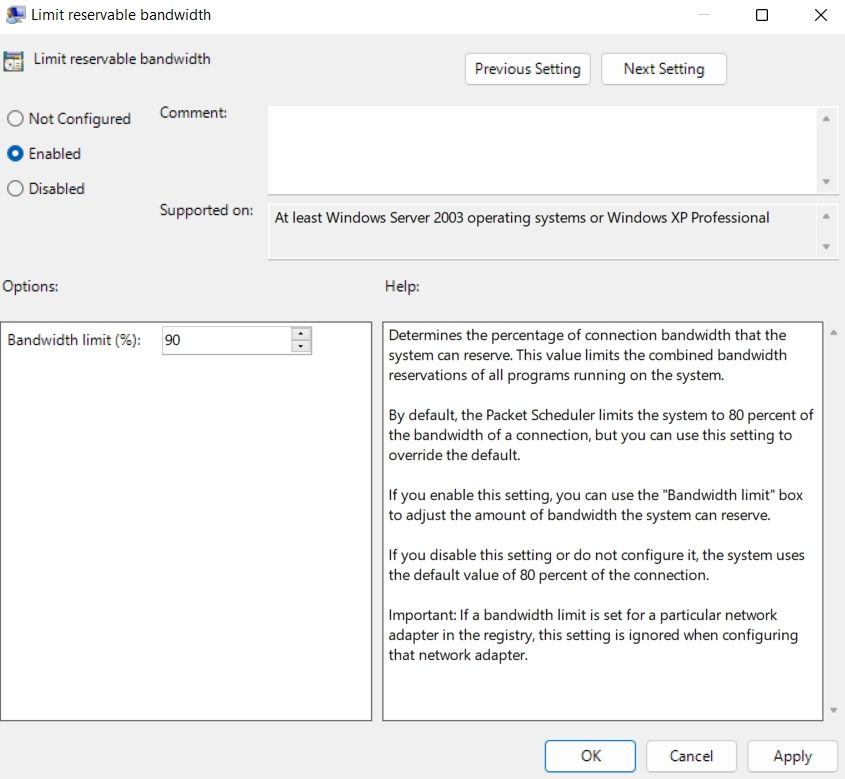
- Right-click on Limit reservable bandwidth and choose Edit from the context menu.
-
Click on Enabled.

- Change the Bandwidth limit as per your convenience. We recommend keeping the limit under 90%.
- Click on Apply > OK.
7. Disable the Windows Update Services
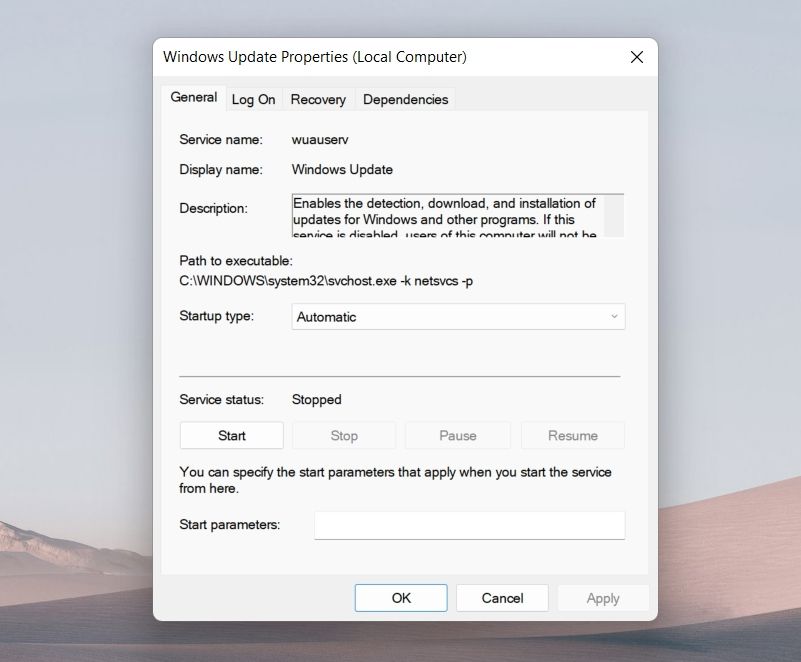
Windows constantly look for and download the new OS update. But while Windows Update is being downloaded in the background, it can directly affect the internet speed for general tasks. You’ll have to disable Windows Update services in this situation.
Below are the steps to disable Windows Update services.
- Open the Run dialogue box and type service.msc and press Enter.
- Locate Windows Update service.
- Right-click on the Windows Update service, and choose Properties from the context menu.
- Change the Startup type to Disabled.
- Click on Stop under the Service status.
- Click on Apply > OK to save the changes.
8. Flush the DNS Cache
A corrupt DNS cache can also result in weak internet connectivity. You’ll have to clear the DNS cache to fix the issue.
Here’s how to flush the DNS cache on Windows 11.
- Open Command Prompt in administrator mode.
- Type ipconfig /flushdns and press Enter.
- You’ll see the message – Windows IP Configuration. Successfully flushed the DNS Resolver Cache.
- Close the Command Prompt window.
Reboot the system and check the connectivity.
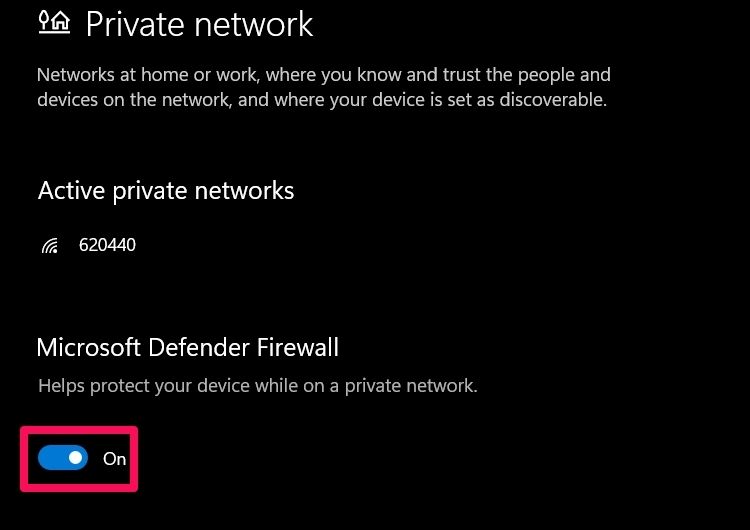
9. Temporarily Disable Windows Defender Firewall
Sometimes Windows Defender Firewall is also why you are experiencing slow internet connectivity. You will have to temporarily disable the Firewall to fix the issue.
Here’s how to do it.
- Open Start Menu, type Windows Security and press Enter.
- Choose Firewall & network protection from the left panel.
- Click on Private network.
-
Disable the toggle under Microsoft Defender Firewall.

Enjoy High Internet Speed On Windows 11
A high internet speed lets you download stuff within seconds and enjoy uninterrupted video calls. But if you are getting a lower internet speed, you can make the above-mentioned changes.
What is more annoying than no internet connection? A Slow one. Almost everyone can testify how infuriating slow download/upload speeds can be. Fortunately, the new Windows 11 provides many tricks to boost it. In this article, we are going to explore 10 ways to increase internet speed on Windows 11. It is important to understand that there could be many factors affecting your internet speed, such as:
- Network connection catering to too many devices
- Ill-configured Bandwidth allocation
- Distance between ISP & user leading to a weak Wi-Fi signal
- Broken wires and cables
- Malware attack on the system
- Network marked as metered connection

Table of Contents
You should first learn how to estimate the speed and strength of your WiFi/Ethernet connection.
1. Visit Ookla Speed Test webpage and click on GO to begin the calculation process.
2. Note down the current upload and download speeds in Mbps.

Note: We strongly recommend that you check & note down the speed every time you tweak system configuration. This will help you understand if you have made a positive change or not and to what degree.
Method 1: Turn Off Metered Connection
A metered connection is used in a scenario where you have limited data to ensure that you do not cross the predefined limit. However, this could result in slower internet speeds. Here’s how to increase your internet speed by disabling metered connection feature:
1. Press Windows + I keys together to launch Windows Settings.
2. Click on Network & internet in the left pane and Wi-Fi option in the right pane, as shown.

3. Now, click on the network SSID properties, as depicted below.

4. And toggle off Metered connection option, as shown.
Method 2: Limit Bandwidth for Windows Updates
Windows checks for updates and downloads them in the background. This could result in slower internet speed. To fix this:
1. Press Windows + I keys together to open the Settings window.
2. Here, click on Windows Update in the left pane and Advanced Options in the right.

3. Scroll down to Additional options and select Delivery Optimization, as shown.

4. Toggle off Allow downloads from other PCs option, highlighted below.

5. Then, click on Advanced options.

6A. Select the Absolute Bandwidth option under Download settings section and check the following:
- Limit how much bandwidth is used for downloading updates in the background
- Limit how much bandwidth is used for downloading updates in the foreground
Then, input the speed in Mbps which you want to set as the limit.

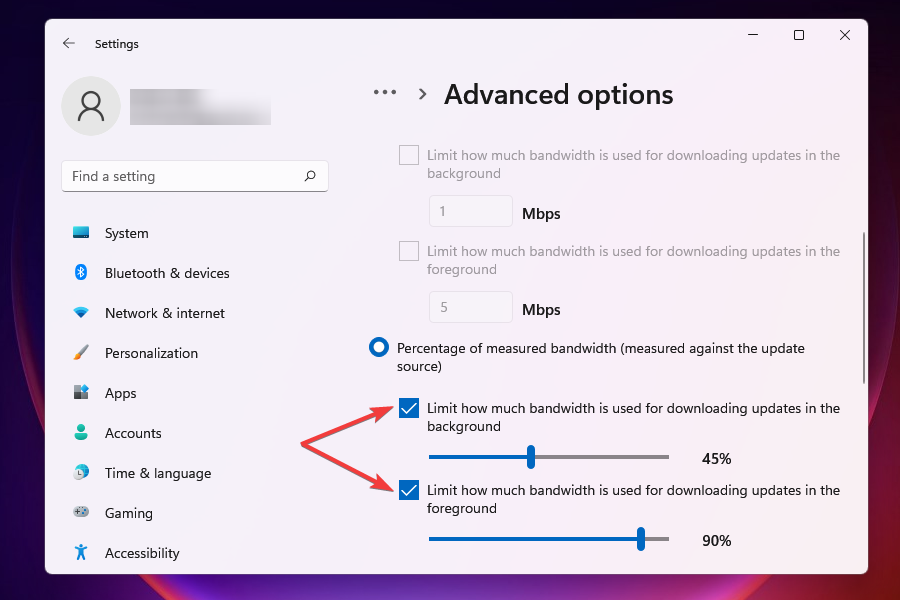
6B. Alternatively, select the Percentage of measured bandwidth option under Download settings and check the following options:
- Limit how much bandwidth is used for downloading updates in the background
- Limit how much bandwidth is used for downloading updates in the foreground
Then, move the sliders to set the percentage of bandwidth to serve as limits.

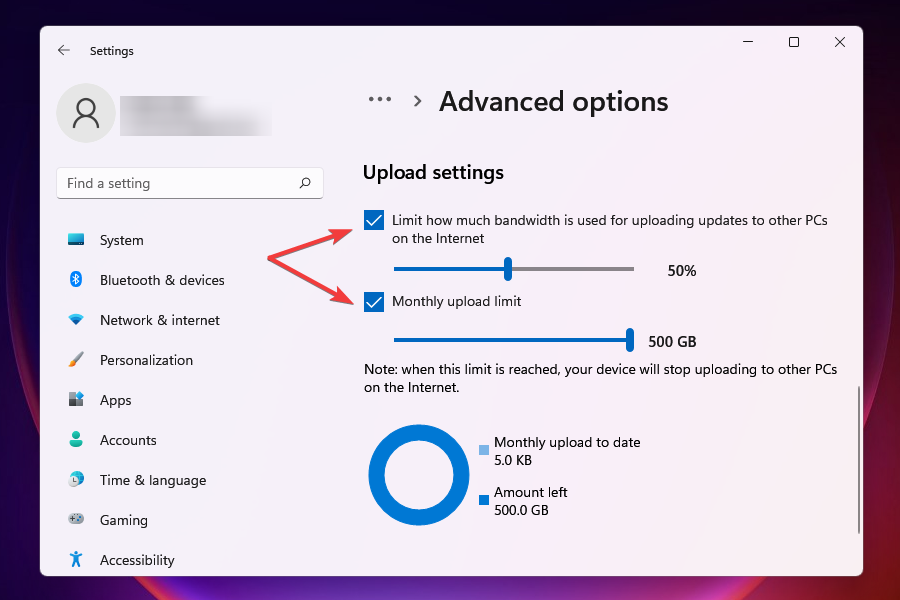
7. Under Upload settings, check the boxes marked:
- Limit how much bandwidth is used for uploading updates to other PCs on the Internet
- Monthly upload limit
Then, move the sliders to set the desired limits.

Also Read: 5 Best Bandwidth Monitoring and Management Tools
Method 3: Close High Bandwidth Consumption Background Processes
Background services and processes can be resource-hogging consuming too much data. Here’s how to increase internet speed in Windows 11:
1. Press Windows + X keys simultaneously to open the Quick link menu.
2. Select Task Manager from the list.
3. Switch to Performance tab and click on Open Resource Monitor as highlighted.

4. Under Network tab in Resource Monitor window, right-click on unwanted background process and select End Process, as illustrated below.

5. Repeat the same for all such tasks and check for improvement in download/upload speeds.
Method 4: Manually Disable Background Apps
You could also disable apps from running in the background to increase your internet connection speed in Windows 11:
1. Launch Settings as earlier and click on Apps from the left pane.
2. Click on Apps & features, as shown.

3. Click on the three-dotted icon next to the unrequired app from the given list.
4. Here, select Advanced options.

5. Then, click on Let this app run in the background dropdown menu and select Never.

6. Repeat the above steps for all unnecessary apps to prevent them from running in the background.
Also Read: Is WinZip Safe
Method 5: Change DNS Server Address
There are many DNS servers that could increase internet speed in Windows 11 desktop/laptop.
1. Click on the Search icon, type view network connections, and hit Enter.

2. Right-click on your current network connection like Wi-Fi and click on Properties, as shown.

3. Here, select Internet Protocol Version 4 (TCP/IPv4) and click on the Properties button.

4. Check the Use the following DNS server addresses option and type:
1.1.1.1 in Preferred DNS server
1.0.0.1 in Alternate DNS server
5. Finally, click OK to save changes and Exit.

Method 6: Scan for Viruses & Malware
Malware can affect internet speed by using it for malicious purposes. Here’s how to increase internet speed on Windows 11 by scanning for malware and removing it from your PC:
Note: McAfee is used as an example here. The options may differ according to the antivirus app.
1. Click on the Search icon and type McAfee LiveSafe. Then, click on Open to launch it.

2. Here, click on PC.

3. Then, select the Antivirus option shown highlighted.

4. Now, click on Scan types.

5. Select the Run a full scan option. Wait for the scan to finish and take action according to the results & suggestions.

Also Read: What is Google Chrome Elevation Service
Method 7: Change Web Browser
You can try other available browser options to see if it is the fault of your browser. There are many browsers with features to optimize the performance of your PC and increase internet speed in Windows 11. Some of the popular web browsers and their features are listed below:
- Chrome: Being the top choice for browsers among cyber citizens today, Chrome is one of the most popular web browsers. Due to its simple interface, it is loved by most users. However, Chrome is also notoriously known for RAM hogging.
- Opera: Opera gives two different options catering to the needs of different people. Opera is used for regular use, while Opera GX is available for the gaming community with inbuilt Discord and Twitch integrations. Opera being developed on Chromium engine also lets you install extensions from Chrome Web Store so that you can enjoy the best of both worlds.
- Firefox: Firefox, though once considered as the biggest rival of Chrome, is somehow lagging behind. However, it is still a worthy contender on its own. Its amazing features like Autoplay blocking, Text to speech, In-built screenshot tool are still lacking in other browsers.
- Brave: Brave browser is one of the more privacy-centric browsers available today. It can block trackers and ads completely making your browsing experience smooth and distraction-free.
- Microsoft Edge: Microsoft Edge is a fast and secure browser developed by Microsoft and pre-installed in Windows 11. It provides various features to boost browser performance such as Startup boost, Hardware acceleration, and Background extensions & apps, as illustrated below.

Method 8: Enable Wireless Access Control
Sometimes your router may exceed the device connection limit. This may cause your internet to slow down. So, you can add wireless access control to limit the network-connected devices.
Note: Since Routers do not have the same settings option, and they vary from manufacturer to manufacturer, hence ensure the correct settings before changing any. The following steps were performed on PROLINK ADSL Router.
Here’s how to increase internet speed in Windows 11 by limiting the number of devices:
1. Click on the Search icon and type, command prompt. Then, click Open.

2. Type ipconfig /all command in Command Prompt and hit Enter.
3. Find the Default Gateway address shown highlighted.
Note: Typically, the gateway address is given at the back of the router or the router manual.

4. Then, open Default Gateway address on any web browser. Log in with your credentials.

5. Under Setup tab, click on WLAN option from the left pane.

6. Here, click on Access Control List and choose Allow Listed option from the Wireless Access Control Mode dropdown menu, as depicted below.

7. Then, add the MAC address (e.g. ABE0F7G601) of the devices to be allowed to use this internet connection and click Add.

8. Finally, click on Apply Changes and exit.
Also Read: How to Boot Windows 11 in Safe Mode
Pro Tip: How to find MAC address of your gadget
For Windows: Execute ipconfig /all in Command Prompt and note Physical address.

For Android: Navigate to Settings > System > About phone > Status option. Note the Wi-Fi MAC address from here.
Also Read: Change Your MAC Address on Windows, Linux or Mac
Method 9: Upgrade Internet Plan
Maybe it is time for you to upgrade your internet plan. Call your Internet Service provider and ask for plans that give better speed options.
Method 10: Replace Router or Cables
Faulty or damaged hardware will result in unstable connections and poor internet speed. So, you should check for faulty wires, cable & Ethernet and replace these, if needed. Get a new router that offers better bandwidth too, if possible.

Recommended:
- How to Update Apps on Windows 11
- How to Change DNS Server on Windows 11
- How to Download and Install Windows 11 Updates
- How to Hide Recent Files and Folders on Windows 11
We hope you found this article helpful to learn how to increase internet speed on Windows 11. You can send your suggestions and queries in the comment section down below. We would love to know which topic you want us to explore next.
We are connected to the Internet for most of the day, for work, shopping, or recreational purposes. But, several users, after upgrading to Windows 11 have reported slow Internet.
A slow speed affects the whole user experience, whether browsing or downloading web files. With the increase in the size of web pages and dependence on downloads, you must look for ways to resolve the problem.
But before we head to the fixes, you must understand the underlying causes to troubleshoot the problem effectively.
Why is my Internet slow in Windows 11?
You should know that when several apps run in the background and consume data, it could lead to slow Internet problems in Windows 11.
Now, circling back to your question, know that download files can be large, especially when downloading a new operating system.
Thus, a large file is going to take longer to download than a smaller one, and seeing how the setup file is about 4GB in size, be prepared to wait for a while.
As you already know, your device’s memory (RAM) also plays a part in the download time, so having a lot at your disposal will ensure shorter, more efficient downloads.
Does Windows 11 cause Internet problems? Not really, but there have been cases where the new OS interfered with Internet quality if we go back in time just a little bit.
It is widely known that, on Windows 11, Wi-Fi connectivity is one of the most common Internet-related problems. The system uses too much data owing to all the new features, which can affect the Internet quality.
There are a lot of reports of users complaining about slow Wi-Fi speeds and error messages like Limited access, Unidentified Network, or No Internet access.
Be sure to check the Windows 11 network throttling index, especially if you have any Windows 11 Internet issues.
What causes slow Internet issues in Windows 11?
While most of us blame the ISP (Internet Service Provider), the other issues are often the real culprit. We have listed some of the prominent ones in the following section:
- Weak signal: When on wireless networks, the farther the device is from the router, the weaker the signal and, subsequently, the slower the Internet.
- A high number of devices connected to the router: If too many devices are connected to the router, it will lead to slow Internet in Windows 11.
- Problems with the DNS server: A DNS server locates the website on the web, and if it’s not set up properly or is facing an outage, it will take longer to load a website.
- Misconfigured settings: The network settings are closely linked to the Internet speed, and any misconfiguration with the former will affect the latter.
- Background processes consuming high data: If you have several background processes consuming data, especially a Windows update being downloaded, you will have a slow download speed in Windows 11.
- Bandwidth-intensive programs: If you have apps that consume too much data you may experience such issues. For instance, you’ll find that your video calls are still slow even with a fast internet connection.
- Issues with the ISP: For users who face the issue at specific times each day, the problem could be traced to your ISP. A simple method to identify this is to perform a Windows 11 Internet speed test. If the speed is slow at a fixed point every day, contact your ISP.
- Delivery Optimization is consuming bandwidth: The Delivery Optimization service is used for updating other devices in your network and it is using some of your bandwidth.
For Windows 11, or any other version of the OS, you can perform Internet speed tests to determine if your internet is slower after the Windows 11 update.
Thus, we made this guide to help you speed up your internet on Windows 11. That being said, if you need some internet optimizer advice for your Windows 11 device, you came to the right place.
Now that you thoroughly understand the causes, we head to the solutions for slow internet speed.
How can I fix my Windows 11’s slow download speed?
Here’s what you should first do
- One of the most effective solutions to most problems encountered in Windows 11 is to restart the computer. If a background process or bug leads to a problem, rebooting the OS will eliminate it, thereby fixing the error.
- Most devices display signal strength after you connect to a wireless network. Make sure it’s maximum.
- Also, we now have dual-band routers that support 5 GHz and the standard 2.4 GHz, which offers a higher Internet speed. In case your router supports both, make sure you are connected to the 5 GHz network.
1. Update your network drivers
1.1 Use Device Manager
1. Press the Win + X keys simultaneously to open a Windows 11 shortcut menu.
2. Select Device Manager from the list.
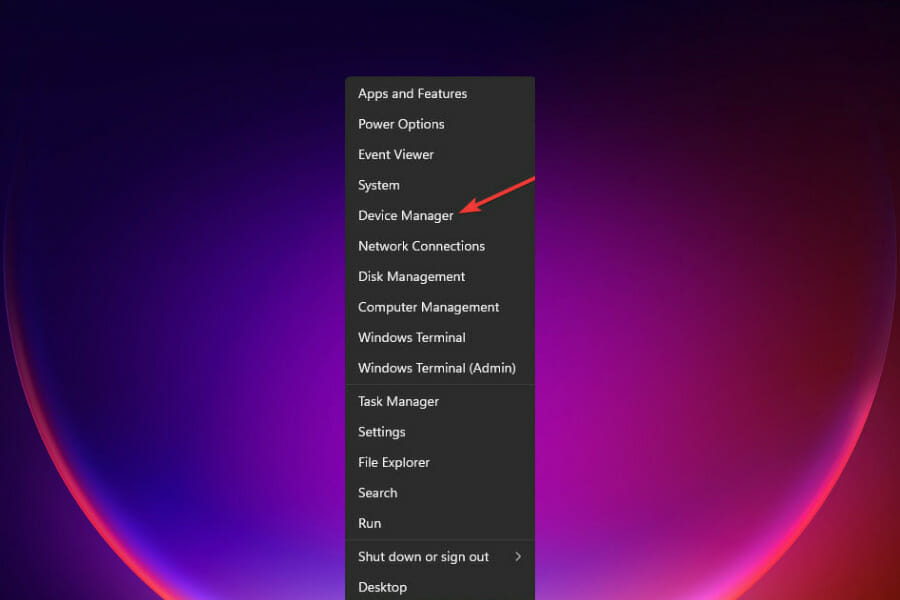
3. In the device list, locate and double click Network Adapters.
4. Then right-click on your Internet network adapter and select Update driver.
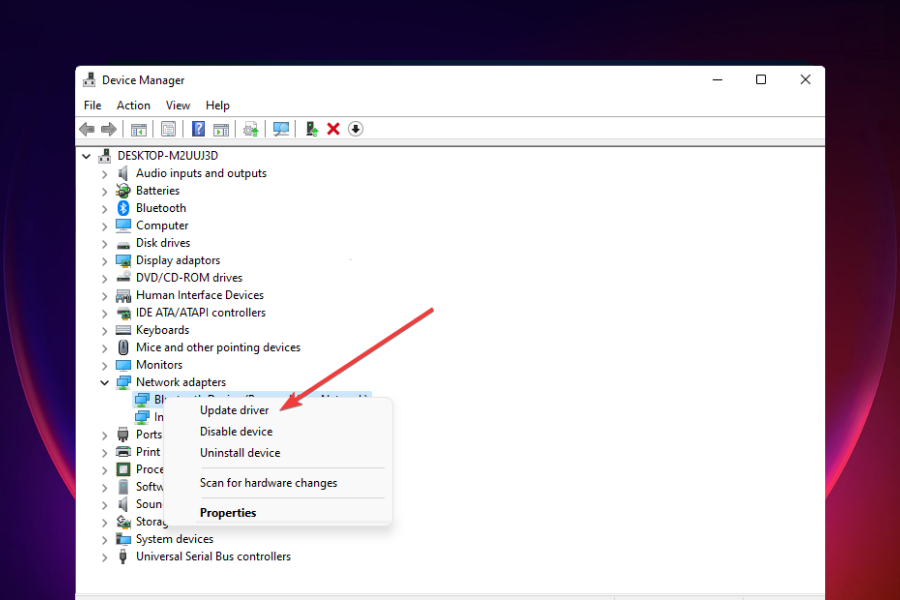
5. Select Search automatically for drivers and wait for the process to complete.
6. If the Windows 11 utility detects new drivers, it will automatically install them on your machine.
Corrupt or out-of-date drivers can have a negative impact on overall Internet performance. Many users report noticeable improvements after they update their network drivers in Windows 11 and it can also help you fix slow internet issues while using wired access points.
1.2 Use an automated solution
If you want a quicker solution to keep your drivers in check regularly, we recommend you try a lightweight utility such as Outbyte Driver Updater.
To update singular drivers, as in this case, the process is pretty similar. Select your network driver from a list and wait for the process to complete.
The benefit of this application, however, is that you can let it run in the background, and it will automatically find up-to-date replacements for any outdated or corrupt drivers on your PC and install them without any effort on your part.
Outbyte Driver Updater
A quick and safe tool to update all your outdated drivers.
2. Lower the bandwidth for downloading updates
- Press Windows + I to launch the Settings app.
- Select Windows Update from the tabs listed in the navigation pane on the left.

- Click on Windows Update on the right.
- Click on Advanced options.

- Next, click on Delivery Optimization.
- Disable the toggle for Allow downloads from other PCs.
- Now, click on Advanced options.
- Under Absolute Bandwidth, tick the checkboxes for allocation of bandwidth to downloading of updates in the background and foreground, and enter the desired value the respective fields.
- You can also go with the Percetange of measured bandwidth method and use the slider to set the desired setting.
- Scroll down and tick the two checkboxes under Upload settings.
- Now use the slider to set the desired bandwidth for Uploading Updates and Monthly Upload Limit.

After changing the bandwidth settings, check if the slow download speed problem in Windows 11 is resolved.
A certain amount of bandwidth is allocated to Windows Update for both download and update. You can lower the bandwidth in order to maximize the bandwidth allocation to other tasks.
Also, Windows sends updates to other PCs on the network, which decreases the Internet speed. Disabling the setting might also help eliminate the problem.
3. Terminate processes consuming data
- Press Ctrl + Shift + Esc to launch the Task Manager.
- Navigate to the Performance tab.
- Click on Open Resource Monitor at the bottom.
- Go to the Network tab in the Resource Monitor window.
- Locate the programs that are consuming way too much data, right-click on them, and select End process.

Certain processes that consume a considerable amount of data can be terminated to fix the Windows 11 slow Internet. However, remember not to end any critical tasks, such as Windows Update.
If you couldn’t find any such tasks or terminating some didn’t help, head to the next fix.
- Recent Windows 11 update lets you disable profanity filter in voice typing
- Microsoft wants Windows 10 users to upgrade to Windows 11 or Copilot + PCs
- Windows 11 KB5055627 update makes File Explorer more fluid
4. Disable apps from running in the background
- Press Windows + I to launch the Settings app.
- Select Apps from the list of tabs in the navigation pane on the left.
- Click on Installed apps on the right.
- Locate the app that you don’t want running in the background, click on the ellipsis next to it and then select Advanced options from the menu that appears.
- Next, click on the Let this app run in the background dropdown menu.
- Select Never from the list of options.
Disabling background apps in Windows 10 is a lot different than the process in Windows 11. In the case of the former, you could easily disable them all in one go, while for the latter, the settings are specific to each app.
When several apps run in the background and consume data, it is bound to lead to a slow Internet problem in Windows 11. Also, some of these may download files or updates.
It would be best if you disabled the non-critical apps from running in the background to increase the download speed since these also lead to slow Windows 11 Ethernet. Whenever you need to work on any of these, launch them.
5. Run the Internet Connections troubleshooter
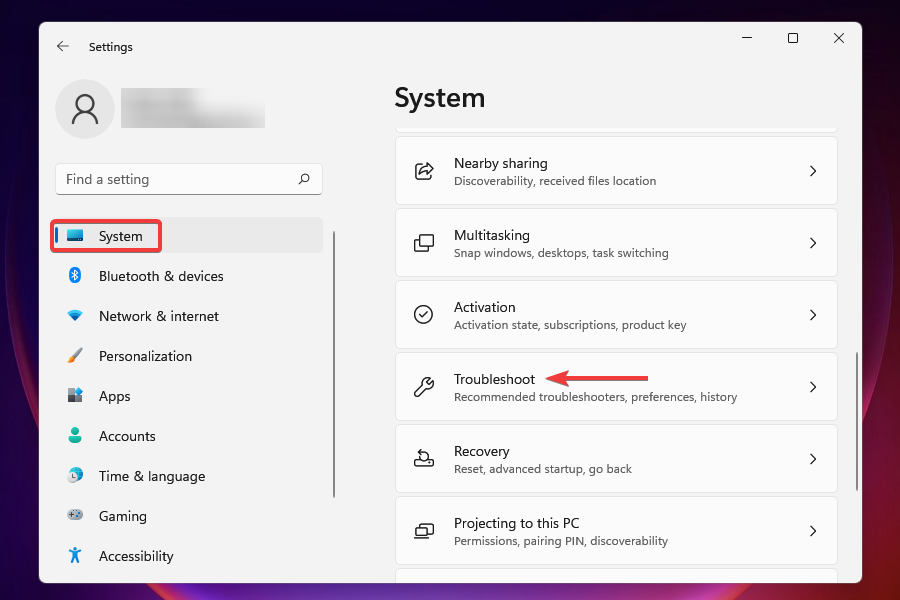
- Press Windows + I to launch the Settings app.
- Click on Troubleshoot on the right in the System tab.
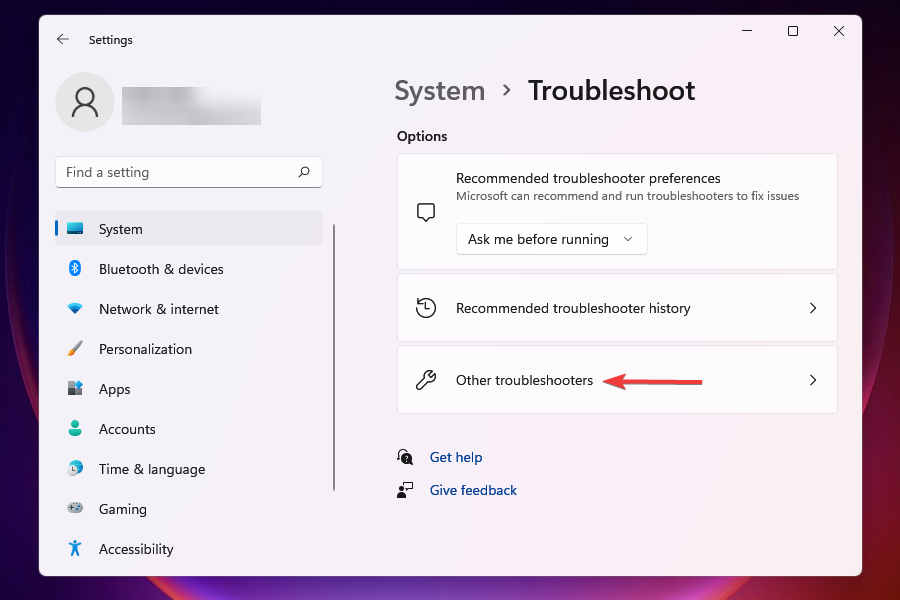
- Now, click on Other troubleshooters.
- Click on Run next to Internet connections to launch the troubleshooter.
- Choose the appropriate response, if and when prompted, to complete the troubleshooting process.
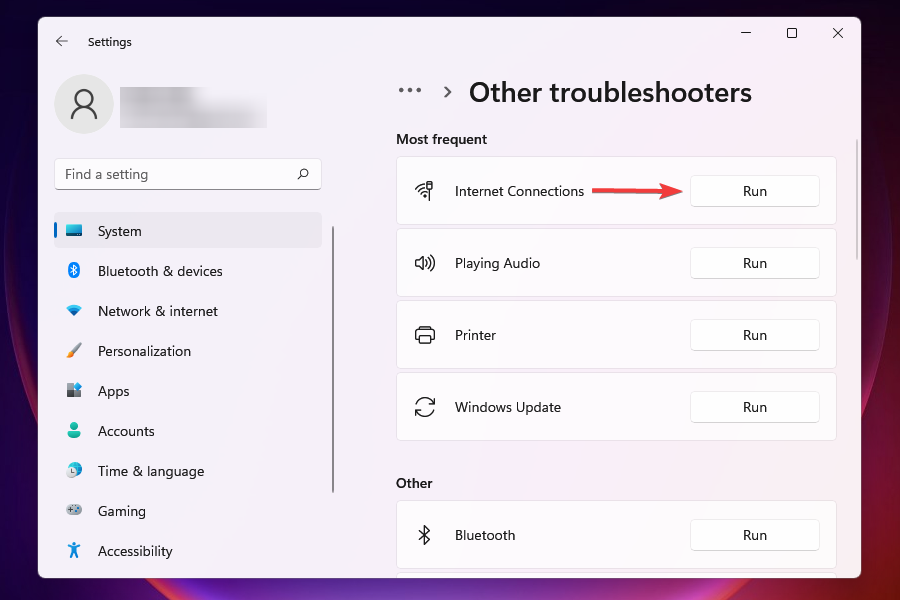
Microsoft offers a bunch of troubleshooters that can identify and eliminate some of the commonly known issues. Before going with the intricate methods, it’s recommended that you run these, in case one is available for the problem.
Internet connections troubleshooter can be used to resolve issues that prevent you from accessing the Internet.
6. Disable Windows Defender Firewall
NOTE
There are various ways you can disable the Windows Defender Firewall in Windows 11, and we have listed one of them. In case you are comfortable with the others, go ahead and use them since the result would be the same.
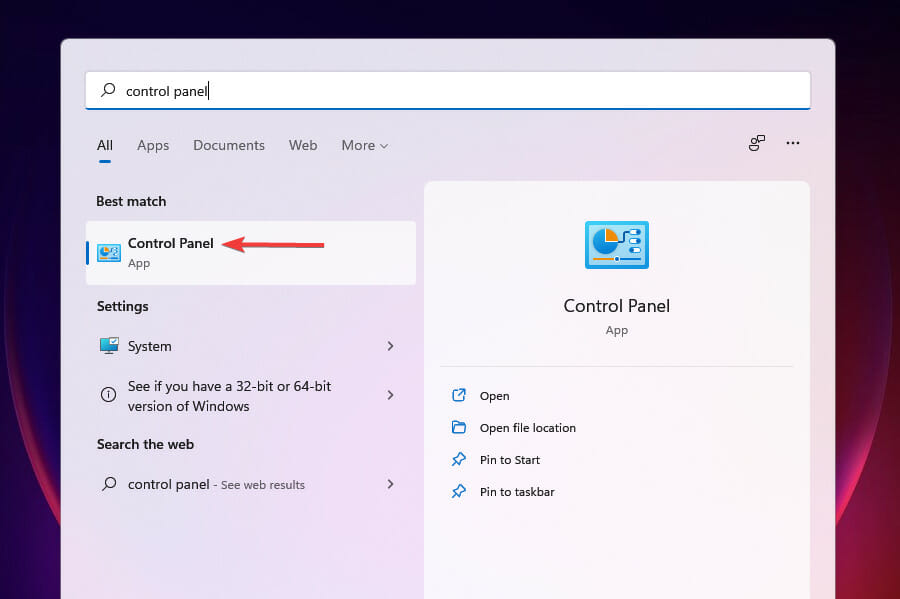
- Press Windows + S to launch the Search menu.
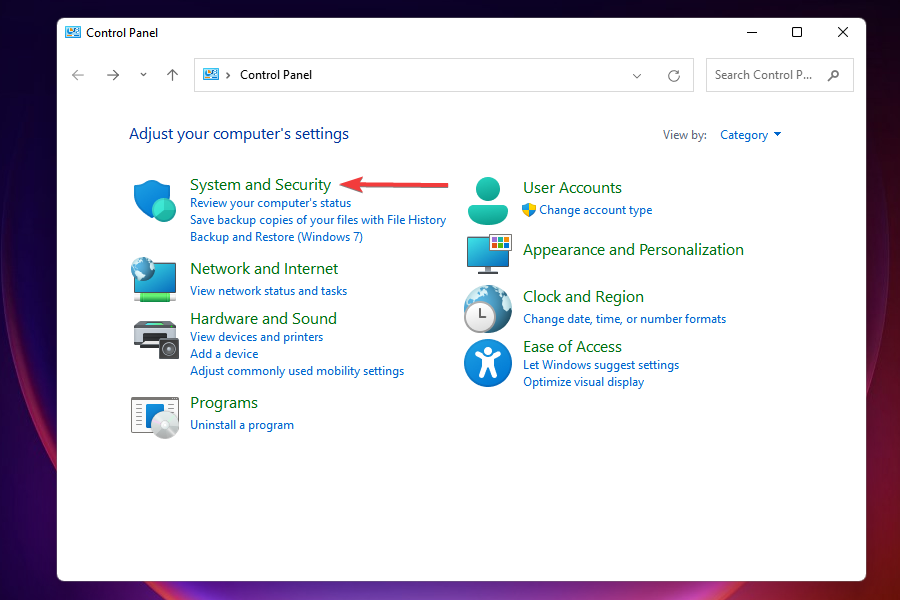
- Enter Control Panel in the text field at the top, and click on the relevant search result that appears.

- Click on System and Security from the list of options that appear.
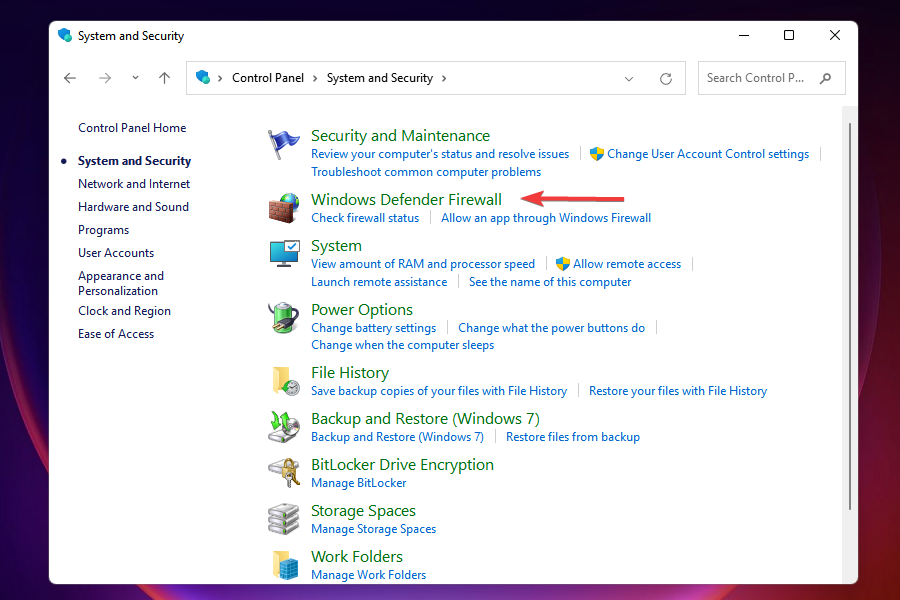
- Select Windows Defender Firewall.
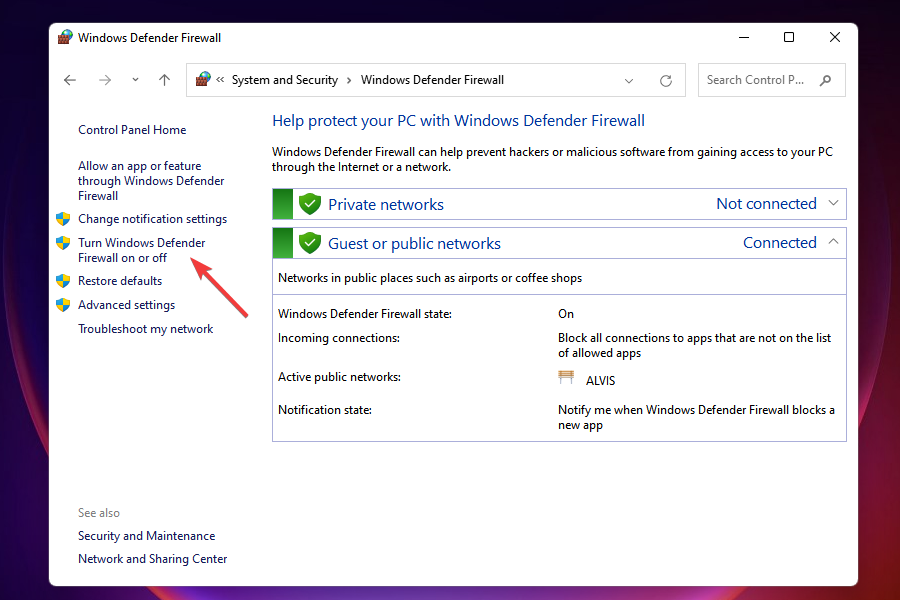
- Click on Turn Windows Defender Firewall on or off from the list of options on the left.
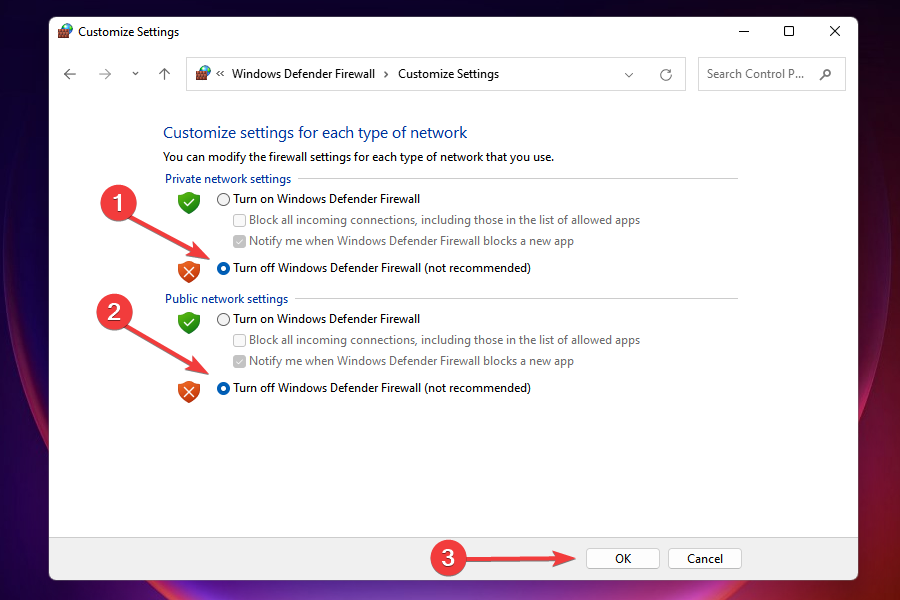
- Now, tick the checkboxes for Turn off Windows Defender Firewall (not recommended) under both Private network settings and Public network settings, and then click on OK at the bottom.
- Choose the appropriate response in case a prompt appears.
Windows Defender Firewall is a critical part of the OS that protects your device from unauthorized traffic, both to and from the computer. However, it’s known to cause slow Internet at times in Windows 11, thus disabling it could work as a fix in this case.
But, do remember that you would be losing out on critical security aspects, and the computer would be exposed to risks. Therefore, if disabling Windows Defender Firewall does not work, re-enable it immediately.
Even more, remember that you may choose one of the best antivirus solutions for Windows 11 to further protect your computer.
7. Turn off metered connections
- Press Windows + I to launch Settings.
- Select Network & internet from the list of tabs in the navigation pane on the left.
- Click on Wi-Fi or Ethernet depending on the network type.
- Click on the network that you are connected to.
- Disable the toggle for Metered connection.
8. Change the DNS server
-
1. Press Windows + R to launch the Run command.
-
2. Enter appwiz.cpl in the text field and either click on OK or hit Enter to launch the Network Connections window.
-
3. Right-click on the connected network adapter, and select Properties from the context menu.
-
4. Select Internet Protocol Version 4 (TCP/IPv4) from the list of options and click on Properties.
-
5. Tick the checkbox for Use the following DNS server addresses.
-
6. Enter the following the respective fields and click on OK to save the changes:
- Preferred DNS server: 8.8.8.8
- Alternative DNS server: 8.8.4.4
-
7. After making the changes, restart the computer.
The DNS server is used to locate the IP address corresponding to the domain name. Whenever you enter the domain name, it’s respective IP is located and the website launched.
Windows is set to choose the DNS server by default but due to issues with it, the Internet speed may be slow. Therefore, it’s recommended that you switch to an open-source DNS for better Internet speed.


Can I go back to Windows 10 from Windows 11?
It is really important to know that rolling back to Windows 10 after trying out Windows 11 can be done within the first ten days, which is considered a trial period.
That being said, if the rollback period has passed, the only method to go back to Windows 10 is to install a fresh copy of the OS.
This is a straightforward process, but it will take some hours of your time. but we can show you how to rollback from Windows 11 to Windows 10.
What do I do if none of the methods listed fix slow Internet issues?
This is a highly likely scenario primarily due to problems from the ISP’s end. In this case, you can either check the connections for faults or choose another plan with a higher Internet speed. Also, you can switch to a faster and safer web browser to resolve the slow Internet problem in Windows 11.
But before making the upgrade, remember to identify your requirements and choose the plan that best suits them.
Wi-Fi or Ethernet: Which is better?
Both have their own set of advantages and disadvantages. As the name suggests, Wi-Fi offers wireless connectivity, while Ethernet connections use cables. The former offers mobility, while the latter offers stability.
Regarding speed, Ethernet no doubt emerges as the winner, but the margin is getting narrower by the day due to advancements in wireless technology. So, if you are facing slow Internet problems in Windows 11, switching to Ethernet might work.
These are the most effective fixes for this inconvenience in Windows 11 and all the other relevant information that might be useful when facing it.
Also, see how you can solve issues that cause the Wi-Fi to disappear in Windows 11.
Now you better understand why your Windows 11 download speed is slow or why your Windows 11 Wi-Fi is so slow or unresponsive.
Besides, if you find slow Internet after the Windows 11 update, uninstalling the previously installed version of the OS may do the trick.
When you notice that the downloads are slow or your Windows 11 upload speed is just as slow, this guide will surely be useful.
Always remember that it is better to check your Windows 11 network speed before engaging in any troubleshooting process.
Tell us which fix worked in the comments section below or whether you had to upgrade the plan.