
Время чтения статьи
~3 минуты
Статья написана студентом Хекслета. Мнение автора может не совпадать с позицией редакции
Столкнулся с проблемой, что невозможно изменить разрешение экрана гостевой ОС в гипервизоре Oracle VirtualBox. Ниже приведу способ, как разрешить эту задачу для практически любой гостевой ОС.
- Предыстория
- Решение
- Ставим на Windows
- Ставим на Linux
- Итог
- P.S.
Предыстория
Когда начал изучать программирование на Hexlet, сразу же переехал на Linux, без возможности возврата. Снёс Windows, поставил Ubuntu.
Само собой сразу возникло много вопросов, как всё это работает и куда тыкать. Точно помню, что в курсе «Основы командной строки. Операционные системы», было знакомство с Linux и дополнительные материалы по установке Ubuntu и операционным системам.
Курс мотивировал изучать и исследовать Linux дальше.
В общем и целом мне очень понравилась операционная система — она плавная и аккуратная. И в последствии конечно же захотелось попробовать как можно больше, найти свой дистрибутив и окружение рабочего стола. Чтобы испытать разные дистрибутивы с понравившимся мне DE, плюс для работы на удалёнке, мне нужен был Windows, поэтому я решил использовать VirtualBox.
Так вот, когда меняю разрешение экрана в настройках гостевой системы, нажимаю «Принять», но разрешение не меняется. А иногда необходимых параметров просто нет. Как-будто не установлены драйвера.
Решение
В общем вычитал, что необходимо поставить VBoxGuestAdditions — Гостевые дополнения. Это образ, который необходимо установить в привод виртуальной машины и запустить в гостевой системе. Данное дополнение предоставляет следующие возможности:
- Интеграция указателя мыши (полезно, единый курсор для хоста и гостя)
- Общие папки
- Лучшая поддержка видео (как следствие произвольное изменение сторон экрана)
- Бесшовные окна
- Общие каналы связи основная/гостевая ОС
- Синхронизация времени
- Общий буфер обмена
- Автоматические логины
Всю информацию взял с офф.сайта, где и расположена документация. Если интересны подробности по каждому пункту, ссылку оставлю тут.
Меня интересует конкретно ресайз окна. Сам образ VBoxGuestAdditions можно найти и скачать в сети, но, к сожалению, все источники не официальны. Но этого как оказалось и не требуется, опять же обратимся к докам, тут всё чётко сказано, что при установке лицензионного софта Oracle VirtualBox, VBoxGuestAdditions поставляется с установочным файлом.
Образ можно найти в основной системе:
- Для Windows
- C:\Program files\Oracle\VirtualBox.
- Для Mac OS X
- Файл находится в пакете приложений Oracle VM VirtualBox в папке Contents/MacOS.
- Для Linux
- Обычно /opt/VirtualBox/
В моём случае образ находился по адресу /usr/share/virtualbox/VBoxGuestAdditions.iso
Чтобы проще было его использовать в будущем и каждый раз не вспоминать, где он находится, скопировал образ в домашний каталог.
sudo cp usr/share/virtualbox/VBoxGuestAdditions.iso ~/VirtualBoxVMs/
Далее дело за малым, запускаем гостевую систему, монтируем диск VBoxGuestAdditions.iso в виртуальный привод или наоборот сначала монтируем, потом запускаем.
Ставим на Windows
- При монтировании CD система автозапуска предложит выбрать действие для обнаруженного диска
- Выбираем «Запустить»
- Если не предложит, нужно будет зайти в Проводник/Мой компьютер, открыть папку и запустить файл VBoxWindowsAdditions.exe
- Согласиться с установкой, подружить с антивирусом (Поставить галочку «Доверять»).
- Перезагрузить
Ставим на Linux
- Запустили ОС
- Монтируем диск
- Открываем эмулятор терминала (можно в файловом менеджере открыть папку с образом, правым кликом «Открыть в терминале»)
- sh ./VBoxLinuxAdditions.run
- Перезагрузить
Итог
Указателем мыши меняем размер окна или разворачиваем его на весь экран, рабочий стол гостевой системы меняет параметры разрешения автоматически под текущие размеры.
P.S.
Из опробованных дистров, почему-то не сработало на Ubuntu 18.04 LXQT и Debian или OPENSuse XFCE, точно уже не помню.
Напишу сюда, чтобы не пропало — вдруг понадобится кому.
После зависания VB винда вдруг в полном экране стала выставлять вместо 1920×1200 неведомо с чего 1920×1136 или что-то около этого — сверху и снизу черные полосы примерно милиметров пять. Какие только танцы с бубном я не исполнял! Переставлял VBoxGuestAdditions, правил свойства машины, менял дрова на дисплей — нифига не помогло.
Помогла следюущая последовательность действий:
— Host-Home, Вид, отключить режим полного экрана — машина отобразится в окне
— Host-Home, Вид, Виртуальный экран 1, появится меню с пунктами «Запросить разрешение …» (эти пункты не появляются в режиме полного экрана!), выбрать нужное разрешение.
— Убедиться внутри машины, что нужное разрешение появилось, переключиться на него
— Host-F для перехода в полный экран
Уф. Думал, что придется машину сносить и заново создавать…
Значения можно добавлять в конфиг:
C:\Users\%USER%\.VirtualBox\Machines\%VirtualMachineName%\%VM%.xml<ExtraDataItem name="VBoxInternal2/EfiGopMode" value="N"/>Где N — число от 0 до 5, означающее разрешения: 640×480, 800×600, 1024×768, 1280×1024, 1440×900, 1900*1200 соответственно.
Я тоже попробовал всё. Два раза сносил виртуал бокс и на третий раз сделал вот что.
Зашёл по дериктории: C:\Users\цыц.PC\.VirtualBox\
(обрати внимание, есть папка .VirtualBox и VirtualBox, с точкой и без точки)
В папке с точкой лежали два файла с одинаковым именем, но разным расширением: VirtualBox.xml и VirtualBox.xml-prev
Открыл текстовым редактором оба файла и в каждом, под всеми
вставил ту смую строчку строчку:
в обоих файлах так сделал. Делать это надо исключительно при закрытом виртуал бокс, лучше даже перезагри комп и сразу заходи в папку и добавляю строчку в эти файлы. Только потом, как сохранил изменения, пробуй запускать.
Где N — число от 0 до 5, означающее разрешения: 640×480, 800×600, 1024×768, 1280×1024, 1440×900, 1900*1200 соответственно.
Изначально я пробовал ставить 5 и у меня не работало, разрешение не менялось, тогда я попробовал погуглить и в ЭТОЙ СТАТЬЕ сказано, что цифры от 0 до 4, и типа больше нет разрешений, так что пробуй. Удачи
поменял граф контроллер. дальше через «вид», метод научного тыка

У меня получилось увеличить разрешение прямо в гостевой ОС(в моём случае Ubuntu) и это заработало.
Oracle’s VirtualBox virtualization software is a popular choice for users who want to test new operating system versions. If you install Windows in VirtualBox, you may notice that you can’t change the default screen resolution of 1024×768.
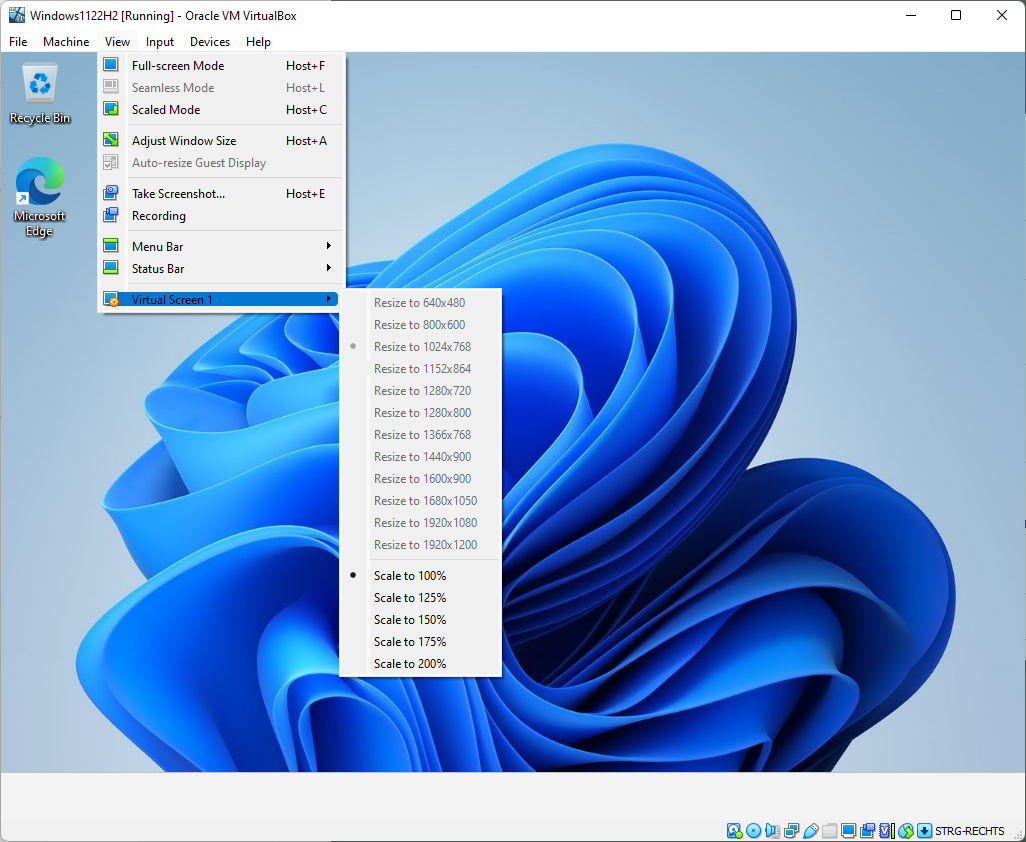
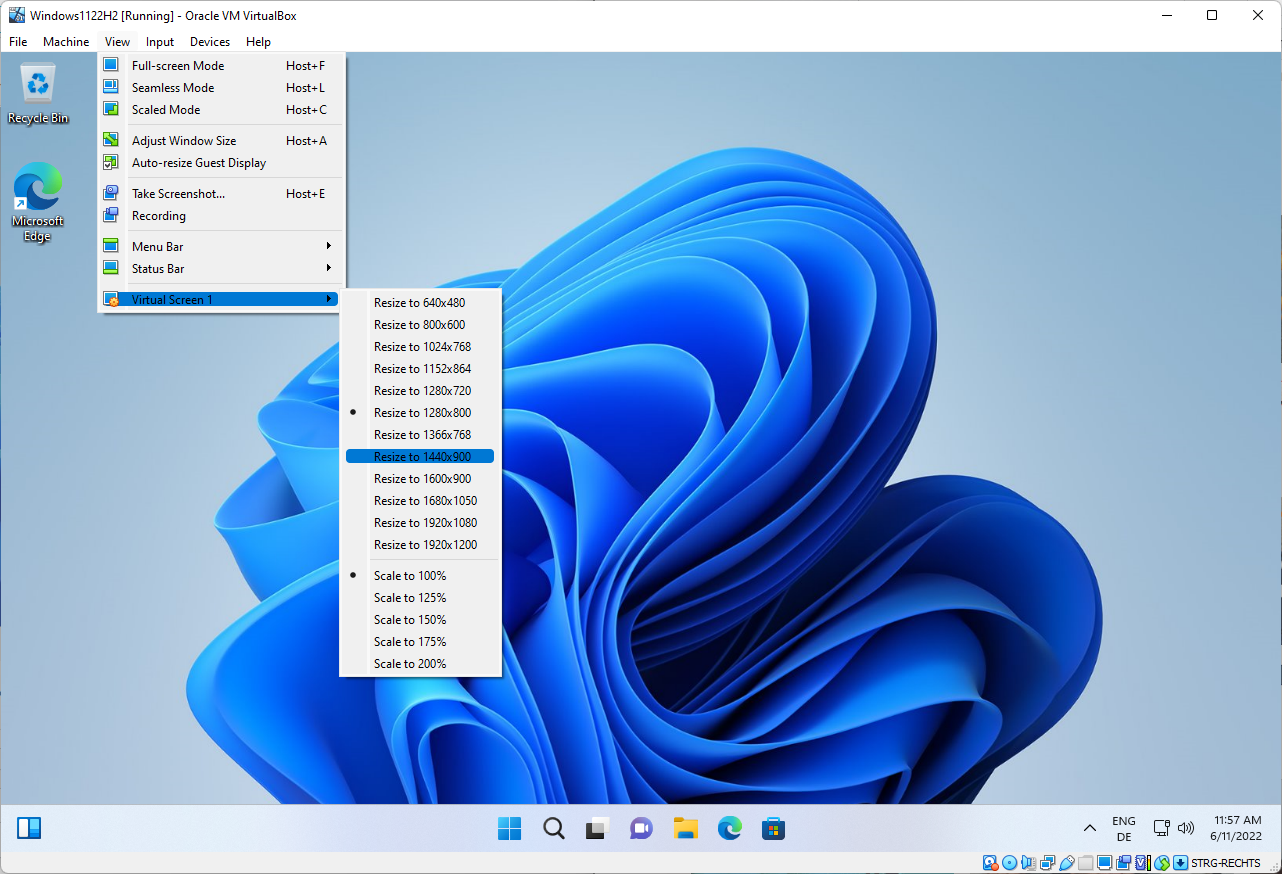
The low resolution may be sufficient for some tasks, but many may benefit from larger resolutions. The View > Virtual Screen menu of the VirtualBox application lists all available resolutions and scaling options.
The «resize to» options are all inactive, as they are grayed out and not selectable. The scaling options are unlocked and available, though.
Thankfully, it is rather easy to unlock all supported screen resolutions in VirtualBox. The following instructions explain in detail how that is done.
Fixing the Screen Size of Windows in VirtualBox
The fix requires the installation of Guest Additions; this may sound intimidating at first, but it is a straightforward process that completes in a matter of minutes on most systems. The description may sound as if you’d need to insert a CD image, but this is not the case. VirtualBox mounts a virtual CD image when the option is selected.
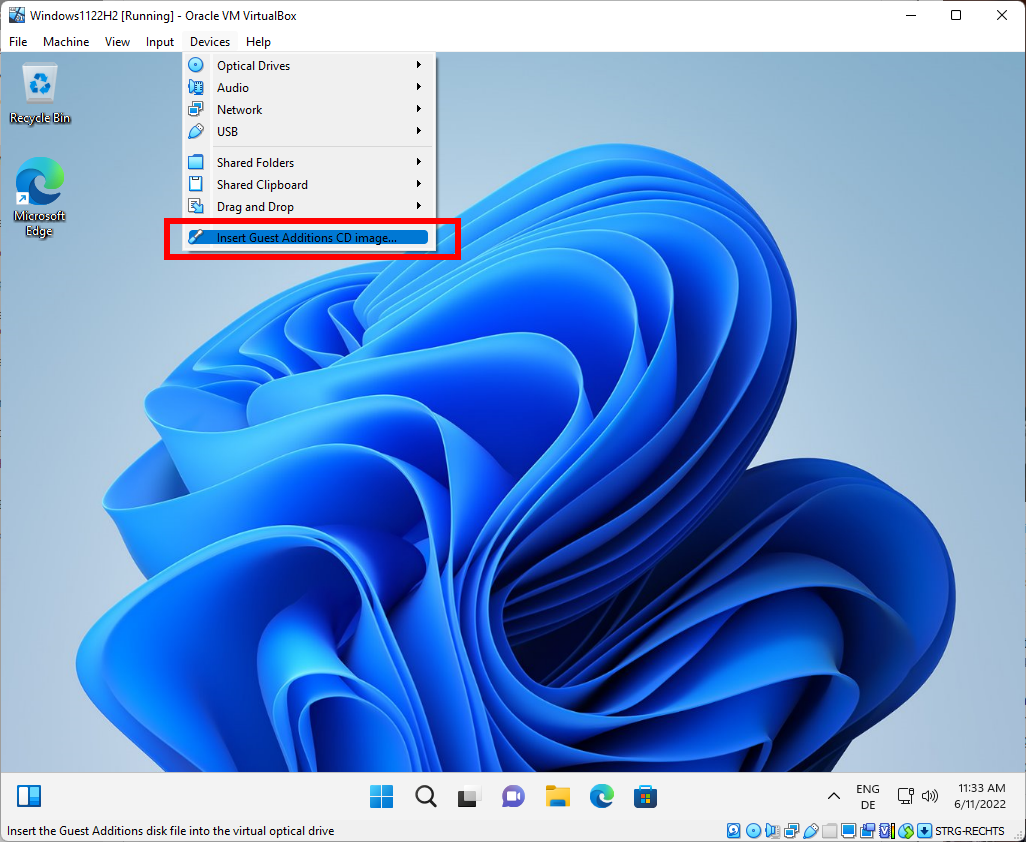
To get started, select Devices > Insert Guest Additions CD image. All that it does is mount the Guest Additions CD in VirtualBox, so that you may access its contents. You will hear a sound that indicates that the CD has been mounted.
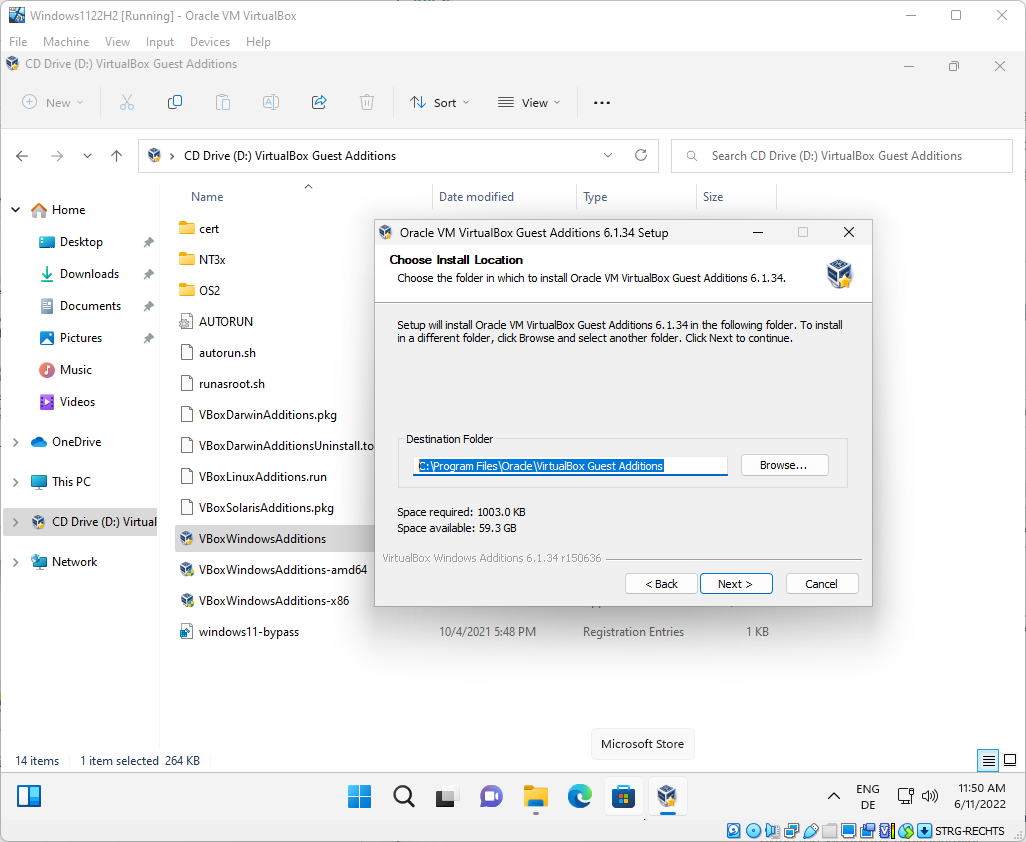
Next, open File Explorer on the system and open the the CD drive «Virtual Guest Additions».
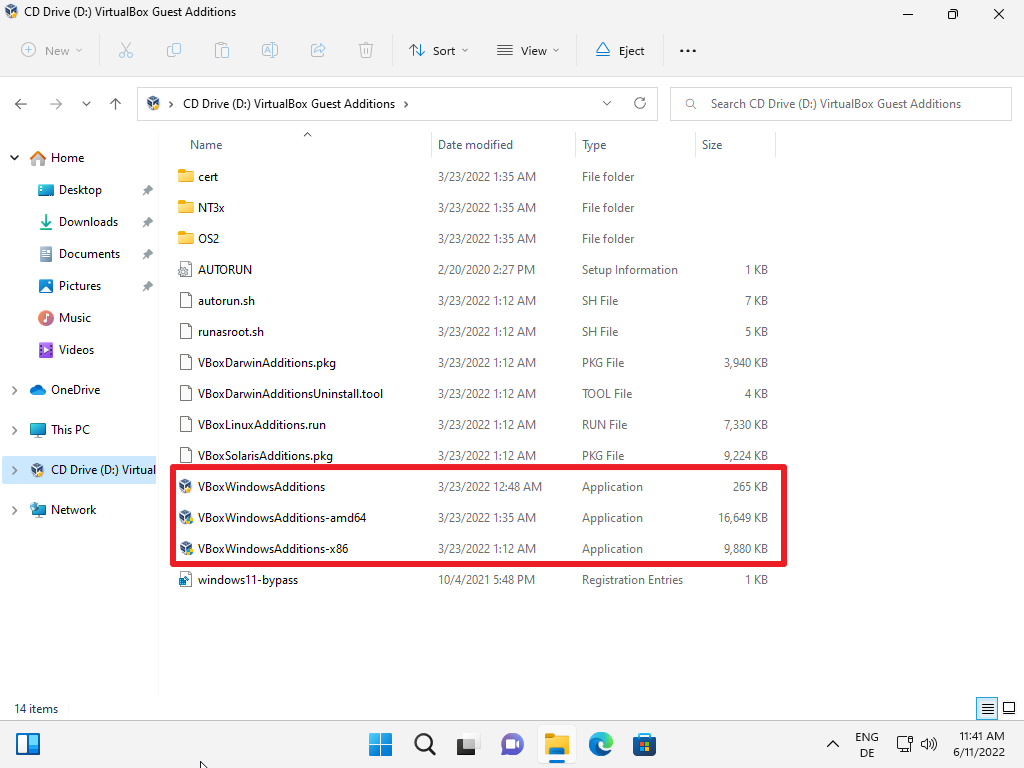
The root menu lists three guest additions for Windows. There are also additions for other operating systems, including Linux and Solaris.
The three Windows guest additions are for different architectures.
- VBoxWindowsAdditions is an automatic selector. Pick this one.
- VboxWindowsAdditions-amd64 is 64-bit systems.
- VboxWindowsAdditions-x86 is for 32-bit systems.
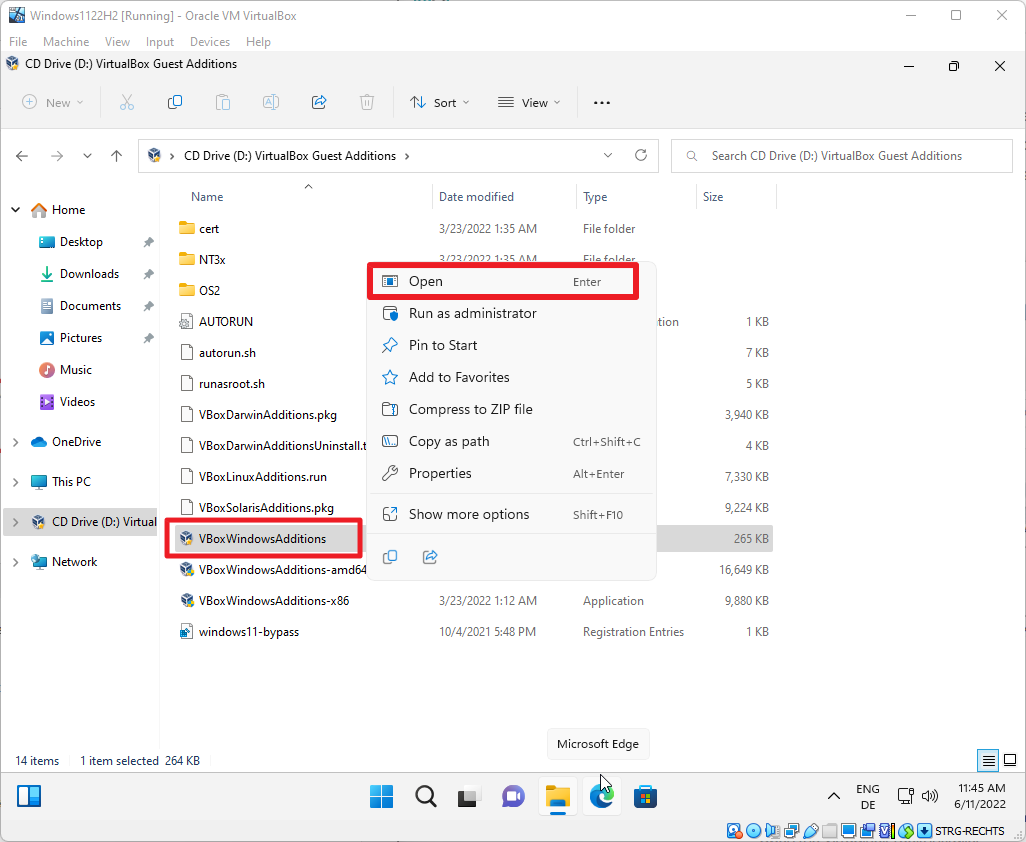
Right-click on one of the files and select open from the context menu to start the installation in the virtual machine. You may double-click on the file to start the installation.
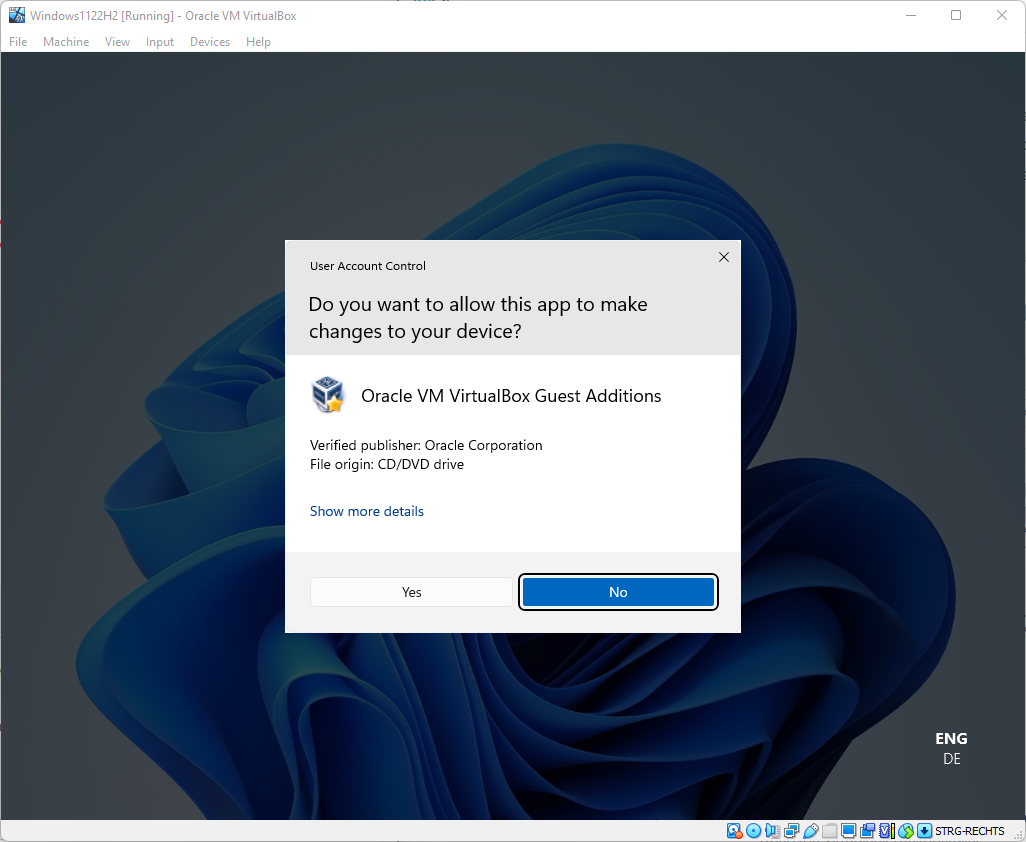
Windows displays a User Account Control prompt, which you need to allow by selecting Yes.
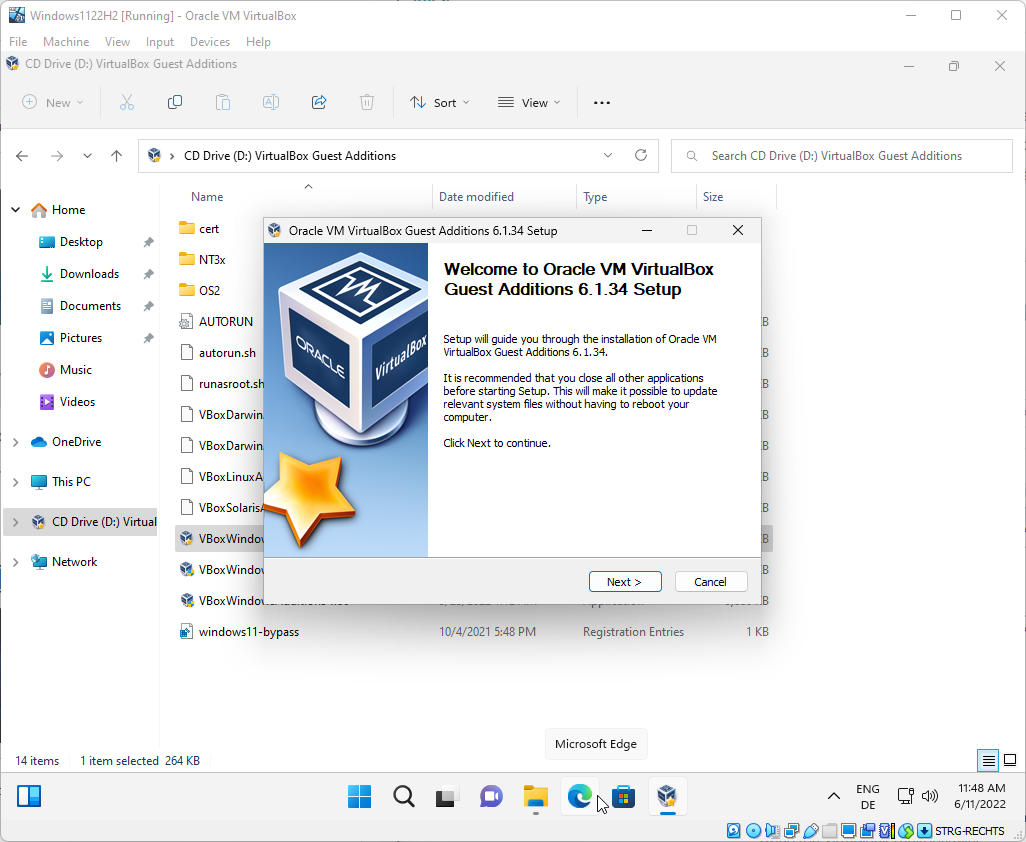
The installer launches after you have selected Yes. Select next on the first page that is displayed.
The page that follows displays the destination folder for the files that will be installed. You may change it, but most users may want to keep the default path. Select Next to proceed.
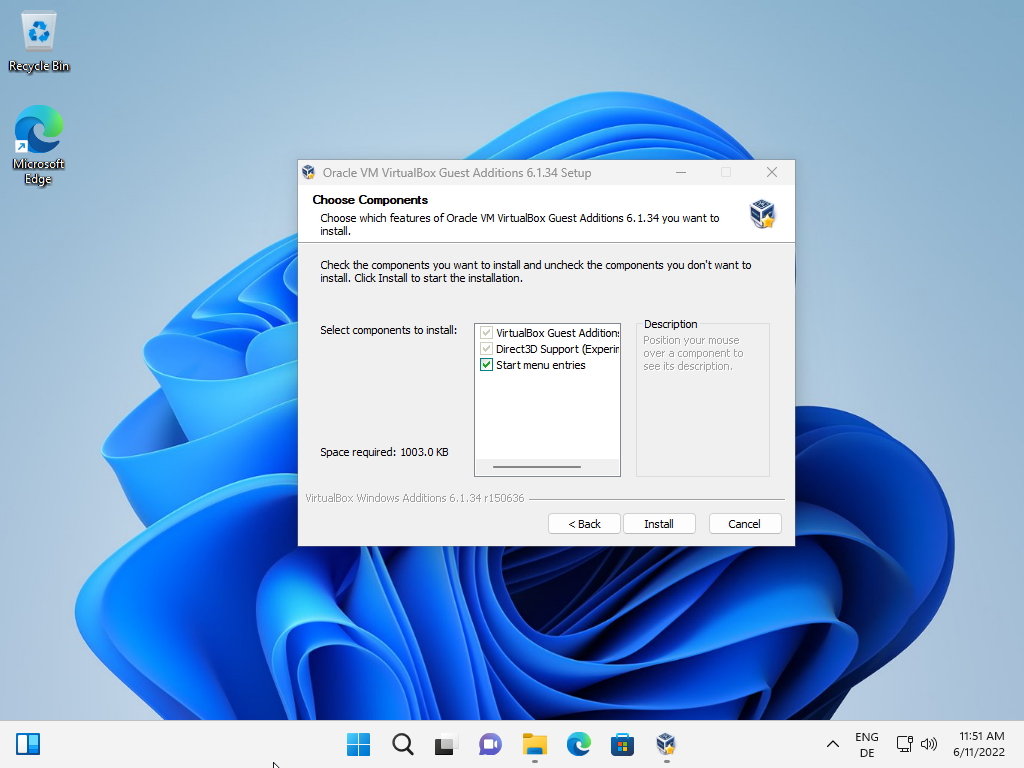
The final screen displays the components that will be installed. You may disable the creation of a start menu entry, but the two remaining components will be installed. Select the install button to proceed.
The installer displays its actions once you hit the install button.
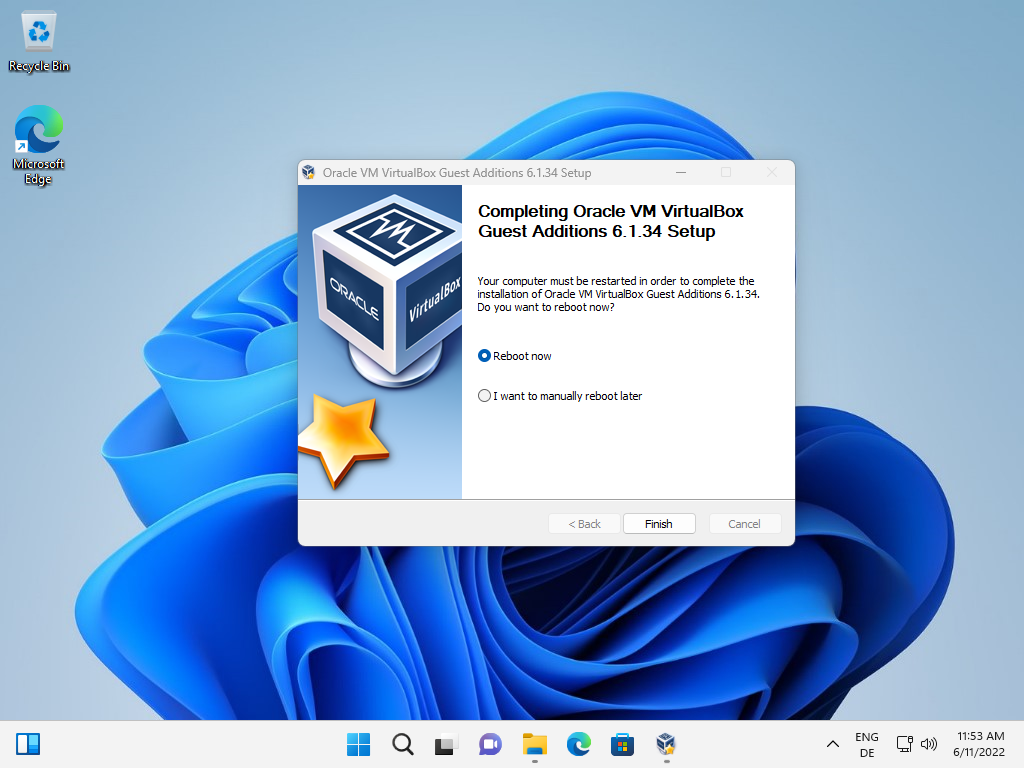
It is necessary to reboot the virtual machine to finalize the installation. You may do so right away by selecting «reboot now», or at a later point in time. Select finish to exit the installer.
All screen resolutions are unlocked after the restart. Select View > Virtual Screen X to select a different resolution. Please note that it may take a few seconds before the resolutions become available.
The physical display limits the available resolution; you can’t go beyond the maximum resolution that is supported by the display.
Summary
Article Name
How to change the Windows screen size in VirtualBox?
Description
Find out how to change the screen resolution of a Windows virtual machine in Oracle’s VirtualBox software.
Author
Martin Brinkmann
Publisher
Ghacks Technology News
Logo
Advertisement
After installing a guest operating system (OS) on VirtualBox, the interface of the guest OS is displayed in a windowed mode by default. Moreover, the size of that window is usually not big, and if you maximize the window’s size, the resolution of the guest OS user interface is left the same.
In the majority of cases, working in a guest OS with low resolution is not comfortable. Don’t worry, as it is possible for you to increase the screen resolution of the guest OS user interface as well as run a guest OS in the full screen mode for macOS, Linux and Windows guest OSs.
How to Make VirtualBox Full Screen for Windows 10 Guests
If security is a concern for you, running Windows 10 as a virtual machine (VM) on VirtualBox is a good idea. You can disable the internet connection or set up a virtual network adapter for a VM in the Host Only mode to allow network communication only between host and guest systems, and deny connecting the Windows 10 guest to external networks, including the internet. As you recall, VirtualBox is installed on the host OS running on a host machine (a physical machine) and the guest OS is the operating system running on a VM.
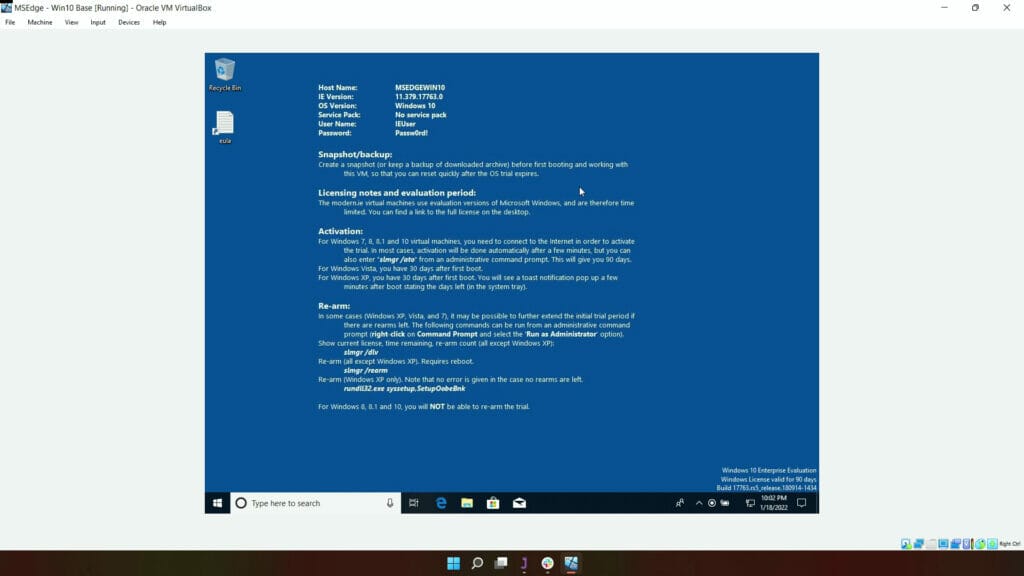
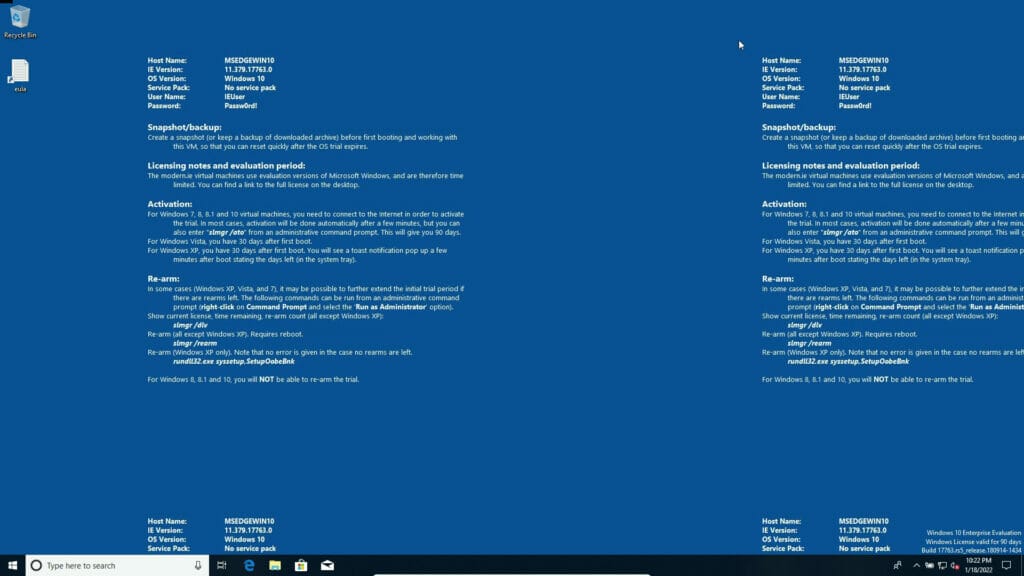
If you try to maximize the VirtualBox VM window right after installing Windows 10 on a VirtualBox VM, the size of the guest OS user interface is not increased (see the screenshot below).

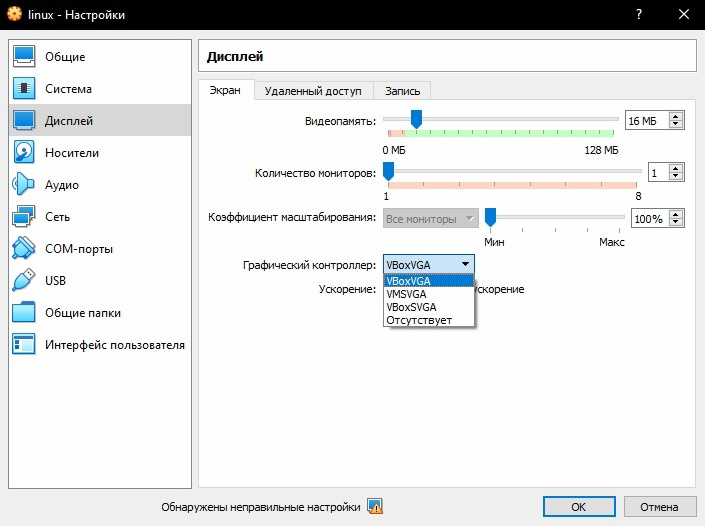
Check the amount of video memory you have in the virtual machine settings. It is recommended that you set 128 MB of video memory, as when a video mode with higher resolution is used, more video memory is needed. You can also enable 2D and 3D acceleration.

If you go to Windows 10 display settings (right click the desktop and select Display settings in the context menu), you can increase the guest OS resolution, but you still have no ability to switch the full screen mode on. For example, in our case the resolution of the monitor is 1920×1080 and the maximum resolution in the Windows 10 guest settings is 1600×1200 (available resolution settings of the guest OS are not for widescreen displays, as you can see). If you try to enter the full screen mode by clicking View > Full screen mode in the VM window or by pressing the combination of the VirtualBox host key and F (Right Ctrl + F in this case), the guest OS screen will not be stretched to the size of your display and resolution will not be increased.

In order to fix this issue and make VirtualBox full screen, you should install VirtualBox Guest Additions on the guest OS.
In the VM window, go to Devices > Insert Guest Additions CD image to insert the ISO disk into the virtual CD drive of the VM.

In the guest Windows system open Windows Explorer, go to the virtual CD drive (disk D: in this case) and run VBoxWindowsAdditions-amd64.exe file to install VirtualBox Guest Additions on the Windows 10 guest.

The process of installing Guest Additions is quite straightforward. After finishing the installation, reboot the VM.
Once VirtualBox Guest Additions are installed, you can see a different set of resolution settings in the Windows 10 guest. In the VM Window menu, go to View and make sure that the Auto-resize Guest Display option is enabled.
Move the mouse pointer over the corner of the VM window, push the left mouse button and change the size of the VM window. The resolution of the user interface of guest Windows 10 is automatically changed. Now you can maximize the VM window size of the Windows 10 guest.

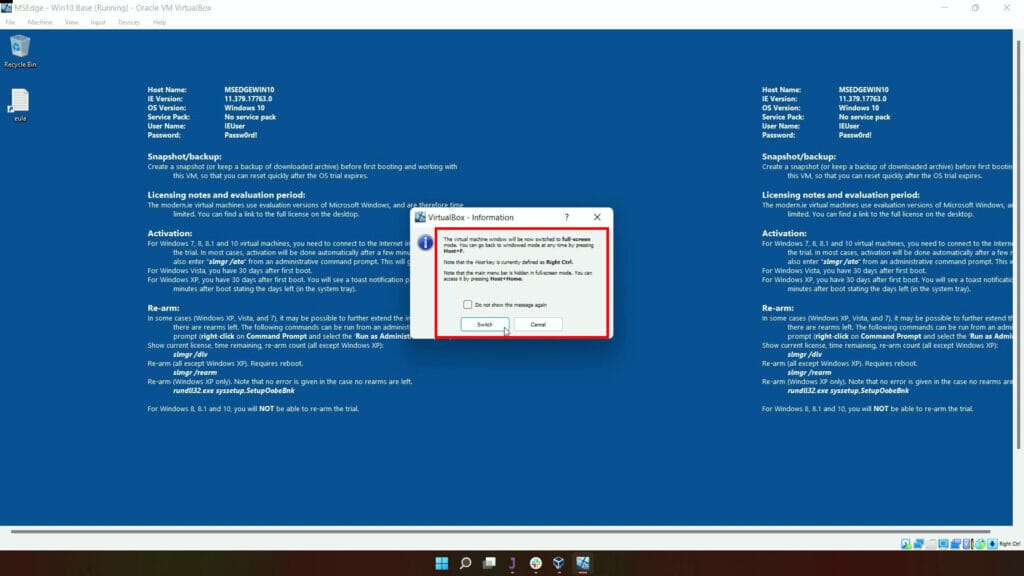
We are now close to answering the “how to make VirtualBox full screen Windows 10” question. After making the configuration explained above, you can enable the full screen mode for your Windows 10 VM by clicking View > Full Screen mode in the VM window. As an alternative, you can press the combination of the VirtualBox Host key and F. Right Control is the default host key in VirtualBox, hence, you should press Right Ctrl + F to enter full screen mode for a Windows 10 VM.
How to Make VirtualBox Full Screen for Mac OS X Guests
After installing macOS on VirtualBox, the default screen resolution of the guest OS is 1024×768. Display Settings of macOS can be found in System preferences > Display. You cannot increase the screen resolution in the display options. Only the 1024×768 resolution is available in these settings.

Before you can increase the display resolution for your macOS running on a VM, go to VM settings > Display, and make sure that the amount of video memory is 128 MB and the Enable 3D acceleration checkbox is ticked (similarly to the process explained above for the Windows VM).
Let’s now go to configuring the display resolution of the macOS guest.
- Power off your macOS VM.
- Open the console in your host machine. In our example, Windows 10 is used as a host machine, hence, we have to run CMD as Administrator.
- Go to the VirtualBox directory; the default installation path of VirtualBox is C:\Program Files\oracle\virtualbox
cd "c:\Program Files\oracle\virtualbox"
Set the necessary resolution with VBoxManage which is a command line configuration tool of VirtualBox. The defined resolution can be less than or equal to the resolution of your physical monitor connected to your physical (host) machine. In our case, the monitor has the FullHD resolution (1920×1080).
Let’s run the command in the host OS to set the necessary resolution.
VBoxManage setextradata "macOSMojave10-14" VBoxInternal2/EfiGraphicsResolution 1920x1080If you use Linux or macOS on a host machine, the configuration principle is similar – run VBoxManage with the similar parameters.
- Power on the VM.
Now you should notice that the VM display resolution in the VM window is higher right after powering on the VM (during VM boot). When a VM boots, you will see your resolution in the display settings of the macOS guest. There is still only one resolution parameter in the list, but it is 1920×1080 now instead of 1024×768 seen previously.

Press the combination of the host key and F. In this case, this is the Right Ctrl + F key combination. As an alternative to the key combination, you can click View in the VM window and hit the Full-screen Mode option.
Now your guest macOS running on VirtualBox is running in the full screen mode.
Advantages of this method: Ease of use.
Disadvantages of this method: You need to shut down a VM to change screen resolution in the VirtualBox VM window.
Since VirtualBox v.6.0.0 was released, VirtualBox Guest Additions have been provided for macOS guest OSs, while earlier versions of VirtualBox did not include Guest Additions for macOS. Unfortunately, the current version of macOS Guest Additions does not contain macOS graphic drivers to change the VM display resolution automatically when stretching or maximizing the guest VM window. Only the basic functionality is available right now, which means that you cannot use the same method of changing screen resolution as for Windows and Linux guest OSs running on VirtualBox after installing Guest Additions.
How to Make VirtualBox Full Screen for Linux Guests
First of all, make sure that in the virtual machine display settings (Machine > Display), the amount of video memory is 128 MB (as was the case for the previous two examples).
Install VirtualBox Guest Additions on your Linux guest.
Let’s explore how to make VirtualBox full screen for Linux guests on an example of using Ubuntu. You can install VirtualBox Guest Additions on Linux, as was shown in the first section for Windows by inserting the ISO disk image into a virtual CD/DVD drive of a VM and running the installer for the appropriate platform. We considered this method in the blog post about installing Ubuntu on VirtualBox. Installing Guest additions from online package repositories with your package manager is possible, but at this time there remain some disadvantages caused by package dependencies. Hence, it is recommended to install Guest Additions from a virtual ISO disk at present.
In order to install Guest Additions and make VirtualBox full screen for Linux guests, do the following:
- In the VM window hit Devices > Insert Guest Additions CD image.
- If autorun is enabled, you will see the autorun window. Hit Run and enter your password to confirm running the installer.
- Type y and press Enter in the appeared console window.
- After finishing installation reboot the Linux VM.
Now you can change the size of the VM window, and the resolution of your guest Linux will fit the size of the VM window automatically. Go to View > Full screen mode or press the Host+F combination to make VirtualBox full screen for your Linux guest.
Note: If for some reason, you cannot install VirtualBox Guest Additions on your guest OS, you can manually and statically increase the resolution of the guest OS display by using VBoxManage (a VirtualBox command line configuration tool) on a host OS as explained above in the macOS configuration section:
VBoxManage setextradata "VM_name" VBoxInternal2/EfiGraphicsResolution 1920x1080
Conclusion
Using a full-screen mode for a virtual machine is convenient and allows you to appreciate the advantages of hardware virtualization. This feature allows you to use the guest OS on the VM much as it would be used on a host machine for high resolution applications, large workspace, etc.
The first method is using VBoxManage, the command line VirtualBox management tool, for changing resolution manually. This method can be used for all available OSs – Windows, macOS and Linux. The disadvantage of this method is that you have to shut down the VM to change the guest OS display resolution. Use this method only if it is impossible to install VirtualBox Guest Additions on a guest OS.
Automatic changing resolution in real time when resizing a VM window or entering a full-screen mode is possible for Windows and Linux guests after installing Guest Additions. This is the second method that is available. Unfortunately, the current version of VirtualBox Guest Additions for macOS (v.6.0.8) does not contain special display drivers for changing resolution and entering a full-screen mode in macOS guests automatically.
If you want to run multiple operating systems such as Linux, Android, Windows, WebOS or MacOS then using VirtualBox is the tool you need to use. There are other tools I’ve used in the past such as Virtual Machine from VMWare but VirtualBox does the job quite nicely. Especially when there are VirtualBox images already created and you can download them from here: https://www.osboxes.org/virtualbox-images/
I’ve been using VirtualBox to troubleshoot issues for Advertise Me and also for creating HOW TO videos for the YouTube channel. This eliminates the need to install multiple programs on my main computers Operating System. When I record the HOW TO videos, I needed the guest OS on VirtualBox to display the screen in Full HD (1920×1080) and at Full Screen. This is how it looked like (resolution of 1152×864) :
As you can see from the image, the actually screen in the VirtualBox doesn’t completely fill to the edge of the actual screen. The actual screen has a resolution of 1920×1080. So to fix this you need to check to make sure to increase the video memory. To do this follow these steps:
- Make sure the VirtualBox instance is shut down. Then click on Settings
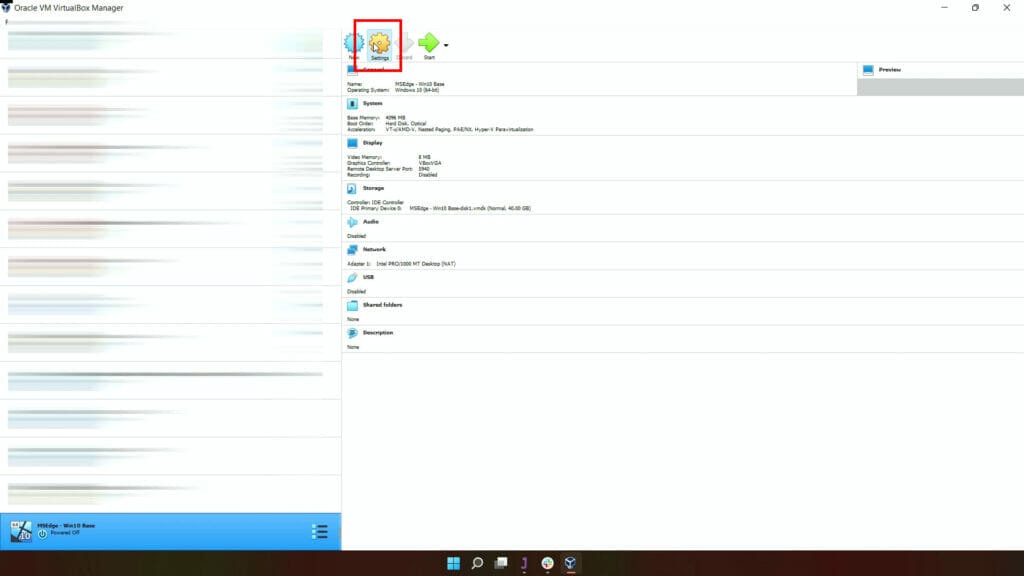
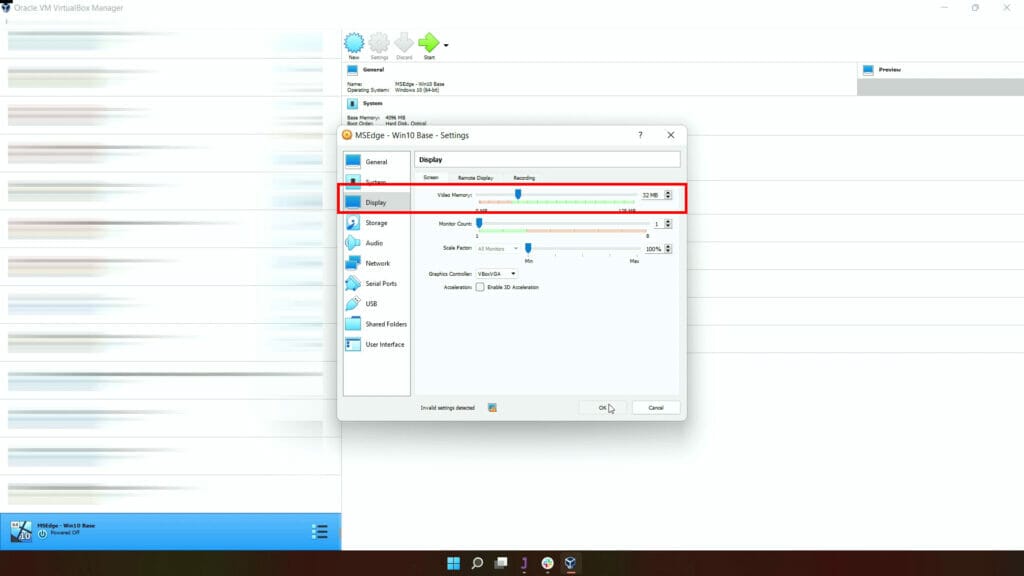
- Click on Display and then Screen. Move the Video memory slider to the right to increase the video memory to 32 MB. Press OK to save.
- Start the VirtualBox instance and then wait until the operating is completely loaded. Then click on View – Virtual Screen 1 and select Resize to 1920×1080
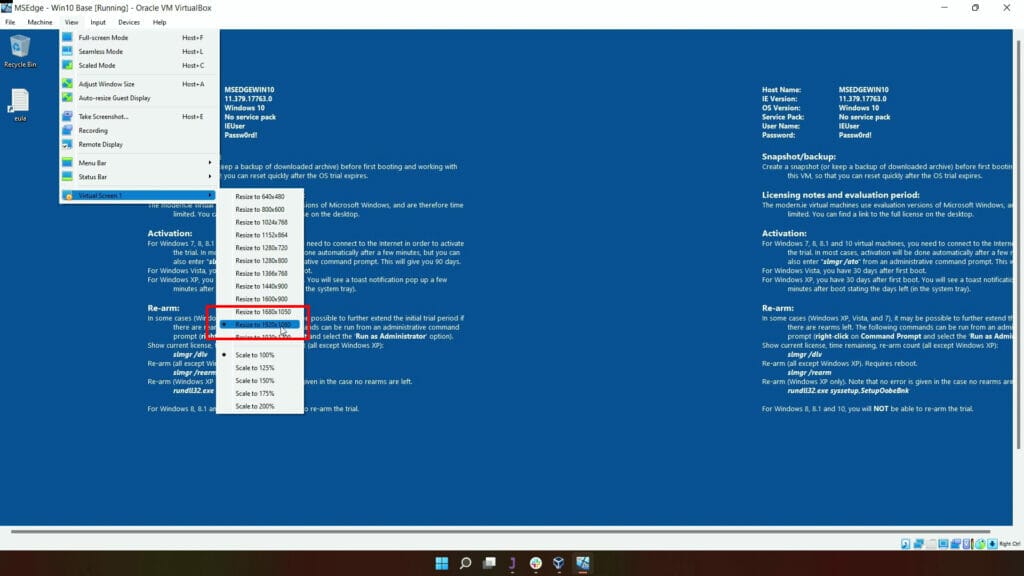
- Select View Full-screen Mode to make the whole VirtualBox instance full screen
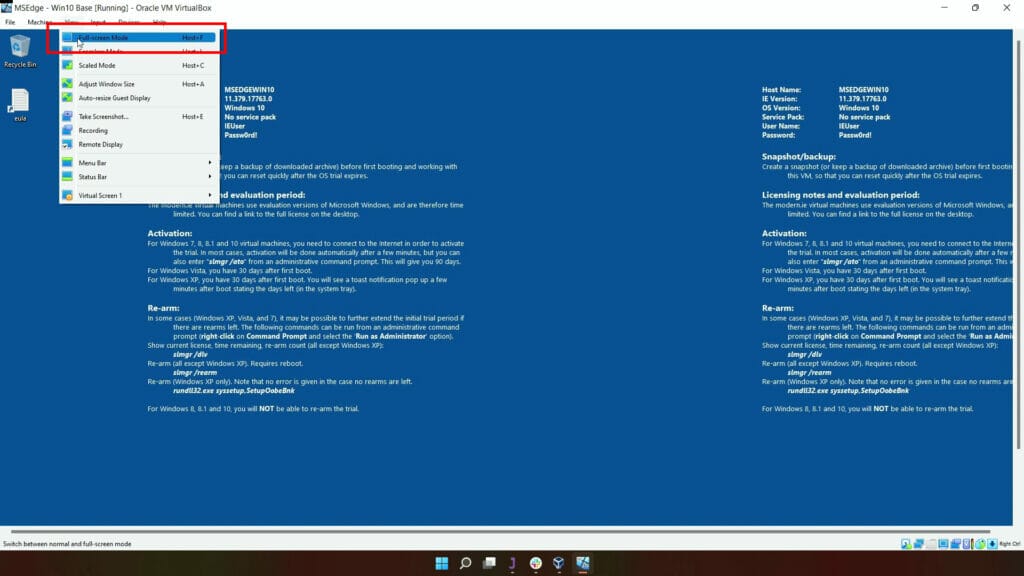
- This is how it looks like when it’s full screen
- To exit from full screen you need to press the Ctrl (right hand side of the keyboard) and F button.
Here’s a video on HOW TO CHANGE WINDOWS 10 SCREEN RESOLUTION IN VIRTUALBOX

If this article helped you in any way and you want to show your appreciation, I am more than happy to receive donations through PayPal. This will help me maintain and improve this website so I can help more people out there. Thank you for your help.
HELP OTHERS AND SHARE THIS ARTICLE
LEAVE A COMMENT
I am an entrepreneur based in Sydney Australia. I was born in Vietnam, grew up in Italy and currently residing in Australia. I started my first business venture Advertise Me from a random idea and have never looked back since. My passion is in the digital space, affiliate marketing, fitness and I launched several digital products. You will find these on the portfolio page.
I’ve decided to change from a Vegetarian to a Vegan diet and started a website called Veggie Meals.
I started this blog so I could leave a digital footprint of my random thoughts, ideas and life in general.
If any of the articles helped you in any way, please donate. Thank you for your help.
Affiliate Compensated: there are some articles with links to products or services that I may receive a commission.