
In today’s interconnected world, the need for efficient and seamless communication is more important than ever. One crucial aspect of this is ensuring that text and characters are correctly encoded, allowing for compatibility across different platforms and languages. In Windows 10, setting the UTF-8 encoding is a vital step to enable smooth communication and eliminate any potential issues with character display and compatibility.
The UTF-8 encoding, which stands for Unicode Transformation Format-8, is a widely used character encoding that supports a vast range of characters from various scripts and languages. By setting the UTF-8 encoding in Windows 10, you guarantee that your system can handle and display text in different languages accurately. This ensures that you can read and share content from around the world without any distortion or loss of information. With the increasing diversity of content and the global nature of communication, setting UTF-8 encoding in Windows 10 is an essential step to enable seamless communication across different languages and platforms.
To set Utf-8 encoding in Windows 10, follow these steps:
- Open the Control Panel.
- Select «Clock and Region» and then click on «Region.»
- In the «Formats» tab, click on «Additional settings.»
- Go to the «General» tab, and under «Language for non-Unicode programs,» select «UTF-8.»
- Click «OK» and restart your computer.

Understanding UTF-8 Encoding in Windows 10
Setting UTF-8 encoding in Windows 10 is crucial for ensuring proper handling and display of characters from different languages and scripts. UTF-8 is a variable-width character encoding that supports almost all characters in the Unicode standard, making it the most widely used encoding worldwide. By setting UTF-8 encoding in Windows 10, you can avoid issues such as garbled text, incorrect character rendering, and missing characters when working with files, websites, or applications that use non-ASCII characters.
1. Setting UTF-8 Encoding for System Locale
The first step to setting UTF-8 encoding in Windows 10 is to configure the system locale settings. The system locale determines the default encoding used by applications and services for non-Unicode programs. Here’s how you can set the UTF-8 system locale:
- Open the Control Panel by searching for it in the Windows 10 Start menu and selecting the corresponding result.
- In the Control Panel, click on «Clock and Region» or «Clock, Language, and Region» depending on your system configuration.
- Under the «Region» or «Region and Language» section, click on «Change date, time, or number formats.»
- In the Formats tab of the Region settings, click on the «Additional settings» button.
- In the «Customize Format» window, navigate to the «Beta: Use Unicode UTF-8 for worldwide language support» section and check the box.
- Click OK to apply the settings and restart your computer for the changes to take effect.
Setting the system locale to UTF-8 ensures that non-Unicode applications and services use this encoding by default, reducing the risk of character-related issues when working with different languages and scripts.
Benefits of Setting UTF-8 Encoding for System Locale
By setting UTF-8 encoding for the system locale, you gain several benefits:
- Compatibility: UTF-8 is widely supported across different platforms, applications, and programming languages, ensuring optimal compatibility and interoperability.
- Character Support: UTF-8 supports nearly all characters and symbols from every major writing system, making it suitable for multilingual applications and content.
- Future-Proofing: UTF-8 is the recommended encoding for future-proofing your systems and applications. It allows seamless incorporation of new characters and scripts as Unicode continues to evolve.
- Global Reach: With UTF-8 encoding, your content can reach a global audience without language or character-based restrictions.
2. Configuring UTF-8 Encoding for Individual Applications
While setting the system locale to UTF-8 is crucial, individual applications can also have their own encoding settings. Configuring UTF-8 encoding for specific applications ensures that they handle non-ASCII characters correctly. Here’s how you can configure UTF-8 encoding for some popular applications:
Microsoft Office Applications
To set UTF-8 encoding for Microsoft Office applications such as Word, Excel, and PowerPoint, follow these steps:
- Open the respective Office application (e.g., Word, Excel).
- Click on «File» at the top left corner and select «Options.»
- In the Options window, navigate to the «Advanced» tab.
- Scroll down to the «International» section.
- Under «Choose the encoding standard to use when saving files,» select «UTF-8.»
- Click OK to save the changes.
Configuring UTF-8 encoding for Microsoft Office applications ensures that you can save and work with documents containing non-ASCII characters without any issues.
Web Browsers
Web browsers are key tools for accessing and viewing websites with different language content. Here’s how you can configure UTF-8 encoding in popular web browsers:
Google Chrome
To set UTF-8 encoding in Google Chrome, follow these steps:
- Open Google Chrome and click on the three-dot menu icon at the top right corner.
- Select «Settings» from the drop-down menu.
- Scroll down and click on «Advanced» to expand the advanced settings.
- Under the «Languages» section, click on «Language and input settings.»
- In the «Languages» settings, click on the «Add» button under the «Customize languages» section.
- Search for «English» in the language list and select «English (United States).»
- Drag «English (United States)» to the top of the list.
- Click «Done» to save the changes.
Configuring UTF-8 encoding in Google Chrome ensures that the browser can handle and display different language content correctly.
3. Troubleshooting UTF-8 Encoding Issues
Despite configuring UTF-8 encoding, you may still encounter issues with character handling in Windows 10. Here are some troubleshooting steps to resolve UTF-8 encoding issues:
Check File Encoding
If you experience character rendering issues with a specific file, check its encoding. Most text editors allow you to view and change the encoding of a file. Ensure that the file’s encoding matches the expected UTF-8 encoding.
Update Applications
If you encounter character handling issues in specific applications, ensure that you have the latest version installed. Application updates often include bug fixes and improvements related to character encoding.
Verify Font Support
In some cases, character rendering issues can occur due to insufficient font support. Ensure that you have appropriate fonts installed for the languages and scripts you are working with. Additionally, check the font settings within applications to ensure they are set to handle UTF-8 encoded characters.
4. Embracing UTF-8 Encoding for Seamless Multilingual Experience
Setting UTF-8 encoding in Windows 10 is a crucial step towards embracing multilingualism and ensuring smooth communication across languages. By configuring the system locale and individual application settings, you can avoid character-related issues and enjoy a seamless experience regardless of the languages and scripts you work with.

Setting utf-8 Encoding in Windows 10
Utf-8 encoding is a character encoding standard used to represent text in various languages, including English. Windows 10, by default, uses a different encoding called ANSI, which may not support all characters from different languages. However, it is possible to set utf-8 encoding in Windows 10 to ensure proper rendering of characters and support for international languages. Here’s how:
Method 1: Changing System Locale
To set utf-8 encoding, you can change the system locale in Windows 10. Follow these steps:
- Open the Control Panel and go to the «Clock and Region» section.
- Select «Region» and click on the «Administrative» tab.
- Click on «Change System Locale» and check the «Beta: Use Unicode UTF-8 for worldwide language support» option.
- Click «OK» and restart your computer for the changes to take effect.
Method 2: Changing File Encoding
If you want to set utf-8 encoding for specific files, you can change their encoding individually. Here’s how:
- Right-click on the file and select «Properties.»
- Go to the «General» tab and click on «Advanced» under «Attributes.»
- In the «Advanced Attributes» window, check the «UTF-8» option under «File Origin
Key Takeaways: How to Set Utf-8 Encoding in Windows 10
- Utf-8 encoding is important for displaying and storing international characters in Windows 10.
- Open Notepad or any text editor to create a new UTF-8 encoded file.
- Choose File > Save As and select UTF-8 encoding from the Encoding dropdown menu.
- Change the file extension to .txt if necessary and click Save.
- You can also set Utf-8 encoding as the default for all new files in Notepad.
Frequently Asked Questions
Here are some common questions related to setting Utf-8 encoding in Windows 10:
1. What is Utf-8 encoding?
Utf-8 encoding is a way of representing characters in a computer system. It allows for the representation of all the characters in the Unicode character set, which includes a vast range of characters used in various languages and symbols. Utf-8 is widely used and recommended for text encoding formats because it can encode any character in a concise and efficient manner.
2. Why should I set Utf-8 encoding in Windows 10?
Setting Utf-8 encoding in Windows 10 is important to ensure that your system can correctly display and handle text in different languages, including characters and symbols that are not present in the default encoding. Utf-8 encoding allows for universal compatibility and ensures that the correct characters are displayed when working with files, websites, or applications that use Utf-8 encoding.
3. How can I set Utf-8 encoding in Windows 10?
To set Utf-8 encoding in Windows 10, you can follow these steps:
- Open the Control Panel by searching for «Control Panel» in the Windows Start menu and selecting it.
- Click on «Clock and Region» and then on «Region».
- In the Region dialog box, click on the «Administrative» tab.
- Under the «Language for non-Unicode programs» section, click on the «Change system locale» button.
- In the «Region Settings» dialog box, select «Beta: Use Unicode UTF-8 for worldwide language support» and click on «OK».
- Restart your computer to apply the changes.
4. Can I change the Utf-8 encoding for specific applications only?
No, the Utf-8 encoding setting in Windows 10 applies system-wide and affects all applications. Changing the encoding setting will ensure that Utf-8 characters are displayed correctly in all programs that use Utf-8 encoding. It is a global setting that affects the entire operating system.
5. Are there any other encoding options available in Windows 10?
Yes, Windows 10 supports various encoding options, including Utf-8, which is the recommended and widely used encoding format. Other options include ANSI, which is mostly used for backward compatibility with older software, and Unicode, which is a more generic term that refers to various character encoding schemes, including Utf-8. However, Utf-8 is the preferred encoding format for its compatibility and efficiency.
Setting UTF-8 encoding in Windows 10 is essential for ensuring compatibility with various languages and characters. By following a few simple steps, you can easily configure your system to use UTF-8 encoding, allowing you to work with multilingual content without any issues.
To set UTF-8 encoding in Windows 10, you need to navigate to the Region settings in the Control Panel. From there, you can access the Administrative tab and change the system locale to use UTF-8 encoding. This will enable your computer to recognize and display characters from different languages accurately.
Once you have set the UTF-8 encoding, you will be able to seamlessly work with files and applications that contain characters from various languages. This is particularly useful for web development, international communication, and working with documents that require special characters.
By ensuring that your Windows 10 system is set to UTF-8 encoding, you can eliminate any potential character display issues and improve overall compatibility. It’s a simple but crucial step that can make a significant difference in your work with multilingual content.
Setting Utf-8 Encoding in Windows 10 allows users to ensure compatibility and proper display of international characters in their applications and documents. With the increasing globalization of communication, it is crucial to have the ability to view and work with text in different languages seamlessly. Utf-8, a widely adopted character encoding standard, offers comprehensive support for a vast range of languages, making it essential for anyone dealing with multilingual content.
To set Utf-8 Encoding in Windows 10, users can follow a straightforward process. First, open the Control Panel by searching for it in the Start menu. Then, navigate to the «Clock and Region» section and select «Region.» In the Region settings, go to the «Administrative» tab, and click on the «Change system locale» button. From there, choose Utf-8 as the default language for non-Unicode programs. By making this adjustment, users can ensure that their Windows 10 system supports Utf-8 encoding, enabling seamless interaction with diverse language content.
To set UTF-8 encoding in Windows 10, follow these steps:
- Open the Control Panel.
- Select «Region» or «Region and Language.»
- Click on the «Administrative» tab.
- Under «Language for non-Unicode programs,» click on «Change system locale.»
- Check the box for «Beta: Use Unicode UTF-8 for worldwide language support.»
- Click «OK» and restart your computer.
By following these steps, you’ll be able to set UTF-8 encoding in Windows 10 and ensure compatibility with international characters and languages.

Understanding Utf-8 Encoding
Utf-8 encoding is a character encoding standard that is commonly used for representing characters in the Unicode character set. It supports almost all characters from all human languages, making it widely used for international communication and data storage. In Windows 10, setting the Utf-8 encoding is crucial to ensure proper display of characters and compatibility with different applications and systems. This article will guide you through the process of setting Utf-8 encoding in Windows 10, empowering you to handle and work with various character sets seamlessly.
Checking Current Encoding Settings
Before diving into the process of setting Utf-8 encoding, it’s important to check the current encoding settings on your Windows 10 system. This will help you understand the current state and determine if any changes are required. Follow the steps below to check the current encoding settings:
1. Open the Control Panel by searching for it in the Windows search bar.
2. In the Control Panel, click on «Clock and Region» and then select «Region.»
3. In the Region window, go to the «Administrative» tab.
4. Under the «Language for non-Unicode programs» section, you will see the current system locale. Note down this information for reference.
Setting Utf-8 as the System Locale
If your current system locale is not Utf-8, you can change it to Utf-8 to enable proper Utf-8 encoding. Follow the steps below to set Utf-8 as the system locale:
1. Open the Control Panel by searching for it in the Windows search bar.
2. In the Control Panel, click on «Clock and Region» and then select «Region.»
3. In the Region window, go to the «Administrative» tab.
4. Under the «Language for non-Unicode programs» section, click on the «Change system locale» button.
5. In the Region Settings window, select «Beta: Use Unicode UTF-8 for worldwide language support» checkbox.
6. Click on «OK» to save the changes and restart your computer for the settings to take effect.
Testing Utf-8 Encoding
After setting Utf-8 as the system locale, it’s important to test whether the changes have been applied successfully. Follow the steps below to test Utf-8 encoding:
- Open a text editor or any application that allows you to input text.
- Type and save some text that includes characters from different languages, such as accents, diacritics, or non-Latin characters.
- Open the saved file and check if all the characters are displayed correctly without any gibberish or question marks.
- If all characters are displayed correctly, it means that Utf-8 encoding is working properly.
Modifying Utf-8 Encoding in Specific Applications
In some cases, you may encounter issues with Utf-8 encoding in specific applications, even after setting it as the system locale. This can happen if the application has its own character encoding settings that override the system settings. Here’s how you can modify Utf-8 encoding in specific applications:
1. Open the application in which you are facing Utf-8 encoding issues.
2. Look for the application’s language or encoding settings, usually found in the preferences or settings menu.
3. Select Utf-8 as the preferred encoding option.
4. Save the changes and restart the application if required.
Common Applications with Utf-8 Encoding Settings
Many popular applications have Utf-8 encoding settings that can be modified to ensure proper character display. Here are a few examples:
| Application | Location of Utf-8 Encoding Settings |
| Notepad++ | Settings > Preferences > New Document > Encoding |
| Sublime Text | View > Encoding |
| Visual Studio Code | File > Save with Encoding |
| Microsoft Office | Options > Advanced > General > File Locations > File Encoding |
| Browsers (Chrome, Firefox, etc.) | Settings > Advanced > Fonts and Encoding |
Using Utf-8 Encoding for Web Development
Utf-8 encoding plays a crucial role in web development, ensuring that websites can display and handle multilingual content properly. When working with web development tools and frameworks, it’s important to set Utf-8 encoding to ensure seamless language support. Here are some key points to remember when using Utf-8 encoding for web development:
- Set the « tag in the « section of your HTML files.
- Ensure that your server-side scripts and databases are also set to Utf-8 encoding.
- If using a content management system (CMS) like WordPress, check the encoding settings in the CMS admin panel.
- Validate and sanitize user input to prevent potential encoding-related security vulnerabilities.
Setting Utf-8 Encoding for File Opening
Besides setting Utf-8 as the system locale, you may also need to specify the encoding when opening specific files to ensure they are interpreted correctly. The steps below will guide you through the process of setting Utf-8 encoding when opening files:
1. Open the application used to open the file, such as a text editor.
2. In the application, locate the file opening or file import feature.
3. Look for an option related to encoding or character set. The terminology may vary depending on the application.
4. Choose Utf-8 or the appropriate encoding option from the available list.
5. Open the desired file with the specified Utf-8 encoding to ensure proper interpretation of the characters.
Conclusion
Setting Utf-8 encoding in Windows 10 is crucial for proper handling and display of multilingual content. By following the steps outlined in this article, you can ensure seamless support for characters from various languages and encoding standards. Whether it’s setting Utf-8 as the system locale, modifying encoding settings in specific applications, or using Utf-8 for web development, understanding and implementing Utf-8 encoding will enhance your experience in working with diverse character sets.

Setting Utf-8 Encoding in Windows 10
Utf-8 encoding is widely used to support international characters and symbols in various software applications, including Windows 10. To set Utf-8 encoding in Windows 10, follow these steps:
Using Registry Editor
1. Press Windows key + R to open the Run dialog box.
2. Type «regedit» and press Enter to open the Registry Editor.
3. Navigate to the following registry key: HKEY_LOCAL_MACHINE\SOFTWARE\Microsoft\Internet Explorer\Main\FeatureControl\FEATURE_BROWSER_EMULATION
4. Right-click on the empty space in the right pane and select «New» -> «DWORD (32-bit) Value».
5. Name the new value «iexplore.exe».
6. Double-click on the «iexplore.exe» value and set the «Value data» to 8888 (Hexadecimal).
Using Notepad
1. Open Notepad.
2. Click on «File» -> «Save As».
3. In the «Encoding» dropdown, select «Utf-8».
4. Choose the desired location and filename for your file, and click «Save».
With these simple
Key Takeaways: How to Set Utf-8 Encoding in Windows 10
- Open the Control Panel by searching for it in the Windows search bar.
- Click on «Clock and Region» and then select «Region» from the options.
- In the Region window, click on the «Administrative» tab.
- Under the «Language for non-Unicode programs» section, click on «Change system locale».
- Check the box next to «Beta: Use Unicode UTF-8 for worldwide language support».
Frequently Asked Questions
Here are some common questions about setting Utf-8 Encoding in Windows 10:
1. How do I change the encoding to Utf-8 in Windows 10?
To change the encoding to Utf-8 in Windows 10, follow these steps:
1. Open the Control Panel by searching for it in the Windows Start Menu.
2. Click on «Clock and Region» and then «Region».
3. In the «Formats» tab, click on «Additional settings».
4. In the «Code page conversion tables» section, select «Utf-8» from the drop-down menu.
5. Click «Apply» and then «OK» to save the changes.
2. Why is Utf-8 encoding important?
Utf-8 encoding is important because it supports a wide range of characters and symbols from different languages. It is a universal encoding standard that allows for seamless communication and compatibility between different systems and devices.
By using Utf-8 encoding, you ensure that your text is correctly displayed and interpreted across platforms, making it essential for international communication, website development, and data storage.
3. Can I change the encoding for specific files or folders?
Yes, you can change the encoding for specific files or folders in Windows 10. Follow these steps:
1. Right-click on the file or folder you want to change the encoding for.
2. Select «Properties» from the context menu.
3. In the «Properties» window, go to the «General» tab.
4. Click on the «Advanced…» button.
5. In the «Advanced Attributes» window, check the box next to «Utf-8» under «File Encoding».
6. Click «OK» to save the changes.
4. How can I check the current encoding of a file in Windows 10?
To check the current encoding of a file in Windows 10, follow these steps:
1. Right-click on the file and select «Properties».
2. In the «Properties» window, go to the «General» tab.
3. Under «Attributes», you will see the «Encoding» information.
5. Can I set Utf-8 as the default encoding in Windows 10?
Yes, you can set Utf-8 as the default encoding in Windows 10. Here’s how:
1. Open the Control Panel and click on «Clock and Region» and then «Region».
2. In the «Formats» tab, click on «Additional settings».
3. In the «Code page conversion tables» section, select «Utf-8» from the drop-down menu.
4. Click «Apply» and then «OK» to save the changes.
To summarize, setting UTF-8 encoding in Windows 10 is an important step to ensure compatibility and proper display of characters in various applications. By following the steps outlined in this article, you can easily change the default encoding settings and avoid any issues with text encoding in your system.
Remember, UTF-8 is a widely accepted and flexible encoding format that supports a wide range of characters from different languages. It is crucial for international communication, web development, and file sharing. Keeping your system’s default encoding as UTF-8 will ensure seamless interactions with texts from around the world.
При установке или использовании некоторых программ, а иногда и в интерфейсе системы некоторые пользователи могут столкнуться с тем, что вместо русских букв отображаются «кракозябры», «иероглифы», квадраты и знаки вопроса.
В этой инструкции подробно о том, как исправить отображение кириллицы в Windows 11 для конкретных программ или системы в целом.
Использование Юникод (UTF-8)
Прежде чем приступить, отмечу, что всё описанное ниже не относится к случаям, когда какой-то текстовый документ или сайт отображается неправильно. В этом случае причина, с большой вероятностью, в неверно определенной вашей программой для открытия файла или браузером кодировкой файла.
Для решения можно использовать текстовые редакторы с возможностью выбора кодировки (например, широкий набор поддерживаемых кодировок доступен в Sublime Text), расширения браузера для изменения кодировки или онлайн-сервисы для конвертации.
Если проблема с отображением кириллицы возникает в единичных программах, при этом речь идёт не о каком-то очень старом ПО, возможно, причина в настройках региональных стандартах, в частности, в функции использования символов Юникод (UTF-8). Для того, чтобы проверить, в этом ли дело, выполните следующие действия:
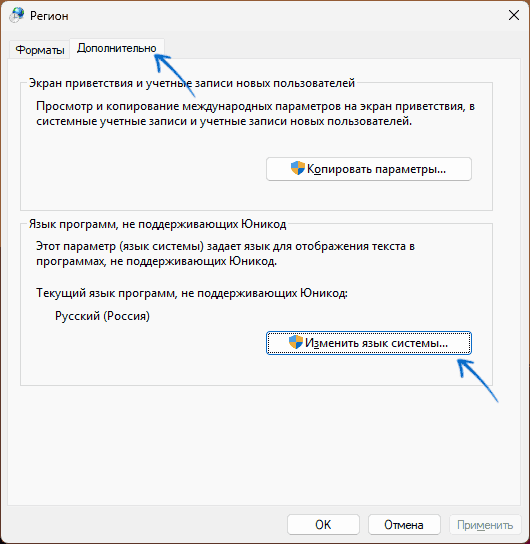
- Перейдите в Панель управления (можно использовать поиск на панели задач), откройте раздел «Региональные стандарты» и перейдите на вкладку «Дополнительно». Попасть на эту вкладку можно, с помощью клавиш Win+R и ввода команды
control intl.cpl,,1
- Нажмите кнопку «Изменить язык системы».

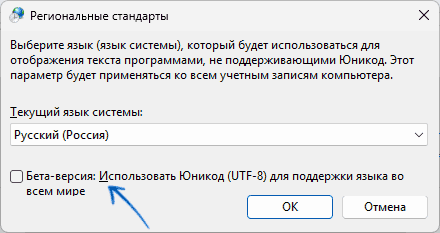
- Проверьте текущий язык системы (установите «Русский», если выбран другой) и состояние отметки «Использовать Юникод (UTF-8) для поддержки языка во всем мире». По умолчанию она снята. Если в вашем случае включена — попробуйте убрать и нажать «Ок», если же отключена, то наоборот.

Вам будет предложено перезагрузить компьютер — сделайте это, после чего проверьте, решилась ли проблема.
Кодовые страницы в реестре
В некоторых случаях, особенно когда ваша Windows 11 была русифицирована установкой языкового пакета (или у вас «сборка» на основе англоязычной версии системы), проблема с «иероглифами» может быть вызвана использованием не подходящих кодовых страниц.
Исправить ситуацию можно попробовать в реестре, однако предварительно я рекомендую создать точку восстановления системы.
Шаги будут следующими:
- Нажмите клавиши Win+R на клавиатуре, введите regedit и нажмите Enter
- Перейдите к разделу реестра
HKEY_LOCAL_MACHINE\SYSTEM\CurrentControlSet\Control\Nls\CodePage
- Обратите внимание на параметр с именем ACP в правой панели редактора реестра и его значение. Если оно отличается от 1251 (обычно при проблемах значение бывает равным 1252), дважды нажмите по параметру и измените значение на 1251. После чего закройте редактор реестра и перезагрузите компьютер.


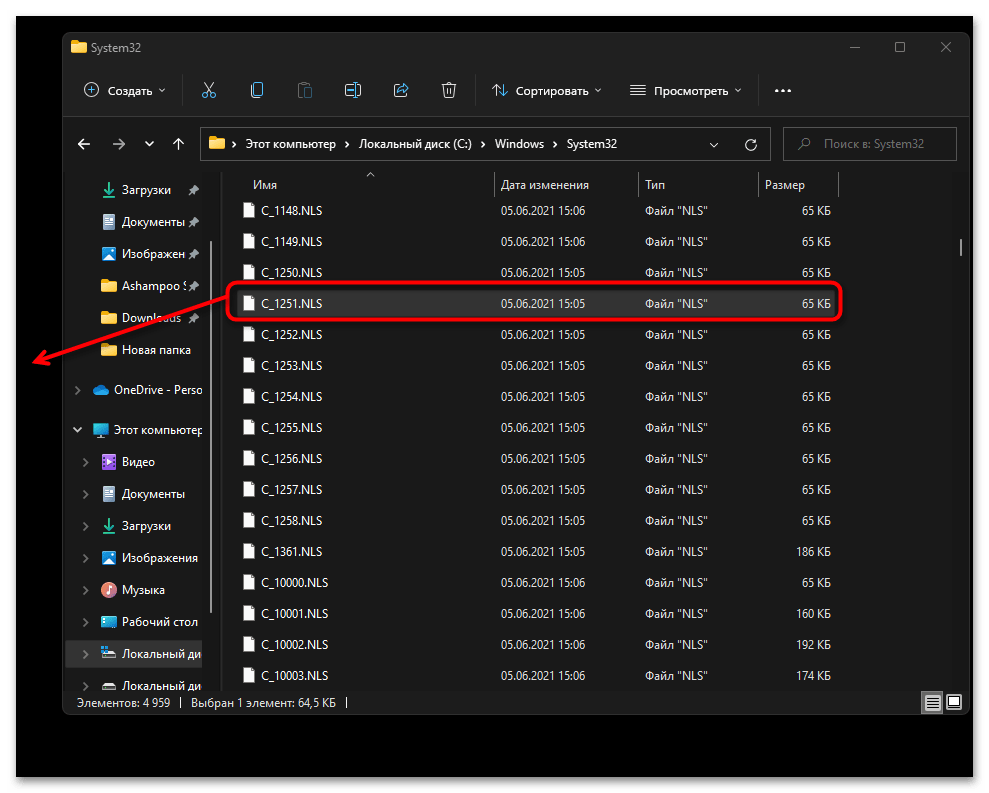
Второй вариант того же действия (менее желательный) — подмена файла кодовой страницы C:\Windows\System32\c_1252.NLS копией файла c_1251.NLS (при этом желательно сохранить резервную копию файла c_1252.NLS). Файлы защищены и потребуется стать владельцем и получить необходимые права. Если при этом что-то пойдёт не так, может потребоваться выполнить восстановление системных файлов Windows.
Дополнительные варианты
Некоторые дополнительные возможные способы решения проблемы с отображением русских букв в программах и системных элементах Windows:
- Если вы изменяли системные шрифты Windows 11 на более «красивые» проблема может быть вызвана тем, что в выбранном вами шрифте отсутствуют необходимые символы кириллицы (обычно в этом случае отображаются пустые квадраты). Решение — тем же способом, которым вы проделывали это изначально, вернуть стандартный системный шрифт (также, при наличии, можно использовать точки восстановления системы).
- Для некоторых старых программ может сработать запуск в режиме совместимости с версией Windows, для которой они были разработаны.
Все способы:
- Способ 1: Изменение системного языка
- Способ 2: Изменение параметра использования бета-версии Юникода
- Способ 3: Редактирование реестра
- Способ 4: Замена системного файла
- Способ 5: Проверка целостности системных файлов
- Способ 6: Возвращение Windows к заводским настройкам
- Исправление кодировки в содержании и названиях файлов
- Вопросы и ответы: 7
Способ 1: Изменение системного языка
Чаще всего проблемы с отображением русских букв в Windows 11 связаны с некорректно установленными языковыми параметрами. Подобные дефекты могут появиться как при переименовании файлов, так и в интерфейсах сторонних программ или даже в некоторых частях операционной системы. Соответственно, понадобится проверить вручную языковые настройки и установить нужные, обеспечив тем самым поддержку текстовой кодировки. Универсальную инструкцию по этой теме вы найдете в другой статье на нашем сайте, перейдя по следующей ссылке.
Подробнее: Смена языка интерфейса ОС Windows 11
Способ 2: Изменение параметра использования бета-версии Юникода
Юникод (UTF-8) — стандартное кодирование текста для поддержки многих языков. В Windows 11 предлагается использовать его вместо основных языковых кодировок для каждого отдельного региона. Пользователь может столкнуться с отображением «кракозябр» вместо русских букв как при использовании функции, так и когда она отключена. Поэтому понадобится изменить состояние настройки и переключить кодировку. Для этого достаточно следовать предложенной ниже инструкции.
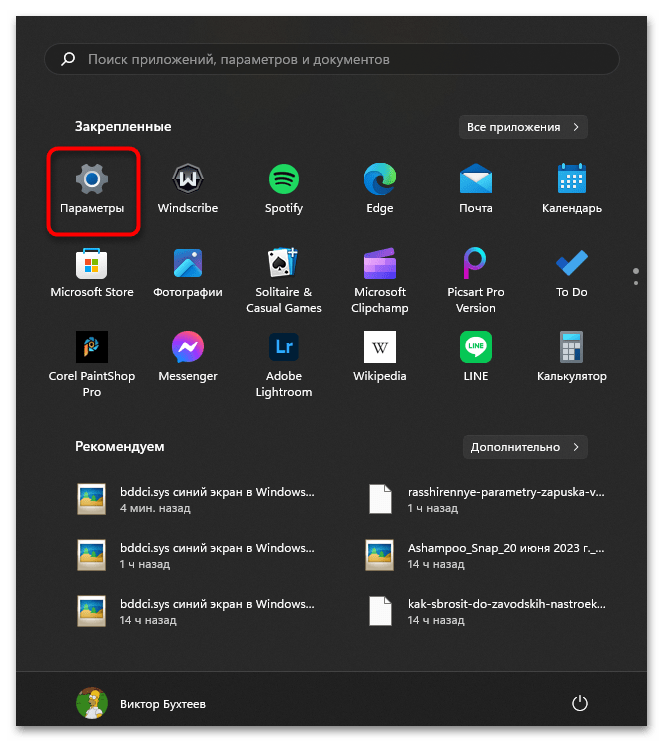
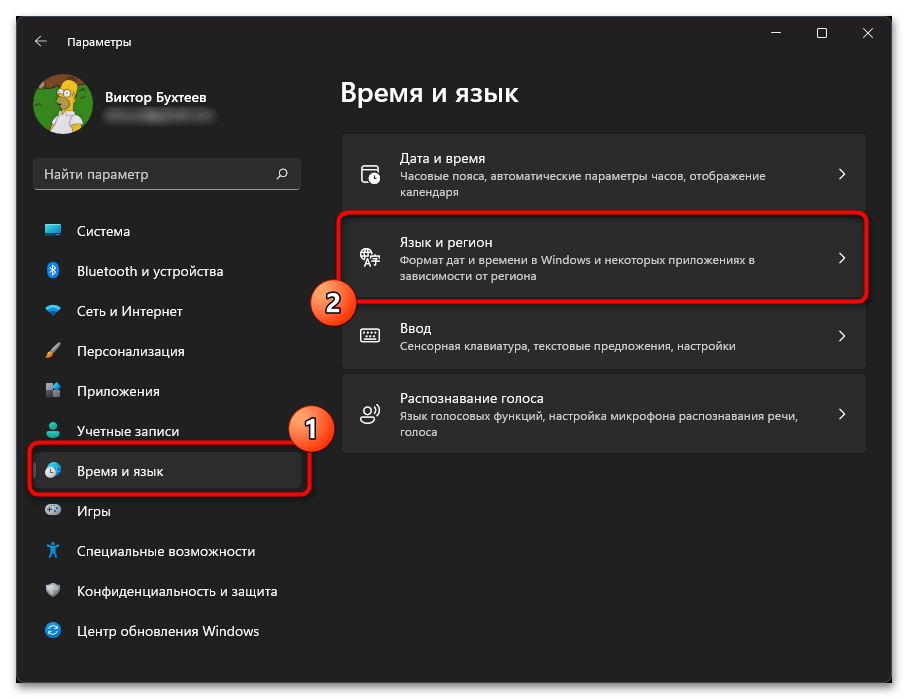
- Откройте «Пуск» и перейдите в «Параметры», кликнув по значку с изображением шестеренки.
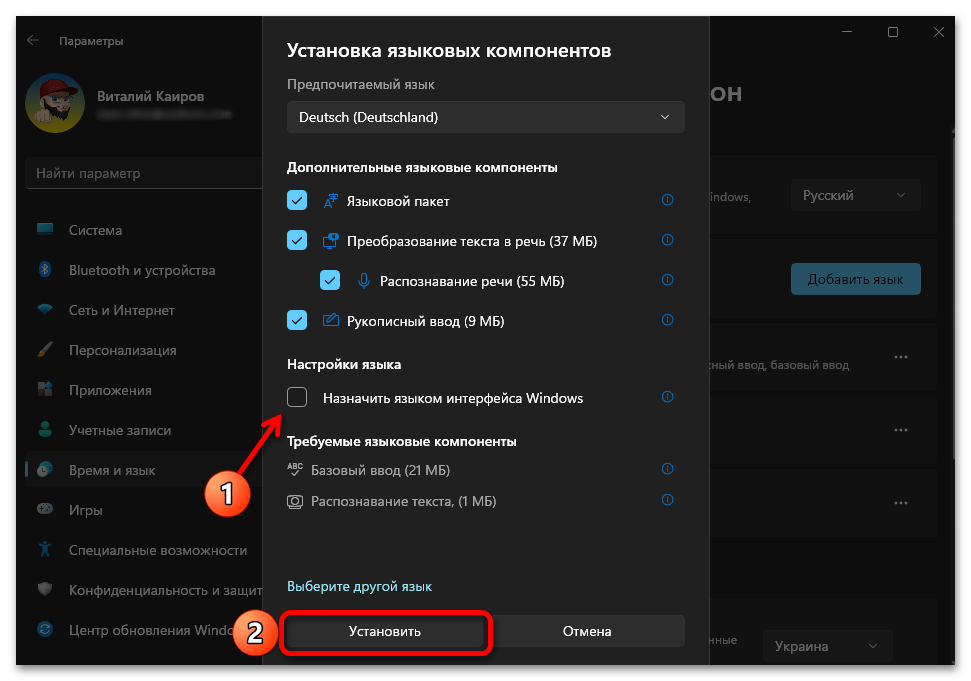
- В новом окне на панели слева выберите раздел «Время и язык», затем щелкните по категории «Язык и регион», чтобы перейти к ней.
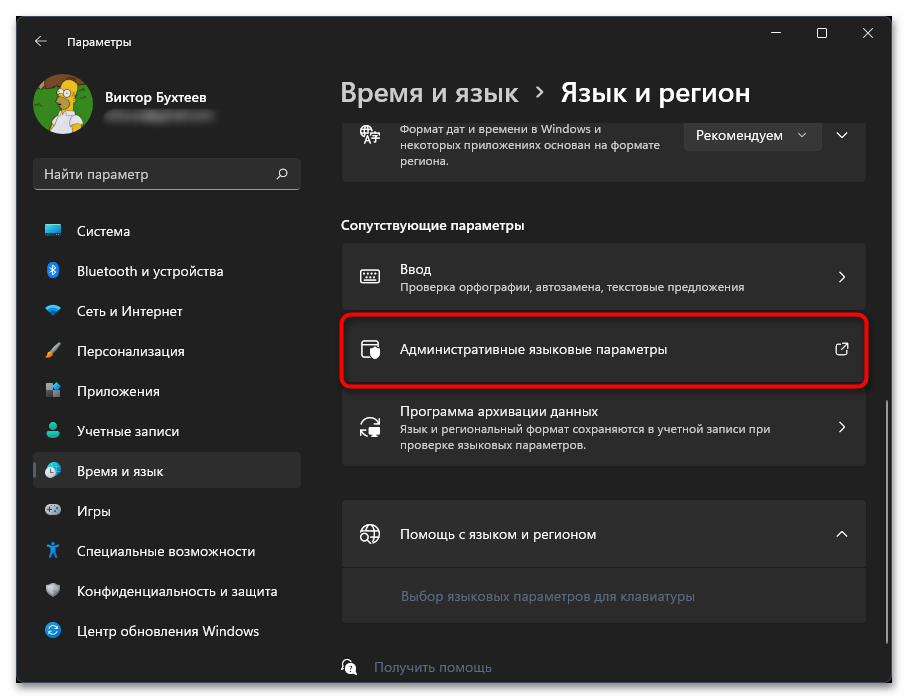
- Нажмите по ссылке «Административные языковые параметры».
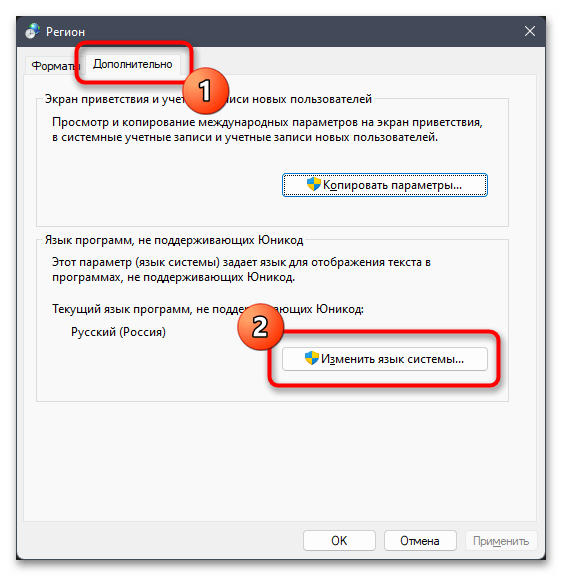
- Отобразится дополнительное окно с названием «Регион», в котором следует выбрать вкладку «Дополнительно» и кликнуть по кнопке «Изменить язык системы».
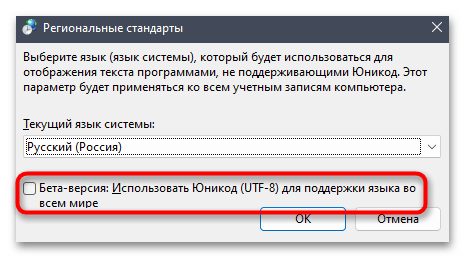
- Поставьте или снимите галочку около пункта «Бета-версия: Использовать Юникод (UTF-8) для поддержки языка во всем мире» в зависимости от того, активна ли она сейчас. Сохраните изменения и отправьте ПК на перезагрузку.
Способ 3: Редактирование реестра
Метод с редактированием реестра несет определенные риски, поскольку будут изменены системные параметры, отвечающие за корректность работы графического интерфейса. Поэтому рекомендуем перед вмешательством обязательно сделать резервную копию и разобраться с тем, как восстановить изначальное состояние реестра, если после применения новых настроек возникнут проблемы с работой ОС.
Подробнее: Восстановление системного реестра Windows 11
После всех подготовительных действий можно переходить непосредственно к настройке реестра. Этот процесс подразумевает проверку текущего языкового параметра с его редактированием или заменой, если это будет необходимо. Внимательно следуйте руководству, чтобы ни на каком из этапов не возникло трудностей.
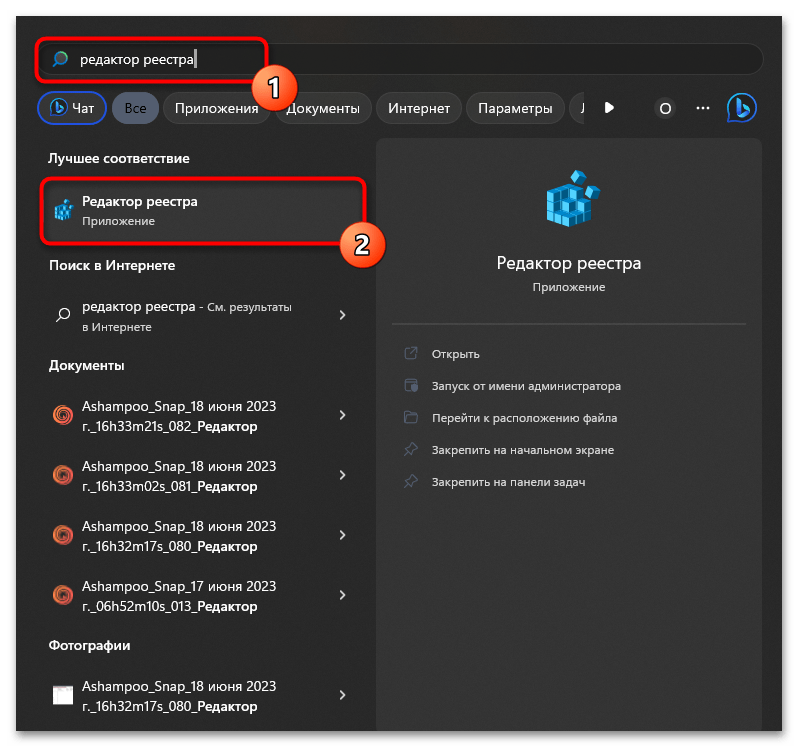
- Откройте «Пуск», через поиск отыщите «Редактор реестра» и запустите данное приложение.
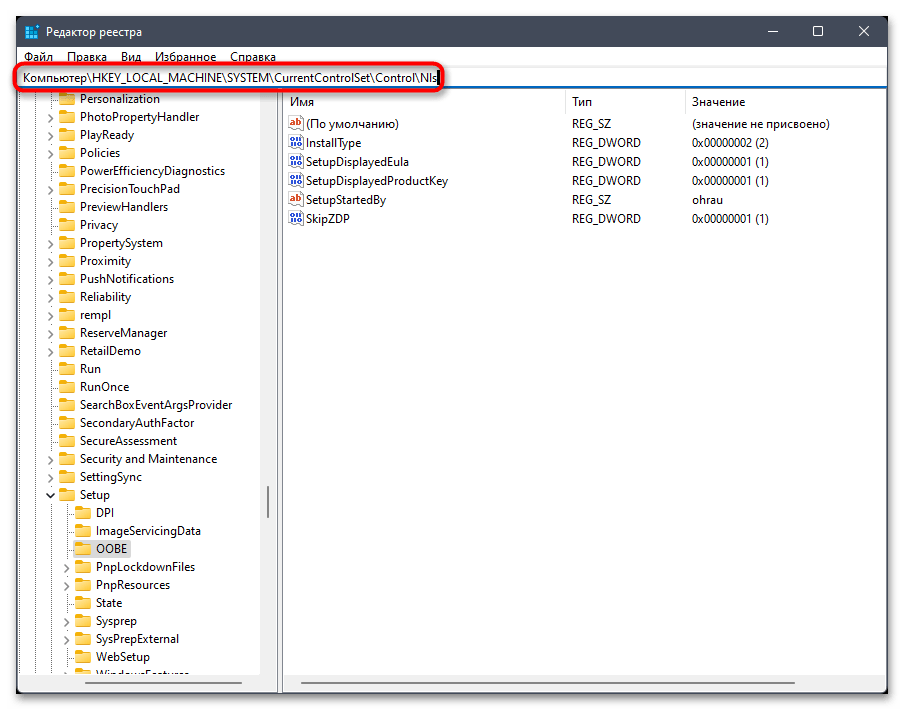
- В его адресную строку вставьте путь
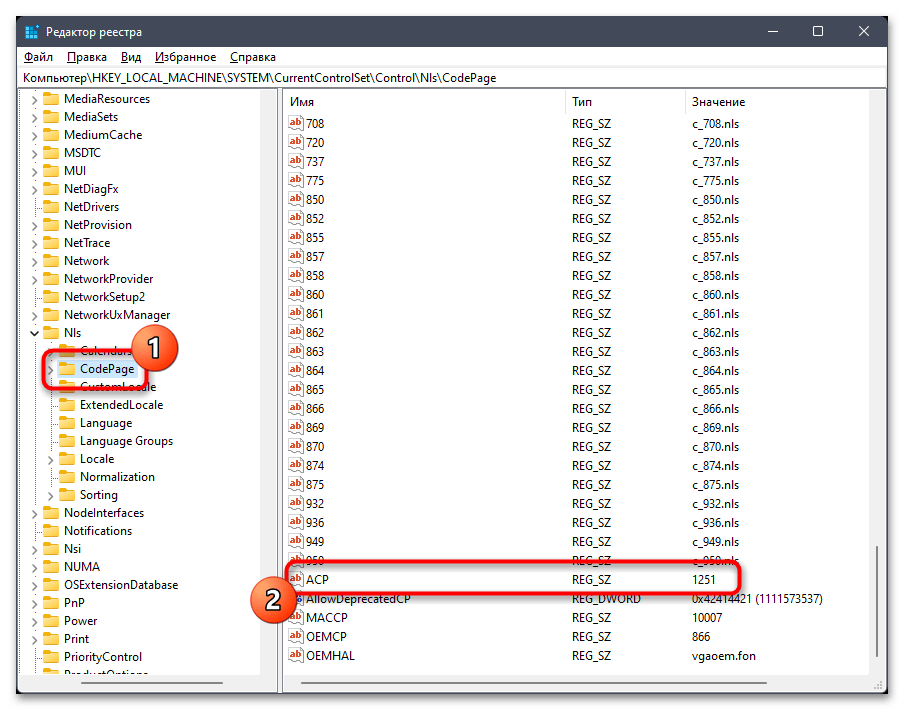
Компьютер\HKEY_LOCAL_MACHINE\SYSTEM\CurrentControlSet\Control\Nlsи перейдите по нему. - На панели слева выберите каталог с названием «CodePage» и внизу списка с параметрами отыщите «ACP». Вам необходимо убедиться в том, что данная настройка имеет значение
1251. - Если это не так, щелкните по параметру дважды и внесите изменение. По завершении обязательно перезагрузите ПК и проверьте, удалось ли такой настройкой исправить «кракозябры».
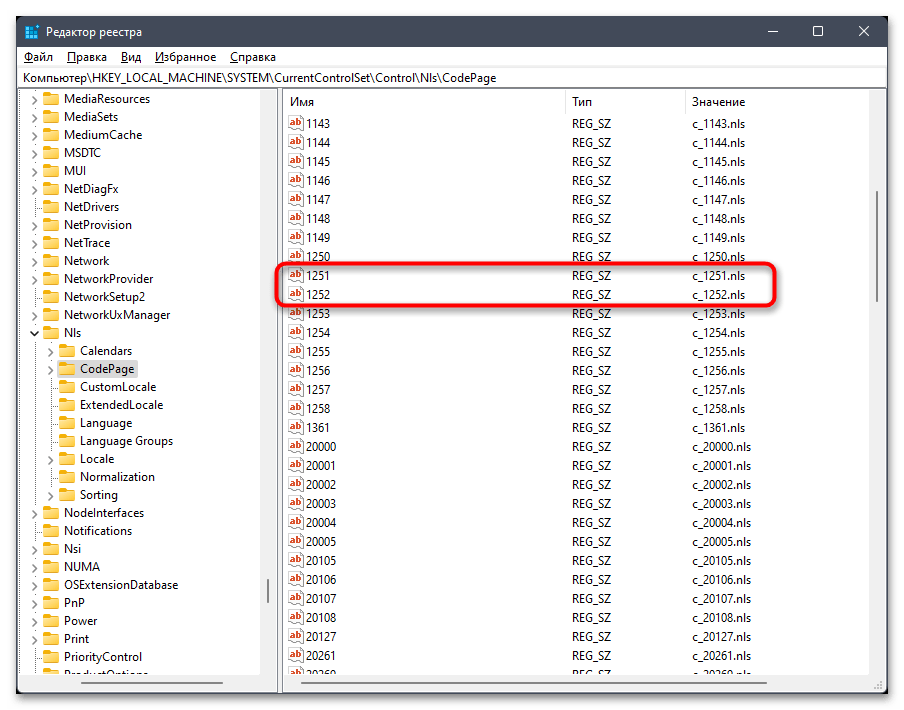
- В случае сохранения ошибки понадобится осуществить подмену файла. Для этого найдите в этой же папке параметры «1251» и «1252». Если каждый из них существует, то «1251» удалите.
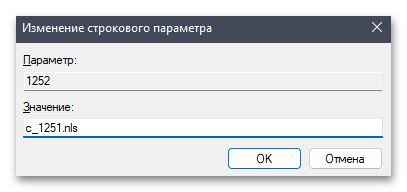
- Для «1252» поменяйте значение на
c_1251.nls, сохраните изменения и снова перезагрузите компьютер.

Если ошибка не исчезла, всегда рекомендуется вернуть настройки по умолчанию, восстановив реестр или самостоятельно воссоздав нужные параметры, изменение которых и производилось ранее.
Способ 4: Замена системного файла
Следующий метод тоже подразумевает изменение системных настроек. При помощи замены файлов можно добиться исправления кодировки, когда язык операционной системы по каким-то причинам распознается некорректно и появляются «кракозябры» вместо нормальных букв. Будьте готовы к тому, что такие изменения тоже могут негативно сказаться на работе ОС, поэтому во время выполнения инструкции соблюдайте все рекомендации по сохранению оригиналов файлов, чтобы в случае чего восстановить все так, как это было ранее.
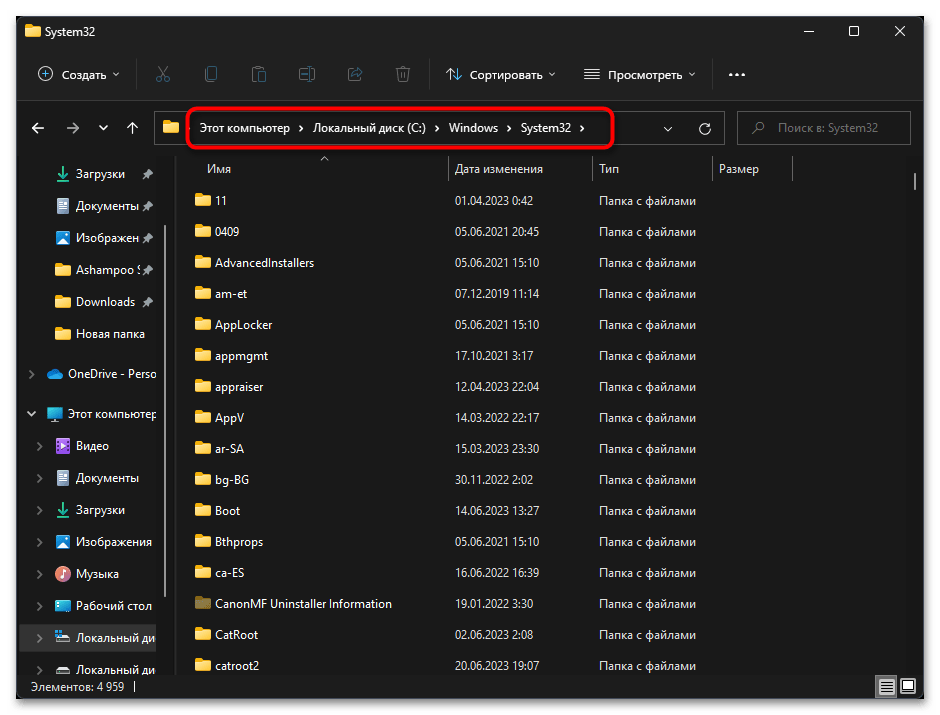
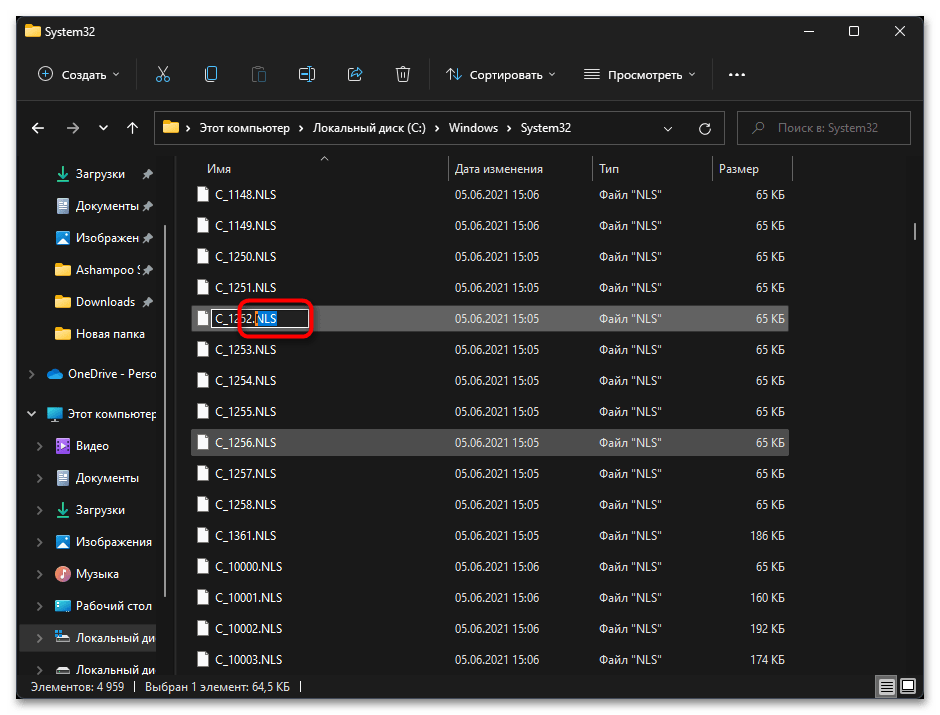
- Откройте «Проводник» и перейдите по пути
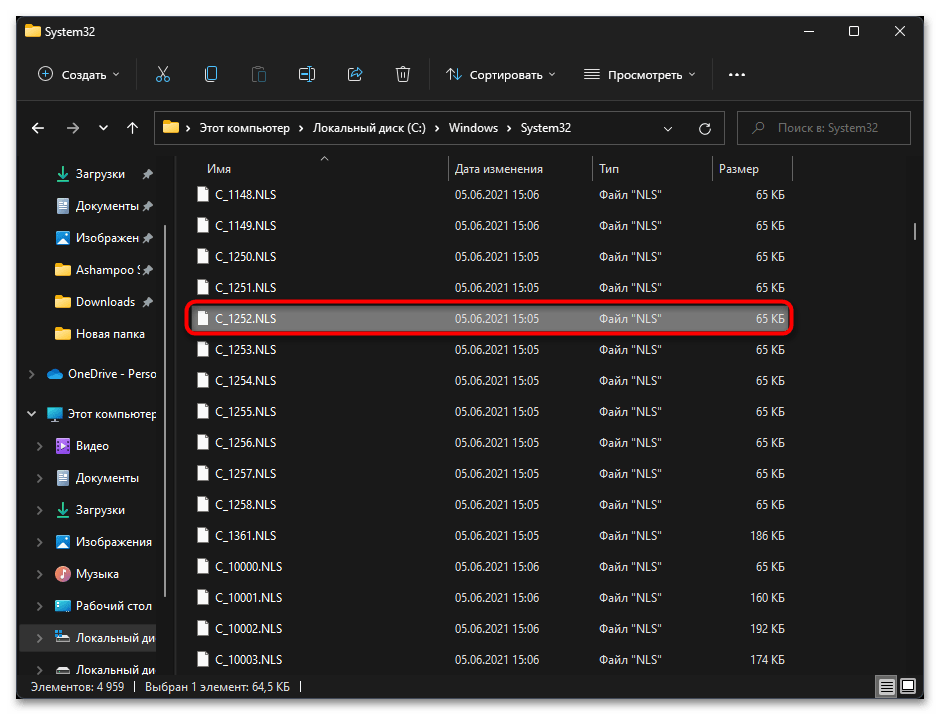
C:/Windows/System32. - В данном каталоге отыщите файл с названием «C_1252.NLS».
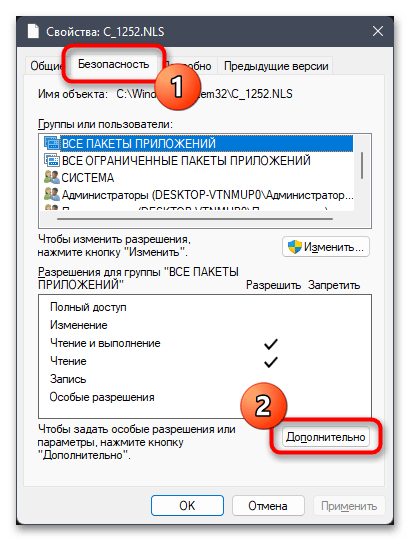
- Для него нужно изменить владельца, чтобы система разрешила переименование и выполнение других действий. Щелкните по файлу правой кнопкой мыши и из контекстного меню выберите пункт «Свойства».
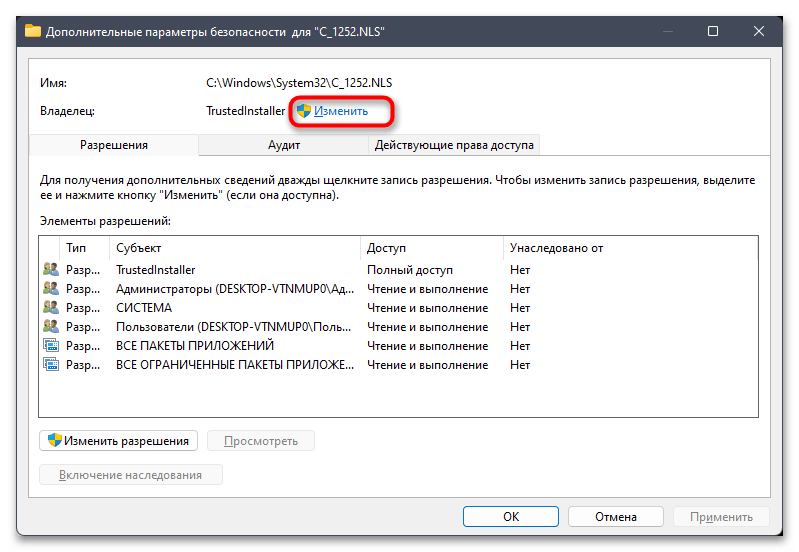
- Перейдите на вкладку «Безопасность» и нажмите по «Дополнительно».
- В новом окне вы увидите текущего владельца файла, коим наверняка будете не вы. Для исправления этой ситуации кликните по «Изменить».
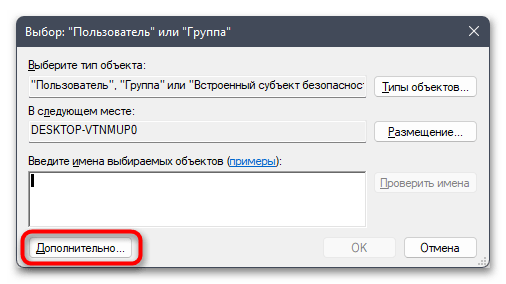
- Можете ввести имя объекта вручную, но в большинстве случаев у пользователя нет информации о том, как точно называется его учетная запись. Поэтому лучше пойти простым путем автоматического поиска, сначала нажав по «Дополнительно».
- В следующем окне нажмите кнопку «Поиск».
- Дождитесь загрузки учетных записей и выберите среди них свою. Подтвердите внесение изменений и закройте данное окно.
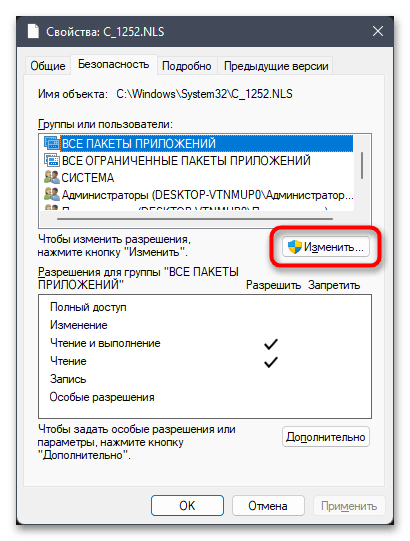
- Остается только добавить полные права доступа к файлу для нового владельца. В окне «Свойств» на вкладке «Безопасность» нажмите по «Изменить».
- В списке «Группы или пользователи» выберите свою учетную запись, предоставьте полные права и сохраните изменения.
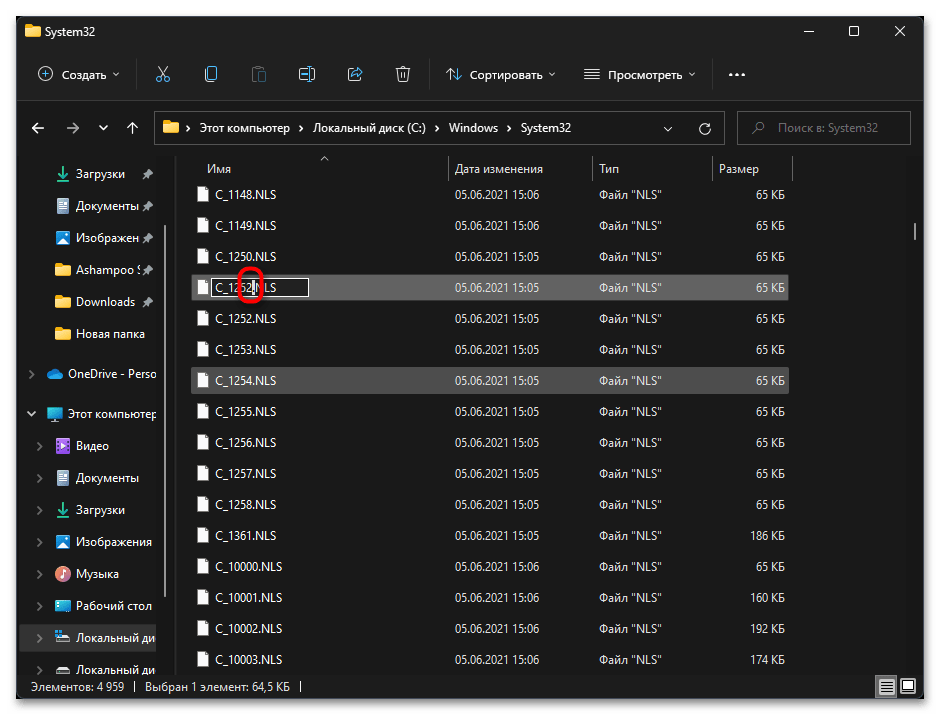
- Теперь вам нужно переименовать файл «C_1252.NLS». Лучшим вариантом будет изменить его формат, допустим, на текстовый. Если что-то пойдет не так, его всегда можно вернуть к NLS.
- Далее в этой же папке отыщите файл «C_1251.NLS» и создайте его копию на рабочем столе.
- Для данного файла с названием «C_1251.NLS» установите новое, переименовав его на «C_1252.NLS». Если действие недоступно, измените владельца и для этого файла точно так же, как это было показано выше.


При помощи нехитрых манипуляций вы произвели замену файлов, отвечающих за локализацию в Windows 11. «C_1252.NLS» нужен для нормального отображения английского языка системы, который является основным. При помощи замены мы сделали так, чтобы основным теперь считался русский и кодировка была исправлена в тех местах, где наблюдаются проблемы с отображением букв. Если после перезагрузки компьютера выяснилось, что система функционирует хуже, появились ошибки и сама проблема не была исправлена, верните оригинальные файлы в ту же папку и снова перезагрузите ПК.
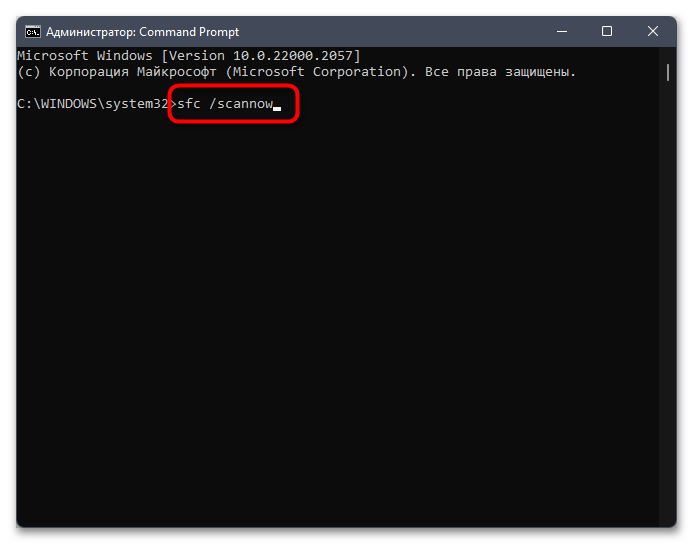
Способ 5: Проверка целостности системных файлов
Не стоит исключать тот факт, что появление «кракозябр» вместо нормального отображения букв иногда свидетельствует о том, что в системе нарушена целостность файлов, отвечающих за локализацию или работу с определенными текстовыми кодировками. Самостоятельно проверить вы это не сможете, поэтому доверьте операцию автоматизированным средствам, а именно специальным консольным утилитам. Информацию об их применении вы найдете в материале от другого нашего автора по ссылке ниже.
Подробнее: Использование и восстановление проверки целостности системных файлов в Windows
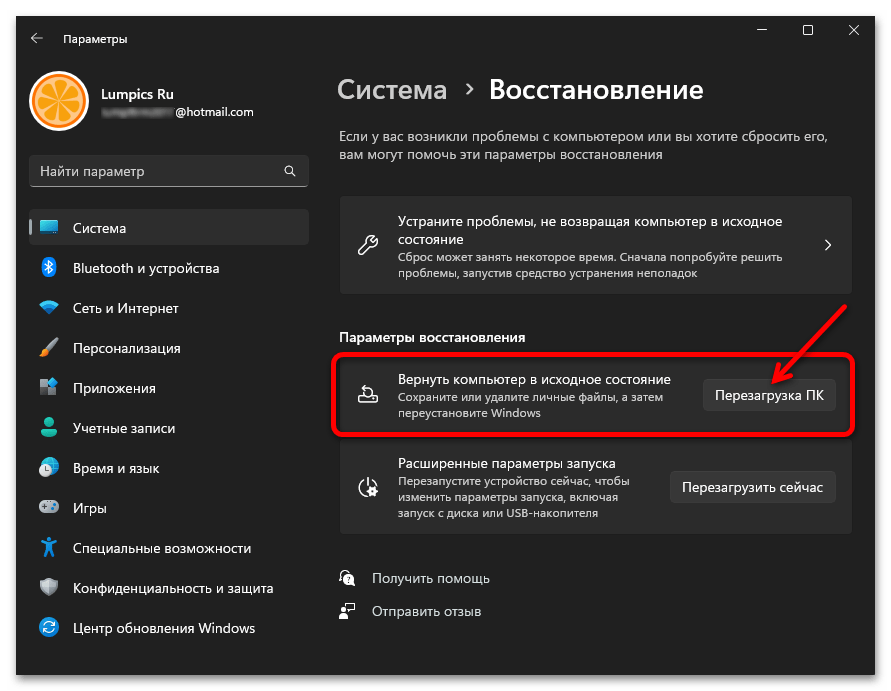
Способ 6: Возвращение Windows к заводским настройкам
Единственный метод исправления ситуации, который еще не был рассмотрен в рамках данной статьи, подразумевает восстановление стандартного состояния Windows 11, что в большинстве случаев решает самые распространенные системные проблемы. Сделать это можно и полной переустановкой, но куда проще восстановить заводские настройки. Для этого подходит стандартное средство операционной системы, об использовании которого читайте в материале по следующей ссылке.
Подробнее: Сброс Windows 11 к заводским настройкам
Исправление кодировки в содержании и названиях файлов
В некоторых случаях пользователь сталкивается с тем, что «кракозябры» отображаются только в названиях конкретных текстовых файлов или после их открытия через текстовые редакторы, когда речь идет о просмотре содержимого. В первую очередь можем порекомендовать сменить текстовый редактор, поскольку не все поддерживают разные кодировки, особенно если речь идет о стандартном «Блокноте». Если это не принесло должного результата, можно попробовать восстановить кодировку через разные онлайн-сервисы. Они поддерживают как загрузку файлов целиком, так и вставку содержимого из буфера обмена.
Подробнее: Исправление кодировки при помощи онлайн-сервисов

Наша группа в TelegramПолезные советы и помощь

If you want to know how to change character code in Windows 11, read this post. Like ASCII, Unicode is a character encoding standard, with UTF8 as one of the most popular text standards. And the system, according to the locale of the computer, will change the Unicode to display special characters of the user’s language. For example, c with cedilla (ç), the tilde (~), the crassed a (à), etc.
Knowing how to change text code in Windows 11 is very important. Because, some programs don’t support Unicode. Then it will be necessary to correct the text that is not displaying correctly.
In this post, we will guide you through the necessary steps to know how to change the character encoding in Windows 11 and be able to correctly display special characters.
How to display special characters in Windows 11
To change special character encoding in Windows 11, follow the steps below:
- Open Settings.
- Select Time and Language.
- Click Language and Region.

- Find the Related Settings section.
- Click Administrative Language Settings.

- Click on the Administrative tab.
- Click Change System Locale.

- Select the desired language for the system locale.
- Click the OK button.
Tip: check the BETA: Use Unicode UTF-8 for worldwide language support checkbox.

After following the steps above, Windows 11 will change the encoding and correctly display characters from other languages.
Note: changing the special character code in Windows 11 will not change the operating system’s display language. Only programs that do not support the Unicode standard.
Summary
Learn how to choose text code in Windows 11 so programs that don’t support Unicode can correctly display special characters from other languages.
So, follow the steps above and tell in the comments if you managed to choose the correct text encoding in Windows 11