
Запустить Apache Kafka и ZooKeeper на Windows 10 проще, чем кажется! Перед вами подробная инструкция без Docker и облаков: установка, настройка, создание тестового топика и обработка первых сообщений.

Apache Kafka — это распределённая система для стриминга данных, разработанная специально для обработки больших объёмов сообщений в реальном времени. Эта платформа используется повсеместно — от логирования и мониторинга до построения полноценных event-driven систем и микросервисной архитектуры. Она позволяет передавать сообщения между продюсерами (отправителями) и консьюмерами (получателями) через надёжную очередь, называемую топиком.
Однако Kafka не работает в одиночку. До версии 2.8 для управления кластером и хранения метаданных ей необходим компонент под названием ZooKeeper. ZooKeeper выполняет функции координатора: отслеживает состояние брокеров Kafka (серверов, обрабатывающих и хранящих сообщения), управляет выборами контроллера и помогает поддерживать целостность данных. Начиная с версии 2.8 Kafka поддерживает режим без ZooKeeper (KRaft mode). Однако в этом гайде используется классическая схема с ZooKeeper.
В продакшене Kafka обычно разворачивают двумя способами. Первый — в облаке или в виде кластера на VPS или собственных Linux-серверах, управляют всей инфраструктурой при этом самостоятельно. И второй — бессерверный Kafka, управляемый сторонними поставщиками услуг. Но для обучения, тестирования и небольших задач вполне подойдёт и локальная установка на Windows. В этой статье мы разберём последний способ и пошагово пройдём через весь процесс: от подготовки системы до запуска Kafka и отправки первого сообщения.
Аренда VPS/VDS виртуального сервера от AdminVPS — это прозрачная и честная услуга с доступной ценой
Подготовка системы
Прежде чем приступать к установке, проверим, готова ли система. Обе платформы написаны на Java, поэтому для их работы требуется установленная Java Virtual Machine (JVM) и библиотеки. Также желательно иметь консольные утилиты, такие как curl, и текстовый редактор — например, Notepad++ или VS Code — для работы с конфигурационными файлами.
Установка Java
Kafka требует Java 8 или выше. Мы рекомендуем OpenJDK 17 или 21 как стабильные и совместимые версии.
Скачайте OpenJDK. Перейдите на официальный сайт Adoptium и скачайте Temurin 17 (это сборка OpenJDK). Выберите установочный .msi-файл для Windows 10.
Установите Java. Запустите установщик и следуйте инструкциям. Убедитесь, что вы отметили галочку «Set JAVA_HOME variable», если такая опция есть.
После установки Java убедитесь, что переменная окружения JAVA_HOME настроена, а в Path добавлен путь к её bin. Пример:
JAVA_HOME=C:\Program Files\Adoptium\jdk-17
Path=…;%JAVA_HOME%\bin
Проверьте установку. Откройте терминал PowerShell или CMD и выполните команду:
java -versionОжидаемый вывод:
openjdk version "17.0.x"Если команда не распознаётся, проверьте значение JAVA_HOME и Path.
Создание рабочих директорий
При раздельной установке выделите отдельные папки для ZooKeeper и Kafka. Продумайте структуру, в нашем примере оба каталога будут находиться в корне диска C. В этих директориях мы разместим и скачанные архивы, и конфигурационные файлы.
Папки нужно создавать как можно ближе к корню — чтобы избежать ошибок при запуске.
Установка 7-Zip
Продукты Apache распространяются в .tgz-архивах. Чтобы их распаковать, установите 7-Zip или любую другую win-утилиту, поддерживающую .tar.gz.
Теперь, когда подготовка завершена, приступим к установке и настройке ZooKeeper. Если вы устанавливаете обе платформы раздельно, то он потребуется первым, так как Kafka ставится поверх него.
ZooKeeper нужен для хранения метаданных, отслеживания брокеров и координации кластера. В этом разделе мы установим его и настроим базовую конфигурацию.
Скачайте ZooKeeper. Перейдите на официальный сайт ZooKeeper в раздел «Download» и скачайте последнюю стабильную версию (на момент написания статьи это 3.8.4) в архиве .tar.gz.
Переместите архив в C:\zookeeper\. Распакуйте его в 7-Zip или аналогичной программе. После распаковки ZooKeeper будет находиться в папке с номером версии:
C:\zookeeper\zookeeper-3.8.4\Следующий шаг — создание конфигурации. ZooKeeper может работать в двух режимах: Standalone и Replicated. Мы рассмотрим Standalone Mode. В этом режиме ZooKeeper использует конфигурационный файл zoo.cfg, который нужно создать вручную. Перейдите в директорию conf:
C:\zookeeper\zookeeper-3.8.4\conf\Там находится пример — файл zoo_sample.cfg. Скопируйте его и переименуйте копию в zoo.cfg, затем откройте для редактирования. В нём нужно указать путь к директории с данными. По умолчанию указано:
dataDir=/tmp/zookeeperПоменяем значение на актуальное:
tickTime=2000
dataDir=C:/zookeeper/zookeeper-3.8.4/data
clientPort=2181
maxClientCnxns=60
Не забудьте создать соответствующий каталог.
После этого добавим переменную среды окружения:
ZOOKEEPER_HOME=C:\zookeeper\zookeeper-3.8.4И в конец системной переменной Path добавьте:
%ZOOKEEPER_HOME%\binОбратите внимание
В Windows не требуется ставить точку с запятой вручную, если редактировать переменные через GUI — система сама добавит разделитель. Указание «;%ZOOKEEPER_HOME%\bin;» допустимо только при редактировании переменной вручную через set.
Готово! Теперь переходим к запуску.
ZooKeeper запускается через скрипт zkServer.cmd. Откройте терминал PowerShell:
cd C:\zookeeper\zookeeper-3.8.4\bin
.\zkServer.cmd
По умолчанию ZooKeeper запускается на порту 2181. Этот порт можно изменить в конфигурационном файле zoo.cfg.
Установка Kafka и ZooKeeper одним пакетом
Kafka поставляется с базовой конфигурацией ZooKeeper и утилитами запуска, но не содержит полноценной самостоятельной сборки ZooKeeper. Для надёжной работы рекомендуется установить ZooKeeper отдельно. Скачайте архив с бинарными файлами с сайта проекта, у нас это kafka_2.13-4.0.0.tgz. Найдите его, и распакуйте с помощью архиватора, поддерживающего .tgz (например, 7-Zip). После распаковки у вас будет папка с номером версии в имени. Для удобства можно переименовать её, например, в Kafka.
Обратите внимание
Убедитесь, что версия Scala (2.13) совместима с установленной версией Kafka. Не всегда новые Kafka-сборки поддерживают все старые версии Scala.
Структура каталогов
Откройте проводник и перейдите в папку Kafka. Структура дерева каталогов
должна быть примерно такой:
C:\
  └── kafka\
      ├── bin\
      │   └── windows\
      ├── config\
      └── ...
Здесь:
- bin — исполняемые скрипты для управления кластером. В подкаталоге /windows расположены файлы, адаптированные для работы под ОС Windows.
- config — хранит конфигурационные файлы (например, zookeeper.properties, server.properties), позволяющие кастомизировать настройки брокера и ZooKeeper.
- libs — включает библиотеки зависимостей (JAR-файлы), необходимые для работы Kafka.
- logs — директория с журналами событий. Логи помогают анализировать работу системы, диагностировать ошибки и отслеживать взаимодействие компонентов.
- site-docs — официальная документация по текущей версии Kafka — полезный ресурс для изучения функционала.
- LICENSE и NOTICE — текстовые файлы с информацией о лицензионных условиях и юридическими уведомлениями.
Настройка ZooKeeper
Модуль ZooKeeper находится в папке bin\windows, его конфигурационный файл — по пути config\zookeeper.properties. Он уже содержит рабочие настройки по умолчанию, но для понимания стоит знать основные параметры:
dataDir=C:/kafka/zookeeper-data
clientPort=2181
maxClientCnxns=0
Где:
- dataDir — путь, где ZooKeeper будет хранить свои данные. Его нужно изменить на win-совместимый. Windows не имеет каталога /tmp. Путь по умолчанию здесь — свидетельство того, что Kafka изначально создавался для Linux.
- clientPort — порт, на котором ZooKeeper принимает подключения. По умолчанию — 2181.
Изменим dataDir на Windows-путь.
Откройте в любом текстовом редакторе файл:
config\zookeeper.propertiesЗамените строку:
dataDir=/tmp/zookeeperна
dataDir=C:/kafka/zookeeper-dataСоздайте папку zookeeper-data внутри каталога Kafka, если она ещё не существует, затем дайте пользователю права на запись:
icacls "C:\kafka\zookeeper-data" /grant "*Users":(OI)(CI)FЗапуск ZooKeeper
В PowerShell или командной строке зайдите в корневую папку Kafka и выполните:
.\bin\windows\zookeeper-server-start.bat .\config\zookeeper.propertiesЕсли всё настроено верно, вы увидите лог со строкой:
INFO binding to port 0.0.0.0/0.0.0.0:2181Настройка и запуск Kafka
После запуска ZooKeeper можно переходить к Kafka.
Конфигурация Kafka
Конфиги Kafka находятся по пути:
config\server.propertiesОткройте этот файл для редактирования и найдите следующие параметры:
broker.id=0
log.dirs=C:/kafka/kafka-logs
zookeeper.connect=localhost:2181
Внесём изменения для Windows. В строке log.dirs по умолчанию указан путь в стиле Linux (/tmp/kafka-logs), который не существует в Windows. Замените его, например, на:
log.dirs=C:/kafka/kafka-logsУбедитесь, что zookeeper.connect указывает на localhost и порт 2181 (если вы не меняли его ранее):
zookeeper.connect=localhost:2181Создайте папку kafka-logs в каталоге Kafka, чтобы избежать ошибок при запуске и предоставьте права на запись:
icacls "C:\kafka\kafka-logs" /grant "*Users":(OI)(CI)FЗапуск Kafka-сервера
Теперь, когда всё настроено, можно запускать Kafka. Откройте второе окно PowerShell или командной строки и войдите в каталог Kafka, например:
cd C:\kafkaЗатем запустите Kafka:
.\bin\windows\kafka-server-start.bat ".\config\server.properties"Если всё работает правильно, вы увидите в выводе сообщение, означающее, что Kafka успешно запущен и готов к работе:
INFO [KafkaServer id=0] started (kafka.server.KafkaServer)Проверка работы Kafka
После запуска Kafka можно проверить, как она работает, создав топик, отправив в него сообщение и считав его обратно. Для этого используем встроенные утилиты командной строки, входящие в состав Kafka.
Создание топика
Откройте ещё одно окно PowerShell (Kafka и ZooKeeper уже работают в своих окнах) и перейдите в папку Kafka:
cd C:\kafkaВыполните для создания нового топика:
.\bin\windows\kafka-topics.bat --create --topic test-topic --bootstrap-server localhost:9092 --partitions 1 --replication-factor 1Если всё прошло успешно, вы увидите сообщение:
Created topic test-topicПроверить список доступных топиков можно так:
.\bin\windows\kafka-topics.bat --list --bootstrap-server localhost:9092Отправка сообщения
Теперь отправим сообщение в созданный топик. Для этого используется Kafka Producer. Запустите в том же окне (третьем):
.\bin\windows\kafka-console-producer.bat --bootstrap-server localhost:9092 --topic test-topicПосле запуска вы не увидите приглашения командной строки — это нормально. Просто введите сообщение и нажмите Enter, чтобы отправить его в топик.
Если вы работаете с нестандартными типами данных (например, JSON или Avro), Kafka может потребовать указания сериализаторов. В этом случае при запуске Producer добавьте параметры:
--producer-property key.serializer=org.apache.kafka.common.serialization.StringSerializer ^
--producer-property value.serializer=org.apache.kafka.common.serialization.StringSerializer
Для строковых сообщений эти параметры не обязательны — Kafka использует их по умолчанию.
Чтение сообщений из топика
Откройте ещё одно окно PowerShell (да, у вас теперь уже 4 окна) и запустите Kafka Consumer:
cd C:\kafka
.\bin\windows\kafka-console-consumer.bat --bootstrap-server localhost:9092 --topic test-topic --from-beginning
Если обработка сообщений проходит успешно — и Producer, и Consumer работают корректно, — то вы должны увидеть отправленное сообщение.
Завершение работы Kafka и ZooKeeper
После тестирования или использования Kafka важно корректно завершить работу сервисов, чтобы избежать повреждения логов или потери информации.
Остановка Kafka
Найдите окно PowerShell, где запущен Kafka-сервер. Просто нажмите Ctrl+C — это отправит сигнал остановки, и Kafka завершит работу.
Пример вывода:
[KafkaServer id=0] shutting down
[KafkaServer id=0] shut down completed
Если Kafka не реагирует на Ctrl+C, можно закрыть окно PowerShell, но это менее предпочтительный способ.
Остановка ZooKeeper
Перейдите в окно, где запущен ZooKeeper, и также нажмите Ctrl+C. Вы увидите строки, подтверждающие завершение:
Shutting down…
Closed socket...
Очистка временных данных (по желанию)
Kafka и ZooKeeper хранят временные данные в папках:
- C:\kafka\kafka-logs — логи Kafka;
- C:\kafka\zookeeper-data — данные ZooKeeper (если вы указывали эту папку при запуске).
Их можно удалить перед следующим чистым запуском Kafka, если вы экспериментировали с настройками и нужно сбросить состояние. В PowerShell:
Remove-Item -Recurse -Force C:\kafka\kafka-logs
Remove-Item -Recurse -Force C:\kafka\zookeeper-data
Будьте осторожны: это удалит все сообщения, топики и внутреннее состояние кластера. Используйте эти команды, только если уверены в своих действиях.
Заключение

Мы рассмотрели, как установить и запустить ZooKeeper и Kafka на Windows 10. Несмотря на то что Kafka изначально разрабатывалась с прицелом на Linux, её вполне можно использовать и в среде Windows — особенно для целей разработки, обучения или тестирования.
В ходе статьи мы:
- установили Java и проверили её работоспособность;
- скачали и распаковали Kafka;
- запустили ZooKeeper и Kafka как отдельные процессы;
- создали и протестировали простой топик, отправив и получив сообщения;
- корректно завершили работу сервисов.
Читайте в блоге:
- Какие серверные SSD-накопители с интерфейсом NVMe лучше
- Как включить и настроить удалённый доступ к серверу
- Как выбрать виртуальный сервер для сложных задач: гайд по GPU-решениям
Today, I will talk about how to install Apache ZooKeeper and run the instance of it.
Prerequisites: JRE 1.6 or higher required (for development purposes, I would install JDK instead 1.6 or higher) At the time of writing this blog, the current stable version of Java is 1.8 and that should work perfectly fine (I have 1.7.0_51)
NOTE: I noticed that some of my peers tend to forget to set the environment variables, so please remember to set them before proceeding.
1. Installing Apache ZooKeeper
1. Download Apache ZooKeeper. You can choose from any given mirror – http://www.apache.org/dyn/closer.cgi/zookeeper/
2. Extract it to where you want to install ZooKeeper. I prefer to save it in the C:\dev\tools directory. Unless you prefer this way as well, you will have to create that directory yourself.
3. Set up the environment variable.
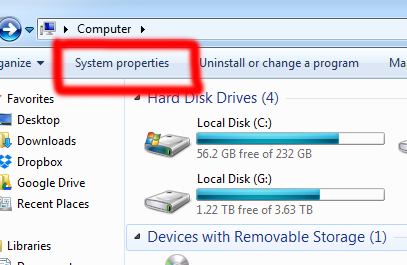
- To do this, first go to Computer, then click on the
System Propertiesbutton. - Click on the
Advanced System Settingslink to the left. - On a new window pop-up, click on the
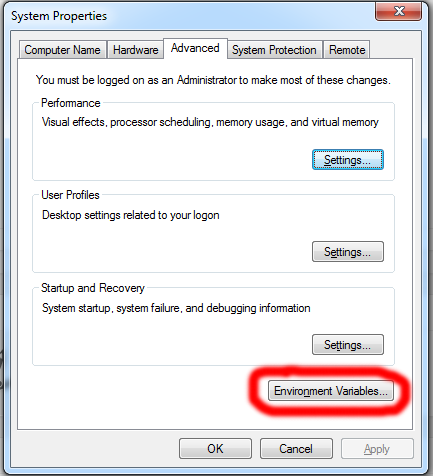
Environment Variables...button. - Under the
System Variablessection, clickNew... - For the
Variable Name, type inZOOKEEPER_HOME. Variable Valuewill be the directory of where you installed the ZooKeeper. Taking mine for example, it would beC:\dev\tools\zookeeper-3.x.x. - Now we have to edit the
PATHvariable. SelectPathfrom the list and clickEdit... - It is VERY important that you DO NOT erase the pre-existing value of the
Pathvariable. At the very end of the variable value, add the following:%ZOOKEEPER_HOME%\bin;Also, each value needs to be separated by semicolon. - Once that’s done, click OK and exit out of them all.
That takes care of the ZooKeeper installation part. Now we have to configure it so the instance of ZooKeeper will run properly.
2. Configuring ZooKeeper Server
If you look at the <zookeeper-install-directory> there should be a conf folder. Open that up, and then you’ll see a zoo-sample.cfg file. Copy and paste it in the same directory, it should produce a zoo-sample - Copy.cfg file. Open that with your favorite text editor (Microsoft Notepad should work as well).
Edit the file as follows:
tickTime=2000
initLimit=5
syncLimit=5
dataDir=/usr/zookeeper/data
clientPort=2181
server.1=localhost:2888:3888
NOTE: you really don’t need lines 2 (initLimit=5), 3 (syncLimit=5), and 6 (server.1=localhost:2888:3888). They’re just there for a good practice purposes, and especially for setting up a multi-server cluster, which we are not going to do here.
Save it as zoo.cfg. Also the original zoo-sample.cfg file, go ahead and delete it, as it is not needed.
Next step is to create a myid file. If you noticed earlier in the zoo.cfg file, we wrote dataDir=/usr/zookeeper/data. This is actually a directory you’re going to have to create in the C drive. Simply put, this is the directory that ZooKeeper is going to look at to identify that instance of ZooKeeper. We’re going to write 1 in that file.
So go ahead and create that usr/zookeeper/data directory, and then open up your favorite text editor.
Just type in 1, and save it as myid, set the file type as All files. This may not be insignificant, but we are going to not provide it any file extension, this is just for the convention.

Don’t worry about the version-2 directory from the picture. That is automatically generated once you start the instance of ZooKeeper server.
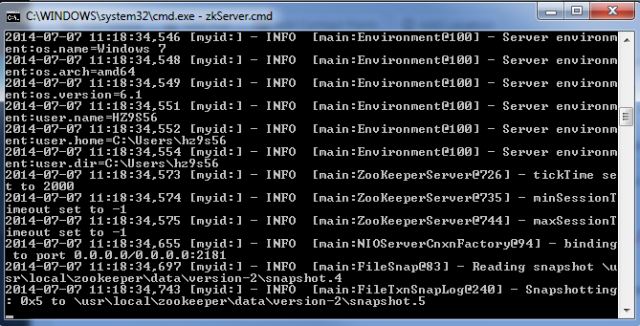
At this point, you should be done configuring ZooKeeper. Now close out of everything, click the Start button, and open up a command prompt.
3. Test an Instance of Running ZooKeeper Server
Type in the following command: zkServer.cmd and hit enter. You should get some junk like this that don’t mean much to us.
Now open up another command prompt in a new window. Type in the following command: zkCli.cmd and hit enter. Assuming you did everything correctly, you should get [zk: localhost:2181<CONNECTED> 0] at the very last line. See picture below:
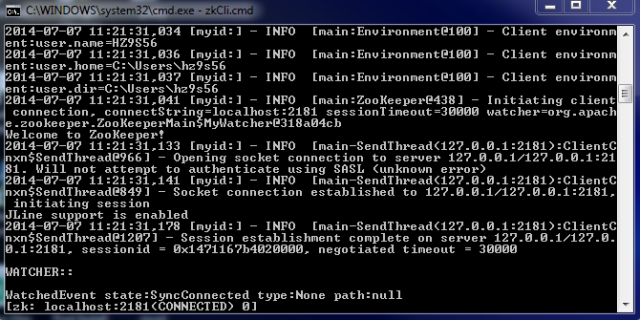
If you are getting the same result, then you setup ZooKeeper server correctly. Thanks for reading, and happy zookeeping!
How to Install ZooKeeper on Windows 11
Apache ZooKeeper is a distributed coordination service that is commonly used in distributed systems. In this tutorial, we will guide you through the process of installing ZooKeeper on Windows 11.
Prerequisites
Before installing Apache ZooKeeper, make sure you have the following prerequisites installed on your Windows 11 machine:
- Java Development Kit (JDK)
- Administrator access
Step 1: Downloading ZooKeeper
- Navigate to the ZooKeeper download page.
- Select the version you want to download. We recommend choosing the latest stable version.
- Click on the link to download the binary release.
Step 2: Extracting ZooKeeper
- Once the download is complete, extract the contents of the .tar.gz file to your desired directory.
- Rename the extracted directory to
zookeeper.
Step 3: Configuring ZooKeeper
- Navigate to the
zookeeper/confdirectory. - Rename the
zoo_sample.cfgfile tozoo.cfg. - Open the
zoo.cfgfile using a text editor. - Configure the
dataDirparameter to point to a directory where ZooKeeper will store its data. For example:C:/zookeeper/data. - Save and close the
zoo.cfgfile.
Step 4: Starting ZooKeeper
-
Open a Command Prompt window with administrator privileges.
-
Navigate to the
zookeeper/bindirectory. -
Run the following command to start ZooKeeper:
.\zkServer.cmd -
ZooKeeper should now be running. Keep the Command Prompt window open.
Step 5: Testing ZooKeeper
-
Open another Command Prompt window with administrator privileges.
-
Navigate to the
zookeeper/bindirectory. -
Run the following command to connect to ZooKeeper:
.\zkCli.cmd -
You should now see the ZooKeeper prompt. Type
helpto see a list of available commands. -
To test if ZooKeeper is functioning correctly, run the following command:
create /test test -
If successful, you should see the message
Created /test. -
Type
exitto exit the ZooKeeper prompt.
Congratulations, you have successfully installed Apache ZooKeeper on your Windows 11 machine!
If you want to self-host in an easy, hands free way, need an external IP address, or simply want your data in your own hands, give IPv6.rs a try!
Alternatively, for the best virtual desktop, try Shells!
In this post, we will start the Kafka and the ZooKeeper from Windows Operating System. First, we will start the Zookeeper and then the Kafka.
Apache Kafka is an open-source distributed event streaming platform used by thousands of companies for high-performance data pipelines, streaming analytics, data integration, and mission-critical applications.
ZooKeeper is a centralized service for maintaining configuration information, naming, providing distributed synchronization, and providing group services.
Prerequisites
- Download and Setup Kafka in PATH in Windows OS
Configuration Changes
Go to the Kafka root directory and create a new folder named data. Inside that create 2 more folders named zookeeper and kafka respectively.

These two folders will hold the kafka and zookeeper data. Copy the zookeeper folder path. For my case, it is as below.
C:\kafka_2.13-2.8.0\data\zookeeper
Now open the config folder from the kafka root folder. Open zookeeper.properties file using any editor. I am using Notepad. Replace the dataDir value with the path you copied.

Make sure to use forward slashes in the path. Save the file and close it.

Start Zookeeper
Open the command line tool and type the following command to start the zookeeper server.
zookeeper-server-start.bat config\zookeeper.properties

If you see this pointed message, then your zookeeper is up and running at the specified port. If you see any error message, make sure the port is not busy and try closing any application running on the specified port and try again.

Start Kafka
Open another command line tool to start the kafka. Make sure you do not close the first command line window where zookeeper is already running.
First we will make some configuration changes for kafka. Copy the data/kafka folder path. Open the config folder and open the server.properties file. Change the path for log.dirs property.

Make sure to use the forward slashes in the path. Save the file and close the editor.

Run the below command in new command line window to start the kafka.
kafka-server-start.bat config\server.properties

If you see the pointed message, you come to know that kafka has started.

If you open the respective folders in data. You would see that kafka and zookeeper has saved some bunch of files in them.
Now, you have the kafka running in one command line window and zookeeper running in another. If you want to start working with them, you will have to open another command line window and start writing commands.
Thank you All!!! Hope you find this useful.
Introduction
Zookeeper is a distributed coordination service for distributed applications, ensuring coordination and synchronization across multiple nodes. Simply, it provides a way for applications to coordinate with each other in a reliable and fault-tolerant way. However, setting it up can be a daunting task, especially for beginners. So, we are here with a step-by-step guide that simplifies the installation process, making it accessible for developers and system administrators.
You will also learn about prerequisite steps, installation steps, and crucial configuration settings in the zoo.cfg file. Moreover, this guide also includes testing Zookeeper using the Command-line interface (CLI) and further tips.
By installing Zookeeper, developers and system administrators can enjoy the benefits of its API, robust fault tolerance, and the ability to manage partial network failures. Follow the steps below for the installation of a zookeeper on Windows and other systems.
Prerequisites
Before you can install ZooKeeper, you will need to have the following prerequisites:
- A Java Development Kit (JDK) version 8 or higher
- A Linux, macOS, or Windows machine
Installing ZooKeeper on Linux (Ubuntu)
To install ZooKeeper on Linux, you can follow these steps:
- Download the ZooKeeper distribution from the Apache ZooKeeper website: https://zookeeper.apache.org/
- Extract the distribution to a directory of your choice.
- Open the conf/zoo.cfg file and configure the settings for your ZooKeeper cluster.
- Start ZooKeeper by running the following command:
bin/zookeeper-server-start.sh conf/zoo.cfg
Steps to Install ZooKeeper on macOS
To install ZooKeeper on macOS, you can follow these steps:
- Download the ZooKeeper distribution from the Apache ZooKeeper website: https://zookeeper.apache.org/
- Extract the distribution to a directory of your choice.
- Open the conf/zoo.cfg file and configure the settings for your ZooKeeper cluster.
- Start ZooKeeper by running the following command:
bin/zookeeper-server-start.sh conf/zoo.cfgHow to Install Zookeeper on Windows
Follow the below steps to run Zookeeper on Windows;
- Download Zookeeper from the official website: https://zookeeper.apache.org/releases.html and download the latest binary.
- Extract it using 7-Zip to a directory of your choice.
- Open the conf\zoo.cfg file and configure the settings for your ZooKeeper cluster.
- Start ZooKeeper by running the following command:
bin\zookeeper-server-start.cmd conf\zoo.cfgConfiguring ZooKeeper
The conf/zoo.cfg file contains the configuration settings for your ZooKeeper cluster. These settings include the following:
- The number of ZooKeeper servers in the cluster
- The hostname and port of each ZooKeeper server
- The ticking time
- The sync limit
- The data directory
For more information on the configuration settings, please refer to the ZooKeeper documentation: https://zookeeper.apache.org/doc/r3.1.2/zookeeperStarted.html
Starting and Testing Zookeeper
Once you have installed and configured ZooKeeper, you can test it by connecting to it using the ZooKeeper CLI. The ZooKeeper CLI is a command-line tool that allows you to interact with ZooKeeper.
Run the following command to start;
bin/zkCli.sh start
Next, you will see the following standard response;
ZooKeeper JMX enabled by default
Using config: /opt/zookeeper/bin/../conf/zoo.cfg
Starting zookeeper ... STARTED
Now, you can test it by connecting to it using the ZooKeeper CLI. The ZooKeeper CLI is a command-line tool that allows you to interact with ZooKeeper.
-
Use ACLs to restrict access and configure permissions for create, delete, read, and write for granular control.
-
Enable SSL/TLS for secure client and server communication.
-
Utilize firewalls to allow only trustworthy IPs to connect.
-
Monitor regularly to detect any suspicious acts.
Implement these security measures to ensure a secure setup.
Conclusion
In this blog, we go through the step-by-step guide for installing Zookeeper on Windows, Linux, and macOS. This will help you get started with Zookeeper, no matter the operating system you are using. Here, we also discussed some additional tips for securing the zookeeper setup. Hope this helps!