Let’s learn how to add language packs offline in Windows Image using DISM. There are several methods to deploy Windows 10 or Windows 11 language packs. Here you will see the steps to add language packs for Windows Image Via DISM (Offline Servicing).
Deployment Image Servicing and Management (DISM) is a command-line tool used to update offline Windows images. There are two ways to install or remove packages offline with DISM. You can either apply an unattend answer file to the offline image, or you can add or remove the package directly from the command prompt.
Microsoft also Introduced Local Experience Packs (LXPs), which are modern language packs delivered through the Microsoft Store or Microsoft Store for Business. So you no longer have to wait for feature update releases to deliver improved translations to you.
You can create Windows images with LIP by installing the appropriate LXP from the language pack ISOs for full languages (aka SKU languages), Microsoft has not yet retired the legacy language packs (lp.cab), so you will need to continue to add lp.cab for full languages to the OS image using DISM.

The four steps process helps you to keep your Windows Image (WIM) file updated –
Modify an image offline: Start with an image file (either .wim or .ffu format). Mount the file using DISM. It appears as a group of folders. Modify it using DISM, adding drivers, languages, and more. Use DISM to unmount and commit the changes back to the original image file. Apply it to new devices.
- Intune Learn to Deploy Windows 10 Language Pack Step by Step | MEM
- How to Deploy Windows App Win32 Using Intune |Language Pack
Download Language Packs
If you have an Enterprise subscription, we recommend that you download language pack media from MSDN or VLSC (Volume Licensing Service Center).
To select and download multiple language packs at once, select MultiLanguage. If you only need one language pack, select the individual language pack.
The results will return the currently available ISO images containing language packs and local experience packs.
Important – Identify the image index before you proceed further to add Windows update. You can get more details about the Image Index. Here we are extracting the Windows 10 Enterprise Edition; you must specify /index:3.
Mount the Windows image (Install.wim) – Use DISM to mount the image into a temporary location on your PC.
- Open a command prompt or DISM (Deployment and Imaging Tools Environment) with administrator privileges.
- Type the following command for creating an empty folder/directory to mount the offline Windows image (Wim).
In this example – The directory is created inside the D drive named _Mount and WIM File location “D:\Win10 21H2\install.wim” Make sure that you adjust the paths as per your environment.
Note: Don’t mount images to protected folders, such as your User\Documents folder.
mkdir D:\_Mount

Dism /mount-wim /wimfile:"D:\Win10 21H2\install.wim" /mountdir:D:\_Mount /index:3
Add a Language package to an image – To achieve full localization of target language during OSD, generally, we install LP.cab files in an offline image using DISM.
Note – It is recommended that you copy the language packs to your computer before adding the language packs to the image.
To apply the download language pack (.cab) to your mounted image. Type the following command to install language packs to the image.
For example, the following command shows how to add a French language pack: /packagepath:<path_to_Language_Packs_directory>
Dism /image:D:\_Mount /add-package /packagepath:"D:\LanguagePack\fr-fr.cab"
Validate Language Packs Installation – Add Language Packs Offline
/Get-Intl: Displays information about international settings and languages.
- Use the
/Image:<path_to_offline_image_directory>option to display information about international settings and languages in the offline image.
Dism /image:D:\_Mount /get-intl

Output -> Execution Status
Reporting offline international settings.

Default system UI language : en-US
System locale : en-US
Default time zone : Pacific Standard Time
User locale for default user : en-US
Location : United States (GEOID = 244)
Active keyboard(s) : 0409:00000409
Keyboard layered driver : Not installed.

Installed language(s): en-US
  Type : Fully localized language.
Installed language(s): fr-FR
  Type : Partially localized language, MUI type.
  Fallback Languages en-US

The operation completed successfully.
Unmount Windows Image – Add Language Packs Offline
After you modify a mounted image, you must unmount it. If you mount your image with the default read/write permissions, you can commit your changes. This makes your modifications a permanent part of the image.
To save changes you make to the image, use the /commit option when you use DISM to unmount the image.
Dism /unmount-wim /mountdir:D:\_Mount /commit
Add a language to an existing language list
This example adds the language French (France) to the language list of the user.
Run the following PowerShell commands with user context to complete the process –
- Get-WinUserLanguageList : Get a language list for the current account.
- Set-WinUserLanguageList : Sets the language list and associated properties for the current user account.
Substitute in the command above with the actual language tag (ex: “fr-FR”) for the language (ex: “French (France)” you want to set as your display language.
- The first command gets the user language list by using the Get-WinUserLanguageList cmdlet. The command stores the result in the $OldList variable.
- The second command adds a language to the object in $OldList.
- The final command sets the language list of the current user to the revised value of $OldList.
$OldList = Get-WinUserLanguageList
$OldList.Add("fr-FR")
Set-WinUserLanguageList $OldList -Force
Troubleshooting – If you experiencing any issue while injecting language packs with any of the command lines from DISM, you can locate the log file in C:\Windows\Logs\DISM for more details.
When deploying Windows through offline images (ISOs) with special language requirements, it can be difficult for a sysadmin to install language packs to each system individually. Today we are going to show you how you can insert language packs directly into ISO images before you install the operating system on a computer.
Table of Contents
The process of adding new updates or features to a pre-existing Windows setup media is known as Slipstreaming. Using this method, you can keep your existing ISO images updated with the required language packs.
Learn how to add Windows Cumulative Updates to existing ISO images.
Before we begin, it would be helpful to understand the types of language packs Microsoft offers for Windows.
Add Language Packs to existing Windows ISO media
Adding language packs to existing ISO images is a step-by-step process. You can do so by performing the tasks below in the order it is given in, and you should have no problems doing so.
Note: This method is applicable for both Windows 11 and Windows 10 ISO images.
Download and install Windows Assessment and Deployment Kit (WindowsADK)
WindowsADK is a tool used to aid in the deployment of Windows OS in bulk, or on a large number of devices.
To learn more about WindowsADK, refer to this blog post.
You can also download and install WindowsADK through the guide provided in the post. We suggest that you do so before proceeding forward to the next step. This is because WindowsADK provides certain elements that are required to push the language packs into existing ISO images, such as the “Windows Kits” folder that can be found in C:\Program Files (x86).
 1")
Download and extract Windows ISO Image
If you do not already have an ISO image to begin with, you can download Windows 10 ISO image here, and Windows 11 ISO image from here.
Once downloaded, right-click on the ISO file and click Mount from the context menu. When mounted, copy its content to an empty folder.
 2")
Alternatively, you can also extract the ISO image from the context menu (using WinRAR, etc.) directly into an empty folder.
 3")
We have extracted the image to D:\Extract\. Once done, you may now proceed to the next step.
Determine image Index Number
Usually, an ISO image contains multiple editions of the same Windows, such as Professional, Education, Home, etc. Each of these editions has its own index number. An index number is an integer associated with each of these editions, which is required later when updating the ISO image with new language packs. Hence, we must determine the index number for the edition you will be deploying in the future using this ISO.
Launch the Command Prompt with administrative privileges, then use the following command to determine the index number for the OS:
Dism /Get-ImageInfo /ImageFile:<PathToExtractedFolder>\sources\install.wimReplace <PathToExtractedFolder> with the complete path to where you extracted the ISO image. Here is an example of the command above:
Note: Do not close the Command Prompt until the very end, as any work done will need to be performed all over again.
 4")
Since we will be adding language packs to Windows 11 Pro, the index number we will be using is 6.
Mount .WIM file using DISM
The next step is to mount the extracted Install.wim file to an empty folder so that changes can be applied to it.
Now that the install.wim file has been mounted successfully, it is now time to move on to the next step.
Add language pack(s)
You should now be able to add language packs to the mounted .wim file. However, you must first download the .cab files for the language packs that are right for your operating system. You can download them from the internet directly.
Once downloaded, proceed with the command shown below to mount the language pack(s) to your ISO:
Dism /Image:"<PathToNewFolder>" /Add-Package /PackagePath="<PathTo.CABLanguagePack>"In the command above, replace <pathToNewFolder> with the complete path with the folder you had created earlier (to which the .wim file is mounted) and also replace <PathTo.CABLanguagePack> with the complete version of the downloaded language pack. Here is an example:
 7")
You can now continue to add as many language packs as you like. Remember that more language packs mean the larger the footprint of the operating system.
Commit and dismount
Once the language packs have been incorporated into the .wim file, all that is left to do is save the changes and then dismount the install.wim file. Use the command given below to commit the changes and dismount.
dism /Unmount-wim /mountdir:"<PathToNewFolder>" /commitReplace <PathToNewFolder> with the complete path of the folder where install.wim file is mounted. In our case, we will be using the following command:
dism /Unmount-wim /mountdir:"D:\MountISO" /commitNote that this may take a few minutes and the Command Prompt may look like it is stuck. However, that is not the case. Please allow a few minutes to commit and dismount successfully.
 8")
Covert extracted folder back to ISO image
You may now convert the updated Windows files and folders back to an ISO image using third-party tools. Here is a guide on how to convert files and folders into ISO images.
Closing words
With lesser download volume and customized language preferences, updating an existing ISO image can be speedy. It eliminates the headache of installing multiple language packs on a number of computers later on.
This post covers the steps to add language packs offline using DISM. We will see how to use Deployment Image Servicing and Management (DISM) to add additional language packs to a wim file. When you deploy operating system using SCCM, you deploy it with a specific language pack. In Windows 7, language packs can be installed only from the Optional Updates section in Windows Update. So if one needs a different language pack, it has to be installed manually. This is a tedious task especially when you have more than one language packs to be installed.
In large deployments, you might want to install the additional language packs for OS that you deploy. There are two ways to simplify this task. Deploy the OS and install all the language packs. Capture the OS and then use this captured wim file and deploy this wim file. There is also another way to do this. Get the wim file and using DISM add the language packs. The second method is what we are going to cover in this post.
Language packs are available as .cab files and are usually named with their locale. You need to know the locale before you add the LP to wim file. A list of all language packs available for windows 10 are listed here. In addition language packs can be downloaded from Microsoft volume licensing site. If you are using SCCM, you would have installed Windows ADK as a prerequisite. To service and prepare you images, we use DISM tool. It’s a command line tool and can be used to service wim and virtual hard disk files. More info about DISM is documented here.

If you are running Windows 10, the DISM tool comes pre-installed and is located in System32 folder. So bringing up command prompt and running DISM command should launch it. Note that when you inject language packs to a wim file, the size of wim file increases. So i would suggest you add only required language packs and not all of them unless it is really required.
How to Add Language Packs Offline Using DISM (Offline WIM File)
The below steps shows how to add language packs offline using DISM. I have got the Windows 7 wim file with me (install.wim is located in sources folder withing ISO file). Launch the command prompt as administrator and type the below commands. I am currently performing the below steps on my primary site server where ADK 1803 is installed. You may choose any other machine as well to achieve this task.
Step 1 – Determine Image Index Number
It is essential to find the image index before you proceed further. Type the following command to retrieve the name or index number. Using the below command we can find out index number and name of the image as well.
Syntax - Dism /Get-ImageInfo /ImageFile:<path to wim file>
In this example, my command looks like this
Command Used - Dism /Get-ImageInfo /ImageFile:\\corpsccm\Sources\OS\Win7\sources\install.wim
 1")
Step 2 – Mount the WIM File
The first step is to mount the wim file. Create a folder and name it as mount.
Syntax - DISM /mount-wim /wimfile:<path to wim file> /index:<image in WIM, e.g. 1> /mountdir:<mount dir path>
In this example, my command looks like this
Command Used - DISM /mount-wim /wimfile:\\corpsccm\Sources\OS\Win7\sources\install.wim /index:1 /mountdir:E:\sources\mount
 2")
Step 3 – Add or Inject Language Packs
I have got two language packs which I will be adding it to wim file. Ensure that you have language packs copied over to a folder. Create a new folder and name it as Scratch. Type the below command to add a language pack to the mounted offline image.
Syntax - dism /image:<mount folder path> /scratchdir:<scratch folder path> /add-package /packagepath: <path to .cab file>
In this example, my command looks like this
Command Used - dism /image:E:\sources\mount /scratchdir:E:\sources\scratch /add-package /packagepath:\\corpsccm\Sources\LP\ja-jp\lp.cab
 3")
Step 4 – Commit Changes
We have added the language packs offline using DISM. The last step is to commit the changes. Type the following command to commit the changes. You can now use the wim file to deploy the OS which also includes language packs.
Syntax - dism /commit-wim /mountdir:<path to mount dir>
My command looks like this
Command Used - dism /commit-wim /mountdir:E:\sources\mount
 4")
Still Need Help?
If you need further assistance on the above article or want to discuss other technical issues, check out some of these options.
установка_языкового_пакета
Содержание
Установка языкового пакета
Информация в данном разделе актуальна для Windows 10: 1607, 1809.
Вопрос по проблеме локализации самый частый, чтобы избежать проблем, связанных с локализацией проще всего использовать скрипт для локализации, который находится в наборе скриптов.
С помощью графического интерфейса
В классической оболочке Win
С подключением целевого устройства к интернету (для Windows 10 1607)
Установка языкового пакета из интернета может привести к невозможности запечатать систему.
Если версия ОС, на которую устанавливается языковой пакет, не является последней из доступных, то возможна некорректная локализация.
-
Если в перечне языков нет необходимого языка, то:
-
Нажмите на кнопку «Добавить язык» (Add a language)
-
Выберите необходимый язык из списка
-
Нажмите на кнопку «Добавить» (Add)
-
-
На необходимом языке выберите пункт «Параметры» (Options)
-
Выберите пункт «Скачивание и установка языкового пакета» (Downlad and install language pack)
-
Дождитесь загрузки и установки языкового пакета
Без подключения целевого устройства к интернету
-
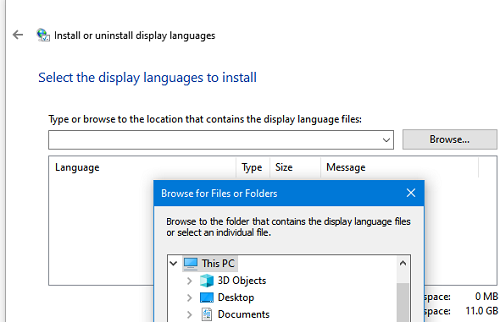
В появившемся окне выберите пункт «Установить языки интерфейса» (Install display languages)
-
Нажмите на кнопку «Обзор…» (Brouse) и укажите расположение языкового пакета
-
Если выбрать не конкретный языковой пакет, а папку с языковыми пакетами, то в утилите будут отображены языковые пакеты содержащиеся в выбранной папке
-
-
Нажмите кнопку «Далее» (Next)
-
Примите лицензионное соглашение и еще раз нажмите «Далее» (Next)
-
Дождитесь завершение процесса установки
В новой оболочке Win (с подключением целевого устройства к интернету)
Установка языкового пакета из интернета может привести к невозможности запечатать систему.
Если версия ОС, на которую устанавливается языковой пакет, не является последней из доступных, то возможна некорректная локализация.
Для Windows 10 1809
-
Выберите пункт «Добавление языка» (Add a language)
-
Выберите необходимый язык и нажмите «Далее» (Next)
-
Выберите необходимые компоненты языкового пакета и нажмите «Установить» (Install)
-
Дождитесь загрузки и установки языкового пакета
Установленный язык будет установлен в качестве языка системы после перезагрузки.
Новый язык будет установлен только для того пользователя под которым был установлен языковой пакет.
Для Windows 10 1607
-
Если в разделе «Языки» (Languages) нет необходимого языка, то
-
Выберите пункт «Добавление языка» (Add a language)
-
Выберите необходимый язык
-
-
Убедитесь, что под необходимым языком есть надпись «Доступен языковой пакет» (Language pack available). Без статуса доступности не будет отображаться кнопка «Загрузить» (Download)
-
Выберите необходимый язык в разделе «Языки» (Languages)
-
Нажмите на кнопку «Параметры» (Options)
-
Нажмите на кнопку «Загрузить» (Download), которая располагается под надписью «Скачать языковой пакет» (Dowload language pack)
-
Дождитесь загрузки и установки языкового пакета
С помощью консоли
Ниже приведены примеры установки русскоязычного языкового пакета с учетом того, что разрядность ОС — «x64»,
а буква виртуального привода подключенного образа — «D»
С помощью утилиты «lpksetup»
Нижеуказанную команду можно выполнить без повышения привилегий
lpksetup /i ru-RU /p D:\x64\langpacks
Подробную справку о возможностях утилиты «lpksetup», можно получить выполнив команду «lpksetup /?»
С помощью утилиты «DISM»
Нижеуказанную команду нужно выполнить в среде с повышенными привилегиями
DISM /Online /Add-Package /PackagePath:"D:\x64\langpacks\Microsoft-Windows-Client-Language-Pack_x64_ru-ru.cab"
Подробную справку о возможностях утилиты «DISM», можно получить выполнить в среде «PowerShell» команду «DISM /?» c повышенными привилегиями
С помощью «PowerShell»
Нижеуказанную команду нужно выполнить в среде «PowerShell» с повышенными привилегиями
Add-WindowsPackage -Online -PackagePath "D:\x64\langpacks\Microsoft-Windows-Client-Language-Pack_x64_ru-ru.cab"
Официальная документация
· Последние изменения: 2021/11/16 13:25 —
vladimir
В этой статье мы рассмотрим типовые ошибки установки языковых пакетов в Windows 10 и 11.
В Windows вы можете установить языковые пакеты из панели управления: Settings ->Time and Language -> Language (URI команда для быстрого перехода в раздел Settings:
ms-settings:regionlanguage
).
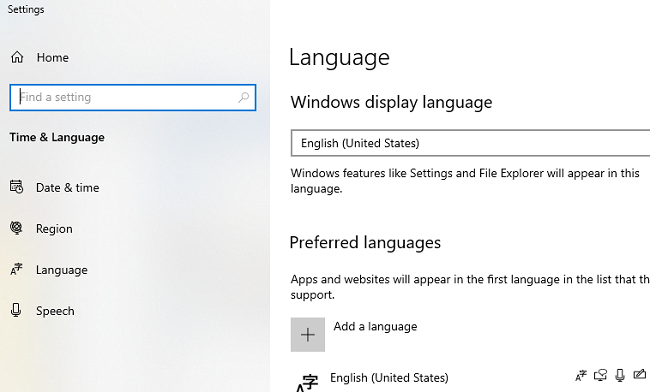
Нажмите кнопку Add a language, выберите язык и Windows должна загрузить языковой пакет с серверов Windows Update.
В моем случае при установке языкового пакета появилась ошибка:
Sorry, we’re having trouble getting this Windows display language installed. You can try later on the Language options page. Error code: 0x8073D01
Sorry, we’re having trouble getting this feature installed. Error code: 0x8034500C
При попытке установки языкового пакета с помощью PowerShell команды, также появляется ошибка:
Install-Language -Language de-de
Install-Language : Failed to install language. ErrorCode: -2145103860. Please try again.

Вы можете столкнуться с ошибкой 0x8073D01 при установке языкового пакета на компьютере, который находится в корпоративной сети и настроен на получение обновлений со внутреннего сервера Windows Server Update Service (WSUS) вместо WU.
В этом случае вы можете установить языковой пакет вручную с помощью DISM и образа FoD (Features on Demand). Если вы хотите разрешить получать прямой доступ к компонентам FoD на серверах Microsoft Update в Интернете, нужно настроить специальный параметр групповых политик.
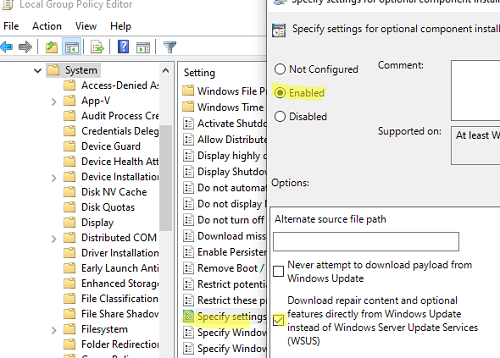
Откройте консоль локального (gpedit.msc) или доменного редактора GPO (gpmc.msc) и перейдите в раздел Computer Configuration -> Administrative Templates -> System.
Включите параметр Specify settings for optional component installation and component repair и отметьте опцию Download repair content and optional features directly from Windows Updates instead of Windows Server Updates Services (WSUS) (Скачать содержимое для восстановления и дополнительные компоненты непосредственно из Центра обновления Windows вместо использования службы WSUS).
Обновите настройки групповых политик и перезапустите службу обновления Windows:
gpupdate /force
net stop wuauserv
net start wuauserv
После этого ваш компьютер должен успешно скачать и установить языковой пакет из Интернета.
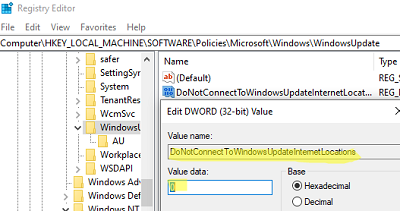
Если это не помогло, проверьте значение параметра реестра DoNotConnectToWindowsUpdateInternetLocations в ветке
HKEY_LOCAL_MACHINE\SOFTWARE\Policies\Microsoft\Windows\WindowsUpdate
. Если его значение равно 1, это будет блокировать подключение к интернету при получении компонентов FoD. Измените значение на 0 и перезапустите службу wuauserv
Если ваш сервер не должен получать обновления через WSUS, задайте также значение параметра реестра UseWUServer = 0 в
HKLM\SOFTWARE\Policies\Microsoft\Windows\WindowsUpdate\AU
.
Ошибка 0x800f0950 при установке LP решается аналогично.

При появлении ошибок 0x800F0908 или 0x800f0954 установки языковых пакетов в Windows нужно попробовать следующее:
- Проверьте, что для вашего сетевого подключения не включена опция Лимитное подключение (Metered Connection). Перейдите в Settings -> Network and Internet -> откройте свойства вашего подключения -> проверьте что опция Set as metered connection отключена.
- Возможно проблема связана с настроками агента Windows Update.
Сначала попробуйте очистить кэш обновлений из командной строки:
net stop wuauserv
net stop bits
net stop appidsvc
net stop cryptsvc
Ren %systemroot%\SoftwareDistribution SoftwareDistribution.bak
Ren %systemroot%\system32\catroot2 catroot2.bak
net start bits
net start wuauserv
net start appidsvc
net start cryptsvc
Если это не поможет, выполнить полный сброс настроек Windows Update на компьютере.
- Если ничего не помогло, проверьте целостность вашего образа Windows. Проверьте хранилище компонентов Windows с помощью команд:
Dism / Online / Cleanup-Image / RestoreHealth
sfc/scannow
Также вы можете вручную скачать CAB файл с языковыми пакетами (ссылки есть в интернете) и установить их вручную с помощью встроенной утилиты
lpksetup.exe
.