
С помощью сервера обновлений Windows Server Update Services (WSUS) вы можете развернуть собственную централизованную систему обновления продуктов Microsoft (операционных систем Widows, Office, SQL Server, Exchange и т.д.) на компьютерах и серверах в локальной сети компании. В этой статье мы рассмотрим, как установить и настроить сервер обновлений WSUS в Windows Server 2019/2016/2012R2.
Содержание:
- Установка роли WSUS в Windows Server
- Начальная настройка сервера обновлений WSUS в Windows Server
- Установка консоли администрирования WSUS в Windows 10/11
- Оптимизация производительности WSUS
Как работает WSUS?
Сервер WSUS реализован в виде отдельной роли Windows Server. В общих словах сервис WSUS можно описать так:
- После установки сервер WSUS по расписанию синхронизируется с серверами обновлений Microsoft Update в Интернете и скачивает новые обновления для выбранных продуктов;
- Администратор WSUS выбирает, какие обновления нужно установить на рабочие станции и сервера компании и одобряет их установку;
- Клиенты WSUS в локальной сети скачивают и устанавливают обновления с вашего сервера обновлений согласно настроенным политикам.
Установка роли WSUS в Windows Server
Начиная с Windows Server 2008, сервис WSUS выделен в отдельную роль, которую можно установить через консоль управления сервером или с помощью PowerShell.
Если вы развертываете новый сервер WSUS, рекомендуется сразу устанавливать его на последнем релизе Windows Server 2022 (возможна установка на Windows Serve Core).
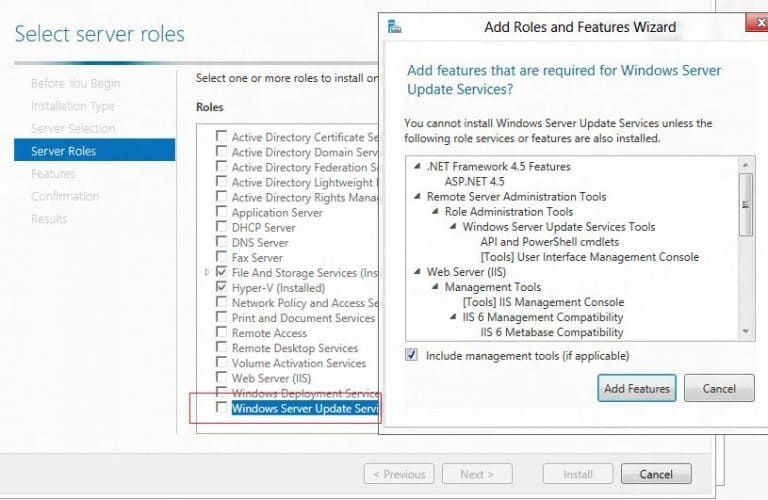
Чтобы установить WSUS, откройте консоль Server Manager и отметьте роль Windows Server Update Services (система автоматически выберет и предложит установить необходимые компоненты веб сервера IIS).

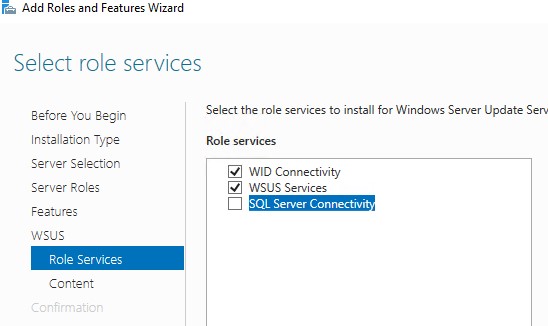
В следующем окне нужно выбрать, какие компоненты WSUS нужно установить. Обязательно отметьте опцию WSUS Services. Две следующие опции зависят от того, какую базу данных вы планируете использовать для WSUS.
Настройки сервера, метаданные обновлений, информация о клиентах WSUS хранятся в базе данных SQL Server. В качестве базы данных WSUS вы можете использовать:
- Windows Internal Database (WID) – встроенную базу данных Windows, опция WID Connectivity (это рекомендуемый и работоспособный вариант даже для больших инфраструктур);
- Отдельную базу Microsoft SQL Server, развернутую на локальном или удаленном сервере. Вы можете использовать редакции MS SQL Enterprise, Standard (требуют лицензирования) или бесплатную Express редакцию. Это опция SQL Server Connectivity.
Внутреннюю базу Windows (Windows Internal Database) рекомендуется использовать, если:
- У вас отсутствуют лицензии MS SQL Server;
- Вы не планируется использовать балансировку нагрузки на WSUS (NLB WSUS);
- При развертывании дочернего сервера WSUS (например, в филиалах). В этом случае на вторичных серверах рекомендуется использовать встроенную базу WSUS.
В бесплатной SQL Server Express Edition максимальный размер БД ограничен 10 Гб. Ограничение Windows Internal Database – 524 Гб. Например, в моей инфраструктуре размер базы данных WSUS на 3000 клиентов составил около 7Гб.
При установке роли WSUS и MS SQL Server на разных серверах есть ряд ограничений:
- SQL сервер с БД WSUS не может быть контроллером домена Active Directory;
- Сервер WSUS нельзя разворачивать на хосте с ролью Remote Desktop Services.
База WID по умолчанию называется SUSDB.mdf и хранится в каталоге windir%\wid\data\. Эта база поддерживает только Windows аутентификацию (но не SQL). Инстанс внутренней (WID) базы данных для WSUS называется server_name\Microsoft##WID.
Базу WID можно администрировать через SQL Server Management Studio (SSMS), если указать в строке подключения
\\.\pipe\MICROSOFT##WID\tsql\query
.
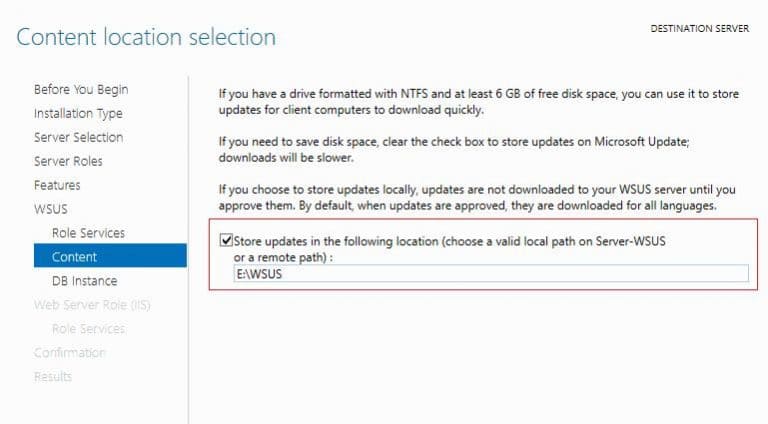
Если вы хотите хранить файлы обновлений локально на сервере WSUS, включите опцию Store updates in the following locations и укажите путь к каталогу. Это может быть папка на локальном диске (рекомендуется использовать отдельный физический или логический том), или сетевой каталог (UNC путь). Обновления скачиваются в указанный каталог только после их одобрения администратором WSUS.
Размер базы данных WSUS сильно зависит от количества продуктов и версий ОС Windows, которое вы планируете обновлять. В большой организации размер файлов обновлений на WSUS сервере может достигать сотни Гб.
Если у вас недостаточно места на дисках для хранения файлов обновлений, отключите эту опцию. В этом случае клиенты WSUS будут получать одобренный файлы обновлений из Интернета (вполне рабочий вариант для небольших сетей).

Также вы можете установить сервер WSUS с внутренней базой данный WID с помощью PowerShell командлета Install-WindowsFeature:
Install-WindowsFeature -Name UpdateServices, UpdateServices-WidDB, UpdateServices-Services, UpdateServices-RSAT, UpdateServices-API, UpdateServices-UI –IncludeManagementTools
Начальная настройка сервера обновлений WSUS в Windows Server
После окончания установки роли WSUS вам нужно выполнить его первоначальную настройку. Откройте Server Manager и выберите Post-Deployment Configuration -> Launch Post-Installation tasks.

Для управления WSUS из командной строки можно использовать консольную утилиту
WsusUtil.exe
. Например, чтобы указать путь к каталогу с файлами обновлений WSUS, выполните:
CD "C:\Program Files\Update Services\Tools"
WsusUtil.exe PostInstall CONTENT_DIR=E:\WSUS
Или, например, вы можете перенастроить ваш WSUS на внешнюю базу данных SQL Server:
wsusutil.exe postinstall SQL_INSTANCE_NAME="SQLSRV1\SQLINSTANCEWSUS" CONTENT_DIR=E:\WSUS_Content
Затем откройте консоль Windows Server Update Services. Запустится мастер первоначальной настройки сервера обновлений WSUS.
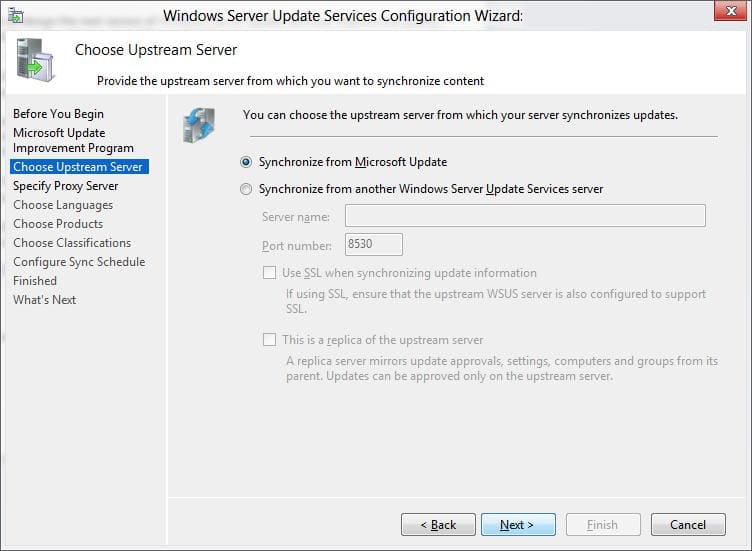
Укажите, будет ли сервер WSUS скачивать обновления с сайта Microsoft Update напрямую (Synchronize from Microsoft Update) или он должен получать их с вышестоящего WSUS сервера (Synchronize from another Windows Update Services server). Дочерние WSUS сервера обычно развертываются на удаленных площадках с большим количеством клиентов (300+) для снижения нагрузки на WAN канал.

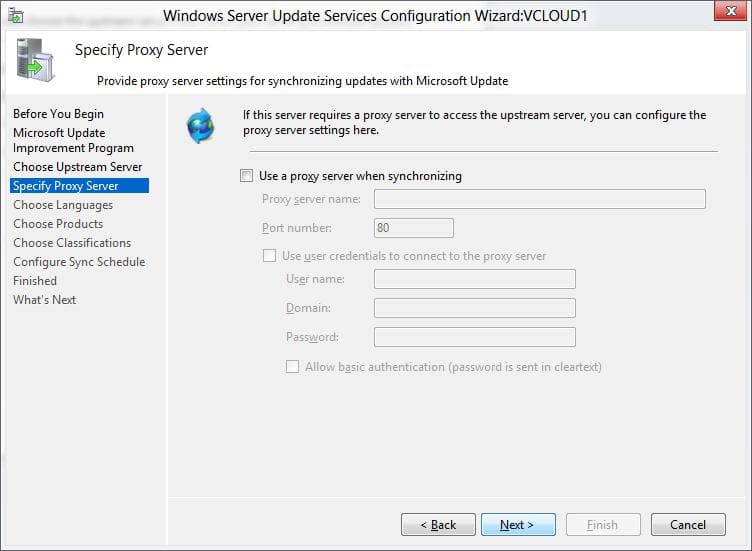
Если в вашей сети используется прокси-сервер для доступа в Интернет, далее нужно указать адрес и порт прокси сервера, и логин/пароль для аутентификации.

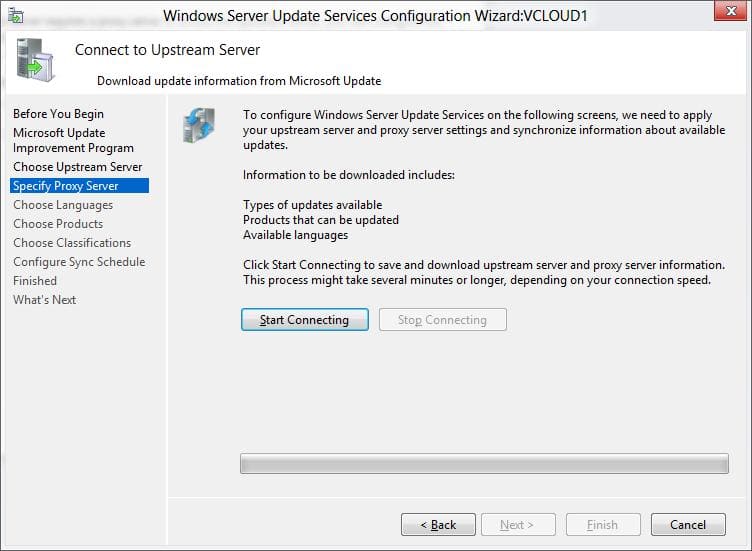
Проверьте подключение к вышестоящему серверу обновлений (или Windows Update). Нажмите кнопку Start Connecting.

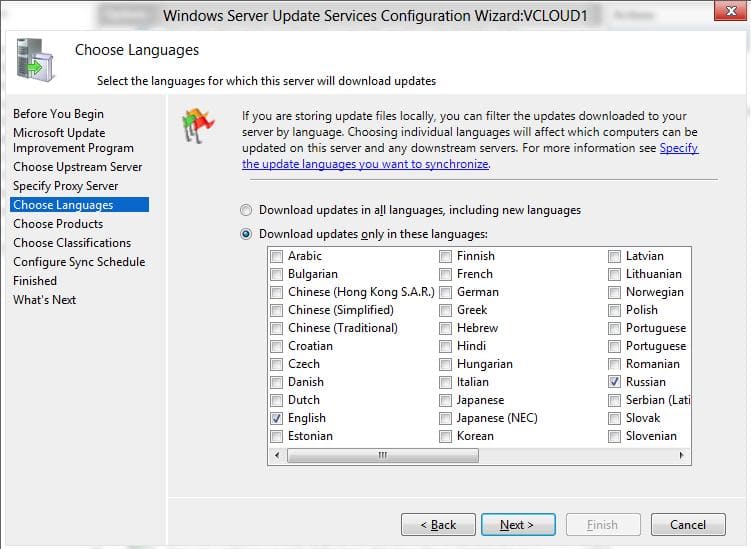
Выберите языки продуктов, для которых WSUS будет получать обновления. Мы укажем English и Russian (список языков может быть в дальнейшем изменен из консоли WSUS).

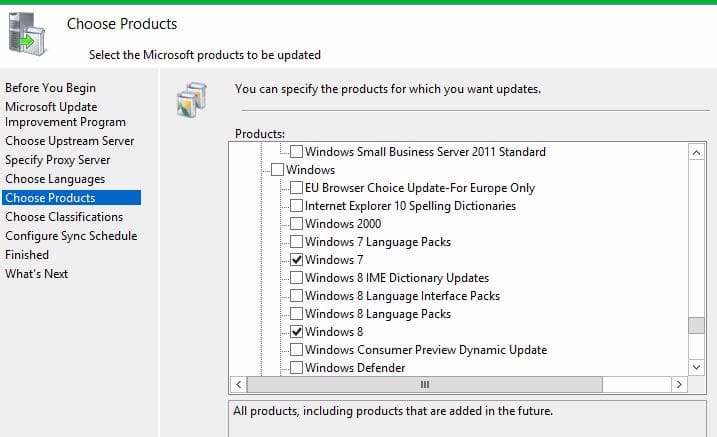
Затем выберите продукты, для которых WSUS должен скачивать обновления. Выберите только те продукты Microsoft, которые используются в Вашей корпоративной сети. Например, если вы уверены, что в вашей сети не осталось компьютеров с Windows 7 или Windows 8, не выбирайте эти опции.
Обязательно включите в классификации следующие общие разделы:
- Developer Tools, Runtimes, and Redistributable — для обновления библиотек Visual C++ Runtime
- Windows Dictionary Updates в категории Windows
- Windows Server Manager – Windows Server Update Services (WSUS) Dynamic Installer

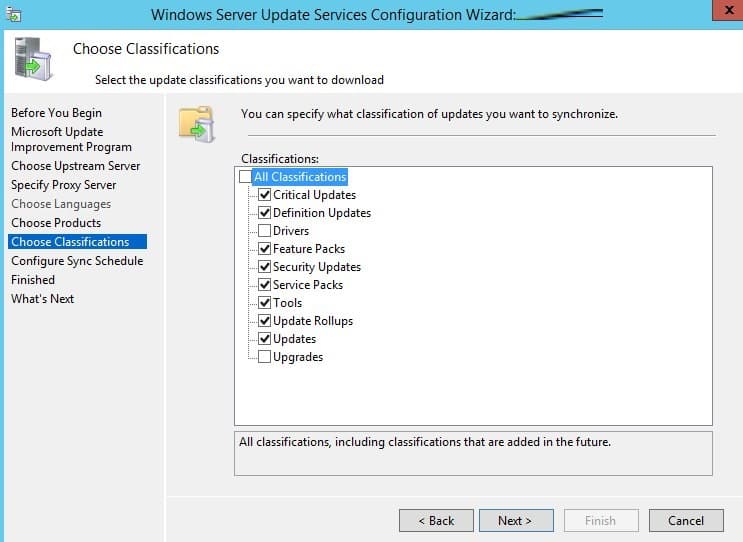
На странице Classification Page, нужно указать типы обновлений, которые будут распространяться через WSUS. Рекомендуется обязательно указать: Critical Updates, Definition Updates, Security Packs, Service Packs, Update Rollups, Updates.

Обновления редакций (билдов) Windows 10 (21H2, 20H2, 1909 и т.д.) в консоли WSUS входят в класс Upgrades.
Настройте расписание синхронизации обновлений. В большинстве случаев рекомендуется использовать автоматическую ежедневную синхронизацию сервера WSUS с серверами обновлений Microsoft Update. Рекомендуется выполнять синхронизацию в ночные часы, чтобы не загружать канал Интернет в рабочее время.

Первоначальная синхронизация сервера WSUS с вышестоящим сервером обновлений может занять несколько дней (в зависимости от количества продуктов, которое вы выбрали ранее).
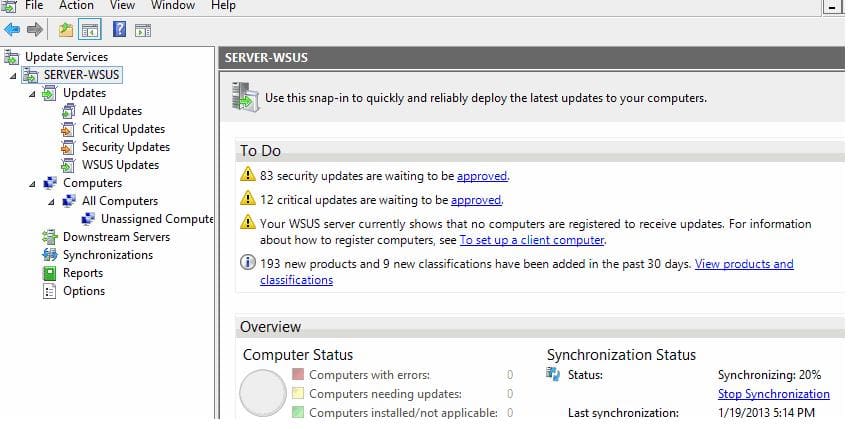
После окончания работы мастера запустится консоль WSUS.

Консоль WSUS состоит из нескольких разделов:
- Updates – обновления, доступные на сервере WSUS (здесь можно управлять одобрением обновлений и назначать их для установки)
- Computers – здесь можно создать группы клиентов WSUS (компьютеры и серверы)
- Downstream Servers – позволяет настроить, будете ли вы получать из обновления Windows Update или вышестоящего сервера WSUS
- Syncronizations –расписание синхронизации обновлений
- Reports – отчёты WSUS
- Options – настройка сервера WSUS
Клиенты теперь могут получать обновления, подключившись к WSUS серверу по порту 8530 (в Windows Server 2003 и 2008 по умолчанию использоваться 80 порт). Проверьте, что этот порт открыт на сервере обновлений:
Test-NetConnection -ComputerName wsussrv1 -Port 8530
Можно использовать защищенное SSL подключение по порту 8531. Для этого нужно привязать сертификат в IIS.
Если порт закрыт, создайте соответствующее правило в Windows Defender Firewall.
Установка консоли администрирования WSUS в Windows 10/11
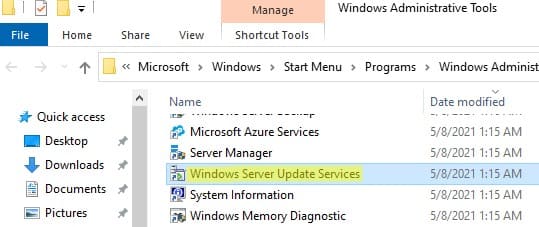
Для администрирования сервера обновления WSUS используется консоль Windows Server Update Services (
wsus.msc
). Вы можете управлять серверов WSUS как с помощью локальной консоли, так и по сети с удаленного компьютера.
Консоль администрирования WSUS для десктопных компьютеров с Windows 10 или 11 входит в состав RSAT. Для установки компонента Rsat.WSUS.Tool, выполните следующую PowerShell команду:
Add-WindowsCapability -Online -Name Rsat.WSUS.Tools~~~~0.0.1.0
Если вы хотите установить консоль WSUS в Windows Server, выполните команду:
Install-WindowsFeature -Name UpdateServices-Ui

При установке WSUS в Windows Server создаются две дополнительные локальные группы. Вы можете использовать их для предоставления доступа пользователям к консоли управления WSUS.
- WSUS Administrators
- WSUS Reporters
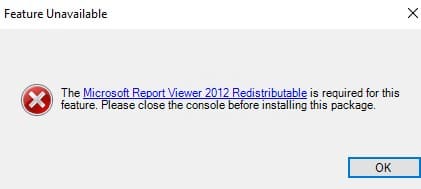
Для просмотра отчетов по установленным обновлениям и клиентам на WSUS нужно установить:
- Microsoft System CLR Types для SQL Server 2012 (SQLSysClrTypes.msi);
- Microsoft Report Viewer 2012 Runtime (ReportViewer.msi).
Если компоненты не установлен, при формировании любого отчета WSUS появится ошибка:
The Microsoft Report Viewer 2012 Redistributable is required for this feature. Please close the console before installing this package.

Оптимизация производительности WSUS
В этом разделе опишем несколько советов, касающихся оптимизации производительности сервера обновлений WSUS в реальных условиях.
- Для нормальной работы WSUS на сервере обновлений нужно должно быть свободным минимум 4 Гб RAM и 2CPU;
- При большом количестве клиентов WSUS (более 1500) вы можете столкнутся с существенным снижением производительность пула IIS WsusPoll, который раздает обновления клиентам. Может появляться ошибка 0x80244022 на клиентах, или при запуске консоль WSUS падать с ошибкой Error: Unexpected Error + Event ID 7053 в Event Viewer (The WSUS administration console has encountered an unexpected error. This may be a transient error; try restarting the administration console. If this error persists). Для решения проблемы нужно добавить RAM на сервер и оптимизировать настройки пула IIS в соответствии с рекомендациями в статье. Воспользуетесь такими командами:
Import-Module WebAdministration
Set-ItemProperty -Path IIS:\AppPools\WsusPool -Name queueLength -Value 2500
Set-ItemProperty -Path IIS:\AppPools\WsusPool -Name cpu.resetInterval -Value "00.00:15:00"
Set-ItemProperty -Path IIS:\AppPools\WsusPool -Name recycling.periodicRestart.privateMemory -Value 0
Set-ItemProperty -Path IIS:\AppPools\WsusPool -Name failure.loadBalancerCapabilities -Value "TcpLevel" - Включите автоматическое одобрения для обновлений антивируса Microsoft В противном случае WSUS станет существенно тормозить и потреблять всю доступную оперативную память.
Антивирусные проверки могут негативно влиять на производительность WSUS. Во встроенном Microsoft Defender антивирусе в Windows Server рекомендуется исключить следующие папки из области проверки:
- \WSUS\WSUSContent;
- %windir%\wid\data;
- \SoftwareDistribution\Download.
In this post I will cover the steps to install and configure WSUS (Windows Server Update Services) on Windows Server 2019. This guide should help you if you decide to install and configure WSUS from scratch.
In the past I have published several posts on WSUS. That includes installing WSUS and configuring WSUS. In addition to that I also published a post on WSUS troubleshooting. Since then I have been using Configuration Manager and never bothered to focus on WSUS.
Few days ago a colleague on mine contacted me and asked if I can publish a post on setting up WSUS on Windows Server 2019. The company where he works uses only WSUS to deploy the updates to computers. So he was looking for a guide that can help him setup and configure WSUS from scratch.

So I decided to publish this guide that is exclusively for admins who wish to install and configure WSUS to manage updates in their setup. I will also cover some WSUS basics which answers basic questions and the importance of WSUS.
It been quite a long time that I have actually configured anything in WSUS. That’s because the moment you start using SCCM to deploy updates, you forget about the WSUS console.
I have chosen Windows Server 2019 to install and configure WSUS. After Server 2012 R2 I believe Server 2019 is a stable release. I hate Windows Server 2016 because I have spent lot of time in troubleshooting windows update issues. For me the most important complain is that updates just don’t install properly on Server 2016.
Table of Contents
What are Windows Updates
Let’s start with some basics. When you install an operating system or image a machine, you always ensure it is patched with latest updates. Not just operating system but almost every software that we use needs to be constantly updated.
Windows updates are released to fix bugs, fix security issues in OS and to add new features to operating system. The Windows Updates rely on Windows Update service which is set to start automatically by default.
Windows Update service downloads and installs recommended and important updates automatically.
Microsoft updates can be classified into following categories :-
- Critical Updates
- Security Updates
- Definition Updates
- Drivers
- Update Rollups
- Service Packs
- Tools
- Feature Packs
- Updates
If you have migrated from Windows 7 to Windows 10, you will notice lot of new options under Windows Update. You get some cool options such as pause the updates for 7 days, change active hours for installing updates. In addition to that there are many useful options under Advanced Options. When you get time, go ahead and explore all of them.
Introduction to Windows Server Update Services
Windows Server Update Services (WSUS) enables the administrators to deploy the latest Microsoft product updates. WSUS is a Windows Server server role and when you install it, you can efficiently manage and deploy the updates.
One of the most important task of system administrators is to keep client and server computers updated with the latest software patches and security updates. Without WSUS it would be really hard to manage the updates deployment.
When you have a single WSUS server in your setup, the updates are downloaded directly from Microsoft Update. However if you install multiple WSUS server, you can configure WSUS server to act as an update source which is also known as an upstream server.
Rather than letting multiple computers download updates directly from internet, you can setup WSUS server and point the clients to download all the updates from a WSUS server. With this you save your Internet bandwidth and also speed up the Windows update process.
I can talk a lot about WSUS but let’s get started with installing WSUS.
WSUS Lab Setup
First of all let me cover about WSUS lab setup. I believe the best way to master WSUS is to install and configure it in your test or lab setup first. You can then start working on it and try several things.
I have created some virtual machines in my lab. Let me give you a list of machines and the OS info.
| Server Name | Operating System | Roles |
| CORPAD.PRAJWAL.LOCAL | Windows Server 2019 Datacenter | Active Directory, DNS, DHCP |
| CORPWSUS.PRAJWAL.LOCAL | Windows Server 2019 Datacenter | WSUS |
| CORPWIN10ENT.PRAJWAL.LOCAL | Windows 10 Enterprise | None |
| CORPWIN10PRO.PRAJWAL.LOCAL | Windows 10 Pro | None |
And if I had to show my setup in the form of a network diagram, this is how it’s going to look.

WSUS System Requirements
When you have decided to implement WSUS in your setup, you must first look into WSUS requirements. To plan your WSUS deployment I recommend reading this article from Microsoft. It covers all the information required to WSUS requirements, deployment scenarios, performance considerations etc.
This post covers the procedure to install Windows Server Update Services using Windows Internal Database (WID).
WSUS Firewall Ports / Exceptions
When you set up WSUS server, it is important that the server connects to Microsoft update to download updates. If there is a corporate firewall between WSUS and the Internet, you might have to configure that firewall to ensure WSUS can obtain updates.
To obtain updates from Microsoft Update, the WSUS server uses port 443 for HTTPS protocol. You must allow Internet access from WSUS to the following list of URLs :-
- http://windowsupdate.microsoft.com
- http://*.windowsupdate.microsoft.com
- https://*.windowsupdate.microsoft.com
- http://*.update.microsoft.com
- https://*.update.microsoft.com
- http://*.windowsupdate.com
- http://download.windowsupdate.com
- https://download.microsoft.com
- http://*.download.windowsupdate.com
- http://wustat.windows.com
- http://ntservicepack.microsoft.com
- http://go.microsoft.com
- http://dl.delivery.mp.microsoft.com
- https://dl.delivery.mp.microsoft.com
Install WSUS Role on Windows Server 2019
The steps to install Windows Server Update Services (WSUS) Role on Windows Server 2019 include :-
- Log on to the Windows 2019 server on which you plan to install the WSUS server role using an account that is a member of the Local Administrators group.
- In Server Manager, click Manage and click add Roles and Features.
- On the Before you begin page, click Next.
- In the select installation type page, select Role-based or feature-based installation option. Click Next.

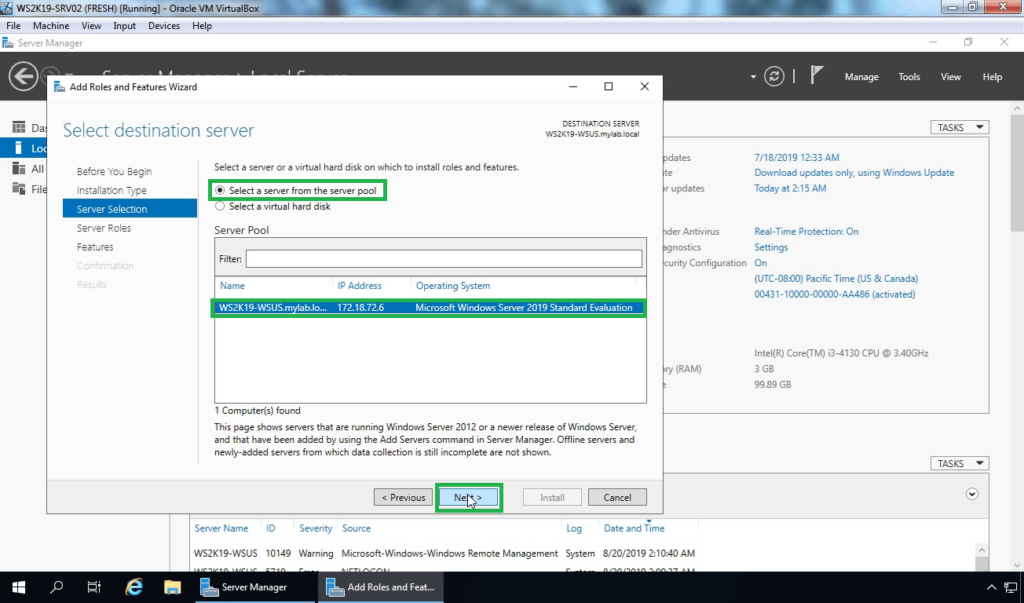
On the Server Selection page, verify the server name and click Next.

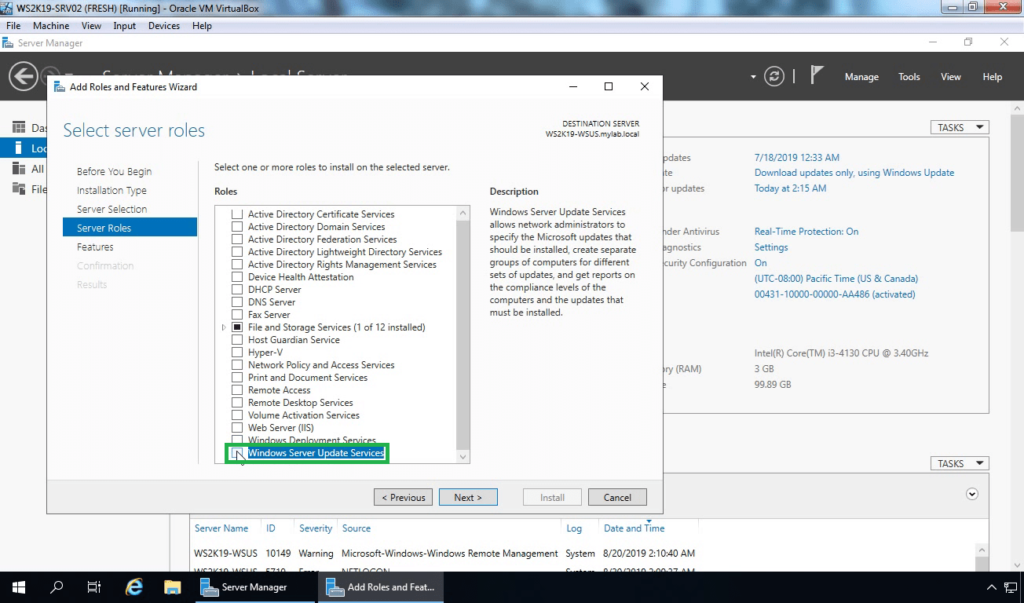
Server Roles – Windows Server Update Services
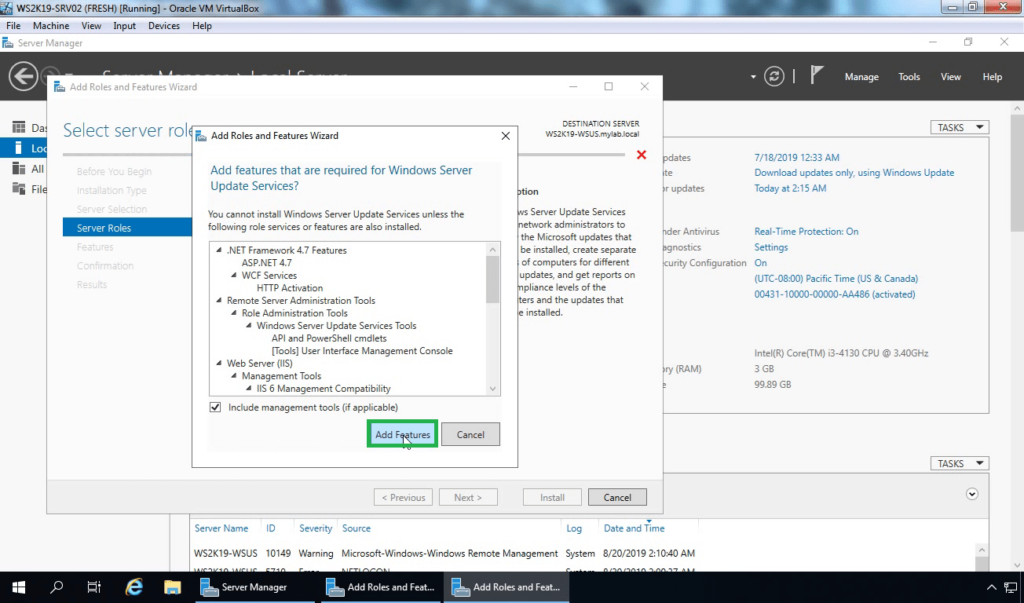
On the Server roles page, select the role “Windows Server Update Services“. You should see Add features that are required for Windows Server Update Services box. Click Add Features, and then click Next.

On the Select features page, leave the options to default and click Next.

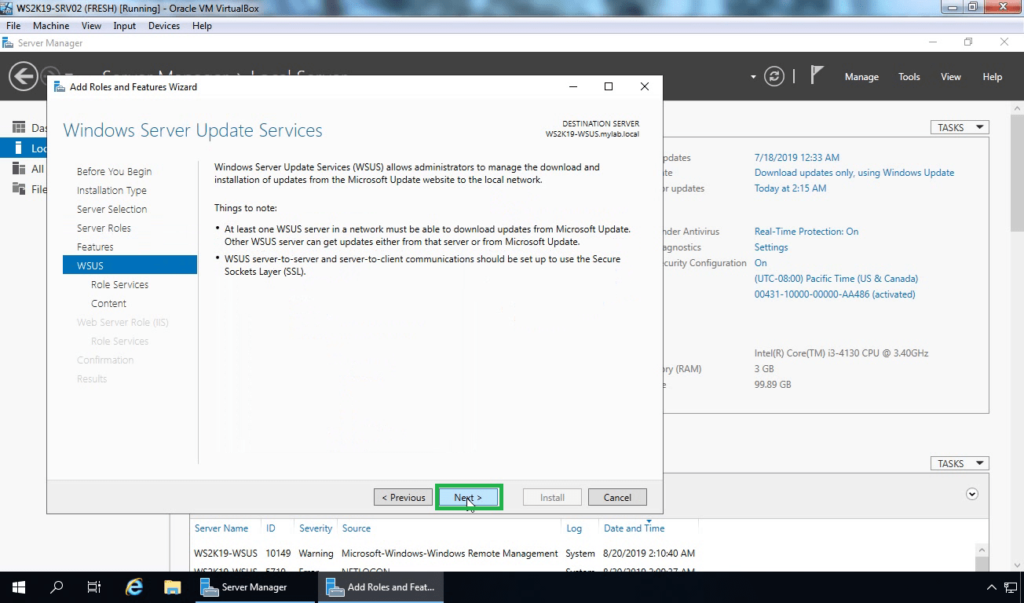
On the Windows Server Update Services page, click Next.

WSUS Database Type – Role Services
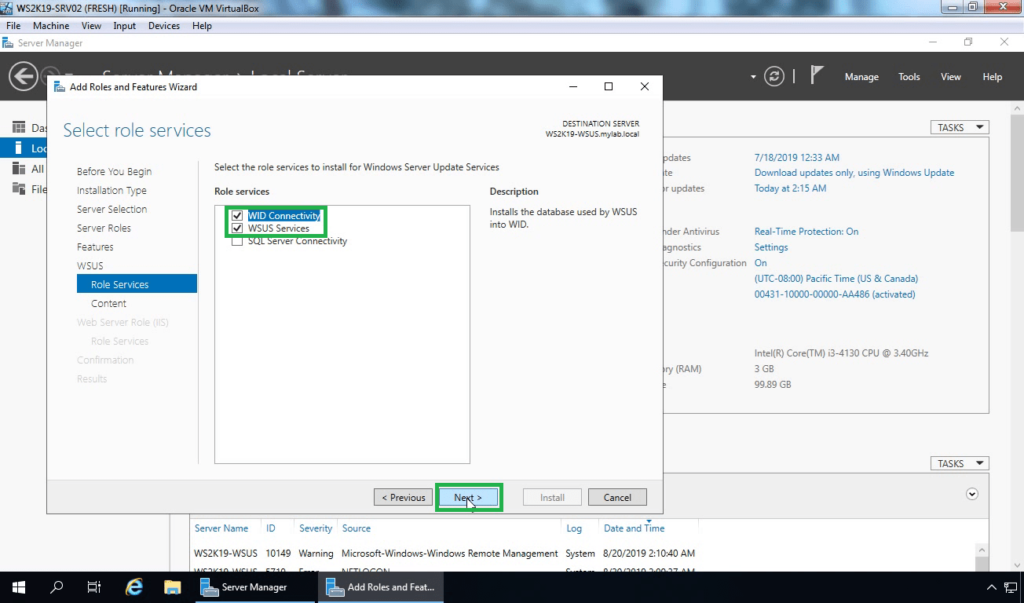
You must select role services / Database type to install for Windows Server Update services. Select WID Connectivity and WSUS Services. Click Next.

WSUS Content Location
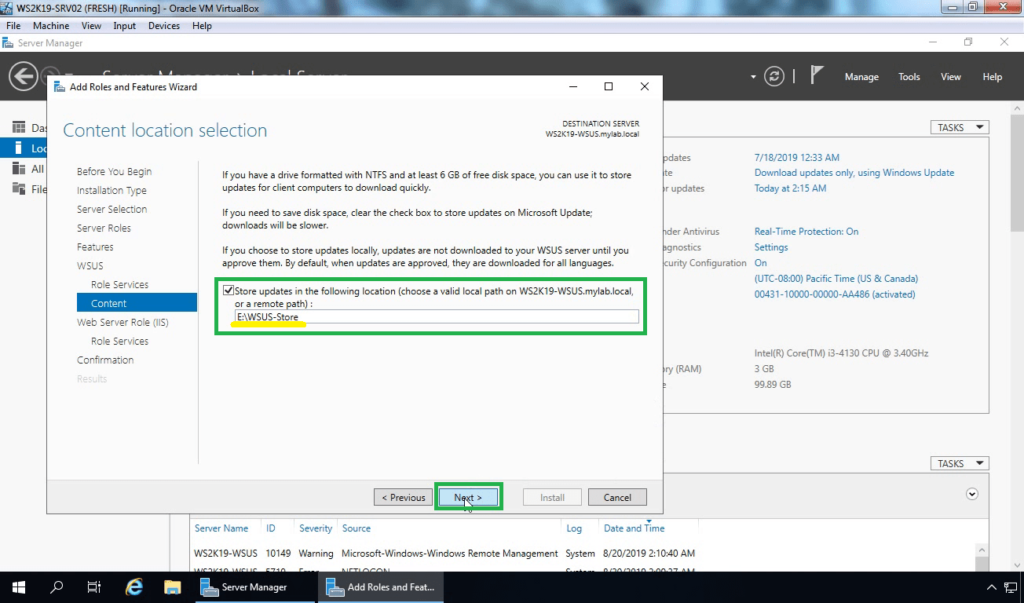
Specify a content location to store the updates. I would recommend storing the updates on another drive and not on your C: drive. The size of this folder can grow eventually and you don’t want this folder to reside on C: drive. Hence choose either a separate drive or store the updates on remote server.
Click Next.

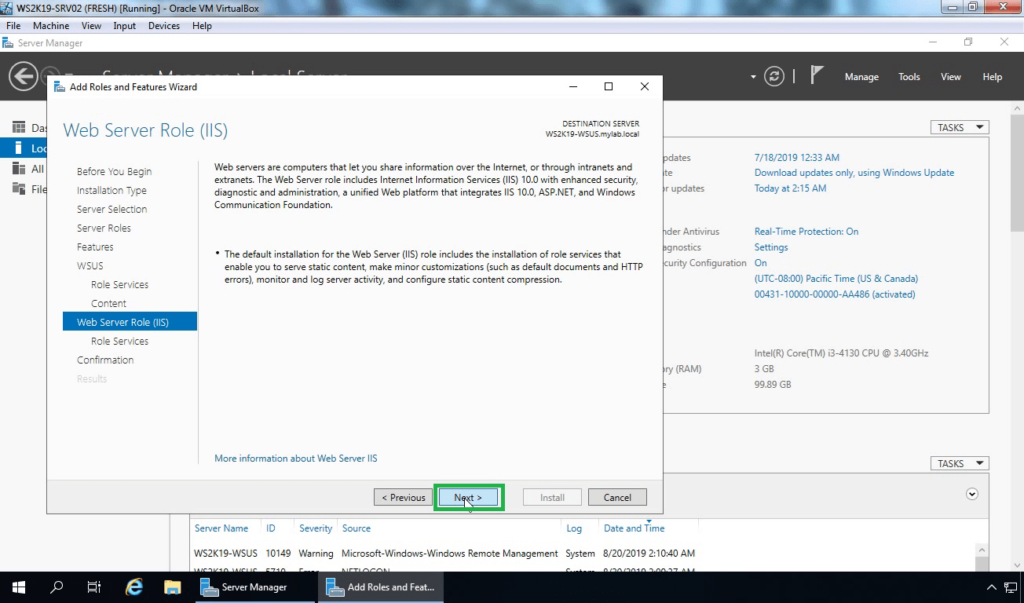
On the Web Server Role (IIS) page, click Next.

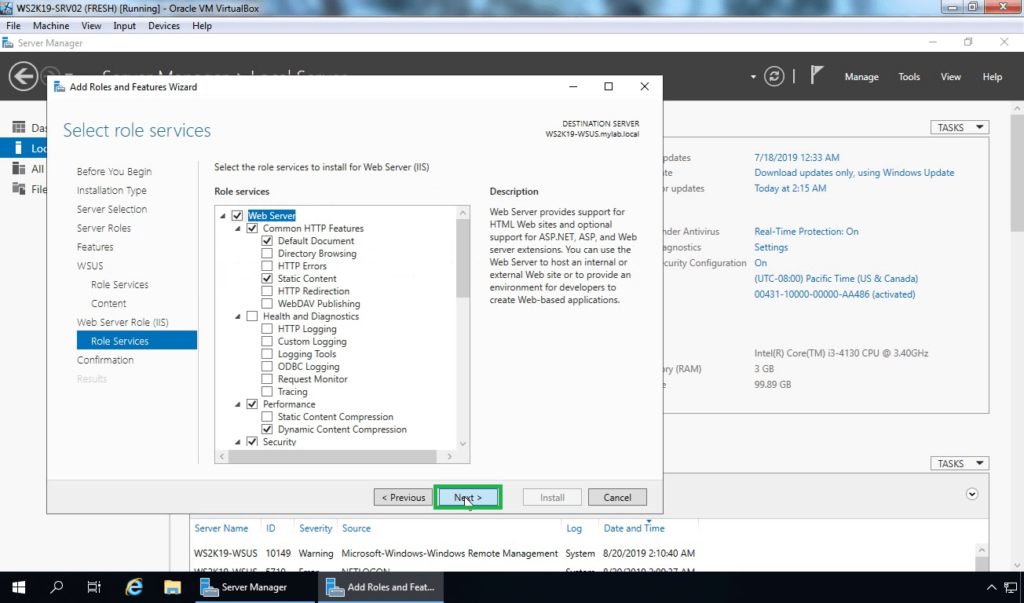
The role services to install web server (IIS) are select automatically. Do not change anything here and click Next.

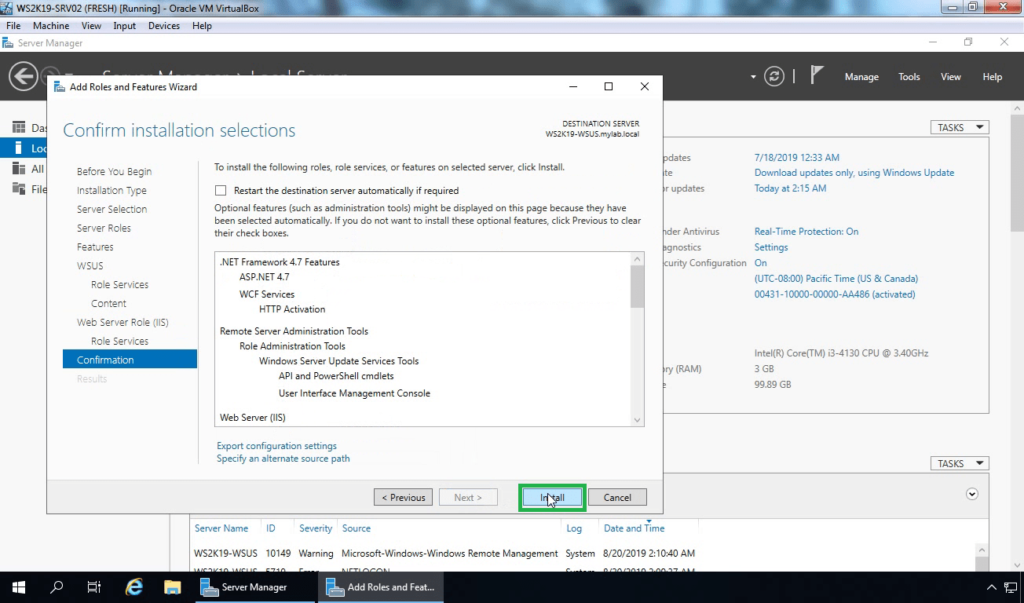
A final confirmation before you install WSUS. Review the settings and click Install.

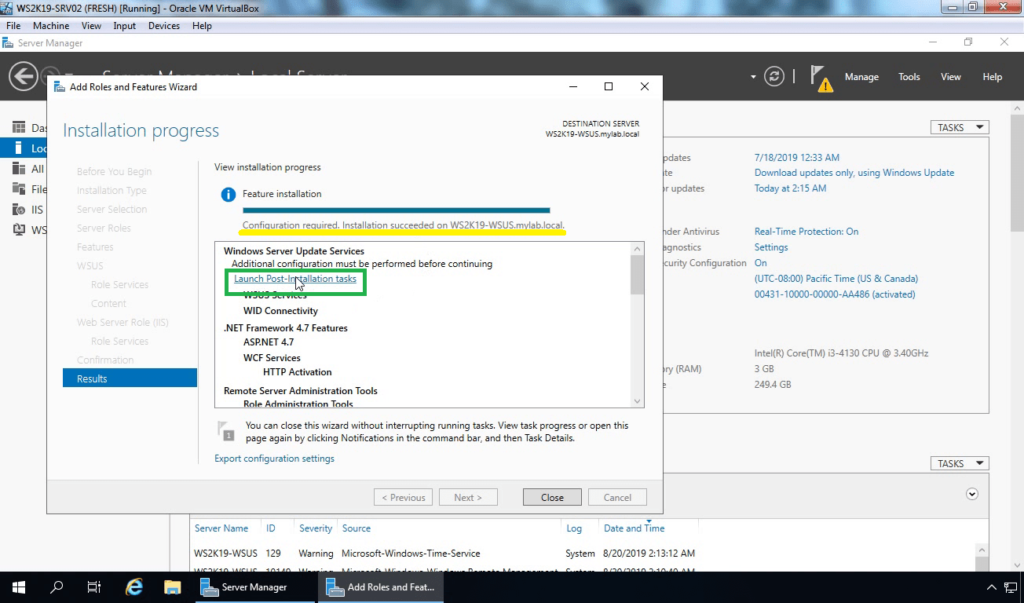
Once WSUS installation is complete, click Launch Post-Installation tasks.

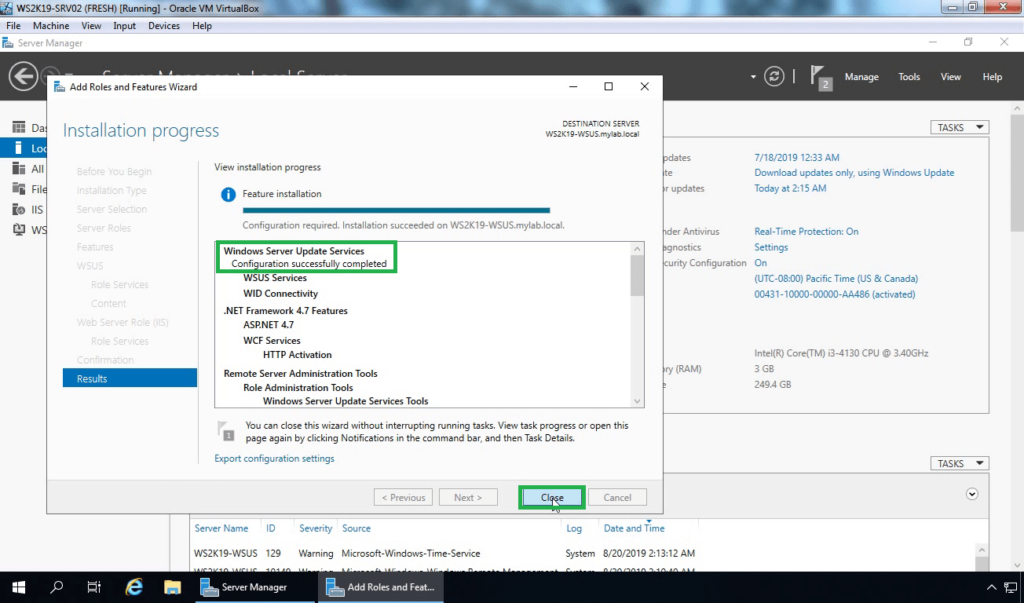
Wait for the message Configuration successfully completed. Click Close.

Configure Windows Server Update Services (WSUS)
After you install WSUS, you can configure the WSUS server using WSUS Server configuration wizard. This is a one time configuration where you will configure some important WSUS options.
If you don’t see a WSUS Server configuration wizard or if you have skipped it by mistake, don’t worry. You can launch it by opening the WSUS Console > Options > WSUS Server Configuration wizard.
Note – Before you start to configure WSUS, some important points.
- Ensure the server firewall allows the clients to access the WSUS server. If the clients have issues connecting to WSUS server, updates won’t be downloaded from server.
- The WSUS downloads the updates from upstream server which is Microsoft update in our case. So ensure the firewall allows the WSUS server to connect to Microsoft Update.
- In case there is a proxy server in your setup, you must enter the credentials for proxy server while configuring WSUS. Have them handy as they are required.
On the Before you begin page, click Next.

Click Next.

Choose WSUS Upstream Server
This is an important section where you select the upstream server. You get two options.
- Synchronize from Microsoft Update – Selecting this option will download the updates from Microsoft update.
- Synchronize from another Windows Server Update Services server – Select this option if you want this WSUS server to download updates from already existing WSUS server. You must specify the server name and port number (8530) by default. If you are selecting the option to use SSL during updates synchronization, ensure that upstream WSUS server is also configured to support SSL.
Since this will be my only WSUS server, I will select Synchronize from Microsoft Update. Click Next.

Proxy Server
Specify Proxy server information if you have got one. If this option is selected, ensure you specify proxy server name and port number. In addition to that specify the credentials to connect to the proxy server. If you want to enable basic authentication for the user connecting to the proxy server, click Allow basic authentication (password in clear text).
Click Next.

On the Connect to Upstream Server page, click Start Connecting button.

Once it is complete, click Next.

Choose Languages for Updates
On the Choose Languages page, you have the option to select the languages from updates. If you choose to download updates in all languages, you would find updates with all languages in the WSUS console.
However if you choose to get updates only for specific languages, select Download updates only in these languages. Select the languages for which you want updates.
Click Next.

Choose Products
This is the page where you select the products for which you want the updates. A product is a specific edition of an operating system or application.
From the list of products you can select individual products or product families for which you want your server to synchronize updates. In this case I am going to select Windows Server 2019 and Windows 10 1903 as products.
Click Next.

Choose Update Classifications
In the beginning of the post I have listed the types of updates. On the Choose Classifications page, select the required classifications. I have selected Critical Updates, Security Updates and Update Rollups.
Click Next.

Configure WSUS Synchronization Schedule
You must decide on how do you want to perform WSUS sync. The Set Sync Schedule page lets you select whether to perform synchronization manually or automatically.
If you choose Synchronize manually, you must manually start the synchronization process from the WSUS Administration Console. With this option selected, you have to manually perform the sync every time. Therefore do not select this option if you are setting up the WSUS in production.
If you choose Synchronize automatically, the WSUS server will synchronize at set intervals. You can set the time of First synchronization. Then set the number of synchronizations per day. From the drop-down you can choose the value between 1-24.
Click Next.

Click Begin initial synchronization. Click Next.

Finally on the last page, click Finish. This completes the steps to configure WSUS.

Configure Group Policy Settings for WSUS
After you install and configure WSUS, the next important task is to configure group policy settings for automatic updates. The new clients still don’t know about the new WSUS server that you just setup. Using group policy you can point your client machines to new WSUS server.
In an active directory environment, you can use Group Policy specify the WSUS server. The group policy settings will be used to obtain automatic updates from Windows Server Update Services (WSUS).
You can create the group policy and apply it at domain level. Or you can create and apply the GPO to a specific OU (containing your computers).
While there are many Windows Update policy settings, I am going to configure few of them. For a list of all windows update policy settings, read this article from Microsoft.
Configure Automatic Updates WSUS
To configure Automatic Updates group policy settings for WSUS
- Open the Group Policy Management console, and open an existing GPO or create a new one.
- Navigate to Computer Configuration > Policies > Administrative Templates > Windows Components > Windows Update.
- Double-click Configure Automatic Updates and set it to Enabled.
Under Configure automatic updating, select the desired option. Under Schedule install day, select the day when you want the updates to be installed. Set the scheduled install time.

In case you select Auto download and schedule the updates install, you get some options to limit updating frequency. If you have configured the settings, click Apply and OK.

Specify Intranet Microsoft Update Service Location
The next setting that you should configure is specify an intranet Microsoft update service location. The idea behind this is to ensure the client computers contact the specified intranet server instead of downloading updates from internet. Unless you configure this policy setting, the client computers wouldn’t know about the intranet server.
To enable the policy, click Enabled. Specify the intranet update service and intranet statistics server. Click Apply and OK.

On the client computer, check the resultant set of policy to confirm if the WSUS GPO is applied.

You can also verify the intranet update service location on client computers using registry. On the client computer, open Registry Editor and go to HKLM\SOFTWARE\Policies\Microsoft\Windows\WindowsUpdate.
Check the values of WUServer and WUStatusServer and confirm if the values match the one that you supplied in WSUS GPO.

Configure WSUS computer groups
By creating computer groups you can first test and target updates to specific computers. When you open WSUS console, you will find two default computer groups – All computers and Unassigned computers.
You can create custom computer groups to manage updates in your organization. As per Microsoft you must create at least one computer group in the WSUS console. Test updates before you deploy them to other computers in your organization.
To create a new computer group in WSUS console
In the WSUS Administration Console, under Update Services, expand the WSUS server. Expand computers, right-click All computers, and then click Add computer Group.
In the add computer Group dialog box, specify the name of the new group, and then click Add.

Click All Computers and you should see list of computers. Select the computers, right click and click Change Membership.

On the Set Computer Group Membership box, select the new group that you just created. Click OK.

Click the new group and you should find those computers.

Approve and Deploy Updates in WSUS
Once you have a test computer group created, your next task to deploy the updates to the test group. To do so you must first approve and deploy WSUS updates.
To approve the updates in WSUS
- Launch the WSUS Administration Console, click Updates > All Updates.
- In the All Updates section, select the updates that you want to approve for installation in your test computer group.
- Right-click the updates and click Approve.

Most of all in the Approve Updates dialog box, select your test group, and then click down arrow. Click Approved for Install. You an also set a deadline to install the updates. Click OK.

The Approval Progress window appears, which shows the progress of the tasks that affect update approval. When the approval process is complete, click Close.

Configure Auto Approval Rules in WSUS
If you don’t want to manually approve the updates you can configure auto approval rule in Windows Server Update Services.
To configure Automatic Approvals in WSUS
- Launch WSUS Administration Console, expand the WSUS server, and then click Options.
- In Options, click Automatic Approvals.
- You should find the default automatic approval rule and if you wish you can edit it and use it.
- To create a new approval rule, click New Rule.

Check the box When an update is in a specific classification. Select the classifications. You can also approve the update for computers groups. I am going to select Windows 10 as that is my test computer group. Finally you can set a deadline for the update approval and specify auto approval rule name.
After you configure the rule, click OK.

On the Automatic Approvals window, you can find the rule that you just created. If you wish to run this rule, click Run Rule.

WSUS Reports
The last section that I want to cover is the WSUS reports. Clicking Reports in the WSUS console shows the list of reports. WSUS comes with several reports to help you find the updates deployment status, sync reports and computers reports.
- Update Reports – Includes Updates status summary, detailed and tabular status, tabular status for Approved Updates.
- Computer Reports – Computer Status Summary, Detailed Status, Tabular Status and Computer tabular Status for approved updates.
- Synchronization Reports – Shows the results of last synchronization.

This completes the steps to install and configure WSUS. I am sure this guide will help you to setup WSUS in your lab setup. If you have any questions related to WSUS, do let me know in comments section.
Still Need Help?
If you need further assistance on the above article or want to discuss other technical issues, check out some of these options.
В этой статье мы подробно рассмотрим процесс установки и настройки сервера обновлений WSUS (Windows Server Update Services) на операционных системах Windows Server 2019, 2016 и 2012 R2. WSUS позволяет централизованно управлять обновлениями продуктов Microsoft, таких как Windows, Office, SQL Server, Exchange, и других. Мы рассмотрим шаги установки, настройки, а также оптимизацию производительности WSUS.
Приобрести оригинальные ключи активации можно у нас в каталоге:
Windows Server 2019 — от 2740 ₽
Windows Server 2016 — от 2470 ₽
Windows Server 2012 R2 — от 1370 ₽
Как работает WSUS?
Сервер WSUS представляет собой отдельную роль Windows Server, которая выполняет следующие функции:
— Периодическая синхронизация с серверами обновлений Microsoft для получения новых обновлений.
— Администратор выбирает и одобряет установку необходимых обновлений для рабочих станций и серверов.
— Клиенты WSUS скачивают и устанавливают обновления в соответствии с политиками, настроенными администратором.
Установка роли WSUS в Windows Server
Начиная с Windows Server 2008, WSUS выделен в отдельную роль, которую можно установить через консоль управления сервером (Server Manager) или с помощью PowerShell.
Установка через Server Manager:
1. Откройте консоль Server Manager.
2. Отметьте роль Windows Server Update Services. Система автоматически выберет необходимые компоненты веб-сервера IIS.
В окне выбора компонентов WSUS выберите WSUS Services. Далее выберите, какую базу данных будет использовать WSUS:
— Windows Internal Database (WID) — встроенная база данных Windows. Это рекомендуемый вариант, особенно для больших инфраструктур.
— Microsoft SQL Server — для использования локальной или удалённой базы данных SQL Server. Это опция SQL Server Connectivity.

Важно: SQL Server для WSUS не может быть установлен на контроллере домена Active Directory, и WSUS не должен работать на сервере с ролью Remote Desktop Services.
База WID по умолчанию называется SUSDB.mdf и хранится в каталоге %windir%\wid\data.
Для её администрирования используйте строку подключения \\.\pipe\MICROSOFT##WID\tsql\query в SQL Server Management Studio.
Если вы хотите хранить файлы обновлений локально на сервере WSUS, включите опцию Store updates in the following locations и укажите путь к каталогу. Это может быть папка на локальном диске (рекомендуется использовать отдельный физический или логический том), или сетевой каталог (UNC путь). Обновления скачиваются в указанный каталог только после их одобрения администратором WSUS.
Размер базы данных WSUS сильно зависит от количества продуктов и версий ОС Windows, которое вы планируете обновлять. В большой организации размер файлов обновлений на WSUS сервере может достигать сотни Гб.
Если у вас недостаточно места на дисках для хранения файлов обновлений, отключите эту опцию. В этом случае клиенты WSUS будут получать одобренный файлы обновлений из Интернета (вполне рабочий вариант для небольших сетей).
Установка через PowerShell:
Чтобы установить сервер WSUS с использованием WID, выполните следующую команду:
Install-WindowsFeature -Name UpdateServices, UpdateServices-WidDB, UpdateServices-Services, UpdateServices-RSAT, UpdateServices-API, UpdateServices-UI –IncludeManagementTools
Начальная настройка сервера обновлений WSUS в Windows Server
После установки роли WSUS выполните начальную настройку через Post-Deployment Configuration => Launch Post-Installation tasks в Server Manager.

Основные шаги настройки:
1. Запустите мастер начальной настройки.
2. Выберите, будет ли сервер WSUS синхронизироваться с Microsoft Update или с вышестоящим WSUS сервером.
3. Укажите настройки прокси, если используется прокси-сервер для доступа в Интернет.
4. Проверьте подключение к вышестоящему серверу обновлений (или Windows Update). Нажмите кнопку Start Connecting.
5. Выберите языки и продукты, для которых WSUS будет скачивать обновления.
Выберите продукты Microsoft, которые актуальны для вашей инфраструктуры. Например, если компьютеры с Windows 7 больше не используются, отключите обновления для этой версии ОС.
Обязательно включите в классификации следующие общие разделы:
— Developer Tools, Runtimes, and Redistributable — для обновления библиотек Visual C++ Runtime
— Windows Dictionary Updates в категории Windows
— Windows Server Manager – Windows Server Update Services (WSUS) Dynamic Installer
На этапе выбора типов обновлений рекомендуем включить следующие классификации:
— Critical Updates
— Security Updates
— Service Packs
— Updates
— Update Rollups
Задайте расписание синхронизации. Оптимально настроить автоматическую ежедневную синхронизацию в ночные часы, чтобы не перегружать сеть в рабочее время.

Первоначальная синхронизация сервера WSUS с вышестоящим сервером обновлений может занять несколько дней (в зависимости от количества продуктов, которое вы выбрали ранее).
После окончания работы мастера запустится консоль WSUS.
Консоль WSUS состоит из нескольких разделов:
Updates – обновления, доступные на сервере WSUS (здесь можно управлять одобрением обновлений и назначать их для установки).
Computers – здесь можно создать группы клиентов WSUS (компьютеры и серверы).
Downstream Servers – позволяет настроить, будете ли вы получать из обновления Windows Update или вышестоящего сервера WSUS.
Syncronizations – расписание синхронизации обновлений.
Reports – отчёты WSUS.
Options – настройка сервера WSUS.
Клиенты теперь могут получать обновления, подключившись к WSUS серверу по порту 8530 (в Windows Server 2003 и 2008 по умолчанию использоваться 80 порт). Проверьте, что этот порт открыт на сервере обновлений:
Test-NetConnection -ComputerName wsussrv1 -Port 8530
Если порт закрыт, создайте соответствующее правило в Windows Defender Firewall.
Установка консоли администрирования WSUS в Windows 10/11
Для администрирования сервера обновления WSUS используется консоль Windows Server Update Services ( wsus.msc ).
Консоль WSUS (wsus.msc) доступна как в локальной установке на сервере, так и удалённо через RSAT (Remote Server Administration Tools) на рабочих станциях с Windows 10 или 11.
Установка RSAT для WSUS:
Для установки WSUS консоли на Windows 10/11 выполните команду PowerShell:
Add-WindowsCapability -Online -Name Rsat.WSUS.Tools~~~~0.0.1.0
Для установки консоли WSUS на сервере используйте:
Install-WindowsFeature -Name UpdateServices-Ui
После установки создаются две локальные группы:
— WSUS Administrators — для пользователей с полным доступом к управлению WSUS.
— WSUS Reporters — для пользователей с доступом к отчетам.
Чтобы формировать отчеты в WSUS, необходимо установить:
— Microsoft System CLR Types для SQL Server 2012
— Microsoft Report Viewer 2012 Runtime
Если компоненты не установлен, при формировании любого отчета WSUS появится ошибка:
«The Microsoft Report Viewer 2012 Redistributable is required for this feature. Please close the console before installing this package.»
Оптимизация производительности WSUS
Для оптимальной работы WSUS рекомендуется следующее:
1. Минимум 4 Гб оперативной памяти и 2 процессорных ядра.
2. При большом количестве клиентов (1500+) может потребоваться увеличение ресурсов, чтобы избежать ошибок производительности, таких как 0x80244022 или Event ID 7053.
Для решения проблемы нужно добавить RAM на сервер и оптимизировать настройки пула IIS. Воспользуетесь следующими командами:
Import-Module WebAdministration
Set-ItemProperty -Path IIS:\AppPools\WsusPool -Name queueLength -Value 2500
Set-ItemProperty -Path IIS:\AppPools\WsusPool -Name cpu.resetInterval -Value "00.00:15:00"
Set-ItemProperty -Path IIS:\AppPools\WsusPool -Name recycling.periodicRestart.privateMemory -Value 0
Set-ItemProperty -Path IIS:\AppPools\WsusPool -Name failure.loadBalancerCapabilities -Value "TcpLevel"
Включите автоматическое одобрения для обновлений антивируса Microsoft В противном случае WSUS станет существенно тормозить и потреблять всю доступную оперативную память.
Исключения для антивируса:
Добавьте следующие папки в исключения антивируса, чтобы не снизить производительность WSUS:
— \WSUS\WSUSContent
— %windir%\wid\data
— \SoftwareDistribution\Download
Эти действия помогут улучшить работу WSUS и обеспечить своевременное обновление клиентов
Теперь, следуя этим инструкциям, вы сможете установить и настроить сервер WSUS на Windows Server, обеспечить централизованное управление обновлениями и оптимизировать его работу в вашей инфраструктуре.
In this post, we will cover the steps on how to install and configure Windows Server Update Services (WSUS) in Windows Server 2019.
Introduction:
Windows Server Update Services (WSUS) enables information technology administrators to deploy the latest Microsoft product updates. You can use WSUS to fully manage the distribution of updates that are released through Microsoft Update to computers on your network.
In a WSUS implementation, at least one WSUS server on your network must be able to connect to Microsoft Update to get available update information.
WSUS test lab setup
I have created three virtual machines in my test lab.
- WS2K19-DC01: Active Directory Domain Controller and DNS server
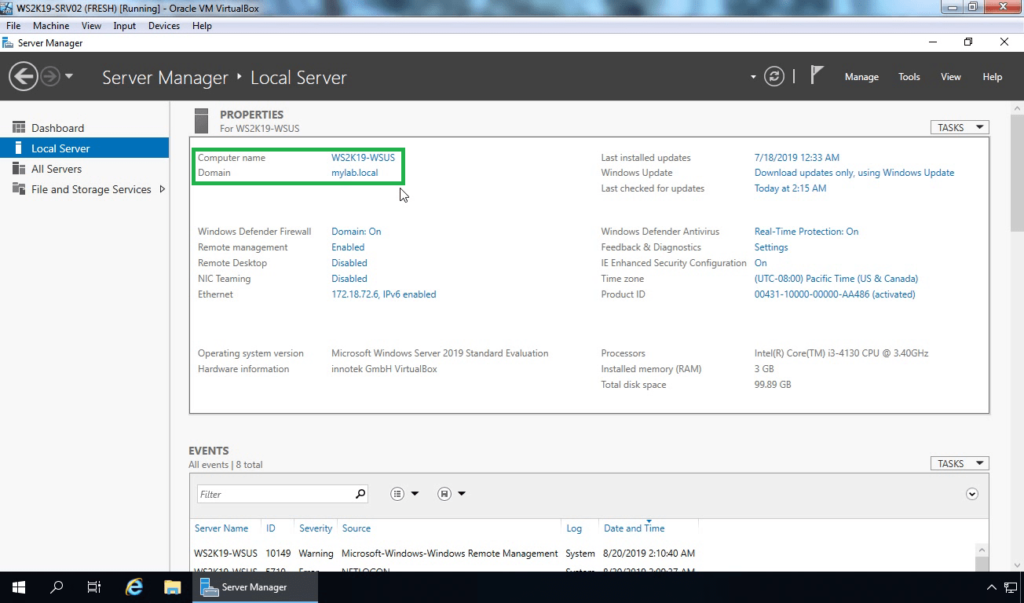
- WS2K19-WSUS: Member Server (Going to be WSUS server)
- WS2K19-SRV01: Member Server (To test WSUS deployment)
Install WSUS server role on Server 2019:
Log on to server 2019, with the credential of the domain administrator.
Open Server Manager Console.
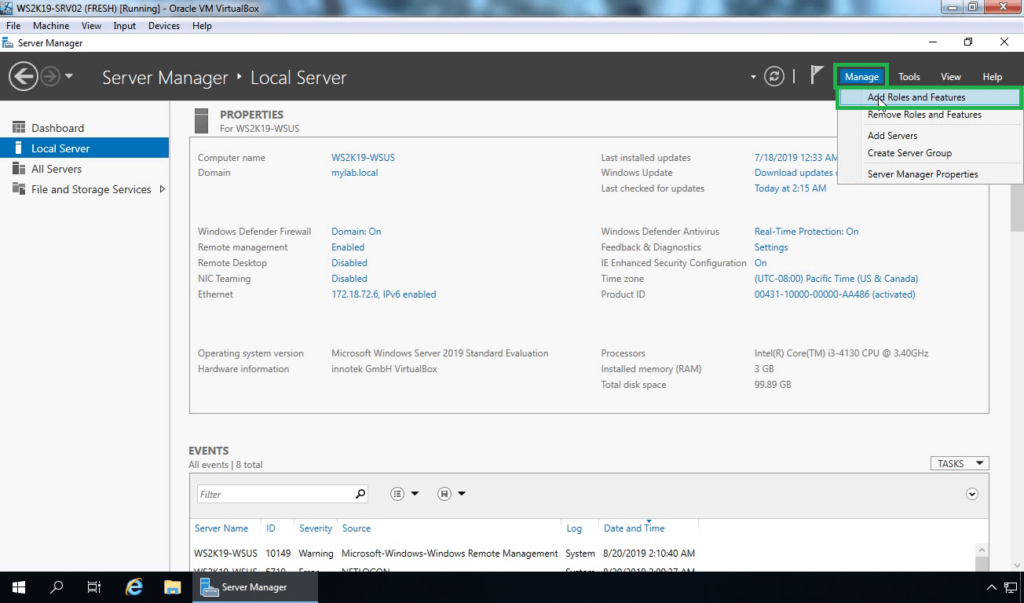
On Server Manager, click Manage and click on Add Roles and Features.
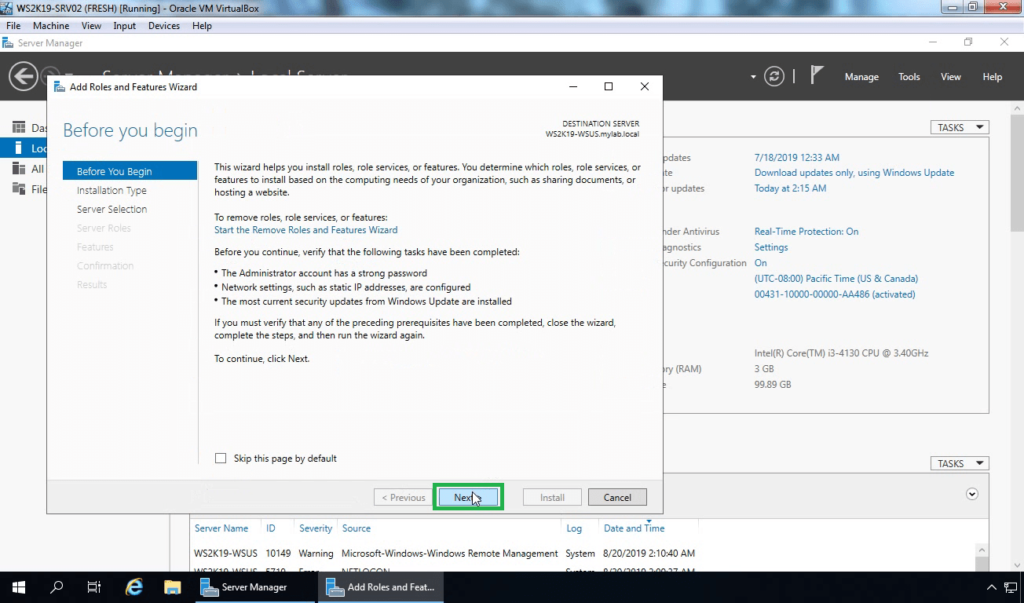
On the Before you begin page, click Next.
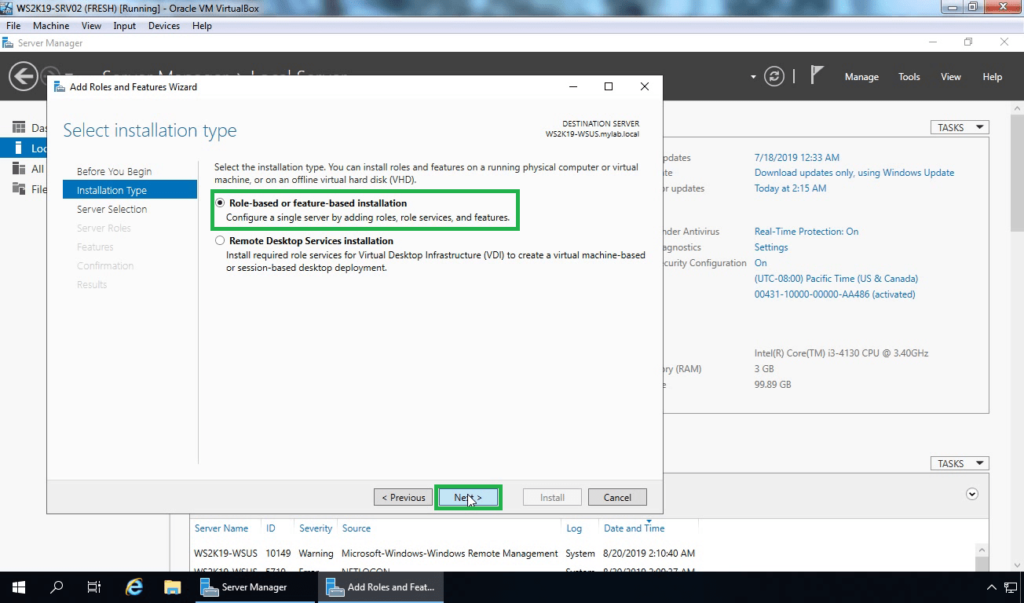
In the Select installation type page, select Role-based or feature-based installation option. Click Next.
On the Server Selection page, verify the local server name (WS2K19-WSUS) is selected and click Next.
On the Server roles page, scroll down and select the role “Windows Server Update Services”.
In the window that appears, click the Add Features button while you have ticked Include management tools, and then click Next to continue.
On the Select features page, leave the options to default and click Next.
On the Windows Server Update Services window, click Next.
You must select role services / Database type to install for Windows Server Update Services. We will use the Windows Internal Database (WID). For large deployments using SQL Server, we can choose the SQL Server Connectivity option. Click on Next.
On the Content location selection, we have the option of
selecting where the WSUS updates will be stored. It highly recommended storing
the updates on another drive or separate disk if you can.
In this example, we will store updates on E: drive under folder name WSUS-Store. Specify the location and click on Next.
On the Web Server Role (IIS) page, click Next.
In the Role Services subsection, all necessary services are already selected. Click Next to continue.
Review the settings and click Install. The installation will take a few minutes to complete.
Once WSUS installation is complete, click on Launch Post-Installation tasks link.
Wait for the message “Configuration successfully completed”. Click on Close.
Once you have installed WSUS server, the next steps is to configure it. In the next article, we will configure the WSUS server role in Windows Server 2019.
Related articles:
- Install and Configure WSUS on Windows Server 2019 – Part 2
- Configure Group Policy Settings for WSUS in Windows Sever 2019
- Configure client-side targeting in WSUS server 2019
Post Views: 4,905
Learn how to install the Windows Server Update Services (WSUS) rols on a core installation of Windows Server 2019 or Windows Server 2016 (Including SSL setup).
The core version of Windows Server (or server without desktop experience) is a nice feature. It allows servers to run with a very small footprint and helps saving precious computing resources. One disadvantage of the core servers are the lack of GUIs for the functions and features the server is providing. This requires administrators to switch more often to Powershell to install, configure and administrate basic functionalities, which (on earlier versions) had a full-featured GUI.
After switching to core server and having a lot of hard work to set it up (partially due to my lack of Powershell skills in certain scenarios), I decided to write this guide to help you set up your WSUS on a core installation of Windows Server 2019 (Which works exactly the same on 2016) by using Powershell only (Plus the setup for SSL alternatively via GUI, if you want to use it).
Table of Contents
Prerequisites
- Installed and configured Windows Server 2016 or 2019 core
- Server is already added to the domain and has the required network settings, firewall rules, etc set up
- The server has an additional volume for the update files (Does not have to be setup within the server)
- Microsoft SQL-Server instance is already installed (If you want to use SQL server instead of the Windows internal database)
- An SSL certificate (If you want to use one) with private key and the password as pfx file
- Installed IIS Manager on your client, if you want to manage the IIS with a GUI
This guide will start directly with the installation, so all basic settings have to be done upfront. Use the command sconfig to open a tool for the main settings.
Important: This guide is provided as is and does not guarantee to be without errors or mistake. Use a test environment and create all necessary backups before proceeding.
Installation
Logon to your server and open a Powershell prompt (Via console, remote shell or remote desktop).
Preparing disk, volumes and drives
If your drives are all setup completely including initialization, formatting and drive letters, then you can skip this chapter.
The first thing you might want to change is the letter of your CD/DVD drive. Many tutorials set the WSUS hard disk on drive letter D, but that’s where the CD/DVD is often assigned to.
To change this, you are using the following command to change the drive letter from D to R:
Get-WmiObject -Class Win32_volume -Filter "DriveLetter = 'd:'" |Set-WmiInstance -Arguments @{DriveLetter='R:'}
Next you have to initialize the second hard disk for the update files. Enter
Get-Disk
to get a list of hard disks.
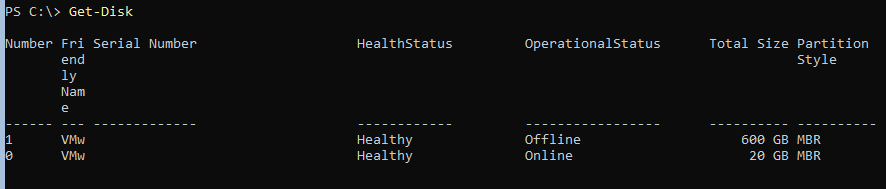
Check the column operational status. If one disk is shown as offline, remember the disk id and switch it to online (Change the 1 after number to your disk number):
Set-Disk -Number 1 -IsOffline $false
Now that disk has to be initialized. Use the same disk number for this command.
Initialize-Disk -Number 1
This initializes the disk using GPT partition style. If you want to use MBR add the parameter -PartitionStyle MBR to the command.
Next step is the creation of a partition.
New-Partition -DiskNumber 1 -Size 90GB -AssignDriveLetter
This creates a 90GB partition and assigns it a drive letter. If the partition should use the entire disk, replace the -Size parameter with -UseMaximumSize:
New-Partition -DiskNumber 1 -UseMaximumSize -AssignDriveLetter

Remember the drive letter of that drive. If you want to use a different letter:
Set-Partition –DriveLetter F -NewDriveLetter D
Now format the newly created drive.
Format-Volume -DriveLetter D -FileSystem NTFS -NewFileSystemLabel WSUS
The file system has to be NTFS (WSUS does not support ReFS) and I prefer the drive to be labeled WSUS, but you can name it whatever you want.
Now create a subfolder WSUS on the new drive as WSUS does not like its content folder to be placed in root.
New-Item -Path D: -Name WSUS -ItemType Directory
Install WSUS
Now, that the server is prepared for the WSUS role, let’s start with the installation.
If you would like to see all WSUS related features, use the Get-WindowsFeauter cmdlet:
Get-WindowsFeature –Name UpdateServices*
Important: The next command is different, depending on if you want to use the Windows Internal Database (WID) or an SQL server instance.
WID:
Install-WindowsFeature -Name UpdateServices-Services,UpdateServices-WidDB -IncludeManagementTools
With SQL server instance:
Install-WindowsFeature -Name UpdateServices-Services,UpdateServices-DB -IncludeManagementTools

If you have used the wrong command, uninstall the features with
Uninstall-WindowsFeature -Name names-from-the-command-used
and then enter the correct command again.
This will install the necessary files and services for your WSUS.
The last step is to tell your server, which SQL instance to use (If you are not using WID) and where to store the update files. Change to the tools folder in the WSUS application directory:
cd 'C:\Program Files\Update Services\tools'
You are going to use the program WSUSutil.exe, which offers many configuration possibilities for your WSUS. The parameter you are using is postinstall. It requires additional parameters depending on your environment.
Important: The next command is different, depending on if you want to use the Windows Internal Database (WID) or an SQL server instance.
WID:
.\WsusUtil.exe postinstall CONTENT_DIR=D:\WSUS
Change the directory if you are using a different path.
MS SQL server:
.\WsusUtil.exe postinstall SQL_INSTANCE_NAME="SQLServer\Instance" CONTENT_DIR=D:\WSUS
Change the SQL server name and instance and the path, if you are using a different folder.

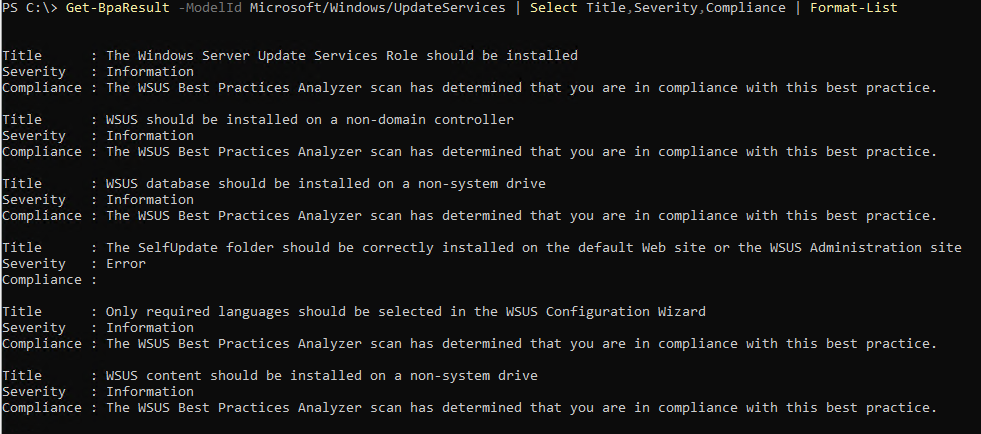
An optional step is to analyze your WSUS installation using the best practice analyzer:
Invoke-BpaModel -ModelId Microsoft/Windows/UpdateServices
Get-BpaResult -ModelId Microsoft/Windows/UpdateServices | Select Title,Severity,Compliance | Format-List
This gives you some hints on how to optimize your system.
And that’s it. Your WSUS is up and running. It does not use SSL and listens on port 8530. You can use the RSAT tools to manage the products, classifications and updates. The RSAT tools for Windows 7 can be downloaded here. Windows 10 as of version 1809 do not need an additional download. The RSAT tools have been moved to optional software features.
There are some optimizations, which are generally recommended for a WSUS installation. The first allows the IIS to use more memory (All available memory) and the second allows it to start more than one worker processes.
First change the private memory limit of the WSUS IIS application pool to 0:
Set-WebConfiguration -Filter "/system.applicationHost/applicationPools/add[@name='WsusPool']/recycling/periodicRestart/@privateMemory" -Value 0
And now change the maximum number of worker processes also to 0 (unlimited):
Set-WebConfiguration -Filter "/system.applicationHost/applicationPools/add[@name='WsusPool']/processModel/@maxProcesses" -Value 0
Configure SSL
Using Powershell
The first step is to import your SSL certificate. As you need to provide the password for your certificate and the cmdlets do not accept the password as plaintext, you need one step more. There are different ways to get the password as secure string. I decided to use the Get-Credential cmdlet:
$mypwd = Get-Credential -UserName 'Enter password below' -Message 'Enter password below'
The certificate file can be located on a local drive or a network or DFS path.
Import-PfxCertificate -FilePath "C:\mypfx.pfx" -CertStoreLocation Cert:\LocalMachine\My -Password $mypwd.Password -Exportable
The certificate store has to be in local machine. Otherwise you cannot use the certificate for your IIS.
And now back to the IIS.
To manage the ISS, you need an additional module:
Import-Module WebAdministration
First check if your WSUS website has bee published successfully:
Get-Website
This list should contain a website “WSUS Administration”.

You will perform 3 steps: you add the SSL certificate to the WSUS website, change some subfolders to require SSL and complete the SSL activation using Wsusutil.exe.
To add the certificate to the IIS binding, you need that binding as object:
$bind = Get-WebBinding -Name 'WSUS Administration' -Protocol https

Please be aware, that the image is not correct. The protocol is case sensitive and requires lowercase letters only. You do not get an error message otherwise, but it simply will not work.
Additionally you need the hash value for your certificate. You can get the hash of your certificate using this command:
Get-ChildItem cert:\LocalMachine\My

Now can you retrieve the object containing your certificate:
$SSLCert=Get-Item cert:\LocalMachine\My\HashOfCertificate
Replace HashOfCertificate with the hash (or thumbprint). Alternatively you can use the TAB key after my\ to switch through all certificates.
With these 2 object, you can finally merge them:
$bind.AddSslCertificate($SSLCert.GetCertHashString(),"my")
The WSUS website is available with SSL encryption as of now. This can be tested by opening https://yourwsus:8531 in a browser. Check the certificate details. If it is not working properly, you may have to restart the website by using the IISRESET command or restarting your server.
Now you need to enforce SSL for certain virtual directories:
Set-WebConfigurationProperty -PSPath 'MACHINE/WEBROOT/APPHOST' -Location 'WSUS Administration/ApiRemoting30' -Filter "system.webServer/Security/access" -Name "sslFlags" -Value "Ssl"
Set-WebConfigurationProperty -PSPath 'MACHINE/WEBROOT/APPHOST' -Location 'WSUS Administration/ClientWebService' -Filter "system.webServer/Security/access" -Name "sslFlags" -Value "Ssl"
Set-WebConfigurationProperty -PSPath 'MACHINE/WEBROOT/APPHOST' -Location 'WSUS Administration/DSSAuthWebService' -Filter "system.webServer/Security/access" -Name "sslFlags" -Value "Ssl"
Set-WebConfigurationProperty -PSPath 'MACHINE/WEBROOT/APPHOST' -Location 'WSUS Administration/ServerSyncWebService' -Filter "system.webServer/Security/access" -Name "sslFlags" -Value "Ssl"
Set-WebConfigurationProperty -PSPath 'MACHINE/WEBROOT/APPHOST' -Location 'WSUS Administration/SimpleAuthWebService' -Filter "system.webServer/Security/access" -Name "sslFlags" -Value "Ssl"
The last step is to complete the SSL configuration for the WSUS. This steps also allows you to specify a different URL (Example: Your server is called SRV01, but you would like to use wsus.company.local):
& 'C:\Program Files\Update Services\Tools\WsusUtil.exe' configuressl wsus.company.local
Restart the server to complete the installation.
Restart-Computer
This concludes the installation and setup of your WSUS and SSL using Powershell only.
Using a GUI
Already sick of using Powershell? Or do you still prefer a GUI? Then this section explains you how to switch your WSUS to SSL using (mainly) a GUI.
Please make sure, that you have installed the IIS manager on your client.
But before you can use a GUI, you have to do some steps in preparation.
The first step is to import your SSL certificate. As you need to provide the password for your certificate and the cmdlets do not accept the password as plaintext, you need one step more. There are different ways to get the password as secure string. I decided to use the Get-Credential cmdlet:
$mypwd = Get-Credential -UserName 'Enter password below' -Message 'Enter password below'
The certificate file can be located on a local drive or a network or DFS path.
Import-PfxCertificate -FilePath "C:\mypfx.pfx" -CertStoreLocation Cert:\LocalMachine\My -Password $mypwd.Password -Exportable
The certificate store has to be in local machine. Otherwise you cannot use the certificate for your IIS.
To administrate the IIS from a remote computer, you have to install a role and allow remote management via a registry key.
Install-WindowsFeature Web-Mgmt-Service
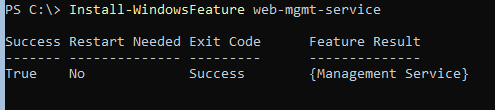
This feature contains all necessary files for remote management, but it is blocked by default as a security measure.
To enable remote connections, update the registry key HKEY_LOCAL_MACHINE\Software\Microsoft\WebManagement\Server\EnableRemoteManagement to 1:
Set-ItemProperty -Path HKLM:\Software\Microsoft\WebManagement\Server -Name EnableRemoteManagement -Value 1
Now start the remote management service:
Start-Service wmsvc
And now back to the GUI:
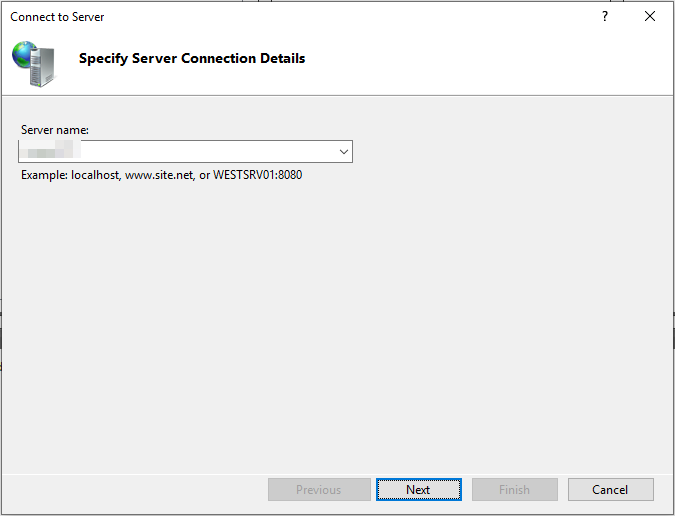
Open the IIS manager. Click on the “File” menu and select Connect to a server.
Enter the name or IP address of your server.
On the next screen, enter the credentials of an administrator for the IIS.

In the connections section, open your server, then Sites and click on WSUS Administration.
Click on Bindings… on the right side.
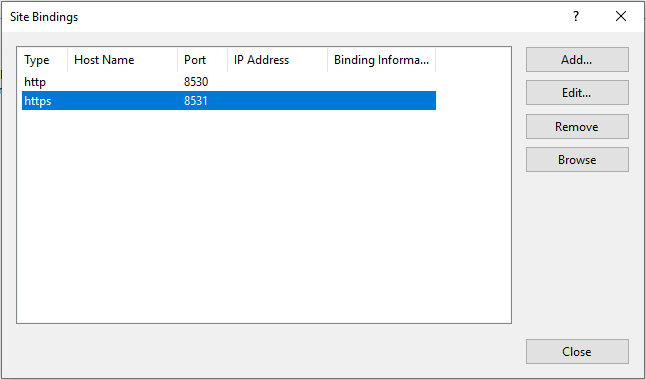
Select the row with https and click on edit….
Choose your SSL certificate from the dropdown list below and click OK.
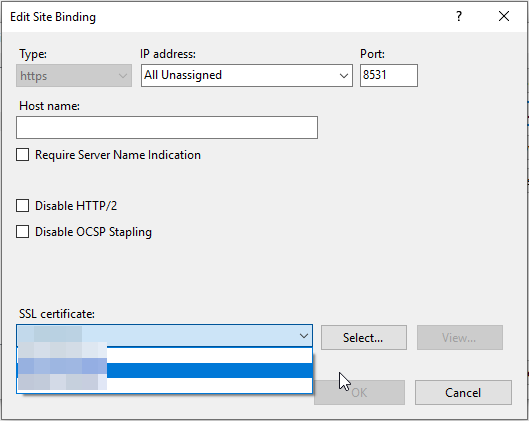
Close the bindings window.
This step has assigned your certificate to the https version of your WSUS websites. The next step is to enforce SSL for certain sites with your WSUS.
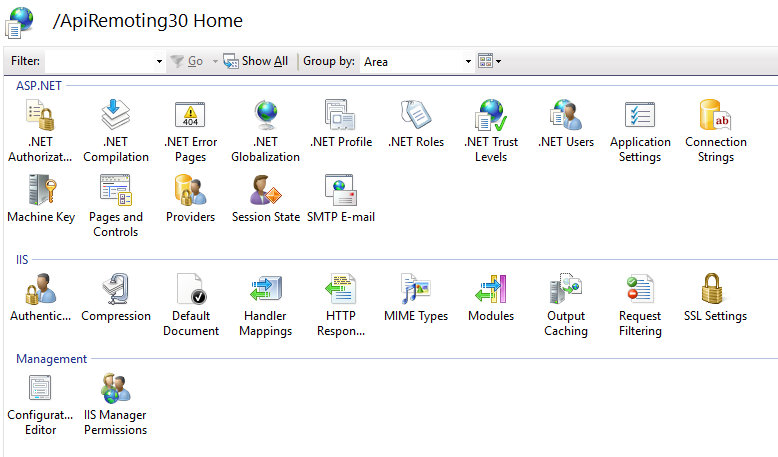
Expand your WSUS Administration site and select ApiRemoting30.
Double click on SSL Settings in the middle section.
Check the box Require SSL and select Ignore.
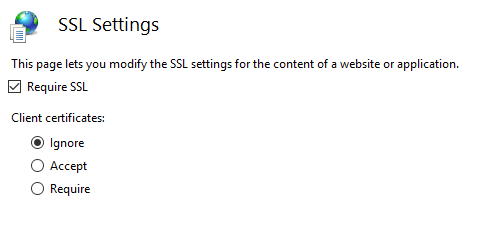
Click Apply on the right side.
Repeat these steps for the following directories (They are all under WSUS Administration):
- ApiRemoting30 (You already did this in the example)
- ClientWebService
- DSSAuthWebService
- ServerSyncWebService
- SimpleAuthWebService
The last step is to complete the SSL configuration for the WSUS. This again needs Powershell or a command prompt (My commands are for Powershell). It also allows you to specify a different URL (Example: Your server is called SRV01, but you would like to use wsus.company.local):
& 'C:\Program Files\Update Services\Tools\WsusUtil.exe' configuressl wsus.company.local
Restart the server to complete the installation.
Restart-Computer