
We will show you how to Install Windows Server 2016 on VMWare Workstation. You can use this method to run Windows Server 2016 on your personal computer and practice new features and configurations before implementing them in a production environment. Windows Server 2016 comes with a lot of improvements and new features. And like always, Microsoft has made available different editions of Windows Server 2016 for different users and scenarios. In this article, we will focus on the Datacenter edition, which is the most feature—rich edition of Windows Server 2016.
If you want to Install Windows Server 2016 on VMWare Workstation, then follow this guide. We will show you a step—by—step process to Install Windows Server 2016 on the VMWare Workstation. For your note: this guide is also applicable for installing other versions of Windows Servers and Desktops on VMWare Workstation.
Basic Requirments To Install Windows Server 2016 On VMWare Workstation?
Before we start with the installation process, let’s have a look at the system requirements to install Windows Server 2016 on VMWare Workstation.
#1. Host Computer to run VMWare Workstation:
The Minimum computational resources needed to run Windows Server 2016 on VMWare Workstation:
-
Processor: Intel Core 2 Duo processor or later. AMD Athlon™ 64 X2 Dual Core Processor 3000+ or higher is recommended.
-
Memory: 4GB of RAM or more is recommended. The minimum support is 2GB of RAM. Note that memory requirements increase as guest operating systems are added.
-
Storage: 60GB of available storage is recommended. Additional storage may be necessary when installing guest operating systems.
-
Network: A network connection is required for installation and updates.
#2. Download Windows Server 2016 ISO File:
The first thing you need is the ISO file of Windows Server 2016. You can download it from the official website of Microsoft. Just go to this link and select the edition you want to download. In our case, we will be downloaded the Datacenter edition because it is the most feature—rich edition.
#3. Install VMWare Workstation 15 Pro:
After downloading the ISO file, the next thing you need is virtualization software. In this article, we will be using VMWare Workstation. You can also use other virtualization software like VirtualBox, Hyper-V, etc.
Just go to the official website of VMWare and download the latest version of VMWare Workstation Pro. Install it on your computer and launch it.
Now that we know the system requirements let’s start with the installation process.
How To Install Windows Server 2016 On VMWare Workstation?
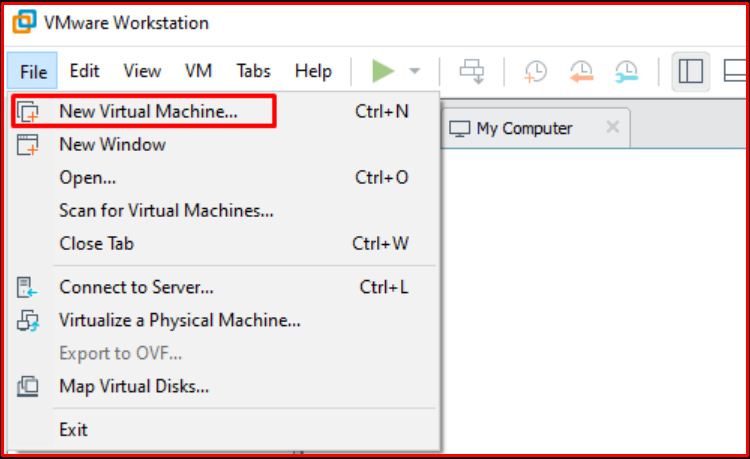
Step 1. Open the new Virtual Machine Wizard
1. Fire up VMWare Workstation
2. Go to File —> New Virtual Machine or Ctrl + N
Step 2. Select Custom Configuration Wizard
Select Custom Wizard and click Next
Step 3. Choose VM Hardware Compatibility
1. Choose the compatible hardware from the drop-down
2. Click Next
Step 4. Select to install operating system later option
1. Select to install operating system later option
2. Click Next
Step 5. Select the guest operating system
1. Select Windows 10 since we don’t have the windows server option included yet.
2. Click Next
Step 6. Virtual Machine Name & Location
1. Give the Virtual Machine Name & Location
2. Click Next
Step 7. Select Firmware Type
1. You can select either BIOS or UEFI. Note: Only new boards supports UEFI.
2. Click Next
Step 8. Allocate the number of processors you need
1. Allocate how many processors you need. This depends on your host machine’s hardware.
2. Click Next
Step 9. Set the Memory for the virtual machine
1. This depends on your host machine’s hardware. You should leave the memory to run the host machine without hazels.
2. Click Next
Step 10. Select Network Connection settings for the VM
1. Four options are available to select. Please read and select your desired network setting.
2. Click Next
Step 11. Choose the appropriate storage IO controller
1. Choose the appropriate storage IO controller
2. Click Next
Step 12. Select the disk type for the VM
1. Select the available disk type on your host machine.
2. Click Next
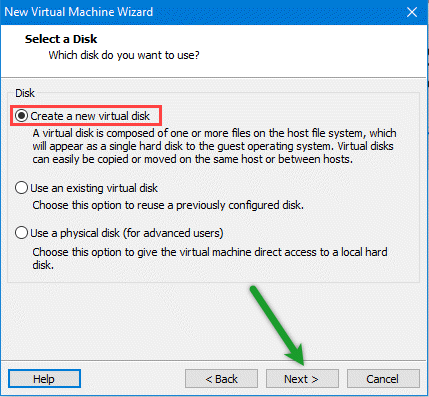
Step 13. Select the virtual disk for the VM
1. Select the virtual disk for the VM if not create a new disk
2. Click Next
Step 14. Assign the disk size for the VM
You can select a single or split virtual disk option. Selecting a single disk will increase the performance. But, if you want to move the disk to a different location you can select the split virtual disk.
Allocate the disk size and click next.
Step 15. Give the path where you want to keep the VM disk
1. Give the location where you want to save the disk.
2. Click Next.
Step 16. Create the VM
1. VM settings are ready to create the VM.
2. Click Finish
Step 17. Load the ISO image to boot the VM
1. Select use ISO image file
2. Browse the ISO image
3. Click Ok
Step 18. All set to power on the VM
Step 19. First boot screen of Windows Server 2016
Step 20. Windows Server 2016 installation wizard
The installation wizard will appear in a couple of seconds after the boot
1. Select the language time and keyboard settings
2. Click Next
Step 21. Install Windows Server 2016
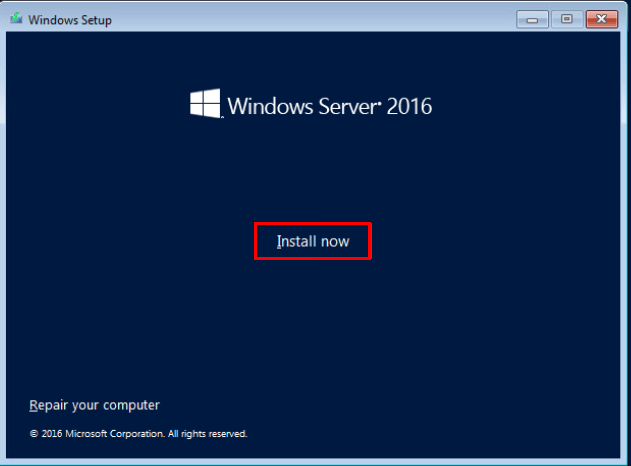
Click on Install Now
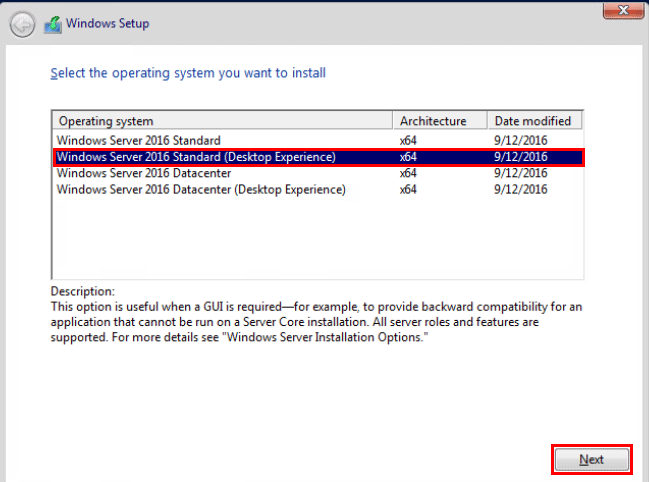
Step 22. Select The Operating System You Want To Install
1. Select the version you want to install
2. Click Next
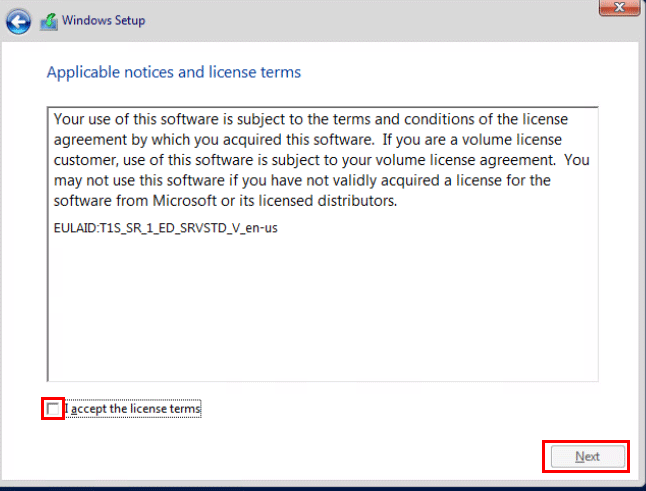
Step 23. Accept the License Agreement
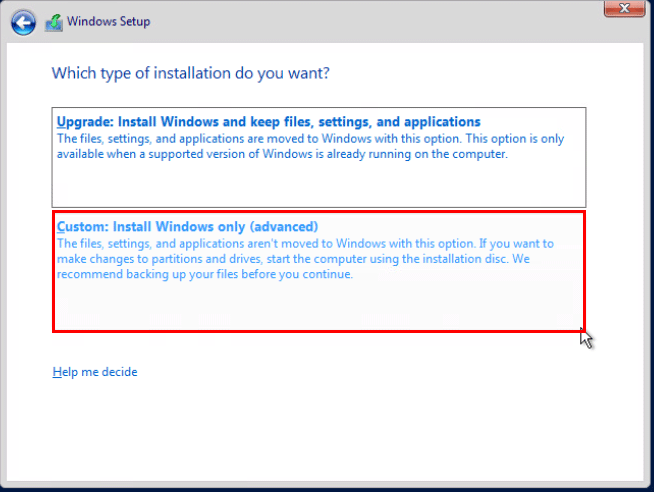
Step 24. Select installation method
Select custom installation if you are doing a fresh installation. Or, select upgrade if you are upgrading your older Windows Server to Windows Server 2016.
Step 25. Select the installation disk for installation
Select the disk and click on Next to install Windows Server 2016. If you want to create additional logical partitions, then select the disk and click on new assign the partition size. You can create multiple partitions within available storage.
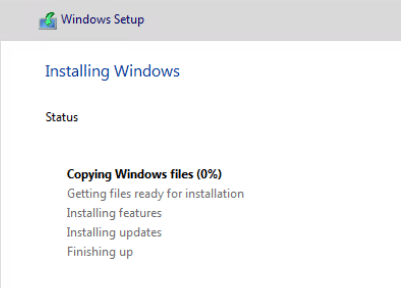
Step 26. Installing Windows Server 2016
Step 27. Installation is in progress…
Step 28. Windows getting ready after the installation completes
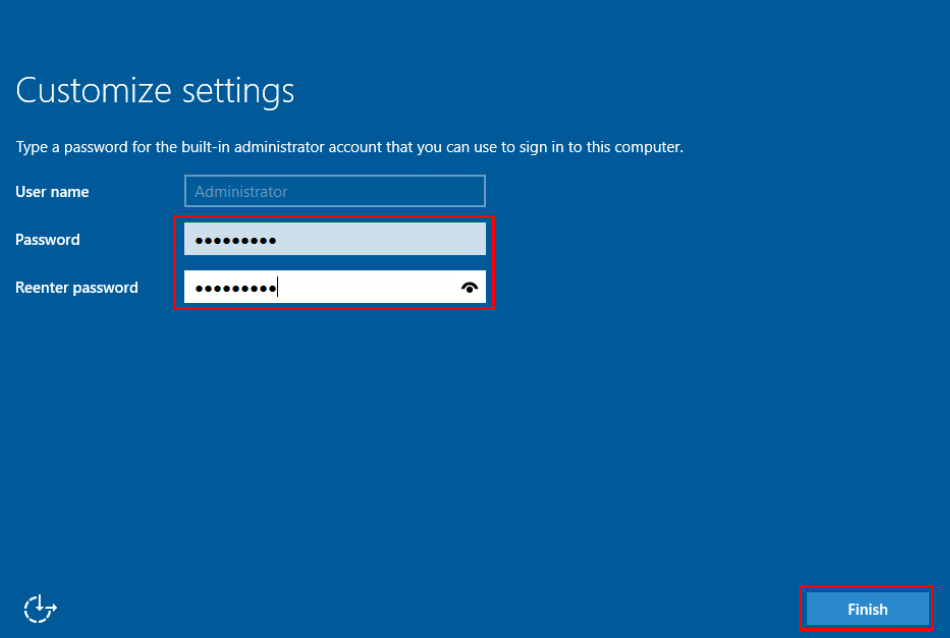
Step 29. Create Administrator User
Step 30. Windows Server is ready to use
Step 31. Windows Server 2016 Login screen
Step 32. First look at Windows Server 2016
This is how you should Install Windows Server 2016 on VMWare Workstation.
Thanks for reading the post. Please share this post with those who want to know the procedure to Install Windows Server 2016 on VMWare.
You may also like these articles:
Installing Windows Server 2016 upgrades us once again from Windows Server 2012/R2 that provides the latest and the essential updates we need. As well as this time, it has includes lots of new and features. In this lesson, you will learn about installing Windows Server 2016 step by step. Also, before installing, make sure you have pre-planned for selecting which edition to install and what to do in it.
Before installing Windows Server 2016 you need to plan for the installation. Making plan means you should choose an appropriate edition of Windows server. You should think of Hyper-v server you need for your network. You must choose an edition which have enough the Hyper-v license. Also think of more licenses you may need in the future.
Every edition of Windows server may support limited number of users. Choose the edition that meets your needs. When we talk about limitations, we don’t talk about software limitations. If you want more license you should pay for. You can upgrade from one edition to another edition. And you can buy more license for physical and virtual servers also users.
Windows server 2016 editions
- Datacenter: Highly virtualized, enterprise network and cloud environment.
- Standard: Only different with Datacenter edition is the number of Virtual servers. Datacenter edition supports more virtual servers.
- Essential: For small business up to 25 users and 50 devices.
Hardware Requirements
- Processor: 1GHZ
- RAM memory: Minimum of 2GB
- Hard Drive Space: 20GB free space
Installing Windows Server 2016 on VMware
Like the previous versions (Windows Server 2012…), the Windows Server 2016 installation is simple, what’s new is the editions that you can choose them wisely during installation.
In order to install Windows Server 2016, first, you must have an ISO image file of it and also make sure you have pre-planned choosing which edition of Windows Server 2016 and have fulfilled the system requirements.
Download Now: Windows Server 2016
Create and Customize the Virtual Machine
1. Open VMware and click on the Create a New Virtual Machine(Ctrl+N) icon. If you don’t have VMware installed on your computer, click here to download one.

2. Now select Custom (Advanced) option to specify the virtual machine with advance options. If you want you can create virtual with less options, click on Typical option. When you are finished here, click on Next button.

3. Leave the Virtual Machine Hardware Compatibility settings as default. If you want you can select your VMware version. Then click Next button.

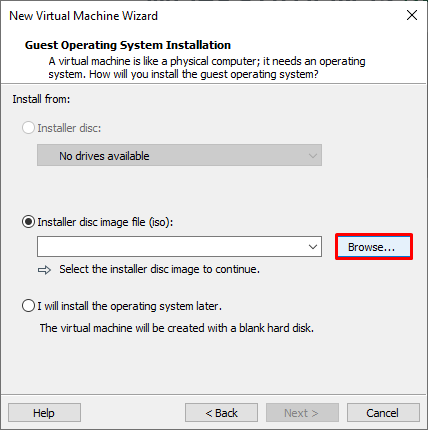
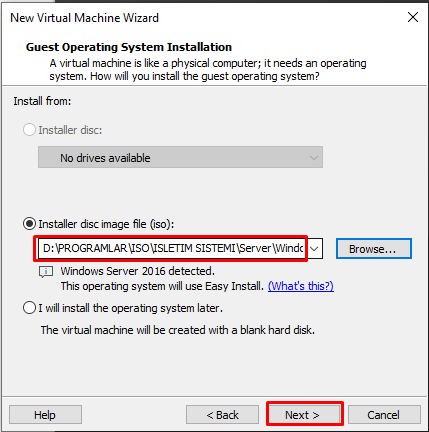
4. Here you should add an installer image into the virtual machine. Select the Installer disc image file (ISO) option and click on the Browse button. Specify .iso file path and import it. Then click on Next button.
Note: Make sure that you are using an ISO image file, otherwise unzipped file won’t boot.

5. Specify which operating system type you want to install on the virtual machine. Select Windows Server 2016 version from the dropdown menu and click on Next button.

6. Enter a name for the virtual machine and browse a place where you want to store the installation files. For the purpose click on Browse button and specify the place. When finished, click on Next button.

7. On the Processor Configuration specify then number of processors your server need to use and click on Next button. Also notice that it refers to your virtual machine speed that how much speed the server should be.

8. Specify the amount of the memory for the virtual machine (based on MB) and click on Next button.

9. Select Use Network Address Translation(NAT) or Use bridged networking to directly connect and use internet, as a network type. Then hit Next.

10. Let the I/O Controller types by default because you don’t have the option to change the SCSI type. just hit Next.

11. Now to create new virtual disk, select create a new virtual disk for the virtual machine.
12. Specify the disk amount by typing the disk size(Recommended 60 GB) and click on Next button.

13. At this point, just check out the settings you’ve done or you can customize if you want and click Next.

Step 2. Install Windows Server 2016
Now it’s time to boot up and start the virtual machine, just click on Power on this virtual machine then wait until it boots.
1. Open VMware Workstation on your host computer. Click on Power on this virtual machine in top left.

2. When the virtual machine powered on, specify the language, time zone and keyboard then click Next.

3. Install now to install the windows server 2016 on virtual machine.

4. Select one the Windows Server editions you’ve decided and click on Next button.

5. Put a mark in the box next to I accept the license terms, then click on the Next button.

6. Go on and click on the Custom: Install Windows only (Advanced) option for installing the server custom.

7. Select the disk, you want to install the widows on and select the disk, click on New, then specify the amount (based on MB) and click on Apply button then click on Next button.

8. Now the server copies all the files to the disk, amount the files from the windows image, install features, updates, so it will take time and when finished it will reboot.

9. After the reboot, type a complex password composed of (uppercase, lowercase, symbols and numbers) and click on Finish button.

10. When the customization finished, now you’ll need to sign in, but first click on the button that is composed of three buttons (ctrl+alt+del) shown in image below or simply press Ctrl+Alt+Del and sign in to Windows Server.

And that’s it, after you have signed in, your windows server installation is completed like the shot below.

Conclusion
The Windows server 2016 is installed successfully and your server is now ready to work now. But before doing that don’t forget to install VMware tools + do initial configuration of Windows Server from the article below. For any questions, leave a comment.
Check out: Install Active Directory on Windows Server 2016 step by step
If you find it helpful, let your friends know it too by sharing this article on social media.

Install Windows Server 2016 VM on VMware Workstation :
In the previous post I have described the step by step procedure of Creating Windows Server 2016 VM. so now its turn to install Windows server 2016 on VM.
First of all open the VMware Workstation and select Windows Server 2016 virtual machine. Click on the Power on this virtual machine and VM will start on the right side of window. Please wait till its boot up completely.

- After booting the VM, on the first page where you can specify Language, Time Zone and the Keyboard.

- Click Install now to start the installation.

- Activate the Windows by entering the Product Key and click on Next

- On the next window select Windows Server 2016 Technical Preview 5 (Desktop Experience) to install GUI then click on Next

- Accept the license terms by check the checkbox next to I accept the license terms, then click on the Next button.
- Click on the Custom: Install Windows only (Advanced) option to install a fresh OS, furthermore you can also upgrade existing installed Windows server by selecting another (Upgrade) option.

- Select the disk and click Next to install the windows, it will automatically create the required partitions using whole virtual disk, However if you want to create partition table manually then select the disk, click on New and create desired partitions.

- Windows will now start the installation process including Copies all the files to the disk, Install features and updates. Windows will finally reboot when installation will be completed.

- After reboot assign the password and click Finish button.

Window server 2016 is installed now and you can enjoy it’s features. You can find the step by step procedures like How to promoting Windows server 2016 to Domain Controller, deploying the DNS server etc. in my next blog.
Note:
Please do not forget to install VM tools after installing the Windows Server.
Enjoy 🙂
Windows Server 2016 is Microsoft’s latest and most modern server operating system developed on Windows Server 2012 R2. This new server operating system was officially released as of September 26, 2016, after two years of preview and is now ready to take part in real business scenarios.
For Windows Server 2016 installation, The corresponding ISO file is provided first. Windows Trial products can be used for this purpose.
In VMware Workstation, click “File> New Virtual Machine”.
The creation of the new virtual machine wizard starts and continue by clicking the “Next” button.

In the next screen, select “Installer disc image file (iso):” and click the “Browse” button.
Select the operating system ISO file you want to install.
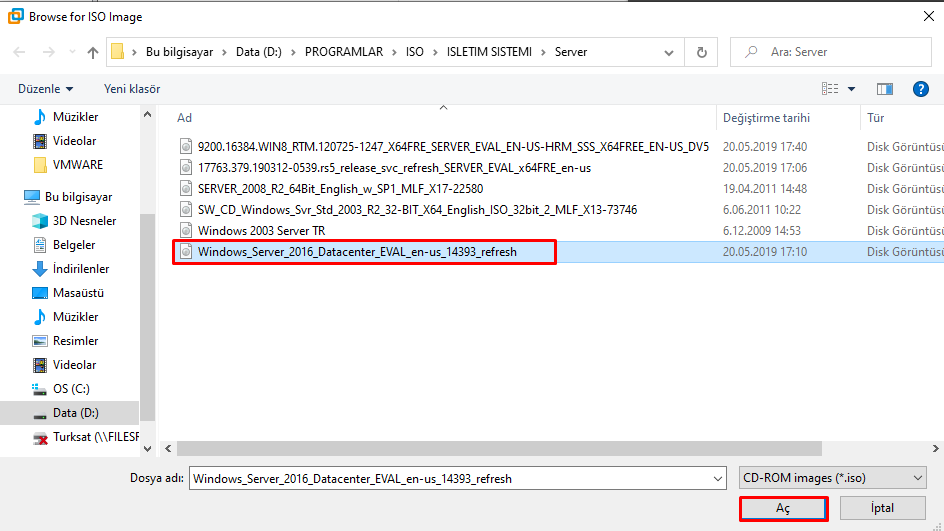
After selecting the downloaded ISO file continue by clicking the “Next” button.
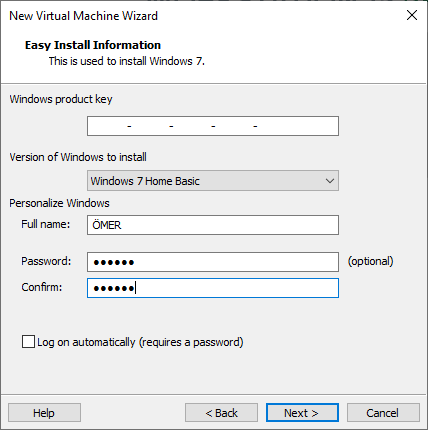
Set options such as license key, version, credentials. I would recommend filling out the credentials because they will be required to log on.
Name the virtual machine and locate the physical area where the files will be saved.

Set the disk capacity. Select one of the “Store virtual disks as a single file and Split virtual disk into multiple files” option. I checked the “Split virtual disk into multiple files” option.

You can change the setting or complete the configuration with the “Customize Hardware” option as required. After setting ıp your virtual computer, check the option “Power on this virtual machine after creation”.
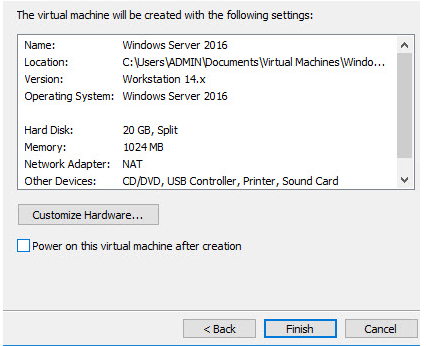
Note: The CPU and RAM values may be set higher for a faster setup. These values can be adjusted after installation. This completes the configuration process.
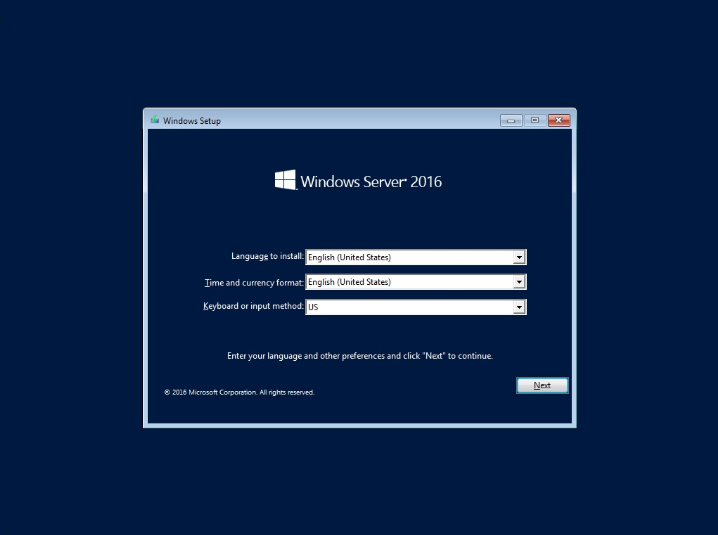
The first step of Windows installation is to customize the installation language, server region and keyboard language. After selecting the appropriate options on this screen, click the “Next” button to continue the installation.
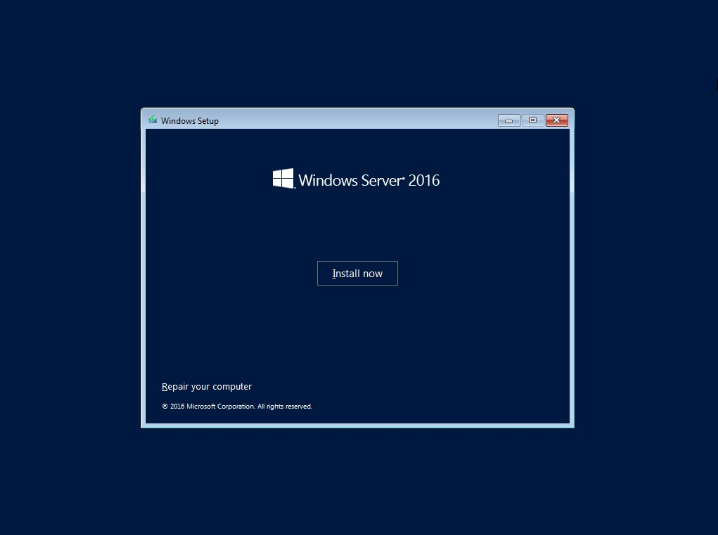
Click “Install Now” in the second step of the Windows installation wizard. You can also use the “Repair your computer” option to repair the operating system that does not open at the bottom left of this page. In this section, we choose the “Install Now” button as we will install a new Windows Server 2016.
After selecting the operating system version and user graphic interface type (Desktop Experience or Core) you want to install on this screen, click the “Next” button.
In this step, Windows Server 2016 is selected by default. In this article, I will be choosing the Windows Server 2016 (Desktop Experience) option.

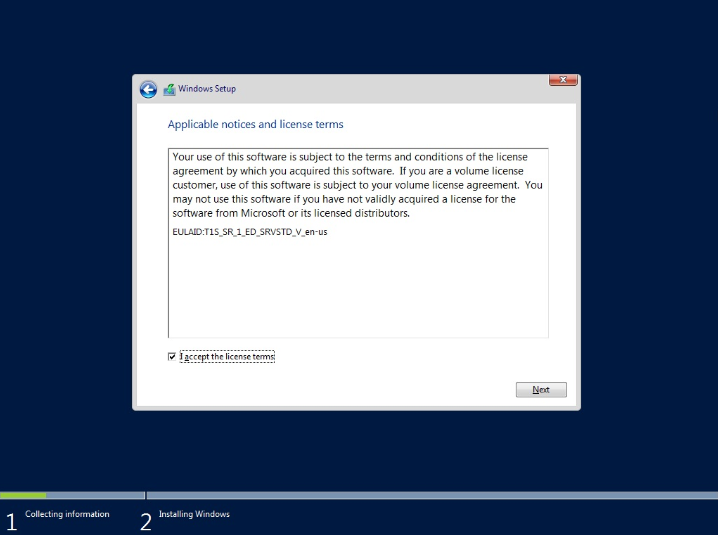
The license page includes the license terms in Microsoft’s end-user license agreement (EULA End User License Agreement). On this screen, to install the operating system and accept the license terms; Select the “I accept the license terms” box and click the “Next” button.
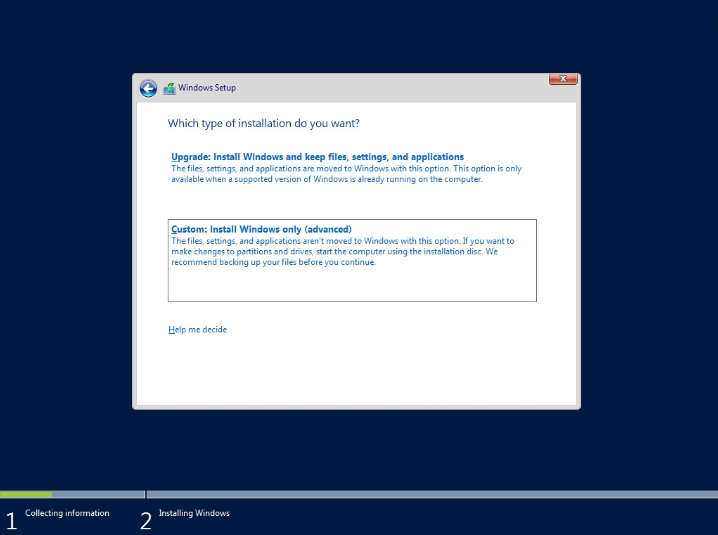
On the “Which Type Of Installation Do You Want” page, there is a screen of Windows Server 2016’s new (clean – install) or on-site upgrade (in-place). In this study, after selecting “Custom” from the installation types, select the “Next” button to continue the installation process.
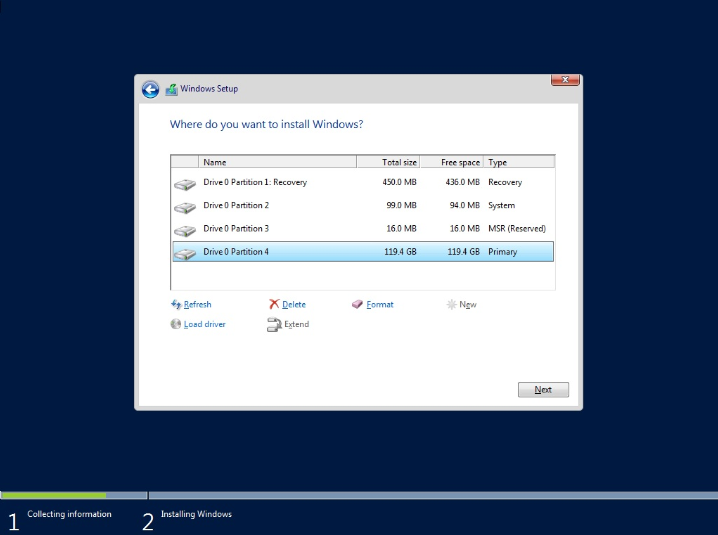
On this page, “Where do you want to install Windows?”, A blank disk is selected for Windows Server 2016 installation. You can also select, configure and format the disks on this screen. When you click “Next” after the disk selection and configuration process is completed, the installation process files are copied and your server will start several times from the installation process time.
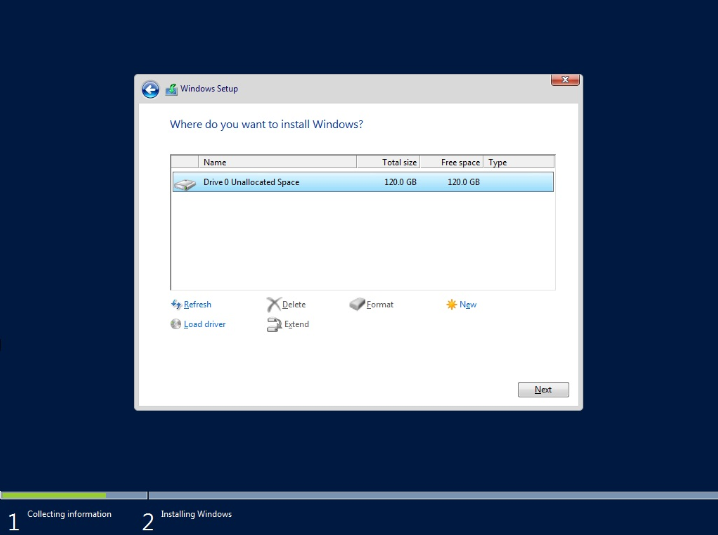
Note: If you want the entire area of your first disk to be located on the “C” drive, “Drive 0 Unallocated Space” is selected. Then, by clicking the “Next” button, your entire disk is reformatted and the operating system is installed on this unit. To divide your disk into different parts; Click “New” and you can split your disk into partitions with the “Size” option that will be active on this screen.

After the partitioning process is completed, “Drive 0 Partition 1: Recovery,” Drive 0 Partition 2: System, and “Drive 0 Partition 3: MSR (Reserved)” partitions will be created.
Recovery: In this section, Windows Recovery Environment (Windows RE) application for operating system boot errors is used.
System: This section; If you have more than one operating system, for example, Windows 8.1 and Windows 10. Your computer displays a list of operating systems prior to boot, and the user’s option allows the operating system to boot. Disk encryption applications such as Windows BitLocker use this section.
MSR (Microsoft Reserved Partition): This section is used in UEFI / GPT systems. Each GPT disk contains MSR. In the disk configuration process, the MSR field is created first and then the primary partition is created. MSR Reserves each drive for later use by the operating system. No meaningful data is stored in the MSR domain.
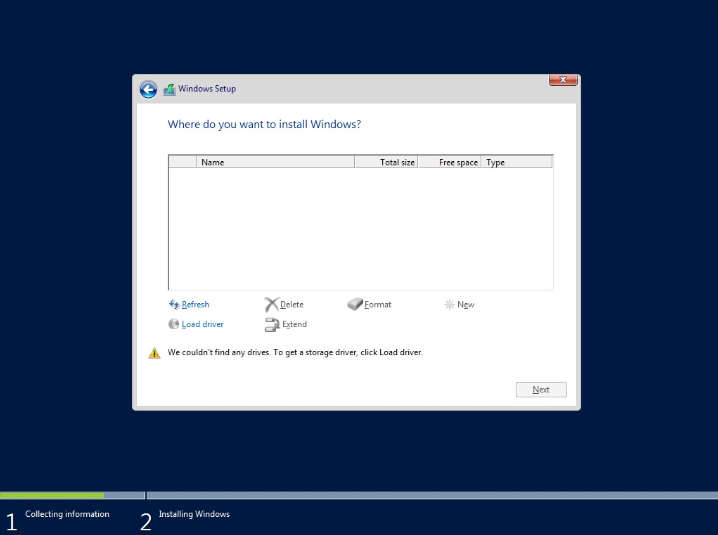
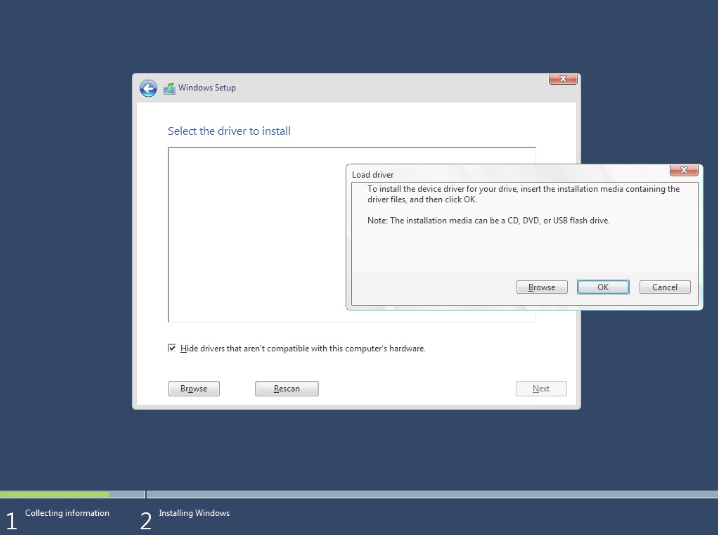
Note: If the setup wizard cannot find your disk in this step of the installation process, you may encounter the following error screen. There are two reasons why you may encounter this error;
If your server or RAID card is a new product, the Windows installation wizard cannot access your disks because it cannot find the appropriate driver for the storage. In this case, copy this data to a CD / DVD or USB drive for storage or access to the required drives of your RAID card, then click the “Load Driver” and add the appropriate drive.
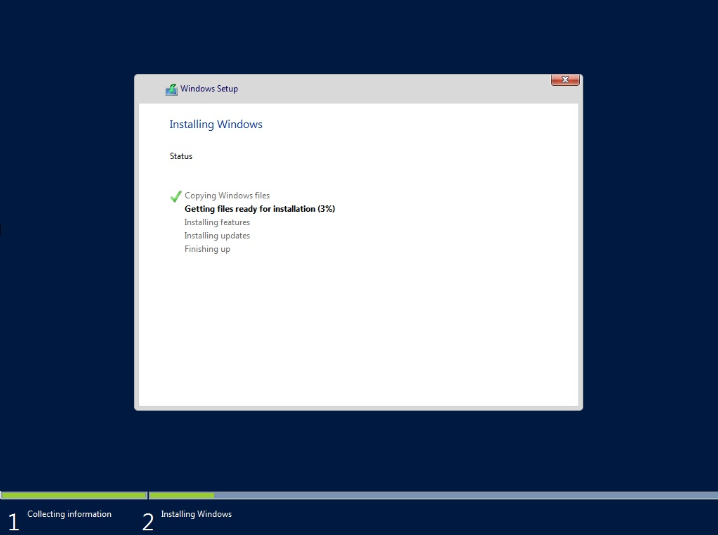
The “Installation Windows” section is the last step. Now the wizard starts the installation of Windows Server 2016. Depending on the type of installation media and the speed of the server, the installation process will take some time.
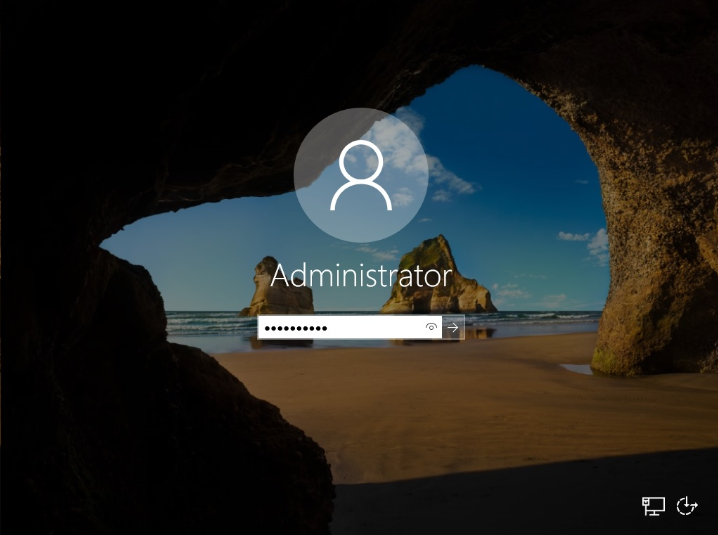
After the installation process is completed, Windows Server 2016 will ask for the password of the local administrator account to be set before logging on to the “Settings” page that will appear.


Note: For a strong Administrator password; uppercase, lowercase, numbers and special characters must be used together. If the Windows Server 2016 administrator account password does not comply with strong password policies, a dialogue describing the administrator password criteria will open, giving you the opportunity to change the password.
After installation, you can log in with the Administrator user using CTRL + ALT + DELETE keys combinations to log in.
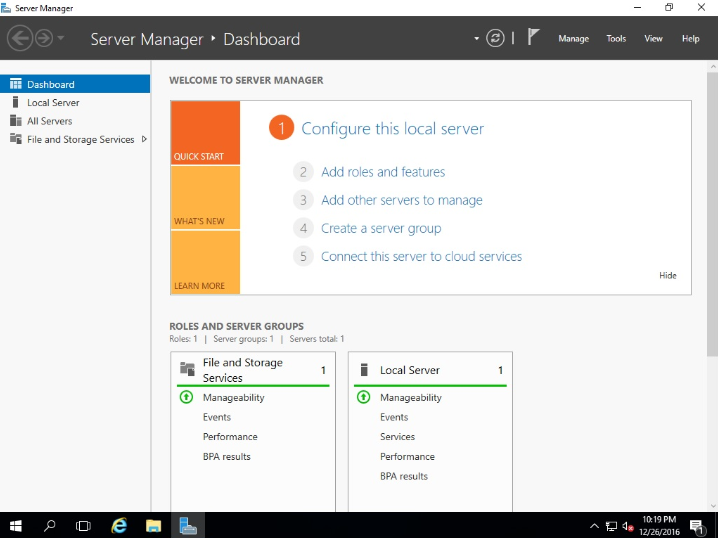
“Server Manager” will welcome you when you log in successfully with the Administrator user.
Historically, the adoption rate on major server releases is slow. With Windows Server 2016 about to hit one year in the release cycle, more organizations are gearing up to deploy the operating system in their environments. That being the case, it seemed appropriate to walk through an install of Microsoft Windows Server 2016 as the guest OS in a vSphere 6.5 environment.
NOTE – Server 2016 is fully supported from ESXi 5.5 and up, as per the VMware Compatibility Guide.
Create New Windows Server 2016 Virtual Machine
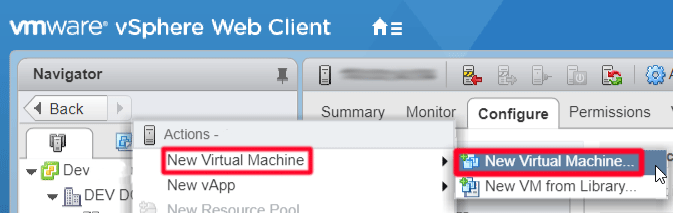
From the vSphere Web Client, right-click the designated host or cluster, and select New Virtual Machine.
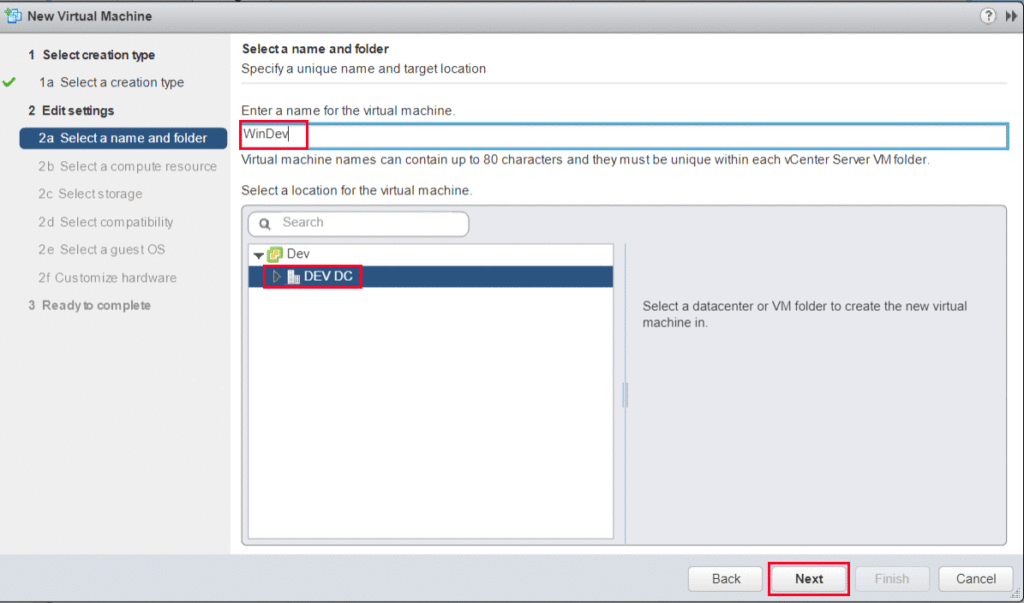
The New Virtual Machine Wizard will begin. First, select the creation type. For this tutorial, we chose to Create a new virtual machine.

Enter the virtual machine name and select the target folder location.
Next, select the ESXi host or cluster to run the virtual machine.
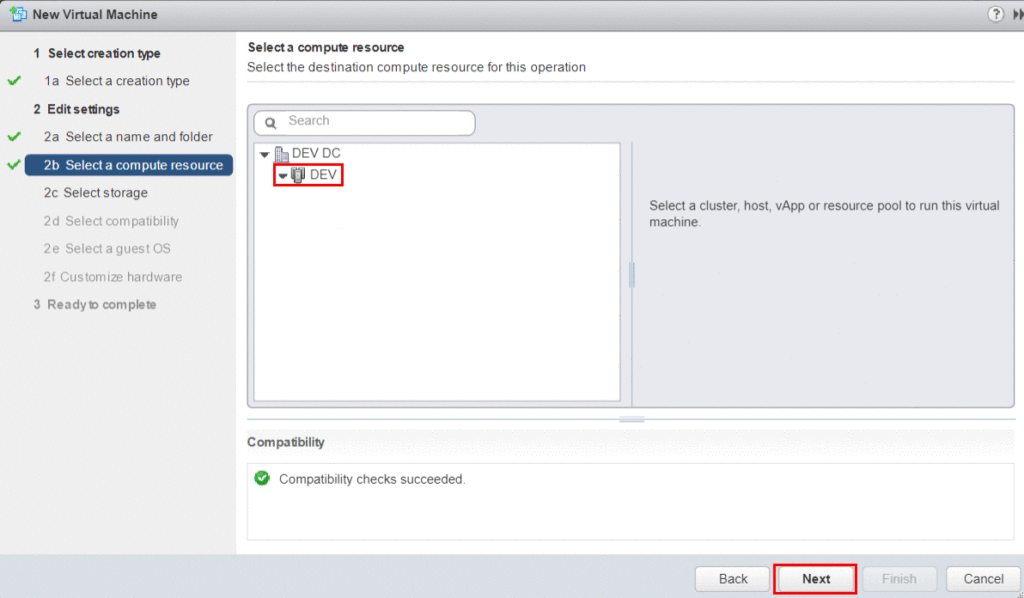
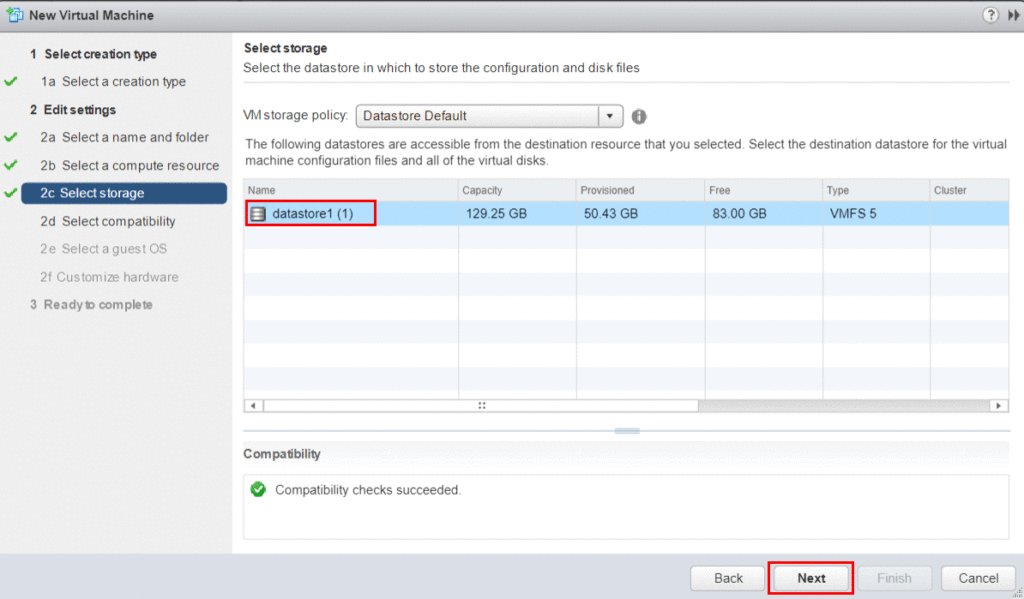
Select the datastore to store the virtual machine files.
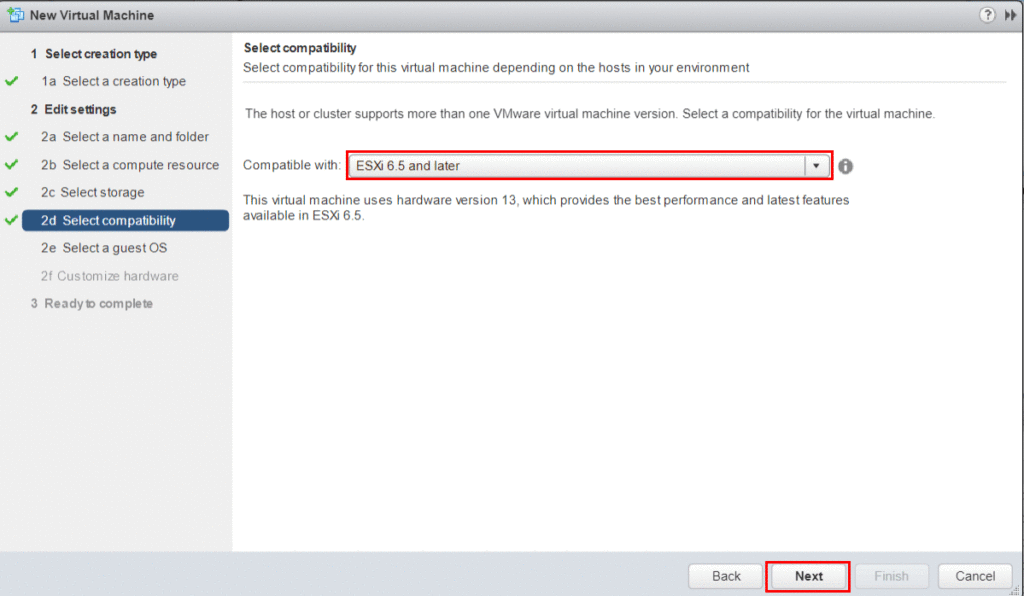
For compatibility, select ESXi 6.5 and later.
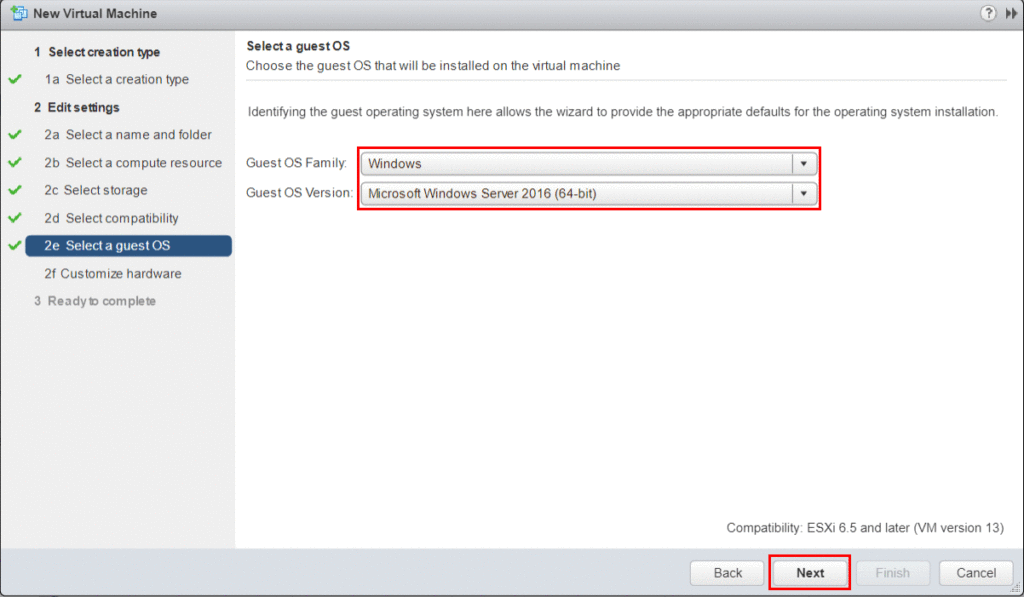
For the Guest OS Family and Version, select Windows and Microsoft Windows Server 2016 (64-bit), respectively.
Next, configure the virtual machine hardware as necessary. For this tutorial, the install will utilize a Server 2016 ISO located on a local datastore. To connect the file, select Datasore ISO File from the CD/DVD drop down. Click the Browse button to locate the ISO file.
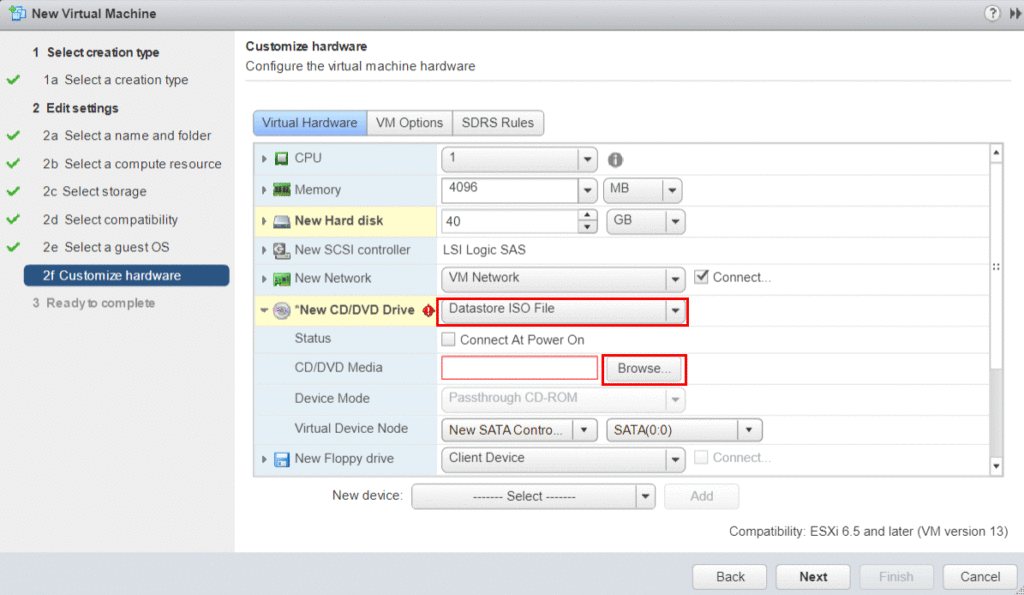
Select the Server 2016 ISO from the datastore.
Lastly, check the Connect at Power On check box to ensure the VM boots into the server installer.
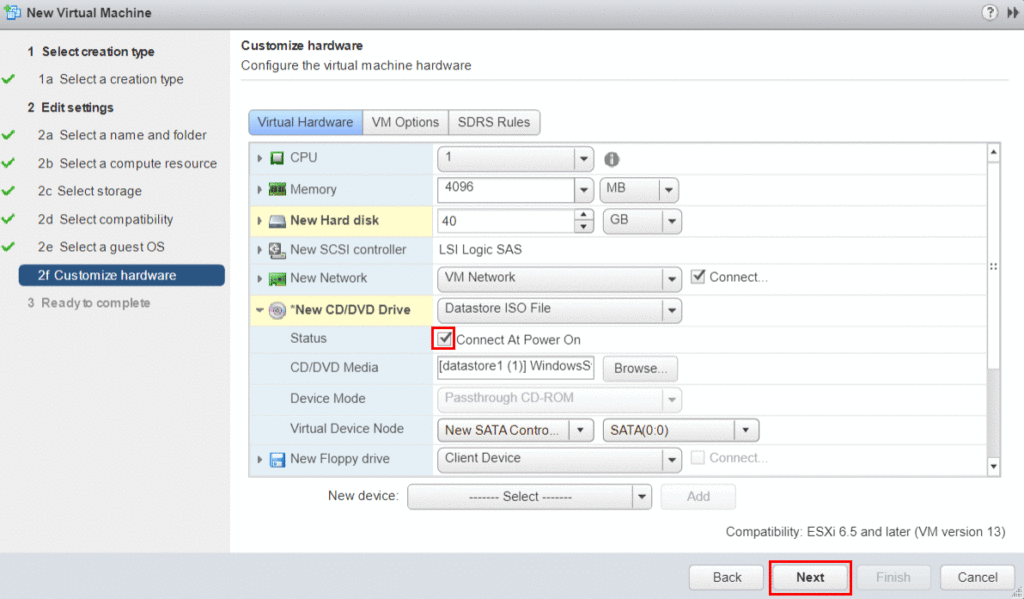
Review the configuration and select Finish to deploy the virtual machine.
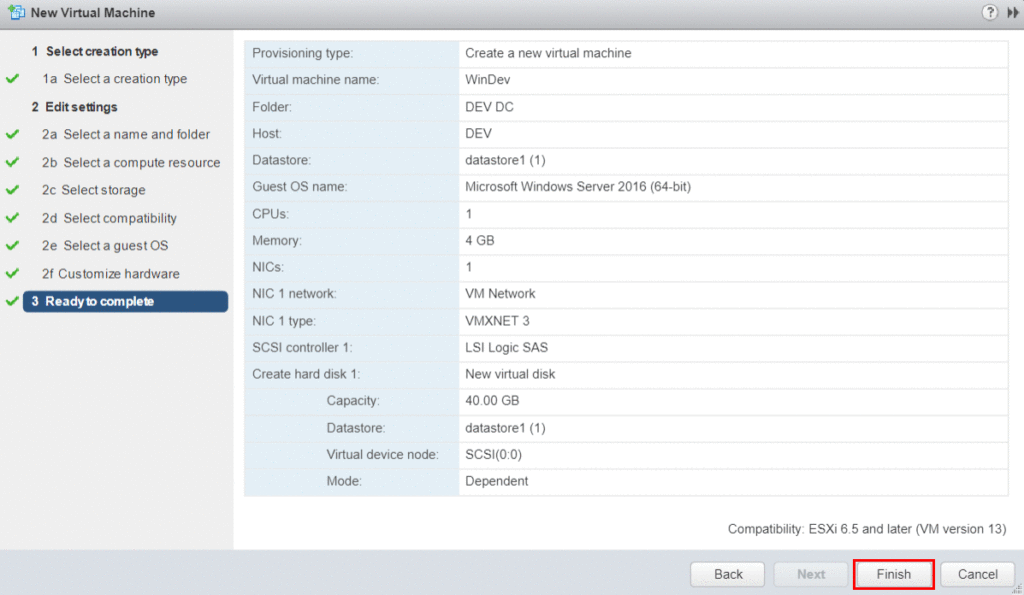
After deployed, Power On the virtual machine.

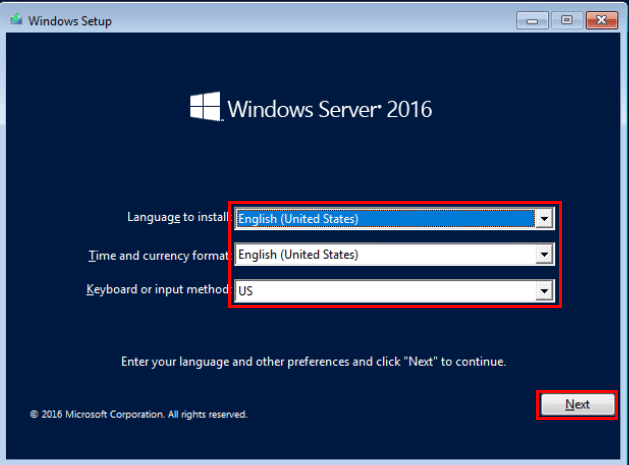
Open the virtual machine’s console to begin setting up Windows.
Install Windows Server 2016
From the Windows Setup screen, select the pertinent language, time, and keyboard.
Next, click Install Now.
Select the operating system to install. The Desktop Experience option includes the standard GUI.
Read the notices and terms. Accept to continue.
Select Custom for the installation type. This option is for new installs.
Choose the drive to install Windows. Click Next to begin the installation.

The installation of Windows will now begin.
Finally, set the password for the administrator account and click Finish.
Windows Server Guest OS Install – VMware Documentation
If you are looking to upgrade your VMware environment to 6.5, check out this tutorial.