
If you’re looking to tweak your mouse sensitivity in Windows to achieve smoother navigation and better control, you’ve come to the right place. Adjusting the mouse sensitivity can significantly enhance your computing experience, whether you’re gaming, working on graphic design, or simply navigating through your daily tasks. Thankfully, it’s a straightforward process that allows you to fine-tune your settings to suit your preferences. In this article, we’ll walk you through the steps to change your mouse sensitivity in Windows 6 to 11, ensuring you get the most out of your device. So, let’s dive right in and empower you with the knowledge to make those adjustments in no time!
Adjusting your mouse sensitivity settings can significantly improve your computer experience. It can make navigating through applications and games smoother and more precise. This guide will help you understand how to change Windows mouse sensitivity specifically to 6 11 settings, which is often recommended for better performance in various applications. We’ll break down the steps in simple terms so that anyone can follow along.
Understanding Mouse Sensitivity
Mouse sensitivity refers to how far the cursor moves on your screen in relation to the movement of the mouse. A higher sensitivity means the cursor will move further with less physical mouse movement. Conversely, lower sensitivity means you need to move the mouse more for the cursor to cover the same distance.
Why Adjust Mouse Sensitivity?
Adjusting your mouse sensitivity can help you:
- Enhance accuracy in gaming
- Improve productivity while working
- Reduce strain on your wrist
Finding the right sensitivity setting depends on personal preference and the tasks you do most.
Accessing Mouse Settings in Windows
Before you can adjust the sensitivity settings, you need to access the mouse settings. Here’s how you can do that:
1. Click on the **Start Menu**.
2. Select **Settings** (the gear icon).
3. Choose **Devices**.
4. Click on **Mouse** from the left-hand menu.
This section allows you to tweak various mouse settings, including sensitivity.
Adjusting the Mouse Sensitivity
Within the Mouse settings page, you can find options to adjust your mouse sensitivity. Windows typically offers a slider to help you find the best fit.
To change to the 6 11 setting:
1. Look for the **Pointer speed** section.
2. Move the slider to achieve the desired sensitivity level.
3. Click **Apply** to save your changes.
Fine-tuning Your Sensitivity Settings
If the standard settings don’t feel right, you can adjust them further. Fine-tuning allows you to customize your mouse experience even more.
Using the Control Panel
For more advanced settings, utilize the Control Panel. Here’s how:
1. Type **Control Panel** in the Start Menu search bar.
2. Click on **Hardware and Sound**, then select **Mouse**.
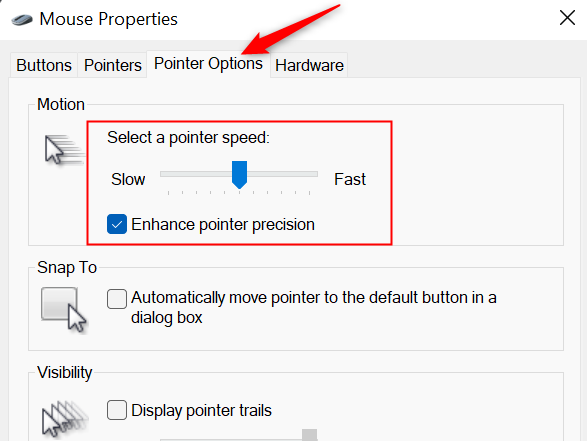
3. In the Mouse Properties dialog box, navigate to the **Pointer Options** tab.
Here, you can adjust the pointer speed for more precision.
Using the Registry Editor
For those who feel comfortable with advanced options, the Windows Registry Editor allows for specific customizations. Remember, be cautious when using the Registry Editor as it can affect your system.
1. Type **regedit** in the Start Menu search bar to open the Registry Editor.
2. Navigate to `HKEY_USERS\.DEFAULT\Control Panel\Mouse`.
3. Change the **MouseSensitivity** value to **6** to switch to a 6 11 setting.
Ensure you back up your registry before making changes.
Testing Your New Settings
After adjusting your mouse sensitivity, it’s crucial to test it out. Open a program or game that you frequently use and see how the new settings feel. It may take a bit of time to get used to the changes.
Tips for Testing
When testing your new mouse sensitivity, consider the following:
- Try out different applications
- Play a game that requires precision
- Take breaks to avoid fatigue
This will help you find the perfect sensitivity level for your needs.
Common Issues and Solutions
Sometimes adjusting mouse sensitivity can lead to some common problems. Let’s address a few of them.
Cursor Movement Issues
If your cursor feels jumpy or unresponsive, you may need to recalibrate your mouse settings or clean your mouse’s sensor. Dust and debris can impact its performance.
Returning to Default Settings
If you’re unhappy with your changes, it’s easy to revert back to default settings. Simply return to the mouse settings and reset the sensitivity to its original value.
Advanced Mouse Features
For users interested in more than just basic settings, many modern mice come with advanced features. These can improve your experience even further.
Using Mouse Software
Companies like Logitech and Razer offer software that allows you to customize mouse settings even more. With these applications, you can:
- Adjust DPI settings
- Program buttons for specific functions
- Create profiles for different games or applications
This can provide a tailored experience that aligns with your needs.
Consider Health and Ergonomics
While adjusting settings, remember to consider your posture and ergonomics. Proper alignment of your monitor and chair can prevent discomfort during long use.
Changing your Windows mouse sensitivity to 6 11 settings can significantly improve your computing experience. Whether you’re gaming or working, these adjustments allow for a customized and comfortable setup. With careful testing and adjustments, you can find the perfect sensitivity that meets your personal needs, making your time on the computer more enjoyable and efficient.
Make sure to revisit your settings periodically or when you change your usage patterns to ensure you maintain optimal performance. Happy adjusting!
How to Change Mouse Sensitivity – Windows 11
Frequently Asked Questions
How can I adjust mouse sensitivity in Windows settings?
To adjust mouse sensitivity in Windows, go to the Control Panel. Click on “Mouse,” then select the “Pointer Options” tab. Here, you can move the slider to change the pointer speed. Adjust it according to your preference, and click “Apply” to save the changes.
What is the impact of increasing mouse sensitivity?
Increasing mouse sensitivity allows the pointer to move faster across the screen. This can benefit gamers and users who require quick navigation. However, it may also reduce precision, making it challenging to perform detailed tasks like graphic design or fine editing.
Can I set different sensitivity levels for different applications?
Windows does not offer a built-in option to set different sensitivity levels for individual applications. However, some third-party mouse software allows you to customize sensitivity settings for different applications, providing the flexibility needed for various tasks.
Is it better to have a high or low mouse sensitivity?
The best mouse sensitivity depends on personal preference and the tasks you perform. High sensitivity can benefit fast-paced gaming, while lower sensitivity may be better for tasks requiring precision. Experiment with both settings to find what works best for you.
How do I reset mouse sensitivity to default settings?
To reset mouse sensitivity to default settings, navigate to the “Mouse” settings in the Control Panel. In the “Pointer Options” tab, you can usually find a “Reset” button or revert the slider back to the center. Click “Apply” to confirm the changes.
Final Thoughts
Adjusting mouse sensitivity can greatly enhance your computing experience. To change Windows mouse sensitivity 6 11, navigate to the Settings menu and locate the Mouse options.
From there, you can easily adjust the pointer speed to suit your preferences. Fine-tuning these settings will help you achieve the control and precision you need for various tasks.
Sign in to your How-To Geek account

Quick Links
-
Why Does Mouse Sensitivity Matter?
-
How to Change Mouse Sensitivity in Settings
-
How to Change Mouse Sensitivity in Control Panel
-
How to Adjust The Sensitivity of Gaming Mice
Summary
- Picking the right mouse sensitivity is important for a pleasant and efficient experience on Windows.
- You can change mouse sensitivity through both the Settings menu and Control Panel, allowing you to find the sensitivity that feels the best for you.
- Gaming mice often come with special software that can be used to configure their buttons and sensitivity, but it is recommended to keep the Windows mouse sensitivity slider in the middle when using this software.
Bad sensitivity settings can be frustrating — you’ll feel like you’re constantly fighting your computer. Luckily, here are a few quick ways to change your mouse settings on both Windows 10 and Windows 11 to get it just right.
Why Does Mouse Sensitivity Matter?
Your mouse sensitivity is what determines how much your cursor moves across the screen when you move your mouse around. When your mouse sensitivity is high, even small mouse movements will send your cursor all the way across your screen. When it is low, you may find yourself picking up your mouse repeatedly just to move half way across your monitor.
On a PC with a graphical user interface, your mouse is your primary means of interacting with your PC. A mouse sensitivity setting on either extreme will tend to annoy most people, but it is worth figuring out what «feels» the best for you, since you spend so much time using it.
How to Change Mouse Sensitivity in Settings
To change your mouse sensitivity, click the Start button. Type «Mouse settings» in the search bar and then hit Enter. The Mouse window will appear. Adjust the slider labeled «Mouse pointer speed» to the sensitivity that feels the best. You can now close the window.
How to Change Mouse Sensitivity in Control Panel
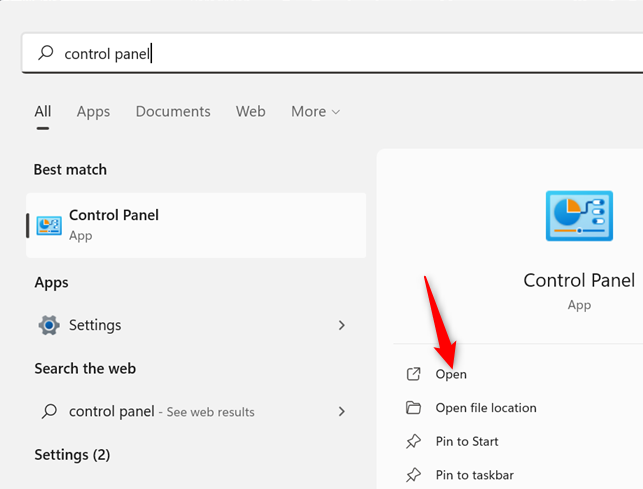
If you prefer, you can still change the mouse sensitivity through the Control Panel. To access the control panel, click the Start button and type «control panel» into the search box. Then hit Enter or click «Open.»
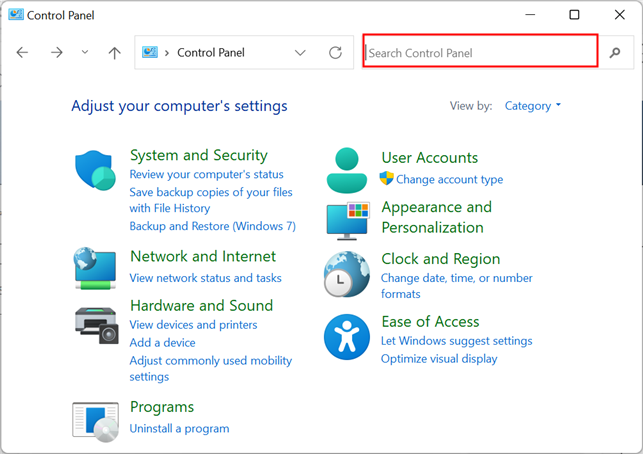
Click the search bar in the top right-hand corner of the Control Panel window and type «Mouse.»
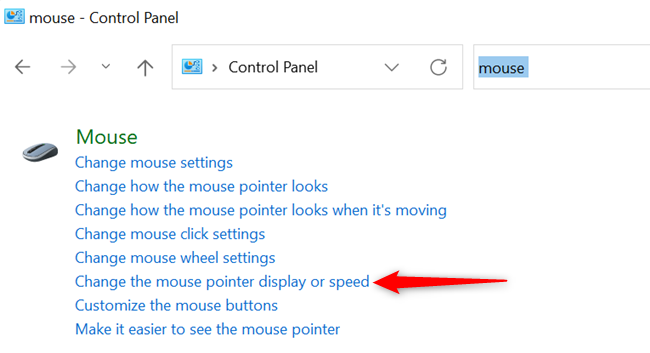
Once you’ve run the search, click «Change the mouse pointer display or speed.»
Click on the «Pointer Options» tab in the Mouse Properties window and adjust the slider labeled «Select a pointer speed» to your liking. You can now close the Mouse Properties window and the Control Panel.
There are other mouse settings you may be interested in, too. You can customize your pointer, configure the behaviour of buttons, enable visibility enhancements, among other things.
How to Adjust The Sensitivity of Gaming Mice
All mice can be controlled through the settings available in Windows 10 or Windows 11. However, many mice designed for gaming, enthusiasts, or professional use also offer special software that allows you to configure their buttons and sensitivity. If you’re going to use the software specific to your mouse, you should leave the Windows mouse sensitivity slider in the middle.
Here are links to the software for some of the most popular mice.
- Logitech
- Razer
- SteelSeries
- Microsoft
If you have a utility from your mouse manufacturer installed, you can probably find it by searching for the name of your mouse manufacturer in your Start menu.
Are you frustrated with the mouse sensitivity on your Windows 11 computer? Fear not, because there’s a simple solution to this common problem. Adjusting the mouse sensitivity can greatly enhance your user experience and make navigation smoother and more precise. So, let’s explore how to change the mouse sensitivity in Windows 11 and take control of your cursor!
Windows 11 offers several ways to customize your mouse sensitivity settings, allowing you to find the perfect balance between speed and precision. By adjusting the mouse sensitivity, you can optimize your workflow and increase your productivity. Whether you need faster movement for gaming or a slower pace for precision tasks, Windows 11 has you covered. Let’s dive into the different methods you can use to adjust mouse sensitivity in Windows 11 and find the one that works best for you.
To adjust mouse sensitivity on Windows 11, follow these steps:
- Click on the Start menu and select «Settings.»
- In the Settings window, click on «Devices.»
- From the left sidebar, choose «Mouse.»
- Under the «Mouse Sensitivity» section, use the slider to increase or decrease the sensitivity.
- Test the new sensitivity by moving the mouse and making sure it feels comfortable.

Understanding Mouse Sensitivity in Windows 11
In Windows 11, the mouse sensitivity refers to the speed at which the mouse pointer moves on the screen in response to physical mouse movement. It determines the distance the cursor travels in relation to the physical movement of the mouse. Adjusting the mouse sensitivity allows users to tailor the mouse’s responsiveness to their liking and improve their overall user experience. Whether you prefer a slower or faster cursor movement, Windows 11 provides several options to change the mouse sensitivity settings. In this article, we will explore different methods to adjust the mouse sensitivity in Windows 11.
Method 1: Using the Settings App
The Settings app in Windows 11 provides a user-friendly interface to change various system settings, including mouse sensitivity. Here’s how you can adjust the mouse sensitivity using the Settings app:
- Click on the Start button in the taskbar or press the Windows key to open the Start menu.
- Click on the gear-shaped icon to open the Settings app.
- In the Settings app, click on the «Devices» category.
- In the left sidebar, select «Mouse» to access the mouse settings.
- In the Mouse settings, scroll down to the «Other mouse options» section.
- Under the «Related settings,» click on the «Additional mouse options» link.
- A new window labeled «Mouse Properties» will appear. Go to the «Pointer Options» tab.
- Adjust the «Select a pointer speed» slider to change the mouse sensitivity.
- Drag the slider towards the left for a slower cursor movement or towards the right for a faster cursor movement.
- Click «Apply» to save the changes, then click «OK» to close the Mouse Properties window.
By following these steps, you can easily modify the mouse sensitivity using the Settings app in Windows 11. Experiment with different slider positions to find the sensitivity that suits your needs and preferences.
Method 2: Using the Control Panel
Aside from the Settings app, you can also adjust the mouse sensitivity using the classic Control Panel. Here’s how:
- Right-click on the Start button in the taskbar or press the Windows key + X to open the power user menu.
- From the power user menu, select «Control Panel.»
- In the Control Panel, change the «View by» option to either «Large icons» or «Small icons» for easier access to individual settings.
- Locate and click on the «Mouse» option to open the mouse settings.
- In the Mouse Properties window, go to the «Pointer Options» tab.
- Adjust the «Select a pointer speed» slider to modify the mouse sensitivity.
- Drag the slider towards the left for slower cursor movement or towards the right for faster cursor movement.
- Click «Apply» to save the changes, then click «OK» to close the Mouse Properties window.
Using the Control Panel is another convenient way to customize the mouse sensitivity according to your preferences. Feel free to fine-tune the settings until you find the perfect balance for smooth cursor movement.
Method 2.1: Accessing Control Panel Through Run Command
If you prefer using the Run command to access the Control Panel, follow these steps:
- Press the Windows key + R to open the Run dialog box.
- Type «control» into the text field and press Enter or click «OK.»
- The Control Panel window will open. Proceed with the steps mentioned in Method 2 above to change the mouse sensitivity.
This alternative method provides a quick way to access the Control Panel directly through the Run command, allowing you to efficiently make adjustments to the mouse sensitivity.
Method 3: Using Registry Editor
For advanced users, modifying the mouse sensitivity through the Windows Registry Editor provides even more control over the settings. Here’s how to do it:
- Press the Windows key + R to open the Run dialog box.
- Type «regedit» into the text field and press Enter or click «OK.»
- The Registry Editor window will open. Navigate to the following path:
| HKEY_CURRENT_USER | Control Panel | Mouse |
- In the right pane, locate the «MouseSensitivity» value.
- Double-click on «MouseSensitivity» to modify its value.
- The default value for a standard sensitivity is 10. You can increase or decrease this value to adjust the mouse sensitivity.
- Click «OK» to save the changes.
Modifying mouse sensitivity through the Registry Editor requires caution and is recommended for advanced users. Make sure to back up the registry before making any changes and follow the steps precisely to avoid unintentional modifications or errors.
Method 4: Using Third-Party Mouse Software
Aside from the built-in tools in Windows 11, there are various third-party mouse software available that offer advanced customization options for mouse sensitivity. These software usually provide additional features and settings to fine-tune the mouse’s sensitivity, acceleration, and other parameters. Some popular third-party mouse software include:
- Razer Synapse
- Logitech G HUB
- SteelSeries Engine
- Corsair iCUE
- Microsoft Mouse and Keyboard Center
By installing and using these third-party mouse software, you can access more advanced settings and customization options to fine-tune the mouse sensitivity according to your specific requirements.
Changing the mouse sensitivity is essential for optimizing your Windows 11 experience and achieving precise cursor control. Whether you prefer a slower or faster cursor movement, Windows 11 offers multiple methods to tailor the mouse sensitivity settings to your liking. Use the built-in Settings app or Control Panel, modify the Registry Editor (with caution), or explore the features of third-party mouse software for even more customization. Experiment with different settings until you find the perfect mouse sensitivity that enhances your productivity and overall comfort.

Adjusting Mouse Sensitivity in Windows 11
When it comes to using a mouse with your Windows 11 PC, having the right sensitivity is crucial for smooth navigation and accurate pointer control. Here’s a step-by-step guide on how to change the mouse sensitivity:
Method 1: Using Settings
The easiest way to adjust mouse sensitivity is through the Settings app. Follow these steps:
- Open the Start menu and click on «Settings».
- Go to «Devices» and select «Mouse» from the left sidebar.
- In the Mouse settings, click on «Additional mouse options» at the bottom.
- In the Mouse Properties window, go to the «Pointer Options» tab.
- Under «Motion», you can adjust the mouse sensitivity by moving the slider to the desired level.
Method 2: Using Control Panel
If you prefer the classic Control Panel interface, you can also change the mouse sensitivity using these steps:
- Open the Start menu and search for «Control Panel».
- In Control Panel, select «Hardware and Sound».
- Under «Devices and Printers», select «Mouse».
Key Takeaways — How to Change Mouse Sensitivity in Windows 11
- Adjusting mouse sensitivity can improve accuracy and comfort.
- Go to «Settings» and search for «Mouse» to access mouse settings.
- Click on «Mouse» settings and select «Additional mouse options.»
- In the «Mouse Properties» window, go to the «Pointer Options» tab.
- Drag the «Pointer Speed» slider to the desired sensitivity level.
Frequently Asked Questions
Here are the answers to some common questions about changing mouse sensitivity in Windows 11.
1. How do I change the mouse sensitivity in Windows 11?
To change the mouse sensitivity in Windows 11, follow these steps:
1. Open the Start menu and click on «Settings».
2. In the settings window, click on «Devices».
3. Select «Mouse» from the left-hand menu.
4. Adjust the slider under «Cursor speed» to increase or decrease the mouse sensitivity.
5. Click «Apply» or «Save» to apply the changes.
6. Close the settings window and test the new mouse sensitivity.
2. Can I adjust mouse sensitivity for different mice separately in Windows 11?
No, in Windows 11, you cannot adjust the mouse sensitivity for different mice separately. The mouse sensitivity settings you apply will affect all connected mice. However, you can change the mouse sensitivity individually in third-party software provided by the mouse manufacturer, if available.
3. Why should I change the mouse sensitivity in Windows 11?
Changing the mouse sensitivity in Windows 11 allows you to personalize your mouse settings to suit your preferences and improve your overall user experience. By adjusting the mouse sensitivity, you can increase or decrease the speed at which the cursor moves on your screen, making it easier to navigate and use your computer.
4. What is the default mouse sensitivity in Windows 11?
The default mouse sensitivity in Windows 11 is typically set in the middle of the sensitivity scale. However, the exact default sensitivity may vary depending on your specific mouse or hardware settings. If you haven’t made any changes to the mouse sensitivity settings, it is likely set to the default value.
5. Can I use keyboard shortcuts to change the mouse sensitivity in Windows 11?
No, there are no built-in keyboard shortcuts to directly change the mouse sensitivity in Windows 11. You need to access the mouse settings through the Windows Settings app to adjust the sensitivity using the graphical interface. However, you can use keyboard shortcuts to navigate and access the settings app quickly, such as pressing «Windows key + I» to open the settings app.
Changing the mouse sensitivity in Windows 11 is a simple process that can greatly enhance your user experience. By adjusting the mouse sensitivity settings, you can customize the speed at which your cursor moves, making it more responsive to your movements. This can be especially beneficial for tasks that require precision, such as graphic design or gaming.
To change the mouse sensitivity in Windows 11, you can follow these easy steps:
- Go to the Settings menu: Click on the Start button, then select the Settings icon (shaped like a gear).
- Open the Mouse settings: In the Settings menu, click on the ‘Devices’ category and then select ‘Mouse’ in the left-hand sidebar.
- Adjust the sensitivity: In the Mouse settings, you’ll find a slider that allows you to adjust the sensitivity level. Move the slider to the left to decrease the sensitivity or to the right to increase it. Test different levels until you find the one that feels comfortable for you.
- Apply the changes: Once you’re satisfied with your desired sensitivity level, close the settings window, and your new mouse sensitivity settings will be saved.
Remember, the mouse sensitivity settings may vary depending on the type of mouse you’re using. If you have a gaming mouse or a specific mouse software installed, you may have additional options to fine-tune the sensitivity. Exploring these options can help you further customize your mouse experience.
With these simple steps, you can easily change the mouse sensitivity in Windows 11 to better suit your needs and preferences. Enjoy a smoother and
-

It’s usually at the bottom-left corner of the Start menu.

Advertisement
-

You’ll see this icon near the top of the window.

-

It’s near the center of the left column.

Advertisement
-

It’s the blue link beneath the “Related settings” header. This opens the Mouse Properties panel to the Buttons tab.
- If you’re on another tab, click Buttons so you can find the options to adjust the sensitivity of the double-click feature.

-

If you want to increase or decrease the rate at which a double-click is registered, use the “Speed” slider.

Advertisement
-
You’ll see it at the top of the window.

-
A higher speed increases sensitivity, while a lower speed enhances precision.

Advertisement
-
Pointer precision lets the mouse movement match the speed of your hand on the mouse (or your finger on the trackpad). Check the box if you want to enable this feature, or remove the check to disable it.

-

Your mouse sensitivity is now adjusted.

Advertisement
Ask a Question
200 characters left
Include your email address to get a message when this question is answered.
Submit
Advertisement
Thanks for submitting a tip for review!
About This Article
Thanks to all authors for creating a page that has been read 48,846 times.
Is this article up to date?
Quick Tips
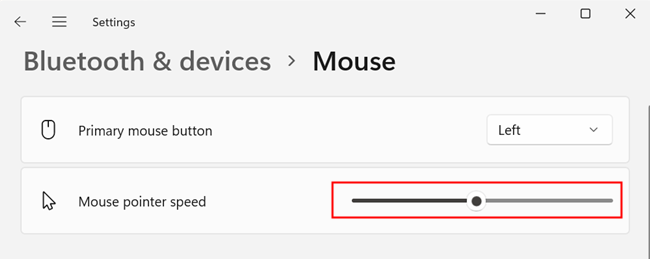
- Open Settings > Bluetooth & devices > Mouse > Mouse pointer speed bar to increase or decrease mouse sensitivity.
- Open Mouse Settings > Roll the mouse wheel to scroll drop-down > select the relevant scrolling setting.
- Go to Mouse Settings > Additional mouse settings > Pointers > Scheme drop-down > select relevant theme > Apply and OK.
Method 1: Increase or Decrease Mouse Sensitivity
Sensitivity in a mouse can be anything, from how fast it moves across the screen to how fast it reacts when double-clicking. For different users, different mouse sensitivity levels can be set according to their preferences. Here’s how to do it.
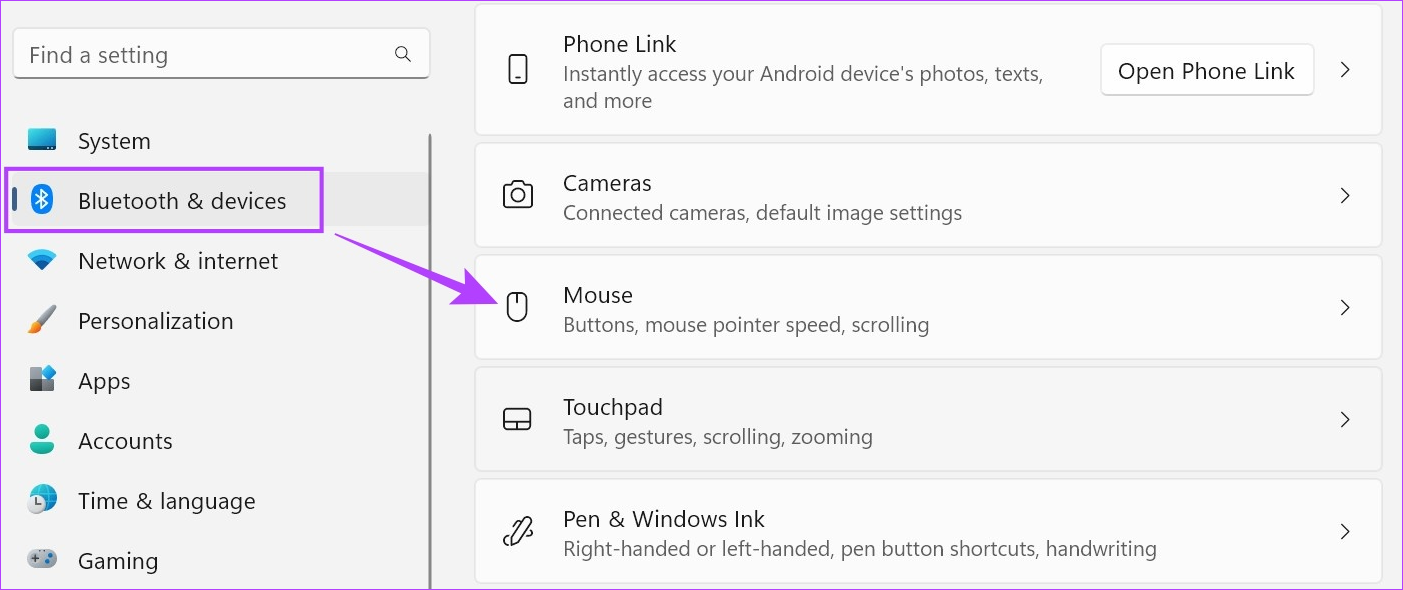
Step 1: Open Settings and click on Bluetooth & devices. Then, click on Mouse.
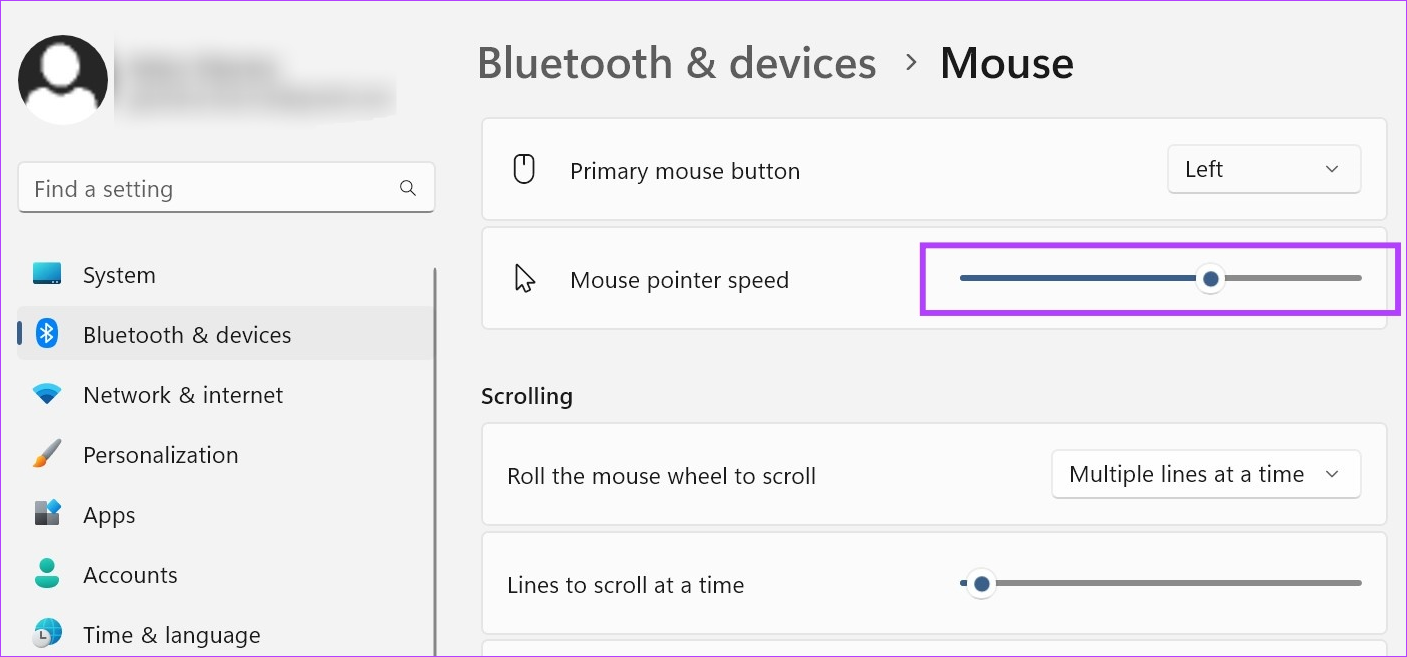
Step 2: Use the Mouse pointer speed bar to increase or decrease mouse sensitivity.
Step 3: Then, scroll down to the Related settings section and click on Additional mouse settings.

Step 4: Here, go to Double-click speed and use scale to increase or decrease the double-click speed.
Step 3: Once done, click on Apply and OK.
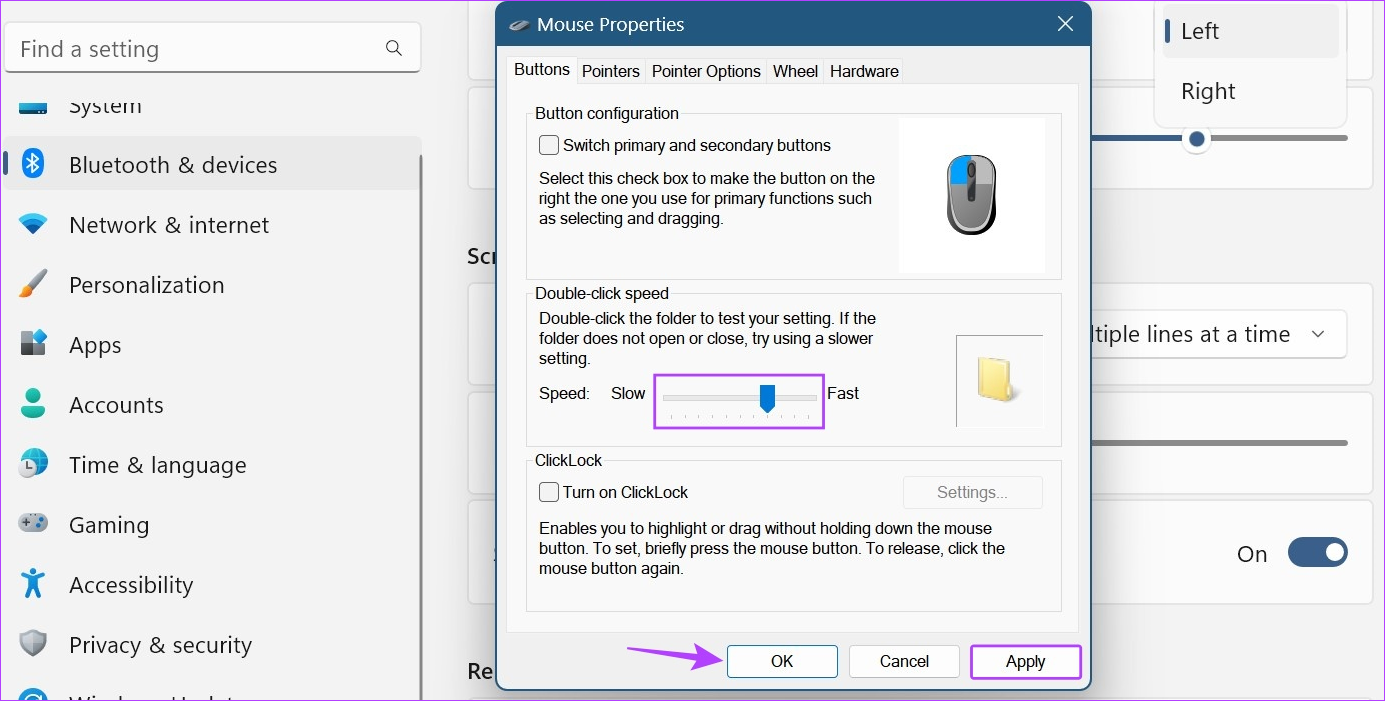
This will close the window and change the double-click response time for your mouse accordingly.
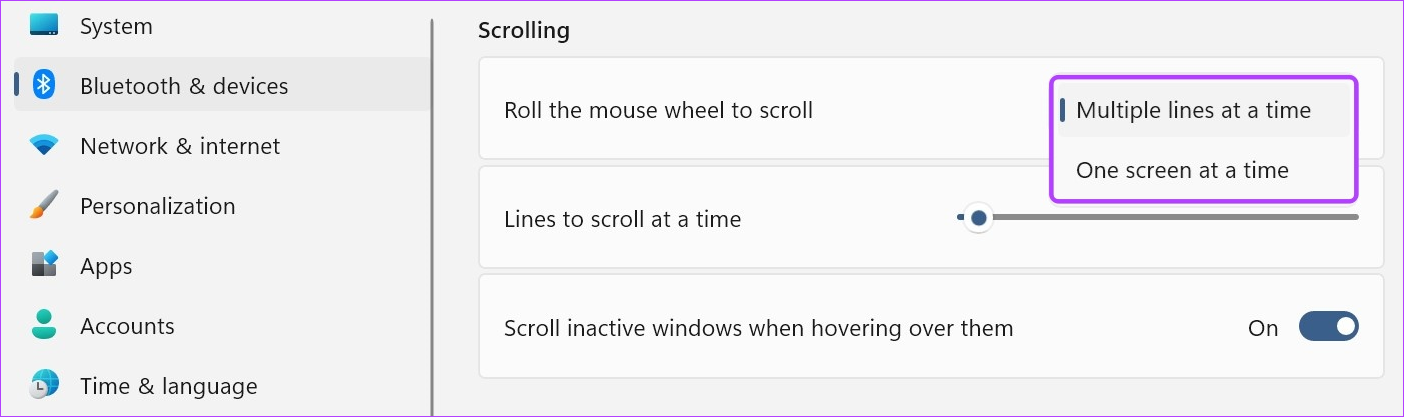
While scrolling up and down on a page might not seem like a major thing, it becomes an important feature when you’re scrolling through pages and would like the scroll speed to be a little fast or slow. This can also be helpful if you’re using an external mouse. Here’s how to do it.
Step 1: Open Settings → Bluetooth & devices → Mouse.
Step 2: Click on the Roll the mouse wheel to scroll drop-down and select the relevant scrolling setting.
Note: Selecting the One screen at a time option will automatically disable the Lines to scroll at a time option.
Step 3: Use the Lines to scroll at a time bar to select the relevant scrolling configuration.
Step 4: Turn on the Scroll inactive windows when hovering over them toggle.
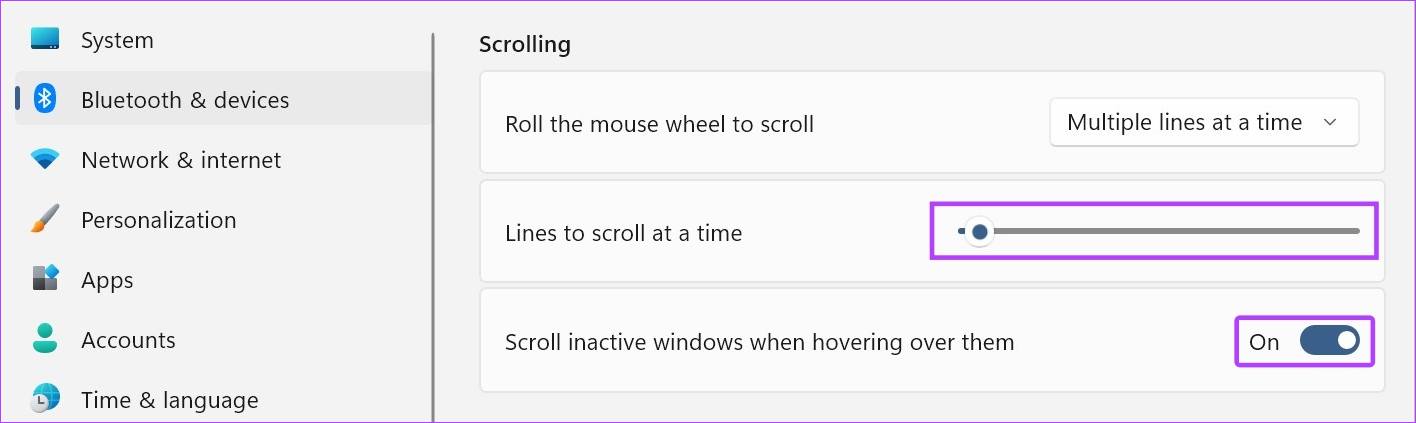
This will allow you to increase the mouse scrolling speed and to scroll through inactive windows just by hovering over them.
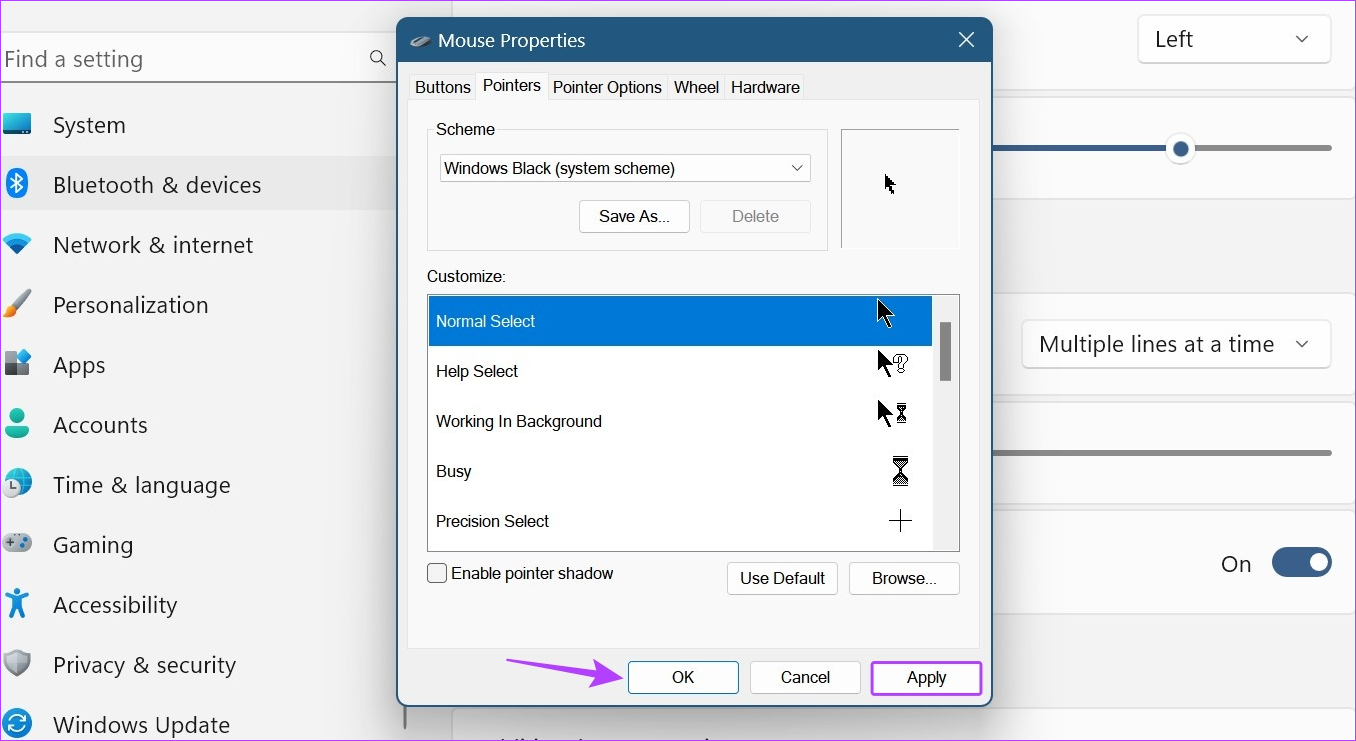
Method 3: Use a Different Cursor Scheme
The classic white mouse cursor with a black outline is a staple across most Windows devices. However, this can get a little monotonous after a while. So, to make your mouse’s cursor more fun, here’s how you can adjust mouse settings using pre-fed cursor schemes in Windows 11.
Step 1: Open Settings → Bluetooth & devices → Mouse. Click on Additional mouse settings.
Step 2: From the menu options, click on Pointers.
Step 3: Use the Scheme drop-down to select the relevant cursor scheme.

Step 4: Once done, click on Apply and OK.
Also Read: How to use mouse without borders using PowerToys on Windows
Method 4: Enable or Disable Cursor Trails
Once activated, a trail comprising your mouse’s icon will follow the icon around the screen. It is an excellent accessibility feature that can help you track where your mouse pointer is at any given time. Follow the below steps to enable mouse cursor trails on your Windows device.
Step 1: Open Settings → Bluetooth & devices → Mouse → Additional mouse settings.
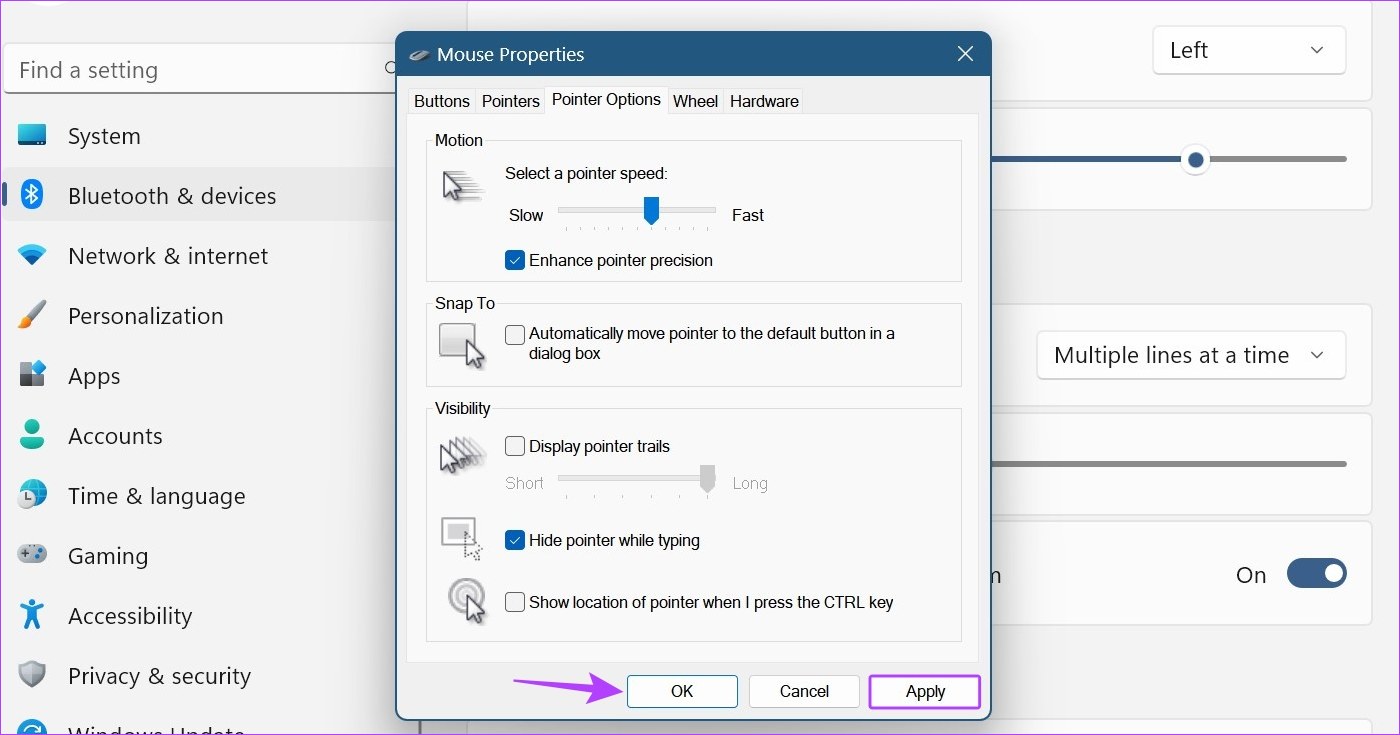
Step 2: From the menu options, click on Pointer Options. Check the Display pointer trails option.
Step 3: Then, increase or decrease the pointer trail by dragging the slider to either end.

Step 4: Check the Hide pointer while typing option to hide the mouse cursor once you start typing.
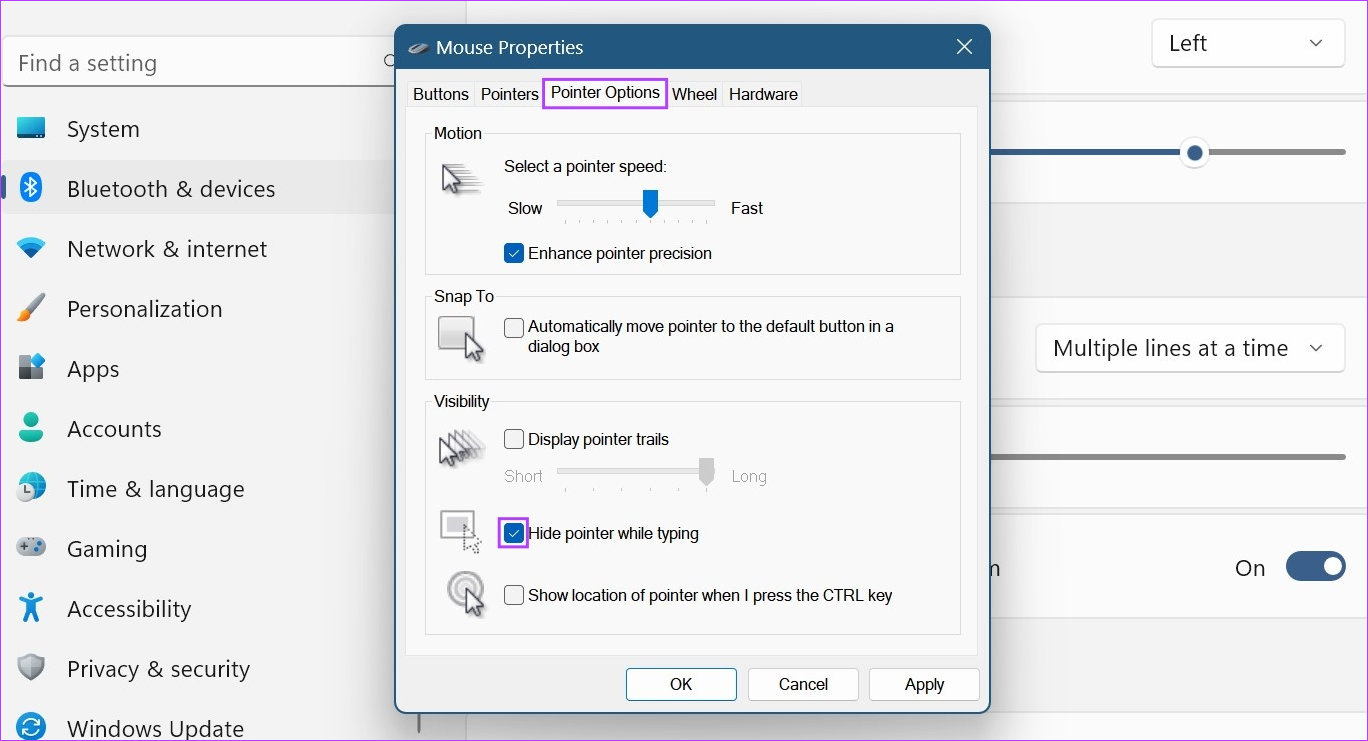
Step 5: Then, click on Apply and OK.
This will save the changes to your mouse cursor’s appearance and behavior accordingly. You can also uncheck the Display pointer trails option to disable pointer trails in Windows 11.
Tip: If you want to further change the appearance of your mouse cursor, you can also change the cursor size and text color on Windows 11.
Method 5: Change the Mouse Button Configuration
Certain users who are either ambidextrous or left-handed might experience difficulty when using the mouse configuration meant for right-handed individuals. You can consider changing the layout of the primary mouse button and see if it helps in making your browsing experience better. Here’s how.
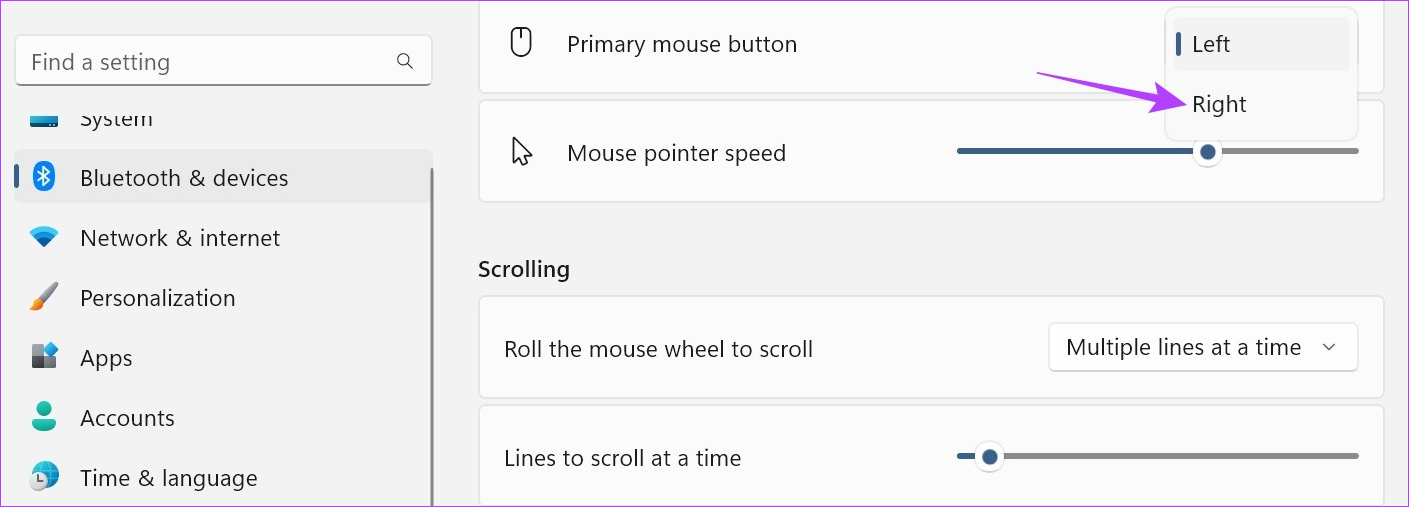
Step 1: Open Settings → Bluetooth & devices → Mouse. Click the Primary mouse button drop-down.
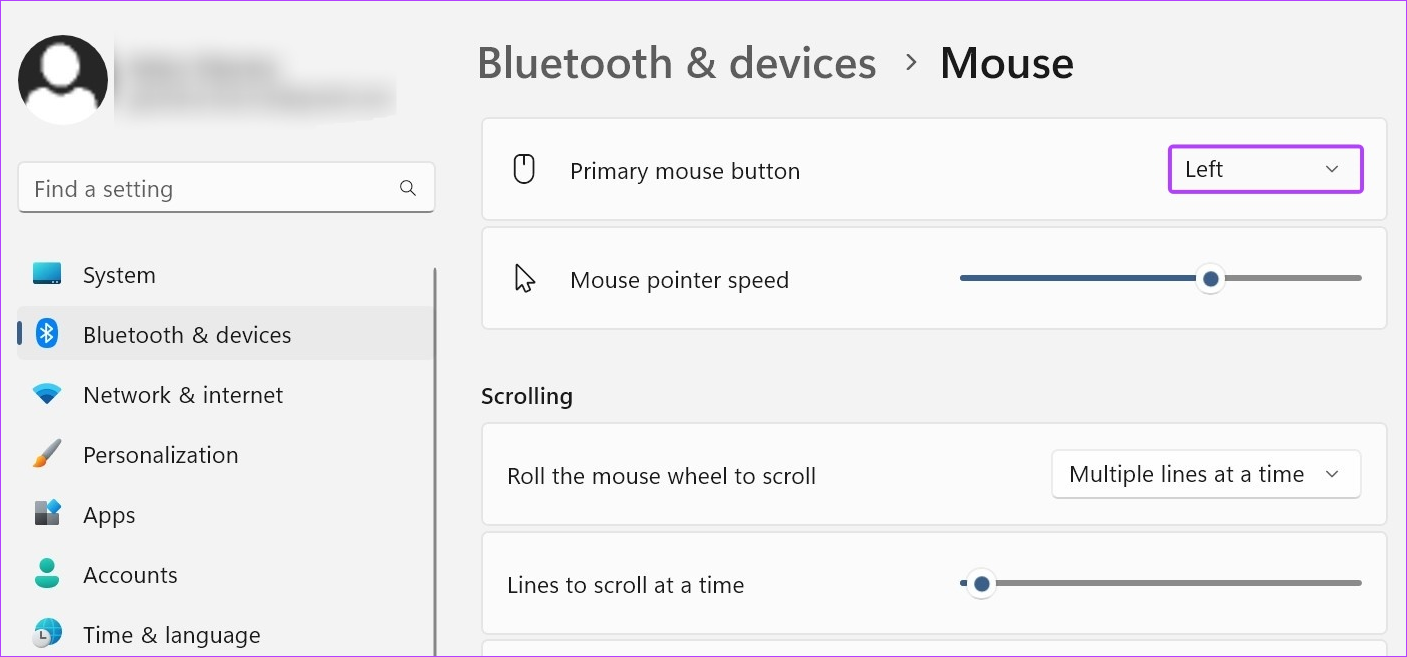
Step 2: Select the relevant side for your primary mouse button.
When mapping the mouse button to make other changes, like getting the scroll wheel to left-click or right-click, ensure an external mouse is connected. However, if you’re unable to map your mouse button using the above steps, use the Mouse Properties window for more settings options. Here’s how.
Step 3: Go down to the Related settings section and click on Additional mouse settings.
Step 4: Check the Switch primary and secondary buttons option.
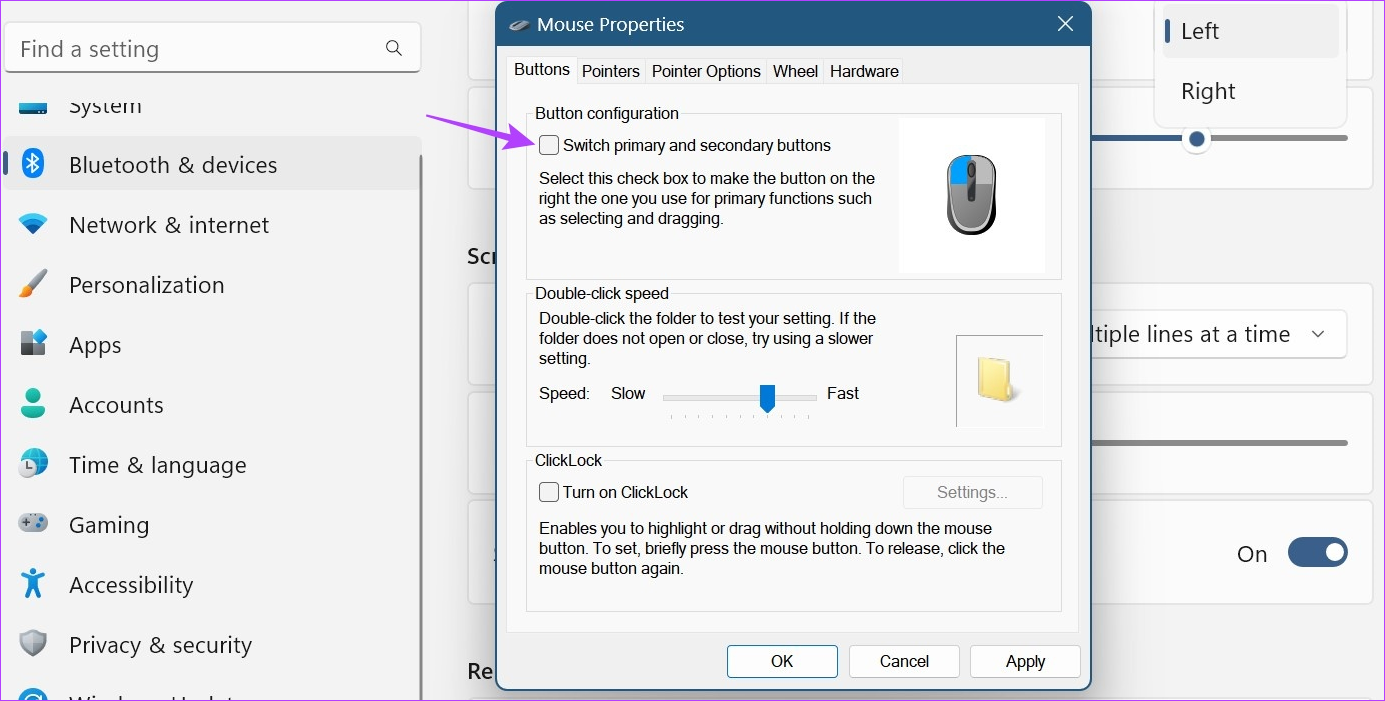
Step 5: Click on Apply and OK to save the changes.

This will switch the current primary button configuration on your mouse, allowing you to use it easily in a left-handed configuration.
FAQ
1. Can you reset the mouse settings in Windows 11?
Open Settings → Bluetooth & devices → Mouse → Additional mouse settings. From the menu, select Pointers → click on Use Default → click on Apply and OK to save the changes. This will change the mouse cursor’s settings back to default. For any other setting change, follow the above steps and make the relevant changes.
Was this helpful?
Thanks for your feedback!
The article above may contain affiliate links which help support Guiding Tech. The content remains unbiased and authentic and will never affect our editorial integrity.