
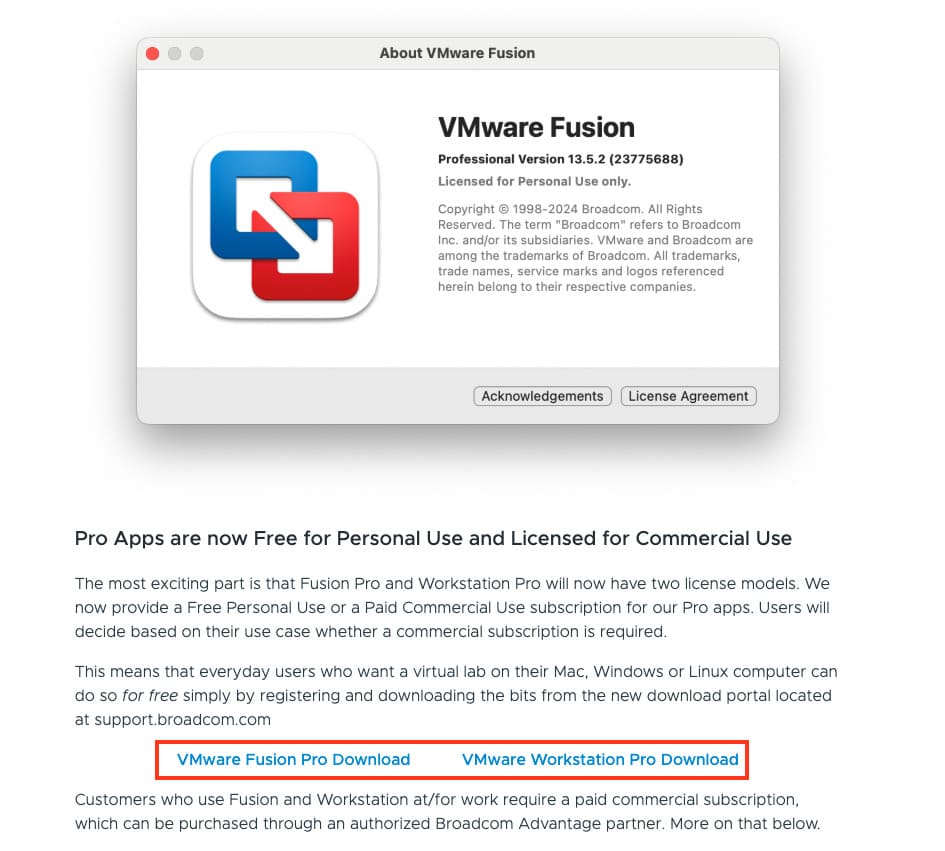
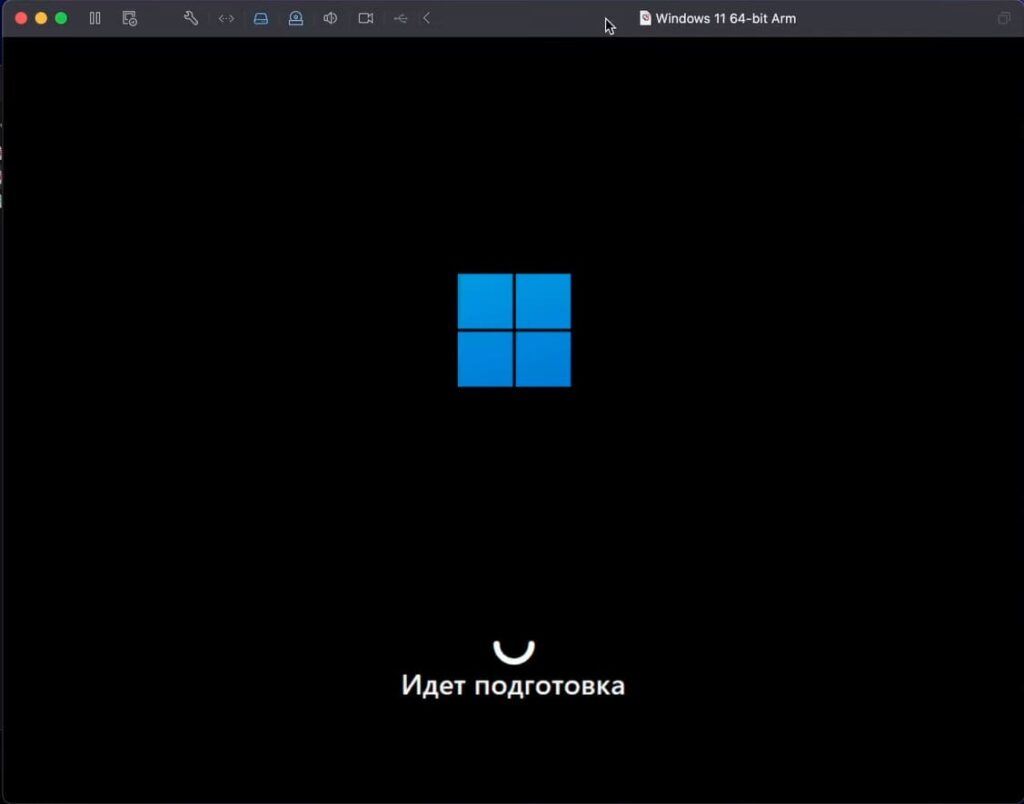
В этой статье вы узнаете, как установить VMware Fusion на ваш Mac, создать виртуальную машину и установить Windows 11 на процессорах M1, M2, M3 или M4. Мы подробно разберём процесс настройки виртуальной машины, установки Windows 11 и активации системы с помощью лицензионного ключа, который можно приобрести у нас.
Установка VMware Fusion
— Чтобы начать, необходимо установить VMware Fusion на ваш Mac.
— Так же вам понабодится специальный дистрибутив Windows 11 ARM, который вы можете скачать с нашего каталога на Русском или Английском языке.
— По окончанию установки Windows 11, вам необходимо будет ее активировать, приобрести лицензионный ключ активации вы всегда можете у нас в магазине от 1690 ₽
Выполните следующие шаги:
1) Скачайте VMware Fusion с официального сайта.
— Перейдите на сайт VMware и выберите раздел загрузки VMware Fusion.
— Скачайте установочный файл для macOS (Для этого вам потребуется зарегистрироваться на сайте).
— Или скачайте VMware Fusion напрямую с нашего сервера.
2) Установите VMware Fusion.
— Дважды щёлкните по скачанному .dmg-файлу.
— В открывшемся окне щелкните дважды значок VMware Fusion и он запустит процесс установки.
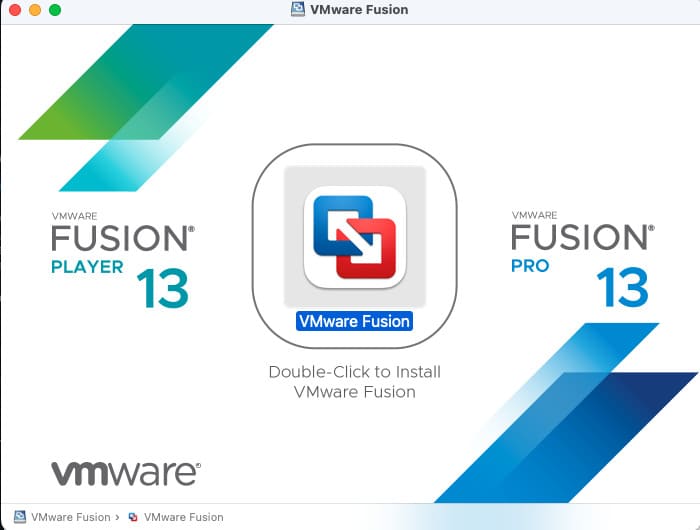

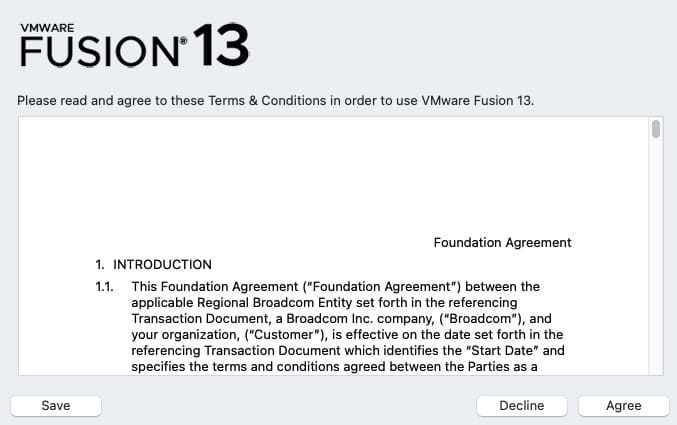
— Следуйте всем пунктам установки VMware Fusion
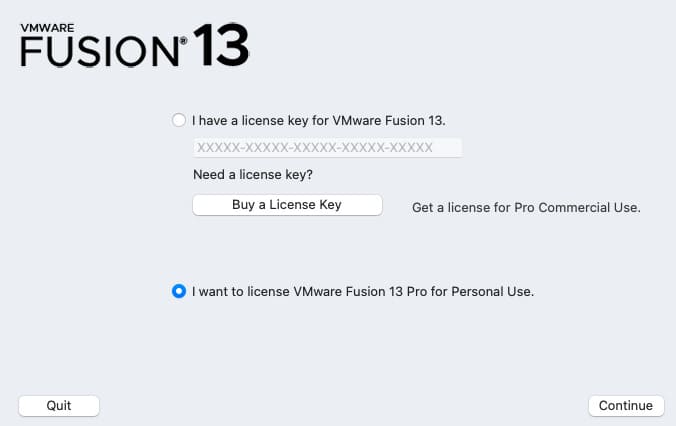
— В окне с вводом лицензионного ключа, выбирайте второй вариант «I want to license for personal use».
3) Запустите VMware Fusion.
— Перейдите в папку «Программы» и откройте VMware Fusion.
— На первом запуске подтвердите запросы macOS на предоставление необходимых разрешений.
— Если вы используете бесплатную версию Fusion, выберите опцию запуска в режиме личного использования.
После завершения установки VMware Fusion можно приступать к созданию виртуальной машины.
Шаги установки Windows 11 через VMware Fusion
1) Создание новой виртуальной машины
— Откройте VMware Fusion и нажмите на значок «+» для создания новой виртуальной машины.
— Выберите «Create a Custom Virtual Machine».
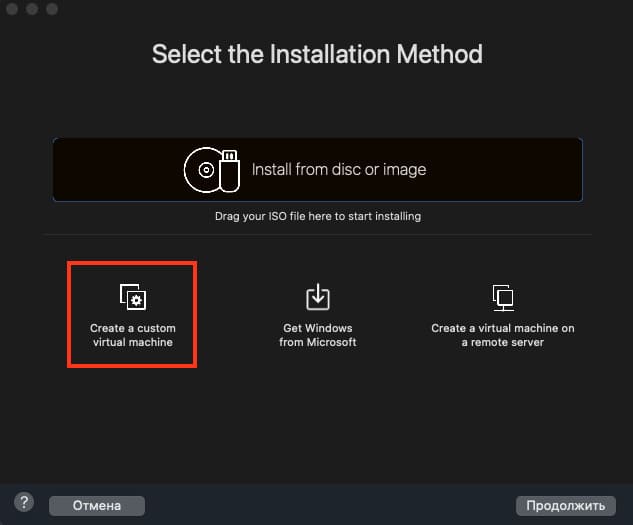
— Укажите тип ОС: Microsoft Windows и версию Windows 11 64-bit ARM.
— Нажмите «Продолжить».

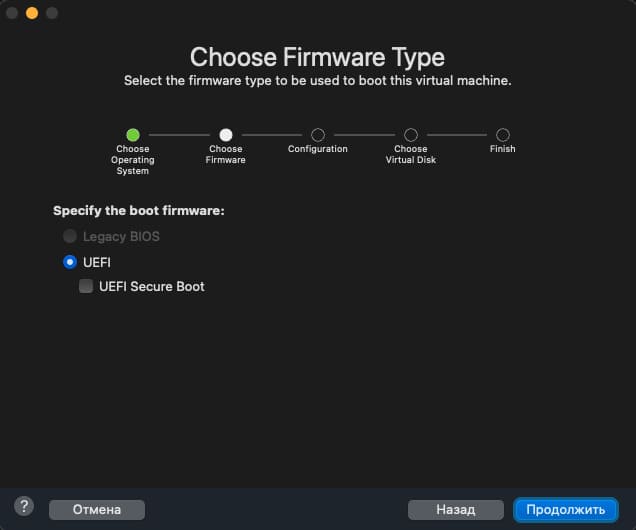
— Выберите UEFI
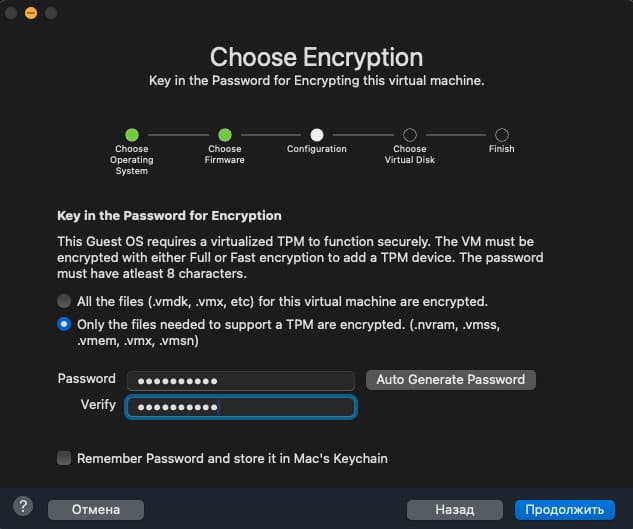
— Создайте пароль шифрования вашей будущей виртуальной Windows
— Здесь выбираем «Create a new virtual disk»
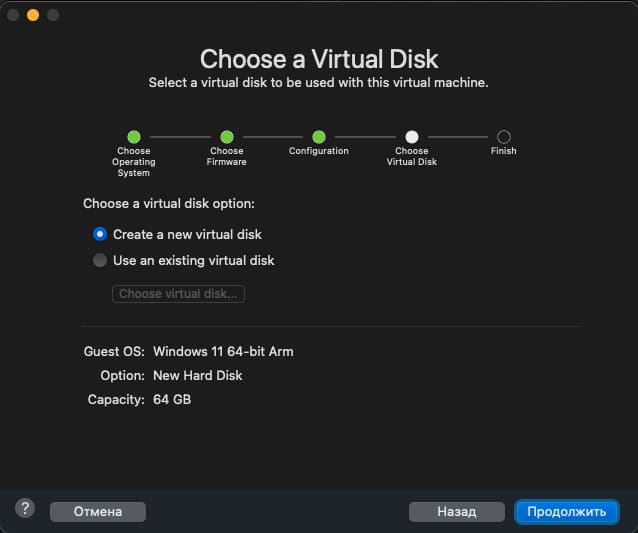
— Нажимаем Finish и переходим к настройке виртуальной машины.
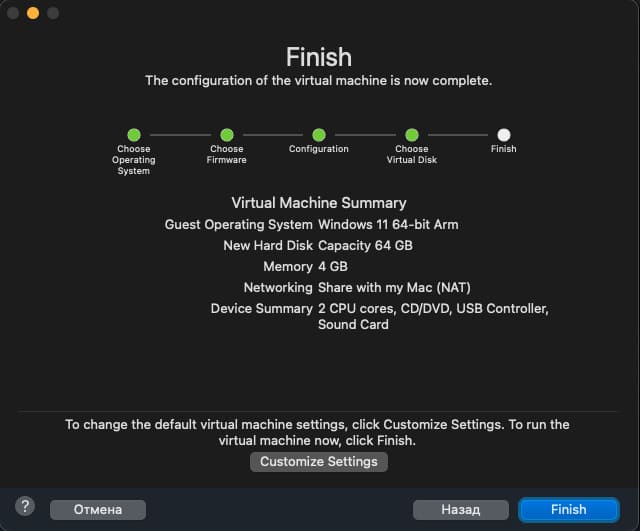
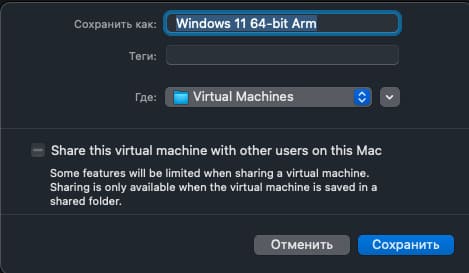
2) Настройка параметров виртуальной машины
Перейдите в настройки через иконку гаечного ключа
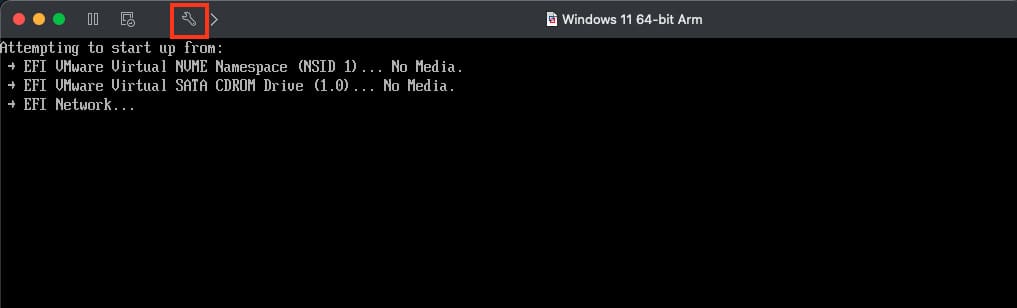
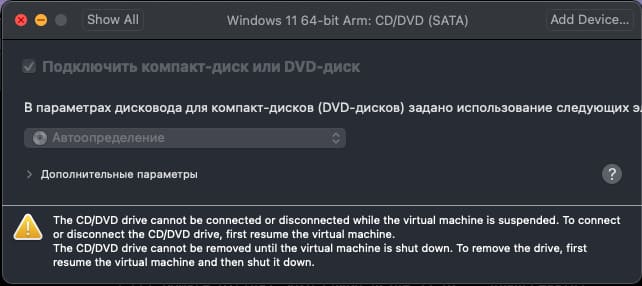
В глобальном меню выберите сначала CD/DVD (SATA)
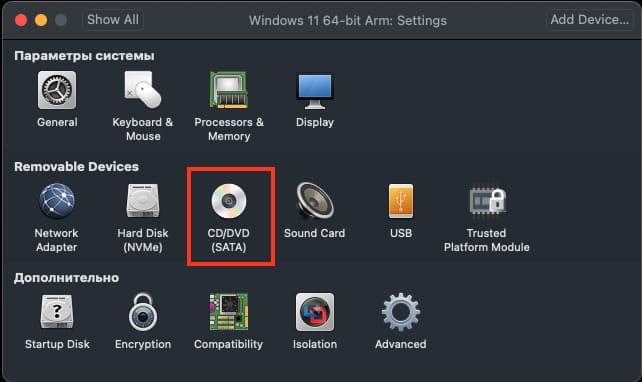
После чего добавьте образ Windows 11 ARM (ISO-файл) который вы скачали ранее.

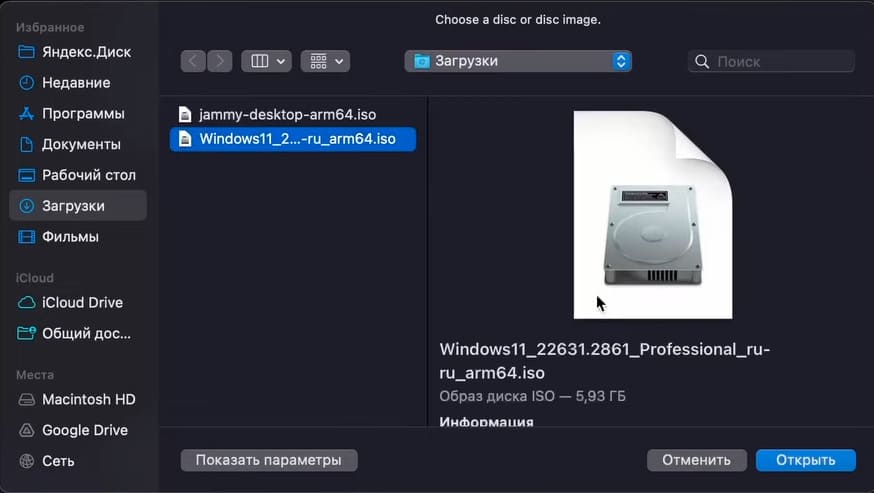
Если не получается выбрать iso файл и вкладка не работает, тогда выключите виртуальную машину через shutdown, после чего попробуйте снова.

Перейдите в настройки «Network adapter»
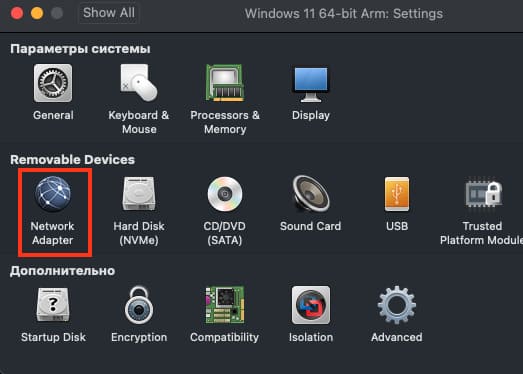
— Выберите Wi-Fi или «Ethernet» для подключения к Интернету.
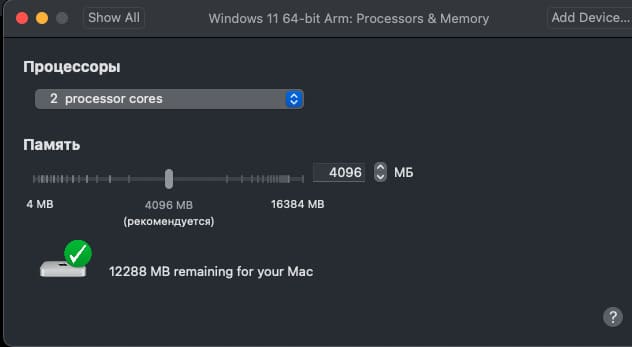
Теперь в настройки Processor & Memory
— Укажите объём оперативной памяти (рекомендуется минимум 4 ГБ).
— Установите 2 или больше процессоров.
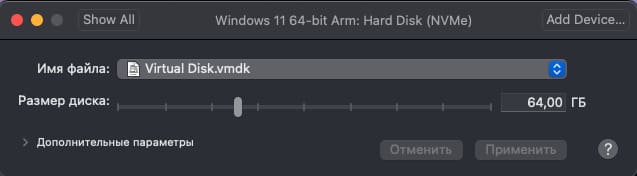
В настройках Hardware Disk (NVMe)
— Укажите размер нового виртуальный диск (минимум 64 ГБ).
Шаги установки Windows 11
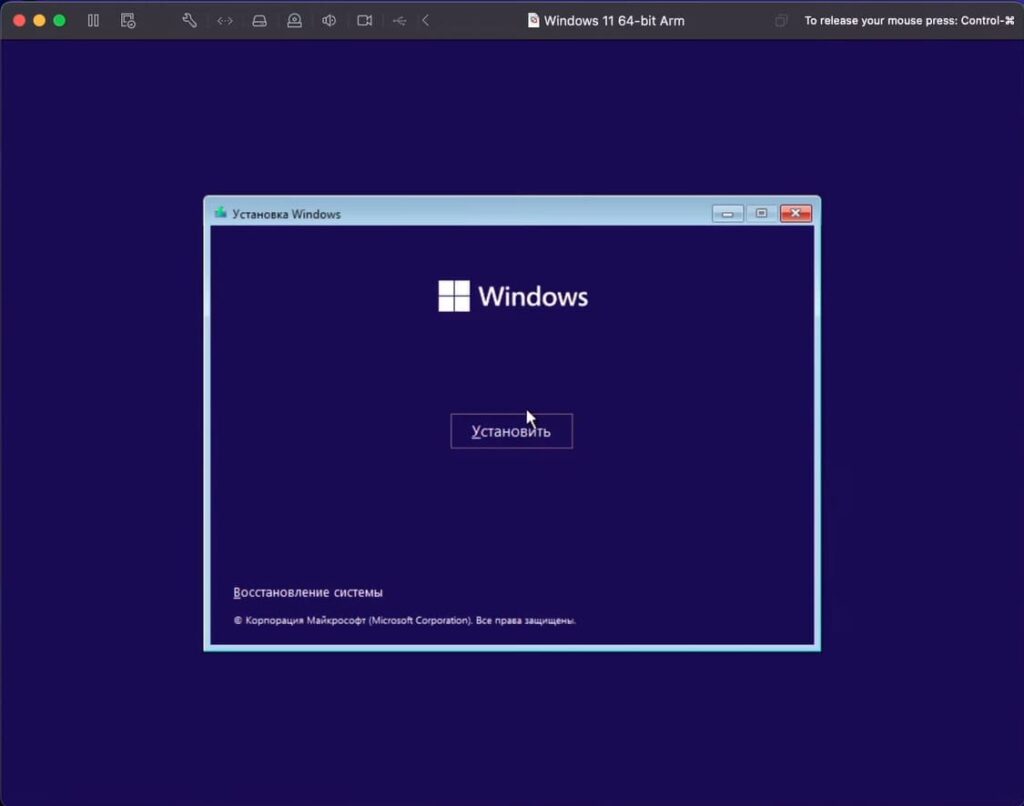
1) Запуск установки
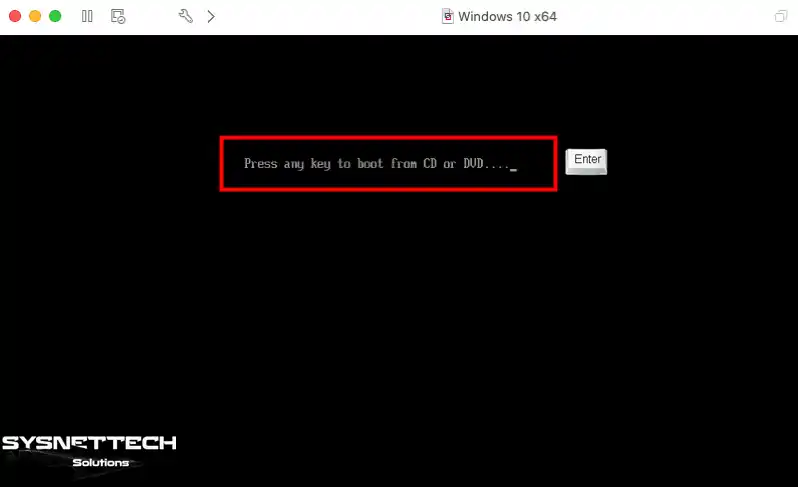
— Запустите виртуальную машину и нажмите Enter, чтобы начать загрузку с ISO-файла.

— Следуйте инструкциям установщика Windows:
— Выберите язык, раскладку клавиатуры и регион.
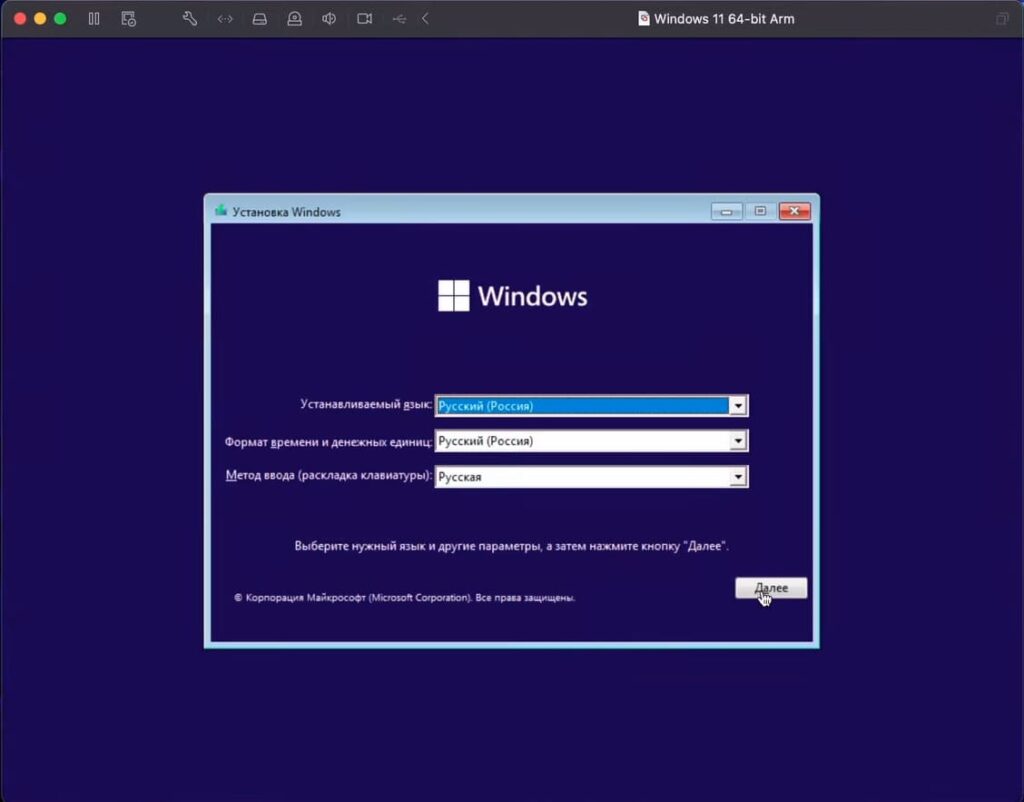
— Нажмите «Установить».
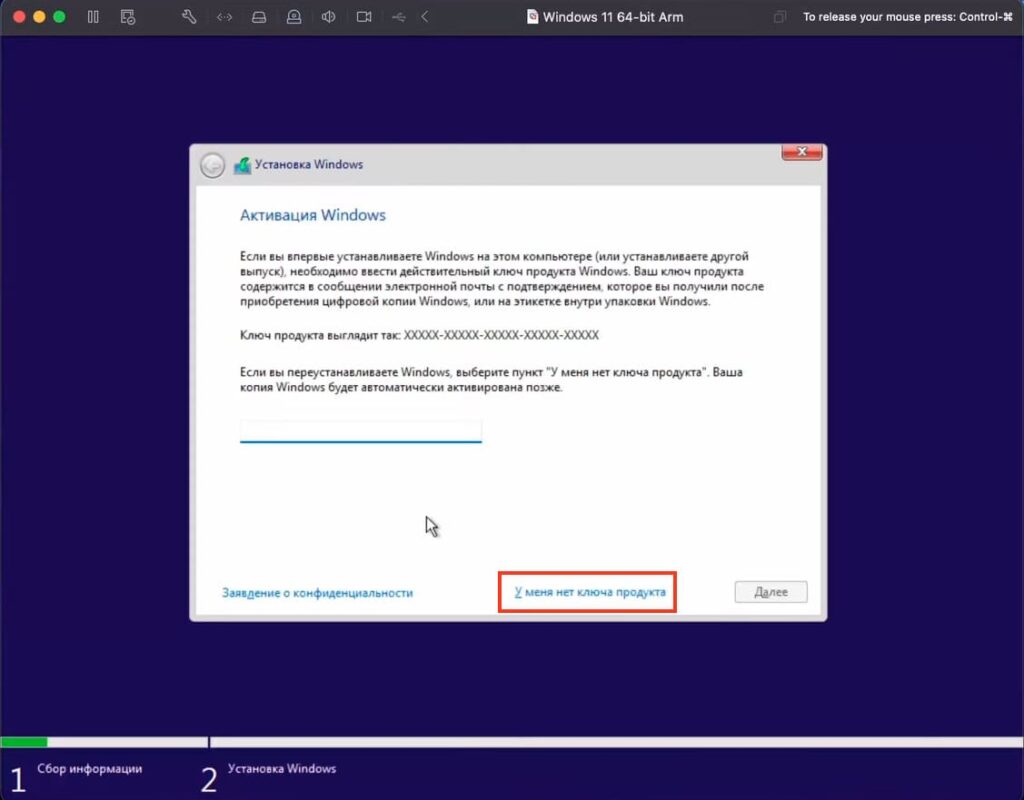
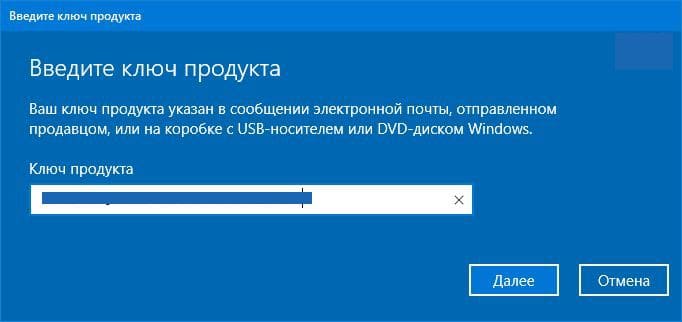
2) Ввод лицензионного ключа
— Пропустите этот шаг и введите ключ позже через настройки.
3) Настройка установки
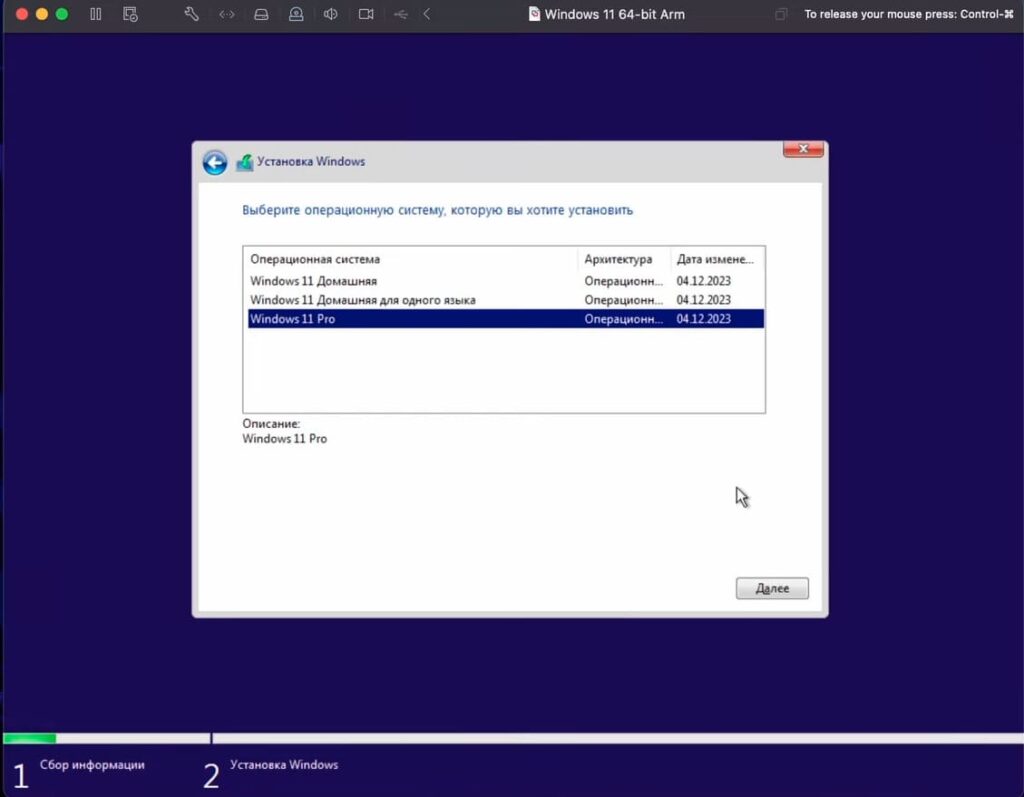
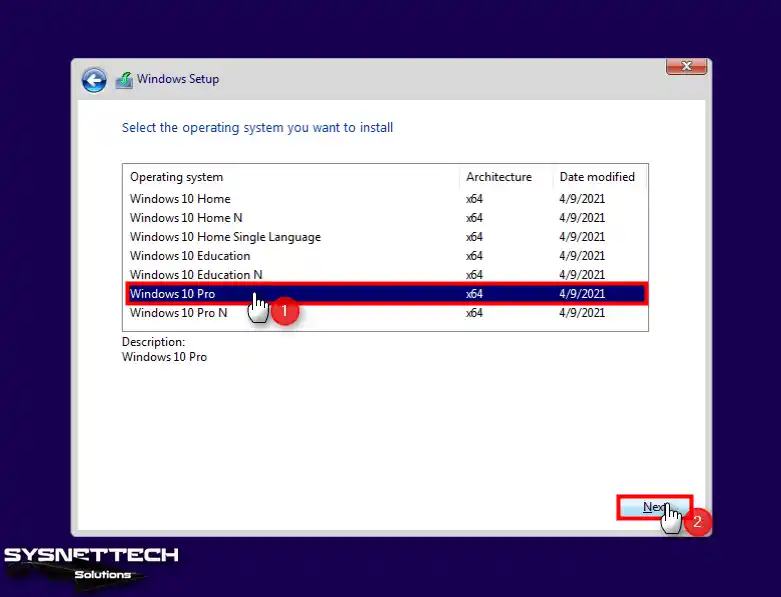
— Выберите Windows 11 Pro или Домашнюю версию
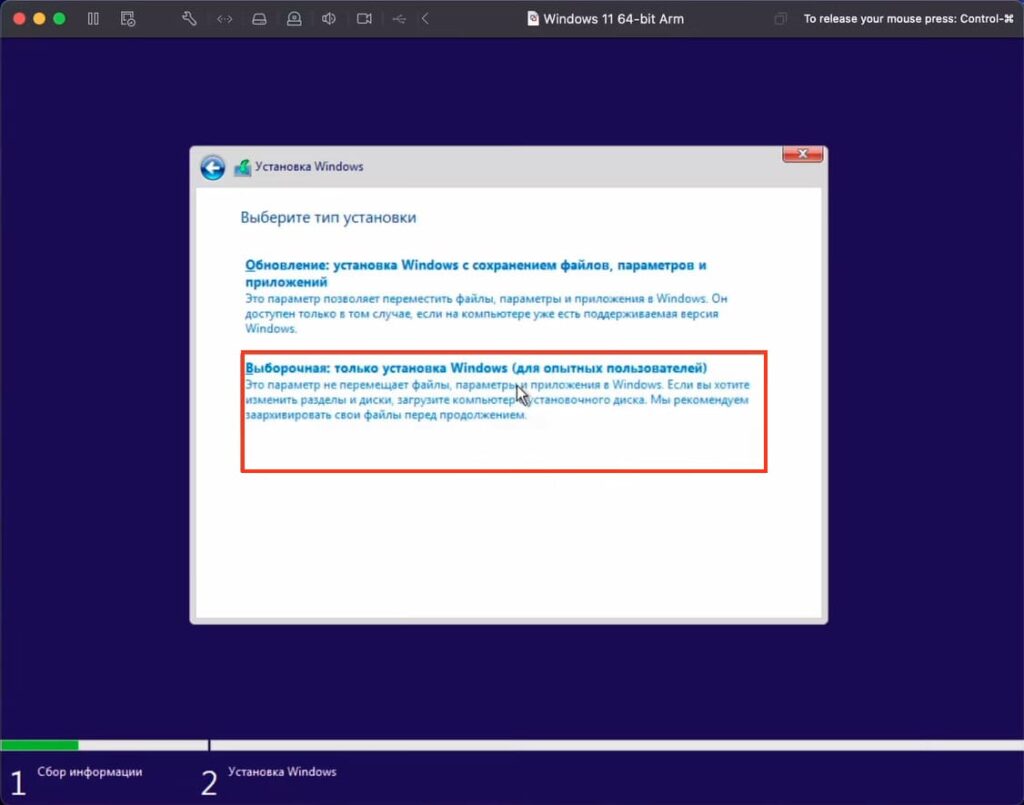
— Выберите «Выборочная установка» (рекомендуется).
— Укажите диск для установки (виртуальный диск, созданный ранее).
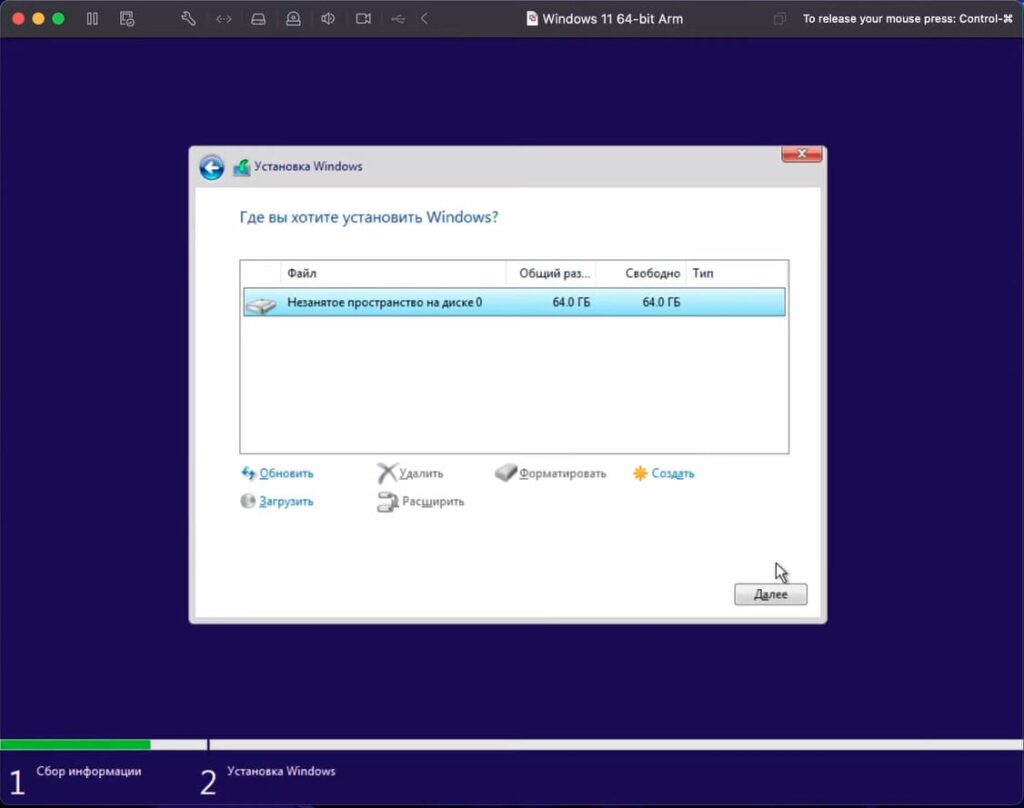
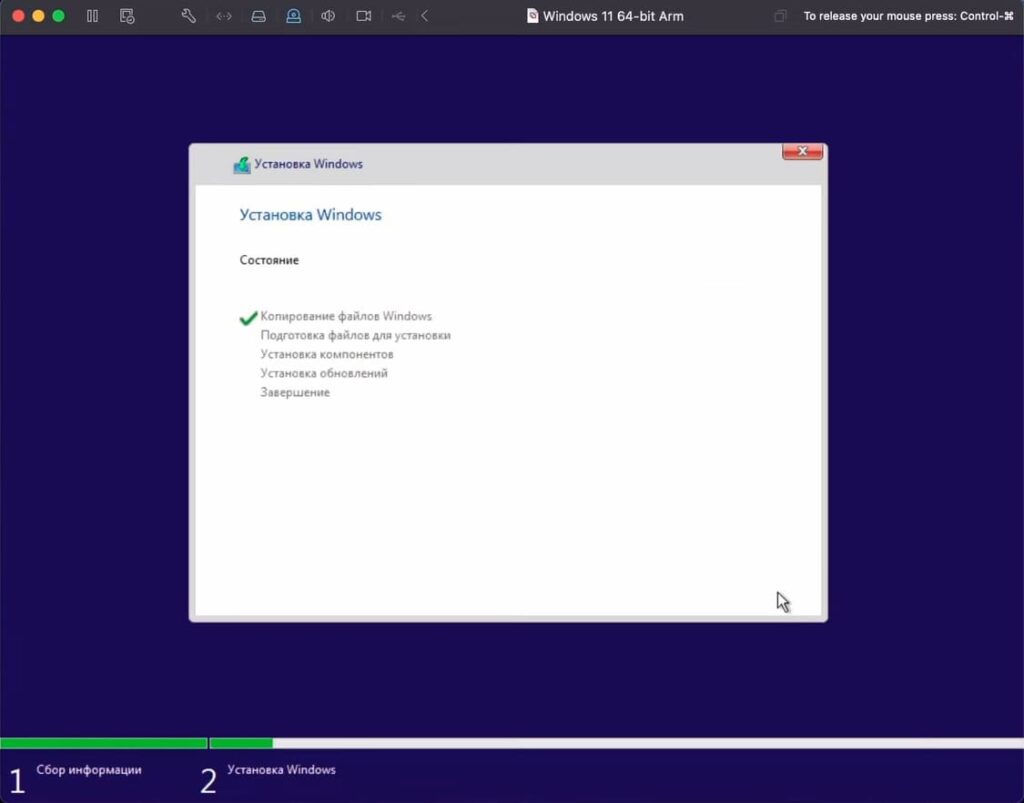
— Нажмите «Далее» и дождитесь завершения установки.
Настройка Windows 11 после установки
После завершения установки начнётся настройка системы. Следуйте этим шагам:
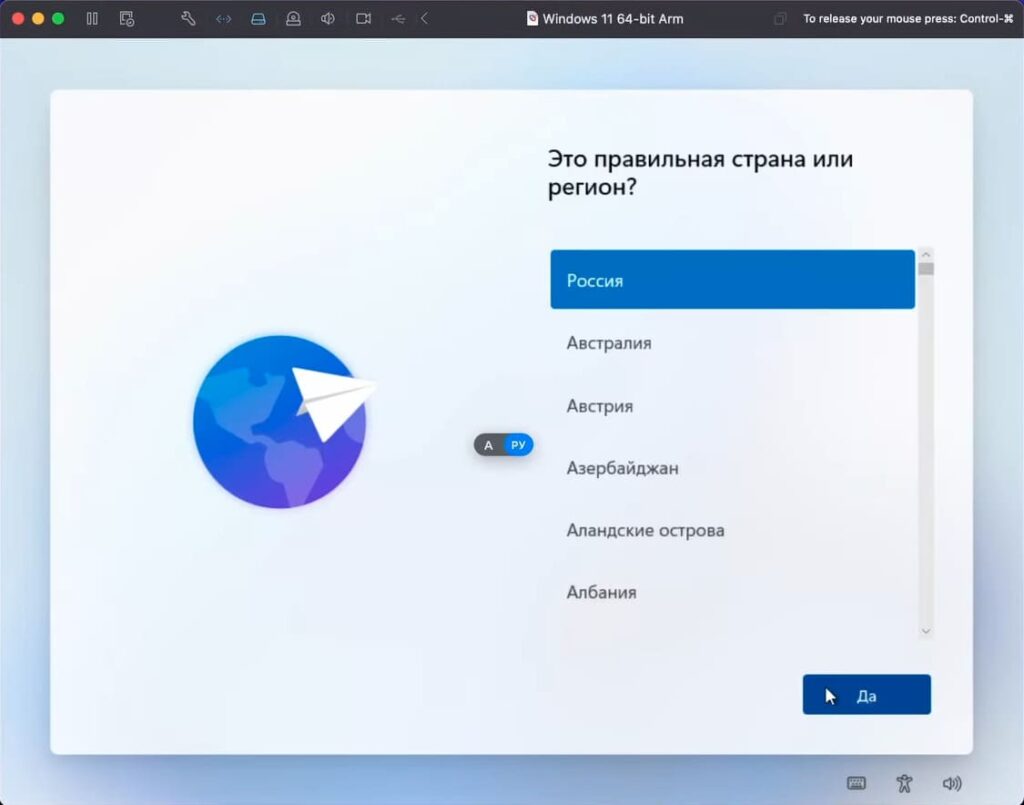
1) Выбор региона
— Выберите регион, соответствующий вашему местоположению (например, Россия или США).
— Нажмите «Далее».
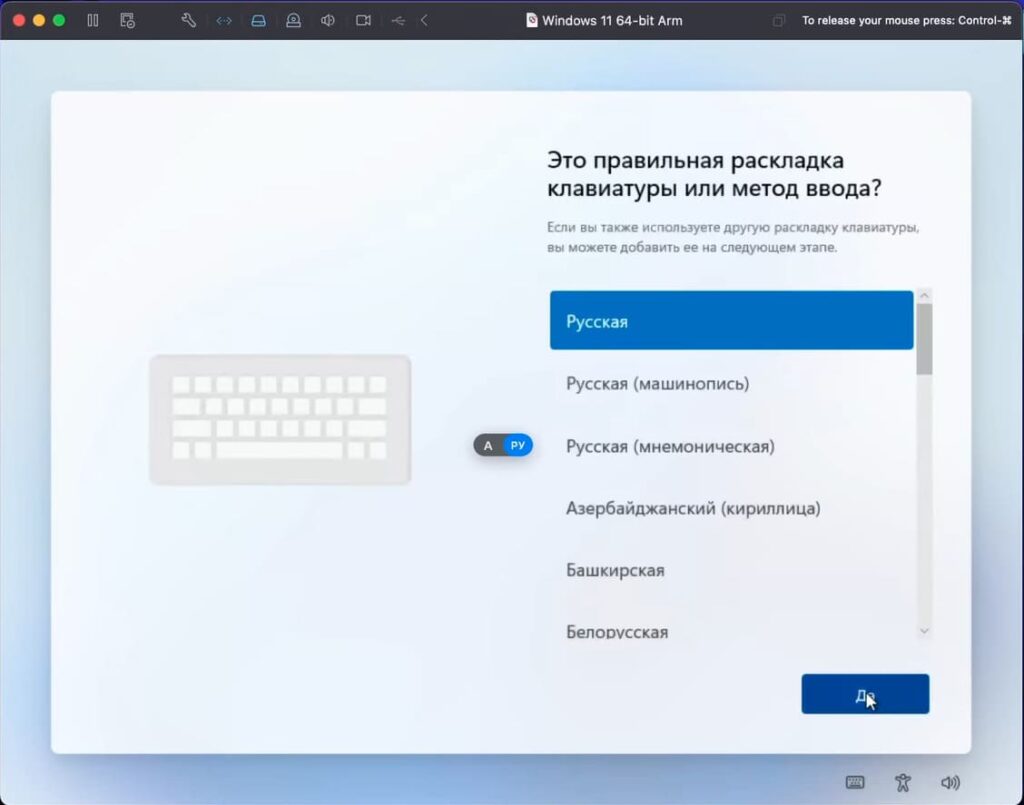
2) Настройка клавиатуры
— Укажите раскладку клавиатуры (например, русская или английская).
— При необходимости добавьте дополнительные раскладки.
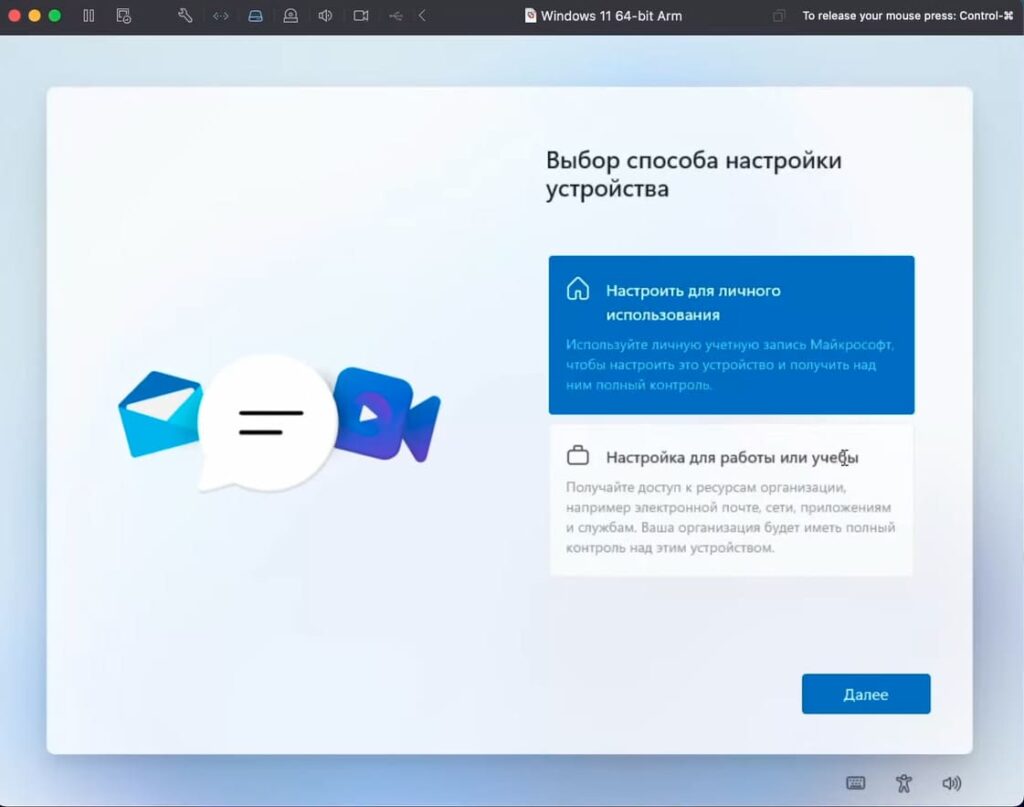
3) Назовите ваше устройство
— Придумайте уникальное имя, по которому устройство можно легко узнать при подключении с других устройств.
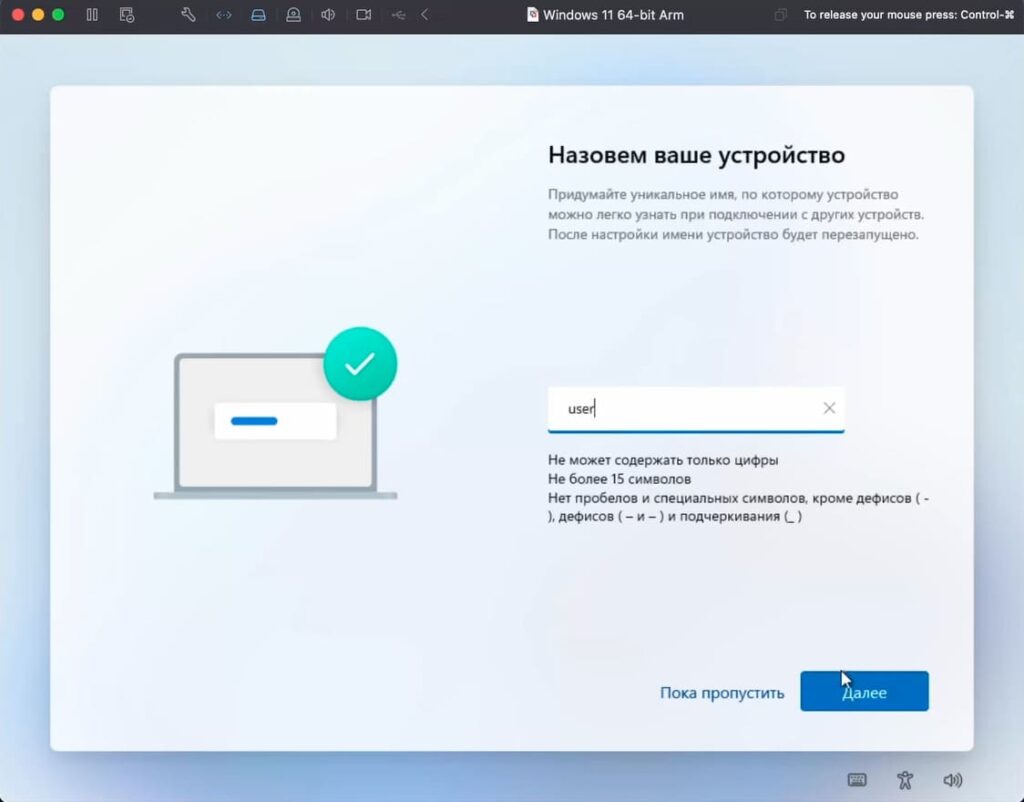
— Выбираем «Настроить для личного использования»
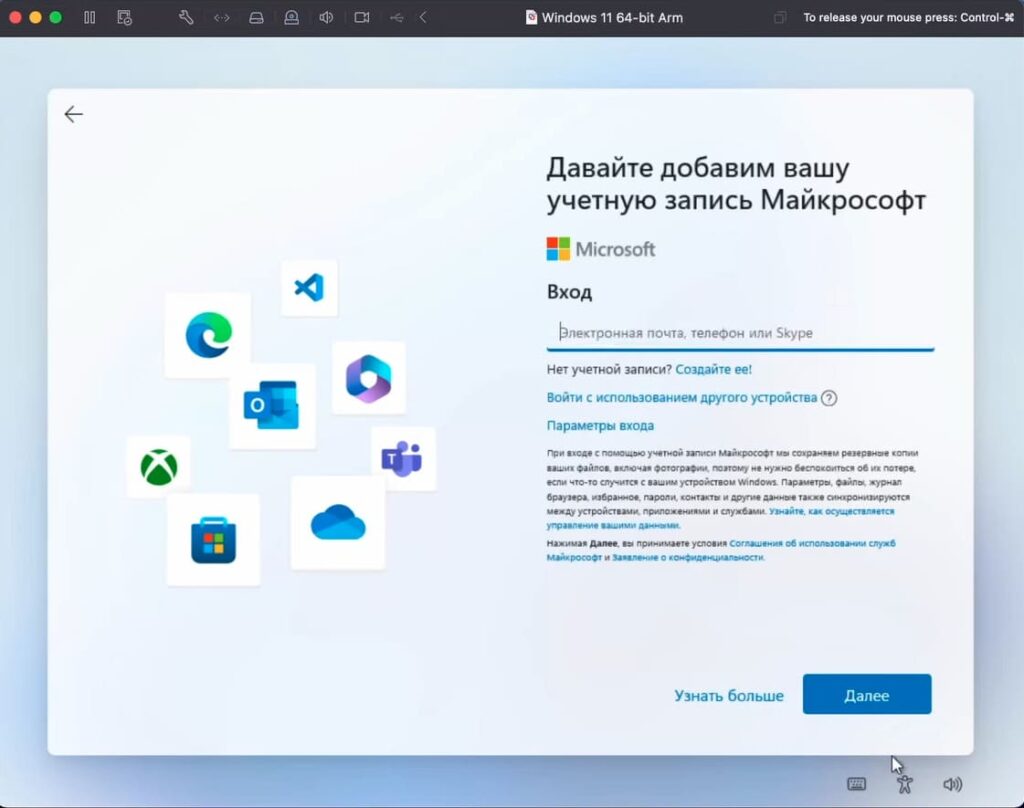
4) Вход в учётную запись Microsoft
— Введите данные своей учётной записи Microsoft или создайте новую.
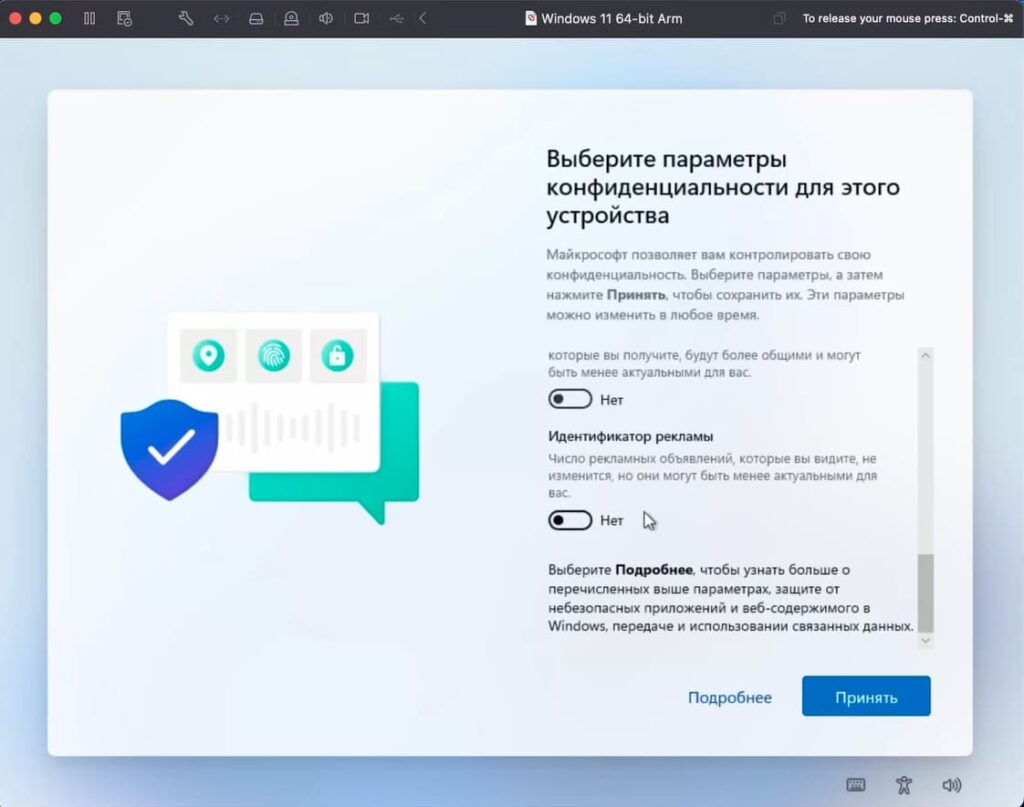
5) Настройка конфиденциальности
— Выберите параметры конфиденциальности или отключите их: отслеживание, местоположение, использование данных и другие опции.
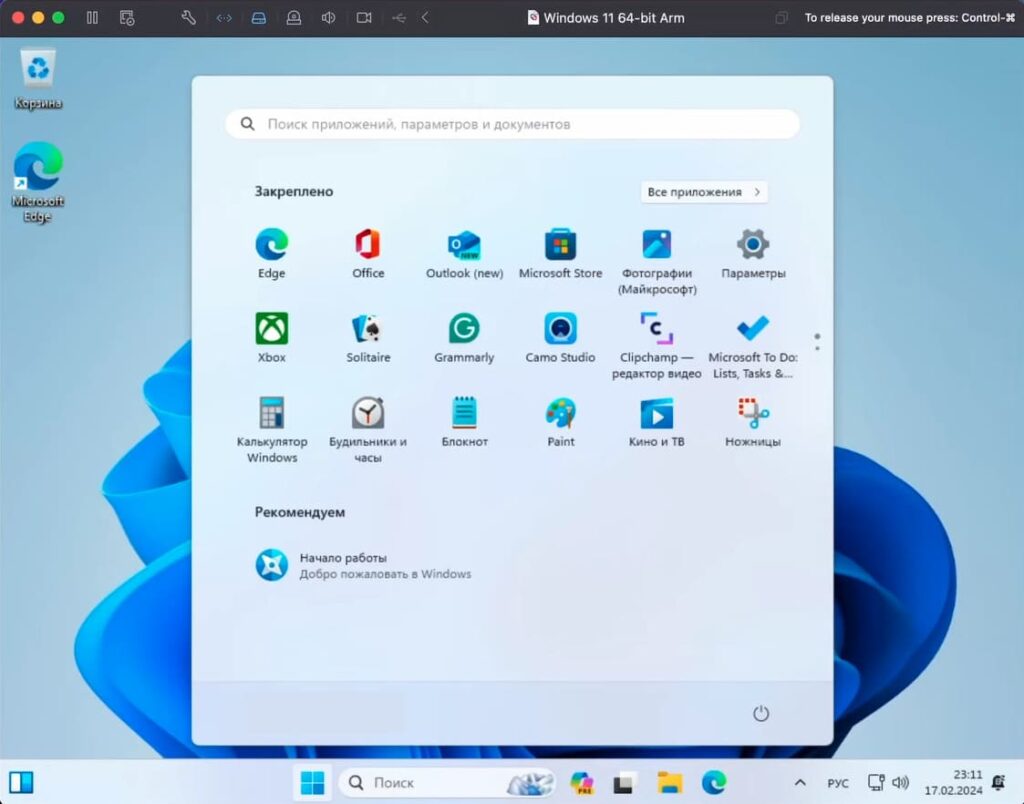
6) Завершение настройки
— Далее пропускайте пункты или жмите «Далее» и под конец настройки Windows 11 будет готова к использованию.

Дополнительные действия
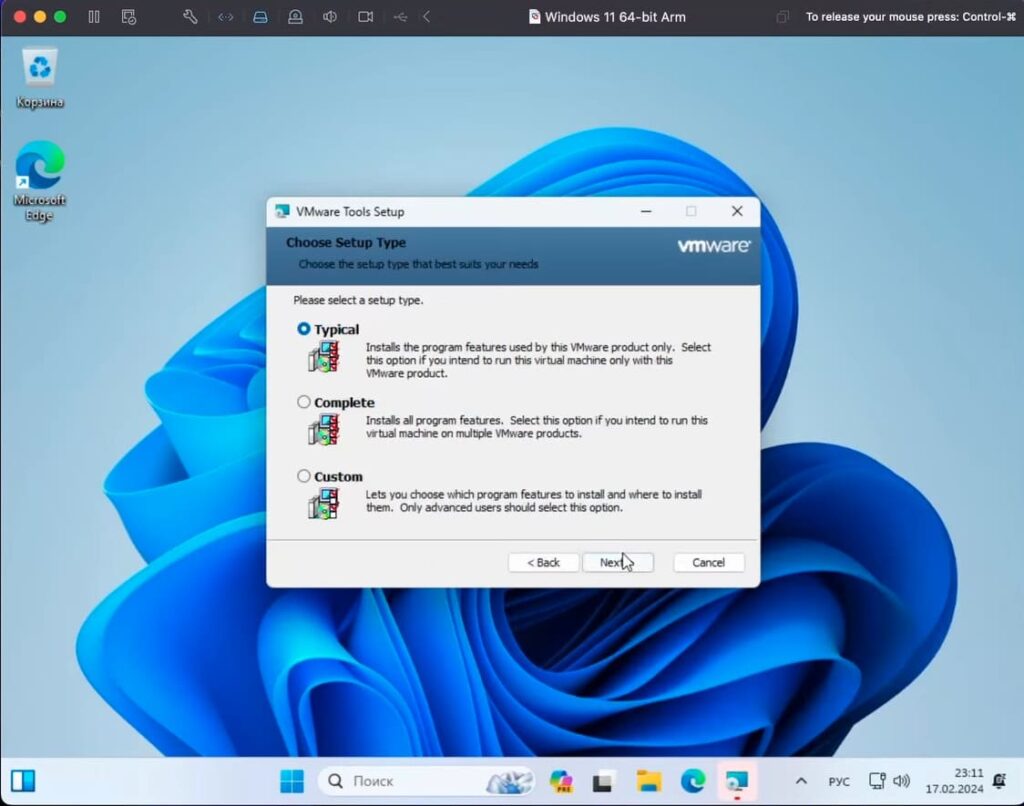
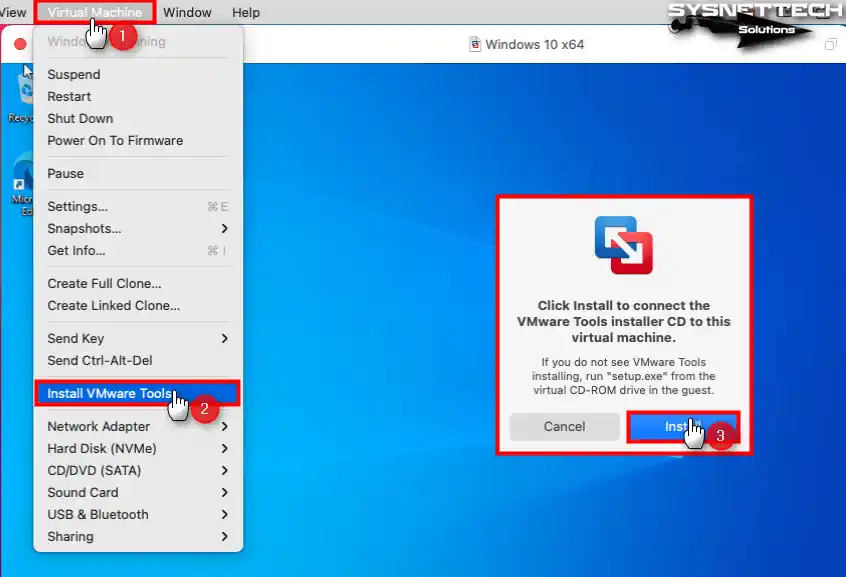
1) Установка VMware Tools
— Для корректной работы виртуальной машины (например, развёртывания окна на весь экран) установите драйвер VMware Tools через меню Fusion.
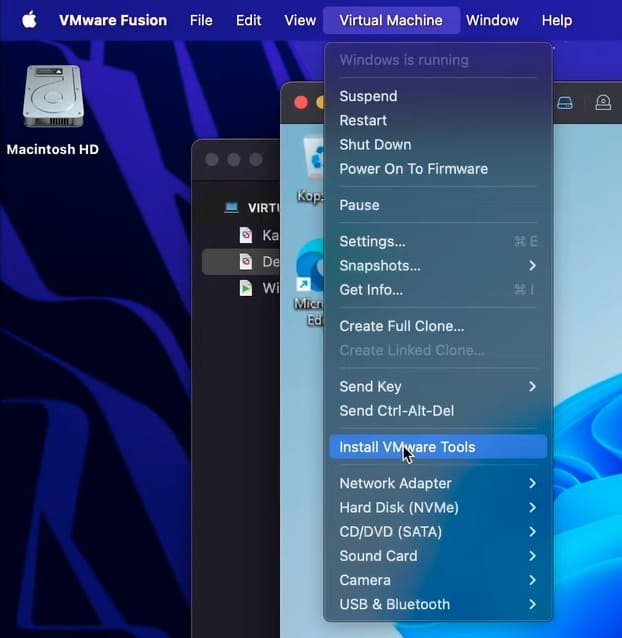
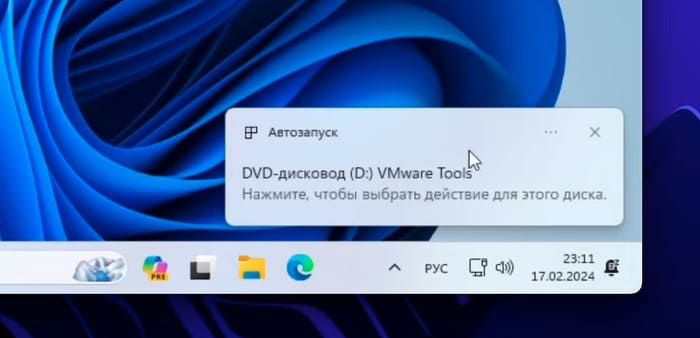
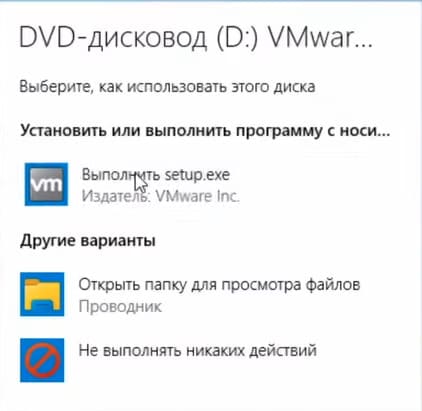
— Установщик появится внутри Windows 11, нажмите на него.
— После стандартной установки выполните перезагрузку виртуальной машины.
2) Активация Windows
— Перейдите в «Параметры» → «Система» → «Активация».
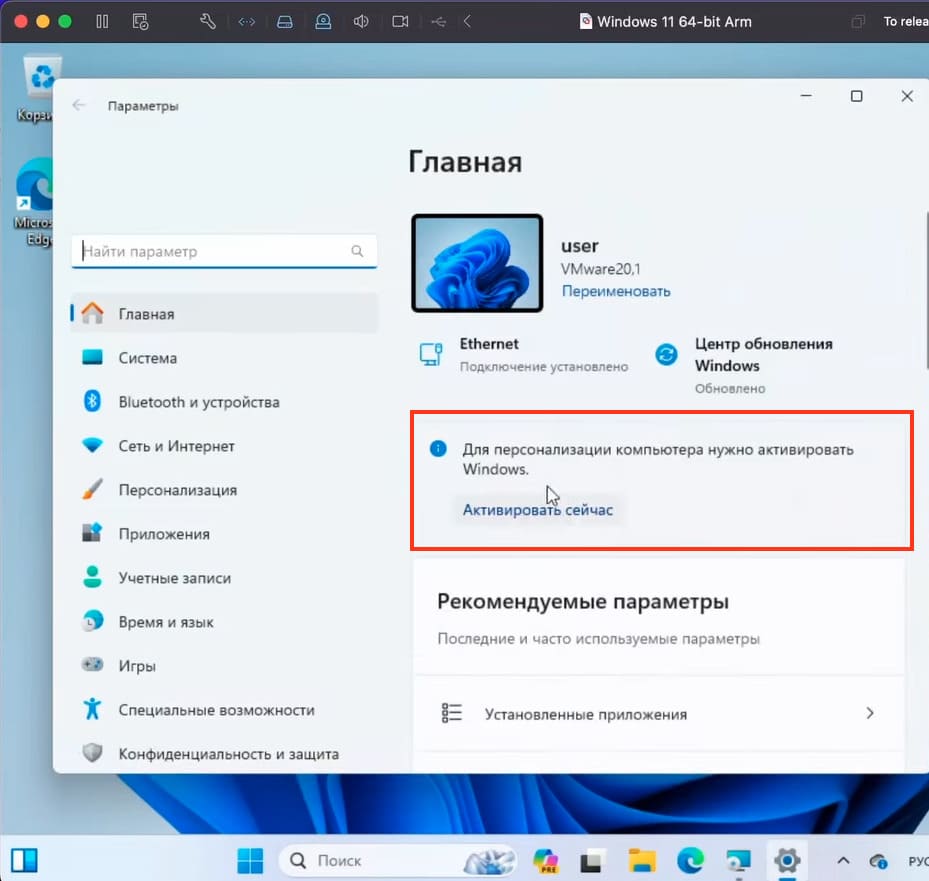
— Введите лицензионный ключ, который приобрели заранее, и выполните активацию.
Вы всегда можете приобрести ключ активации Windows 11 у нас в магазине.
Теперь у вас есть полноценная Windows 11 на вашем Mac через VMware Fusion. Это решение отлично подходит для работы, обучения или тестирования. Если у вас остались вопросы, пишите в комментариях — мы всегда готовы помочь!
Mac owners often need to run their favorite Windows applications that are not supported on macOS. However, it is possible to do so if Windows is installed on the Mac computer. There are three common methods to run Windows on a Mac computer: use Parallels Desktop, install Windows on the Boot Camp partition, or install Windows on a VirtualBox VM or VMware Fusion VM.
This blog post explains how to install Windows 10 as a guest OS on a macOS virtual machine using VMware Fusion and combine the advantages of both Windows and macOS operating systems.
Requirements
Before proceeding with installing VMware Fusion, check system requirements. In this section, I list the requirements for VMware Fusion 12, the latest version at the time of writing this blog post. If your macOS version is older than 10.5 Catalina, install an older VMware Fusion version supported by your macOS.
Requirements for VMware Fusion 12:
- A Mac computer manufactured in 2011 or later (except 2012 Mac Pro Quad Core with the Intel Xeon W3565 Processor); 2010 Mac Pro Six Core, Eight Core, and Twelve Core with a graphics card that supports Metal.
- Processor (CPU) architecture must be Intel x86-64
- 4 GB of memory, but we recommend at least 8 GB of memory to install VMware Fusion on macOS. Keep in mind that you need more RAM to run VMware guest operating systems. Windows 10 running as a guest OS requires at least 4 GB of RAM.
- 750 MB of free disk space to install VMware Fusion and additional disk space to store virtual machine files.
- Your macOS must be compatible with the VMware Fusion version you are going to install. VMware Fusion 12 can be installed on macOS 10.15 Catalina and macOS 11.0 Big Sur.
- The ISO installation image of Windows 10.
Preparing the Environment
I’m using macOS 10.15 Catalina as the host operating system and Windows 10 20H2 Professional x64 as the guest operating system in the tutorial.
What is a guest operating system? The difference between host and guest operating systems is that a host OS is installed on the hardware, and a guest OS is running on a virtual machine that uses virtualized hardware. I’m using VMware Fusion 12.1.0 as a VMware hypervisor to run a Windows 10 VM on macOS.
You can download the VMware Fusion 12 installer from the official VMware website.
You can download the installation ISO image of Windows 10 from the Microsoft website.
In my case, I have a separate disk partition to store installation files and virtual machines on Mac. The name of this disk partition is disk_d. You can create a separate partition or create custom folders in your home user folder to store installation files and virtual machines.
For convenience, I’ve renamed installation files to avoid using long names. In my tutorial, the names of the installation files are:
VMware Fusion: VMwareFusion12-1-0.dmg
Windows 10: windows_10_20h2_x64.iso
Now we are ready to start installation and configuration.
Installing VMware Fusion
Boot macOS on your Mac. Locate the VMware Fusion installation file in Finder, and double click this file to open the installer (in my case – VMwareFusion12-1-0.dmg). Wait until the installer opens.

When you see the VMware Fusion installer window, double click the corresponding icon to install VMware Fusion.

Enter the credentials of your macOS user account to grant administrative privileges to the installer, and hit OK to continue.

Read the End User License Agreement (EULA), and click Agree to continue.

Define the license options to install VMware Fusion on macOS. If you don’t have a license key, select the second option: I want to try VMware Fusion 12 Professional for 30 days.
If you have a license key for VMware Fusion or VMware Fusion Pro, select the option I have a license key for VMware Fusion 12 and enter your license key. If the key is valid, the corresponding green icon appears. You can also enter a license key after finishing the installation in the graphical VMware Fusion user interface. In my case, I’m using a license key for VMware Fusion Pro.
Click Continue to proceed.

The macOS security notification messages pop up. You have to allow all access needed for macOS VMware Fusion to work properly.
“VMware Fusion” wants access to control “System Events”. Allowing control will provide access to documents and data in “System Events”, and to perform actions with that app.
Click OK.
Unable to access Accessibility. For optimal performance of your keyboard and mouse inside your virtual machine, give VMware Fusion access to your system’s accessibility features. If you do not give this access now, you can go to the Security & Privacy System Preferences later.
Click OK.
“VMware Fusion” would like to control this computer using accessibility features. Grant access to this application in Security & Privacy preferences, located in System Preferences.
Click Open System Preferences.

Once the Security & Privacy window opens, in the Privacy tab you can see that VMware Fusion is not selected in the list of allowed apps and is inactive. You should also see a request to enable VMware Fusion notifications. Click Allow because important information may be displayed in notifications when you work with VMware Fusion. In order to provide VMware Fusion with access, click the lock to make changes in the privacy settings (this icon is located in the bottom left corner of the window).

Now the privacy settings are unlocked. Select VMware Fusion in the list of allowed apps (select the corresponding checkbox). Now you can close the Security & Privacy settings window.

VMware Fusion is now installed, and you can run the application.
Creating a VM and Installing a VM Guest OS
Open VMware Fusion in the Launchpad or click the icon in the Dock. In the main window of VMware Fusion, you can see a big area with the text: Install from disc or image. This is what you need to start creating a virtual machine and installing a guest operating system. Open the folder containing the Windows 10 installation image in Finder, then drag and drop the Windows 10 ISO image to this area of the VMware Fusion window.

Create a New Virtual Machine. A new VM installation wizard opens in VMware Fusion. The ISO installation image is already selected after the drag and drop.

System Extension Blocked. The alert message is displayed.
A program tried to load new system extension(s) signed by “VMware, Inc.”. If you want to enable these extensions, open Security & Privacy System Preferences.
Click Open Security Preferences to allow access for VMware Fusion. Otherwise, you cannot continue the configuration of a new VM.

Click the lock icon to unlock access to the settings just as you did before.
Enter your credentials to unlock Security & Privacy preferences, and click Unlock.

The following message is displayed: System software from developer “VMware, Inc.” was blocked from loading. Click the Allow button near this message to unlock VMware Fusion and allow the required access. Then you can close the Security & Privacy window.

Now you can go back to the VMware Fusion window and the new VM installation wizard. By default, VMware Fusion suggests using Easy Install to create a VM and install a guest operating system. Easy Install requires minimum user interaction during the installation process, but in this case, a user has the lowest level of control. You can enter some settings such as a user name, password, the Windows product key, select the needed language. Then the entire process of VM creation and guest operating system installation is completed automatically by VMware Fusion.
In my example, I’m not using Easy Install to fully control the VM creation and guest operating system installation process (and for a better understanding of configuration). Once the needed option is selected (we unselect the Use Easy Install checkbox), click Continue.
If you use Easy Install, then you can select one of the two provided options:
More Seamless. If you use this option, Mac user folders such as Desktop, Documents, and Downloads are shared between the host OS and guest OS with write permissions for guest Windows users. The Seamless option provides more convenience, including the ability to use the Unity mode. You should use antivirus software because if a guest OS is infected, the shared files can be corrupted on the host OS (and vice versa). Read about ransomware to learn more.
More Isolated. This option is better from the security point of view. User folders are not shared automatically, but you can drag and drop files between the host OS and guest OS without violating the isolation.
You can select one of these two options of Mac integration settings only at the step of creating a virtual machine. As I’m not using Easy Install, I explain how to configure a VM created with the More Isolated option.

Choose Firmware Type. Select Legacy BIOS or UEFI depending on your needs. Select BIOS to use MBR (Master Boot Record) or select UEFI to use GPT (GUID Partition Table) for disk partitioning. We use BIOS for our Windows 10 VM we are creating now. Hit Continue.

Finish. The configuration of the virtual machine is now complete. Click Customize settings to define the path to store VM files before you click the Finish button.

Select a folder to store your VM files. In my case, I will store VM files in /Volumes/disk_d/VM/
Note: In VMware Workstation, you can select a folder to store VM configuration files and virtual disk files at different steps of the new VM wizard with the ability to use different folders to store these files. However, in VMware Fusion, all VM files and virtual disks are automatically stored in one selected folder. The default location to store VM files in macOS is your_home_directory/Virtual Machines/
Hit Save to save VM location, and then click Finish to finish VM creation and close the wizard.

Probably you have noticed that unlike VMware Workstation and VMware ESXi, there were no virtual hardware configuration options in the new VM creation wizard. In order to configure VM settings, including virtual hardware, click Virtual Machine > Settings in VMware Fusion right after creating a new VM and closing the New VM wizard.

VM settings are displayed in a separate window. You can configure the virtual disk size (60 GB are provisioned for a Windows 10 VM by default). Let’s configure processor and memory settings for our Windows 10 VM by clicking the Processors & Memory icon.

Select 4096 MB of memory and 2 processor cores for a VM to run Windows 10 (this configuration may vary). You can expand advanced options to enable nested virtualization and other useful features for your VM. Close the window after finishing configuration.

Once you have finished configuring a virtual machine, including virtual hardware, start the VM, boot from the Windows 10 installation ISO image selected automatically with the current configuration, and install Windows 10 as a guest operating system on the VM. Click the Play button to start a virtual machine.

You can see error messages after an attempt to start a VM.
Could not open /dev/vmmon: Broken pipe. Please make sure that the kernel module ‘vmmon’ is loaded.
Transport (VMDB) error – 14: Pipe connection has been broken.

These errors are displayed due to the security configuration of macOS. Issues related to macOS security settings require manual configuration. In order to fix this issue and avoid these errors when starting a VM, go to Security & Privacy settings once again. Click the Apple button, and click System Preferences.

In the Security & Privacy window, select the Privacy tab, then select Full Disk access in the left pane of the window. Click the lock icon to unlock settings (similarly as you did multiple times before).
Once settings become active, select the checkbox near VMware Fusion to allow full disk access for this virtualization application. If VMware Fusion is running now, a notification message is displayed:
“VMware Fusion” will not have full disk access until it is quit.
You can choose to quit “VMware Fusion” now or do it on your own later.
Click Quit Now to close VMware Fusion and apply security settings when running VMware Fusion next time.

Open VMware Fusion, and start your new VM once again. Now the VM should start correctly without displaying any errors.
Once the VM is booted from the Windows 10 installation ISO image, you should see the Windows setup GUI (graphical user interface). Installation of Windows 10 as a guest operating system on VMware Fusion is similar to the installation of Windows 10 on a physical machine. We disconnect the machine from the internet until finishing the installation of Windows 10.
Select a language to install, time and currency format, and keyboard or input method. We use English (United States) in this example. Click Next at each step to continue.

Activate Windows. If you have bought the Windows 10 license, you can enter the product key now. If you don’t have a license key, click I don’t have a product key to select the trial mode and continue.
Select the Operating system you want to install. Select the needed Windows 10 edition. I select Windows 10 Pro in my case.

There is a difference between Windows 10 editions and Windows 10 N or KN editions (N – Europe, KN – Korea). Due to the European anti-competitive practices, Microsoft released special Windows 10 N editions for Europe marked with the N letter. These Windows 10 N editions don’t include Windows Media Player and related features. Windows 10 editions (without N in the name) include Windows Media Player, Voice Recorder, Music, Video, and Skype.
Windows 10 N and KN editions are provided without media technologies. You can download and install these multimedia components from the Microsoft website manually (a special Media Feature Pack is provided) after installing Windows 10 on your computer or virtual machine.
The product keys for Windows 10 Pro and Windows 10 Pro N are different (this rule is true for other Windows 10 and Windows 10 N editions).
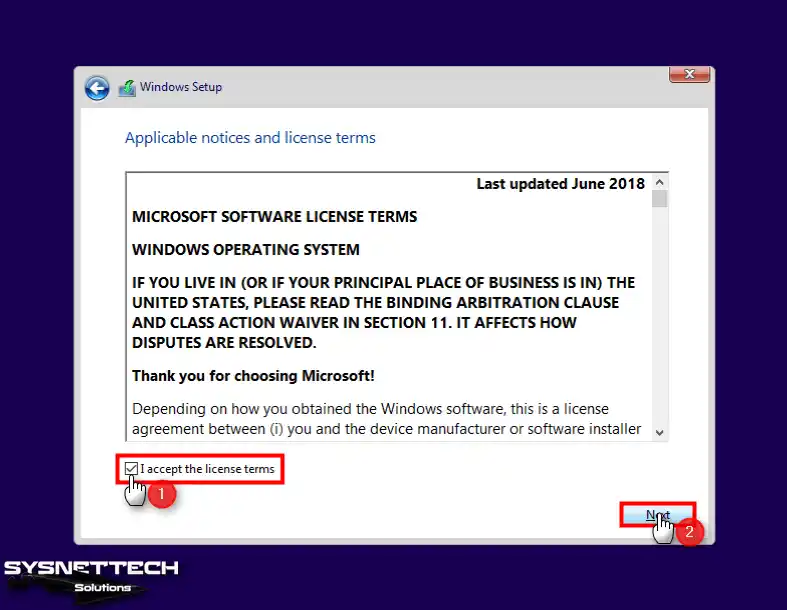
Applicable notices and license terms. Read the license agreement and select the I accept the license terms checkbox.
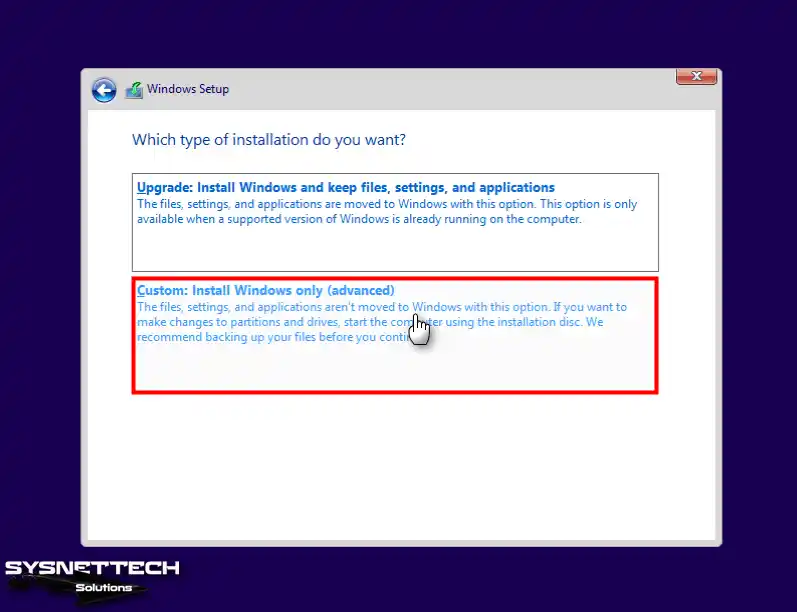
Which type of installation do you want? Select Custom: Install Windows only (advanced) to perform a clean installation.

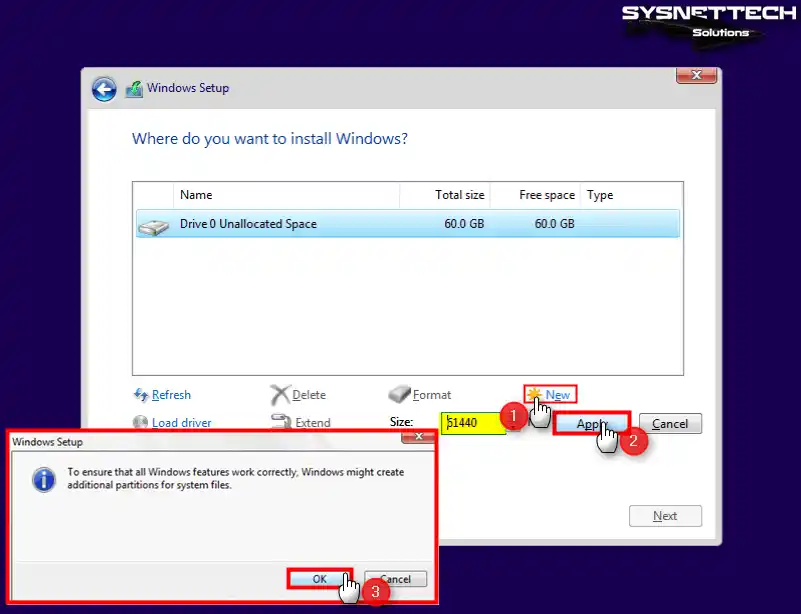
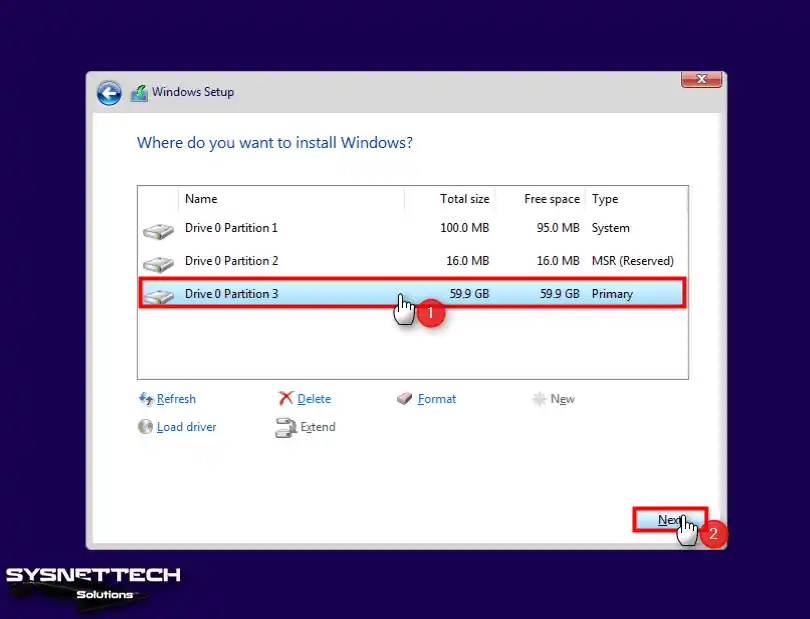
Where do you want to install Windows? Now you should create a partition table with the configuration that is suitable for you. You can see the 60 GB empty virtual hard disk (or another size virtual disk if you configured that in VM settings). Click New to create a new partition and enter the partition size, then click Apply. Windows automatically creates the first 50 MB service partition prior to your custom partition. If you don’t want to have this additional service partition on your disk, you can delete the service partition. It is especially useful when you use the MBR partition table with a limit of four partitions, but you need to use the same amount for your work without wasting one as the service partition. However, you cannot simply select the 50 MB partition and click Delete.
In order to delete the 50 MB partition, first, delete your custom partition (the size of my partition to install Windows 10 is 59.9 GB). The name of my custom partition is Drive 0 Partition 2.

Then select the service partition (Drive 0 Partition 1: System Reserved) and click Extend. We extend the first partition to the maximum possible size. Click Apply to save settings.
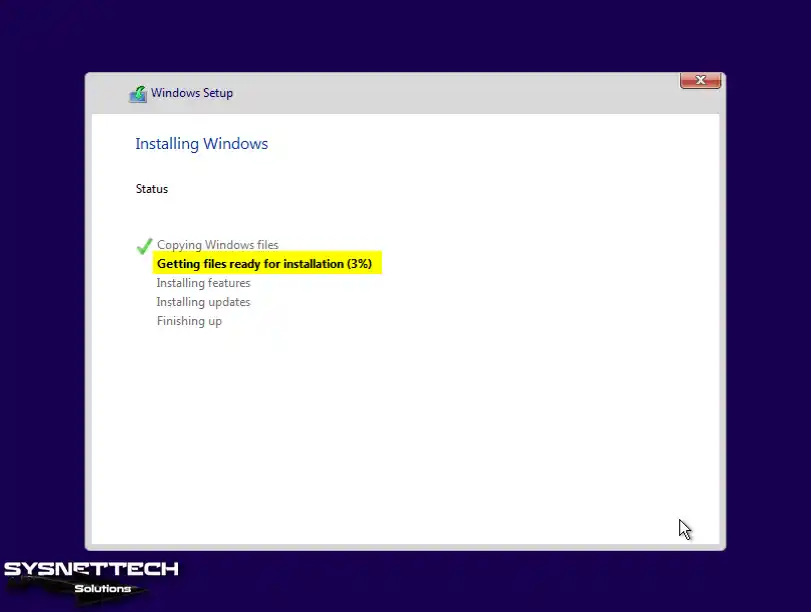
Now we have one 60 GB partition on our virtual disk to install Windows 10. Later you can create new virtual disks for a VM in VMware Fusion, create partitions, and format them in a guest operating system after finishing Windows 10 installation. Select the partition where Windows 10 must be installed, and hit Next. Wait until the installer copies all the needed files and installs Windows.

Let’s start with region. Select your location. I choose the United States.

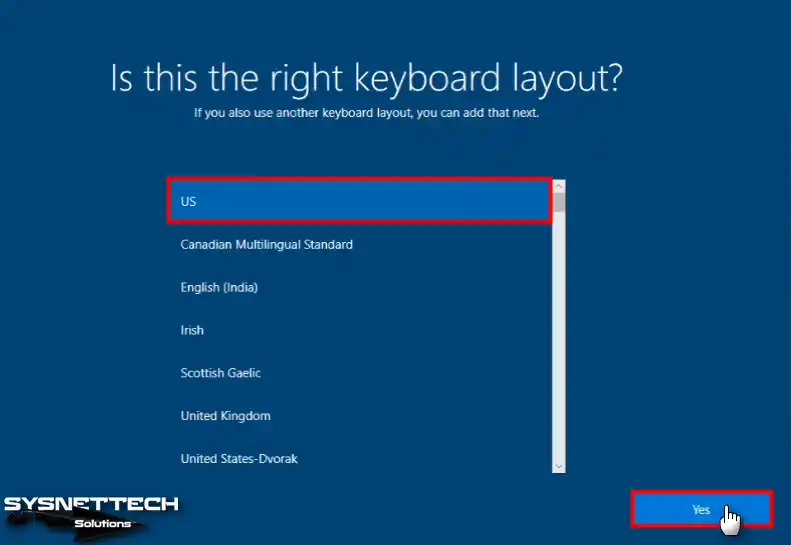
Is this the right keyboard layout? Select the needed keyboard layout. I use the US keyboard layout for my Windows 10 installation.
Let’s connect you to a network. I disable the internet connection until I finish Windows 10 installation and click I don’t have internet. We can configure the internet connection and download needed updates later after completing the installation.

There’s more to discover when you connect to the internet. Windows 10 persistently asks you to enable an internet connection. However, we are not going to turn on the internet until finishing installing the VMware guest operating system. Click Continue with limited setup.
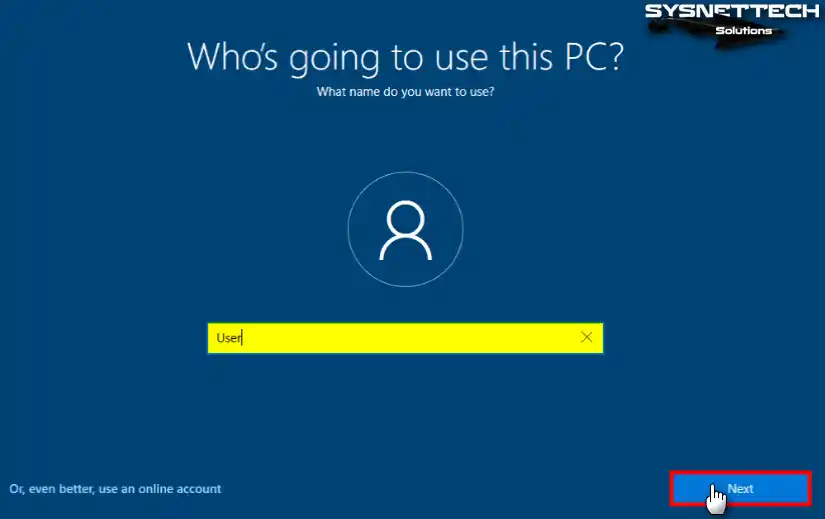
Who’s going to use this PC? Enter a name for your local user account on the Windows machine, for example, user1. We disconnected the internet and are not using the Microsoft account.

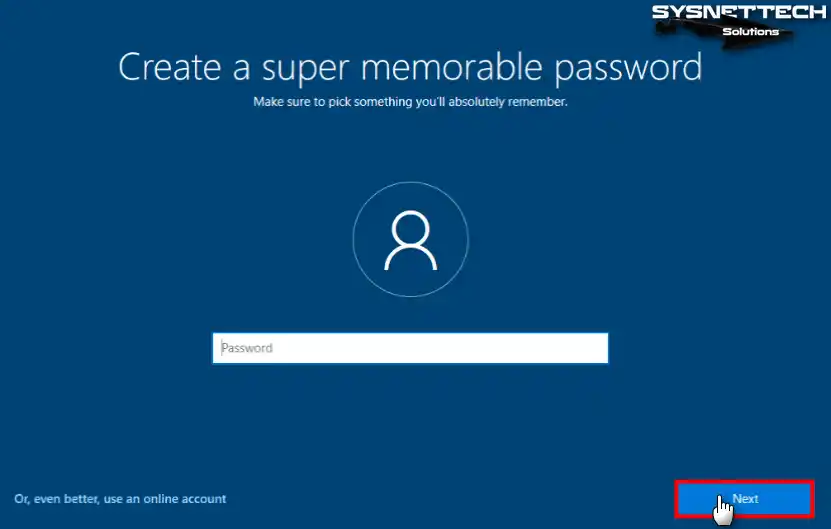
Create a super memorable password. Enter a strong password and remember the password. It is recommended that you use a password that contains at least 8 characters, including uppercase, lowercase letters, digits, and special characters.
Confirm your password. Enter your password once again. Then Windows 10 asks you to create three security questions for the user account.

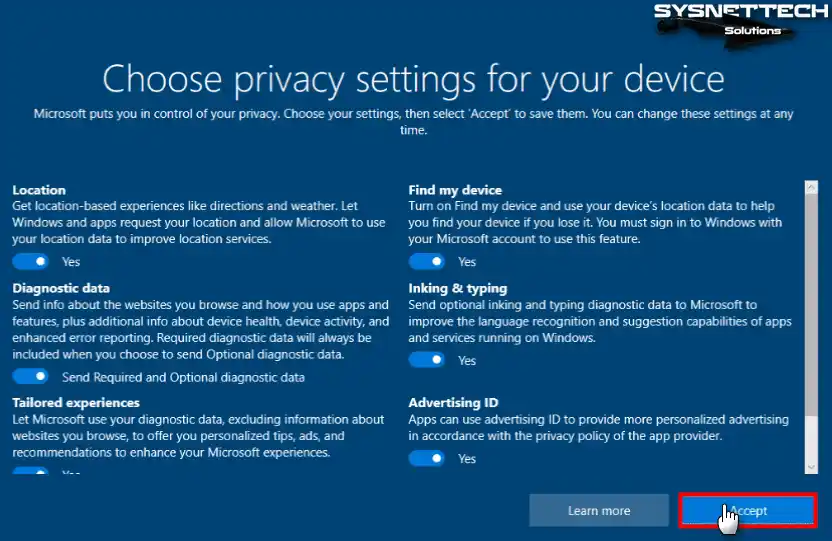
Choose privacy settings for your device. Deselect all settings that collect your data and send the data to Microsoft.
Let Cortana help you get things done. Select Not now to disable Cortana.

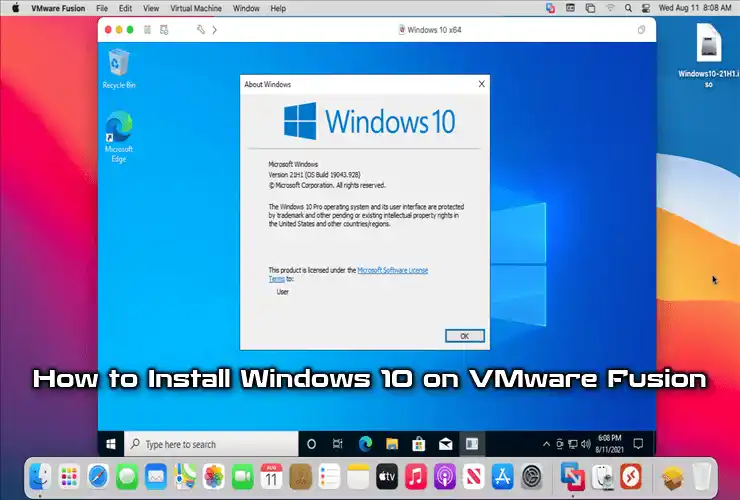
Windows 10 is now installed as the VMware guest operating system. You can see Windows desktop and other elements of the graphical user interface of Windows 10 in the window of VMware Fusion running on macOS. Now you have to install VMware Tools for higher performance and better guest OS user experience.
Installing VMware Tools
VMware Tools is a set of drivers and tools developed to improve VM performance and provide better user experience. Read more about VMware Tools in this blog post.
While the VM is powered on and Windows 10 is running as a guest OS in VMware Fusion, click Virtual Machine > Install VMware Tools.
The following message is displayed: Click Install to connect the VMware Tools installer CD to this virtual machine.
Click Install.

A virtual ISO CD image is mounted in a guest OS. Open the autorun or run setup64.exe on a virtual CD to launch the VMware Tools installer.

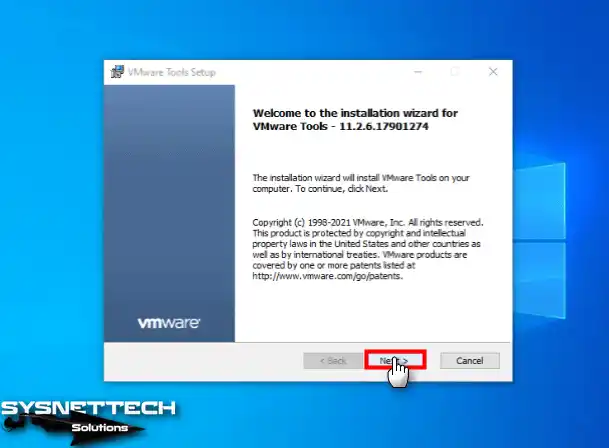
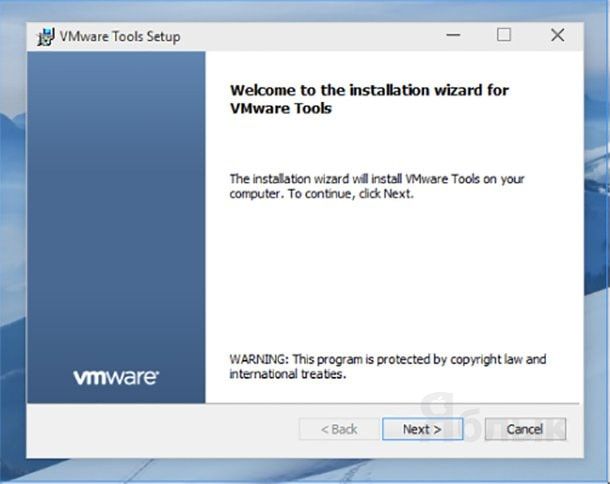
The installation wizard for VMware Tools opens. The welcome screen is displayed first. Hit Next at each step of the wizard to continue.
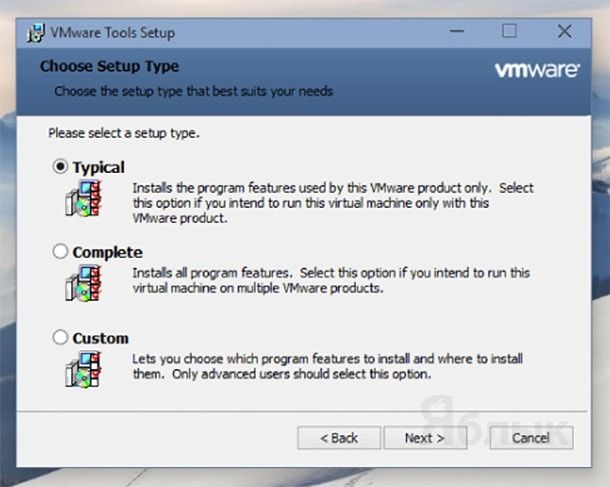
Choose Setup Type. Select Typical (the default option) that is suitable for most cases. You can perform the complete installation to install all program features of VMware Tools.

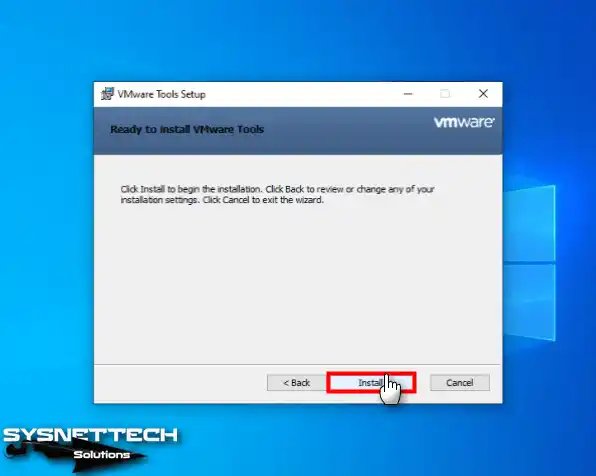
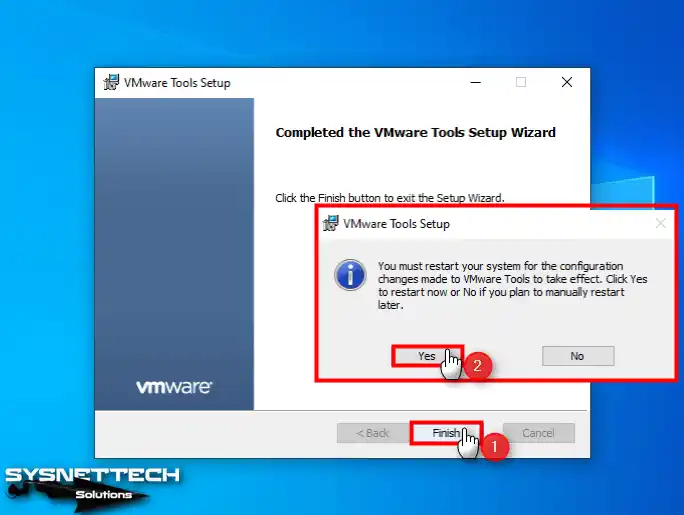
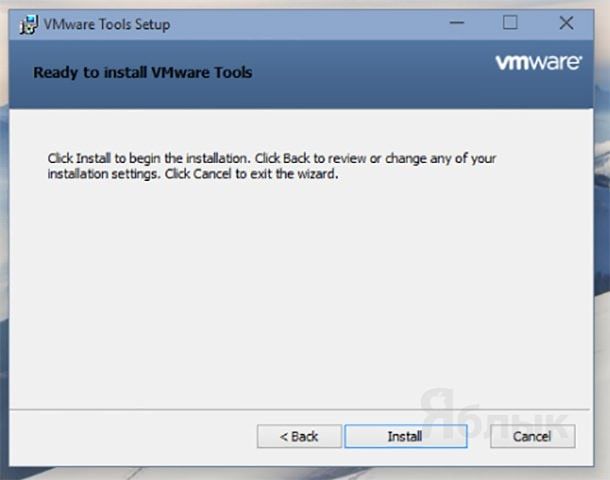
Ready to install VMware Tools. Click Install to start the process of VMware Tools installation.
Completed the VMware Tools Setup Wizard. You must restart your system for the VMware Tools configuration changes made to take effect. Click Finish, then click Yes to restart your Windows 10 guest OS now.

Configuring Shared Folders
Let’s configure Shared Folders to better integrate a host OS and guest OS in case we use the More Seamless mode of Easy Install. Shared Folders allow you to copy files from a host OS to a guest OS and vice versa more conveniently. In addition, you can use drag and drop without the need to share folders and configure permissions manually in the operating system.
In VMware Fusion, go to Virtual Machine > Settings, then click Sharing to open the configuration of Shared Folders.

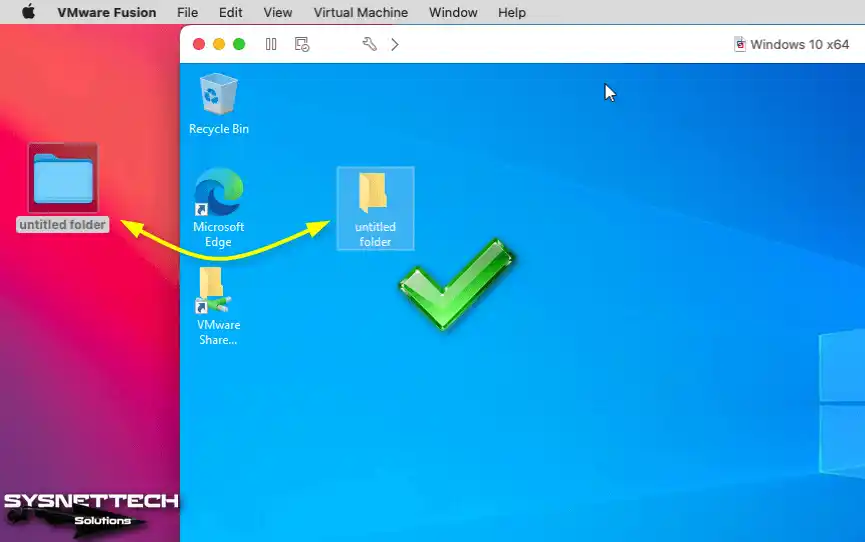
Select the Enable Shared Folders checkbox. Click + and select a folder that is accessible from your Mac and that you want to share with your Windows guest. In the bottom of the window, go to a Mirrored Folders section. Here select the checkboxes near macOS user folders that you want to share and provide write access in your guest Windows system.

After configuring Shared Folders, you can see a shortcut to the VMware Shared Folders directory created on the Windows desktop of the guest operating system. The folders stored on the Mac desktop are now displayed on the Windows desktop of the guest OS.

You can expand the guest OS window to the Full Screen mode (View > Full Screen) or enter the Unity mode (View > Unity) to see Windows 10 application windows in the macOS GUI as if you were using one common desktop environment. Suspend or shut down a VM when you want to close the VM and VMware Fusion. VMware Fusion is a powerful virtualization application. It also supports running Windows 10 installed on a Boot Camp partition as a virtual machine when you work in macOS as a host OS. VMware Fusion supports nested virtualization allowing you to run a VM inside a VM.
Another advantage of VMs in VMware Fusion is the ability to copy VM files and run VMs on other Mac computers with VMware Fusion; Windows and Linux computers – with VMware Workstation or Player installed. With VM snapshots, you can test applications and roll back changes to one of the previous snapshots. You can use VMware Fusion to connect to ESXi hosts and vCenter Servers by clicking File > Connect to Server. VMware Fusion supports many guest operating systems, including different versions of Windows, Linux, and FreeBSD.
If you use Windows or Linux as a host OS, you can use VirtualBox or VMware Workstation to run macOS as a VM on your computer. If you run virtual machines on VMware ESXi, don’t forget to back them up. To ensure comprehensive protection for your VMware vSphere VMs, download the Free Edition of NAKIVO Backup & Replication that includes licenses for 10 workloads and 5 Microsoft 365 accounts and is absolutely FREE for one year!
Conclusion
This blog post covers the installation of Windows 10 as a guest operating system running in VMware Fusion on Mac OS X. For this, you have to check system requirements, download installation images of VMware Fusion and Windows 10, install VMware Fusion, create a virtual machine, and install Windows 10 as a guest OS in VMware Fusion. If you want to use the default VM configuration for a Windows 10 VM, you can use Easy Install, which requires minimum user interaction, and automatically installs a guest OS. If you want full control over the installation process and to be able to configure everything manually, don’t use Easy Install. VMware Fusion is a powerful virtualization application that provides you with a lot of configurable features.
Running Microsoft Windows 10 in a virtual machine in a macOS environment provides a versatile computing experience for Mac users. In particular, VMware Fusion 12 Pro allows us to create virtual machines on Mac computers. It also provides a seamless way to operate various systems.
In this article, I will explain how to install Windows 10 on Mac using VMware Fusion 12 Pro. First, I will explain each step, from creating a virtual machine to installing this system.
How to Set Up Windows 10 on Mac / macOS using Fusion 12 Pro
VMware Fusion lets you create virtual machines on Mac computers and install and run Windows, Linux, or macOS on them.
There are Pro and Player versions of the Fusion program developed by VMware for Apple Mac OS X systems. The Player version is free and suitable for personal use. The Pro version enables the use of more advanced features in VMs and is paid.
You can use the Boot Camp program when you want to install a Windows 10 system in addition to the macOS operating system of your Apple Mac computer with an Intel-based processor. Still, you will have to restart your computer when you want to switch to Windows 10.
You can choose VMware Fusion software instead of Boot Camp on your host computer. Thus, you will be able to boot up your Windows 10 operating system quickly without having to restart your system every time.
After installing Fusion Pro, you can easily install an operating system in the VM using the ISO installation media of the operating system or the CD/DVD optical drive of your physical computer.
How to Create a Virtual Machine (Guest Machine) for Windows 10
Creating a virtual machine with Fusion is quite simple and easy compared to other software. Suppose you have the operating system’s ISO file. In that case, you can quickly prepare a guest machine by dragging and dropping it into the program.
Step 1
After opening the Fusion software, you can see different installation methods on its main screen. To create a more detailed and neat virtual computer, select Create a custom virtual machine and click the Continue button.

Step 2
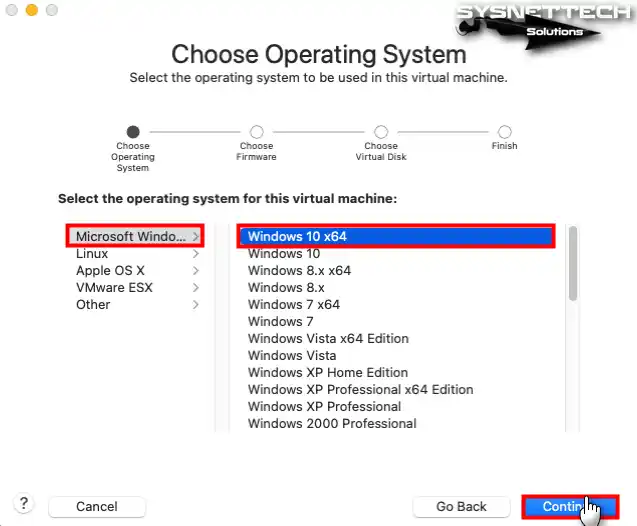
You need to select the operating system that you will install on the virtual machine on this screen. Since you will install Windows 10 on the guest machine, choose Microsoft Windows / Windows 10 x64 and click Continue again.
Step 3
When you decide to install older versions of Windows, you should choose Legacy BIOS for systems that do not support UEFI. If you are going to install Microsoft’s current operating system, I recommended to select UEFI / UEFI Secure Boot for VM security.

Step 4
Suppose you have a Windows 10 virtual disk that you have previously installed. In that case, you can add the virtual disk to the guest machine using the add an existing virtual disk option. However, if you want to install Windows 10 from scratch, it would be more logical to create a new virtual disk.

Step 5
In the last step of the virtual machine creation wizard, click the Customize Settings button and configure the installation location of the VM in the window that opens.

Step 6
When you open the settings of the Windows 10 guest machine, configure the amount of virtual processor and memory size in accordance with the processor and RAM characteristics of your host computer. In addition, you can use nested virtualization by enabling the use of hypervisor applications within the VM and increasing virtual system performance by converting virtual memory addresses to physical addresses with the IOMMU feature.
- Enable hypervisor applications in this virtual machine
- Enable IOMMU in this virtual machine

Step 7
To let your guest machine get an address automatically from the DHCP server on your Mac’s network, adjust the network settings accordingly. In this case, select Ethernet if you want it to appear as a separate device on your local network.

Step 8
You must add the Windows 10 ISO file to the virtual machine you prepared. Now, in the CD/DVD settings, select the Choose a disk or disk image option from the pop-up window.
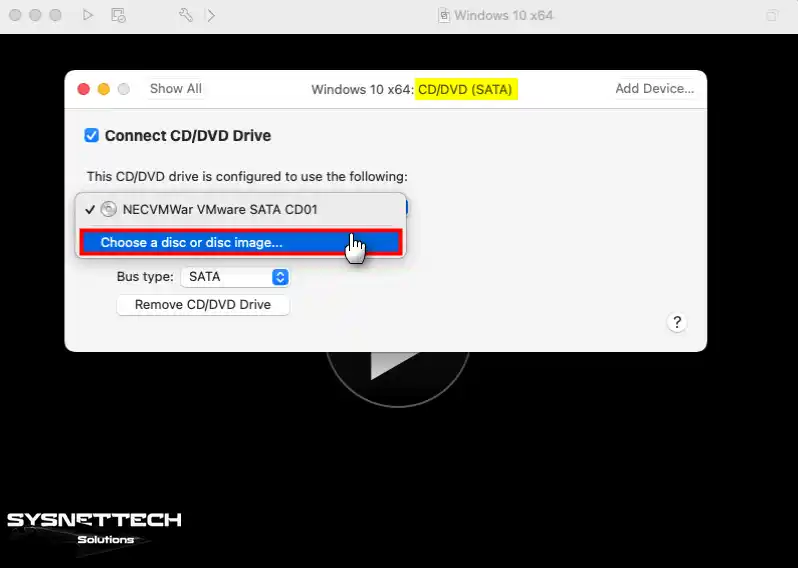
Step 9
At this stage, go to the location of the Windows 10 image file you downloaded to your Mac. After selecting the ISO file from the relevant area, click Open.

Step 10
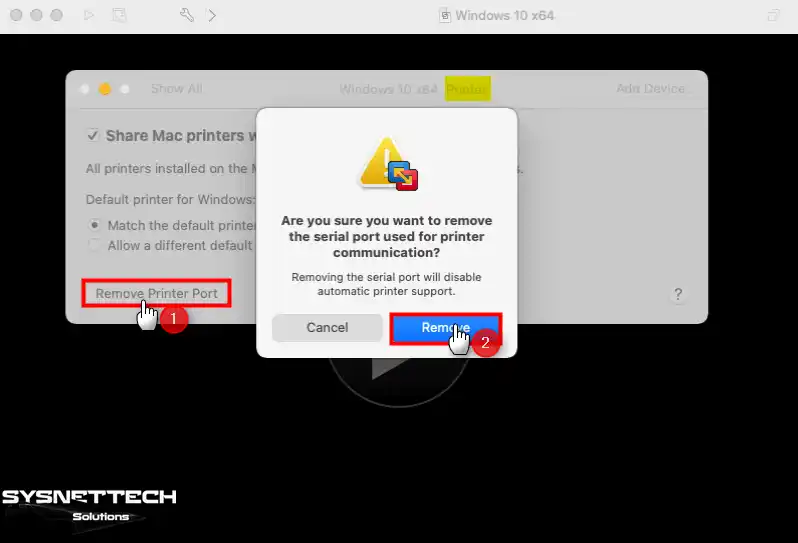
If you do not want to print from the Guest machine to the printer selected by default on your Mac, delete the printer port in the Printer settings.
Step 11
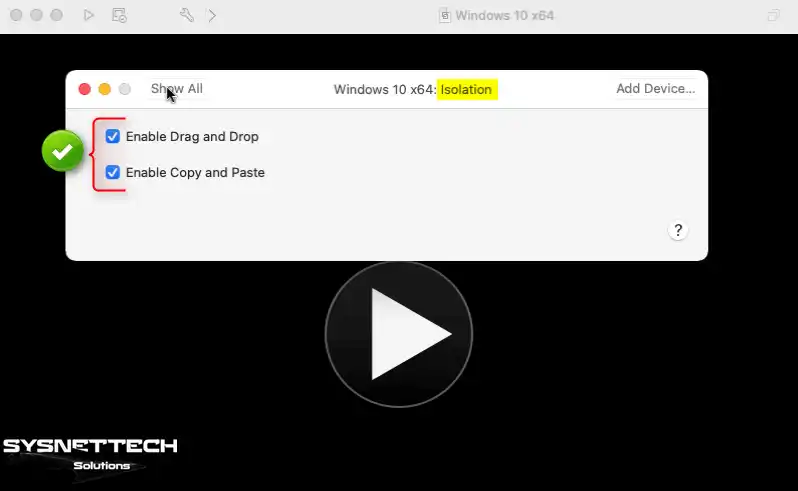
Enable drag-drop and copy-paste support to transfer files and copy text between the host and virtual computer.
Step 12
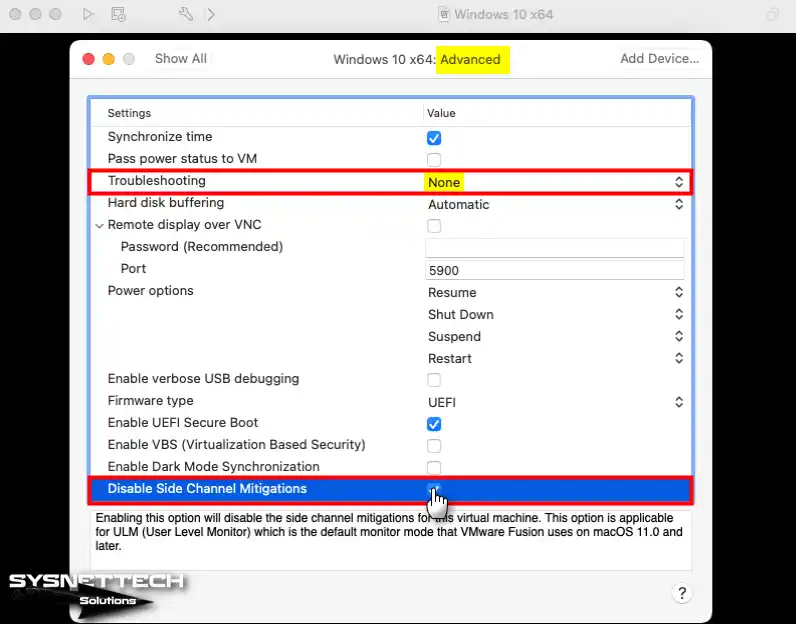
To increase the virtual machine performance in advanced settings, configure the Troubleshooting feature to None and also check the Disable Side Channel Mitigations option.
Step 13
After preparing and configuring the Windows 10 virtual machine, run it to start the system setup.

How to Install Windows 10 on a macOS PC
Installing Windows 10 on a Mac consists of the same steps as installing it on a physical computer in a real scenario.
Step 1
After running the virtual computer, press any key on your keyboard to start the installation when it boots with the ISO image you added.
Step 2
After selecting the system display language, system time settings, and keyboard layout you want to use in your guest operating system, click Next.

Step 3
Click the Install Now button to start the Windows installation in the setup wizard. Also, in this window, you can click Repair Your Computer and perform the relevant steps to repair your system from file errors later.

Step 4
When you have already bought the operating system you plan to use on the guest machine, you should enter your product key on the Activate Windows screen.
However, if you will only use the VM for testing, click I don’t have a product key to continue without activating your system.

Step 5
You will see the Windows 10 versions you want to install on the virtual machine. On this screen, select a suitable version depending on your business and click Next.
Step 6
Accept the software license terms of the Windows 10 Pro operating system and click Next.
Step 7
If you were using an older version of Windows, you could update your system to a newer version of Windows in this window. Click Install Windows Only to install from scratch.
Step 8
You can select the virtual disk or partition where you want to install Windows. If you have added a new virtual disk, you need to create a new partition. So, after selecting Drive 0 Unallocated Space, click New and then click the Apply button to accept the disk space automatically by the wizard.
Step 9
After partitioning the virtual HDD, select the Primary partition Drive 0 Partition 3 and click Next.
Step 10
Wait while the setup wizard copies the Windows 10 system files.
Step 11
Restart your virtual system as soon as the Windows 10 wizard copies the necessary system files.

Step 12
When your guest operating system restarts, you will configure Windows 10 system settings. Select the country you live in in the region settings of your system and click Yes.

Step 13
For the keyboard settings of your guest system, select the keyboard layout you use in your macOS system and click Yes again.
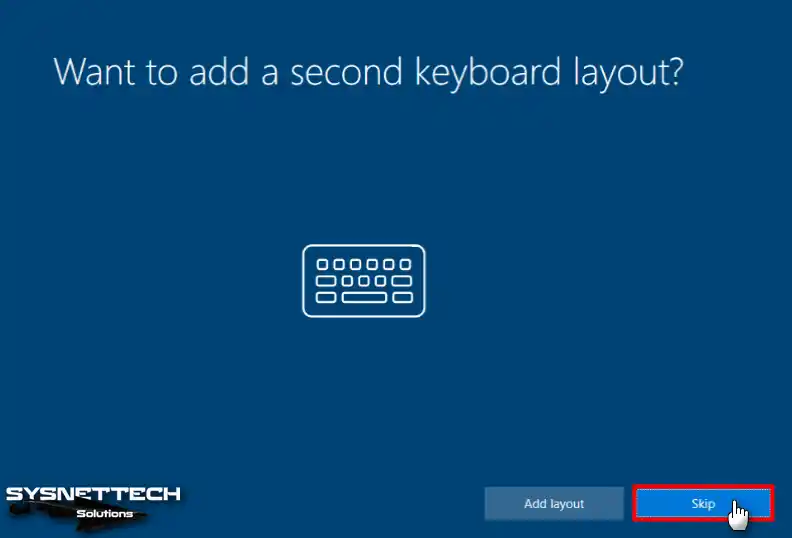
Step 14
If you want to add a second keyboard layout to your virtual system, click the Add Layout button to continue. Otherwise, if you do not want to add another layout, click the Skip button.
Step 15
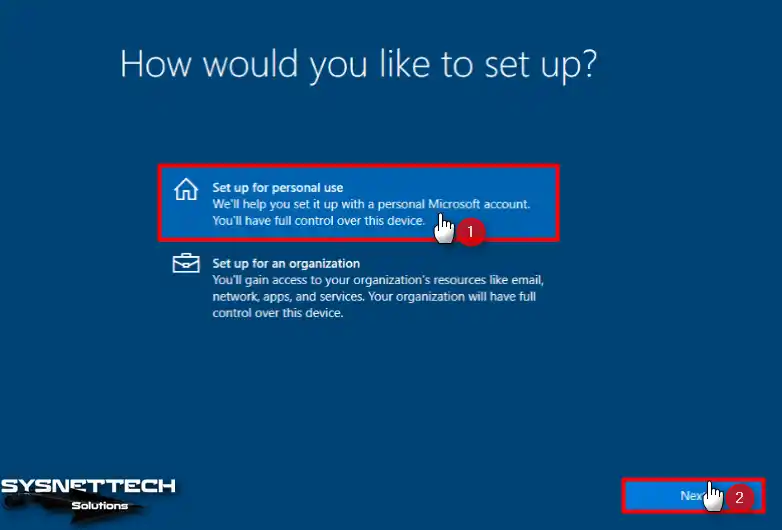
Suppose you are going to use your guest system in a server environment. In that case, you can add your VM to the domain environment with the Organization option. Or, if you prefer to use it personally, click Set up for personal use.
Step 16
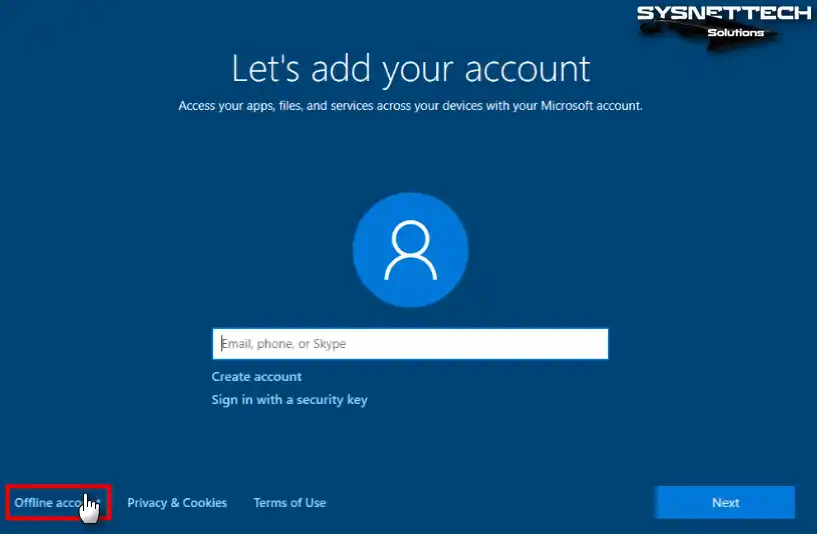
When you set up your Guest machine for personal use, you can sign in with a Microsoft account and back up all your data and settings to the cloud. If you do not want to log in with a Microsoft account, click Offline Account.
Step 17
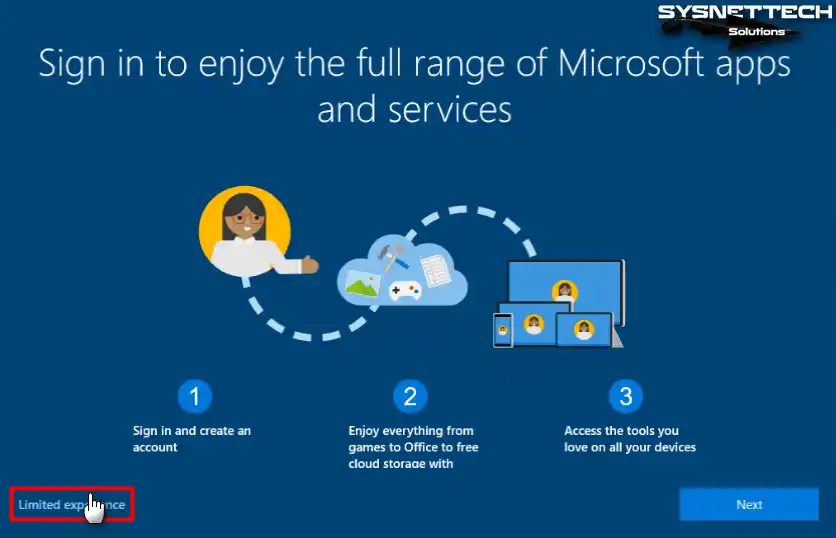
Click Limited Experience to continue without choosing to use Microsoft applications and services.
Step 18
Type a username for your Windows 10 virtual system and click Next.
Step 19
You can protect your system from unauthorized people by creating a user account password that you can definitely remember. You can directly click Next to continue without making a system password.
Step 20
If you want to enable sending your location and diagnostic data to Microsoft in the privacy settings of your Windows 10 operating system or allow personalized advertisements, click the Accept button. If you prefer to accept some of these options, configure the relevant settings and continue.
Step 21
If you want to enable the use of Cortana after the privacy settings, click the I accept button. You can click Not Now to configure Cortana later.

Step 22
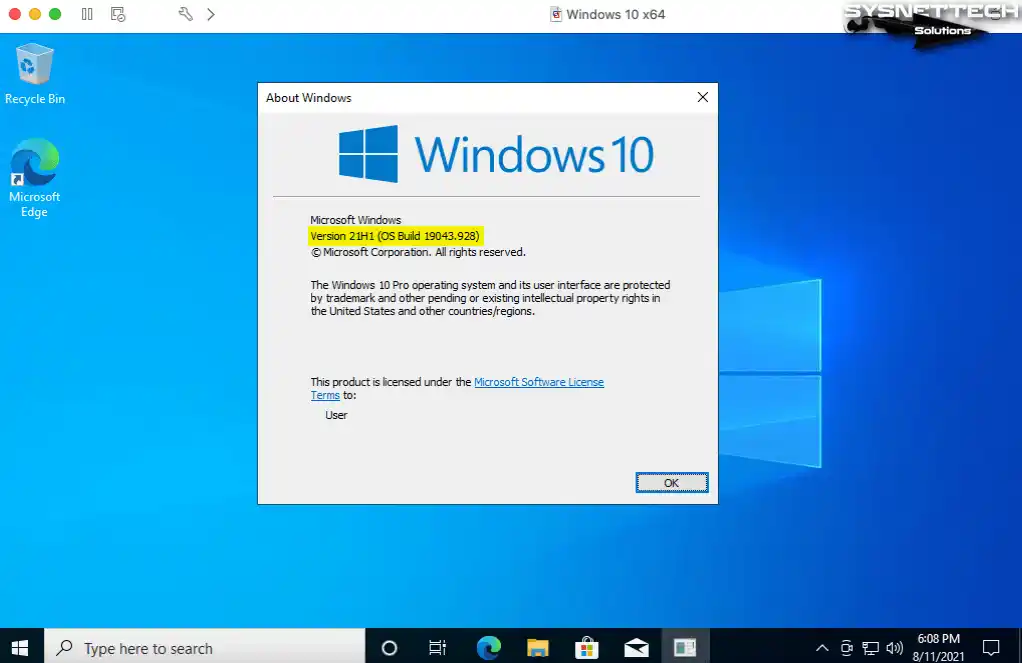
After making the necessary settings, your Windows 10 desktop environment will be ready. You can find the Windows version by executing the Winver command in the Run tool.
How to Install and Configure VMware Tools on Windows 10 Guest Machine
After installing Windows 10 on macOS using VMware Fusion, you need to install VMware Tools in order to fix the screen resolution, increase system performance, or transfer files on the VM.
Step 1
When your guest virtual machine is running, you can install VMware Tools by clicking on Virtual Machine in Fusion’s menu. Then, click Install to mount the CD image to the system.
Step 2
After clicking the AutoPlay window in the lower right corner of your system, click Run setup64.exe.

Step 3
Click Next to continue installing the virtual machine tools in the VMware Tools setup wizard.
Step 4
If you are going to use your guest machine with other VMware products, select Complete in the installation options and click Next.

Step 5
Hit the Install button to start setting up the virtual machine tools. If there is a setting you want to change, you can go back with Back or end the installation with Exit.
Step 6
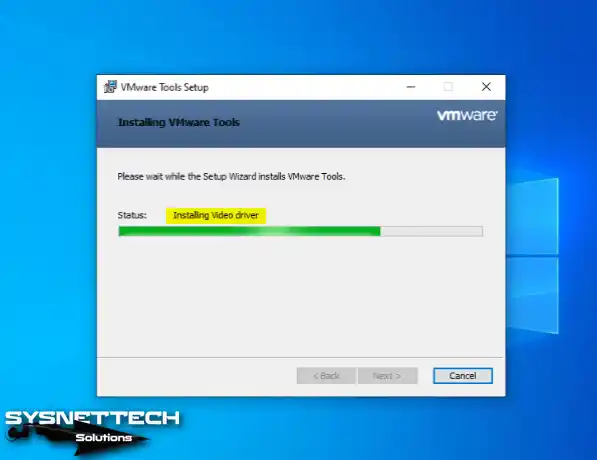
Wait while the video driver of the virtual machine and other hardware drivers are loaded.
Step 7
You have installed VMware Tools on the Windows 10 guest machine. Now, restart the OS to activate the drivers of the virtual system, that is, to activate the changes.
Step 8
You can now transfer files between your Windows 10 guest machine and your Mac computer using the drag-and-drop method.
How to Test Internet Connection
You have prepared your Windows 10 virtual computer on your Mac. Now, one of the other things you need to do is test the Internet connection. Because of that, the VM can access your Mac’s local network or the Internet.
Step 1
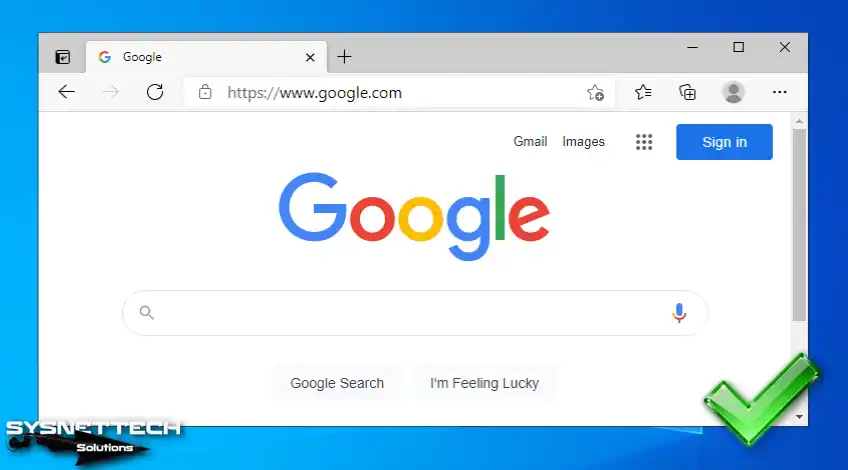
In Windows 10 VM, press Windows Key + R to open Run, type cmd in Open, and click OK. Ping the Google servers and test your network connection by executing the png 8.8.8.8 command at the command prompt.

Step 2
Open the Microsoft Edge web browser on Windows 10 and check that you can access the Google homepage.
How to Use USB Flash Memory in Virtual Machine
It is straightforward to connect your USB flash drives or USB storage devices to the Windows guest machines you use on macOS.
When you connect a device to your Mac’s USB port, the Fusion program will ask you where you want to connect that device. In this window, you can connect your USB device to your Mac or Windows guest machine.
Step 1
Plug a USB stick into your Mac computer and click Connect to Mac to connect it to your macOS system first.

Step 2
Open Disk Utility and right-click on the USB device you connected from the External section, then click Erase.

Step 3
You cannot use an NTFS-based USB device on Mac systems. So, change the format of your USB device to ExFAT and click Erase again.

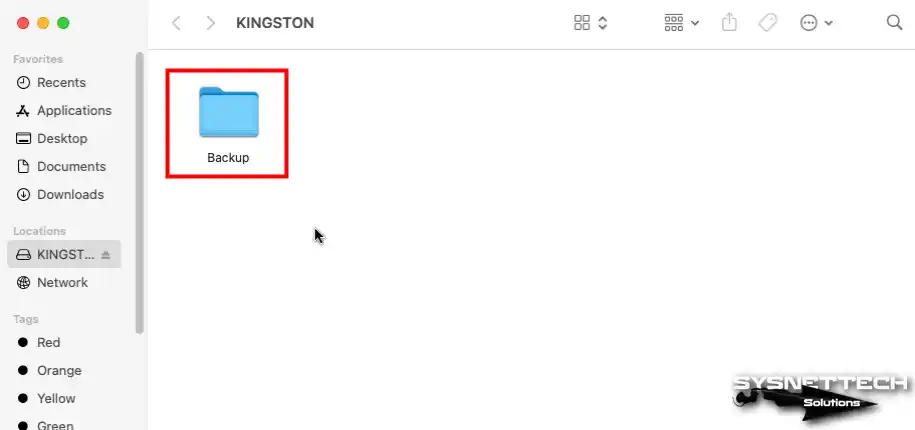
Step 4
You can now copy or create a file or folder inside the flash memory called KINGSTON on your Mac computer.
Step 5
After making your flash drive usable on Mac, click Virtual Machine / USB & Bluetooth / Connect KINGSTON (Kingston DataTraveler 3.0) in the Fusion tool menu to connect it to your Windows guest machine.
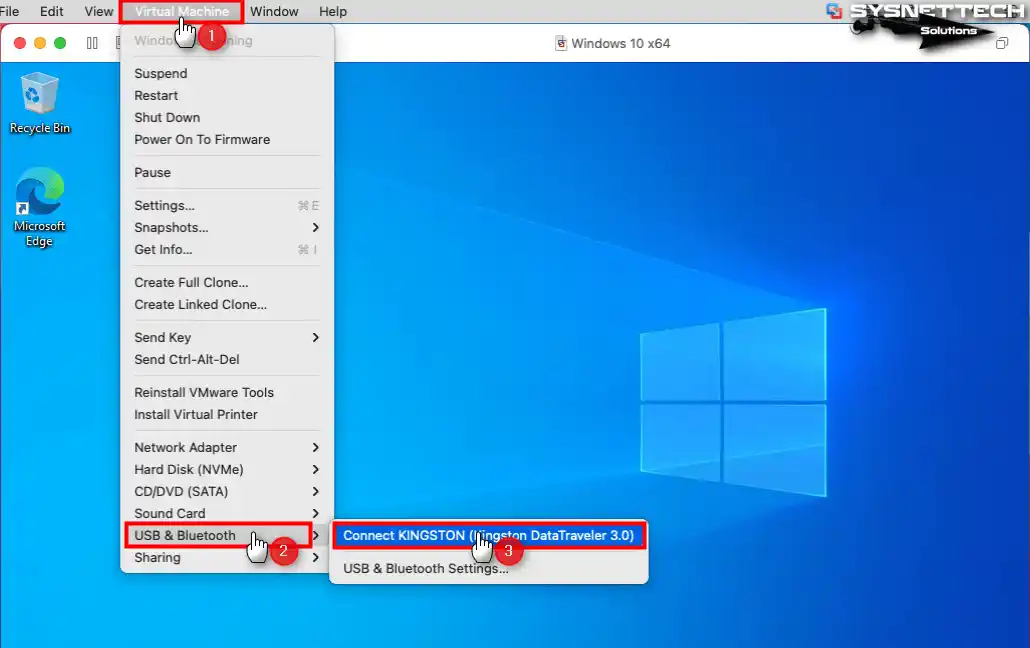
Step 6
In Windows 10 virtual PC, you can now use your USB stick and transfer files between your host and your VM via USB.

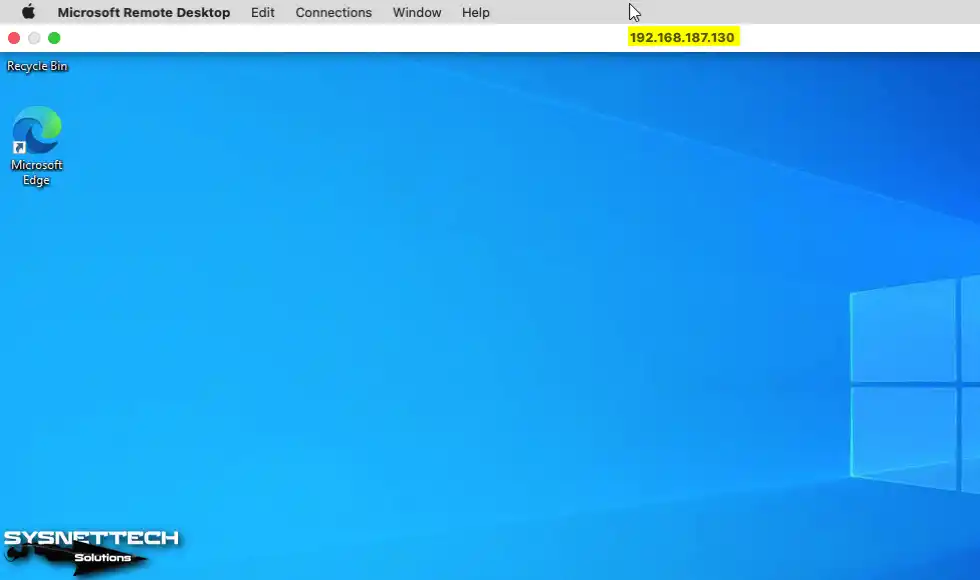
How to Connect to Guest OS using Remote Desktop Connection on Mac
You can continue to do your work by connecting to a Windows guest machine running on your Mac with a Remote Desktop Connection. After downloading and installing this software for macOS on your system, you need to allow remote connections on your guest machine and create a password for your user account.
Step 1
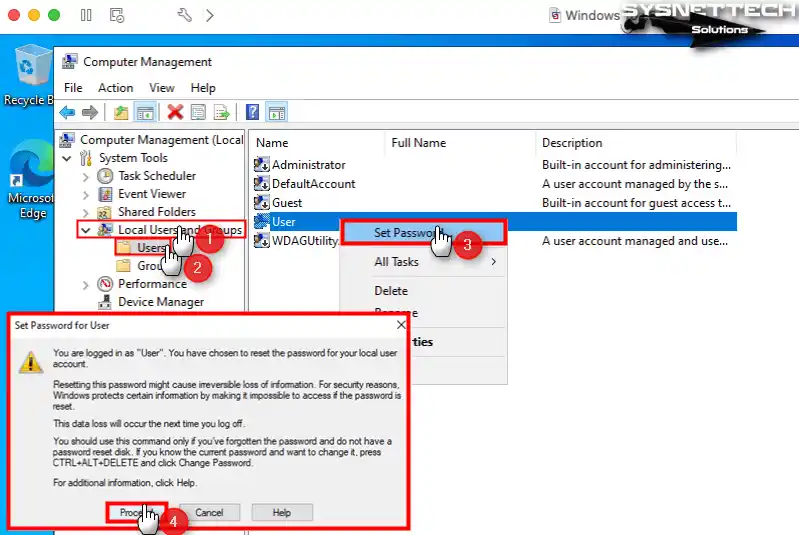
After right-clicking on My Computer on your Windows 10 machine, click Manage from the options that appear. Then, when Computer Management opens, click Users under Local Users and Groups on the left.
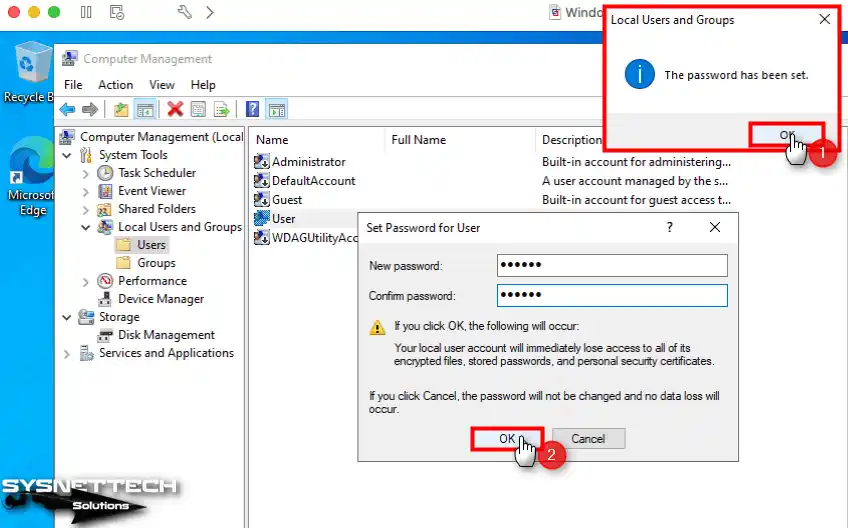
To set a password for the user named User in the user list on the right panel, right-click on it. Then, click Set Password. Click the Proceed button in the warning window informing you that you have chosen to reset the password for the local user account.
Step 2
In the “Set Password” window, pick a password that’s easy for you to remember, then click “OK” to continue.
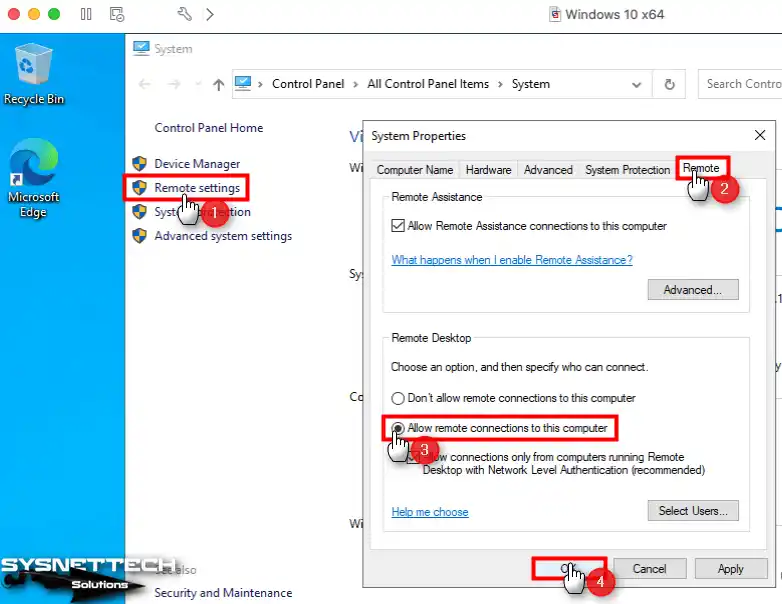
Step 3
To allow remote connections in Windows 10, open computer properties and click Remote Settings on the left. Then, go to the Remote tab in the System Properties window and turn on Remote Desktop.
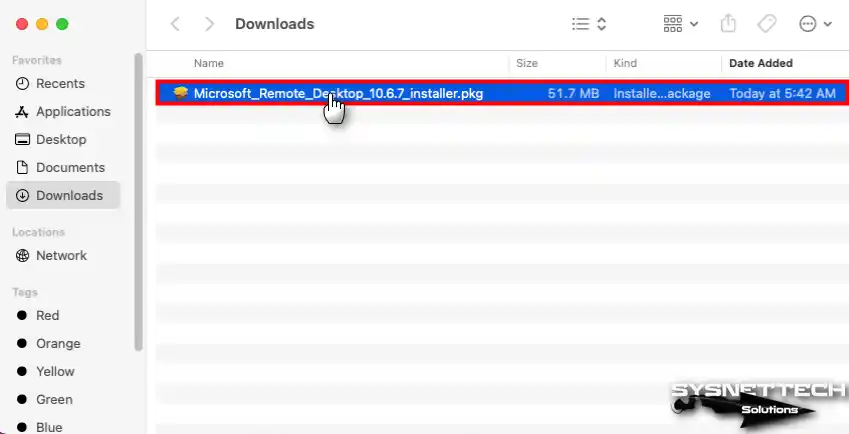
Step 4
After downloading the Microsoft Remote Desktop application to your Mac, double-click the pkg installation file.
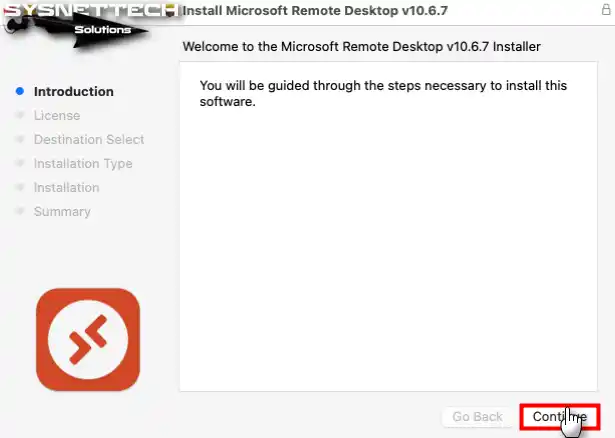
Step 5
Click Continue in the Microsoft Remote Desktop setup wizard.
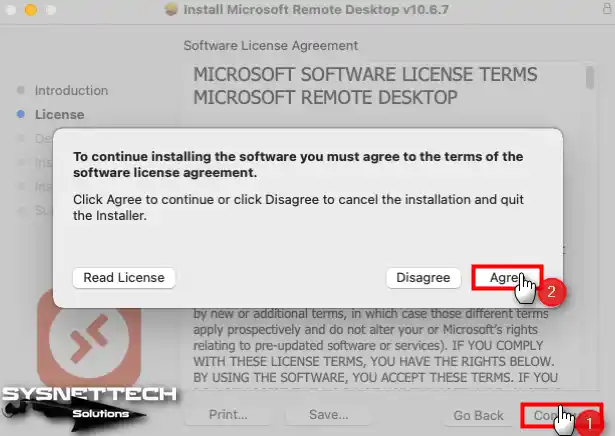
Step 6
Accept the license agreement to continue using the Remote Desktop software.
Step 7
Click Continue again to start the installation without changing the installation location.
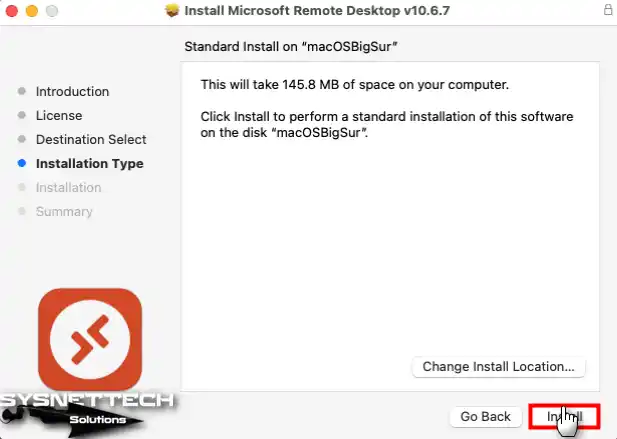
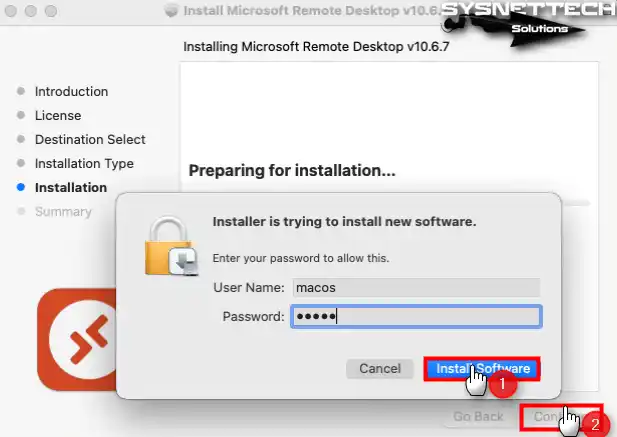
Step 8
To start the installation, type your macOS user account password and click Install Software.
Step 9
Open Applications on your Mac and run Microsoft Remote Desktop.

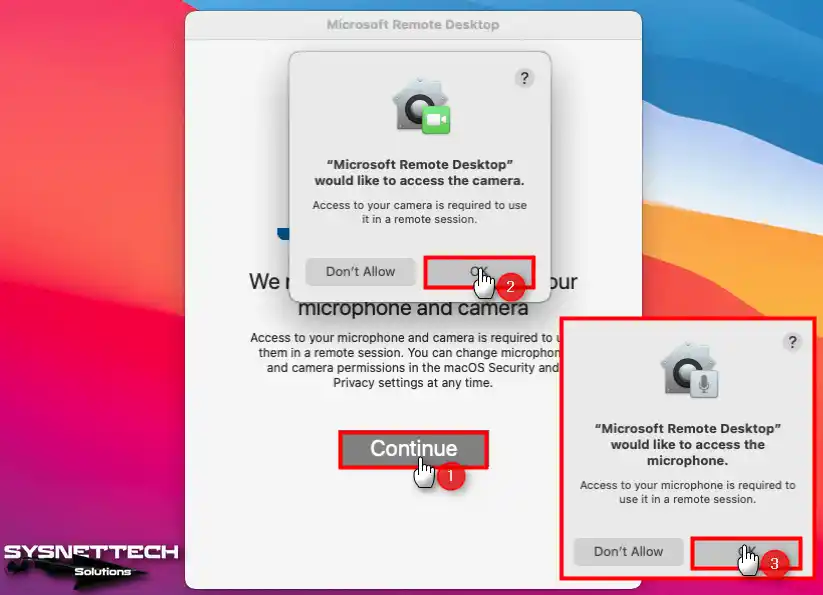
Step 10
Click OK if you want to allow the use of your computer’s camera and microphone devices on remote connections.
Step 11
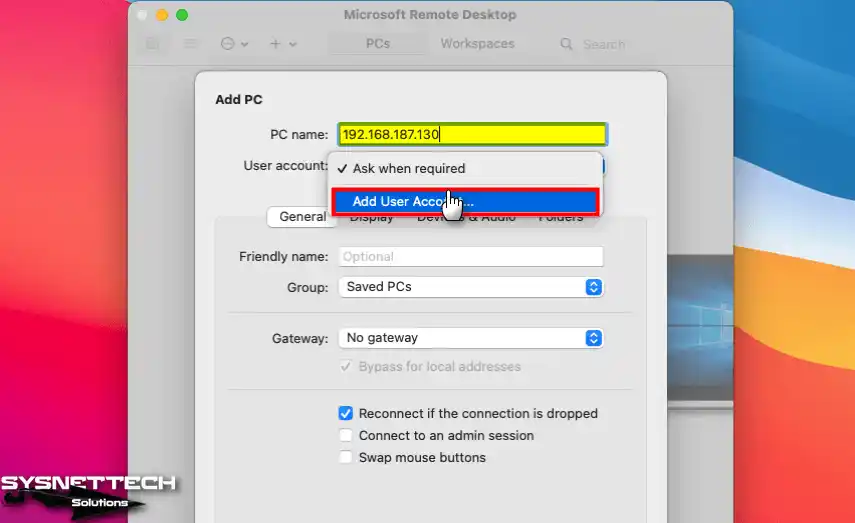
After opening the Remote Desktop application, click Add PC to add your Windows guest machine.

Step 12
Execute the ipconfig command in CMD to find out the IP address of your guest machine. Type the IP address of the guest machine in PC Name and click Add User Account from the User Account options to automate the remote login.
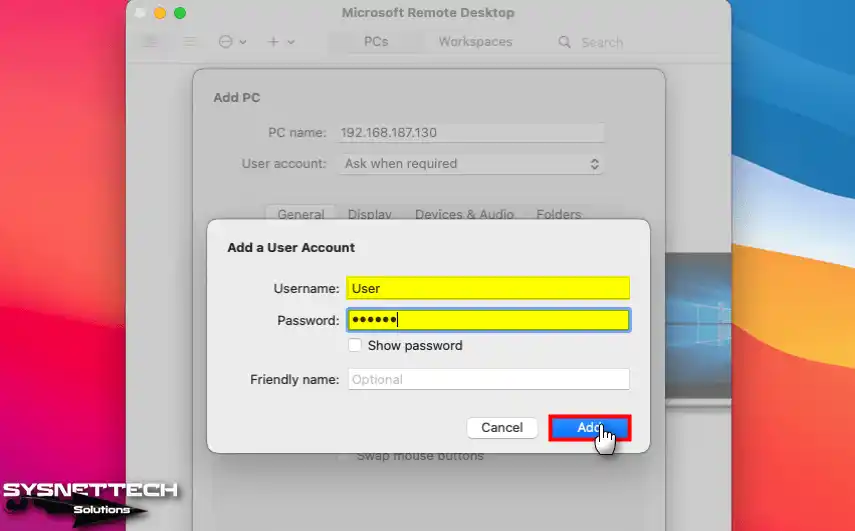
Step 13
When you open the Add a User Account window, type the user account name and password of the Windows 10 guest machine and click the Add button.
Step 14
After typing the necessary information, add your virtual computer to the remote desktop program.

Step 15
Connect to the PC you added to the homepage of the Microsoft Remote Desktop program and click Continue in the certificate warning window.

Step 16
You have successfully connected to a Windows 10 guest machine via a remote desktop from your Mac.
How to Configure Shared Folder
You can use the Shared Folder feature on Fusion to make the file transfer between your host computer and your VM easier.
Step 1
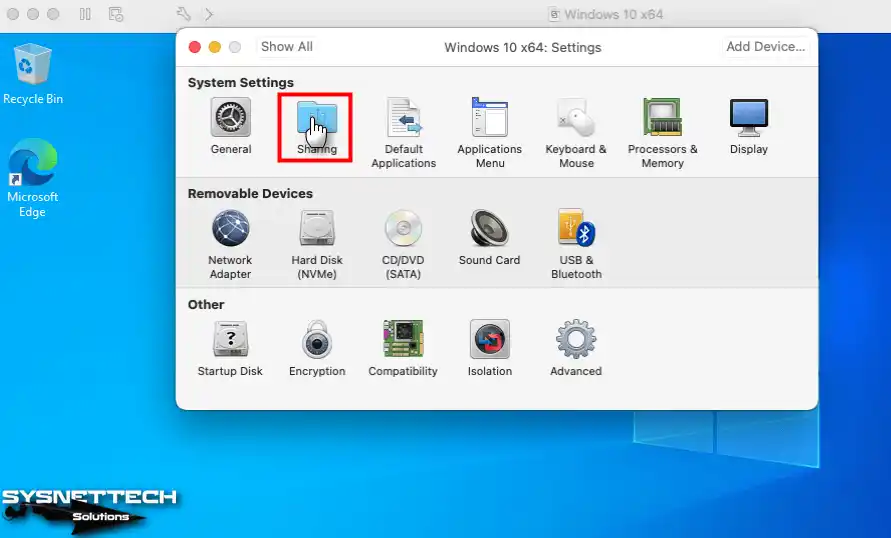
Click Virtual Machine / Settings from the tool menu to enable Shared Folder while the guest machine is running.

Step 2
When you open the settings of the Windows 10 machine, click Sharing.
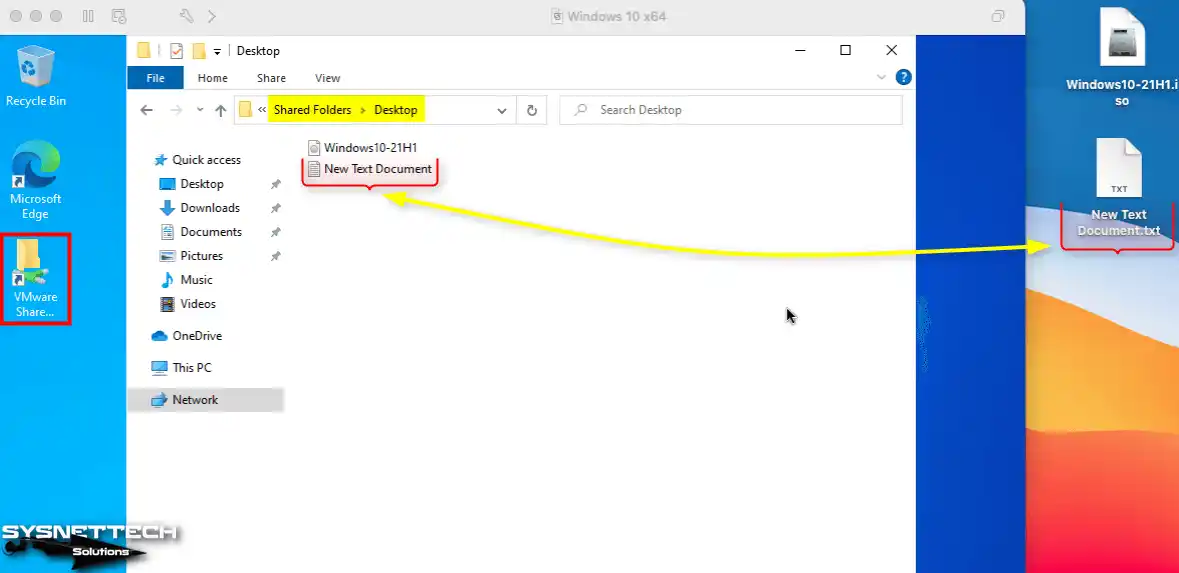
Step 3
After enabling Shared Folder in the virtual machine, click the + button to add a location on your Mac.

Step 4
You can access the files you have added or created to the Shared Folder location created on your Windows 10 virtual computer directly from your macOS system.
Video
Conclusion
As a result, we can use VMware Fusion 12 Pro to run Windows 10 on Mac. This software provides flexible and seamless virtualization on our Mac PCs. You can create VMs, whether for professional purposes or personal use. Afterward, you can install and run various operating systems on these fake PCs.
If you are a Mac user, you can install Windows 10 on your host system by following every step I explain in this article. This way, you get enhanced productivity and functionality on your Mac computer. With the power of virtualization, you can quickly switch between different operating systems!
As technology evolves, virtualization has become an essential part of software development, testing, and overall productivity. VMware Fusion 13 is a powerful tool for creating and managing virtual machines on macOS. If you’re looking to install Windows 11 on VMware Fusion 13, you’ll find this article a comprehensive guide to doing just that.
Prerequisites
Before we dive into the installation process, let’s list the prerequisites. Ensure that you have the following:
-
A Compatible Mac: Make sure your Mac’s hardware is up to par. Apple devices must have an Intel or Apple Silicon CPU.
-
VMware Fusion 13: Ensure that you’ve installed VMware Fusion 13 on your Mac. A quick download from the VMware website can help you get started.
-
Windows 11 ISO File: You’ll need a Windows 11 ISO file; this can be downloaded from the official Microsoft website.
-
VMware Tools for Windows: This installation will improve performance and integration with macOS.
-
Administrational Access: You’ll need administrative permissions on your Mac to install software.
-
Internet Connection: A stable connection will help with the downloading of files and Windows updates.
Step 1: Download Windows 11 ISO
-
Open your web browser and navigate to the Microsoft Windows 11 download page.
-
Under the «Create Windows 11 Installation Media» section, click on the «Download Now» button.
-
If you want to directly download the ISO instead of using the media creation tool, scroll down and select «Download Windows 11 Disk Image (ISO).»
-
Choose
Windows 11from the dropdown menu and click onDownload. Select your preferred language and click on theConfirmbutton, then choose the version (64-bit) to initiate the download. -
Once the ISO file is downloaded, note its location, as you will need this for the virtual machine setup.
Step 2: Create a New Virtual Machine
-
Open VMware Fusion 13.
-
Click on
Filein the menu bar and selectNewor use the shortcut Command + N. -
Choose “Create a new virtual machine.”
-
On the New Virtual Machine wizard, you will see an option to install from disk or image. Click
Use another disc or disc image. -
Locate the Windows 11 ISO you downloaded earlier, select it, and click
Open. -
The wizard will then load the setup files from the ISO. Click
Continue.
Step 3: Configure Virtual Machine Settings
-
Operating System: In the Operating System drop-down menu, select “Microsoft Windows” and “Windows 11” as the version.
-
Name and Location: Choose a name for your virtual machine, which will help you identify it later. You can also select the location where the virtual machine files will be saved. You might want to place it in a location with ample space.
-
Processor Configuration: Click on
Customize Settings.
Under theProcessorssection, allocate two or more processors if your Mac has enough CPU cores. This allows the VM to perform better. -
Memory Settings: Still in the configuration, allocate at least 4 GB (4096 MB) of RAM. 8 GB is recommended for optimal performance.
-
Storage Configuration: Under the
Hard Disksection, allocate at least 64 GB for the virtual hard drive. If you plan to install more applications in the future or store files, consider allocating more space. -
Network Settings: Leave the network connection set to “Use Bridged Networking” to allow the virtual machine to access your local network.
-
After configuring, close the settings window. You might be prompted to save changes. Click
Save.
Step 4: Start the Installation Process
-
With your new virtual machine selected, click on
Start. -
This will boot your virtual machine, and you will see the Windows 11 installation screen.
-
Select your language preferences and confirm by clicking
Next. -
Click
Install nowto begin the installation. -
If you have a product key, enter it here. If you don’t, you can choose the option to skip this step and activate Windows later.
-
Select the Windows edition you want to install and click
Next. -
Accept the license terms by checking the box and clicking
Next. -
Choose the type of installation you want. Select
Custom: Install Windows only (advanced). -
You will now see the list of drives available for installation. Select the virtual hard drive you’ve created (usually titled “Drive 0 Unallocated Space”) and click
Next.
Step 5: Configure Windows During Setup
-
Windows will begin copying files and will automatically reboot several times during the installation process.
-
Once the installation is complete, you’ll go through Windows 11 setup, where you’ll be prompted to configure your settings.
-
Choose your region and keyboard layout, then click
Yes. -
Connect to your network. This can either be Wi-Fi or Ethernet. If you’re using bridged networking, it should automatically detect your network.
-
You’ll be prompted to sign in with a Microsoft account. You can either sign in or choose to create a local account.
-
Set privacy settings according to your preference.
-
Wait for the setup process to finish, which may take several minutes.
Step 6: Install VMware Tools
After Windows 11 is up and running, it’s important to install VMware Tools to enhance performance and improve integration with macOS.
-
In the VMware Fusion menu, click on
Virtual Machineand selectInstall VMware Tools. -
A virtual CD will mount in Windows. Open
File Explorerand click on the CD drive labeled VMware Tools. -
Double-click the
VMwareTools.exefile to begin the installation. -
Follow the prompts. You may need to allow changes if prompted by Windows User Account Control.
-
Choose the typical installation and allow the setup to complete.
-
Upon finishing, you will need to restart the virtual machine. Allow the system to reboot to apply the changes.
Step 7: Adjust VM Settings for Better Performance
To ensure smooth performance across your virtual machine, here are a few additional tweaks you can consider:
-
Adjust Video Memory: Open your VM settings again and navigate to the
Displaytab. Allocate more video memory if necessary for graphics-intensive applications. -
Disable Unused Devices: Under the
USB & Bluetooth, disable any unused USB controllers. -
Snapshot Your Installation: Once you have everything set up and configured, consider taking a snapshot. This allows you to revert to a clean state should anything go wrong in the future. To do this, click on
Virtual Machinein the menu bar, thenTake Snapshot.
Troubleshooting Common Issues
-
Insufficient Resources: If the VM runs slowly, check your settings to ensure adequate CPU and RAM are allocated. Restart the VM after making changes.
-
Network Issues: If you can’t access the internet, recheck the networking settings to ensure “Bridged Networking” is selected. You can also try switching to NAT if it’s not working.
-
Activation Issues: If you skip the product key during installation, ensure to activate Windows later.
Conclusion
Congratulations! You’ve successfully installed Windows 11 on VMware Fusion 13. This platform allows you to run Windows applications seamlessly on your macOS environment, enhancing your productivity and broadening your development capabilities.
Always remember to keep both your VMware software and Windows operating system up-to-date. This ensures security, stability, and access to the newest features.
As virtualization technology continues to evolve, so too will the methods and tools available to enhance your experience. Stay informed and embrace these tools to maximize your productivity in an increasingly digital world.
Feel free to revisit this guide as you explore the features of Windows 11 and discover all that VMware Fusion 13 has to offer!
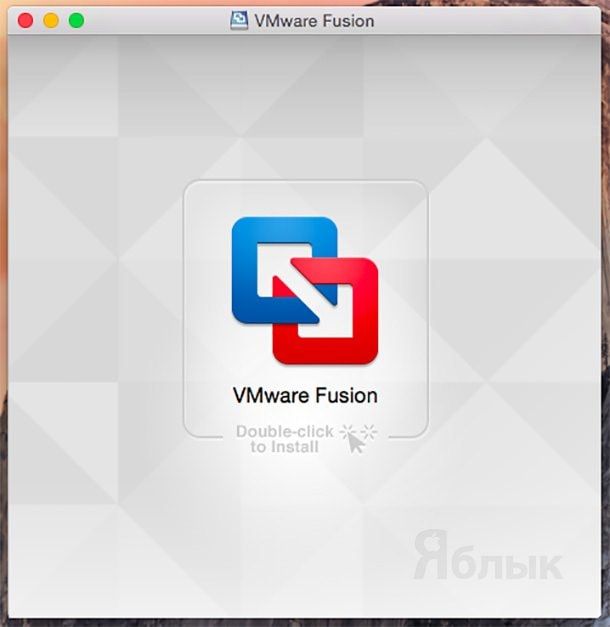
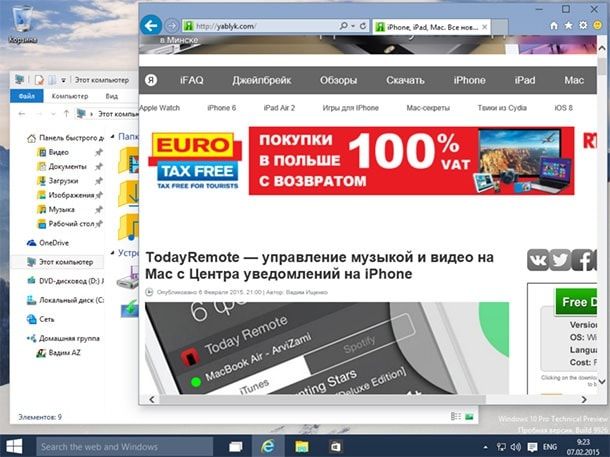
Состоялся релиз Windows 10 Technical Preview, который явно будет интересен для тестирования не только любителям редмондовской платформы, но и поклонникам Mac. Оценить новые возможности, опробовать голосовой помощник Cortana, протестировать улучшенную многозадачность и многое другое можно при помощи виртуальной машины VMware Fusion.
В этом руководстве мы расскажем как от «А» до «Я» установить Windows 10 Technical Preview на Mac при помощи виртуальной машины VMware Fusion, тем более это не замёт много времени.
Что необходимо скачать:
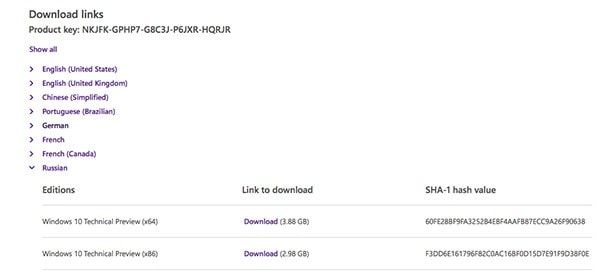
1. iOS-образ Windows 10 Technical Preview. Для этого пройдите на официальную страничку Microsoft, зарегистрируйтесь в программе Windows Insider Program (это легко и бесплатно) и скачайте 32- или 64-битный образ в зависимости от разрядности вашей системы. В среднем, размер iOS-файла будет равен 3—4 ГБ. Присутствует русскоязычная версия!
2. DMG-файл виртуальной машины VMWare Fusion.
Предварительные шаги
1. Смонтируйте DMG-образ VMWare Fusion и двойным щелчком мыши кликните по иконке программы.
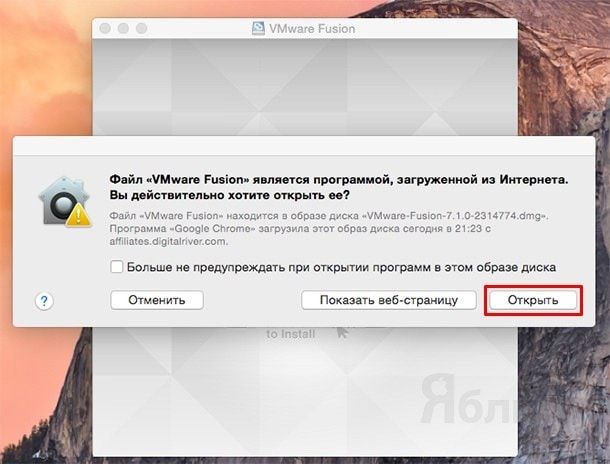
2. Так как эта программа из интернета, то во всплывающем окне нажмите «Открыть», после чего введите имя пользователя и пароль администратора Mac.
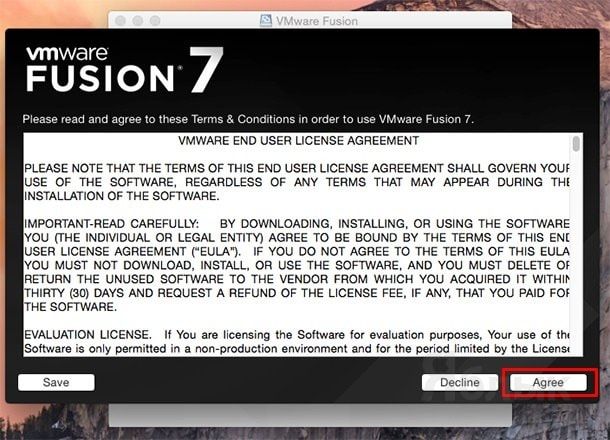
3. После инициализации согласитесь с пользовательским соглашением нажатием кнопки «Agree«.
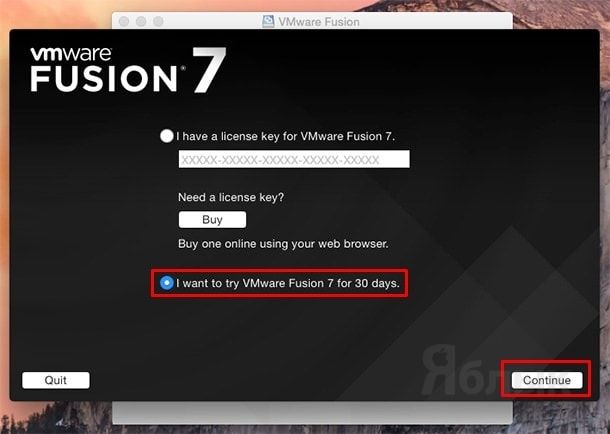
4. Воспользуйтесь бесплатной 30-дневной trial-версией программы, поставив точку напротив «I want to try VMware Fusion 7 for 30 days«.
5. Введите свой E-mail (если не хотите, чтобы к вам приходила надоедливая рассылка, то впишите любой сторонний адрес почты) и выберите версию для домашних пользователей, далее нажмите «Continue» и введите логин и пароль ещё раз.
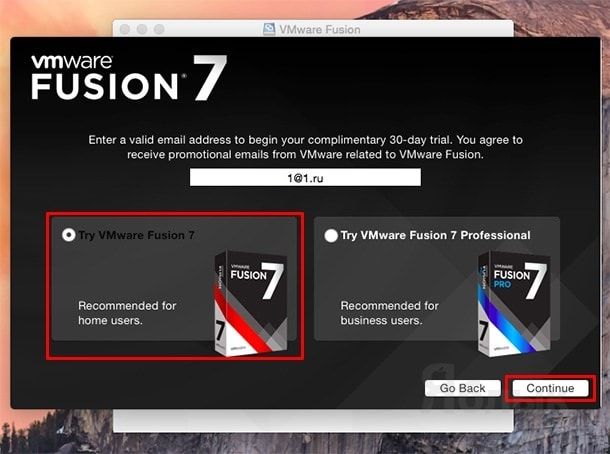
6. После того, как вы решите, хотите помогать разработчикам VMWare или нет нажмите «Done«.
Установка Windows 10 Technical Preview на виртуальную машину VMware Fusion 7
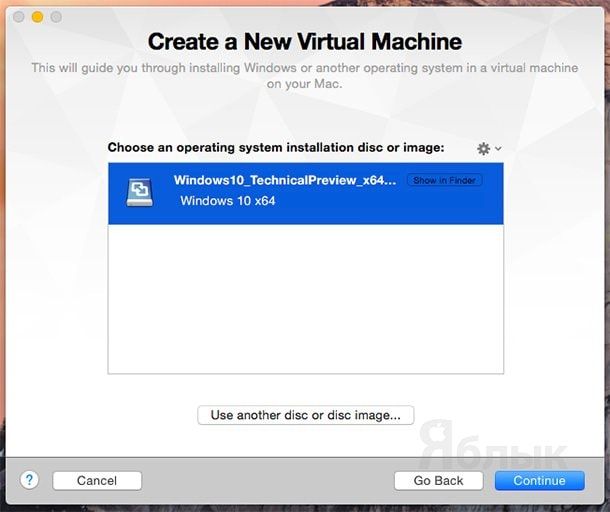
1. Выберите пункт «Install from disc or image» и нажмите «Continue«.

2. Кликните по «Use another disc or disc image…» и укажите путь к скачанному образу Windows 10 —> Continue.
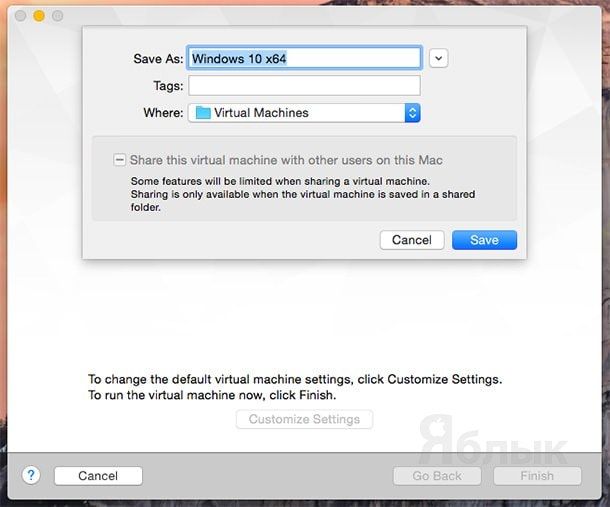
3. Нажмите «Customize Settings» и сохраните *.vmwarevm-файл в папку ~/Documents/Virtual Machines.
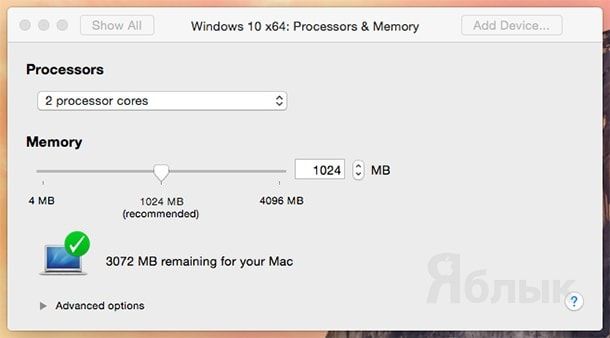
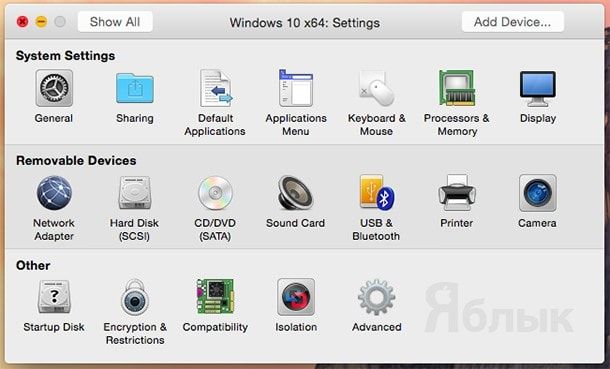
4. После старта виртуальной машины откройте в разделе «System Settings» пункт «Processors & Memory«. Укажите количество процессоров на вашем Mac и количество оперативной памяти как минимум вдвое меньшее, чем стоит на компьютере.
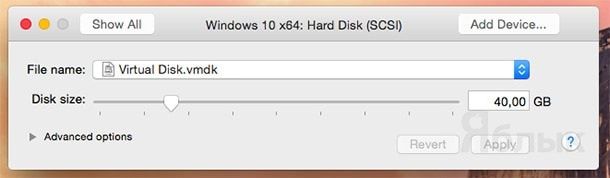
5. Нажмите «Show All» и выберите раздел «Hard Disk«. Рекомендуемый размер виртуального жёсткого диска — 60 ГБ, но допустимый минимум 40 ГБ (на самом деле вся установленная операционная система с утилитами займёт около 12 ГБ).
6. Закройте окно настроек нажав на крестик.
7. Нажмите кнопку воспроизведения для начала установки Windows 10.

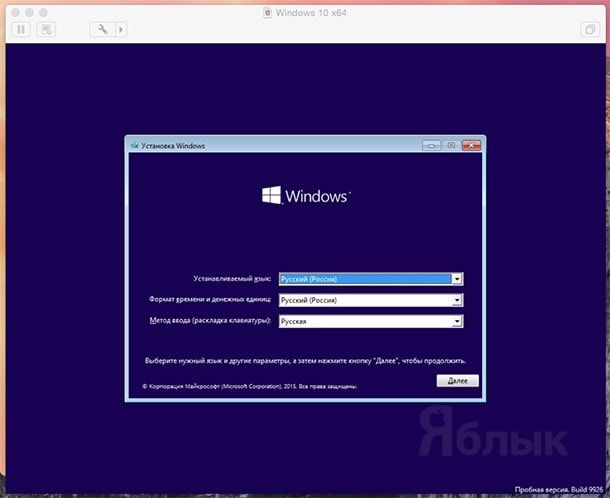
8. В параметрах выбора языка щёлкните «Далее».
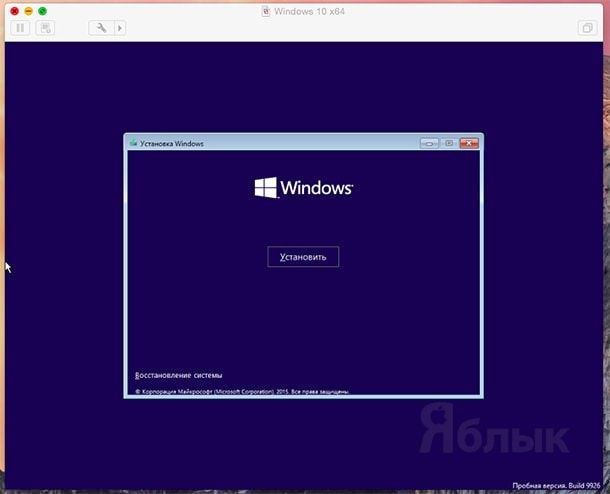
9. Нажмите «Установить».
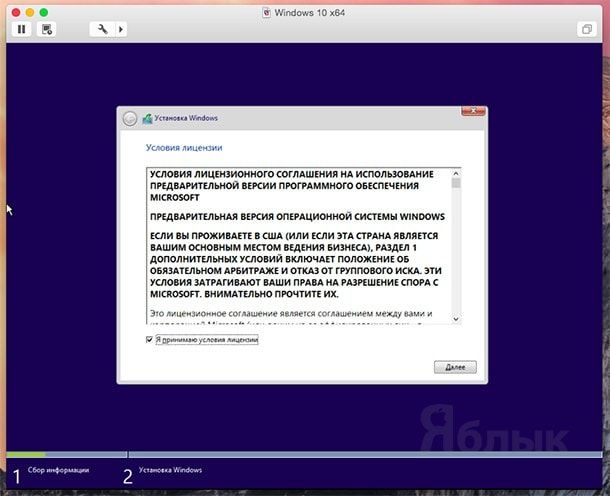
10. Согласитесь с условиями лицензионного соглашения.
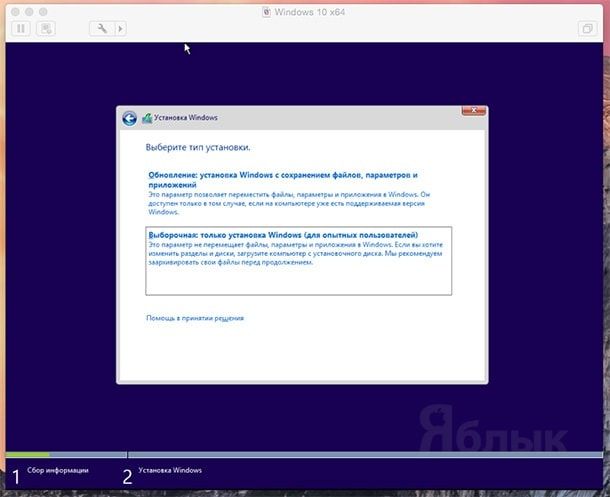
11. Тип установки —> выборочная.
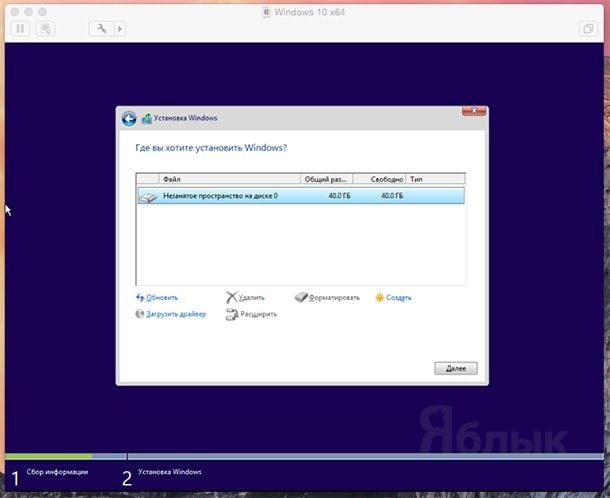
12. Устанавливаем Windows в незанятое пространство — «Далее».
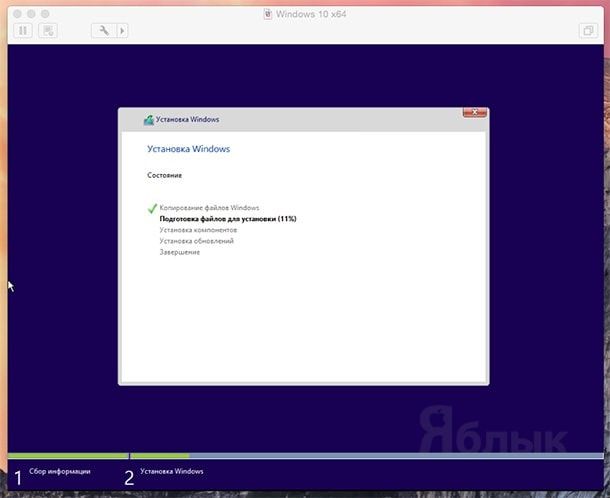
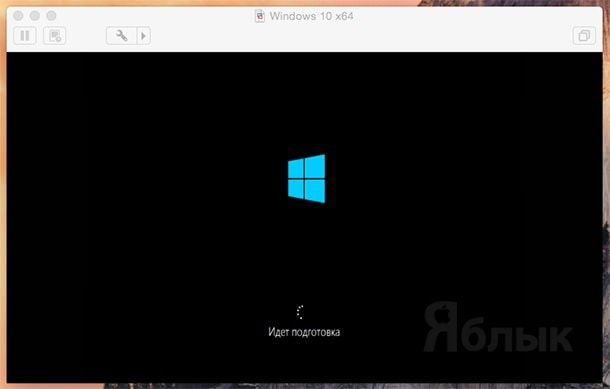
13. Начнётся процесс установки Windows: копирование файлов, подготовка к инсталляции, установка компонентов и обновлений.
14. После перезагрузки продолжится установка и подготовка устройств.
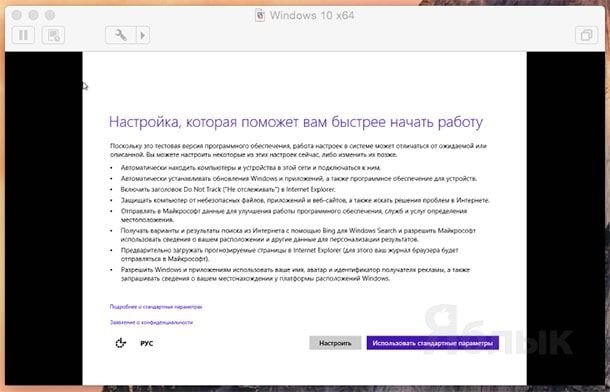
15. Детальную настройку можно пропустить нажав кнопку «Использовать стандартные параметры».
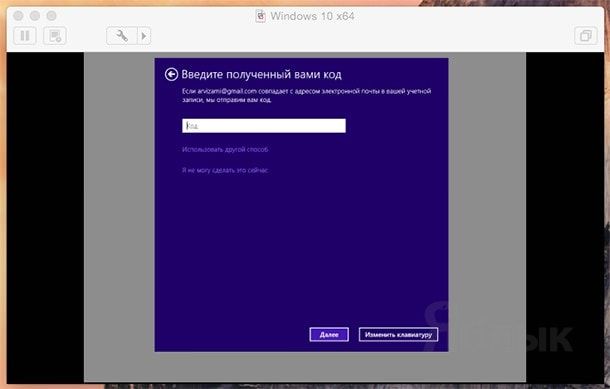
16. Введите данные учётной записи и нажмите «Далее».

17. Повторите ввод электронной почты и введите полученный на почтовый ящик код протекции.
Установка инструментов VMware Tools
Завершающим этапом настройки виртуальной машины под Windows 10 станет установка инструментов VMware Tools. Они содержат все необходимые драйвера и настройки, обеспечивающие максимальную оптимизацию и производительность в зависимости от имеющегося оборудования.
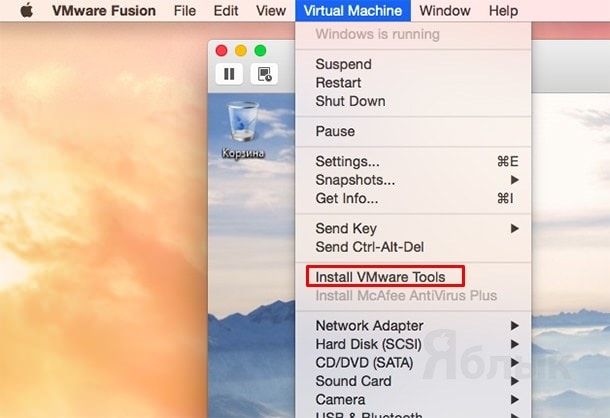
1. Для установки VMware Tools нажмите Virtual Machine —> Install VMware Tools —> Install.
2. Откройте Проводник Windows —> DVD-дисковод и запустите файл установки «setup64«.
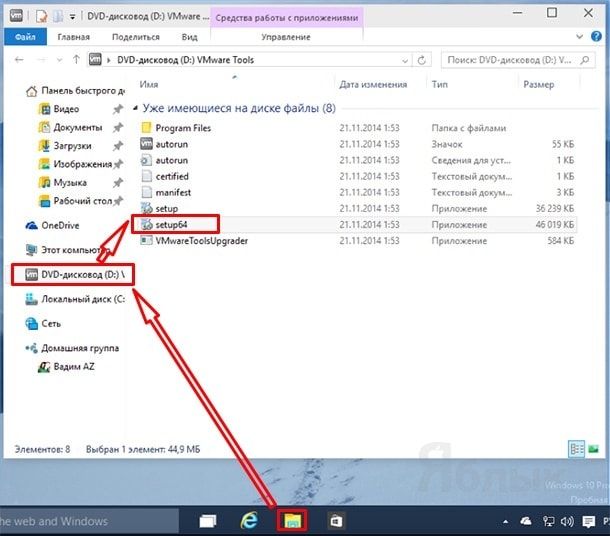
3. В появившемся окне Контроля учётных записей пользователей разрешите вносить изменения нажатием кнопки «Да».

4. В инсталляторе VMware Tools Setup нажмите «Next«.
5. Тип установки «Typical» —> Next.
6. Кликните по «Install«. По окончанию установки — «Finish«.
7. Перезагрузите компьютер нажатием кнопки «Yes» в появившемся запросе.

Вся установка длится 15—20 минут. Чиcтая Windows 10 Technical Preview занимает около 12 ГБ свободного места на жёстком диске. Даже на стоковом MacBook Air 13″ система работает довольно шустро.
Смотрите также:
- Как отключить автоматическую синхронизацию iPhone и iTunes.
- Как правильно и зачем отключать iMessage при переходе на Android, Windows Phone, BlackBerry.
- Как установить док-панель в стиле OS X на iPhone и iPad с твиком Harbor.
- Приложение зависло при скачивании. Как исправить? 7 способов.