
This PowerShell command reinstalls Windows Defender in seconds
Updated on September 22, 2022
What to Know
- You don’t need to download Windows Defender, because it’s integrated into Windows 11.
- Enter this in a PowerShell window: Get-AppxPackage Microsoft.SecHealthUI -AllUsers | Reset-AppxPackage.
- Or, go to Settings > Apps > Installed apps > Windows Security > three dots > Advanced options > Reset.
This article explains when and how to reinstall Windows Defender through the command line or Settings app in Windows 11.
How to Reinstall Windows Defender in Windows 11
Windows Defender (aka, Microsoft Defender) isn’t installed on your computer like a typical program, so you can’t reinstall it like you can regular software. Instead, follow these directions to use a PowerShell command to get the job done. It might take anywhere from 5 seconds to a few minutes to complete. If you can open Settings normally, there’s an easier method after these steps.
-
Right-click the Start button and select Terminal (Admin).
If that doesn’t work for whatever reason, use the search bar on the taskbar to search for PowerShell, and then right-click it to find the Run as administrator option.
-
Copy the command exactly as it’s shown here, and then right-click in the PowerShell window to paste it (Ctrl+V works, too):
Get-AppxPackage Microsoft.SecHealthUI -AllUsers | Reset-AppxPackage -
Press Enter to immediately start the process to reset Windows Defender to its original settings so that it performs as a freshly installed app.
-
You’ll know when it’s finished because you’ll see the blinking cursor again on a new line below the command you entered. In the meantime, you might briefly see a Deployment operation progress message.
If you see lots of red text, and an «Access is denied» message, return to step 1 and make sure you’re opening PowerShell as an administrator.
Another way to reset Windows Defender is through Settings. If Settings opens fine for you, you don’t need to bother with a PowerShell command. Instead, go to Settings > Apps > Installed apps > Windows Security > three dots > Advanced options > Reset.
When to Reinstall Windows Defender
Technically, you’re not really reinstalling the program because Windows doesn’t actually let you uninstall it. That said, you might run the above command to reset Windows Defender if it’s just not working correctly.
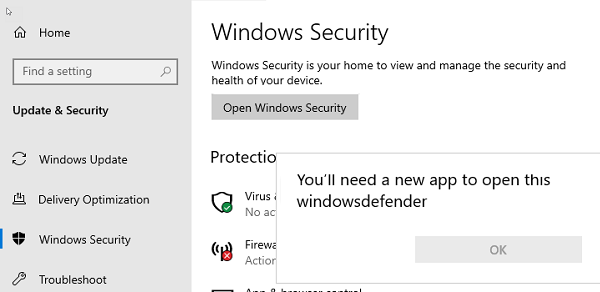
The most obvious sign you need to do this is if you see an error when you try to open it. If it’s not opening as it should, and you see this message, the above command should fix it right away:
You'll need a new app to open this windowsdefender linkLook for an app in the Microsoft Store
Or, maybe it does open, but some of its toggles won’t turn on or off, or you can’t even find a link to it on your computer. In these cases, the PowerShell command should refresh the tool back to working order.
Windows Defender Might Just Be Off
It’s possible that you’ve considered reinstalling Windows Defender because it isn’t catching malware, when in reality, it’s just not turned on. You might think it’s been uninstalled or is broken, but really it’s just disabled.
This is completely possible since Windows 11 lets you turn off its built-in antivirus program if you’d rather not use it.
Learn how to turn Windows Defender on and off for specific directions.
FAQ
-
Not really. While Windows Defender provides basic protection from threats, it’s no substitute for third-party antivirus software.
-
Go to Start > Settings > Privacy & Security > Windows Security > Virus & threat protection. Under Virus & Threat Protection Settings, select Manage settings, then under Exclusions, select Add or remove exclusions.
Thanks for letting us know!
Get the Latest Tech News Delivered Every Day
Subscribe
If you can’t open Windows Defender or access any of its settings, or if you have accidentally uninstalled Windows Defender, this guide will show you how to reinstall Windows Defender in Windows 11 via PowerShell command lines.
Although Windows Defender has always been the default antivirus software that comes preinstalled with Windows, some users may find the app missing after certain events such as after updating Windows or after installing or uninstalling certain third party antivirus software.
When the problem occurs and you try to open Windows Defender, Windows may prompt you the “You’ll need a new app to open this Windows Defender link” pop up that ask you to find a compatible app from Microsoft Store to open Windows Defender related link or setting. This indicates that Windows Defender is either missing or corrupted in Windows 11.
Reinstall Windows Defender in Windows 11
You can reinstall Microsoft Windows Defender in Windows 11 by executing a single line of command through PowerShell or Windows Terminal. However, you will need administrator rights to be able to execute the command.
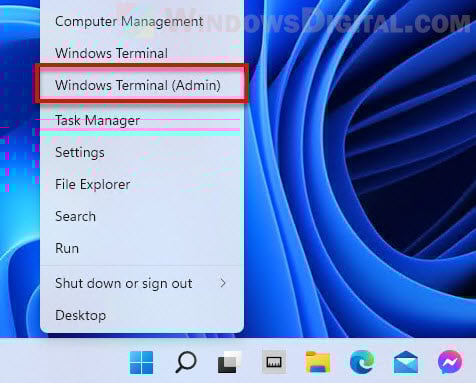
Thus, you will need to first open Windows Terminal or PowerShell with admin rights. To do so, right-click the Start button on the taskbar and select “Windows Terminal (Admin)“.
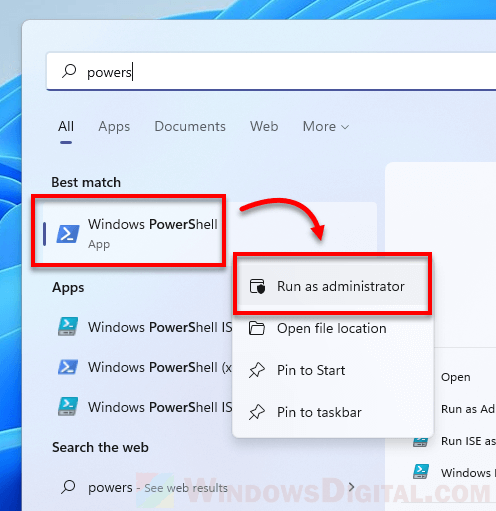
Alternatively, you can search for PowerShell through Start menu. Then, right-click Windows PowerShell from the search result and select Run as administrator.
Once you have an elevated (admin) Windows Terminal or PowerShell window opened, enter the following command to reset and reinstall Windows Defender in Windows 11.
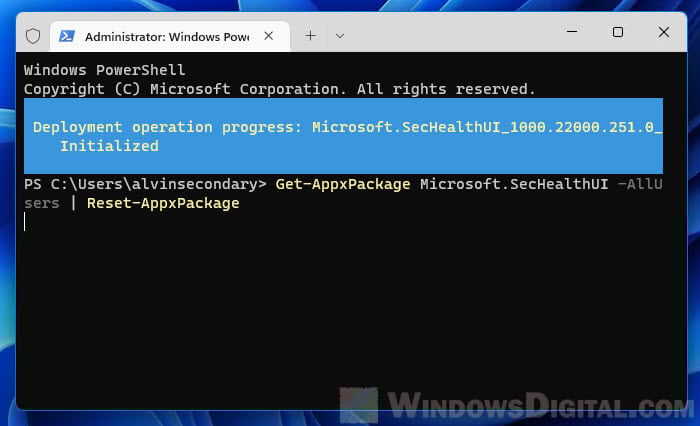
Get-AppxPackage Microsoft.SecHealthUI -AllUsers | Reset-AppxPackage
After executing the command, Windows Terminal will begin to reset Windows Defender and show a progress message that says “Deployment operation progress”. It may take a while for the process to complete.
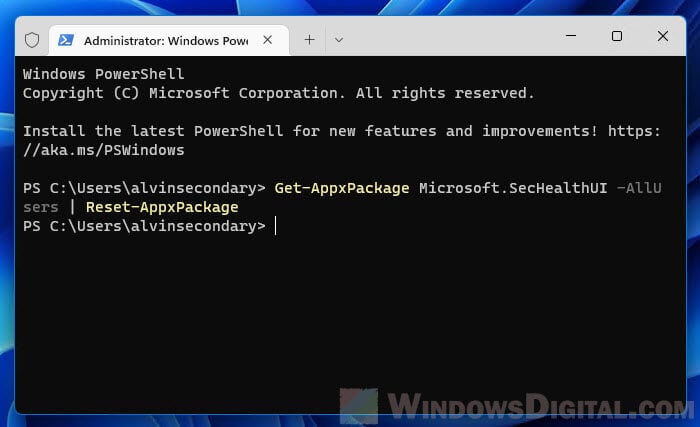
Once completed, the progress message will disappear and Windows Terminal will start at a new line, which indicates the previous command has been executed.
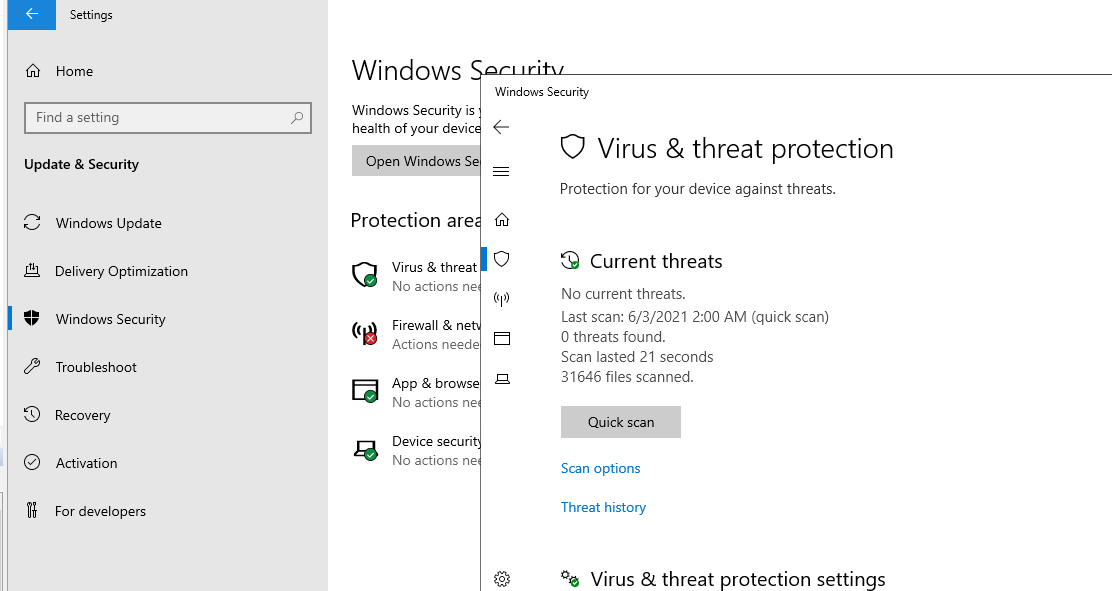
Now, you can press Win + i keys to open Settings and go to Privacy & security > Windows Security. This should open up the Windows Security (Windows Defender) settings like it used to.
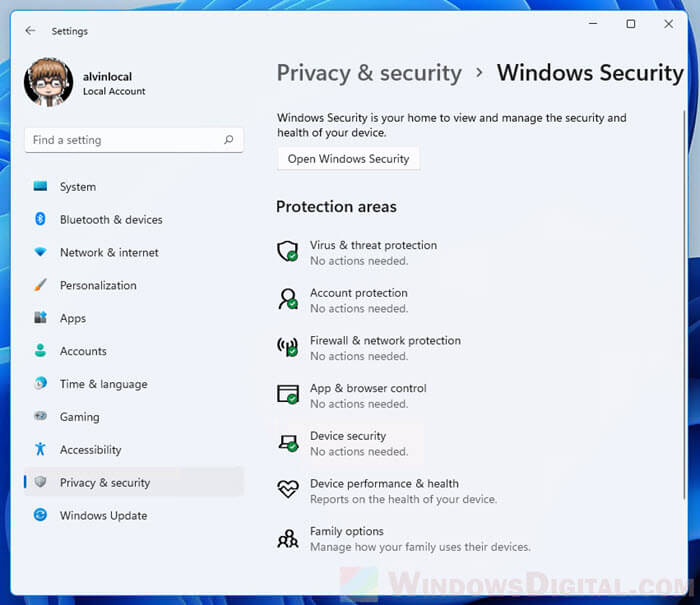
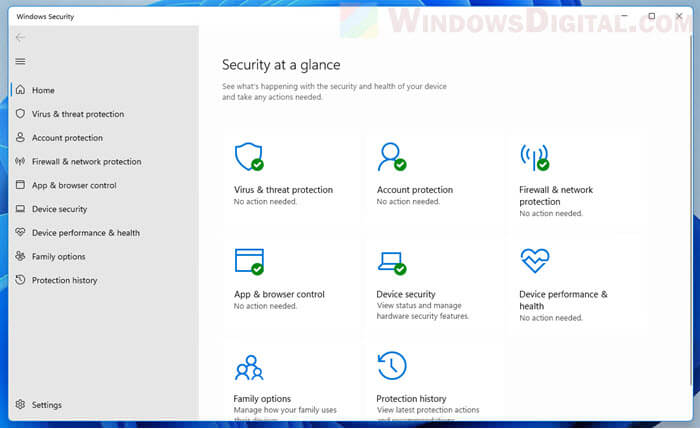
To further verify if Windows Defender is successfully installed, click on the “Open Windows Security” button to open the Windows Security window. From there, you can manage your computer’s security such as virus protection, firewall, network protection, browser control, etc.
PowerShell shows errors when executing the command
If the command above doesn’t work or if you receive errors when you execute the command, try the following commands instead to reinstall Windows Defender in Windows 11.
In an elevated (admin) Windows Terminal or PowerShell window, enter the following commands in the following order.
Set-ExecutionPolicy Unrestricted
Get-AppXPackage -AllUsers | Foreach {Add-AppxPackage -DisableDevelopmentMode -Register "$($_.InstallLocation)\AppXManifest.xml"}
Set-ExecutionPolicy Default
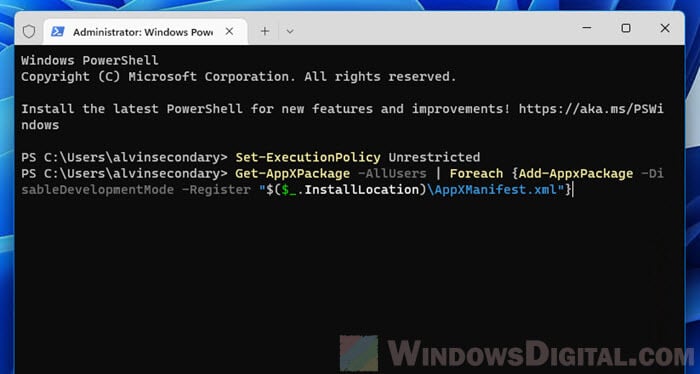
Since the command requires execution policy to be set to unrestricted in order to be executed successfully, you should set the execution policy back to its default (by running the third line of command as shown above) after the Get-AppXPackage process is completed.
If you receive an error that says “Access is denied”, it indicates that you do not have the rights to run the command. As mentioned above, you need to open Windows Terminal or PowerShell as administrator in order to execute the command successfully.
How to enable Windows Defender if you already have an existing antivirus software
If you already have an existing third party antivirus program actively running and protecting your PC, Microsoft Defender Antivirus will be disabled. However, you can re-enable Microsoft Defender periodic scanning to have it periodically check for threats in conjunction with your other antivirus software.
To enable Windows Defender with periodic scanning when you are already using an existing third party antivirus software, open Settings and navigate to Privacy & Security > Windows Security, then click the Open Windows Security button.
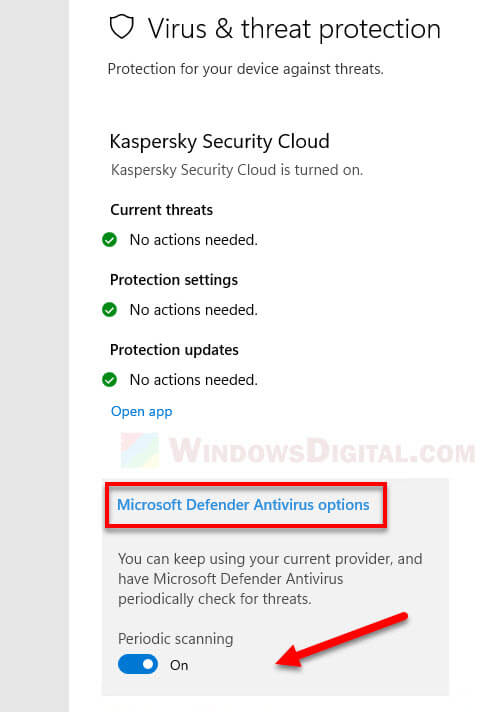
Next, select Virus & threat protection and click Microsoft Defender Antivirus options. This will expand the setting and you should then be able to see a toggle option. Toggle on the Periodic scanning option to enable Windows Defender periodic scan while also using your other antivirus software.
Readers help support Windows Report. We may get a commission if you buy through our links.
Read our disclosure page to find out how can you help Windows Report sustain the editorial team. Read more
Windows Defender missing on Windows 11 is one of the numerous problems users face when using Microsoft’s default antivirus on their PC.
In the past, users have complained that Windows 11 Defender is turned off. But some could not even find the app on their PC at all.
Thankfully, the fixes for this problem are not far-fetched, with a little tweak needed in most cases. Read on to find out what to do if Windows Defender is not installed on your Windows 11 device.
Why can’t I find Windows Defender?
There are various reasons why Windows Defender is not found in Windows 11, but we will highlight the most important ones:
- Malware infection – Usually, the first thing a virus or malware does is disable or eliminate the antivirus. Good third-party antiviruses are harder to counter.
- The service is not running – Though Windows Defender should show up even when the service is not running, this, coupled with other issues, can make the app inaccessible.
- Registry problems – Changes to the registry, wherein Windows Defender is disabled, could be an underlying cause. The administrator could take action in case you are using an office computer.
So, let’s find out how to fix things if Windows Defender is not working in Windows 11.
Quick Tip:
If you want to protect your PC on all fronts, use a security utility with multi-layered protection. ESET HOME Security Essential’s feature set aims to protect you from today’s cyber threats.
It includes advanced banking and payment protection, webcam and microphone security, parental controls, anti-malware, anti-ransomware, and more.
ESET HOME Security Essential
ESET technology protects every click, screen tap, and step in your digital life.
How can I fix the Windows 11 Windows Defender missing issue?
1. Install Windows Defender Using PowerShell
-
1.Right-click on the Start icon in the Taskbar, and then select the Windows Terminal (Admin) option.

-
2.Click the Yes button to allow Windows Terminal to make changes to your PC.
-
3. Paste the following commands individually and hit Enter after each:
Set-ExecutionPolicy UnrestrictedGet-AppXPackage -AllUsers | Foreach {Add-AppxPackage -DisableDevelopmentMode -Register "$($_.InstallLocation)\AppXManifest.xml"}
Using the commands below via Powershell should reinstall Windows Defender on your Windows 11 PC and solve the missing issue in no time.


The command above helps to reinstall all default Windows apps. This is especially useful if Windows Defender is not installed in Windows 11 due to file corruption during an upgrade.
2. Repair and reinstall Windows Defender
- Press Windows + S to open the Search menu, enter Terminal in the text field, right-click on the relevant search result, and select Run as administrator.

- Click Yes in the UAC prompt.

- Type/paste the following command and hit Enter:
Get-AppxPackage Microsoft.SecHealthUI-AllUsers | Reset-AppxPackage


Sometimes, Windows Defender might be installed, but the installation is either incorrect or incomplete. The command above will remove all components from the PC and reinstall Windows Defender in Windows 11.
To learn more, don’t miss our guide on how to reinstall Windows Security on Windows 11.
3. Perform a Windows update
- Press the Windows key, and select the Settings app.
- Select the Windows Update option on the left pane.

- Click the Check for updates button in the right pane.

- If an update is listed after the scan, download and installs it on the computer.


Windows update comes with fixes for bugs and other errors in the previous versions.
If Windows Security is missing in Windows 11, an update should have fixes for the bugs responsible for the error. Also, if it is due to an incomplete or incorrect update, this should solve the problem if done correctly.
4. Perform a System Restore
- Press Windows + R to launch the Run command, enter rstrui.exe in the text field, and click OK.

- Select Next in the System Restores window to proceed.

- Choose a restore point from the options provided, and click Next.
- Verify the restore details, and click on Finish to initiate the restore process.


If you noticed the Windows Defender link missing after installing an update in Windows 11 or making changes to the system, this fix could help you return to the previous state.
Select a restore point created before installing the new update, and things should return to normal.
- Recent Windows 11 update lets you disable profanity filter in voice typing
- Microsoft wants Windows 10 users to upgrade to Windows 11 or Copilot + PCs
- Windows 11 KB5055627 update makes File Explorer more fluid
- A few keyboard settings are moving from Control Panel to Settings app in Windows 11
- Details of Windows 11 25H2 spotted in the wild; likely to be a smaller update
Does Windows 11 have a built-in antivirus?
Yes, Windows 11 comes with Windows Security as the built-in antivirus. In case you are confused between the two, Windows Defender and Windows Security are the same thing.
The program efficiently identifies and eliminates malware and performs other essential functions to ensure security. But, in case you were looking for advanced security, we recommend using an effective third-party antivirus.
The Windows 11 Defender not installed problem is not the first faced by users. There have been complaints that Windows Defender is not opening or not enabled, among other issues.
Unlike some of these issues, this problem is not hard to fix, as shown above. We hope you find the helpful guide and get Windows Defender back to protect your PC.
Also, if you are wondering, Windows Defender can be downloaded from the Microsoft Store. This will download the Windows Defender 64-bit version in Windows 11.
Besides, find out what to do if you get the You’ll need a new app to open this windowsdefender link error in Windows 11.
Feel free to discuss the solution that worked for you in the comments section. You can also state any solution you tried successfully that is not in this guide.
Ola-Hassan Bolaji
Windows Hardware Expert
A Computer Engineering graduate, he has spent most of his life reading and writing about computers.
He finds joy in simplifying complex topics into simple solutions for PC users. The quality of his work and providing step-wise tested and proven solutions to PC issues are all that matter to him.
Away from computers, he is either reading or watching football!
В Windows Server 2016 и 2019 по умолчанию установлен и включен “родной” бесплатный антивирус Microsoft — Windows Defender (начиная с Windows 10 2004 используется название Microsoft Defender). В этой статье мы рассмотрим особенности настройки и управления антивирусом Windows Defender в Windows Server 2019/2016.
Содержание:
- Графический интерфейс Windows Defender
- Удаление антивируса Microsoft Defender в Windows Server 2019 и 2016
- Управление Windows Defender с помощью PowerShell
- Добавить исключения в антивирусе Windows Defender
- Получаем статус Windows Defender с удаленных компьютеров через PowerShell
- Обновление антивируса Windows Defender
- Управление настройками Microsoft Defender Antivirus с помощью GPO
Графический интерфейс Windows Defender
В версиях Windows Server 2016 и 2019 (в том числе в Core редакции) уже встроен движок антивируса Windows Defender (Защитник Windows). Вы можете проверить наличие установленного компонента Windows Defender Antivirus с помощью PowerShell:
Get-WindowsFeature | Where-Object {$_. name -like "*defender*"} | ft Name,DisplayName,Installstate

Однако в Windows Server 2016 у Windows Defender по-умолчанию нет графического интерфейса управления. Вы можете установить графическую оболочку Windows Defender в Windows Server 2016 через консоль Server Manager (Add Roles and Features -> Features -> Windows Defender Features -> компонент GUI for Windows Defender).
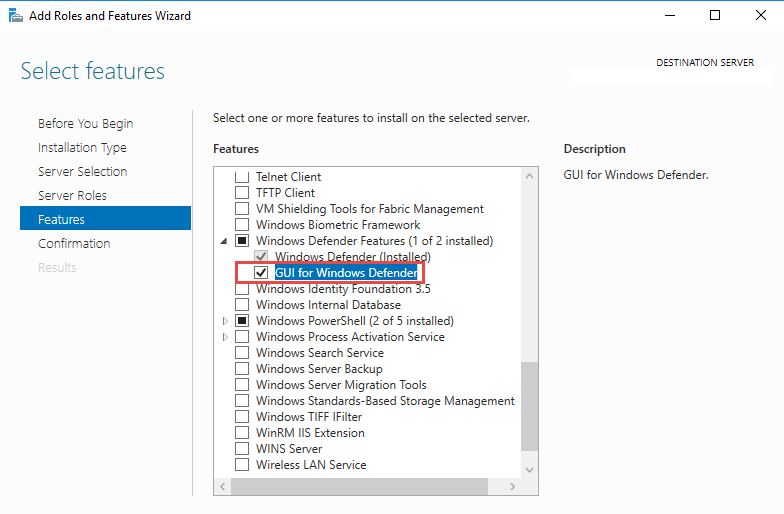
Установить графический компонент антивируса Windows Defender можно с помощью PowerShell командлета Install-WindowsFeature:
Install-WindowsFeature -Name Windows-Defender-GUI
Для удаления графического консоли Defender используется командлет:
Uninstall-WindowsFeature -Name Windows-Defender-GUI
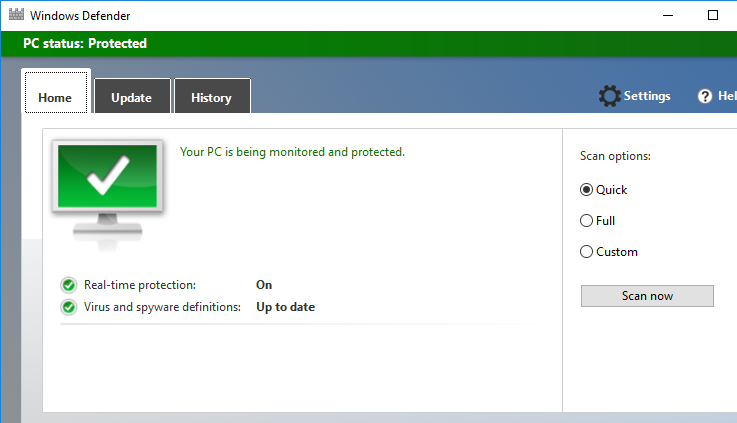
В Windows Server 2019 графический интерфейс Defender основан на APPX приложении и доступен через меню Windows Security (панель Settings -> Update and Security).
Настройка Windows Defender производится через меню “Virus and threat protection”.
Если вы не можете открыть меню настроек Defender, а при запуске апплета Windows Security у вас появляется ошибка “You’ll need a new app to open this windowsdefender”, нужно перерегистрировать APPX приложение с помощью файла манифеста такой командой PowerShell:
Add-AppxPackage -Register -DisableDevelopmentMode "C:\Windows\SystemApps\Microsoft.Windows.SecHealthUI_cw5n1h2txyewy\AppXManifest.xml"
Если APPX приложение полностью удалено, можно его восстановить вручную по аналогии с восстановлением приложения Micorosft Store.
Удаление антивируса Microsoft Defender в Windows Server 2019 и 2016
В Windows 10 при установке любого стороннего антивируса (Kaspersky, McAfee, Symantec, и т.д.) встроенный антивирус Windows Defender автоматически отключается, однако в Windows Server этого не происходит. Отключать компонент встроенного антивируса нужно вручную (в большинстве случаев не рекомендуется использовать одновременно несколько разных антивирусов на одном компьютере/сервере).
Удалить компонент Windows Defender в Windows Server 2019/2016 можно из графической консоли Server Manager или такой PowerShell командой:
Uninstall-WindowsFeature -Name Windows-Defender
Не удаляйте Windows Defender, если на сервере отсутствует другой антивирус.
Установить службы Windows Defender можно командой:
Add-WindowsFeature Windows-Defender-Features,Windows-Defender-GUI

Управление Windows Defender с помощью PowerShell
Рассмотрим типовые команды PowerShell, которые можно использовать для управления антивирусом Windows Defender.
Проверить, запущена ли служба Windows Defender Antivirus Service можно с помощью команды PowerShell Get-Service:
Get-Service WinDefend
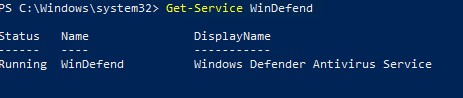
Как вы видите, служба запушена (статус –
Running
).
Текущие настройки и статус Defender можно вывести с помощью командлета:
Get-MpComputerStatus

Вывод комадлета содержит версию и дату обновления антивирусных баз (AntivirusSignatureLastUpdated, AntispywareSignatureLastUpdated), включенные компоненты антвируса, время последнего сканирования (QuickScanStartTime) и т.д.
Отключить защиту в реальном времени Windows Defender (RealTimeProtectionEnabled) можно с помощью команды:
Set-MpPreference -DisableRealtimeMonitoring $true
После выполнения данной команды, антивирус не будет сканировать на лету все обрабатываемые системой файлы.
Включить защиту в реальном времени:
Set-MpPreference -DisableRealtimeMonitoring $false
Более полный список командлетов PowerShell, которые можно использовать для управления антивирусом есть в статье Управление Windows Defender с помощью PowerShell.
Добавить исключения в антивирусе Windows Defender
В антивирусе Microsoft можно задать список исключений – это имена, расширения файлов, каталоги, которые нужно исключить из автоматической проверки антивирусом Windows Defender.
Особенность Защитника в Windows Server – он автоматически генерируемый список исключений антивируса, который применяется в зависимости от установленных ролей сервера. Например, при установке роли Hyper-V в исключения антивируса добавляются файлы виртуальных и дифференциальных дисков, vhds дисков (*.vhd, *.vhdx, *.avhd), снапшоты и другие файлы виртуальных машин, каталоги и процессы Hyper-V (Vmms.exe, Vmwp.exe)
Если нужно отключить автоматические исключения Microsoft Defender, выполните команду:
Set-MpPreference -DisableAutoExclusions $true
Чтобы вручную добавить определенные каталоги в список исключения антивируса, выполните команду:
Set-MpPreference -ExclusionPath "C:\Test", "C:\VM", "C:\Nano"
Чтобы исключить антивирусную проверку определенных процессов, выполните команду:
Set-MpPreference -ExclusionProcess "vmms.exe", "Vmwp.exe"
Получаем статус Windows Defender с удаленных компьютеров через PowerShell
Вы можете удаленно опросить состояние Microsoft Defender на удаленных компьютерах с помощью PowerShell. Следующий простой скрипт при помощи командлета Get-ADComputer выберет все Windows Server хосты в домене и через WinRM (командлетом Invoke-Command) получит состояние антивируса, время последнего обновления баз и т.д.
$Report = @()
$servers= Get-ADComputer -Filter 'operatingsystem -like "*server*" -and enabled -eq "true"'| Select-Object -ExpandProperty Name
foreach ($server in $servers) {
$defenderinfo= Invoke-Command $server -ScriptBlock {Get-MpComputerStatus | Select-Object -Property Antivirusenabled,RealTimeProtectionEnabled,AntivirusSignatureLastUpdated,QuickScanAge,FullScanAge}
If ($defenderinfo) {
$objReport = [PSCustomObject]@{
User = $defenderinfo.PSComputername
Antivirusenabled = $defenderinfo.Antivirusenabled
RealTimeProtectionEnabled = $defenderinfo.RealTimeProtectionEnabled
AntivirusSignatureLastUpdated = $defenderinfo.AntivirusSignatureLastUpdated
QuickScanAge = $defenderinfo.QuickScanAge
FullScanAge = $defenderinfo.FullScanAge
}
$Report += $objReport
}
}
$Report|ft

Для получения информации о срабатываниях антивируса с удаленных компьютеров можно использовать такой PowerShell скрипт:
$Report = @()
$servers= Get-ADComputer -Filter 'operatingsystem -like "*server*" -and enabled -eq "true"'| Select-Object -ExpandProperty Name
foreach ($server in $servers) {
$defenderalerts= Invoke-Command $server -ScriptBlock {Get-MpThreatDetection | Select-Object -Property DomainUser,ProcessName,InitialDetectionTime ,CleaningActionID,Resources }
If ($defenderalerts) {
foreach ($defenderalert in $defenderalerts) {
$objReport = [PSCustomObject]@{
Computer = $defenderalert.PSComputername
DomainUser = $defenderalert.DomainUser
ProcessName = $defenderalert.ProcessName
InitialDetectionTime = $defenderalert.InitialDetectionTime
CleaningActionID = $defenderalert.CleaningActionID
Resources = $defenderalert.Resources
}
$Report += $objReport
}
}
}
$Report|ft
В отчете видно имя зараженного файла, выполненное действие, пользователь и процесс-владелец.

Обновление антивируса Windows Defender
Антивирус Windows Defender может автоматически обновляться из Интернета с серверов Windows Update. Если в вашей внутренней сети установлен сервер WSUS, антивирус может получать обновления с него. Убедитесь, что установка обновлений одобрена на стороне WSUS сервера (в консоли WSUS обновления антивирусных баз Windows Defender, называются Definition Updates), а клиенты нацелены на нужный сервер WSUS с помощью GPO.
В некоторых случаях, после получения кривого обновления, Защитник Windows может работать некорректно. В этом случае рекомендуется сбросить текущие базы и перекачать их заново:
"%PROGRAMFILES%\Windows Defender\MPCMDRUN.exe" -RemoveDefinitions -All
"%PROGRAMFILES%\Windows Defender\MPCMDRUN.exe" –SignatureUpdate
Если на сервере нет прямого доступа в Интернет, вы можете настроить обновление Microsoft Defender из сетевой папки.
Скачайте обновления Windows Defender вручную (https://www.microsoft.com/en-us/wdsi/defenderupdates) и помесите в сетевую папку.
Укажите путь к сетевому каталогу с обновлениями в настройках Defender:
Set-MpPreference -SignatureDefinitionUpdateFileSharesSources \\fs01\Updates\Defender
Запустите обновление базы сигнатур:
Update-MpSignature -UpdateSource FileShares
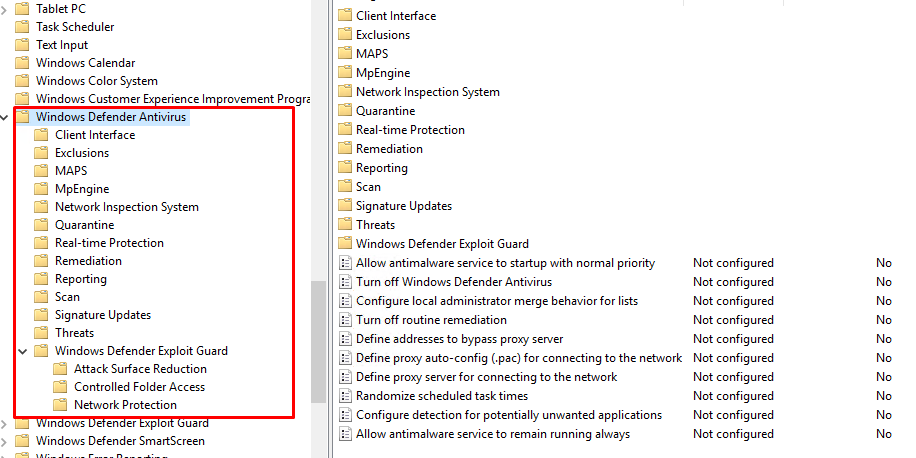
Управление настройками Microsoft Defender Antivirus с помощью GPO
Вы можете управлять основными параметрами Microsoft Defender на компьютерах и серверах домена централизованно с помощью GPO. Для этого используется отдельный раздел групповых политик Computer Configurations -> Administrative Template -> Windows Component -> Windows Defender Antivirus.
В этом разделе доступно более 100 различных параметров для управления настройками Microsoft Defender.
Например, для отключения антивируса Microsoft Defender нужно включить параметр GPO Turn off Windows Defender Antivirus.
Более подробно о доступных параметрах групповых политик Defender можно посмотреть здесь https://docs.microsoft.com/en-us/microsoft-365/security/defender-endpoint/use-group-policy-microsoft-defender-antivirus
Централизованное управление Windows Defender доступно через Advanced Threat Protection доступно через портал “Azure Security Center” (ASC) при наличии подписки (около 15$ за сервер в месяц).
Eager to know about ‘windows defender antivirus’ and install it? Then take a peek at this blog.
Here at Bobcares, we have seen several such Windows related queries as part of our Server Management Services for web hosts and online service providers.
Today we’ll see how to install windows defender antivirus.
A few facts about windows defender antivirus
The Microsoft Defender is an anti-malware component that Microsoft Windows provides. It is available on Windows Server 2016 and Windows Server 2019.
Also, it is referred to as the Endpoint Protection.
The functionality, configuration, and management are quite the same for the Microsoft Defender Antivirus on Windows 10 except for a few differences.
How to install Windows Defender Antivirus in Windows servers2016 and 2019
Now let’s take a look at how to install the Defender.
1. Enable the user interface on Windows Server 2016 or 2019
Microsoft Defender Antivirus is installed and functional on Windows Server 2016 and Windows Server 2019 by default. Also, the GUI is installed by default in some of the SKUs. However, in case, if it is not installed then you can add it by using the Add Roles and Features Wizard or PowerShell.
Turn on the GUI using the Add Roles and Features Wizard
- Use the Add Roles and Features Wizard.
- When you come across the Features step of the wizard which is present under Windows Defender Features, select the GUI for Windows Defender option.
Turn on the GUI using PowerShell
Run the below PowerShell cmdlet to enable the interface.
Install-WindowsFeature -Name Windows-Defender-GUI2. Install Microsoft Defender Antivirus on Windows Server 2016 or 2019
For installation, you can use either the Add Roles and Features Wizard or PowerShell to install Microsoft Defender Antivirus.
Use the Add Roles and Features Wizard
In Add Roles and Features Wizard, when you come across the Features step of the wizard, select the Microsoft Defender Antivirus option. Also, select the GUI for the Windows Defender option.
Use PowerShell
Run the below command to install Microsoft Defender Antivirus using the PowerShell.
Install-WindowsFeature -Name Windows-Defender3. Verify Microsoft Defender Antivirus is running
Run the below PowerShell cmdlet to verify that Microsoft Defender Antivirus is running on the server
Get-Service -Name windefendRun the below PowerShell cmdlet to verify that firewall protection is turned on or not.
Get-Service -Name mpssvcTo verify that Microsoft Defender Antivirus is running or not, you can use Command Prompt as an alternative to PowerShell. For that, run the below command from a command prompt.
sc query Windefend4. Update antimalware Security intelligence
You must have the Windows Update service running so that you will get an updated antimalware Security intelligence. In case, if you are using update management service, like Windows Server Update Services (WSUS), make sure that updates for Microsoft Defender Antivirus Security.
By default, on Windows Server 2016 or 2019, the Windows Update doesn’t download and install updates automatically. However, you can change this configuration by using one of the following methods.
Method 1: Windows Update in Control Panel
- ‘Install updates automatically’ results in all updates being automatically installed, including Windows Defender Security intelligence updates.
- ‘Download updates but let me choose whether to install them’ will allow Windows Defender to download and install Security intelligence updates automatically. But other updates aren’t installed automatically.
Method 2: Group Policy
- You can set up and manage Windows Update by using the settings available in Group Policy, in the following path: ‘Administrative Templates\Windows Components\Windows Update\Configure Automatic Updates’
Method 3: The AUOptions registry key
- The following two values will allow Windows Update to automatically download and install Security intelligence updates.
– 4 Install updates automatically. This value will result in all updates being automatically installed, including Windows Defender Security intelligence updates.
– 3 Download updates but let me choose whether to install them. This value will allow Windows Defender to download and install Security intelligence updates automatically. But other updates aren’t installed automatically.
Ensure that you enable ‘Windows Error Reporting service’ and ‘Windows Update service’ so that protection from malware is maintained.
[Need any further assistance with Windows queries? – We are here to help you.]
Conclusion
In today’s writeup, we saw how to install windows defender antivirus.
PREVENT YOUR SERVER FROM CRASHING!
Never again lose customers to poor server speed! Let us help you.
Our server experts will monitor & maintain your server 24/7 so that it remains lightning fast and secure.
GET STARTED
var google_conversion_label = «owonCMyG5nEQ0aD71QM»;