
Созданная более 30 лет назад, именуемая BIOS базовая система ввода-вывода порядком устарела, и всё большее количество компьютеров сегодня выпускается на базе UEFI — расширяемом интерфейсе прошивки, который можно условно назвать новым поколением BIOS. И хотя UEFI появился не вчера и даже не позавчера, для многих пользователей он остаётся ещё чем-то новым и малопонятным, что приводит к разного рода недоразумениям. Например, почему-то считается, что на ПК с UEFI принципиально нельзя установить Windows 7 x64, если он не поддерживает режим CSM, в котором «семёрка» показывает лучшую производительность.
Как установить Windows 7 на компьютер с UEFI без поддержки CSM с помощью FlashBoot
Это неверно. CSM не является чем-то критически важным для установки Windows 7 на UEFI, ведь вы можете запустить эту систему в режиме UEFI на не поддерживающих CSM гипервизоре bhyve во FreeBSD или на виртуальной машине VirtualBox, настроенной под Windows 8 x64, предварительно интегрировав в установочный образ паравиртуальные драйвера VirtualBox VBoxVGA и VBoxSVGA. А раз так, провернуть всё это можно и на железе, главное — знать, как сделать это правильно.
Что такое CSM
Если не вдаваться глубоко в технические подробности, CSM — это модуль совместимости, режим, позволяющий устанавливать и загружать старые операционные системы на компьютерах с UEFI так же, как если бы вместо UEFI в них использовался классический BIOS, примером чему может служить загрузка с MBR-дисков на UEFI. Эта опция в интерфейсе UEFI (в зависимости от версии) может называться CMS Boot, UEFI and Legacy OS или CMS OS. При её использовании обычно приходится отключать Secure Boot, работающий только с «чистой» UEFI. Проблема в том, что в самых новых материнских платах CSM может и не поддерживаться, ведь и эта технология постепенно уходит в прошлое.
В поиске решения
Из примера с установкой 64-разрядной Windows 7 на VirtualBox в режиме UEFI можно видеть, что VGA-совместимый GPU с правильно сопоставленными портами ввода-вывода и обработчиком INT 10H действительно необходим, причём INT 10H обычно предоставляется прошивкой при включённом режиме CSM. Начиная с Windows 8, обработчик INT 10H перестал использоваться для загрузки системы, а вместе с ним были удалены эмулятор BIOS и драйвер минипорта VGA, а вместо последнего стал использоваться интегрированный видеодрайвер на базе протокола вывода графики UEFI, также известный как GOP.
Так может быть для загрузки Windows 7 на UEFI будет достаточно интегрировать модифицированный обработчик INT 10H, умеющий использовать тот же протокол GOP? Увы, эксперименты показали, что этого оказалось недостаточно, так как помимо вызова VGA через INT 10H, через порт ввода-вывода VGA происходит обращение к ядру операционной системы (файл NTOSKRNL.EXE). Чтобы решить проблему загрузки, разработчикам пришлось создать патч для NTOSKRNL.EXE, создающий специальный подпроцесс при каждой загрузке Windows.
FlashBoot как итог решения проблемы
«Видимым» результатом усилий разработчиков стала утилита FlashBoot Pro — простой и интуитивно понятный инструмент для создания загрузочных флешек с пропатчиванием Windows 7 x64, благодаря чему эту систему можно устанавливать на новые компьютеры с UEFI без поддержки режима совместимости CSM. Кроме того, FlashBoot и ее профессиональная версия FlashBoot Pro может быть использована для «создания» переносных, загружающихся с флешки систем Windows, создания образов флешек (в том числе загрузочных) и восстановления из них на других переносных накопителях, а также их форматирования и полной очистке. FlashBoot Pro дополнительно поддерживается создание клонов Windows 7, 8, 8.1 и 10 с возможностью интеграции драйверов USB 3.0, NVMe и AHCI/RAID, создание загрузочных флешек с Windows XP и «живых» дисков BartPE (мини-версия XP), а также самораспаковывающихся архивов.
Создание загрузочной флешки в FlashBoot
Приведём пример создания загрузочной флешки с Windows 7 x64 с пропатченными файлами загрузки для последующей установки системы на новые ПК с UEFI без поддержки CSM. Первым делом находим Free-версию программы на официальном сайте www.prime-expert.com/flashboot (Pro-версию можно только купить), устанавливаем и запускаем. Подключаем к компьютеру флешку и жмём в открывшемся окне приложения «Next».
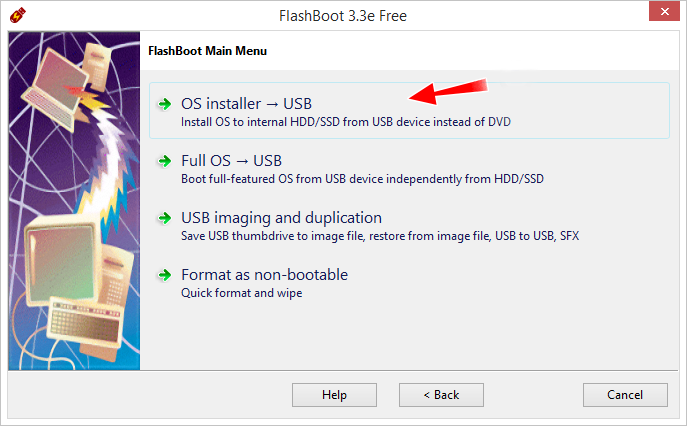
В следующем окне выбираем опцию записи дистрибутива на флешку «OS installer → USB». Далее программа предложит выбрать метод создания загрузочного носителя.
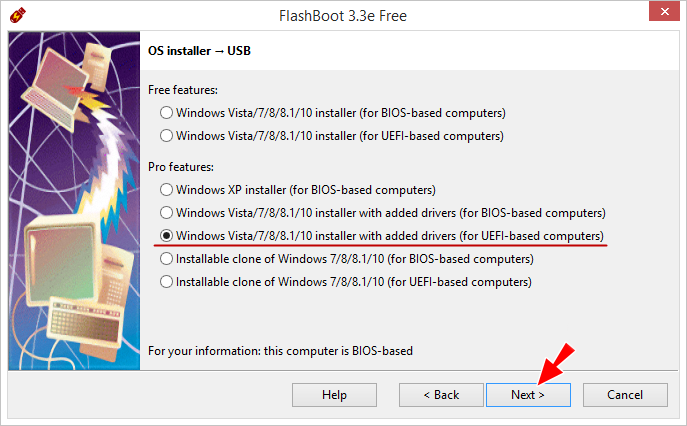
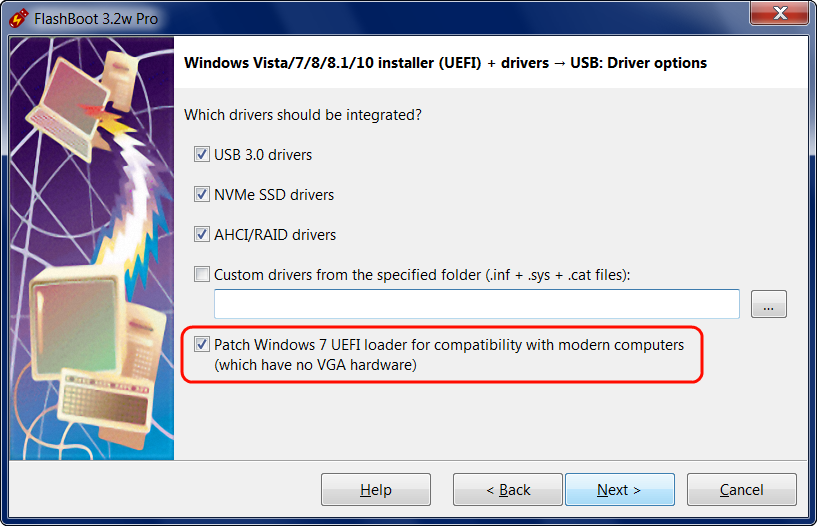
Поскольку нам нужна загрузочная UEFI-флешка без поддержки CSM выбираем опцию «Windows Vista/7/8/8.1/10 installer with added drivers (for UEFI-based Computers)», доступную только в Pro-версии. Она же позволяет интегрировать в процессе создания загрузочного накопителя драйвера. Если нужна UEFI-флешка с поддержкой CSM, подойдёт и «Windows Vista/7/8/8.1/10 installer (for BIOS-based Computers)».
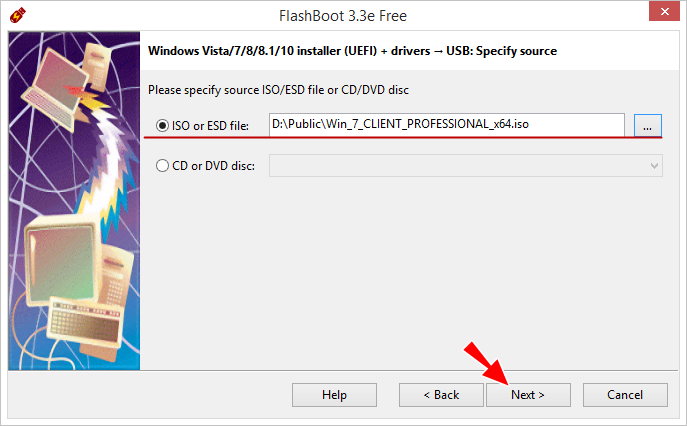
Следующий шаг — выбор источника, которым может служить как установочный ISO-файл, так и записанный на DVD-диск дистрибутив системы.
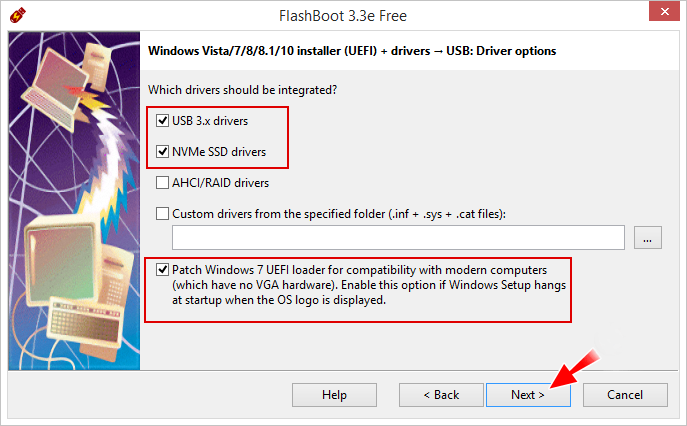
Жмём «Next» и видим, что FlashBoot уже включила интеграцию драйверов USB 3.x и NVMe, а также пропатчивание загрузочных файлов. Активировав пункт «Custom drivers from the specified folder…», можно добавить свои драйвера, указав файлы INF, SYS и CAT.
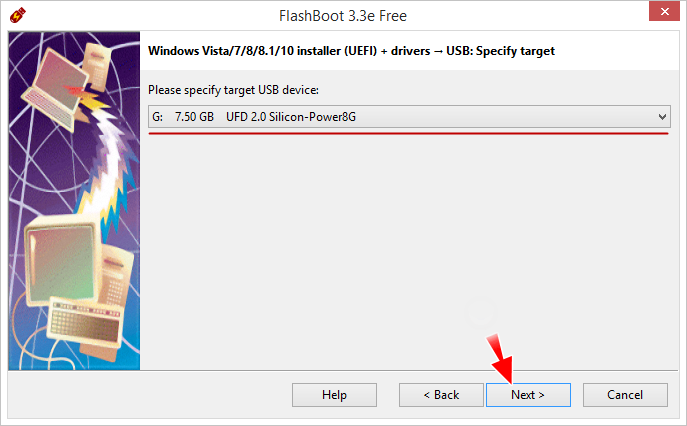
После очередного нажатия «Next» выбираем в выпадающем списке подключённую флешку и снова нажимаем «Next».
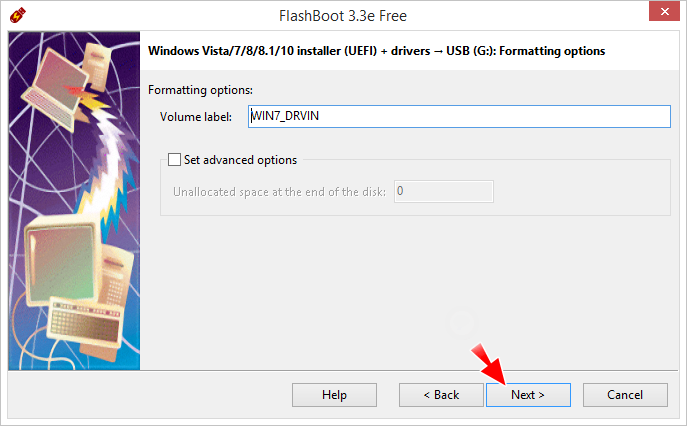
На следующем этапе можно дать метку тома и указать в дополнительных настройках «Set advanced options» нужно ли добавлять в конец флешки нераспределённое пространство, чего мы делать не станем.
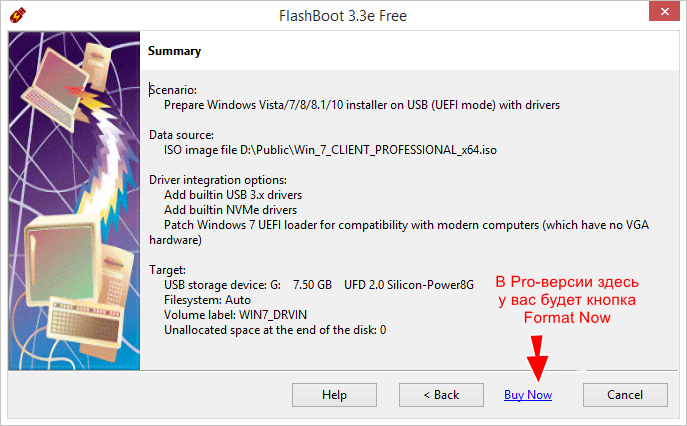
В итоге перед вами предстанет список запланированных операций, запускаем их нажатием «Format Now». Процедура записи довольно длительная, копирование файлов образа размером 5,5 Гб на флешку объёмом 7,5 Гб, подключённую по интерфейсу USB 2.0 у нас заняла почти два часа!
За прогрессом записи вы можете наблюдать в окошке мастера. По успешном завершении процедуры вы получите сообщение «Completed successfully. Click OK to exit». Готово, можете использовать флешку для установки Windows.

FlashBoot Pro со скидкой 40% или как мы пытались получить бесплатную версию программы для создания загрузочных флешек.
Читайте наш специальный раздел об установке Windows 7 на новые ноутбуки и ПК с интерфейсом UEFI
It’s a well-known fact that Windows 7 works best in CSM mode, which, unfortunately, is not supported by the firmware of many modern motherboards and laptops.
Contrary to the popular belief, it’s possible to install Windows 7 x64 to the pure UEFI systems without CSM support. Read below to find out how.
| Contents |
|
1. Counter-examples
A really good counter-example why CSM support is not really necessary for Windows 7 installation
is bhyve virtual machine manager in FreeBSD which supports 64-bit
editions of Windows 7 and Windows 2008 Server R2, despite the complete lack of CSM support.
Also it’s possible to run Windows 7 x64 in the UEFI-based virtual machine of Oracle VirtualBox
(which apparently has no CSM support), which was configured for Windows 8 x64 guest OS,
by pre-integrating VirtualBox paravirtual VBoxVGA/VBoxSVGA drivers to the Windows 7 x64
installation image (install.wim).
2. History of our research and development
Virtual machine counter-examples listed above indicate that what is really important for Windows 7
is a VGA-compatible GPU with properly mapped I/O ports and INT 10H handler (the former depends
mostly on the chipset and the latter is usually provided by firmware when CSM mode is enabled
in the settings). By the way, Windows 7 and Windows 2008 Server R2 never directly run the INT
10H handler installed by BIOS/CSM, instead they contain an emulator in the VGA miniport driver
(VIDEOPRT.SYS) which runs 16-bit BIOS code in a sandbox, without leaving 64-bit protected mode
and without halting other CPU cores.
Starting from Windows 8, everything has changed: INT 10H handler is no longer required by Windows
to boot, BIOS emulator and entire VGA miniport driver both are gone, instead Windows basic display
driver relies upon UEFI Graphics Output Protocol aka GOP.
So, the main question is: will it be enough to provide a custom INT 10H handler (by implementing
a specialized UEFI preloader) to boot Windows 7 successfully on the modern pure UEFI systems? This
custom INT 10H handler can rely on UEFI GOP to provide some sort of «mini CSM» (not a real thing,
but just enough for VIDEOPRT.SYS to boot Windows 7).
As our experiments demonstrated, this, unfortunately, is not enough. In addition to invoking VGA
BIOS via INT 10H in VIDEOPRT.SYS, Windows 7 makes direct reads and writes to/from VGA I/O ports
right from the OS kernel (NTOSKRNL.EXE). First of all, Windows 7 OS kernel has
VgaIsPresent() function which may halt boot process indefinitely
on the «glowing logo» phase if VGA-compatible GPU does not respond on the standard I/O ports
(0x3C0-0x3DF). Also, Windows 7 OS kernel has several other functions, such as
VidInitialize(), VgaInterpretCmdStream(),
VidSolidColorFill(), SetPixel() etc,
which perform direct I/O on VGA ports for drawing BSoD (blue screen of death).
Therefore, we continued development of our preloader for Windows 7 by introducing a patch for
NTOSKRNL.EXE to replace all instances of direct I/O via VGA ports with updates of framebuffer provided
by UEFI GOP (in similar manner to Windows 8+). This patch is activated every time Windows boots,
so NTOSKRNL.EXE is updated on the fly, only in the RAM, and on-disk version of this file is not
affected (it may undergo any Windows 7 updates, it may be contained inside BOOT.WIM etc).
3. Final result of our effors
Final result of our efforts: Windows 7 x64 with patched UEFI loader boots fine on pure UEFI systems
(without CSM and without properly mapped VGA I/O ports): we successfully tested it and confirmed
to work on ASUS C8HM70-I, Dell Inspiron 3584, HP OMEN X 17-ap001ur, Atomic Pi,
bhyve virtual machine with VGA emulation disabled,
VirtualBox virtual machine configured in UEFI mode for Windows 8 x64
guest OS. Thus, it is no longer necessary to disable Vga
and VgaSave services in registry. It’s no longer necessary to set
«novesa on» option via bcdedit. Safe Mode and Windows Recovery work
as expected. Last but not least: Windows 7 BSoD works as expected! 
«Windows 7 x64 UEFI loader patch for VGA emulation on the pure UEFI systems» has become a feature
of our software product (FlashBoot Pro). In addition to patching
the loader, FlashBoot Pro has prepackaged generic drivers for USB 3.x and NVMe controllers, which
can be slipstreamed to Windows 7 Setup just by a few checkboxes ticked on (which greatly simplifies
installation of Windows 7 to modern computers for beginners).
31 минуту назад, Std_fast сказал:
Да уж windows 7 уже старичок и под него дров не пишут особенно на новое железо, поддержка завершилась.
да я вообще удивился тому, что 7-ку можно поставить на uefi без поддержки csm (ее в этих ноутах, которые у меня, нет априори)……
в итоге после того, как установил, проблемы осталось две….это драйвер на тачпад и драйвер встроенной графики….никак не хотели вставать
но порадовало, что в сборке, которую предложил @logg , из коробки есть поддержка usb 3.0 и м2 накопителей (хоть с этим проблем не возникло)
ну и по итогу я убил 3-4 часа только на то, чтобы найти драйвера и запихнуть их в этот ноут…но как итог, с огромным количеством костылей, я все таки поставил 7-ку на этот ноут и даже работает)
Page 1 of 25
-
It’s a well-known fact that Windows 7 works best in CSM mode, which, unfortunately, is not supported by the firmware of many modern motherboards and laptops.
Contrary to popular belief, it’s possible to install Windows 7 x64 to the pure UEFI systems without CSM support. For example, «bhyve» virtual machine manager in FreeBSD supports 64-bit editions of Windows 7 and Windows 2008 Server R2, despite the complete lack of CSM support.
What is really important for Windows 7 is a VGA-compatible GPU with properly mapped I/O ports and INT 10H handler (the former depends mostly on the chipset and the latter is usually provided by firmware when CSM mode is enabled in the settings). By the way, Windows 7 and Windows 2008 Server R2 never directly run the INT 10H handler installed by BIOS/CSM, instead they contain an emulator in the VGA miniport driver (VIDEOPRT.SYS) which runs 16-bit BIOS code in a sandbox, without leaving 64-bit protected mode and without halting other CPU cores.
Starting from Windows 8, everything has changed: INT 10H handler is no longer required by Windows to boot, BIOS emulator and entire VGA miniport driver both are gone, instead Windows basic display driver relies upon UEFI Graphics Output Protocol aka GOP.
So, will it be enough to provide a custom INT 10H handler (by implementing a specialized UEFI preloader) to boot Windows 7 successfully on the modern pure UEFI systems? This custom INT 10H handler can rely on UEFI GOP to provide some sort of «mini CSM» (not a real thing, but just enough for VIDEOPRT.SYS to boot Windows 7).
As our experiments demonstrated, this, unfortunately, is not enough. In addition to invoking VGA BIOS via INT 10H in VIDEOPRT.SYS, Windows 7 makes direct reads and writes to/from VGA I/O ports right from the OS kernel (NTOSKRNL.EXE). First of all, Windows 7 OS kernel has VgaIsPresent() function which may halt boot process indefinitely on the «glowing logo» phase if VGA-compatible GPU does not respond on the standard I/O ports (0x3C0-0x3DF). Also, Windows 7 OS kernel has several other functions, such as VidInitialize(), VgaInterpretCmdStream(), VidSolidColorFill(), SetPixel() etc, which perform direct I/O on VGA ports for drawing BSoD (blue screen of death).
Therefore, we continued development of our preloader for Windows 7 by introducing a patch for NTOSKRNL.EXE to replace all instances of direct I/O via VGA ports with updates of framebuffer provided by UEFI GOP (in similar manner to Windows 8+). This patch is activated every time Windows boots, so NTOSKRNL.EXE is updated on the fly, only in the RAM, and on-disk version of this file is not affected (it may undergo any Windows 7 updates, it may be contained inside BOOT.WIM etc).
Final result of our efforts: Windows 7 x64 with preloader boots fine on pure UEFI systems (without CSM and without properly mapped VGA I/O ports): we successfully tested it and confirmed to work on ASUS C8HM70-I, Dell Inspiron 3584, HP OMEN X 17-ap001ur, Atomic Pi, «bhyve» virtual machine with VGA emulation disabled, «VirtualBox» virtual machine configured in UEFI mode for Windows 8 guest OS. Thus, it is no longer necessary to disable Vga and VgaSave services in registry. It’s no longer necessary to set «novesa on» option via bcdedit. Safe Mode and Windows Recovery work as expected. Last but not least: Windows 7 BSoD works as expected!
The only drawback of this approach is that screen resolution is fixed at 1024×768 with black sidebars added as necessary to fill in for the native resolution of the LCD screen. But after installation of the native GPU drivers (from Intel, AMD or NVIDIA) everything goes back to normal. Black sidebars remain at boot time only, when animated OS logo is displayed by Windows 7 via standard VGA driver.
`Windows 7 x64 preloader to provide VGA emulation on the pure UEFI systems’ has become a feature of our software product (FlashBoot Pro). In addition to patching the loader, FlashBoot Pro provides a set of prepackages drivers for USB 3.x, NVMe and AHCI RAID controllers, which can be integrated to Windows 7 Setup just by a few checkboxes ticked on (driver integration is hardly a suprise for a seasoned Windows 7 installers from this forum, and was meant to simplify this matter for beginners).
Right now we are running a giveaway of 10 licenses for FlashBoot Pro on MyDigitalLife forums, so if you are interested in this topic (installation of Windows 7 to modern motherboards and laptops without CSM support, in the pure UEFI mode), please feel free to enroll.
-
Completely unnecessary.
Just integrate vendor specific video drivers (Intel, nVidia or AMD) to Windows 7 install.wim file, then use Windows 10 installer in place of Windows 7 installer. In other words, just copy your modified install.wim from Windows 7 to Windows 10 installation DVD.It is also required to replace Windows 7 boot manager (bootmgr.efi) with that of Windows 10, either inside install.wim file or on an installed system (on EFI system partition).
See my these 2 postsSo, I see no reason to emulate INT 10h for Windows 7. As I have tested above solution on Lenovo ThinkCenter M82 with UEFI enabled and CSM disabled.
Even Secure Boot enabled work as expected. -
In your approach, Safe Mode / Windows Recovery won’t work. And BSoDs won’t be displayed (computer will just freeze). Also there may be early BSoDs like ACPI_BIOS_ERROR and INACCESSIBLE_BOOT_DEVICE which appear before video driver is loaded, so it’s nice to have them as well (with all details included), instead of usual small frozen red dot above «Starting Windows».
-
AFAIK, vendor specific drivers could be added to Windows Recovery (winRE.wim) in the same way as it could be added to install.wim.
Incidentally, winRE.wim resides inside install.wimYou are right, but I haven’t seen accidental BSoD for many, many years. It never happens on properly installed OS (at least never happened to me).
If I see it, I will be almost sure about hardware failure. -
You could use boot.wim from Windows 10 along with entire Windows 10 installation DVD, so you use its drivers.
Only install.wim from Windows 7 is needed.
-
Last time I checked, Windows 7 UEFI loader was able to boot Windows 10 without any problems. Boot menu was presented in text mode (akin to «bootmenupolicy legacy» bcdedit option of Windows 8+), but otherwise it was fine, both in cold boot mode (via winload.efi) and dehibernation mode (via winresume.efi).
It works fine because OS-specific boot logic is contained within \Windows\System32\winload.efi, and early bootloader bootmgfw.efi merely displays boot menu, activates recovery/dehibernation boot path if necessary, and transfers control to the next bootloader in chain.
But, given Windows 10 bad habit to continuously update everything in sight, UEFI loader included, I’d rather moved patched Windows 7 UEFI loader along with its BCD hive to the small separate partition and added third-party boot manager like REFind to choose between Windows 7 and Windows 10 UEFI loaders in dual-boot configuration.
-
Not sure what you mean in «use its (boot.wim) drivers». After deploying OS («extracting» OS from WIM/ESD file to target storage media) via official Setup app from ISO or other means, user then boots the OS for 1st time. There is a «device configuration» stage (PnP stage) where devices like (i)VGA are detected and, if they exist in the deployed OS driver store, suitable drivers (native/OEM) are installed. They won’t install (will be ignored/rejected, specially in Win x64 scenarios) if they don’t meet the described properties.Actually I’ve never tried to boot full Win10 OS via Win7 efi bootloader, but I can’t boot my custom Win10 PE with Win7 efi bootloader, so I’m using Win10 one. I will try again using untouched boot.wim from one of the recent Win10 releases, just to be sure it’s not just my specific Win10 PE. In any case, that sounds great, you have it covered.
Also, I like rEFInd
Some users like to boot in Safe Mode to DDU VGA drivers. Other scenarios might be borderline, I have to agree here, but as I’ve said having it available is better than not.
-
Does this method also solve that annoying message saying that bios is not acpi compilant?
The BIOS in this system is not fully ACPI compliant. Prease contact your system vendor for an updated BIOS.
Technical information:
Stop: 0x000000A5 (0x0000000000000011, 0x0000000000000008, 0xFFFFFA80074416E8, 0x0000000020160422) -
@Atak_Snajpera
No.Happens with Ryzen APU, right?
It’s another issue, nothing to do with the UEFI booting subject of this topic.
Stop hovering to collapse…
Click to collapse…
Hover to expand…
Click to expand…
-
I wonder if there is a forum where people discuss their success or failure when using the FlashBoot software. I searched with Google but I wasn’t able to find anything.
-
That is really odd.
@LostED, please let us know if the no CSM fix does really work.
Stop hovering to collapse…
Click to collapse…
Hover to expand…
Click to expand…
-
I have the same problem, albeit trying with Flashboot PRO on an ASUS G731GU with i7-9750H (CannonLake-H?? I believe..)
Software (flashboot pro) works fine with some standard ~3GB size Win7 x64 SP1 iso, adding USB, NVME and whatnot as well as the preloader as said in OP — although(!) a newer, bigger 5.5GB ISO downloaded with Windows-ISO-Downloader (August 2018 version) is creating problems during driver & preloader integration (size errors, not enough space etc, probably some file exceeds fat32 limitation?).
USB memory boots fine in pure uefi (3.0) mode, no more red bar on top but i get the acpi error ( Don’t know what drivers (if any) to integrate, I’ve tried some varios acpi / chipser drivers from win-raid forums, like canonkong’s ACPITME / EHCI(AMT) driver for win7 64bit of new Intel chipset systems, or Fernando’s Latest «pure» Intel Chipset Device *.INF files for all Intel systems from 6-Series up (including CannonLake-H), as well as the ones from asus’s support page (although those are for win10).
I’m stuck atm at what more can I do to use this method which seems very easy and hassle free for me (not a pro as many of you)
In any case, do you guys believe I have a better chance eventually with wkeller’s suggested method, of using Windows 10 installer instead of 7’s albeit with the necessary changes? Seems a lot to do, and I do not have the required knowledge I fear, if there’s a (as much as possible) simple how-to on this (starting from a Win7x64 ISO and a say, Win19x64 1909 ISO, what comamnds to execute, what files to replace, from start to end — I would greatly appreciate. Right now I don’t have the will anymore to try varios acpi or chipset drivers blindly, rebuilding USB sticks time and again, it’s tiresome
-
Stop error A5 is related to ACPI DSDT table of BIOS.
Flashboot Pro won’t help you with this.Intel and manufacturers are building a DSDT table that is not compatible with Windows 7. Yes, it’s on purpose.
Please try Windows 8.1 to see if it is also affected.
Stop hovering to collapse…
Click to collapse…
Hover to expand…
Click to expand…
-
Updates,
Now I’m trying to install Windows 7 on a pure UEFI laptop with «Windows 7 Image Updater — SkyLake\KabyLake\CoffeLake\Ryzen Threadripper» by Atak_Snajpera which already uses Integrates installer from Windows 10. I can get to NVME SSD partitioning part and copying files, but after the first restart i get the top red bar due to GOP video and lack of VGA.
I know i have to disable VGA drivers and insert vendor drivers, i have tried various commands, bat files, etc but i’m failing, surely doing somethin wrong, please please please HELP me cause i’m goint nuts ((
so to make things easier, i have a USB stick with Bob.Ombs.Modified.Win10PEx64.v4.8 for a live PE medium.
I have another USB stick with en_windows_7_ultimate_with_sp1_x64_dvd_u_677332, modified with
Windows 7 Image Updater — SkyLake\KabyLake\CoffeLake\Ryzen Threadripper by Atak_Snajpera with integrated installer from Windows 10 (among updates, various needed drivers etc).I boot Win10PE and i have:
RAMDisk (B: ) (from WinPE)
Local Disk (C: ) — Windows partition from NVME ssd made with 7 installer up to the point of first restart, after copying files. (so no more acpi error with win10 installer)
Windows7x64 (D: ) — from USB stick, the one with winx64 updated with image updater by Atak_Snajpera
UEFI_NTFS (E: ) — another small 494KB partition from the USB stick, i think Rufus makes it? as D: is of ntfs format, probably due to big install.wim? anyway
and
Boot (X: ) (from WinPE as well, i guess)So next, what do i do?
What commands do i execute and where, to either:
a) disable vga on the already (half installed) windows 7 on C: (if possible) and also integrate intel graphics additionally, or
b) disable vga on the USB stick with 7 installer, D: , integrate intel graphics and start installer from scratch, again.
Please help me, cause i fell like the ultimate noob atm
-
Another update,
Unfortunately nothing seemed to work after more than 2 days of various tries, fixes etc, probably due to that ACPI DSDT table as daniel_k was suggesting
Managed to put the right commands on cmd on a bootable Win10PE to disable vga, after rebuilding the iso with Image updater as well as slipstreaming UHD 630 graphics (by canonkong from win-raid forums, also had other 2 variants) and geforce 1660ti, but still no good.
Had another try yesterday starting from a clean iso, working with Flashboot Pro to integrate the preloader only (for UEFI GOP to/from VGA), then working with Gigabyte’s Windows USB Installation Tool to integrate more USB/AHCI/nvme/kb’s whatever (though maybe it might add something I might skip), then working with NTLite to integrate GTX 1660ti drivers as well as canonkong’s UHD 630 drivers, plus Fernando’s (from win-raid) Latest «pure» Intel Chipset Device *.INF files for all Intel systems from 6-Series up, plus canonkong’s ACPITME / EHCI(AMT) Drivers & Fake Drivers for SMBus Controller, SPI Controller, Intel Serial IO GPIO Host Controller then finally working with Windows_7_Image_Updater for final goodies of various other drivers and Windows’ 10’s updated installer.. which went alright with no errors on all software, but to no avail, as, just the same, setup launches, I’m able to partition, copy files etc, reboot, preloader kicks in after first restart in 1024×768 as it should but i get to the acpi bsod it’s killing me inside spending so much time to build these isos, time and time again And today I had to give back the laptop to the guy who owns it, without completing my challenge unfortunately
I didn’t have the time to lunch a Windows 8.1 installer as daniel_k suggested to see if it works, at the end of the day the feeling is that if only i would find some right acpi inf files for this specific laptop to skip this bsod I would be in desktop mode already.
At the end of the day, since I’m posting in author’s topic with other problems for which I apologize, just want to say as well that the program works as expected and does what it advertises, which by the way is quite a brilliant ideea imo. Just a shame my problems are further down the road. Worth a try, I guess.
Thanks all peope who gave me advice and help in private messages and posts, here and in other forums as well, thought sharing it here might maybe help others in the future. Good luck, and thanks again.
-
I was interested in doing this a few years ago, I came across a GitHub project called VgaShim, written for a Mac laptop. Just posting in case some were unaware.
-
Page 1 of 25
Всем привет и хороших выходных,
В общем дело такое: выдали мне на работе ноут с уефёй, на нем была 8-ка предустановлена. Я поставил убунту, удалив восьмеркины разделы и переразметив диск. Теперь мне нужно установить еще и 7-ку, чтобы был dual-boot. Проблема в том, что я просто не могу загрузиться с DVD, его нет в списке возможных источников загрузки. Если я включаю в биосе CSM (режим обратной совместимости UEFI; насколько я понимаю — это чуть ли не отключает уефю), то я могу загрузиться с диска, но тогда я не могу поставить винду, т.к. диск размечен под GPT (GUID Part. Table), в то время как винда хочет MBR. Нет, вообще 7-я винда в 64-битной редакции может работать с GPT, но для этого должен быть включен UEFI. А с включенным UEFI я не могу даже войти в диалог установки.
Если что, ноут — Asus N56V
Как тут быть? Может можно переразметить диск с GPT на MBR не теряя данные? (на убунте много самособранных программ, очень не хочется опять тратить время на сборку, развертку, и т.п.)
Secure Boot отключен
PS я также пытался загрузиться с этого диска с Grub-a, но пока просто не знаю как… Не понятно, на какой файл натравливать chainloader.