Прощаться с отличным компьютером только потому, что производитель отказывается выпускать для него обновления, обидно. Но именно так рано или поздно произойдёт со всеми Mac на процессорах Intel.
Сегодня остаётся всего несколько моделей Mac с чипами Intel, под которые ещё выпускаются новые версии macOS. Этим летом всё может измениться. Возможно, уже в этом году, максимум следующем, Apple окончательно уберёт поддержку процессором x86-64 из операционки. Обновлений не будет. Но сейчас не про это.
Продлить работу таких Mac можно ещё лет на пять, а то и на десять, и это без шуток. Достаточно установить Windows 11 второй системой. И всё, ваш MacBook, iMac или Mac mini снова в строю. Между прочим, на Mac c Apple Silicon такой финт не работает.
Сейчас расскажу, зачем рекомендую ставить именно Windows 11, дам простую инструкцию по установке и пару рекомендаций по значительному улучшению производительности ваших «старых» Mac в Windows 11.
Стоп, а почему бы не установить Windows 10?
Вопрос правильный. Каждый владелец Mac на чипе Intel знает, что на них можно без труда установить Windows 10 второй системой через BootCamp, встроенное приложение в macOS. Я так давно сделал на всех своих Mac без Apple Silicon. И всё бы хорошо, но это сейчас не лучшая идея.
Поддержка Windows 10 прекращена. Эту систему, что вышла в 2015 году, Microsoft фактически «списала» и отказалась выпускать новые фичи, патчи и вообще содержать в рабочем виде. К тому же горячо любимая в мире «десятка» в некоторых вещах технически устарела.
Производительность актуальной версии Windows 11 сейчас сравнялась с Windows 10 с финальным обновлением. Так что объективных причин не ставить Windows 11 не осталось. Кроме одной, с которой мы сейчас разберёмся.
Как подготовить старый Mac к установке Windows 11
Во всех Mac с чипами Intel отсутствует поддержка технологии TPM 2.0, необходимой как для обновления уже установленной Windows 10 на Windows 11, так и для «чистой» установки новой системы. Также BootCamp официально не поддерживает установку Windows 11.
Но всё это можно обойти. Погнали.
Для начала вам нужно установить Windows 10 через BootCamp. Да-да, это самый лучший вариант. Таким образом вы удобно и легко разметите диск под «винду», а также получите все необходимые драйверы для вашего Mac. Драйверы эти затем будут работать в Windows 11 без проблем.
Чтобы не повторяться здесь, советую перейти в нашу статью-гайд по установке Windows 10 через BootCamp. Она по-прежнему актуальна.
Если у вас уже есть Windows 10, установленный через BootCamp, то продолжаем дальше.
Как установить Windows 11 на старый Mac
Все действия далее будем проводить в Windows.
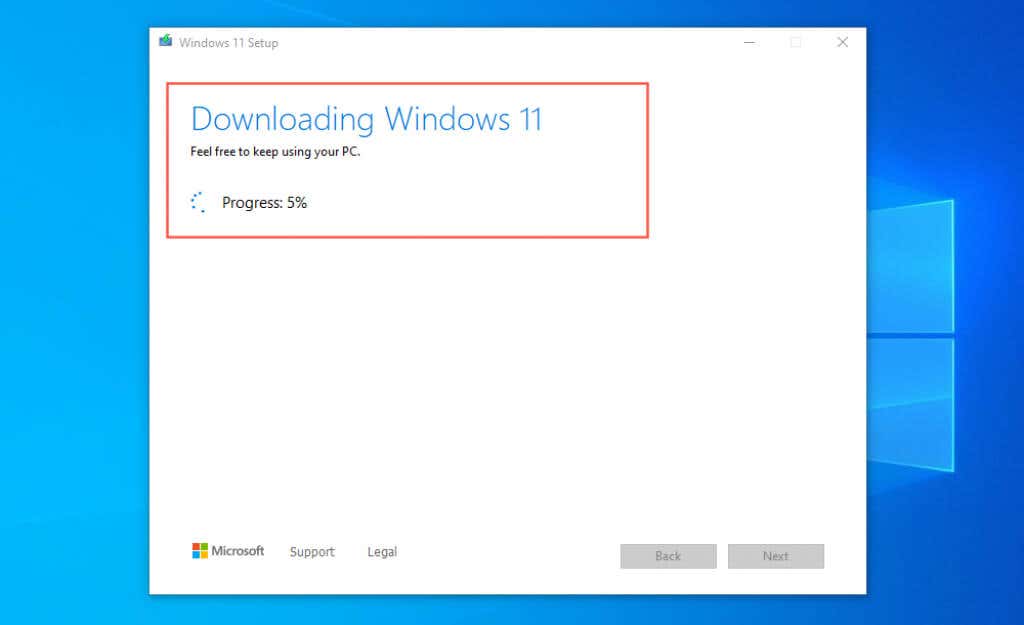
Вам понадобится где-то час времени, не менее 50 ГБ свободного места на разделе диска с BootCamp (где установлена Windows) и ISO-файл Windows 11. Скачать последний можно с сайта Microsoft. В России прямая загрузка затруднена, но иностранный IP решает проблему. Можно также найти образы Windows 11 в интернете, но так делать стоит только на свой страх и риск.
Не рекомендую ставить сборки и модифицированные версии Windows 11 на Mac. Выбирайте обычную, не изменённую никем версию ОС, чтобы не столкнуться с неожиданными трудностями во время и после установки системы.
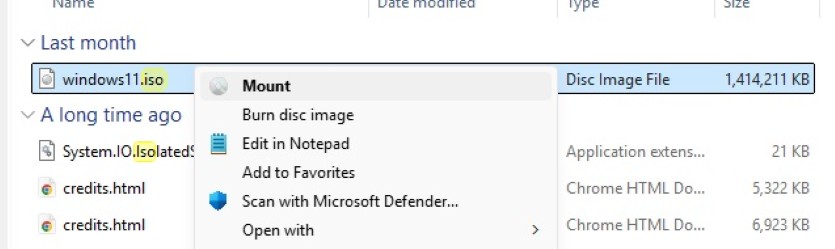
1. Как только скачаете ISO-файл, нажмите на него дважды, чтобы он развернулся как виртуальный диск в Проводнике. Зайдите в Проводник и запомните латинскую букву напротив развёрнутого диска.
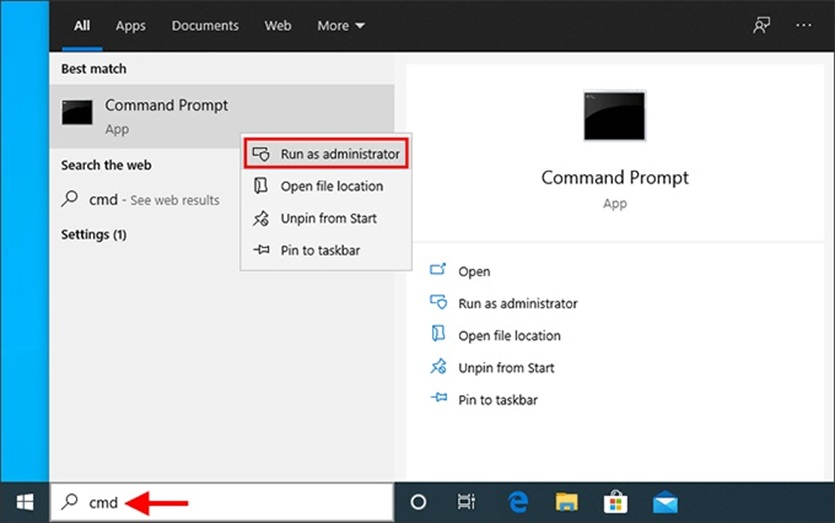
2. Нажмите на Пуск, введите в поиске cmd.exe. Щёлкните по cmd.exe правой кнопкой и в открывшемся меню выберите «Запустить как Администратор».
3. В открывшемся окне cmd.exe введите букву виртуального диска, которую ранее запомнили, и двоеточие. Затем нажмите Enter.
Например, если это диск D, то должно получиться вот так:
D:
4. Теперь в том же окне cmd.exe вставьте следующую строку и нажмите Enter.
setup.exe /product server
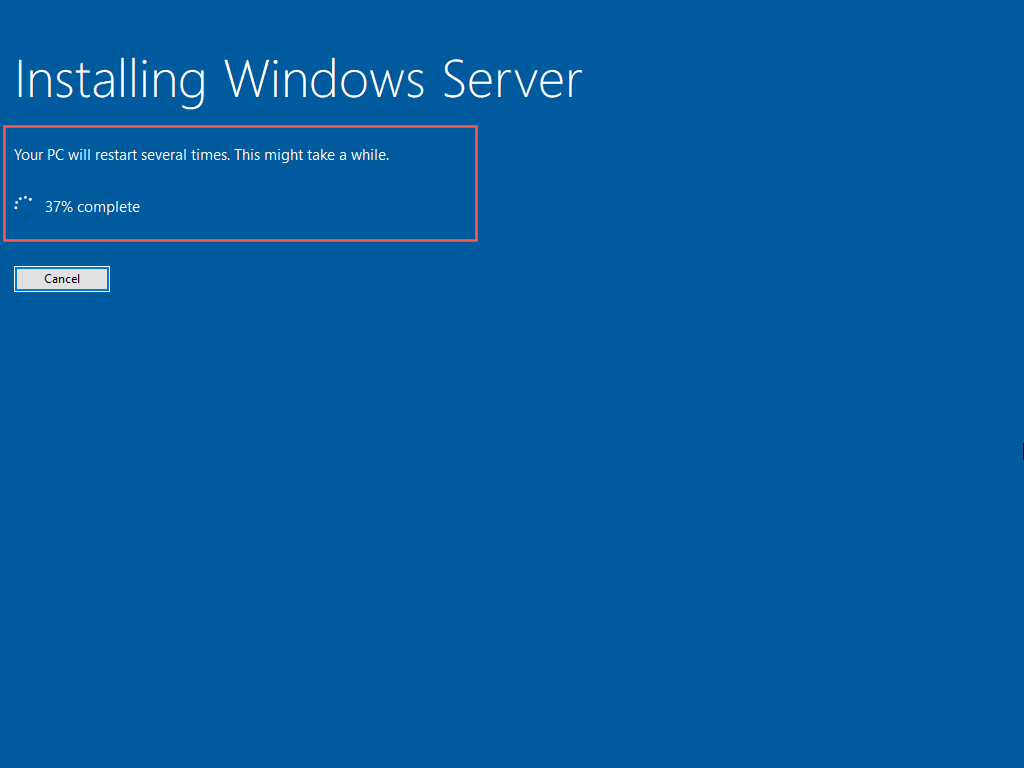
5. Запустится установка Windows 11. Соглашайтесь на всё, а когда вас спросят, как именно устанавливать систему, выберите вариант установки Windows 11 через обновление. Тогда все данные, приложения, учётные записи и драйвера Mac останутся нетронутыми.
6. В процессе установки Mac перезагрузится несколько раз, затем запустит первичную настройку Windows 11. Проходите её так, как считаете нужным, никаких особенных рекомендаций тут нет.
Всё, добро пожаловать в Windows 11. Все ваши драйверы на месте, файлы тоже, система работает отлично и будет далее получать все обновления от Microsoft.
Пара рекомендаций после установки Windows 11
Это делать совершенно необязательно и уже не настолько просто, как всё предыдущее. Но лично я это сделал для всех Mac.
Во-первых, драйвера BootCamp для видеокарт, которые предоставляет Apple и AMD, безнадёжно и критически устарели. С ними не запустятся многие игры, а требовательный софт будет тормозить. Поэтому пользуйтесь драйверами с сайта BootCampDrivers.com. Я установил их ещё в 2020 году на все Mac с Windows, пользуюсь чуть ни не ежедневно и очень доволен результатом: прирост производительности очень значительный.
Самые свежие релизы размещаются у них не на сайте, а в Discord (заблокирован в РФ). У меня стоит последний бета-драйвер оттуда, никаких жалоб, всё отлично. Перед установкой обязательно ознакомьтесь с инструкцией в архиве и следуйте ей.
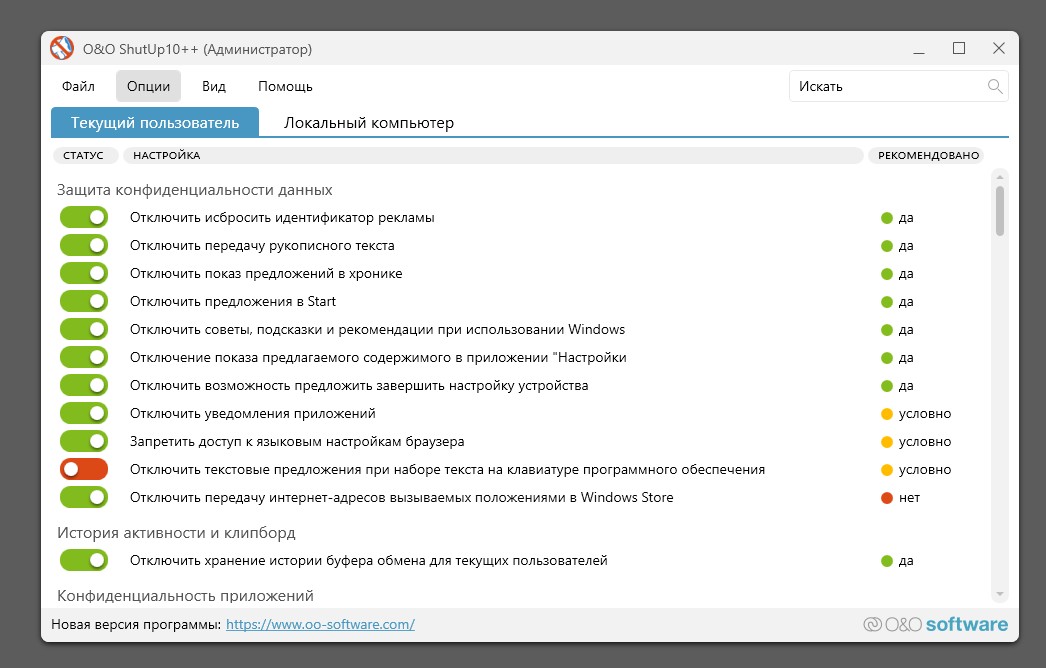
И во-вторых, в Windows 11 очень много лишнего. Чтобы отключить все трекеры, отправку ваших данных на серверы Microsoft и ненужные «фишечки», поставьте бесплатное приложение O&O ShutUp10++. В нём сможете вырубить кучу наворотов за минуту.
Кстати, ставить антивирус в 2025 году на Windows почти нет никакого смысла, встроенный справляется очень хорошо.
Вот теперь точно всё. Я пользуюсь iMac 2020 в Windows 11 постоянно, даже чаще, чем в macOS. Всё работает куда быстрее, чем в ОС от Apple, кстати. Чего и советую всем владельцам Mac на чипах Intel.
(33 голосов, общий рейтинг: 4.55 из 5)
iPhones.ru
Прощаться с отличным компьютером только потому, что производитель отказывается выпускать для него обновления, обидно. Но именно так рано или поздно произойдёт со всеми Mac на процессорах Intel. Сегодня остаётся всего несколько моделей Mac с чипами Intel, под которые ещё выпускаются новые версии macOS. Этим летом всё может измениться. Возможно, уже в этом году, максимум следующем,…
Никита Горяинов
@ngoryainov
Главный редактор iPhones.ru. Спасибо, что читаете нас. Есть вопрос, предложение или что-то интересное? Пишите на [email protected].
I should emphasize that I am providing these instructions so Mac users can enjoy the benefits of Windows 11 in their Boot Camp installs, not so that the product is downloaded for free.
Prerequisites of this guide
The first step to installing Windows 11 on your Mac with this guide is having Windows 10 already set up in Boot Camp. If you need help with this initial step, Apple provides instructions on its Boot Camp Support Page. This entire guide is meant to be followed while running your Windows 10 Boot Camp.
Guide Compatibility
It should be noted that in order to install any version of Windows with Boot Camp, your Mac needs to have an Intel chip. With that established, these steps should work on any Mac that can run Windows 10. This includes any MacBook Pro, MacBook Air or iMac with an Intel chip.
The Magic Tool
The program that makes installing Windows 11 on your Mac possible is called “MediaCreationTool.” I previously wrote about it in my 2021 article “Install Windows 11 on a 2015 MacBook Pro.” Since then, the program has been greatly improved and the install method is way simpler. Plus, it’s been so streamlined, I’m confident the steps will work on any Intel Mac that can run Windows 10 in Boot Camp. I’ve tested it on a 2013 iMac, 2015 MacBook Pro, 2015 MacBook Air and a 2019 MacBook Pro. As a bonus, these steps will also work for any Windows 10 virtual machine, such as those created by Parallels. Let’s get started.
Download MediaCreationTool.bat from GitHub
MediaCreationTool needs to be downloaded from its official project repo on GitHub. Don’t downloaded it from anywhere else.
The first link below is to the exact version of the program I used for this guide. Alternatively, you can use the second link, which is to the latest version of the program. Since MediaCreationTool could update at any time though and potentially break this install method, if you want to follow the steps in this guide exactly, use the first link.
Guided Version – 2024/01/04
https://github.com/AveYo/MediaCreationTool.bat/tree/2f1f304652175d1d8c9a3a2f8eff6bb0ff881b13
Latest Version
https://github.com/AveYo/MediaCreationTool.bat
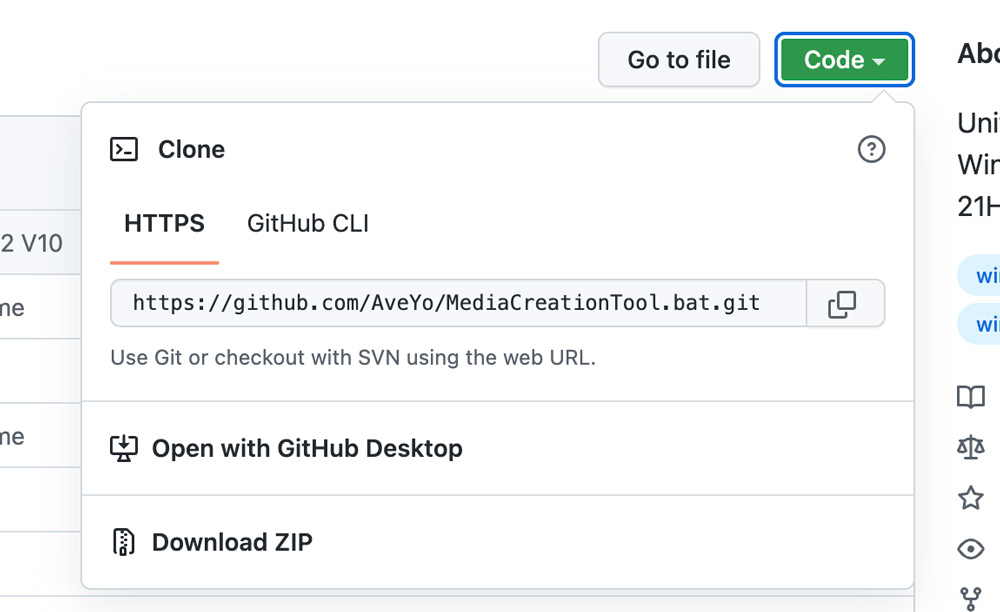
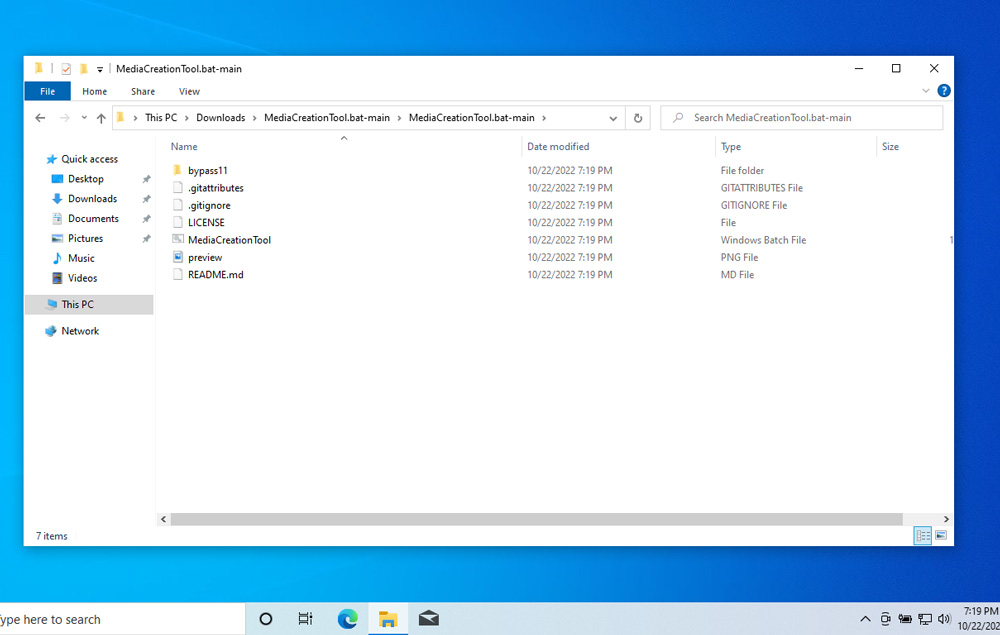
Once you’re on the program’s GitHub repo page, click the big green Code button and select “Download ZIP” from the drop-down. The image below should match what you’ve downloaded and unzipped.
Download the official Windows 11 23H2 ISO from Microsoft
Official Download Page
https://www.microsoft.com/software-download/windows11
- Scroll down to “Download Windows 11 Disk Image (ISO) for x64 devices”
- Select “Windows 11 (multi-edition ISO for x64 devices)” from the drop-down
- Click “Download Now”
- Select your language from the next drop-down
- Click “Confirm”
- Click “64-bit Download” and the ISO will begin downloading, most likely to your
Downloadsfolder
Pro Tip
Never download an ISO (a Windows file format) or DMG (a Mac file format) from a website you don’t completely trust.
Disable User Account Control (UAC)
Before using MediaCreationTool, disable User Account Control. It isn’t necessary, but it will save you from having to click confirm on a safety prompt after every single step. Open Windows Start menu, type UAC, and select “Change User Account Control settings.” Control Panel will open, and then move the slider to “Never notify” at the bottom and click OK.
Disabling User Account Control (UAC)
(If any of the Youtube videos fail to load, just refresh the page)
Time for MediaCreationTool
Unzip your downloaded folder and navigate into the directory bypass11. Double-click on Skip_TPM_Check_on_Dynamic_Update. A blue “Windows protected your PC” prompt will appear. Click “More info” and then “Run anyway.” A command prompt will appear saying “Installed.” Wait 6 seconds for the window to close on its own or hit Enter.
MediaCreationTool.bat folder and running Skip_TPM_Check_on_Dynamic_UpdateTime to install Windows 11 23H2
Locate your downloaded Windows 11 ISO (most likely it’s in your Downloads folder, right next to your MediaCreationTool.bat folder). Double-click the file – it will mount and then display its disc contents. Double-click setup, and after a brief pause, the “Install Windows 11” wizard will appear. Click “Change how Setup downloads updates” towards the top, select “Not right now”, and then “Next”. “Accept” the license, and it will then say “Making sure you’re ready to install”.
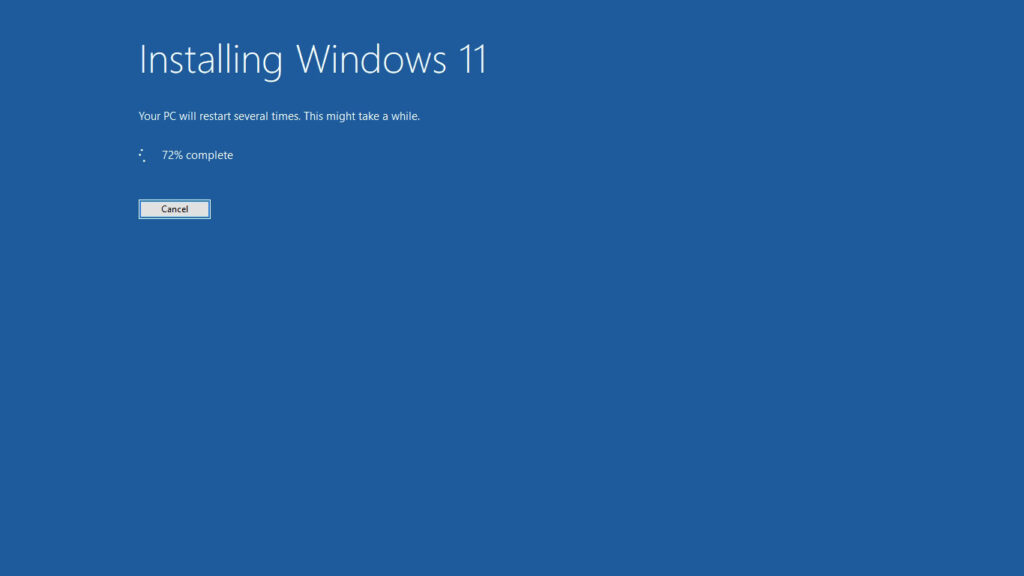
When it gets to “Ready to install”, it recaps that it will “Install Windows 11 Home” and “Keep personal files and apps”. Most likely you want to keep your existing files, but just in case you want a fully clean install, select “Change what to keep”. Finally click “Install” and a blue “Installing Windows 11” view will take over the whole screen. For the remainder of the install you don’t need to click anything.
Eventually it will restart, and you will be greeted by the new Windows 11 logo.
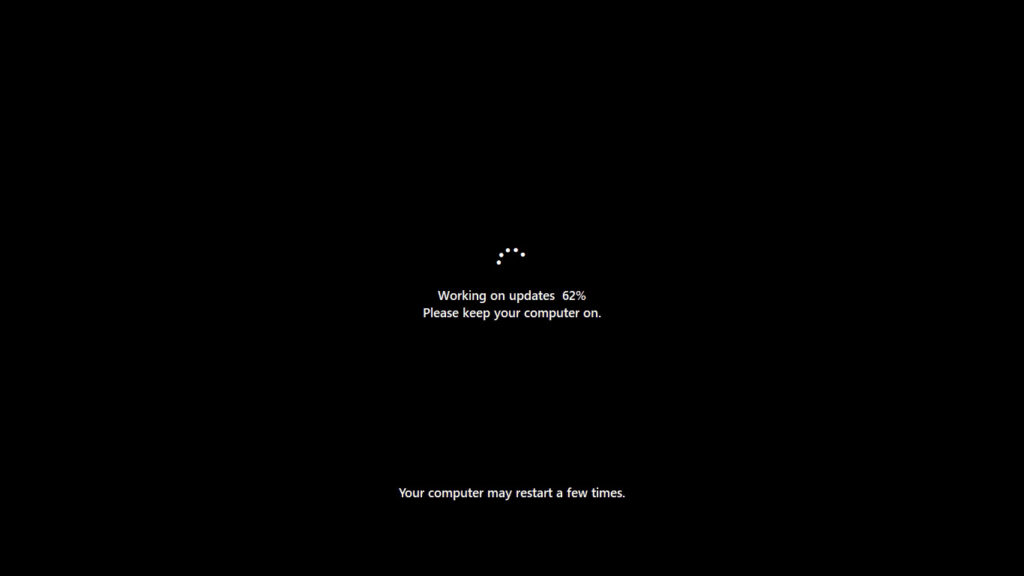
Then a black screen will appear with a “Working on updates” percentage-completion measure.
Once those updates are finished, you’ll be greeted by some “Please hold” messages over a color-changing background.

After the hold prompts are over, you’ll be logged into your new Windows 11 desktop.
If you found this guide helpful then spread the word! Enjoy your Windows 11 23H2 Boot Camp install.
I’m a web developer by trade and Mac enthusiast at heart. If you ever need help with either of those things you can always reach me at nico@studioncreations.com.
Table of Contents
1
The advent of technological advancements has opened up new possibilities and opportunities for users of various operating systems. For years, Windows and macOS have been considered two distinct entities, catering to different user preferences and software ecosystems.
However, the desire for interoperability and cross-platform compatibility has led to the exploration of using both operating systems on the same device. One such approach is the use of Boot Camp, a utility provided by Apple, which allows users to run Windows alongside macOS on their Mac computers. With the release of Windows 11, the latest version of Microsoft’s operating system, many Mac users may be curious about whether they can install and run this new OS on their devices using Bootcamp.
In this discussion, we will delve into the feasibility of installing Windows 11 on a Mac using Boot Camp, the potential benefits, and the challenges that may arise from this endeavor.
What is the Bootcamp App on Mac?
The Boot Camp app on Mac is a utility developed by Apple that allows you to install and use Microsoft Windows operating system on a Mac computer. This means that you can run Windows and macOS side-by-side on your Mac, and switch between Windows and macOS as needed.
Using Boot Camp allows Mac users to access Windows-only applications, games, or software. It also enables you to use hardware devices that are only compatible with Windows, such as printers, scanners, or gaming peripherals.
How Does Bootcamp App Work on Mac?
Boot Camp Assistant guides you through the process of partitioning your Mac’s hard drive and creating a Windows installation disk, and then installing Windows on your Mac. Once Windows is installed, you can use the Boot Camp Control Panel in Windows to set up boot options and adjust other settings.
Here’s a general overview of how the Boot Camp app works on a Mac:
- Preparing the Mac: Before installing Windows using Boot Camp, it’s essential to ensure your Mac is up to date with the latest macOS version and firmware updates. Additionally, you should have a valid Windows license and a Windows ISO file or installation media.
- Launching Boot Camp Assistant: Boot Camp Assistant is located in the Utilities folder within the Applications folder on your Mac. Launch the app to begin the installation process.
- Partitioning the hard drive: Boot Camp Assistant will guide you through the process of partitioning your Mac’s hard drive. You’ll need to allocate a portion of the hard drive space for the Windows installation. The size of the partition depends on your requirements, but it should be large enough to accommodate the Windows OS and any apps or files you plan to use within Windows.
- Installing Windows along with macOS: Once the partition is created, Boot Camp Assistant will prompt you to insert your Windows installation media or locate your Windows ISO file. The app will then guide you through the Windows installation process. During the installation, you’ll need to select the partition created by Boot Camp Assistant (usually labeled «BOOTCAMP«) as the target drive for Windows.
- Installing Boot Camp drivers: After Windows is installed, your Mac will restart into the Windows OS. Boot Camp Assistant will automatically launch the Boot Camp driver installer within Windows. These drivers ensure that your Mac’s hardware, such as the keyboard, trackpad, and other components, work correctly with the Windows OS. Follow the on-screen instructions to complete the driver installation.
- Switching between macOS and Windows: Once the Boot Camp drivers are installed, you can restart your Mac and choose between macOS and Windows at startup. To switch between the operating systems, hold down the Option (Alt) key during the boot process and select the desired OS.
Where to Find Bootcamp Assistant in Mac?
Click on the Finder icon in the Dock, which is usually the first icon on the left side.
In the Finder sidebar, locate and click on the «Applications» folder.
Now, scroll through the Applications folder until you find the «Utilities» folder, then double-click to open it.
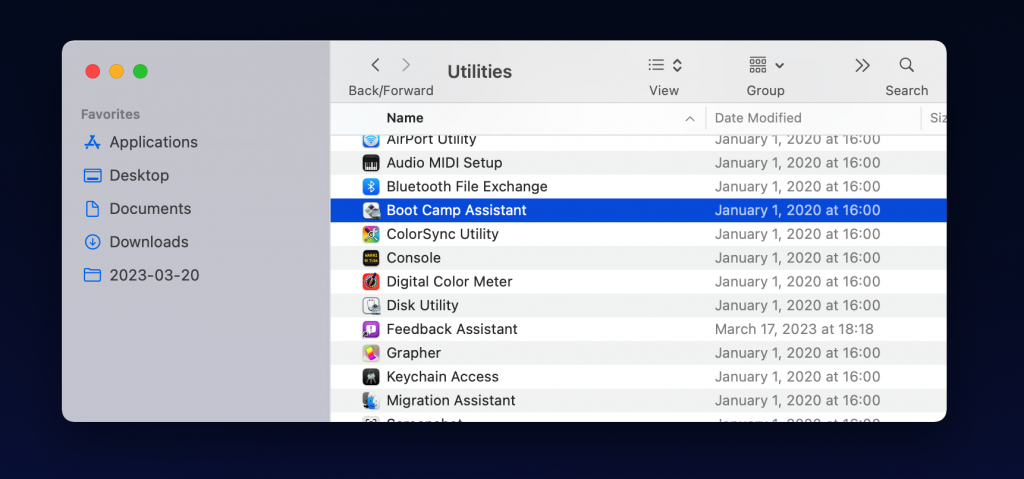
Inside the Utilities folder, you will find the «Boot Camp Assistant» app. It is represented by an icon featuring a hard drive with a Windows logo and an Apple logo. Double-click on the «Boot Camp Assistant» icon to launch the app.
How to Download Bootcamp on Mac
Boot Camp is a built-in app on your Mac, so you don’t need to download it separately. Here are the steps to open Boot Camp Assistant on your Mac:
- Go to the «Applications» folder in Finder.
- Open the «Utilities» folder.
- Double-click on «Boot Camp Assistant.«
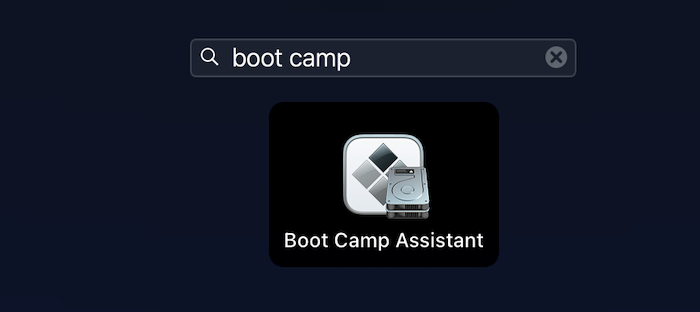
Alternatively, you can search for «Boot Camp Assistant» using Spotlight search (click on the magnifying glass icon in the top right corner of your screen).
Does Bootcamp Work on M1 or M2 Mac?
Note that Boot Camp only works on Intel-based Macs. If you have a newer Mac with Apple’s M1 chip, you can still run Windows using virtualization software such as Parallels Desktop, VMware Fusion, or VirtualBox.
These programs allow you to create a virtual machine that emulates a Windows environment, allowing you to run Windows applications within macOS. Note that you’ll still need a licensed copy of Windows to use with these programs.
Another option is to use CrossOver, which allows you to run Windows applications directly within macOS without the need for a Windows license or virtualization software. However, not all Windows applications are compatible with CrossOver, so it’s best to check the compatibility list before purchasing the software.
Windows 11 System Requirements
Windows 11, the latest operating system from Microsoft, comes with a new set of system requirements to ensure optimal performance and user experience. Here are the minimum system requirements for Windows 11:
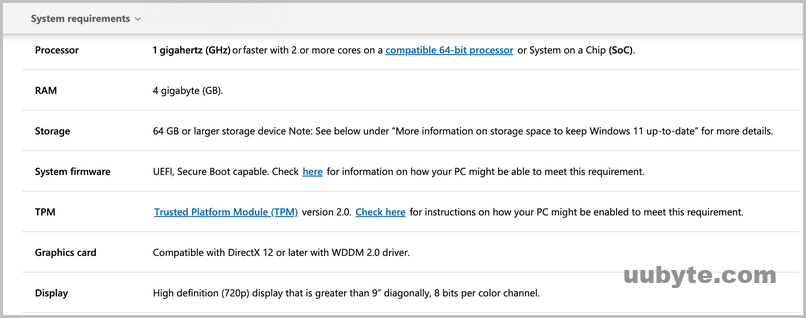
It is important to note that these are the minimum requirements to run Windows 11, and actual performance may vary depending on the hardware configuration. For a better user experience, Microsoft recommends using a system with higher specifications, such as a faster processor, more RAM, and additional storage. Additionally, certain Windows 11 features may have their own specific hardware requirements, so it is essential to review the feature requirements on Microsoft’s website for complete information.
Can You Install Windows 11 on M1 or M2 Mac with Bootcamp?
No, you cannot install Windows 11 on an M1 or M2 Mac with Boot Camp. Boot Camp only supports Intel-based Macs and is not compatible with Apple’s M1 or M2 chips.
However, there are alternative ways to run Windows 11 on an M1 or M2 Mac. One option is to use virtualization software such as Parallels Desktop or VMware Fusion, which allows you to create a virtual machine and install Windows 11 within macOS. Note that you’ll still need a licensed copy of Windows 11 to use with these programs.
Video: How to Install Windows 11 on a Mac, A step by step guide
The Bottom Line
It is possible to install Windows 11 on a Mac using Boot Camp once the device meets the hardware requirements specified by Microsoft. By doing so, users can benefit from the versatility and flexibility of using both macOS and Windows 11 on the same computer, maximizing productivity and software compatibility.
However, users should be aware of the potential challenges, including driver compatibility and performance differences between the two operating systems. It is crucial to stay updated with official guidelines from both Apple and Microsoft, as well as to explore alternative solutions such as virtualization, in case Boot Camp does not fulfill all your requirements. Ultimately, the choice of installing Windows 11 on a Mac using Boot Camp depends on individual user preferences and use cases, making it a valuable option for those seeking a seamless integration of the two leading operating systems.
Though it’s been a while since I perennially switched from Windows to macOS, at times, I do wish to give a shot at the latest iteration of Windows just to have a sneak peek into the vastly improved software. Ever since Microsoft unleashed Windows 11 with a plethora of exciting features, I had been itching to go hands-on with the much-talked-about new layout and eye-catching widgets.
Now, I think it’s the right time to dive into the details. If you are also pretty much in the same ballpark as me, follow along as I show you how to install Windows 11/10 on Mac with Boot Camp.
How Do You Install Windows 11/10 on Mac?
To begin with, let’s first check out how the installation of Windows on macOS works and also tick off the essential requirements so that you won’t run into any unexpected obstruction later.
While there are multiple ways to get Windows on Mac, using Boot Camp is one of the best ways. Aside from being a highly efficient windows installer, it is also very secure. That’s the reason why both tech nerds and newbies take this route to test Windows on Apple’s computers.
Hence, you can count on it to let you enjoy using Windows on your macOS device without any hassle. So long as you have a Mac with a sufficient amount of storage, you will be able to sail through.
What are the Requirements for Installing Windows on Mac?
To get going, make sure to check off the important requirements for getting Windows 11 on Mac.
- Do note that you will need a full installation, a 64-bit version of Windows on a disk image (ISO file), or other installation media.
- Besides, you will also need to download a Windows 10 Disc Image (ISO File) from Microsoft.
Important Things to Do Before Getting Started
To get started on the right note, make sure you back up all the essential files. If something goes wrong during the process, you will have the latest backup to restore the lost files.
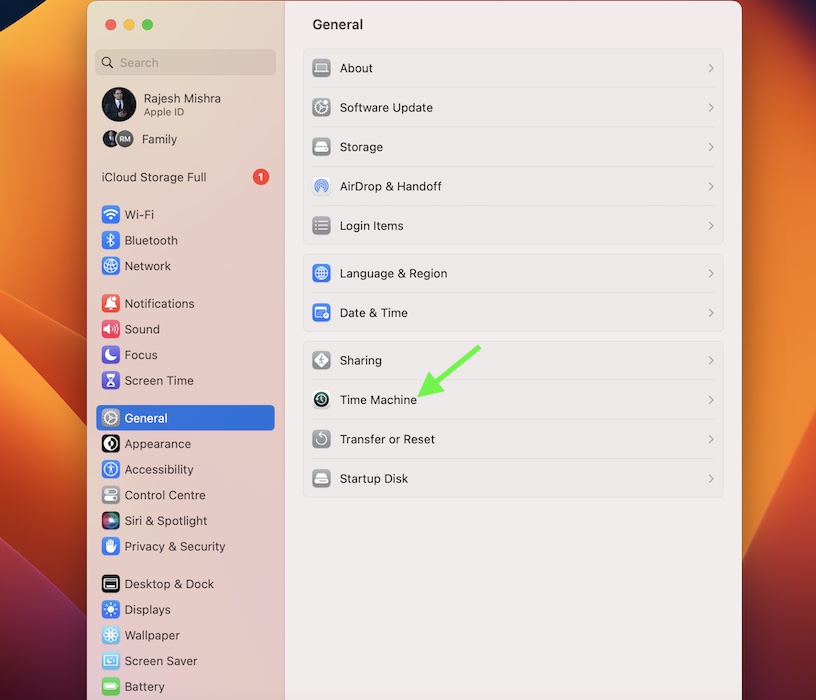
- As always, you can use Time Machine to back up your files on your Mac. To do so, head into the System Settings app on your Mac -> General -> Time Machine to back up your Mac.
- And if your Mac is not updated, make sure to update it without fail. To get it done, head over to the System Settings app on your Mac -> General -> Software Update. After that, download and install the latest iteration of macOS as usual.
- If you want to install Windows on your Mac, connect the notebook to a power source during the whole process.
Ways to Prepare Your Mac for Windows 11
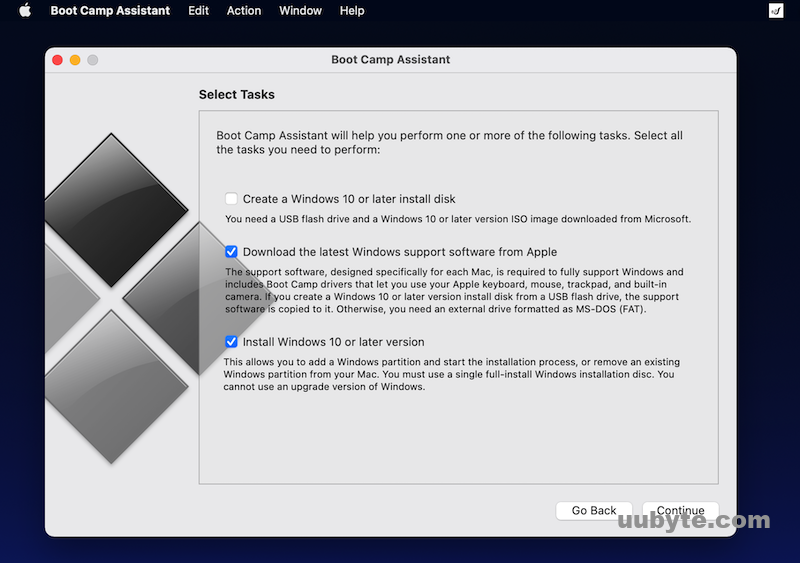
Note that Boot Camp Assistant lets you prepare your Mac by making a new partition for Windows named BOOTCAMP and also downloading the Boot Camp support software.
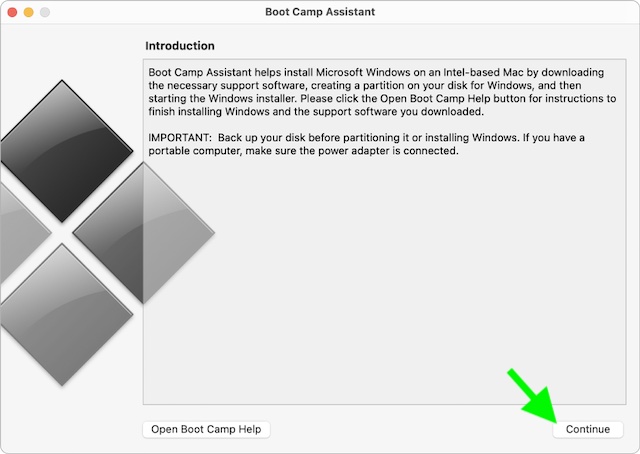
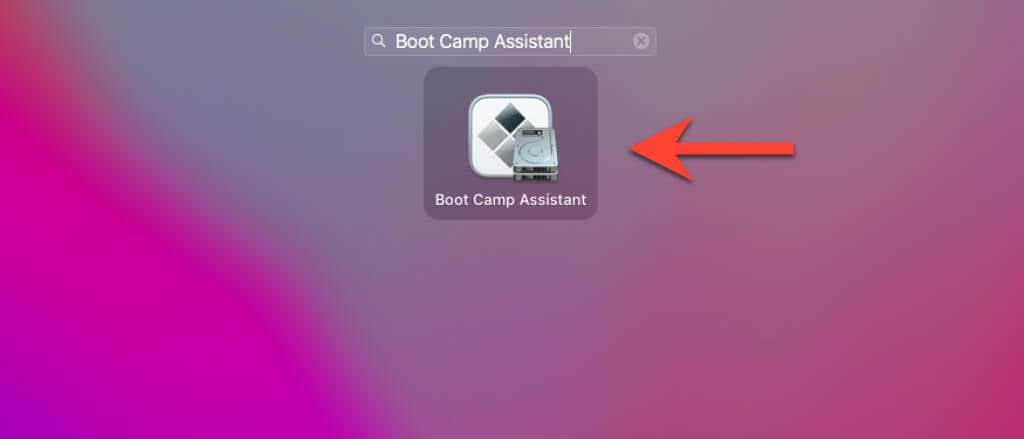
1. On your Mac, launch Boot Camp Assistant which is inside the Applications -> Utilities. Alternately, bring up the Spotlight Search -> type in Boot Camp and open it.
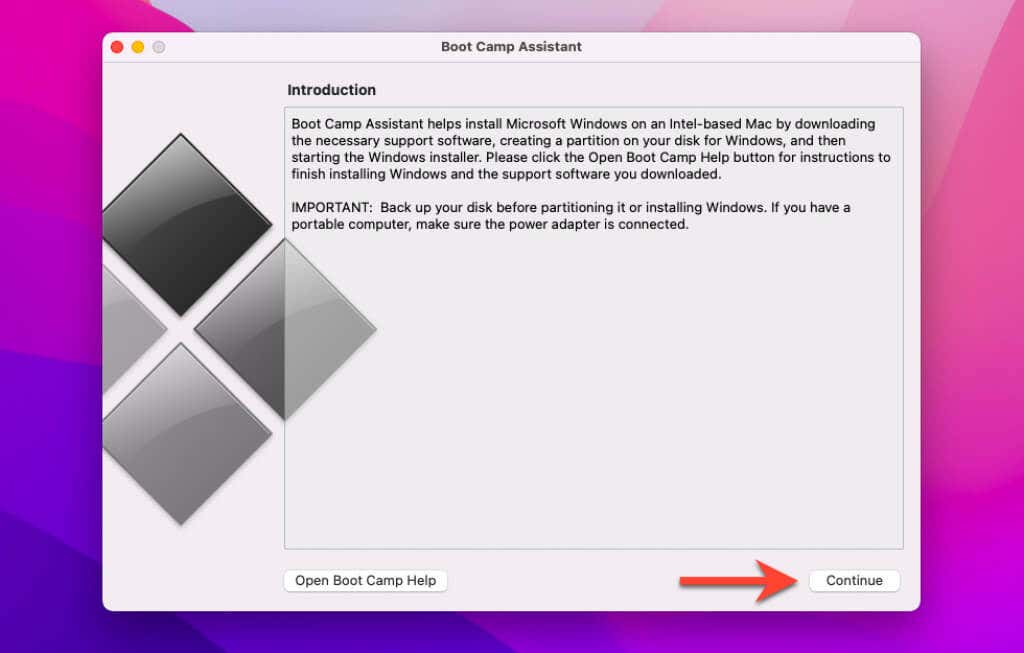
2. At the Introduction screen, hit Continue. Now, it will check your system for the total available disk space.
3. Be warned that it will get rid of older Time Machine snapshots and cached iCloud files to recover enough space for Boot Camp. Hence, the process will take some time to complete. But bother not, you can always click on the Stop button to skip this process.
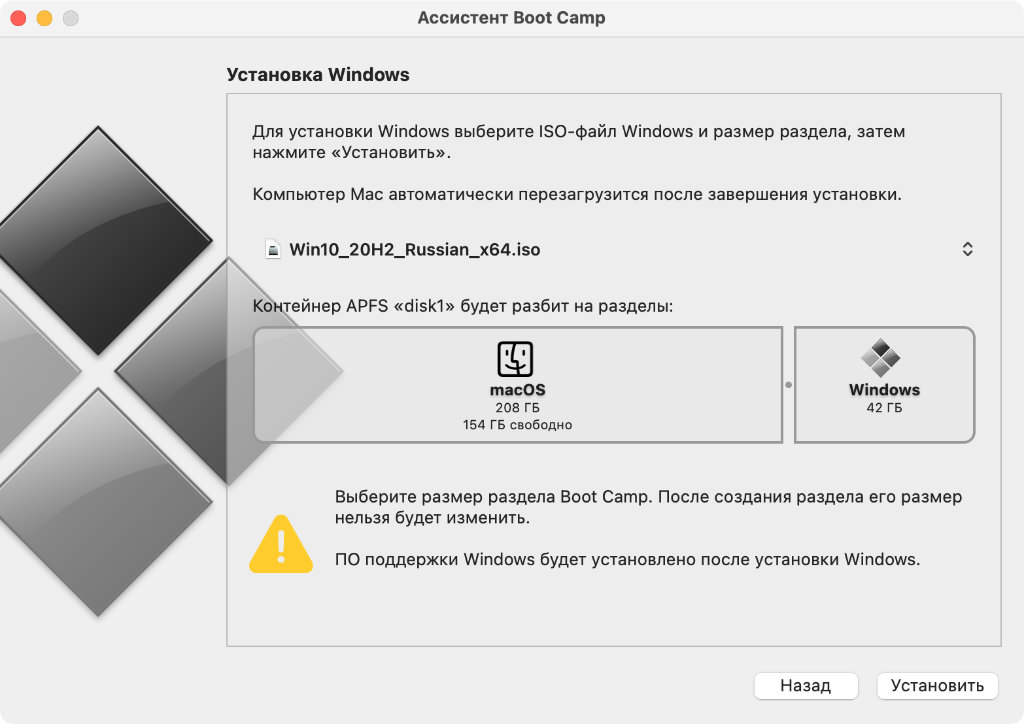
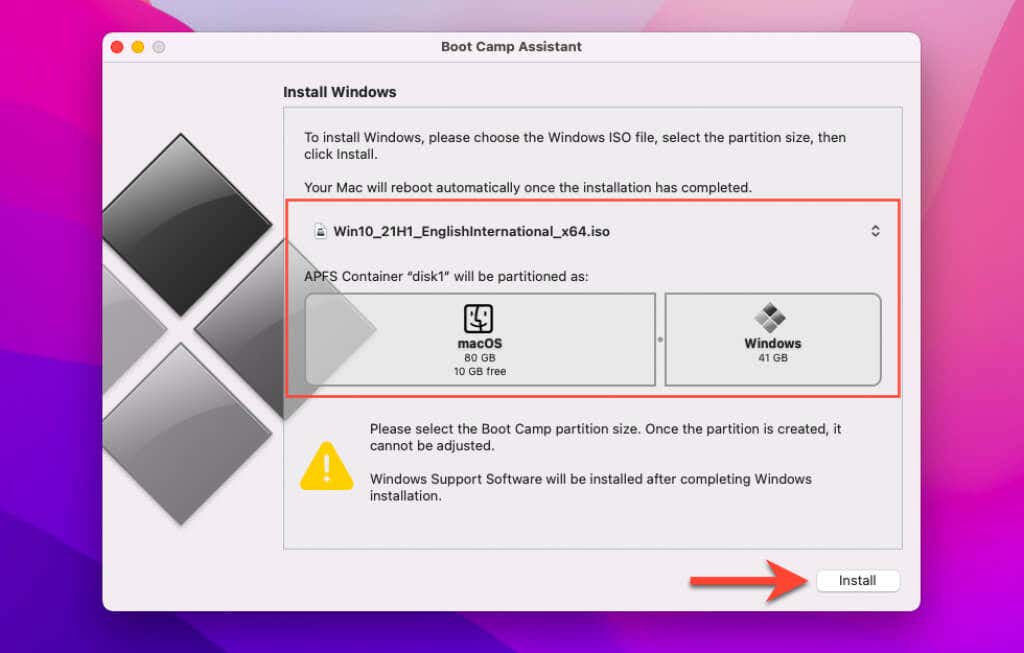
4. Just in case you have only one internal disk, select the Windows ISO image. After that, be sure to specify the partition size by dragging the divider that shows between the macOS and Windows partitions. Then, hit Install to proceed.
Pro Tip:
- Keep in mind that you won’t be able to resize the partition later. For the folks who have multiple internal disks, I would suggest they go through the onscreen instructions to choose and format the disk that they want to install Windows on. After that, select the Windows ISO image.
5. If you choose your startup disk, you will get an option to make an additional partition for Windows. Then after, be sure to specify the partition size by dragging the divider that appears between the macOS and Windows partitions.
6. And if you choose an APFS-formatted disk, you will be able to either make an additional partition on the disk for Windows or wipe out the entire disk and then make a partition for Windows.
7. Again, if you decide to make an additional partition, make sure to specify the partition size by dragging the divider that appears between the macOS and Windows partitions.
8. It’s important to point out that if you choose a non-APFS-formatted disk, you will have the option to erase the entire disk and make a partition for Windows. Another thing you need to know is that if Boot Camp is already present on the disk you select, you will have the option to uninstall it.
9. Note that macOS won’t allow you to resize the partition later. Once this step is complete, the Windows installer will automatically start.
Install and Set Up Windows on Mac
- Once the installation is complete, your Mac will automatically restart using Windows.
- After that, go through the instructions to set up Windows on your Mac.
Install Boot Camp on Windows
Once you have successfully installed Windows, the Boot Camp drivers that support your Mac hardware will begin to install.
- Head over to the Boot Camp installer in Windows, and go through the onscreen instructions to install Boot Camp.
- Make sure not to click on the Cancel button in any of the installer dialogs. If you see any message saying that the software you are installing has not passed Windows Logo testing, be sure to click on Continue Anyway to proceed.
- Another thing that I would recommend you do is to avoid responding to installer dialogs that show only briefly during the installation process. However, if you get a prompt asking you to install the device software, make sure to click on Install. But just in case nothing seems to be happening, check out if there is a hidden window that needs to respond. Also, be sure to look behind open windows to find out if there is a hidden window.

- When the installation is over, click on Finish.
- Now, your Mac will restart. Once the computer has rebooted, follow the given instructions to complete the process.
Enjoy Using Windows 11/10 on Your Mac…
There you go! Now that you have successfully installed Windows on your Mac, it’s time to explore all the cool features and also customize the OS to your heart’s liking. Whether you are a pro or a normal Joe, you may not have faced any issues during installation. It would be great to have your thoughts in the comments section below.
Windows 11’s compatibility checks for Secure Boot and TPM 2.0 don’t translate well on Intel Mac hardware. So, for example, if you try to use the official Windows 11 ISO from Microsoft in macOS 12 Monterey, the Boot Camp Assistant will fail to procure the necessary drivers or stall at Windows Setup.
Thankfully, you can install Windows 11 in macOS Monterey using Boot Camp with a workaround. It requires upgrading a standard Windows 10 Boot Camp installation to Windows 11 with an automated batch script that bypasses the operating system’s stringent system requirements.

The following method is also secure and less complicated than alternative ways of installing Windows 11 on Mac that you may have read about (such as those involving a modified ISO or bootable USB drive).
Note: If you already have Windows 10 set up on your Intel MacBook Air, MacBook Pro, iMac, or Mac mini, skip to the section that focuses on upgrading it to Windows 11.
Update Your Mac
You can use the instructions in this tutorial to run Windows 11 on all macOS Monterey-compatible Intel Macs. However, to minimize the chances of running into any Boot Camp Assistant errors, we recommend that you install all available macOS Monterey point updates before you begin.
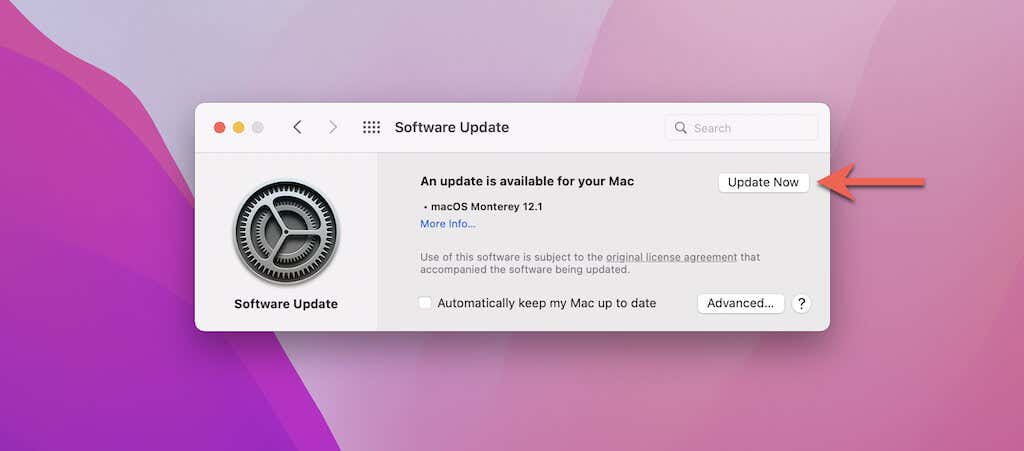
1. Open the System Preferences app.
2. Select Software Update.
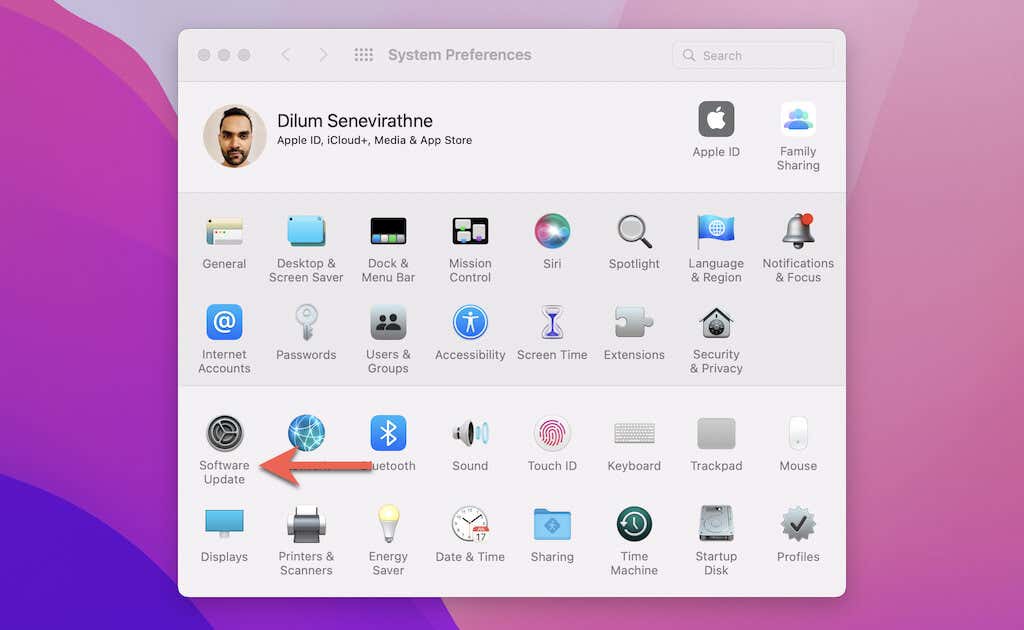
3. Select Update Now to update your Mac to the latest version of macOS Monterey.
Download Windows 10 ISO
Since you must install Windows 10 on your Mac first, the next step involves downloading an up-to-date copy of a 64-bit Windows 10 ISO image file from Microsoft.
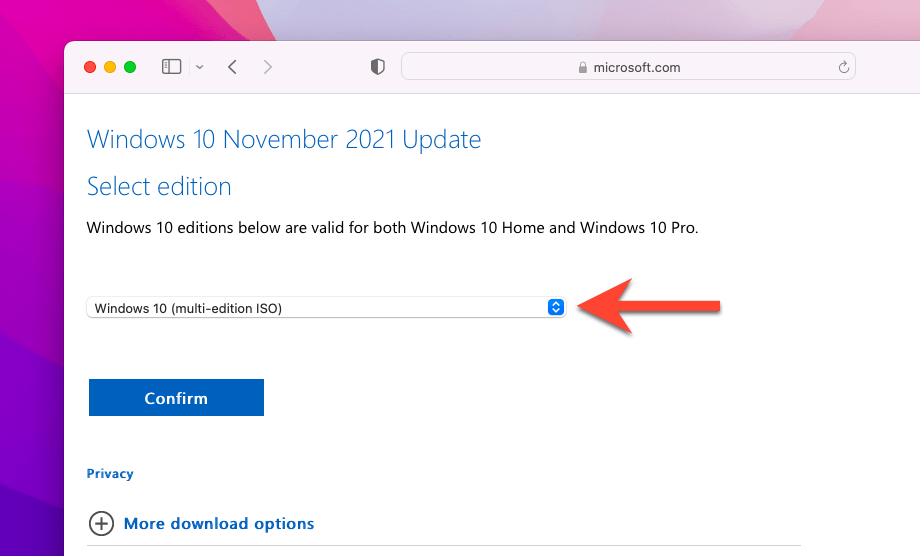
1. Visit the Download Windows 10 Disc Image (ISO File) page on the Microsoft website using Safari or another web browser.
2. Pick the latest version of Windows 10, choose a language (e.g., English or English International), and select Confirm.
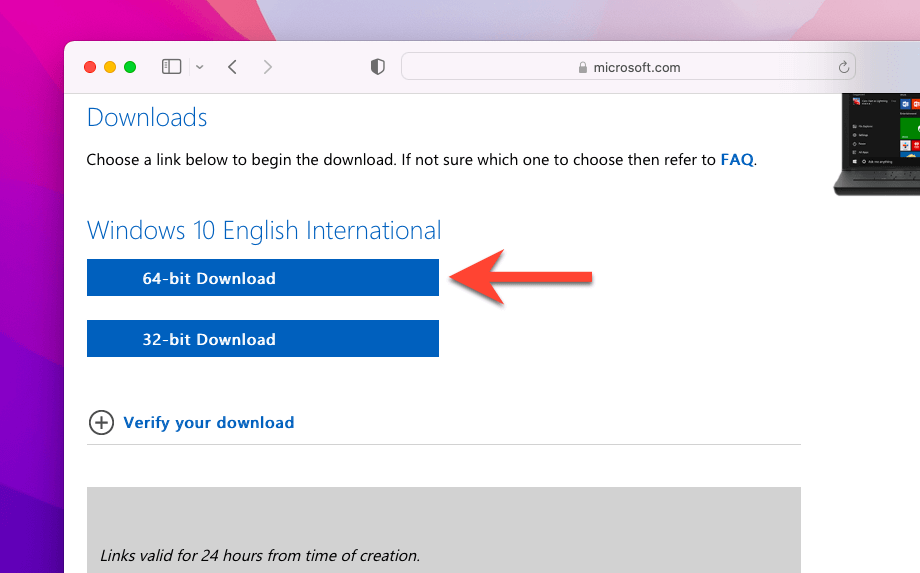
3. Select 64-bit Download and wait until your web browser downloads the ISO file to your Mac.
After downloading the ISO file, you can start installing Windows 10 on your Mac. Just make sure to have at least 50 gigabytes of free space before you begin.
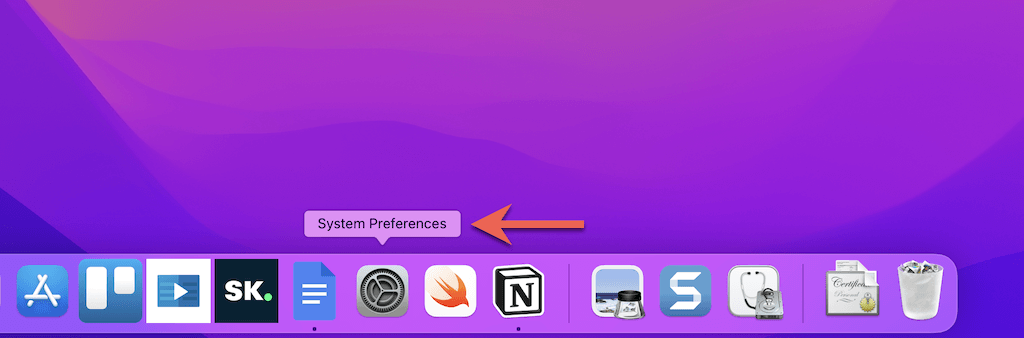
1. Open Boot Camp Assistant via the Mac’s Launchpad.
Note: Boot Camp Assistant is only available on Intel-based Macs. If you use an Apple Silicon M1 Mac, you can’t install Windows via Boot Camp.
2. Select Continue.
3. Pick the downloaded ISO file from your Mac’s Downloads folder and specify a size for the Windows partition. Then, select Install.
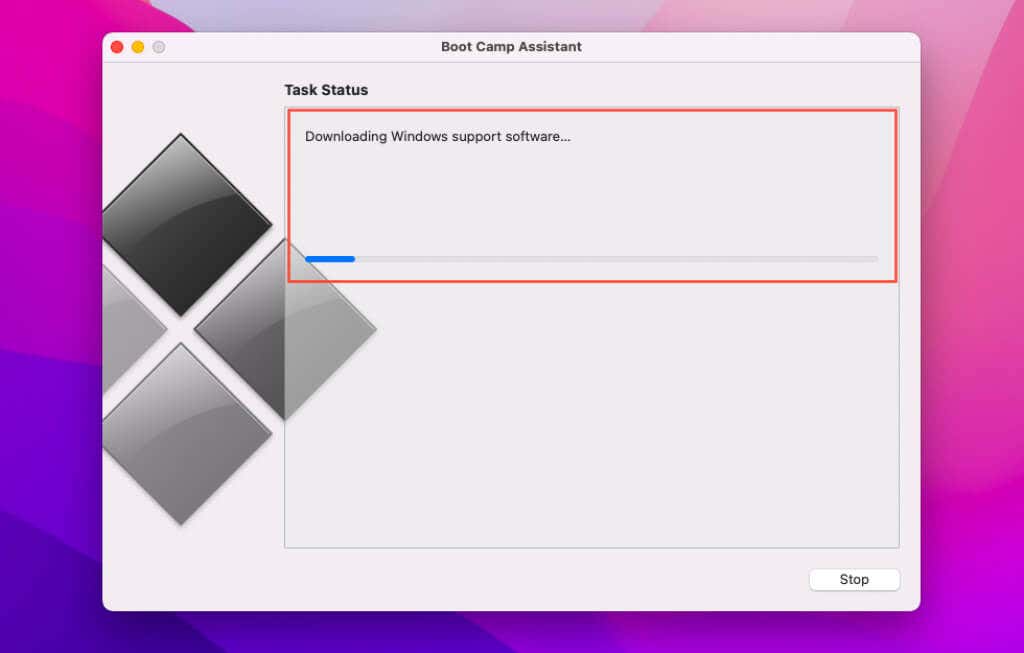
4. Boot Camp Assistant will begin to download Windows support software. Once that finishes, it will create a Windows OS partition and boot your Mac into the Windows Installer.
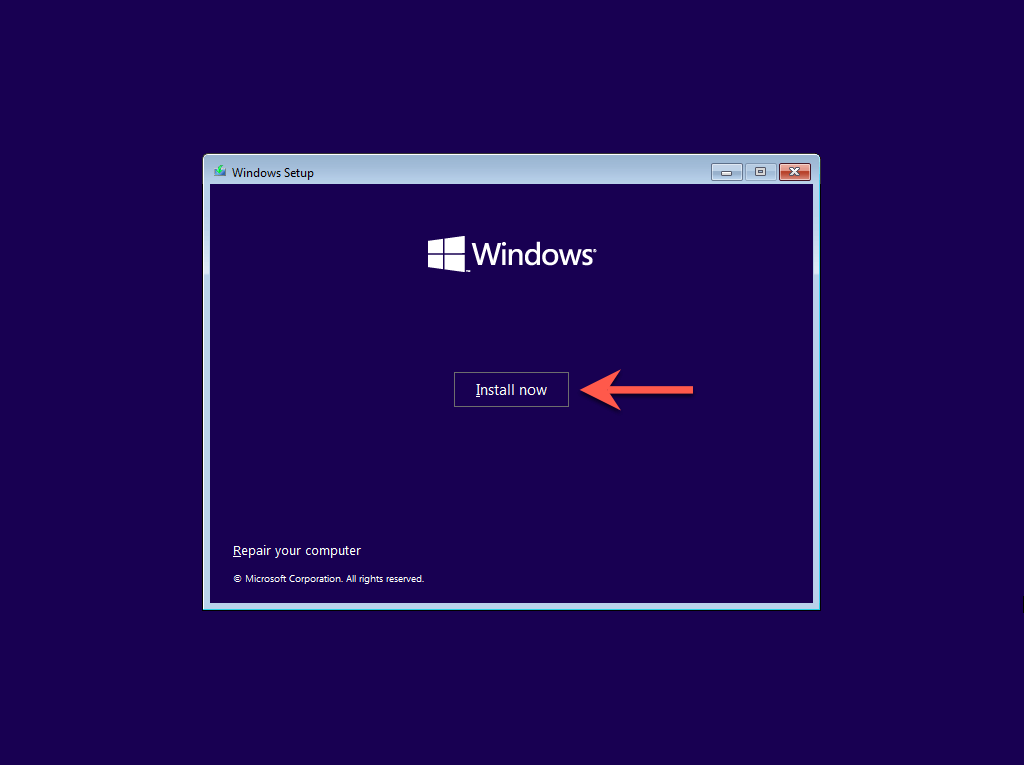
5. Select Install now on the Windows Setup screen.
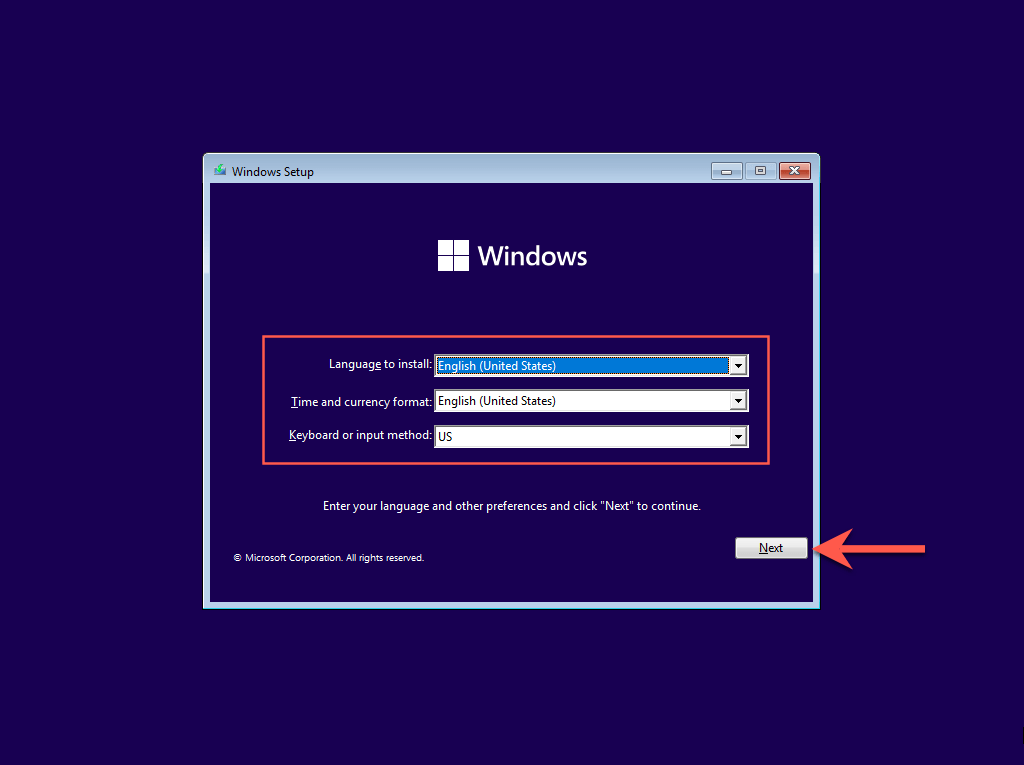
6. Select your language, time and currency format, and keyboard layout. Then, select Next.
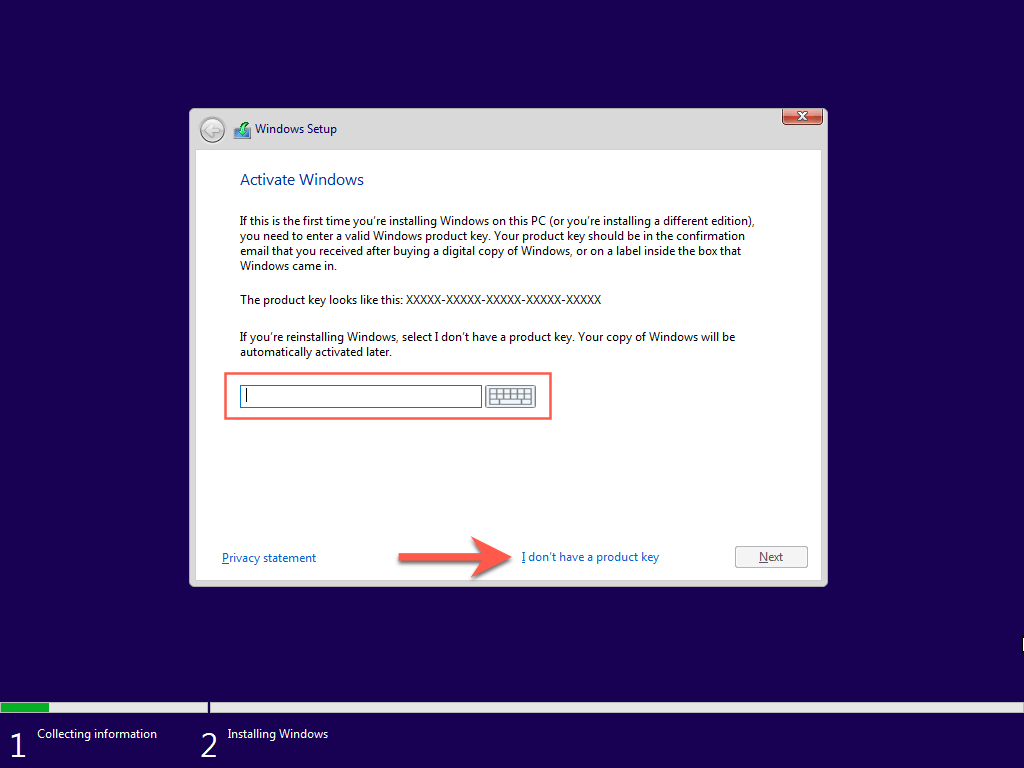
7. Enter your Windows product key. If you don’t have one, select I don’t have a product key.
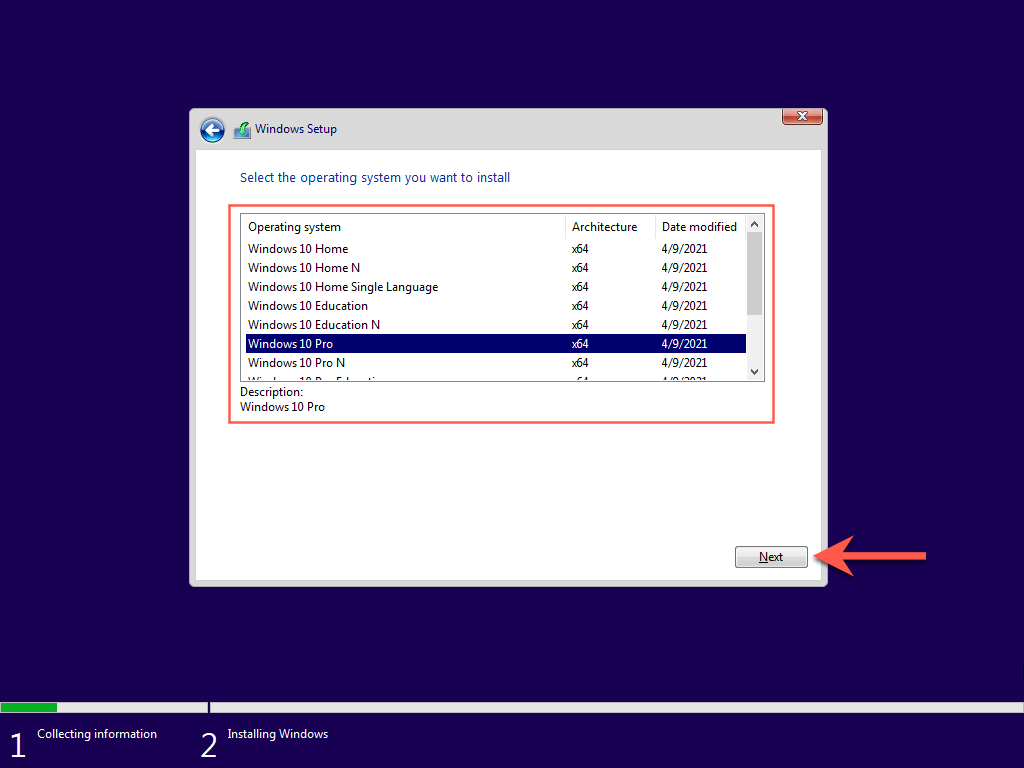
8. Pick the edition of Windows you want to install—Windows 10 Home or Windows 10 Pro—and select Next.
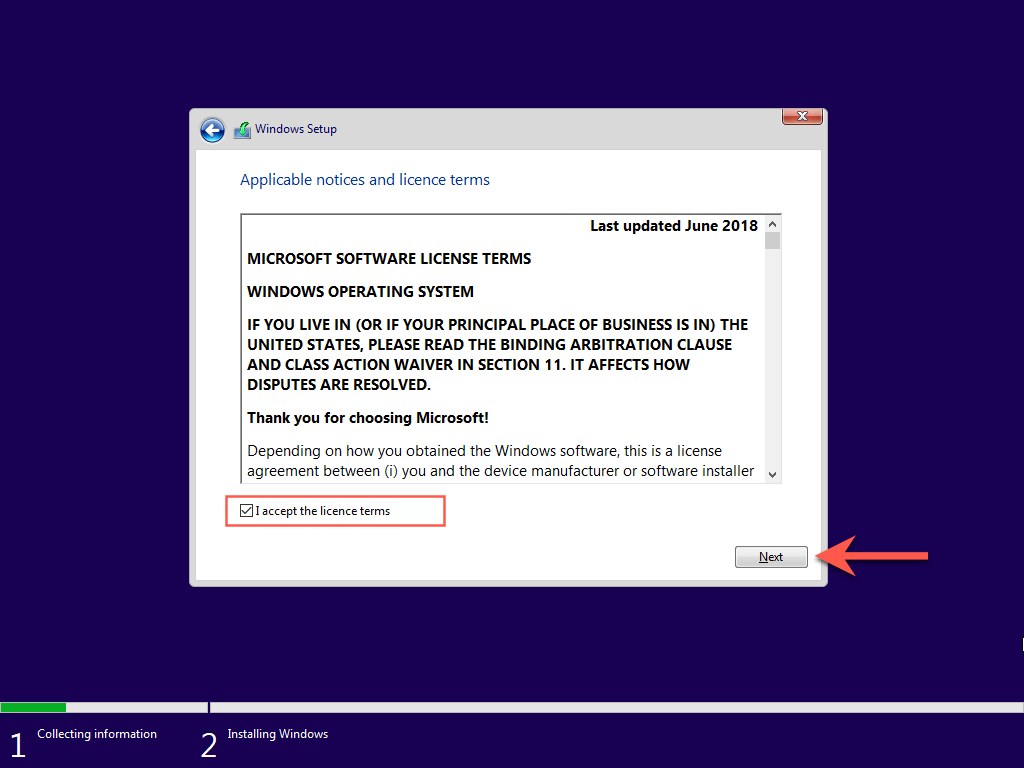
9. Agree to the Microsoft software license terms and select Next.
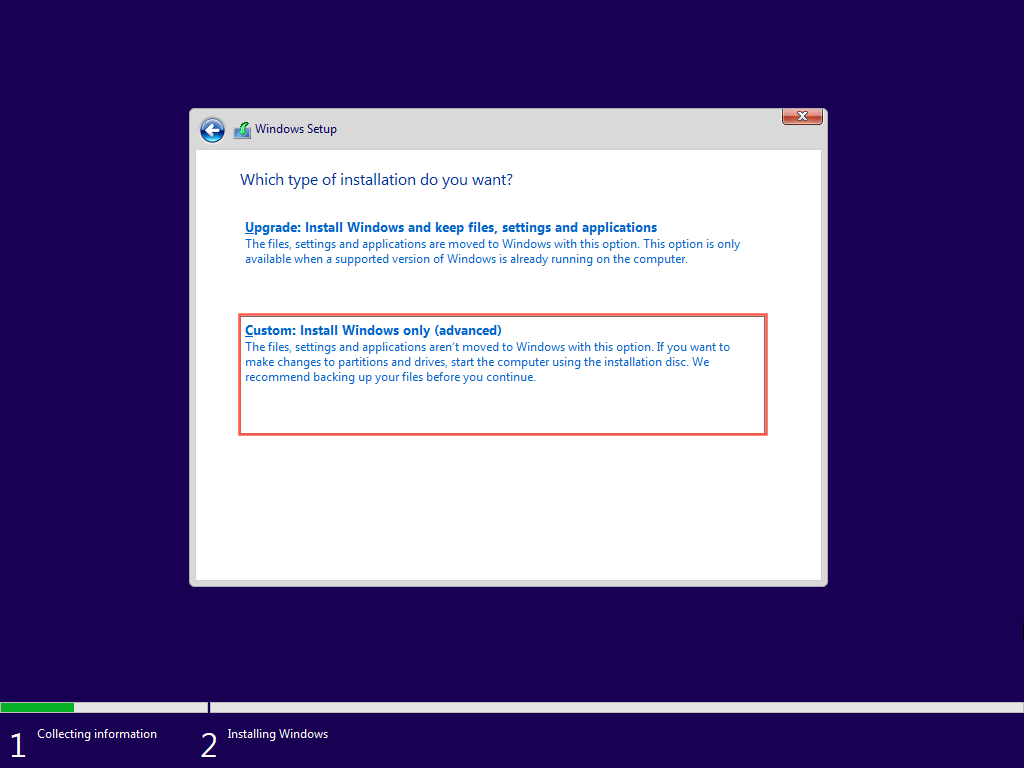
10. Select Custom: Install Windows only (advanced).
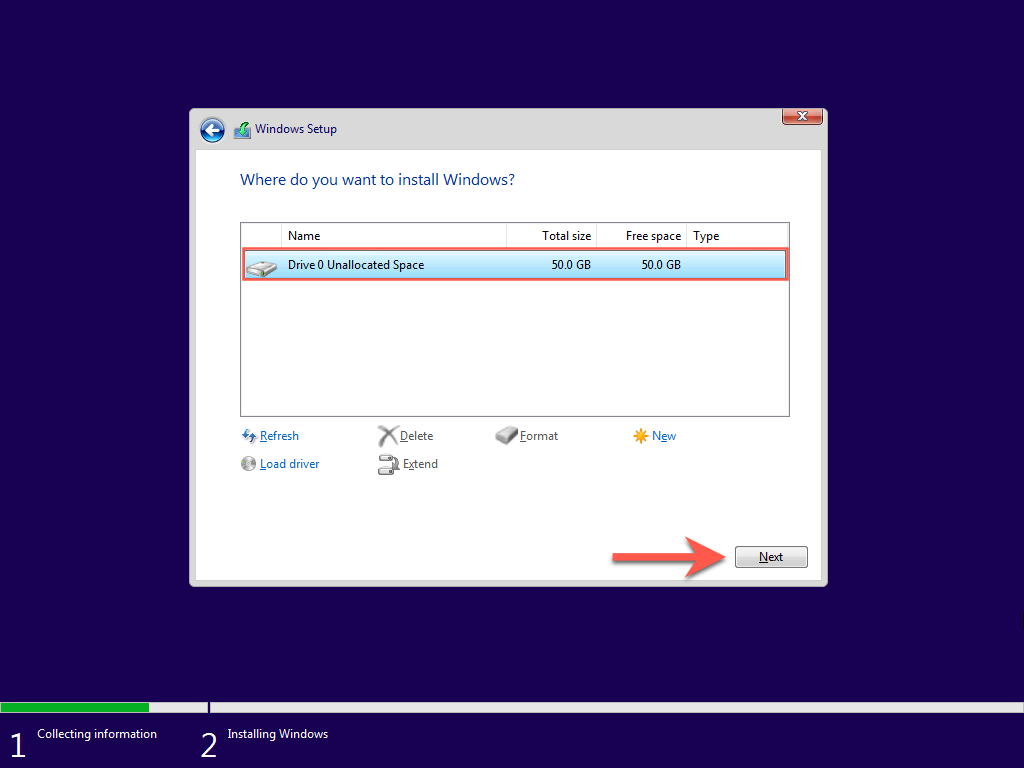
11. Pick your BOOTCAMP (Windows) partition and select Next.
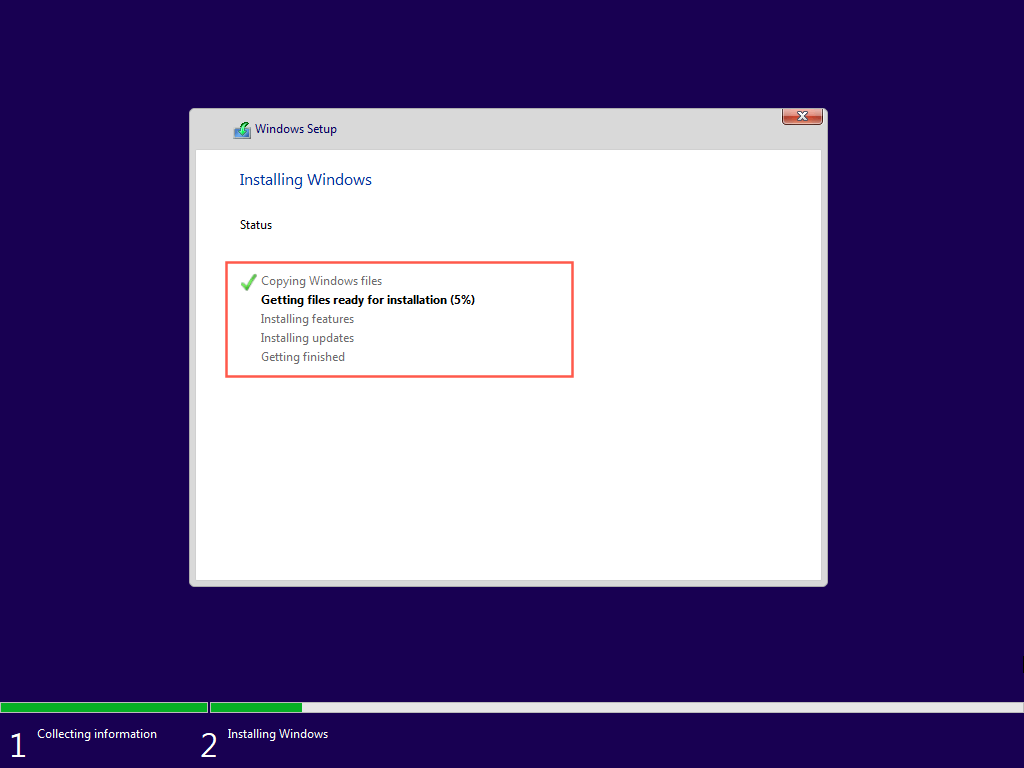
12. Wait until the Windows Setup finishes installing Windows 10 on your Mac.
Set Up Windows 10 on Mac
Once the Windows Setup finishes installing Windows 10, you must specify your language, keyboard, and privacy preferences. You must also create a Windows user account.
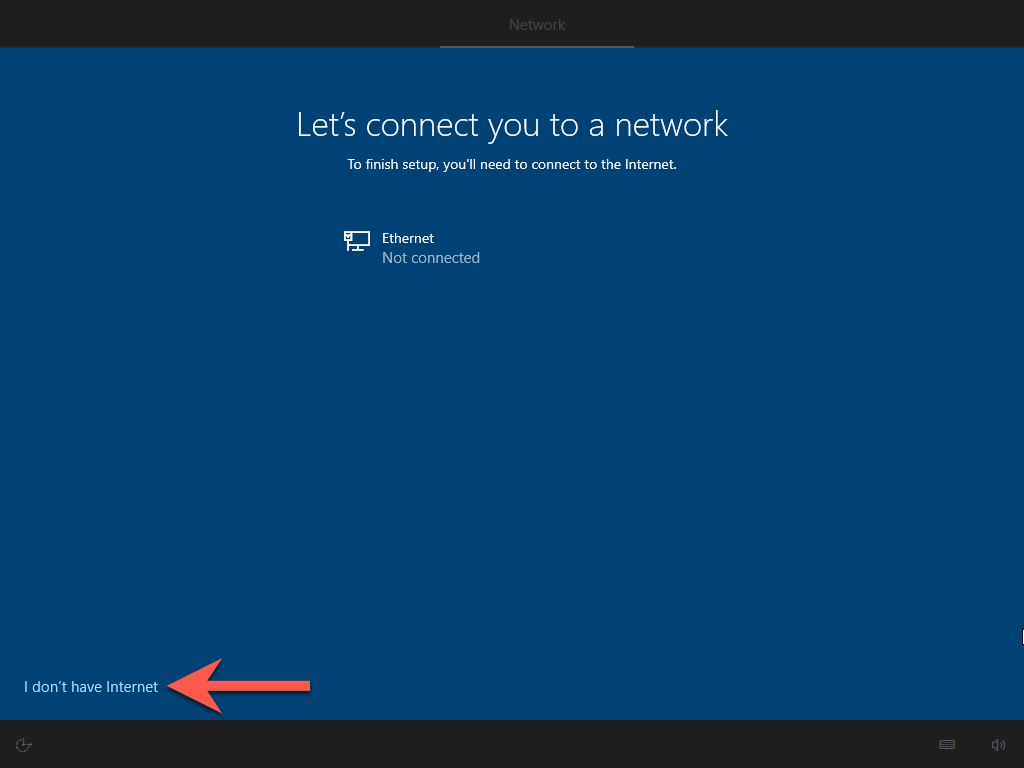
Note: Windows Setup will not connect to the internet due to missing network drivers. You can restore online connectivity after reaching the Windows 10 desktop.
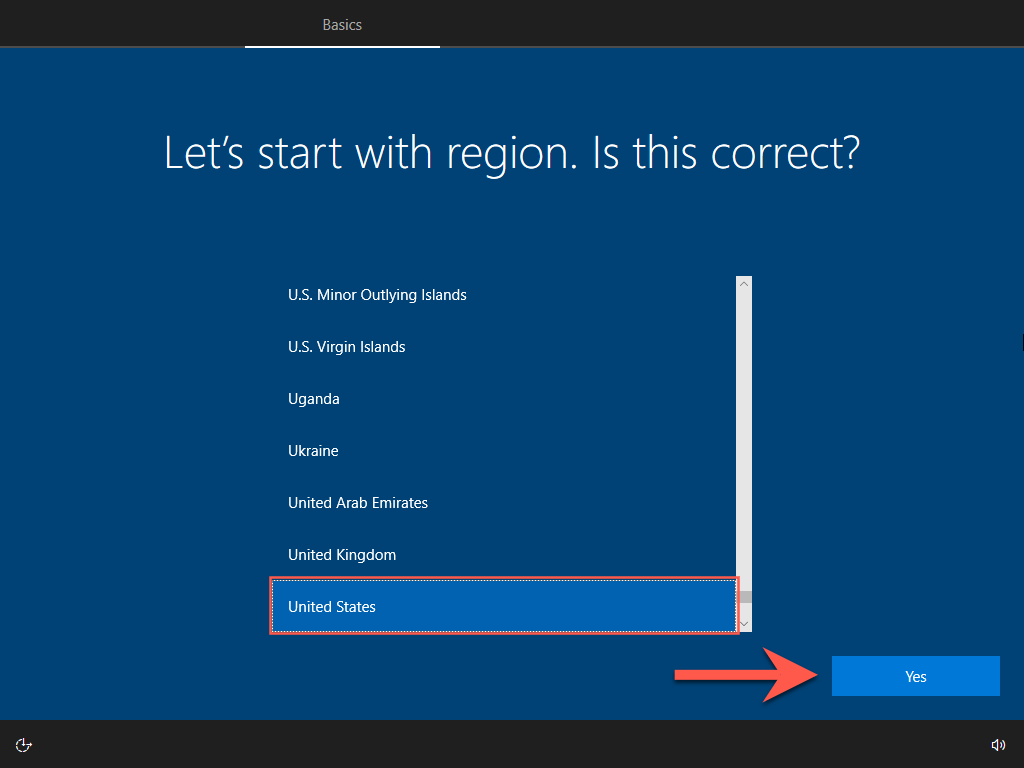
1. Choose a region and select Yes.
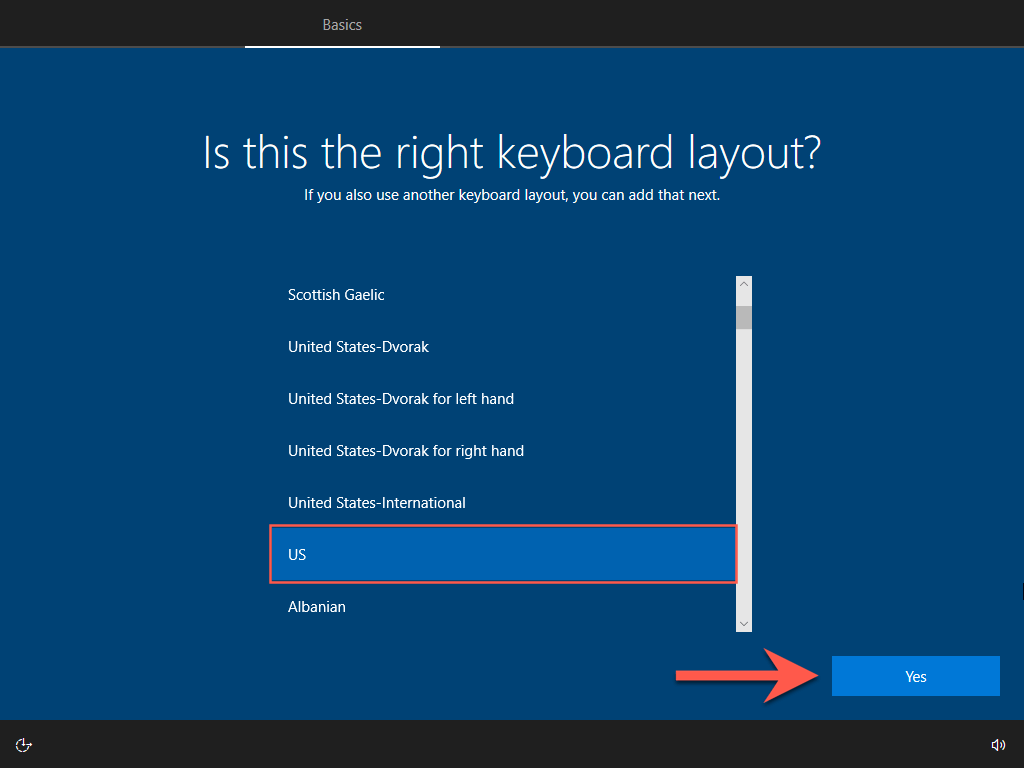
2. Pick a keyboard layout and select Yes.
3. Select I don’t have internet.
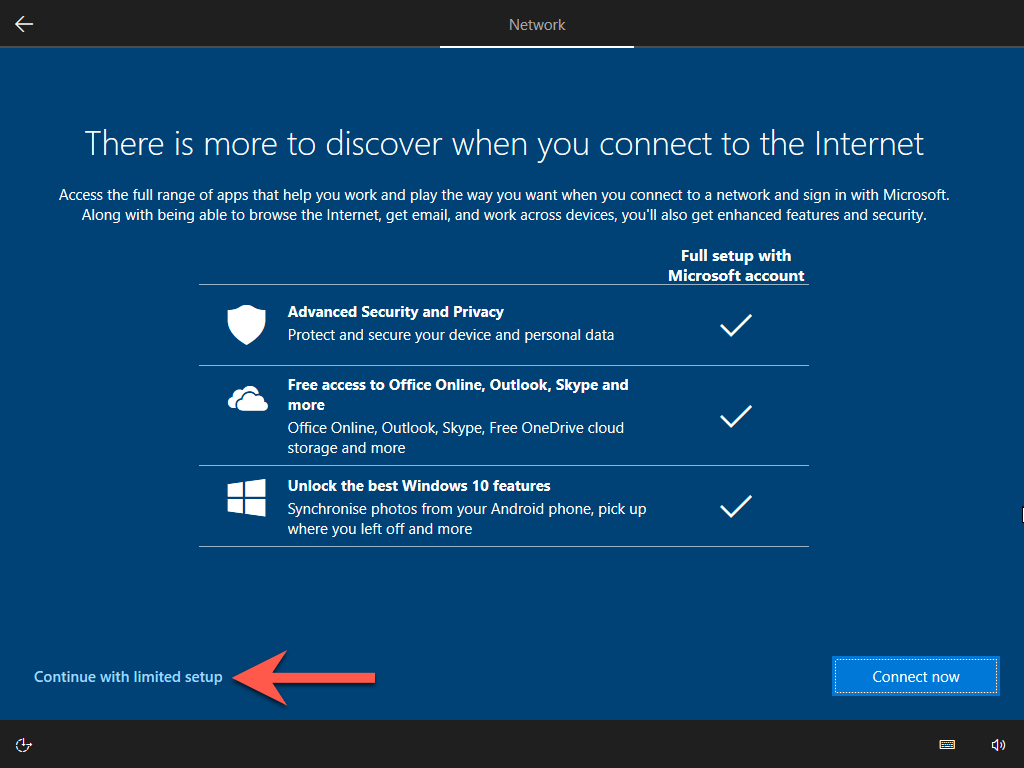
4. Select Continue with limited setup.
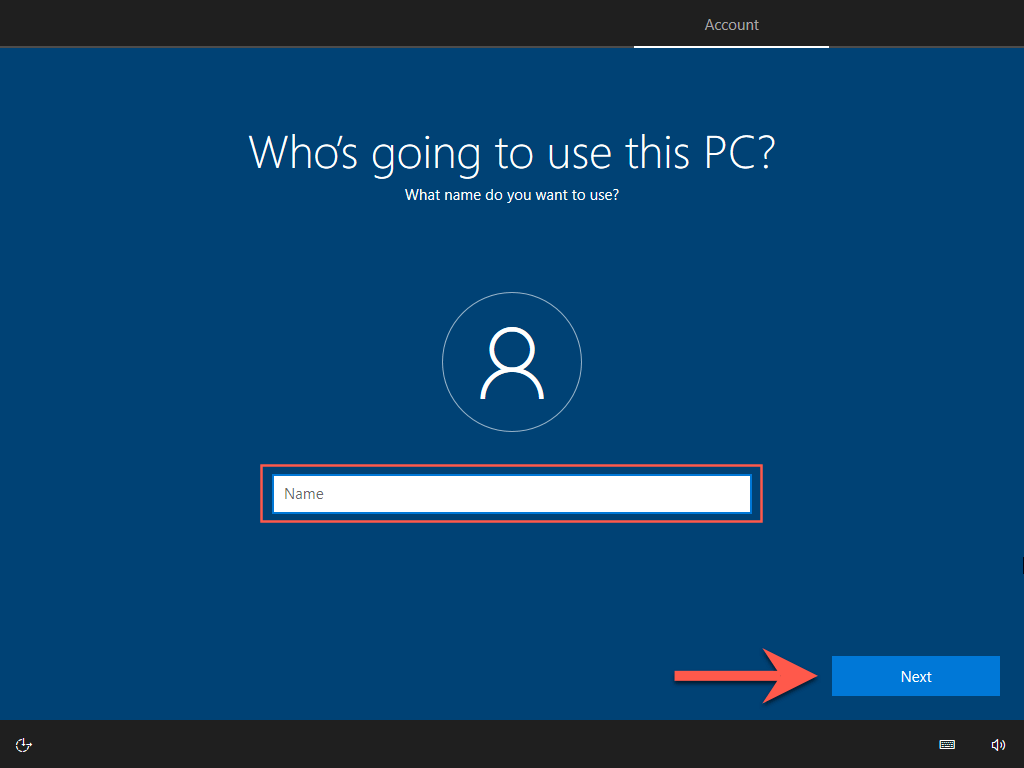
5. Enter your name and select Next to create a local account.
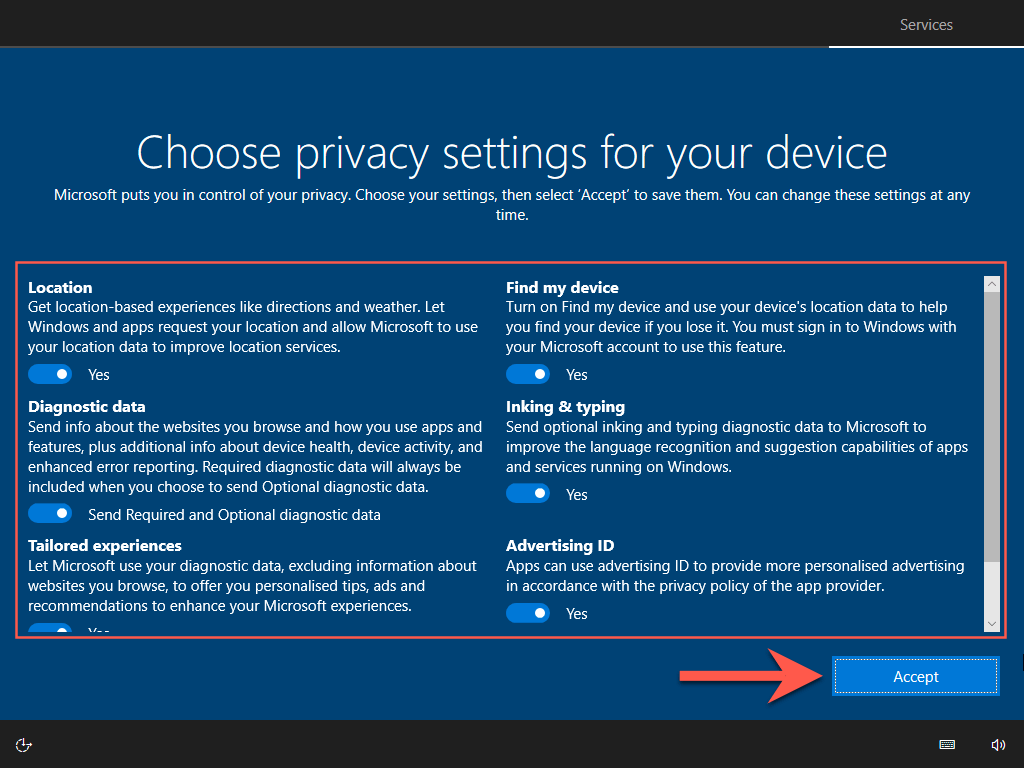
6. Review your privacy settings—e.g., Location, Diagnostic data, and Advertising ID. Disable anything if needed and select Accept.
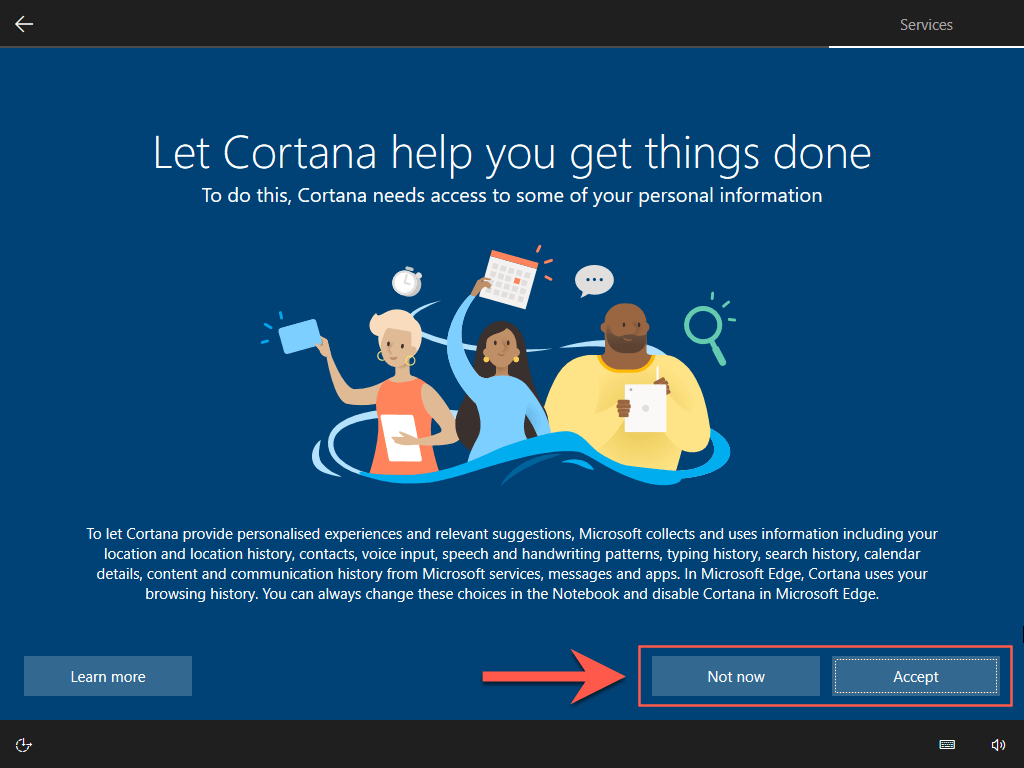
7. Set up Cortana or select Now Now to do that later.
8. Wait for the Windows Setup to finalize the installation.

9. Your Mac will boot into the Windows 10 desktop momentarily. You are halfway there!
Update Windows 10 on Mac
Now that you’ve finished installing Windows 10 on Mac, you must install the hardware drivers, support software, and system updates required to get it working correctly. That also ensures a smooth upgrade to Windows 11.
Run Boot Camp Installer
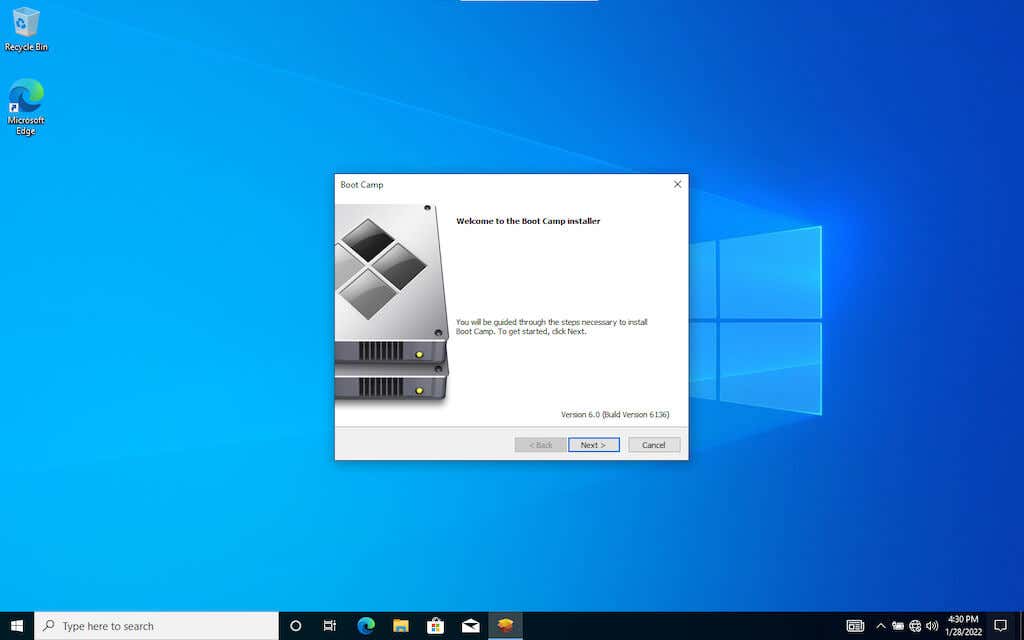
The Boot Camp installer shows up automatically after your Mac boots into Windows 10 for the first time. It contains critical drivers that you must install right away.
1. Select Next.
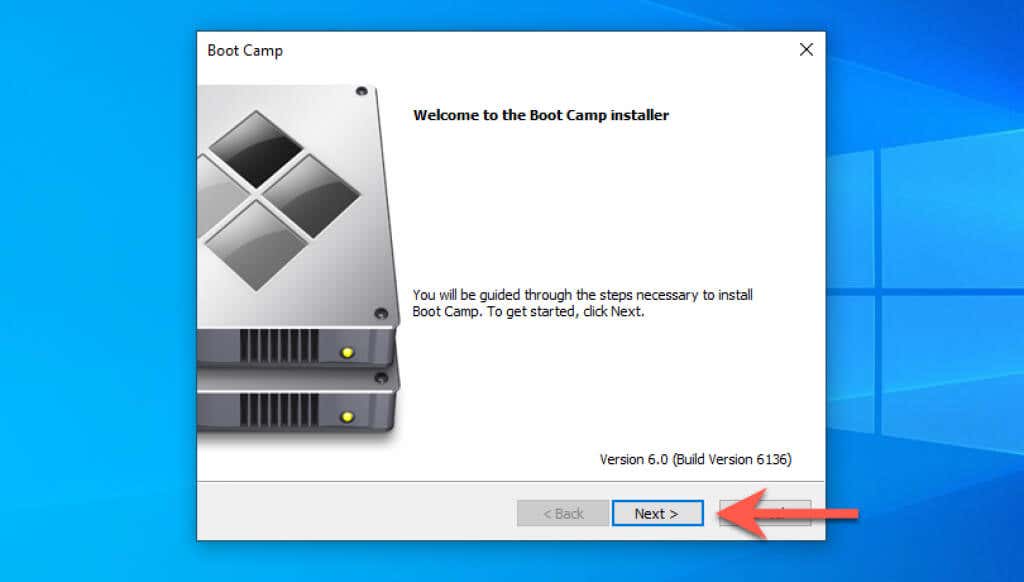
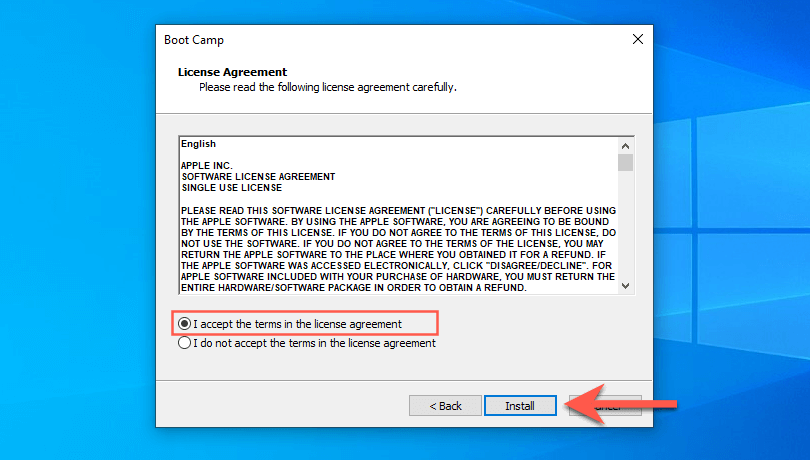
2. Accept the Boot Camp license agreement and select Install.
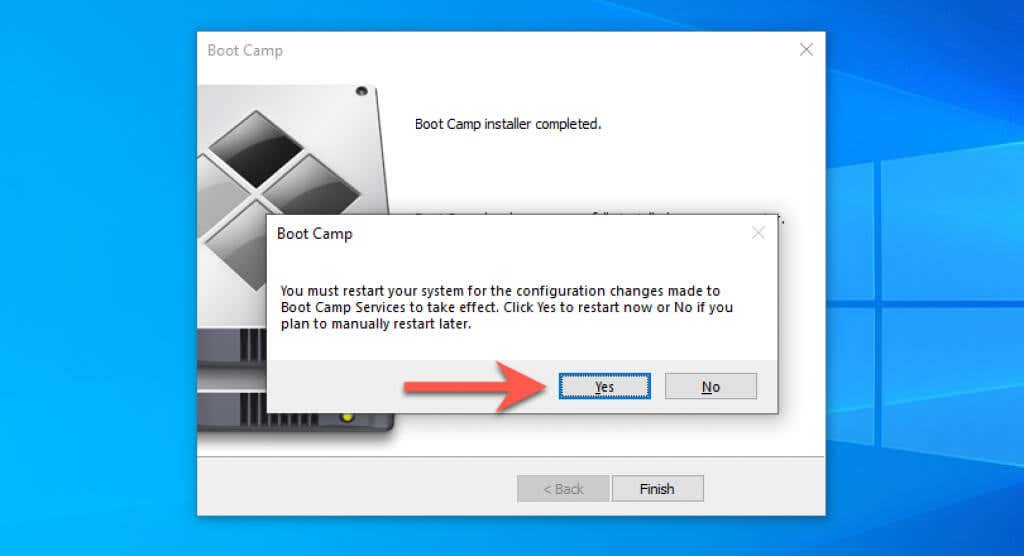
3. Wait for the Boot Camp installer to finish installing all drivers. Then, select Yes to restart your Mac.
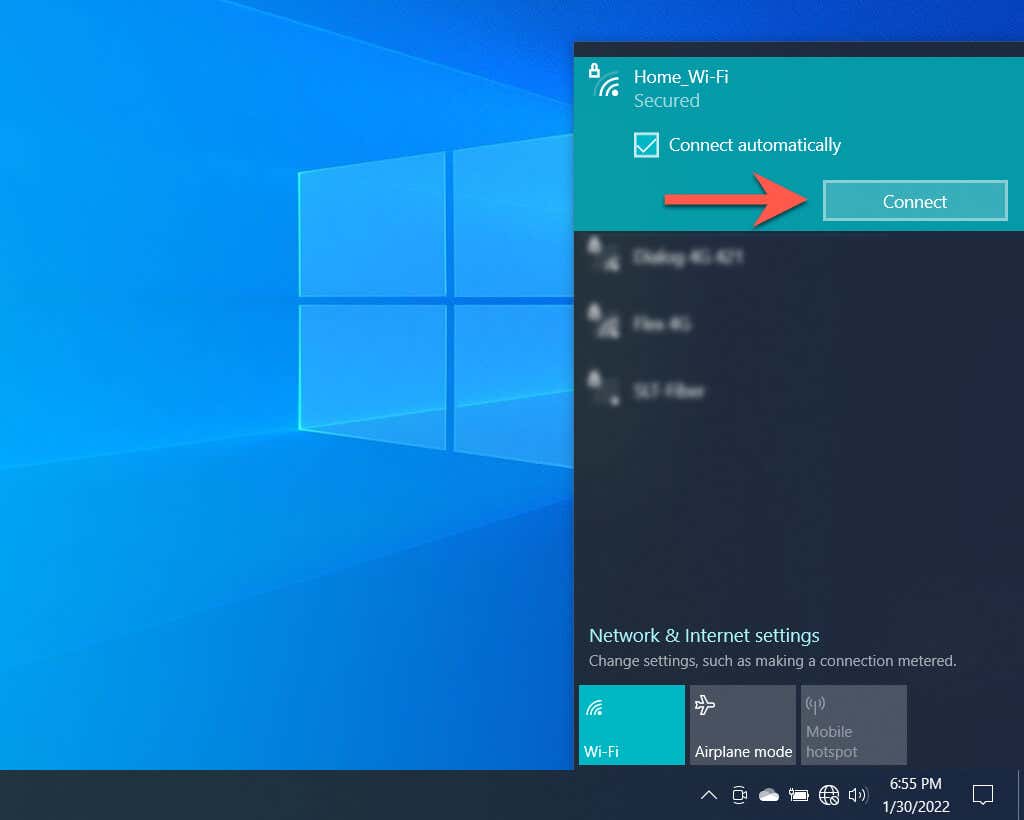
Connect to a Wi-Fi Network
The Boot Camp installer should’ve restored online connectivity in Windows 10. If you don’t use Ethernet, you can connect to Wi-Fi instead. Just select the Globe icon on the system tray (right-corner of the taskbar), pick an available Wi-Fi network, enter its password, and select Connect.
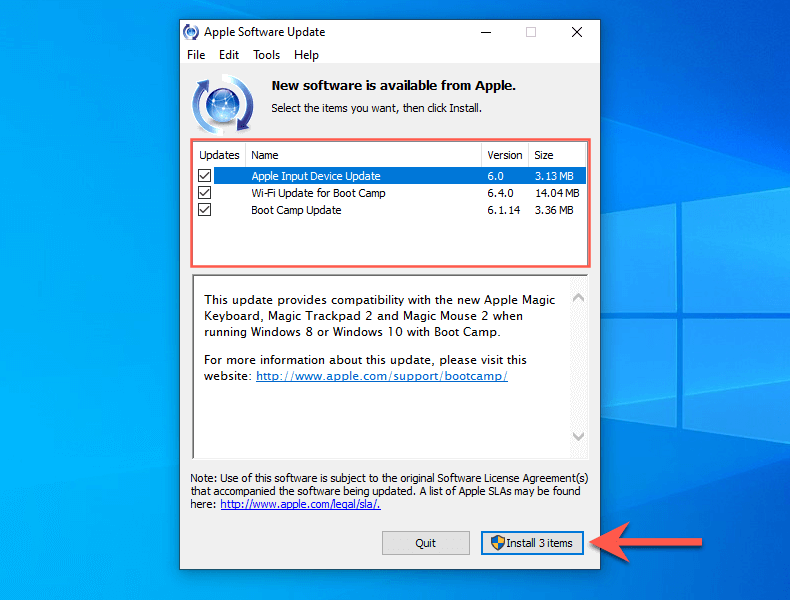
Install Apple Software Update
Next, use the Apple Software Update app to install additional Boot Camp driver updates.
1. Type Apple Software Update into the taskbar and select Open.
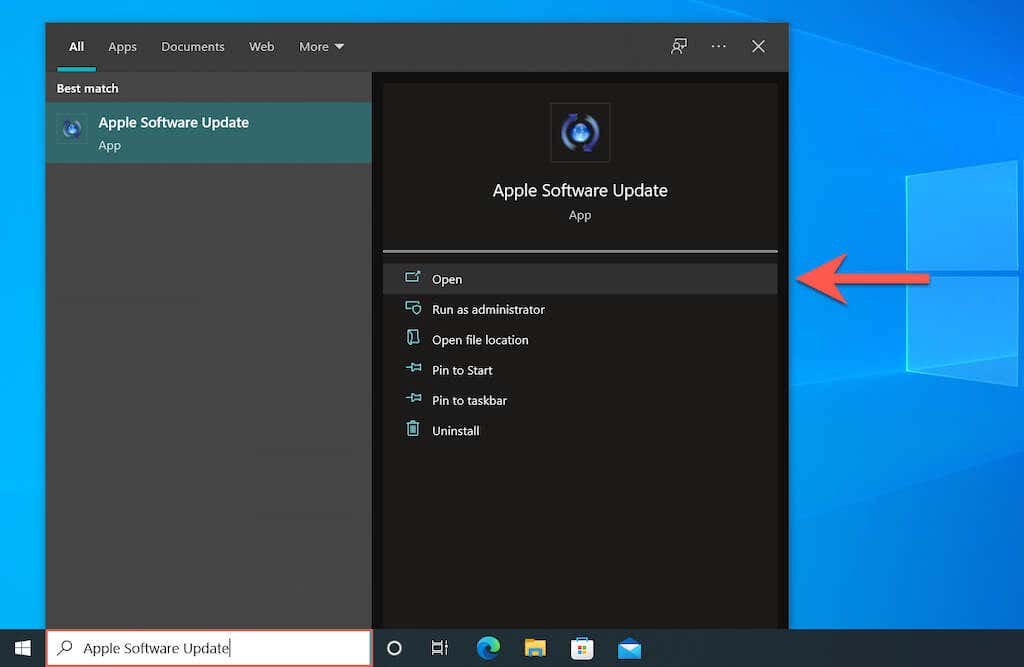
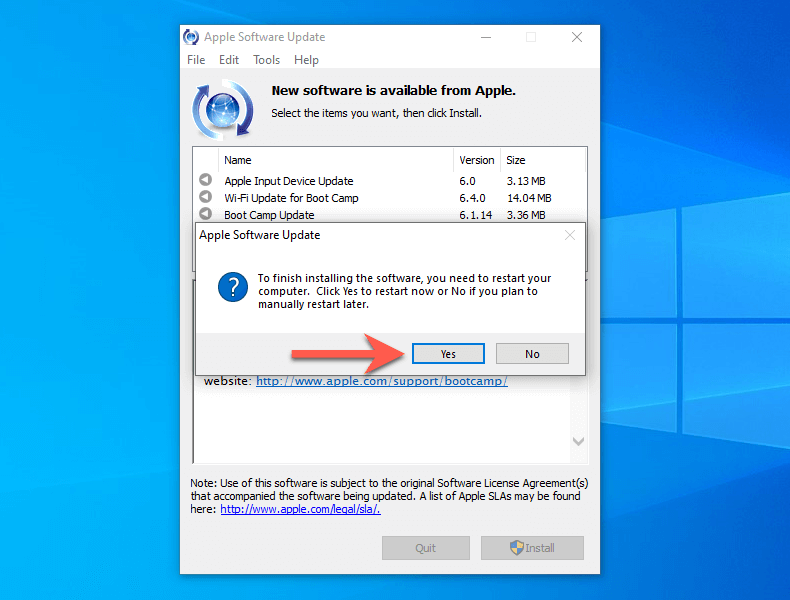
2. Check the boxes next to all available Apple software updates and select Install.
3. Select Yes to restart your PC.
Install Windows Drivers & Updates.
Finally, you must install all Microsoft-verified drivers via Windows Update.
1. Type Windows Update into the taskbar and select Open.
2. Select Check for Updates > View all optional updates.
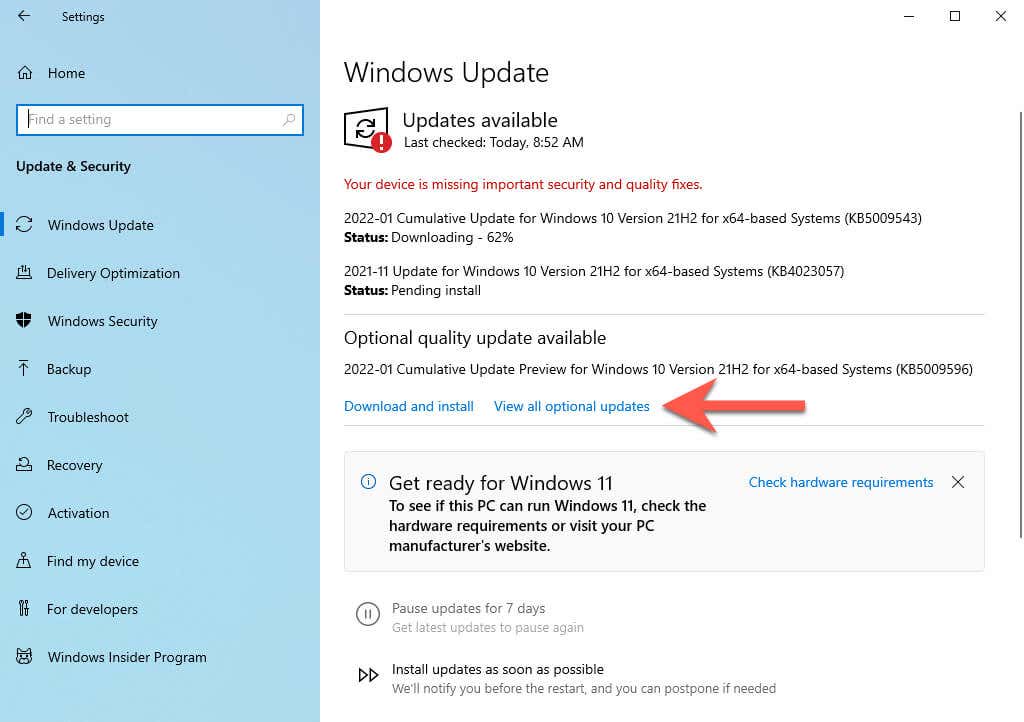
3. Expand Driver updates. Then, check the boxes next to all driver updates and select Download and install.
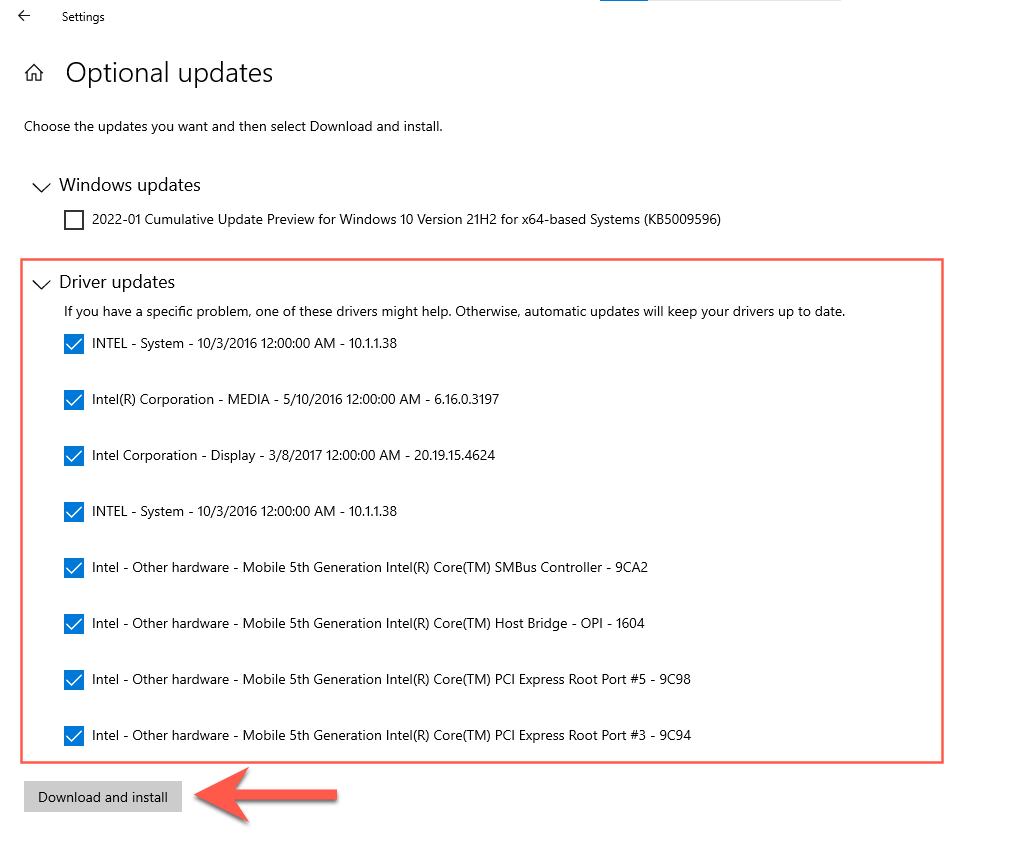
4. Head back to the previous screen and install the latest Windows 10 updates.
5. Select Restart now.

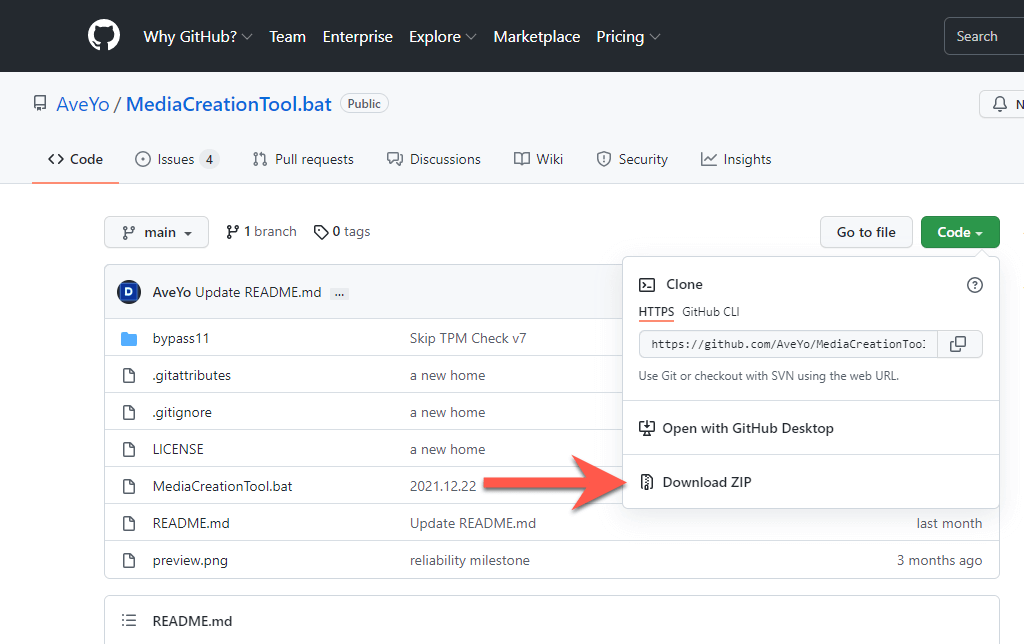
Download the MediaCreationTool GitHub Script
You’re now ready to make the upgrade to Windows 11. To begin, you must download MediaCreationTool (MCT) from GitHub. It’s an automated script that downloads Windows 11 from the official Microsoft servers and installs it by skipping all compatibility checks.
1. Open Microsoft Edge from the Windows 10 taskbar and head over to AveYo’s MediaCreationTool page on GitHub.
2. Select Code and pick the option labeled Download ZIP to download the batch script in ZIP format.
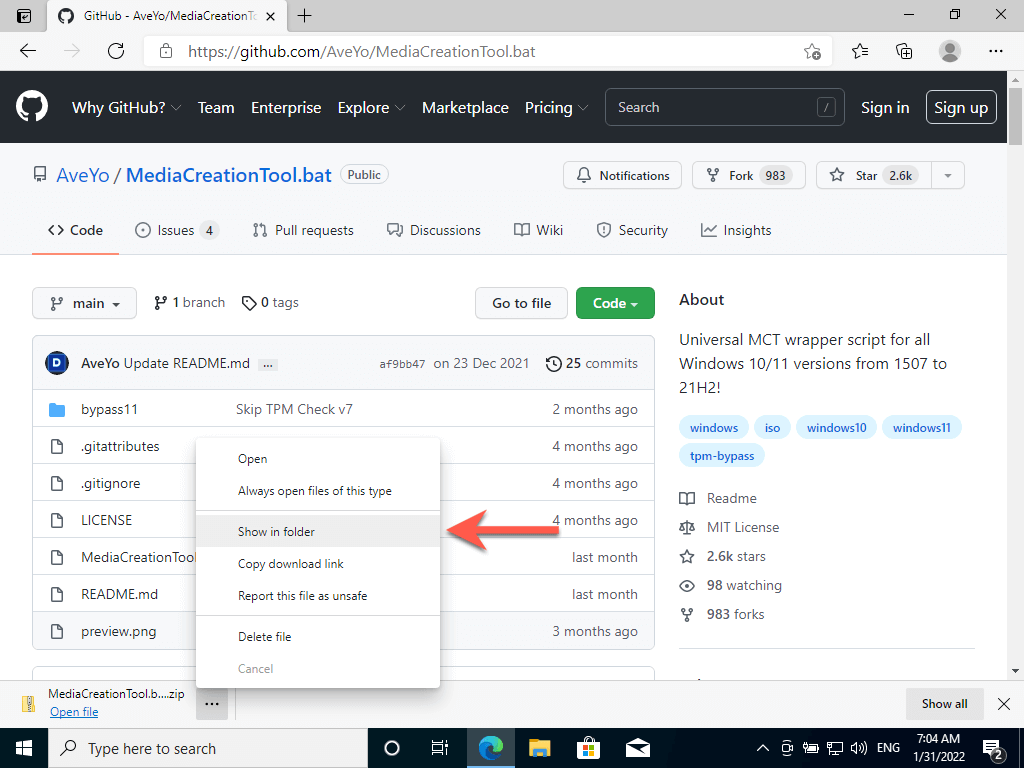
3. Select the More icon (three dots) on the download shelf and choose Show in Folder.
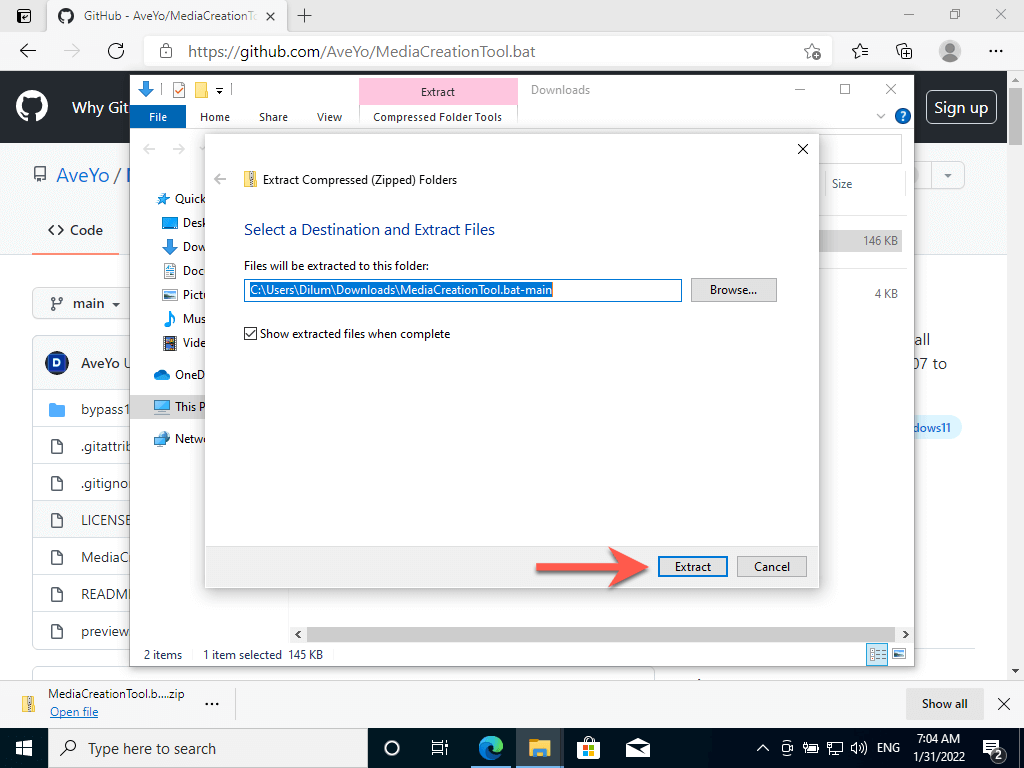
4. Right-click the downloaded ZIP file and select Extract Files. Then, choose Extract. The extracted folder will show up automatically.
Upgrade Windows 10 Installation to Windows 11
Running the batch script will upgrade Windows 10 to Windows 11. If you’re upgrading a previous Windows 10 installation, create a backup of your data before proceeding.
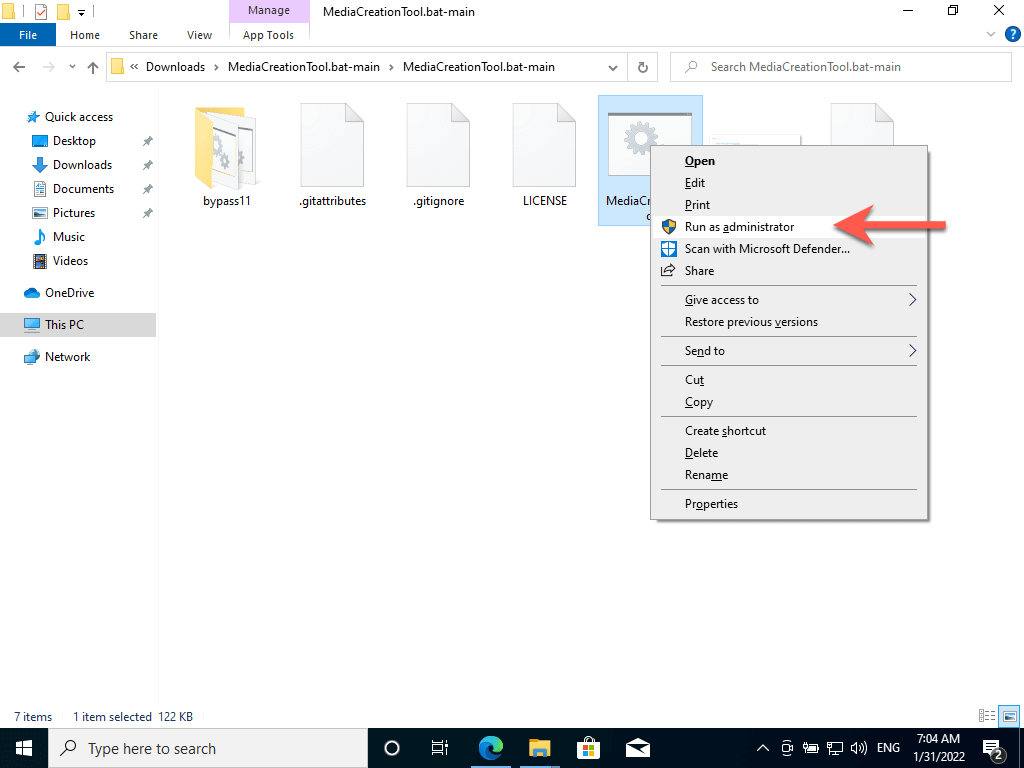
1. Right-click the MediaCreationTool.bat file and select Run as an administrator.
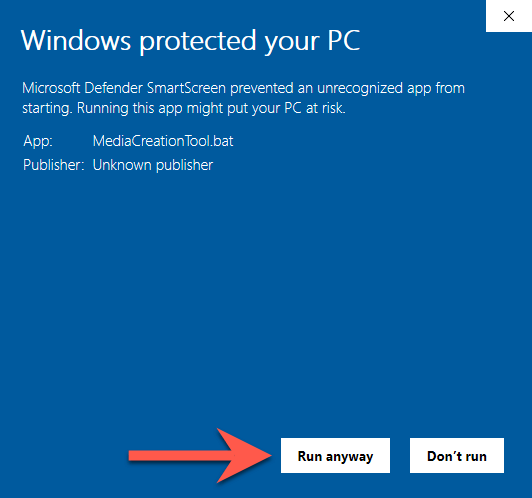
2. Select More info > Run anyway on the Windows SmartScreen pop-up.
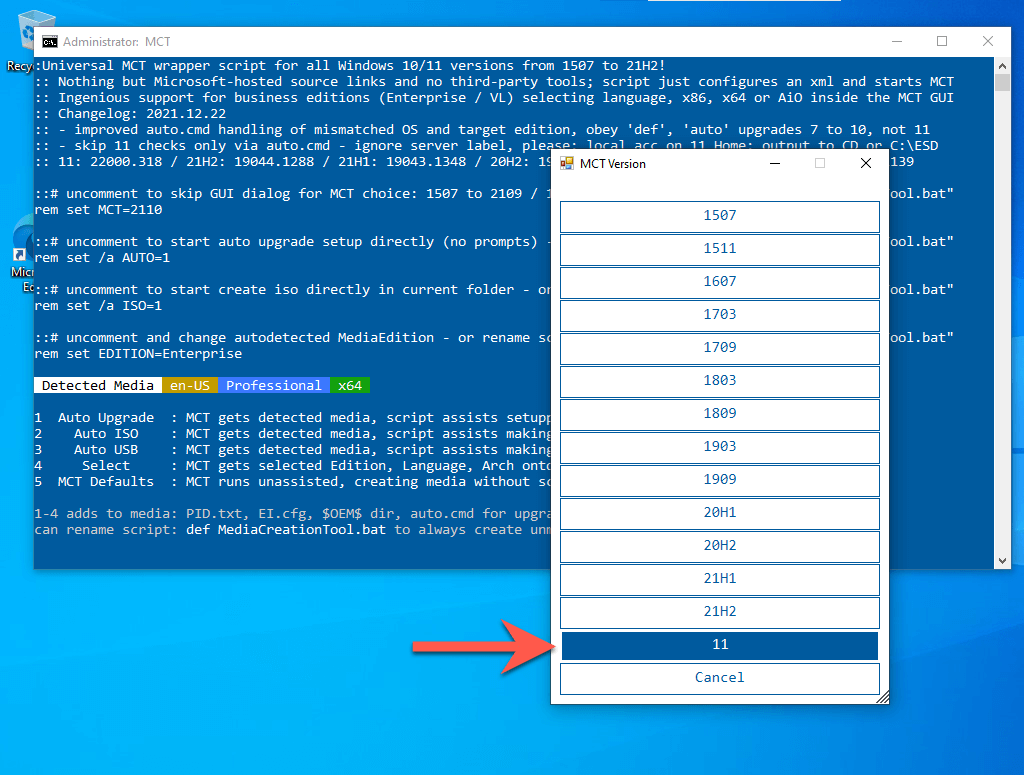
3. Select 11.
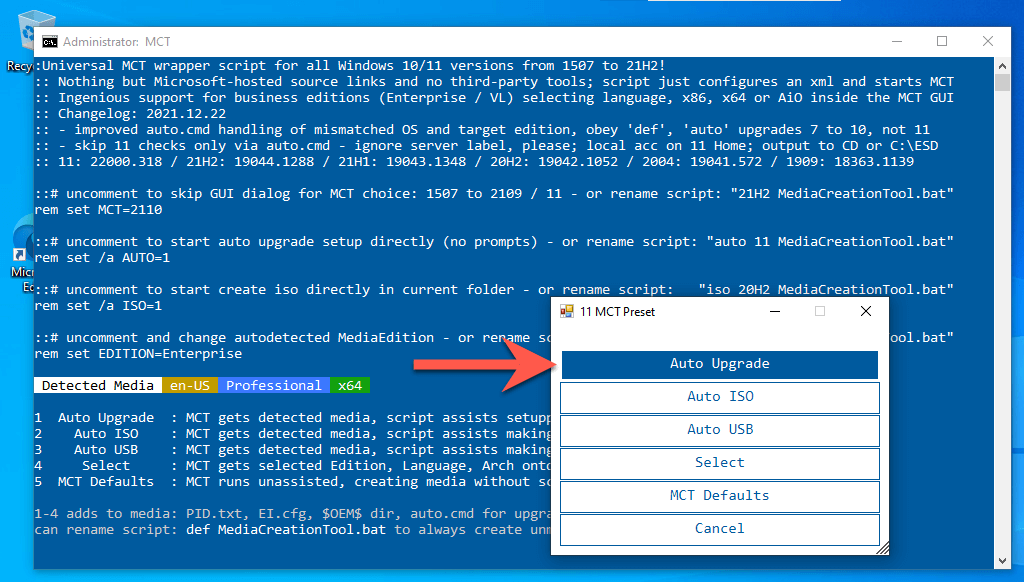
4. Select Auto Upgrade.
5. Wait until the MediaCreationTool script downloads Windows 11 onto your PC. You don’t have to do anything from this point onward.
6. The MediaCreationTool will reboot your Mac and begin installing Windows 11. The procedure may take up to an hour or more to complete.
7. Your Mac will boot into the Windows 11 desktop after the upgrade. Congratulations!
Optional: Sign Into Microsoft Account
You’ve finished setting up Windows 11 on your Mac. You can begin using it immediately since you installed all drivers and updates in Windows 10.
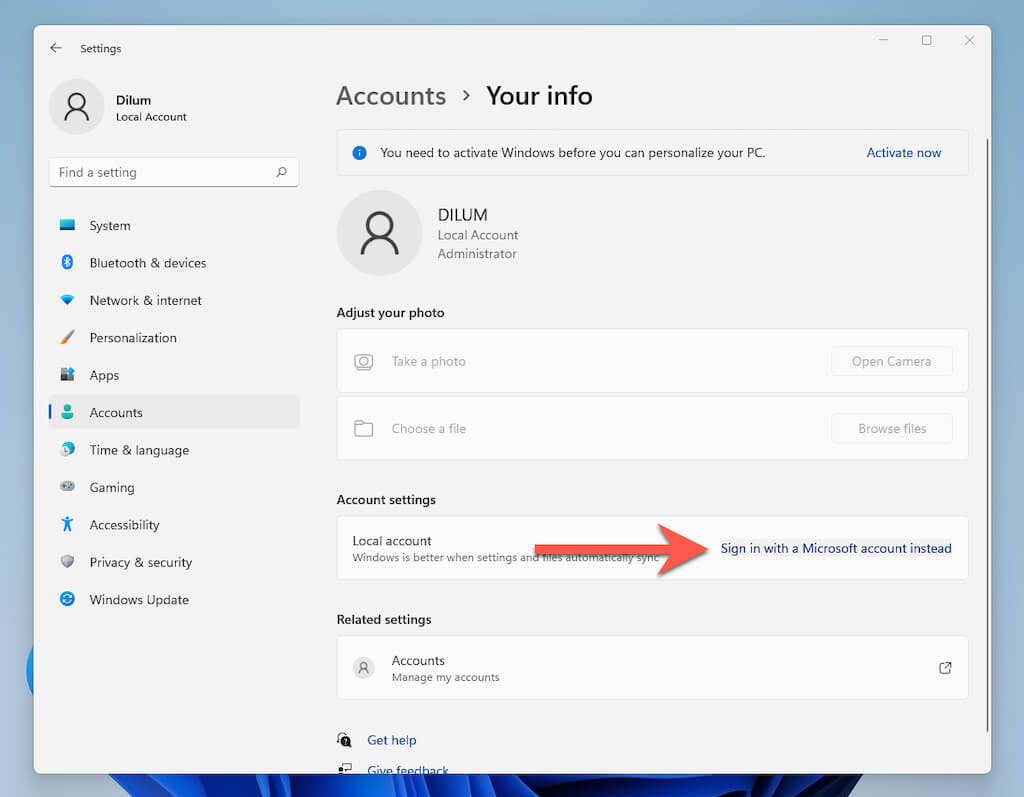
You can also sign into Windows 11 with a Microsoft Account to unlock additional features—such as the ability to sync PC settings and download age-restricted content from the Microsoft Store—or activate Windows if it’s linked with a digital license.
1. Open the Start menu and select Settings.
2. Select Accounts > Your info.
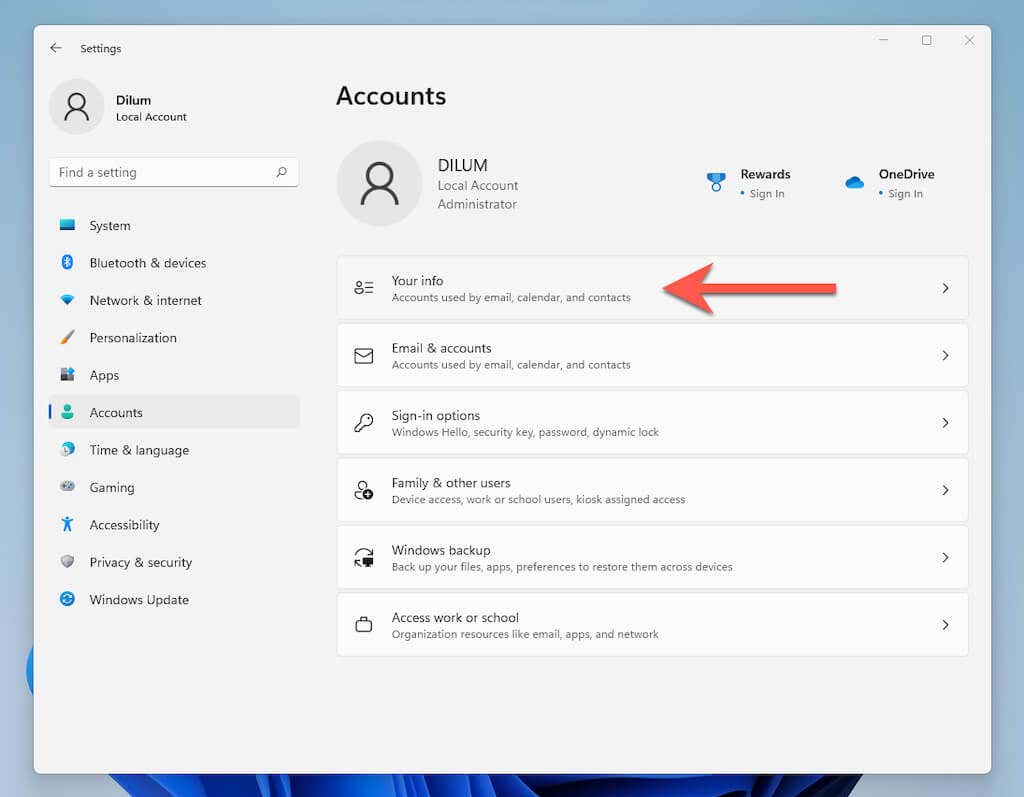
3. Select Sign in with a Microsoft Account instead.
4. Enter your Microsoft Account credentials (or choose to create one) and sign in to Windows 10.
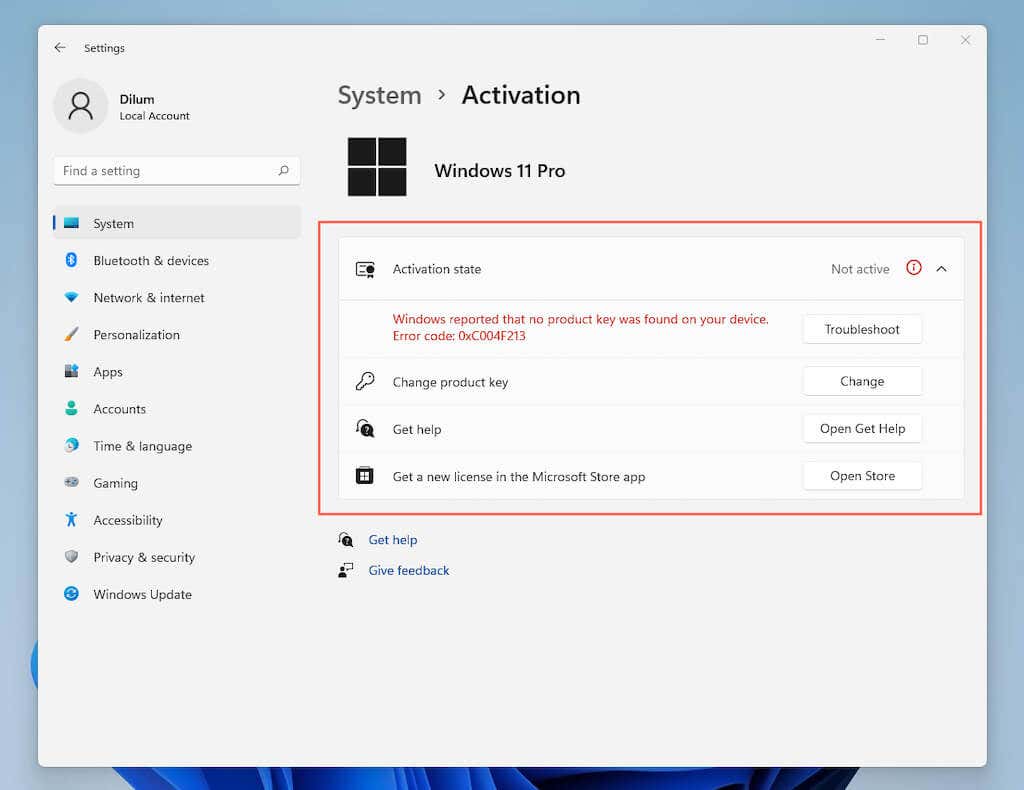
Activate Windows 11 on Mac
You don’t have to activate Windows 11 to keep using it on your Mac, but you will lose the ability to customize your desktop. Regardless, you can check your activation status and enter/purchase a product key by heading to Start > Settings >System > Activation.