
При выпуске оригинальной версии Windows 11 компания Microsoft установила весьма специфические системные требования, которые должны быть выполнены для установки или обновления до Windows 11 с любой предыдущей ОС. Эти требования включают TPM 2.0, Secure Boot, 4 ГБ оперативной памяти, минимум 2 ядра процессора и т.д. Однако не каждый компьютер может соответствовать этим требованиям, особенно если вы ограничены в бюджете.
Бывают случаи, когда вы хотите установить последнюю версию Windows 11, например Windows 11 23H2, но не можете ее установить, поскольку ваше оборудование не соответствует требованиям ОС. Если вы столкнулись с подобной дилеммой, то сообщаем вам, что существуют методы установки Windows 11 версии 23H2 в обход специфических аппаратных требований Windows 11.
При этом новые требования к Windows призваны повысить безопасность систем в связи с участившимися кибератаками. Однако не каждый ПК можно или нужно модернизировать в соответствии с этими требованиями.
Интересно: Windows 11 заимствует одно из самых больших удобств MacOS
Системные требования Windows 11 23H2
Windows 11 23H2 имеет те же системные требования, что и оригинальный выпуск. Прежде чем планировать обновление текущей ОС до Windows 11 23H2, рекомендуется проверить, поддерживает ли оборудование эту ОС по умолчанию, или необходимо обойти требования.
Ниже приведен список основных системных требований Windows 11 23H2:
- Процессор: 1 ГГц или более быстрый CPU или система на кристалле (SoC) с двумя и более ядрами.
- ОЗУ: Не менее 4 ГБ.
- Жесткий диск: 64 ГБ или более.
- Прошивка системы: UEFI, с поддержкой Secure Boot.
- ТПМ: Модуль доверенной платформы (TPM) версии 2.0.
- Графика: Совместимость с DirectX 12 или более поздней версией с драйвером WDDM 2.0.
- Разрешение экрана: Дисплей высокой четкости (720p) с диагональю более 9″, 8 бит на цветовой канал.
- Сеть: Учетная запись Microsoft и подключение к Интернету.
Эти спецификации означают, что не все компьютеры смогут установить Windows 11 23H2 в исходном виде. Придется либо перепрошивать ее, либо обновлять аппаратное обеспечение, либо обходить эти требования. Последний вариант представляется более предпочтительным, если у вас нет бюджета на модернизацию оборудования, а безопасность системы не является вашей главной заботой.
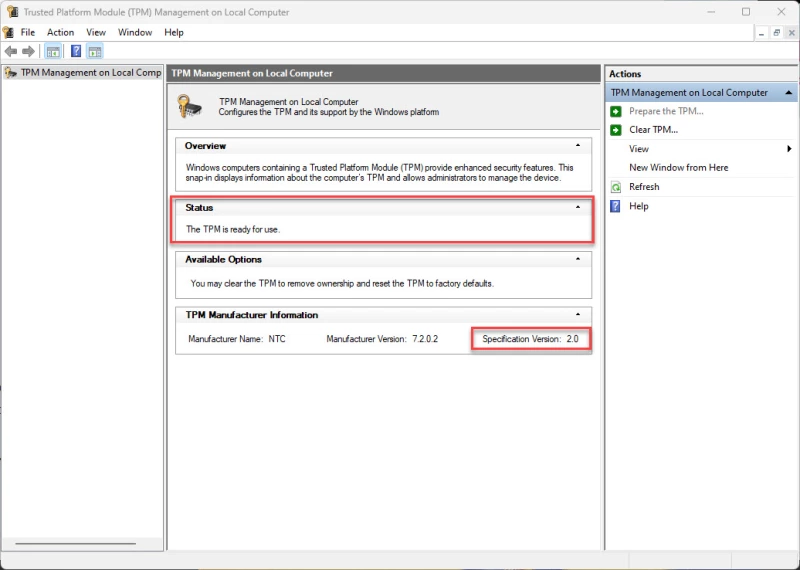
Проверка наличия TPM 2.0
Начните с проверки наличия или отсутствия в компьютере чипсета TPM 2.0, выполнив следующие действия:
- Нажмите Win + R, чтобы открыть окно Run Command.
- Введите «tpm.msc» и нажмите Enter чтобы открыть консоль управления TPM.
- Здесь найдите статус TPM в разделе Status _. Вы также найдете его версию в разделе _TPM Manufacturer Information.

Если в Status написано «TPM готов к использованию», это означает, что он доступен и включен. Если же в Status написано «Compatible TPM cannot be found», это означает, что либо TPM недоступен, либо присутствует, но отключен в настройках BIOS/прошивки UEFI.
Узнайте другие способы проверк TPM.
Включить TPM
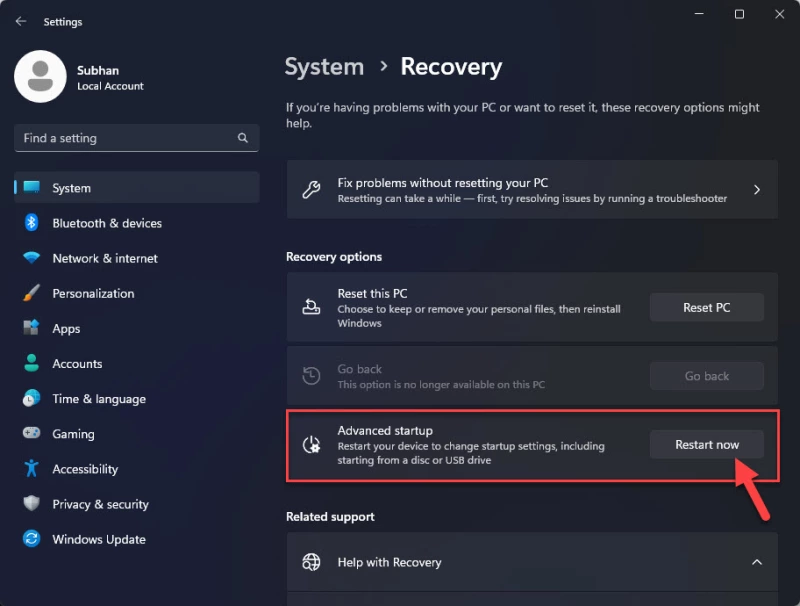
Если TPM отключен, необходимо включить его в настройках UEFI. Вот как это делается:
- Нажмите клавишу Win + i, чтобы открыть приложение настроек Windows.
- Перейдите к следующему:
System >> Recovery
- Нажмите «Перезагрузить сейчас» перед «Дополнительный запуск».

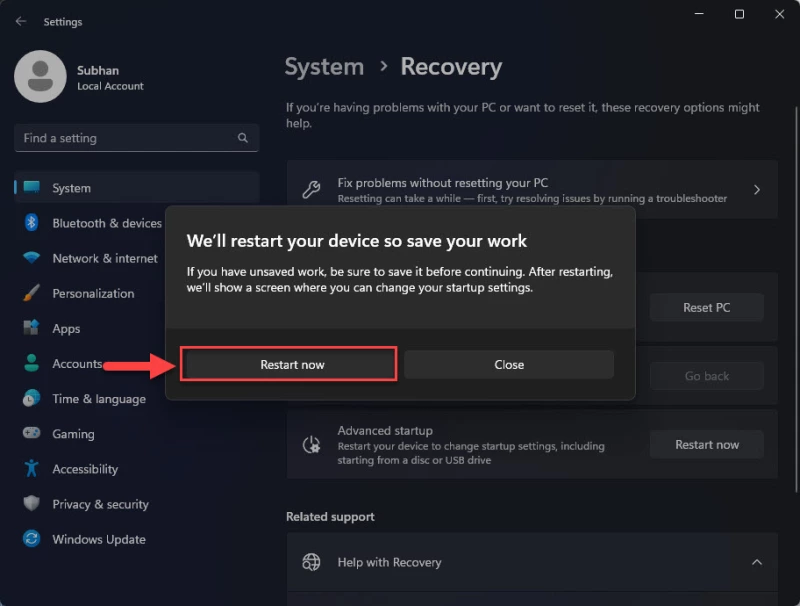
- Во всплывающем окне подтверждения снова нажмите «Перезагрузить сейчас».
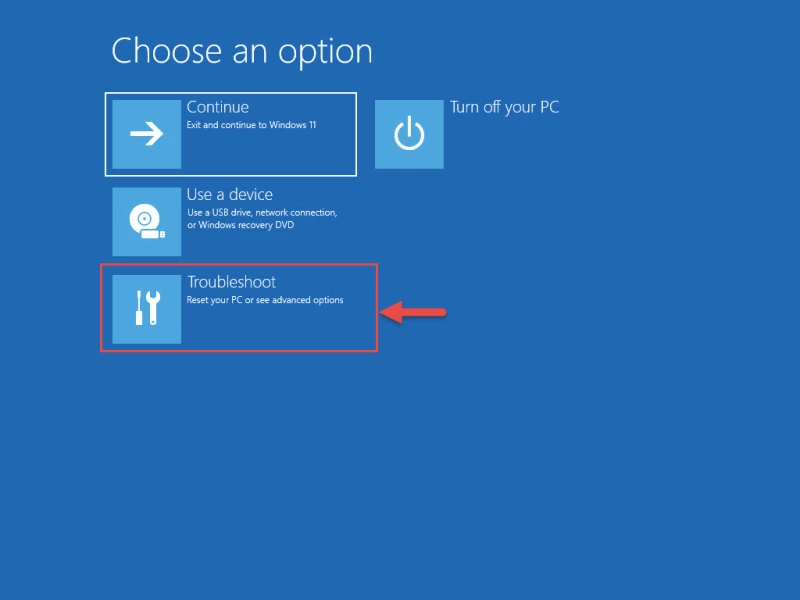
Компьютер включится и загрузится в среду восстановления Windows (WinRE).
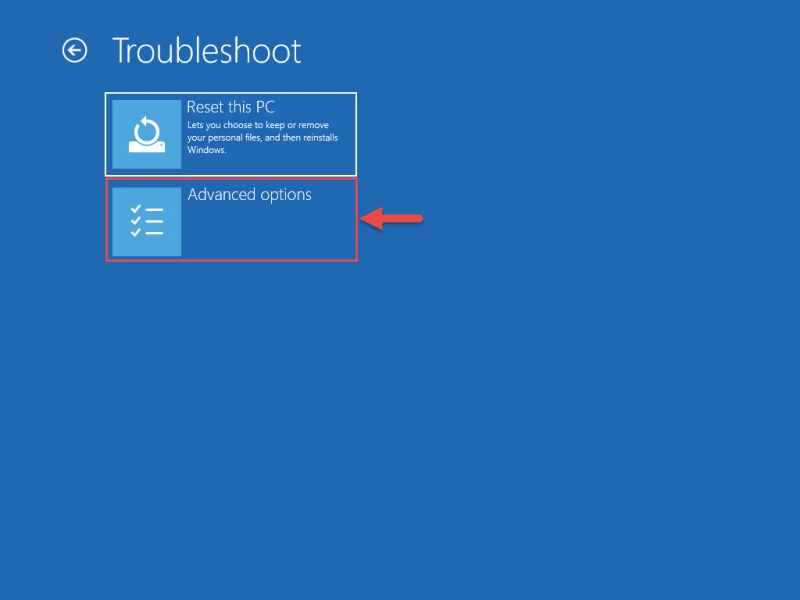
- Нажмите Troubleshoot.

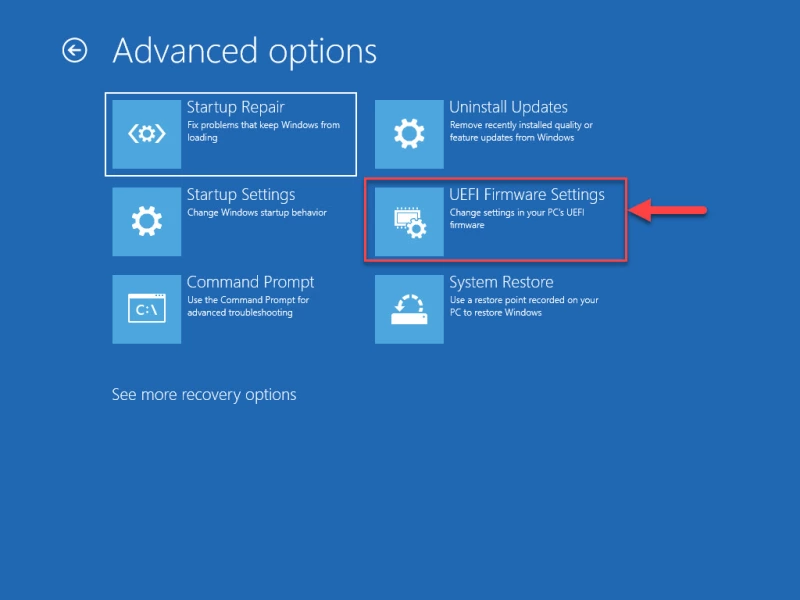
- Затем нажмите «Advanced options.»
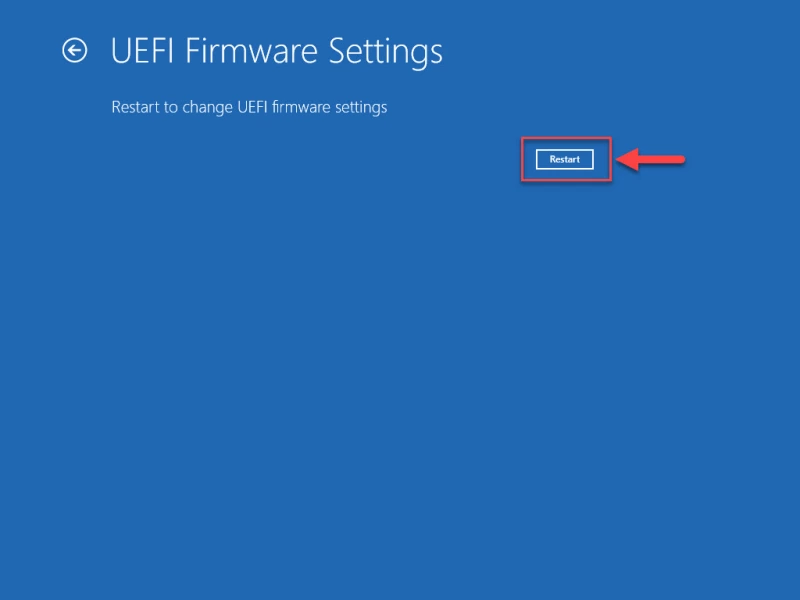
- Нажмите «UEFI Firmware Settings.»
- Теперь нажмите Restart.
Компьютер снова перезагрузится.
- Теперь перейдите к настройкам Advanced, Security или Boot. Они зависят от типа материнской платы.
- Выберите опцию TPM 2.0 и выберите опции «Enabled» и «TPM On».

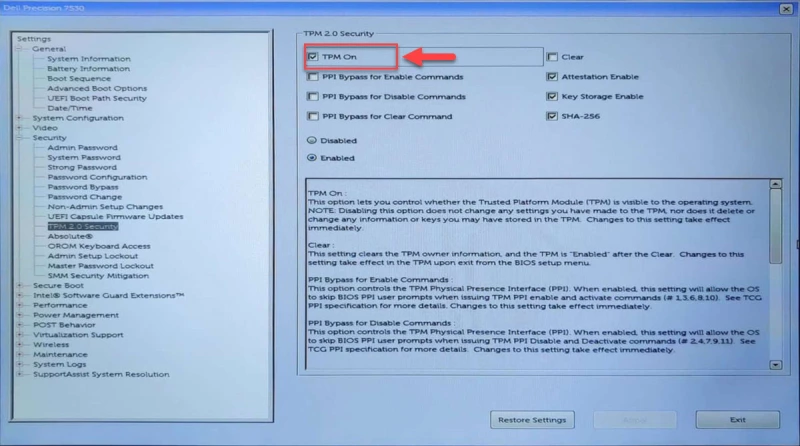
Если вы обнаружили, что опция TPM 2.0 отсутствует или не может быть включена, то, скорее всего, она недоступна на вашей материнской плате. Однако если проблема заключается в чем-то другом, попробуйте воспользоваться следующими методами устранения неисправностей TPM.
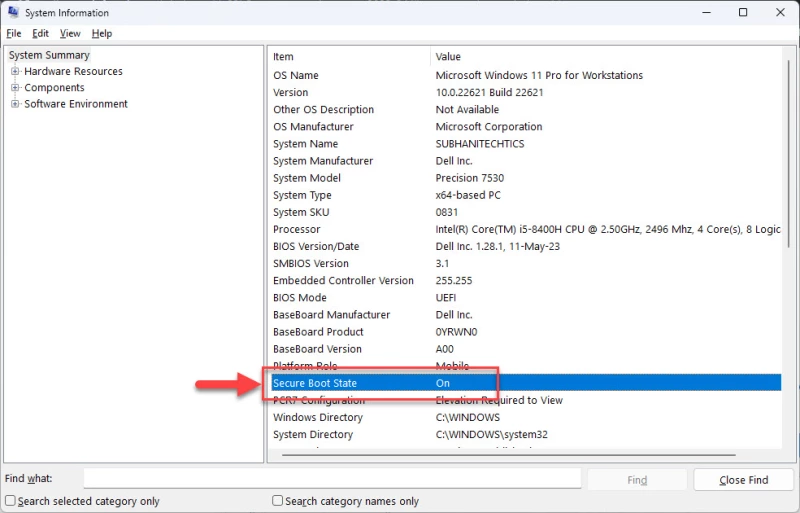
Проверка наличия Secure Boot
Другим обязательным требованием является Secure Boot. Проверьте, включена ли Secure Boot, выполнив следующие действия:
- Нажмите Win + R, чтобы открыть окно Run Command.
- Введите «msinfo23» и нажмите Enter.
- На вкладке System Summary проверьте наличие информации перед строкой «Secure Boot State».

Если Secure Boot выключен или отключен, его можно включить в настройках UEFI Firmware так же, как и TPM 2.0, описанным выше способом.
Если вы убедились, что и TPM 2.0, и Secure Boot доступны и включены, только тогда можно переходить к установке Windows 11 23H2 обычными методами. Если же ни одна из опций не доступна или не включена, то необходимо установить Windows 11 23H2 в обход системных требований, используя описанные ниже методы.
Установка Windows 11 23H2 на неподдерживаемое оборудование
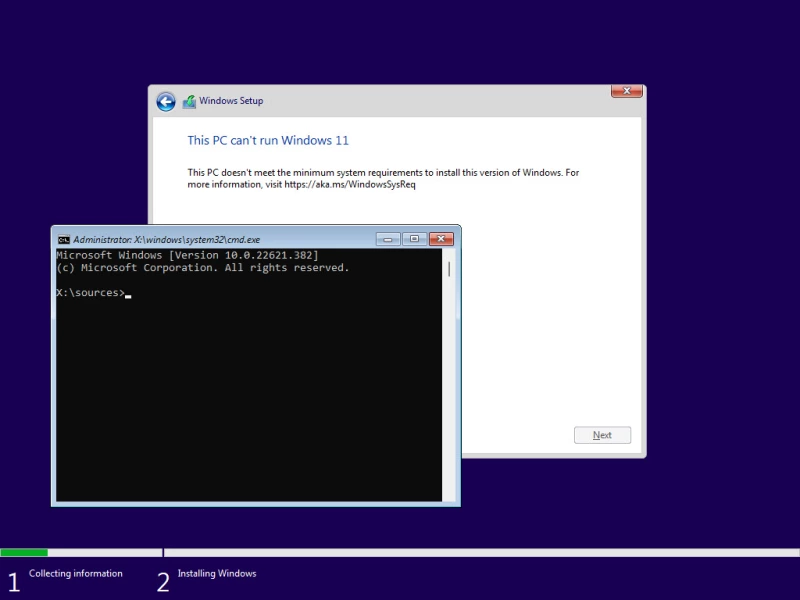
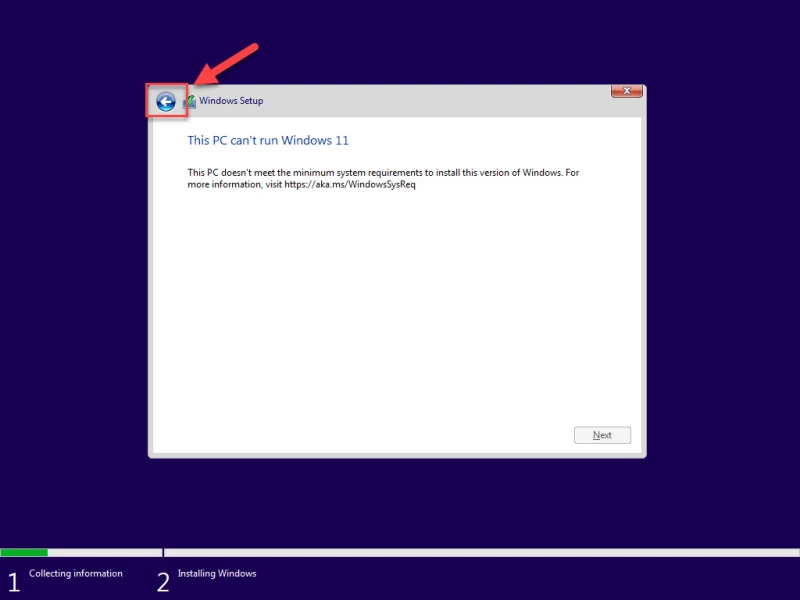
Если попытаться установить Windows 11 23H2 или любую другую версию Windows 11 на компьютер, не соответствующий системным требованиям, то установить или перейти на нее обычными методами не удастся. Вместо этого при попытке установки появится сообщение об ошибке, подобное следующему:
This PC can't run Windows 11 This PC doesn't meet the minimum system requirments to install this version of Windows.
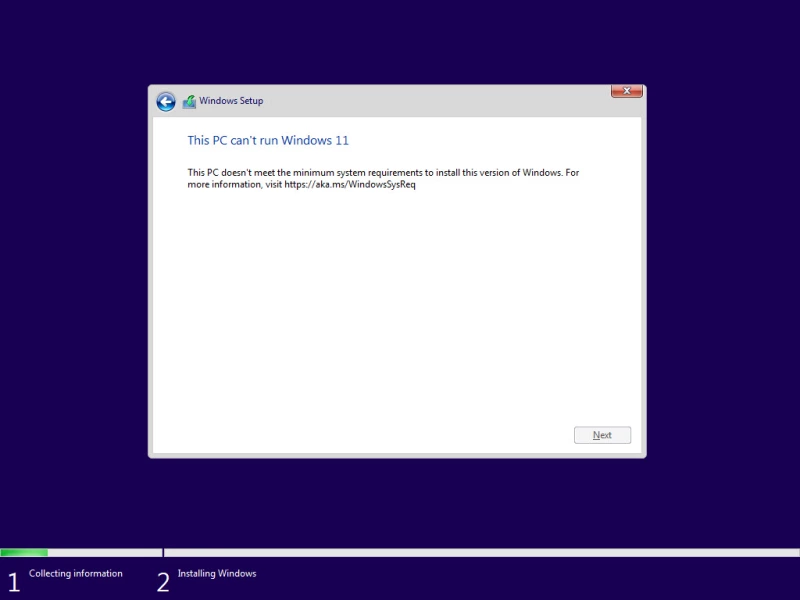
В этом случае можно выполнить одно из следующих решений, чтобы обойти эти системные требования и продолжить установку Windows 11 23H2 без обновления оборудования
Обход ограничений на установку Windows 11 23H2
Обход требований TPM и Secure Boot из реестра Windows
Чтобы обойти системные требования TPM 2.0 и Secure Boot при установке Windows 11 23H2, выполните следующие действия:
- Начните с загрузки Windows 11 23H2 ISO.
- Продолжите создание загрузочного USB-накопителя или используйте Ventoy для создания мультизагрузочного USB-накопителя.
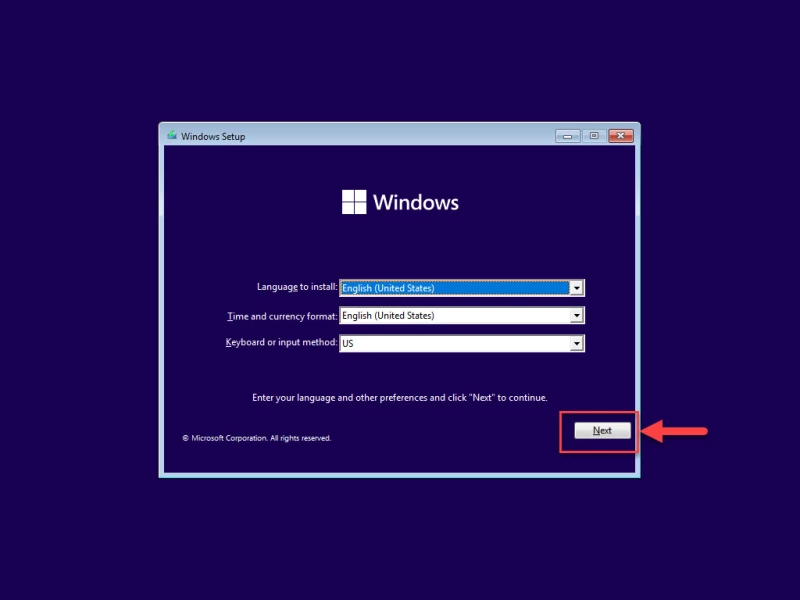
- Загрузитесь с загрузочного USB-накопителя и нажмите кнопку Next на первом экране установки Windows.
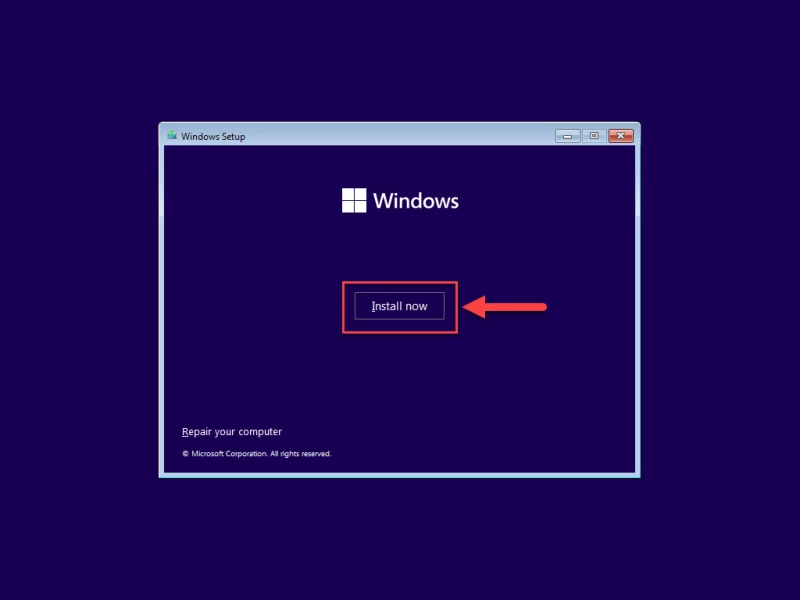
- Нажмите «Установить сейчас.»
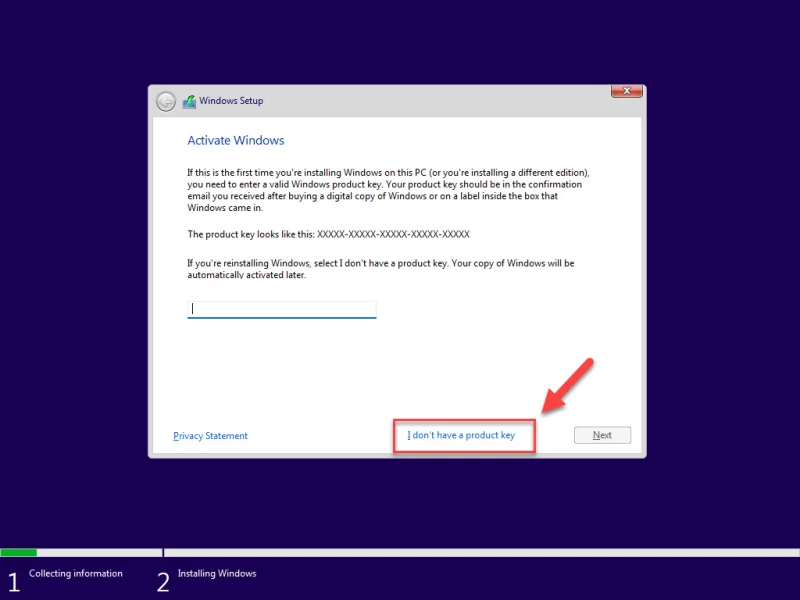
- Нажмите «У меня нет ключа продукта.«Даже если у вас есть ключ продукта, вы можете использовать его для активации Windows позже.
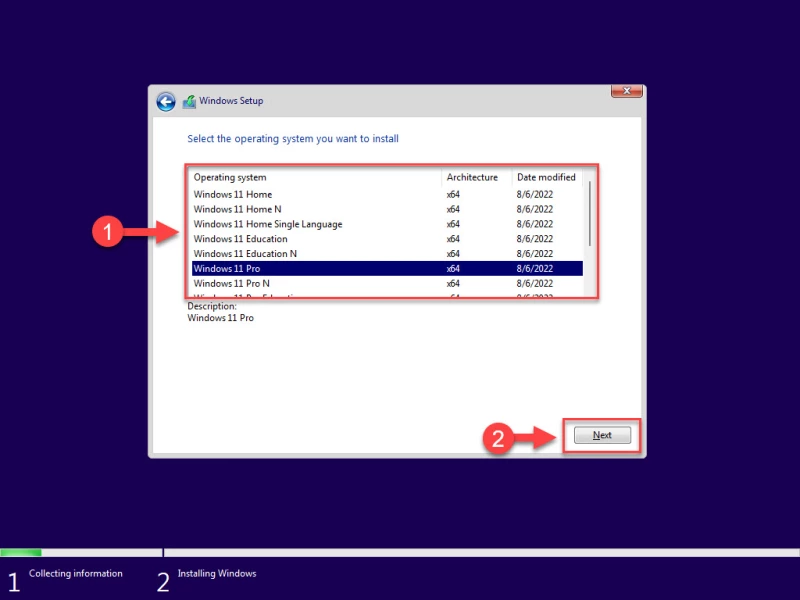
- Выберите одну из редакций Windows и нажмите Next.
- На экране ошибок одновременно нажмите клавиши Shift + F10, чтобы открыть Командную строку.
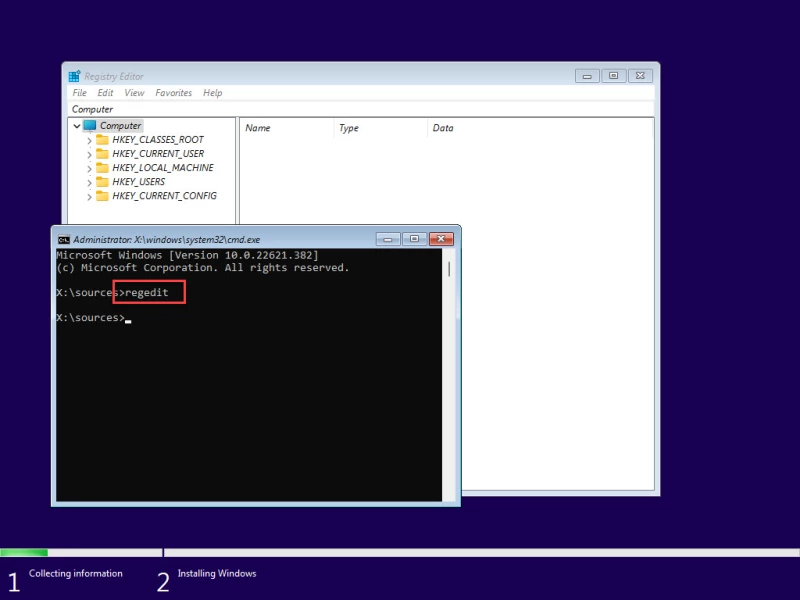
- Введите «regedit» и нажмите Enter, чтобы открыть редактор реестра.
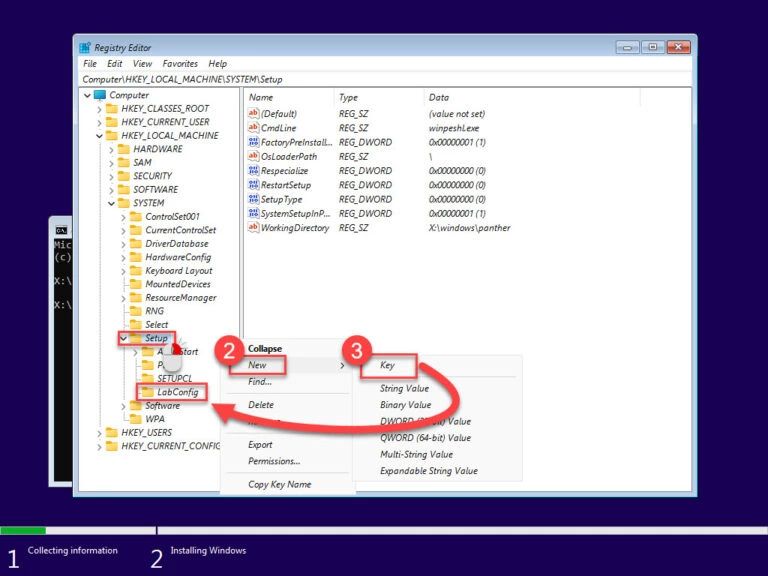
- В редакторе реестра перейдите к следующему пути из левой панели:
Computer\HKEY_LOCAL_MACHINE\SYSTEM\Setup
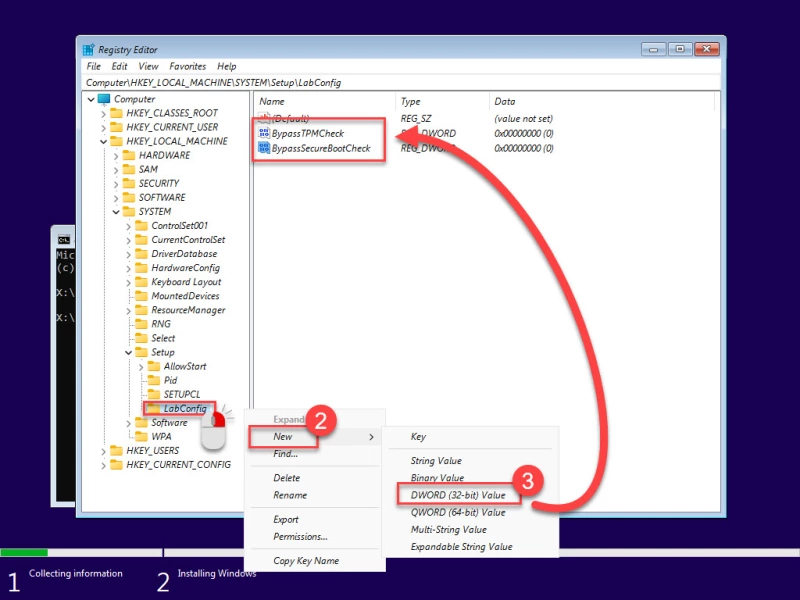
- Щелкните правой кнопкой мыши «Setup», разверните New и выберите Key. Назовите этот ключ «LabConfig.»

- Щелкните правой кнопкой мыши «LabConfig», разверните New и выберите «DWORD (32-bit) Value». Назовите этот DWORD «BypassTPMCheck».
- Повторите все действия еще раз и создайте еще один DWORD в ключе LabConfig с именем «BypassSecureBootCheck».
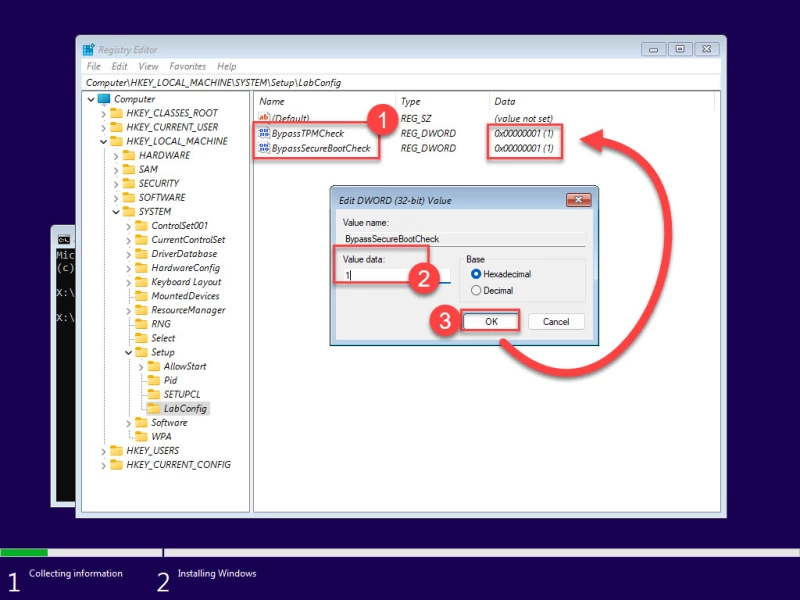
- Дважды щелкните оба этих DWORD и измените их Value Data на «1».
- Закройте редактор реестра и окно командной строки.
- Нажмите кнопку «Назад» в мастере установки Windows.
- Теперь снова выберите редакцию Windows и нажмите кнопку Next.

Теперь вы заметите, что подсказка об ошибке исчезла, а на ее месте появились правила и условия. Продолжайте выполнять оставшиеся шаги для успешной установки Windows 11 23H2 без соблюдения системных требований.
*Примечание: *Остальные шаги типичны для всех современных установок Windows.
Обход требований TPM и Secure Boot с помощью Rufus
Rufus, полное название которого «The *R*eliable *U*SB *F*ormatting *U*tility, with *S*ource», – это утилита с открытым исходным кодом для операционной системы Windows, позволяющая изменять и создавать ISO-файлы операционной системы Windows. Теперь эта утилита также включает в себя опции, которые можно выбрать, что позволит создать загрузочный USB-накопитель, на котором системные требования Windows 11 23H2 уже обойдены.
Для обхода требований TPMm Secure to и RAM с помощью Rufus выполните следующие действия:
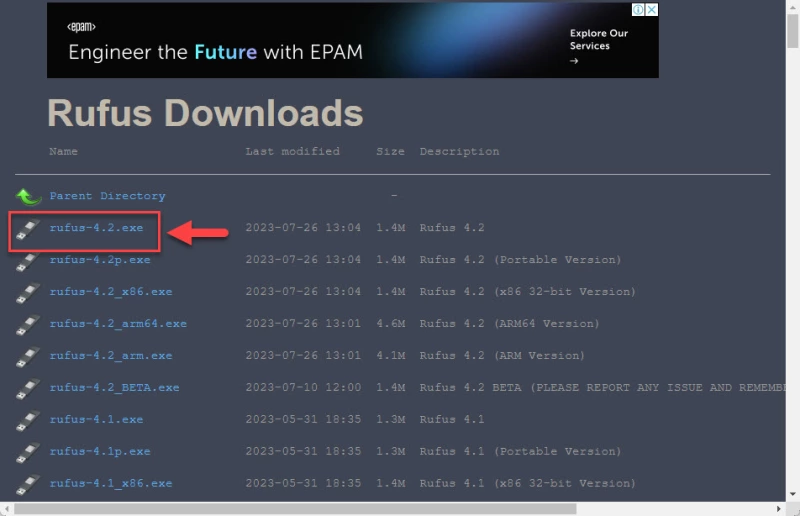
- Откройте Сайт Руфус и нажмите на последнюю версию Rufus, чтобы загрузить ее.

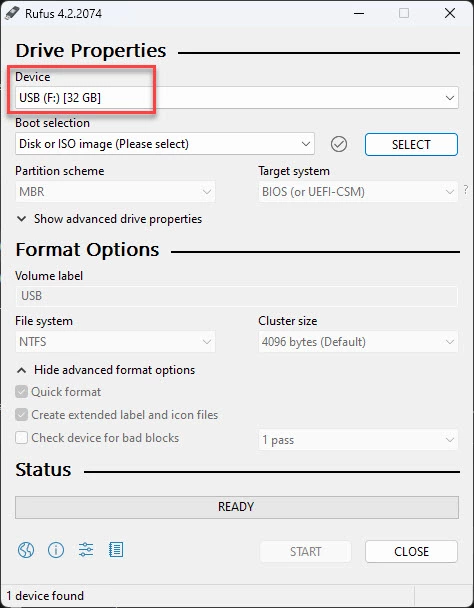
- Подключите USB-накопитель к компьютеру и запустите Rufus.
- В Rufus убедитесь, что USB-накопитель выбран в выпадающем меню Device.

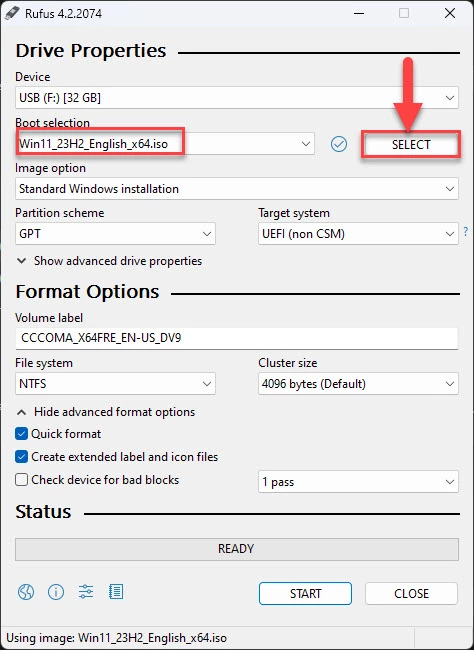
- Нажмите Select и выберите ISO-файл Windows 11 23H2.

- Убедитесь, что остальные настройки соответствуют следующим:
- Опция образа: Стандартная установка Windows
- Схема разделов: GPT
- Целевая система: UEFI (не CSM)
- Филевая система: NTFS
- Размер кластера: значение по умолчанию
- Выберите: «Быстрое форматирование» и «Создать расширенные файлы меток и значков»
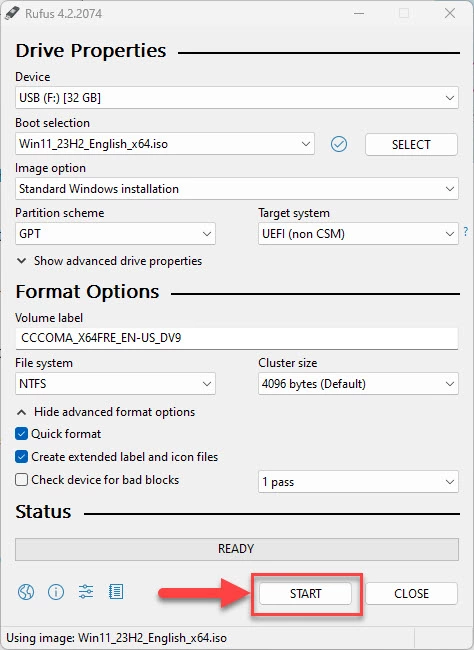
- Нажмите Старт.
- Во всплыающем окне выберите следующие опции и снимите все остальные:
- Снять требования к 4 Гб RAM, Secure Boot, и TPM 2.0
- Убрать требование к учетной записи Microsoft в Интернете
Выбрав эти опции, нажмите Ok.
- Во всплывающем окне с предупреждением нажмите Ok.

Rufus отформатирует USB-накопитель и создаст загрузочный диск Windows 11 23H2, который будет автоматически обходить требования к TPM 2.0, Secure Boot и RAM. При установке Windows с этого накопителя никаких дополнительных действий не потребуется.
Заключение
Хотя для нашего же блага мы гарантируем, что наши системы соответствуют минимальным требованиям к версиям Windows 11, это не всегда необходимо. Например, если у вас есть отдельный компьютер для тестирования, не подключенный к Интернету и не содержащий конфиденциальной информации, то нет необходимости вкладывать средства в модернизацию его аппаратного обеспечения только для тестирования под Windows 11.
Таким образом, вы можете спокойно обойти требования TPM 2.0 и Secure Boot, используя любой из двух рассмотренных выше методов. Обход минимальных требований Windows 11 с помощью реестра Windows позволяет обойти только требования Secure Boot и TPM, тогда как с помощью Rufus можно обойти оба этих требования, а также ограничения по минимальному объему оперативной памяти.
- To install Windows 11 without an internet connection, press Shift + F10 on the “Let’s connect you to a network” screen and run the command “OOBE\BYPASSNRO”.
- To install Windows 11 without a Microsoft account, enter the email address “no@thankyou.com”, enter a random password, and continue with the remaining OOBE screens.
The Windows 11 23H2 is the talk of the town since it is about to be released and is the latest stable Windows operating system yet. However, while installing Windows 11 23H2, you may face a problem relating to either internet connectivity or your Microsoft account.
By default, the Windows 11 operating system requires an active internet connection and a Microsoft account to be installed. It will not continue without either of these. Previously, Microsoft provided the option to “Sign in with a local account instead,” but this has long been removed. Now, these two items are a must.
So how do you install Windows 11 23H2 on a computer that has no internet connectivity, or you do not have a Microsoft account? In this post, we are about to learn how you can bypass the internet connectivity and the Microsoft account requirement while installing Windows 11, and install it with a local account instead.
Table of Contents
Why it is mandatory to use a Microsoft account while installing Windows 11
When Microsoft first released Windows 11, they made using a Microsoft account mandatory. This was so that the users could synchronize all of their devices with a single account. It allowed them to store their data on the cloud, and keep their devices in check.
The Microsoft account then becomes a centralized point of access to control all of the connected devices, move data across them, and monitor their activity.
Therefore, while making Windows 11 more cloud-oriented, Microsoft decided to use a Microsoft account as the primary user account and the user not being able to continue installing Windows without one.
Install Windows 11 23H2 without an internet connection
If your PC does not have an internet connection but you still wish to install Windows 11, here are the steps you must perform to do so and bypass the internet connectivity requirement:
Note: Make sure your PC satisfies the minimum system requirements for Windows 11. If it doesn’t, you can bypass the TPM and Secure Boot requirements as well.
-
Create a Windows 11 23H2 bootable media device.
Download Windows 11 23H2 ISO image.
-
Plug it into the PC and continue to install it.
-
Once installed, continue with the Out of Box Experience (OOBE) screens until you reach the “Let’s connect you to a network” screen.
 1")
Connect to a network OOBE screen -
Press the Shift + F10 function key simultaneously to open the Command Prompt.
-
Run the following command:
OOBE\BYPASSNRO
Run command to bypass internet connectivity requirement As soon as you run the command, the computer will restart.
-
Continue through the OOBE screens until you see the “Let’s connect you to a network” screen again.
-
Click “I don’t have internet.”
Continue Windows 11 installation without internet -
Now proceed with the remaining OOBE screens which include naming the local account, setting up a password, etc.
 1")
 2")
 3")
When you are finished with the OOBE screens, you will have successfully installed Windows 11 23H2 without an internet connection.
Install Windows 11 23H2 without a Microsoft account
If your computer does have an internet connection and you attempt to install Windows 11 23H2, it will ask you to create a computer account using a Microsoft account, or you won’t be allowed to proceed to the next screen. But you can bypass that too.
To install Windows 11 23H2 with an internet connection and bypass the Microsoft account requirement, use these steps:
-
Create a Windows 11 23H2 bootable media device.
-
Plug it into the PC and continue to install it.
-
Once installed, continue with the Out of Box Experience (OOBE) screens until you reach the “Unlock your Microsoft experience” screen.
Sign in to Windows 11 OOBE with a Microsoft Account -
Click “Sign in.”
-
Enter the following email address and click Next.
no@thankyou.com
Enter a bogus email address -
Now enter any random password and click “Sign in.”
Enter a random password -
You will now see the “Oops, something went wrong” screen. Click Next.
Proceed with Windows installation -
Now continue to go through the remaining OOBE screens, which will include setting up a local account, adjusting privacy settings, etc.
 4")
 5")
 6")
 7")
When you are done with the OOBE screens, Windows 11 version 23H2 will be successfully installed.
Ending thoughts
Microsoft previously gave the control over to the users whether they wanted to use a local account or a Microsoft account when they installed Windows 10. Now, that option is no longer available, since Microsoft is planning to completely centralize everything and give users more control over their devices. For this purpose, it is compulsory that your device be associated with a Microsoft account.
Although this article teaches you how to bypass adding a Microsoft account to your Windows 11 OS, considering the security factors, that may not be a wise choice. Therefore, we suggest that you only employ these practices when it is absolutely necessary, and the computer is completely disconnected from the internet.
UPDATED 9/23/2023: Although Windows 11 23H2 is not due for release until September 26, 2023, it’s possible to install the new version before it becomes available to everyone to get early hands on the new features and changes.
If you want to upgrade early to the Windows 11 2023 Update, you have to enroll the computer in the Release Preview Channel (or Beta Channel) to download and install the feature update through Windows Update. It’s also possible to download the official ISO file (preview) to create a USB media to perform a clean installation.
This guide will teach you two ways to upgrade to Windows 11 23H2 before it becomes generally available.
- Install Windows 11 23H2 from Insider Program
- Install Windows 11 23H2 using USB
Important: At the time of this writing, Windows 11 23H2 still hasn’t been finalized, which means that you may still run into some issues during and after the upgrade. Also, creating a full backup of your computer is recommended in case you need to roll back if something wrong happens.
Install Windows 11 23H2 from Insider Program
You can install Windows 11 23H2 before it’s officially available using the Release Preview or Beta Channel. These channels are designed for anyone who wants to try out upcoming features while the company continues the development process. The previews in this channel are stable, but you may still run into problems.
To upgrade to Windows 11 23H2 early from version 22H2, use these steps:
-
Open Settings on Windows 11.
-
Click on Windows Update.
-
Click the Windows Insider Program tab.

-
Click the Get started button.
-
Click the “Link an account” button.
-
Sign in with your Microsoft account credentials.
-
Click the Continue button.
-
Under the “Pick your Insider settings” section, select the “Release Preview” (recommended) or “Beta Channel” option.

-
Click the Continue button.
-
Click the Continue button to agree to the terms and conditions.
-
Click the Restart button.
-
Open Settings after the reboot.
-
Click on Windows Update.
-
Click the Check for updates button to install Windows 11 23H2.
-
Click the Restart button.


Once you complete the steps, Windows Update will download and begin updating the computer to the Windows 11 2023 Update.
After the upgrade, you can gracefully remove the computer from the program from the “Windows Insider Program” settings page to prevent upgrading to a follow-up version by turning on the “Stop getting preview builds” toggle switch.
It’s worth noting that starting on September 22, Microsoft has released build 22631.2361 (KB5030310) for version 22H2 in the Release Preview Channel, which includes most of the features for version 23H2. If you want to upgrade early to the new version, using the Release Preview Channel is the best option.
Install Windows 11 23H2 from USB
You can also download the ISO file with the latest files for version 23H2 to create a USB media to perform a clean installation. You need to start your computer with the bootable media to launch the Windows 11 setup.
Also, you have to check whether the device can start from a USB flash drive, which means you may need to change the UEFI settings. Since the firmware settings are different on every computer, check your manufacturer support website for more specific details.
To perform a clean install of Windows 11 23H2 from USB, use these steps:
-
Start the PC with the Windows 11 23H2 USB flash drive.
-
Press any key to continue.
-
Click the Next button.

-
Click the Install now button.

-
Click the “I don’t have a product key” option if you are doing a reinstallation. If Windows 11 was previously activated after the installation, reactivation would happen automatically.

-
Select the edition of “Windows 11” that your license key activates (if applicable).
-
Check the “I accept the license terms” option.
-
Click the Next button.
-
Select the “Custom: Install Windows only (advanced)” option.

-
Select each partition in the hard drive you want to install Windows 11 23H2 and click the Delete button. (Typically, the “Drive 0” is the drive that contains all the installation files.)

Warning: When you delete a partition, it also deletes all data on the drive. Also, it is not required to delete the partitions from a secondary hard drive.
-
Select the hard drive (Drive 0 Unallocated Space) to install Windows 11.

-
Click the Next button.
-
Select the hard drive (“Drive 0 Unallocated Space”) to install Windows 11 on your computer.
-
Click the Next button.
-
Select your region setting after the installation on the first page of the out-of-the-box experience (OOBE).

-
Click the Yes button.
-
Select your keyboard layout setting.
-
Click the Yes button.
-
Click the Skip button if you do not need to configure a second layout.
-
The computer will automatically connect to the network if it uses an Ethernet connection. If you have a wireless connection, you must set up the connection manually (a security key may be required).
-
(Optional) Confirm a name for the computer.
-
Click the Next button. (The device will restart automatically.)
-
Select the “Set up for personal use” option if you are configuring Windows 11 Pro. The “Home” edition does not have this option.
-
Click the Next button.
-
Click the Sign in button.
-
Confirm your Microsoft account email, phone number, or Skype identification to create an account.
-
Click the Next button.
-
Confirm your Microsoft account password.
-
Click the Next button.
-
Click on “View more options.”

Quick note: Microsoft is updating the out-of-the-box experience, and the process may be slightly different in the final release.
-
Choose the “Set up a new device” option.
-
Click the Next button.
-
Click the Create PIN button.
-
Create a new four-digit PIN.
-
Click the OK button.
-
Confirm the privacy settings that best suit your situation by turning on or off the toggle switch for each setting.
-
Click the Next button.
-
Click the Next button again.
-
Click the Accept button.
-
(Optional) On the “Let’s customize your experience” page, select one or more ways you plan to use the device to allow the setup to suggest tools and service customizations during this experience.
-
Click the Accept button to continue. Or click the Skip button to skip this part of the setup.
-
Click the Skip button for the Android phone link process.
-
Click the “Next” button to automatically upload your Desktop, Pictures, and Documents folders to OneDrive. Or Select the “Only save files to this PC” option.
-
Click the Next button.
-
Click the Decline button to skip the Microsoft 365 setup.
-
Click the “Skip for now” button to skip the Game Pass subscription promotion.


After you complete the steps, Windows 11 23H2 will finish the clean installation on the computer.
In the case that the installation is still on version 22H2, you can follow the previous steps to enroll the device in the Beta Channel to upgrade the system to version 23H2.
Guide
When you purchase through links on our site, we may earn an affiliate commission. Here’s how it works.
· Hot!

Windows 11 version 23H2 is now available for download with numerous neat improvements and new features (check out our review to learn more). Sadly, it still has steep hardware requirements, which make the OS inaccessible to people with older yet still perfectly capable Windows 10 devices. If you are unwilling to deal with such injustice but buying a new PC is not an option either, here is a guide detailing how to install Windows 11 version 23H2 on an unsupported computer.
Caution: Mind the risks of using a modern OS on incompatible hardware. Microsoft may refuse to provide support, plus you might encounter reduced performance, bugs, and other nastiness. If you plan to upgrade from Windows 10 to Windows 11 23H2 on an unsupported computer, back up important data before pulling the trigger.
It is also worth noting that even though we checked all three methods when writing this guide, Microsoft might change how things work at any moment without a warning.
Here are quick links for your convenience:
- I want to upgrade my unsupported PC to Windows 11 version 23H2
-
I want to install Windows 11 version 23H2 on my unsupported PC (clean installation)
- Without third-party apps
- Using a third-party app
How to update an unsupported PC from Windows 10 to Windows 11 23H2?
Here is a recently discovered quick and easy method to update your unsupported computer from Windows 10 to Windows 11 version 23H2. It does not require third-party apps or scripts, so it is a great option for those who do not trust unofficial tools or modified images.
- Download a Windows 11 version 23H2 image from the official website. You can use a direct link or the Media Creation Tool app. Microsoft has finally updated it, and it now properly downloads 23H2 images. A bootable USB drive with Windows 11 23H2 will also work.
- Mount the downloaded image or connect your bootable USB drive.
- Launch Command Prompt as Administrator: press Win + R, type cmd, and press Ctrl + Shift + Enter. User mode will also work, but the system will show a UAC prompt upon launching the setup app.
- Type X:/setup.exe /product server. Replace X with your mounted Windows 11 image or USB letter.

- Command Prompt will launch the setup process without checking for TPM or a matching processor. Note that the command cannot change your system edition—it only tricks the setup app into thinking you are trying to install the Server edition. The installation will proceed with the SKU matching your Windows 10 copy.
- Follow on-screen instructions to complete the process. Once everything is done, you will have Windows 11 version 23H2 running on unsupported hardware with all your files and apps untouched (assuming you picked that option during the initial setup).

How to install Windows 11 version 23H2 on an unsupported PC?
Without third-party apps:
This method does not require third-party applications or scripts. However, you need a registry file with values set to force the setup process to bypass TPM, RAM, and processor checks. These values are easy to read, so you can be sure you are not injecting any unwanted third-party code.
Copy the following text:
Windows Registry Editor Version 5.00
[HKEY_CURRENT_USER\SOFTWARE\Microsoft\PCHC]
«UpgradeEligibility»=dword:00000001[HKEY_LOCAL_MACHINE\SYSTEM\Setup\LabConfig]
«BypassTPMCheck»=dword:00000001 «BypassSecureBootCheck»=dword:00000001 «BypassRAMCheck»=dword:00000001 «BypassStorageCheck»=dword:00000001 «BypassCPUCheck»=dword:00000001 «BypassDiskCheck»=dword:00000001
Launch Notepad, paste the copied text, and save the file. Enable file extensions in File Explorer and change the file’s extension from txt to reg. Now you have the necessary registry file.
- Create a bootable USB using the Media Creation Tool app from the official website.
- Copy the registry file to your bootable USB.
- Boot from the USB and follow the on-screen instructions.
- Once you get the error screen claiming your computer is not eligible, press Ctrl + Shift + F10 and type notepad in the Command Prompt window.
- In Notepad, click File > Open and go to your bootable drive.
- Select All Files from the Files of type dropdown.
- Find the registry file and right-click it, then select Merge. Confirm the changes and close Notepad and Command Prompt.
- Go back one step to close the error message and try again. The setup app should prompt you to accept the license terms and proceed with the installation.
- Continue installing Windows as usual.

Using a third-party app (easier)
A third-party app for creating bootable USB drives can automate the process and give you bootable media ready for installing Windows 11 on unsupported hardware without extra steps or registry hacks. It can also equip your Windows image with additional conveniences, like skipping the Microsoft Account requirement, bypassing privacy toggles, etc.
- Download your Windows 11 version 23H2 image from the official website. You can also use this guide to learn how to download Windows images using Rufus.
- Download Rufus from the official website. Rufus is a free, open-source app many people use for creating bootable media.
- Connect your USB stick and launch Rufus. Select the drive from the Device drop-down list.
- Select Disk or ISO image and click Select.
- Specify your Windows 11 ISO and leave everything else as is.
- Click Start.
- Place a checkmark next to the «Remove requirement for 4GB+ RAM, Secure Boot, and TPM 2.0.» It is necessary to install Windows 11 version 23H2 on an unsupported PC. You can also use additional options for extra convenience.
- Wait for the app to finish creating your bootable USB.
- Now you can boot from your newly made media to install Windows 11 version 23H2 without extra steps or tweaks.

That is how you install Windows 11 23H2 on unsupported hardware. You may find other methods, but we prepared the easiest ones in this article.