
В этом подробном руководстве для новичков показано, как установить Windows 10 в VirtualBox в Linux.
Я регулярно призываю людей использовать Linux, и когда я даю основания переключиться на Linux, я всегда упоминаю, что они могут использовать Windows и Linux вместе, если они «боятся Linux».
Содержание
- Давайте поговорим о том, как пользоваться VirtualBox
- Что такое VirtualBox и каковы его преимущества
- Установите Windows 10 в VirtualBox в Ubuntu и Linux Mint
- Шаг 1: Загрузите Windows 10 ISO
- Шаг 2. Установка VirtualBox в Ubuntu и Linux Mint
- Шаг 3. Установка Windows 10 в VirtualBox
- Что делать если Windows не запускается
- Ваше впечатление от этой программы
- Установка Ubuntu в VirtualBox
- Выберите язык установки
Давайте поговорим о том, как пользоваться VirtualBox
Одним из способов совместной работы двух ОС является двойная загрузка Windows и Linux. Он отлично работает, за исключением того, что вам нужно переключиться между операционной системой, перезапустив систему. Это неудобно в определенной степени.
Если вы, как и я, тоже нечасто являетесь пользователем Windows и не хотите беспокоиться о двойной загрузке Ubuntu и Windows 10, я предлагаю установить Windows 10 в Linux, создав виртуальную машину. В предыдущем учебном пособии я показал вам, как установить VMWare в Ubuntu, но в этом учебнике мы будем использовать Oracle VirtualBox для создания виртуальных машин для установки Windows 10.
Что такое VirtualBox и каковы его преимущества
VirtualBox — это программное обеспечение для виртуализации с открытым исходным кодом от Oracle для создания виртуальных машин. С помощью виртуальной машины вы можете запускать операционную систему, такую как приложение в вашей текущей операционной системе. Это как компьютер внутри компьютера.
Они называются виртуальными машинами, потому что они в основном имитируют другую операционную систему, но на самом деле они не взаимодействуют с системой, как настоящая операционная система.
Суть в том, что с помощью программного обеспечения для виртуальных машин вы можете использовать Windows, как приложение в Linux. В отличие от обычных приложений, он будет потреблять много оперативной памяти. Таким образом, вы можете использовать программное обеспечение и программу для Windows в Linux, без необходимости установки Windows в целом.
Установите Windows 10 в VirtualBox в Ubuntu и Linux Mint
Перед установкой Windows 10 в VirtualBox давайте посмотрим, что вам нужно заранее:
- Подключение к Интернету с хорошей скоростью для загрузки операционной системы Windows 10 ISO
- Не менее 4 ГБ оперативной памяти. Чем больше RAM вы получили, тем лучше.
- Около 20 ГБ свободного места для установки Windows 10
После того, как вы убедитесь в предварительных условиях и требованиях, давайте посмотрим, как пользоваться VirtualBox. Для наглядного примера, мы установим Windows 10 в VirtualBox на Ubuntu.
Шаг 1: Загрузите Windows 10 ISO
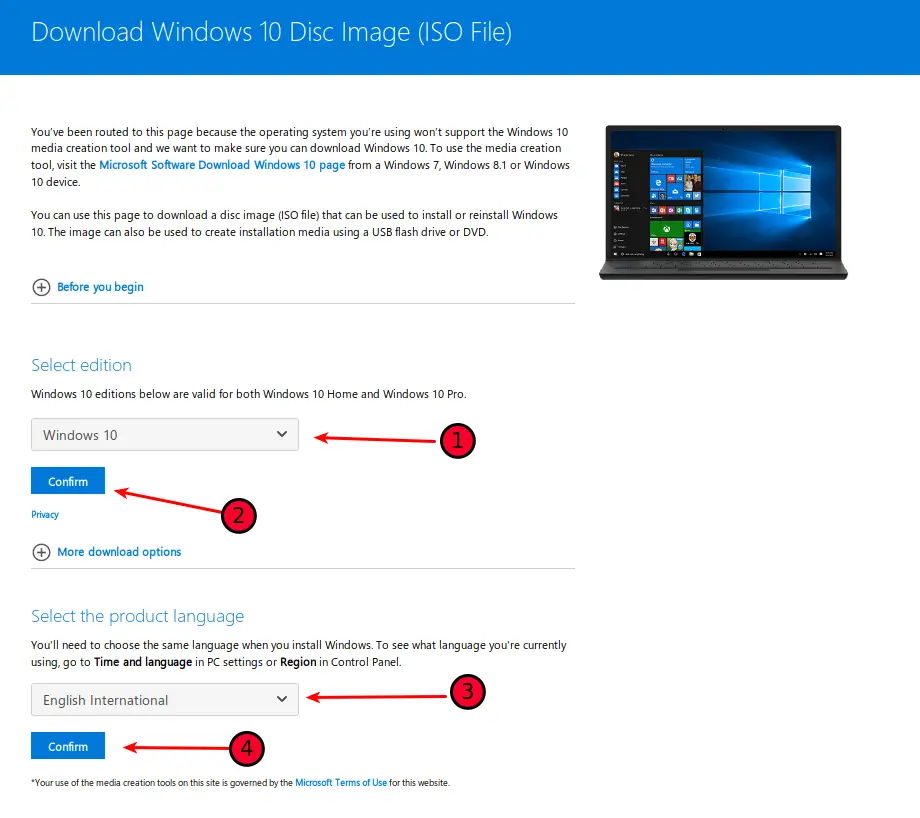
Первым и главным шагом является загрузка Windows 10 ISO. Вы можете загрузить Windows 10 32-bit или 64-bit, в зависимости от вашей системы. Перейдите по на официальный сайт Microsoft и выберите, какую версию Windows 10 вы хотите скачать:
- Вам нужно будет выбрать издание, язык, а затем выбрать между 32-битной или 64-битной системой, прежде чем загружать ISO.
Шаг 2. Установка VirtualBox в Ubuntu и Linux Mint
VirtualBox доступен по умолчанию в Ubuntu и Linux Mint. Установить это очень просто. Все, что вам нужно сделать, это использовать следующую команду:
sudo apt-get install virtualbox
Шаг 3. Установка Windows 10 в VirtualBox
Сейчас мы расскажем вам наглядно, как пользоваться VirtualBox на Ubuntu или Linux Mint. Должен сказать, то, что установка Windows 10 в VirtualBox очень быстрая. Конечно все зависит от производительности вашего устройства, но если оно современное, то, это займет несколько минут. Давайте разберем все более подробно.
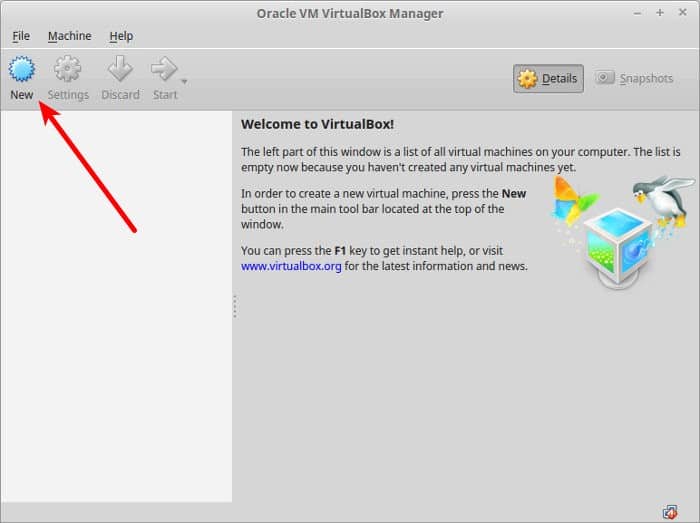
Запустите VirtualBox. Вы должны увидеть экран, подобный приведенному ниже. Нажмите на кнопку «Далее»:

Назовите VM все, что стоит запомнить. Также выберите операционную систему и версию, в этом случае для Windows 10 и 64 бит для меня.
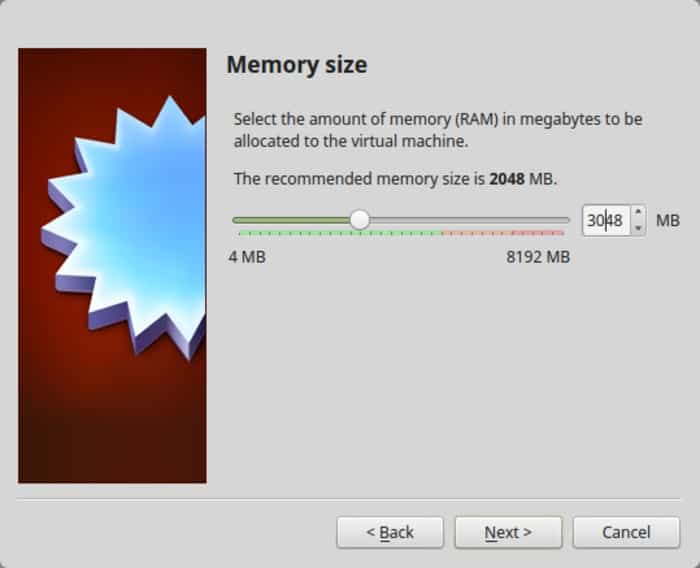
Выберите размер ОЗУ. Рекомендуемый размер оперативной памяти для 64-битной Windows 10 составляет 2 ГБ, а для 32-битной Windows 10 — 1 ГБ. Но я предлагаю немного больше установить значение, чем нужно для более плавного опыта.
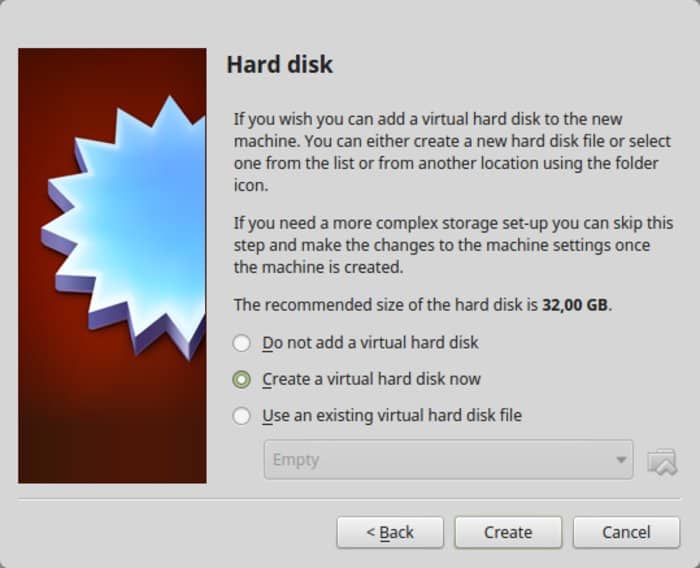
Следующее это размер места для виртуальной машины. Если вы хотите хорошей производительности то не скупитесь в пространстве, выберите рекомендуемый размер или больше, стандартное значение у вас будет немного больше рекомендуемого размера.
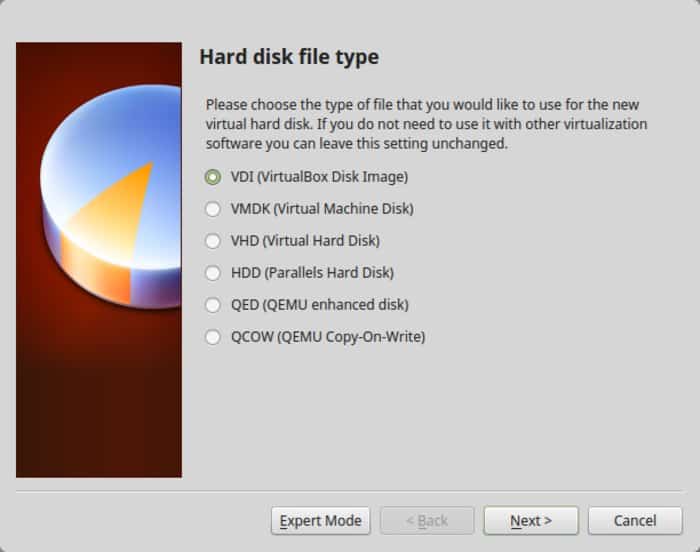
Для формата используйте формат VDI.
Смутно понимаете главную разницу в динамическом или фиксированном размере? Если вы выберете динамический, установленная VM позже вырастет из выделенного размера. Если вы не собираетесь широко использовать Windows, я предлагаю пойти с фиксированным размером.

Завершите работу вокруг установки. Вы можете выбрать, где создать виртуальный диск. Место по умолчанию (домашний каталог) также будет работать.
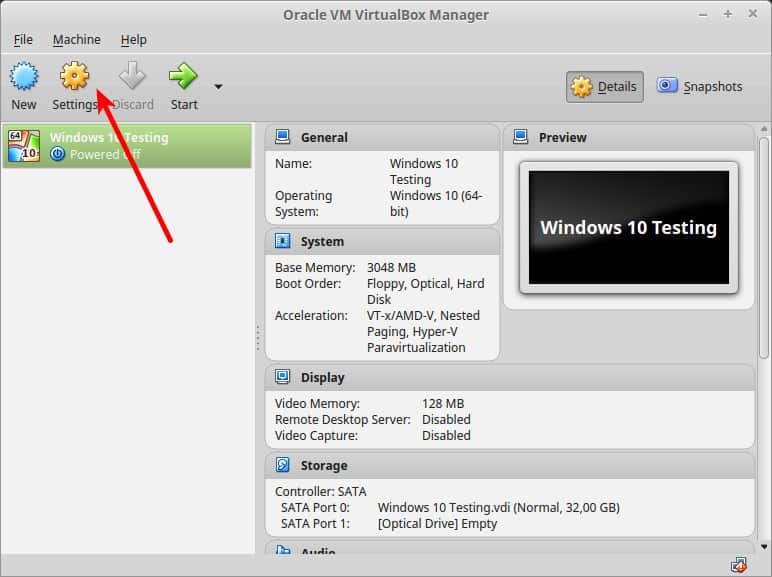
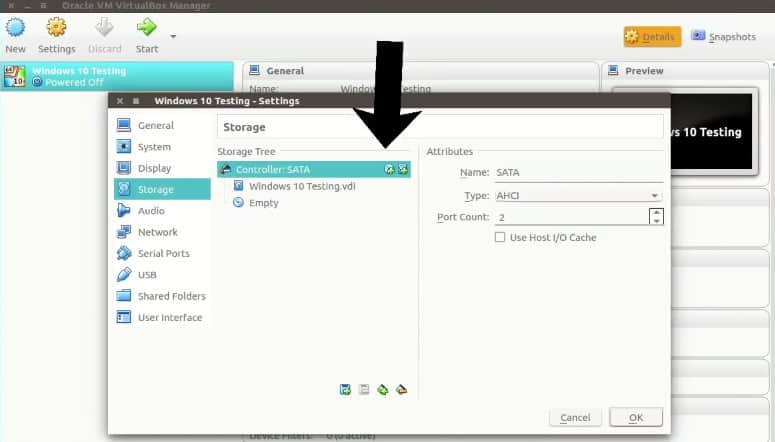
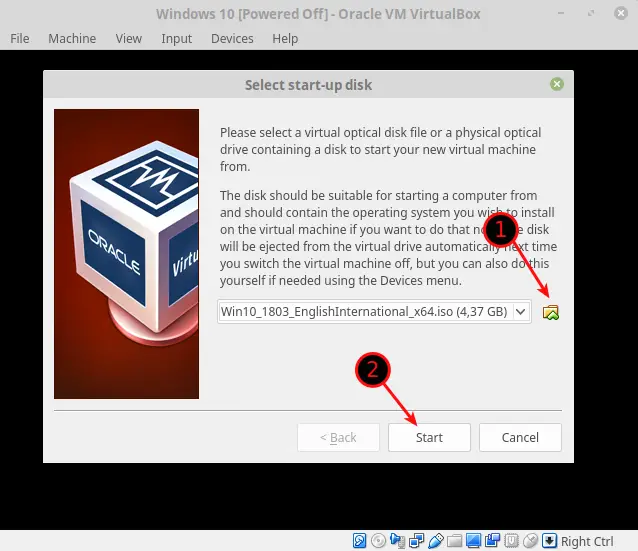
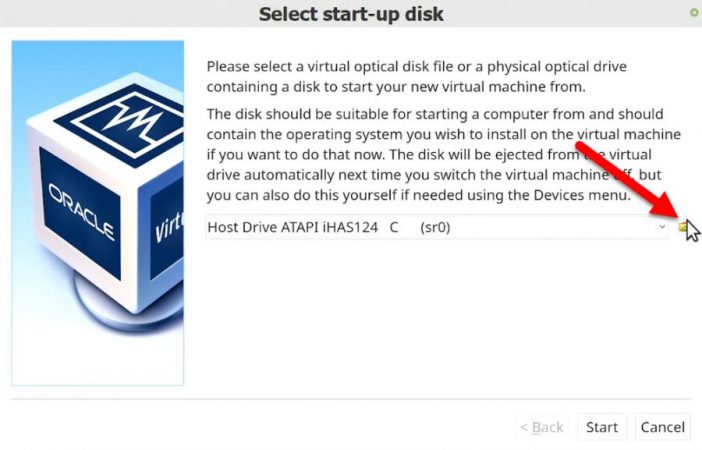
Вы должны вернуться к началу экрана. Но подождите, мы еще не использовали нашу Windows 10 ISO, не так ли? Сейчас настало время использовать ISO. Нажмите «Настройки».
Здесь перейдите в Storage и добавьте новый оптический дисковод. Я добавил этот снимок экрана позже, потому что у нескольких читателей были трудности с его поиском.
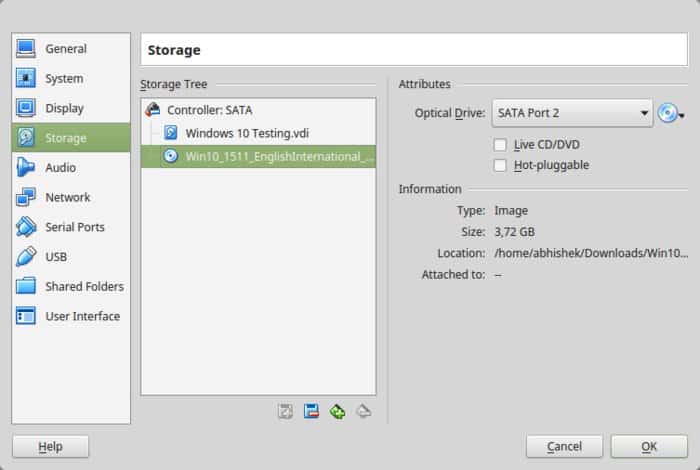
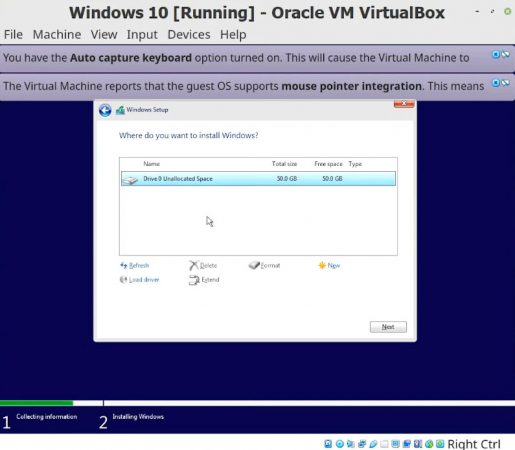
Выберите «Диск» и укажите «Windows 10 ISO».
Теперь вы должны увидеть Windows 10 ISO, перечисленные в разделе «Хранение». Нажмите OK.
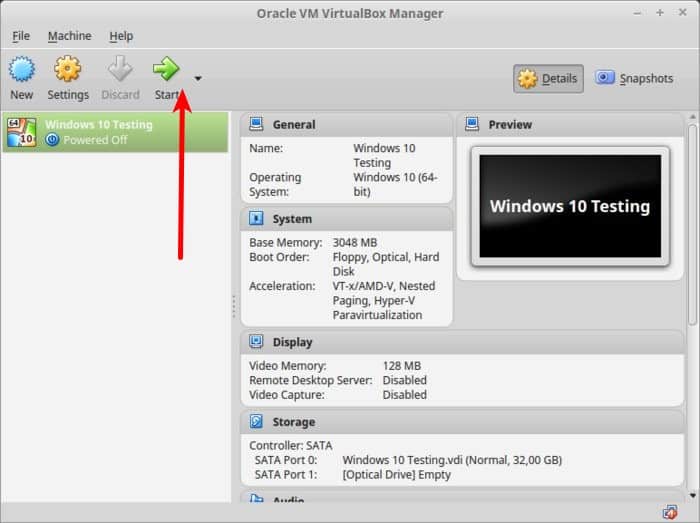
Вы должны вернуться к главному экрану Oracle VirtualBox. Теперь у вас все готово. Следующим шагом будет установка Windows 10. Нажмите «Пуск» на главном экране:
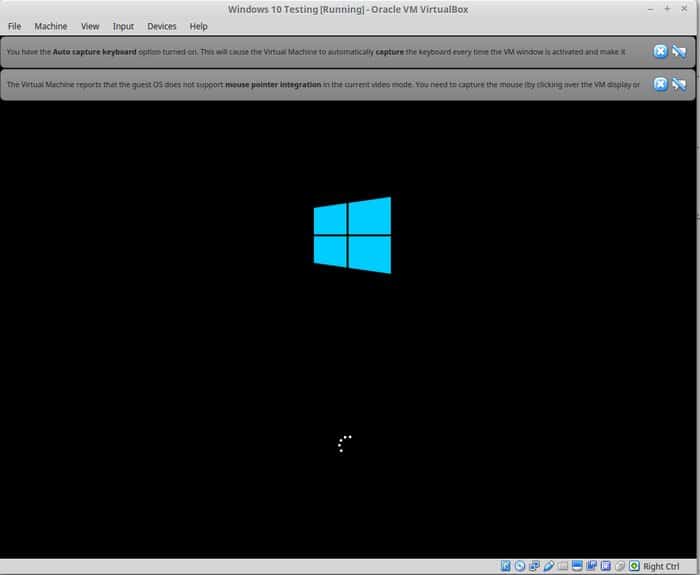
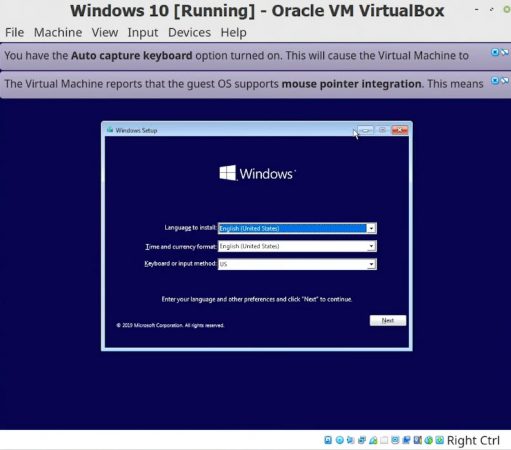
Вуаля !! Вы должны увидеть знакомый экран загрузки Windows:
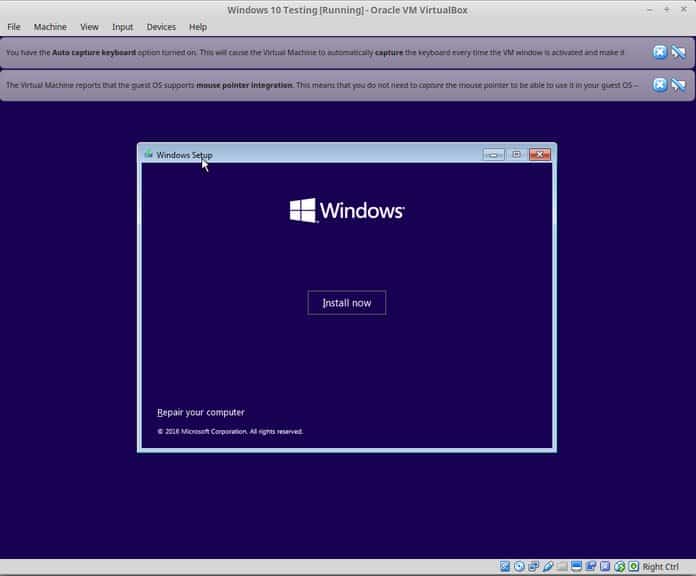
Через пару секунд вы увидите возможность установки Windows:
Примечание. В это время, если вы видите логотип Windows с черным фоном и он не запускается, вам, возможно, придется немного подкорректировать настройки.
Что делать если Windows не запускается
«Кажется, что существует несовместимость между Virtualbox и Windows 10 1703. Виртуальная машина, которая работает с W10 1607, не сможет загрузиться W10 1703 -UNLESS- установлен следующий параметр: В разделе «Ускорение системы» вы должен установить Paravirtualization в None, а затем перезагрузиться».
Я думаю, что вы можете справиться с этим, поскольку установка Windows — это всего лишь несколько кликов. Для вашего удобства я добавляю скриншоты в галерею. Нажмите на изображение, чтобы увеличить их, если вам нужно сделать подсказку.
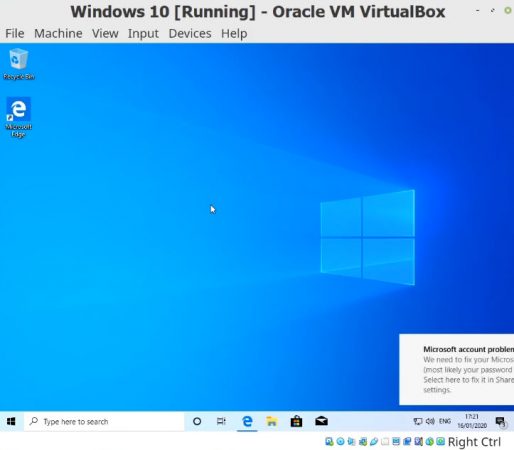
После того как вы успешно установили Windows 10, вы обнаружите, что интернет-соединение также используется совместно с виртуальными Windows. Нет необходимости в дальнейшей настройке.
Когда вы закончите использовать виртуальную Windows, вы можете вернуться на главный экран и отключить виртуальную Windows:
Чтобы снова запустить виртуальную ОС, снова нажмите «Пуск» (зеленая стрелка) на главном экране VirtualBox. Это оно. Подробнее об использовании виртуальной ОС позже. Я думаю, это дает вам хорошее представление о том, как установить Windows в Linux Mint на первом месте 🙂
Надеемся вы поняли, как пользоваться VirtualBox, но также стоит сказать, что еще мы рассказывали про похожие программы виртуализации для Ubuntu.
Ваше впечатление от этой программы
Помогло ли это учебное пособие установить Windows в Linux с помощью VirtualBox? Если у вас есть вопросы о том, как пользоваться VirtualBox или предложения по улучшению, не стесняйтесь оставить комментарий.
Установка Ubuntu в VirtualBox
Ubuntu теперь загрузится в живую версию операционной системы и появится приветственное сообщение.
Вам будет предложено выбрать ваш язык, и вы сможете выбрать, попробовать ли Ubuntu или установить Ubuntu.
Если вы решите сначала попробовать Ubuntu, вы всегда можете запустить установщик, дважды щелкнув значок «Установить» на рабочем столе Ubuntu.
Выберите язык установки
Теперь мы входим в настройку установки Ubuntu.
Первым шагом является выбор языка установки.
- Выберите язык
- Нажмите «Продолжить»
- Предварительные условия
- Появится экран, показывающий, как вы подготовлены к установке Ubuntu.
Убедитесь, что если вы используете ноутбук, который подключен к компьютеру или имеет достаточное время автономной работы. Я рекомендую вам подключиться к источнику питания, особенно если вы планируете устанавливать обновления по мере поступления.
В нижней части экрана есть два флажка.
- Выберите, нужно ли устанавливать обновления по мере поступления
- Выберите, устанавливать ли стороннее программное обеспечение
- Если у вас достаточно быстрое подключение к Интернету, стоит поправить, как вы идете, но если вы этого не сделаете, я бы порекомендовал установку Ubuntu и обновление позже.
Я бы также рекомендовал не устанавливать стороннее программное обеспечение на этом этапе. Это можно сделать после установки.
- Нажмите «Продолжить».
Перевод из отличного английского ресурса itsFoss.
В этой статье мы рассказали вам о том, как пользоваться VirtualBox. Надеемся статья была полезной для вас. Если остались вопросы — пишите их в комментариях.
Также, поделитесь ссылкой в социальных сетях.
If you have followed me lately, you probably know that I started a Linux for SysAdmins Series on YouTube. So far, I have worked with Windows 10 and Linux in Dual Boot. So every time I needed a Windows Machine, I would reboot and boot into my Windows 10 Installation. This changes today because we are going to Install Windows 10 on Linux using the free Virtualization Software VirtualBox.
Follow along to learn how to Install Windows 10 on Linux Step-by-Step!
Table of Contents
- Step 1 – Downloading the Windows 10 ISO File
- Step 2 – Installing VirtualBox
- Step 3 – Creating a new Virtual Machine
- Memory Size
- Hard Disk
- Hard Disk File Type
- Storage on Physical Hard Disk
- File Location and Size
- Step 4- Adjusting Virtual Machine Settings
- Step 5 – Starting the Virtual Machine
- Step 6 – Install Windows 10 on Linux
- Step 7 – Install VirtualBox Guest Additions on Windows 10
- Step 8 – Taking a Snapshot
- Wrapping Up
Step 1 – Downloading the Windows 10 ISO File
First things first, we need the Windows 10 ISO File. Open a Web Browser and open the Microsoft Website. Choose the latest Windows 10 Version and choose the Language that suits you. Click on Confirm. Now choose the 64-bit Version and Download the ISO File.
Step 2 – Installing VirtualBox
If you use Linux Mint, VirtualBox comes pre-installed. In case it is not, either install it through your Software Manager or by opening a Terminal and typing:
sudo apt-get update -y
sudo apt-get install virtualbox -yCode language: JavaScript (javascript)
Step 3 – Creating a new Virtual Machine
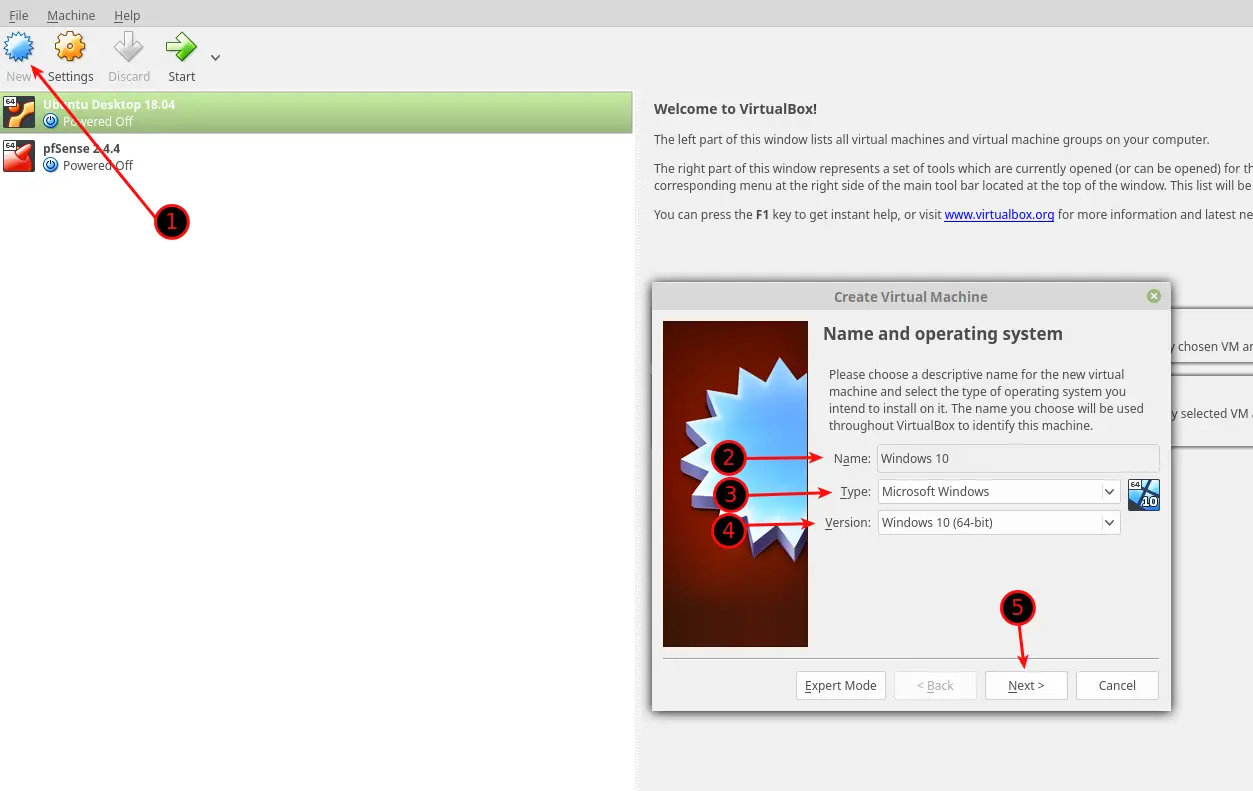
Start VirtualBox. Enter a Name, choose the correct Type and Version and click on Next.
Memory Size
Allocate at least 4096 MB of RAM to have a smooth experience.
Hard Disk
Select Create a Virtual Hard Disk now. Click on Create.
Hard Disk File Type
Choose VDI (VirtualBox Disk Image)
Storage on Physical Hard Disk
Choose Dynamically allocated
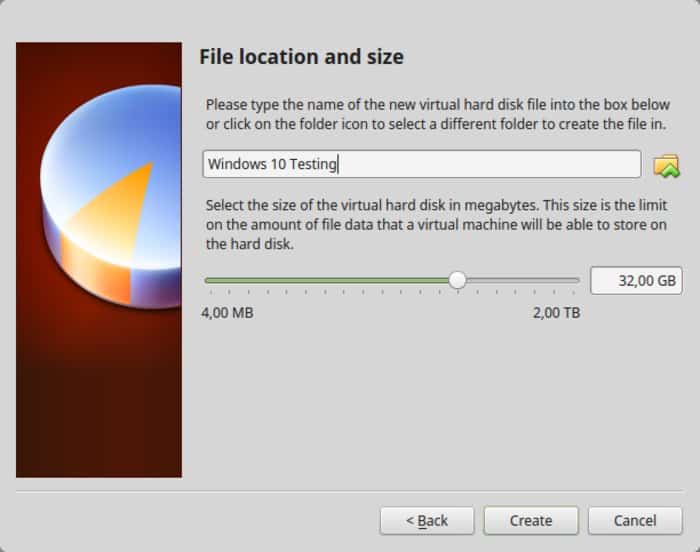
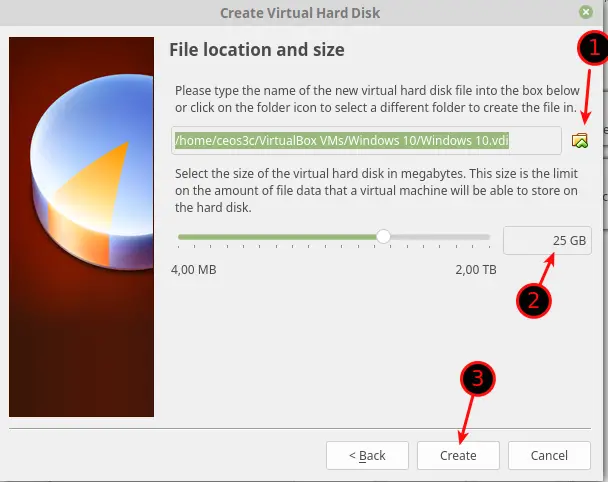
File Location and Size
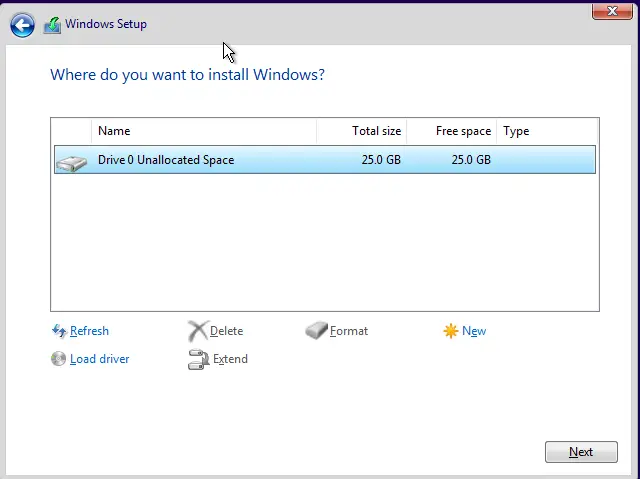
For Windows 10, depending on your needs, I would at least assign 25GB to it. Because we chose Dynamically Allocated above, the Virtual Hard Disk will only take up as much physical Disk Space as the Windows 10 installation is big. So if your Windows 10 only eats up 18GB, only 18GB will be taken from your Physical Drive, up till a maximum of 25GB, or whatever you choose.
You can choose where you want to store your Virtual Hard Disk by clicking on the Folder.
Step 4- Adjusting Virtual Machine Settings
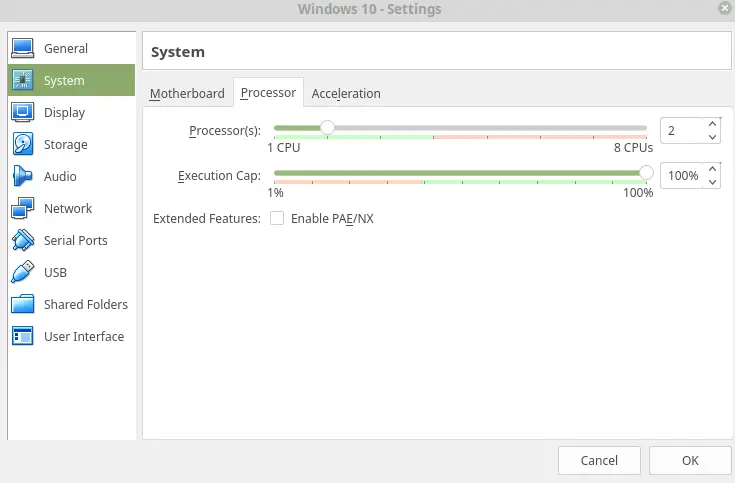
Right-Click your VM and select Settings. Navigate to the System / Processor Tab. Assign it 2 CPU’s if you can for a better experience.
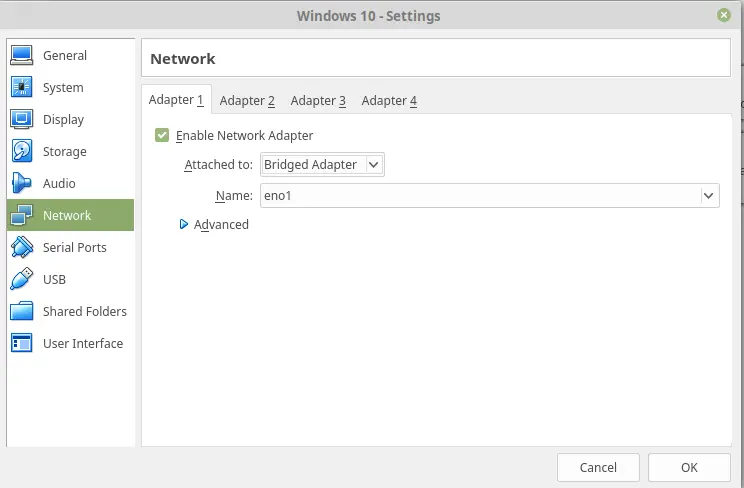
OPTIONAL: Navigate to the Network Tab and choose if you want NAT or Bridged, or even Internal Network. NAT is a Virtual Network running on your Computer (With Internet Access); Bridged is like the VM is plugged straight into your local Network (With Internet Access, obviously), and Internal Network is an Internal Network on your Computer (Without Internet Access).
So choose what suits you best and click on OK.
Step 5 – Starting the Virtual Machine
Select your VM and click Start. It will ask you to provide the Windows 10 Image File you downloaded earlier. Click on the Folder and select it from your Downloads Directory. Click on Start.
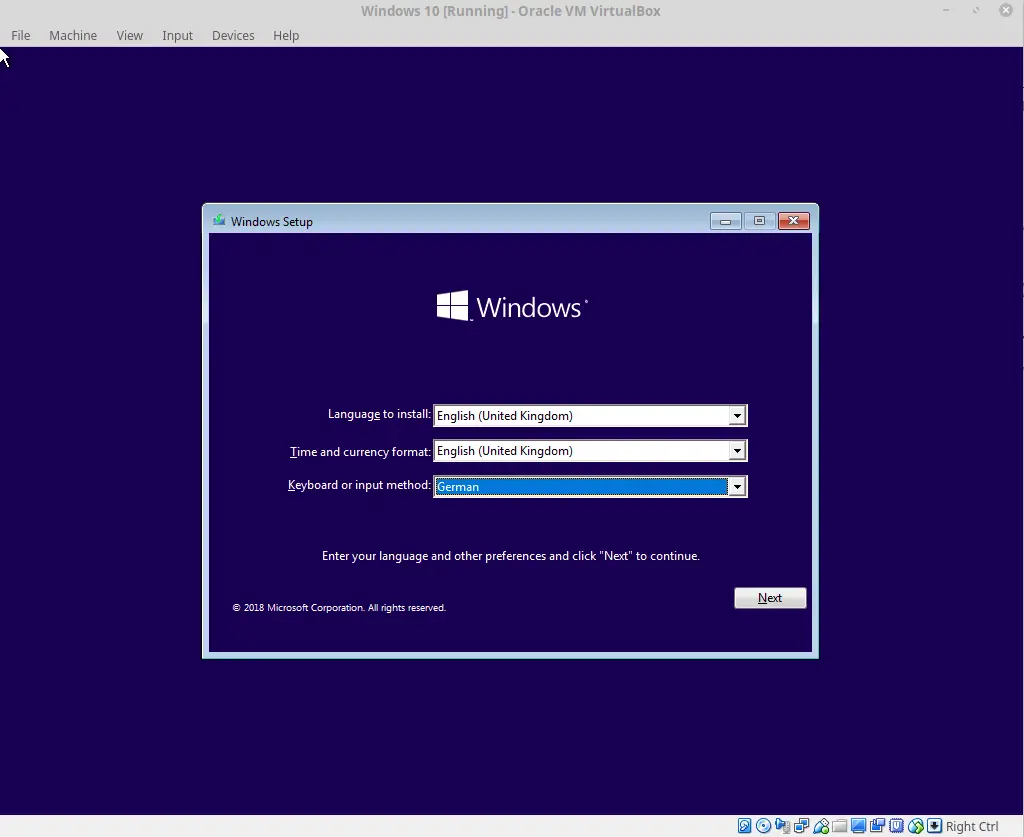
Now we will run through the Windows Installation. Select the Language and Keyboard Layout and click Next.
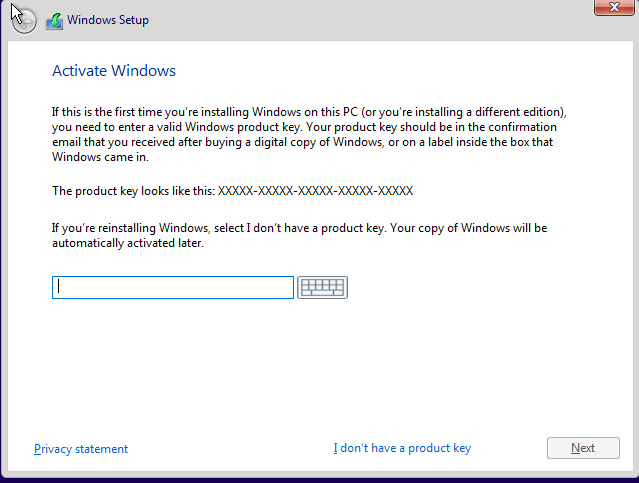
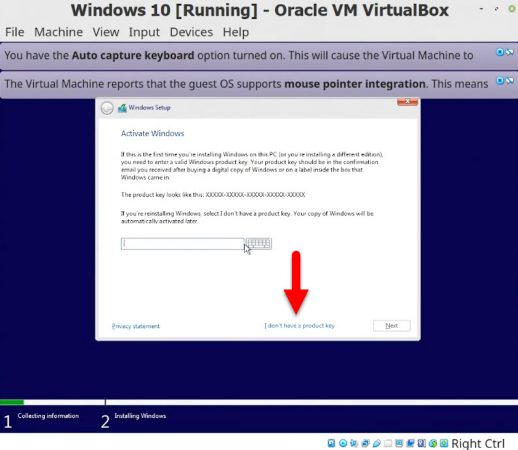
Click on Install Now. Now, either enter a Product Key if you have one or select I don’t have a product key if you want to enter it later once it’s completely installed.
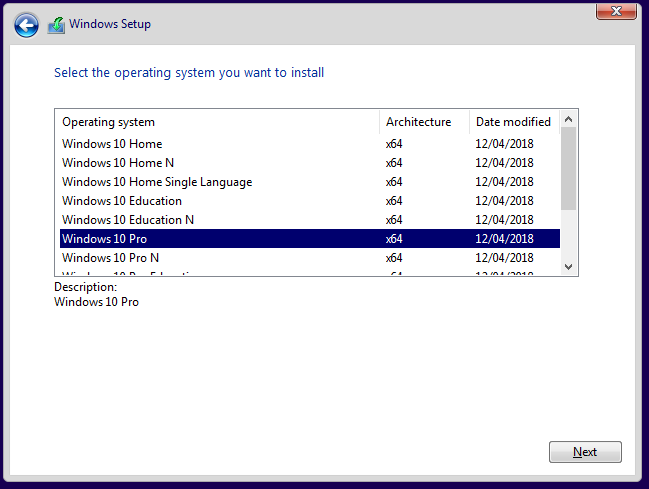
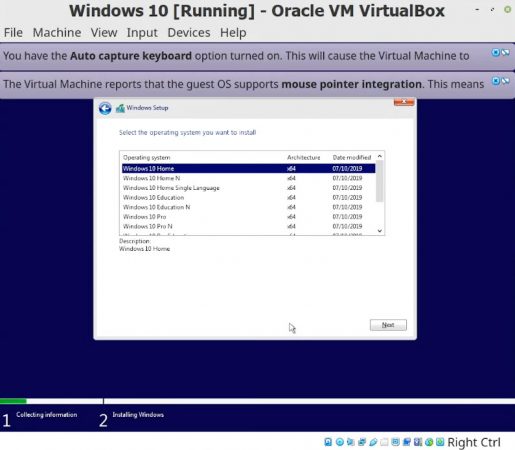
Choose for which Windows Version fits the Windows Key you have and click Next.
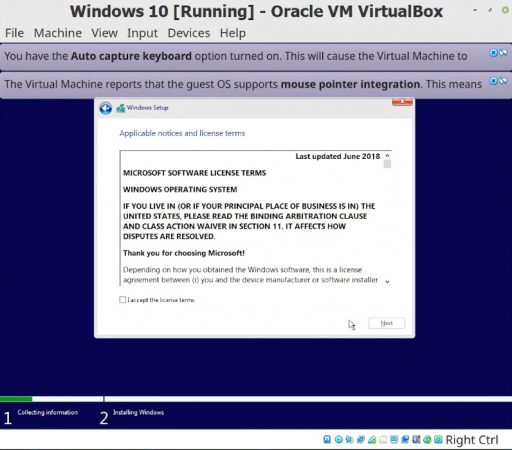
Accept the License Terms and click Next.
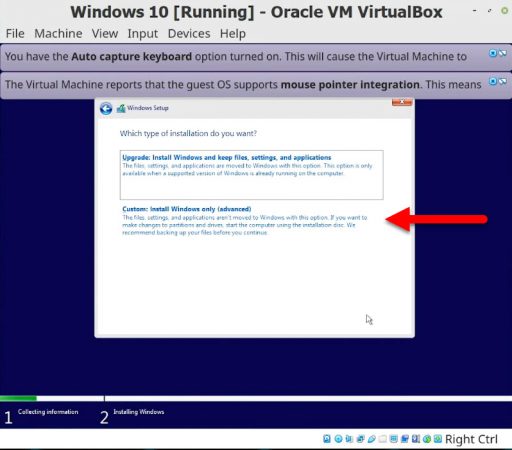
Now choose Custom: Install Windows only (Advanced). Select the only available Hard Drive and click Next.
The Windows installer will do its job now. You can go and grab a Coffee in the meanwhile, or even better, Donate a Coffee to me!
I leave going through the initial Windows Installer to you. Once you have answered all of Cortana’s annoying questions and you are booted into your System, we are going to continue installing the VirtualBox Guest Additions.
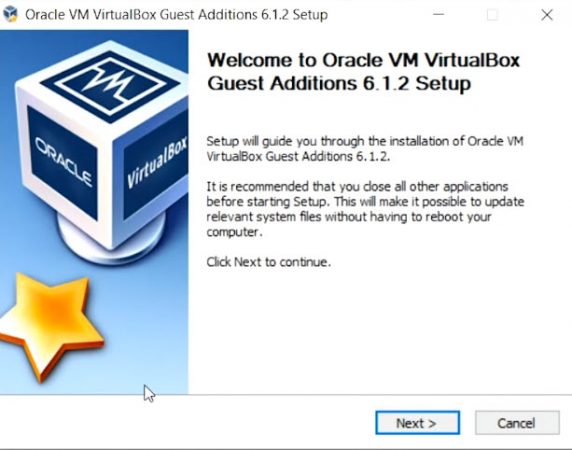
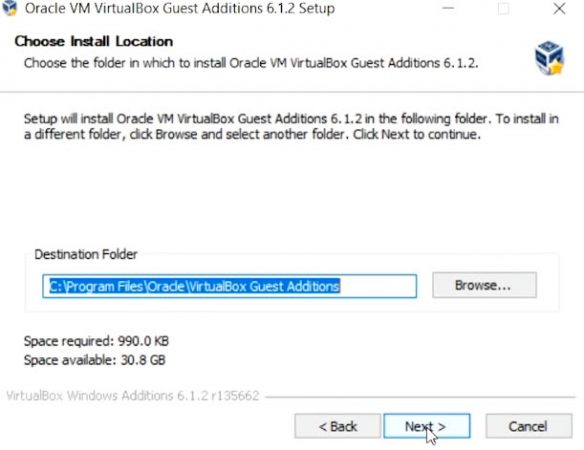
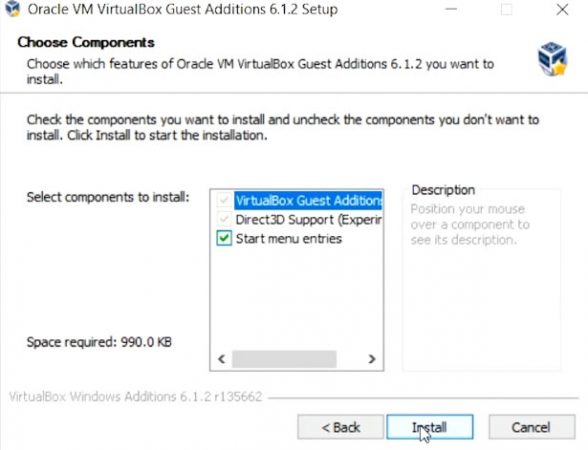
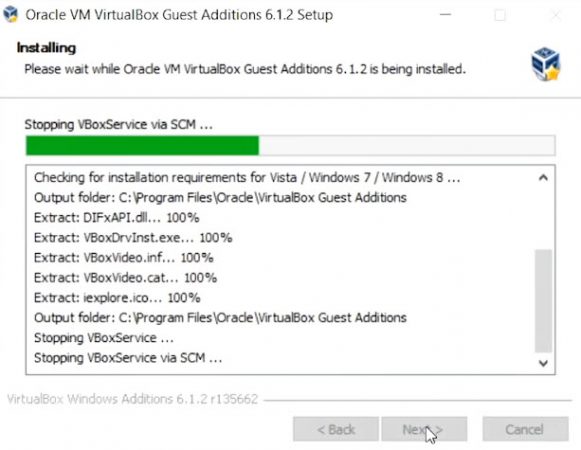
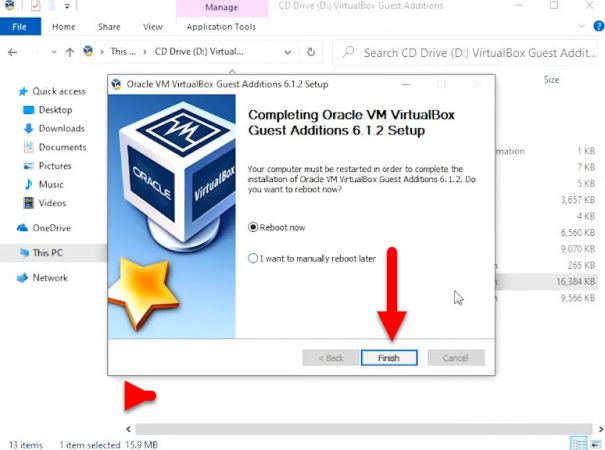
Step 7 – Install VirtualBox Guest Additions on Windows 10
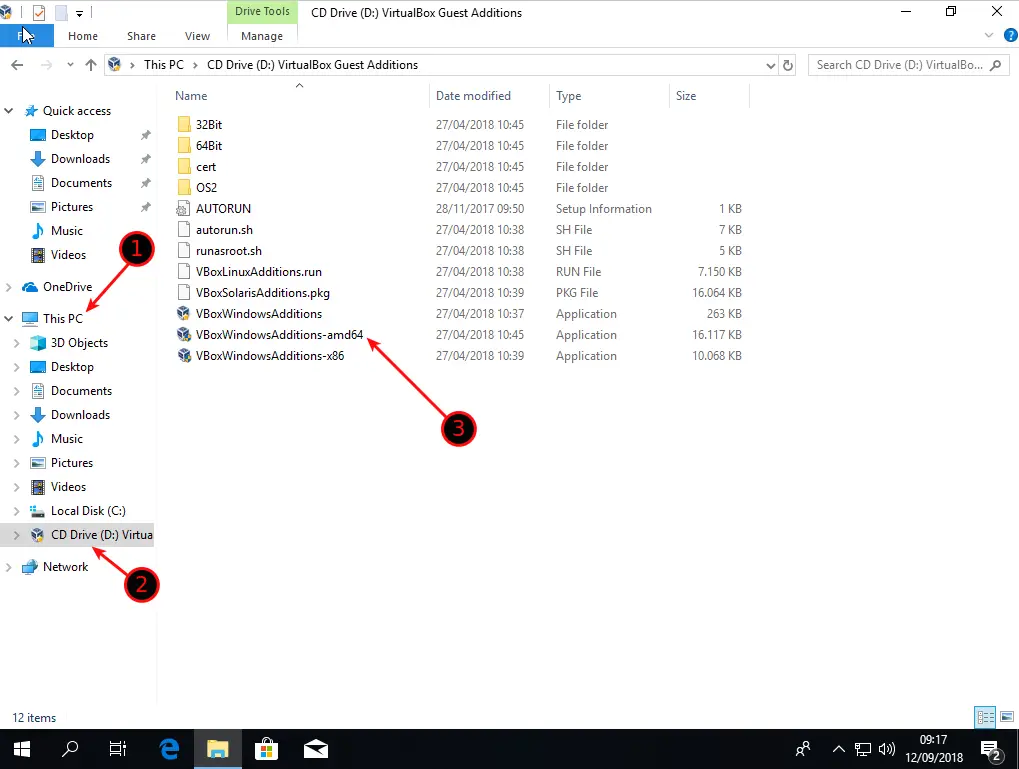
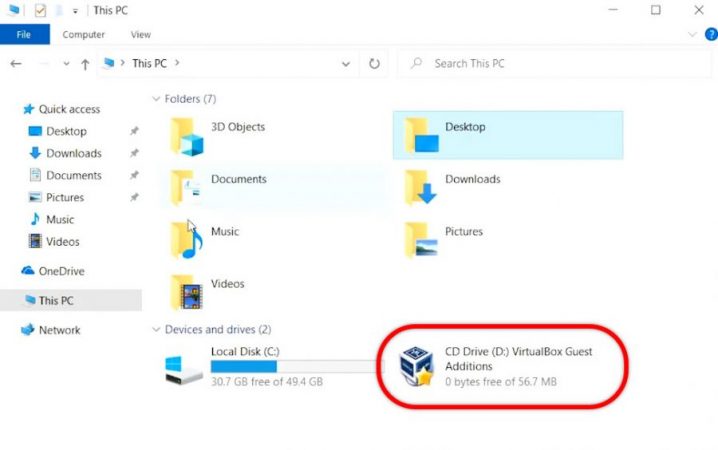
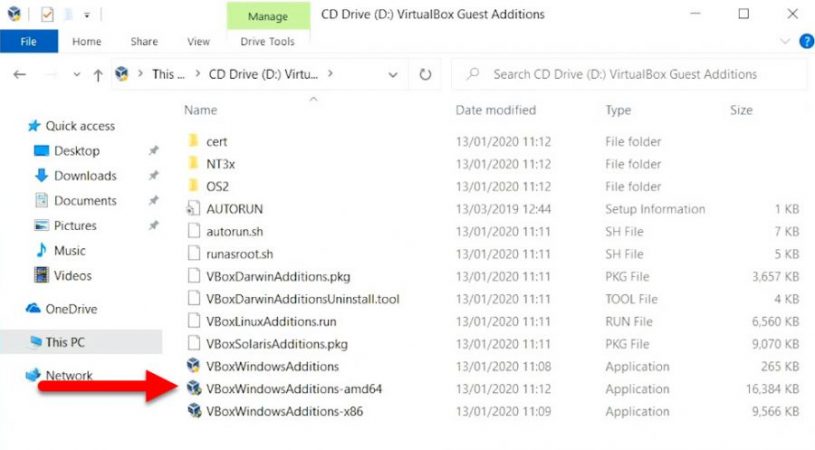
In your VM Window, click on Devices -> Insert Guest Additions CD Image. When prompted to Download it, select Yes and Confirm all the following dialogues. Once the Image is inserted, open a Windows Explorer (WIN Key + E) and expand This PC and click on the CD Drive. Start VBoxWindowsAdditions-amd64. Run through the installation and restart your Windows 10 VM.
Once you have rebooted, I recommend you to take a Snapshot of the VM. So in case something goes wrong, you can revert back to the freshly installed state.
Step 8 – Taking a Snapshot
Shut down your VM. In VirtualBox, select your VM, click on Machine Tools and, select Snapshots, click on Take.
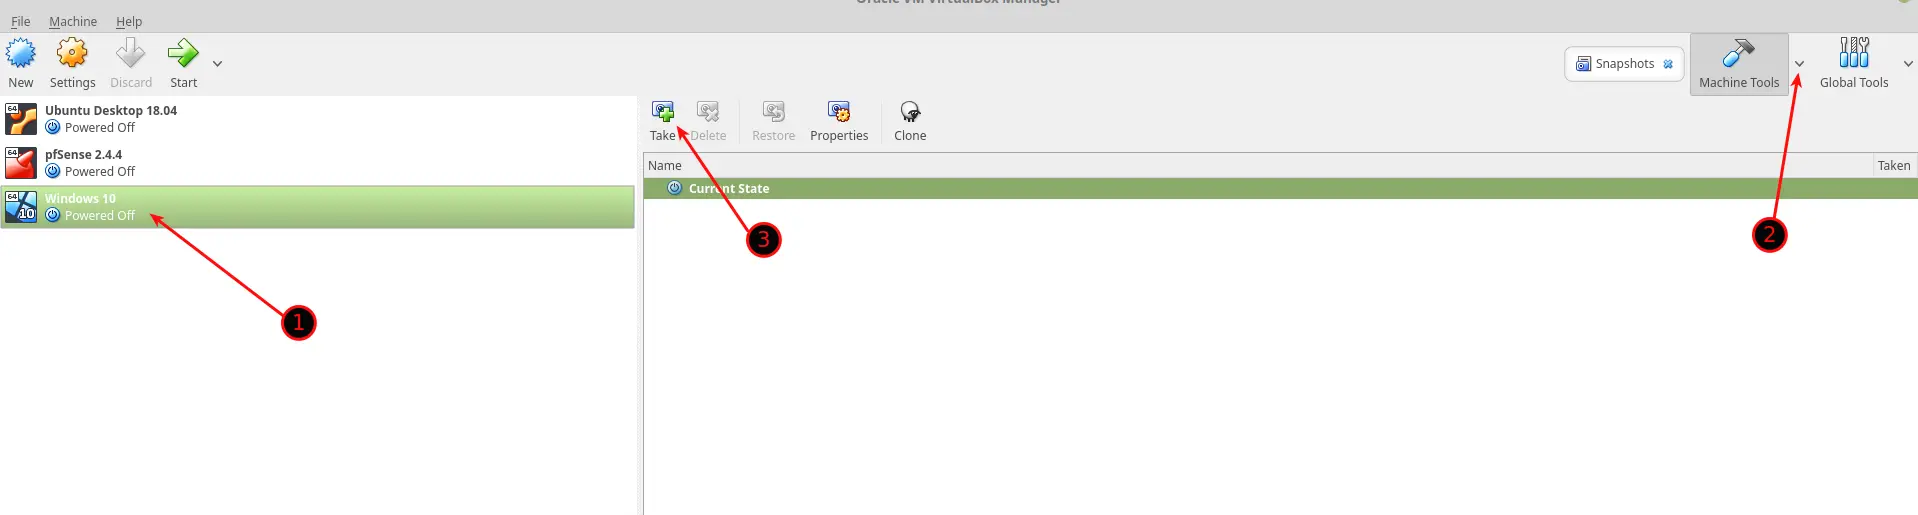
Name your Snapshot something like “Fresh Install not Activated”. So you know the state of the VM later on when you need to revert back to it.
Wrapping Up
The next thing I recommend you do is to run Windows Update to make sure you are on the latest version. (Hit the Windows Key and simply type “Update” in the Search Field)
Now you have a fully functional Windows VM on top of your Linux install; you can use it for Windows Exclusive Tools like Adobe Suite. It actually works pretty well if you have a beefy enough Computer. Please let me know in the comments below how you use your Windows VM, and I would love to know.
Stefan
Stefan is the founder & creative head behind Ceos3c.
Stefan is a self-taught Software Engineer & Cyber Security professional and he helps other people to learn complicated topics.
Let’s try and run Windows 10 inside the Linux on VirtualBox. I know that Linux distributions are far better and awesome compared to windows from every angle. But Linux is built for penetration testing, I mean there is a time where you need to test the Windows 10 for your purpose. So, it is better to know Install Windows 10 on VirtualBox on Linux.
If you are a beginner, don’t worry because every step is mentioned one by one with the screenshot. If you are an intermediate person with tech, there is just see the screenshot and you will know yourself.
- Install Kali Linux on VirtualBox on Windows 10
- Install Windows Software on Linux Mint
How to Install Windows 10 on VirtualBox on Linux?
Step 1. Download VirtualBox for Linux
Open your favorite browser and go to VirtualBox.org> now head over to downloads. On the VirtualBox Packages, select the Linux distributions and on the next page choose the version suited for the Linux you are running on your system.

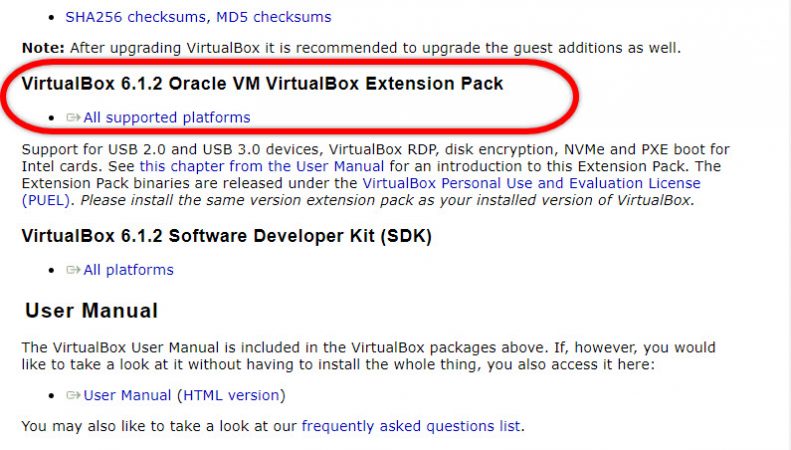
Step 2. Download VirtualBox Extension pack
The VirtualBox Extension pack is developed for some specific feature that is available inside the VirtualBox itself. The example would be USB 3.0, so to download the Virtualbox extension pack go to VirtualBox.org> Downloads> scroll down until you find the VirtualBox for all platforms.
Step 3. Install VirtualBox on Linux
Since you have downloaded the Linux version, the installation is so much easy. Double-click on the setup, and choose Install Package.
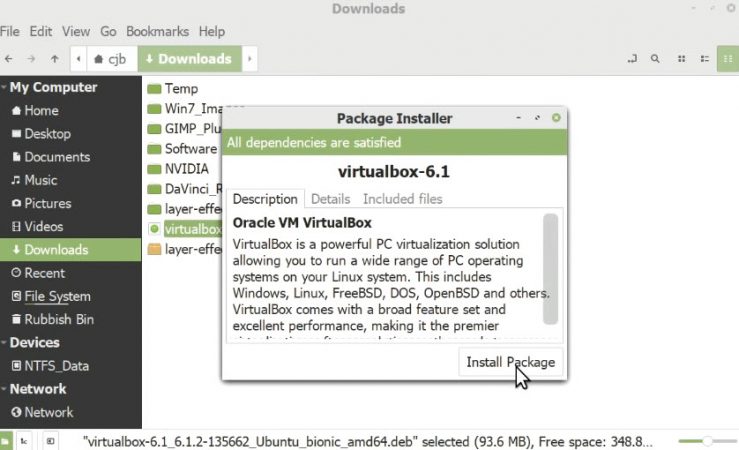
Now Go ahead and insert your password so the OS should verify the installation.
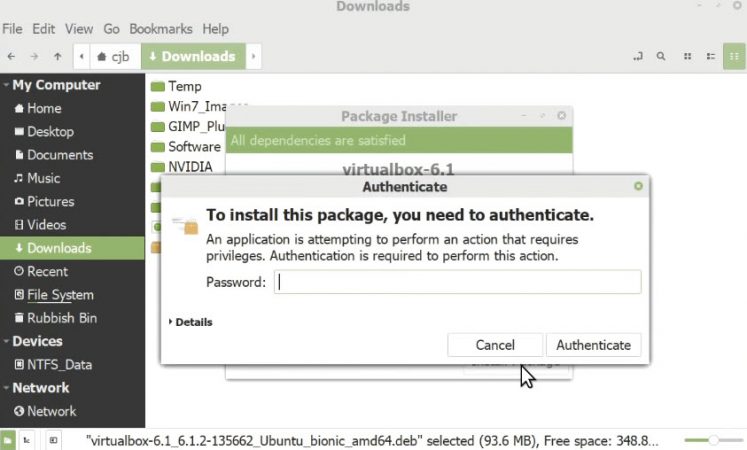
Once the installation is complete, close the install package and move to the next step.
Step 4. Install VirtualBox Extension Pack
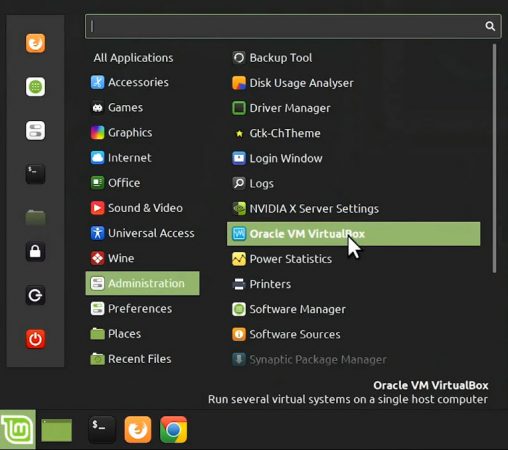
Open the Megamenu, head over to the Administration, choose Oracle VM VirtualBox.
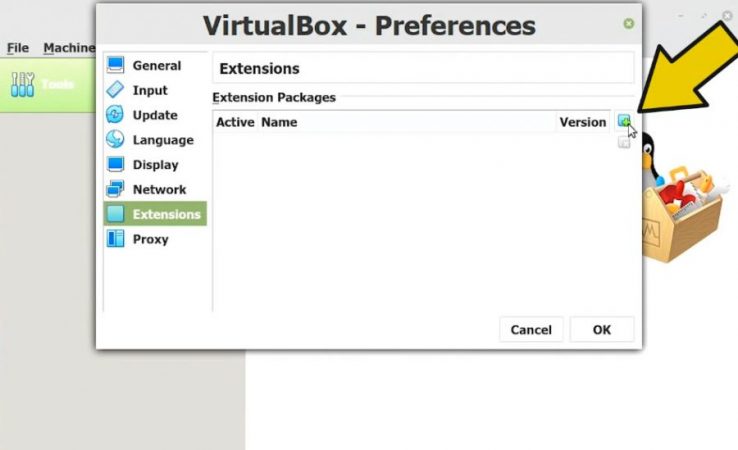
To Install the VirtualBox Extension pack Go to File> Preferences> and extensions, after that click on the plus icon.
Once you clicked on the Plus icon, now go ahead and locate the VirtualBox Extension Pack.
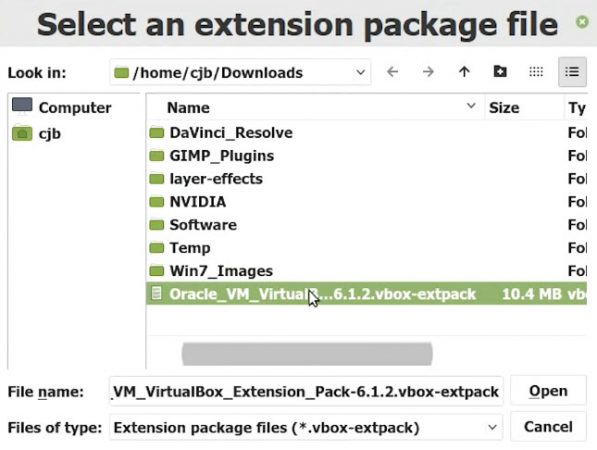
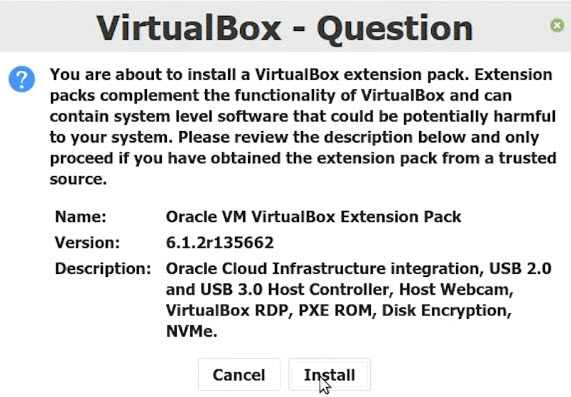
The moment you clicked on open, the installer package window will appear, which asks if you want to install it.
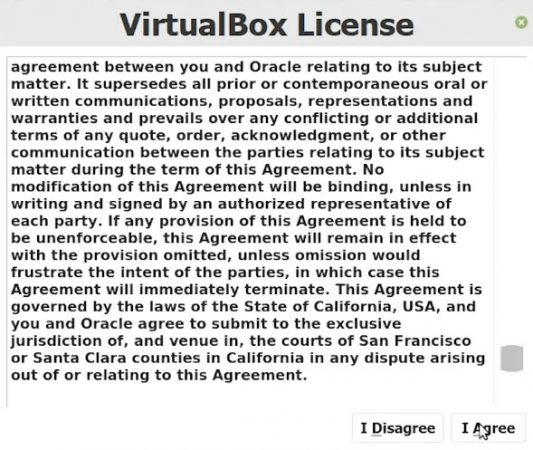
Scroll down to the end and choose to agree with the terms and conditions.
Again authenticate with the OS by entering your password.
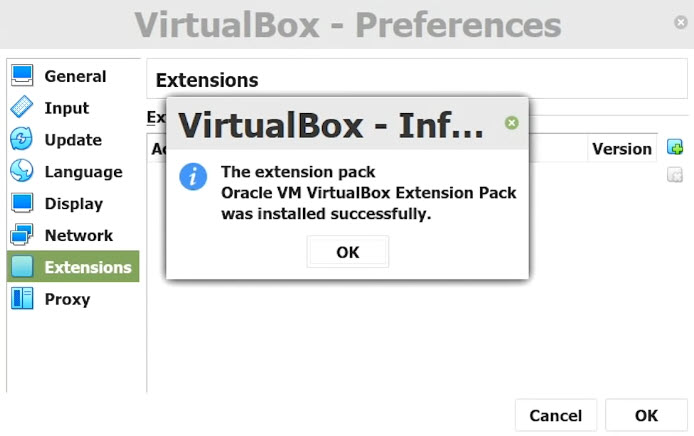
Once the installation is completed, click OK on the dialog box to close it.
Create a New Virtual Machine in VirtualBox on Linux
Now it is time to create a new Virtual Machine for Windows 10 inside the Virtualbox on Linux. To do that launch the VirtualBox and click on the New Button.

After that, a dialog box will open where you have to type the name for your Virtual machine. If you easily type its name “Windows 10”, the guest OS will be selected automatically Microsoft and the version will be 64 bit. If you want to bring changes to the version of Windows 10, change it to 32 bit if you want.
Now go ahead and choose the amount of RAM for the guest operating system. However, the recommended amount for Windows 10 64 bit is 2 GB and if you are running windows 10 32 bit it will be 2 GB of RAM.
Certainly, a hard disk is required for the guest OS, here choose to Create a Virtual Hard Disk and click create.

After creating the Hard Disk, you have to choose a hard disk type. Basically there are three types of hards here. VDI, VHD, and VMDK, If you want to use this virtual machine inside the other Virtualization software like VMware, then choose the VHD and VMDK.
Here is the place where you need to choose the storage type. There are two types of storage, fixed and Dynamically allocated. The fixed store the exact amount of storage that you entering in the next step, but Dynamically allocated won’t do that. Instead, whatever you install it will restore that much amount of storage. So, I recommend you to go with the Dynamically Allocated.
Just go ahead and choose the location where you want to save this Virtual machine. Then you can specify the amount of storage for the guest operating system.

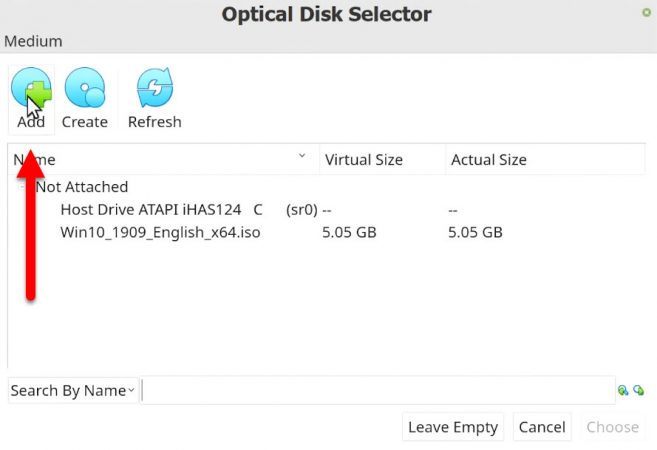
Start the Virtual Machine and the VirtualBox asks you to add the Windows 10 ISO, so, click on the Yellow folder.
Once you click on the yellow folder logo, the optical disk selector will open. Here click on Add and locate the Windows 10 ISO and click open.
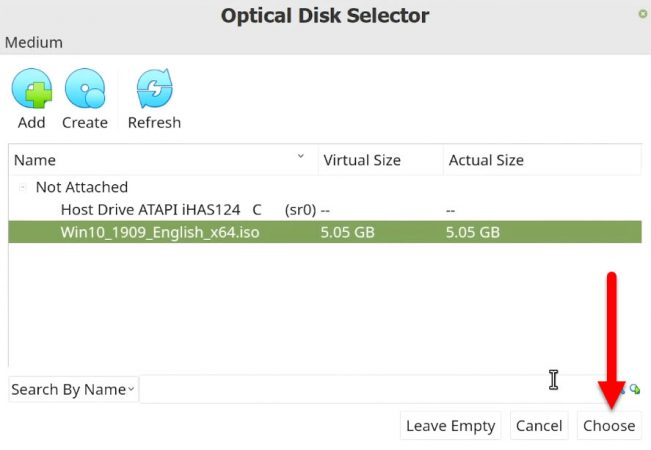
Click on Choose to add this ISO to install Windows 10.
Install Windows 10 on VirtualBox on Linux
Installing Windows 10 is so much easy you would never imagine. After the operating system is booted, you have to select a language and click next.
After the selection of language, keyboard, and language, choose to enter the license key of the Windows. If you don’t have the product key, simply select I don’t have a product key.
Go ahead and choose the version of the Windows which you want to test.
Here is the place where you have to agree with the license and agreement of Microsoft.
Also, choose the custom type of installation.
You have to create a New drive where the windows files should be copied. However, if you click next it will create the whole of the storage as one drive.
Wait until the Windows files should be copied on the selected drive. Once the files are copied your system will restart.

The other Steps are so much where I don’t need to provide any guidance. I believe in you, that you can do it yourself.
How to Configure Windows 10 Drivers in VirtualBox on Linux?
After installing Windows 10 on the actual PC, you have to update the windows, so the drivers should be configured. But inside the Virtual machine software like VMware and VirtualBox, you don’t have to do it. Because they have an additional tool that can configure the drivers automatically.
Step 1. Insert guest Tools
Ok, Launch and run the Windows 10 Guest operating system, then head over the devices and choose “Insert Guest Addition s CD Image“

Once the guest tools are inserted, inside This PC you will see “VirtualBox Guest Addition Tools”
Open the guest addition tools and choose the Setup of VirtualBox Guest Addition Tools.
In the user account alert easily choose yes and move to the next step.

On the welcome screen of the guest addition tools click next.
Now go ahead and choose the drive location where the software should be installed.
Now go ahead and choose that which Choose Components of the VirtualBox guest addition should be installed.
In the next step easily click next and wait until it should be installed.
Once the files are installed and completed, choose the finish and it will restart the guest operating system.
Conclusion
It’s all about How to Install Windows 10 on VirtualBox on Linux? I hope this post is helpful to you. So, if you like this post, please share it on social media.
If you haven’t used Windows in a while and want to check it then, this can help you. Here I will show on installing Windows on a Virtual Machine in Ubuntu. You can use the exact same method to install Windows 11, 8, or 7 on any virtual machine.
How to Install Windows 10 on Ubuntu

For installing Windows 10 (or any version) on Ubuntu, you are going to need the followings. These are must to have, as without these you won’t be able to run Windows.
- First thing is to have a stable internet connection. Internet connection is a must, as you are going to download many files later.
- The second thing will be to download Windows 10 ISO file. You can find the ISO file of Windows 10 on the internet for free. The ISO file of Windows 10 for both VMware and VirtualBox will be provided soon.
- Make sure that you have at least 6 GB of RAM memory. As your Windows 10 will need at least 4 GB to run, the rest of 2 GB will be used by the host (Ubuntu).
- You will need additional 20 GB of free storage for Windows 10. Almost 14-16 GB will be taken by system files of Windows 10, rest will be quickly covered by applications and games from Microsoft Store.
Related: How to Dual Boot Ubuntu & Windows 10?
Download Windows 10
Those who are not confident about downloading the ISO file from the internet due to security can use third-party applications like the Media Creation tool. Media Creation tool is developed by Microsoft to provide setup files for Windows 8, 10, and 11 in the safest way possible.
Here download the Media Creation tool. Once downloaded, run it on your Windows and you will see some options.
Navigate through and select download ISO file. After the selection of editions and versions of Windows 10, the downloading process will begin.
The time to download the ISO file is totally dependent on your internet speed. The faster and more stable your internet speed is, the quicker you will get the ISO file.
Install VirtualBox on Ubuntu
Now we are going to install a virtualization application. I have used VirtualBox, but you can use VMware or any other application that you feel confident in.
We are going to use VirtualBox here to create a virtual machine inside which we are going to install Windows.
For installing VirtualBox on Ubuntu, you will use Terminal.

Open the terminal and use the command below:
$ sudo apt install virtualbox
Now you will be asked for confirmation. You are going to type “Y” and press the Return key.
This is one way to download and install VirtualBox on Ubuntu. However; if you want the setup file then you can use this link to download VirtualBox for Ubuntu. There you will download the setup file and install it manually.
After the installation, we will be processed to the next step.
Create Virtual Machine on Ubuntu
Run VirtualBox on Ubuntu to begin the creation of VM.

Click on the New button on your screen.
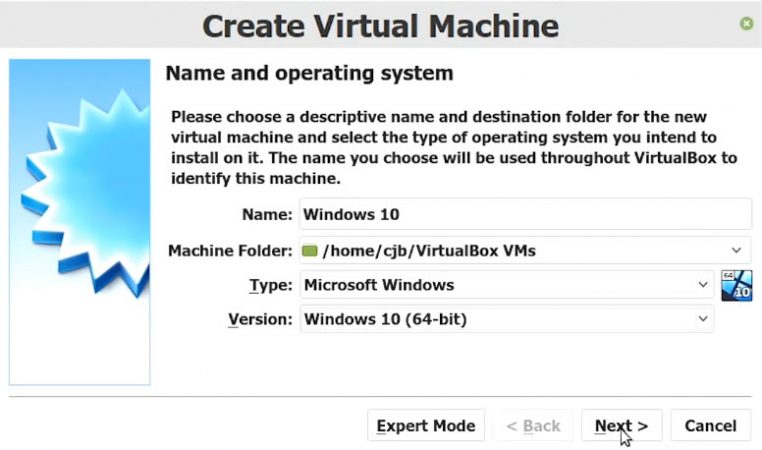
Now you are in Name and operating system. Here you will Name your virtual machine and the type of virtual machine you are going to create. The details of your VM should look something like this:
Name: Windows 10
Type: Microsoft Windows
Version: Windows 10 (64-bit/32-bit)

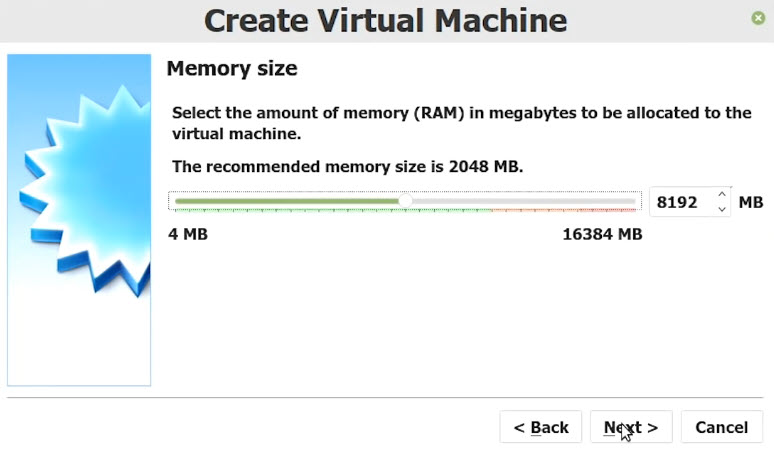
Click on Next and you are at the Memory Size window. Give your VM an amount of RAM memory and click on Next. For running 64-bit, you should give 2GB (4GB is recommended for smooth performance) and 32-bit requires 1GB (2GB for smooth performance).
Since we are creating a virtual disk and not using a VMDK file then we will select Create a virtual hard disk now option. Select the option and click on Create.

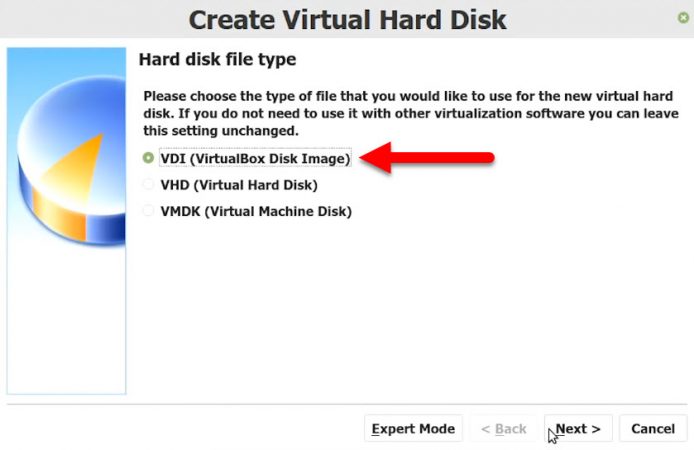
You will be asked for the format of your VM. Here you will find different options that are mind-boggling. Instead of getting confused, you will select VDI (VirtualBox Disk Image) option and click on Next.

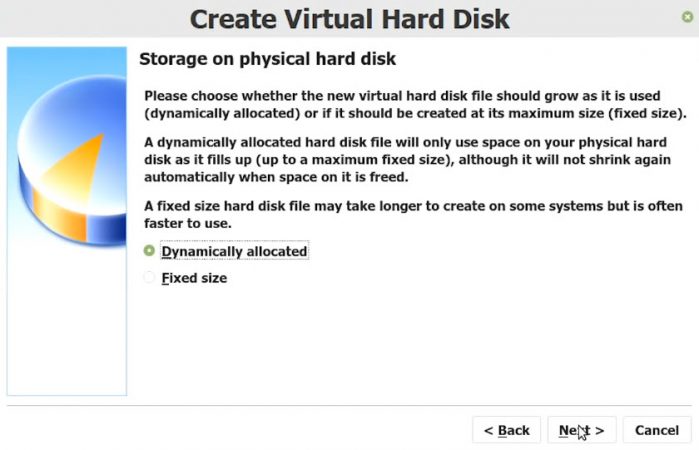
Storage on physical hard disk will appear, select Dynamically allocated option and click on Next.

Now you will see the File location and size. Here you will type the name of your new virtual hard disk file that you have created and also insert the size of the VM.
It is recommended to give the VM around 20 GB in size and name the VM something related to Windows 10. After inserting the name and value, you will click on Create.
Configure Virtual Machine for Windows 10

After clicking on Create, you will be probably placed on the start screen of VirtualBox. You will click on the Settings button on your screen to start the configuration of the VM.
Go to Storage and click on add a new optical drive. Find the downloaded ISO file of Windows 10.
For selecting your ISO file, you will see a small popup. Here you will select Choose disk option and then find the Windows 10 ISO file.
After selecting the ISO file of Windows, you will click on OK.
Reaching here means that you have created the VM, now only the installation of Windows 10 is remaining.
Install Windows 10 on VirtualBox on Ubuntu
For the installation, we are going to use the exact virtual machine that we created earlier. Now let’s install Windows 10 on Virtual Machine on Ubuntu. Begin by clicking on the Start button on your screen.
NOTE: if you want the entire process in detail then this can help “How to install Windows 10 on VirtualBox?”. Else, you can continue below.
Like any other system, you will see a Press any key…
By pressing any of the keys on your keyboard, you will begin the installation. Now you will select the following option in the first window.
Language to install English (US)
Time and currency format: English (US)
Keyboard or input method: US
NOTE: you should select the keyboard and language according to yourself. I have selected mine, according to my usage.

Click on Install Now.
You will be asked for the product key. Since we are going to use it on a VM, then we will select I don’t have product key option. And if later required then you can buy one online.
Now you will be asked to select one of the options to perform the installation. Select Custom: Install Windows Only (advanced) option.
From here on, don’t download any updates now, select the partition and install Windows 10. Once the installation begins; it is only a matter of time to use Windows 10.
When the installation got completed then you will customize your Windows 10 and that’s it. The customization is easy and straightforward, so I have left that for you.
Refine your Windows
After installing Windows 10 on Ubuntu, you are recommended to install Extension Pack. With the extension pack, you will get enhanced performance and better graphics with more features. Get the extension pack of VirtualBox for Ubuntu here.
NOTE: if you have already installed the extension pack then there is no need for second installation.
And that is it all about installing Windows 10 on a virtual machine on Ubuntu. If you got any sort of question or experienced an error, then commend down. If you want something quite opposite then try “How to Install Ubuntu on Windows 10 using VirtualBox?”.
How to speed up Windows 10 on a virtual machine (Ubuntu host)?
To speed up Windows after installing it on Ubuntu then you are going to VM Settings. Select the VM and you will find Settings on your screen. There you will increase RAM, Processor, and Graphics. Apply the changes and start your VM.
Make sure that you won’t provide all system juice to your VM, as this way your host will be crashed and your guest too. Try to find a point where both guest and host can run smoothly. If you find one fast while the other is slow then increase your system specs by adding new.
How to create an Ubuntu virtual machine in Windows 10?
To create a virtual machine of Ubuntu on Windows 10 then you will need to have either VirtualBox or VMware. There you will select New > Name and operating system > Memory size > Create a virtual hard disk now > VDI (virtual disk image) > Dynamically allocated > File location and size > Create.
Now, you will configure your VM by clicking on Settings. Here you go, you have created a new virtual machine for Ubuntu on Windows 10.
There are different virtual machines available for Linux/Ubuntu, but in this tutorial we are using Oracle VM VirtualBox. VirtualBox is a free and open source virtualization software from Oracle.
This post was written on November 2018, so instructions may vary in later versions. I installed VirtualBox 5.2 on Ubuntu 16.04 LTS (Xenial Xerus). The official (and hopefully responsibly updated) instructions are located on this external link.
1. Add VirtualBox to Ubuntu repository
On this step, you need to know the distribution codename of your Ubuntu version. To know it, open a terminal and type this command:
lsb_release-a
You will find the distribution codename after the field “Codename”.
To add VirtualBox to Ubuntu repository, go to Start > Software & Updates > Other Software > Button ‘Add…’
Enter the following APT line in the input box, substituting <mydist> by your distribution codename (in my case it was xenial):
deb https://download.virtualbox.org/virtualbox/debian <mydist> contrib
Enter password and close dialog.
2. Download Oracle signature
Download Oracle public key for apt-secure:
- Here for Debian 8 (“Jessie”) / Ubuntu 16.04 (“Xenial”) and later (including at least Ubuntu 22.10 “Kinetic”)
You may have to right click on link and select “Save as”.
3. Apply Oracle signature
Go to the terminal and enter the command below:
sudo apt-key add oracle_vbox_2016.asc;
In my case, file was in Downloads folder so I used this command:
sudo apt-key add ~/Downloads/oracle_vbox_2016.asc;
If everything is fine, you will get this output:
OK
4. Install VirtualBox
Open terminal. Go to Start > Terminal.
sudo apt-get update

sudo apt-get install virtualbox-5.2
5. Download Windows 10 ISO image
Visit Microsoft Media Creation Tool from this link.
Download “Microsoft Media Creation Tool”.
Run the tool from a Windows computer and follow these ISO creation steps:
- Accept Terms & Condition
- Select ‘Create installation media (USB flash drive, DVD, or ISO file) for another PC.
- Select language, architecture and edition.
- When askw which media to use, select “ISO file
- Wait until the process is finished.
- When it proposes to burn ISO on CD, just click on “Finish”.
Find the newly created “Windows.iso” file and copy or send it to your Linux/Ubuntu computer. I used a USB memory stick (filesize is 3,90 GB).
6. Configure Windows 10 on VirtualBox
Open Virtual Box by going to Start > Oracle VM VirtualBox.
Click on “New” button.
Name your OS and select the correct OS version (in my case it was “Windows 10 (64-bit)”.
Select memory size. I accepted the recommend amount.
Create virtual hard disk.
Select hard disk file type. I chose the proposed VDI.
Select “Dynamically allocated”.
Accept File Location and size.
It takes back to main screen. Select OS and click on Settings.
Go to “Storage” option.
Remove any empty optical drive that may exist.
Click on button “Adds new storage attachement” > “Adds optical drive”.
Select “Choose disk” in dialog.
Select ISO file download in previous step.
7. Run Windows 10
Select Windows 10 OS from VirtualBox main screen and click “Start”.
Enter Windows registration key.
Windows installation screen will be displayed.
I chose the advanced option of just installing Windows.
Wait until Windows installation is finished.
References
Main sources:
- “Download VirtualBox for Linux Hosts“, by VirtualBox
- “How To Install Windows 10 In VirtualBox in Linux“, by Abhishek Prakash