
Добрый день уважаемая каста обладателей Steam Deck. Относительно недавно я настрочил графоманский гайд по самой базированн��й установке игр.
Учимся основам деководства.
Пост посвящён неофитам, которые вот только что влились в «семью деководов» и не знают с какой стороны подойти к этой чудесной вундервафле. Ну и подойдёт ещё тем, кто долгое время особо не вникал и играл в нативные версии игр для линухи из Steam (извращенцы). В этой статье мы научимся обходиться штатными средствами Дека, не прибегая к помощи других…
И в комментариях под этой статьёй всплыл очень интересный вопрос, который мучает умы всех неофитов готовящихся вот-вот войти в наши дружные ряды.
Отвечу на вопрос Алксандра. Да, такое сделать можно. Я бы даже сказал, что нужно, ибо насиловать свой Дек установкой виндузы на внутренний SSD, со сносом родной оси, будет только самый сумасшедший мазохист и извращенец.
Итак, пришло время представить героя нашей статьи и это…барабанная дробь…Windows To Go.
Windows To Go это идейное продолжение Windows PE, но намного лучше. Ибо идёт полноценная установка ОС со всеми драйверами и программами, да и она своими тентаклями не лезет на ваш внутренний накопитель
Итак, для закатки нашей пердузы на съёмный накопитель нам понадобятся:
- Съёмный накопитель (желательно NVME)
- Дистрибутив ОС
- Драйвера для нашего Steam Deck
- Программа Hasleo WinToUSB
Перво наперво скачаем драйвера на наш Steam Deck. Посещаем вот этот сайт.
На этом сайте есть драйвера для двух версий Steam Deck. Выбирайте только для своей версий.
Все архивы распаковать по своим папкам, а потом все папки запихнуть в одну, откуда программа будет тянуть драйвера.
Итак, посещаем сайт программы и скачиваем её бесплатную версию и устанавливаем.
Через бесплатную версию этой программы можно установить только Home версию Windows. Если хотите Pro, то покупайте лицензию или ищите крякнутую версию на трекерах.
В общем, мы закончили с подготовлением. Теперь приступаем к основной части этого гайда.
Запускаем Hasleo WinToUSB.
Выбираем пункт USB с Windows To Go и попадаем в другое окно.
Итак, в источнике установки выбираем образ нашей операционной системы, а целевым диском выступит наш съёмный накопитель. Всё должно выглядеть вот так.
Снизу будет маленькая стрелочка. Нужно на неё нажать, чтобы развернуть дополнительные настройки.
В пункте дополнительные драйверы выбираем папку с нашими заранее распакованными драйверами. И если у вас не стоит галочка на Автономные внутренние диски при загрузке Windows To Go то лучше её поставьте, иначе винда будет лезть своими тентаклями в наш внутренний накопитель.
Всё, подготовка закончена. Жмём Начать и ждём окончание процесса установки. Время установки составляет примерно 20-30 минут. Статус установки можно будет отследить тут.
После установки можно смело отключать наш съёмный накопитель.
Теперь берём наш Steam Deck и заходим в BIOS. Чтобы зайти в BIOS нужно на выключенном устройстве зажать + и один раз нажать на кнопку power. Держим палец на + до тех пор, пока не попадём в сам BIOS.
В биосе выбираем пункт Setup Utility. Переходим во вкладку Boot и активируем параметр USB Boot. После активации этого параметра вы можете загружаться с внешних носителей
Подключаем наш внешний накопитель. Заходим в Bios. Выбираем пункт Boot Menu. Вуаля, у вас пошёл запуск винды. После каждого перезапуска запускаемся через Бут меню. А так дальнейший сценарий будет точно таким же, как при первом запуске винды. Подключение к сети, своему аккаунту, загрузка обновлений и т.д. С этим вы сами разберётесь. Дам только пару советов.
- Сначала установите все обновления.
- Потом установите клиент Steam.
Если с самого начала не установить все обновления, то у вас будет тупо глохнуть Steam при запуске. А без клиента Steam, управление в самой системе будет очень кастрированное.
While SDHQ is nowhere near the first to cover this, I recently wanted to play the new Call of Duty: Modern Warfare II campaign on my Steam Deck. Its RICOCHET anti-cheat engine isn’t compatible with Proton, so my only choice was to install Windows. Windows is useful for other unsupported games as well, such as Fortnite and Destiny 2, which even bans players for attempting to play on their Steam Deck (c’mon Bungie!).
Before we begin, there are a few different ways to boot Windows on the Steam Deck:
- Alternative OS (Operating System) — This method involves using a separate device, like external SSD or Mircro SD card to boot Windows, keeping SteamOS dedicated to one device, and Windows dedicated to another.
- Dual Boot — Builds on the concept of an Alternative OS, but uses disk partitioning to share one section of a device with the other operating system. This method is especially useful if you have a large external drive or Micro SD card and want to use part of it for Windows, and the other part for extra game storage in SteamOS. Dual booting is not currently supported on the internal Steam Deck SSD.
In order to install windows on the Steam Deck, you’ll need a few things:
- A Windows PC. While there are Mac compatible methods available, the tools we will be using make the process simpler and are only available for Windows. Did you know you can install Windows on your Mac alongside MacOS? Check out Parallels (Paid) or Boot Camp (Free).
- A Windows 10 ISO or Windows 11 ISO. For Windows 10, follow the instructions to «Create installation media for another PC» and for Windows 11, download the ISO directly from the page.
- A disk image writing utility. A free tool, such as RUFUS is recommended.
- An external SSD or Micro SD card with at least 64gb capacity (256gb+ is recommended for gaming)
- The Steam Deck Windows drivers
- A USB adapter for your external SSD (optional)
Download the Windows ISO
From the Microsoft web pages linked above, download the ISO image of the operating system you wish to install. Note: You will need a valid Windows product key to remove the «Activate Windows» watermark, but you can install and use most of Windows’ features without activating. For this tutorial, we’ll be using Windows 10.
Creating your Windows Boot Drive
Plug your external SSD or Micro SD card into your computer. Open up RUFUS (no installation necessary) and select «yes» if prompted to allow RUFUS to make changes to your system. In the RUFUS UI, select your removable drive and the Windows ISO you downloaded earlier.

Under «Image Option» select «Windows to Go» and click Start
Note: Everything on this drive will be erased once you click Start, so make a backup if you are repurposing a drive.

Let RUFUS run its course writing the image. This can take anywhere from 5-25 minutes depending on the speed of your device.
Booting Windows and Installing Drivers
If this drive will be dedicated to Windows and no portion will be shared with SteamOS, then you’re almost done! Eject the drive, connect it to your Steam Deck, and access the bootloader by holding the Volume down button while powering on the Steam Deck. You’ll see a few options and will want to select «EFI — SD/USB» to access Windows. Windows will finalize the setup process and present you with the desktop.
At this point, you’ll want to install the Steam Deck drivers linked above. Simply run each setup.exe file and allow the installation to complete. For .inf drivers, right-click each one and click install. You’ll receive a confirmation message after each driver installs successfully. Windows will want you to restart the Steam Deck, so go ahead and do so using the Windows menu, and holding the volume down button to access the bootloader once the system starts powering on. Access the EFI SD/USB again, and you’ll be logged into a fully functioning Windows OS on the Steam Deck!
If you intend to split the drive’s capacity between Windows and SteamOS, power down your Steam Deck, insert your Windows SSD or Micro SD card into your PC, and follow the steps below. Otherwise, happy gaming!
Section 2: For Dual Boot ONLY
The sections below only apply if you’ll be sharing the drive capacity between Windows and SteamOS.
Let’s say you have a 1-2TB external SSD or Micro SD card you’re installing Windows on, and want a portion of that to be available to store games in SteamOS. There are a few extra steps required to partition and format the drive in a way where the space can be shared.
Note: Games installed via SteamOS will not be accessible in Windows. Even though both operating systems have access to the same physical storage device, Windows cannot read the Linux-based ext4 filesystem and each OS requires different user permissions to access the storage. You MUST install Windows first, as the process for creating a Windows to Go drive erases the entire disk. Therefore you cannot install to a partition on a drive currently used in SteamOS without erasing it. I tried a variety of tools to install and restore from an existing system image to no avail. Learn from my pain, install Windows first!
Partitioning
By this point in the guide, you have Windows installed on an external SSD or Micro SD card. Connect the drive to a PC and open Disk Management in Windows. You can find it by searching «partition» in Windows search. You’ll be presented with a list of disk drives connected to your computer. In the screenshot below, Disk 4 is my Windows to Go Micro SD card.

Right-click on the Windows partition and select Shrink Volume
Choose the amount of space to shrink your partition by. The space next to «Enter the amount of space to shrink in MB» will be the amount of storage available in SteamOS.

Once the operation completes, you’ll see a block of Unallocated Space on your disk. You’re all set on your computer and can eject your device.

Steam Game Library
Connect your SSD to your Steam Deck or insert the Micro SD card, and boot into Windows by holding Volume down during boot, and selecting «EFI SD/USB» from the bootloader menu. Once you’ve successfully booted into Windows, reboot your Steam Deck into SteamOS desktop mode. The next steps involve formatting the unallocated space with the ext4 filesystem, changing the partition permissions, adding the newly formatted space as a Steam game library, and if you’re using an external SSD connected via USB, editing the fstab to auto-mount the drive. Luckily, SDHQ already has a guide covering these steps.
If you’re using a Micro SD card, you can skip the steps about modifying fstab after adding the game library folder to Steam, since the Steam Deck automatically mounts the Micro SD card when powered on.
If you’ve gotten this far, you have a bootable Windows partition and SteamOS partition for use as a Steam games library folder! Happy gaming!

When it comes to unlocking the full potential of the Steam Deck, one option that many gamers explore is installing Windows 10. Did you know that by installing Windows 10 on the Steam Deck, you can access a wider range of games, applications, and software? This opens up a whole new world of possibilities for gamers who want to utilize the device to its fullest extent.
Installing Windows 10 on the Steam Deck is a straightforward process that can greatly enhance the versatility of the device. By running Windows 10, you can not only play your favorite Steam games but also utilize other gaming platforms and software with ease. With an ever-expanding library of games and the seamless integration of Windows features, this installation option gives you the freedom to tailor your gaming experience to suit your preferences.
Installing Windows 10 on your Steam Deck is a straightforward process. Follow these steps to get started:
- Connect the Steam Deck to a power source and turn it on.
- Navigate to Settings and select «System».
- Choose «Windows Installation» and follow the prompts.
- Insert a Windows 10 installation media into the designated USB port on the Steam Deck.
- Restart the device and press the appropriate key to enter the BIOS/UEFI settings.
- Configure the boot order to prioritize the USB drive.
- Save the changes and exit the BIOS settings.
- Follow the on-screen instructions to install Windows 10 on your Steam Deck.
- Once the installation is complete, you can customize the settings and start using Windows 10 on your Steam Deck.

Preparing Your Steam Deck for Windows 10 Installation
1. Check system requirements
Before installing Windows 10 on your Steam Deck, it’s crucial to ensure that your device meets the necessary system requirements. Here are the minimum requirements:
- Processor: 64-bit processor with at least 1.6 GHz clock speed
- RAM: 4 GB or more
- Storage: 64 GB or more
- Display: 7-inch LCD with a resolution of 1280×800 pixels
Additionally, make sure you have a stable internet connection and a USB drive with at least 8 GB of storage capacity. It’s also advisable to back up any important data on your Steam Deck before proceeding with the installation.
If your Steam Deck doesn’t meet the minimum requirements, it may not be able to run Windows 10 efficiently or at all. In such cases, consider upgrading your Steam Deck’s hardware or consulting with technical experts to explore alternative options.
2. Enable developer mode
Before you can install Windows 10 on your Steam Deck, you need to enable the developer mode. Here’s how:
- Go to the Steam Deck main menu and select «Settings».
- Navigate to the «System» section and select «Console info».
- Click on the «Enable Developer Mode» option and follow the prompts to enable it.
Enabling developer mode allows you to access and install applications from outside the Steam Deck’s native environment.
It’s important to note that enabling developer mode may void your warranty, so proceed with caution and be aware of the risks involved. If you’re unsure or uncomfortable with this step, it’s advisable to seek assistance from technical experts.
3. Download the Windows 10 image file
In order to install Windows 10 on your Steam Deck, you’ll need to download the Windows 10 image file. Follow these steps:
- Visit the official Microsoft website and navigate to the Windows 10 download page.
- Select the desired edition of Windows 10 (e.g., Home, Pro) and click on the download button.
- Choose the 64-bit version of Windows 10 unless you have specific requirements for the 32-bit version.
Once the download is complete, you will have an ISO file of the Windows 10 installation.
It’s crucial to download the Windows 10 image file from official sources to ensure its authenticity and reliability. Avoid downloading the image file from third-party or unofficial websites to protect your device from potential security risks.
4. Create a bootable USB drive
After downloading the Windows 10 image file, you’ll need to create a bootable USB drive to facilitate the installation process. Follow these steps:
- Insert the USB drive with at least 8 GB of storage capacity into your computer.
- Open the Windows 10 image file with a disk image utility or a dedicated tool like Rufus.
- Select the USB drive as the target device for creating the bootable drive.
- Click on the «Create» or «Start» button and wait for the process to complete.
Once the bootable USB drive is created, it will be ready for use during the installation process on your Steam Deck.
Keep in mind that creating a bootable USB drive will erase all existing data on the drive, so make sure to backup any important files before proceeding. Additionally, ensure that you have a stable internet connection during the creation process for smooth and uninterrupted download of required files.
Installing Windows 10 on Steam Deck
1. Boot from the USB drive
Once you have prepared the bootable USB drive, you can proceed with the installation of Windows 10 on your Steam Deck by following these steps:
- Power off your Steam Deck.
- Insert the bootable USB drive into the USB port.
- Press and hold the power button along with the volume up button.
- Release the buttons when the Steam Deck logo appears.
Your Steam Deck should now boot from the USB drive, initiating the Windows 10 installation process.
If your Steam Deck doesn’t boot from the USB drive, you may need to access the BIOS settings and change the boot order to prioritize the USB drive. Consult the Steam Deck’s user manual or technical support to understand the steps specific to your device.
2. Follow the installation prompts
Once the Steam Deck boots from the USB drive, follow these prompts to install Windows 10:
- Select your language, time zone, and keyboard layout preferences.
- Click on the «Install Now» button.
- Enter the Windows 10 product key if prompted or choose the option to skip this step.
- Read and accept the terms and conditions.
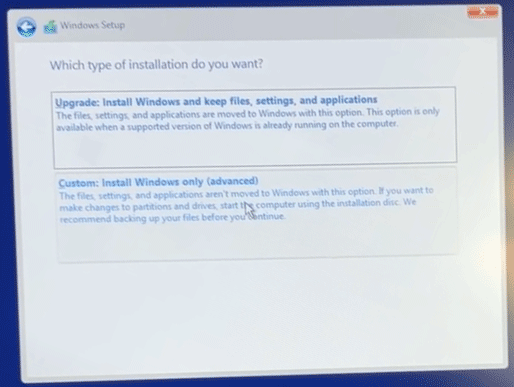
- Select the type of installation (e.g., Custom or Upgrade) based on your preferences and requirements.
- Choose the installation drive and follow the prompts to complete the installation process.
Ensure that you select the correct installation drive to avoid overwriting or deleting any important data stored on your Steam Deck. Double-check the choices you make at each step of the installation process to minimize any errors or conflicts.
3. Complete the Windows 10 setup
Once the installation process is complete, you’ll need to go through the initial setup of Windows 10 on your Steam Deck. Follow these steps:
- Select your region and language preferences.
- Set up a username and password for your Windows 10 account.
- Customize the privacy and security settings based on your preferences.
- Connect to a Wi-Fi network to enable internet access.
- Sign in with your Microsoft account or create a new one.
After completing these setup steps, your Steam Deck will be running Windows 10, allowing you to access a wider range of applications and functionalities.
It’s important to note that installing Windows 10 on your Steam Deck may void the warranty or have other implications on the device’s performance. Make sure to read and understand any terms or conditions provided by the manufacturer before proceeding.
Windows 10 on Steam Deck: A New Experience
By installing Windows 10 on your Steam Deck, you’re unlocking a whole new level of versatility and possibilities. Here are some benefits of having Windows 10 on your Steam Deck:
- Access to a vast library of software and games not available on the Steam Deck’s native operating system.
- Compatibility with various productivity tools, allowing you to use your Steam Deck for work or educational purposes.
- Increased customization options, including desktop backgrounds, themes, and application preferences.
- Integration with Microsoft services and features such as Microsoft Office, Windows Store, and Xbox Game Pass.
With Windows 10 installed, your Steam Deck becomes a versatile device that can cater to both gaming and productivity needs. Explore the possibilities and make the most out of your Steam Deck’s capabilities.

Installing Windows 10 on Steam Deck
In order to install Windows 10 on your Steam Deck, follow these steps:
- Ensure that your Steam Deck is charged and connected to a stable internet connection.
- Go to the «Settings» menu and click on «System».
- Scroll down and select «System Update» to make sure your Steam Deck is running the latest version of SteamOS.
- After updating SteamOS, go back to the «Settings» menu and click on «SteamOS».
- Select «Switch to Windows» and follow the on-screen instructions to download and install Windows 10.
- Once Windows 10 is installed, you can customize your settings and download your preferred software and games.
Note: Installing Windows 10 on your Steam Deck will replace the SteamOS and wipe all existing data. Make sure to back up your files before proceeding with the installation.
Key Takeaways
- Installing Windows 10 on Steam Deck allows you to access a wider range of games and applications.
- You can install Windows 10 on Steam Deck by following a simple step-by-step process.
- Make sure you have a USB drive with at least 16GB of storage space before starting the installation.
- Before installing Windows 10, back up all your important data and files to prevent any loss.
- After installing Windows 10, you can switch between SteamOS and Windows 10 whenever you want.
Frequently Asked Questions
Here are some common questions regarding the installation of Windows 10 on Steam Deck:
1. Can I install Windows 10 on Steam Deck?
Yes, you can install Windows 10 on Steam Deck. Valve, the company behind Steam Deck, has designed the device to be compatible with multiple operating systems, including Windows 10.
To install Windows 10 on Steam Deck, you will need to follow a few steps. First, you need to create a bootable USB drive with the Windows 10 installation files. Then, you have to enter the Steam Deck’s BIOS and change the boot order to prioritize the USB drive. Finally, you can proceed with the installation process of Windows 10 as you would on any other PC.
2. What are the benefits of installing Windows 10 on Steam Deck?
Installing Windows 10 on Steam Deck opens up a wide range of possibilities. You can use Steam Deck not only to play Steam games but also to run desktop applications, productivity tools, and even other gaming platforms such as Epic Games Store and Xbox Game Pass.
With Windows 10, you have access to a vast library of software and games, allowing you to leverage the full potential of Steam Deck as a portable gaming and productivity device.
3. Do I need a license for Windows 10 to install it on Steam Deck?
Yes, you will need a valid license for Windows 10 to install it on Steam Deck. Windows 10 is a proprietary operating system developed by Microsoft, and it requires a valid license key for activation.
You can either purchase a license key from Microsoft or use an existing license key that you have previously purchased for another device. Without a valid license key, you will not be able to activate and use Windows 10 on Steam Deck.
4. Can I dual boot Windows 10 and SteamOS on Steam Deck?
Yes, it is possible to dual boot Windows 10 and SteamOS on Steam Deck. Dual booting allows you to have both operating systems installed on the device, and you can choose which one to boot into during startup.
However, it’s important to note that dual booting requires technical knowledge and carries the risk of data loss if not done correctly. It is recommended to follow a detailed guide or seek assistance from experienced users if you are not familiar with the dual booting process.
5. Are there any drawbacks of installing Windows 10 on Steam Deck?
While installing Windows 10 on Steam Deck brings many benefits, there are a few drawbacks to consider. The foremost drawback is that Windows 10 is a resource-intensive operating system, which means it may consume more battery power and generate more heat compared to SteamOS.
In addition, compatibility with games and performance may vary compared to SteamOS, as games optimized for SteamOS may not perform as well on Windows 10. It’s important to research compatibility and performance before installing Windows 10 to ensure a satisfactory gaming experience.
To summarize, installing Windows 10 on a Steam Deck can provide you with a versatile gaming experience. By following the step-by-step guide outlined in this article, you can ensure a smooth installation process. Remember to back up any important data and create a bootable USB drive before starting the installation process.
Once you have successfully installed Windows 10 on your Steam Deck, you can access a wide range of PC games and applications. Additionally, you can take advantage of the Steam Deck’s powerful hardware to enjoy a seamless gaming experience. Whether you’re a casual gamer or a hardcore enthusiast, the ability to install Windows 10 on the Steam Deck opens up new possibilities for gaming on the go. So, don’t hesitate to try it out and discover the full potential of your Steam Deck!
You are allowed to install another operating system like Windows 10 or Windows 11 on your Steam Deck. Do you know how to install Windows 10/11 on the Steam Deck? In this article, MiniTool Software will show you a full guide, as well as some other related information.
What Is the Steam Deck?
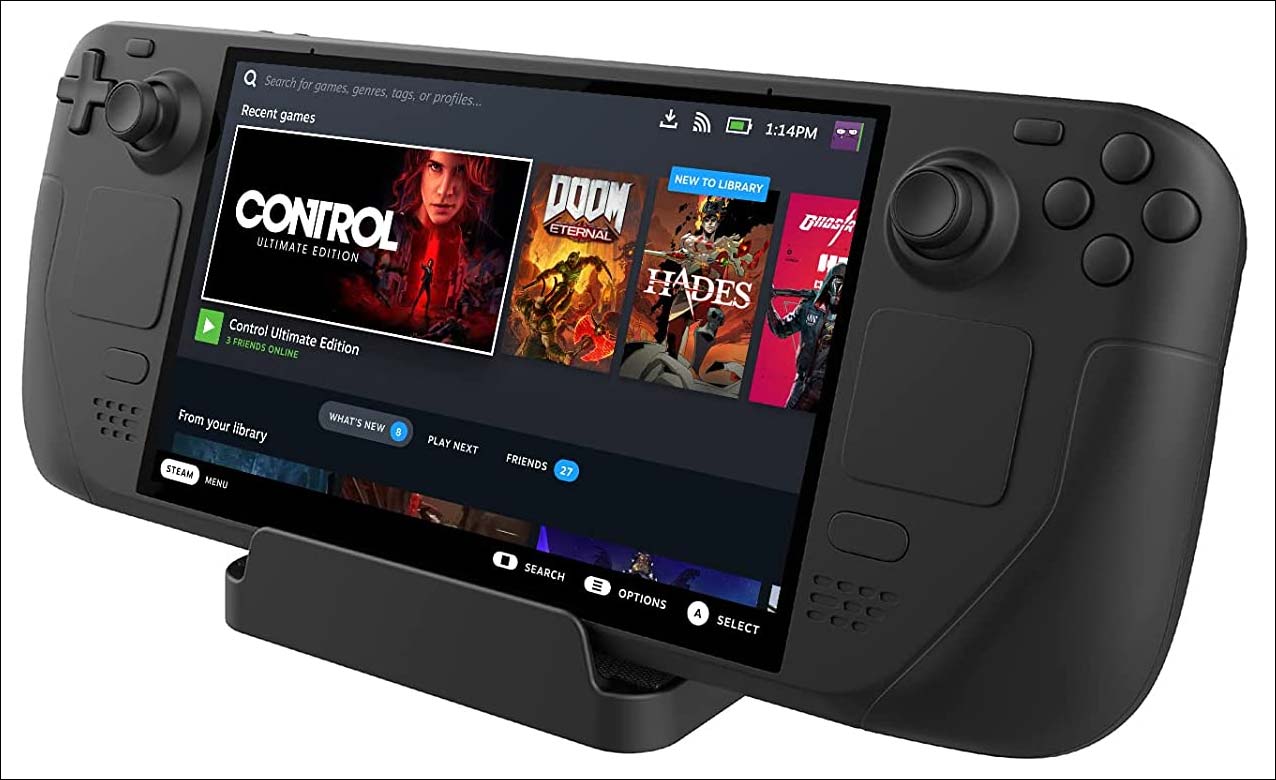
The Stem Deck is a newly released handheld gaming computer which was initially released on February 25, 2022. It is developed by Valve. Like the Nintendo Switch, you can use the Steam Deck as a handheld device or connect it to a monitor and then use it to play games.
Which OS Is the Steam Deck Running?
The Steam Deck is an x86-64-v3 device with integrated gaming inputs. It is designed to play the full Steam library. By default, the Steam Deck is running SteamOS out of the box, which is based on Arch Linux.
However, Steam Deck is also mentioned as a PC. This means that you can install another operating system like Windows 10/11 on your Steam deck. To run Windows on the Steam Deck and get the best experience, you need to install some additional drivers.
In the next part, we will introduce how the Steam Deck runs Windows, including how to install Windows on the Steam Deck and some other useful information.
How to Install Windows on the Steam Deck?
Windows and SteamOS dual-boot are not yet available. If you want to install Windows 10 or Windows 11 on your Steam Deck, you need to firstly wipe the device.
After that, you can boot your Steam Deck from the Windows 10/11 bootable USB drive and install Windows on your Steam Deck.
Just in case you don’t know what to do, we write this article to show a complete tutorial.
Step 1: Wipe Steam Deck
As mentioned above, you can only install one operating system on Steam Deck. If SteamOS has been pre-installed on your device and you want to install Windows on it, you will need to factory reset Steam Deck.
It is very easy to do this: you can just factory reset Steam Deck from itself:
- Go to Settings > System.
- Tap the Factory Reset button on the screen.
- Tap the Factory Reset button on the pop-up interface to confirm the operation.
You should wait patiently until the factory reset process ends. Then, power off your Steam Deck.
Step 2: Create a Windows 10/11 Bootable USB Drive
Like install Windows 10/11 on a computer via USB, you need to create a Windows 10/11 bootable USB drive, then use it to install Windows on the Steam Deck. To do this, you need to prepare a USB drive that with at least 8GB. You’d better do this job on your Windows computer.
Additionally, if you want to install Windows 11, you need to make sure that you have the latest OS update (in order to get the latest BIOS with fTPM support) before the installation.
Here is how to create a Windows 10/11 bootable USB drive:
1. Go to the Windows 10 software download page if you want to create a Windows 10 bootable USB drive.
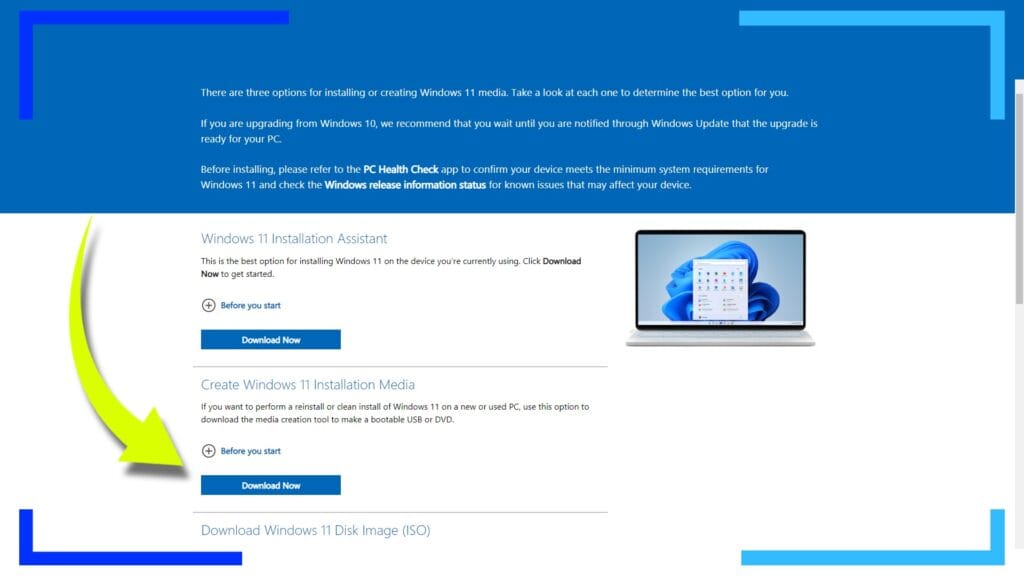
Go to the Windows 11 software download page if you want to create a Windows 11 bootable USB drive.
2. Click the Download now button under the Create Windows 10 installation media section or click the Download now button under the Create Windows 11 Installation Media section to download the Windows 10/11 media creation tool.
3. Plug the USB drive to your computer via the USB port.
4. Open the Windows 10/11 media creation tool you have downloaded to run it.
5. Click the Accept button when you see the Windows 10/11 setup interface.
6. The setup begins to work on getting a few things ready. You should wait patiently until the whole process end.
7. When you see the What do you want to do page, select Create installation media (USB flash drive, DVD, or ISO file) for another PC, then click Next to continue.
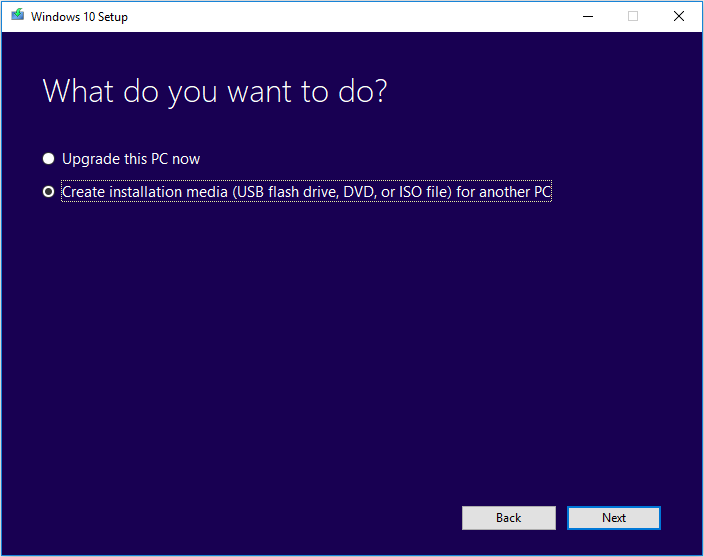
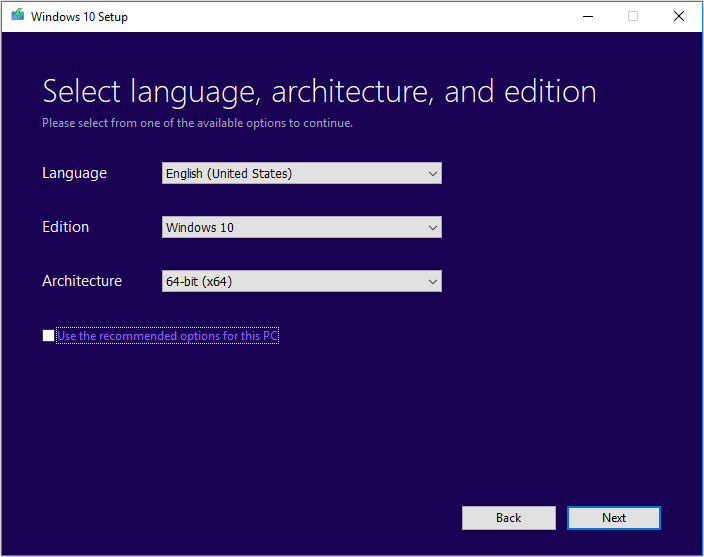
8. Uncheck Use the recommended options for this PC. Then select the language, edition, and architecture as per your situation. Next, click the Next button to continue.
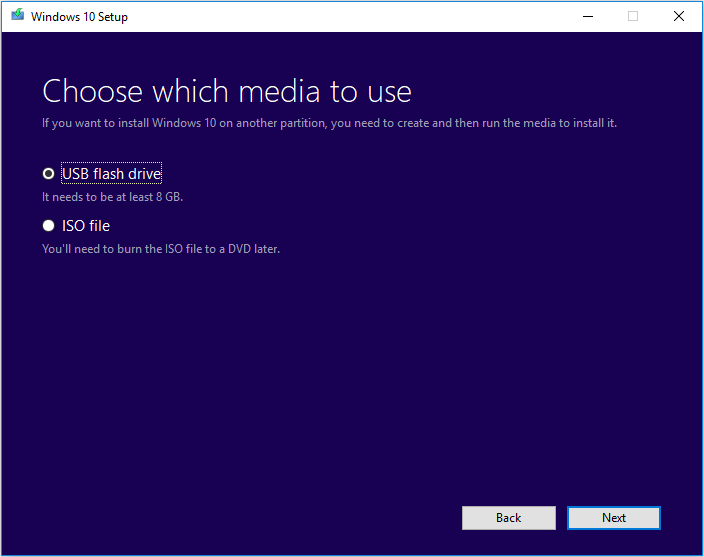
9. On the next page, select the media you want to use. In this case, we need to create a Windows 10/11 bootable USB drive. So, you need to make sure USB flash drive is selected. Then, click the Next button to continue.
10. You will see all the removable drives that can be detected on the next page. Select the target one and click the Next button to continue.

11. The Windows 10/11 setup will begin to download Windows 10/11 and create a Windows 10/11 bootable USB medium. This process will last for a while. But you can keep using your computer during the process.
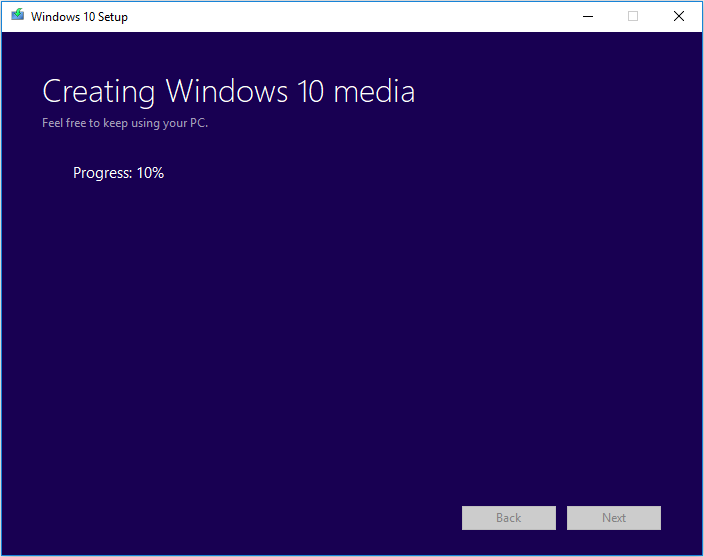
12. When the process ends, you need to click the Finish button to quit this interface.
Now, a Windows 10/11 bootable USB drive is prepared. You need to unplug it from your computer and continue with the next step.
Step 3: Install Windows 10/11 on the Steam Deck
It is not difficult to install Windows 10/11 on your Steam Deck as long as you have a Windows 10/11 bootable USB drive.
Here is how to install Windows on the Steam Deck:
1. Make sure your Steam Deck is powered off. Then, connect the bootable USB drive to your Steam Deck with a USB hub. A USB hub also allow you to control the installation with a mouse and keyboard. So, it is a good choice to use a USB hub.
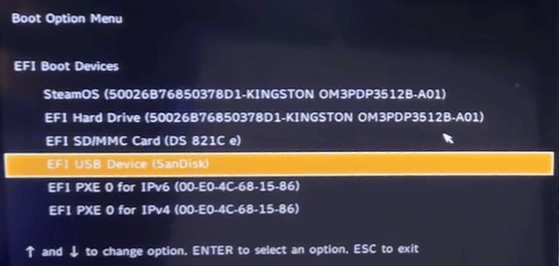
2. Press the Power button and hold the Volume down button at the same time. This can help you enter the boot manager.
3. Select your connected Windows 10 bootable USB drive or Windows 11 bootable USB drive to continue.
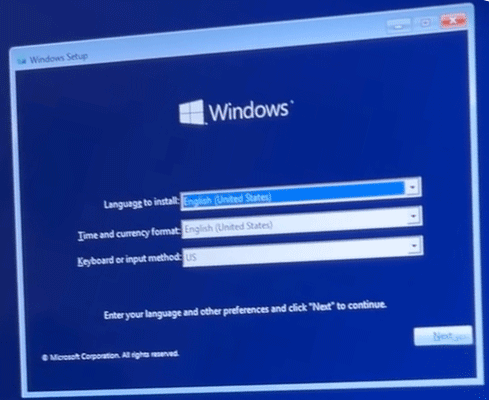
4. When you first see the Windows Setup interface, you need to select the language you want to install, time and currency format, and keyboard or input method according to your needs. If the default selections can satisfy you, you can just click the Next button to continue.
5. On the next page, click the Install now button to continue. Then, the setup process will begin.
You will see the Activate Windows interface. If you have a product key, you can enter it into the box on the page. If you don’t have one or want to activate Windows 10/11 later, you can click the I don’t have a product key link to continue.
6. When you see the next page, select the operating system you want to install and click the Next button to continue.

7. On the next page, check I accept the license terms and click the Next button.
8. Select Custom: Install Windows only (advanced).
9. On the next page, you need to select the partition where you want to install Windows and delete it.
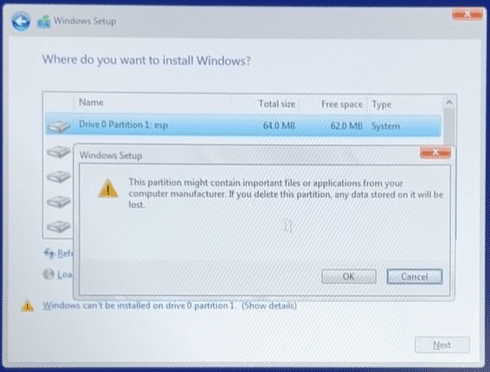
10. Select the partition you have deleted. This partition should show up as Unallocated space. Then, click the Next button to continue.
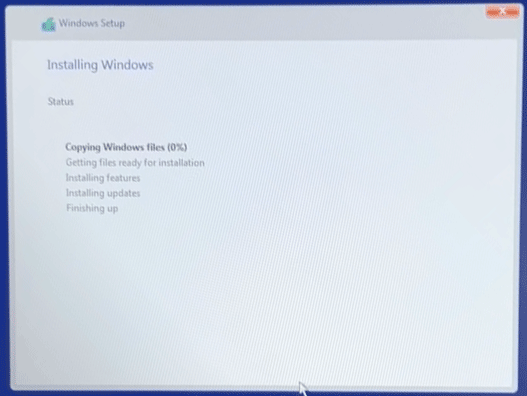
11. Windows Setup will begin to install Windows 10/11 on that drive. You should wait until the process completes.
12. Continue with the Windows 10/11 Out-of-Box Experience like doing it on a Windows computer.
Until now, the Windows 10/11 installation on the Steam Deck is finished. However, to get the best performance, you should install Steam Deck Windows drivers on your device. Valve has officially released Windows drivers for the Steam Deck. You can go to the official site to download and install all needed Steam Deck Windows drivers.
Steam Deck Windows Drivers Download and Install
These drivers are available to download now:
- APU driver: you can click here to download it, then run the setup.exe file to install it on your Steam Deck.
- Wi-Fi driver: you can click here to download it, then run the install.bat file to install it on your Steam Deck.
- Bluetooth driver: you can click here to download it, then run the installdriver.cmd file to install it on your device.
- SD Card reader driver: you can click here to download it, then run the setup.exe file to install it on your Steam Deck.
- Audio drivers: you can click here to download driver 1/2, then right click inf and select Install to install this driver on your device. Or, download driver 2/2, right click NAU88L21.inf and select Install. On Windows 11, you need to right-click the file and select Show more options to use the Install option. Besides, you should get the updated APU driver mentioned above for audio support.
Now, you can experience Windows 10/11 on the Steam Deck and check if it is suitable for you. If you are not satisfied with it, you can reinstall Steam Deck on your device.
Recover Your Lost and Deleted Files on Windows 10/11
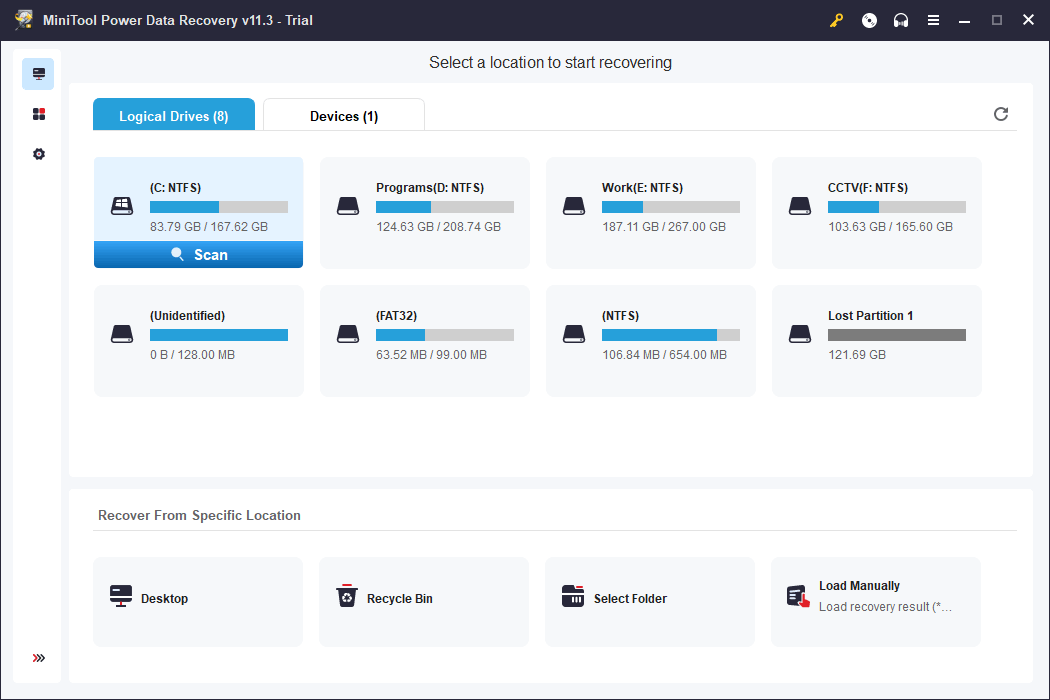
If some of your files get lost or deleted on your Windows device, you can try a free file recovery tool like MiniTool Power Data Recovery to get them back.
This data recovery software is designed to work on all versions of Windows. With it, you can recover many kinds of files like images, videos, music files, documents, and more from your computer internal hard drives, external hard drives, SSDs, memory cards, USB flash drives, pen drives, and more.
This software can work on various situations. For example:
- If you delete some important files by mistake and you have empty Recycle Bin, you can use this software to scan the original drive and recover your data.
- If your storage drive is inaccessible, you can use this software to scan that drive, find your needed files, and recover them.
- If your Windows device is unbootable, you can create a MiniTool Power Data Recovery bootable drive, boot your computer from the drive, then scan, find, and recover your files.
However, you may be not sure if this tool can help you find your files. Here, we recommend you first use the trial edition to scan the target drive and check the scan results.
MiniTool Power Data Recovery TrialClick to Download100%Clean & Safe
After downloading and installing this software on your device, you can open it and select the target drive to scan. After scanning, you can check if you can find your needed files from the scan results. To recover all your needed files, you need to use a full edition.
Make the Steam Deck Run Windows 10/11
Want to run Windows on the Steam Deck? It is not so difficult to do this. You can find a full guide on how to install Windows 10/11 on the Steam Deck. Hope you have a good experience.
Should you have other related issues, you can let us know in the comments. You can also contact us via [email protected].
The Steam Deck is a brilliant device with a killer operating system that can do some amazing things. It is, however, a pain to get non-Steam games working. Some will work with minimal effort, others require dumping nights to get them up and running.
That’s why loads of users are opting to install Windows on Steam Deck. It’s simple, many are already familiar with Windows, and most games should work without needing to mess around with Proton or Wine settings.
Windows does have its own, albeit different, problems. And while we’re certain most users will choose to switch back to SteamOS, having the option to run Windows is cool as heck. Plus with more and more third-party docks with built-in SSDs coming out, knowing how to get Windows up and running on the Steam Deck is well worth checking out.
It’s not as easy as getting EmuDeck running on the Steam Deck, and it takes around two hours to get it all sorted, but the end result is worth it for those who like to push their devices as far as they can.
What You Need
- The Windows 10 or Windows 11 Media Creation Tool
- A microSD card, USB hard drive, or USB thumb drive
- A cable for connecting an external drive to the Steam Deck (optional)
- The Steam Deck drivers from Valve
Before we start it’s worth noting installing Windows on the Steam Deck will completely erase everything on the Steam Deck and the memory card/hard drive.
What that means is any data – including games, save files, or any configurations you may have set up – will be lost if they’re not backed up first.
This is less of an issue for Steam games as reconfiguring a game isn’t that time-consuming and game saves should auto-upload to Steam’s servers. If you’ve got a bunch of Epic or GOG games running via Heroic Launcher, though, the auto-upload save feature is still in beta so it’s best to assume your saves aren’t packed up and need to be (Google Drive is a quick way to get this done).
Step 1: Grab the Windows Installation Media Tool
First, make a decision about which version of Windows you want. We’ve got a breakdown at the bottom of the page listing the pros and cons of each. We’ve installed both versions and the process is the same, so feel free to repeat this guide from the start if you want to see which version is right for you.
When you’ve decided which version you’d prefer head over to the official Windows 10 or Windows 11 webpage and hit “Download now” in the “Create Windows Installation Media” section of the corresponding page.
Upon the completion of the download, open the file either by clicking on the downloaded item (in Chrome) or head to Windows Explorer and locate the file in the “Downloads” folder and click it there instead.
Next, insert your chosen storage device – this will be either a microSD card, a USB hard drive, or a USB thumb drive.
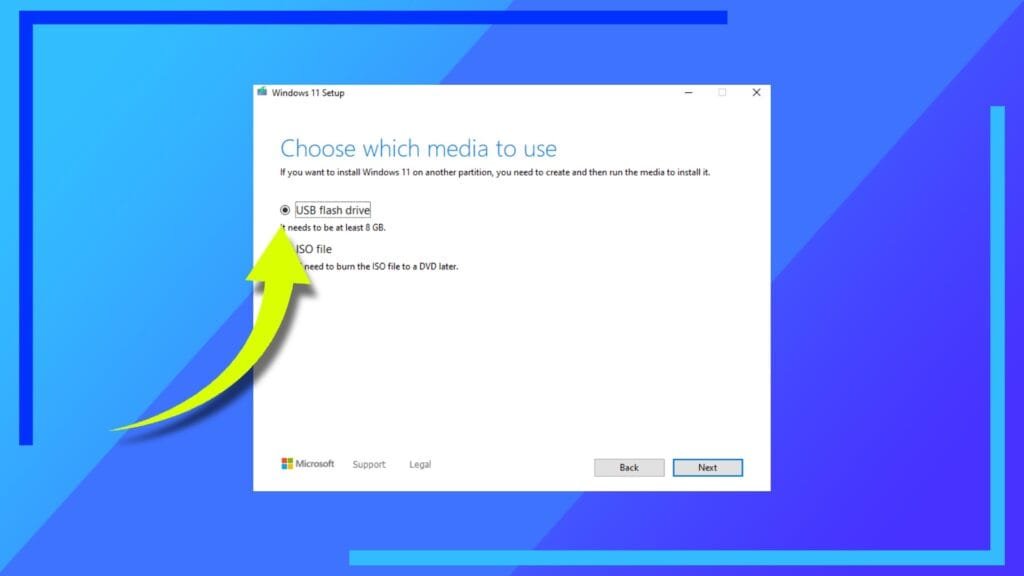
Go back to the Windows Installation Media tool and follow the on-screen instructions until you reach the “Choose media” section (pictured above).
Here we want to select “USB flash drive” and click next. From here navigate to the correct drive and, again, follow the on-screen instructions to complete the first part of the installation process.
What just happened is we’ve created a self-booting version of the Windows 10 or Windows 11 installer. When we move on to plugging it into the Steam Deck, we’ll be able to use that software to install Windows. Neat, right?
This took us about 10 minutes to complete on our PC, so if it takes a while, don’t fret. It’s all good.
- A note about the storage device when you’re done
One thing to keep in mind, when we did it with an SD card, the Windows Installation Media tool made what’s known as a partition on our storage. This meant when we were done, our device had much less storage than it did before (1TB down to 32GB in our case).
If this happens, and that is an ‘if‘, when you’re finished installing Windows on the Steam Deck, or you reach the later point in this guide where you need to grab the Steam Deck drivers, pop the storage device back into the Windows PC and use the little magnifying glass icon in the corner of the screen to search for “DIsk management.”
Load this program and it’ll show your storage. Right-click the storage device and select delete partition. When that’s finished, right-click it once more and select the option to make a simple partition. This time, your partition will be the maximum amount of storage instead of the incorrect smaller size listed.
Note: If neither version of Windows works on your Steam Deck (it’s temperamental like that for some), try using Rufus instead of the creation tool and instead install Windows 10 To Go. That, in most cases, fixes the compatibility issues.
Step 2: Boot the Deck Bios and Start Installation
Safely eject your storage device and connect it to the Steam Deck. If you’re using a microSD card, plug it in via the bottom of the Deck. If you’ve got a USB cable to connect an external device, hook that up now.
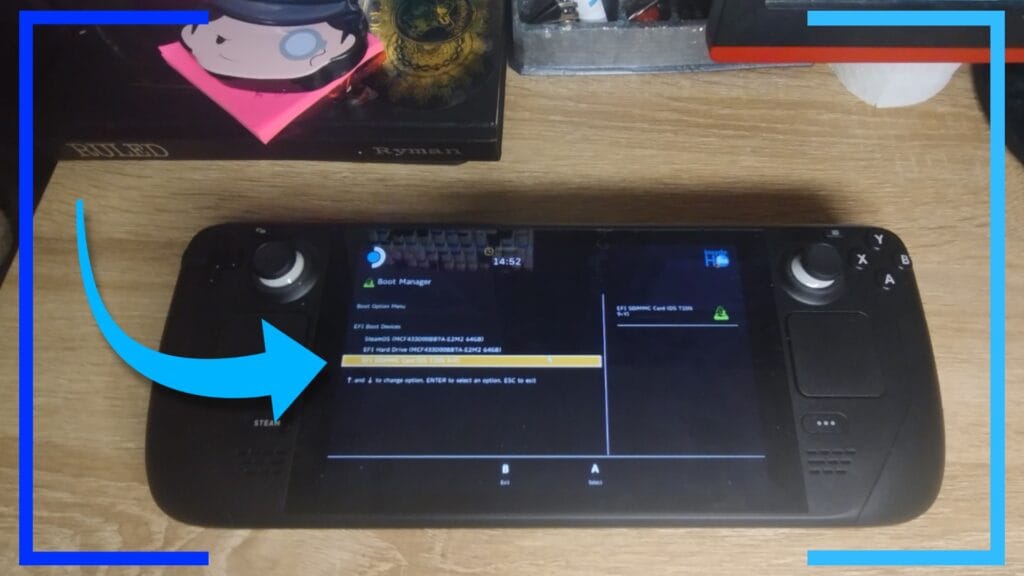
With the Steam Deck powered off, hold down the volume down button (the left volume button). Next, tap the power button to turn it on while keeping the left volume button held down.
After a few seconds, the Steam Deck will boot into its BIOS. From here you should have several options. Ignore them all except for the one that shows your storage device. Click on that device and the installation process will begin.
This is almost the point of no return, so again, if you haven’t backed up any data, now’s the time to do it.
Step 3: Install Windows
Installing Windows on the Steam Deck is all fairly straightforward. If you’ve ever bought a PC and had to set it up, it’s the same process. Just follow the on-screen instructions and you’ll be done in no time.
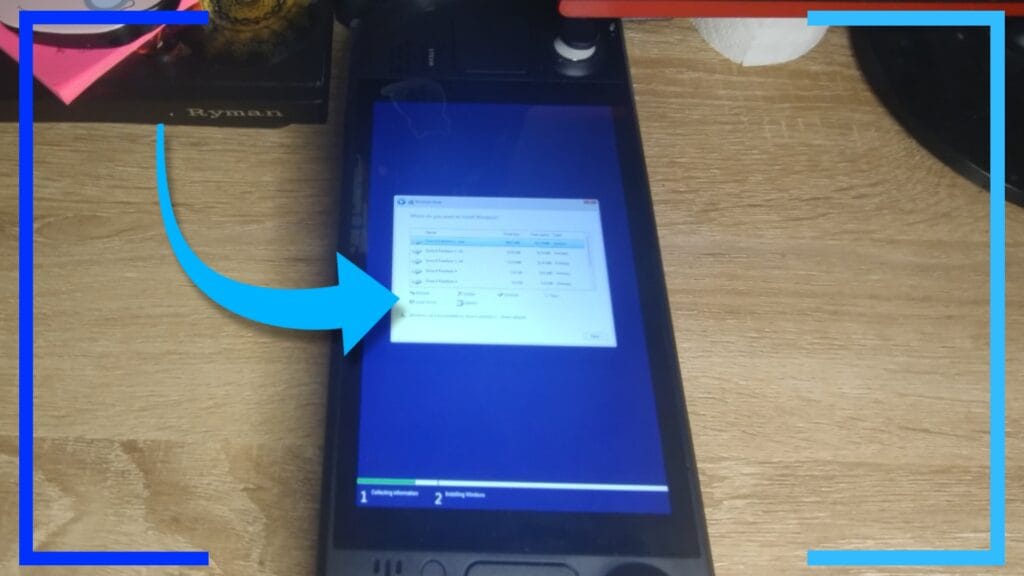
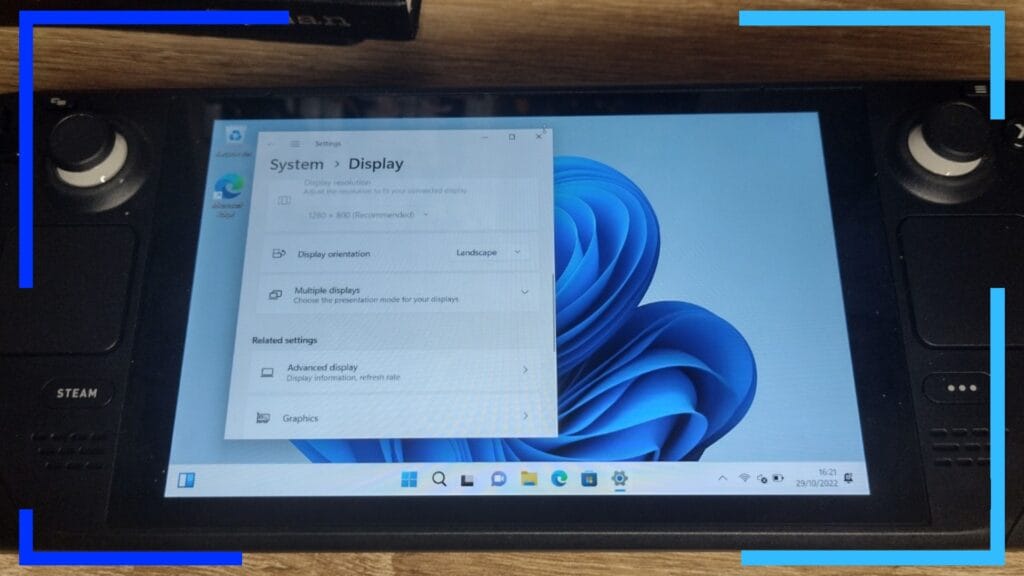
Just so you don’t get a scare, you’ll be doing this whole process in portrait mode. That means you’ll be using the Steam Deck the wrong way round – very much like a tablet. We can’t fix that until the new operating system is installed but worry not, we will be fixing it later.
- Where to install the operating system to
One area that is worth covering is the section where Windows asks where to install the operating system to. Here you’ll have a host of different drives and it’s easy to get a little lost.
Don’t panic. It’s fairly simple once you know what to click.
All we need to do here – the actual point of no return – is select each of the sections and click “Delete” on all of them. That’s it.
The Steam Deck is partitioned into several different sections, so what we’re deleting here is the operating system, Linux files, and recovery options. In its place, Windows will modify the internal storage so it’s all ready for Windows instead of Linux.
Don’t forget, although we’ve deleted the Steam Deck recovery options, you can still get SteamOS back at a later date (outlined at the bottom of this article).
After that’s done, click “Next” and follow the on-screen instructions.
Eventually, you’ll get to a point where Windows leaves you alone and installs everything that’s needed. If this takes some time, don’t worry. It’s meant to.
Step 4: Change From Portrait to Landscape
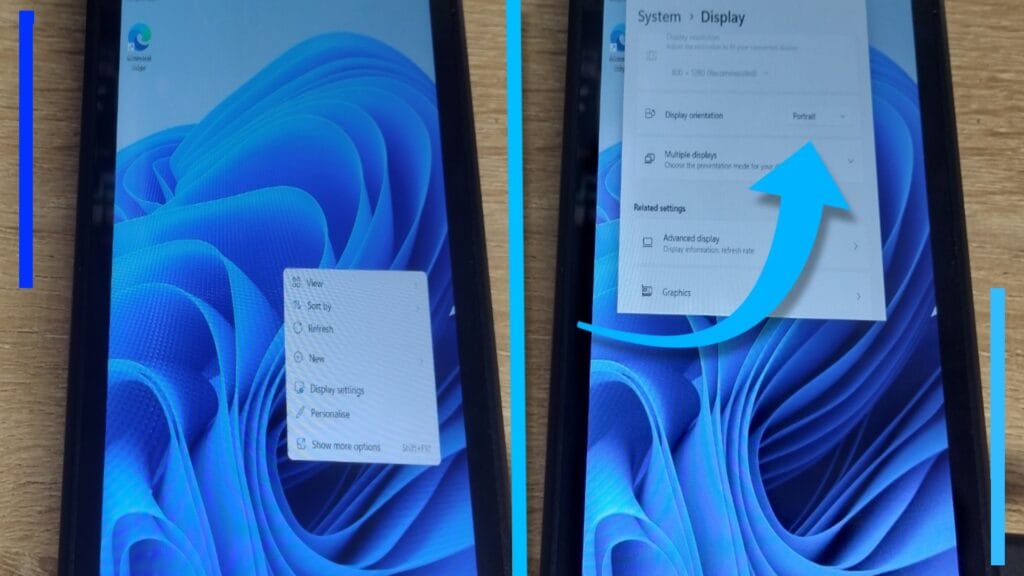
When the installation of Windows on the Steam Deck is complete, the first thing you’ll notice is the screen is still the wrong way round. Here’s where we fix that. At last!
Once the desktop loads, hold down a finger on the desktop background. After half a second a bunch of options will pop up (we’ve manually done a right-click). See where it says “Display settings”? Click on that, then use your finger to scroll down to where it says “Portrait” and change it to “Landscape.”
At long last, your Steam Deck is now back to looking like a Steam Deck. Or Windows Deck?
Step 5: Grab and Install Steam Deck Drivers
You’re nearly done. All we need to do now is grab the drivers we need to let Windows interact with the different sections of the Steam Deck.
If you installed Windows 11, and your wi-fi is working, you could just hop online and download the files directly to the Deck.
For Windows 10 users, chances are your wi-fi isn’t up and running right now so you need the drivers to make it all work. If that’s you, read on.
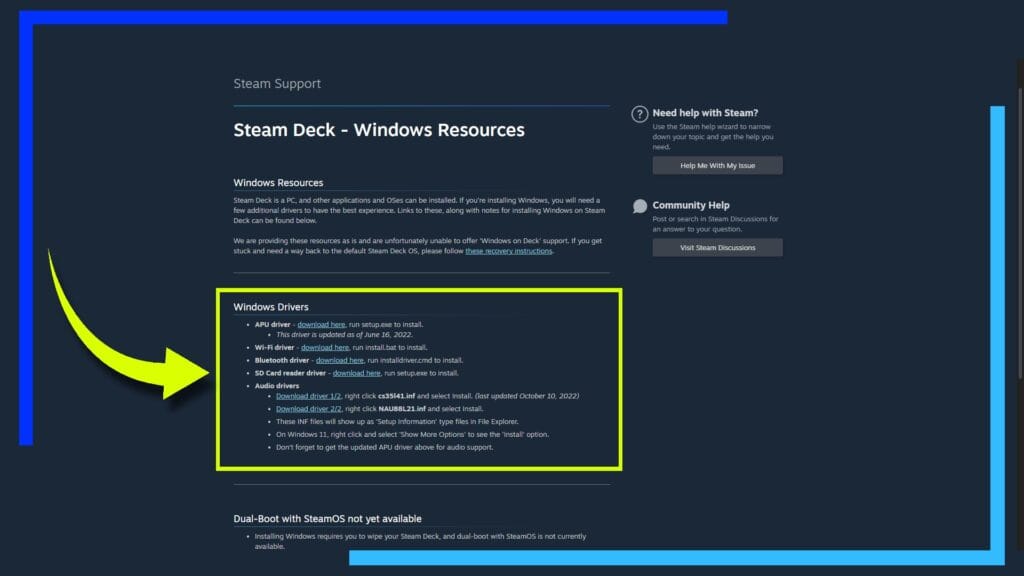
Grab your storage device and plug it back into a Windows PC. Open up your Internet browser and go to the Valve Steam Deck Resources website and download the following six files:
- APU driver
- Wi-Fi driver
- Bluetooth driver
- SD Card reader driver
- Audio driver 1: cs35l41.inf
- Audio drive 2: NAU88L21.inf
Once they’re downloaded, transfer them over to your storage device and return it back to the Steam Deck.
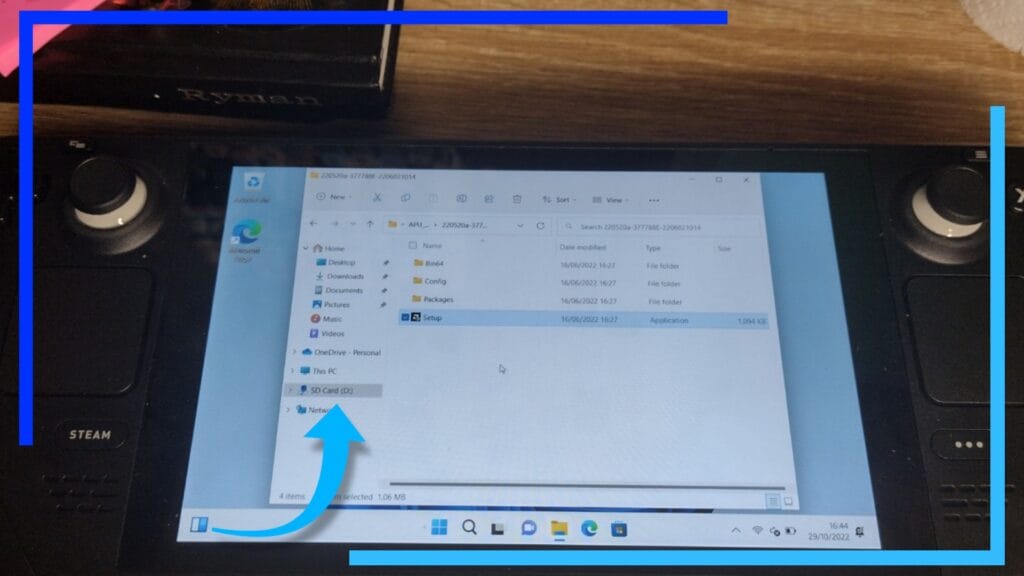
Boot up the Deck and head into Windows Explorer to locate the files and install each of them as explained below:
- APU driver: Click “setup.exe” to install
- Wi-Fi drive: Click “install.bat” to install
- Bluetooth driver: Click “installdriver.cmd” to install
- SD Card reader driver: Click “setup.exe” to install
- Cs35l41.inf: Right-click and select “install”
- NAU88L21.inf: Right-click and select “install”
Once they’re all installed, power down the Steam Deck or restart it from the Windows icon in the bottom-left corner (or center on Windows 11).
With that you’re completely done and free to start installing Steam, the Epic Games Store, or even the Xbox 360 emulator Xenia.
Although you’re free to go, there are some fairly-important tweaks we’d recommend to make sure the system runs as well as it can.
Extra: Windows Tweaks to Make Life Easier
- Stop Edge from Running in the Background (Important)
Windows is a massive bloat fest. That means that there are not only a host of useless apps you can delete in the add/remove programs section, but there are also some things that are sure to drain the battery faster.
The Edge browser isn’t so much of an issue when you’re using a PC as it’s plugged into a power source. When it’s a mobile device like the Steam Deck, that drain isn’t wanted.
To stop Edge from running in the background, open up Edge and click on the three dots “…” From here select “System and Performance” from the left side of the screen, then navigate to “continue running background extensions and apps when Microsoft Edge is closed.” Yes, it’s that long.
To the right of this setting should be a toggle. Hit it so it’s off and Edge won’t drain your battery anymore.
- Change Scaling
By default, the Windows Steam Deck will set the screen to 125%. This does make everything easier to read but will throw up problems when playing games.
To fix this, right-click on the desktop and choose “Display settings”. It’s like how we changed the screen from portrait to landscape. Under “Scale and Layout,” click the drop-down box and change “125%” to “100%”.
- Enable the On-Screen Keyboard
You may have noticed the on-screen keyboard doesn’t pop up as it does in SteamOS. Annoying, we know, so let’s fix that.
Click on the Windows icon and navigate to “Settings.” Under the “Time and Language” tab on Windows 11 or “Ease of use” then “Keyboard” on Windows 10.
Once inside, there should be the option “Show the touch keyboard when there’s no keyboard attached.” Click that and the virtual keyboard can now be used with the help of a little button near the clock in the bottom-right corner.
- Disable Hibernation
Windows has a handy option to enable hibernation to conserve power. This doesn’t work as it does on Steam Deck and may very well lead to errors (known colloquially as the “blue screen of death”).
To shut this feature off, open up the start menu from the Windows icon and navigate to “Run Command Prompt”. Don’t left-click it, though. Right-click it and select “Run as administrator.”
A new window will open. In it type the following code below or open this page on the Steam Deck and copy and paste it into the window without the quotation marks.
“PowerCfg -hibernate off”
Hit enter and that will disable hibernation.
Extra Software Worth Considering
Now you’re legit free to go off and play with your brand new Windows Deck. There is a piece of software we really recommend grabbing first though.
- Power Control Panel
Although you can change video game settings in-game, there are still a few options missing from the Deck that makes it great. One of those features is being able to change the power consumption or the refresh rate on the fly.
That’s where Power Control Panel comes in. While this doesn’t work exactly like its equivalent does on the Steam Deck, it still gives users the option to limit the power intake and change the refresh rate and is the next best thing.
How to Reinstall SteamOS on Steam Deck
If you decide Windows isn’t for you, switching back to SteamOS from Windows is nice and simple.
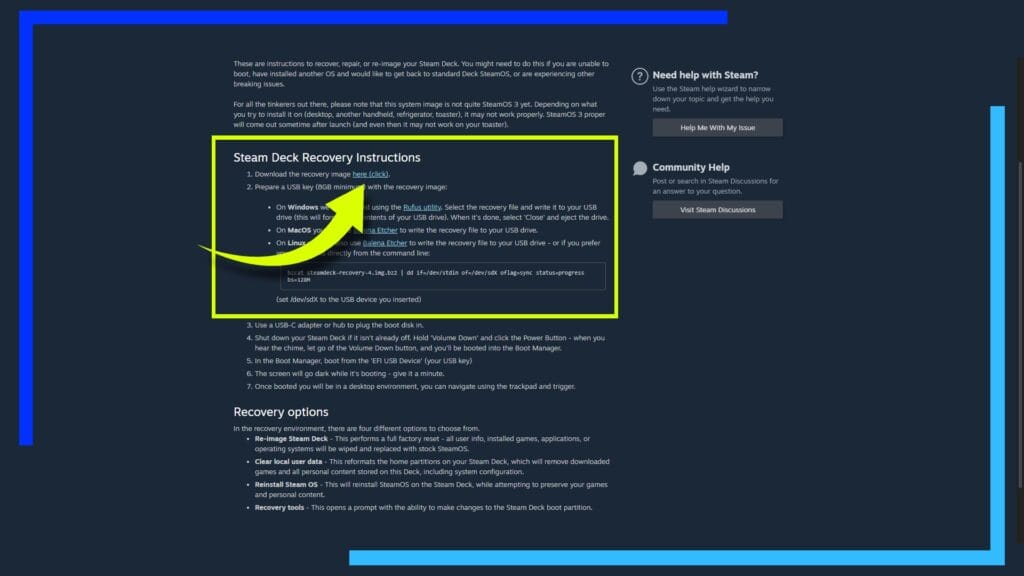
First head over to the Steam Deck recovery website and download the “recovery image.”
Next download Rufus. That program will let you write the Steam Deck recovery image to an SD card or external drive for use with the Steam Deck.
When Rufus has finished creating a bootable file, plug the drive or SD card into the Steam Deck (this sounding familiar?).
With SteamDeck power off, hold down the “Volume down” button and while keeping it pressed, tap the power button. This will bring up the BIOS. As we did when we installed Windows on Steam Deck, select the option pointing to the memory card and that’ll begin the Steam Deck recovery process and reinstall SteamOS back onto the Deck.
Easy, right?
How Windows Handles on Steam Deck
Both SteamOS and Windows have their own set of issues. Installing Windows on the Deck is essentially trading one set of problems for another. The Steam Deck can be a pain when trying to install games from outside Steam, and Windows can be a pain when trying to use features that make SteamOS so great.
Windows is also much louder. The fan will whir at the smallest task and it’s very annoying. Though the above-mentioned Power Control Panel does help with that.
If you’re after a smooth experience, stick with SteamOS. Windows has a habit of randomly crashing when something doesn’t like the Steam Deck hardware. There are also random quirks we couldn’t understand.
Case in point, we installed the AMD software on Windows 11. It worked. Hurray! Then when we reinstalled Windows 11 later to test something else out for this guide, installing the AMD software kept crashing the Deck. As we say, weird quirks.
When Windows works, it’s great, and being able to install non-Steam games without having to faff around with Proton settings is so much more user-friendly. But as with how SteamOS is a pain when you move outside of SteamOS and into Linux territory, Windows is a pain when it’s trying to make sense of hardware it wasn’t designed for or when it fights the Steam app for control.
The good news is, if Windows 10 or Windows 11 isn’t for you, you can easily reinstall SteamOS back to the Deck. So long as you follow the guide and don’t veer off and start clicking random things, you can switch back to SteamOS in about 20 minutes.
Don’t Install Windows to an SD Card
No, don’t install Windows 10 or 11 to an SD card. Ever. Windows 11 runs horribly from an SD card, and while Windows 10 runs fine from an SD card, the amount of processes per minute each operating system performs isn’t good for memory cards. They simply weren’t designed to be put under that constant level of stress. Install games to the SD card, sure, but not the operating system.
If you don’t want to install Windows to the internal Steam Deck SSD/eMMc drive, grab an external hard drive and hook it up via USB. Just don’t use an SD card. Even more so if it’s an expensive one.
Should You Dual Boot Between SteamOS and Windows?
It’s possible to dual boot the Steam Deck between SteamOS and Windows, but we won’t be covering how to do that here for one simple reason: It’s not officially supported yet.
Dual booting allows the user to change which operating system the Deck loads into each time. This is great as you can play your Steam games in SteamOS and games designed for Windows via Windows 10 or Windows 11.
The problem right now is it’s not officially supported by Value and won’t be until we get SteamOS version 3.0.
Now, lots of users have successfully implemented dual boot and it appears to work well. The problem we have is when Valve eventually adds support, how will that impact people who already have it set up? Will the update break everything? Chances are it won’t, but that’s not a chance we’re comfortable taking right now.
Plus with how easy it is to install Windows on Deck and then reinstall SteamOS when you want to switch back, it’s not worth the risk.
Steam Deck: Windows 10 vs Windows 11
Both versions of Windows will run on the Steam Deck but both have their own kinks.
Overall, our testing showed better gaming performance on Windows 11. Not only that, Windows 11 also can use certain features of the Steam Deck without installing any drivers, like being able to access the Internet during setup. That last point isn’t a major factor as we have the drivers to install it manually, but it is a stylish example of what Windows 11 is capable of.
Windows 11 is also the current operating system, and while Windows 10 is still supported, we don’t know how long Windows 10 support will last. It’s future-proofing on a small scale.
Windows 11 may be the better choice for gaming, but if you don’t want your fan to constantly spin even when performing the most basic tasks, we found Windows 10 to be much quieter by comparison.
It’s hard to say which version is better for the Steam Deck because there are so many differing factors. Gaming performance is great on Windows 10, but Windows 11 was slightly better. We also found that Windows 10 had fewer issues than WIndows 11.
Also, the pop-up keyboard in Windows 11 is dire. It’s truly abysmal. Even when it’s scaled correctly it’s a massive step back from the version we had in Windows 10.
What it all comes down to is this: If you want the easy life, go with Windows 10. If you want to push the Steam Deck to its fullest to get the best visuals and speeds, go with Windows 11.