
Windows 10 comes with a number of built-in universal apps such as Start menu, Cortana, Microsoft Edge browser, Xbox, Microsoft store, photos, paint 3D, one-note, skype etc. These are default build-in apps that come pre-installed while installing upgrade to windows 10. Sometimes after a recent windows 10 upgrade, you may notice certain apps missing. Or after installing the latest updates, Apps does not perform properly, Crashes, or Not respond. Or for some others number of apps get broken and not work properly.
In Such Causes, we recommend resetting the app following the steps below.
- Press Windows + I keyboard shortcut to open the Settings app,
- Click on apps then Apps and features,
- Now select the problematic app and click on Advanced options
- Scroll down and click on the reset option,
- Click reset again to reset the app to its default setup.
But if the reset option didn’t fix the problem, Or apps missing after Windows 10 1903 Upgrade, Here is how to restore removed apps on windows 10
Contents
- 1 How To Re-register default Windows apps
- 1.1 Reinstall All Built-in Apps in Windows 10
- 1.2 Reinstall a Specific Built-in App in Windows 10
- 2 Reset your PC to its default settings
How To Re-register default Windows apps
You Can Re-install or Re-register Build-in Windows apps by performing some command line on Windows PowerShell. Here step by step guide to re-install a particular default app or all the default built-in apps on your Windows 10 computer using PowerShell commands.
Reinstall All Built-in Apps in Windows 10
To Re-install All Built-in Windows apps
- Open the Windows PowerShell with administrative privileges.
- You can do this by press win + X and select PowerShell ( admin ).
- Now copy/paste the command below on PowerShell and hit the enter key to execute the same.
Get-AppXPackage | Foreach {Add-AppxPackage -DisableDevelopmentMode -Register “$($_.InstallLocation)\AppXManifest.xml”}
It then tries to install all of the default apps on Windows 10 for the account you are currently logged in to. Or you can use the below command to Re-register Windows Apps for All Users :
Get-AppxPackage -Allusers | Foreach {Add-AppxPackage -register “$($_.InstallLocation)\appxmanifest.xml” -DisableDevelopmentMode}
If one of the default apps is already installed on the computer, then you get shown the name of it in red. Simply Ignore the Red lines after complete the command Restart windows to get a fresh start. Now check apps related problems get resolved.
Reinstall a Specific Built-in App in Windows 10
If you Getting problems with any specific windows app and others working properly then no need to Re-register / Reinstall All apps by performing above command. Check the below commands to Re-register only a Specific windows app.
- Again open PowerShell (admin) by press Win + X and select.
- On the Administrator PowerShell prompt copy/paste command below and hit enter to execute the same.
- 3D Builder:
PowerShell -ExecutionPolicy Unrestricted -Command “& {$manifest = (Get-AppxPackage *3DBuilder*).InstallLocation + ‘\AppxManifest.xml’ ; Add-AppxPackage -DisableDevelopmentMode -Register $manifest}”
- Alarms & Clock:
PowerShell -ExecutionPolicy Unrestricted -Command “& {$manifest = (Get-AppxPackage *WindowsAlarms*).InstallLocation + ‘\AppxManifest.xml’ ; Add-AppxPackage -DisableDevelopmentMode -Register $manifest}”
- App Connector:
PowerShell -ExecutionPolicy Unrestricted -Command “& {$manifest = (Get-AppxPackage *AppConnector*).InstallLocation + ‘\AppxManifest.xml’ ; Add-AppxPackage -DisableDevelopmentMode -Register $manifest}”
- Calculator:
PowerShell -ExecutionPolicy Unrestricted -Command “& {$manifest = (Get-AppxPackage *WindowsCalculator*).InstallLocation + ‘\AppxManifest.xml’ ; Add-AppxPackage -DisableDevelopmentMode -Register $manifest}”
- Calendar and Mail:
PowerShell -ExecutionPolicy Unrestricted -Command “& {$manifest = (Get-AppxPackage *windowscommunicationsapps*).InstallLocation + ‘\AppxManifest.xml’ ; Add-AppxPackage -DisableDevelopmentMode -Register $manifest}”
- Camera:
PowerShell -ExecutionPolicy Unrestricted -Command “& {$manifest = (Get-AppxPackage *WindowsCamera*).InstallLocation + ‘\AppxManifest.xml’ ; Add-AppxPackage -DisableDevelopmentMode -Register $manifest}”
- Candy Crush Soda Saga:
PowerShell -ExecutionPolicy Unrestricted -Command “& {$manifest = (Get-AppxPackage *CandyCrushSodaSaga*).InstallLocation + ‘\AppxManifest.xml’ ; Add-AppxPackage -DisableDevelopmentMode -Register $manifest}”
- Connect:
PowerShell -ExecutionPolicy Unrestricted -Command “& {$manifest = (Get-AppxPackage *PPIProjection*).InstallLocation + ‘\AppxManifest.xml’ ; Add-AppxPackage -DisableDevelopmentMode -Register $manifest}”
- Contact Support:
PowerShell -ExecutionPolicy Unrestricted -Command “& {$manifest = (Get-AppxPackage *ContactSupport*).InstallLocation + ‘\AppxManifest.xml’ ; Add-AppxPackage -DisableDevelopmentMode -Register $manifest}”
- Cortana:
PowerShell -ExecutionPolicy Unrestricted -Command “& {$manifest = (Get-AppxPackage *Windows.Cortana*).InstallLocation + ‘\AppxManifest.xml’ ; Add-AppxPackage -DisableDevelopmentMode -Register $manifest}”
- Feedback Hub:
PowerShell -ExecutionPolicy Unrestricted -Command “& {$manifest = (Get-AppxPackage *WindowsFeedbackHub*).InstallLocation + ‘\AppxManifest.xml’ ; Add-AppxPackage -DisableDevelopmentMode -Register $manifest}”
- Get Office:
PowerShell -ExecutionPolicy Unrestricted -Command “& {$manifest = (Get-AppxPackage *MicrosoftOfficeHub*).InstallLocation + ‘\AppxManifest.xml’ ; Add-AppxPackage -DisableDevelopmentMode -Register $manifest}”
- Get Started:
PowerShell -ExecutionPolicy Unrestricted -Command “& {$manifest = (Get-AppxPackage *GetStarted*).InstallLocation + ‘\AppxManifest.xml’ ; Add-AppxPackage -DisableDevelopmentMode -Register $manifest}”
- Mail and Calendar:
PowerShell -ExecutionPolicy Unrestricted -Command “& {$manifest = (Get-AppxPackage *windowscommunicationsapps*).InstallLocation + ‘\AppxManifest.xml’ ; Add-AppxPackage -DisableDevelopmentMode -Register $manifest}”
- Maps:
PowerShell -ExecutionPolicy Unrestricted -Command “& {$manifest = (Get-AppxPackage *WindowsMaps*).InstallLocation + ‘\AppxManifest.xml’ ; Add-AppxPackage -DisableDevelopmentMode -Register $manifest}”
- Messaging:
PowerShell -ExecutionPolicy Unrestricted -Command “& {$manifest = (Get-AppxPackage *Messaging*).InstallLocation + ‘\AppxManifest.xml’ ; Add-AppxPackage -DisableDevelopmentMode -Register $manifest}”
- Microsoft Edge:
PowerShell -ExecutionPolicy Unrestricted -Command “& {$manifest = (Get-AppxPackage *MicrosoftEdge*).InstallLocation + ‘\AppxManifest.xml’ ; Add-AppxPackage -DisableDevelopmentMode -Register $manifest}”
- Microsoft Solitaire Collection:
PowerShell -ExecutionPolicy Unrestricted -Command “& {$manifest = (Get-AppxPackage *MicrosoftSolitaireCollection*).InstallLocation + ‘\AppxManifest.xml’ ; Add-AppxPackage -DisableDevelopmentMode -Register $manifest}”
- Money:
PowerShell -ExecutionPolicy Unrestricted -Command “& {$manifest = (Get-AppxPackage *BingFinance*).InstallLocation + ‘\AppxManifest.xml’ ; Add-AppxPackage -DisableDevelopmentMode -Register $manifest}”
- Movies & TV:
PowerShell -ExecutionPolicy Unrestricted -Command “& {$manifest = (Get-AppxPackage *ZuneVideo*).InstallLocation + ‘\AppxManifest.xml’ ; Add-AppxPackage -DisableDevelopmentMode -Register $manifest}”
- News:
PowerShell -ExecutionPolicy Unrestricted -Command “& {$manifest = (Get-AppxPackage *BingNews*).InstallLocation + ‘\AppxManifest.xml’ ; Add-AppxPackage -DisableDevelopmentMode -Register $manifest}”
- OneNote:
PowerShell -ExecutionPolicy Unrestricted -Command “& {$manifest = (Get-AppxPackage *Office.OneNote*).InstallLocation + ‘\AppxManifest.xml’ ; Add-AppxPackage -DisableDevelopmentMode -Register $manifest}”
- Paint 3D:
PowerShell -ExecutionPolicy Unrestricted -Command “& {$manifest = (Get-AppxPackage *MSPaint*).InstallLocation + ‘\AppxManifest.xml’ ; Add-AppxPackage -DisableDevelopmentMode -Register $manifest}”
- People:
PowerShell -ExecutionPolicy Unrestricted -Command “& {$manifest = (Get-AppxPackage *People*).InstallLocation + ‘\AppxManifest.xml’ ; Add-AppxPackage -DisableDevelopmentMode -Register $manifest}”
- Phone:
PowerShell -ExecutionPolicy Unrestricted -Command “& {$manifest = (Get-AppxPackage *CommsPhone*).InstallLocation + ‘\AppxManifest.xml’ ; Add-AppxPackage -DisableDevelopmentMode -Register $manifest}”
- Phone Companion:
PowerShell -ExecutionPolicy Unrestricted -Command “& {$manifest = (Get-AppxPackage *WindowsPhone*).InstallLocation + ‘\AppxManifest.xml’ ; Add-AppxPackage -DisableDevelopmentMode -Register $manifest}”
- Photos:
PowerShell -ExecutionPolicy Unrestricted -Command “& {$manifest = (Get-AppxPackage *Photos*).InstallLocation + ‘\AppxManifest.xml’ ; Add-AppxPackage -DisableDevelopmentMode -Register $manifest}”
- Settings:
PowerShell -ExecutionPolicy Unrestricted -Command “& {$manifest = (Get-AppxPackage *immersivecontrolpanel*).InstallLocation + ‘\AppxManifest.xml’ ; Add-AppxPackage -DisableDevelopmentMode -Register $manifest}”
- Skype:
PowerShell -ExecutionPolicy Unrestricted -Command “& {$manifest = (Get-AppxPackage *SkypeApp*).InstallLocation + ‘\AppxManifest.xml’ ; Add-AppxPackage -DisableDevelopmentMode -Register $manifest}”
- Sports:
PowerShell -ExecutionPolicy Unrestricted -Command “& {$manifest = (Get-AppxPackage *BingSports*).InstallLocation + ‘\AppxManifest.xml’ ; Add-AppxPackage -DisableDevelopmentMode -Register $manifest}”
- Sticky Notes:
PowerShell -ExecutionPolicy Unrestricted -Command “& {$manifest = (Get-AppxPackage *MicrosoftStickyNotes*).InstallLocation + ‘\AppxManifest.xml’ ; Add-AppxPackage -DisableDevelopmentMode -Register $manifest}”
- Microsoft Store:
PowerShell -ExecutionPolicy Unrestricted -Command “& {$manifest = (Get-AppxPackage *microsoftStore*).InstallLocation + ‘\AppxManifest.xml’ ; Add-AppxPackage -DisableDevelopmentMode -Register $manifest}”
- Sway:
PowerShell -ExecutionPolicy Unrestricted -Command “& {$manifest = (Get-AppxPackage *Office.Sway*).InstallLocation + ‘\AppxManifest.xml’ ; Add-AppxPackage -DisableDevelopmentMode -Register $manifest}”
- Twitter:
PowerShell -ExecutionPolicy Unrestricted -Command “& {$manifest = (Get-AppxPackage *Twitter*).InstallLocation + ‘\AppxManifest.xml’ ; Add-AppxPackage -DisableDevelopmentMode -Register $manifest}”
- Voice Recorder:
PowerShell -ExecutionPolicy Unrestricted -Command “& {$manifest = (Get-AppxPackage *WindowsSoundRecorder*).InstallLocation + ‘\AppxManifest.xml’ ; Add-AppxPackage -DisableDevelopmentMode -Register $manifest}”
- Weather:
PowerShell -ExecutionPolicy Unrestricted -Command “& {$manifest = (Get-AppxPackage *BingWeather*).InstallLocation + ‘\AppxManifest.xml’ ; Add-AppxPackage -DisableDevelopmentMode -Register $manifest}”
- Xbox:
PowerShell -ExecutionPolicy Unrestricted -Command “& {$manifest = (Get-AppxPackage *XboxApp*).InstallLocation + ‘\AppxManifest.xml’ ; Add-AppxPackage -DisableDevelopmentMode -Register $manifest}”
- Xbox One SmartGlass:
PowerShell -ExecutionPolicy Unrestricted -Command “& {$manifest = (Get-AppxPackage *XboxOneSmartGlass*).InstallLocation + ‘\AppxManifest.xml’ ; Add-AppxPackage -DisableDevelopmentMode -Register $manifest}”
Note: windows add new apps regularly. So may the app you are getting problem not listed above then you can follow the below steps to re-register the specific app.
On Admin PowerShell type Get-AppxPackage -AllUsers | Select Name, PackageFullName and hit the enter key. This will display available packages (for installation) on your computer. look for the App that you want to re-register (re-install) for the current user. ( for ex we want to re-install Skype app )
Here first copy the package name by select and press Ctrl + C and paste on notepad. ( for ex: Microsoft.SkypeApp_11.8.204.0_x64__kzf8qxf38zg5c ) and the perform command below.
Get-AppXPackage | Foreach {Add-AppxPackage -DisableDevelopmentMode -Register “C:\Program Files\WindowsApps\PackageFullName\appxmanifest.xml” -DisableDevelopmentMode
Note: Replace the package name which you copied from PowerShell. This means the command would be like bellow
Get-AppXPackage | Foreach {Add-AppxPackage -DisableDevelopmentMode -Register “C:\ProgramFiles\WindowsApps\Microsoft.SkypeApp_11.8.204.0_x64__kzf8qxf38zg5c\appxmanifest.xml” -DisableDevelopmentMode
Press enter and wait until executing the command, After that Restart windows and check the specific which you recently re-install working properly.
Reset your PC to its default settings
If the above solutions didn’t fix the problem then Reset this PC is probably a good fix that reinstalls Windows 10 without affecting your files and folder.
- Open Settings.
- Click on Update & Security.
- Click on Recovery.
- Under “Reset this PC,” click the Get Started button.
Select the Keep may files options. and follow on-screen instructions to reset Windows 10 Without effecting files.
Did this help to reinstall preinstalled apps for windows 10? Let us know on the comments below, also read:
- How to Remove Activate Windows 10 watermark permanently
- Windows 10 laptop won’t wake up from sleep mode? Here how to fix it
- Fix error status 0xc000012f Bad Image Error on Windows 10
- Fix This App Has Been Blocked For Your Protection in Windows 10
- How To Update, Re-install, Roll Back Device Drivers in Windows 10
Привет друзья! Если у вас не запускается или некорректно работает какое-либо из встроенных в Windows 10 приложений: Магазин (Windows Store), Календарь, Музыка, Карты, Почта, Погода, Новости и другие, то самое распространённое на сегодняшний день решение, это просто переустановить проблемное приложение с помощью командной оболочки Windows PowerShell, что довольно трудно для начинающего пользователя. Но спешу обрадовать вас, в новейшей сборке Windows 10 build 1607 переустановка проблемного приложения происходит очень просто в окне системных параметров операционной системы.
Как переустановить стандартные приложения в Windows 10
Предлагаю для примера переустановить на моём ноутбуке магазин приложений для Windows 10 (Windows Store). С данным приложением многие пользователи часто испытывают проблемы, оно то не хочет открываться, а иногда наоборот аварийно закрывается во время работы и спасает только перезагрузка.
Откройте меню «Пуск» и щёлкните левой мышью на кнопке «Параметры»

«Система»
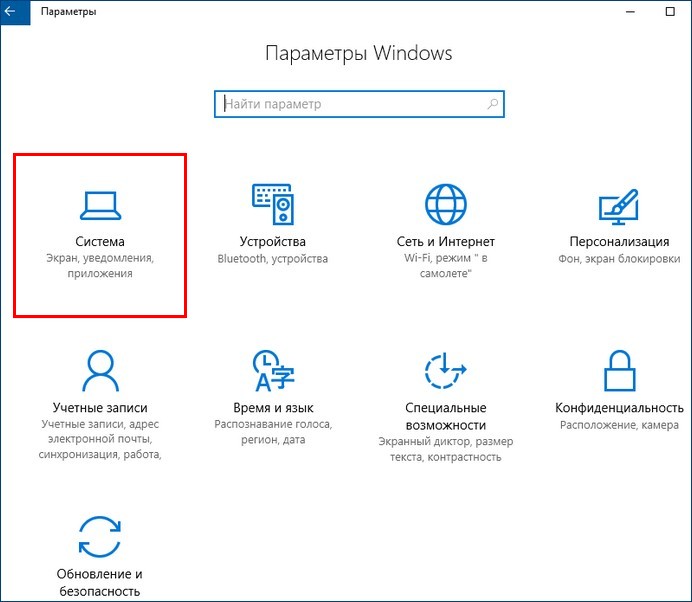
«Приложения и возможности»

Выберите проблемное приложение и щёлкните на нём левой мышью.

«Дополнительные параметры»

Жмите на кнопку «Сбросить»

Ещё раз жмём «Сбросить»
Происходит сброс всех параметров выбранного приложения.

Видим галочку рядом с кнопкой сброса, это значит, что операция успешно завершена.
Теперь приложение заработает должным образом!


Some people do not like the universal apps installed by default In Windows 10 or Windows 11 and want to get rid of them. They can manually uninstall most of them using the Settings app or PowerShell. Apps like Calendar, Mail, Camera, Photos, or Candy Crush Soda Saga can be gone from a Windows 10 or Windows 11 computer in no time. So how do you get all the default apps back when you learn that you need them or when they are broken and no longer work correctly? In this tutorial, we show you how to reinstall and re-register all the default apps shipped with Windows 10 or Windows 11. Don’t worry, this is a straightforward process. Let’s get started:
NOTE: If you’ve arrived here looking for ways to uninstall Windows apps with PowerShell, check this guide instead: How to uninstall Windows apps with PowerShell.
Things you should know about reinstalling Windows apps with PowerShell
The steps in this tutorial help you reinstall all the default apps from Windows 10 or Windows 11, including the Microsoft Store. Furthermore, they also allow you to reinstall Windows apps without the Store. However, note that everything we show is tested and confirmed to work only in the latest versions of Windows 10 and in Windows 11.
If you have an older version of Windows 10, you can follow the steps we show for getting the built-in apps back, but you might not be able to also re-install the Microsoft Store. The only proven way to get the Microsoft Store back in older versions of Windows 10 to then be able to install other apps is to reinstall Windows 10.
Step 1. Open PowerShell as Administrator
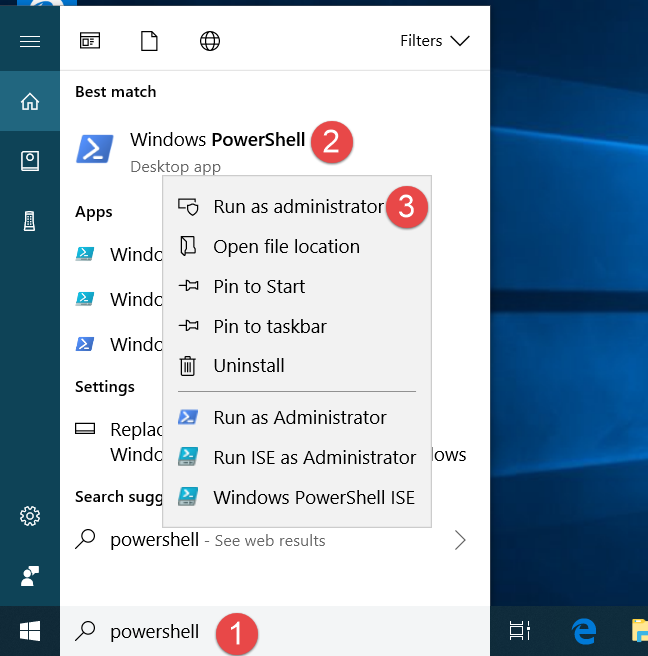
First of all, you must open PowerShell with administrative rights. The fastest way to do that in Windows 10 is to use the search bar on the taskbar. Type “powershell,” and then click or tap on “Run as administrator” on the panel to the right of the Windows PowerShell search result.
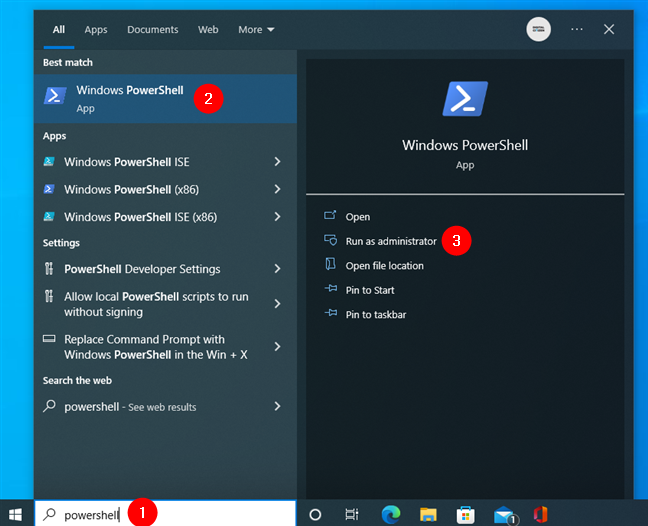
Open Windows PowerShell in Windows 10 as admin
If you’re using Windows 11, press the Search button on the taskbar and type “powershell” in the search box. Then, select the Windows PowerShell result on the left and click or tap “Run as Administrator” on the right-hand panel.
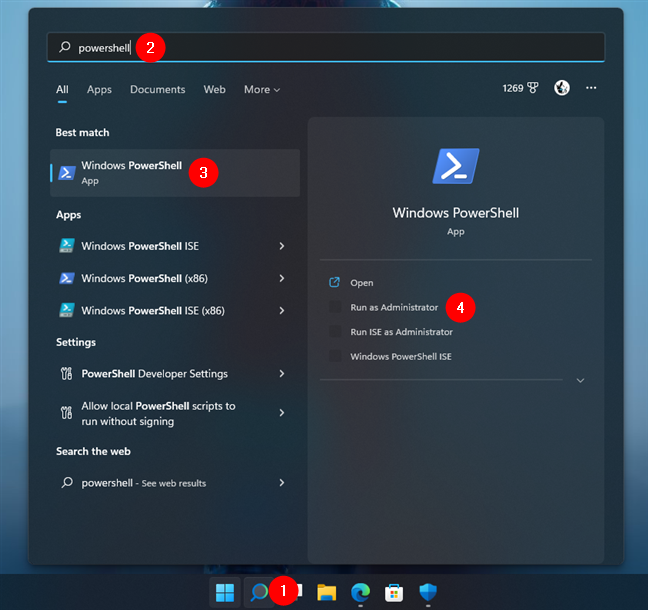
Open Windows PowerShell in Windows 11 as admin
TIP: You can find many other ways of opening PowerShell in this tutorial: 9 ways to open PowerShell in Windows (including as administrator).
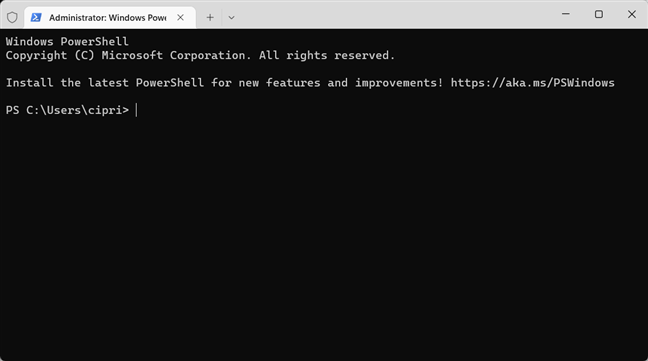
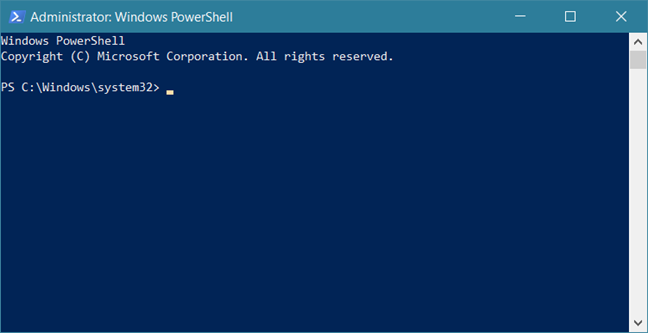
Once PowerShell is launched, you should see a window similar to this one:
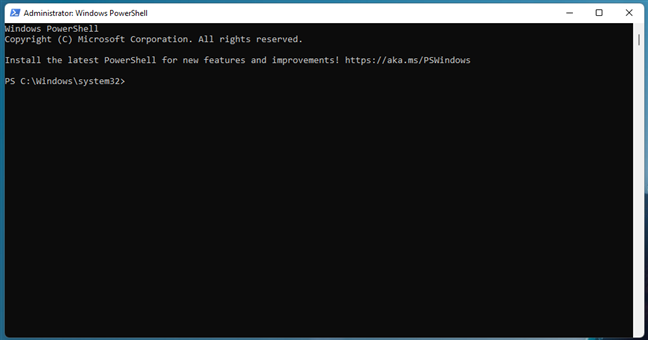
The PowerShell window
TIP: You can also start Windows Terminal as an administrator and run a PowerShell tab.
Opening a PowerShell tab in Windows Terminal works just as well
Step 2. Run the reinstall and re-register command for built-in Windows 10 or Windows 11 apps
To reinstall all the Windows apps that you uninstalled over time, all you have to do is run a specific command. Type or copy-paste the following command inside your PowerShell window:
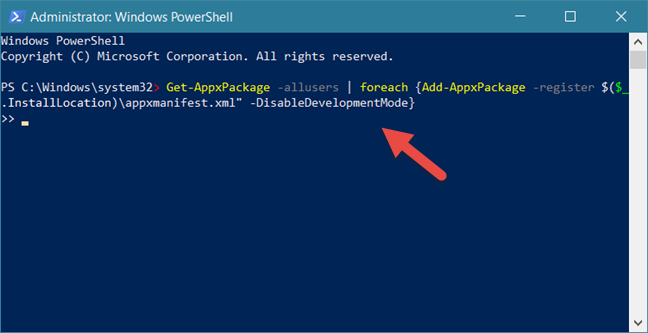
Get-AppxPackage -allusers | foreach {Add-AppxPackage -register “$($_.InstallLocation)\appxmanifest.xml” -DisableDevelopmentMode}
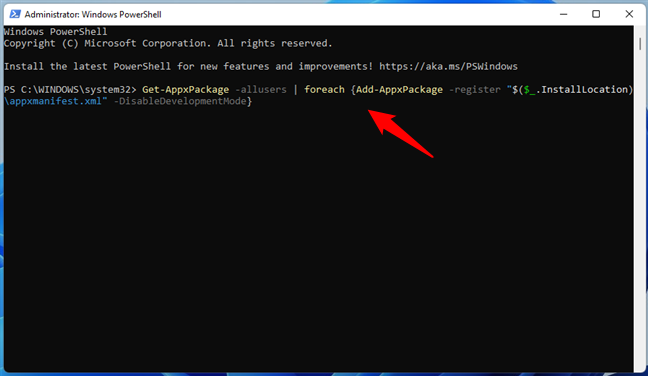
The PowerShell command for reinstalling all Windows apps
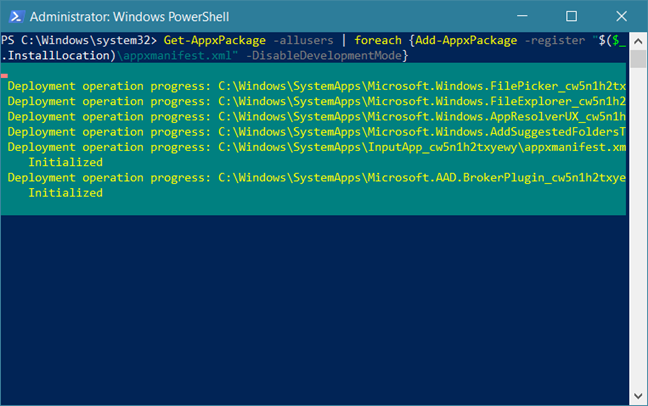
After you’ve entered the above command in PowerShell, press Enter. Then, your Windows 10 or Windows 11 PC begins reinstalling and re-registering all their default built-in apps. Note that this step might take a while, depending on the speed of your PC.
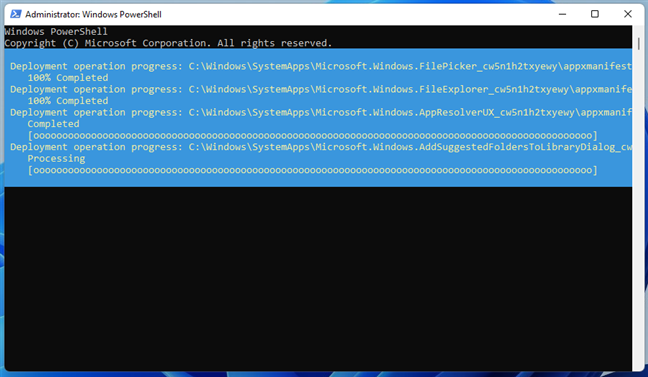
Default Windows apps are reinstalled in PowerShell
Step 3. Reboot your Windows PC
Once the command has finished running, PowerShell displays the current folder path. There are no messages or additional confirmations displayed. Close PowerShell and reboot your Windows 10 or Windows 11 PC or device. You should find all your missing Windows 10 or 11 default apps when you log in.
What if the Windows apps I reinstalled still don’t work well?
If your Windows 10 or Windows 11 built-in apps are reinstalled but still do not work correctly, you should try one more thing before losing hope: run the Windows Store Apps troubleshooter.
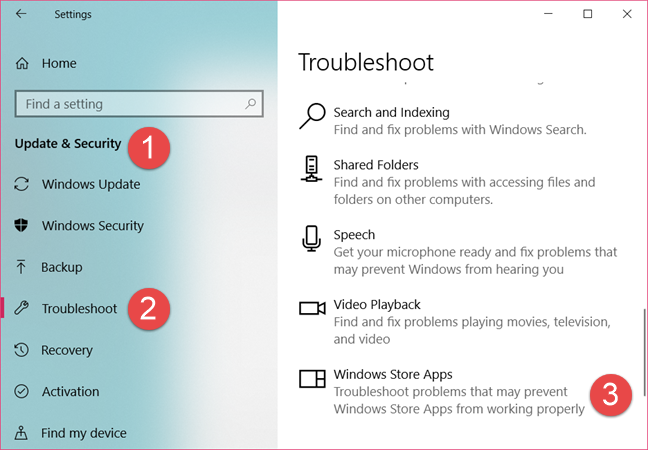
On Windows 10, open the Settings app (Windows + I), head to Update & Security > Troubleshoot, and click or tap Additional troubleshooters on the right.
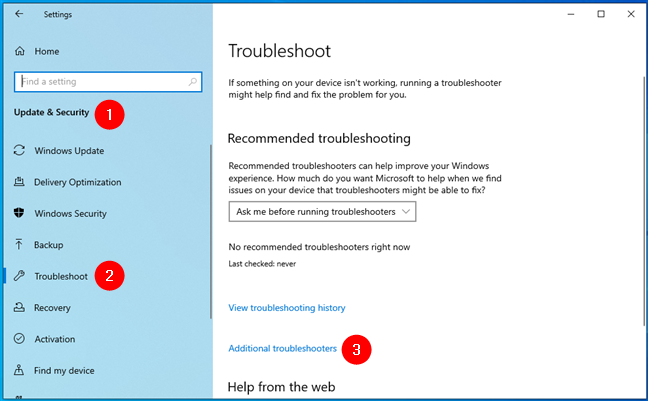
Additional troubleshooters in Windows 10
Then, scroll down to the end of the list and click or tap on Windows Store Apps.
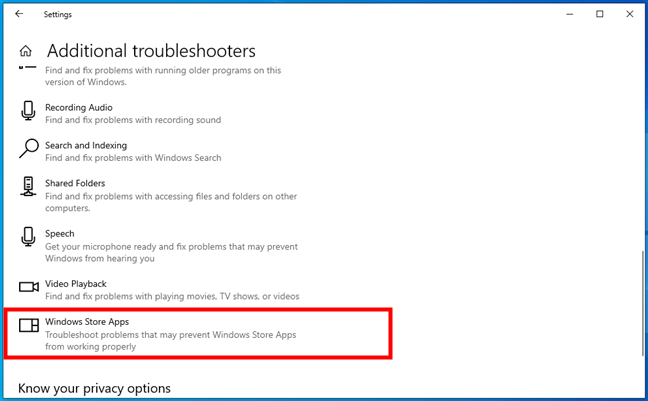
The Windows Store Apps troubleshooter in Windows 10
In Windows 11, launch Settings (Windows + I) and navigate to System > Troubleshoot > Other troubleshooters. Then, scroll down, and you’ll find the Windows Store Apps troubleshooter towards the end of the list. When you do, click or tap the Run button to its right.
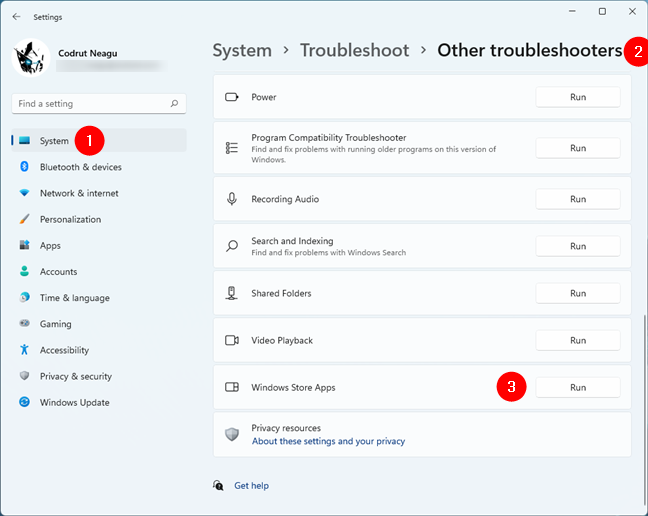
Run the Windows Store Apps troubleshooter in Windows 11
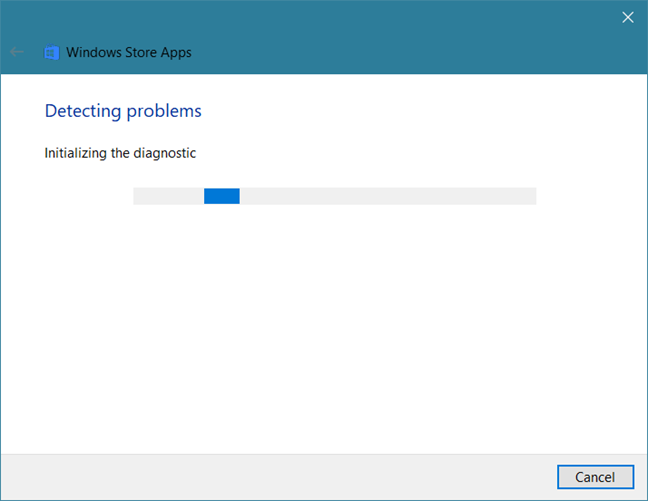
Whether you’re using Windows 10 or Windows 11, once you start the Windows Store Apps troubleshooter, it will begin to detect potential problems.
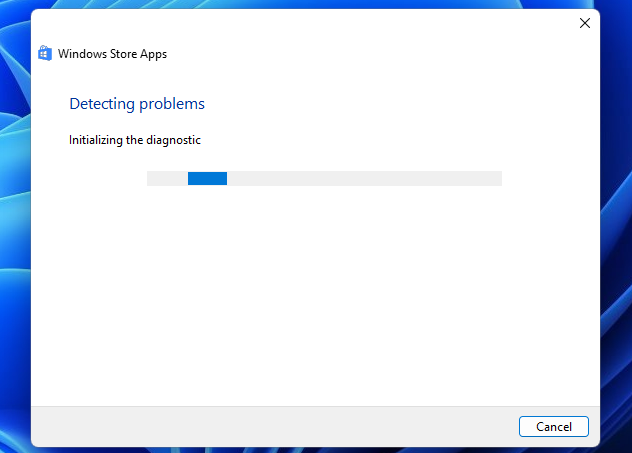
Using the Windows Store Apps troubleshooter
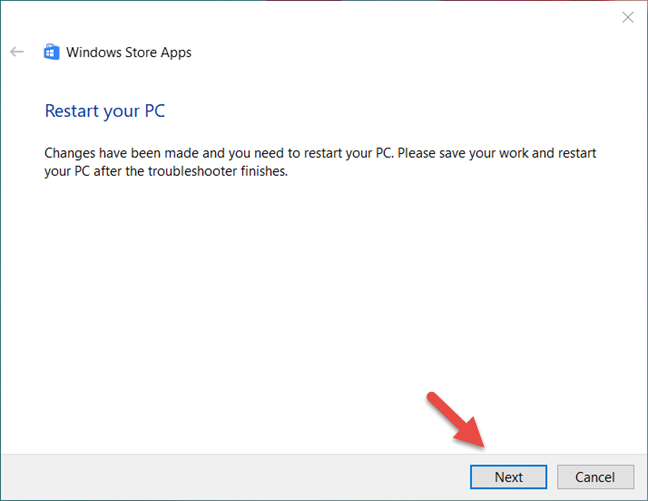
If it finds anything that could affect how the Windows apps run on your PC, it makes the necessary repairs. When that process is done, it might ask you to reboot your Windows 10 or Windows 11 computer or device. If that happens, restart it and check whether your apps are working correctly. If they still don’t, we’re sorry, but the best thing you can do is reset or reinstall each app on its own or even try resetting Windows altogether. If you need help with that, you might like these guides:
- How to reset apps in Windows 10 and clear their data
- How to reset Windows 10 without losing your files
- How to reset Windows 11 without losing your files
Did you reinstall Windows apps with PowerShell?
As you can see, bringing back all the Windows 10 or Windows 11 default apps is easy, at least in theory. Furthermore, it shouldn’t take too long. After all, it’s all about running just one PowerShell command. However, as with all things in life, it might not go as planned, and, in some cases, Windows can fail to reinstall its standard apps. So, do you know other ways to get the built-in apps back into Windows 10 or Windows 11? Don’t hesitate to let us know in the comments section below.
В Windows 8.1 впервые появились так называемые Modern-программы, которые распространялись через Windows Store. В Windows 10 Microsoft доработала эту концепцию и представила универсальные UWP-приложения (Universal Windows Platform). Если известные всем Win32-программы можно установить простым двойным кликом по exe / msi-файлу, то с UWP-приложениями всё несколько сложнее. В этой статье разберемся с тем, как правильно поставить такие программы на компьютер с Windows 10. Отметим, что это немного сложнее, чем установка Appx в Windows 10 Mobile.
Какие бывают установщики UWP-приложений
Сами по себе установщики универсальных приложений бывают только двух видов:
- Appx-файл — стандартный установщик.
- AppxBundle-файл — установщик, включающий в себя несколько Appx-пакетов. Используется гораздо чаще, так как позволяет разработчику распространять приложение для разных типов устройств и различных локализаций буквально одним файлом.
Для пользователя никакой разницы между Appx и AppxBundle-пакетом нет. Гораздо важнее разделение универсальных приложений по их состоянию, так как это влияет на способ их установки. Существует 3 категории программ:
- Опубликованные приложения — это программы, которые можно скачать из Microsoft Store. Их установщик — это только один Appx / AppxBundle-файл. Чтобы установить такую программу, достаточно запустить этот файл.
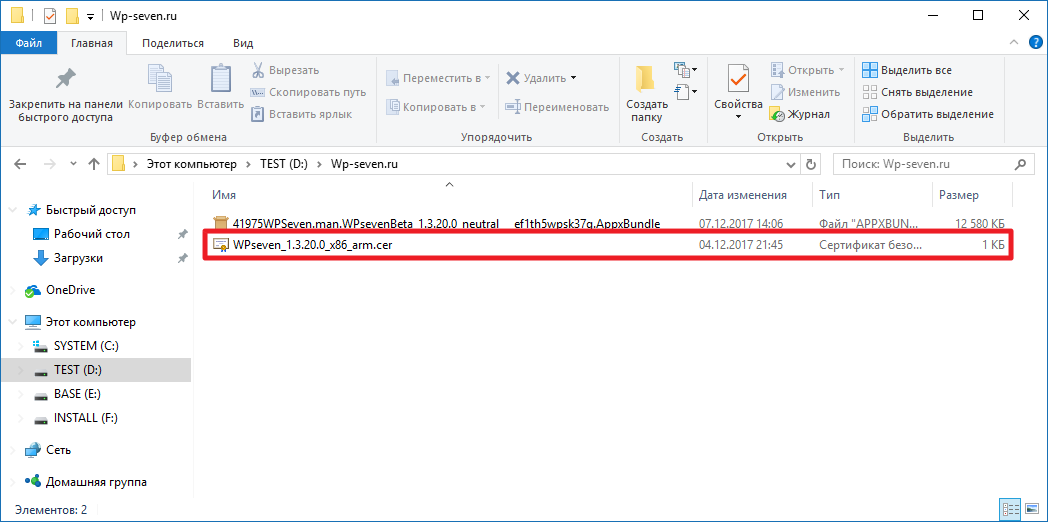
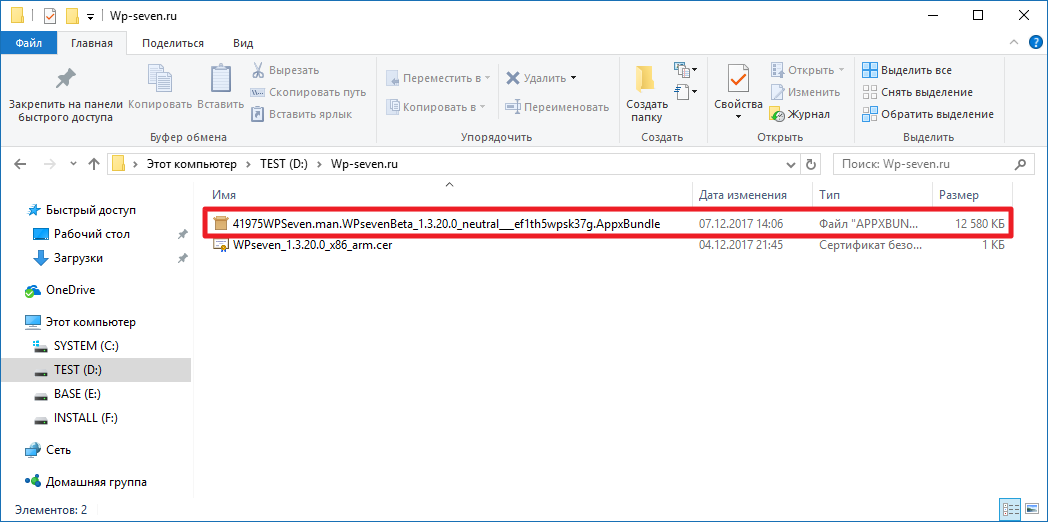
- Неопубликованные приложения — это достаточно стабильные релизные версии программ, которые разработчик пока не выложил в Microsoft Store. Неопубликованное приложение поставляется в виде Appx / AppxBundle-файла и сертификата (файла в формате .cer). Чтобы его поставить, нужно установить в систему сертификат, и только потом воспользоваться Appx / AppxBundle-установщиком.
- Тестовые версии приложений — программы, которых нет в Microsoft Store. Зачастую доступны в виде ZIP-архива, который включает в себя несколько папок и файлов. Способы их установки мы разберём отдельно, ближе к концу этой статьи.
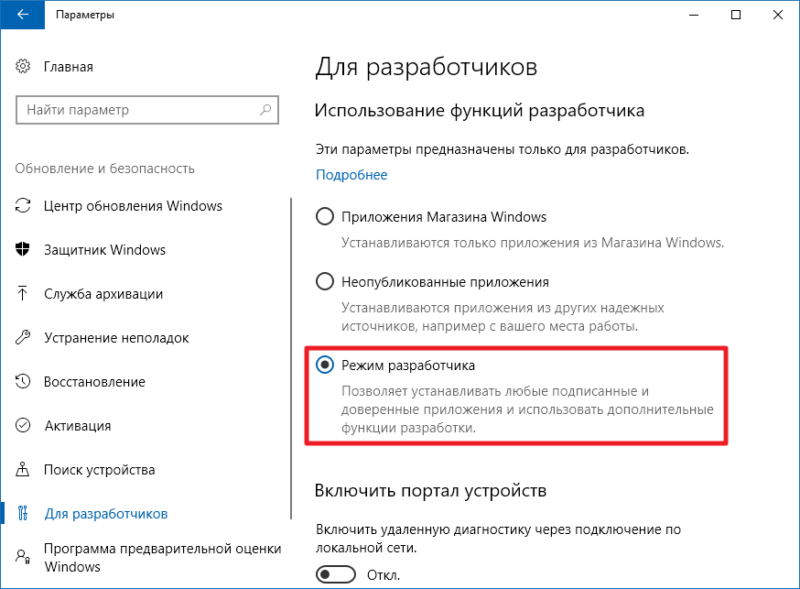
Как включить режим разработчика в Windows 10
Все инструкции в этой статье надо выполнять после включения режима разработчика. Для этого откройте Параметры — Обновление и безопасность — Для разработчиков и выберите Использование функций разработчика — Режим разработчика. Его можно оставить включенным. Если режим разработчика не включить, Windows будет блокировать попытки установить приложения извне магазина Microsoft Store.
Как установить сертификат (.cer) UWP-приложения
Сертификат можно поставить двумя способами: через Мастер импорта сертификатов или с помощью командной строки (Powershell). Вы можете выбрать тот, который вам удобнее.
Как установить сертификат через Мастер импорта сертификатов
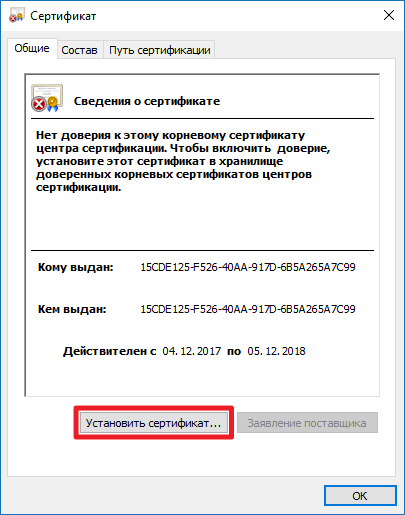
- Кликните два раза по нужному файлу.

- Нажмите на кнопку Установить сертификат.

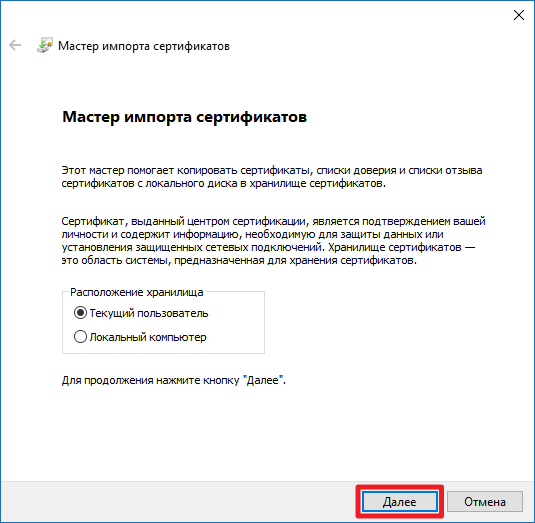
- Нажмите Далее.

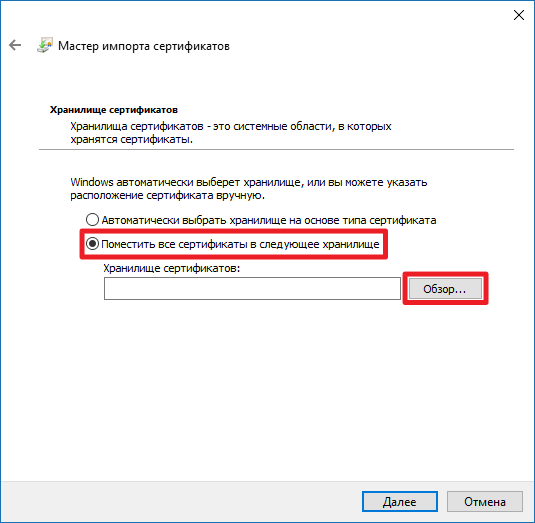
- Выберите пункт Поместить все сертификаты в следующее хранилище и кликните по кнопке Обзор.
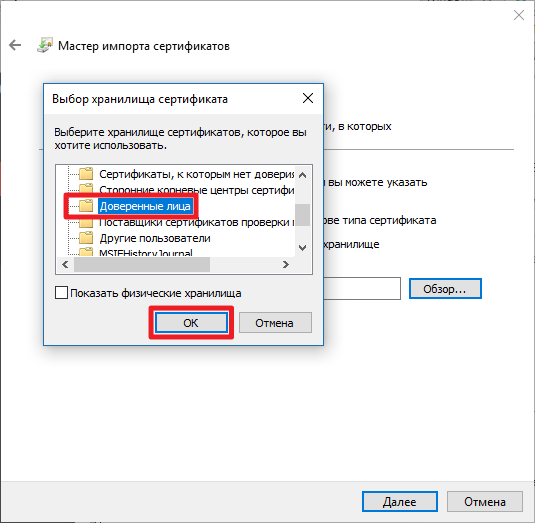
- Найдите в списке папку Доверенные лица, выделите её и нажмите ОК.
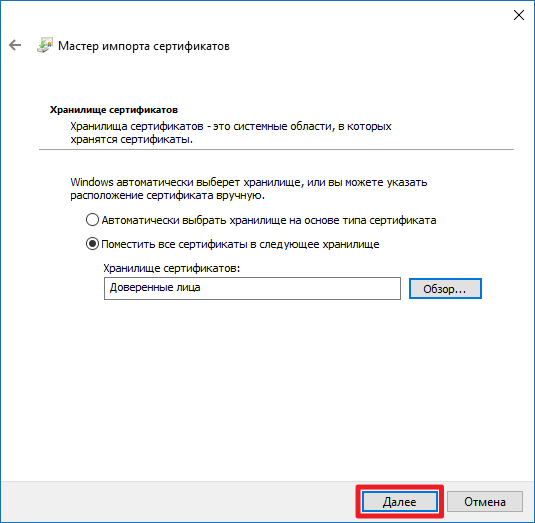
- Нажмите Далее.
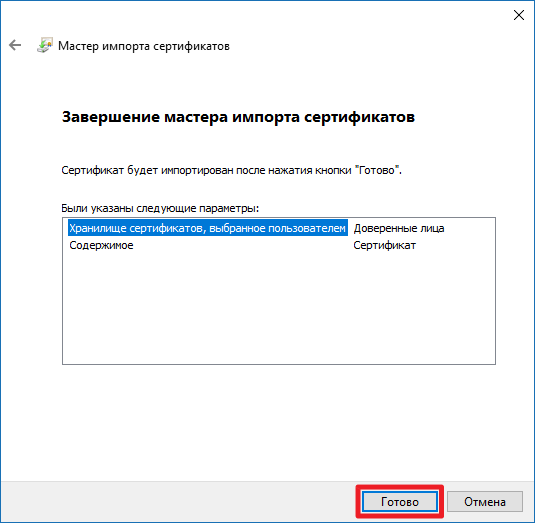
- Кликните на кнопку Готово и подождите пару секунд, пока сертификат будет установлен.
Как установить сертификат через командную строку или Powershell
Этот способ гораздо быстрее предыдущего, но вам придётся набрать пару команд в консоли. Отметим, что можно использовать и командную строку, и Powershell — все команды будут абсолютно одинаковыми.
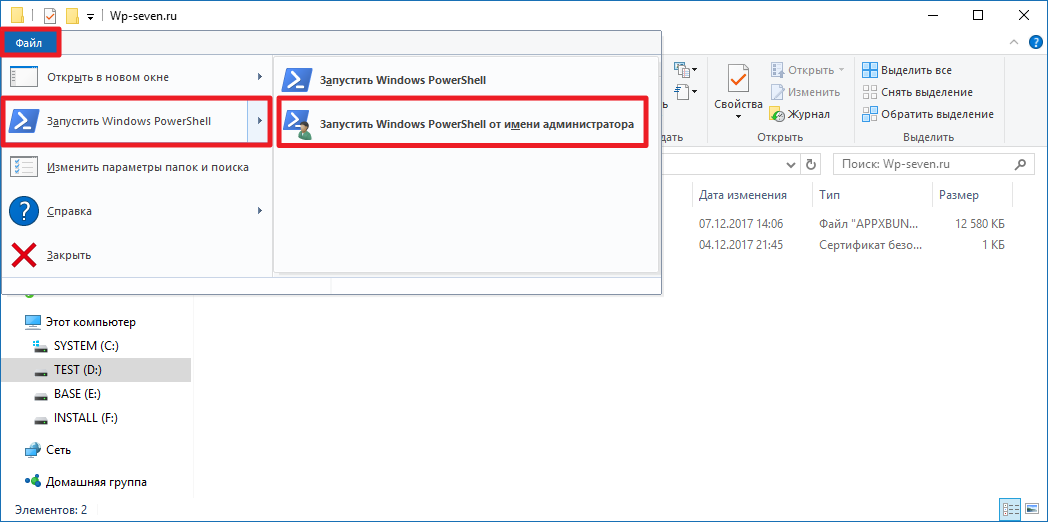
- Откройте папку с сертификатом в Проводнике.
- Кликните по кнопке Файл, затем по Запустить Windows Powershell — Запустить Windows Powershell от имени администратора.
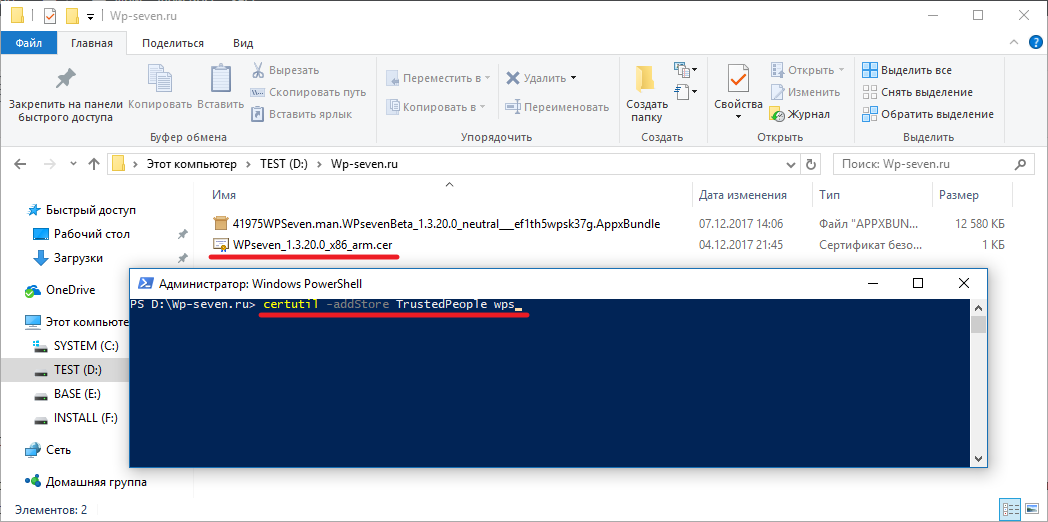
- Наберите следующую команду: certutil -addStore TrustedPeople.
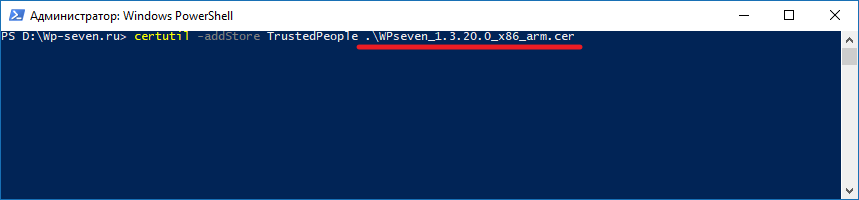
- Начните набирать имя файла-сертификата.
- Нажмите на клавишу Tab на клавиатуре, чтобы Powershell (или командная строка) набрали полное название файла за вас.

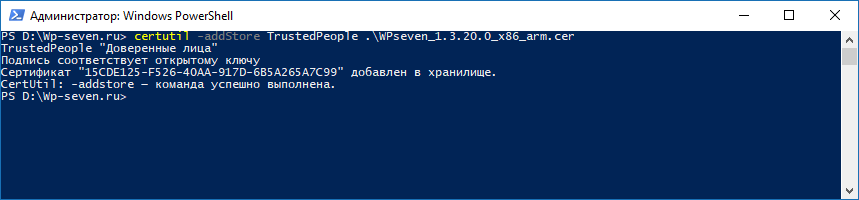
- Нажмите Enter.
Как установить Appx или AppxBundle-файл UWP-приложения
Как и в случае с сертификатами, есть два распространённых способа установки универсального приложения.
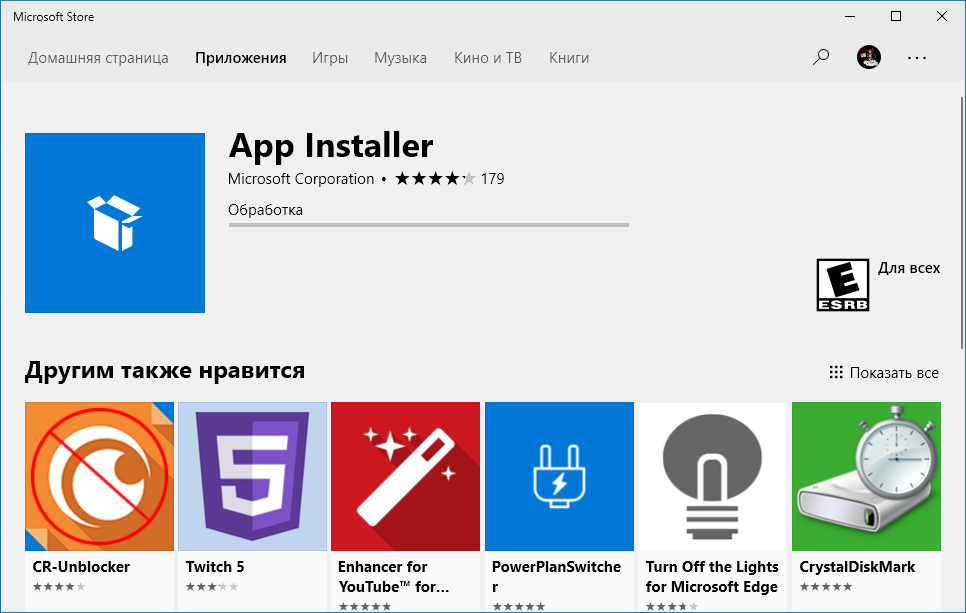
Как установить Appx или AppxBundle-файл через Установщик приложений
Начиная с Windows 10 1607, в системе предустановлена специальная утилита под названием Установщик приложений. Она позволяет установить программу буквально в пару кликов. В некоторых редакциях Windows 10 утилита может отсутствовать. В таком случае вам придётся сначала скачать её из Microsoft Store.
Как поставить Установщик приложений в Windows 10
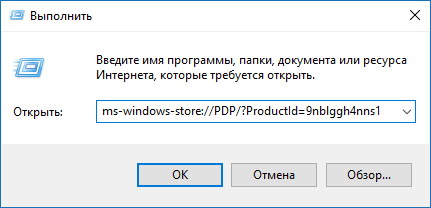
- Нажмите Win + R. На планшетах можно тапнуть и удерживать палец на кнопке Пуск, после чего выбрать пункт Выполнить.
- Введите следующую команду и нажмите Enter или ОК: ms-windows-store://PDP/?ProductId=9nblggh4nns1.

- Установите утилиту. Если Магазин покажет, что продукт уже установлен, просто закройте его.

Если у вас нет приложения Microsoft Store, можно загрузить AppxBundle-файл утилиты и установить её с помощью PowerShell (инструкция находится немного ниже). После того, как вы убедились, что Установщик приложений уже есть в системе, сделайте следующее:
- Откройте папку с Appx / AppxBundle-файлом в Проводнике.
- Кликните по нужному файлу два раза.
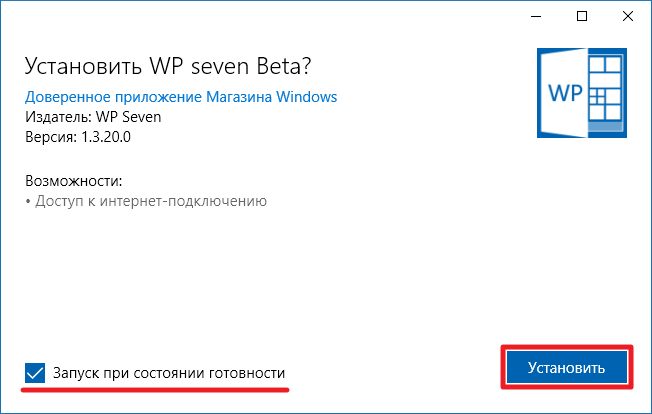
- Если у вас включён фильтр SmartScreen, Windows выдаст предупреждение о предотвращении запуска подозрительного приложения. Нажмите Подробнее, а затем Выполнить в любом случае.

- Снимите или поставьте отметку возле Запуск при состоянии готовности, после чего нажмите Установить.

- Подождите некоторое время.

Как установить Appx или AppxBundle файл через Powershell
В отличие от импорта сертификата, вам нужно использовать именно Powershell: командная строка не подходит.
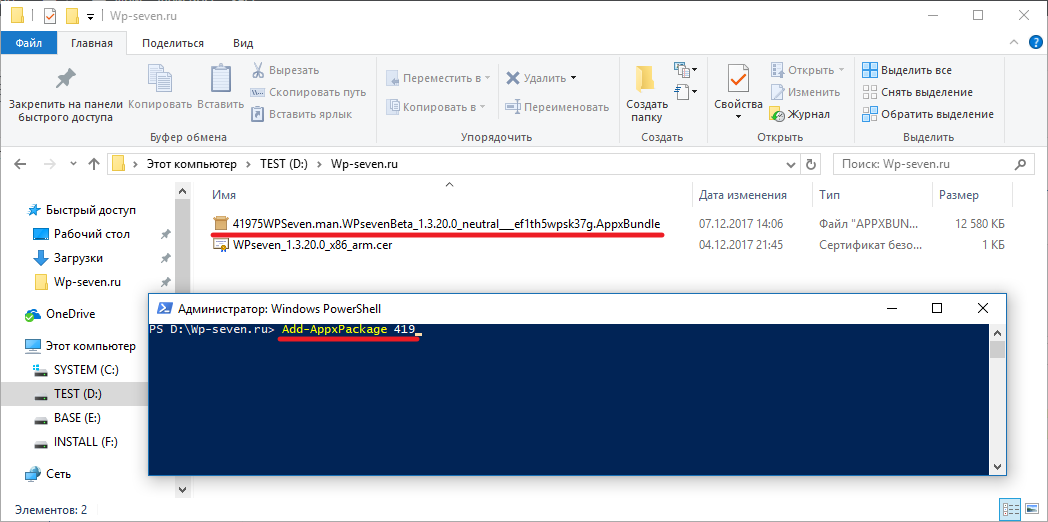
- Откройте папку с Appx / AppxBundle-файлом в Проводнике.
- Кликните на кнопку Файл, затем на Запустить Windows Powershell — Запустить Windows Powershell от имени администратора.
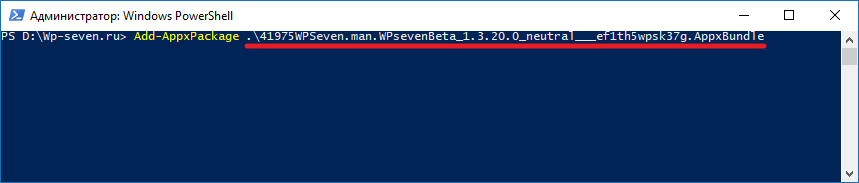
- Введите следующую команду: Add-AppxPackage.
- Начните набирать имя установочного файла приложения.
- Нажмите на клавишу Tab на клавиатуре, чтобы Powershell набрала полное название файла вместо вас.

- Нажмите Enter и подождите.
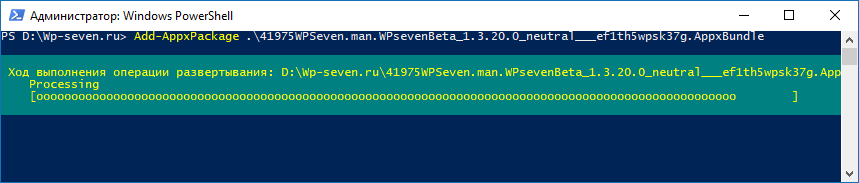
В случае возникновения ошибок перезагрузите компьютер. Если это не помогло, обратитесь за помощью к тому, кто предоставил вам пакет приложения.
Как установить тестовую версию приложения
Тестовые версии приложения, как мы и писали ранее, распространяются в виде ZIP-архивов. Распаковав этот архив, вы увидите следующие папки и файлы:
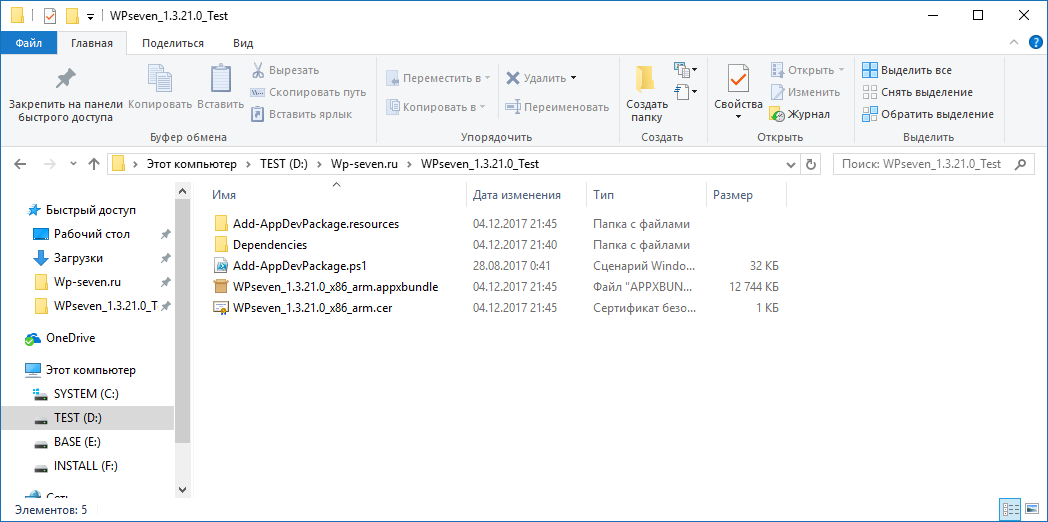
- Папка Add-AppDevPackage.resources и файл Add-AppDevPackage.ps1 — нужны для быстрой установки приложения.
- Папка Dependencies — содержит в себе некоторые системные компоненты. Без этих компонентов приложение не заработает, так что их нужно установить перед тем, как устанавливать саму программу.
- Appx / AppxBundle-файл — установщик приложения.
- CER-файл — сертификат приложения, без которого оно не установится.
Установить тестовую версию приложения можно в автоматическом режиме, а также вручную.
Как быстро установить тестовую версию приложения через Powershell
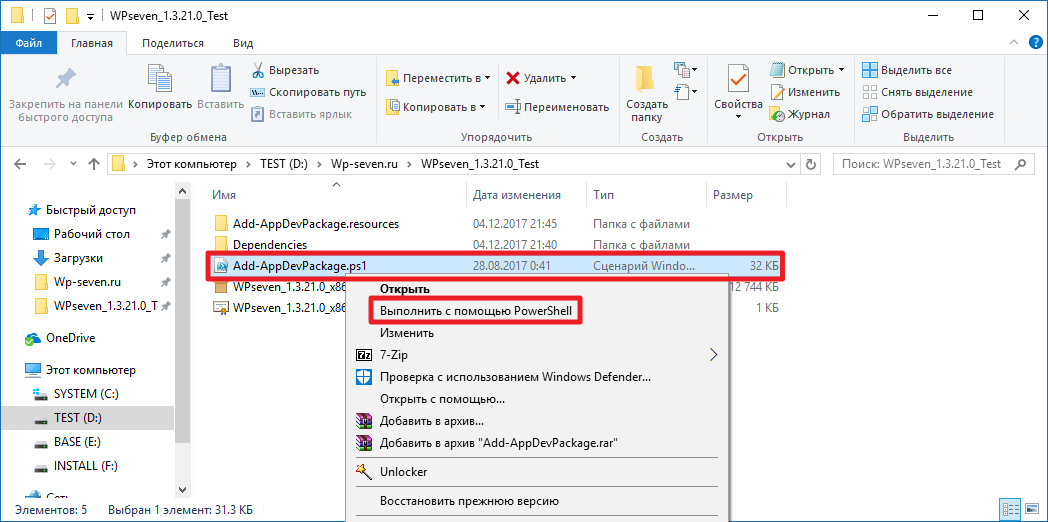
- Кликните по файлу Add-AppDevPackage.ps1 правой клавишей мыши и выберите пункт Выполнить с помощью Powershell.
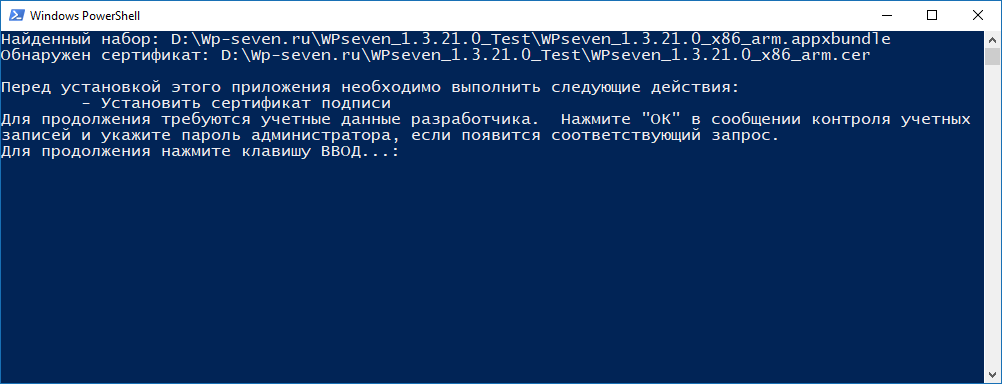
- Нажмите Enter и подтвердите запрос о выдаче прав администратора.

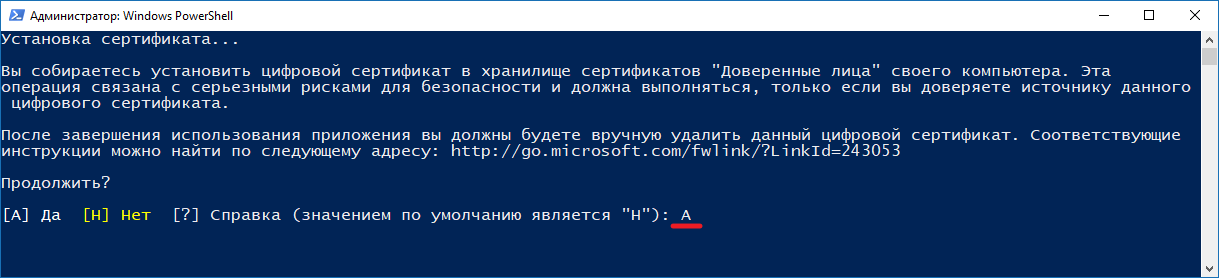
- Подтвердите установку сертификата. Для этого введите на клавиатуре букву А (кириллическую, а не латинскую!) и нажмите Enter. В локализациях Windows, отличных от русской, чётко следуйте инструкциям, которые появятся на экране.

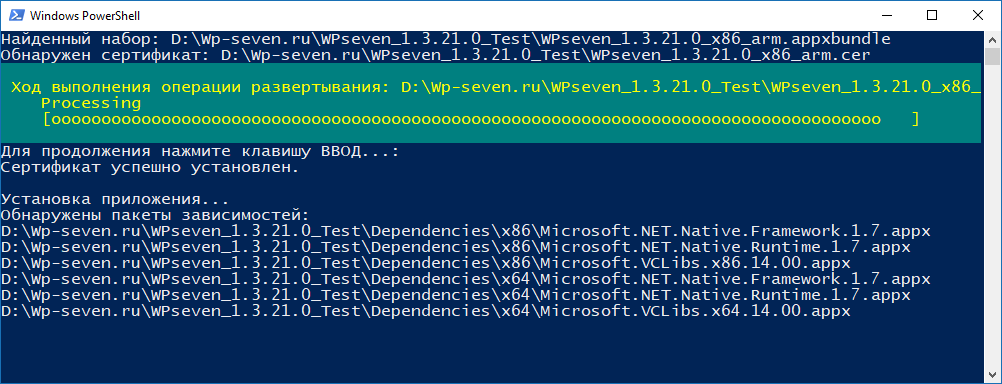
- Подождите, пока приложение установится.
Как установить тестовую версию приложения вручную
- Зайдите в папку Dependencies, затем в директорию, соответствующую вашей системе и процессору: ARM — ПК на базе процессоров Qualcomm Snapdragon, x86 — 32-битная Windows, x64 — 64-битная Windows. Отметим, что иногда на 64-битной Windows нужно установить системные компоненты не только из папки x64, но ещё и из директории x86.
- Установите все Appx-файлы из нужной папки с помощью инструкций выше.
- Вернитесь в корневую директорию и установите сертификат приложения, который в ней находится.
- Установите Appx / AppxBundle-файл программы.
Если у вас будут возникать проблемы с установкой приложения, перезагрузите компьютер. В случае, если это не поможет, обратитесь к разработчику программы.
Некоторым людям не нравятся универсальные приложения, которые устанавливаются по умолчанию в Windows 10, и хотят от них избавиться. Они могут вручную удалить большинство из них с помощью приложения «Настройки» или PowerShell, чтобы удалить все или только некоторые из них. Такие приложения, как календарь, почта, камера, фотографии или Candy Crush Soda Saga, могут быть удалены с компьютера с Windows 10 в кратчайшие сроки. Вопрос в том, как вернуть все стандартные Windows 10, когда вы узнаете, что они вам нужны, или когда они сломаны и больше не работают правильно? В этом руководстве мы покажем вам, как переустановить и заново зарегистрировать все приложения по умолчанию, которые поставляются с Windows 10. Вы не должны беспокоиться, поскольку это простой и простой процесс. Давайте начнем.
Важные вещи, которые нужно знать, прежде чем идти дальше
Шаги, которые мы покажем вам в этом руководстве, помогут вам переустановить все стандартные приложения из Windows 10, включая Microsoft Store. Однако обратите внимание, что все, что мы показываем, протестировано и подтверждено, что оно работает только в последней версии Windows 10 с обновлением от апреля 2018 года .
Если у вас более старая версия Windows 10, вы можете выполнить шаги, которые мы показываем, чтобы вернуть встроенные приложения, но вы не сможете переустановить Microsoft Store . Единственный проверенный способ вернуть Microsoft Store в более старые версии Windows 10, а затем иметь возможность устанавливать другие приложения, — это выполнить чистую установку Windows 10.
Шаг 1. Откройте PowerShell от имени администратора
Прежде всего, вы должны открыть PowerShell с правами администратора. Самый быстрый способ сделать это — использовать панель поиска Cortana на панели задач. Введите «PowerShell», щелкните правой кнопкой мыши (или нажмите и удерживайте) результат Windows PowerShell, а затем нажмите или нажмите «Запуск от имени администратора».
После запуска PowerShell вы должны увидеть окно, похожее на это:
Шаг 2. Запустите команду переустановки и перерегистрации для встроенных приложений Windows 10
Чтобы переустановить все встроенные приложения Windows 10, которые вы удалили с течением времени, все, что вам нужно сделать, это запустить определенную команду. Введите или скопируйте и вставьте следующую команду в окно PowerShell:
Get-AppxPackage -allusers | foreach {Add-AppxPackage -register «$($_.InstallLocation)\appxmanifest.xml» -DisableDevelopmentMode}
После того, как вы ввели вышеуказанную команду в Powershell, нажмите Enter.
Windows 10 сразу же начинает переустановку и перерегистрацию всех встроенных приложений по умолчанию. Обратите внимание, что этот шаг может занять некоторое время, в зависимости от скорости вашего ПК с Windows 10.
Шаг 3. Перезагрузите устройство Windows 10
После завершения выполнения команды PowerShell отображает текущий путь к папке. Там не отображаются сообщения или дополнительные подтверждения. Закройте PowerShell и перезагрузите компьютер или устройство с Windows 10. При входе в систему вы должны найти все отсутствующие приложения по умолчанию для Windows 10.
Что если некоторые из ваших восстановленных приложений все еще не работают?
Если ваши встроенные приложения Windows 10 переустанавливаются, но все еще не работают должным образом, есть еще одна вещь, которую вы должны попробовать, прежде чем терять надежду: запустить средство устранения неполадок приложений Магазина Windows.
Вы можете найти его в приложении Настройки, раздел Обновления и безопасность → Устранение неполадок.
Нажмите или нажмите на Приложения Магазина Windows и следуйте инструкциям мастера устранения неполадок.
Если он обнаружит что-либо, что может повлиять на работу универсальных приложений на вашем ПК с Windows, он произведет необходимый ремонт. Когда этот процесс будет завершен, он должен попросить вас перезагрузить компьютер или устройство с Windows 10.
Перезагрузитесь и проверьте, правильно ли работают ваши приложения. Если это не так, извините, но лучшее, что вы можете сделать, — это сбросить или переустановить Windows 10.
Заключение
Как видите, вернуть все приложения по умолчанию для Windows 10 может быть легко, и это не должно занять слишком много времени. В конце концов, это все о запуске одной команды PowerShell . Знаете ли вы другие способы вернуть встроенные приложения в Windows 10? Не стесняйтесь, дайте нам знать в разделе комментариев ниже.
Просмотров: 1 601